

Page 1
PYRO A/V Link: Multilingual Manual
Tech
High-Quality Analog to DV Video Converter
User's Guide : First Edition
North America Support Hours:
M-F : 8 am - 5 pm, PST
Email : support@adstech.com
website : www.adstech.com
ADS Tech
PYRO A/V Link
Page 2

Page 3

Table of Content
ENGLISH
Product Overview ...........................................................................................................
The missing link in DV Video ..............................................................................
Capture, Edit, Export ..........................................................................................
Features .............................................................................................................
What’s Included ........................................................................................................
Connection Congurations ............................................................................................
Analog Video Capture connected to PC or Mac .......................................................
Export DV from computer to Analog monitor or video tape recorder ........................
Capture from a DV Camcorder .................................................................................
Export DV to your Digital Camcorder .......................................................................
Dub video from an Analog device to a Digital recorder or from a Digital
deck or camcorder to an Analog video tape machine ..........................................
PYRO A/V Link Hardware Description ...........................................................................
Front Panel ...............................................................................................................
Rear Panel ................................................................................................................
4 Position Dip Switch .........................................................................................
6 Pin 1394 / FireWire Connection ......................................................................
Right and Left RCA Audio Outputs ....................................................................
Video Out (RCA) ................................................................................................
S-VHS Out (Y/C 4 Pin Din) ................................................................................
Component Video ..............................................................................................
On / Off ..............................................................................................................
Power Jack - 5VDC Input ..................................................................................
Getting Started - WIndows ............................................................................................
Hardware Installation ................................................................................................
Windows - Quick Start ..............................................................................................
Windows Software .............................................................................................
Getting Started - Mac .....................................................................................................
Hardware Installation 2 .............................................................................................
MAC - Quick Start .....................................................................................................
Software .............................................................................................................
Computer Connected Congurations ............................................................................
Ready to Capture Video ...........................................................................................
Connecting an Analog Video Source ........................................................................
Capturing Video with your Video Capture / Edit Software ........................................
PYRO A/V LINK 3
5
5
5
6
6
7
7
7
8
8
8
9
9
10
10
12
12
12
12
12
12
12
13
14
14
14
16
17
17
17
18
18
18
20
Page 4

PYRO A/V LINK 5
ENGLISH
Connecting an External TV for Simultaneous Video Preview .........................................
Connecting for Analog Record and Preview at the same time ........................................
ENGLISH
Connecting for Capture from DV Camcorder ..................................................................
Exporting Video from a Video Editor to an Analog Device ..............................................
Exporting to a Digital Camcorder ....................................................................................
Non-Computer Congurations .............................................................................................
Connecting for Analog to Digital Conversion ...........................................................
Connecting for Digital to Analog Conversion ...........................................................
Installing the Bundled Software CD .....................................................................................
Using VideoStudio Software ................................................................................................
Hardware checkup before using VideoStudio .................................................................
Installing and running VideoStudio ......................................................................................
Conguring VideoStudio .................................................................................................
Using DV Pass-Through for Digital Camcorders .................................................................
Getting around VideoStudio .................................................................................................
Detailed Product Specications ...........................................................................................
TroubleShooting ..................................................................................................................
German Manual ...................................................................................................................
French Manual .....................................................................................................................
Spanish Manual .................................................................................................................
Service & Warranty .............................................................................................................
FCC Information .................................................................................................................
Contacting Technical Support .............................................................................................
21
22
23
24
25
26
26
27
29
30
31
33
34
35
36
38
39
40
70
100
130
131
131
Copyright Notice
The PYRO A/V Link is an innovative, hassle-free device that is designed to let you convert analog video to dv and vice-versa easily. ADS Technologies
respects the rights of copyright owners and asks that you do the same. The Copy Right Act gives owners of copyrights the exclusive right to reproduce and
prepare derivative works as well as to publicly perform, display and distribute their works. This means that you must obtain permission to engage in any of
these activities when using works that are copyrighted by another person.
© 2003 ADS Technologies. All Rights Reserved
First Edition: September 2003
Microsoft, Windows, & Windows 98 are registered trademarks of Microsoft Corporation. IBM is a registered trademark of the International Business Machines,
Inc.
ADS is a registered trademark of ADS Technologies Inc. ADS Technologies (ADS) makes no warranty of any kind with regard to this material, including but
not limited to, the implied warranties of merchantability and tness for a particular purpose. The information furnished within this written document is for
information purposes only and is subject to change without notice. ADS Technologies assumes no responsibility or liability for any errors or inaccuracies that
may appear herein. ADS makes no commitment to update or to keep current information contained within this document. (rtt)
PYRO A/V LINK 4
Page 5

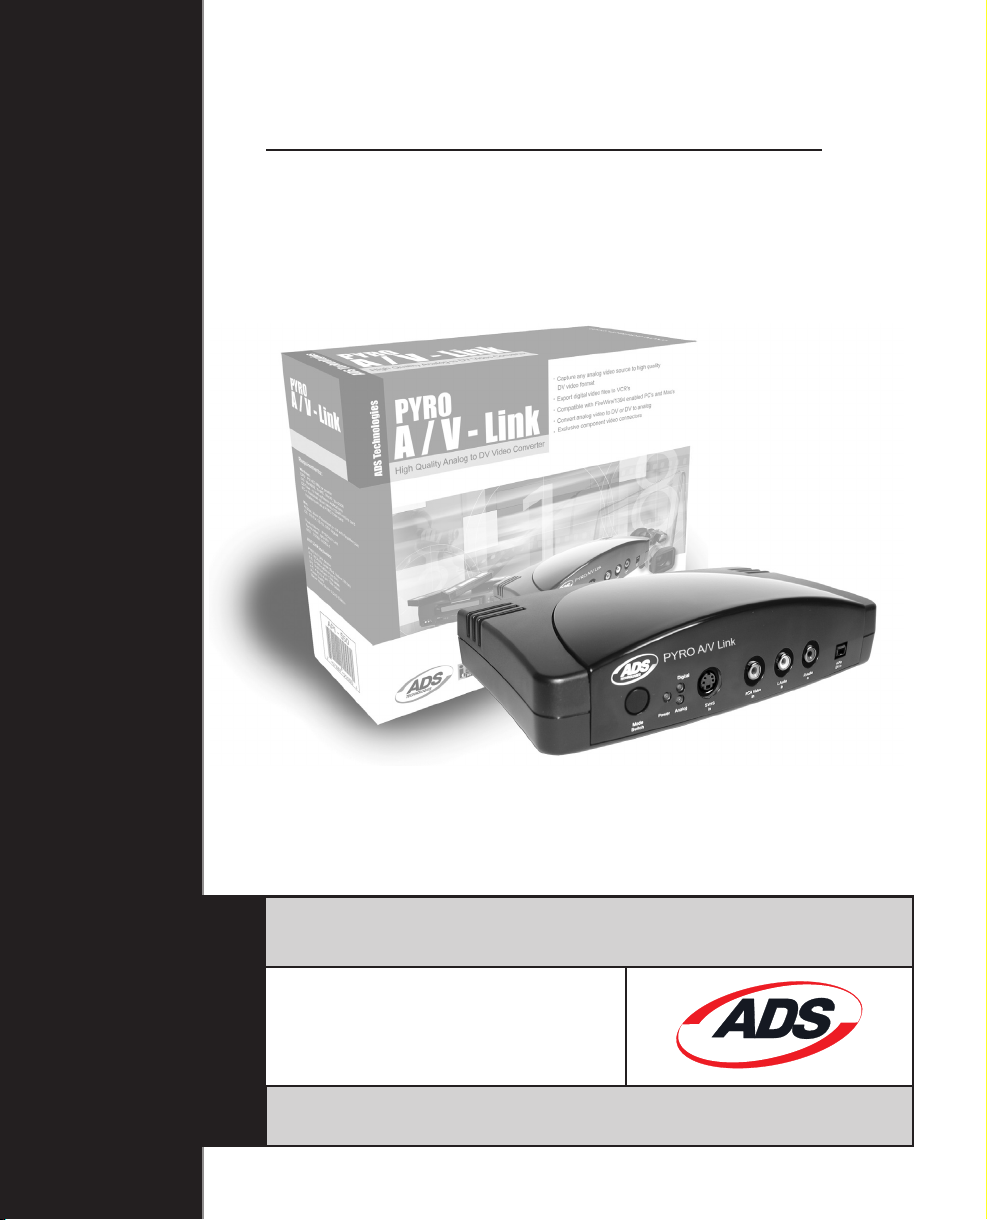
Product Overview
PYRO A/V Link
High Quality Analog to DV Video Converter
The ultimate tool for capturing and converting video into professional
quality DV format and an extraordinary tool for exporting edited DV
content to analog video tape recorders..
The missing link in DV Video
Capturing DV from a Digital camcorder is fantastic, but what about all of the
video content you have in other formats (8mm, beta, VHS, DVD), how do you
get that content into the DV format? PYRO A/V link solves the problem by
converting any analog video source into DV.
DV video looks great but when you want to send it to tape your options are
limited. You can export back to your miniDV camcorder, but it’s hard to share
a miniDV tape with Grandma. PYRO A/V link bridges the gap by allowing you
to export DV video to any analog video recorder. Capture and edit your video,
then output to VHS and share tapes that anyone can watch!
ENGLISH
Capture, Edit, Export
With PYRO A/V link you can capture from any video source, including DV
camcorders. Mix and match your video content to create a truly unique video
production. Capture the video with VideoStudio 7 SE DVD, then add video
lters, transition effects, video overlays, narration, background music and more.
When your video production is a wrap, export to any VCR or VTR, save as
MPEG-2 and burn a DVD (Windows only) or publish to the Internet.
PYRO A/V LINK 5
Page 6
PYRO A/V LINK 7
ENGLISH
Features:
- External FireWire/1394 device
ENGLISH
- Converts analog (RCA, S-VHS or Component Video) to DV video format
- Export DV Video to analog video tape recorders (RCA, S-VHS,
Component)
- Convert between devices (from DV to Analog or Analog to DV) without
using a computer
- Capture from DV camcorder with full device control
- Compatible with a wide range of video DV editing software
- Capture as MPEG-2 video and Create VCD, SVCD, DVD disks (Windows
only using VideoStudio)
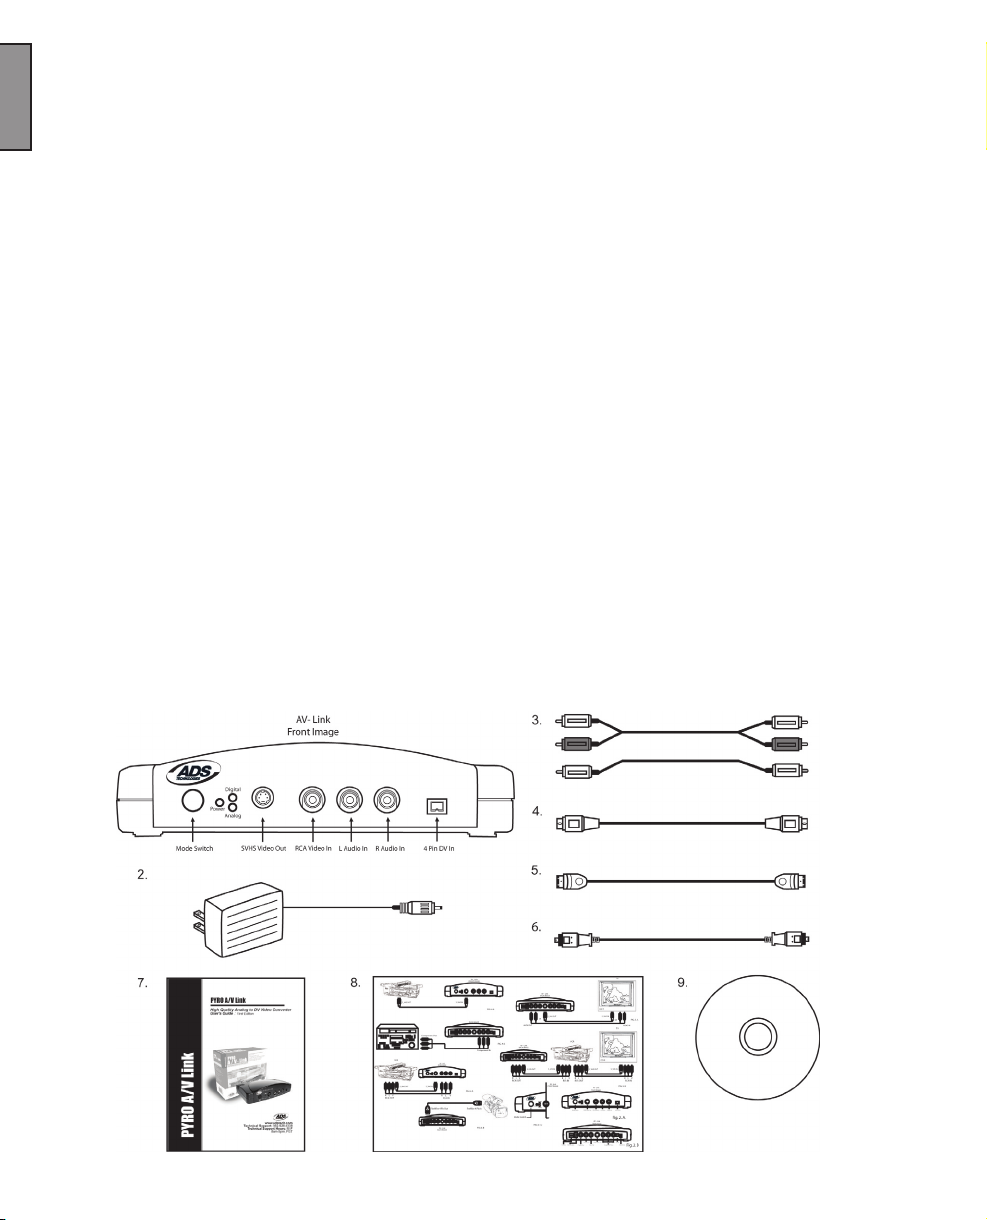
What’s Included:
1.) PYRO A/V Link device
2.) 5 VDC Power Supply
3.) 6 ft. RCA to RCA cable ( Yellow, Red, White - Yellow, Red, White)
4.) 6 ft. S-VHS Cable
5.) 6 ft. 6 pin to 6 pin 1394 cable
6.) 6 ft. 4 pin to 4 pin 1394 cable
7.) User Guide
8.) Quick Guide
9.) Software CD (Windows users)
PYRO A/V LINK 6
Page 7
Connection Congurations:
PYRO A/V Link can be used in several ways depending upon your video
conversion needs.
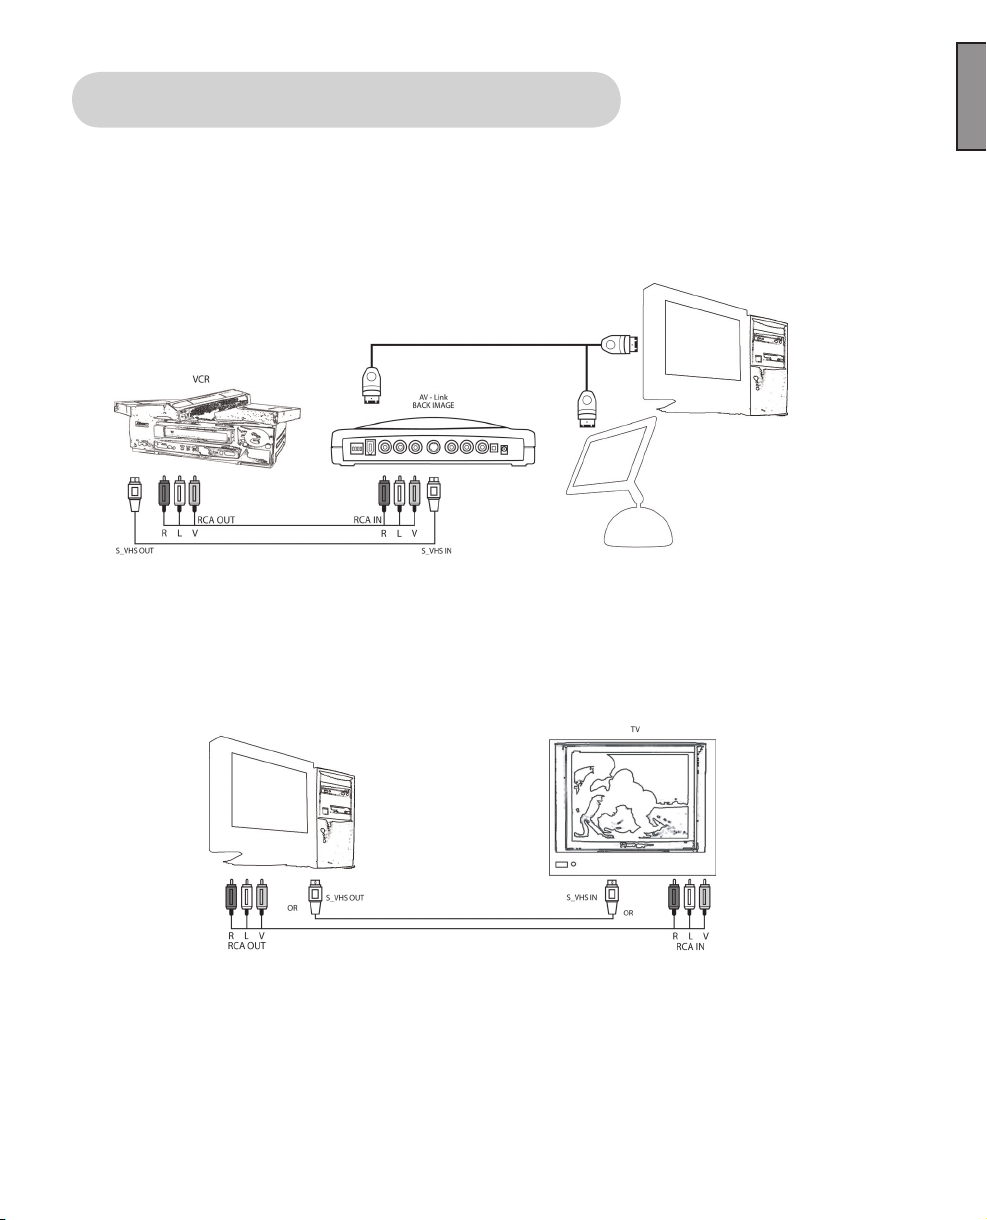
Analog Video Capture connected to PC or Mac
Fig. A
* Capture any Analog Video source to PC or Mac via the A/V link and a
FireWire connection.
ENGLISH
Export DV from computer to Analog monitor or video tape
recorder
Fig. B
Publish to Tape: Export your video production from the video editors timeline
out to a TV or Video Tape recorder.
PYRO A/V LINK 7
Page 8
PYRO A/V LINK 9
ENGLISH
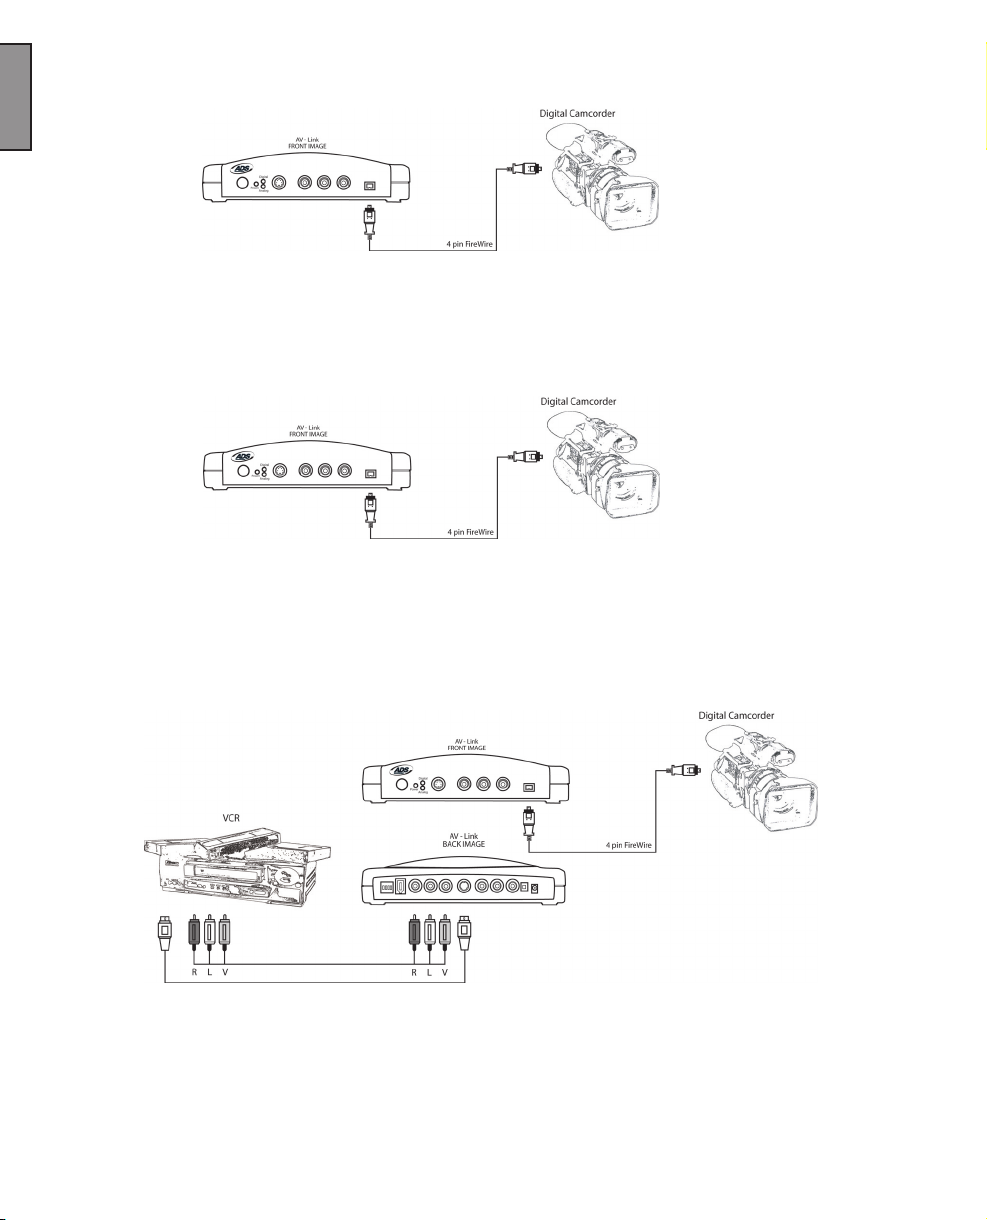
Capture from a DV Camcorder
ENGLISH
Fig. A
Easy desktop connection for your Digital camcorder. Complete device control,
just as if you were directly connected to your 1394/FireWire host card.
Export DV to your Digital Camcorder
Fig. B
Publish to your Digital camcorder. Use A/V Link as an easy way to send edited
video back to your DV camcorder.
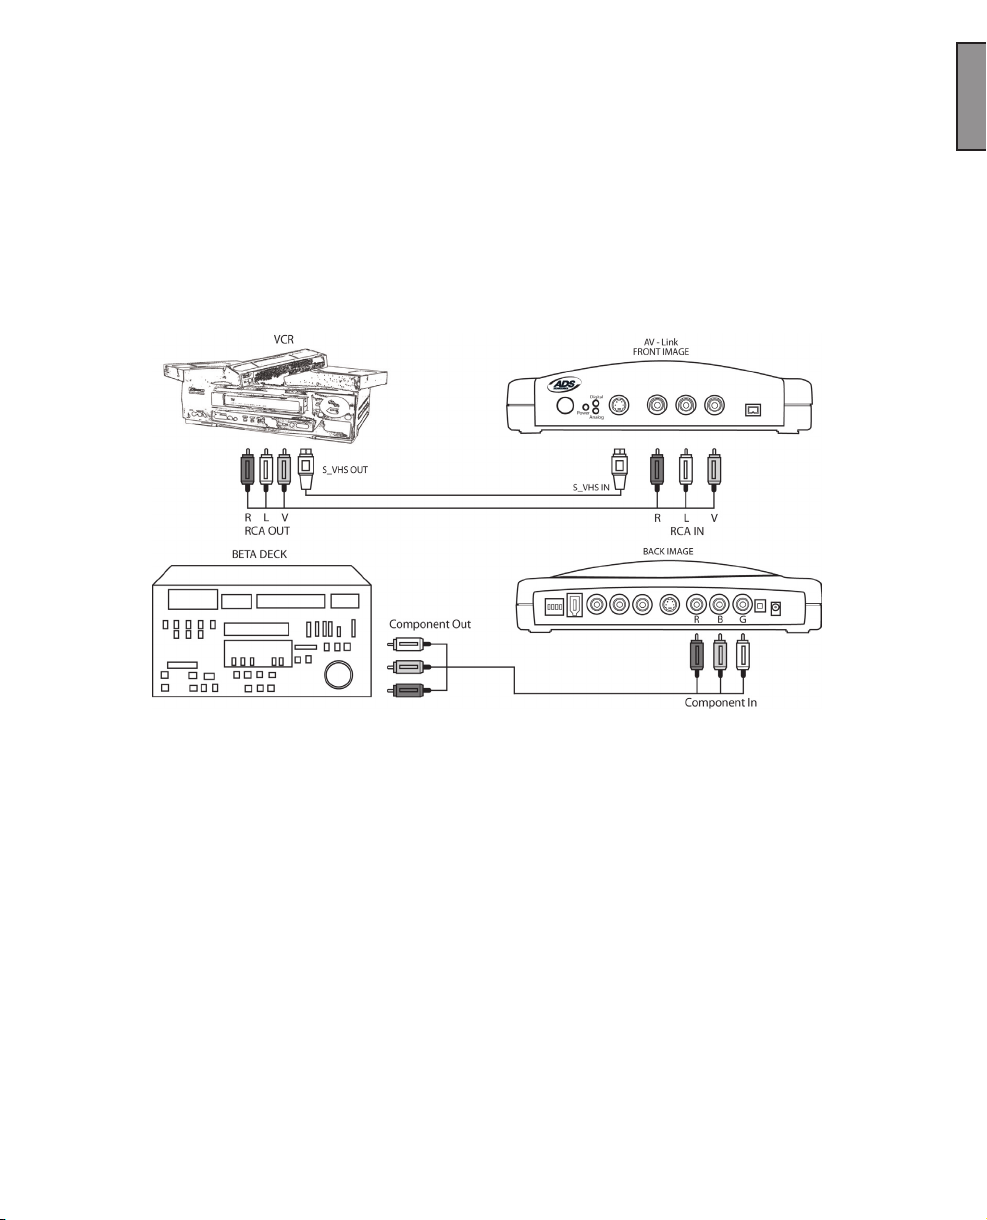
Dub video from an analog device to a Digital recorder or from a
Digital deck or camcorder to an analog video tape machine
Fig. C
Use A/V Link without a computer to convert video content from digital to
analog. A/V link can operate as a stand alone media converter. No computer
required!
PYRO A/V LINK 8
Page 9
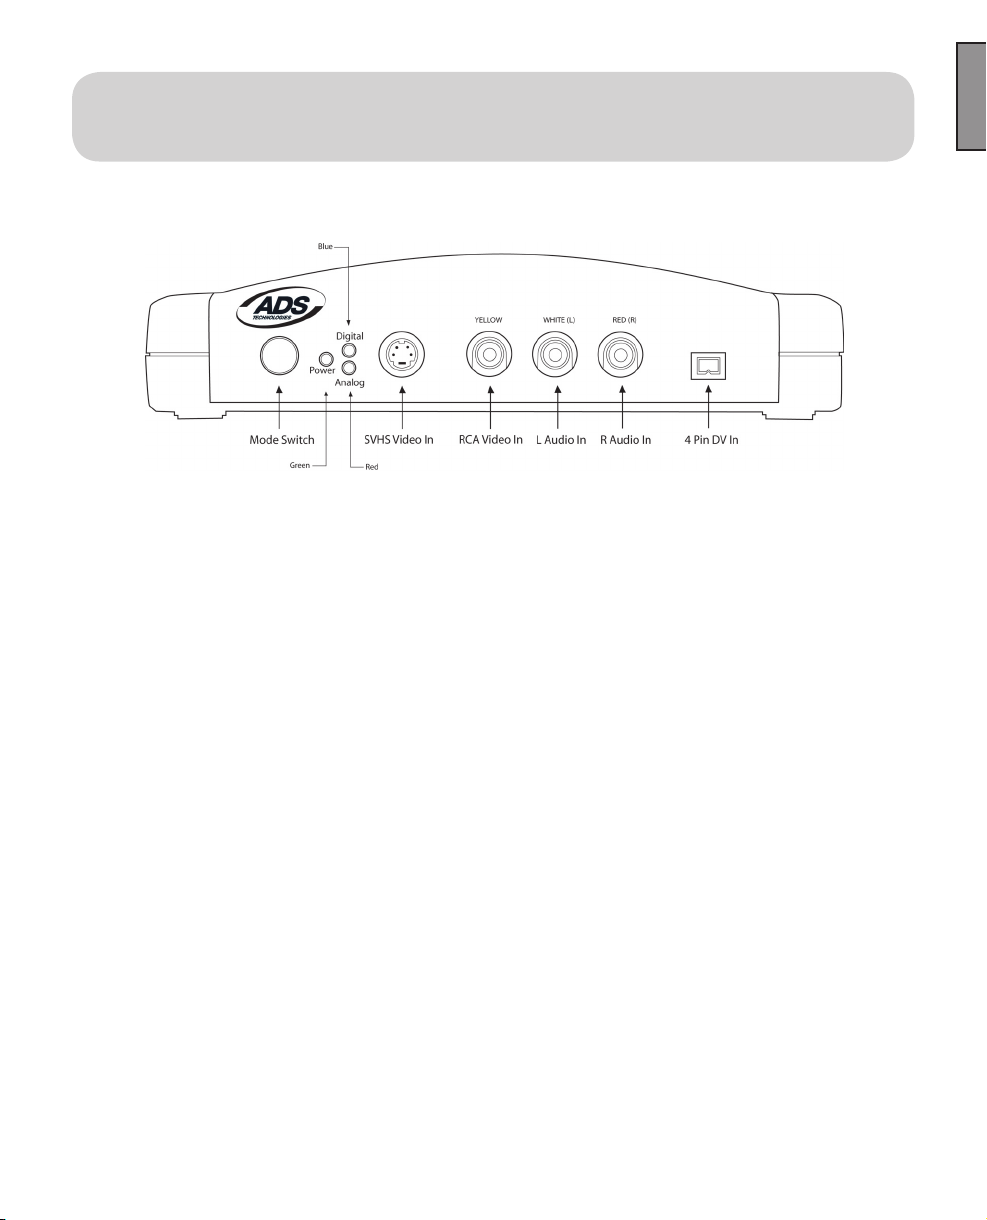
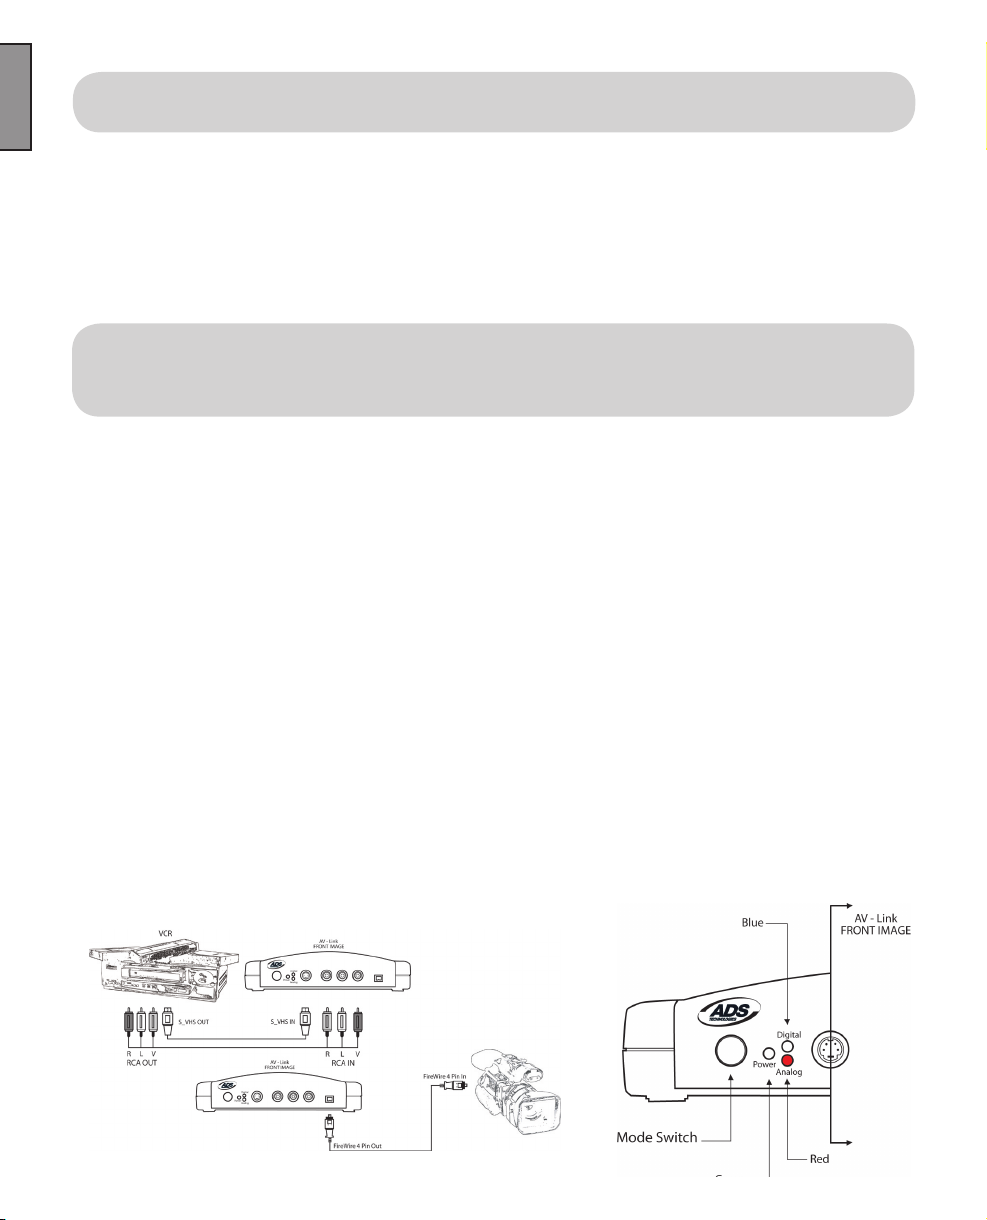
PYRO A/V Link Hardware Description
PYRO A/V Link
Front Image
Front Panel:
The front of the PYRO A/V Link is for all of the audio and video INPUT
Connectors, LED displays and Mode Switch.
Mode Button – Switches from DV capture or Analog Output.
The Blue LED will be on whenever video is being captured as DV whether the
source is an analog video tape or your DV camcorder. The RED Analog LED will
turn on when you are exporting DV to a VCR or other analog device.
ENGLISH
LED:
Green: Power
Blue: DV Capture
Red: Analog Export
Connectors:
S-VHS Input
Composite(RCA) Input
Right and Left Audio(RCA) Input
4 Pin DV Input
PYRO A/V LINK 9
Page 10
PYRO A/V LINK 11
ENGLISH
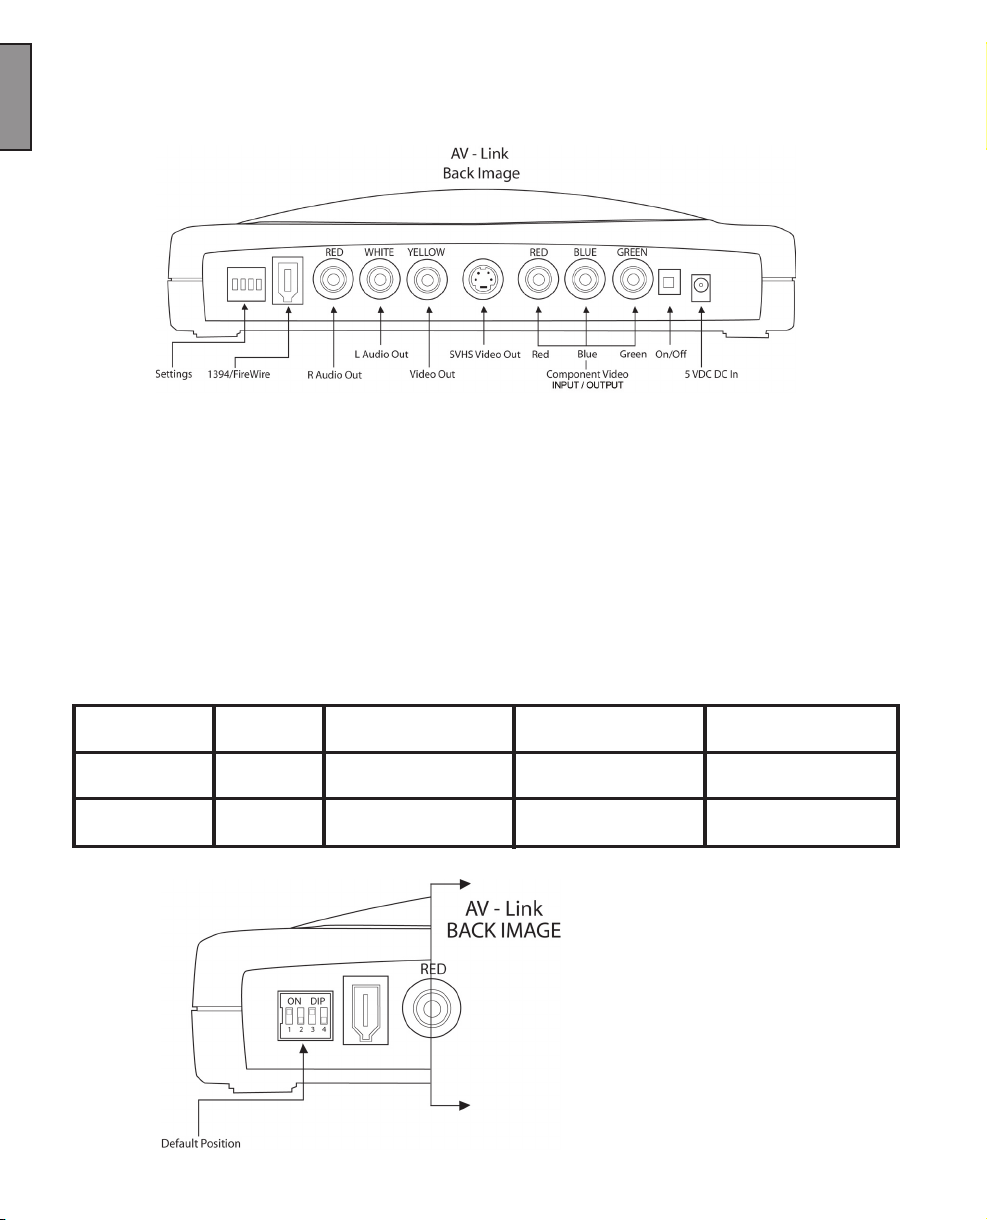
Rear Panel:
The back of the PYRO A/V Link is for all of the audio and Video Outputs with the
exception of the Component Video inputs.
ENGLISH
Fig. A
• The video input jacks are auto-sensing. Which ever video jack you connect (RCA, S-Video or
Component) the jack with the active video source will automatically be selected.
• The video output jacks will automatically be active. In all congurations the RCA and S-Video jacks will
always be simultaneously outputting video. This is true for video pass-through mode and exporting DV to
Analog video mode.
• The Component Video jacks are dual purpose and bi-directional. You can capture from analog video
sources via the component jacks and you can export DV to Analog video via the Component jacks. The
jacks are auto-sensing and auto-switching. This means that if ANY video input jack is capturing analog video
to DV, the Component jacks switch to video input mode. If you are exporting to Analog Video the
Component jacks switch to component video export.
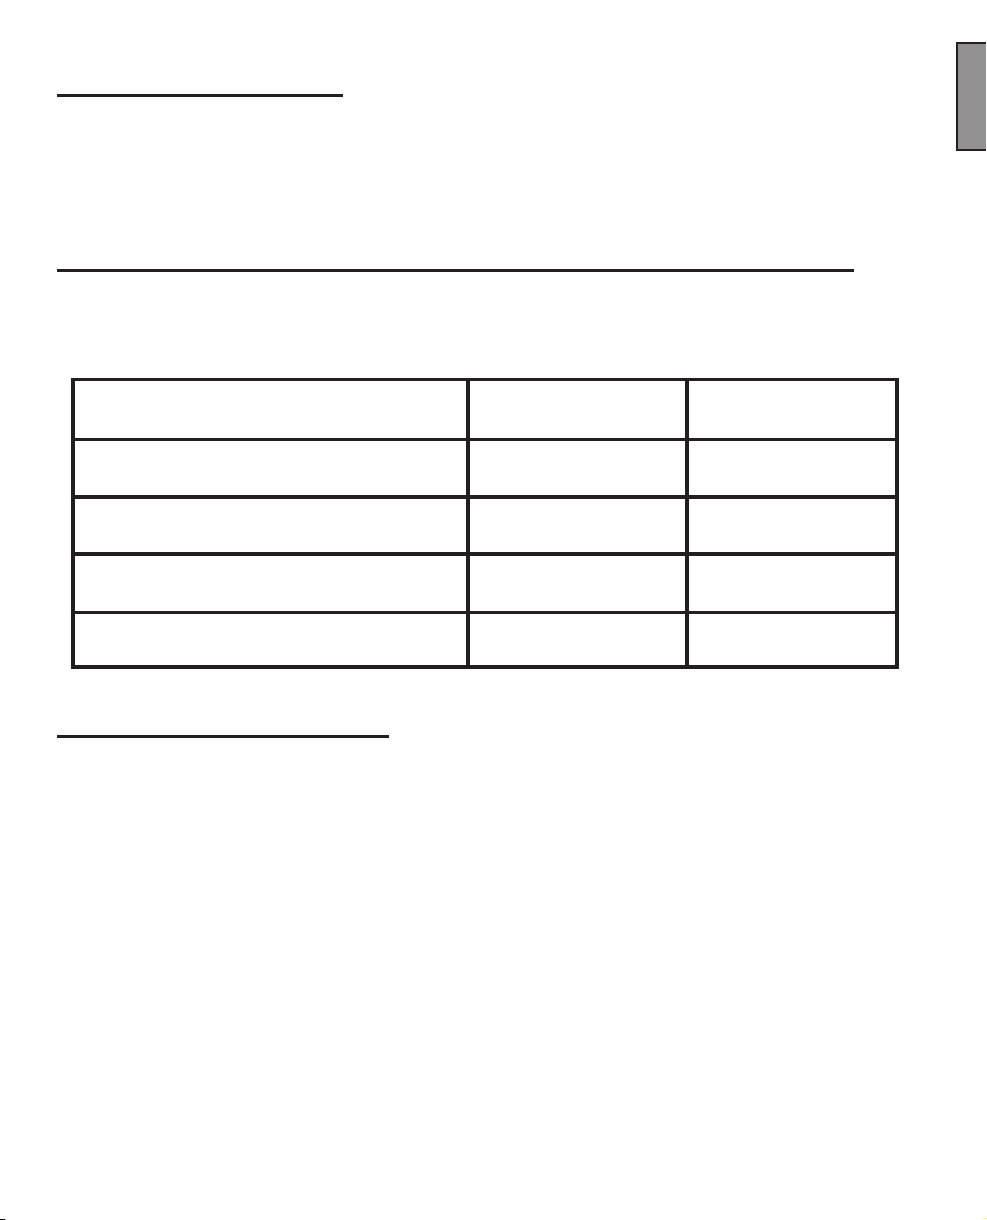
4 Position Dip Switch
POSITION:
UP
DOWN
Fig. B
1
PAL
NTSC
See Next Page
See Next Page
PYRO A/V LINK 10
2 3 4
See Next Page
See Next Page
Unlock Audio
Locked Audio
Page 11
Switch 1 - TV Format:
Set this switch to match the television/video format for your country.
Generally, North America, Japan and Taiwan are set to NTSC. Europe, Africa
and Australia are set to PAL. See the back of the user guide for a complete
listing of every country.
Switches 2 and 3 - DV Source / Operating System Selection:
The device is factory set to be most compatible to the 1394 timing for
Windows XP. You can easily set the dip switches to match the timing
of the device or operating system you are using.
DV SOURCE /
OPERATING SYSTEM
SWITCH 2 SWITCH 3
ENGLISH
DV Camcorder
Windows 2000
WinXP, Win98SE, WinME
Mac
Down Down
Down
Up
Up
Up
Down
Down
Switch 4 - Locked Audio:
Switch to Locked Audio mode to ensure that audio and video synch remain
locked during video capture.
Audio is set to capture at 16-bit, 48 kHz.
PYRO A/V LINK 11
Page 12

PYRO A/V LINK 13
ENGLISH
6 Pin 1394/FireWire connection
Use the supplied 6 pin to 6 pin cable to connect the A/V Link to your PC or Mac.
ENGLISH
In a non-computer – analog to DV conversion setting, use the 6 pin cable to
connect to another device.
Right and Left RCA Audio Outputs
Use the supplied A/V cables to connect audio outputs to your TV or video tape
recording device.
Video Out (RCA)
Use the supplied A/V cables to connect the RCA Video output to your TV or video
tape recording device.
S-VHS Out (Y/C 4 Pin Din)
Use the supplied S-VHS cable to connect the video output to your TV or video
tape recording device.
More about Video Outputs
You may have both RCA and S-VHS connected and outputting video
simultaneously. You can also use the outputs to preview video on a TV monitor
during DV editing or during analog video capture.
Component Video
The Red, Green and Blue component video jacks allow for input/ouput of video
from a component source. You can also connect a composite synch cable to the
RCA Video input to allow for composite synch.
On/Off
Power On/Off switch
Power Jack - 5VDC input
This is a self powered device, meaning the unit will function only when power is
applied. Use only the power supply included with PYRO A/V Link to power this
device.
PYRO A/V LINK 12
Page 13

Getting Started - Windows
Minimum System Requirements:
Processor: 800 MHz CPU or faster
OS: Windows 98SE, WinME, WinXP or Win2000
RAM: 128 MB or higher (256 MB or higher for editing)
Hard Disk: 500 MB or higher Ultra DMA 5400 RPM or faster with DMA enabled
(4 GB for every 18 minutes of video captured).
Monitor/Graphics: Resolution of 1024 x 768, 32 bit color, DirectX 8.1 or later
Sound: Standard Windows compatible sound card
1394 Port: OHCI-compliant 1394 card or built in port functioning properly.
Texas Instruments or Agere based 1394 host controllers are recommended.
Note: Most 1394 add-in cards are OHCI compliant including the
ADS PYRO 1394 cards.
CD-ROM: For software installation
CD Burner: For burning Video CD’s (VCD) or Super VCD (SVCD) disks
DVD Burner: For burning DVD disks
Windows CD: The Windows CD may be needed to load 1394 drivers if you are
using Win98SE or WinMe.
ENGLISH
Optimize your system for DV capture and editing:
It is highly recommended that you complete the following procedures to ensure
smooth video capture.
1.) Make sure all of your drives are defragmented. This is done in Windows
under Accessories/System tools. (Not required on the Mac)
2.) Make sure your drive had DMA enabled. This is done in Device Manager
under Disk Drives. This procedure may require you to reboot after you
have enabled DMA on your hard drive. (Not required on the Mac)
3.) If possible use a separate drive, even an external FireWire drive for saving
captured video .
4.) Close all unnecessary programs and background tasks when recording or
exporting video.
PYRO A/V LINK 13
Page 14

ENGLISH
PYRO A/V LINK 15
ENGLISH
Hardware Installation:
WINDOWS – Quick Start
1.) Connect A/C Power adapter
2.) Connect the 6 Pin 1394 cable between the PYRO A/V Link and computer.
Connect directly to the 1394 Host port. Connecting through a 1394 Hub/
Repeater is not recommended.
3.) WinXP and Win2000 will automatically recognize the device and install
drivers. WinME and Win98SE may ask for drivers from the Windows CD.
4.) Once the device drivers are installed the PYRO A/V Link will appear under
Windows Device manager as an Imaging Device.
5.) Connect Audio/Video cables between your video devices and
PYRO A/V Link
6.) Start your Video Editor application and you are ready to capture video
7.) Press Play on your video device.
8.) Press the Play button on your video editor’s preview window to begin
previewing video. Press Record, or Capture button to begin recording to
your computer hard drive.
Windows Software:
The drivers necessary for the PYRO A/V Link to operate with a Windows based
PC are built into the operating system. Once you plug in the device, Windows will
recognize it and the device will appear as an imaging device in Device Manager.
If you already own video editing software such as Adobe Premiere, you are ready
to connect your video devices and start capturing video.
For Windows Users who don’t have any video editing software, we provide a CD
that includes Ulead’s VideoStudio software. This software allows you to capture,
edit, export video, save as MPEG-1, MPEG-2, streaming video or even burn a
VCD, SVCD or DVD disk.
PYRO A/V LINK 14
Page 15
Other Video Editing software:
The PYRO A/V Link can be used with any video editing software that is
compatible with DV. We have tested with Adobe Premiere, Avid DV Express,
Ulead DVD Workshop, Ulead Media Studio Pro 6.5, Vegas Video, ArcSoft
ShowBiz, Magix Video Deluxe 2.0 and we continue to test with other video editors
on the market.
ENGLISH
PYRO A/V LINK 15
Page 16

PYRO A/V LINK 17
ENGLISH
Getting Started - Mac
ENGLISH
Minimum System Requirements:
Processor: 400 MHz or faster
OS: Mac OS 9.0.4, OSX (Not in Classic Mode), OSX 10.02 (Jaguar)
RAM: 128 MB or greater
Monitor/Graphics: Resolution of 1024 x 768, 32 bit color
Sound: Standard Macintosh sound system
1394 Port: Standard built-in 1394 port or OHCI-compliant 1394 add-in card
Note: Most 1394 add-in cards are OHCI compliant including, the ADS
PYRO 1394 cards.
CD Burner: For burning Video CD’s (VCD) or Super VCD (SVCD) disks
DVD Burner: For burning DVD disks (iDVD, DVD Studio Pro or Instant DVD for
Mac required).
Note: Apple iMovie is included with systems which include built-in FireWire ports.
Optimize your system for DV capture and editing:
It is highly recommended that you complete the following procedures to ensure
smooth video capture.
1.) If possible use a separate drive, even an external FireWire drive for
capturing video.
2.) Close all unnecessary programs or disable extensions not required for
recording or exporting video.
PYRO A/V LINK 16
Page 17
Hardware Installation 2:
MAC – Quick Start
1.) Connect Power
2.) Connect the 6 Pin 1394 cable between the PYRO A/V Link and computer.
Connect directly to the 1394 Host port. Connecting through a 1394 Hub/
Repeater is not recommended.
3.) Your Mac will automatically recognize the device.
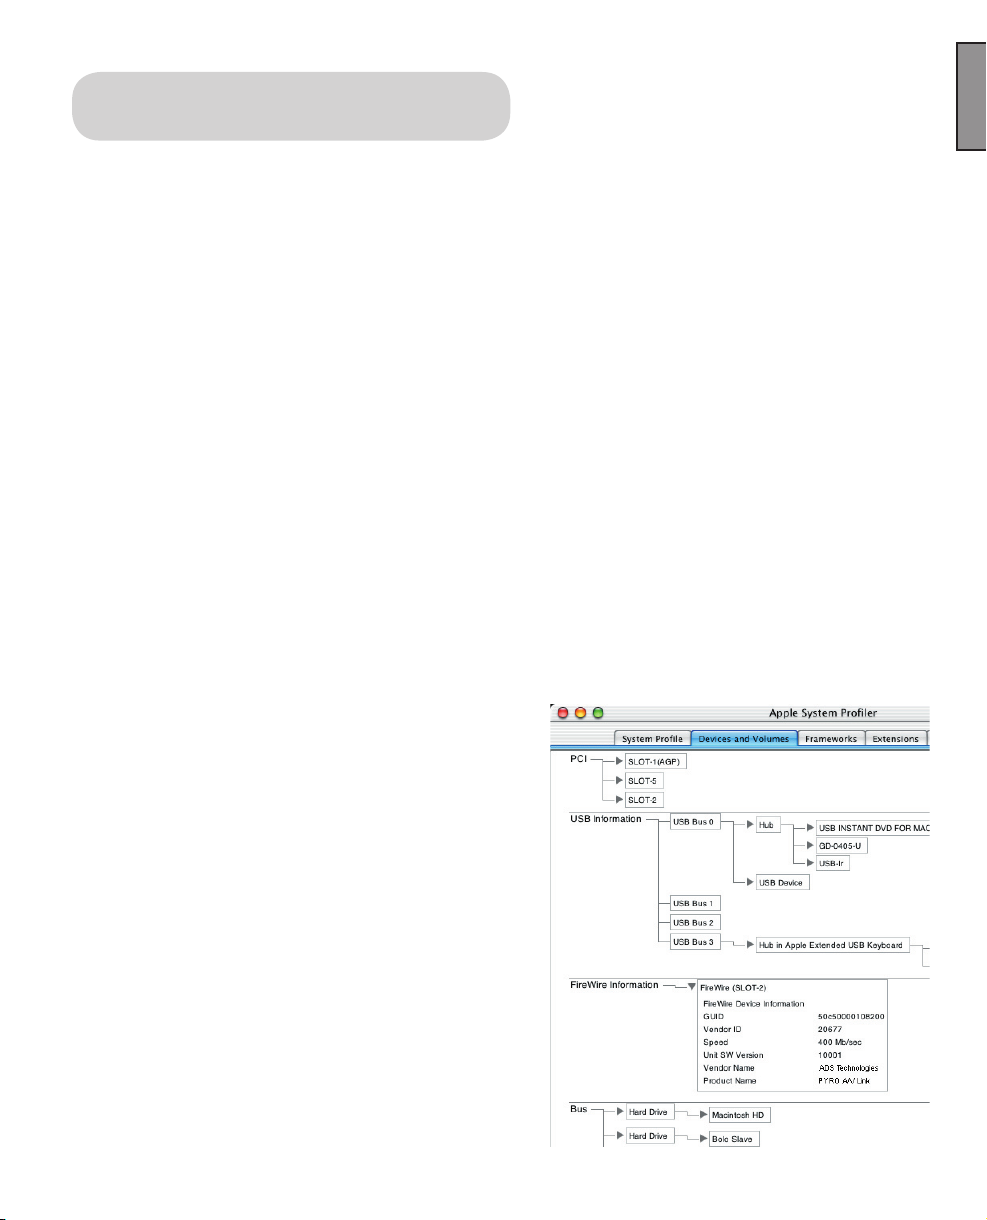
4.) Once the device has been detected PYRO A/V Link will appear under the
Proler as shown on this page.
5.) Connect Audio/Video cables between your video devices and
PYRO A/V Link
6.) Start your Video Editor application and you are ready to capture video
7.) Press Play on your video device.
8.) Press the Play button on your video editor’s preview window to begin
previewing video. For iMovie, press Import to begin recording.
Software:
ENGLISH
No software is included with PYRO A/V Link
for the Mac platform. No device drivers are
required for proper operation and all Mac
computers that have shipped with built-in
FireWire ports include iMovie for capturing,
editing and exporting video from a 1394
device, such as PYRO A/V Link. PYRO
A/V Link is also compatible with other video
editing software such as Final Cut Pro, Avid
Express DV and Adobe Premiere
PYRO A/V LINK 17
Page 18

ENGLISH
PYRO A/V LINK 19
ENGLISH
Computer
Connected Congurations
Ready to Capture Video
DV Video is great because it offers superior quality and is easily edited. The only
problem is how can you get all of your non-DV content converted into the DV
format through your FireWire connection. PYRO A/V Link lets you do that quickly
and easily. You can connect many different video devices to the PYRO A/V
Link such as your old 8mm camcorder, your VCR, DVD Player, a TV to preview
captured video or even a digital camcorder. Over the next few pages we will
demonstrate several possible congurations.
Connecting an analog Video source
We have supplied you with most of the audio/video cables you will need for
capturing from a variety of video sources. In some cases you may need to use
the custom cable supplied by your camcorder manufacturer or you may need to
purchase extra cables depending upon your desired A/V conguration.
1.) Use the supplied RCA to RCA cable to connect between your analog
source and the PYRO A/V Link. This cable has 3 RCA connectors at each
end.
Yellow = Video Yellow = Video
Red = Right Audio Red = Right Audio
White = Left Audio White = Left Audio
Note: If your camcorder does not have three separate RCA Jacks, use the
custom cable supplied with the camcorder.
PYRO A/V LINK 18
Page 19
1.) If your camcorder, VCR or other video device includes an S-VHS
connector, use the supplied S-VHS cable to connect between your video
device and PYRO A/V Link for improved quality.
2.) If your Video tape machine, DVD player or other video device provides
Component video outputs, use a component video cable (not supplied)
to connect between your video device and PYRO A/V Link. Component
video will provide the best quality video.
ENGLISH
* Component cables not included.
* If you have BNC Connectors as component out, you can convert them
with component to RCA Connectors.
PYRO A/V LINK 19
Page 20

ENGLISH
PYRO A/V LINK 21
ENGLISH
Capturing Video with your
Video Capture/Edit Software
When powered up the PYRO A/V Link is ready to convert an analog video source
into DV so you can capture video to your computer via your capture/edit software.
Video Source:
PYRO A/V Link will auto detect which video input connections have a video
source and automatically use that source. Use the best video input source you
have available, Component being best, S-VHS second best and RCA (Composite)
the lowest quality video source.
Previewing Video in Video Editing Software:
With most video editing software, the interface includes a video preview window.
In some cases you must select the Movie Capture Window (Adobe Premiere).
1.) Start your Video Editing software application.
2.) Locate the video Preview Window or Movie Capture Window.
3.) Once you have the video preview or capture window open, press PLAY on
your video playback device.
4.) Click PLAY on the video editing software preview window. Now you will
see and most likely hear (depending on the software) your video playing on
the computer.
5.) Click the RECORD button on the video editing software and you will begin
to record DV to your computer hard drive.
PYRO A/V LINK 20
Page 21
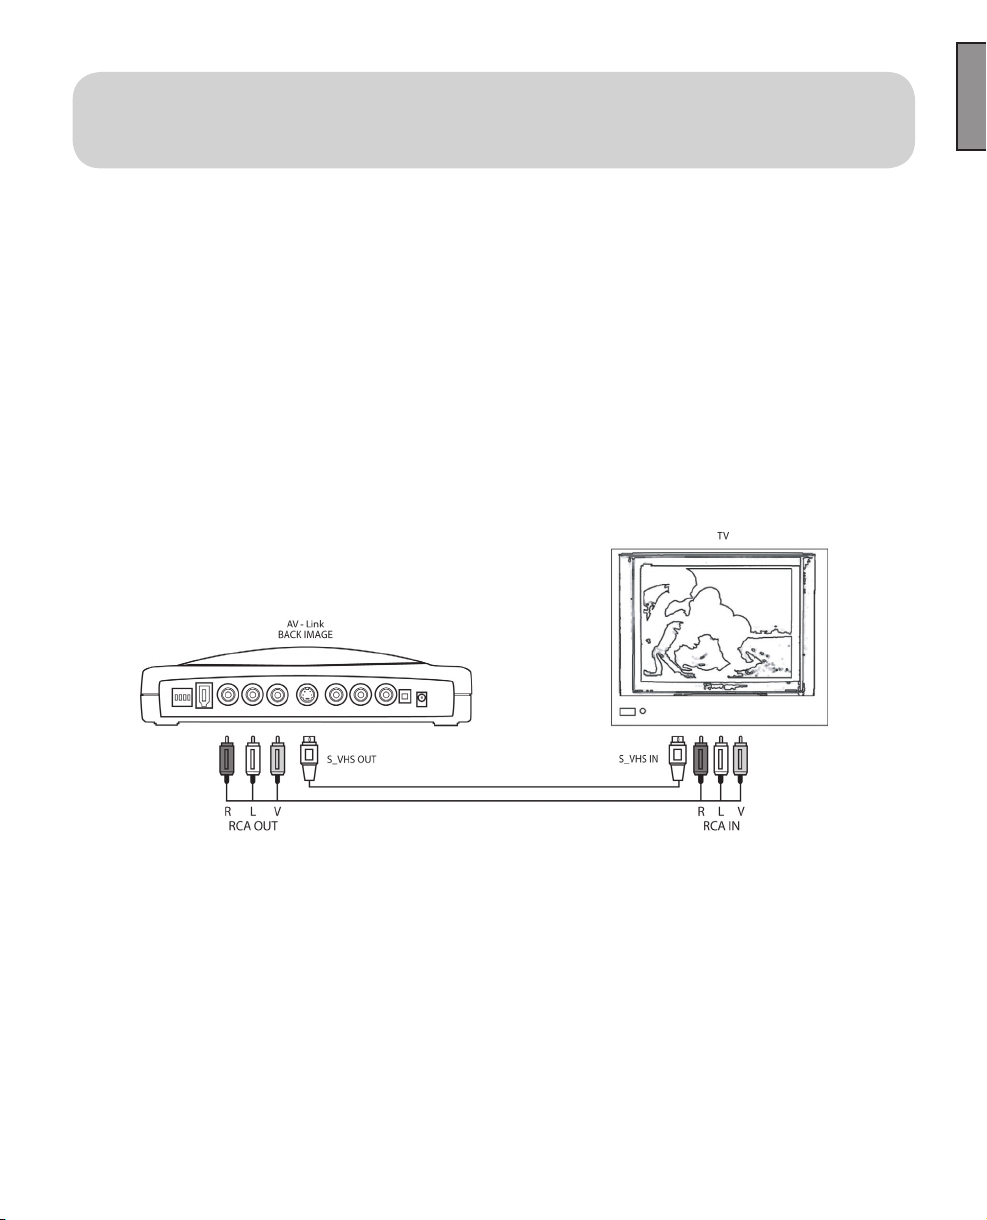
Connecting an external TV for
Simulation Video Preview
PYRO A/V Link allows you to preview video while being captured and edited so
you can see your results full screen on the TV.
1.) Connect a video cable from the RCA or S-VHS OUT jacks on the back of
the PYRO A/V Link and into an external video input (RCA or S-VHS) on
your TV.
2.) Connect an audio cable to the Left and Right RCA audio OUT jacks on the
back of the PYRO A/V Link to the external audio inputs (RCA) on your TV.
3.) Apply Power to the TV and switch the TV to accept the external video
source. (Check your TV manual if you are not sure how to do this.)
ENGLISH
PYRO A/V LINK 21
Page 22
PYRO A/V LINK 23
ENGLISH
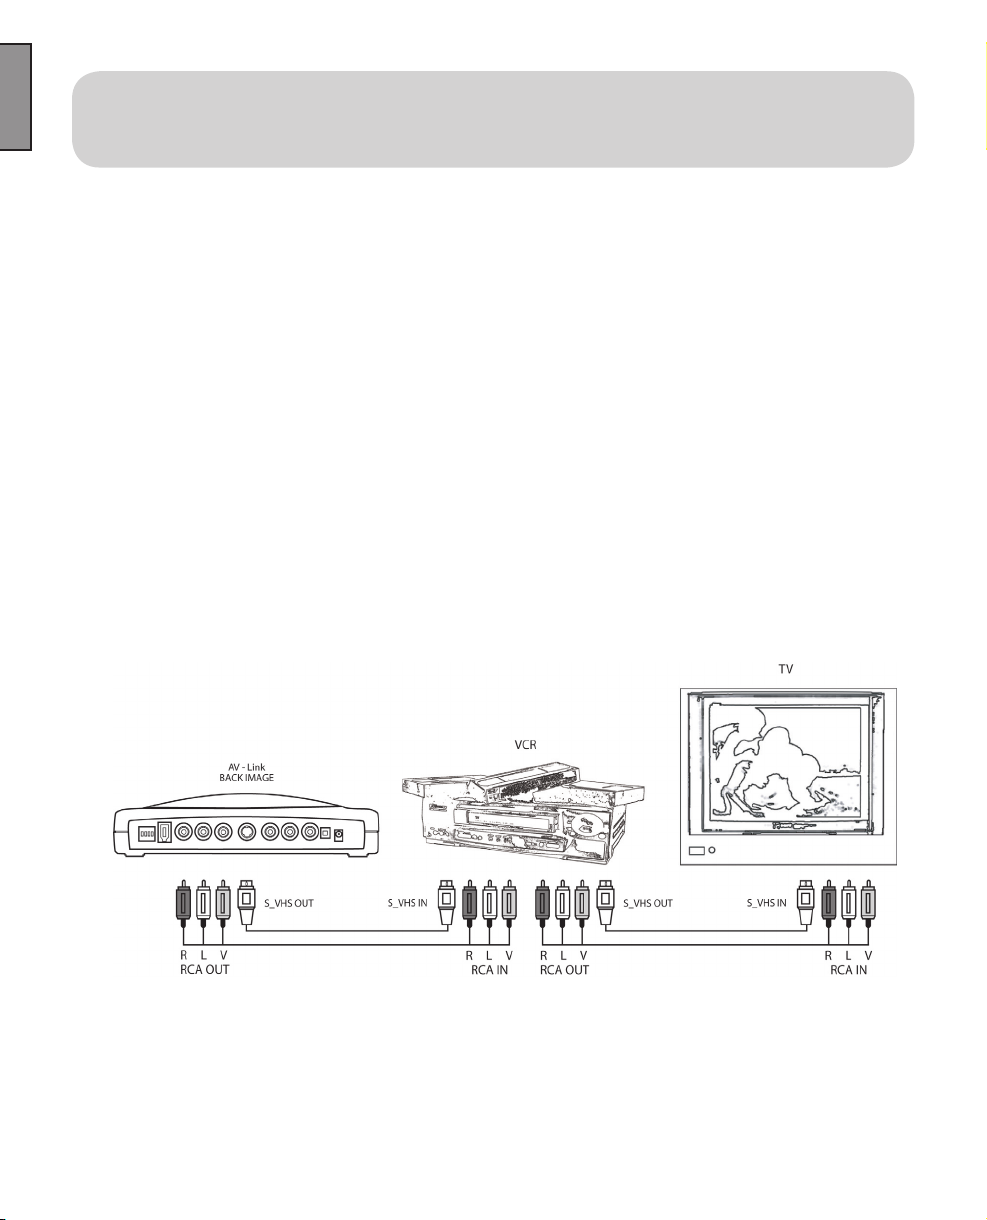
Connecting for Analog Record and
ENGLISH
You can preview and record video to a VCR at the same time as long as the VCR
allows for audio and video to be passed through it. Check and test your VCR
to ensure that has audio and video inputs and outputs and that it allows pass
through of audio and video while recording.
1.) Connect a video cable from the RCA or S-VHS OUT jacks on the back of
the PYRO A/V Link and into the Video In on your VCR.
2.) Connect an RCA or S-VHS cable to the Video Out on your VCR to an
external video input (RCA or S-VHS) on your TV.
3.) Connect an audio cable to the Left and Right RCA audio OUT jacks on the
back of the PYRO A/V Link to the audio inputs (RCA) on your VCR.
4.) Connect an audio cable between the Left and Right RCA OUT on your
VCR to the Audio INPUTS on your TV.
5.) Apply Power to the VCR – You may have to change the TV/VCR switch on
the VCR to allow pass through.
6.) Apply Power to the TV and switch the TV to accept the external video
source. (Check your TV manual if you are not sure how to do this.)
Preview at the same time
The only non-valid connection conguration for video pass-through would be RCA or S-Video
In and Component Video out. This is because the component jacks are auto-switching and
auto-sensing. If you are bringing analog video in, the Component Jacks switch to inputs, if
you are exporting video out the Component Jacks switch to video output.
PYRO A/V LINK 22
Page 23
Connecting for Capture from DV Camcorder
If you are using a Digital Camcorder to capture and or export video you can do
this by simply connecting the Digital camcorder directly to the 1394 port on your
computer.
For your convenience the PYRO A/V Link provides a 4 pin DV In/Out connection,
thus acting as a 1394 desktop Hub and allowing easier connection to your
computer.
1.) Connect a 4 pin to 4 pin DV cable between the DV In/Out connection on
your digital camcorder to the 4 Pin DV IN port on the front of the
PYRO A/V Link.
2.) Turn your Camcorder on to VCR/VTR mode.
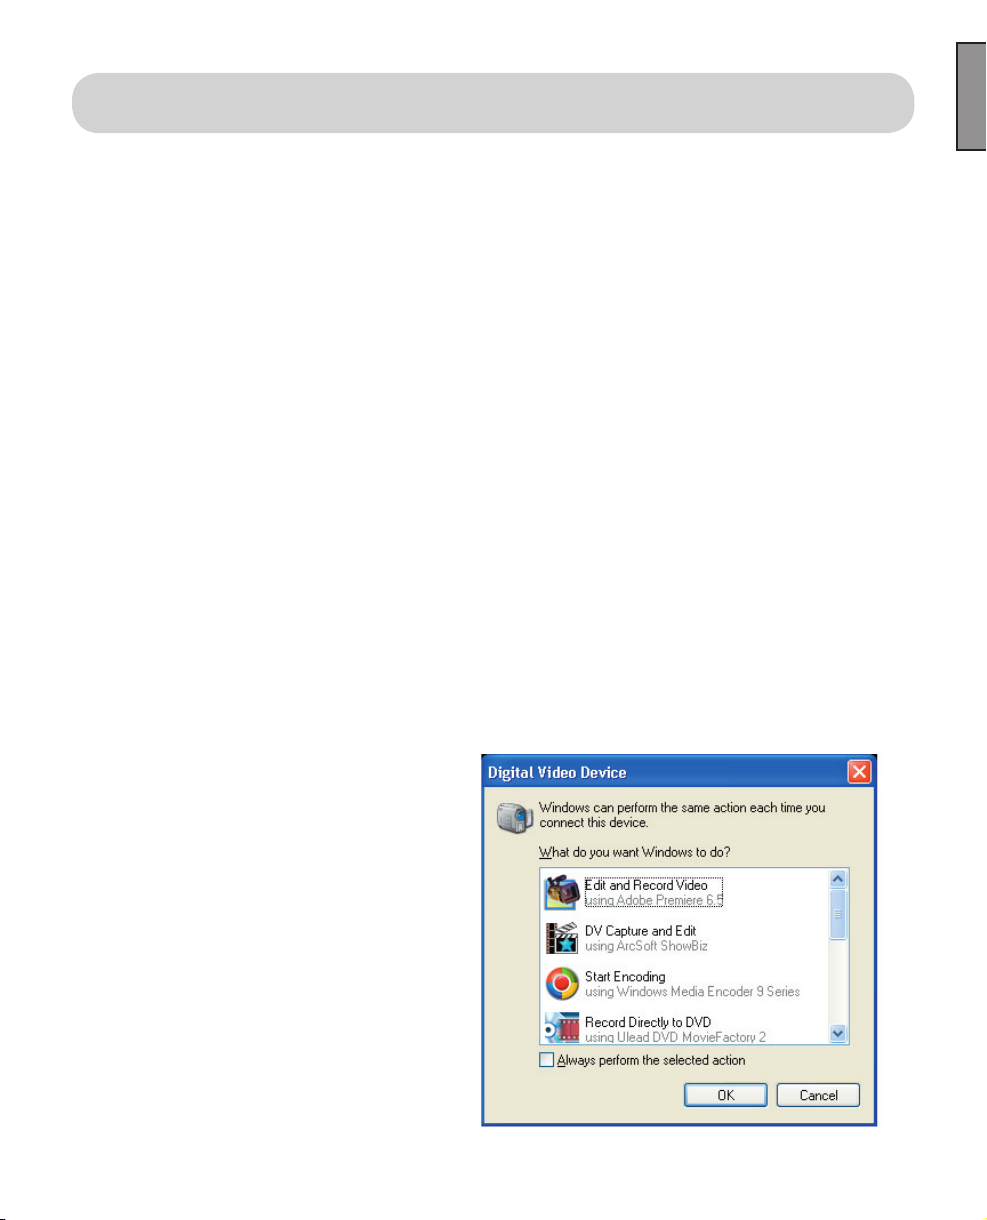
3.) The Digital Camcorder will be recognized by the computer and
Windows(WinXP) will show all compatible software that can be used with
the digital camcorder (see Box). Select the video capture or
editing application you want to use.
ENGLISH
4.) If this selection box does not appear, Start your Video Editing software the
old fashion way.
PYRO A/V LINK 23
Page 24

PYRO A/V LINK 25
ENGLISH
Previewing Video in the Video Editing Software:
ENGLISH
With most video editing software, the interface includes a video preview window.
In some cases you must select the Movie Capture Window (Adobe Premiere).
1.) Locate the software video Preview Window or Movie Capture Window.
2.) Once you have the video preview or capture window open click PLAY on
the video editing software preview window. This will send a signal to your
digital camcorder to enter PLAY mode and you will see and most likely
hear (depending on the software) your video playing on the computer.
3.) Click the RECORD button on the video editing software and you will begin
to record DV to your computer hard drive.
Device Control Note: Depending upon the video editing software,
there may be extra steps to select your camcorder as the 1394 device
to be used for capture. Once your camcorder is selected as the 1394
device, you can use software device control just as if you were directly
connected to the computers 1394 port (See video editing notes in
appendix).
Exporting Video from a
Video Editor to an Analog Device
Now that you have captured and edited your video you might want to export it out
of your computer and on to tape so you can easily publish or share your video
production with friends, family or even paying customers!
1.) Connect a video cable from the RCA or S-VHS OUT jacks on the back of
the PYRO A/V Link and into an external video input (RCA or S-VHS) on
your VCR
Note: S-VHS provides higher quality video recording than an RCA
cable. S-VHS is recommended if your camcorder or VCR offers this
connection.
PYRO A/V LINK 24
Page 25

2.) Connect an audio cable to the Left and Right RCA audio OUT jacks on
the back of the PYRO A/V Link to the external audio inputs (RCA)
on your VCR.
Note: If you are recording back to a camcorder, you may need to use
the cables provide by the camcorder manufacturer.
3.) Apply Power to the VCR and press RECORD just before you begin
exporting video from your computers video editing software.
Note: Each video editing software program will offer a slightly different method for
exporting video. Some software will allow export from timeline without rendering
the video and others will require that you “Save” your video and then “Print to
Tape”. Please check the user guide for your video editing software to learn how
to export video.
Exporting to a Digital Camcorder
If you want to export from your video editor to a digital camcorder, you can
accomplish this by connecting the camcorder directly to the 1394 port. However,
you can also use the PYRO A/V Link as your 1394 connection and export DV
through the A/V Link and into your digital camcorder.
ENGLISH
The setup is the same as if you used A/V Link as your Digital camcorder
capture connection.
1.) Connect a 4 pin to 4 pin DV cable between the DV In/Out connection on
your digital camcorder to the 4 Pin DV In/Out port on the PYRO A/V Link.
2.) Turn your Camcorder on to VCR/VTR mode.
3.) The Digital Camcorder will be recognized by the computer.
4.) Start your Video Editing software, Use the export or Print to Tape function
in the software to export video from your computer and record in the
digital camcorder.
PYRO A/V LINK 25
Page 26
ENGLISH
PYRO A/V LINK 27
ENGLISH
Non-Computer Congurations
PYRO A/V Link can operate as a stand a lone conversion device between analog
and digital recording devices. This means you can convert analog content into
DV content via a direct conversion to a DV deck or a Digital camcorder without
connecting either device to a computer
Connecting for Analog Video to
Digital Conversion
1.) Apply Power to the PYRO A/V Link device.
2.) Connect the RCA audio and video cables between your analog video
device and the RCA audio and video inputs on the front of the PYRO A/V
Link unit.
3.) Use the S-VHS or Component video inputs if your analog video device has
these connections for the best possible video quality.
4.) Use a 6 Pin to 4 Pin 1394 cable to connect from the A/V Link to your digital
camcorder or DV deck. Connect the 6 pin end of the cable to the 6 pin
1394 connector on the rear of the PYRO A/V unit and connect the 4 pin
end to your digital camcorder or DV Deck.
5.) Use the MODE SELECTOR SWITCH on the front of the PYRO A/V Link
device to switch to ANALOG MODE. In this mode, the RED LED should
be lit.
6.) Press the RECORD button on your digital camcorder or DV deck just
before pressing the PLAY button on your analog video device (VCR or
Camcorder).
Fig. B
Fig. A
PYRO A/V LINK 26
Page 27

Add a Preview Monitor to this Conguration
You can easily connect a TV to the audio video output jacks on the PYRO A/V
Link to monitor your video dubbing process.
1.) Connect an RCA or S-VHS video cable between the PYRO A/V Link and
your TV RCA or S-VHS Video input jacks.
2.) Connect Right and Left audio cable between the PYRO A/V Link Right and
Left audio jacks and your TV audio inputs.
3.) Switch the TV to accept an external video input.
Connecting for Digital to
Analog Conversion
If you have a digital camcorder you can use the PYRO A/V Link to convert the
digital content into an analog video signal so it can be recorded on your VCR.
ENGLISH
1.) Connect your digital camcorder or DV deck to the 4 pin DV In jack on the
front of the PYRO A/V Link.
2.) Connect a video cable from the RCA or S-VHS OUT jacks on the back of
the PYRO A/V Link and into an external video input (RCA or S-VHS) on
your VCR
Note: S-VHS provides a higher quality video recording than an RCA
cable. S-VHS is recommended if your camcorder or VCR offers this
connection.
3.) Connect an audio cable to the Left and Right RCA audio OUT jacks on
the back of the PYRO A/V Link to the external audio inputs (RCA) on your
VCR.
Note: If you are recording back to a camcorder, you may need to use
the cables provide by the camcorder manufacturer.
PYRO A/V LINK 27
Page 28

PYRO A/V LINK 29
ENGLISH
4.) Use the MODE SELECTOR SWITCH on the front of the PYRO A/V Link
ENGLISH
device to switch to DIGITAL MODE. In this mode, the BLUE LED should
be lit.
5.) Apply Power to the VCR and press RECORD just before you press PLAY
on your digital camcorder.
Add a Preview Monitor to this Conguration
You can preview and record video to a VCR at the same time as long as the VCR
allows for audio and video to be passed through it. Check and test your VCR to
ensure that it has audio and video inputs and outputs and they allow pass through
of audio and video while recording.
1.) Connect a video cable from the RCA or S-VHS OUT jacks on the back of
the PYRO A/V Link and into the Video In on your VCR.
2.) Connect an RCA or S-VHS cable to the Video Out on your VCR to an
external video input (RCA or S-VHS) on your TV.
3.) Connect an audio cable to the Left and Right RCA audio OUT jacks on the
back of the PYRO A/V Link to the audio inputs (RCA) on your VCR.
4.) Connect an audio cable between the Left and Right RCA OUT on your
VCR to the Audio INPUTS on your TV.
5.) Apply Power to the VCR – You may have to change the TV/VCR switch on
the VCR to allow pass through.
6.) Apply Power to the TV and switch the TV to accept the external video
source. (Check your TV manual if you are not sure how to do this.)
PYRO A/V LINK 28
Page 29
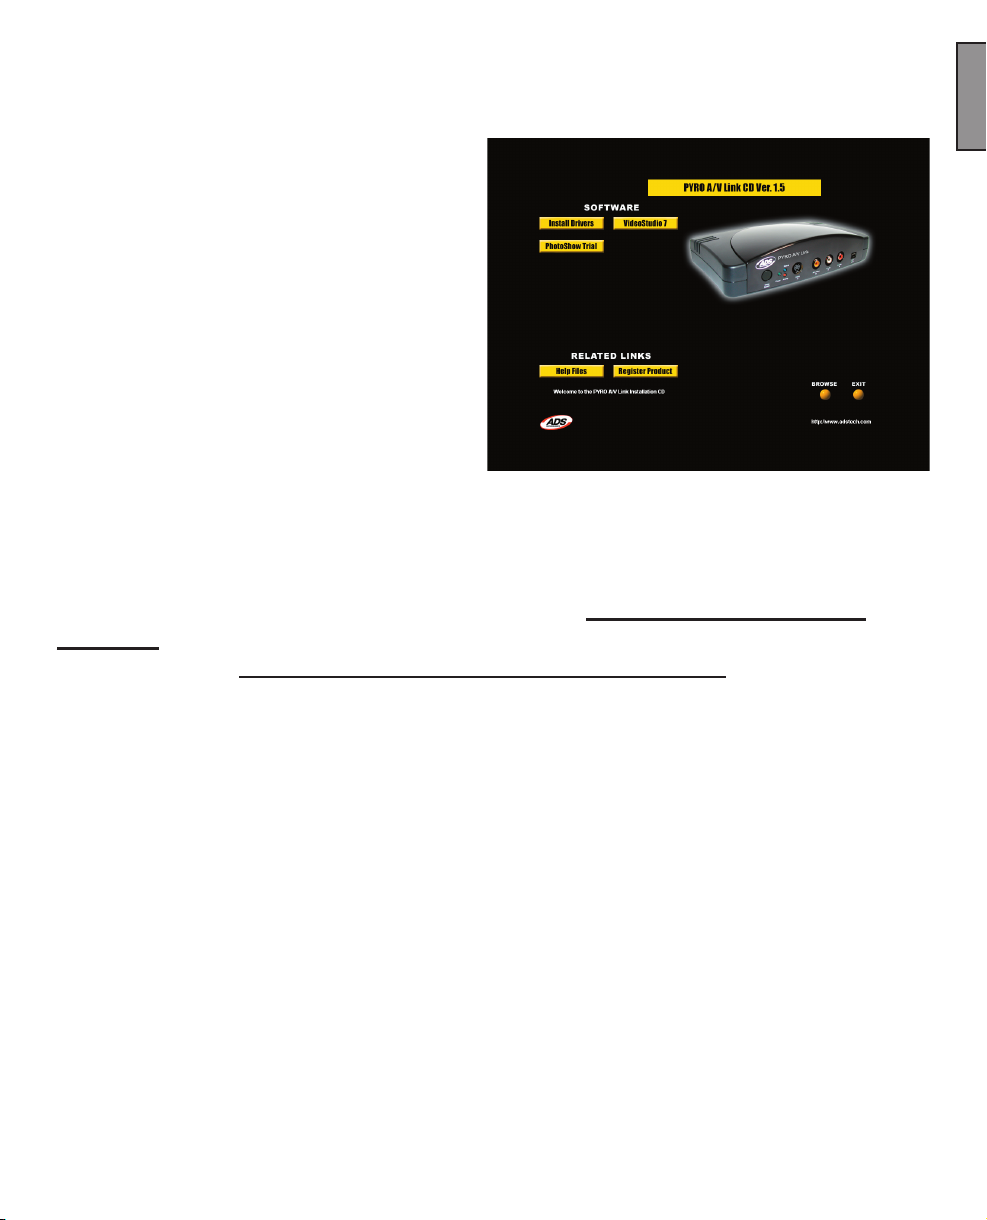
Installing the Bundled Software CD
1.) Insert the PYRO A/V Link CD
into your CD-ROM drive.
2.) The Auto-run screen displayed
here will appear on your
screen.
3.) This Auto-Run requires Apples
Quick Time player to run. If
you do not have Quick Time
installed, it will automatically
begin installing Quick Time on
your system.
4.) There are 4 Selections:
a. Install Driver
b. VideoStudio
c. PhotoShow (Trial software)
a.) Install Drivers – Driver installation is required ONLY if you are running
Win98SE. This driver is actually a patch to the Microsoft 1394 software in
Windows 98SE. If you have Windows ME, WinXP or Win2000 – skip this Step.
ENGLISH
b.) VideoStudio - Click the VideoStudio button and the VideoStudio installer will
open. See page 38 for full VideoStudio 7 SE DVD installation instructions.
c.) PhotoShow – PhotoShow is a fun and easy way to make rich, music videolike shows with your digital photos. Experience your photos like never before!
When you are done, share your PhotoShow online, burn it to a CD, use it as your
screen saver or even publish it on your own web site.
PYRO A/V LINK 29
Page 30
ENGLISH
PYRO A/V LINK 31
ENGLISH
Using VideoStudio Software
How VideoStudio works
VideoStudio follows a step-by-step paradigm so that editing tasks remain
uncomplicated from start to nish. VideoStudio also offers more than a
hundred transition effects, professional titling capabilities and simple
soundtrack creation tools. Learn in seconds, create in minutes.
VideoStudio breaks up your movie into separate tracks, giving you broad
creative freedom. Changes to one track do not affect others.
After transferring footage from your camcorder, you can arrange scenes,
apply special effects, overlay images, add animated titles, sync in a voiceover
narration, and use background music from your favorite CDs in formats such
as WAV and MP3. All these can be done using drag-and-drop, cut-and-paste,
or select-and-apply operations.
All the tracks in your movie are then organized into a video project le (*.VSP),
which contains all the video and audio information on how your movie is put
together.
When everything is all set to go, your computer collects all information needed
to create your nal movie le. This process is called rendering. You can then
output and distribute your movie as a DVD/VCD/SVCD title, streaming Web
page video, or an e-mail attachment. You can also record your movie back to
your camcorder or VCR.
PYRO A/V LINK 30
Page 31

Hardware checkup before using VideoStudio
To ensure that your video production runs smoothly and trouble-free, click
Control Panel: Systems - Device Manager and check if your devices are
working properly in accordance with your Operating System (O/S).
DV IEEE 1394 capture card
The following Windows operating systems support the IEEE 1394 capture
card. Always remember to turn on your PYRO A/V Link/DV camcorder
connected to the IEEE 1394 interface so that it can be detected as image
device or sound, video and game controller.
Windows 98
Windows 98 supports the Texas Instruments DV driver only but does not
provide it. Search the drivers (if bundled) that come with the IEEE 1394
card. Check that the following devices are working properly:
• 1394 Bus Controller
• Sound, video and game controllers: 1394 camcorder
Windows 98 Second Edition / Windows 2000
ENGLISH
Windows 98 Second Edition and Windows 2000
include the Microsoft DV driver and still support
the Texas Instruments DV driver. Check that the
following devices are working properly:
• 1394 Bus Controller
• Image Device: Microsoft DV Camera and VCR (For
Microsoft DV driver only.)
• Sound, video and game controllers: 1394 camcorder
(For Texas Instruments DV driver only.)
* It is strongly recommended to use the Microsoft driver in Win
ME and Win 2000.
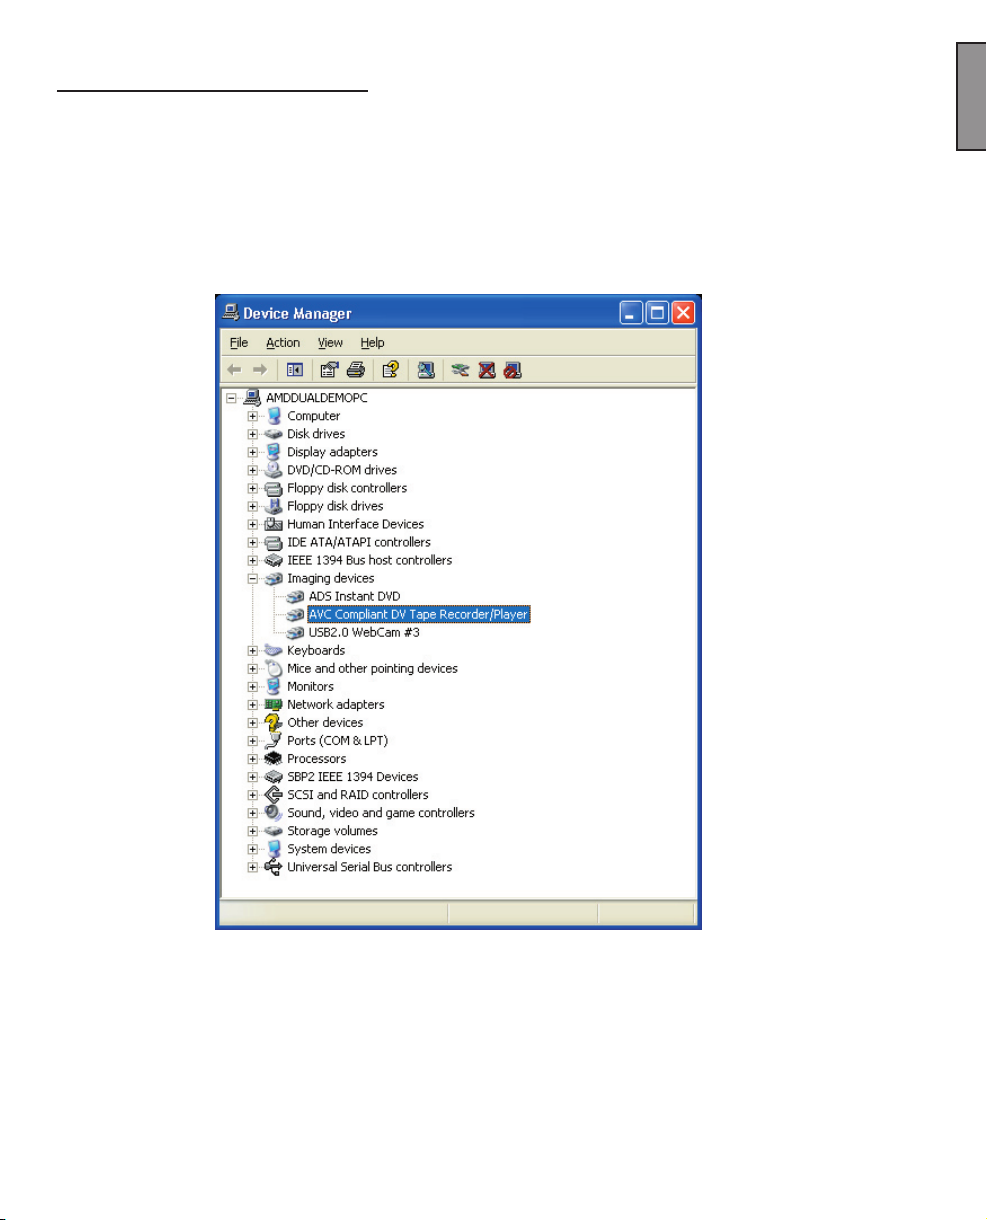
* PYRO A/V Link will be listed as AVC Compliant DV Tape
Recorder/Player
PYRO A/V LINK 31
Page 32

PYRO A/V LINK 33
ENGLISH
Windows Millennium Edition (ME)
Windows Me fully supports the IEEE 1394 card. Check that the following devices
ENGLISH
are working properly:
• 1394 Bus Controller
• 61883 Device Class
• AVC Device Class
• (Brand name) DV Camcorder: The brand name depends on the DV camcorder connected to the IEEE interface card.
Windows XP
Windows XP fully supports IEEE 1394.
* PYRO A/V Link will be listed as AVC Compliant DV Tape Recorder/Player under
the Device Manager.
To run VideoStudio under Windows XP, check that the following devices are
working properly:
• 1394 Bus Controller
• 61883 Device Class
• AVC Device Class
• (Brand name) DV Camcorder: The brand
name depends on the DV camcorder connected to the IEEE interface card.
For Windows 98 and Windows Me, select the
DMA option in Device Manager: Disk drive
Settings Tab. In Windows 2000, the DMA
option is hidden but it is always enabled. DMA
avoids possible drop frame problems later
when you are capturing video.
Note:In addition to commonly used Texas Instruments and Micro-
soft DV drivers, there are other drivers available. Consult your
camcorder’s manual for suitable drivers.
PYRO A/V LINK 32
Settings Tab after clicking Properties
when a hard drive is selected from Control
Panel: System - Device Manager
Page 33

Installing and running VideoStudio
To install VideoStudio:
1. Place the A/V Link CD into your CD-ROM drive.
Click on the VideoStudio icon to load the
VideoStudio Installation screen.
2. When the Setup screen appears, follow the
instructions to install VideoStudio onto your
computer.
Note: If the Setup screen does not appear after loading the CD, then you
can manually start it by double-clicking the My Computer icon on your
desktop, then double-clicking the icon for the CD-ROM drive. When the
CD-ROM window opens, double-click the Setup icon.
Please install also the following applications, because they are very important
in making digital video work well on your computer. The installation program
will walk you through installing:
• QuickTime
• Windows Media Format
• RealPlayer
• Acrobat Reader
Note: Skip this step if you already have newer versions of the above supporting applications installed in your PC.
VideoStudio installation screen
ENGLISH
To run VideoStudio:
• Double-click the VideoStudio icon on your Windows desktop.
OR
• Select the VideoStudio icon from the VideoStudio program group on the
Windows Start menu.
Running VideoStudio from Windows
Start menu
PYRO A/V LINK 33
Page 34

PYRO A/V LINK 35
ENGLISH
Conguring VideoStudio
ENGLISH
PYRO A/V Link allows you to capture video from camcorders, VCRs, and
VCD/DVD Players into the high-quality DV format. To ensure a smooth
installation and setup with VideoStudio 7, please follow the steps outlined
below.
1.) Turn on your PYRO A/V Link and be
certain that it has been properly detected
by the Windows Device manager as
outlined on the previous pages.
2.) Connect your video source to the audio
and video jacks on A/V Link.
3.) Check your video source to ensure it is
powered on and that you have a tape of
disk playing video.
4.) Click the Capture Step at the top of the
VideoStudio program. You should see
“PYRO A/V Link” listed in the Source eld
in the Capture Settings panel.
5.) DV should be the video capture format. If
you wish to capture as MPEG video, read
the section on “Direct Capture of MPEG”
later in this manual.
6.) Click on File.
7.) Then click “Change Capture Plug-in” – Be
sure that Ulead Direct Show Capture
Plug-in is selected
8.) Click PLAY on the Preview Window and
you will see your video previewing.
Check that your device is listed under Source
Note: PYRO A/V Link supports many video input sources. PYRO A/V Link has the ability to
automatically sense and select the active video input whether it be Composite (RCA), SVideo
(S-VHS) or Component video inputs. Video will be captured from what ever video source is
connected with a live video signal.
PYRO A/V LINK 34
Page 35

Using DV Pass Through for Digital Camcorders
If you wish to connect your Digital Camcorder to the 4 Pin 1394 port on the front
of the PYRO A/V Link, you will need to make some additional settings to ensure
that you can control your camcorder via the Video Studio software. Device
control will include Start, Stop and Record functions on your digital camcorder.
Follow the steps below to properly setup your Digital Camcorder for 1394
pass-through with PYRO A/V Link.
1.) Click on “File”
2.) Click – “Select Device Control”
3.) Select the camcorder driver;
“MS 1394 Device Control”
4.) Then click on “Options”
5.) Select your Digital Camcorder
as the active device
6.) Click “OK” to close the dialog boxes
ENGLISH
You now should now see your digital
camcorder listed in the Source window
on the capture settings panel.
7.) Be sure your camcorder is turned
on and set to VCR/VTR mode
8.) Press “Play” below the Preview Window
and your camcorder should begin
playing and video will begin playing in
the preview Window
PYRO A/V LINK 35
Page 36

PYRO A/V LINK 37
ENGLISH
Getting around VideoStudio
The VideoStudio interface has been designed to make the sometimes
ENGLISH
complicated task of editing movies on your PC intuitive and enjoyable.
This illustration shows the major components of the program.
Options Panel
Contains controls, buttons, and other
information that you could use to customize
the settings of the selected clip.
The contents of this panel change depending
on the step you are in.
Preview Window
Shows the current clip,
video lter, effect, or title.
Timeline
Displays all the clips, titles,
and effects included in your
project. Select the media
track that contains the clip
you want to edit.
Navigation Panel
Use these buttons to
go through a selected
clip for precision
editing or trimming.
The Options Panel
The Options Panel changes depending
on the program’s mode and the step or
track you are working on. The Options
Panel may contain one or two tabs.
Information in each tab vary depending
on the selected clip.
PYRO A/V LINK 36
Library
Stores and organizes all
of your media clips.
Options Panel in Edit
Video Mode.
Page 37

Capturing still images
In addition to video, VideoStudio also allows you to capture still images. The
image format can be BMP or JPEG, and the size depends on its source video.
To choose your image format, click File: Preferences. In the Preferences dialog
box click the Capture Tab and set the format.
To capture still images:
1. Connect your camcorder or VCR to your capture
card. Switch it on and set it to Play (or VTR /
VCR) mode. Check your device manual for
specic instructions.
2. Open a new project.
3. In the Capture Step, click Play in Navigator.
4. When you get to the part of the video you want
to record, click Capture Image on the Capture
Settings Tab in the Options Panel.
VideoStudio Manual and other Help Resources
We hope that the information that
has been provided you has got you
up and running with PYRO A/V Link
and Video Studio. This “Getting
Started with VideoStudio” is a very
abridged version of the VideoStudio
manual. VideoStudio has many
features and capabilities; some
have yet to be covered. To learn
more step by step procedures, you
can read the full on-line manual that
is in Acrobat reader format.
ENGLISH
Help and Instructions (F1)
At any time you can press the F1
key on your keyboard and Video Studio help will pop up. You can read tips
and techniques or read step by step procedures.
Full Manual
The Full manual is located on the PYRO A/V Link CD:
1.) Insert CD and when the Auto-run menu pops up, Click on Video Studio icon.
2.) On the Video Studio Auto-run screen, Click Browse CD.
3.) An le explorer window will open, double click on the “Document” folder and then
double click on the Manual folder.
4.) If you do not have Adobe Acrobat installed, click on the Acrobat folder and install the
Acrobat Reader.
PYRO A/V LINK 37
Page 38

ENGLISH
PYRO A/V LINK 39
ENGLISH
Detailed Product Specications
- Capture Resolution:
o NTSC: 720 x 480 @ 30 frames per second
o PAL: 720 x 576 @ 25 frame per second
- Capture in DV video format
- Audio capture in 48KHz (16 Bit)
- Power On/Off button
- Mode Selector switch – Analog or Digital switch
- Inputs:
o Video
§ RCA, S-VHS, Component Video
§ 4 Pin 1394 connector
o Audio
§ Right and Left RCA
- Outputs:
o Video
§ RCA, S-VHS, Component Video
§ 6 Pin 1394 Connector
o Audio
§ Right and Left RCA
Product Name: PYRO A/V Link
Part Number: API-550
PYRO A/V LINK 38
Page 39

Trouble Shooting
Video will not Preview in VideoStudio or other video editing software
Check and Make sure that the PYRO A/V Link is connected properly to your
computer. To check if PYRO A/V Link is recognized please go to page 15 of
this manual.
VideoStudio will not transcode DV to MPEG2 properly, dropped frames etc.
This problem is mostly related to lack of SYSTEM RESOURCES. Your
computer might not be fast enough, your hard drive might not be optimized
(defragged), your video card might not be AGP Etc. Real Time DV to MPEG2
transcoding requires a lot of horsepower. ADS Technologies guarantees
continuous DV to MPEG2 Transcode for up to 2.5 Hours on a P4, 1.8GHZ
Machine.
VideoStudio or my Video Capture Application hangs for awhile after I stop
capturing
ENGLISH
This might happen in really long captures. This is normal. Remember that you
are capturing and manipulating les in the Gigabytes range. Stop the capture
and wait several seconds, your capture software or VideoStudio should go
back to normal.
Selecting PAL as your template results in a video captured as NTSC
Restart VideoStudio or your video capture application. Select PAL again. This
should x the problem.
PYRO A/V LINK 39
Page 40

PYRO A/V LINK 41
GERMAN
Product Overview ..............................................................................................................
Eigenschaften ....................................................................................................................
Packungsinhalt ..................................................................................................................
Connection Congurations ................................................................................................
PYRO A/V Link Hardware Description ..............................................................................
4 Positionen Dip-Schalter ..................................................................................................
Einstieg - Windows ............................................................................................................
GERMAN
Hardware Installation .........................................................................................................
Einstieg - Mac ....................................................................................................................
Hardware Installation 2 ......................................................................................................
Kongurationen mit Computer-Anschluss .........................................................................
Videocapturing mit Ihrer Video-Capture-/-Schnitt-Software ...............................................
Anschluss eines externen TV-Geräts für Simultan-Video-Vorschau .................................
Anschluss für gleichzeitige analoge Aufnahme und Vorschau ..........................................
Anschluss für Capturing vom DV Camcorder ....................................................................
Video von einem Video-Editor auf ein analoges Gerät exportieren ...................................
Auf einen digitalen Camcorder exportieren .......................................................................
Kongurationen ohne Computer ........................................................................................
Anschluss für Konvertierung analog zu digital ...................................................................
Anschluss für Konvertierung digital zu analog ...................................................................
DV “Pass Through” für digitale Camcorder verwenden .....................................................
Das Softwarepaket von CD installieren .............................................................................
VideoStudio Software ........................................................................................................
Detaillierte Produktspezikationen ....................................................................................
Fehlerbehebung ................................................................................................................
41
42
42
42
44
45
47
48
49
50
51
52
53
53
54
55
56
57
57
58
60
61
62
68
69
PYRO A/V LINK 40
Page 41

Product Overview - German
PYRO A/V Link
Hochqualitativer Analog-zu-DV Video Konverter
Das ultimative Werkzeug für Video Capture und Konvertierung in DV
Format in professioneller Qualität und ein außergewöhnliches Werkzeug
für den Export geschnittener DV Aufnahmen auf analoge Videorecorder.
Das DV Video “Missing Link”
DV Capturing von einem digitalen Camcorder ist eine fantastische Sache, was
aber ist mit Ihren bestehenden Videoaufnahmen in anderen Formaten (8mm,
Beta, VHS, DVD), wie konvertieren Sie die in das DV Format? PYRO A/V
Link löst dieses Problem durch die Konvertierung jeder beliebigen analogen
Videoquelle in DV.
DV Video sieht gut aus, bei der Übertragung auf Band sind Ihre Optionen
allerdings beschränkt. Sie können zu Ihrem miniDV Camcorder
zurückexportieren, aber es ist schwer, ein miniDV Band mit der Grossmutter
zu teilen. PYRO A/V Link füllt diese Lücke und erlaubt Ihnen, DV Video auf
jeden analogen Videorecorder zu exportieren. Nehmen Sie Ihr Video auf und
schneiden Sie es, dann geben Sie es auf VHS aus und Sie können es mit
jedermann teilen!
GERMAN
Capture, Schnitt, Export
PYRO A/V Link unterstützt Capturing von jeder beliebigen Videoquelle, auch
von DV Camcordern. Für eine wirklich einzigartige Videoproduktion können Sie
Ihre Videoinhalte beliebigen mischen. Nehmen Sie das Video mit VideoStudio
auf, fügen Sie dann Videolter, Übergangseffekte, Overlays, gesprochene Texte,
Hintergrundmusik und vieles mehr hinzu. Wenn Sie mit Ihrer Videoproduktion
zufrieden sind, exportieren Sie sie auf einen beliebigen VCR oder VTR, sichern
sie im MPEG-2 Format und brennen eine DVD (nur Windows) oder publizieren
sie im Internet.
PYRO A/V LINK 41
Page 42

PYRO A/V LINK 43
GERMAN
Eigenschaften:
- Externes FireWire/1394 Gerät
- Konvertiert analoges Video (RCA, S-VHS oder Component Video) auf DV
Video Format
- Exportiert DV Video auf analoge Videorecorder (RCA, S-VHS)
- Konvertiert zwischen Geräten (von DV auf analog oder analog auf DV)
GERMAN
ohne Computeranschluss
- Capturing vom DV Camcorder mit voller Gerätesteuerung
- Kompatibel zu einer großen Auswahl von Schnittsoftware für DV Video
- Capturing als MPEG-2 Video und Ausgabe als VCD, SVCD, DVD (nur
Windows mit VideoStudio)
Packungsinhalt:
1.) PYRO A/V Link Gerät
2.) 5 V DC Stromkabel
3.) 1,80 m RCA - RCA Kabel (gelb, rot, weiß - gelb, rot, weiß)
4.) 1,80 m S-VHS Kabel
5.) 1,80 m. 6-poliges 1394 Kabel
6.) 1,80 m. 4-poliges 1394 Kabel
7.) Gebrauchsanleitung
8.) Kurzanleitung
9.) Software CD (Windows Benutzer)
Siehe Bild auf Seite 6
Connection Congurations:
PYRO A/V Link kann je nach Ihren Bedürfnissen bei der Videokonvertierung auf
verschiedene Arten eingesetzt werden.
Analoge Videoaufnahme mit Anschluss an PC oder Mac
PYRO A/V LINK 42
Page 43

* Nehmen Sie jede beliebige analoge Videoquelle Mit A/V Link und einer
FireWire Verbindung auf PC oder Mac auf.
DV vom Computer auf analogen Monitor oder Videorecorder
exportieren
Siehe Bild auf Seite 7
Ausgabe auf Band: Exportieren Sie Ihre Videoproduktion aus der Timeline des
Video-Editors auf TV oder Videorecorder.
Capture von einem DV Camcorder
Siehe Bild auf Seite 8
Einfache Desktop Verbindung für Ihren digitalen Camcorder. Volle
Gerätesteuerung, wie bei Direktanschluss an die 1394/FireWire Computerkarte.
GERMAN
DV auf ihren digitalen Camcorder exportieren
Siehe Bild auf Seite 8
Ausgabe auf digitalen Camcorder. Mit A/V Link übertragen Sie geschnittene
Videos einfach auf Ihren digitalen Camcorder zurück.
Video von einem analogen Gerät auf einen digitalen Recorder
oder von einem digitalen Deck oder Camcorder auf einen
analogen Videorecorder duplizieren.
Siehe Bild auf Seite 8
Nutzen Sie A/V Link ohne Computer zur Konvertierung von Videoaufnahmen
von digitalem auf analoges Format. A/V Link kann als selbstständiger
Medienkonverter eingesetzt werden. Ohne Computer!
PYRO A/V LINK 43
Page 44

PYRO A/V LINK 45
GERMAN
PYRO A/V Link Hardware Description
Siehe Bild auf Seite 9
GERMAN
Vorderseite:
Auf der Vorderseite des PYRO A/V Link benden sich alle Audio- und VideoEingangsanschlüsse, LED-Anzeigen und der Mode-Schalter.
Mode-Schalter – schaltet zwischen DV Capture und analoger Ausgabe.
Während der Aufnahme im DV Format leuchtet die blaue LED-Anzeige,
unabhängig davon, ob die Quelle ein analoges Videoband oder Ihr Camcorder ist.
Die rote LED-Anzeige leuchtet dann, wenn Sie DV Format auf VCR oder auf ein
anderes analoges Gerät exportieren.
LED:
Grün: Strom eingeschaltet
Blau: DV Capture
Rot: Analoger Export
Anschlüsse:
S-VHS Eingang
Composite(RCA) Eingang
Audio(RCA) R & L Eingang
DV 4-polig Eingang
Rückseite:
Auf der Rückseite des PYRO A/V Link benden sich alle Audio- und VideoAusgänge, mit Ausnahme des Component Video Eingangs.
Siehe Bild auf Seite 10
PYRO A/V LINK 44
Page 45

• Die Video Input Steckfassungen sind selbstabfragend. Egal welche Videosteckfassung Sie benutzen, (RCA,
S-Video oder Component) die Steckfassung mit der aktiven Videoquelle, wird automatisch vorgewählt.
• Die Video Output Steckfassungen sind automatisch aktiv. In allen Kongurationen werden die RCA und
S-Video Steckfassungen immer gleichzeitig Video ausgeben. Dies gilt für Video Pass Through Modus und
Exportation von DV in analogen Videomodus.
• Die component Videosteckfassungen sind einem doppelten Zweck dienend und Umkehrbahr. Sie können
von den analogen Videoquellen über die component Steckfassungen aufnehmen und Sie können DV in
analogen Video über die component Steckfassungen exportieren. Die Steckfassungen sind selbstabfragend
und selbstschaltend. d.h., wenn IRGENDEINE Video Input Steckfassung analog Video zu DV aufnimmt,
schalten sich die component Steckfassungen auf Video Input Modus. Wenn Sie zu analog Video
exportieren, schalten sich die component Steckfassungen auf component Video export um.
4 Positionen Dip-Schalter
GERMAN
POSITION:
Nach oben
Nach unten
1
PAL
NTSC
2 3 4
Siehe Unten
Siehe Unten
Siehe Unten
Siehe Unten
entriegeln Sie das Audio
(Unlock Audio)
“Angebunden”
(Locked Audio)
Siehe Bild auf Seite 10
Schalter 1 – TV Format:
Stellen Sie diesen Schalter, passend zum TV/Video Format Ihres Landes ein. Im Allgemeinen werden
Nordamerika, Japan und Taiwan auf NTSC eingestellt. Europa, Afrika und Australien werden auf PAL
eingestellt. Sehen Sie die Rückseite des Benutzer Handbuchs für eine komplette Auistung aller Länder.
Schalter 2 und 3 – DV Quelle/ Betriebssystem Auswahl:
Die Vorrichtung ist von der Fabrik so eingestellt, um dem 1394 Zeittakt für Windows XP am kompatibelsten zu
sein. Verschiedene Windows Versionen unterscheiden sich in der 1394 Software und im Zeittakt. Mit diesem
Schalter können Sie den A/V Link auf den Zeittakt einstellen, der von Ihrem Betriebssystem erwartet wird.
DV QUELLE /
BETRIEBSSYSTEM
DV Camcorder
Windows 2000
SCHALTER 2 SCHALTER 3
Nach unten Nach unten
Nach unten
Nach oben
WinXP, Win98SE, WinME
Mac
Schalter 4 – Locked Audio:
Die Audiodatei ist an die Videodatei “angebunden“ (locked audio). Stellen Sie sicher das der Schalter auf
locked audio eingestellt ist, damit Audio und Video synchron sind während der Videoaufnahme.
Die eingestellte Audio-aufnehmrate ist 16-bit, 48 kHz.
Nach oben
Nach oben
Nach unten
Nach unten
PYRO A/V LINK 45
Page 46

PYRO A/V LINK 47
GERMAN
6-poliger 1394 / FireWire Anschluss
Mit dem mitgelieferten 6-poligen Kabel schließen Sie den A/V Link an Ihren
PC oder Mac an. In einer Konguration für analog zu DV Konvertierung ohne
Computer schließen Sie mit dem 6-poligen Kabel ein anderes Gerät an.
RCA Audio-Ausgänge R & L
GERMAN
Mit den mitgelieferten A/V Kabeln schließen Sie Audio-Ausgänge an Ihren
Fernseher oder Videorecorder an.
Video-Ausgang (RCA)
Mit den mitgelieferten A/V Kabeln schließen Sie den RCA Video-Ausgang an Ihren
Fernseher oder Videorecorder an.
S-VHS-Ausgang (Y/C 4-polig Din)
Mit dem mitgelieferten S-VHS-Kabel schließen Sie den Video-Ausgang an Ihren
Fernseher oder Videorecorder an.
Mehr zu den Video-Ausgängen
Die RCA und S-VHS-Videoausgänge können gleichzeitig angeschlossen und aktiv
sein. Mit den Ausgängen ist während des DV-Schnitts oder dem analogen VideoCapturing auch eine Video-Vorschau auf einem TV Bildschirm möglich
Component Video
Mit den roten, grünen und blauen Component Video-Buchsen ist die Eingabe aus
einer Component Video-Quelle möglich. Composite Synch ist über den Anschluss
eines Composite Synch-Kabels an den RCA-Video-Eingang möglich.
Ein/Aus
Netz Ein/Aus Schalter
Stromanschluss - 5V DC Eingang
Dieses Gerät funktioniert nur, wenn es an eine Stromquelle angeschlossen ist.
Verwenden Sie dafür nur das mit PYRO A/V mitgelieferte Stromkabel.
PYRO A/V LINK 46
Page 47

Einstieg - Windows
Mindest-Systemvoraussetzungen:
Prozessor: 800 MHz processor oder schneller
OS: Windows 98SE, WinME, WinXP oder Win2000
RAM: 128 MB oder mehr
Hard Disk: Ultra DMA 5400 RPM oder schneller mit eingeschaltetem DMA (4 GB
je 18 Minuten Video-Capture).
Monitor/Grak: 1024 x 768 Auösung, 32 bit Farbe, DirectX 8.1 oder höher
Audio: Standard Audio-Karte
1394 Port: OHCI-konforme 1394 Karte oder korrekt funktionierender interner
Port. Texas Instruments oder Agere-basierte 1394 Host Controller werden
empfohlen.
Bemerkung: Die meisten 1394 Zusatzkarten sind OHCI-konform, auch
die ADS PYRO 1394 Karten.
CD-ROM: Für Softwareinstallation
CD Brenner: Zum Brennen von Video CDs (VCD) oder Super VCDs (SVCD)
DVD Brenner: Zum Brennen von DVDs
Windows CD: Eventuell zum Laden der 1394-Treiber benötigt, wenn Sie
Win98SE oder WinMe einsetzen.
GERMAN
Optimieren Sie Ihr System für DV-Capture und -Schnitt:
Die folgenden Schritte werden stärkstens empfohlen, um einwandfreies VideoCapturing sicherzustellen:
1.) Stellen Sie sicher, dass Ihre Speicherlaufwerke defragmentiert sind. Das
erfolgt in Windows unter Zubehör/Systemprogramme (Für Mac nicht nötig).
2.) Stellen Sie sicher, dass DMA für Ihr Laufwerk eingeschaltet ist. Das erfolgt
im Geräte-Manager/Festplatten. Nach dem Einschalten von DMA auf Ihrer
Festplatte müssen Sie eventuell den Computer neu starten (Für Mac nicht
nötig).
3.) Wenn möglich sichern Sie Ihre Videoaufnahmen auf einem getrennten
Laufwerk, z.B. einem externen FireWire-Gerät.
4.) Schließen Sie während des Capturing oder Export von Videos alle dafür
nicht benötigten Programme und Hintergrundprozesse.
PYRO A/V LINK 47
Page 48

PYRO A/V LINK 49
GERMAN
Hardware Installation :
WINDOWS – Quick Start
GERMAN
1.) Schließen Sie die Stomversorgung an
2.) Schließen Sie das 6-polige 1394 Kabel zwischen dem PYRO A/V Link und
dem Computer an. Schließen Sie direkt an den 1394 Host-Port an. Der
Anschluss über einen 1394 Hub/Repeater wird nicht empfohlen.
3.) WinXP und Win2000 erkennen das Gerät automatisch und installieren
die Treiber. WinME und Win98SE verlangen eventuell das Nachladen der
Treiber von der Windows CD.
4.) Nach der Installation der Geräte-Treiber erscheint der PYRO A/V Link im
Windows Geräte-Manager als Imaging-Gerät.
5.) Schließen Sie die Audio/Video-Kabel zwischen Ihren Video-Geräten und
dem PYRO A/V Link an.
6.) Starten Sie Ihre Videoschnitt-Anwendung. Sie sind jetzt für das
Videocapturing bereit.
7.) Drücken Sie auf Ihrem Video-Gerät die Play-Taste.
8.) Drücken Sie im Preview-Fenster Ihres Video-Editors die Play-Taste, um die
Vorschau zu starten. Drücken Sie die Record- oder Capture-Taste, um die
Aufnahme auf ihrem Computer-Laufwerk zu beginnen.
Windows Software:
Die Treiber, die für den Betrieb des PYRO A/V Link mit einem Windows-basierten
PC benötigt werden, sind im Betriebssystem enthalten. Nachdem Sie das Gerät
angeschlossen haben, wird es von Windows erkannt und im Geräte-Manager als
Imaging-Gerät angezeigt. Wenn Sie Videoschnitt-Software, z.B. Adobe Premiere,
bereits besitzen, können Sie jetzt Ihre Video-Geräte anschließen und mit dem
Video-Capturing beginnen.
Für Windows-Benutzer, die keine Videoschnitt-Software besitzen, liefern wir eine
CD mit der VideoStudio Software von Ulead mit. Mit dieser Software können Sie
Videos aufnehmen, schneiden, exportieren, im MPEG-1, MPEG-2 oder Video
Streaming Format speichern oder auf eine VCD, SVCD oder DVD brennen.
PYRO A/V LINK 48
Page 49

Weitere Videoschnitt-Software:
Der PYRO A/V Link kann mit jeder DV-kompatiblen Videoschnitt-Software.verwendet
werden. Wir haben mit Adobe Premiere, Avid DV Express, Ulead DVD Workshop, Ulead
Media Studio Pro 6.5, Vegas Video, ArcSoft ShowBiz, Magix Video Deluxe 2.0 getestet
und testen weiterhin mit anderen am Markt erhätlichen Video-Editoren.
Siehe Bild auf Seite 15
Einstieg - Mac
Mindest-Systemvoraussetzungen:
Prozessor: 400 MHz oder schneller
OS: Mac OS 9.0.4, OSX (nicht in Classic Mode), OSX 10.02 (Jaguar)
RAM: 128 MB oder mehr
Monitor/Grak: 1024 x 768 Auösung, 32 bit Farbe
Audio: Standard Macintosh Audiosystem
1394 Port: Standard interner 1394 Port oder OHCI-konforme 1394 Zusatzkarte.
Bemerkung: Die meisten 1394 Zusatzkarten sind OHCI konform, auch die
ADS PYRO 1394 Karten.
CD Brenner: Zum Brennen von Video CDs (VCD) oder Super VCDs (SVCD).
DVD Brenner: Zum Brennen von DVDs (Voraussetzung iDVD, DVD Studio Pro
oder Instant DVD für Mac).
GERMAN
Bemerkung: Apple iMovie wird bei Systemen mit internen FireWire Ports
mitgeliefert.
Optimieren Sie Ihr System für DV-Capture und -Schnitt:
Die folgenden Schritte werden stärkstens empfohlen, um einwandfreies VideoCapturing sicherzustellen:
1.) Wenn möglich sichern Sie Ihre Videoaufnahmen auf einem getrennten
Laufwerk, z.B. einem externen FireWire-Gerät.
2.) Schließen Sie alle nicht benötigten Programme und deaktivieren Sie alle
Erweiterungen, die für die Aufnahme oder den Export von Videos nicht
benötigt werden.
PYRO A/V LINK 49
Page 50

PYRO A/V LINK 51
GERMAN
Hardware Installation 2 :
MAC – Quick Start
GERMAN
1.) Schließen Sie die Stomversorgung an
2.) Schließen Sie das 6-polige 1394 Kabel zwischen dem PYRO A/V Link und
dem Computer an. Schließen Sie direkt an den 1394 Host-Port an. Der
Anschluß über einen 1394 Hub/Repeater wird nicht empfohlen.
3.) Ihr Mac wird das Gerät automatisch erkennen.
4.) Nach dem Erkennen des Geräts erscheint der PYRO A/V Link im Proler,
wie auf dieser Seite dargestellt.
5.) Schließen Sie Audio/Video-Kabel zwischen Ihren Video-Geräten und dem
PYRO A/V Link an.
6.) Starten Sie Ihre Videoschnitt-Anwendung. Sie sind jetzt für das
Videocapturing bereit.
7.) Drücken Sie auf Ihrem Video-Gerät die Play-Taste.
8.) Drücken Sie im Preview-Fenster Ihres Video-Editors die Play-Taste, um die
Vorschau zu starten. Für iMovie drücken Sie Import, um die Aufnahme zu
starten.
Software:
Mit dem PYRO A/V Link für Mac wird keine Software mitgeliefert. Für den
richtigen Betrieb werden keine Gerätetreiber benötigt, und alle Mac Computer mit
internen FireWire Ports werden mit iMovie für Capture, Schnitt und Export von
Videos aus einem 1394-Gerät wie PYRO A/V Link ausgeliefert. PYRO A/V Link
ist auch mit anderen Videoschnitt -Softwareprodukten wie Final Cut Pro, Avid
Express DV und Adobe Premiere kompatibel.
PYRO A/V LINK 50
Page 51

Kongurationen mit
Computer-Anschluss
Bereit für Videocapturing
DV Video ist eine wunderbare Sache, weil es höhere Qualität bietet und leicht
editierbar ist. Das einzige Problem ist die Konvertierung Ihres nicht-DV Materials
in das DV Format über den FireWire-Anschluss. Mit PYRO A/V Link geht das
schnell und einfach. Sie können viele verschiedene Video-Geräte an den
PYRO A/V Link anschließen, etwa Ihren alten 8mm Camcorder, VCR, DVDSpieler, einen Fernseher für die Vorschau der Videoaufnahmen oder auch einen
digitalen Camcorder. In den nächsten Seiten stellen wir Ihnen mehrere mögliche
Kongurationen vor.
Anschluss einer analogen Video-Quelle
Wir haben Ihnen die meisten Audio/Video-Kabel mitgeliefert, die Sie für die
Aufnahme aus einer Reihe von Videoquellen benötigen werden. In einigen Fällen
müssen Sie die herstellerspezischen Kabel Ihres Camcorders verwenden oder
zusätzliche Kabel kaufen, ja nach der gewünschten A/V Konguration.
1.) Verwenden Sie das mitgelieferte RCA - RCA Kabel für die Verbindung
zwischen der analogen Quelle und dem PYRO A/V Link. Dieses Kabel hat
an jedem Ende drei Anschlüsse.
GERMAN
Gelb = Video Gelb = Video
Rot = Audio rechts (R) Rot = Audio rechts (R)
Weiß = Audio links (L) Weiß = Audio links (L)
Bemerkung: Wenn Ihr Camcorder nicht drei getrennte RCA-Buchsen hat,
verwenden Sie das mit dem Camcorder mitgelieferte Kabel.
PYRO A/V LINK 51
Page 52

PYRO A/V LINK 53
GERMAN
1.) Wenn Ihr Camcorder, VCR oder anderes Videogerät einen S-VHS-
Anschluss hat, verwenden Sie das mitgelieferte S-VHS-Kabel, damit wird
die Qualität der Verbindung zwischen Ihrem Videogerät und PYRO A/V
Link verbessert.
2.) Wenn Ihr Video-Bandgerät, DVD-Spieler oder anderes Videogerät
Component Video-Ausgänge hat, verwenden Sie ein Component-Video-
GERMAN
Kabel (nicht mitgeliefert) für die Verbindung zwischen Ihrem Video-Gerät
und PYRO A/V Link. Component Video bietet die beste Video-Qualität.
Siehe Bild auf Seite 19
* Wenn Sie als Component-Ausgang BNC-Buchsen haben, können Sie
sie mit Component - RCA Zwischensteckern konvertieren.
Videocapturing mit Ihrer
Video-Capture-/-Schnitt-Software
Nach dem Einschalten ist PYRO A/V Link für die Konvertierung einer analogen
Videoquelle in DV bereit, Sie können also über Ihre Capture-/Schnitt-Software
Videos auf Ihrem Computer aufnehmen.
Video-Quelle:
PYRO A/V Link erkennt automatisch, an welchen Video-Eingängen eine
Videoquelle angeschlossen ist, und verwendet automatisch diese Quelle. Nehmen
Sie die beste Video-Eingangs-Quelle, die Sie haben, am besten Component,
dann S-VHS und zum Schluss RCA (Composite), das ist die Videoquelle mit der
niedrigsten Qualität.
Video-Vorschau in der Videoschnitt-Software:
Bei den meisten Videoschnitt-Produkten bietet die Benutzerschnittstelle ein
Video-Vorschau-Fenster. In einigen Fällen müssen Sie dafür das Movie-CaptureFenster wählen (Adobe Premiere).
1.) Starten Sie Ihre Videoschnitt-Software.
2.) Lokalisieren Sie das Video-Vorschau- oder Movie-Capture-Fenster.
3.) Nachdem Sie das Video-Vorschau oder Capture-Fenster geöffnet haben,
drücken Sie auf Ihrem Video-Abspiel-Gerät auf PLAY.
4.) Klicken Sie im Vorschau-Fenster der Videoschnitt-Software auf PLAY. Jetzt
wird das Video auf Ihrem Computer abgespielt, aller Wahrscheinlichkeit
nach (abhängig von der Software) inklusive Ton.
5.) Klicken Sie in der Videoschnitt-Software auf die RECORD-Taste, und die
DV-Aufnahme auf das Plattenlaufwerk Ihres Computers beginnt.
PYRO A/V LINK 52
Page 53

Anschluss eines externen TV-Geräts für
Simultan-Video-Vorschau
PYRO A/V Link ermöglicht Ihnen die Video-Vorschau während der Aufnahme und
Bearbeitung, damit können Sie die Ergebnisse Ihrer Arbeit im TV-Großbildformat sehen.
1.) Verbinden Sie ein Videokabel mit den RCA oder S-VHS Ausgangsbuchen auf
der Rückseite des PYRO A/V Link und einem externen Video-Eingang (RCA
oder S-VHS) in Ihrem Fernsehgerät.
2.) Verbinden Sie ein Audiokabel mit den RCA Audio-Buchsen L & R auf der
Rückseite des PYRO A/V Link und den externen Audio-Eingängen (RCA) in
Ihrem Fernsehgerät.
3.) Schalten Sie das Fernsehgerät ein und stellen Sie es so ein, dass es die externe
Videoquelle akzeptiert (sehen Sie im Ihrem TV-Manual nach, wenn Sie nicht
sicher sind, wie das geht).
Siehe Bild auf Seite 21
Anschluss für gleichzeitige analoge Aufnahme und
Vorschau
Gleichzeitige Video-Vorschau und -Aufnahme im VCR sind dann möglich, wenn der
VCR Audio- und Video-”Pass Through” erlaubt. Überprüfen und testen Sie Ihren VCR
um sicherzustellen, dass er mit Ein- und Ausgängen für Audio und Video bestückt ist,
und dass er für Audio- und Video-”Pass Through” während der Aufnahme konguriert
ist.
1.) Verbinden Sie ein Videokabel mit den RCA oder S-VHS Ausgangsbuchen auf
der Rückseite des PYRO A/V Link und dem Video-Eingang in Ihrem VCR.
2.) Verbinden Sie ein RCA oder S-VHS-Kabel mit dem Video-Ausgang in
Ihrem VCR und einem externen Video-Eingang (RCA oder S-VHS) in Ihrem
Fernsehgerät.
3.) Verbinden Sie ein Audiokabel mit den RCA Audio Ausgangsbuchsen L & R auf
der Rückseite des PYRO A/V Link und den Audio-Eingängen (RCA) in Ihrem
VCR.
4.) Verbinden Sie ein Audiokabel mit den RCA Audio Ausgangsbuchsen L & R in
Ihrem VCR und den Audio-Eingängen in Ihrem Fernsehgerät.
5.) Schalten Sie den VCR ein - eventuell müssen Sie den TV/VCR-Schalter im
VCR umschalten, um das “Pass Through” zu ermöglichen.
6.) Schalten Sie das Fernsehgerät ein und stellen Sie es so ein, dass es die
externe Videoquelle akzeptiert (sehen Sie im Ihrem TV-Manual nach, wenn Sie
nicht sicher sind, wie das geht).
GERMAN
Siehe Bild auf Seite 22
PYRO A/V LINK 53
Page 54

PYRO A/V LINK 55
GERMAN
Die einzige nicht-gültige Anschlußkonguration für Video Pass Through wäre RCA oder SVideo IN und component OUT. Dieses ist, weil die component Steckfassungen selbstschaltend
und selbstabfragend sind. Wenn Sie analog Video importieren, schalten die component
Steckfassungen zu INPUTS, wenn Sie Video exportieren schalten sich die component
Steckfassungen auf Video OUTPUT.
GERMAN
Anschluss für Capturing vom DV Camcorder
Wenn Sie einen digitalen Camcorder für Video-Capture und/oder -Export
verwenden, geht das einfach durch direktes Anschließen des digitalen
Camcorders an den 1394-Port Ihres Computers.
Dafür bietet der PYRO A/V Link einen 4-poligen DV-Ein/Aus-Anschluss, er wirkt
dann wie ein 1394 Desktop-Hub und erleichtert den Anschluss an Ihren Computer.
1.) Verbinden Sie ein 4-poliges DV-Kabel mit dem DV-Ein/Aus-Anschluss in
Ihrem digitalen Camcorder und der 4-poligen DV-Eingangsbuchse auf der
Vorderseite des PYRO A/V Link.
2.) Schalten Sie Ihren Camcorder auf VCR/VTR Modus.
3.) Der digitale Camcorder wird vom Computer erkannt, Windows(WinXP)
zeigt alle kompatible Softwareprodukte an, die mit dem Camcorder
verwendet werden können (siehe Box). Wählen Sie die Anwendung für
Video-Capture oder -schnitt, mit der Sie arbeiten wollen.
4.) Wenn die Auswahlbox nicht erscheint, starten Sie Ihre Videoschnitt Software wie sonst auch.
Siehe Bild auf Seite 23
PYRO A/V LINK 54
Page 55

Video-Vorschau in der Videoschnitt-Software:
Bei den meisten Videoschnitt-Produkten bietet die Benutzerschnittstelle ein
Video-Vorschau-Fenster. In einigen Fällen müssen Sie dafür das Movie-Capture
Fenster wählen (Adobe Premiere).
1.) Lokalisieren Sie das Video-Vorschau- oder Movie-Capture-Fenster.
2.) Nachdem Sie das Video-Vorschau oder Capture-Fenster geöffnet haben,
drücken Sie im Vorschau-Fenster der Videoschnitt-Software auf PLAY.
Mit diesem Signal wird Ihr digitaler Camcorder in den PLAY-Modus
versetzt und das Video wird auf Ihrem Computer abgespielt, in aller
Wahrscheinlichkeit (abhängig von der Software) inklusive Ton.
3.) Klicken Sie in der Videoschnitt-Software auf die RECORD-Taste, und die
DV-Aufnahme auf das Plattenlaufwerk Ihres Computers beginnt.
Bemerkung zur Gerätesteuerung: Abhängig von der VideoschnittSoftware sind weitere Schritte notwendig, um Ihren Camcorder als 1394Gerät für Capturing zu selektieren. Wenn Ihr Camcorder als 1394-Gerät
selektiert ist, können Sie die Software-Gerätesteuerung so verwenden,
wie bei direktem Anschluss an den 1394-Port Ihres Computers (siehe
dazu die Bemerkungen zum Videoschnitt im Anhang).
GERMAN
Video von einem Video-Editor auf ein analoges
Gerät exportieren
Sie haben jetzt Ihr Video aufgenommen und geschnitten – vielleicht wollen Sie es
von Ihrem Computer auf Band exportieren, um Ihre Videoproduktion auf einfache
Weise zu publizieren oder mit Freunden, Familie oder sogar zahlenden Kunden
zu teilen!
1.) Verbinden Sie ein Videokabel mit der RCA oder S-VHS Ausgangsbuchse
auf der Rückseite des PYRO A/V Link und einem externen Video-Eingang
(RCA oder S-VHS) in Ihrem VCR.
Bemerkung: S-VHS bietet Videoaufnahmen höherer Qualität als mit
RCA Kabel. S-VHS wird empfohlen, wenn Ihr Camcorder oder VCR
diesen Anschluss hat.
PYRO A/V LINK 55
Page 56

PYRO A/V LINK 57
GERMAN
2.) Verbinden Sie ein Audiokabel mit den RCA Audioausgängen L & R auf der
Rückseite des PYRO A/V Link und den externen Audioeingängen (RCA) in
Ihrem VCR.
Bemerkung: Wenn Sie zurück zum Camcorder aufnehmen, müssen Sie
eventuell die herstellerspezischen Kabel des Camcorders verwenden.
GERMAN
3.) Schalten Sie den VCR ein und drücken Sie RECORD, unmittelbar bevor Sie
mit dem Export des Videos aus der Videoschnitt -Software Ihres Computers
beginnen.
Bemerkung: Jede Videoschnitt-Software bietet eine etwas andere Methode für den
Video-Export. Manche Software-Produkte erlauben den Export direkt aus der Timeline
ohne Rendering, bei anderen müssen Sie Ihr Video “Speichern” und dann “Auf Band
ausgeben”. Sehen Sie bitte im Benutzerhandbuch für Ihre Videoschnitt-Software nach,
wie Videos exportiert werden.
Auf einen digitalen Camcorder exportieren
Wenn Sie von Ihrem Video-Editor zu einem digitalen Camcorder exportieren
wollen, können Sie das durch direktes Anschließen des Camcorders an den
1394-Port erreichen. Sie können allerdings auch den PYRO A/V Link als 1394Anschluss verwenden und DV durch den A/V Link auf Ihren digitalen Camcorder
exportieren.
Die Konguration ist die gleiche wie bei der Verwendung des A/V Link als
Anschluss für Capturing mit Ihrem digitalen Camcorder.
1.) Verbinden Sie ein 4-poliges DV Kabel mit dem DV-Ein/Aus-Anschluss in
Ihrem digitalen Camcorder und der 4-poligen DV-Ein/Aus-Buchse im PYRO
A/V Link.
2.) Schalten Sie Ihren Camcorder in den VCR/VTR Modus.
3.) Der digitale Camcorder wird vom Computer erkannt.
4.) Starten Sie Ihre Videoschnitt-Software, verwenden Sie die SoftwareFunktion “Export” oder “Auf Band ausgeben”, um Videos von Ihrem
Computer zu exportieren und im digitalen Camcorder aufzunehmen.
PYRO A/V LINK 56
Page 57

Kongurationen ohne Computer
PYRO A/V Link kann als selbstständiges Konvertiergerät zwischen analogen
und digitalen Aufnahmegeräten betrieben werden. Das bedeutet, dass Sie
analoges Material auf DV über den direkten Anschluss an ein DV-Deck oder
digitalen Camcorder konvertieren können, ohne diese Geräte an einen Computer
anschließen zu müssen.
Anschluss für Konvertierung analog zu digital
1.) Schalten Sie das PYRO A/V Link Gerät ein.
2.) Verbinden Sie die RCA Audio- und Videokabel mit Ihrem analogen Videogerät
und den RCA Audio- und Videoeingängen auf der Vorderseite des PYROA/V Link
Gerätes.
3.) Verwenden Sie die S-VHS oder Component Video-Eingänge für die bestmögliche
Videoqualität, wenn Ihr analoges Videogerät diese Anschlüsse hat.
4.) Verwenden Sie ein 4-Pol zu 6-Pol 1394-Kabel für die Verbindung zwischen dem A/V
Link und Ihrem digitalen Camcorder oder DV-Deck. Verbinden Sie das 6-polige Ende
des Kabels mit dem 6-poligen 1394- Anschluss auf der Rückseite des PYRO A/V
Link Gerätes und das 4-polige Ende mit Ihrem digitalen Camcorder oder DV-Deck.
5.) Schalten Sie den MODE SELECTOR Schalter auf der Vorderseite des PYRO A/V
Link Gerätes auf ANALOG MODE. In diesem Modus sollte die rote LED Anzeige
leuchten.
6.) Drücken Sie die RECORD-Taste auf Ihrem digitalen Camcorder oder DV-Deck,
unmittelbar bevor Sie auf Ihrem analogen Videogerät (VCR oder Camcorder) die
PLAY-Taste drücken.
GERMAN
Siehe Bild auf Seite 26
Diese Konguration um einen Preview-Monitor ergänzen
Für die Überwachung Ihres Video-Kopier-Vorgangs können Sie einfach ein Fernsehgerät
mit den Audio/Video-Ausgangsbuchsen des PYRO A/V Link verbinden.
1.) Verbinden Sie ein RCA oder S-VHS Videokabel mit dem PYRO A/V Link und den
RCA oder S-VHS Videoeingangsbuchsen Ihres Fernsehgeräts
2.) Verbinden Sie das Audiokabel R & L mit den PYRO A/V Link Audiobuchsen R & L
und den Audioeingängen Ihres Fernsehgeräts.
3.) Stellen Sie das Fernsehgerät für die Aufnahme externer Video-Eingabesignale
ein.
PYRO A/V LINK 57
Page 58

PYRO A/V LINK 59
GERMAN
Anschluss für
Konvertierung digital zu analog
Wenn Sie einen digitalen Camcorder haben, können Sie PYRO A/V Link zur
GERMAN
Konvertierung des digitalen Inhalts in ein analoges Videosignal verwenden, das
von Ihrem Videorekorder aufgenommen werden kann.
1.) Verbinden Sie Ihren digitalen Camcorder oder DV-Deck mit der 4-poligen
DV Eingangsbuchse auf der Vorderseite des PYRO A/V Link.
2.) Verbinden Sie ein Videokabel mit der RCA oder S-VHS Ausgangsbuchse
auf der Rückseite des PYRO A/V Link und einem externen Videoeingang
(RCA oder S-VHS) an Ihrem Videorekorder.
Bemerkung: S-VHS bietet Videoaufnahmen besserer Qualität als mit
RCA Kabel. S-VHS wird empfohlen, wenn Ihr Camcorder oder VCR
diesen Anschluss bietet.
3.) Verbinden Sie ein Audiokabel mit den RCA Audioausgängen L & R auf der
Rückseite des PYRO A/V Link und den externen Audioeingängen (RCA) in
Ihrem Videorekorder.
Bemerkung: Wenn Sie zurück zum Camcorder aufnehmen, müssen
Sie eventuell die herstellerspezischen Kabel des Camcorders
verwenden.
4.) Schalten Sie den MODE SELECTOR Schalter auf der Vorderseite des
PYRO A/V Link Gerätes auf DIGITAL MODE. In diesem Modus sollte die
blaue LED Anzeige leuchten.
5.) Schalten Sie den Videorekorder ein und drücken Sie AUFNAHME,
unmittelbar bevor Sie auf Ihrem digitalen Camcorder PLAY drücken.
PYRO A/V LINK 58
Page 59

Diese Konguration um einen Preview-Monitor ergänzen
Der gleichzeitge Preview und die Video-Aufnahme im Videorekorder sind dann
möglich, wenn der Videorekorder Audio- und Video-”Pass Through” erlaubt.
Überprüfen und testen Sie Ihren Videorekorder um sicherzustellen, dass er mit
Ein- und Ausgängen für Audio und Video bestückt ist, und dass er für Audio- und
Video-”Pass Through” während der Aufnahme kongurierbar ist
1.) Verbinden Sie ein Videokabel mit der RCA oder S-VHS Ausgangsbuchse
auf der Rückseite des PYRO A/V Link und der Videoeingangsbuchse Ihres
Videorekorder.
2.) Verbinden Sie ein RCA oder S-VHS Kabel mt der Video-Ausgangsbuchse
Ihres Videorekorder und einem externen Videoeingang (RCA oder S-VHS)
Ihres Fernsehgeräts.
3.) Verbinden Sie ein Audiokabel mt den Audio Ausgangsbuchsen L & R auf
der Rückseite des PYRO A/V Link und den Audioeingängen (RCA) Ihres
Videorekorder.
4.) Verbinden Sie ein Audiokabel mt den Audio Ausgangsbuchsen L & R Ihres
Videorekorder und den Audioeingängen Ihres Fensehgeräts.
GERMAN
5.) Schalten Sie den Videorekorder ein – Sie müssen eventuell den TV/
VCR-Schalter im Videorekorder umschalten, um das “Pass Through” zu
ermöglichen.
6.) Schalten Sie das Fernsehgerät ein und stellen Sie es für die Aufnahme
externer Video-Eingabesignale ein. (Sehen Sie im Ihrem TV-Manual nach,
wenn Sie nicht sicher sind, wie das geht).
PYRO A/V LINK 59
Page 60

PYRO A/V LINK 61
GERMAN
DV “Pass Through” für digitale Camcorder verwenden
Wenn Sie Ihren digitalen Camcorder an die 4-polige 1394 Buchse auf der
Vorderseite des PYRO A/V Link anschließen wollen, müssen Sie einige
zusätzliche Einstellungen vornehmen, um sicherzustellen, dass Sie Ihren
GERMAN
Camcorder aus der VideoStudio Software heraus steuern können. Die
Gerätesteuerung umfasst die Start-, Stop- und Record-Funktionen Ihres
digitalen Camcorders.
Führen Sie die unten aufgelisteten Schritte durch, um Ihren digitalen Camcorder
für 1394 “Pass-Through” mit PYRO A/V Link richtig zu kongurieren.
1.) Klicken sie auf das Icon “Tool”, um das Menü “Settings and Commands” anzuzeigen.
2.) Klicken Sie auf “Select Device Control”
3.) Selektieren Sie den Camcorder-Treiber; Microsoft 1394 Device Control.
4.) Selektieren Sie dann “Options”
5.) Selektieren Sie Ihren digitalen Camcorder als das aktive Gerät.
6.) Klicken Sie auf “OK”, um die Dialogfenster zu schließen.
Ihr digitaler Camcorder sollte jetzt im Fenster “Treiber” im Panel “Capture Settings”
angezeigt werden.
7.) Stellen Sie sicher, dass Ihr Camcorder eingeschaltet und auf VCR/VTR Modus
gesetzt ist.
8.) Drücken Sie im Preview-Fenster auf “Play”, Ihr Camcorder sollte mit dem Abspielen
beginnen und das Video wird im Preview-Fenster gezeigt.
Siehe Bild auf Seite 35
PYRO A/V LINK 60
Page 61

Das Softwarepaket von CD installieren
1.) Legen Sie die PYRO A/V Link CD in Ihr CD-ROM Laufwerk ein.
2.) Der hier abgebildete Auto-Run Bildschirm wird angezeigt.
3.) Dieses Auto-Run setzt Apple Quick Time voraus. Wenn Quick Time nicht
installiert ist, wird zunächst mit der automatischen Installation von Quick
Time auf Ihrem System begonnen.
4.) Es gibt vier Auswahlpunkte:
a. Treiber-Installation
b. VideoStudio
c. PhotoShow (Probe-Software)
Siehe Bild auf Seite 29
a.) Treiber-Installation – Die Installation des Treibers ist NUR für Win98SE
notwendig. Dieser Treiber ist eigentlich eine Korrektur für die Microsoft 1394
Software in Windows 98SE. Wenn Sie Windows ME, WinXP oder Win2000
haben – lassen Sie diesen Schritt aus.
b.) VideoStudio – Klicken Sie auf den Button VideoStudio, der VideoStudio
Installer wird geöffnet. Weiter unten nden Sie die vollständige
Installationsanleitung für VideoStudio.
GERMAN
c.) PhotoShow – Mit PhotoShow können Sie Spass haben und auf einfache
Weise, Musikvideos mit Ihren digitalen Fotos erstellen. Entdecken Sie Ihre Fotos
wie nie zuvor! Wenn Sie fertig sind, teilen Sie Ihre PhotoShow online, brennen Sie
es auf CD, verwenden Sie es als Screen Saver oder veröffentlichen Sie es auf
Ihrer eigenen Webseite.
PYRO A/V LINK 61
Page 62

PYRO A/V LINK 63
GERMAN
VideoStudio Software
Wie VideoStudio funktioniert
GERMAN
VideoStudio folgt einem Schritt-für-Schritt-Muster und sorgt dafür, dass das Bearbeiten
vom Anfang bis zum Ende ein unkomplizierter Vorgang ist. VideoStudio bietet Ihnen
mehr als Hundert Übergangseffekte, professionelle Funktionen zur Titelerstellung und
einfache Werkzeuge für Tonspuren. Lernen Sie in Sekunden- und erstellen in
Minutenschnelle.
VideoStudio teilt Ihren Film in separate Spuren auf und bietet Ihnen größtmöglichen
kreativen Freiraum. Änderungen an einer Spur haben keine Auswirkungen auf eine
andere.
Nachdem Sie Ihre Videomitschnitte vom Camcorder aus übertragen haben, können
Sie Szenen anordnen, Spezialeffekte anwenden, Bilder überlagern, animierte Titel
hinzufügen, Filmkommentare aufnehmen und Hintergrund-musik von Ihren LieblingsCDs in Formaten wie WAV oder MP3 verwenden. All diese Schritte lassen
sich durch einfaches Ziehen-und-Ablegen, Auschneiden-und-Einfügen oder
Auswählen-und-Anwenden bewerkstelligen.
Alle Spuren Ihres Films werden dann in einer Videoprojektdatei (*.VSP) organisiert,
die alle Video- und Audioinformationen über die Zusammensetzung des Films enthält.
Wenn alle Vorbereitungen getroffen wurden, sammelt Ihr Rechner alle Informationen
zum Erstellen der endgültigen Filmdatei. Dieser Vorgang wird als Rendern bezeichnet.
Sie können den Film dann als DVD-/VCD-/SVCD-Titel, Streaming-Webseitenvideo
oder E-Mail-Anlage ausgeben und verbreiten. Sie können den Film auch zurück zum
Camcorder oder zu einem Videorecorder aufnehmen.
Siehe Bild auf Seite 30
PYRO A/V LINK 62
Page 63

Hardware Check-Up vor Einsatz von
VideoStudio
Um sicherzustellen, dass Ihre Videoproduktion reibungslos und ohne Probleme
läuft, klicken Sie auf Einstellungen: Systemsteuerung – Geräte-Manager und
prüfen Sie nach, ob die Geräte Ihrem Betriebssystem (O/S) entstprechend
richtig funktionieren.
DV IEEE 1394 Capture-Karte
Die folgenden Windows-Betriebssysteme unterstützen die IEEE 1394 CaptureKarte. Vergessen Sie nicht, Ihren an der IEEE 1394 Schnittstelle angeschlossenen PYRO A/V Link/DV Camcorder einzuschalten, damit er als Image-Gerät
oder Audio-,Video- und Gamecontroller erkannt werden kann.
Windows 98
Windows 98 unterstützt den Texas Instruments DV Treiber, der aber mit dem
Betriebssystem nicht mitgeliefert wird. Suchen Sie die Treiber, die mit der IEEE
1394 Karte mitgeliefert werden (wenn sie im Paket enthalten sind). Prüfen Sie,
dass folgende Geräte richtig funktionieren:
• 1394 Bus Controller
• Audio-, Video- und Gamecontroller: 1394 Camcorder
GERMAN
Windows 98 Second Edition / Windows 2000
Der Microsoft DV-Treiber ist im Lieferumfang von Windows 98 Second Edition
und Windows 2000 inbegriffen, der Texas Instruments DV-Treiber wird weiterhin unterstützt. Prüfen Sie, dass folgende Geräte richtig funktionieren:
• 1394 Bus Controller
• Image Gerät: Microsoft DV-Kamera und Videorekorder (nur für Microsoft DV-Treiber.)
• Audio-, Video- und Gamecontroller: 1394 Camcorder (nur für Texas Instruments DVTreiber.)
* Es wird stärkstens empfohlen, den Microsoft Treiber in Win ME and Win 2000 zu verwenden.
* PYRO A/V Link wird als AVC konformes DV Band-Aufnahmegerät/-Spieler angezeigt.
Siehe Bild auf Seite 31
PYRO A/V LINK 63
Page 64

PYRO A/V LINK 65
GERMAN
Windows Millennium Edition (Me)
Windows Me bietet volle Unterstützung für die IEEE 1394 Karte. Prüfen Sie,
dass folgende Geräte richtig funktionieren:
• 1394 Bus Controller
• 61883 Geräteklasse
• AVC Geräteklasse
GERMAN
• (Markenname) DV Camcorder: Der Markenname hängt vom DV Camcorder
ab, der an die IEEE Schnittstellenkarte angeschlossen ist.
Windows XP
Windows XP bietet volle Unterstützung für IEEE 1394.
* PYRO A/V Link wird im Geräte-Manager als AVC konformes DV BandAufnahmegerät/-Spieler aufgeführt.
Um VideoStudio unter Windows XP zu betreiben prüfen Sie, dass folgende
Geräte richtig funktionieren:
• 1394 Bus Controller
• 61883 Geräteklasse
• AVC Geräteklasse
• (Markenname) DV Camcorder: Der Markenname hängt vom DV Camcorder
ab, der an die IEEE Schnittstellenkarte angeschlossen ist.
Siehe Bild auf Seite 32
Für Windows 98 und Windows Me selektieren Sie die Option DMA in GeräteManager: Laufwerke Einstellungen. In Windows 2000 ist die Option DMA
versteckt, aber immer selektiert. Mit DMA vermeiden Sie später beim Video-Capturing Probleme mit fehlenden Bildern.
Bemerkung: Zusätzlich zu den häug verwendeten DV-Treibern von Texas Instruments und den Microsoft DV-Treibern
sind auch weitere Treiber erhältlich. Sehen Sie im Manual Ihres Camcorders für passende Treiber nach.
Siehe Bild auf Seite 32
PYRO A/V LINK 64
Page 65

VideoStudio installieren und verwenden
VideoStudio installieren:
1. Legen Sie die Instant DVD CD in Ihr CD-ROM Laufwerk ein. Klicken Sie auf
das Icon VideoStudio, um den VideoStudio Installationsbildschirm zu laden.
2. Wenn der Setup Bildschirm erscheint, folgen Sie den Anweisungen, um
VideoStudio auf Ihrem Computer zu installieren.
Bemerkung: Wenn der Setup Bildschirm nach Einlegen der CD nicht erscheint, können Sie
ihn händisch starten, indem Sie auf das Icon Arbeitsplatz in Ihrem Desktop doppelklicken,
dann auf das Icon für das CD Laufwerk. Wenn sich das CD-ROM Fenster öffnet, doppelklicken Sie auf das Icon Setup.
Bitte installieren Sie auch die folgenden Anwendungen, da sie für den guten
Betrieb von Digital-Video auf Ihrem Computer sehr wichtig sind. Das Installationsprogramm führt Sie durch die Installation von:
• QuickTime
• Windows Media Format
• RealPlayer
• Acrobat Reader
Bemerkung: Lassen Sie diesen Schritt aus, wenn Sie bereits neuere Versionen dieser An-
wendungen auf Ihrem PC installiert haben.
GERMAN
Siehe Bild auf Seite 33
Um VideoStudio zu starten:
• Doppelklicken Sie auf das Icon VideoStudio auf Ihrem Windows Arbeitsplatz.
ODER
• Selektieren Sie das Icon VideoStudio aus der Programmgruppe VideoStudio
im Windows Startmenü.
Siehe Bild auf Seite 33
PYRO A/V LINK 65
Page 66

PYRO A/V LINK 67
GERMAN
VideoStudio kongurieren
PYRO A/V Link ermöglicht Ihnen das Capturing von Videos im hochqualitativen
DV-Format aus Camcordern, Videorekorder und VCD/DVD-Spielern. Um eine
reibungslose Installation und Einstellung von VideoStudio zu gewährleisten
führen Sie bitte die unten aufgelisteten Schritte durch.
GERMAN
1.) Schalten Sie Ihren PYRO A/V Link ein und vergewissern Sie sich, dass
es vom Windows Geräte-Manager richtig erkannt worden ist, wie bereits
beschrieben.
2.) Schließen Sie Ihre Videoquelle an die Audio- und Video-Buchsen im A/V
Link an.
3.) Überprüfen Sie, dass Ihre Videoquelle eingeschaltet ist und dass ein
Band oder eine Platte abgespielt wird.
4.) Klicken Sie den Schritt Capture oben in Ihrer VideoStudio Software
an. Im Fenster “Capture Settings” sollte “PYRO A/V Link” als Treiber
angezeigt werden.
5.) Das Video-Capture-Format sollte auf DV gesetzt sein. Wenn Sie
als Capture-Format MPEG Video verwenden wollen, lesen Sie den
Abschnitt über “Direktes Capturing von MPEG” weiter unten in diesem
Manual.
6.) Klicken Sie auf das Icon “Tools”, um das Menu “Settings and
Commands” zu öffnen.
7.) Klicken Sie auf “Change Capture Plug-in” – stellen Sie sicher, dass
Ulead Direct Show Capture Plug-in selektiert ist.
8.) Klicken Sie im Preview-Fenster auf PLAY und Sie sehen die Vorschau
Ihres Videos.
Siehe Bild auf Seite 34
Bemerkung: PYRO A/V Link unterstützt viele Video-Eingangsquellen. PYRO A/V Link ist in der Lage,
den aktiven Videoeingang automatisch zu erkennen und zu selektieren, unabhängig davon, ob es sich
um einen Composite (RCA), SVideo (S-VHS) oder Component Video Eingang handelt. Video wird von
der Video-Quelle aufgenommen, die mit einem aktiven Videosignal verbunden ist.
PYRO A/V LINK 66
Page 67

In VideoStudio navigieren
Die VideoStudio Schnittstelle ist so aufgebaut, dass die manchmal komplizierte
Aufgabe, auf Ihrem PC Filme zu schneiden, inuitiv und lustig wird. Die Abbildung
auf dieser Seite zeigt einen Überblick über das ganze Programm, während die
nächsten Seiten einige spezielle Eigenschaften genauer beschreiben.
Siehe Bild auf Seite 36
Panel “Options”
Das Panel “Options” ändert sich abhängig vom Programm-Modus und dem Schritt
oder die Spur, die Sie gerade bearbeiten. Das Panel “Options” kann eine oder zwei
Karteikarten enthalten. Die Informationen auf jeder Karte hängen vom selektierten
Clip ab.
Siehe Bild auf Seite 36
VideoStudio Manual und weitere Hilfe-Ressourcen
Wir hoffen, dass Sie mit der zur Verfügung gestellten Information mit PYRO
A/V Link und VideoStudio arbeiten können. Der vorliegende Abschnitt “Einstieg
in VideoStudio” ist eine stark verkürzte Version des VideoStudio Manuals.
VideoStudio hat viele Funktionen und Fähigkeiten, die noch nicht genannt
worden sind. Um weitere Vorgänge kennenzulernen lesen Sie das vollständige
Online Manual im Acrobat Reader Format.
Hilfe und Anleitungen (F1)
Sie können jederzeit die F1-Taste auf Ihrer Tastatur drücken, dadurch wird die
VideoStudio-Hilfe geöffnet. Sie können Tipps und Techniken oder Schritt-fürSchritt Prozeduren nachlesen.
GERMAN
Siehe Bild auf Seite 37
Vollständiges Manual
Das vollständige Manual bendet sich auf der PYRO A/V Link CD:
1.) Legen Sie die CD ein, wenn das Menü Auto-Run angezeigt wird, klicken Sie auf das
Icon VideoStudio.
2.) Im VideoStudio Auto-Run Bildschirn klicken Sie auf Browse CD.
3.) Ein File-Explorer-Fenster wird geöffnet, doppelklicken Sie zuerst auf das Verzeichnis
“Document” und dann auf das Verzeichnis Manual.
PYRO A/V LINK 67
Page 68

PYRO A/V LINK 69
GERMAN
Detaillierte Produktspezikationen
GERMAN
- Capture-Auösung:
o NTSC: 720 x 480 @ 30 Bilder pro Sekunde
o PAL: 720 x 576 @ 25 Bilder pro Sekunde
- Capture im DV-Video-Format
- Audio-Capturing 48KHz (16 bit)
- Netz Ein/Aus Schalter
- Moduswechsel -Schalter (Mode Selector) - schaltet zwischen analog und
digital um
- Eingänge:
o Video
§ RCA, S-VHS, Component Video
§ 4-poliger 1394 Anschluss
o Audio
§ RCA R & L
- Ausgänge:
o Video
§ RCA, S-VHS
§ 6-poliger 1394 Anschluss
o Audio
§ RCA R & L
Produktname: PYRO A/V Link
Artikelnummer: API-550
PYRO A/V LINK 68
Page 69

Fehlerbehebung
Die Video-Vorschau funktioniert weder in VideoStudio 7 noch in einer anderen
Videoschnitt-Software
Vergewissern Sie sich, dass PYRO A/V Link an Ihren Computer korrekt
angeschlossen ist. Wie Sie prüfen, ob PYRO A/V Link erkannt wird, lesen Sie
bitte auf Seite 15 in diesem Manual nach.
VideoStudio 7 konvertiert DV nicht richtig zu MPEG2, es fehlen Bilder, usw.
Dieses Problem hängt meistens mit fehlenden SYSTEMRESSOURCEN
zusammen. Ihr Computer ist vielleicht nicht schnell genug, Ihr Plattenlaufwerk
nicht optimiert (defragmentiert), Ihre Videokarte nicht AGP usw. Echtzeit-DV zu
MPEG2-Konvertierung ist sehr leistungshungrig. ADS Technologies garantiert
kontinuierliche Konvertierung von DV auf MPEG2 für bis zu 2,5 Stunden auf
einem P4 System mit 1,8GHZ.
VideoStudio 7 oder My Video Capture-Anwendung bleibt eine Zeitlang stehen,
wenn ich das Capturing stoppe
GERMAN
Das kann bei wirklich langen Aufnahmen passieren. Es ist normal. Bedenken
Sie, dass Sie Dateien in Gigabyte-Größe aufnehmen und bearbeiten.
Halten Sie die Aufnahme an und warten Sie mehrere Sekunden, Ihre
Capture-Software bzw. VideoStudio 7 sollten wieder in den Normalzustand
zurückkehren.
Bei Selektion von PAL als Vorlage wird das Video als NTSC aufgenommen
Starten Sie VideoStudio 7 oder Ihre Video-Capture-Anwendung neu.
Selektieren Sie wieder PAL. Damit sollte das Problem behoben sein.
PYRO A/V LINK 69
Page 70

PYRO A/V LINK 71
FRENCH
Product Overview ..............................................................................................................
Fonctionnalités ..................................................................................................................
Contenu .............................................................................................................................
Connection Congurations ................................................................................................
PYRO A/V Link Hardware Description ...............................................................................
Commutateur Dip 4 Position ..............................................................................................
Prise en main avec Windows .............................................................................................
Installation du matériel .......................................................................................................
Prise en main avec Mac ....................................................................................................
Installation du matériel 2 ...................................................................................................
FRENCH
Congurations avec un ordinateur ....................................................................................
Capturer des séquences vidéo avec votre logiciel de capture/montage de vidéo ............
Connexion d’un téléviseur externe pour prévisualiser une simulation
d’une séquence vidéo ........................................................................................................
Connexion pour un enregistrement analogique et une prévisualisation simultanée .........
Connexion pour une capture a partir d’un caméscope DV ................................................
Exportation de séquences vidéo a partis d’un logiciel de montage sur un
appareil analogique ...........................................................................................................
Exportation sur un caméscope numérique ........................................................................
Congurations sans ordinateur ..........................................................................................
Connexion pour une conversion analogique a numérique ................................................
Connexion pour une conversion numérique a analogique ................................................
Utilisation de la fonctionnalité de conversion numérique/analogique pour
caméscopes numériques ...................................................................................................
Installer le CD de logiciels groupés ...................................................................................
VideoStudio Software ........................................................................................................
Spécications détaillées du produit ...................................................................................
Régler les problémes .........................................................................................................
71
72
72
72
74
75
77
78
79
80
81
82
83
83
84
85
86
87
87
88
90
91
92
98
99
PYRO A/V LINK 70
Page 71

Product Overview - FRENCH
PYRO A/V Link
Convertisseur de vidéo analogique / DV de grande qualité
L’outil dernier cri pour capturer et convertir de la vidéo au format DV
de qualité professionnelle et un extraordinaire outil d’exportation sur
magnétoscopes analogiques de lms DV montés..
Le chaînon manquant de la vidéo DV
Il est fantastique de pouvoir capturer des images DV à partir d’un caméscope
numérique, mais que faire de tous vos lms dans d’autres formats (8mm, Beta,
VHS, DVD) ? Comment les convertir au format DV ? PYRO A/V Link résout ce
problème en convertissant tout support vidéo analogique au format DV !
Les vidéos DV sont superbes, mais vos choix sont limités si vous voulez les
mettre sur cassettes. Vous pouvez les réimporter sur votre caméscope miniDV,
mais comment partager ses images avec Mamie ? Grâce à PYRO A/V Link vous
pouvez maintenant exporter des vidéos DV vers tout magnétoscope analogique.
Capturez et montez vos vidéos, puis exportez-les sur VHS et distribuez des
cassettes que tout le monde peut voir!
Capturer, Monter, Exporter
Avec PYRO A/V link vous pouvez capturer des séquences vidéo à partir de toute
source, y compris les caméscopes DV. Mélangez et choisissez vos images vidéo
pour créer une véritable production vidéo unique. Capturez la vidéo avec Video
Studio, puis ajoutez des ltres vidéo, des effets de transition, des incrustations
vidéo, des commentaires, une musique de fond et bien d’autres effets. Quand
votre vidéo est montée, exportez-la sur une cassette vidéo (VCR ou VTR),
sauvegardez-la au format MPEG-2 ou gravez un DVD (Windows uniquement)
ou mettez-la sur Internet.
FRENCH
PYRO A/V LINK 71
Page 72

PYRO A/V LINK 73
FRENCH
Fonctionnalités:
- FireWire/1394 externe
- Convertit les signaux analogiques (RCA, super VHS ou Video
Composantes) au format vidéo DV
- Exporte les vidéos DV vers des magnétoscopes analogiques (RCA, super
VHS ou vidéo Video Composantes)
- Convertit directement entre systèmes (de DV à analogique ou d’analogique
à Dv) sans ordinateur
- Capture à partir d’un caméscope DV avec un parfait contrôle.
- Compatible avec une large gamme de logiciels de montage vidéo DV
- Capture au format MPEG-2 et crée des disques VCD, SVCD, DVD
FRENCH
(uniquement Windows en utilisant Video Studio)
Contenu:
1.) L’appareil PYRO A/V Link
2.) 5 prises pour courant continu
3.) 1 câble RCA-RCA de 1,82 mètres (jaune, rouge, blanc – jaune, rouge,
blanc)
4.) 1 câble Super VHS de 1,82 mètres
5.) 1 câble 6 broches-6 broches 1394 de 1,82 mètres
6.) 1 câble 4 broches-4 broches 1394 de 1,82 mètres
7.) Guide de l’utilisateur
8.) Points principaux
9.) CD du logiciel (utilisateurs Windows)
voir l’image à la page 6
Connection Congurations:
PYRO A/V Link peut être utilisé de plusieurs façons selon vos besoins en
conversion vidéo.
Capture de séquences vidéo analogique via une connexion à un PC ou à un Mac
PYRO A/V LINK 72
Page 73

* Capturez tout type de vidéo analogique sur un PC ou un Mac via le lien
audio/vidéo et une connexion FireWire.
Exportation de format DV à partir d’un ordinateur sur un moniteur
analogique ou un magnétoscope
voir l’image à la page 7
Transfert sur cassette : Exportez votre vidéo à partir du plan de montage vidéo
sur un téléviseur ou sur un magnétoscope.
Capture à partir d’un caméscope DV
voir l’image à la page 8
Connexion facile de votre caméscope numérique au bureau de votre
ordinateur. Contrôle parfait de l’appareil comme si vous étiez directement
connecté à votre carte hôte 1394/FireWire.
Exportation de format DV sur votre caméscope numérique
voir l’image à la page 8
Transfert sur caméscope numérique : Utilisez le lien audio/vidéo comme un
moyen simple de renvoyer des vidéos montées sur votre caméscope DV.
Réengistrement de séquences vidéo à partir d’un appareil analogique sur
un enregistreur numérique ou à partir d’une table de lecture numérique ou
d’un caméscope numérique sur un lecteur de cassettes vidéos analogique.
FRENCH
voir l’image à la page 8
Utilisez le A/V Link sans ordinateur pour convertir des données vidéo d’un
format numérique à un format analogique. Le A/V Link peut fonctionner comme
un convertisseur média indépendant. Aucun ordinateur n’est nécessaire !!
PYRO A/V LINK 73
Page 74

PYRO A/V LINK 75
FRENCH
PYRO A/V Link Hardware Description
voir l’image à la page 9
Panneau avant :
Tous les connecteurs audio et vidéo en ENTREE, les voyants DEL et le sélecteur
de mode se trouvent à l’avant du PYRO A/V Link.
FRENCH
Bouton Mode : permet de passer de la capture DV à la sortie analogique.
Le voyant DEL bleu est allumé à chaque fois qu’une séquence vidéo est capturée
en format DV que la source soit une bande vidéo analogique ou votre caméscope
DV. Le voyant DEL ROUGE est allumé lorsque vous exportez du format DV sur
un magnétoscope ou tout autre appareil analogique.
DEL :
Vert : sous tension
Bleu : Capture DV
Rouge : Exportation analogique
Connecteurs :
S-VHS Entrée
Composite (RCA) Entrée
Audio droite et gauche (RCA) Entrée
DV 4 broches Entrée
Panneau arrière :
Tous les connecteurs audio et vidéo en sortie, à l’exception des entrées Video
Composantes, se trouvent à l’arrière du PYRO A/V Link.
voir l’image à la page 10
PYRO A/V LINK 74
Page 75

• Les connecteurs vidéo d’entrée sont « auto-sensing ». Quel que soit le connecteur que vous reliez (RCA, S
Vidéo ou Component) le connecteur vidéo avec la source active sera automatiquement choisi.
• Les connecteurs vidéo de sortie seront automatiquement en activité. Dans toutes les congurations les
connecteurs RCA et S-Vidéo enverront toujours la vidéo simultanément. Cela vaut pour le mode vidéo de
pass-through et DV d’exportation vers le mode vidéo analogue.
• Les connecteurs vidéo component sont dual purpose et bi-directionnels.
• Vous pouvez capturer des sources vidéos analogues par les connecteurs component et vous pouvez
exporter DV vers la vidéo analogue par les connecteurs component.
• Les connecteurs sont a sensation automatique et commutations automatique. Ceci signie que si
N’IMPORTE QUEL connecteur vidéo d’entrée capture la vidéo analogue à DV, les connecteurs component
commutent au mode d’entrée vidéo. Si vous exportez vers la vidéo analogue les connecteurs component
commutent à vidéo component exporte.
Commutateur DIP 4 Position
POSITION:
1
2 3 4
FRENCH
vers le haut
vers le bas
PAL
NTSC
voyez ci-dessous
voyez ci-dessous
voyez ci-dessous
voyez ci-dessous
ouvrez l’audio
audio verrouillée
voir l’image à la page 10
Commutateur 1 – Format TV:
Arrangez ce commutateur pour assortir le format de TV/Video pour votre pays. D’une façon générale,
l’Amérique du Nord, le Japon et Taiwan sont placés à NTSC. L’Europe, l’Afrique et l’Australie sont placées à
PAL. Voyez la page arrière du guide d’utilisateur pour une liste complète de chaque pays.
Commutateur 2 et 3 – Source DV/ Choix de logiciel d’exploitation:
Le dispositif est arranger par l’usine à être le plus compatible à la synchronisation 1394 pour Windows XP. Vous
pouvez facilement placer les commutateurs DIP pour assortir la synchronisation du dispositif ou du logiciel
d’exploitation vous employez.
DV SOURCE /
OPERATING SYSTEM
DV Camcorder
Windows 2000
WinXP, Win98SE, WinME
Commutateur 2 Commutateur 3
vers le bas vers le bas
vers le bas
vers le haut
vers le haut
vers le bas
Mac
vers le haut
Commutateur 4 – Audio verrouillée:
Assurez-vous que l’audio est verrouillée.
Horloge audio verrouillée à l’horloge vidéo pour une parfaite synchronization.
Le taux audio de capture est 16-bit, 48 kHz.
PYRO A/V LINK 75
vers le bas
Page 76

PYRO A/V LINK 77
FRENCH
Connexion 6 broches 1394/FireWire
Utilisez le câble 6 broches-6 broches fourni pour connecter le A/V Link à votre
PC ou à votre Mac. Pour une conversion analogique - DV, si vous n’utilisez pas
d’ordinateur, connectez ce câble à un autre appareil.
Sorties audio RCA droite et gauche
Utilisez les câbles audio/vidéo fournis pour connecter les sorties audio sur votre
poste de télévision ou sur votre magnétoscope.
FRENCH
Sortie vidéo (RCA)
Utilisez les câbles audio/vidéo fournis pour connecter les sorties vidéo RCA sur
votre poste de télévision ou sur votre magnétoscope.
Sortie super VHS (YC à 4 Pin Din)
Utilisez le câble super VHS fourni pour connecter les sorties vidéo sur votre poste
de télévision ou sur votre magnétoscope.
Informations supplémentaires sur les sorties vidéo
Il est possible de connecter les câbles RCA et super VHS et de sortir de la vidéo
simultanément. Vous pouvez aussi utiliser les sorties pour prévisualiser des
images sur un moniteur de télévision au cours du montage DV ou au cours de la
capture analogique de vidéo.
Video Composantes
Les jacks de vidéo Video Composantes (rouge, vert, bleu) permettent la saisie
de séquence vidéo d’une source Video Composantes. Il est également possible
de connecter un câble synchrone composite à l’entrée de la vidéo RCA pour
permettre une synchronisation composite.
Marche/Arrêt
Commutateur marche/arrêt
Prise de mise sous tension - 5V CC en entrée
Cet appareil ne fonctionne que lorsqu’il est sous tension. N’utilisez que
l’alimentation électrique fournie avec le PYRO A/V Link pour le brancher.
PYRO A/V LINK 76
Page 77

Prise en main avec Windows
Conguration minimale du système :
Processeur : 800 MHz CPU au minimum
Système d’exploitation : Windows 98SE, WinME, WinXP or Win2000
RAM: 128 MB or higher (256 MB or higher for editing)
Disque dur : Ultra DMA 5400 tours par minute ou plus rapide avec accès direct à
la mémoire (4 Go pour chaque 18 minutes de vidéo capturée).
Moniteur/Graphiques : Résolution de 1024 x 768, couleurs 32 bit, DirectX 8.1
ou plus récent
Son : Carte son standard
Port 1394 : Carte 1394 conforme à OHCI ou d’origine fonctionnant correctement.
Nous recommandons les contrôleurs hôtes Texas Instruments ou
Agere basés 1394. Remarque : La plupart des cartes ajoutées sont
conformes à OHCI y compris les cartes PYRO 1394 ADS.
Lecteur de CD-ROM : Pour l’installation du logiciel
Graveur de CD : Pour graver des CD vidéo (VCD) ou des super CD vidéo
(SVCD).
Graveur de DVD : Pour graver des DVD
CD Windows : Si vous utilisez Win98SE ou WinMe, il est possible que vous ayez
besoin du CD Windows pour installer les pilotes 1394.
FRENCH
Optimisation de votre système pour la capture DV et pour le montage :
Nous vous recommandons vivement d’effectuer les procédures suivantes pour
que vos captures de séquences vidéo soient aussi simples que possible.
1.) Assurez-vous que tous les disques sont défragmentés. Pour le faire dans
Windows, allez sous Accessoires/Outils système. (n’est pas à faire sous
Mac)
2.) Assurez-vous que votre disque a directement accès à la mémoire. Pour le
faire, allez dans Gestionnaire de périphériques sous disques durs. Il
peut-être nécessaire de relancer la machine après cette procédure. (n’est
pas à faire sous Mac)
3.) Si possible, utilisez un disque séparé, même un disque externe FireWire
pour sauvegarder les séquences vidéos capturées.
4.) Fermez tous les programmes non nécessaires et les tâches d’arrière plan
lorsque vous enregistrez ou exportez des vidéos.
PYRO A/V LINK 77
Page 78

PYRO A/V LINK 79
FRENCH
Installation du matériel :
WINDOWS – Démarrage rapide
1.) Connectez l’adaptateur de secteur
2.) Connectez le câble 1394 à 6 broches entre le PYRO A/V Link et
FRENCH
8.) Appuyez sur le bouton Lecture dans la fenêtre de prévisualisation de votre
logiciel de montage vidéo pour commencer à visualiser la vidéo. Appuyez
sur Enregistrer ou Capturer pour commencer à enregistrer sur le disque
dur de votre ordinateur.
l’ordinateur. Connectez-le directement sur le port hôte 1394. Il n’est pas
recommandé de le connecter via un hub/répéteur.
3.) WinXP et Win2000 reconnaîtront automatiquement l’appareil et les pilotes
d’installation. Il est possible que WinME et Win98SE demandent des
pilotes du CD Windows.
4.) Une fois les pilotes installés, le PYRO A/V Link sera sous le Gestionnaire
de périphériques de Windows comme un périphérique d’acquisition
d’images.
5.) Connectez les câbles audio/vidéo entre vos appareils vidéo et PYRO A/V
Link.
6.) Lancez votre application de montage vidéo et vous êtes prêt à capturer des
séquences vidéo.
7.) Appuyez sur le bouton Lecture de votre appareil vidéo.
Logiciel Windows :
Les pilotes nécessaires pour que le PYRO A/V Link fonctionne avec un PC
sous Windows sont inclus dans le système d’exploitation. Une fois que vous
avez branché l’appareil, Windows le reconnaît et l’appareil est listé comme un
périphérique d’acquisition d’images dans le gestionnaire de périphériques. Si
vous avez déjà un logiciel de montage vidéo, comme Adobe Premiere, vous êtes
prêts à connecter vos appareils vidéo et à commencer à capturer des séquences
vidéo.
Pour les utilisateurs de Windows qui n’ont pas de logiciel de montage vidéo, nous
fournissons un CD qui comprend le logiciel Ulead’s Video Studio. Il vous permet
de capturer, de monter, d’exporter, de sauvegarder des séquences vidéos aux
formats MPEG-1, MPEG-2, de les transmettre en continu ou même de graver un
CD vidéo (VCD), un super CD vidéo (SVCD) ou un DVD.
PYRO A/V LINK 78
Page 79

Autre logiciel de montage vidéo :
Vous pouvez utiliser le PYRO A/V Link avec tout logiciel de montage vidéo compatible
avec le format DV. Nous l’avons testé avec Adobe Premiere, Avid DV Express, Ulead
DVD Workshop, Ulead Media Studio Pro 6.5, Vegas Video, ArcSoft ShowBiz, Magix
Video Deluxe 2.0 et nous continuons à le tester avec d’autres logiciels de montage
disponibles sur le marché.
voir l’image à la page 15
Prise en main avec Mac
Conguration minimale du système :
Processeur : 400 MHz au minimum
Système d’exploitation : Mac OS 9.0.4, OSX (pas en Mode classique),
OSX 10.02 (Jaguar)
RAM : au moins 128 Mo
Moniteur/Graphiques : Résolution de 1024 x 768, couleurs 32 bit
Son : Système sonore Macintosh standard
Port 1394 : Carte 1394 d’origine ou carte ajoutée conforme à OHCI.
Remarque : La plupart des cartes ajoutées sont conformes à OHCI y
compris les cartes PYRO 1394 ADS.
Graveur de CD : Pour graver des CD vidéo (VCD) ou des super CD
vidéo (SVCD).
Graveur de DVD : Pour graver des DVD (iDVD, DVD Studio Pro ou
Instant DVD pour Mac).
Remarque : Apple iMovie est inclus avec les systèmes qui comprennent des ports
FireWire prédénis.
Optimisation de votre système pour la capture DV et pour le montage:
Nous vous recommandons vivement d’effectuer les procédures suivantes pour
que vos captures de séquences vidéo soient aussi simples que possible.
FRENCH
1.) Si possible, utilisez un disque séparé, même un disque externe FireWire
pour sauvegarder les séquences vidéos capturées.
2.) Fermez tous les programmes non nécessaires ou désactivez toutes les
extensions non requises pour enregistrer ou exporter des séquences
vidéos.
PYRO A/V LINK 79
Page 80

PYRO A/V LINK 81
FRENCH
Installation du matériel 2 :
MAC – Démarrage rapide
1.) Mettez sous tension.
2.) Connectez le câble 1394 à 6 broches entre le PYRO A/V Link et
l’ordinateur. Connectez-le directement sur le port hôte 1394. Il n’est pas
FRENCH
8.) Appuyez sur le bouton Lecture dans la fenêtre de prévisualisation de votre
appareil de montage vidéo pour commencer à visualiser la séquence
vidéo. Pour iMovie, appuyez sur importation pour commencer à enregistrer.
recommandé de le connecter via un hub/répéteur.
3.) Votre Mac va automatiquement reconnaître l’appareil.
4.) Une fois l’appareil détecté, le PYRO A/V Link sera dans la liste du Prol
comme indiqué plus bas.
5.) Connectez les câbles audio/vidéo entre vos appareils vidéo et PYRO A/V
Link.
6.) Lancez votre application de montage vidéo et vous êtes prêt à capturer des
séquences vidéo.
7.) Appuyez sur le bouton Lecture de votre appareil vidéo.
Logiciel :
Aucun logiciel n’est inclus pour le Mac. Aucun pilote n’est requis pour un bon
fonctionnement et tous les ordinateurs Mac qui sont livrés avec des ports FireWire
prédénis comprennent iMovie pour la capture, le montage et l’exportation de
séquences vidéo à partir d’un périphérique 1394 comme PYRO A/V Link. PYRO
A/V Link est également compatible avec d’autres logiciels de montage vidéo
comme Final Cut Pro, Avid Express DV et Adobe Premiere.
PYRO A/V LINK 80
Page 81

Congurations avec un ordinateur
Prêt à capturer des séquences vidéo
La vidéo au format DV est fantastique car elle offre une bonne qualité et est facile
à monter. Le seul problème est de savoir comment convertir tous vos lms vidéos
sur d’autres formats en format DV via votre connexion FireWire. Grâce à PYRO
A/V Link, ceci n’est plus un problème. Connectez le PYRO A/V Link à de
nombreux appareils de vidéo, comme votre vieux caméscope 8mm, votre
magnétoscope, votre lecteur de DVD, un poste de télévision pour visualiser
une séquence vidéo capturée ou même un caméscope numérique. Plusieurs
congurations sont présentées dans ce document.
Connecter une source vidéo analogique
La plupart des câbles audio/vidéo dont vous aurez besoin pour capturer des
séquences vidéo à partir de nombreuses sources sont fournis. Dans quelques
cas, vous devrez utiliser un câble spécique fourni avec votre caméscope ou vous
devrez acheter des câbles supplémentaires selon la conguration A/V que vous
souhaitez.
FRENCH
1.) Utilisez le câble RCA/RCA fourni pour connecter votre source analogique
au PYRO A/V Link. Ce câble a 3 connecteurs RCA à chaque extrémité.
Jaune = Vidéo Jaune = Vidéo
Rouge = Audio droite Rouge = Audio droite
Blanc = Audio gauche Blanc = Audio gauche
Remarque : Si votre caméscope n’a pas 3 jacks RCA séparés, utilisez le câble
spécique qui est fourni avec.
PYRO A/V LINK 81
Page 82

PYRO A/V LINK 83
FRENCH
1.) Si votre caméscope, magnétoscope ou tout autre appareil de vidéo
comprend un connecteur super VHS, utilisez le câble super VHS fourni
pour connecter votre appareil vidéo au PYRO A/V Link an d’améliorer la
qualité.
2.) Si votre lecteur vidéo, lecteur de DVD ou tout autre appareil vidéo comprend
des sorties Video Composantes, utilisez un câble Video Composantes (non
fourni) pour connecter votre appareil vidéo au PYRO A/V Link. La Video
Composantes vous donnera la meilleure qualité vidéo.
voir l’image à la page 19
FRENCH
* Si vous avez des connecteurs de type BNC en sortie Video Composantes, vous
pouvez les transformer avec des connecteurs Video Composantes ou RCA.
Capturer des séquences vidéo avec votre logiciel de
capture/montage de vidéo
Lorsqu’il est sous tension, le PYRO A/V Link peut convertir une vidéo source
analogique au format DV, vous pouvez donc capturer des séquences vidéo sur
votre ordinateur via votre logiciel de capture/montage.
Source de la séquence vidéo :
PYRO A/V Link détecte automatiquement la source de la séquence vidéo
connectée en entrée, et utilise automatiquement cette source. Utilisez la meilleure
source vidéo en entrée dont vous disposez : Video Composantes est la meilleure,
suivie de super VHS, et RCA (composite) est la moins bonne.
Prévisualiser une séquence vidéo sur un logiciel de montage vidéo :
La plupart des logiciels de montage vidéo comprennent une fenêtre de
prévisualisation vidéo. Dans quelques cas vous devez sélectionner la fenêtre de
capture video (sur Adobe Premiere).
1.) Lancez votre logiciel de montage vidéo.
2.) Localisez la fenêtre de prévisualisation vidéo ou la fenêtre de capture
video.
3.) Une fois la fenêtre de prévisualisation ou de capture ouverte, appuyez sur
le bouton LECTURE de votre appareil de lecture vidéo.
4.) Cliquez sur LECTURE dans la fenêtre de prévisualisation du logiciel. Vous
pouvez alors voir et très probablement entendre (selon le logiciel) votre
vidéo sur votre ordinateur.
5.) Cliquez sur le bouton ENREGISTREMENT du logiciel de montage vidéo
pour commencer à enregistrer au format DV sur le disque dur de votre
ordinateur.
PYRO A/V LINK 82
Page 83

Connexion d’un téléviseur externe pour prévisualiser
une simulation d’une séquence vidéo
Grâce au PYRO A/V Link, vous pouvez voir, en temps réel, sur un téléviseur le
résultat de votre capture et de votre montage.
1.) Connectez un câble vidéo entre le jack de sortie RCA ou super VHS au
dos de PYRO A/V Link et une entrée vidéo externe (RCA ou super VHS)
de votre téléviseur.
2.) Connectez un câble audio entre les jacks de sortie RCA audio droite et
gauche au dos de PYRO A/V Link et une entrée audio externe (RCA) de
votre téléviseur.
3.) Mettez le téléviseur sous tension et congurez-le pour accepter une source
vidéo externe. (Vériez le guide utilisateur de votre téléviseur si vous n’êtes
pas certain de la procédure à suivre).
voir l’image à la page 21
Connexion pour un enregistrement analogique et une
prévisualisation simultanée
Il est possible de prévisualiser et d’enregistrer une séquence vidéo sur un
magnétoscope simultanément à condition que le magnétoscope puisse effectuer des
conversions numériques / analogiques lors de l’enregistrement. Vériez et testez votre
magnétoscope pour vous assurer qu’il a des entrées et des sorties audio et vidéo et
qu’il permet des conversions numériques / analogiques audio et vidéo.
FRENCH
1.) Connectez un câble vidéo entre le jack de sortie RCA ou super VHS au dos de
PYRO A/V Link et l’entrée vidéo de votre magnétoscope.
2.) Connectez un câble vidéo entre la sortie vidéo RCA ou super VHS de votre
magnétoscope et une entrée vidéo externe (RCA ou super VHS) de votre
téléviseur.
3.) Connectez un câble audio entre les jacks de sortie RCA audio droite et gauche
au dos de PYRO A/V Link et les entrées audio (RCA) de votre magnétoscope.
4.) Connectez un câble audio entre les sorties RCA droite et gauche de votre
magnétoscope et les entrées audio de votre téléviseur.
5.) Mettez votre magnétoscope sous tension. Il vous faudra peut-être modier le
mode TV/VCR pour que votre magnétoscope puisse effectuer des conversions
numériques / analogiques.
6.) Mettez le téléviseur sous tension et congurez-le pour accepter une source
vidéo externe. (Vériez le guide utilisateur de votre téléviseur si vous n’êtes pas
certain de la procédure à suivre).
voir l’image à la page 22
PYRO A/V LINK 83
Page 84

PYRO A/V LINK 85
FRENCH
la seule conguration non-valide de raccordement pour le pass-through visuel serait RCA
ou S-Vidéo IN et vidéo component OUT. C’est parce que les connecteurs component sont
automobile-commutation et automobile-sensation. Si vous importez la vidéo analogue, les
connecteurs component commutent aux entrées, si vous exportez la vidéo les connecteurs
component commutent aux sortie de vidéo.
Connexion pour une capture à partir d’un caméscope DV
Si vous utilisez un caméscope numérique pour capturer et/ou exporter des
séquences vidéo, vous pouvez directement connecter votre caméscope
FRENCH
numérique sur le port 1394 de votre ordinateur.
Pour vous simplier la vie, le PYRO A/V Link comprend une connexion DV entrée/
sortie 4 broches qui fonctionne comme un répéteur 1394 et facilite la connexion à
votre ordinateur.
1.) Connectez un câble 4 broches/4 broches entre la connexion DV entrée/
sortie de votre caméscope numérique et le port entrée à 4 broches à
l’avant du PYRO A/V Link.
2.) Mettez votre caméscope en mode VCR/VTR.
3.) Votre ordinateur reconnaît le caméscope numérique et Windows (WinXP)
afche tous les logiciels compatibles avec le caméscope numérique (voir
encadré). Sélectionnez l’application de capture ou de montage de vidéo
que vous souhaitez utiliser.
4.) Si cette boîte de sélection ne s’afche pas, lancez votre logiciel de
montage vidéo de façon classique.
voir l’image à la page 23
PYRO A/V LINK 84
Page 85

Prévisualiser la vidéo sur le logiciel de montage vidéo :
La plupart des logiciels de montage vidéo comprennent une fenêtre de
prévisualisation vidéo. Dans quelques cas vous devez sélectionner la fenêtre de
capture video (sur Adobe Premiere).
1.) Localisez la fenêtre de prévisualisation vidéo ou la fenêtre de capture
video.
2.) Une fois la fenêtre de prévisualisation ou de capture ouverte, appuyez sur
le bouton LECTURE de la fenêtre de prévisualisation de votre logiciel de
montage vidéo. Cliquez sur LECTURE dans la fenêtre de prévisualisation
du logiciel. Un signal sera transmis à votre caméscope numérique
pour qu’il passe en mode lecture et vous pourrez alors voir et très
probablement entendre (selon le logiciel) votre vidéo sur votre ordinateur.
3.) Cliquez sur le bouton ENREGISTREMENT du logiciel de montage vidéo
pour commencer à enregistrer au format DV sur le disque dur de votre
ordinateur.
Remarque sur le contrôle de l’appareil : selon le logiciel de montage
vidéo, d’autres étapes peuvent être nécessaires pour sélectionner votre
caméscope comme un périphérique 1394 à utiliser pour la capture.
Une fois qu’il est sélectionné, vous pouvez utiliser le contrôle de logiciel
comme si vous étiez directement connecté au port 1394 de l’ordinateur
(voir les remarques sur le montage vidéo en annexe).
FRENCH
Exportation de séquences vidéo à partir d’un
logiciel de montage sur un appareil analogique
Maintenant que vous avez capturé et monté votre séquence vidéo, comment
l’exporter de votre ordinateur sur une bande de façon à pouvoir facilement la
copier et la partager avec vos amis, votre famille ou même des clients ?
1.) Connectez un câble vidéo entre le jack de sortie RCA ou super VHS au
dos de PYRO A/V Link et une entrée vidéo externe (RCA ou super VHS)
de votre magnétoscope.
Remarque : la qualité de la vidéo est supérieure avec Super VHS
plutôt qu’avec un câble RCA. Si votre magnétoscope a une connexion
super VHS, il est recommandé de l’utiliser.
PYRO A/V LINK 85
Page 86

PYRO A/V LINK 87
FRENCH
2.) Connectez un câble audio entre les jacks de sortie RCA audio droite et
gauche au dos de PYRO A/V Link et une entrée audio externe (RCA) de
votre magnétoscope.
Remarque : Si vous enregistrez de nouveau sur un caméscope, vous
devrez utiliser les câbles fournis par le fabricant.
3.) Mettez votre magnétoscope sous tension et appuyer sur
ENREGISTREMENT juste avant de commencer à exporter votre vidéo
depuis le logiciel de montage vidéo de votre ordinateur.
Remarque : les méthodes d’exportation de vidéo diffèrent entre les logiciels de montage
FRENCH
vidéo. Avec certains, vous pouvez exporter à partir du plan de montage chronologique
sans rendu, avec d’autres, il faut d’abord « sauvegarder » votre vidéo puis « imprimer
sur cassette ». Consultez le guide de l’utilisateur de votre logiciel de montage vidéo pour
connaître la procédure exacte d’exportation de vidéo.
Exportation sur un caméscope numérique
Si vous souhaitez exporter à partir de votre logiciel de montage sur un caméscope
numérique, connectez le caméscope directement au port 1394. Cependant vous
pouvez aussi utiliser le PYRO A/V Link comme connexion 1394 et exporter au
format DV via le PYRO A/V Link sur votre caméscope numérique.
Cette conguration est la même que si vous utilisez le PYRO A/V Link comme
connexion de capture de votre caméscope numérique.
1.) Connectez un câble 4 broches/4 broches entre la connexion DV entrée/
sortie de votre caméscope numérique et le port entrée/sortie à 4 broches
du PYRO A/V Link.
2.) Mettez votre caméscope en mode VCR/VTR.
3.) Votre ordinateur reconnaît le caméscope numérique.
4.) Lancez votre logiciel de montage vidéo. Utilisez la fonctionnalité d’export
ou d’impression sur cassette du logiciel pour exporter la vidéo de votre
ordinateur et l’enregistrer sur votre caméscope numérique.
PYRO A/V LINK 86
Page 87

Congurations sans ordinateur
Le PYRO A/V Link est un appareil qui peut fonctionner de manière autonome
entre des appareils d’enregistrement analogiques et numériques. Ce qui signie
qu’il est possible de convertir du contenu analogique en numérique via une
conversion directe sur un lecteur DV ou un caméscope numérique sans connecter
de périphérique à un ordinateur.
Connexion pour une conversion analogique
à numérique
1.) Mettez le PYRO A/V Link sous tension.
2.) Connectez les câbles audio et vidéo RCA entre votre appareil de vidéo
analogique et les entrées audio et vidéo RCA à l’avant du PYRO A/V Link.
3.) Si votre appareil vidéo analogique dispose d’entrées super VHS ou Video
Composantes, utilisez-les car la qualité de la vidéo est meilleure.
4.) Utilisez un câble 1394 6 broches/4 broches pour connecter le A/V Link à
votre caméscope numérique ou à votre lecteur DV. Connectez l’extrémité
6 broches au connecteur 1394 6 broches à l’arrière du PYRO A/V, et
connectez l’extrémité 4 broches à votre caméscope numérique ou à votre
lecteur DV.
5.) Utilisez le sélecteur de mode (MODE SELECTOR SWITCH) à l’avant du
PYRO A/V Link pour basculer en mode analogique (ANALOG MODE).
Dans ce mode le voyant DEL Rouge est allumé.
6.) Appuyez sur le bouton d’enregistrement de votre caméscope numérique
ou de votre lecteur DV juste avant d’appuyer sur le bouton LECTURE de
votre appareil vidéo analogique (magnétoscope ou caméscope).
FRENCH
voir l’image à la page 26
Ajout d’un moniteur de prévisualisation à cette conguration
Vous pouvez facilement connecter un téléviseur aux jacks de sortie audio et vidéo
du PYRO A/V Link pour contrôler la procédure de transfert de la vidéo.
1.) Connectez un câble vidéo RCA ou super VHS entre le PYRO A/V Link et
les jacks en entrée vidéo RCA ou super VHS de votre téléviseur.
2.) Connectez un câble audio droite et gauche entre les jacks audio droite et
gauche du PYRO A/V Link et les entrées audio de votre téléviseur.
3.) Allumez vote téléviseur et acceptez l’entrée de vidéo externe.
PYRO A/V LINK 87
Page 88

PYRO A/V LINK 89
FRENCH
Connexion pour une conversion numérique
à analogique
Si vous avez un caméscope numérique, vous pouvez utiliser le PYRO A/V Link
pour convertir des vidéos numériques en vidéos analogiques pour pouvoir les
enregistrer sur votre magnétoscope.
FRENCH
1.) Connectez votre caméscope numérique ou votre lecteur DV au jack DV 4
broches en entrée à l’avant du PYRO A/V Link.
2.) Connectez un câble vidéo entre les jacks de sortie RCA ou super VHS à
l’arrière du PYRO A/V Link et l’entrée vidéo externe (RCA ou super VHS)
de votre magnétoscope.
Remarque : La qualité obtenue par le super VHS est supérieure à celle
du RCA. Si votre magnétoscope ou votre caméscope dispose d’une
connexion super VHS, nous vous recommandons de l’utiliser.
3.) Connectez un câble audio entre les jacks de sortie gauche et droite RCA
à l’arrière du PYRO A/V Link et les entrées audio externes (RCA) de votre
magnétoscope.
Remarque : Si vous enregistrez de nouveau sur un caméscope, vous
devrez utiliser les câbles fournis par le fabricant.
4.) Utilisez le sélecteur de mode (MODE SELECTOR SWITCH) à l’avant du
PYRO A/V Link pour basculer en mode numérique (DIGITAL MODE). Dans
ce mode le voyant DEL Bleu est allumé.
5.) Mettez votre magnétoscope sous tension et appuyez sur le bouton
d’enregistrement juste avant d’appuyer sur le bouton LECTURE de votre
caméscope numérique.
PYRO A/V LINK 88
Page 89

Ajout d’un moniteur de prévisualisation à cette conguration
Il est possible de prévisualiser et d’enregistrer une vidéo sur un magnétoscope
simultanément à condition que le magnétoscope puisse traiter l’image et le son
lors de l’enregistrement. Vériez et testez votre magnétoscope pour vous assurer
qu’il a des entrées et des sorties audio et vidéo et qu’il permet des conversions
numériques / analogiques audio et vidéo.
1.) Connectez un câble vidéo entre le jack de sortie RCA ou super VHS au
dos de PYRO A/V Link et l’entrée vidéo de votre magnétoscope.
2.) Connectez un câble vidéo entre la sortie vidéo RCA ou super VHS de votre
magnétoscope et une entrée vidéo externe (RCA ou super VHS) de votre
téléviseur.
3.) Connectez un câble audio entre les jacks de sortie RCA audio droite et
gauche au dos de PYRO A/V Link et les entrées audio (RCA) de votre
magnétoscope.
4.) Connectez un câble audio entre les sorties RCA droite et gauche de votre
magnétoscope et les entrées audio de votre téléviseur.
FRENCH
5.) Mettez votre magnétoscope sous tension. Il vous faudra peut-être modier
le mode TV/VCR pour que votre magnétoscope puisse effectuer des
conversions numériques / analogiques.
6.) Mettez le téléviseur sous tension et congurez-le pour accepter une source
vidéo externe. (Vériez le guide utilisateur de votre téléviseur si vous n’êtes
pas certain de la procédure à suivre).
PYRO A/V LINK 89
Page 90

PYRO A/V LINK 91
FRENCH
Utilisation de la fonctionnalité de conversion numérique /
analogique pour caméscopes numériques
Si vous souhaitez connecter votre caméscope numérique au port 1394 4 broches situé à
l’avant du PYRO A/V Link, vous devez effectuer quelques réglages supplémentaires pour
pouvoir contrôler votre caméscope à partir de Video Studio. Le contrôle de l’appareil inclut
les fonctions de lancement, d’arrêt et d’enregistrement de votre caméscope numérique.
Suivez les étapes ci-dessous pour congurer votre caméscope numérique pour une
conversion numérique / analogique 1394 avec le PYRO A/V Link.
FRENCH
1.) Cliquez sur l’icône Outils pour faire apparaître le menu Settings and Commands.
2.) Cliquez sur Select Device Control (sélectionner périphérique de contrôle).
3.) Sélectionnez le lecteur de caméscope, contrôle périphérique Microsoft 1394.
4.) Puis sélectionnez options.
5.) Sélectionnez votre caméscope numérique comme périphérique actif.
6.) Cliquez sur OK et fermez les boîtes de dialogue.
Votre caméscope numérique est maintenant listé dans la fenêtre Driver
du panneau Capture Settings.
7.) Assurez-vous que votre caméscope est allumé en mode VCR/VTR.
8.) Appuyez sur la touche de lecture sous la fenêtre de prévisualisation et votre
caméscope commence à lire et vous voyez la vidéo dans la fenêtre de
prévisualisation.
voir l’image à la page 35
PYRO A/V LINK 90
Page 91

Installer le CD de logiciels groupés
1.) Insérez le CD fourni avec le PYRO A/V Link dans votre lecteur de
CD-ROM.
2.) L’écran Auto-run (lancement automatique) afché ci-dessous s’afchera
sur votre écran.
3.) Cet Auto-run requiert que Apple Quick Time soit lancé. Si Quick Time n’est
pas installé sur votre machine, son installation automatique commencera.
4.) Il existe 4 sélections :
a. Installation du pilote
b. VideoStudio
c. PhotoShow (logiciel d’essai)
voir l’image à la page 29
a.) Installation des pilotes – l’installation du pilote n’est requise QUE si
Win98SE est installé sur votre machine. Ce pilote est en fait une rustine du
logiciel 1394 Microsoft de Windows 98SE. Si Windows ME, WinXP or Win2000
est installé sur votre machine, sautez cette étape.
FRENCH
b.) VideoStudio – cliquez sur le bouton Video Studio et l’installation de Video
Studio sera lancé. Consultez la section ci-après pour des instructions complètes
quant à l’installation de VideoStudio.
c.) PhotoShow – PhotoShow est amusent et d¹une manière facile vous pouvez
créez des vidéos de musique avec vos photos numériques. Découvrez vos
photos comme jamais avant! Quand vous êtes ni, partagez votre PhotoShow
online, brûlez-le sur CD, utilisez-le comme épargnant d’écran ou même éditez-le
sur votre propre site Web.
PYRO A/V LINK 91
Page 92

PYRO A/V LINK 93
FRENCH
VideoStudio Software
Comment marche VideoStudio
VideoStudio suit un paradigme pas à pas, de sorte que les tâches d’édition restent
simples du début à la n. VideoStudio offre aussi plus d’une centaine d’effets de
transition, des capacités de titrage de niveau professionnel, et des outils simples
pour la création de la piste sonore. L’apprentissage se fait en quelques secondes,
FRENCH
la création est une affaire de minutes.
VideoStudio fractionne votre lm en plusieurs pistes, pour vous donner une grande
liberté créative. Les modications apportées à une piste n’affectent pas les autres.
Après avoir transféré vos rushs à partir de votre caméscope, vous pouvez
disposer les scènes, appliquer les effets spéciaux, incruster des images,
ajouter des titres animés, synchroniser un commentaire en voix off, et utiliser de
la musique de fond à partir de vos CD préférés sous des formats tels que WAV et
MP3. Et tout cela se fait par des opérations de type glisser-déposer, couper-coller
et sélectionner-appliquer. Toutes les pistes de votre lm sont alors organisées dans
un chier projet vidéo (*.VSP), qui contient toutes les informations audio et vidéo
concernant le montage de votre lm.
Et lorsque tout est prêt, votre ordinateur rassemble toutes les
informations nécessaires pour créer le lm nal. Ce processus est appelé
rendu. Vous pouvez alors produire et distribuer vos lms sous forme de titre
DVD/VCD/SVCD, de vidéo par ux sur page web, ou de pièce jointe à
un courrier électronique. Vous pouvez aussi réenregistrer votre lm sur
votre caméscope ou votre magnétoscope.
voir l’image à la page 30
PYRO A/V LINK 92
Page 93

Vérication du matériel avant d’utiliser VideoStudio
Pour vous assurer que votre production vidéo se passe sans embûche, cliquez
dans le panneau de conguration : systèmes, gestionnaire de périphériques et
vériez que tous vos périphériques fonctionnent normalement en accord avec
votre système d’exploitation.
Carte de capture DV IEEE 1394
Les systèmes d’exploitation Windows suivants supportent la carte de capture
IEEE 1394. L’ensemble PYRO A/V Link/caméscope DV doit être connecté à
l’interface IEEE 1394 pour être détecté comme un appareil vidéo, un appareil
audio ou un contrôleur de jeu.
Windows 98
Windows 98 ne supporte que le pilote DV Texas Instruments mais ne le fournit
pas. Ces pilotes (s’ils sont disponibles en groupes) sont livrés avec la carte
IEEE 1394. Vériez que les périphériques suivants fonctionnent normalement :
• Contrôleur bus 1394
• Contrôleurs son, vidéo et jeu : caméscope 1394
Windows 98 deuxième édition / Windows 2000
Windows 98 deuxième édition et Windows 2000 incluent le pilote DV Microsoft et
supportent également le pilote DV Texas Instruments. Vériez que les périphériques suivants fonctionnent normalement :
FRENCH
• Contrôleur bus 1394
• Périphérique d’image : Camera DV Microsoft et
magnétoscope (uniquement pour le pilote Microsoft DV.)
• Contrôleurs son, vidéo et jeu : caméscope 1394
(uniquement pour le pilote DV Texas Instruments.)
* Il est fortement recommandé d’utiliser le pilote Microsoft avec les systèmes d’exploitation Win ME
et Win 2000.
* PYRO A/V Link est sur la liste des lecteurs/enregistreurs de
cassette DV conforme à AVC.
voir l’image à la page 31
PYRO A/V LINK 93
Page 94

PYRO A/V LINK 95
FRENCH
Windows Edition Millennium (Me)
Windows Me supporte totalement la carte IEEE 1394. Vériez que les périphériques
suivants fonctionnent normalement :
• Contrôleur bus 1394
• Classe de l’unité 61883
• Classe de l’unité AVC
• Caméscope DV (Marque) : La marque dépend du caméscope DV connecté
à l’interface de la carte IEEE.
Windows XP
FRENCH
Windows XP supporte totalement IEEE 1394.
* PYRO A/V Link est sur la liste des lecteurs/enregistreurs de cassettes DV conforme
à AVC du gestionnaire de périphériques.
Pour lancer VideoStudio sous Windows XP, vériez que les périphériques suivants
fonctionnent normalement :
• Contrôleur bus 1394
• Classe de l’unité 61883
• Classe de l’unité AVC
• Caméscope DV (Marque) : La marque dépend du caméscope DV connecté
à l’interface de la carte IEEE.
voir l’image à la page 32
Pour Windows 98 et Windows Me, sélectionnez l’option d’accès direct à la
mémoire dans le gestionnaire de périphériques : onglet des paramètres
du lecteur de disque. Dans Windows 2000, l’option d’accès direct à
la mémoire est cachée mais elle est toujours active. L’accès direct à la
mémoire permet d’éviter les problèmes de perte d’images lors de la capture
de vidéo.
Remarque : En plus des pilotes DV Texas Instruments et Microsoft couramment utilisés, il existe d’autres pilotes.
Consultez le manuel de votre caméscope pour une liste des pilotes compatibles.
voir l’image à la page 32
PYRO A/V LINK 94
Page 95

Installation et utilisation de VideoStudio
Installation de VideoStudio :
1. Placez le CD A/V Link dans le lecteur de CD ROM. Cliquez sur l’icône Video
Studio pour ouvrir l’écran d’installation de Video Studio.
2. Lorsqu’il est ouvert, suivez les instructions pour installer VideoStudio sur
votre ordinateur.
Remarque : Si l’écran d’installation n’apparaît pas après avoir lancé le CD, ouvrez-le
manuellement en double-cliquant sur l’icône Mon ordinateur de votre bureau, puis
double-cliquez sur l’icône du lecteur de CD ROM. Lorsque cette fenêtre s’ouvre, double-cliquez
sur l’icône d’installation.
Veuillez également installer les applications suivantes car elles facilitent la création
de vidéos numériques sur votre ordinateur. Les programmes d’installation vous
guideront pas à pas :
• QuickTime
• Windows Media Format
• RealPlayer
• Acrobat Reader
Remarque : Sautez cette étape, si vous avez déjà de nouvelles versions des applications
ci-dessous installées sur votre ordinateur.
voir l’image à la page 33
Pour lancer VideoStudio :
• Double-cliquez sur l’icône VideoStudio de votre bureau Windows.
OU
FRENCH
• Sélectionnez l’icône du groupe de programme
VideoStudio dans le menu Démarrer de
Windows.
voir l’image à la page 33
PYRO A/V LINK 95
Page 96

PYRO A/V LINK 97
FRENCH
Congurer VideoStudio
Les caméscopes, magnétoscopes et lecteurs de VCD/DVD sont les
sources les plus courantes de métrage vidéo. Pour assurer une
interaction uide entre ces sources vidéo et votre ordinateur, assurezvous
que les paramètres de VideoStudio sont correctement
congurés par rapport au périphérique de capture que vous utilisez.
1.) Vériez que votre PYRO A/V Link a
correctement détecté le gestionnaire de
périphériques de Windows ainsi que décrit
FRENCH
précédemment.
2.) Connectez la source de la vidéo aux jacks
audio et vidéo de l’A/V Link.
3.) Assurez-vous que la source de la vidéo est
sous tension et qu’une cassette ou un disque
est en lecture.
4.) Cliquez sur Capture Step (étape de capture)
en haut de l’écran de Video Studio.
«PYRO A/V Link» doit faire partie des options
du champ Driver (pilote) dans le panneau
Capture Settings (paramètres de capture).
5.) Le format de capture vidéo doit être DV. Si
vous souhaitez capturer au format vidéo
MPEG, consultez la section Capture directe
de format MPEG de ce manuel.
6.) Cliquez sur l’icône Outils pour ouvrir le menu
Settings and Commands (paramètres et
commandes).
7.) Cliquez sur Change Capture Plug-in (modier
logiciel compagnon de capture). Assurez-vous
que l’option Ulead Direct Show Capture
Plug-in (logiciel compagnon de capture
Ulead Direct Show est sélectionnée.
8.) Cliquez sur LECTURE dans la fenêtre
Preview (prévisualisation) et vous verrez la
vidéo en mode de prévisualisation.
voir l’image à la page 34
Remarque : PYRO A/V Link supporte de nombreuses sources de vidéo. Il est capable de détecter
automatiquement et de sélectionner l’entrée de vidéo active qu’il s’agisse de vidéo composite
(RCA), de Svidéo (super VHS) ou de Video Composantes. La vidéo sera toujours capturée,
quelque que soit la source à laquelle il est connecté, avec un signal vidéo en direct.
PYRO A/V LINK 96
Page 97

Visite guidée de VideoStudio
L’interface de VideoStudio a été conçue de façon à rendre intuitives et
amusantes les tâches d’édition des lms, parfois complexes, sur votre PC.
Cette illustration montre les éléments principaux du programme. Les pages
suivantes énumèrent en détail les caractéristiques et les fonctions spéciques
de chaque élément.
voir l’image à la page 36
Panneau des options
Le panneau des options change en fonction du mode dans lequel tourne le
logiciel et l’étape ou la section sur laquelle vous travaillez. Le panneau des
options peut contenir un ou deux onglets. Les informations de chaque onglet
varient selon le clip sélectionné.
voir l’image à la page 36
Manuel Video Studio et autres aides disponibles
Nous espérons que les informations fournies vous aideront à utiliser PYRO
A/V Link et Video Studio. Ce manuel de prise en main contient une version très
succincte du manuel de Video Studio. Video Studio comprend de nombreuses
fonctionnalités et possibilités qui ne sont pas décrites ici. Pour en savoir plus,
lisez le manuel disponible en ligne au format Acrobat Reader.
FRENCH
Aide et instructions (F1)
A tout moment, vous pouvez appuyer sur la touche F1 de votre clavier pour
appeler l’aide de Video Studio. Lisez les trucs et techniques ainsi que les
procédures étape par étape.
voir l’image à la page 37
Manuel complet
Le manuel complet se trouve sur le CD de PYRO A/V Link :
1.) Insérez le CD et lorsque le menu Auto-run apparaît, cliquez sur l’icône Video Studio.
2.) Dans l’écran Auto-run de Video Studio, cliquez sur Browse CD (lire CD).
3.) Une fenêtre de recherche de chiers s’ouvre, double-cliquez sur le répertoire
Document puis sur Manual folder (répertoire Manuel).
4.) Si Adobe Acrobat n’est pas installé sur votre machine, cliquez sur le répertoire Acrobat
et installer Acrobat Reader.
PYRO A/V LINK 97
Page 98

FRENCH
PYRO A/V LINK 99
FRENCH
Spécications détaillées du produit
- Résolution de capture :
o NTSC : 720 x 480 à 30 images par seconde
o PAL : 720 x 576 à 25 images par seconde
- Capture de vidéo au format DV
- Capture audio en 48KHz (16 bits)
- Bouton d’allumage
- Sélecteur de mode – Analogique ou numérique
- Entrées :
o Vidéo
§ RCA, S-VHS, Video Composantes
§ connecteur 1394 à 4 broches
o Audio
§ RCA droite et gauche
- Sorties :
o Vidéo
§ RCA, Super VHS
§ connecteur 1394 à 6 broches
o Audio
§ RCA droite et gauche
Nom du produit : PYRO A/V Link
Code article : API-550
PYRO A/V LINK 98
Page 99

Régler les problèmes
Impossible de prévisualiser la vidéo avec VideoStudio 7 ou tout autre logiciel
de montage vidéo
Vériez et assurez-vous que le PYRO A/V Link est connecté à votre ordinateur.
Pour vérier que PYRO A/V Link est reconnu par votre ordinateur, veuillez
consulter la page 62 de ce manuel.
VideoStudio 7 ne transcode pas de DV à MPEG2, pertes d’images, etc.
Ce problème est principalement dû à un manque de ressources du système.
Votre ordinateur n’est probablement pas assez rapide, votre disque dur
n’est probablement pas optimisé (défragmenté), votre carte vidéo n’est
probablement pas AGP, etc. Le transcodage de DV temps réel à MPEG2
nécessite énormément de capacité. ADS Technologies garantit un transcodage
DV à MPEG2 continu pendant une durée maximale de 2h30 sur une machine
P4, 1,8 GHz.
VideoStudio 7 ou mon application de capture vidéo reste bloqué après l’arrêt
de la capture
FRENCH
Ceci peut arriver après de longues captures. C’est normal. Rappelez-vous que
vous capturez et manipulez des chiers de plusieurs gigaoctets. Arrêtez la
capture, après quelques secondes votre logiciel de capture ou VideoStudio 7
devrait revenir à la normale.
La vidéo est capturée au format NTSC même après avoir sélectionné PAL
comme modèle
Relancez Video Studio 6 ou votre application de capture vidéo. Sélectionnez
PAL à nouveau. Le problème devrait être réglé.
PYRO A/V LINK 99
Page 100

PYRO A/V LINK 101
SPANISH
Product Overview ...............................................................................................................
Características ....................................................................................................................
Qué se incluye ....................................................................................................................
Connection Congurations .................................................................................................
PYRO A/V Link Hardware Description ................................................................................
Interruptor de 4 Posiciones ................................................................................................
Puesta en marcha - Windows ............................................................................................
Instalación del equipo físico ...............................................................................................
Puesta en marcha - Mac ....................................................................................................
Instalación del equipo físico 2 ............................................................................................
Conguraciones de ordenador conectado .........................................................................
Captación de vídeo con software de aptar/editar vídeo .....................................................
Conexión a una TV externa para previsualización simultánea de vídeo ............................
Conexión para grabación analógica y previsualización al mismo tiempo ..........................
Conexión para captar desde cámara de vídeo DV ............................................................
SPANISH
Exportar vídeo de un editor de vídeo a un dispositivo analógico .......................................
Exportar a una cámara de vídeo digital .............................................................................
Conguraciones no de ordenador ......................................................................................
Conexión para conversión de vídeo analógico a digital .....................................................
Conexión para conversión de digital a analógico ...............................................................
Utilización del paso de DV para las cámaras de vídeo digital ............................................
Instalación del CD de paquete de software ........................................................................
VideoStudio Software .........................................................................................................
Especicaciones detalladas del producto ..........................................................................
Resolución de fallos ...........................................................................................................
101
102
102
102
104
105
107
108
109
110
111
112
113
113
114
115
116
117
117
118
120
121
122
128
129
PYRO A/V LINK 100
 Loading...