

Page 1

http://www.adsequip.com/
Installation manual
of AJ12US dental chair
P/N:8021733 Version:C Date:2017-08-01
Page 2

Installation manual of AJ12 US dental chair
Copyrights
ADS makes no warranty of any kind with regard to this
material , including but not limited to, the implied warranties
of merchantability and fitness for a particular purpose. ADS
shall not be held liable for any errors contained herein or any
consequential or other damages concerning furnishing,
performance or use of this material. The information in this
document is subject to change without notice . If you find
any problems in the documentation, please report them to us
in writing. ADS does not warrant that this document is errorfree.
No part of this document may be copied, reproduced, altered,
or transmitted in any form or by any means, electronic or
mechanical, including photocopying, recording, or by any
information storage and retrieval system, without prior
written permission from ADS.
The document is intended to be used in conjunction with the
equipment.
Comments and feedback
Please contact us if you have any feedback and opinions on
this document:
Add: 1590 S Milliken Ave., unit A, Ontario, CA 91761
Tel: (626) 620 0456
E-mail : sales@adsequip.com
http://www.adsequip.com/
Product service
If you want to get service information, please contact the
local dealer authorized by ADS company.
Technical support tel: 800 488 9708
Page 3

Installation manual of AJ12 US dental chair
C O N T E N T S
1 Introduction………………………………………………………………1
1.1 Products information…………...………………………………1
1.2 Symbols explanation……………………………………………1
2 Composition………………………………………………………………3
3 Parameters……………………………………………………………4
3.1 Specifications……………………………………………………4
3.2 Size…….....…………… … …………… … … … …………… 4
4 Preparations………………………………………………………………5
4.1 Attentions………………………………………………………5
4.2 Tools recommended………………..…………….…………….6
4.3 Installation requirements………………………………………..7
5 Installation………………………………………………………… 7
5.1 Place the chair ...…………………………………………………7
5.2 Fix the chair………………………………………………………8
5.3 Install the backrest………………………………………………9
5.4 Install the headrest ……………………………………………10
5.5 Install backrest upholstery…….....………………………………11
5.6 Install seat upholstery………………………………………12
6 Operations……………………………………………………………13
6.1 Power………….…………………………………………………13
6.2 Chair positioning………………………………………… 14
6.2.1 Operate by foot control……………………………………14
6.2.2 Initial settings of the chair…………………………………14
6.2.3 Initial setting description....……………….....……………...…15
6.2.4 Chair positions description….…………………………….…..16
6.3 Dual articulating headrest……………….……………………17
7 Regulation & maintenance…………………………………………19
7.1 Remove the upholstery …………….……………………19
8 Reserved lines ……………………………………………………21
9 Upholstery Maintenance Instruction ……………………………22
10 Connecting diagrams………...........…………………………………23
Page 4
Installation manual of AJ12 US dental chair
1 Introduction
1.1 Product information
•Name:Dental chair
•Model:AJ12US
•Working conditions:
① Ambient temperature:5 ℃~40 ℃;
② Relative humidity:≤ 80%;
③ Air pressure:86 kPa~106 kPa;
④ Nominal voltage:AC110 V±22 V;
⑤ Nominal frequency:60 Hz±1 Hz;
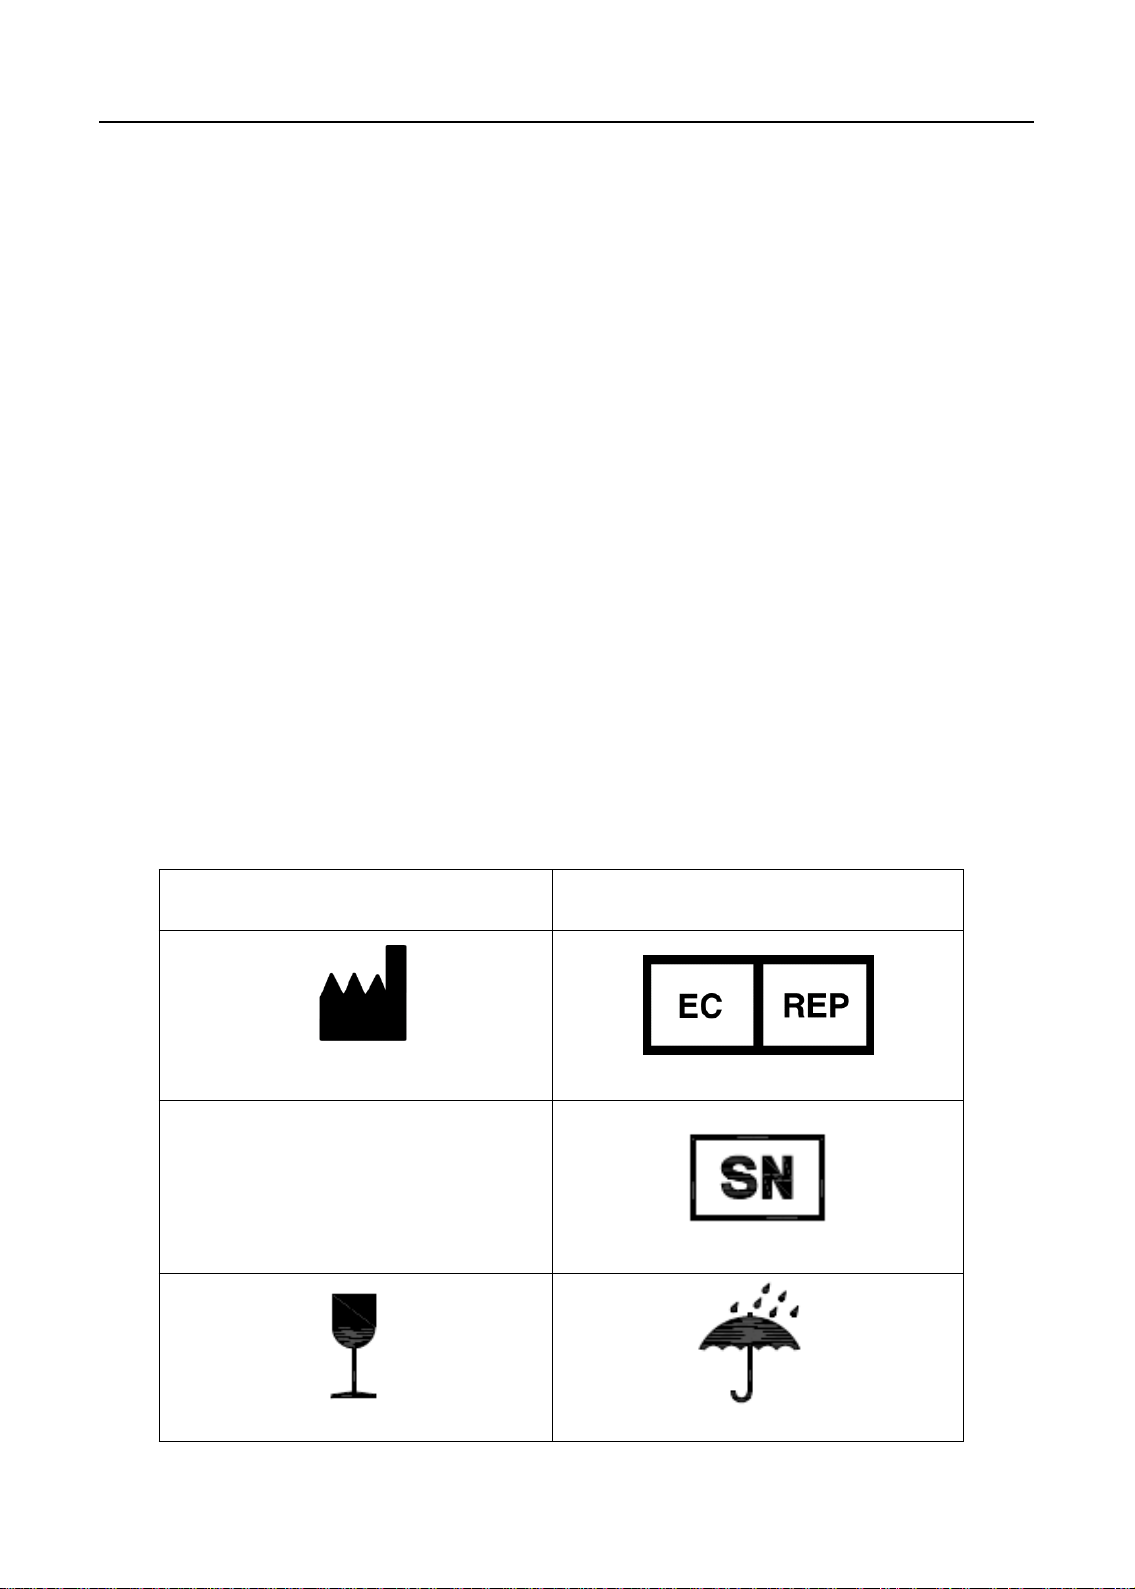
1.2 Symbols explanation
Table 1
Symbol
Manufacturer EU representative
Producing date Serial number.
Explanation
Place with care Keep dry
1
P/N:8021733
Page 5
Installation manual of AJ12 US dental chair
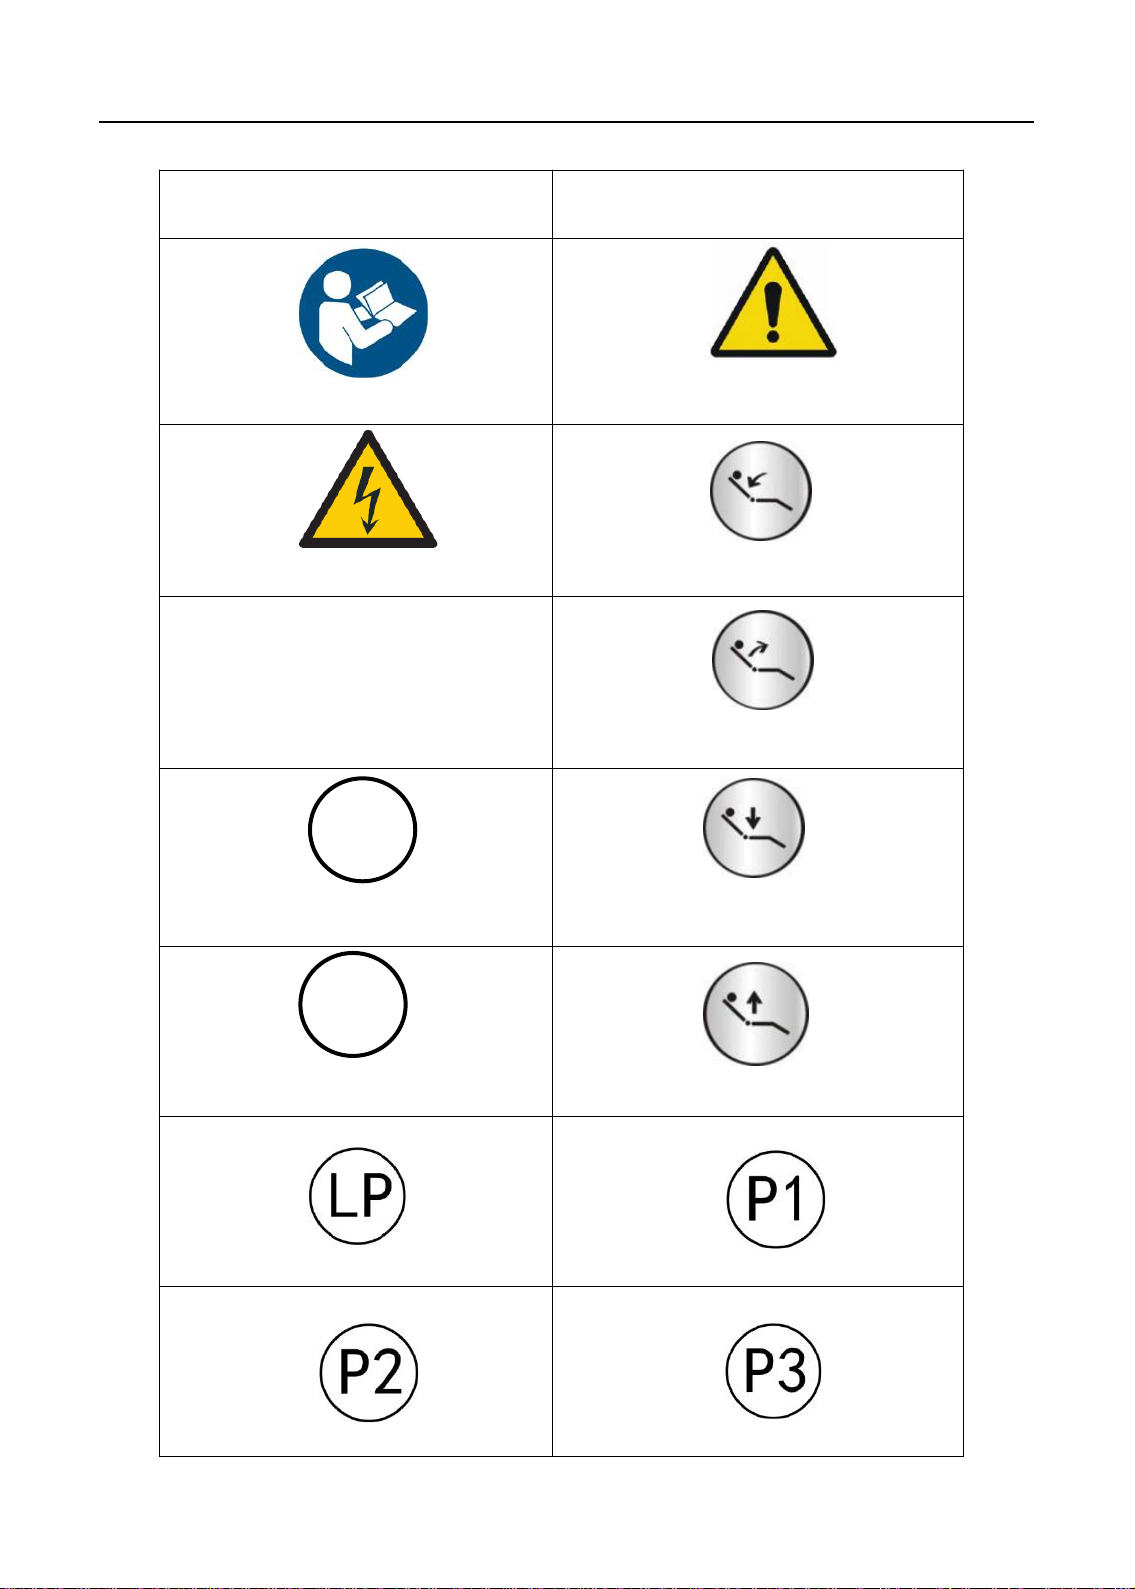
Symbol Explanation
Refer to attached document Notice
Avoid electric shock Backrest Down
Ground protection Backrest Up
0
Original position
P
Set
Spitting position
Program Chair Position 1
Chair Down
Chair Up
Program Chair Position 2 Program Chair Position 3
2
P/N:8021733
Page 6
Installation manual of AJ12 US dental chair
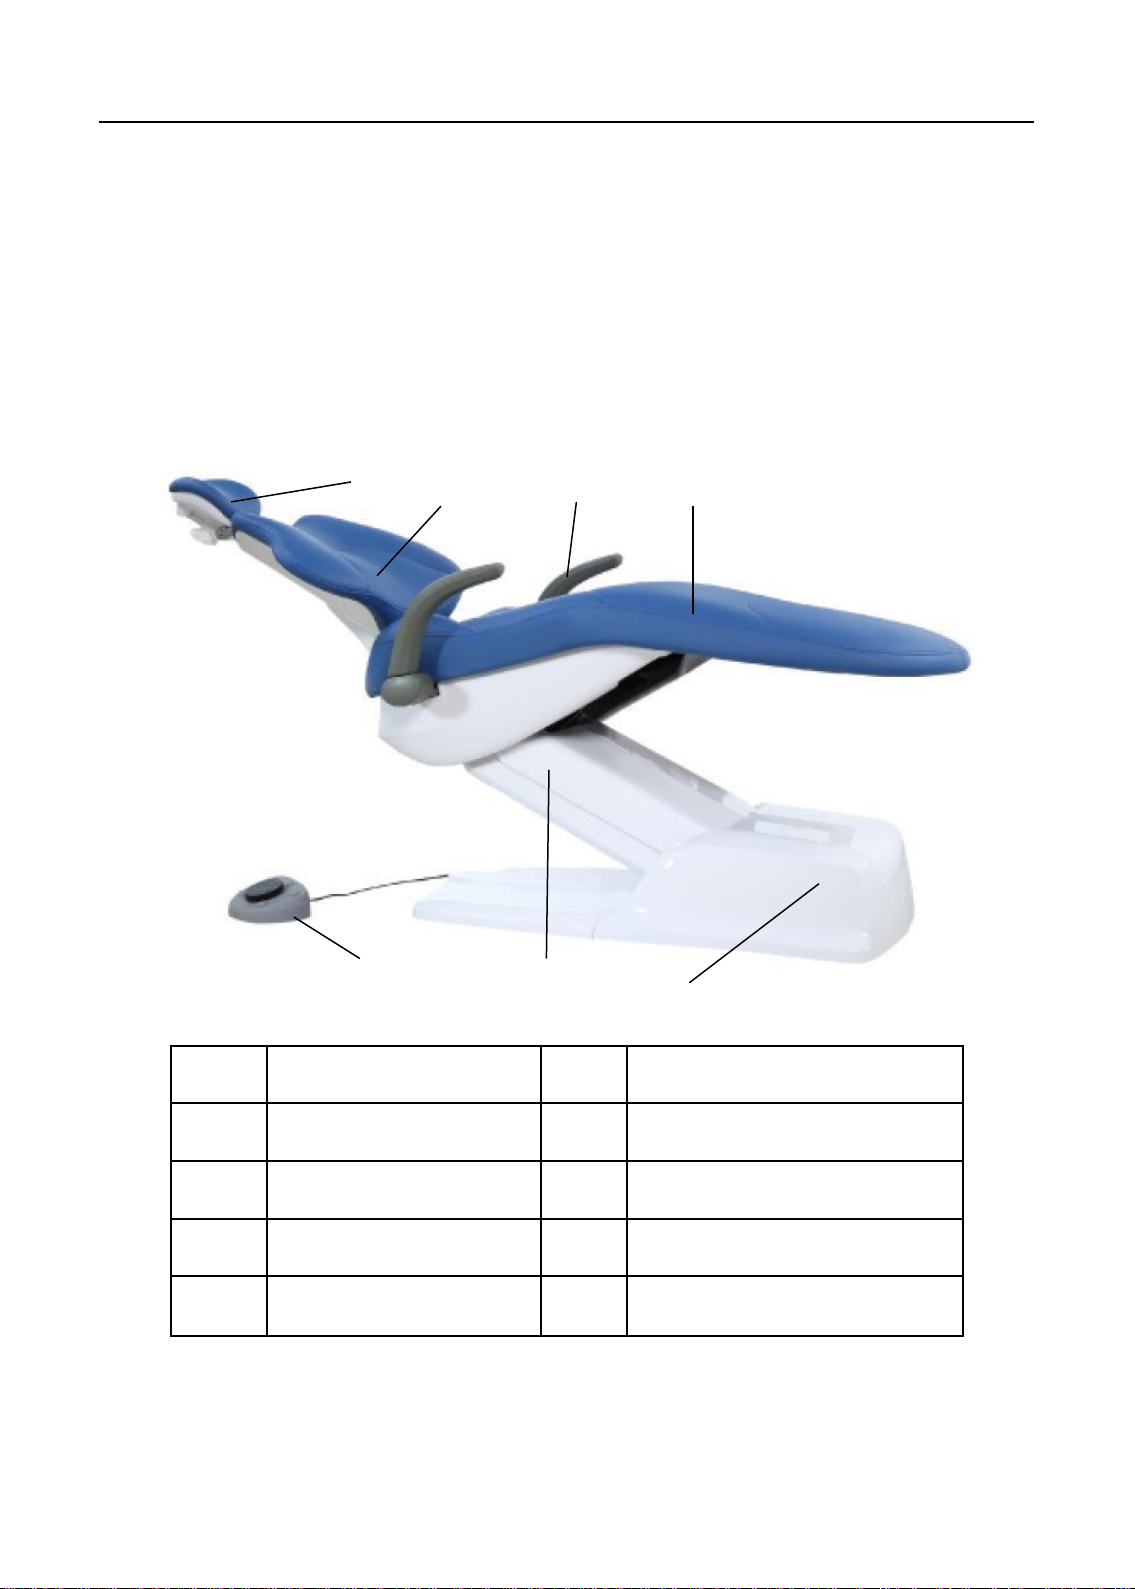
2 Composition
AJ12US dental chair (figure 1)combined with new design concepts ,
provide a good balance for usability ,simplicity and comfortability.
Figure 1 AJ12 US Dental Chair
1 2 4
3
6 7 5
Item Component Item
1 Headrest 5 Foot control
2 Backrest 6 Lifting arm
3 Armrest 7 Junction box
4 Seat
3
Component
P/N:8021733
Page 7
Installation manual of AJ12 US dental chair
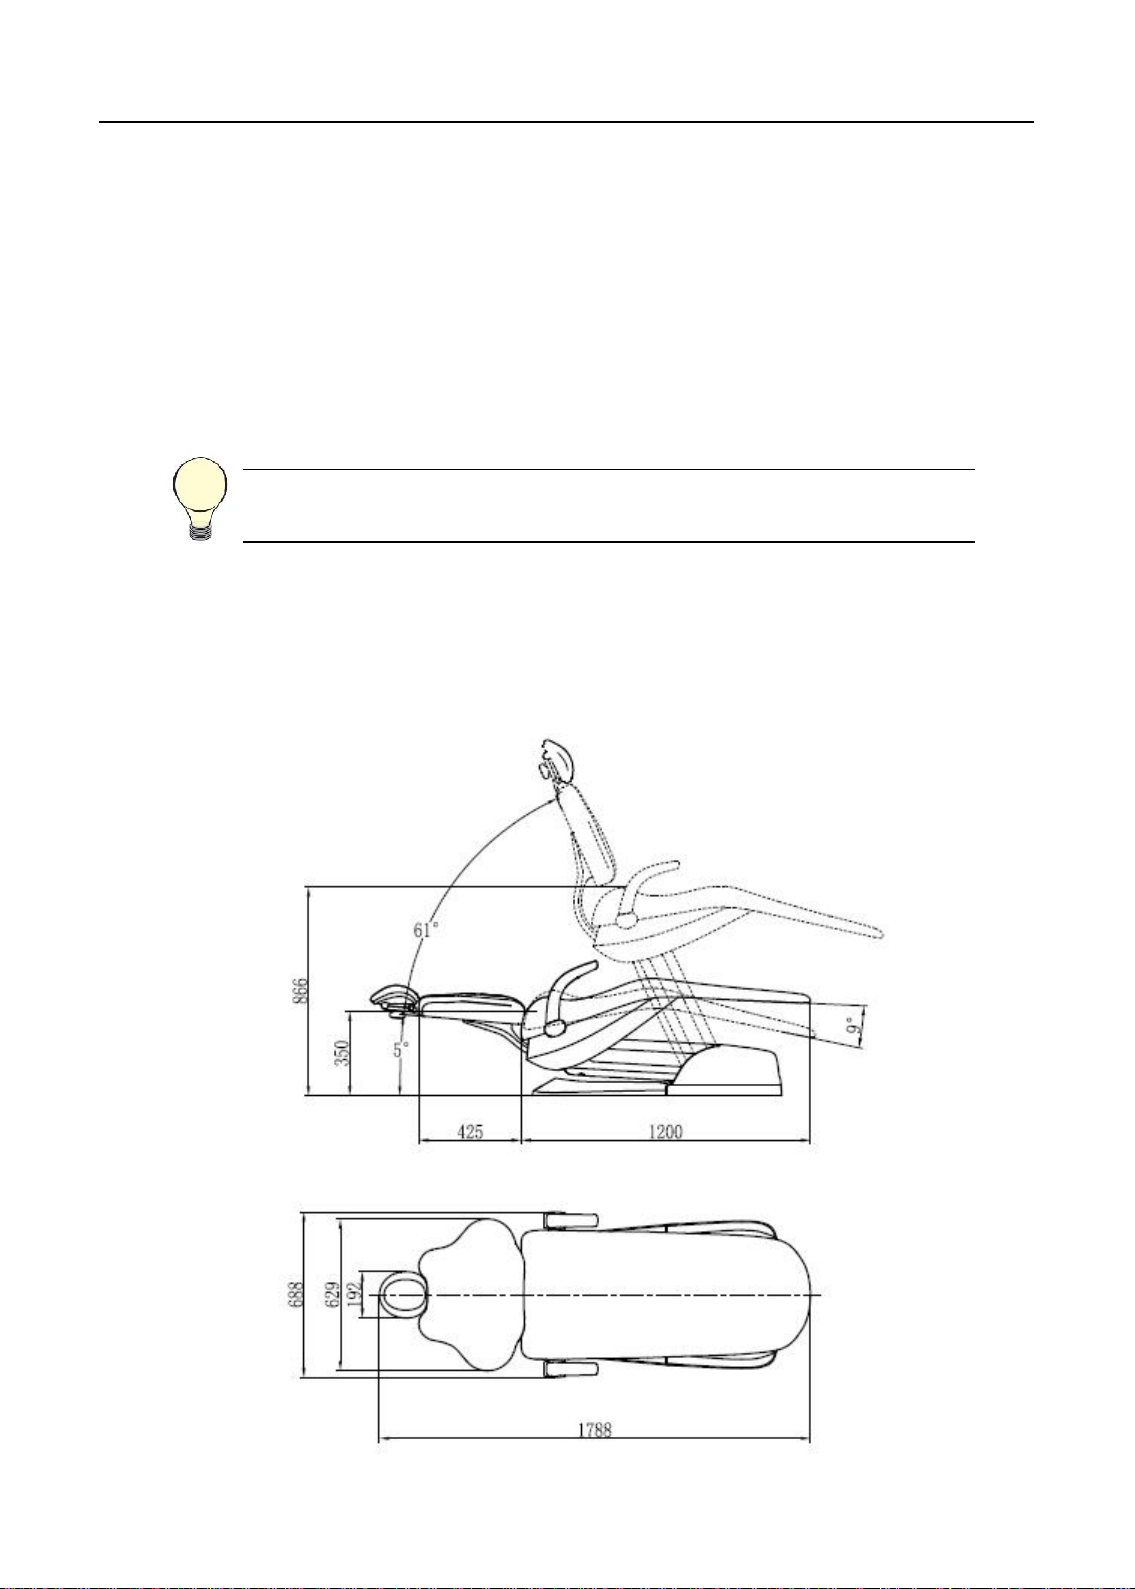
3 Paremeters
3.1 Specifications
Load bearing
Patient bearing:Max 135kg
Tip: Specifications are subject to change without notice.
3.2 Size (unit: mm)
4
P/N:8021733
Page 8

Installation manual of AJ12 US dental chair
4 Preparations
4.1 Attentions
Before install the unit, you should:
• Clear all the debris in the room ,and clean the floor thoroughly.
• Apply two manually operated valves for the air and water source.
• Exhaust the dirty water and air before connecting.
• May have no necessity to use all the component described in this document when
installing. Components should be evaluated before installation.
Before install the unit, please read the manual carefully:
• Input voltage AC110 V ,60 Hz.
• Make sure the dental unit is in good grounding .
• All the electrical components and connections should be made by an authorized
technician.
• Only fuse and accessories recognized by ADS technician can be used.
• This device should not operate in the environment of high temperature, high
humidity, vibration ,flammability, unbalance, or dusty.
• Only the authorized spare parts can be used in this device.
• This dental unit should not come into contact with any object in its operational range
of movement.
• This device can not be used in the environment of strong magnetic, electromagnetic.
Leather maintenance:
• 1、No organic solvent or alkaline detergent (such as: gasoline、alcohol ,etc.), or
the leather will crack, be smelly or fade;
• 2、No exposure, keep the room in good ventilation(exposure can cause the leather
crack,bad ventilation lead to go mouldy);
• 3、Mention the patient to remove edged tools(like keys)before operation,to avoid
scratch the leather.
5
P/N:8021733
Page 9
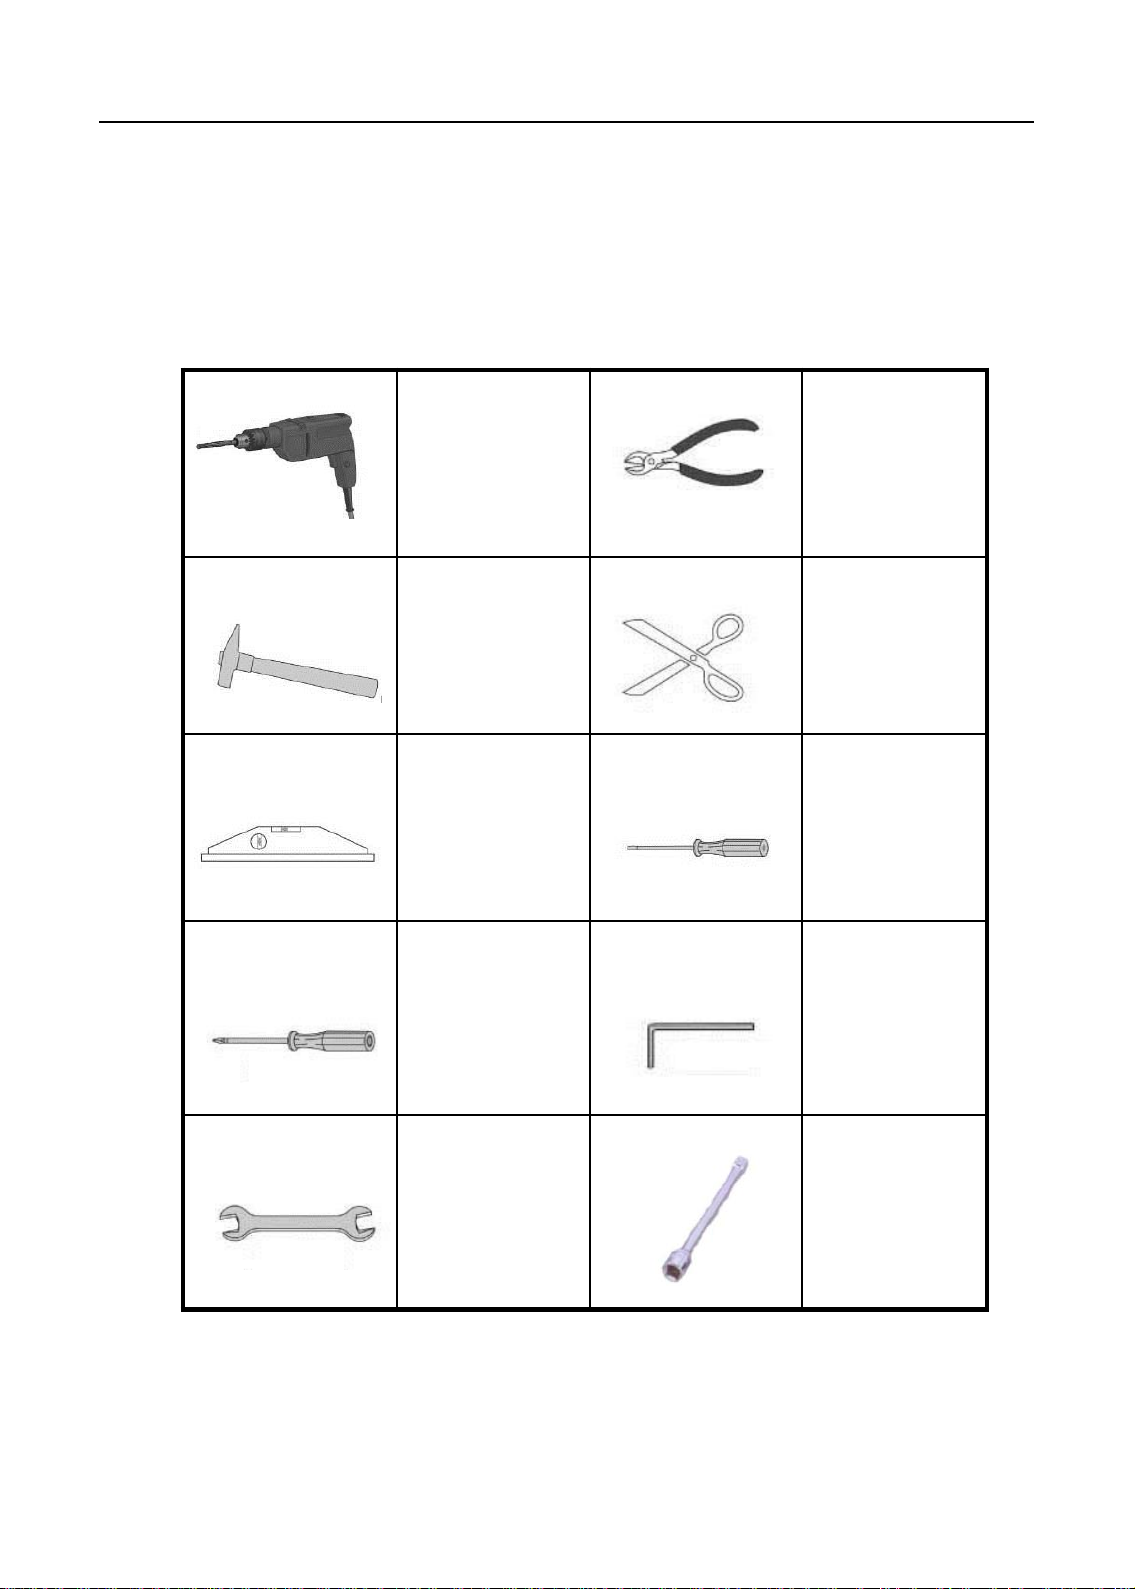
Installation manual of AJ12 US dental chair
Electrical drill
Pincers
Hammer
Scissors
Leveling
instrument
Flat
Screw driver
Phillip screw
driver
Allen wrench
Spanner
4.2 Tools recommended
The tools and instruments need to prepare before installation.
Hexagon
wrench
-bladed
socket
6
P/N:8021733
Page 10

Installation manual of AJ12 US dental chair
4.3 Installation requirements
Note:Sizes above are the minimun that required.
5 Installation
5.1 Place the chair
1. Remove all debris and cardboards
around the chair.
2. Hold the handrail and the front of the
frame, uplift the chair and place the
chair on the right place.
3. Remove binding belt and packages.
Holds
7
P/N:8021733
Page 11

Installation manual of AJ12 US dental chair
5.2 Fix the chair
Attentions:
1.The chair must be fixed on the floor for ensuring stability,
for it can be seriously damaged by wrong fixation.
2.Check out the material of the floor on the installing place.
Please contact the authorized contractor to thickening the
floor if its thickness is less than 82 mm.
1、Power on and activate the unit.
2、Step the button on foot control ,
raise the unit.
3、Unit switched off and power
disconnected.
4、Remove the cover and mark the installing position , then move the unit away.
Drill on the marked position, press the explosive bolt, then return the unit to its
position and tighten the screw.
8
P/N:8021733
Page 12

Installation manual of AJ12 US dental chair
5.3 Install the backrest
Figure 2
1
2.3.4
1 Metal backrest
2 M10*45 Hexagon socket cap screw
3 Φ10 Spring washer
4 Φ10 Plain washer
Fix the backrest on the chair frame wth three M10*45 screws.
9
P/N:8021733
Page 13

Installation manual of AJ12 US dental chair
5.4 Install the headrest
Figure 3
Adjustment nut
Install the headrest
1. Push the headrest glidebar into the slot of the backrest.
2. Adjust the nut to get proper damping force.
3、Fix the upholstery to the headrest bottom plate.
10
P/N:8021733
Page 14

Installation manual of AJ12 US dental chair
5.5 Install backrest upholstery
Figure 4
1
2 3
1、Metal backrest 2、Fixing shaft 3、Backrest upholstery
When installing the upholstery, you should put the upholstery on
the backrest with the shaft head pass through corresponding
keyholes of the upholstery, then push the upholstery in force till
it’s fixed.
11
P/N:8021733
Page 15

Installation manual of AJ12 US dental chair
5.6 Install the seat upholstery
Figure5
A: M6*16Hexagon socket
pan head bolt group
Install the seat upholstery
Put the upholstery onto the chair frame, let the chair frame get stuck in the
grabs that on the rear bottom of the upholstery, and fix the upholstery by
two M6*16 screws.
12
P/N:8021733
A
Page 16

Installation manual of AJ12 US dental chair
6 Operations
6.1 Power
The power switch of the power box controls power supplying of the dental
chair and its delivery system.
Switch on and you can get the power,switch off for not using in a
long term, or before maintenance .
Figure 6
13
P/N:8021733
Page 17

Installation manual of AJ12 US dental chair
6.2 Chair positioning
You can operate the chair manually or by foot control.
6.2.1 Operate by foot control
Raise or low the chair by pressing base up/down button , step on the
up/ down arrow on the foot control till the chair is in best position.
Move the backrest by pressing backrest up/down button , step on the
left/right arrow till the chair is in best position .
Figure 7
0
1
2
P
LP
Original position
Program Chair
Position 1
Program Chair
Position 2
Set
Spitting position
Backrest down
Backrest up
14
Chair up
Chair down
P/N:8021733
Page 18

Installation manual of AJ12 US dental chair
6.2.2 Initial settings of the chair
Electric motor system initial settings specification:
Press the “O” button on the main control panel of dentist unit to descend the
chair motor till the lower limit switch is triggered, raise the backrest motor till
the higher limit switch is triggered. System initialize automatically ,it can be
normally performed after initialization finished .
Caution: Electric motor system shall have the initial settings
in following situations.
.First installation.
.Motor replacement.
.Main board replacement.
.Limit switch readjustment or replacement.
.Abnormal movement .
6.2.3 Settings of programming memory position
Process or or
• Move the chair and backrest to the working position, and adjust dental light
to the desired condition ( On or Off), press the “P” button(3s),the
indicator light is on (beep 1 time),( loose button so as not to enter the
original setting state),enters the setup procedure.
• Press the “P1” button , and then press the “P “button one time
again,(beep1-2times), setup finished and escape the setup
procedure.
• P2, P3 position setup are same step as the P1.
P
P
15
P/N:8021733
Page 19

Installation manual of AJ12 US dental chair
6.2.4 Chair positions description
a. Backrest Up
Press this button continuously and the backrest will move upwards. When the backrest
reach the desired position, stop pressing the button and the backrest will stop
immediately.
b. Backrest Down
Press this button continuously and the backrest will move downwards. When the
backrest reach the desired position, stop pressing the button and the backrest will stop
immediately.
c. Chair up
Press this button continuously and the chair will move upwards. When the backrest
reach the desired position, stop pressing the button and the backrest will stop
immediately.
NOTE: If you press the button continuously, when the chair backrest
reach the limit position, it will automatically stop the movement.
NOTE: If you press the button continuously, when the chair backrest
reach the limit position, it will automatically stop the movement.
d. Chair down
Press this button continuously and the chair will move downwards. When the backrest
reach the desired position, stop pressing the button and the backrest will stop
immediately.
NOTE: If you press the button continuously, when the chair backrest
reach the limit position, it will automatically stop the movement.
NOTE: If you press the button continuously, when the chair backrest
reach the limit position, it will automatically stop the movement.
16
P/N:8021733
Page 20

Installation manual of AJ12 US dental chair
e. Original position
Press the button, the chair and backrest will move to the original position
automatically(Original position : backrest highest , the chair lowest) and light off . Press
this button again , the chair returns to former position and light on. The chair shall stop at
a new position by halfway stop.
f. Spitting button
Press the button, the chair and backrest will move to spitting position
automatically(Spitting position : backrest highest , the chair is still) and light off . Press
this button again , the chair returns to former position and light on. The chair shall stop at
a new position by halfway stop.
0
6.3 Dual articulating headrest
Figure 9 Headrest adjustment
A
B
C
NOTE:
Please fix the headrest after adjustment to avoid patient’s head not
being settled.
A Headrest
B Lock knob
C Glidebar
17
P/N:8021733
Page 21

Installation manual of AJ12 US dental chair
Figure 10 Fix the headrest for a wheelchair
Fix the headrest for a wheelchair:
1. Backrest of the dental chair is fully raised.
2. After reposition the headrest ,raise or descend the chair to adjust
heights. Patient's position should also be adjusted to put the
wheelchair and dental chair back to back together.
3. Make sure the wheelchair is locked.
18
P/N:8021733
Page 22

Installation manual of AJ12 US dental chair
7 Regulation & maintenance
7.1 Remove the upholstery
The special design of upholstery is easy to remove and replace .They
are installed on backrest, seat and headrest of the chair .
Backrest upholstery
To take off the upholstery from backrest ,you should hold the bottom
edge of gasket firmly and lift it up (1 inch or 25 mm) ,then lift the
upholstery from the backrest of the chair ( Figure15).
To reinstall the upholstery,you can put the keyhole of gasket on nail
head, then push till the gasket is fixed.
Figure 15 Remove the backrest upholstery
19
P/N:8021733
Page 23

Installation manual of AJ12 US dental chair
Seat upholstery
Loose the screw at the front end of the upholstery, push the upholstery
forward,then remove the seat upholstery.
Figure 16 Remove the seat upholstery
20
P/N:8021733
Page 24

Installation manual of AJ12 US dental chair
8 Reserved lines
A
Control wire for delivery head
24V power cord for dental light
Ground wire for delivery head
21
P/N:8021733
Page 25

Installation manual of AJ12 US dental chair
Swing Type
A B C
A
C
16
17
18
1
2
3
4
5
6
7
8
9
10
11
12
13
14
15
1. 1/8" white , reserved for dentist unit
2. 1/8" brown,reserved for dentist unit
3. 1/8" red, reserved for dentist unit
4. 1/8" orange, reserved for dentist unit
5. 1/8" black, reserved for dentist unit
6. 1/8" blue,reserved for dentist unit
7. 1/8" yellow,reserved for dentist unit
8. 1/8" green,reserved for dentist unit
9. 1/4" black,reserved for dentist unit
10. 1/4" blue,reserved for dentist unit
11. 1/4" red,reserved for dentist unit
12. Control wire for delivery head
13. 7 core power cord for delivery head
14. 24V power cord for dental light
15. Ground wire for delivery head
16. 1/4" green, reservd for assistant's control
17. 1/4" yellow, reservd for assistant's control
18. Control wire for assistant control
B. Drainage pipe
22
P/N:8021733
Page 26

Installation manual of AJ12 US dental chair
9 Upholstery Maintenance Instruction
The upholstery provides users unparalleled comfort, excellent aesthetics and
reliable quality. The upholstery has a one-year warranty on defective materials and
workmanship. This instruction ensures a longer life of the upholstery if it is properly
maintained.
Cleaning
Users can clean the upholstery with mild solution, non-ionic detergent, water or
cleaners without alcohol, bleach or ammonia. Do not use abrasive cleansers or
tools which can permanently damage the surface of upholstery.
Disinfection
The dental system suggests disinfecting the leather once a month with a 3%
hydrogen peroxide solution, leather cleaner or 3% muti-enzyme cleaner based on
its instruction to ensure effective disinfection, and then fully wipe it with water.
Caution:
Do not disinfect the upholstery with alcohol, potentiated glutaraldehyde
disinfectant, liquid bleach, Benzammonium bromide (Benzalkonium chloride)
disinfectant, Benzoyl chloride ammonium propanol disinfectant or any kind
of acid and alkaline disinfectants which will lead to the aging, cracking or color
difference of the upholstery. If the improper material is used and the upholstery is
damaged, such as leather cracking or aging and color difference, this warranty
becomes void.
23
P/N:8021733
Page 27

Installation manual of AJ12 US dental chair
10 Connecting diagrams
Connecting diagram(Electric system)
24
P/N:8021733
Page 28

We reserve the right to make any alterations which may be due to technical
improvements.
ADS Dental System Inc.
Add: 1590 S Milliken Ave., unit A, Ontario, CA 91761
Tel: (626) 620 0456
E-mail: ads@adsequip.com
http://www.adsequip.com/
 Loading...