

Admiral (Kelon) AW-10CR1FLU Owner’s Manual
AIR CO
UseandCareManual
AIBEACONOIC_ON£I}OP£_._A_ABiTACIONES
Manual de Usey Ma_stenimiento
[] ®
}f :
}:ii:: ? : _ illllllllllllllllllllllllllllllll i 2 il :?illlllllllllllllllllllllllllll : 2 :::::::
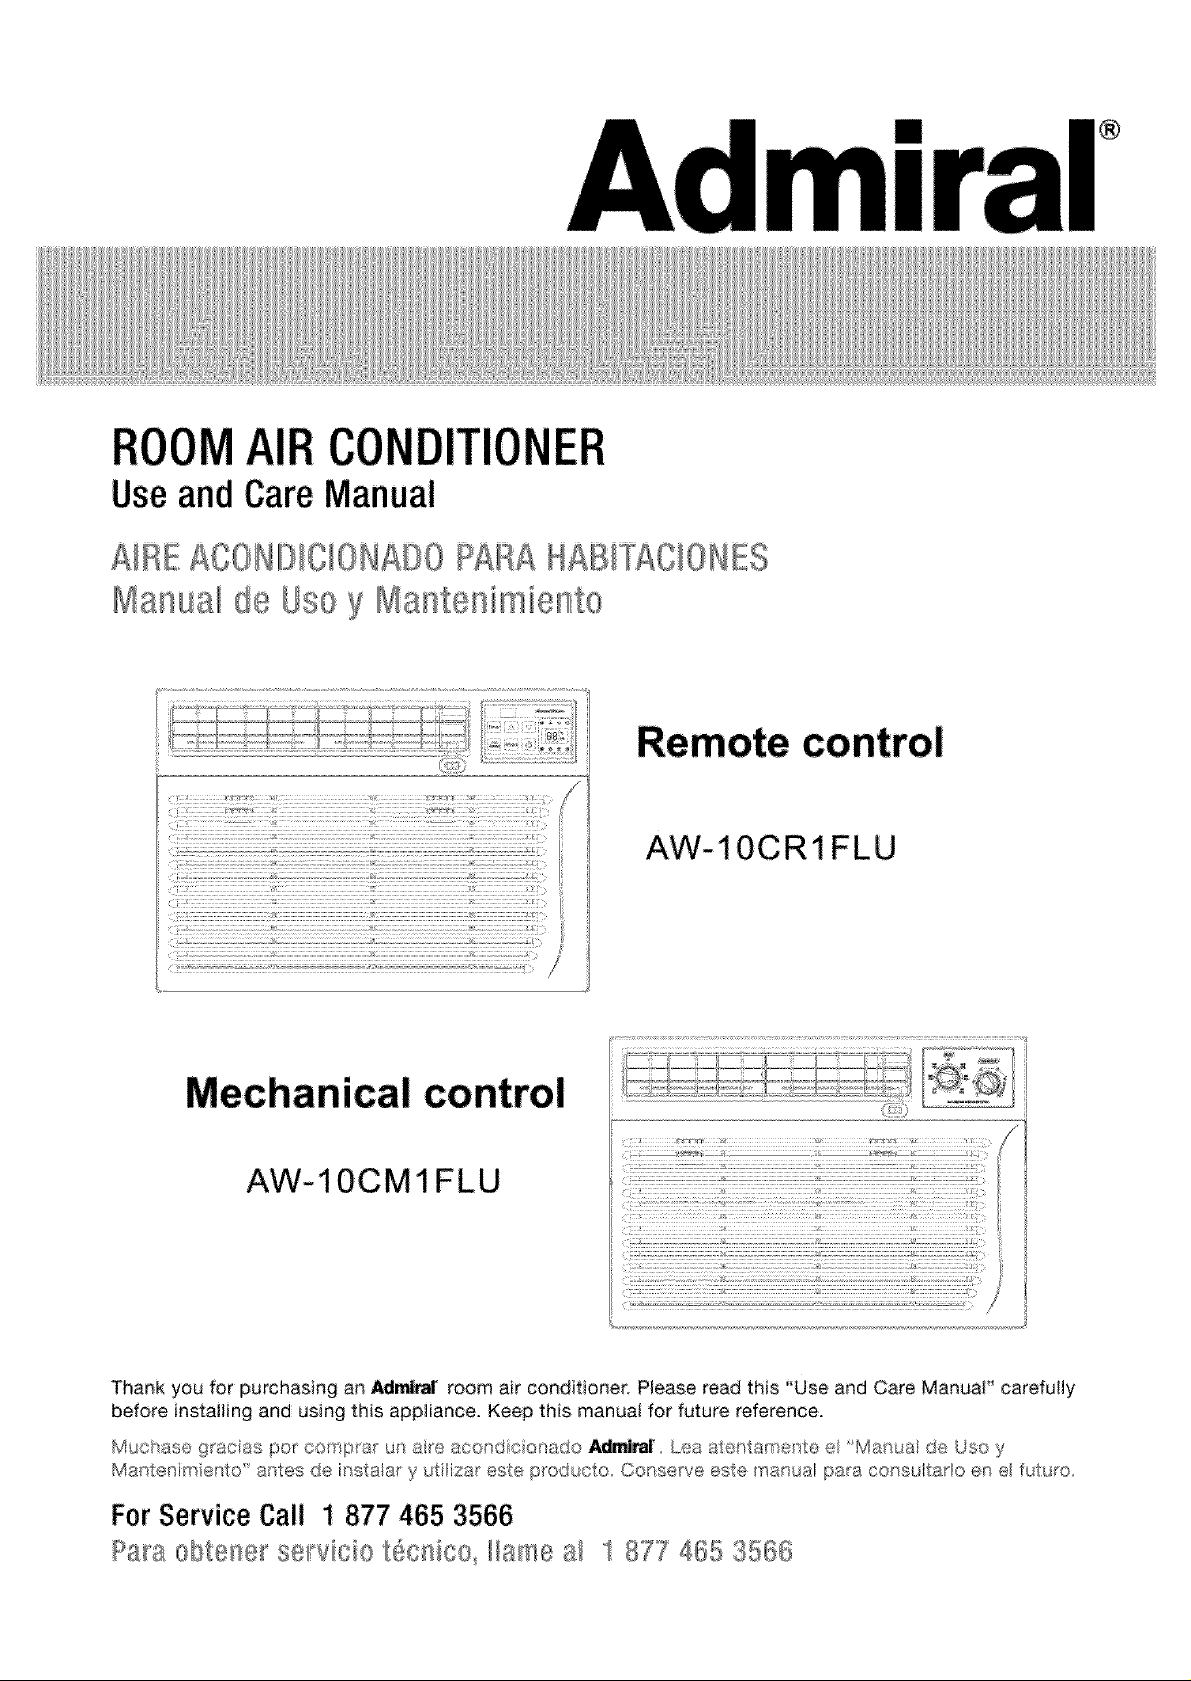
Mechanical control
AW-i OCM1 FLU
Remote control
f_
AW-10CRI FLU
r
:) i
}
a
;2: 2:::: 2 2::22;22:/22 ?:: 2::: 2:::::::::::::::::::::::::;£
i
2 '' -- /
.... .¢
Thank you for purchasing an Admiral"room air conditioner. P_easeread this "Use and Care ManuaI" carefully
before instai|ing and using this appliance. Keep this manuat for future reference.
MLcbase f_rac as f:_o_ ompe U_-_aide acor_dicio__ado .a_mi_ Lea at:entame_te e 'Mar_,_a de Uso y
Mantenimie¢_to' a_te de ir_staiar y uti_izar este p_oducto. Co serve este mar_ual pa_a co_su_ ado en el t,£_Jas.
ForService Call 1 877 465 3566
Para obteser seivicio t(sc,,x_ico_Itame al 1 877 465 356_
Page,
Air Conditioner Safety ......................
_ntreductien and Pa,_sidentification ..............
Electrtca! Specifications
Tips Before Installation
Installationinstructions
Operating instructions
Care and Maintenance
TroubleshootingGuide
Warranty ...............................
..... 4-5
..... 15
m
..... !6
.... 2_3
°.. 8o10
,, 11-14
lntreducci6n ...................
Identificaci6n de las Piezas .......
£specificaciones E!_ctric_s .......
Consejos Antes _ela Instalaci_n ....
Instruccionesde _nsta!a¢i6n ........
Instruccionesde OperatiOn ......
Cuida_o y Man_enimiento ..........
Gutapara I_ Soluci6n _e Problemas
Page,
..... !8
.. i8-19
....... 20
..... 21
,. 22-24
.. 25-28
...... 29
...... 30
WhatYouNeedto KnowAboutSafetyInstructons
Warning and important Safety instructionsappearing in this manua! a_enot meant to cover
all possible conditions and situations that may occoc Common sense, caution, and care
must be exercised when operating or cleaning tools and equipment.
Always contact your deaie5 distributor, service agent, or manufacturer about problems or
conditionsyou do not understand.
This:isthe safety alert symbol tt s used to a_ertyou to potential personal injury hazards
ai! safety messagesthat foiiOWthis symbol tOavoiidpossible inlu_yor deat:k
i
DANGER' _
avoided, wi!! resuit: in death or serious in ury,
WARNINGindicates a potentially hazardoussituation which, if not
avoided, could result in death or'serious injury,,,
CAUTIONindicated a potentially hazardoussituation which if not
avoided, may result in reiinoror moderate injury,
................................................................................................................................................................................CAUTIONusedwithout the safety alert symbo}indicated a
nd cate,_an imminently hazardous situation which, f not
! CAUTioN
property damage,
PORTANT
Toreduce the risk of fire, eiectrica]
shock, or injury when using your air
conditioner;, follow these basic precautions:
• Plug into a grounded
3_prong out!or.
= Do net remove
ground prong.
,, Do not use an extension cord,
,,' gnptug air conditioning
before servicing,
Use two or more people to move
and install air conditioner,
THESE INSTRUCTIONS

The potableai_cond tlonershouldbe conneoted
fo a 115 V_60 Hz 15_or R0_,am#fiJsed 3@_n@
• The use of a _im_deiay fuse or time_,_ay c#suit
bre_akeriS recommer!ded
A.IIwidng mus_ c_'np_y with local madnatioeaJ
et_strical _d_ and be Installed by a qua!iliad
eiectr_cian if you have any questions coetact
a qualdied electdeia_,
Power Supply Cord
Ebctrical Requirements
ELECTRIC S_OCK _AZASII
• Pla_ into_ grounded 3_@rong eufiet
• Do r_t remove groaad prong,
Do r_ot uae ae adapter,
Do _ot u._e an extension cord,
" Failure to fellow _ese instructions can
resuR in de_ fire_ er electrical shook,
A Bes_ B_wte_ B Test ButtOn
Unpack the Air C0ndit:i0 er
EXCESSIVE WE!6_T HAZARD
Use two or mo_e _epte to move and
install air coraltloner,
Failure to _e _o _an re_u!! t# back or
ell'mr injttry.
Remove packaging materials
Remove a_'_dproperly dispose o_ _ckag#_# materials
Remove tape and glue residue #ore eu_acee before
t_ming on lhe air condAioner. Rub a small amount
o_ iqu_ @sh soap over the _heslve w_h your fingers
Wipe wth warm water and dP#r
• Do not use sharp 7nsfrume_ts, rubbing alcohol
flammable fluids_ or abrasive oleaners to remove
tape e_ gtue_ These products can damage the
surface of your air conditior_e_
• Handle aft conditioner with care°
Thank _u for this' roan air _ c_l your home, This USE AND CARE MANUAL
provides #on ne _¢ the proper care and maJnte#ance of _ur new room air condit_ne_
ff pro_tty maJn'ta_n_, your air conditioner wil_ give you many years of trouble h_e epe_tian. Toavoid
ins read instt'ucdens completely before starting. "Tl_ismanuat contains infe_a#on for the
ins and c_ra#en of your room air condi#ene_
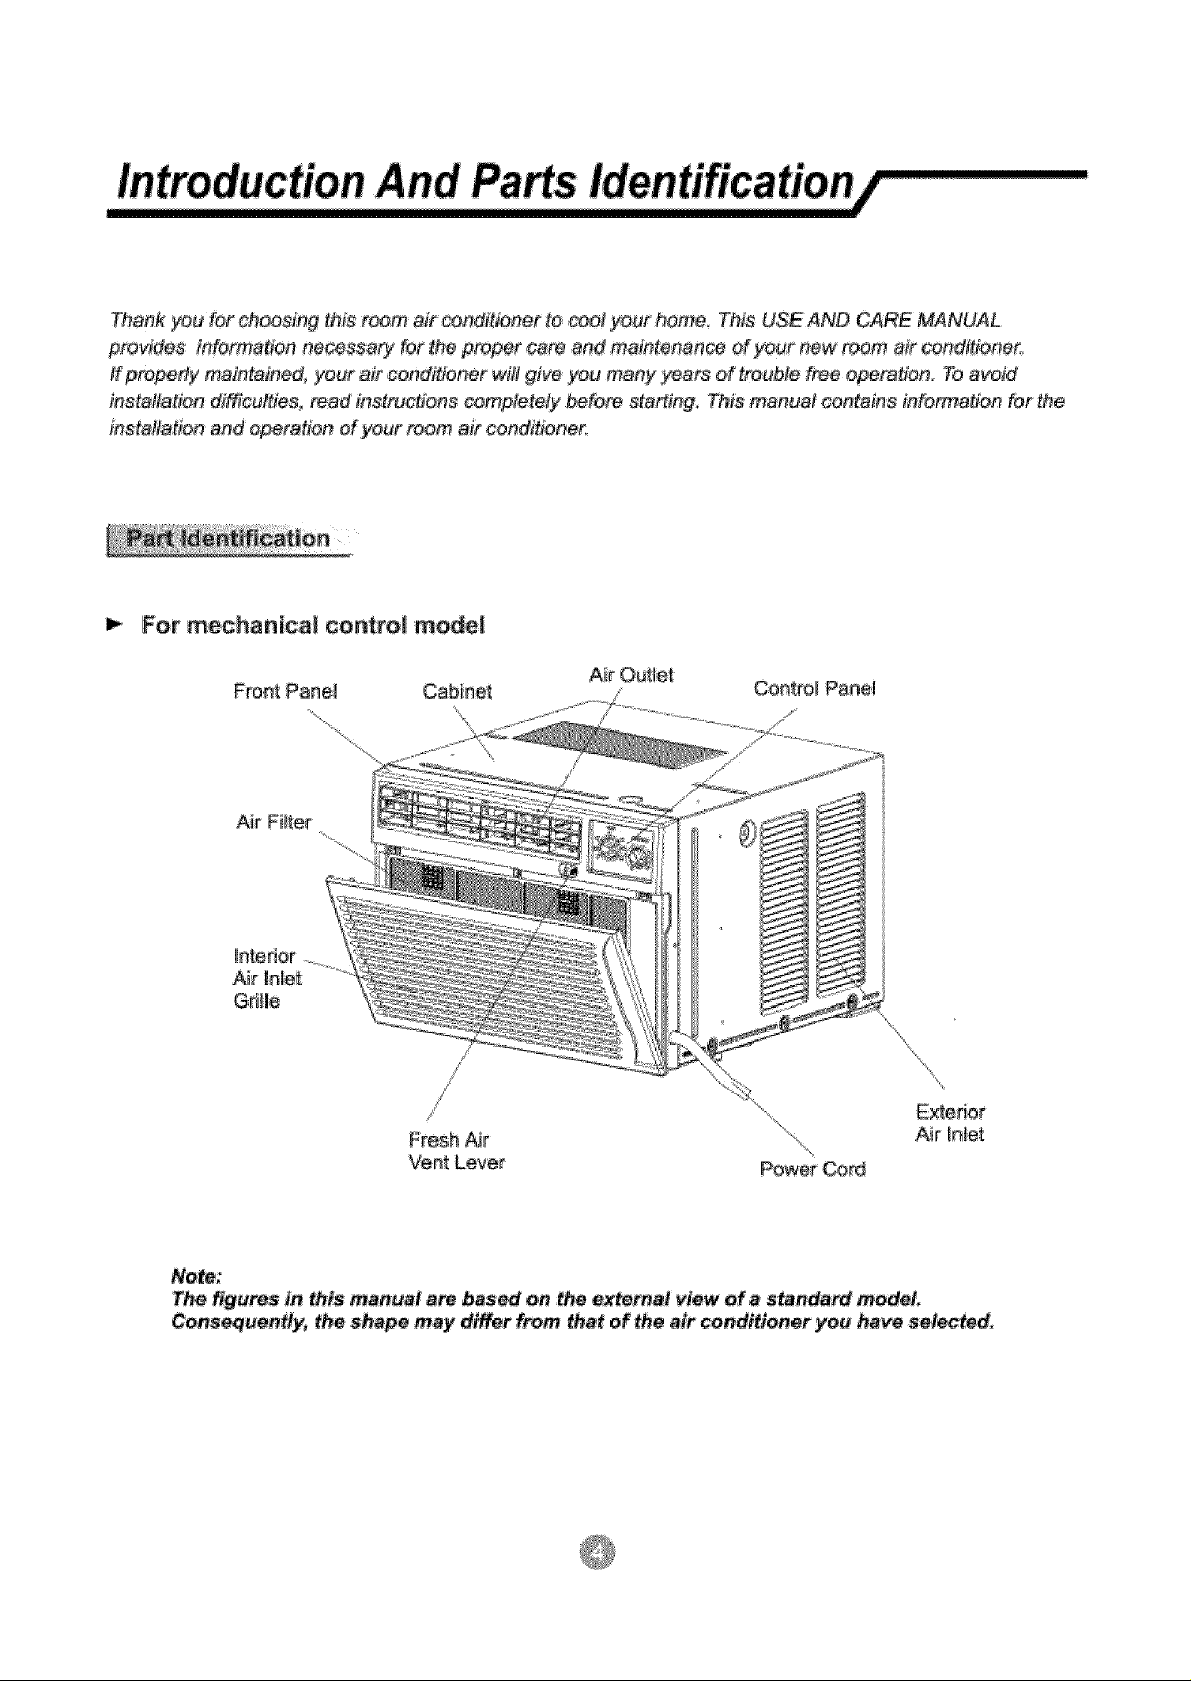
For mechanlca! control mode|
Ne_;
The fig#resin this manual a_ bas_ on :the externa! view era atandand _deL
Cens_uent/y, the shape may di_r from tha_ of the alr cendltiener ye# ha_ aeSected.
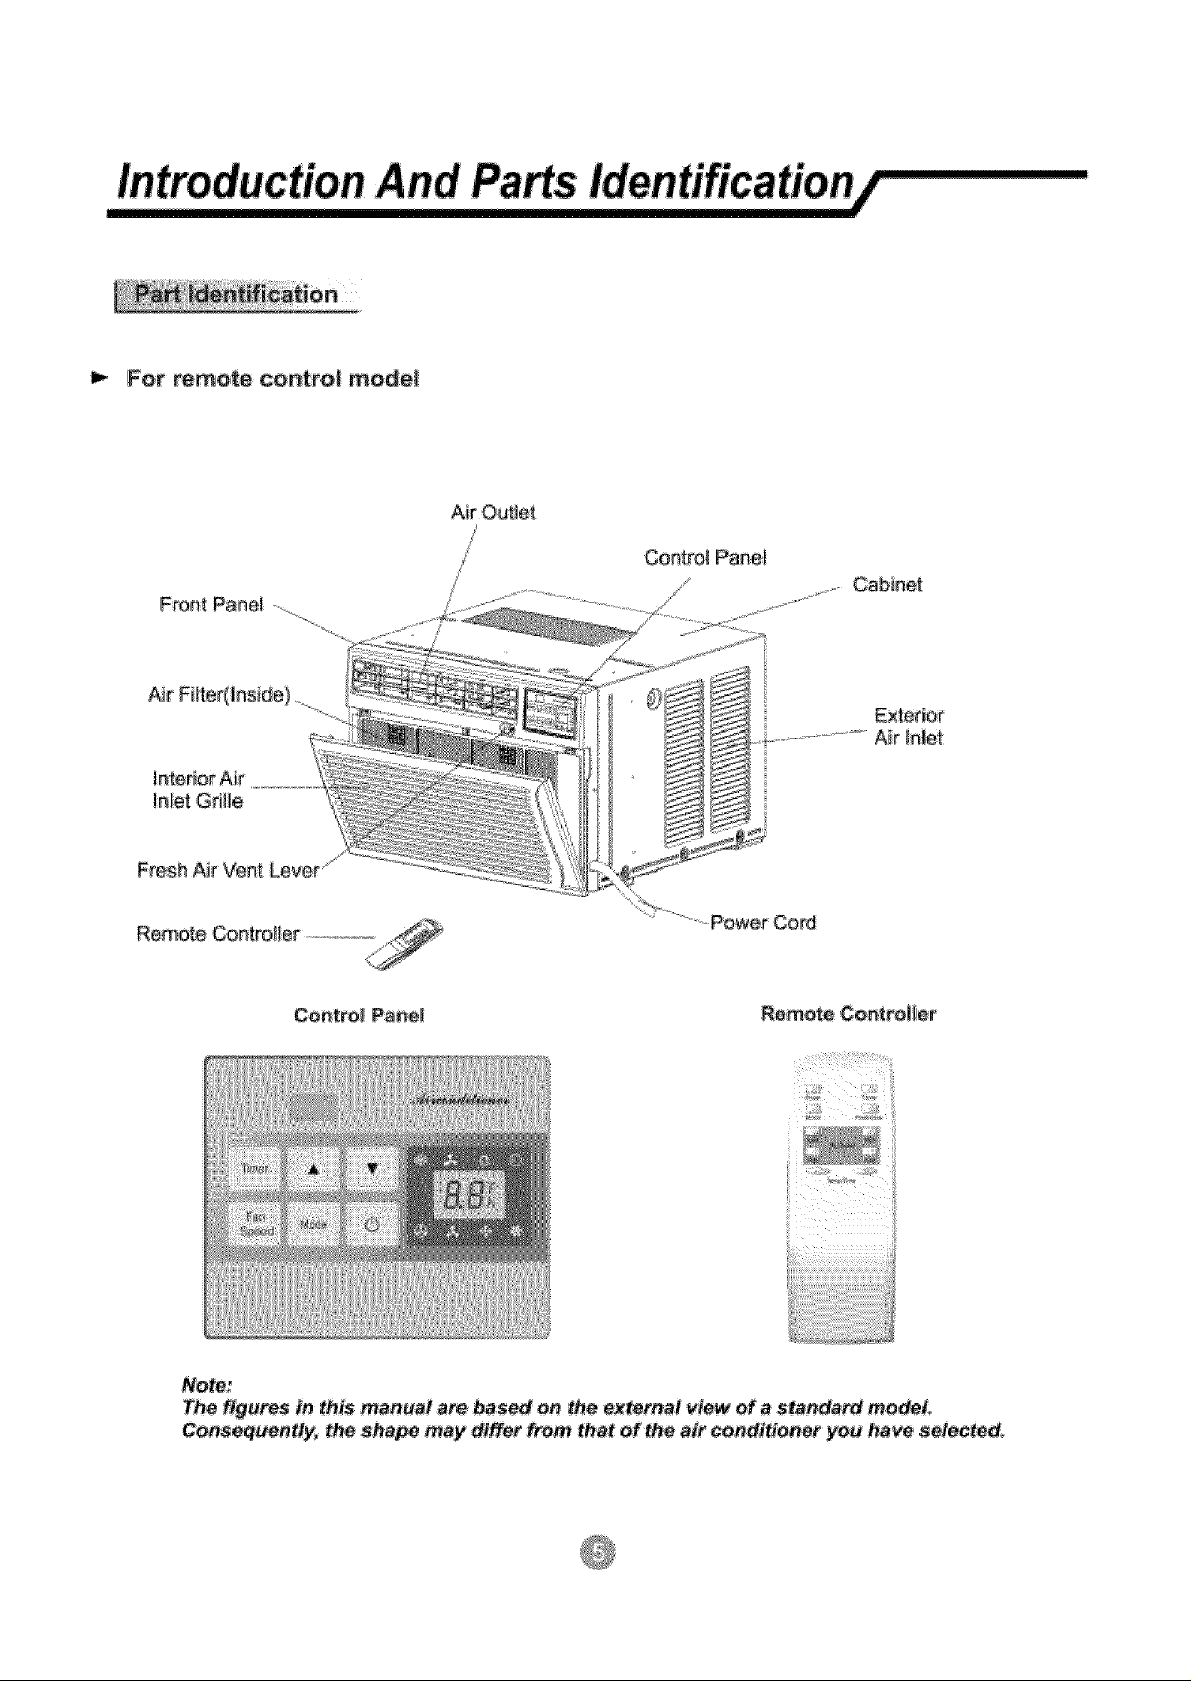
For remote contro| mode!
Power Cod
Note:
The figures in this manual are, ba.s_ on the external view of a standard medial
Conseq_._ently, the shape may differ #ore that of th_ air conditioner you have setested_
A_ wi_ng must comply w_th_e_l and national
e_ec_rica_codes and must be insia_ed by a
q_Ja_ieedele_rician Once you have any
questions, regarding t_e fo#c_wing inst_Jctions,
co_act a qual#ied e_ridan
2. Che_ avai_ab:_epower supply and :resolve aey
wiring p_ebiems BEFORE i_sta#ing and ope_atJeg
this umit
3. For _r safety and protection: This unit _s
grounded throughthepower cord when
p_uggedintoa ma_ch_r_waiio_et,,_fyou are
not sure whether your wa|i| outlet is pro_dy
grounded, please _nsu_t a qua|tiled
e|ectriciae,
4. The 'wa!_ou_let(3op_} _us_ match _he p_
(_p_R) oa the _rv.ice cord s_pplied "withthe u#_o
DO NOT use p_ug a_apters or extension cord
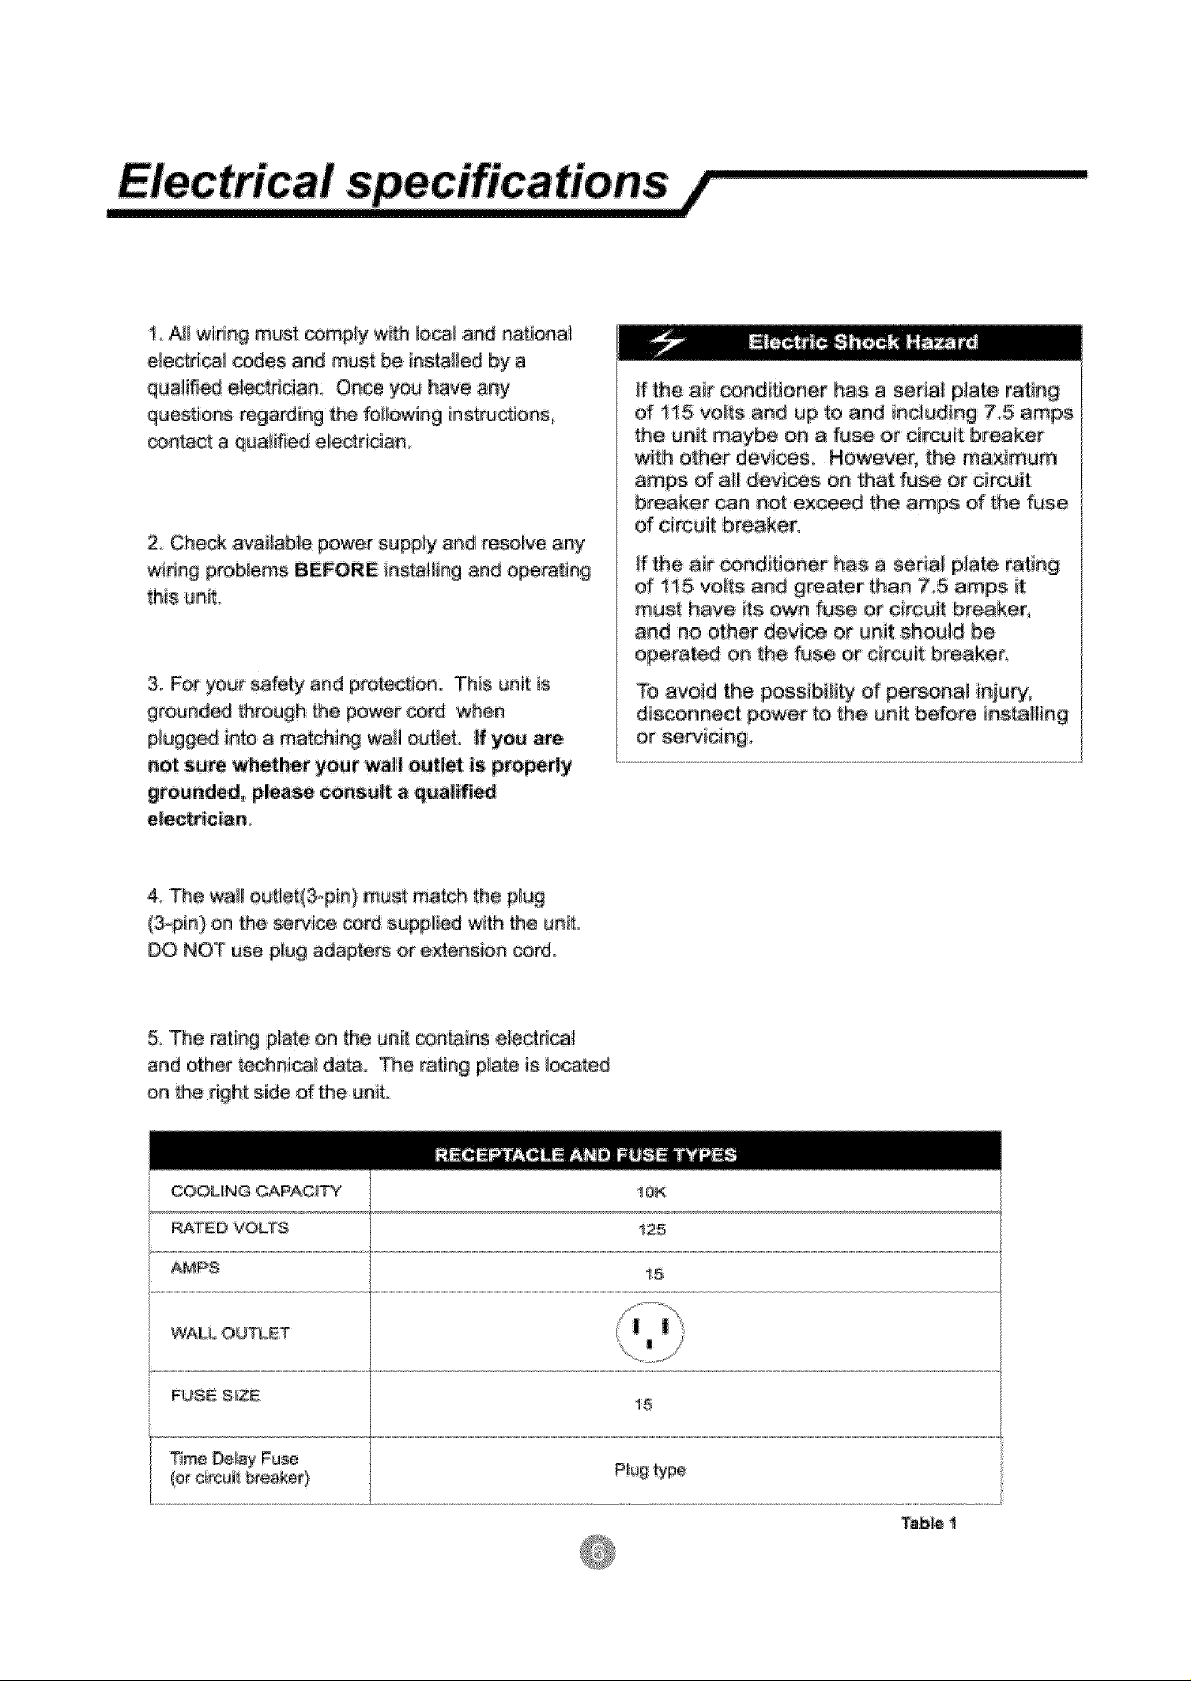
_fthe a_r _ndf_ener has; a serial p_ate rating
d !t5 veils and up to and in_ud_ag 75 amps
the uni_ maybe on a fu_ or circuit breaker
wi_ other devils However, the maximum
amps of at_ on that fuse or circuit
breaker can not exceed _e ampe of the fuse
of circuit breake_
If the _ir _ndiflener has a serial p_ate rating
of 1!5 vo_ts ned greater than 7.5 amps _t
mua_ have _ts ow_ fuse o_ circuit breaker,
a_d :no ether devi_ or u_it should be
operated o# _he fuse er circuit breaker.
To avoid the possib{iity of per_na_ ir_ju_/,
d_scaane¢t power to the _tt before _stall_g
& The _ti#g plate on _he umlt _n_in;s e!ectd_l
and other i[echni_ da_o The rating p_ate is _o_ted
o_ the dght side of _e unit.
YourRoommr Condit:_onerunit is designed b
be h_ghlye_cient arid save energy,, Fo_ow these
_ecommendations for greater efficiency,
1. Sol,oct thermostat setting that suits your
c#mfoA Meeds and _eave the ff_ermostat at:
2_The fi_ter is very efficient in remevi% airborne
paAide& Keep air fi_tet ciean, Norma_y flter
should _ cle_r_ed once a _oR[h, Mote
frequent c_eaning may _ necessa_ de_nding
on outdoor a_d iad_r air quality.
3 Use drape& curtains, or shades to keep
direct sun}ig;ht from heating your room, but
DO NOT obstru_ the air conditioner_ Allow _ree(3}
inches a_und unit to Circ_4!ate_
4. StaA your air conditioner before outdoor
ar _cornes ho_and un_mfod_ble. This
_voids a_ _att[a!_od of d_scornfoA whi_e
the u_ff is co_ng off the _m
'tbur Room Air CoodiHoner was designed
for e_sy _nstaih_ion in _ single or doub_e-h£%
window. NOTE: This ur_i__ NOT designed for
vedii_[ (s!_er type) w-indows_
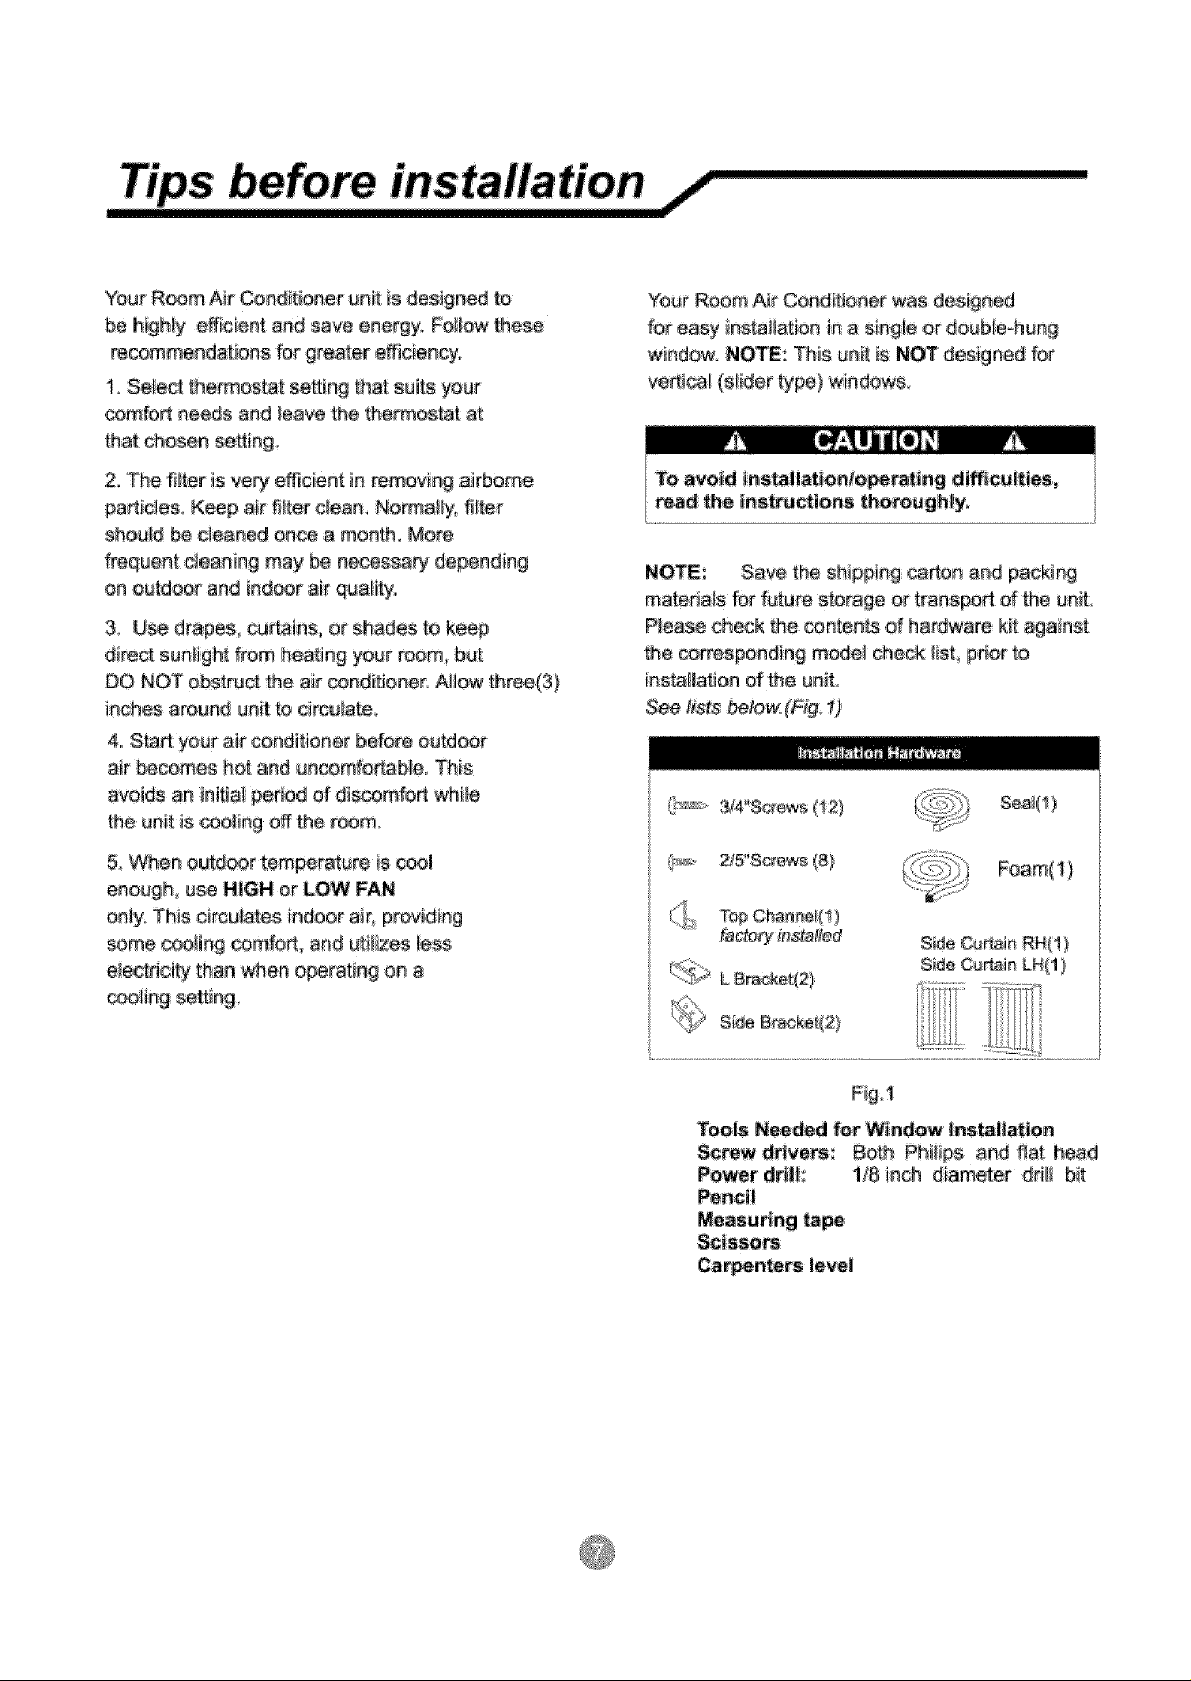
NOT_; Save the shipping _rto_ arid pack_%
materials for future s_o_ge or transpsd of _he uniL
Ptea_ check the eo_te_ of hardware kit against
_e correspondin_ mode_ che_k _ist,F_r
testa[laden tithe unit.
(?"':"'.#4"Sc'_e'_s(!2)
5, When ou_r temperature is _ol
enough use HIGH or LOW FAN
only TNs ei_cul_es indoer air, p_._vidi%
some c@ling oomfo¢ and uLilizes less
eiectricity than when eperati% o_
_lif_ _ettin 9,
2i5"Sc_e,w_(8}
Tools N_ded for Window Installation
_w drive_s: Both Phiiip_ _nd flat head
Power drill 1/8 inch diameter dd_f bit
Penei_
Measuring tape
Carpenters level
Becausethe_mp_esBorisheatedenthe
_nt_o[ssided the unit (right si_e), this side
wilt _ heavier ar_ mere awkward _ manipulate°
inadequate suppo_ on contr_ side d the unit
_n result _npercent _nju_ and damage b your
unit and greedy, Bherefore, it is re.remanded
to have som_ne assist you dunng the insta]_ation
d thisuniL
E Your unit was designed _oevaporate co_densatb_
u_er aerma_ c_it_on& Hewever_ _nde_e×treme
humidity _ed_t_oae excess _nde_ation may ¢_use
basepa# to, ove_ow Rethe _tside.
The u_it sheuJd be l_s_aHedwhere condensation
_n_eff can.t drip o_ p_estrians or neighboring
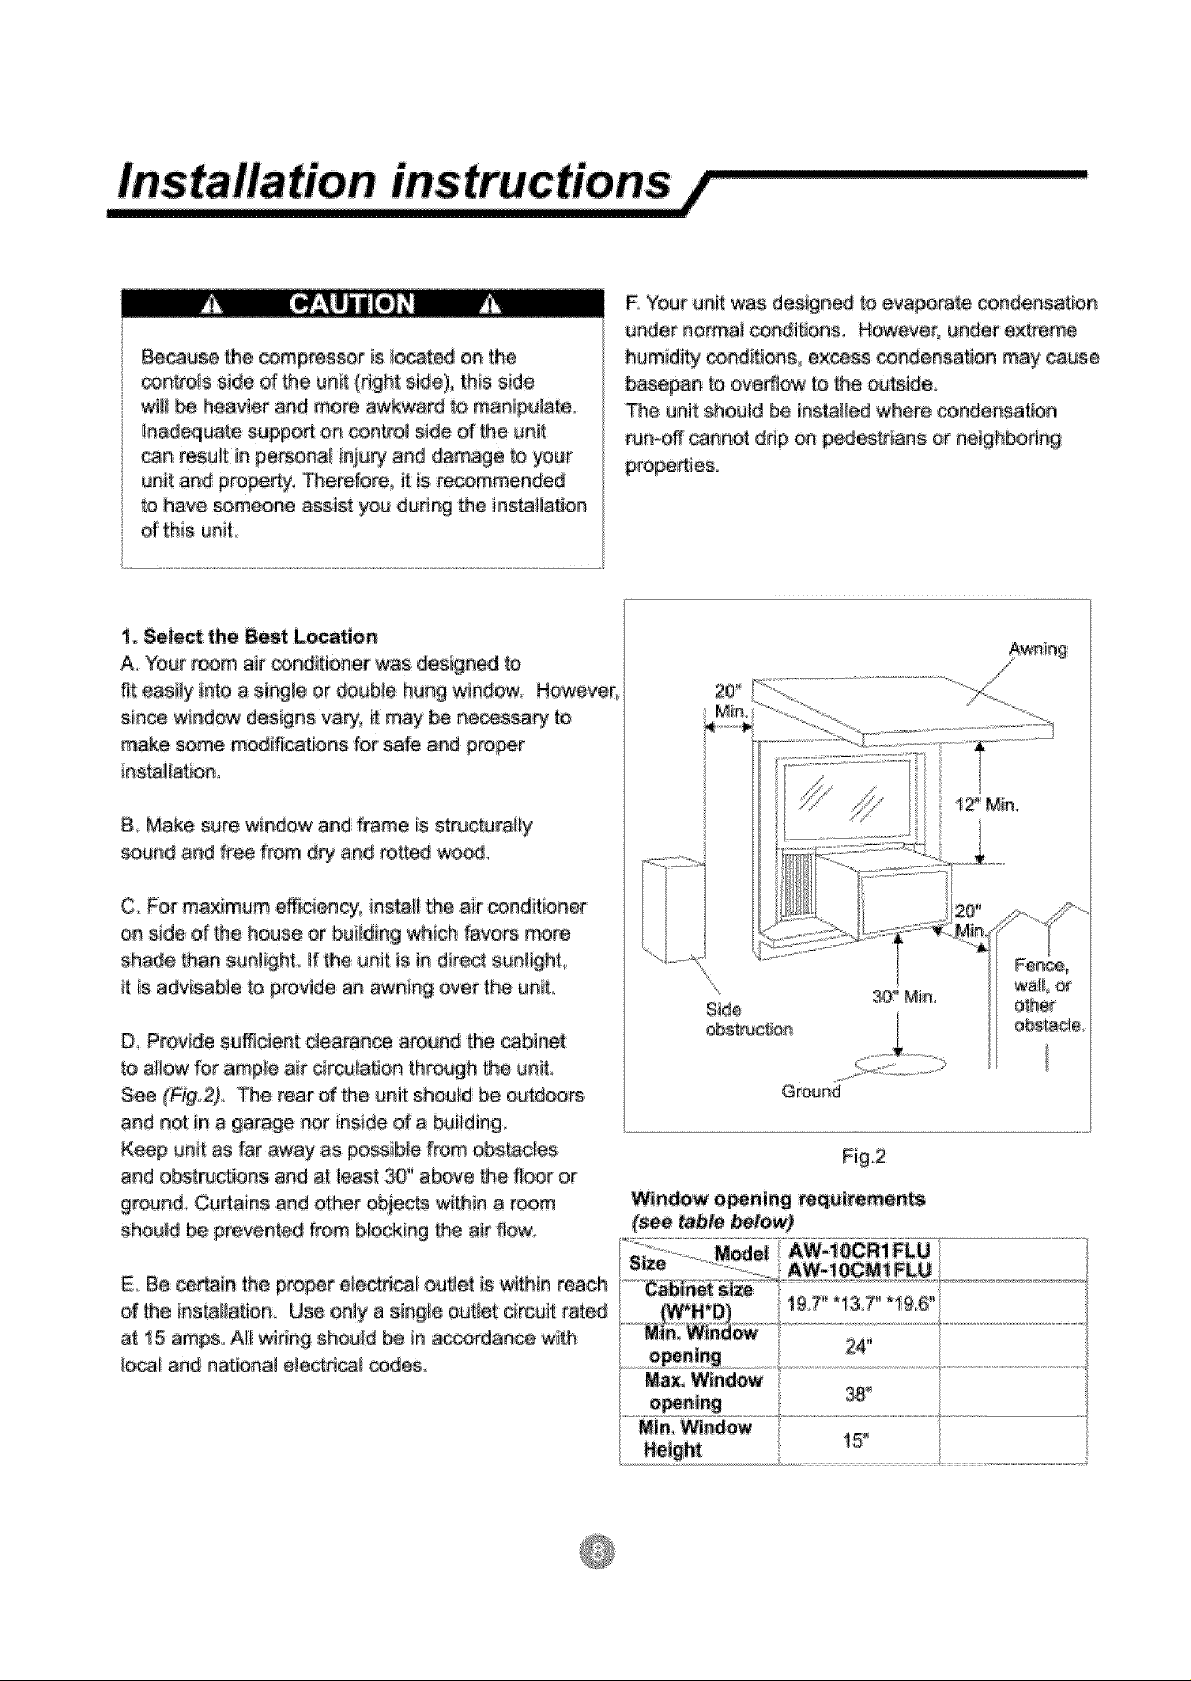
1. Select the Best Location
A, Your t_m att _ndl_ioa÷r was de_ign_ b
A ÷asi!y _ntea s!ng!e or doeb_e hung win_ew, However,
since window designs vary, it m_y be ne_ry to
make some medificatbns for safe and proof
;ns_ltatbn
B, Make sure window and frame is _ructurally
_und a_d _r_ from d_ and retted wo_,
C For ma×imum efft,ci_cy, ias_!t the air conditioner
on side of the house or building which favors _re
shade than sun_ighL _fthe ua_t is _ direc_ su_/ighL
it is advisable Reprovide ae awning over the uniL
D Provide sentient deara_ around lhe cabJae!
to allow for ampb ai_ gtrcula_Jenlbreu,g_ the u#iL
See _@_2). The rear of the unit _ould _ outdoors
a#d _o¢ in a garage nor inside of a building.
Keep uRit as far away as possible from ebstacles
and obs_rucaens a_ at toast 30" above _e f_r or
g_und CuAai_s and o_her objecls within a room
_houtd be prevented [tom blocking the air flc_.
AwniR_
Gru_d
Fig.2
Wt#dow e_ai_g reqebemee_
(see t_ble belew_
E. Be cer_ai_ the proper e_tti_l outlet i_ within reaCh
o_the installation Use ea!y a single out/at circuit rat_
at_t5 ampso All w;ri_g sheuW be i_ a_erdan_ wi_
_o_i and n_.bnal e_ectd_ codes
e_ng
Mi_, Wiadew
15_,
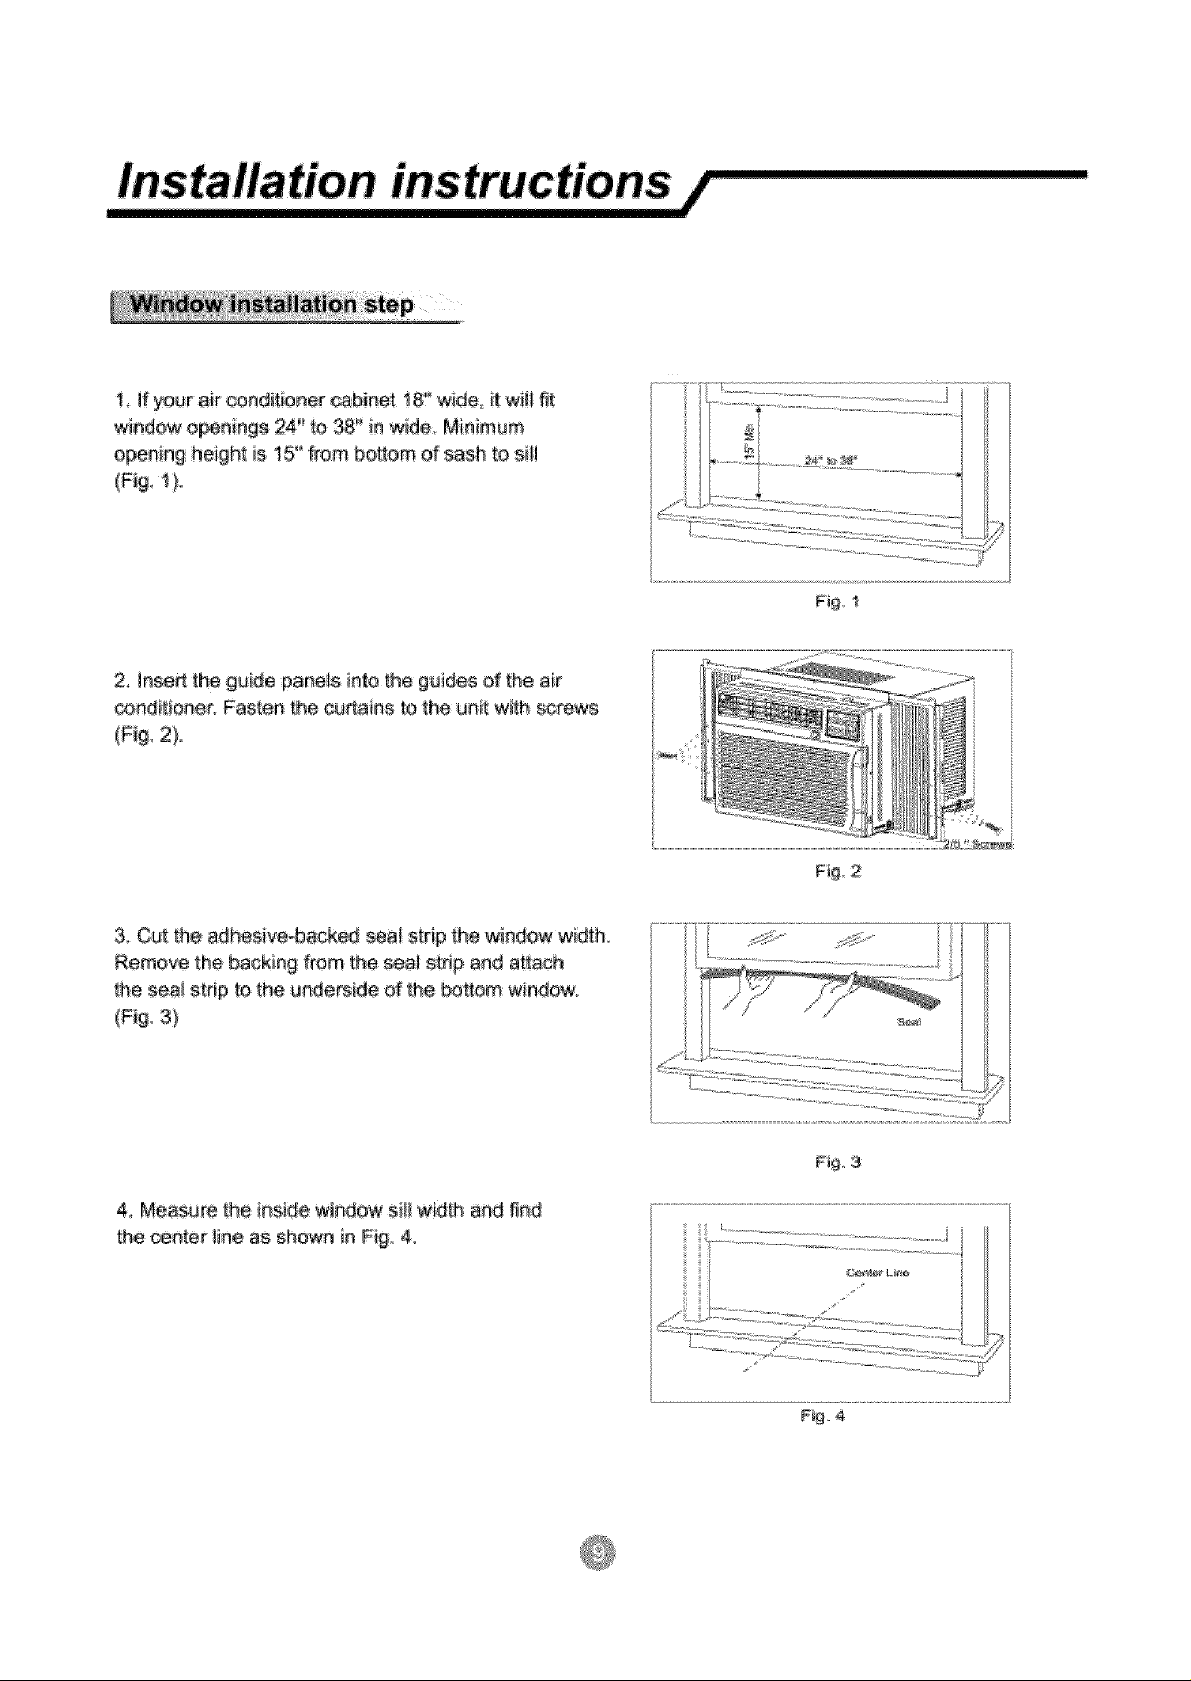
1, !f _ur air conditioner _bi_et _ w aeo it:w_il fff
wimdow o_n#mga z ,o inwide, Minimum
^4" *_ 38"
_ i _
openin# height is 15" _om bottem of sash _osill
2__nsed the guide panels into _e gu des ef _he air
c_di_ione{: Fasten the _ins ta _h÷ unit wi#_ screws
F!g_2
3, Cut the adbesive@ack_ _al strip the window w_th,
Remove the backing f_om the seal stdp and attach
the seai s_rip te the underside of the _ttom: window,
4 Measure _e inside wind_ si!_width a_ fi#_
_e _ater line as shown in Fig 4.
[! ........
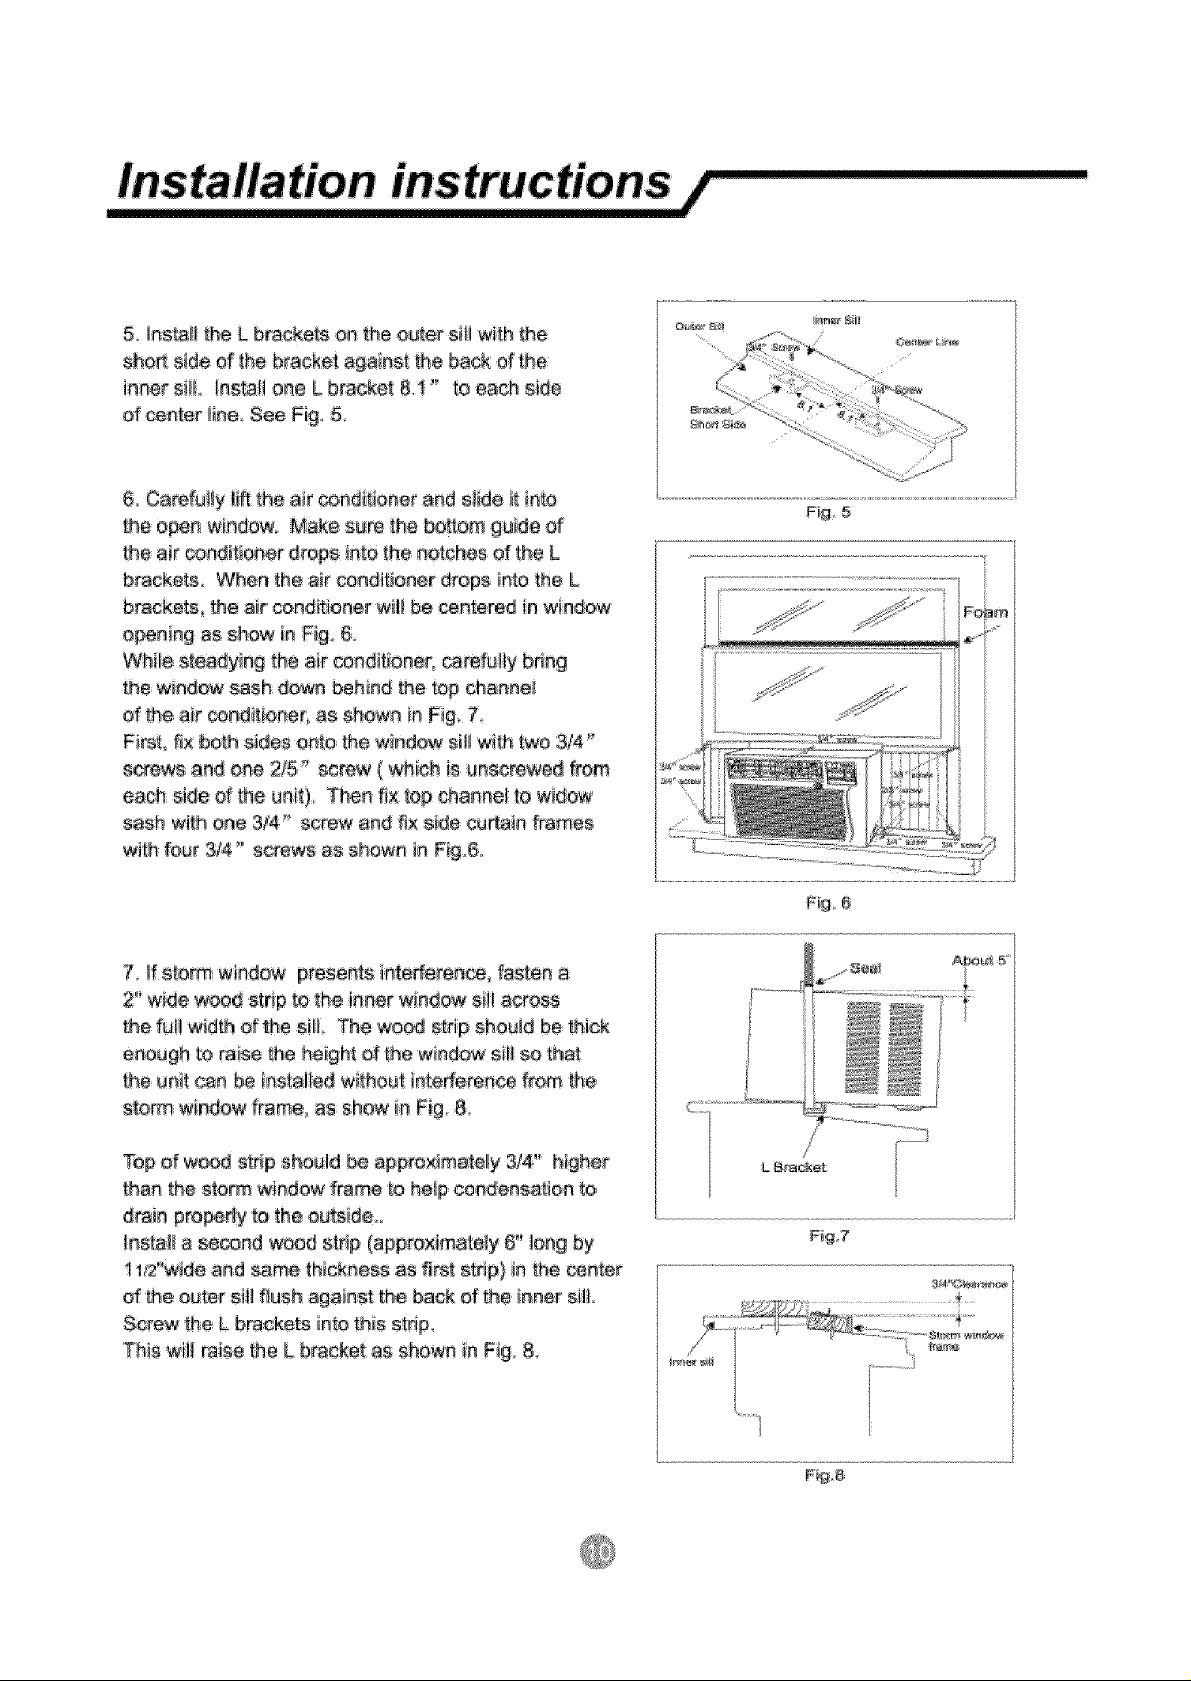
5_#_s_!!theL b_ckeLs oa the outer sill with #_e
sh_ s_deof the bracket against the back of he
inner si_L _nst,all one L bracket 8,1" to each side
af center line, See Fig 5,
& Carefully l_A_he air cond{_aner and slide it into
the open w_ndow_ Make s_m _he _ttem gu_e of
he air _nd_t_oner drops !ere _he notches of the L
brackets When the air c_ditioner drops into _he L
brackets_ the air conditioner wil} be centered [n w_ndow
e_ning as show inFig 6
While steadying the air candit©nef_ _reNI]y b#ng
the window sash down behind [he top cha_nei
of _e air _nditk}neB as shown in Fig 7
First, fix beth sides o_e _hewind_.*_ sWw_th two 3/4 _'
s_-ews and on_ 2/5" scr_ ( which _sunscrewe_ f_om
each s_deof the unit), Then fl× _op channel to widow
sash with one 3/4" scow and fi× s_e cu&a#_ frays
with four 314" screws as shown inFig6
Fi# 6
7 !f storm window presents intederence_ fasten a
2" wide wood s_rip [a the inner windaw sill acrass
the full wid_ af the sill The 'wo_ strip shouJd be hick
enough to raise _heheight afhhe wind_ sill so that
he un_tcan be Installed witha_t t_t,ede_n_ _m _he
storm window #ame, as shaw in Hg, 8.
Top of w_d strip should _ approximately 3/4" higher
than the storm window frame to he_pcoedensafiee to
d_ain pre_dy to _heeu_ide.
!ns[a_ a se_nd wood st@ (a£preximate_y 6" !ORgby
1lf2"wide a_d same thickness :as fl_t strip} _nthe center
d hheouter sill flush against the back d _e i_ner sill
Screw the L brackets into this stri_,
This wil_ raise the L bracket as shown in F_go8.
Fig 7
F@,8
 Loading...