

Admiral (Kelon) AW-08CR1FM, AW-06CR1FM Owner’s Manual

UseandCareManual
m ®
Mechanica! Control
AW-06CM1 FD
AW-O8CMI FD
Remote Control
qli!_;!
Thaak you for porchaei_g _# _ room air ¢onditie_er. Please read this '_Uee and Care ManuaP careft_iiy
belofe installing and using lhis appliance Keep this man_a! for f_ttJre _ference,
For Service Cat! ! 877 465 3566
Air Cenditiener Safety .......................
...... 2-3
Intreduction and Parts Identif_cation ..............
Electrical Specifications ........................
Tips Before Installation .................
installation instructions
Operating Instructiens
Care and Maintenance
Troubleshoeting Guide
........ 4-5
....... 8-!0
.... 11-14
....... 15
........ i6
....... t7
t_tred_cci6n ..................
Identificaci_n de tas ?iezas ,. °
Especificacienes E!_ctricas ....
Consejes A_tes dela Instalaci6_
lnstruccienes de _nsta_a_i_n o,.
i_str_ccienes de OperaciSn ,,,
Cuidade y Mantenimie_to ......
Guia para la Sei_ciSn de Problemas
Page
...... 18
...... 19'
..... 20
..... 21
,, 22-24
,, 25°28
...... 29
...... 30
......... 31
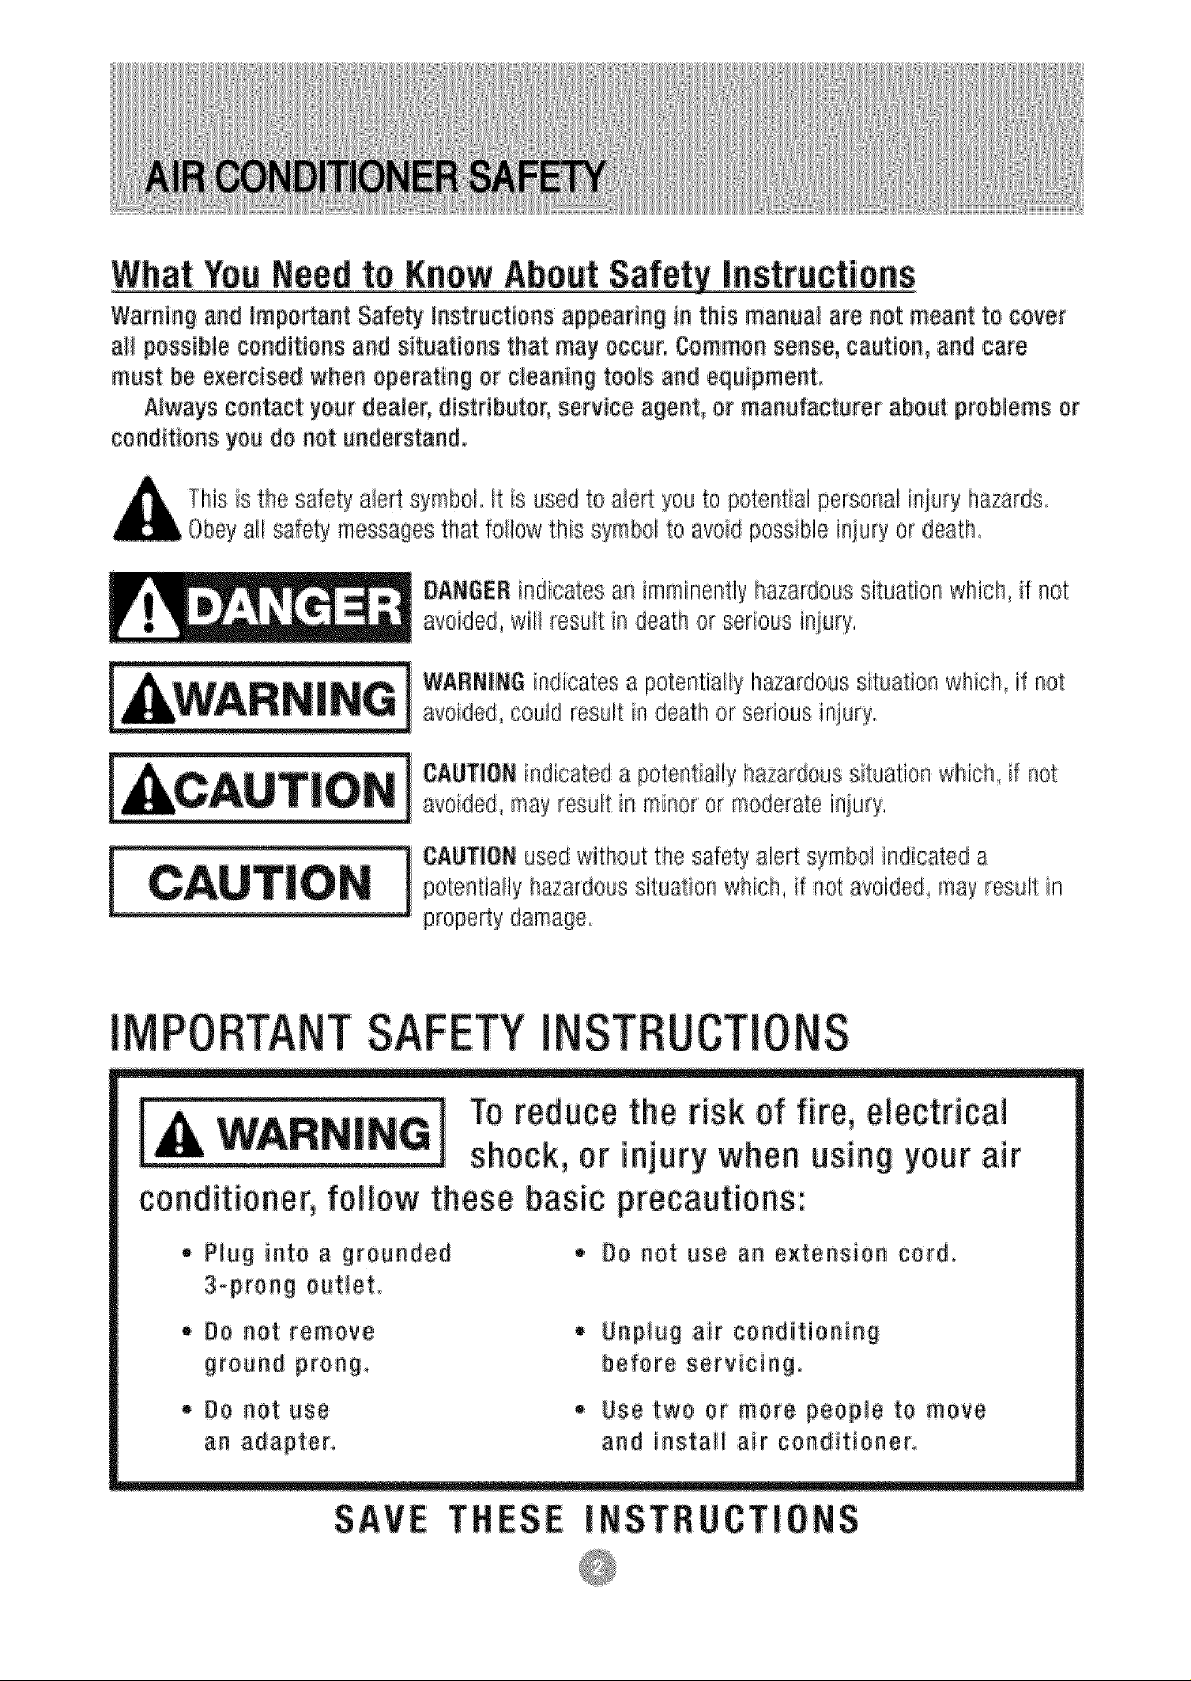
WhatYouNeedto KnowAboutSafetyinstructions
Warning and important Safety instructions appearing in this manual are not meant to cover
a_ possibleconditions and situations that may occur, Common sense, caution, and care
must be exercised when operating or cleaning tools and equipment,
Always contact: yourdea!er, distribute5 service agent, or manufacturer about problems or
conditions you do not understand°
This isl:he:safetyaiert symbol..It s used to a_ertyouto potential persor_ali;nj:uo'hazards
'a!! safetymessagesthat renew this symbolto avoid possible iniury or d.,ath
DANBEB indicates an immiiner_tlyhazardoussituation which, f: not
avoided, wilt result in death or serious iniury,
WARNINGindicates a potentia!!:yhazardoussituation which_if r_ot
avoided, could result in death or serious injury.
CAUTION ndlcated a potent a_lyhazardouss_tuahonwhich if not
avoided, may result:in mino_or moderate ir_iur?,
CAUTION usedwithout the safety alert symbo!indicated a
potenlia!ly hazardoLs situation which, if not avoided_may result in
property damage
I UCTIONS
Toreduce the risk of fire, electrical
shock, or injury when using your air
conditioner, follow these basic precautions:
-Piug into a grounded
3-prong outlet,
- De net remove
ground prong_
SAVE THESE INSTBUCTIONS
DO not: use an extension cord,
gnpiug air conditioning
before servicing,
Use two or more people to move
and install air conditioner,
The p_ab!÷ air cend tkmer shou!d be co_i_ex:'._ed
to a i i 5 V 60 Hz t 5_or 20.-am_ _used S@roe_
The use of a _me de_ayfuse or _ime.de_ay circuit
bma%r b recommended
e_eetrical 6odes as_ be installed by a quaiifie_
e!_1rician, If you have any questions, contac_
a queried _ectd iarL
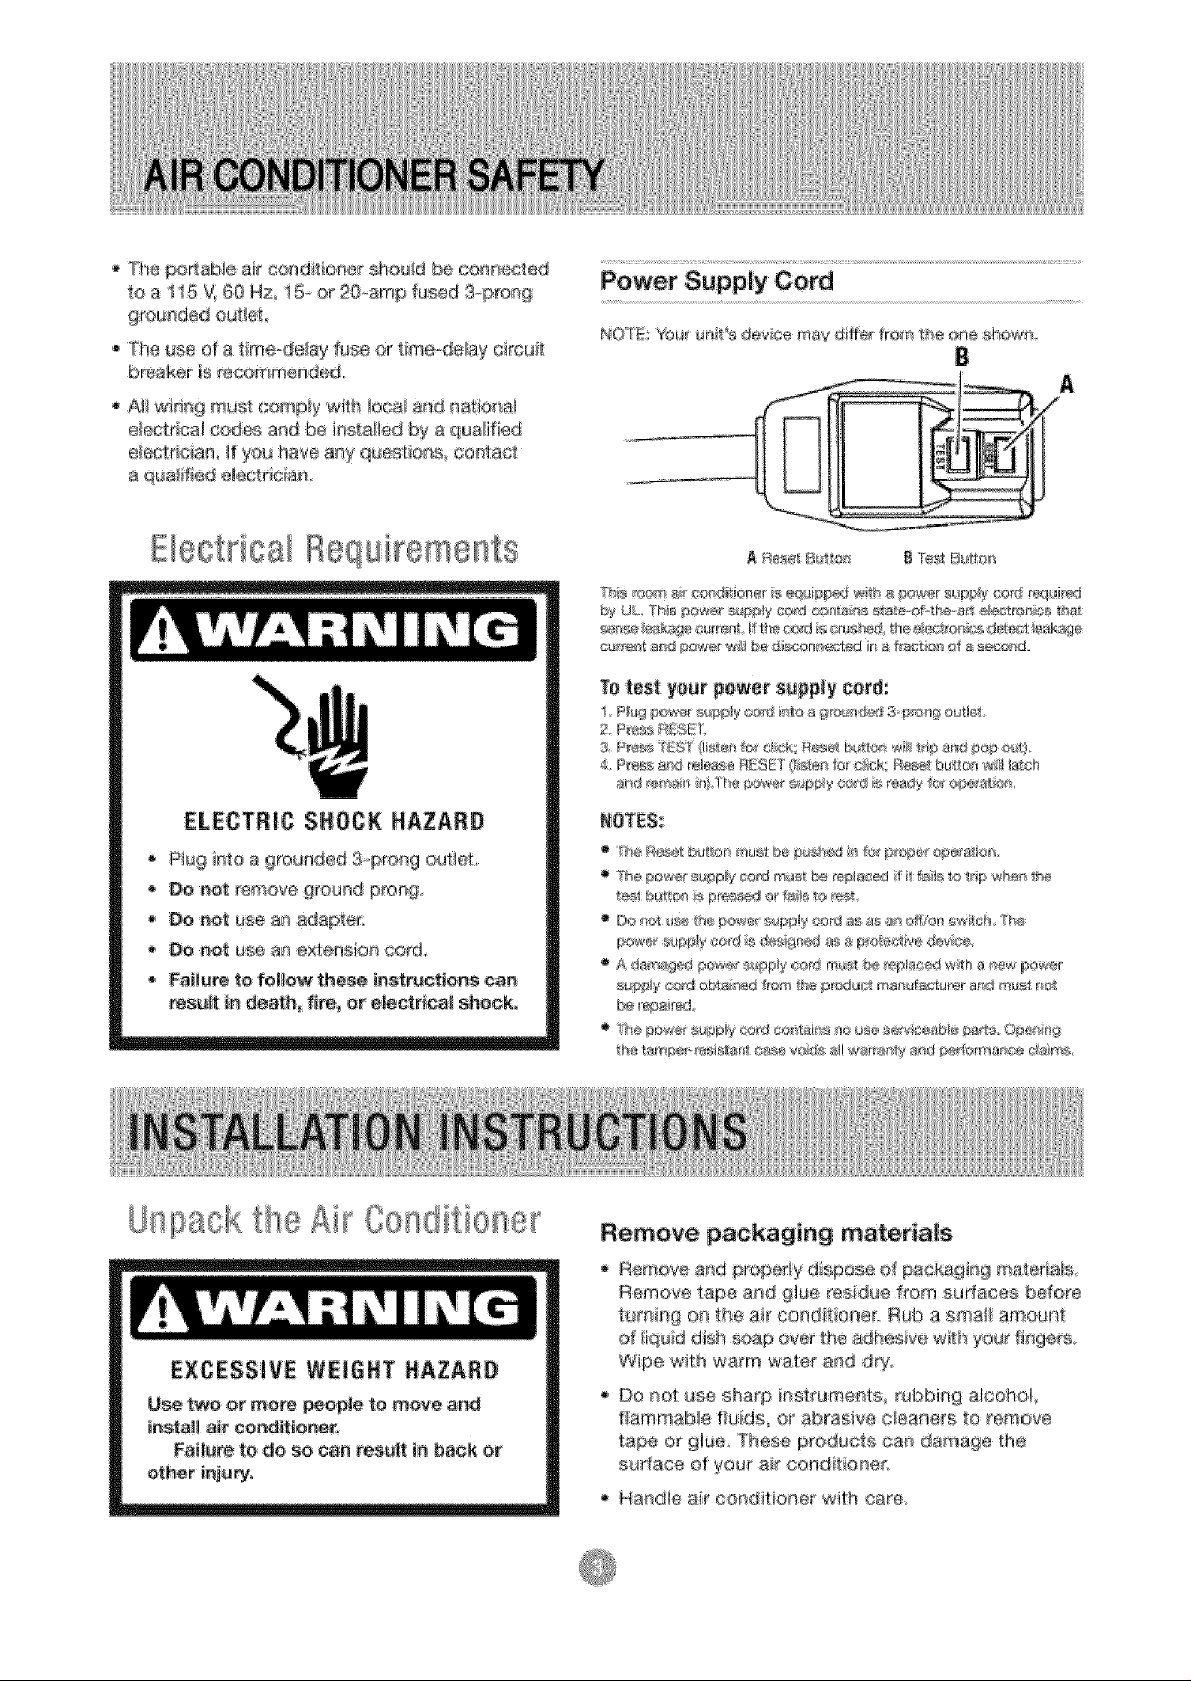
E ectdca Bequi ements
t'40_/'Et'¢ou_i._nV8 de_ce ma'_,dtfe_ from _8 one s_ew
8
A
Te test y_ar powe_ s_p|y cer_:
2 R_r:,s RFf£Z
;, R_ss am_ _el_sa B_SE]' _sl_er_for @ok _s_ bu_tcq _41 la_i::h
C011dtt!o !eth ®Alt
EXCESSIVE WEI6_T _AZAR#
U_, two or me_ _op_e to move and
instal! _ _o_t_0aer.
Fai|am to do, so can res_!t i_ baok or
Remove packaging materials
_, Remove and :prt,_mr!y dispose of pac_agin9 am_erials
Remove tape ao# glue ms,due from sudaces before
tt£eillg oB _he ai_' eo_ldilioR,er. Rub a a_l_a!_ amo[Jet
of i_,}u_ddish soap o-vet the adhes!ve with ye_4_tinges
Wipe with warm water aed #ry.
_, Do _ot ease sharp insfmmeets robbing alcohol
t ammabie fluds, or abrasi_ve cteaners _o remove
tape o_ gh.,m. These F_;>duota oan damage the
surface of your ar oondit oriel.
Handle a_'eonditbner _'ith earn

Thank you lot ch this ro___mair condft_oner _ocod your home, Th_SUSE AND CARE MANUAL
provk_'es i'n,fo_ma#Onnecessa_ #at the prosper ca_ and maintenanc_ d your new room air co er.
ff pmpe@ ma)htained_ .your air conditioner w#_g_'veyou many years of"treub/e free ope_t_oe To avoid
#_s n difficu#ie& read _nstructions e_ybefore staR#_g, Th_srnaoua_ co_ta#'}s _t}fotT_at_ _orthe
inetaffation and opera#or_ of your room air icondidoner:,
PARTIDENTiFICATiON
For mechanical control model
]ntede_ Air Outlet
Ve_i Air Vane Fresh Nr Lever(_r 8K modet only}
i
g
Cabinet
Cont_ol Knob .................Powe r Corn
Note:
'The figu_s in t#is manua! ate L_8ed en the externa_ v:tew era standard medal
Censeq#ent_y, the _hape _ay differ from that of the _tr ¢ondltien_t _o# ha_e _eleeted_
He[_ental _ir vane and Fresh air :ever is not avatiable _ this medal
PARTWDENTiFICATtON
Remote control mode!
Front Pa#e!
In_efior AI_
In_t Gdlle
F
Remote Cent roi!er
Contro! Pane!
Control Pane|
No_:
Remo_ Contro!_r
! A_!wiring must comply with local and nat e}_a!
e_ectdca_eodes and must be installed by a
_ice_sed e_ectrioian Once you have any
questions regard ng the fo_!ew_r_gir_stractiens,
contact a ficensed electrician
2, Check: available power supply and resolve any
wiring probiems BEFORE ins_ii _g arid operating
this unit.
3 For your safety and protection this unit is
grounded through the power cord whee
p!ugged _to a ma[@_in9 waii out!or, if you are
n_t sure whether yeu_ wall ouNet is prepet_y
grounded,, p_ease consa|t a [ieeaeed
electrician,
4 The wall eut!et(3@rl} must ma_ch the p_ug
13Pi_) e# _he _wer cord suppled with the u_it
DO NOT _se plufl adapters or extension cords,
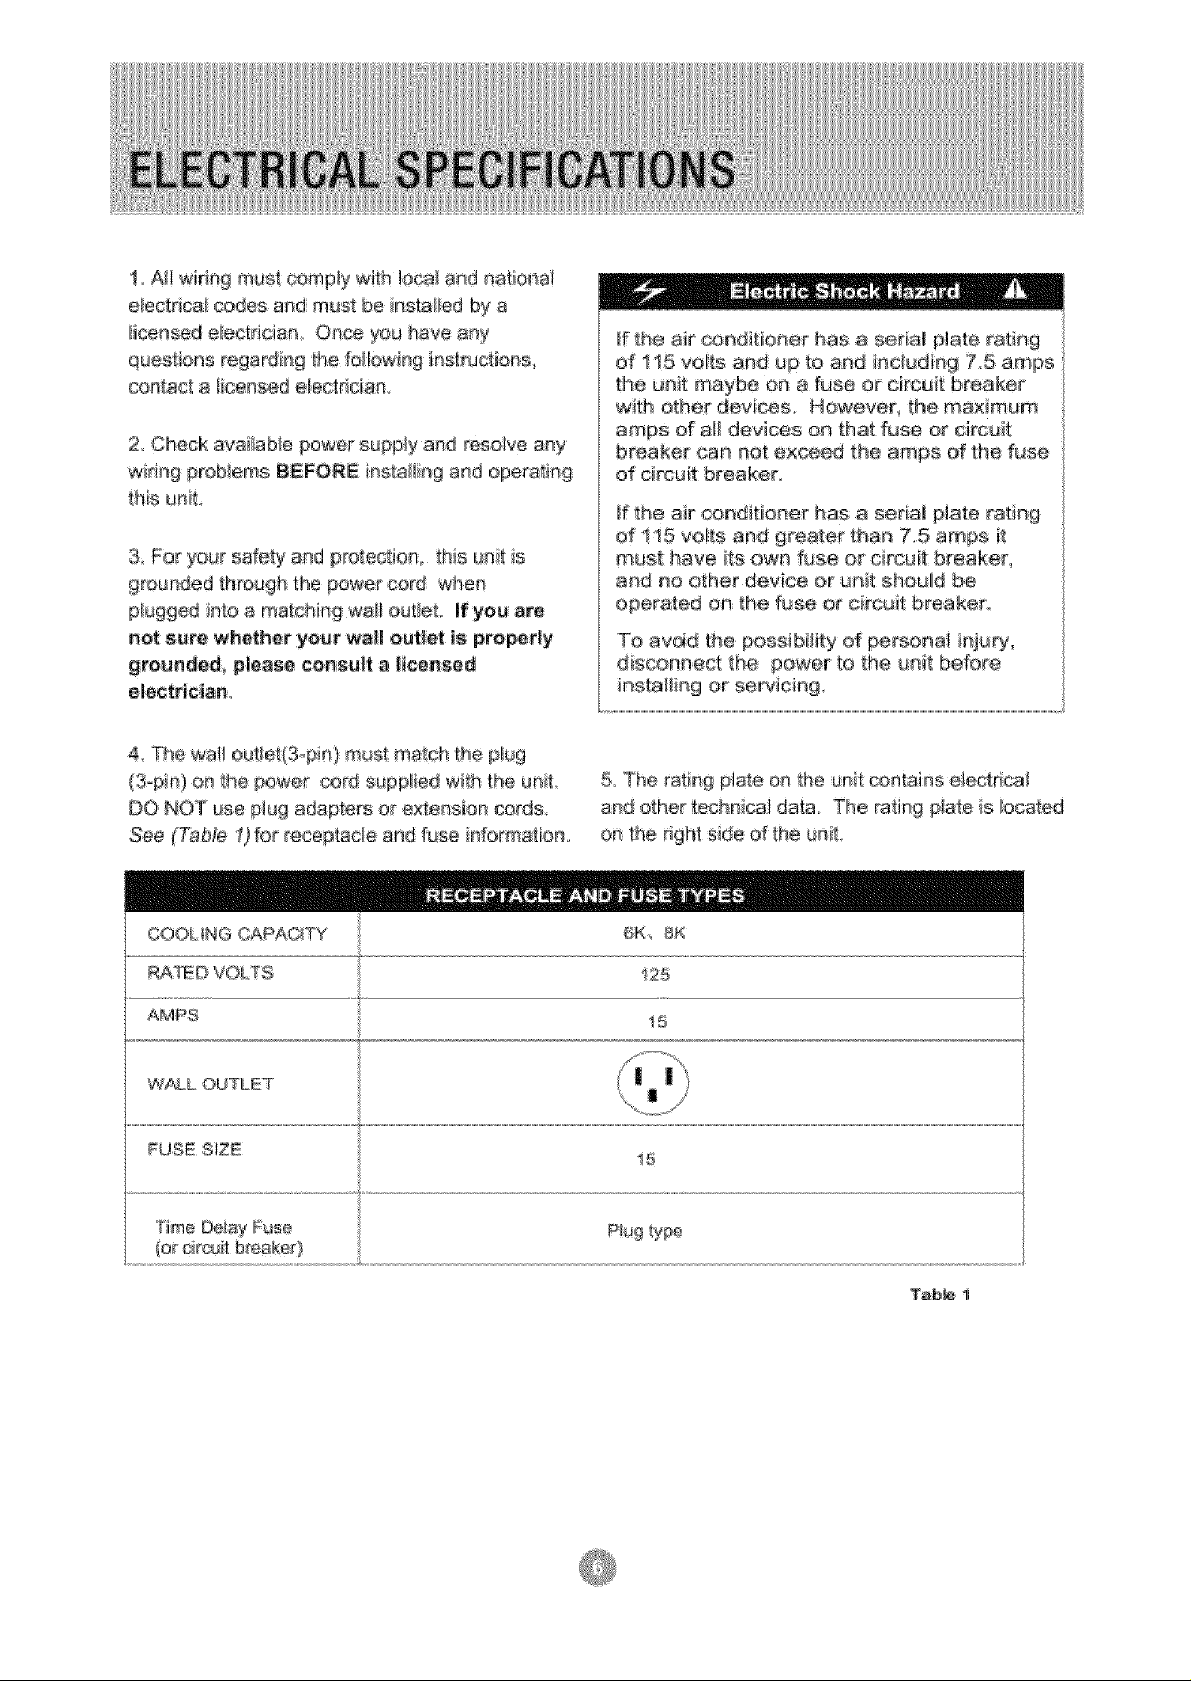
See (Tab@ 1._fo_ receptacle and fuse information_
ff the air ce_ditio_ser has a serial p_ate rating
of 1t5 yours and up to and _sciudin_ 75 amps
the unit maybe or} a fuse or circuit breaker
with ether devices. However, the maximum
amps of al_devi,_e:s on that fuse or circuit
breaker can not exceed the amps of the f_se
of circuit breaker
If the air conditioner has a serial plate _ting
of !t5 voits and #rea_r thar_ 7.5 arr_ps it
must have its own fuse or circuit breake_
and no other device or unit eh.o#!d be
operated on the fuse or circuit breaker.
To awJd the possibility of pereor_at iejt_ry,
dis_nnect ti_e power te the uait b÷fore
ir_staiiing or servlcin9
5_The rati_# plate oe the ant _alains electrical
and other technical data The _ing plate is _oca_ed
on the r_ght side of the ant.
W/g_L OUTLBT
(or cir£uit bresker)
Tab_ 1
Your RoomMr' Co,rid tioner unit is designed to
be highly efficient and save e_ergy Rol_r_ these
reeemmer_datiens for gre_ter eft cie_cy
! Select} _hetmos_a_set_ _g that suits yo_r
rx_m_o_ needs and _esve t_e _hermostat st
_hat_osen setting
2 The ai_ f_er is very efficient in removing airborne
particles, Keep the air fi_te_c!ear_ Typica#}_filter
should be cleaned erase a month, More
frequent c_ea_ie9 may be eecessary depending
or_eetdoot arid _r_d¢_ta_ quality,
3oUse drspes, eu£a[r_s o_ shades to keep d_ect
sunlight from heating your reem_ but DO NOT
obstruel the air co_d t e_e_ A_io'wthree (3}ir_ehes
around unit to c r_:ula_e,
Your RoomAir Ce_d _ioner was designed
_o_easy i_sstaHatien_na sing!e or doubleohun9
wind@_,,_OT_ Ths unit is NOT desig_'_edfor
ve_ cs_(stider type} w ndews.
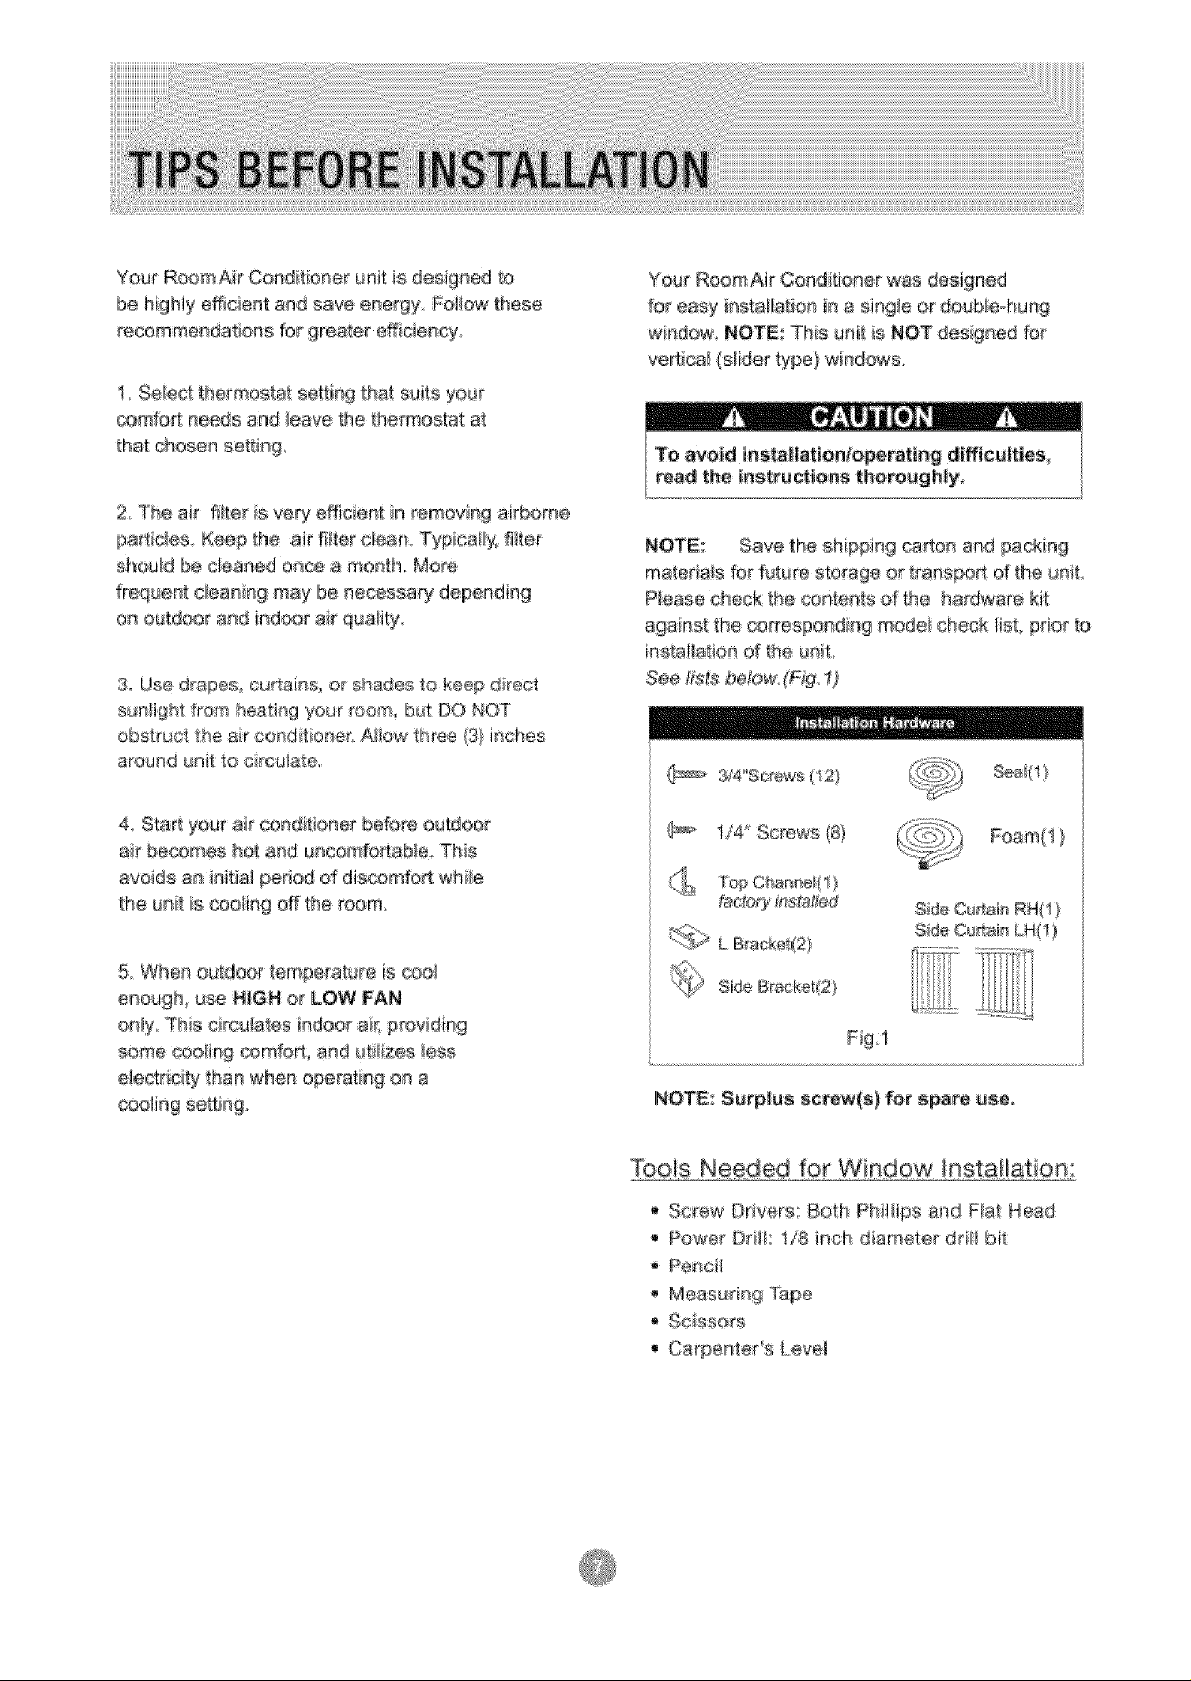
NO,B: Save the shipping ca_os and packing
materials fo_future ste_age or transpo_ of the u_i_
P_easecheck the esntems d the hardware _i¢
8gai_st the c@rrespo_sdin_msde_ check lisL pdo_ to
installation d theunt,
See fis_sbek_ (Fig. t)
4 Start ysur air send _ionet before outdoor
a!r becomes _ot and uncomfo_sb_e. This
avoads a_ initial pedod et discomfoA while
the uh[ s toeing off the room
5 When ou[door fempsra_urs is _;x_ol
enough use NiGH or LOW FAN
on_y Ths simulates indoor air, prov@ng
_me costing ¢×>r'_£erl,and ut4izes !nee
electricity _ha_ when operat n_ o_ a
cooling setting,,
1/4" Screws (8)
Sde Cu_ai_-_RH( t )
S_deCu_tais LH{ I )
INOT_: Surp|us screw(s} for _parie _se,
Tools Needed fo[ Window hsta[[atio_:
Sc_'ew Dd_ers: Both Ph_Hips and _a/I He_d
Power O#ii: !/8 inch diameter driii bit
Measu_in 9 Tape
_*Sc_sso s
Carpenteds L_ve_
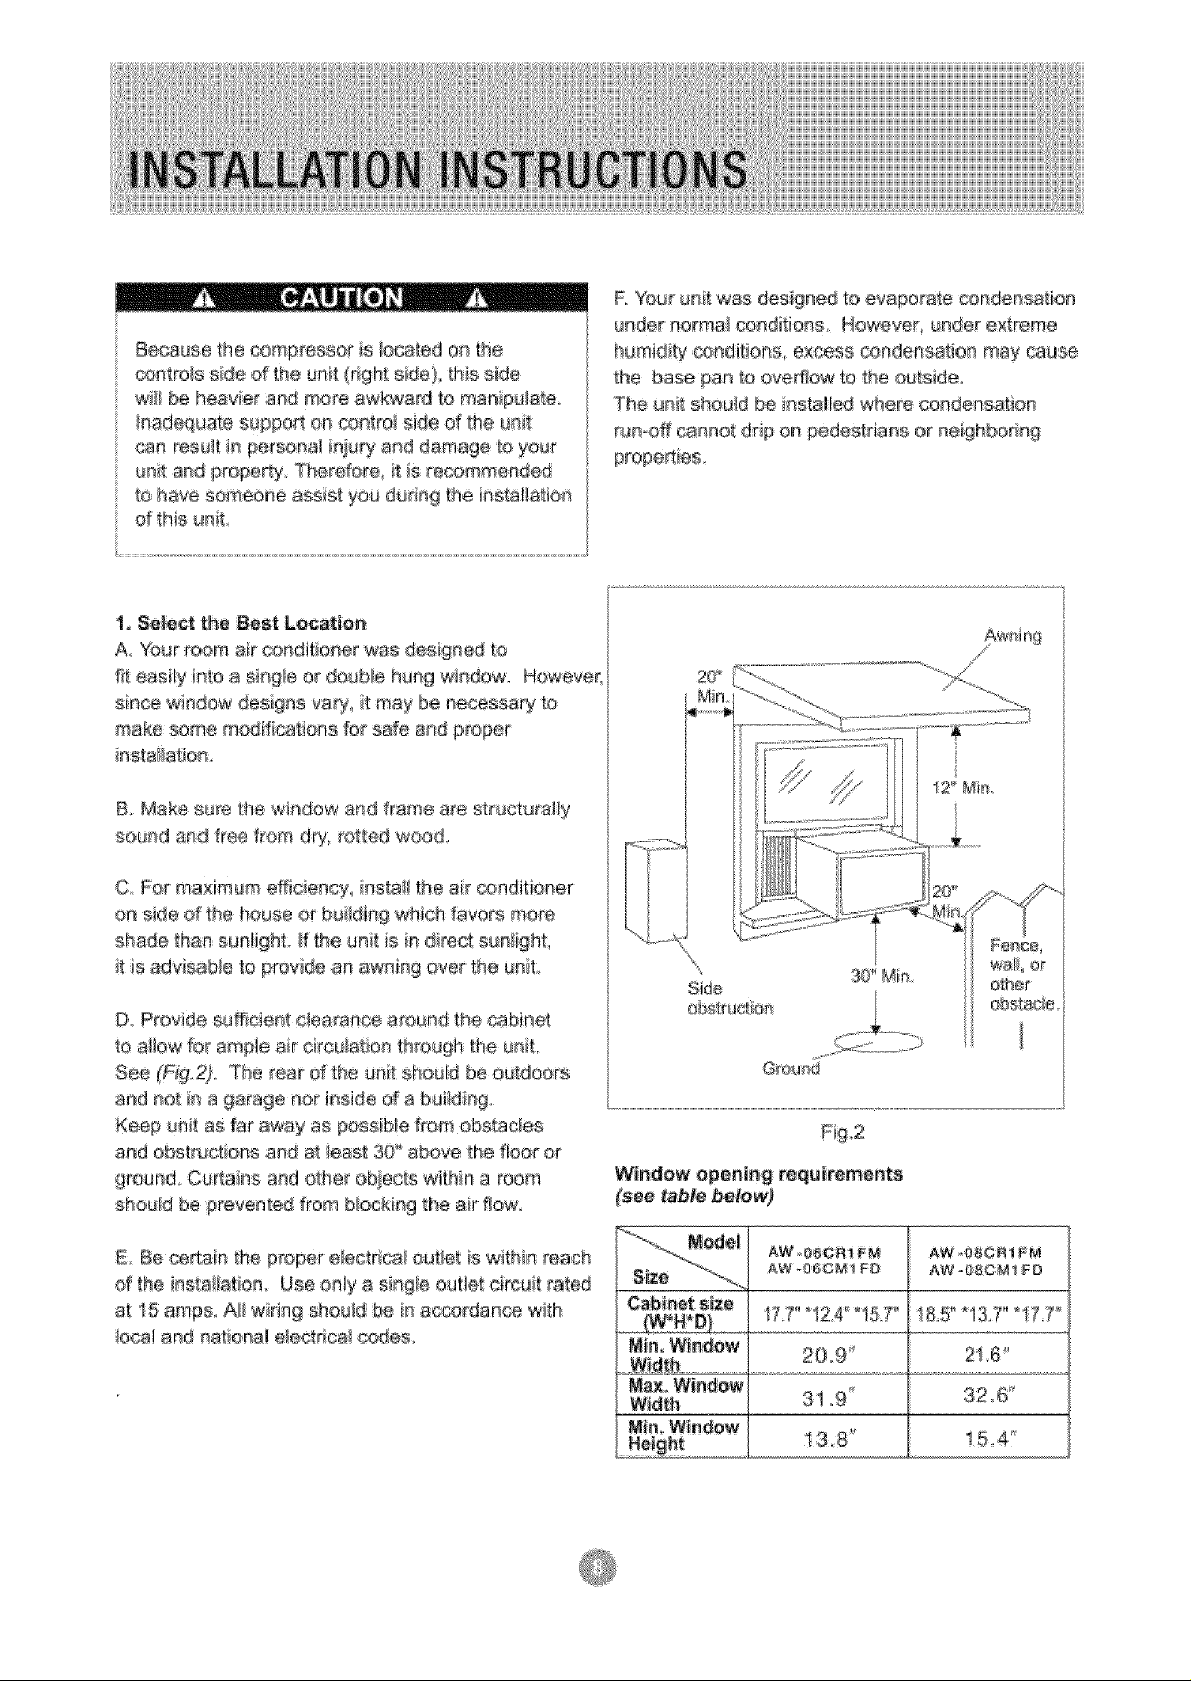
Be@use the compressor is located ONtile
carafe,s sale of the unit {right sde) _hisside
w_iibe heavier and more awkward to manipulate
_nadequate suppo_ sis control side of the unit
can res#lt i_ persona! irfjury a#d damage [o your
unit and property 'Therefore _t s recommended
to have someone assis_ yea dedeg tl_e instal!arian
d _hiSunit
1, Select the Best LQGation
A Your room air condk orderwas designed t#
[it easily into a s#'_g!eo_double hung window. Heweve_
sines window de@gas vary_it may be necessary to
make some modifications for safe and proper
installation
B, Make sure 'IIqewindow and #am÷ are structsrafly
s@_nd and free from dry__otted wood
R Your un#_was closer#nedto evaporate @ndensation
under norms_ co,editions However, under e×_reme
humid#y ,condi:_ia_s_exc£ss condensation may ca#so
the base pan bs oveffbw to the ou_ide_
The unit shouid be nslalied where condensation
nJn-eff _nno_ drip on pedestrians or neighboring
C. Per maximum effi@ency nstall t/he air conditioner
on side d the house er bui!din9 which favors mere
shade _han sunlight: }f the unit s in direr€ s_niight,
it is advisable !o prey de an awning over the unit
D Provide sufficient clearance around the 8ab_ne¢
to atlow for ample air ckcu_at_onthrough the u_it,
See (Fig:@. The rear d the unit should be outdoors
a_d not in a garage nor inside of a bui!d ng,
Keep unit an far away as possib!e _:romobstacles
and abe#uSers and at i÷as_ 38 a_ve the floor or
ground, Curtains and ether ob,iec_swithin a room
sho_d be #revealed #ore biecking _heair _ow.
E, Be ceRan the proper e_ec_rica_out, aSis within reach
of the ii_staiietio_o U_e only a _i_g_e outle_circuit t_ted
a_ 15 amps A_ wiring shoal_ be in accordance v_h
_ocaland nationa_ e_eetdca_e_es.
Grsued
Window opening _e_a_reme_e
[see _bi_e be/e_
.... --.... _edei
AW 436C Mi FD
Cabine_ size
? 7' _I24" °t5T' 1&5" _t3.7" *17,1_
_in, Window
_s× Win_ew
WM_
Min_Window
eW -SeC_ t _D
216"
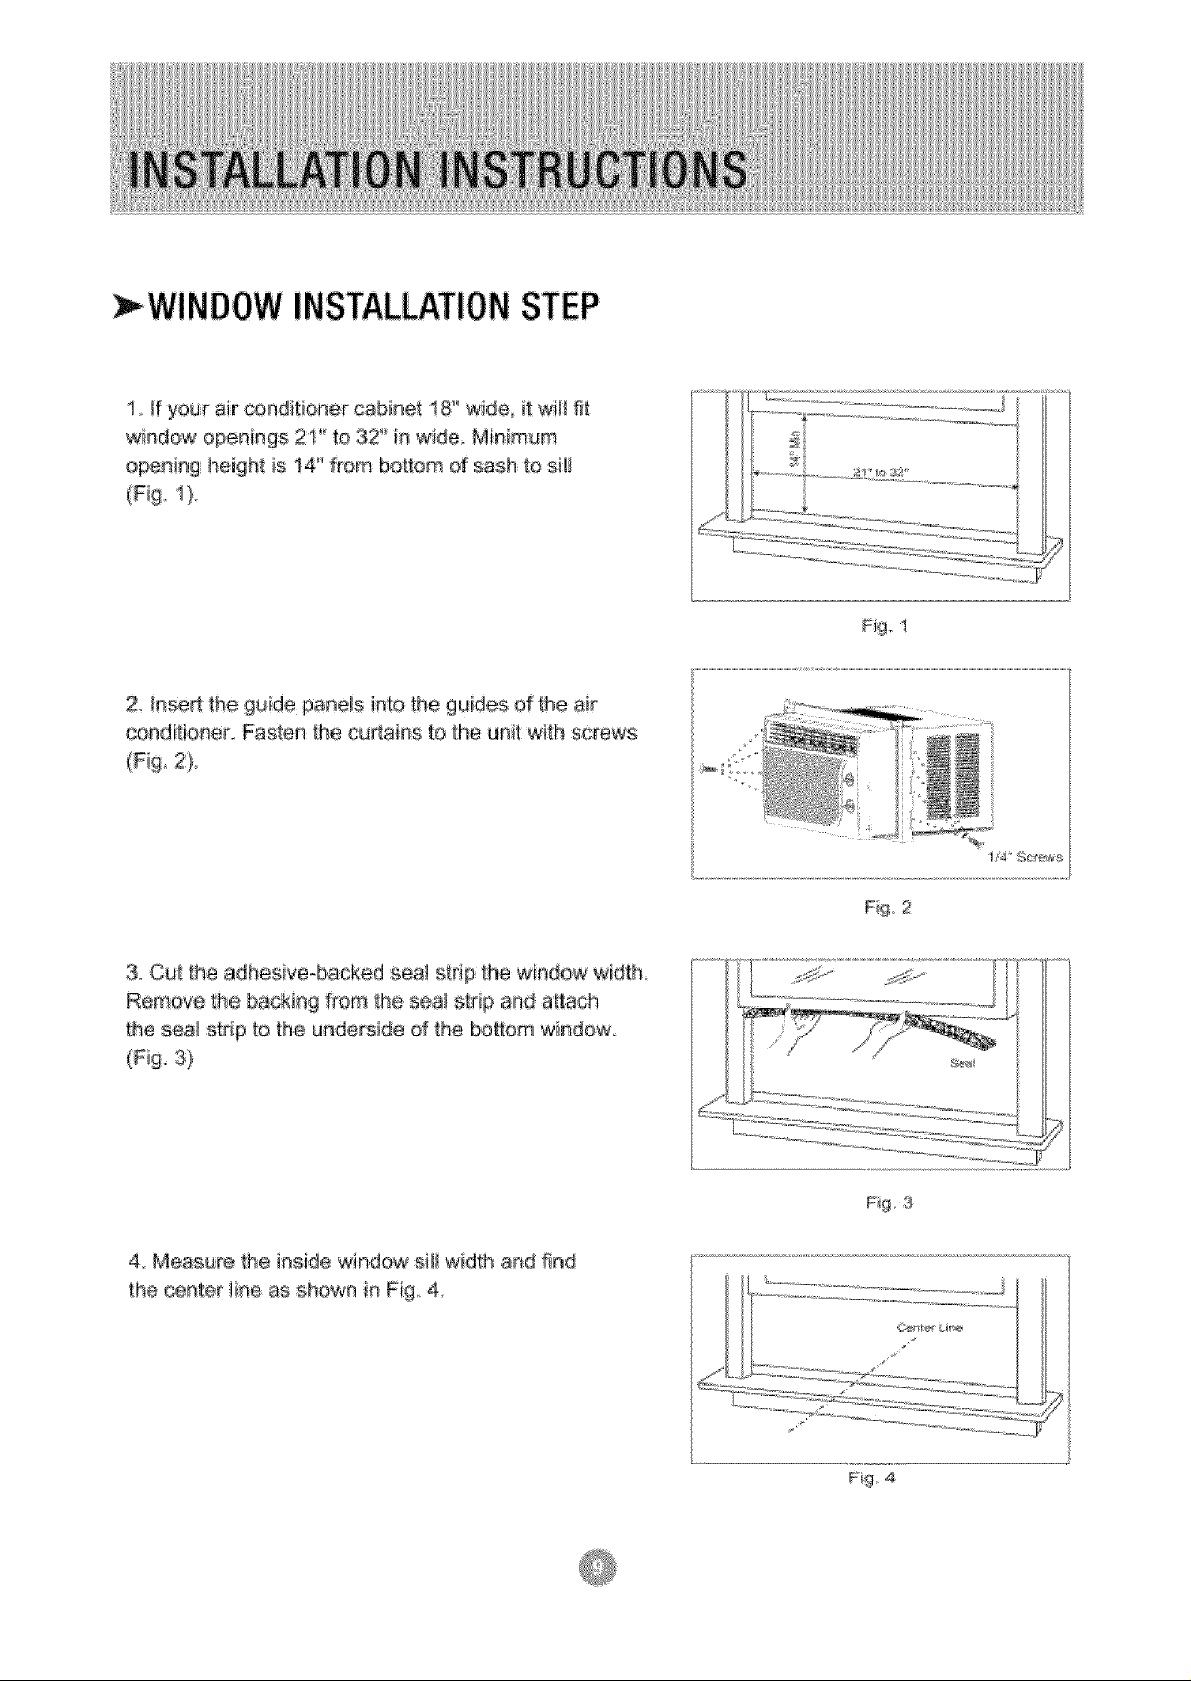
WINDOWINSTALLATIONSTEP
1. ff your air conditioner cabinet 18 '°wide it wiil f_
window openings 2t '_to 32 _ h w_de Minimum
opening height is !4" from bottom d sash to si!!
(Fig. !}
Z Inse_ Sheguide pane!s into Sheguides of_be air
conditkmer_ Fasten the cu£a#_s Sothe unit with screws
Fig. I
3. Cut the adhesive-backed sea! sSrip the window-width
Remove the backing from _he sea_ s_rip and a_tach
[he sea_ s#ip tc, the underside ef the bottom window
4 Measure _he inside windew s'i_ widfl_ a_d f_nd
the _nt÷r iine as shown _n Fig 4
F£ :2
....................:. ..................................... .......
! / //
d'?] z_:2::_z:2 ::;?:7--_..................
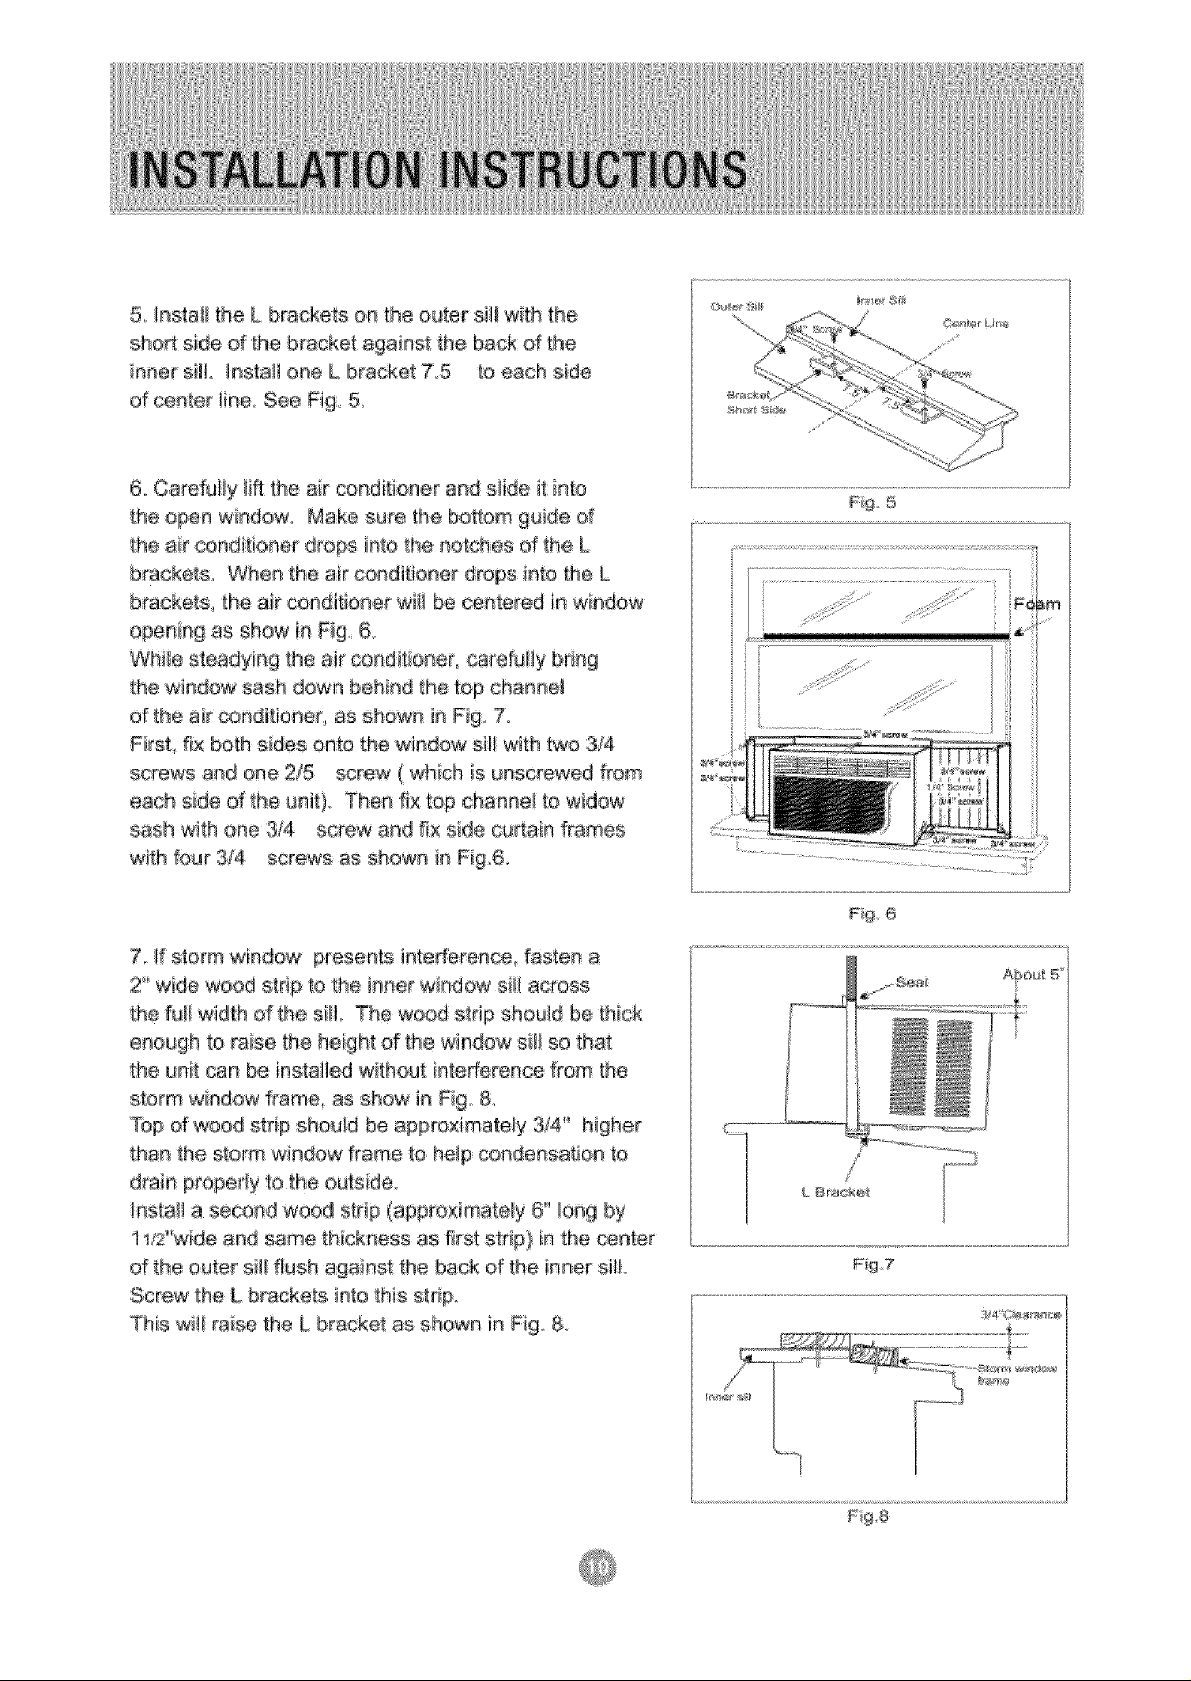
5_hsta#theLbracketsontheoutersi][withthe
shoAsideof thebracketagainstthebackofthe
in#orsil_ _nstai_oneLbracket7,5 toeachsde
ofcentertineSeeFig 5_
I_ ¸_ii_
6. Caretu@ litt the air conditioner and slide it _nto
_h_,__ windGw Mak_ sure t_le bottom 9wde o1[
the air conditioner _roos _n_o_he notches ol _he L
b_ackets, When _he air conditione_ droias into the L
brackets, _he air conditioner w_Jlbe centered in window
open_n_ as _now in F_g 6
White st_sadyi_g the air conditione_ care[u/ly bneg
the window sash down behind the top chaneeJ
of the a_rconditioner as snows _nF g. 7
First. fix boeh sides onto the window sill wath Iwo 3/4
screws and one 2/_ screw _which s [_nsc¢ewed from
each s_e Ofthe [_nit). Then fix top channel to w_dow
SaSh with one 3/4 sorew and f_×side cudain frames
with four 3/4 screws as shown in Fig6.
7. If storm win_c;w presents interferen_, fasten a
2" wide wood strip to the i_n_r windqw si_ across
the full width of #_e @H, The woad atdp should be thick
enough to raise the height of the window s_l[so that
the unit can be installed w thout interference from the
storm window f_ame_ as show in _i9 8
Top d wood strip should be approximately 3/4 '_ higher
than the stare window fi'ame to heip condensatio_ to
drai_ propedy to the ouls de,
instal! a se(;oed wood strip (approximately 6° _ong by
1t_'2"wide and same thick_'_ess as first strip} in the center
d the oute_ si_ flush against the back of the inner sill.
Serew the L brackets into this s,tdp
This wi_i raise the L bracket as shown in _ig &
_::# 5
Fg, 6
Fig 7
P9,8
 Loading...