

Admiral (Kelon) AW-05CM1FLU, AW-05CR1FHLU Owner’s Manual
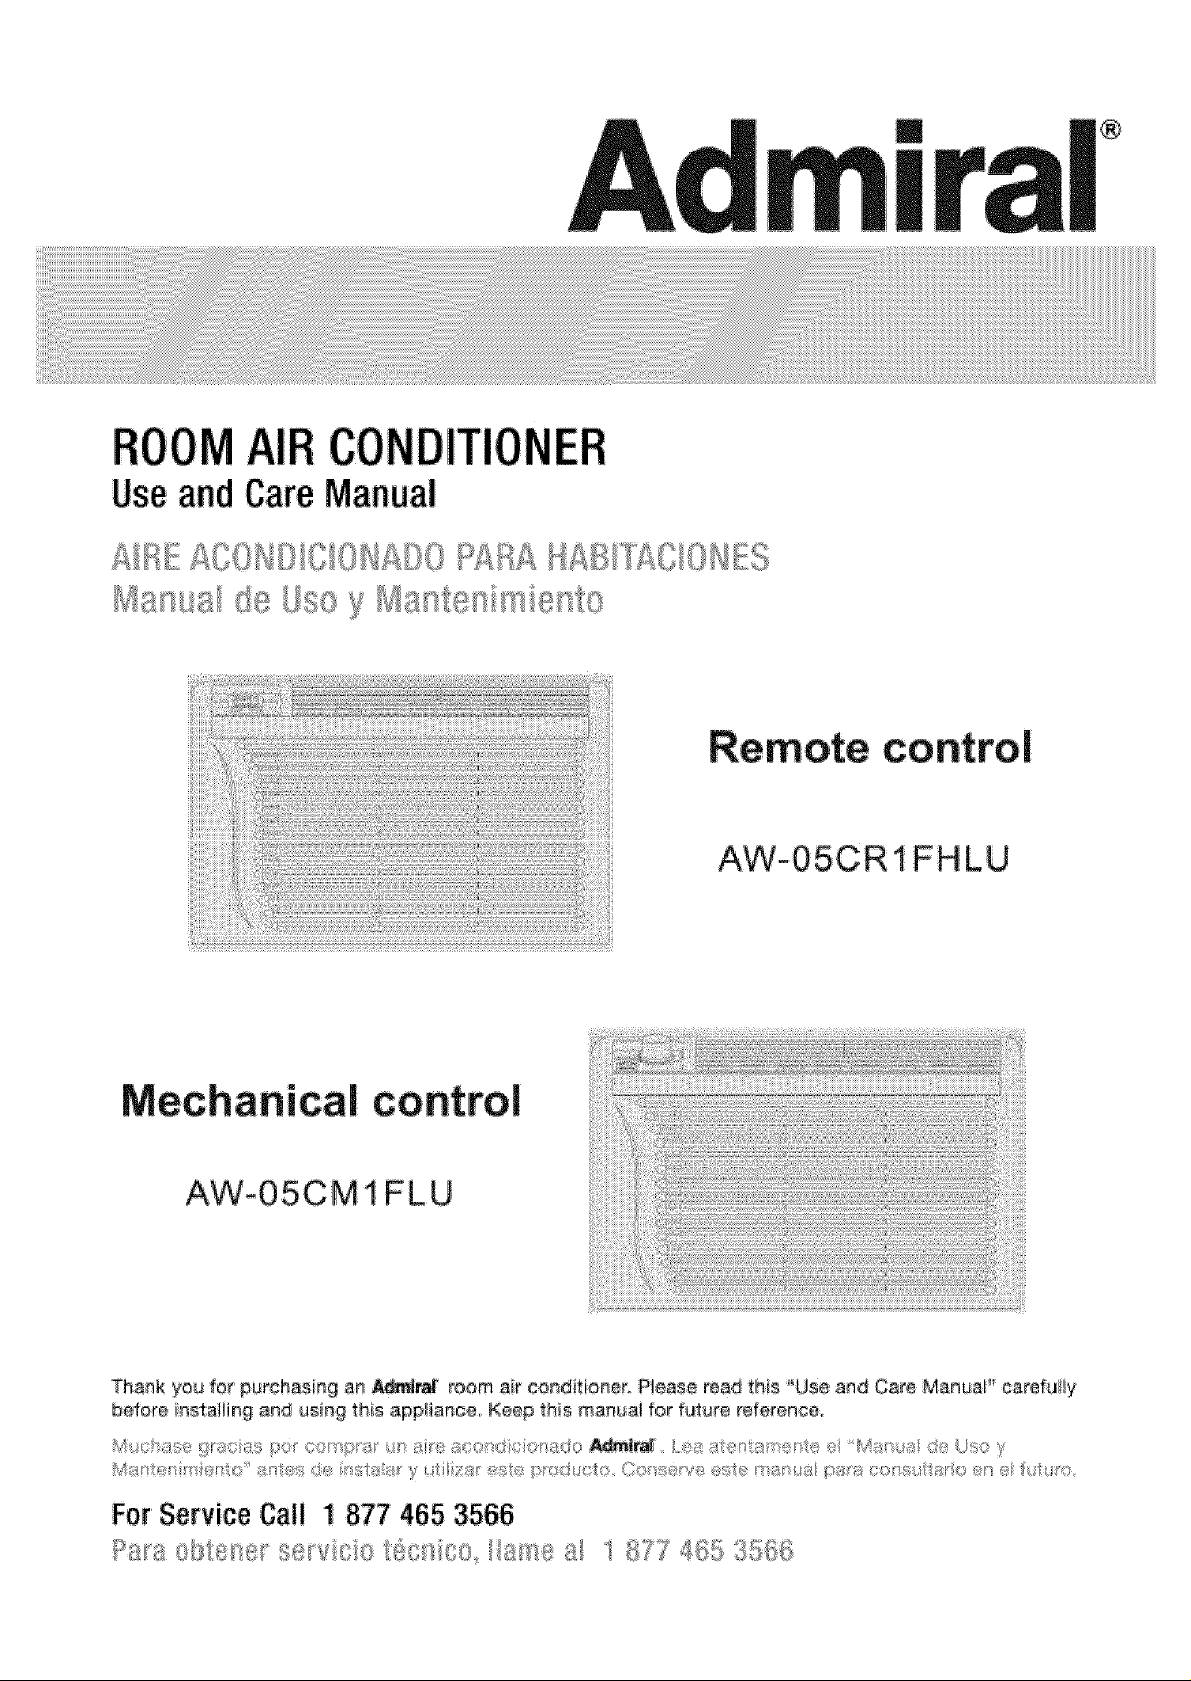
UseandCareManual
I
®
Mechanical control
AW-0 5CM 1FL U
Remote control
AW-05CRIFH LU
_hsak you for purchasi_# _ _ room _ir ¢_nditiome_. Please read this '°Use sad Cste M_mu_! _ carefuiiy
be'fore i_st:alling and usin@ _his appiia_ce Keep this man_a! for f_t_re _ference,
ForService Ca!! 1 877 46,53566

Page
Air Cenditiener Safety
Introduction and Parts _dentification
Electrical Specifications
Tips Before _nstaHation
Installation instructions
Operating instructions
Care aad Maintenance
Troubleshooting Guide
Warranty ............
........ 2-3
......... 4-5
........ 8-10
..... '11-14
....... 15
....... 16
......... i7
l_troducciOn .................
!_entificaciSn de las Piezas ......
Especificaciones E!_ctricas .......
Censejes A_tes _ela Instalacio_ .....
_struccienes de _nsta_a¢iOn.....
_strucciones de Operacibn .....
Cuidado y Manienimie_to .........
Gufa para la Solucidn _e Probiemas o.,
Page
..... 18
..... 20
.... 21
°.. 29
..... 30
....... 31
WhatYouNeedireKnow AboutSafetyinstructions
Warning and Important Safety instructions appearing in this manual are not meant to cover
all pessibite conditions and situations that may occur. Common sense, caution, and care
must be exercised when operating or ciea_tng too_sand equipment.
Always contact your deaie5 distribute5 service agent, or manufacturer about problems or
condttione you do not understando
This is t:hesafety alert symboi _tis used to a_ertyou to potelstialpersonal;injury hazards
'a_lsafety messagesthat feiiow this symbol to avoid possible in_dy or death
DANGERindicate:san imminently hazardoussituation which, if not
avoided, wi!! _esu!tin death or serious inury,
WARNING indicates a potentiaily hazardous situation which if not
avoided could result in death or serious injury°
CAUTIONindicated a potentiaily hazardous:situationwhich if not
avoided, may result:in minor or moderate i_]iu_y,
CAUTION used without the safety alert symbol indicated a
potentiaily I_azardous situation which, if ,not:avoided, may result in
property damage,
I STRUCTIONS
Toreduce the risk ef fire, electrical
shock, or injury when using your air
conditioner, follow these basic precautions:
, P_ug into a grounded
3_prong outlet.
, De net remove
ground prong
THESE INSTRUCTIONS
• DO not USe an extension co_d,
Unplug air conditioning
before servicing.
gee two or more people te move
and install air cendit:iener.
The p0rlab!÷ Bit con d t_on_t shoMd be co_r_ec_ed
to A t 15 V180 Hz 15- @ 20amp fused 3opre_9
Power Supply Cord
Fhe use of a time-d@ay fuse or timeode_aycircuit
breake_ is {ecerr_mended.
All wid[_g must ec_t_p@with locat and nat_al
e!_ctr_cal codes and be in_Nled by a quNified
ekTetric_an,if you have any quest_o_s_co,tat1
a qua_Fie8dectrieiar_
Electrical Requirements
ELECTR|C SHOCK HAZARD
- Plu_ nfo a grounded 3_.pre_goutlet.
D_ _et remove _reued prong
De ae_ use an adapter.
D_ _ot u_e an exten_io_ cord,
- FeiJu_to foJ(owtJ_eeeinstructions oa_
res_t_ in dea_ fl_'e_or e_ectr_oal sl_ook,
NO'TS: Vou_ units d÷,_ ce may diff÷_ fr6_# t)'_eone shzs_m',
8
A
Te test yaar pewe_ s_#p(y cer_:
4 P_es_a_J I_e_,@ f/_ESET(bsi¢lfor _m:k'o_M_t bu_le_d4i i_,sh
U psc k theAi Oondlt oner
EXCESSIVE WEIGHT HAZARD
Use two or mere _oNe _emove and
inslall air ce_ittene_ro
Failure ls _o so ¢_a res,ull 1_ta;k _f
Remove packaging materials
Rotor;ryeand pr_aper_ydispoee of packag r_gmaterials_
Remove tape asd glue residue from su_aces before
turning as the air condltionero Rub a smail amount
oK)iqu/d d_shsoap ever the adhesive with your fingers°
Wipe with warm water and d%
Do cot _se slsarp instruments rubbing alcohol
flsmmable fiude er abrasive ofeaners to _emove
tape o glue These preduots oaF_damage the
eudaee of your air coedhieeer,
Handle a_rcoeditioner w_th care.,
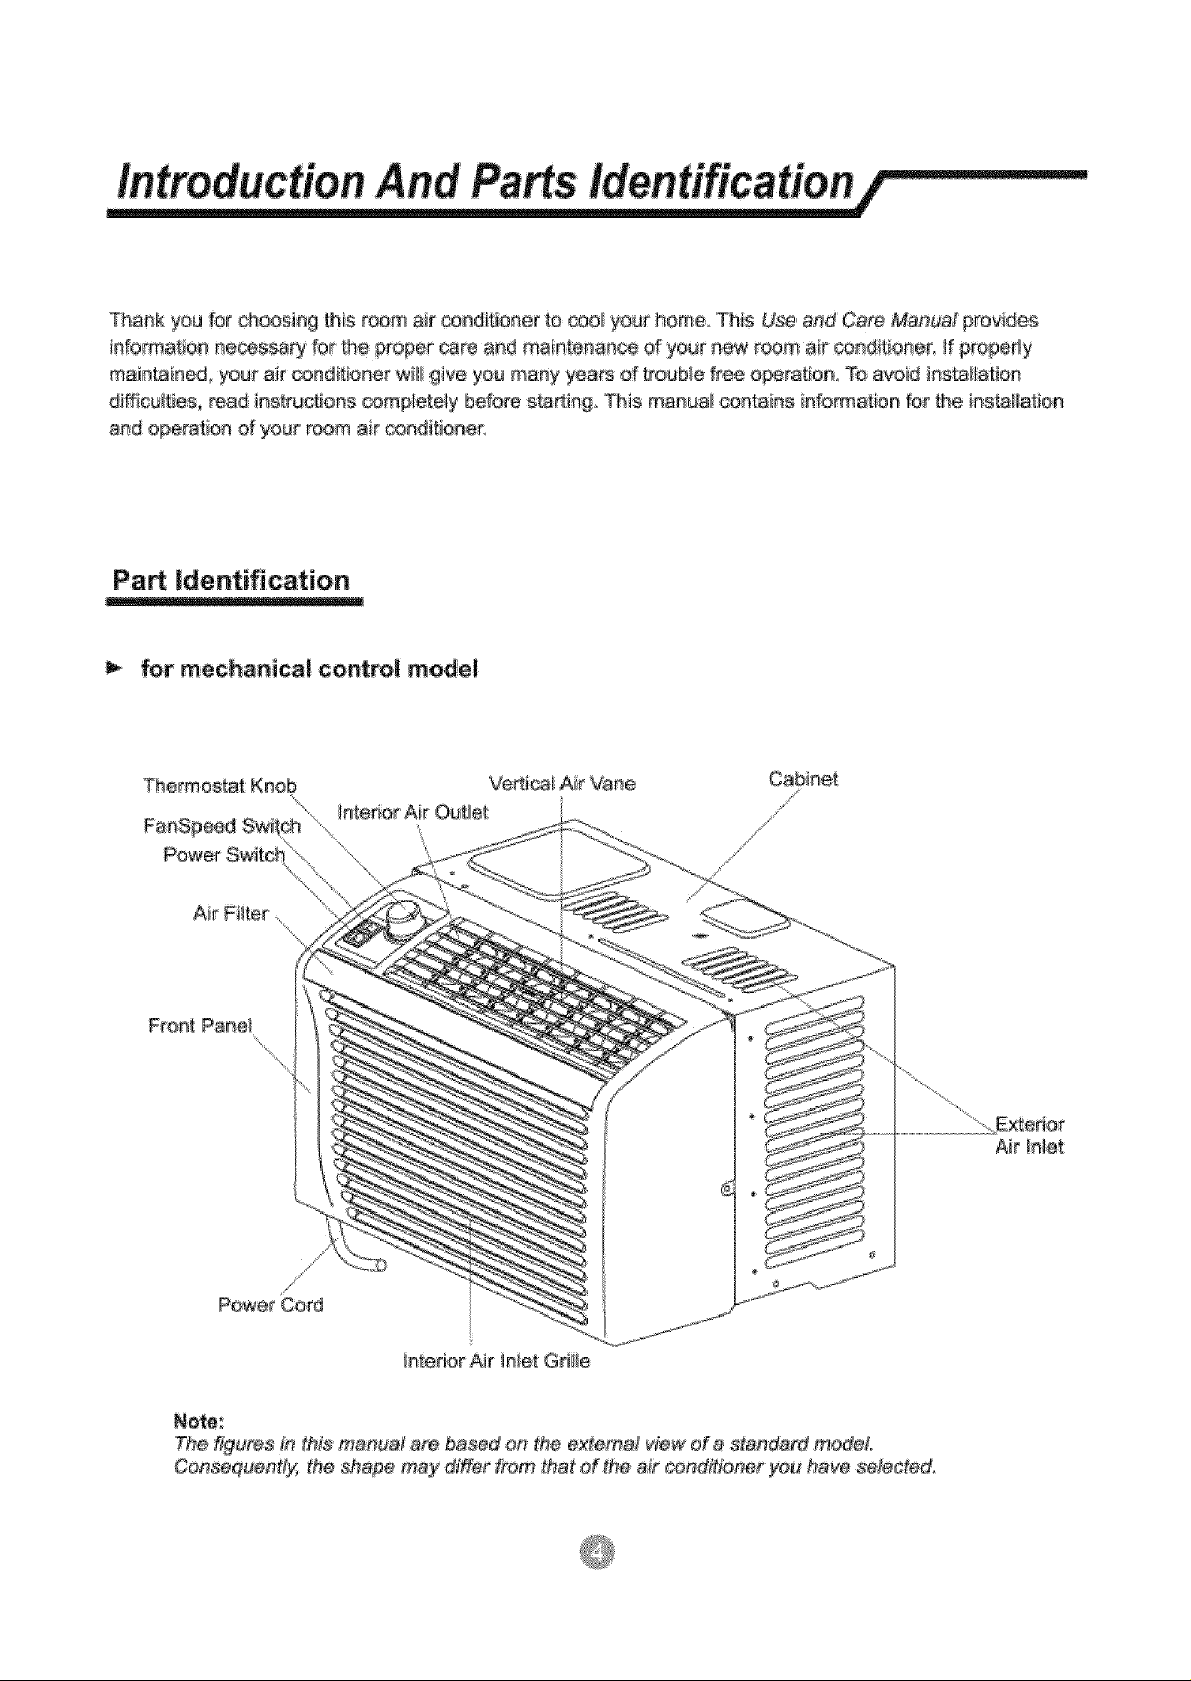
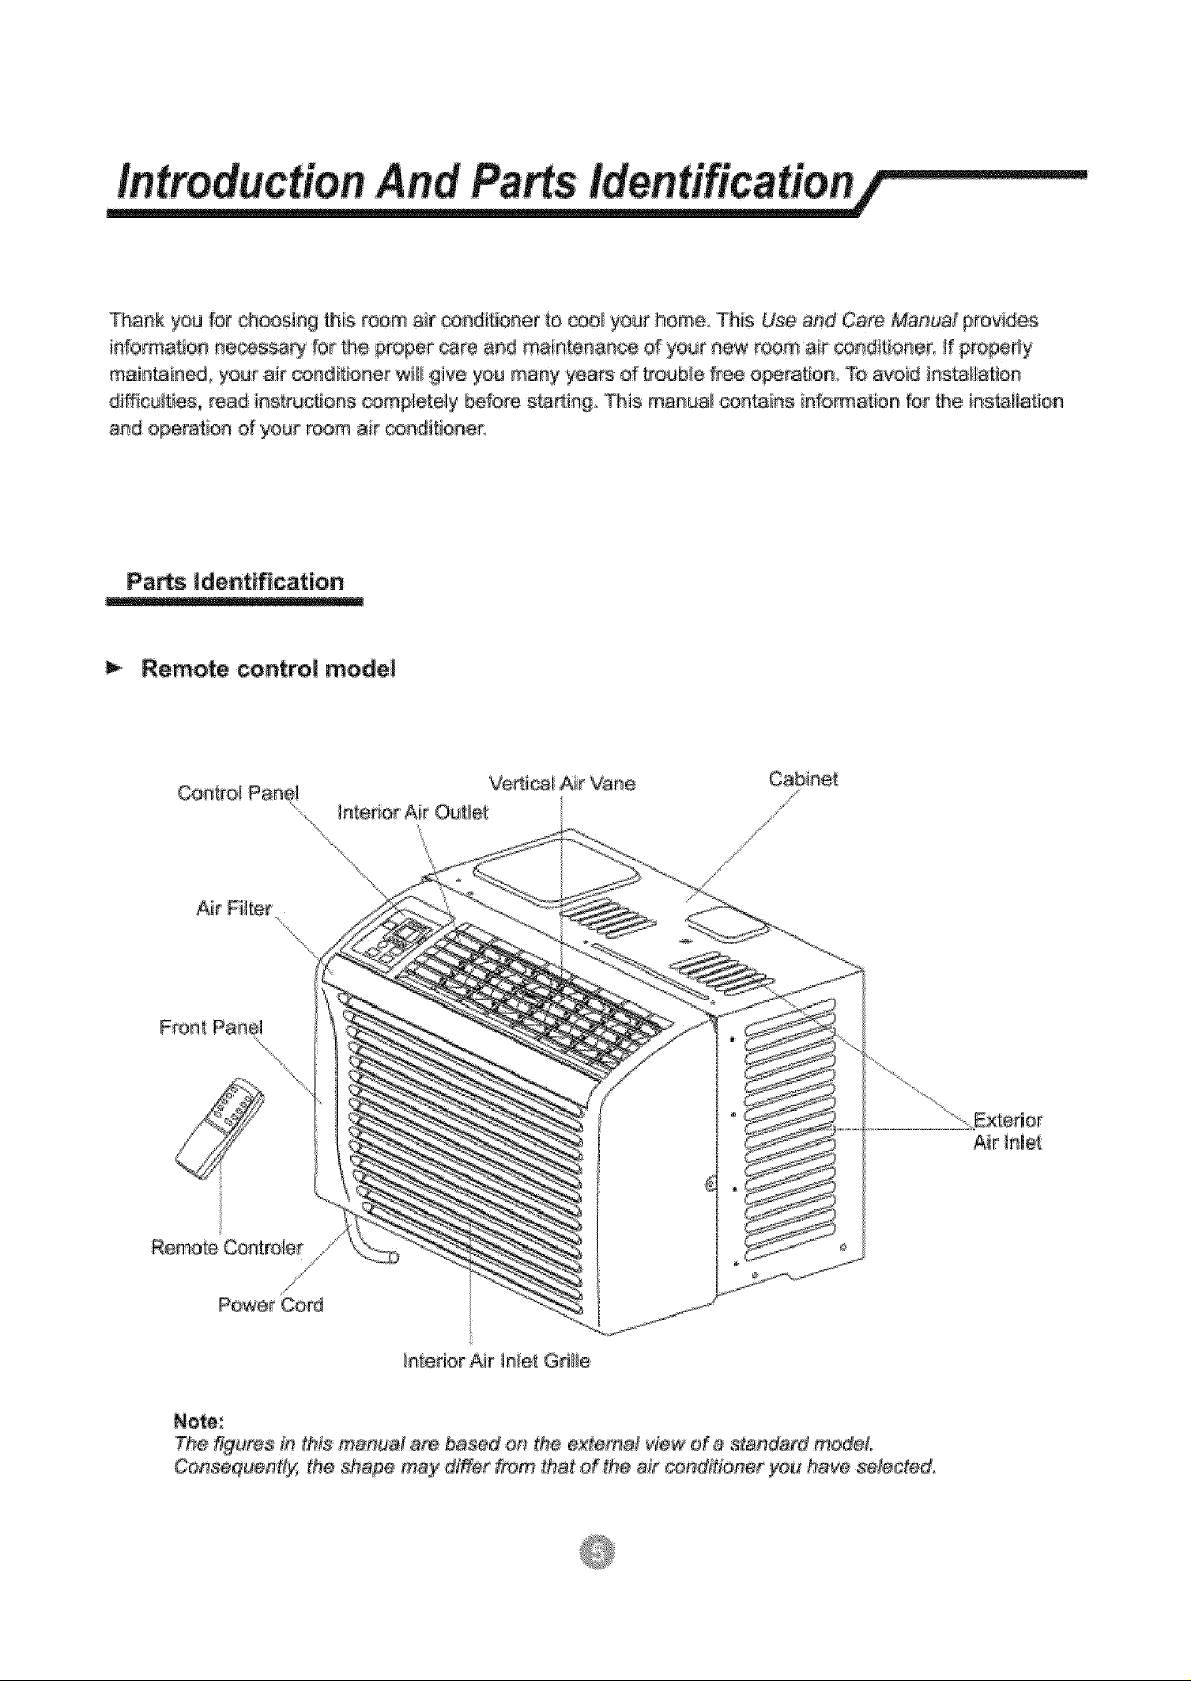
Thank you for _,c_s_ng this ro_m a_rco_dit:ioaer to c0o_you_ home Thi_ Use and Care Manuat provides
in'rormat_o_necessary for the proper care and maintenance of your r_ewroom air conditiOneh !f prepe,dy
maia_ined_ your air _ndit#ner w#_lgive you mary years of t[mub_efree operation To avoid imsta_t,alon
dimcuWes,, read instructions _mplete_y before s_img, This rnanua_ c_m_ ns info_ation for the instaiiat_en
and operation of your r_m air _mdJtioner.
identification
for mechanica| centre| model
Thermostat Knob
Cab_eet
Air [a_et
IntedorAirIn_etGMi_e
Note::
The f_ut_e4rsin this rnsnuat a¢_ based on the externa_ view of _ standa_ modeL
C_sequer_t_y, the ,shape may diffe¢ from that of the a_r co t yeu ha_ seteoted,
Thankyoufor_sing thisro_m a_r cond_oaer to coo_ your home This U_ a#d Ca/e Manual provides
informat_oe nec_ssa_ for the #roper care e#d ma#n_nance or your new room air conditioner. !f _ropedy
maintained_ your air _ndilfioner w_ give you many years of _m_b_afree o_ration ?o avoid ias_ttaflon
difficu_ties,, read ias/truct_ons _mpletely be_ores_Ming. This rnanua_ c_n_ ns information for the in_atlatJon
and operation of your r_m air _aditio_er.
Pa_s identification
Remote c:oatroi mode!
oteo
The f!_u_e #_##s m_nua_ a_e based o_ the extema¢ v_w o__ ste_de_Y model
Cee_quend)/, the shape may differ _rom tha_ of the a_t cendttionec you have selected.
I _ wi_in#must_mpl¥with_oca!andnationa_
e_ectdca_codesandmustbe_r_sta_edbya
qualifiede_ectNdan _fyo_ have any queseons
r_ardin 9 the fol_in,g instruc_©#s conta_ a
2 ChecA avaiiable power sup#ly and resolve a#y
wiring probtems BEFORE ins_ai_r_gand ogerating
3, For yaur safety and protect_or_,. Th_sua!t is
grounded though the :power co_d when p_ug_d
_ntoa mashing wa_toutleL, ffyeu are not sues
whether your wal! eut@t is' #_unded,
please censu# a d de ,
4. The wa!! o_tiet m_st mat@_the p!ug on the
se_ce cord supplied w_h the unit DO NOT use
piug adapters or extension cord,
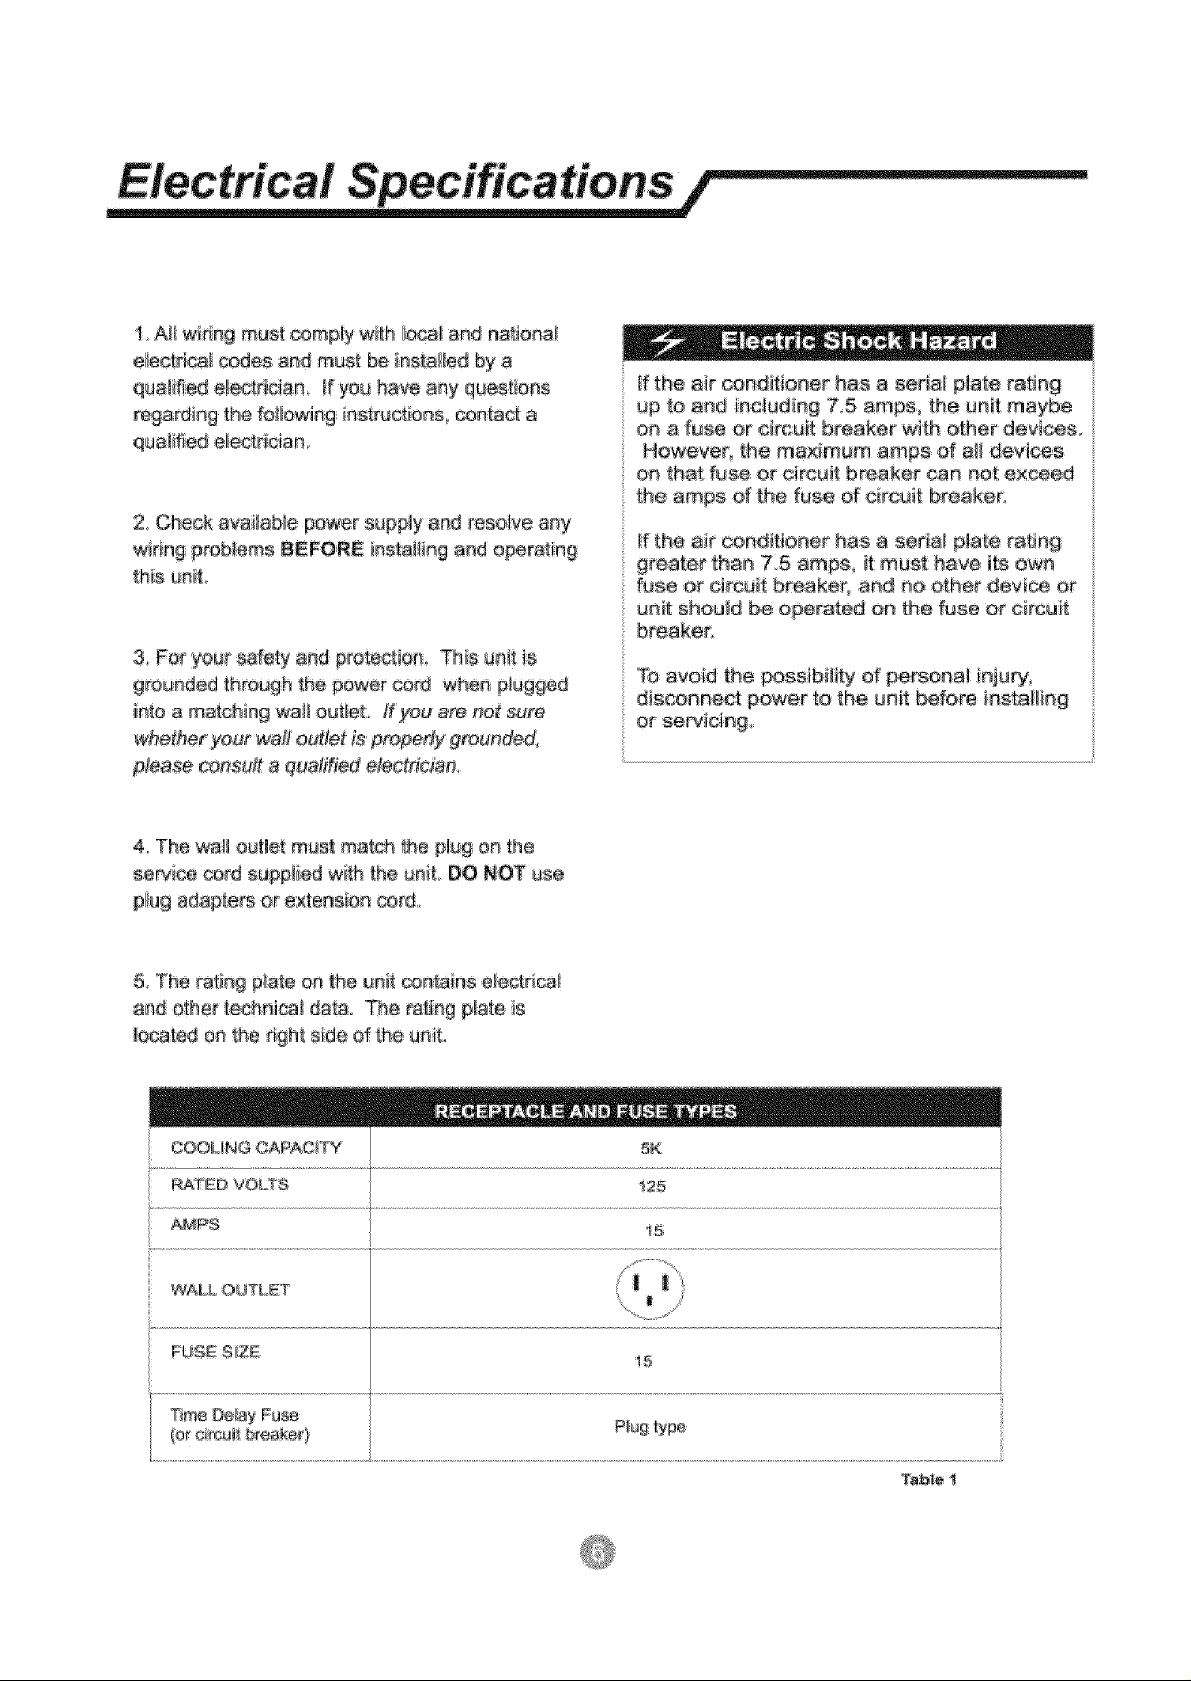
If Lhe ai_ _nditioner has a seria_ plate rating
up to, a_d _ndudi_g 75 amps_ the unit maybe
oe a fuse or @re_i_ breaker wJ_hother devil&
However, the maximum amps of a_l _evices
oe that fu_ o_ otre_it breaker ca_ _ot exceed
the amps of _he fuse of circui_ breaker,
_fthe air co,ndifioner has a sedal p_ate _at_ng
greater tha_ 75 amps, it mu_t have its ow_
fuse or c_rcui[ breaker_ an_ #o other device or
u_A shoutd be o_erated on the fuse or circuit
breaker.
To avoid _he possibility of ;pomona! ir_jury_
discx3nnect #ower to the unit before instal_ing
5 The _ti_g pta'te o_ the unit cont_ainse[ectri_
and other technical _ata° The _a_i_gplate is
]ocate_ 0a 1he #gh_ side of the a_it:,
YourR_m AirConditioneran,itisdeaig_!edto
beh_Ny off,centand_ve e_orgyF_!lowthane
rer_mmendat:Jensforgreatere_ciency,
1.Selectfhe_oste_sea,tag_hatsuitsyour
comfort,needsand_eavethethe,rmosta_at
_atchosense_ta_,
2 Thefit_erisveryemcien_inremovingairborne
pa_c_e&Keepairfilter cle_n No_a_y, fil_e_
should be cleaned on_ a month More
frequent cleaning may be necessa_ depending
on outdoor a_d indoor air quality,
3 Use drapes, eudaiaso or shades te keep direct
suaiight #'era heating your room hut #0 NOT
ebstruc_ the air ®nditbne_, AHo_ _hree(3) inches
around unii to circulate.
4 StaA your air _:_ndi_iener before outdoor
ai_ becomes hotand uneomfo_ble Th_s
av@ds an !nffiat peri_ d d!_omfo_ wh_e
the unit is coo#rig off the r®m
Your Reo_ A_r Condffiener was designed
for easy _ns_i{a_ba i_ a single or deuble_h#n 9
window. NOTE: This uni_ is NOT designed for
(sfider type) _@dews.
'Toavoid i_et;altatfo_@_ti_g difficulties,
read _ho f_str_etio_a tho._oug_ly°
NOT_; Save _he caden and packing
for @_am slorage or tra#spe# of _heuniL
P@a,se check' the cen_e_¢s of re kit against
the d_ 9 m_e_ check rise,pdor to
£_sfaflafian of the unit,
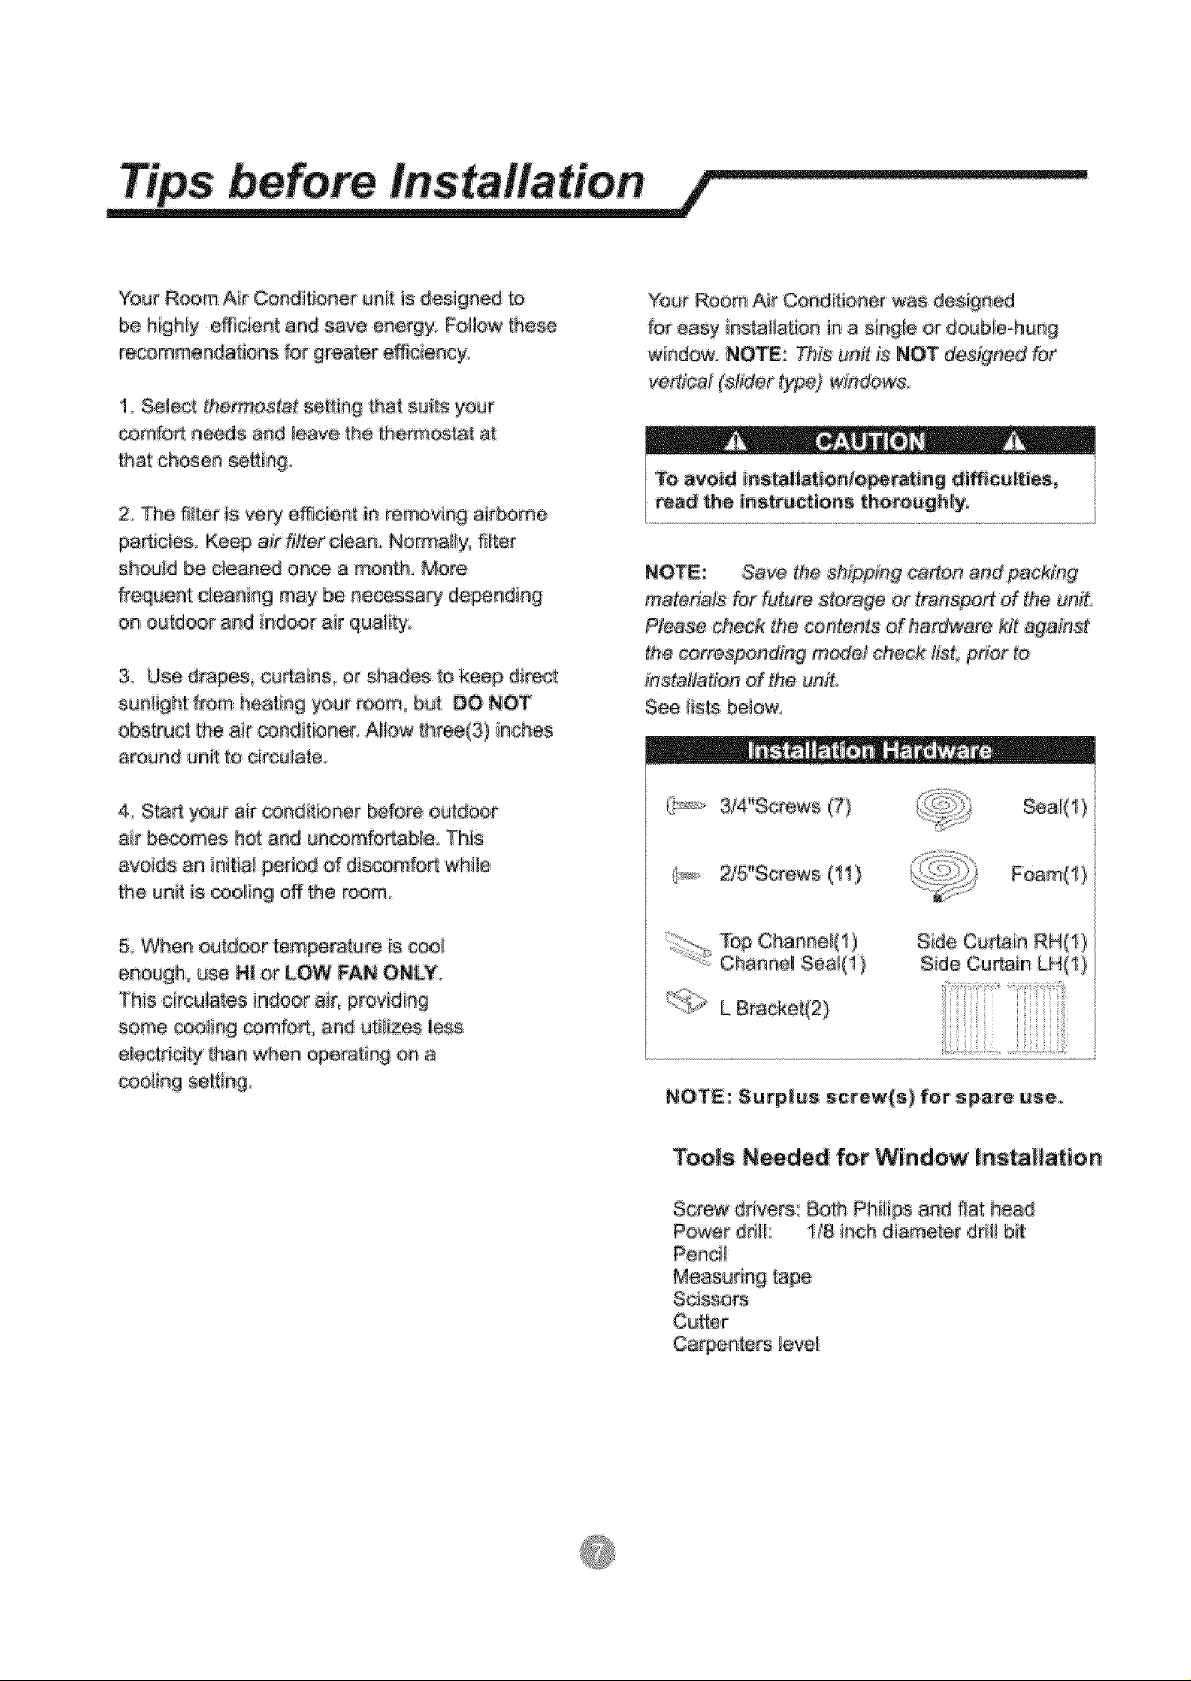
See !ists be_ow.
2/5"Screws (tl)
5. When outd_r temperature is cooi
enough° use Hl or LOW FAN ON£¥.
This circulates indoor air, providing
some eoo_iag cornfort_ and utAzee !ees
e_e.etrictt_tha_ whe_ operatia#(_ a

F Your unit was des_ned to evep_srat,econdensatie_
under normat conditions Ho,,*_vero_,mde_ e
Because the ®represser _slocated on the controls
side of the unit,this side wi_! be heavier and mere
awkward to mampula_e, eadequate sup,pert 0n
eont_i side of Lheunit can result in per_e! inju_
, and damage to your unit and pro_tty. The_fo_e,
it is recomrneeded to have somec_e assist you
during the installation of th_s unit,
h_midityt'_adibons excess r_ndensafon may cause
b_se pan to over_ow ie the ouf_side,
The uni_ should be #_ste_ed where eondresat:ion
runoff caeno_ ddp o_ pedestrians or ne_ghbodr.g
8ele the Best Location A'_ln 9
A, Year _m air conditioner was desigr_ed to
fit easily into a sin#!e or double h_ng w_ndow
However, since window designs va% _ may be
ne@&sa_ to make some modifications for safe
B. Make sure window and frame _s®_uctura_{y
sound aed free f_m dry and ro_ed w_d
C For maxim_m efffcien_, t_a_ll _he air _editio_er
oa side d _he ho_se or b_Jildi#gwhich favors more
shade th_n sunfigbL _fthe uni_ is ia _irec¢ sunfighL
it _Sadvisable '_ provide an awning ove_ the e_i_
D. Proqde su_cien_ e_earance around thecab#_e¢
to e_!_ _orample air c_rcu]etbn through the unit
The rear of the unit should be outdoo_ and ne_her
_na garage nor inside d a buitdiag_ Keep u_ as far
away ,as _ssi_fe from obstacles and e_s_ruct_e_s
and at _eae_30_above t_ floor or ground (See dgh_
figure) Curtains and other obi_l_s within a room
shouM _ prevented from M_kin# _he air flow.
BeBe certain 1he proper etec_r_ out,eL is w_hie
reach of the i_s_II_on, Use o_ly a single out_et
c_rcu_ _ted at i5 amps All wiring should be in
ao_rda_ce w'i_h[_af and marietta! e_ _codes
see tune below
1FLu.........................................................................
_:L}..................}/::::::::::::::::::::Aw_SCBIFHkU
_TiP "11.4'*%3"
35"
II_in,Wtnd_
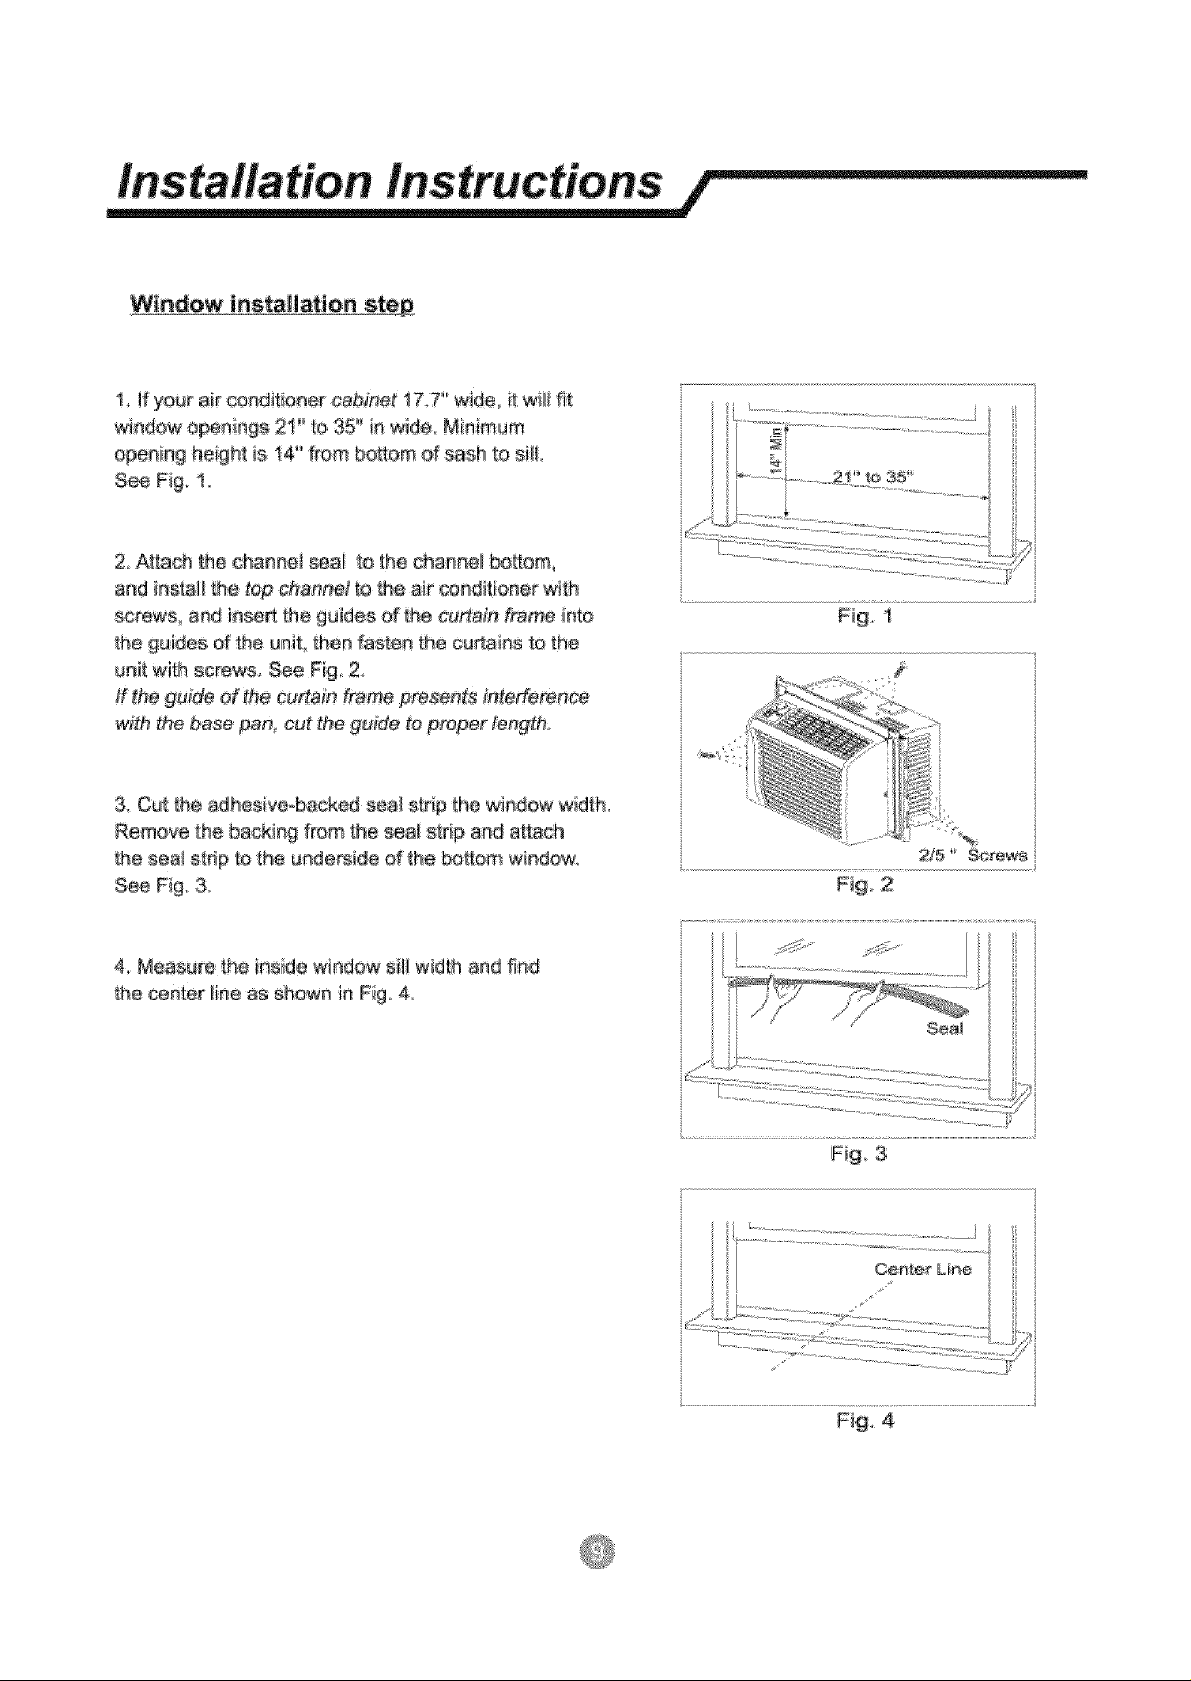
1, _fyour air coadit_o_er cabinet 17.T _w_de, it wiii fit
,w_ldow openings 2I'" to 35" ie wide° Minimum
oger_ia_ height is 14" from bottom d sash to silL
2 A:t_ach _f_echa_ae_ _sai to _he c_a_ne_ _4[tom,
a_d ir_s_H _ top ch&er_el _o_ air conditioner wl_h
_rews, an,diase_ the guides of _,heeu#ain frame into
the guides of the unitthen faste_, the cu_ains te the
uni_ with screws, See Fig 2
ffthe guide Of the cu_ain frame p_nts interference
w#h the base pan cut the guide to proper length,
3 Cut _he adheeive.backed seai strip _he wiedow width.
Remove the backing from the _ai st#p and a_ch
the _ea__,Mp to the u_de_ide o_the bottom window,
See F'_go3.
4,, Measure _he inside window sill width and fi_d
the cee_e_line as shown in Fig 4,_
.... ......... ................................
.................. ::..... I/_
_i 9. I
2/5" Screws
............i :::::..................................
Fig 3
Fig, 4
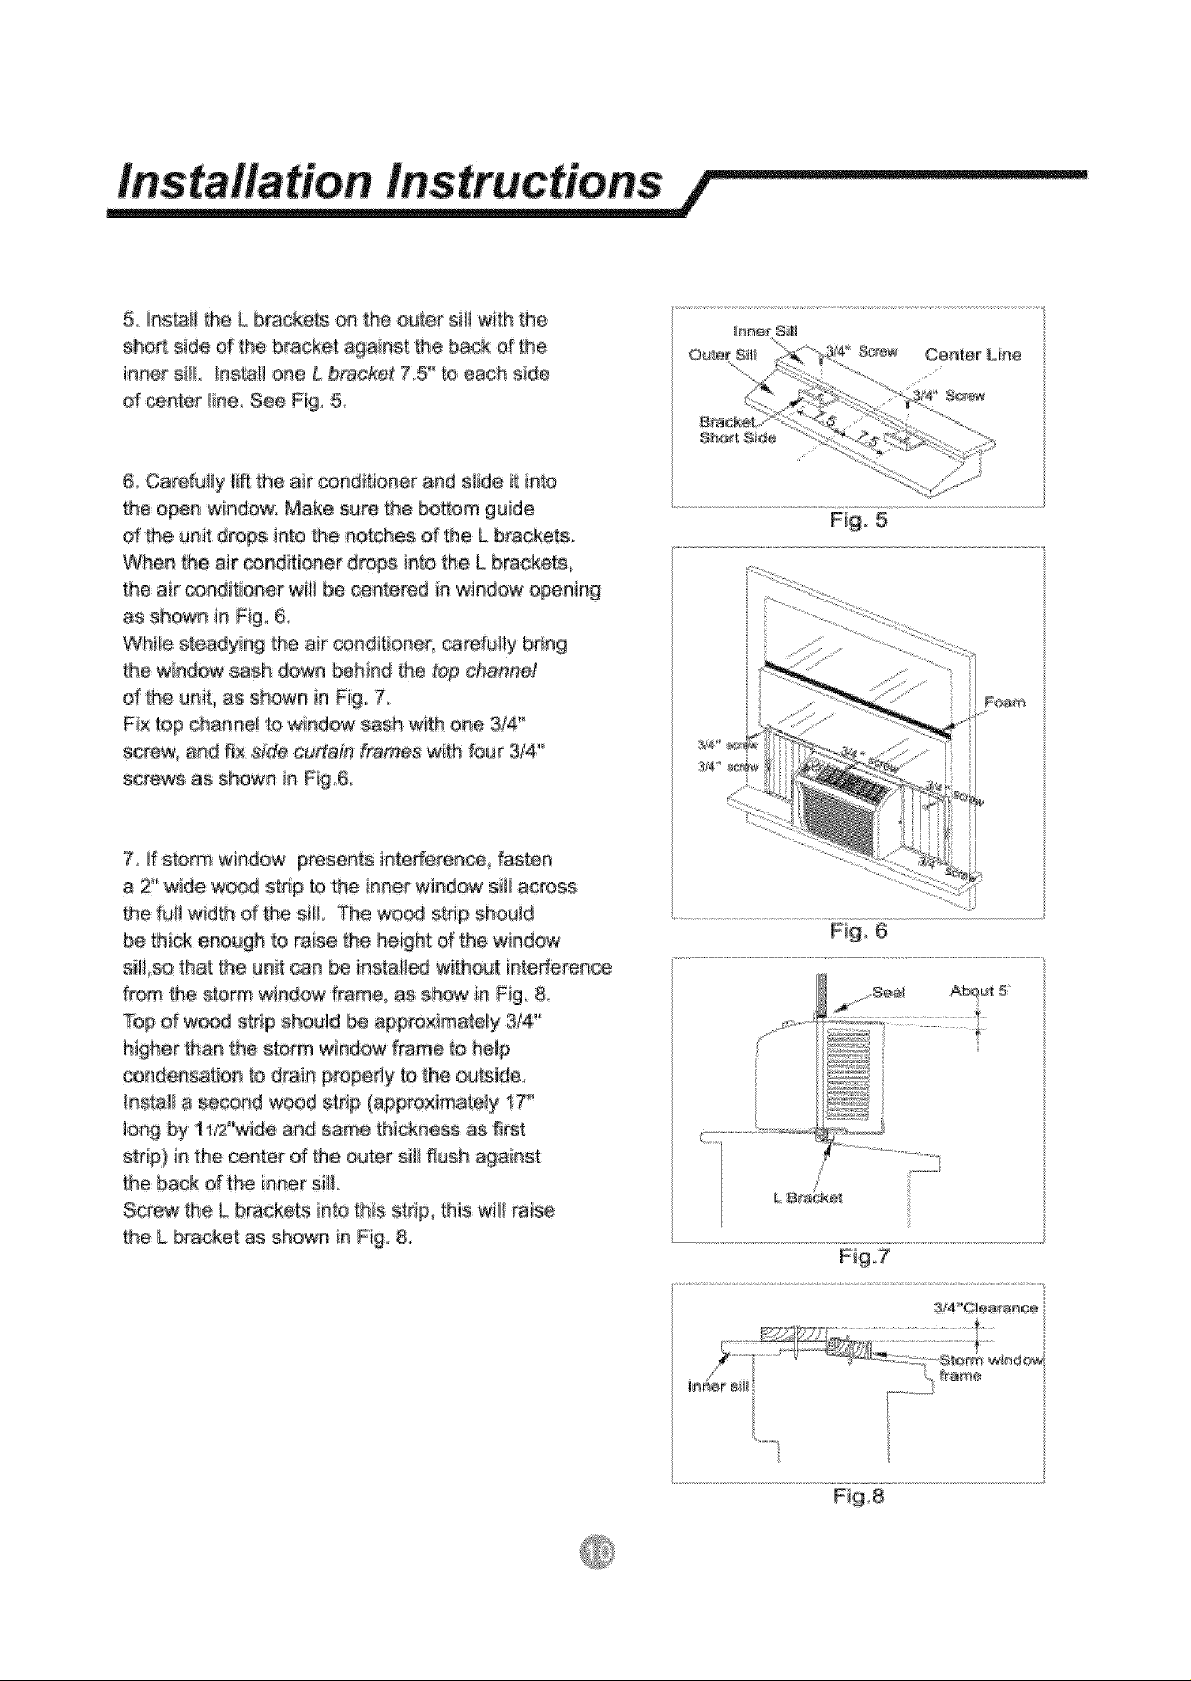
5__ns_iltheL btacke_ontheoutersil!with_he
shodsideofthebracketagainstthebetaofthe
innersl_ _as_t]oneL bracket 7,5_°to each s_de
or r_nte{ line, See Fig_ 5,
& Carefu41ytiIR_heair conditioner and s_ide _ in_o
the open window. Make sure the bottom guide
in[_othe notches of the L brackets_
When _e air conditioner drops into the L bracket_
the air _editioner will be _nteted in window opening
as shown in Fig_6,
Whle atesdyia9 the air ®adi#oner, carefully bring
the wlnd_ sash down behind _he top r_hanne!
of th_ unit, as shown in Fig_ 7
F_×top oha_e! 1ow_ndow sash with o_e 3/4 '°
sctew_ and f_×,s_decu#ain f_mes with four 314'°
screws as shown in Fig6,
t _fstorm window presents interferenc_ fasten
a 2'_wide wo_ str_p to _e inne_ window sili across
the fUl! width d the ei!i The weed strip shouid
be thick e#ough to raise 1fhehei#ht d the ,_ndow
siti so that the unit can _ _nstalled wRhout in_ederenc_e
from _e e_orm w_ndew frame, aS show }n Fig 8,
Top d w_ad strip should be appm×_mate_y 3/4"
higher than the storm w_ndow flame _oheip
cond,ensatio_ [o drain ptopedy to [h_ oatsldeo
Insta_ a second w_ad sir@ (a_proximate!y t7"
_ongby 1lr2"w4de and sa_ thickness as first
s#_p) i_ the center of' the outer silt f_ush against
the back d_he i_ner sill
Screw the L brackets in_ this st@_ this wi!! raise
the L bracket as shown in _i9 &
F_g. 5
F_9 6
Fig7
Fig.8
 Loading...