

Admiral Craft HD-26, HD-36, HD-48 Owner's Manual
HD-26, HD-36, HD-48
Heated Displays
This manual contains important infor mation regarding your
Admiral Craft unit . Please read this manual thoroughly prior to
equipment set-up, operation and ma intenance. Failure to comply
with regular maintenance guidelines outlined in this manual may
void the warranty. MUST READ!!!

WARNINGS
•
Fire, injury or death hazard – have this unit installed by a qualified installer in accordance with all deferral, state
and local codes. Failure to install thi s equipment properly can result in injur y or d e a th.
•
Fire hazard – this unit is designed to be used with legs. Do not use without legs installed. U s e of this equipment
without legs can cause the unit to overheat and cause a fire.
•
Fire and burn hazard – fire and burn i njuries can o ccur if this equipment is not used properly. To reduce the risk
of injury or death:
o Do not touch any hot surfaces
o Plug only i nt o a 3-hole grounded electrical outlet
o Do not immerse unit, cord or plug in liquid at any time
o Unplug cord from outlet when not in use and before cleaning
o Do not operate unattended
o Do not use thi s unit for anything other than intended use
o Do not use outdoors
o Always use on a firm, dry and level surface at least 12” from walls or any other obstruction
o Do not use if unit has a damaged cord or plug, in the event the appliance malfunctions, or has been damaged in
any manner
o Keep children and animals away from unit
o Any incorrect installation, alterations, adjustments and/or improper maintenance can lead to property
loss and injury. All repairs should be done by authorized professionals only
o Ensure that the designated power supply is adequate for continual usage and the voltage is correct
*This unit is intended to be used as a merchandiser for hot food in commercial food service operations only. It
is not intended for household use.
TO INSTALL
1. Remove all packing material and tape, as well as any protective plastic or tape
2. Clean off any glue or tape residue
3. Place the unit in the desired position and level using the included a djustable feet
4. Installing doors: Note the longer doors are for the front or sloped side and the shorter doors are for the back or
straight side. The doors are fitted with the handles facing outside of the unit. Place the top of the door into the
top track and slide the door up to clear and lower into the bottom track.
5. Installing shelves: Place the uprights into the provided slots. Make sure that the longer tab in on top and the
flat sides face inwards. Place the shelf supports at the desired locations and position the shelf on these
supports.
NOTE: The shelf supports and shelves can be positioned level or sloping forward for improved presentation.
6. Plug the unit into a properly grounded electrical supply that matches the data plate rating. Damage to the unit
may occur if incorrect power is supplied to the unit.
TO USE
1. Set the thermostat to the desired heat
2. Preheat the unit for approximately 15 minutes, until the unit reaches the set te mperature. The pilot light will
cycle on and off when the unit has reached the set temperature.
3. Use the toggle switch to operate the li ght
4. If moisture is required, fill the humidit y p a n with 20 ounces of water and monitor the water level
CLEANING – NOTE: To maintain cleanliness and increase service life, the oven should be cleaned daily. Do not
immerse the unit in water or any other liquid. If liquid enters the electrical compartment it may cause a short circuit or
electrical shock
1. Unplug the unit and allow to cool completely before cleaning
2. Using a damp cloth or sponge dipped in soapy water, carefully
3. Wipe the uni t dry and wait a t least a half hour before us ing the unit.
VER811
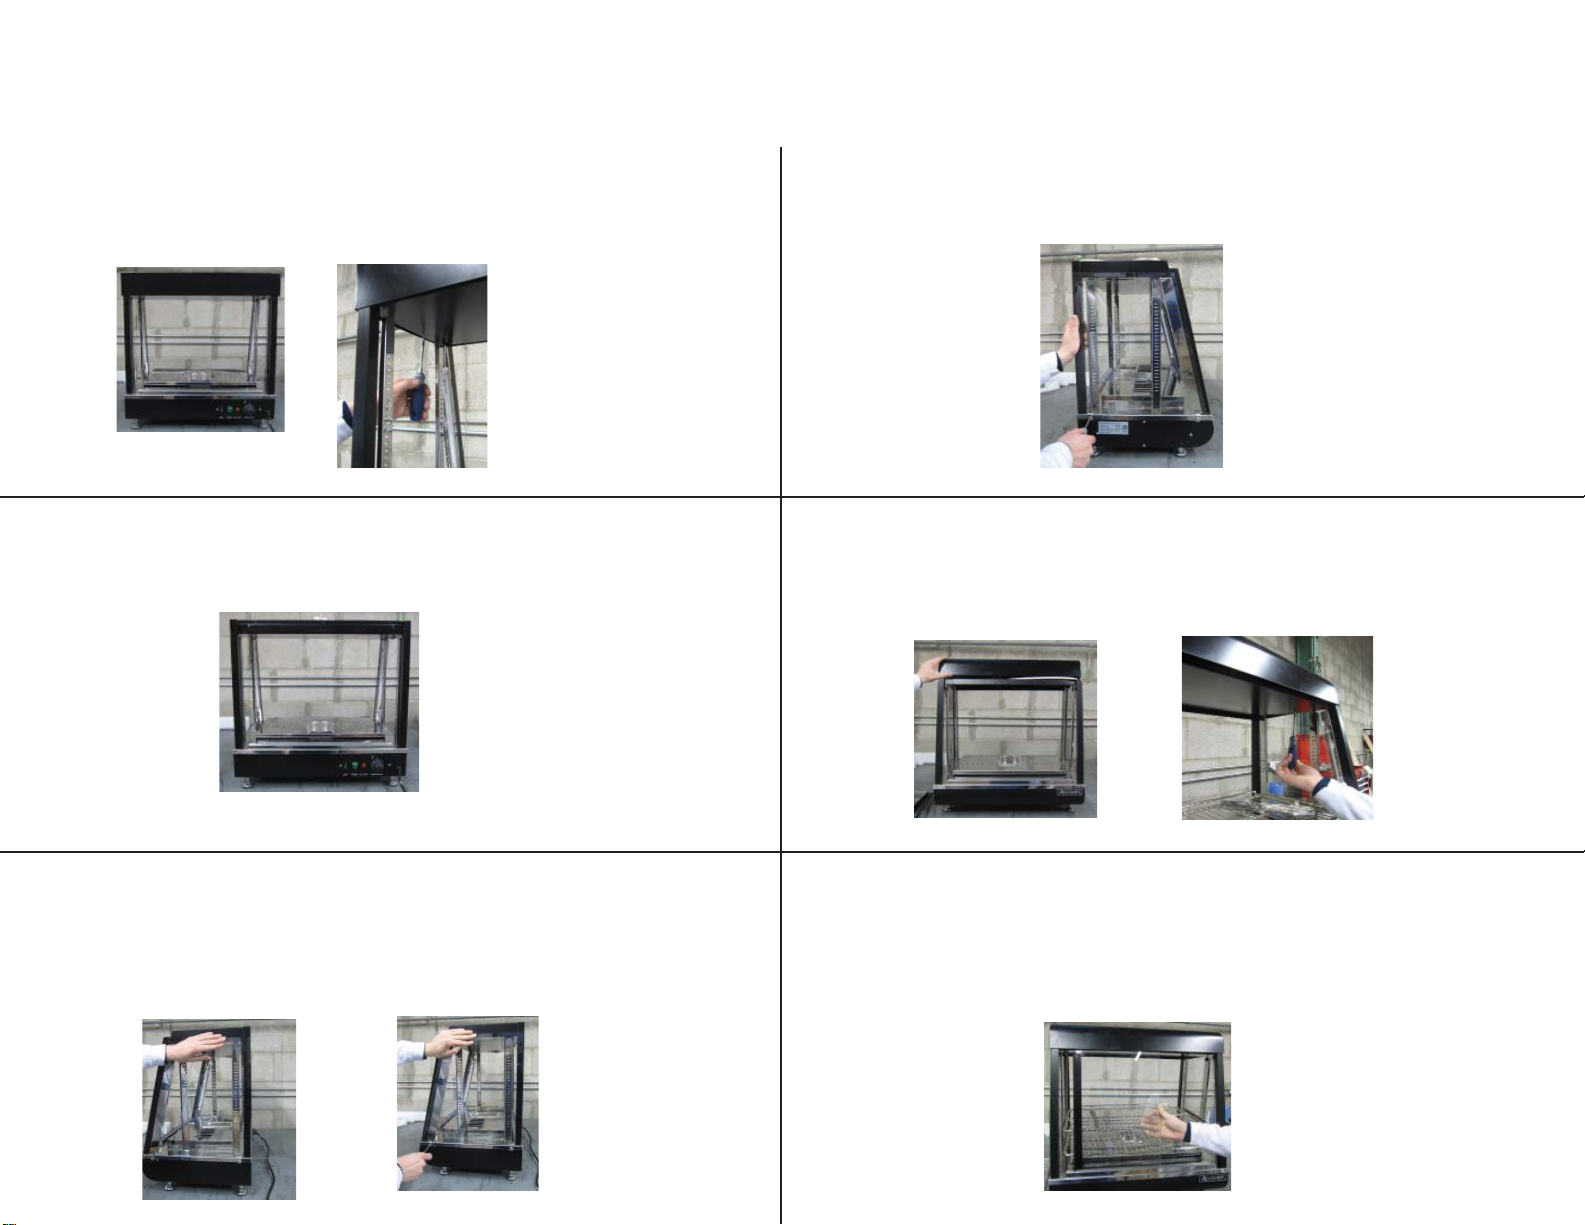
Heated Display Merchandiser Assembly Instructions
HD-26 model pictured in instructions. These instructions are for the HD-26, HD-36 and HD-48 models.
Step 1
With the back of the unit facing you, un-screw both
screws located under the top cover of the unit.
Step 2
Remove the top cover and set aside.
Step 4
Repeat step 3 for the other side glass.
Step 5
Put top cover back on and tighten screws (leave a little
loose for fi tting the front glass pieces in).
Step 3
Loosen the bottom screws located on the side. Do not take
the screws out all the way. Slide the glass between the posts and when
properly aligned tighten the screws.
Step 6
Insert the top of the front left glass into the top inner slot.
Then place the bottom of the front left glass into the bottom
inner slot. If need be, lift up the top cover a bit to fi t glass in under.
Remember to hold onto side glass pieces so they don’t fall out.
 Loading...