

Page 1
®
10.1 Kg
AAV-3
Washer
Use & Care Guide
Table of Contents
Important Safety Instructions 1-2
Using the Controls
2 Speed Combo Models . . . . . . . 3-4
3 Speed Combo Models . . . . . . . 5-6
4 Speed Combo Models . . . . . . . 7-8
Operating Tips . . . . . . . . . . . . . 9
Special Features . . . . . . . . 10-11
Care & Cleaning . . . . . . . . . . . 11
Troubleshooting . . . . . . . . . . . 12
Guide d’utilisation
et d’entretien . . . . . . . . . . . . . . 14
Guía de uso y cuidado . . . . . 28
orm No. A/0
F
/05 P
7
art No. 2205438 Litho U.S.A. ©2005 Maytag Appliances Sales Co.
Page 2
S
pecial Features
Important Safety Instructions
Cycles, options, lights
S
pecial Features
Installer: Please leave this guide with this
appliance.
Consumer: Please read and keep this guide for
future reference. Keep sales receipt and/or canceled
check as proof of purchase.
Have complete model and serial number
identification of your appliance. This is located on
the back center of the control panel. Record these
numbers below for easy access.
Model Number _______________________________
Serial Number ________________________________
Date of Purchase______________________________
In our continuing effort to improve the quality and
performance of our appliances, it may be necessary
to make change
this guide.
Note: When writing or c
problem, please include the following information:
a. Your name, address and telephone number;
b. Model number and serial number;
c. Name and addre
d. A clear description of the problem you are having;
e. Proof of purchase (s
s to the appliance without revising
alling about a service
ss of your dealer or engineer;
ales receipt)
What You Need to Know About
Safety Instructions
ant Safety Instructions appearing in
arning and Impor
W
this guide are not meant to cover all possible
conditions and situations that may occur. Common
sense, caution and care must be exercised when
installing, maintaining or operating appliance.
Always cont
conditions you do not understand.
act the manufacturer about problems or
Recognize Safety Symbols, Words,
Labels
NG –
I
N
AR
W
sult in severe personal injury or death.
re
t
WARNING
Hazards or uns
afe practice
s which
LD
U
O
C
WARNING! FIRE HAZARD
Do not add gasoline, dry-cleaning solvents, or other
flammable or explosive substances to the wash
water. These substances give off vapors that could
ignite or explode.
Do not wash articles which have been previously
cleaned, washed, soaked, or spotted with gasoline,
dry-cleaning solvents, oil, waxes, chemical solvents,
alcohol, turpentine, or other flammable or explosive
materials. These substances will be retained in
articles, and articles which still contain these
flammable or explosive substances give off vapors
that could ignite or explode.
Observe these precautions when using cleaning
fluids, spot or stain removers, etc. These products
should be labeled “nonflammable.” Use according to
manufacturers’ directions in a well ventilated area or
outdoors. Thoroughly rinse articles by hand before
placing them in the washer
– rust removers, for example – will damage
components and the finish of the washer.
Keep area around and underneath washer free from
the accumulation of combustible materials, such as
lint, paper, rags, gasoline, and all other flammable
vapors and liquids.
ROGEN GAS IS EXPLOSIVE!
HYD
conditions, hydrogen gas may be produced in a hot
water system that has not been used for two weeks
or more. If the hot water system has not been used
for such a period, before using the washer, turn on
all the hot water faucets and let the water flow from
each faucet for several minute
accumulated hydrogen gas. As this gas is
flammable,
during this time.
Recent studies have shown that if vegetable oil
contaminated materials are incompletely washed, a
arry-over and buildup of the oil may contribute to a
c
chemical reaction (spontaneous combustion) that
could c
be more likely to happen if the load were left in the
dryer after tumbling stopped or if items were folded
and st
do not smoke or use an open flame
ause a load to c
acked while warm.
. Some of the
his will release any
s. T
atch fire by it
se products
Under cer
his would
. T
self
tain
C
result in minor personal injury.
1
Hazards or uns
N –
O
AUTI
CAUTION
afe practice
s which
LD
U
O
C
Page 3

S
pecial Features
Important Safety Instructions
Cycles, options, lights
S
pecial Features
WARNING
To reduce the risk of fire, explosion, electric shock,
or personal injury when using your washer, follow
basic safety precautions, including the following:
1. Read all instructions before using the appliance.
2. As with any equipment using electricity and having
moving parts, there are potential hazards. To use this
appliance safely, the operator should become familiar
with the instructions for operation of the appliance
and always exercise care when using it.
Do not install or store this appliance where it will be
3.
exposed to the weather.
4. Install and level washer on a floor that can support
the weight.
5. This appliance must be properly grounded.
plug the appliance cord into a receptacle which is
not grounded adequately and in accordance with
local and national codes. See installation instructions
for grounding this appliance.
6. To avoid the possibility of fire or explosion:
a.
Do not wash items that have been previously
cleaned in, washed in, soaked in, or spotted with
gasoline, dry-cleaning solvents, other flammable or
explosive substances as they give off vapors that
could ignite or explode. Hand wash and line dry
any items containing these substances.
Any material on which you have used a cleaning
solvent, or which is saturated with flammable
liquids or solids,
washer until all traces of these liquids or solids
and their fumes have been removed.
These items include acetone, denatured alcohol,
gasoline, kerosene, some liquid household
cleaners, some spot removers, turpentine, waxes
and wax removers.
Do not add gasoline, dry-cleaning solvents, or
b.
other flammable or explosive substances to the
wash water. These substances give off vapors that
could ignite or explode.
c. Under certain conditions, hydrogen gas may be
produced in a hot water system that has not been
used for two weeks or more. HYDROGEN GAS IS
EXPLOSIVE. If the hot water system has not been
used for such a period, before using a washer or
combination washer-dryer, turn on all hot water
faucets and let the water flow from each for
several minutes. This will release any accumulated
should not be placed in the
Never
hydrogen gas. As the gas is flammable, do not
smoke or use an open flame during this time.
Do not wash or dry items that are soiled with
d.
vegetable or cooking oil. These items may contain
some oil after laundering. Due to the remaining oil,
the fabric may smoke or catch fire by itself.
7. Do not reach into the appliance if the tub or agitator
is moving.
8. Do not allow children or pets to play on, in, or in
front of the appliance. Close supervision is necessary
when the appliance is used near children and pets.
9.
Do not tamper with controls.
10.
Do not repair or replace any part of the appliance or
attempt any servicing unless specifically
recommended in published user-repair instructions
that you understand and have the skills to carry out.
11. Unplug power supply cord before attempting to
service your washer. Service is to be done only by
qualified service personnel.
12. The agitator
removed, it must be replaced by pushing down
completely and the locking screw tightened before
the washer is operated.
13. Keep all laundry aids such as detergents, bleach, etc.,
out of the reach of children, preferably in a locked
cabinet. Use laundry aids only as directed by the
manufacturer. Observe all warnings on container labels.
14. Keep the area around and underneath washer free
from the accumulation of combustible materials, such
as lint, paper, rags, gasoline, and all other flammable
vapors and liquids.
Do not use chlorine bleach and ammonia or acids
15.
(such as vinegar or rust remover) in the same wash.
Hazardous fume
16.
Do not machine wash fiberglass materials. Small
ticle
par
loads and cause skin irritation.
17. For flame resistant finishes - follow garment
manufacturer's instructions carefully. Improper
laundering could remove the finish.
Before the appliance is removed from service or
18.
discarded, remove the door to the washing compartment.
19. Inlet hoses are subject to damage and deterioration
over time. Check the hoses periodically for bulges, kinks,
cuts, wear or leaks and replace them every five years.
should not be removed. If the agitator is
an form.
s c
s can stick to fabrics washed in following
SAVE THESE INSTRUCTIONS
2
Page 4
Using the Controls - 2 Speed Combo Models
C
ycles, options, lights
W
hat can & cannot be
washed
o
perating tips
d
ishwasher use
l
oading
C
ontrols at a glance
Special Features
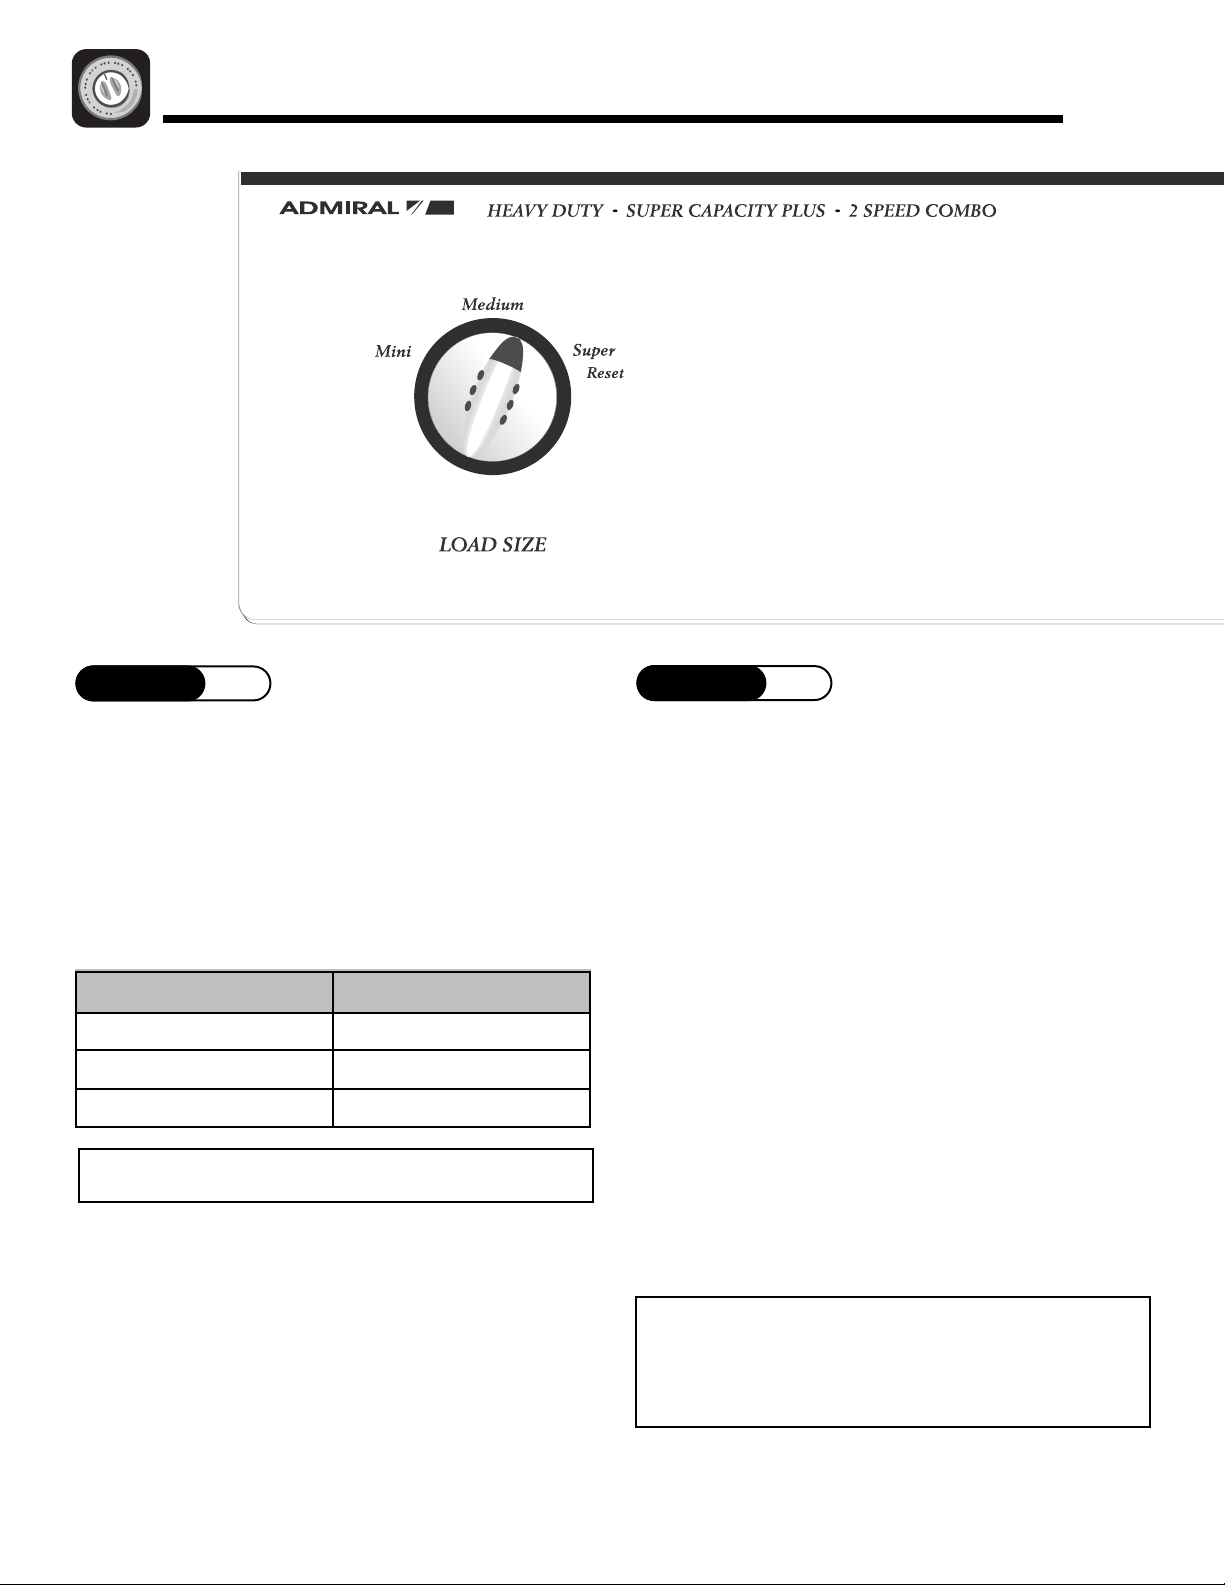
STEP 1
Select LOAD SIZE
Determine the selected setting based on load size.
Selection should provide sufficient water to permit
clothes to circulate freely during agitation.
It may become nece
adjust the water level after agitation begins. To adjust
the water level, turn the control to
back to the desired setting.
TER LEVEL SETTING LOAD SIZE
A
W
Mini (select models)
Medium 1/4 – 3/4
Super 3/4 – Full
Note: Items must circulate freely for best results.
ssary, due to bulky fabrics, to
Reset and then
ull
4 F
1/
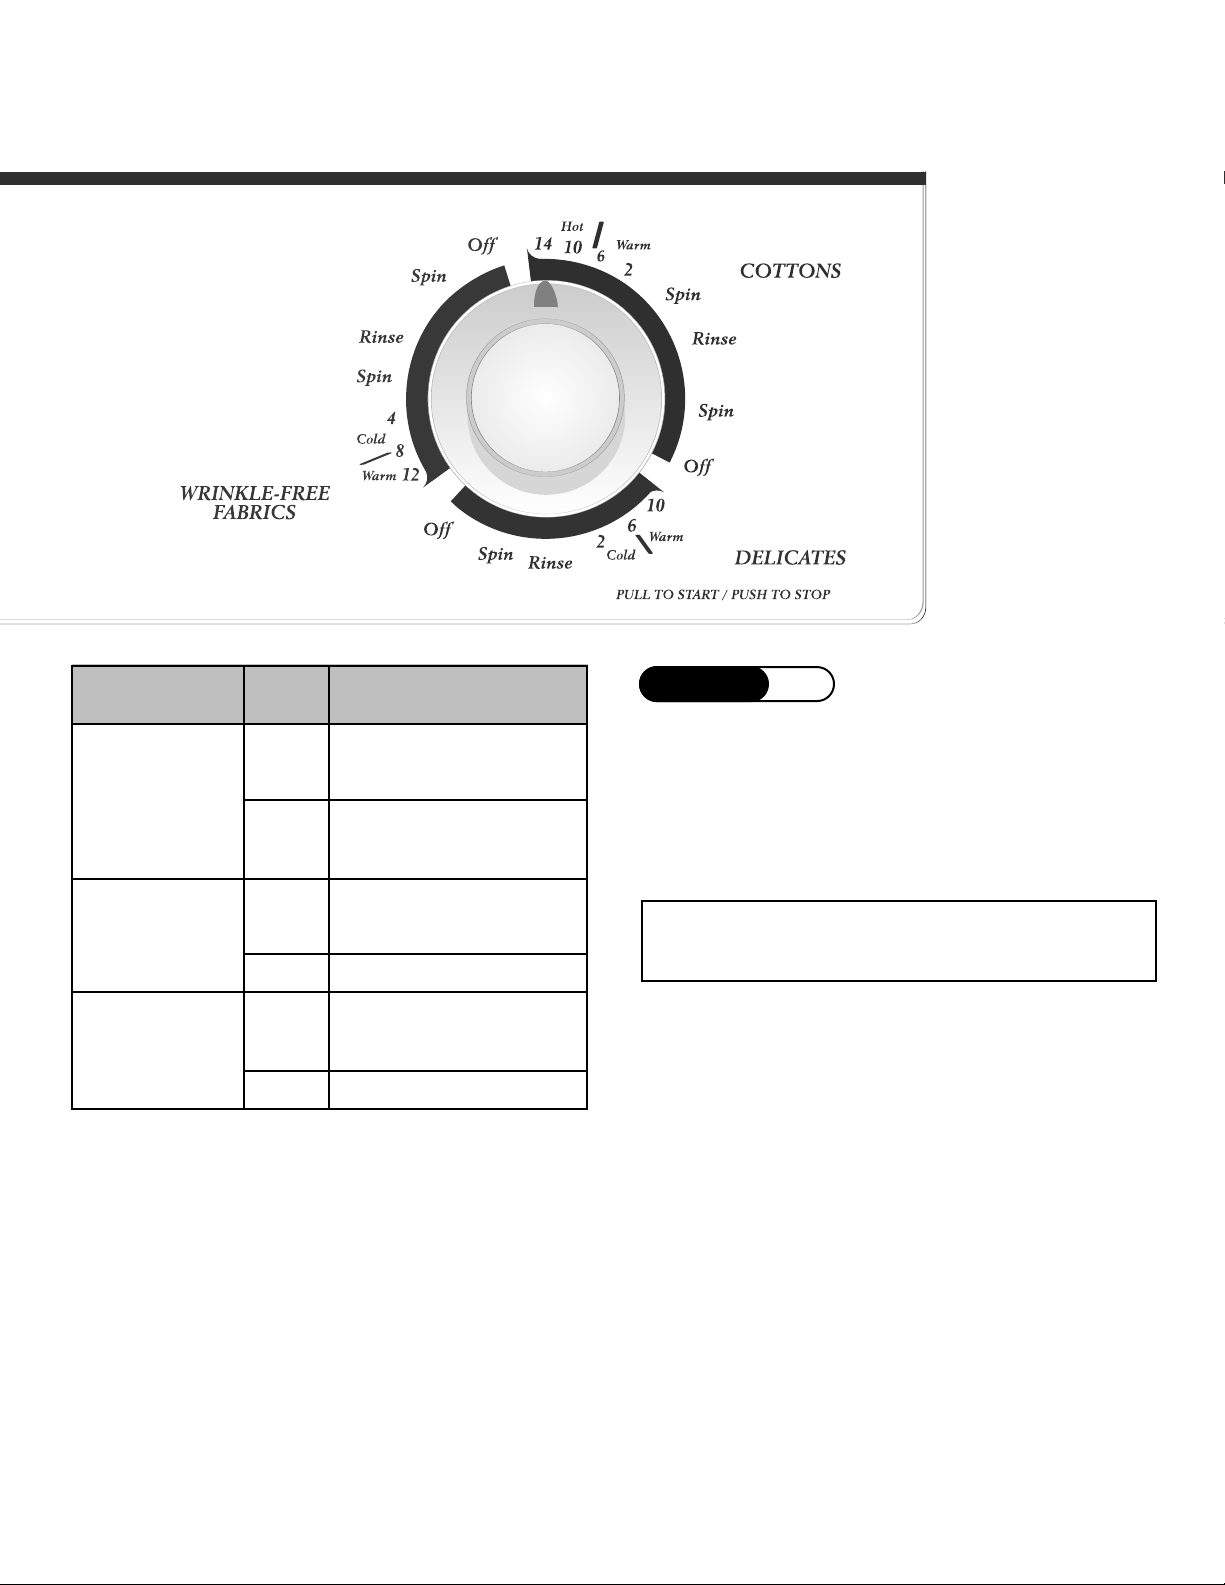
STEP 2
Select Cycle and Water
Temperature
To select a cycle and water temperature, push the
control dial
(clockwise) until the pointer is at the number of
minute
load in the COTTONS, WRINKLE-FREE FABRICS or
DELICATES c
COTTONS Cycle
Used to wash Cottons and heavily soiled items.
WRINKLE-FREE FABRICS Cycle
Used to minimize wrinkles with a cool-down spray
rinse following the wash.
DELICATES Cycle
Used for items requiring delicate wash action. The
washer will fill, then agit
in (off position) and turn it to the right
s and water temperature needed for the wash
ycles. All rinses use cold water.
ate and soak alternately
.
Note: In wash water temperatures below 60
(16° C), detergents
well. Care labels define cold water as up to 85°F
3
(29° C).
do not dissolve well or clean
°
F
Page 5
Control features vary by model.
CYCLE TIME TEMPS
COTTONS
WRINKLE-
FREE
FABRICS
DELICATES
14
10
6
2
12
8
4
10
6
2
Hot/Cold
Warm/Cold
Warm/Cold
Cold/Cold
Warm/Cold
Cold/Cold
STEP 3
Pull Control Dial Out to Start
You may stop the washer at any time by simply
pushing the control dial in. Therefore it is possible to
ain a non-agit
obt
repeat any part of a cycle. The control dial must be
pushed
in (off position) when you change the setting.
Note: Do not attempt to turn the control dial
counterclockwise. Damage to the timer will result.
ated soak or to shorten, skip or
4
Page 6
Using the Controls - 3 Speed Combo Models
C
ycles, options, lights
What can & cannot be
washed
operating tips
d
ishwasher use
loading
C
ontrols at a glance
Special Features
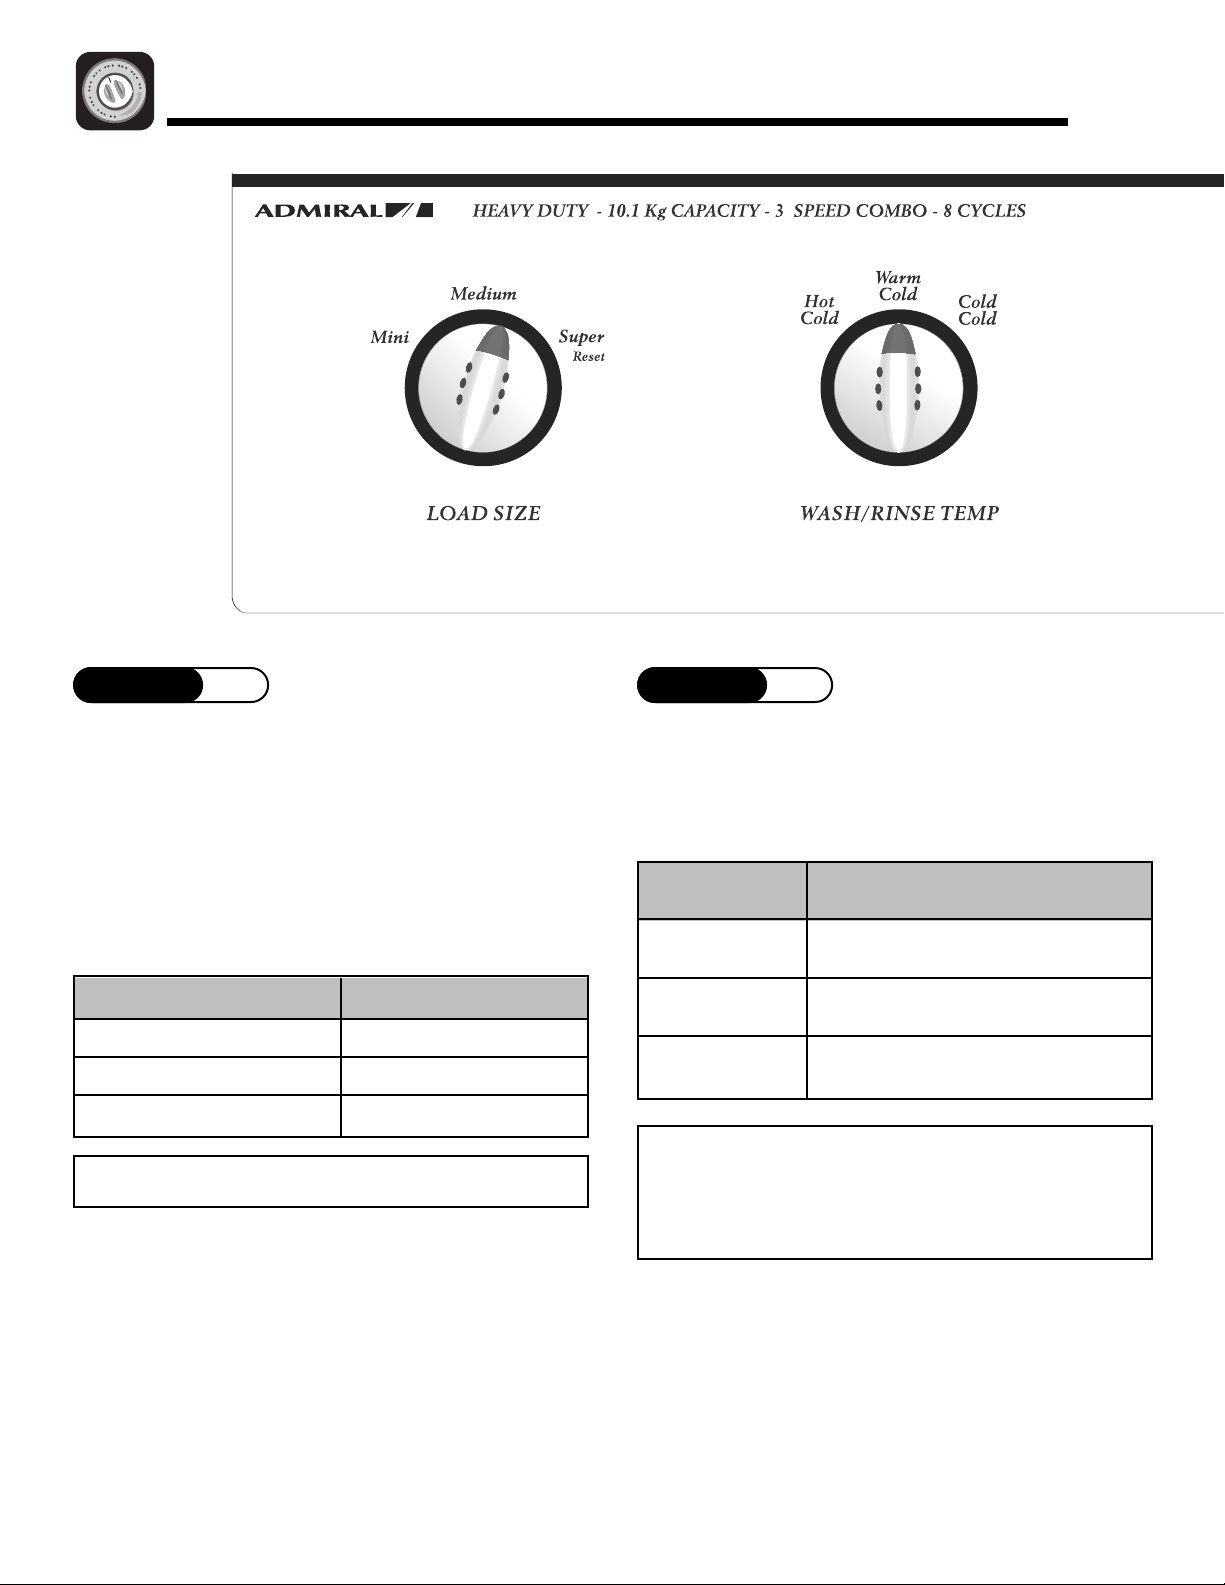
STEP 1 STEP 2
Select LOAD SIZE
Determine the selected setting based on clothes load
size. Selection should provide sufficient water to permit
clothes to circulate freely during agitation.
It may become necess
adjust the water level after agitation begins. To adjust
the water level, turn the control to
to the desired setting.
TER LEVEL SETTING LOAD SIZE
A
W
Mini (select models) 1/4 Full
Medium 1/
Super 3/
Note: Items must circulate freely for best results.
ary, due to bulky fabrics, to
reset and then back
4 – 3/4
ull
4 – F
Select WASH/RINSE TEMP
Your washer gives you a choice of hot, warm or cold
water for washing and cold water for rinsing. Use the
chart below as a guide.
WASH/RINSE LOAD TYPE
TEMPS
Hot/Cold
Warm/Cold
Cold/Cold
Note: In wash water temperatures below 60
° C), detergents
(16
well. Care labels define cold water as up to 85°F
(29° C).
White and heavily soiled, color-fast
items.
Moderately soiled, colored items;
most wrinkle-free items.
Brightly colored, lightly soiled
items; washable woolens.
°
F
do not dissolve well or clean
5
Page 7
Control features vary by model.
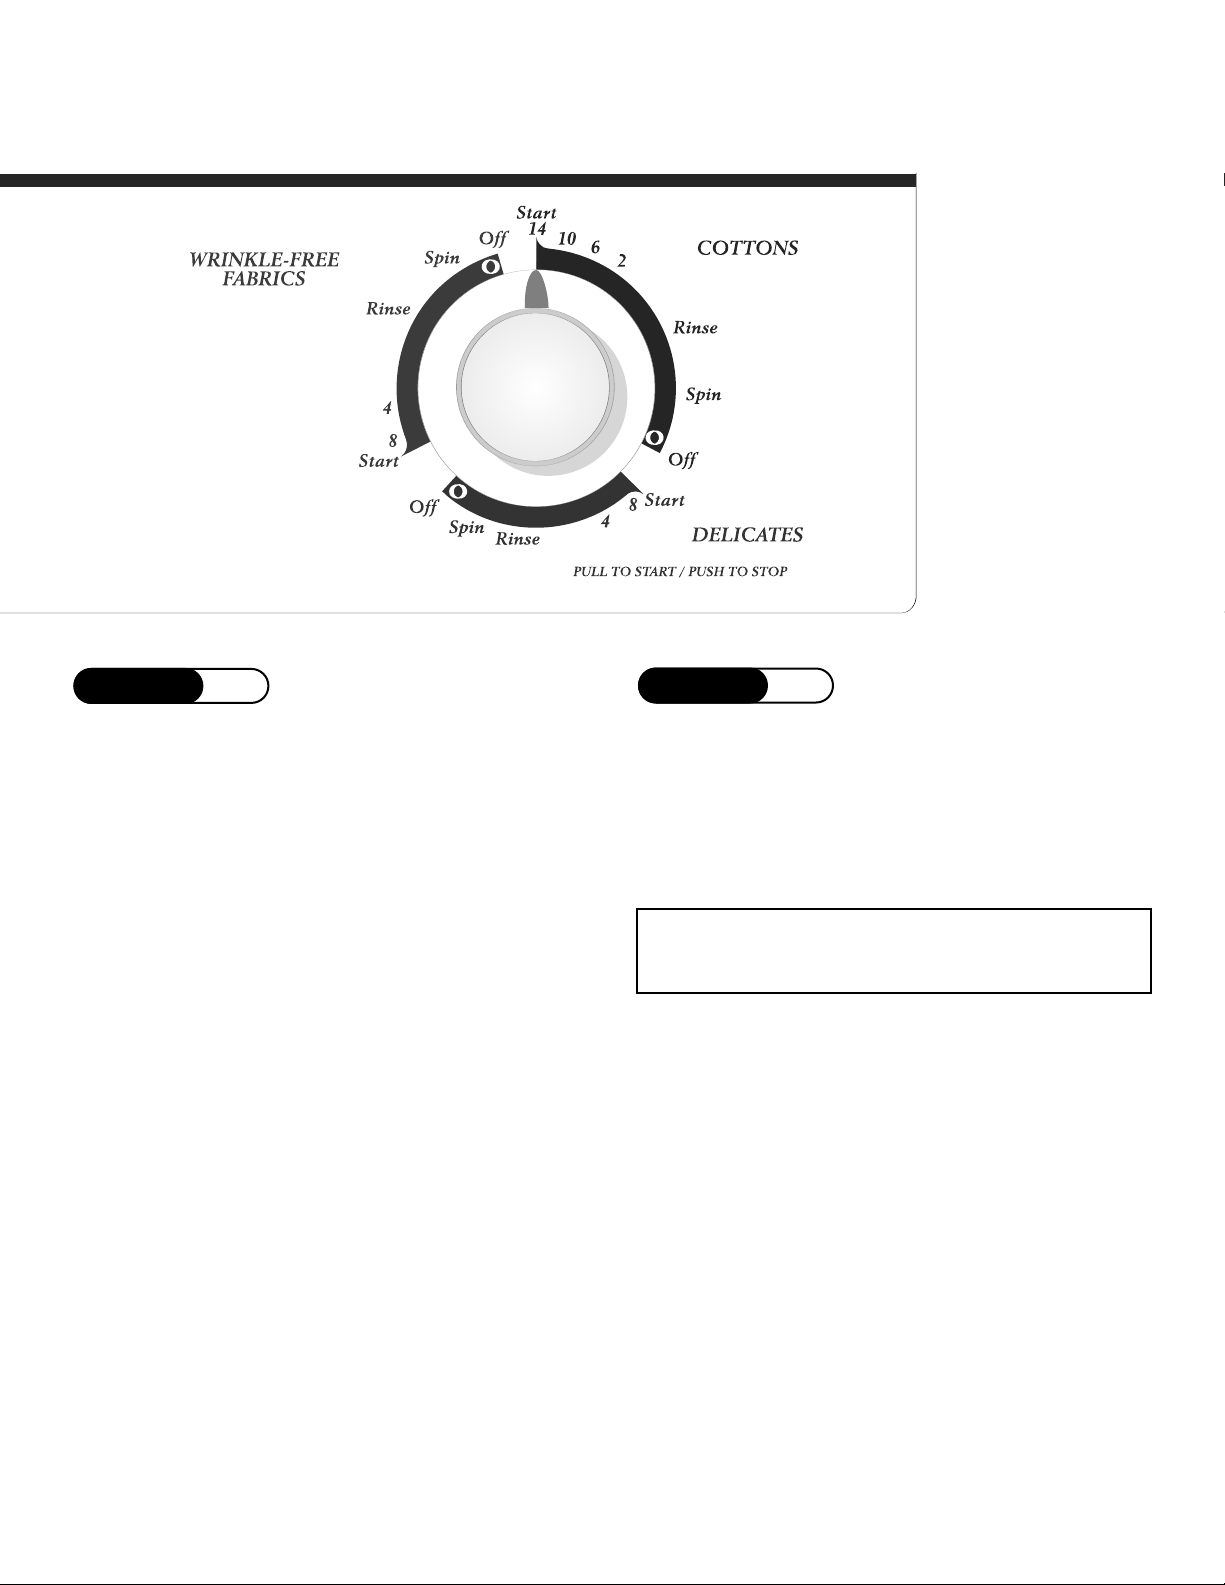
STEP 3
Select Cycle
To select a cycle, push the control dial in (off position)
and turn it to the right (clockwise) until the pointer is at
the number of minutes needed for the wash load in the
COTTONS Fabrics, WRINKLE-FREE FABRICS or
DELICATES cycles.
COTTONS Cycle
Provides normal agitation and normal spin speeds to
wash cottons and heavily soiled items. F
cleaning, set the dial at 14 minutes.
WRINKLE-FREE FABRICS Cycle
Provides normal agitation speed and normal spin
speed with a spray rinse to protect wrinkle-free fabrics.
DELICATES Cycle
Provides slow agitation speed and slow spin speed for
delicates and knits.
or maximum
STEP 4
Pull Control Dial Out to Start
You may stop the washer at any time by simply
pushing the control dial
obtain a non-agitated soak or to shorten, skip or
repeat any part of a cycle. The control dial must be
pushed
in (off position) when you change the setting.
Note: Do not attempt to turn the control dial
counterclockwise. Damage to the timer will re
in. Therefore it is possible to
sult.
6
Page 8

Cycles, options, lights
W
hat can & cannot be
w
ashed
o
perating tips
d
ishwasher use
loading
C
ontrols at a glance
S
pecial Features
Using the Controls - 4 Speed Combo Models
STEP 1
Select LOAD SIZE
Determine the selected setting based on load size.
Selection should provide sufficient water to permit
clothes to circulate freely during agitation.
It may become necessary
adjust the water level after agit
the water level, turn the control to
back to the desired setting.
WATER LEVEL SETTING LOAD SIZE
Mini (select models) 1/4 Full
Small 1/
Medium 1/2 – 3/
Super 3/4 – Full
Note: Items must circulate freely for best results.
, due to bulky fabrics, to
ation begins. To adjust
Reset and then
4 – 1/2
4
STEP 2
Select WASH/SPIN SPEED
our washer has select
Y
combinations.
able wash and spin speed
WASH/S
SPEEDS
Normal/Normal
Normal/Slow
Slow/
Slow/Slow Delicate fabrics needing slower
PIN LOAD TYPE
Sturdy fabrics needing maximum
water extraction.
Sturdy fabrics needing a slower
spin speed bec
Normal
Heavy loads of delic
needing a fast spin for better water
extraction.
wash and spin speed bec
clothing construction.
ause of wrinkling.
ate fabrics
ause of
STEP 3
Select WASH/RINSE TEMP
our washer gives you a choice of hot, warm or cold
Y
water for washing and cold or warm water for rinsing.
Use the chart below as a guide.
E LOAD TYPE
S
N
I
R
/
H
AS
W
TEMPS
White and heavily soiled, color-fast
Hot/Cold
Warm/Warm
Warm/Cold
Cold/Cold
items.
Moderately soiled, colored items.
Moderately soiled, colored items;
most wrinkle-free items.
Brightly colored, lightly soiled
items; washable woolens.
7
Page 9
Control features vary by model.
Note: In wash water temperatures below 6
(16° C), detergents
well. Care labels define cold water as up to 85°F
(29° C).
do not dissolve well or clean
0°F
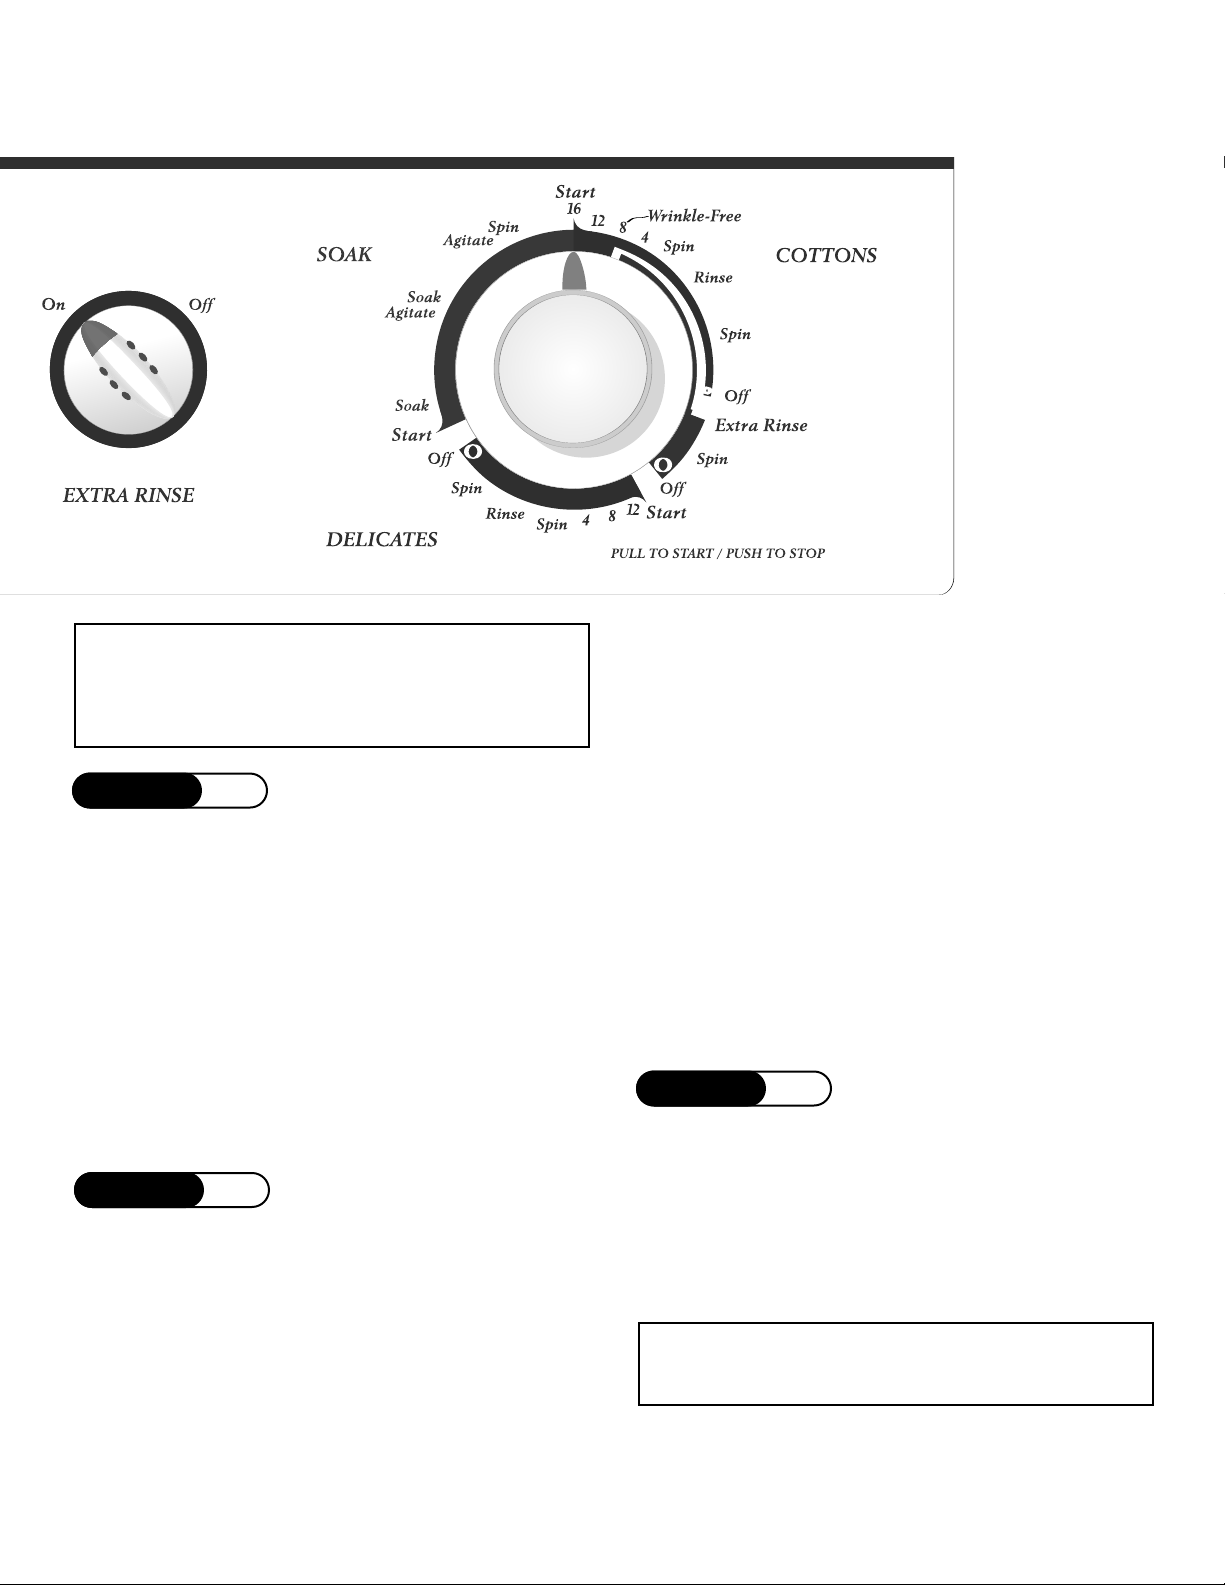
STEP 4
Select Options (if desired)
EXTRA RINSE
When the knob is in the on position, an additional
rinse at the end of the COTTONS cycle is provided to
more completely remove laundry additive
fumes, etc.
per
s, suds,
END OF CYCLE SIGNAL (select models)
The end of cycle signal will sound once the cycle is
completed. The end of cycle signal can be canceled by
setting the switch to Off.
STEP 5
Select Cycle
o select a c
T
and turn it to the
the number of minutes desired for the wash load.
IMPORTANT: For optimum fabric care, the
appropriate wash and spin speed for the load type
must be selected using the WASH/SPIN SPEED knob.
ycle, push the control dial
right (clockwise) until the pointer is at
in (off position)
COTTONS Cycle
For regular fabrics, select the cycle time and turn the
Wash/Spin Speed dial to Normal/Normal.
For fabrics needing a slower spin speed to reduce
wrinkling, set the control dial on
turn the wash/spin speed dial to Normal/Slow.
Wrinkle-Free and
DELICATES Cycle
This cycle provides up to 12 minutes of agitation.
Depending on the load, select either the Slow/Slow
or Slow/Normal wash/spin speed.
SOAK Cycle
This cycle provides approximately 30 minutes of
ation and soaking to help remove stubborn dir
agit
and stains. For more information see page 10.
t
STEP 6
Pull Control Dial Out to Start
ou may stop the washer at any time by simply
Y
pushing the control dial in. Therefore it is possible to
ain a non-agit
obt
repeat any part of a cycle. The control dial must be
pushed
in (off position) when you change the setting.
ated soak or to shor
Note: Do not attempt to turn the control dial
counterclockwise. Damage to the timer will re
ten, skip or
sult.
8
Page 10

C
ycles, options, lights
W
hat can & cannot be
w
ashed
o
perating tips
S
pecial Features
Operating Tips
Detergent
• Use either liquid or granular laundry detergent. For
best results, be sure detergent is added to the
washer BEFORE the load and be sure the wash
water is above 60
• Use the correct amount of detergent for the load size,
soil level and water conditions. Use more detergent if
you have hard water and very soiled loads.
If you have soft water or a lightly soiled load, use less
detergent. (See manufacturer’s instructions.)
• Wipe up any detergent spills on the washer.
Loading
• For best results add the detergent to the washtub
before adding the load.
°
F (16° C).
• Put dry, unfolded clothe
top row of holes for a maximum load.
•
Do not wrap large items like sheet
.
ator
agit
• Mix large and small items for best circulation. Wash
bulky items like blanket
• When laundering wrinkle-free items or items of
delicate construction, washable woolens or loosely
knit items, never use less than the Medium water
level setting. This will minimize shrinkage, wrinkling
and pulling of seams.
• Close lid carefully to avoid slamming.
s loosely in the tub, up to the
s around the
s separately.
Additional Tips
• During the spin, it is possible for the load to become
unevenly distributed in the tub. If this happens, push
in the control dial, open the lid, redistribute the load,
close the lid and restart the washer. The spin will
resume at the point it was interrupted.
• The washer will pause briefly throughout each cycle.
These pauses are normal.
• This washer is designed so that it will not agitate or
spin when the lid is open. It will, however
lid open so water is available for pretreating st
diluting fabric softener.
• If you open the lid during a spin cycle, the washer
will stop. When the lid is closed and the washer is
restarted, the washer will continue the cycle at the
point it was interrupted.
, fill with the
ains or
9
Page 11

Special Features
Special Features
Liquid Bleach Dispenser
The dispenser automatically dilutes liquid chlorine
bleach before it reaches your wash load.
To use, follow these steps:
1. Measure liquid chlorine bleach carefully, following
the instructions on the bottle.
2.
Pour liquid chlorine bleach into bleach
dispenser
splashing or over-filling the dispenser.
before adding the load. Avoid
If it is necessary to clean the dispenser:
1. Pull the dispenser off of the top of the agitator.
2. Soak for one hour (in sink or container) in hot
water and dishwashing liquid.
3. Hold hands over top and bottom of dispenser and
shake to loosen buildup.
4. Rinse with clean, hot water.
5. Repeat process if necessary.
6. Replace dispenser on agitator.
Do not use dishwashing liquid inside the washer.
Oversudsing can occur.
SOAK Cycle (select models)
This cycle eliminates the inconvenience of soaking
stained loads before they are placed in the washer.
To use, follow these steps:
1. Add liquid or granular detergent to the washtub.
2. Add the load.
Notes:
• Never pour undiluted liquid chlorine bleach
directly onto the load or into the wash tub. It is a
powerful chemical and can cause fabric damage,
such as tearing or color loss, if not used properly.
• If you prefer to use color-safe, non-chlorine
bleach, pour it into the wash tub with your
detergent.
the bleach dispenser
Do not pour non-chlorine bleaches into
.
Liquid Dispenser (select models)
he dispenser may be used for fabric softener with
T
most cycles or liquid detergent with the SOAK cycle
(select models). The liquid dispenser should be
cleaned before and after each use of liquid detergent.
The dispenser automatically releases the liquid at the
proper time during the c
ycle.
3. Add
4. Set the control dial to
The load will soak for 30 minutes with brief periods of
agitation. The water is then spun out and clean wash
water is added along with the liquid detergent for a
16-minute wash c
liquid detergent only to the Liquid Dispenser
in the top of the agitator
ycle.
.
Start in the SOAK Cycle.
Safety Spin
If for any reason you open the washer lid when the
washer is in a spin or extract period, the operation will
immediately stop. This is for your personal safety. If
your washer does not stop, call your service technician
hen the lid is closed, the operation will
immediately
automatically resume.
. W
Finger Faucet (select models)
Provides a flow of water when holding the
switch in the On position.
To use, follow these steps:
1. Pour a measured amount of desired liquid into
the dispenser to fill line only.
2. If liquid comes below line, add warm water.
10
Page 12

Special Features
Special Features
Cycles, options, lights
What can & cannot be
washed
Special Features
Automatic Lint Filtering System
The Lint Filtering System does not require
cleaning.
Wash and rinse water is filtered and re-filtered
continuously to trap lint shed by most fabrics during
the agitation cycle before it can be redeposited on the
wash load. The engineered hole design on the wash
basket, in conjunction with water flow produced by the
agitator, traps lint away from the clothes between the
inner wash basket and the outer tub. Lint is
automatically flushed from the washer during the spin
cycle.
Unbalanced Spin Load
Compensator
Your new washer is designed to handle out-of-balance
loads without shutting down or interrupting the
washing cycle.
F
or this reason, the cycle will always be completed. If
heavier fabrics in such out-of-balance loads should
ever contain excessive moisture at the completion of
the cycle, redistribute the clothes in the washer and
reset the control dial for the final spin period.
Overload Protector
A built-in protector automatically shuts off the washer
motor in case of an overload. This can occur if:
• The load being washed is too heavy.
• Too many appliances are plugged into the line
operating your washer.
• A low voltage condition exists on the line.
• Lid is opened and closed repeatedly.
The overload protector permits the washer to start again
when the motor has cooled to a safe operating temperature.
If the motor stops repeatedly, call your service technician.
Care & Cleaning
1. After washing, leave the lid open until the interior
is dry.
Check hose
2.
our washer
Y
3.
temperatures will go below freezing, as damage to
the washer could result.
4. To clean, occasionally wipe exterior with a clean
damp sponge or cloth.
plastic parts.
5. Lifetime lubrication is done at the factory, so your
washer never needs to be oiled or greased.
6.
Do not lay heavy or sharp objects on top of your
washer
he top of the washer
T
.
7
removing stains from garments. Some stain
removers, such as rust remover, will mar the finish.
8. Remove pins, buckles or other sharp objects from
clothes to prevent scratching interior parts.
9. Clothes
s to be sure there are no kinks or knots.
should not be inst
Do not use polish on
.
should not be used for
should not be stored in washer.
alled where
11. If you close your home for the winter
technician drain the washer. Unplug cord from
electrical outlet and disconnect hoses from faucets.
, have a service
Cleaning the Interior
Clean the interior of the washer periodic
any dir
that may remain in the washer as a result of washing
clothes. We recommend taking the following steps
every 60 to 120 days to clean and freshen your washer
interior. The frequency with which the washer should
be cleaned and fre
us
through your washer, or the use of cold water. Failure
to follow these instructions may result in unsatisfactory
conditions, including unpleasant odor and/or
permanent st
To clean and freshen the washer interior:
t, soil, odor
age, the amount of dirt, soil or bacteria being run
1. Add a measured amount of chlorine bleach to the
bleach dispenser, following package directions.
2. Add 1/4 cup of detergent to the tub.
, mold, mildew or bacteria re
shened depends on factors such as
ains on the washer or wash load.
ally to remove
sidue
11
Bleach, detergent, solvent
10.
of your washer that are allowed to remain will
remove the glossy finish. Remove all spills with a
damp, soft cloth.
s, etc. spilled on the top
3. Run the washer without a load through a complete
cycle using hot water.
4. Repeat the process if necessary.
Page 13

Cycles, options, lights
W
hat can & cannot be
w
ashed
o
perating tips
d
ishwasher use
loading
S
pecial Features
Troubleshooting
on’t Fill
W
Won’t Agitate
Won’t Spin
or Drain
Load is Wet
Stops
• Plug cord into live electrical outlet.
Check fuse or reset circuit breaker.
•
• Turn the control dial to proper cycle and restart the washer.
• Turn both faucets on fully.
• Straighten inlet hoses.
• Disconnect hoses and clean screens. Hose filter screens may be plugged.
• Check fuse or reset circuit breaker.
• Make sure the lid is completely closed.
• Turn the control dial to proper cycle and restart the washer.
• Pauses are normal. Wait and see if the washer will start again.
• Check fuse or reset circuit breaker.
• Straighten drain hoses. Eliminate kinked hoses. If there is a home drain restriction, call for
drain service.
• Close lid and restart the washer. For your safety, washer will not spin unless the lid is closed.
• Suds lock – caused by too much suds. Rewash without detergent. Use correct amount of a
low-sudsing detergent.
• Unevenly distributed load. Redistribute the load, close the lid and restart the washer. Check for
leveling. Be sure water level is acceptable for load size.
• A normal spin speed is recommended for heavy loads like jeans or towels.
• Plug cord into live electrical outlet.
• Check fuse or reset circuit breaker.
• Close lid and restart the washer. For your safety, washer will not agitate or spin unless lid is closed.
• This may be a pause in the cycle. Wait briefly and it may start.
Leaks Water
Is Noisy
Fills with
the Wrong
Temperature
ater
W
e Selector
cl
Cy
Advances Through
Off
• Make sure hose connections are tight.
• Make sure end of drain hose is correctly inserted and secured to drain facility.
• Avoid extended soaking – soak for 30 minutes or less.
• Avoid overloading.
• Be sure washer is leveled properly as outlined in installation manual.
• Weak floors can cause vibration and walking.
• Operating sounds will vary depending on agitation speed.
• Turn both faucets
on fully.
• If equipped with a temperature selector dial, be sure it is set directly on a temperature setting and
not between settings.
• Make sure temperature selection is correct.
• Make sure hoses are connected to correct faucet
regulated correctly. Flush water line before filling washer.
• Check the water heater. It should be set to deliver a minimum 120° F (49° C) hot water at the tap.
Also check water heater c
Disconnect hose
•
A RINSE
TR
X
E
•
s and clean screens. Hose filter screens may be plugged.
(select models) is selected.
apacity and recovery rate.
s and inlet connections. Be sure water supply is
12
 Loading...