


Dynamic Messenger
User’s Manual
DM8m, DM10m
Dynamic Messenger

CONTENTS
2
Parts Inventory Check List
1. Multimedia Digital Photo Frame
2. Instruction Manual
3. Remote Control
4. DC12V/2.5A power supply
5. Counter Stand
(DM10m includes 8-installation screws)
6. 4 - Standoffs
7. AV Cable (4.5ft)
8. VGA input cable (DM10m only)
1. Introductions ...................................................................................................................... 3
1.1 8"m Dynamic Messenger ............................................................................................... 3
1.2 10"m Dynamic Messenger ................................................................................................ 3
2. Warnings and Suggestions ................................................................................................... 3
2.1 Safety Precautions ........................................................................................................... 3
2.2 Troubleshooting ............................................................................................................. 3
2.3 Warranty ......................................................................................................................... 3
3. Installation ........................................................................................................................... 4
3.1 Remove CF Cover ........................................................................................................... 4
3.2 Counter Stand ... ............................................................................................................. 4
3.3 Wall Mount .................................................................................................................... 4
4. Operation Guide .................................................................................................................. 5
4.1 Remote Control ............................................................................................................. 5
4.2 Remote Control Button Functions ................................................................................ 5
4.3 AV Input/Output .......................................................................................................... 6
4.4 VGA Input ..................................................................................................................... 6
4.5 Motion Sensor ................................................................................................................ 7
5. Media Guide ........................................................................................................................ 8
5.1 Parameter Setting ............................................................................................................ 8
5.4.1 SETUP MENU—MAIN PAGE ................................................................................... 8
5.4.2 SETUP MENU—PHOTO .......................................................................................... 9
5.4.3 SETUP MENU—MUSIC .......................................................................................... 10
5.4.4 SETUP MENU—SLIDE SHOW ................................................................................ 10
5.4.5 SETUP MENU—MOVIE ........................................................................................... 12
5.4.6 SETUP MENU—PREFERENCES PAGE ................................................................. 12
5.4.7 SETUP MENU—EXIT SETUP .................................................................................. 14
6. Menu Setup ......................................................................................................................... 15
6.1 Video Adjust .................................................................................................................. 15
6.2 Menu Adjust ... .............................................................................................................. 15
6.3 Exit .................... ............................................................................................................ 15
7. Specifications ...................................................................................................................... 16

1. Introductions
This user’s manual covers operational instructions and technical specifications of 8" and 10"
Adview Dynamic Messengers with motion sensor and built-in compact flash card player.
Please read it carefully prior to turning on the unit.
1.1 8-inch Dynamic Messenger with motion sensor
Frame: 7.25"h X 11"w high impact plastic.
Built-in compact flash card player.
AV/Audio input and output connections.
1.2 10-inch Dynamic Messenger with motion sensor
Frame: 9"h X 12"w high impact plastic.
Built-in compact flash card player.
VGA input, AV/Audio input and output connections.
2. Warnings and Suggestions
Warning:
Please power off the unit before inserting or withdrawing CF card. Otherwise,
the card or the unit could be damaged.
2.1 Safety precautions
1. Handle unit with care. Place LCD screen on a soft cloth or surface before installation of counter stand
to prevent scratches or damage.
2. Turn off power before cleaning panel, use a soft cloth only.
3. Never block venting in order to prevent overheating.
4. Never disassemble or perform self-maintenance and repair. Opening or removing cover plate may result
in a high-voltage electric shock hazard. Have a qualified technician perform all product maintenance.
Warranty will be void if the unit is disassembled.
5. Do not allow unit to come into contact with liquids.
6. Use only approved DC12V/2.5A power adapter with unit.
2.2 Troubleshooting
1. Will not switch on:
Please ensure the power adapter is connected to unit and plugged into working outlet.
2. If motion sensor does not work make sure that jumper has been removed from player.
3. If motion detection contiues without jumper in place, make sure jumper connector wires are not touching.
4. If movie or music is played but no sound, please turn up the volume and verify mute is not activated.
5. Can not read files after compact flash card is inserted.
Check the insertion direction. It should never take excessive force to insert card into player.
Make sure the file types are supported by the unit.
6. Blue screen
Please press POWER key on remote control to restart. If this fails, please reseat power adapter plug.
2.3 Warranty
Our warranty does not cover the following:
1. Removed or altered serial number label
2. Damage as a result of natural disasters
Disasters such as floods, fires, winds, earthquakes or lightening
3. Misuse or abuse, any modification or alternation
Improper installation or maintenance
Used with an unauthorized accessory
3
4
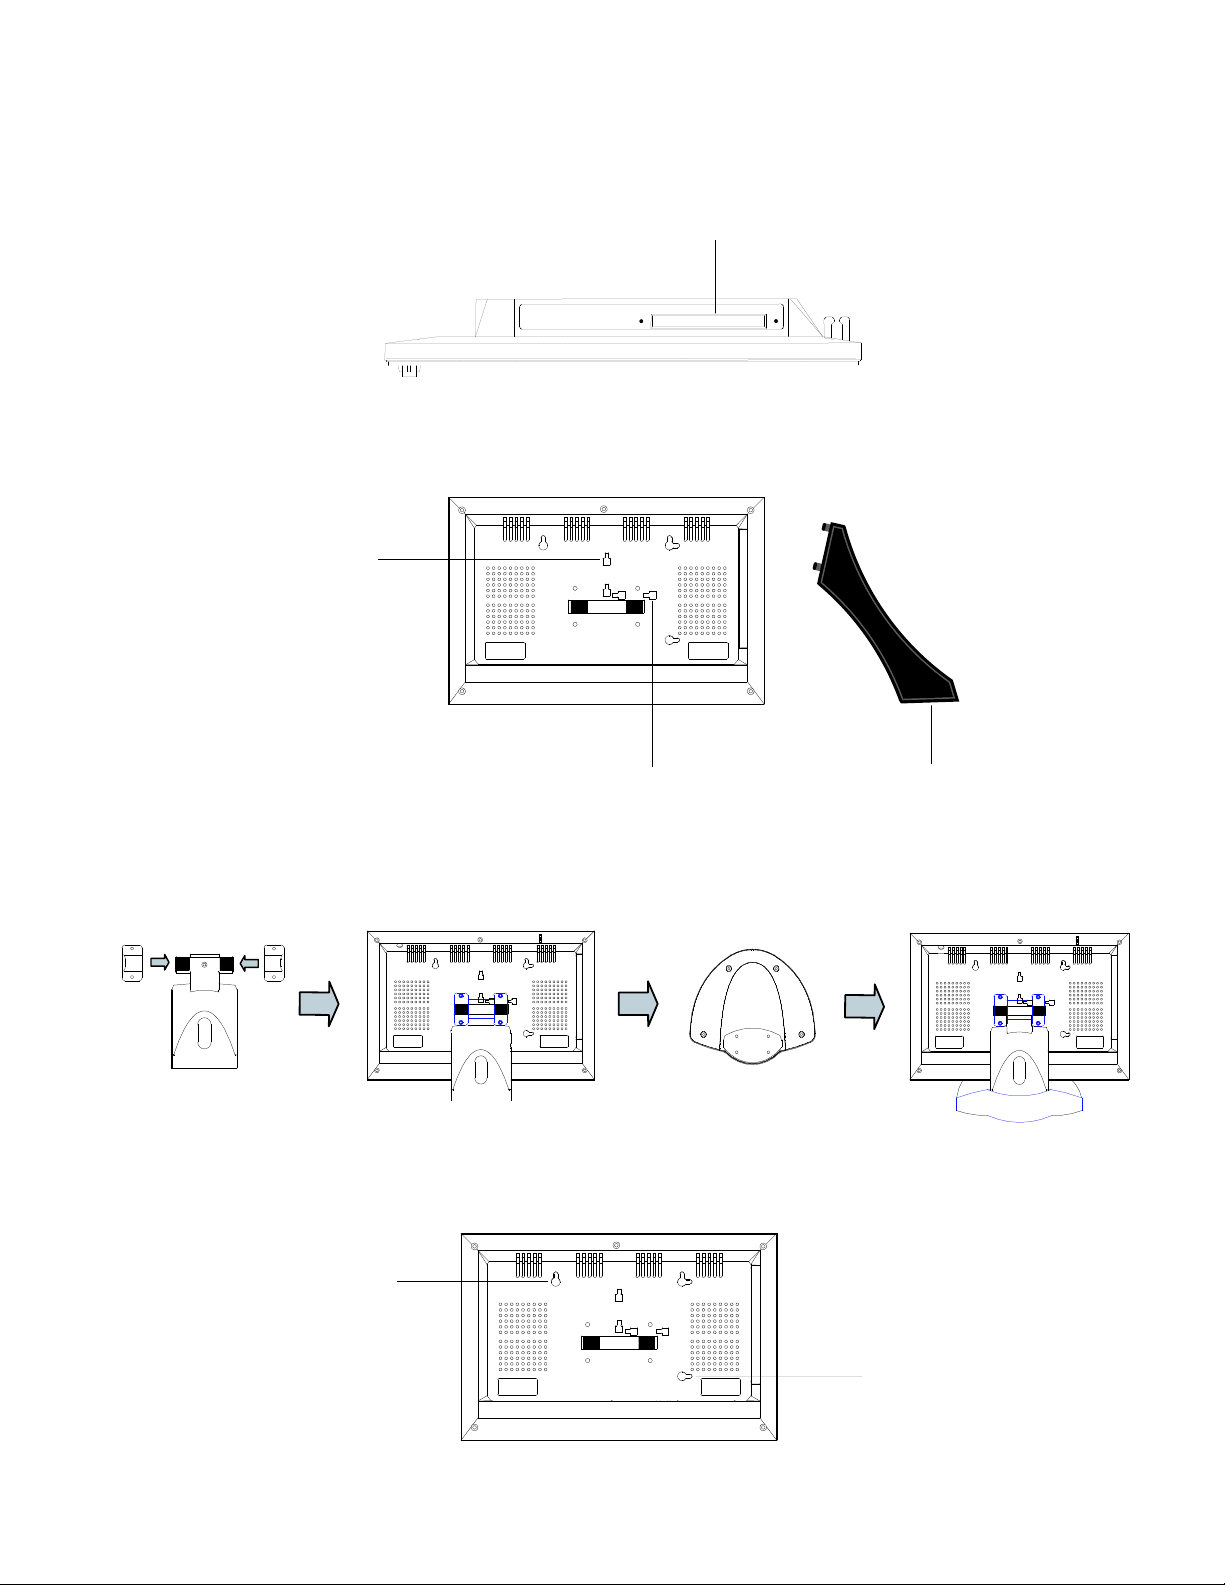
3. Installation
3.1 Remove Compact flash Cover
CF Port
The DM8/10m will come with a metal cover over the CF port. This cover will need to be
removed with a small phillips screw driver before CF card insertion. Once card is inserted
metal cover can be reinstalled to keep card from easily being stolen or changed.
3.2 Counter Stand
DM8m - Comes with a snap in stand. This can be installed in either landscape or portrait
orientation.
Landscape
Orientation
Portrait
Orientation
DM10m - Includes stand with base. Attach stand to DM10m using 4 mounting screws.
Attach base to stand using 4 remaining mounting screws.
3.3 Wall Mount - DM8/10m can be wall mounted in either landscape or portrait orientation. (Wall mounting
screws are not included).
Landscape
Orientation
Portrait
Orientation
Stand
Base
Snap-in
Stand
5
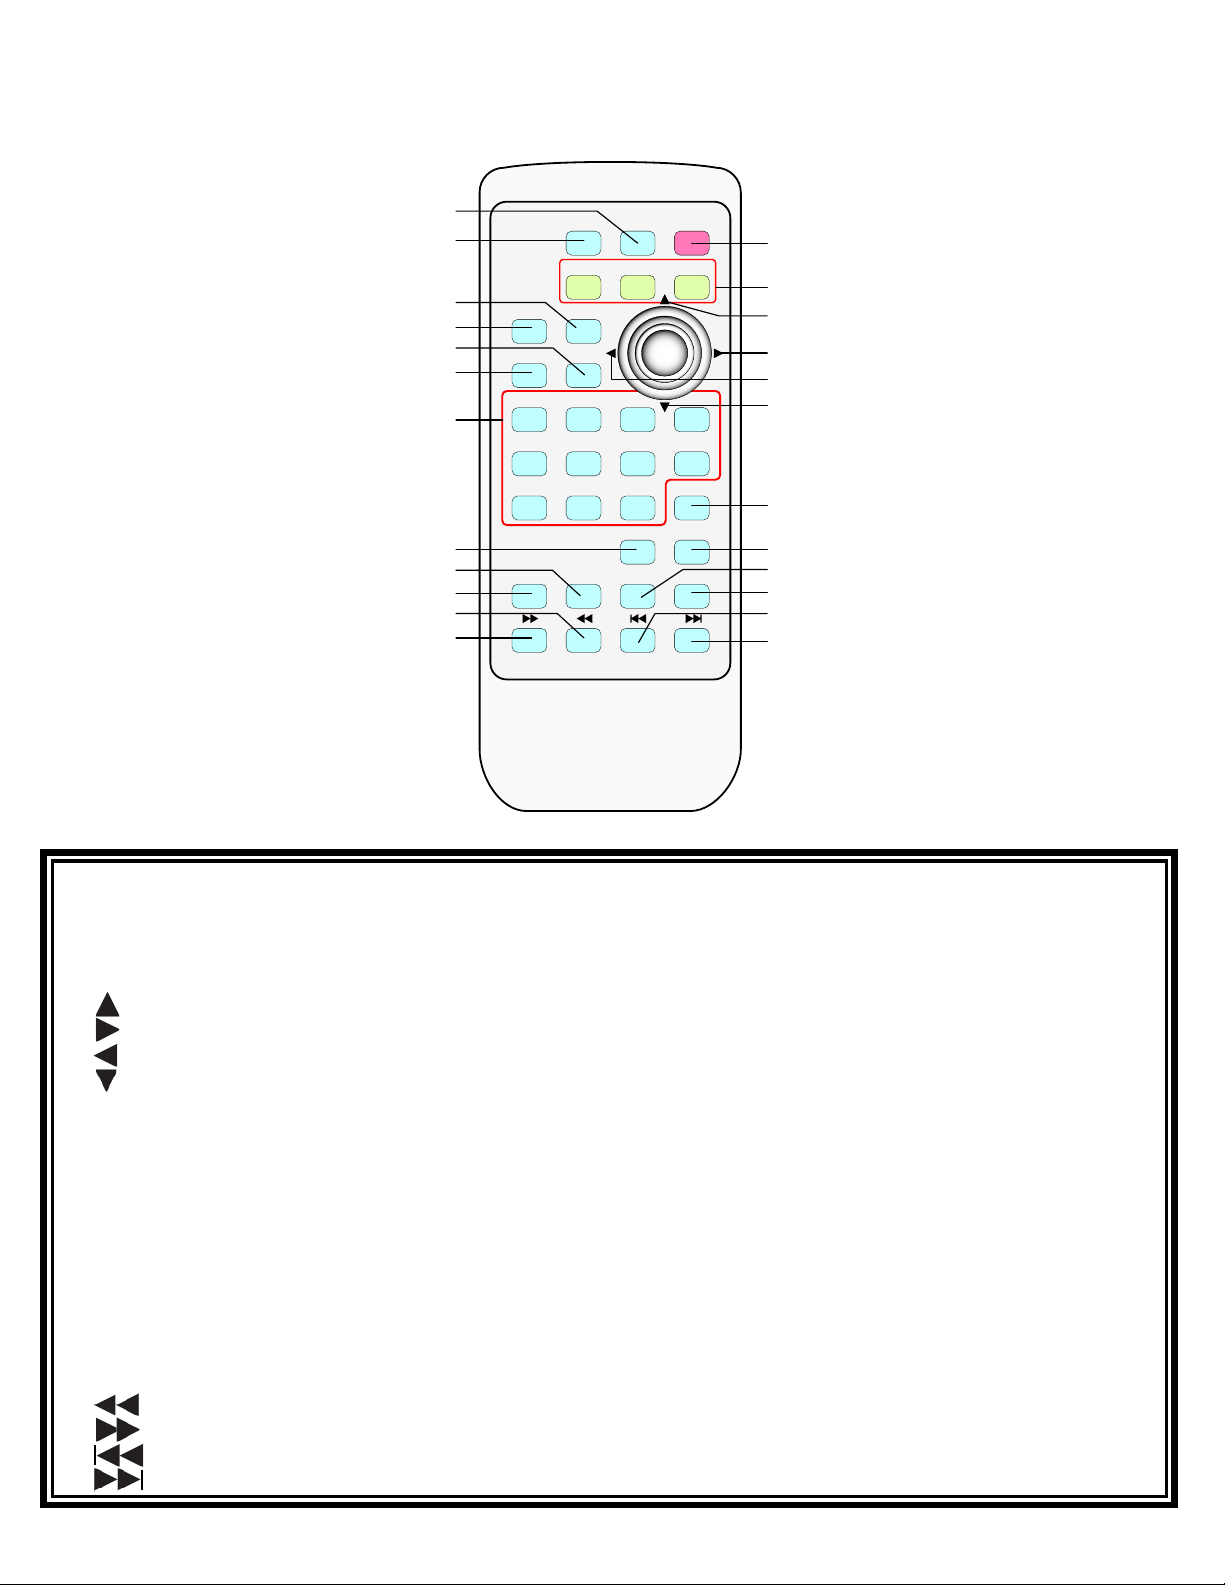
KEY
Memory Card Player
1. POWER ......................................
Press it to turn the unit on or off
2. AV/VGA ....................................
Press for Audio Visual or VGA input (Must be in AV mode for CF player operation)
3. SETUP ........................................
Press for CF player setup
4. MUSIC/PHOTO/MOVIE ........
Press appropriate button to play only that file type on player
Press it to play previous file (Normal operation) or Arrow Up (Setup is activated)
Press it to play next file (Normal operation) or Arrow Left (Setup is activated)
Press it to play next file (Normal operation) or Arrow Down (Setup is activated)
Press to confirm selection
Press to play MP3 file in back ground (Must be in PHOTO mode)
9. ENTER .......................................
Press to stop player and access file library
10. BGM ...........................................
Press to select file number to play as listed on compact flash card
11. STOP ..........................................
Press it for menu setup options (Use VOL- or VOL+ to make adjustments)
12. DISPLAY ....................................
Press to reduce volume (Normal operation) Press to reduce setting (Menu is activated)
13. Number Keys ..............................
Press to gain volume ( Normal operation) Press to increase setting (Menu is activated)
14. MENU ........................................
Press it when playing MPEG's to advance one frame at a time
15. VOL- ...........................................
Press it once to mute player, press again to resume
16. VOL+ ...........................................
Press it in play mode to pause, press in pause mode to resume play
17. STEP ...........................................
5.
18. MUTE .........................................
7.
19. PLAY/PAUSE ............................
6.
20. ESC .............................................
8.
Press it to play previous file (Normal operation) or Arrow Right (Setup is activated
Press to access information on active file
21.
22.
Press to restart from the beginning of CF content
Press to return to start of MPEG or reduce speed of MP3 play by up to 8X
Press to forward to end of MPEG or fast forward MP3 play by up to 8X
Press to play previous file
Press to play next file
23.
24.
4. Operation Guide
4.1 Remote Control - Before use please remove plastic battery saver sheet from end of remote.
MUTE STEP
PLAY/PAUSE
ESC
VOL- VOL+
9 0
--/--
MENU
5 6 7 8
1
1
4
5
6
7
8
14
16
20
24
3
9
10
12
13
15
18
22
2 3 4
DISPLAY STOP
BGM ENTER
MUSIC PHOTO MOVIE
SETUP AV/VGA POWER
19
23
2
11
17
21
4.2 Remote Control Button Functions
...............................................
...............................................
...............................................
...............................................
...........................................
...........................................
............................................
...........................................

6
4.3 AV Input /Output
VIDEO
OUT
AUDIO
OUT
VIDEO
OUT
VGA
DC +12V
ANT
AUDIO
OUT
Out
Audio
Out
Video
In In
Video Audio
AV Input - Source player must have composite Audio/Visual ouputs, use AV Cable (Included). Plug yellow connector
into source video output. Plug white and red connectors into source audio outputs. On DM8/10m plug
single cabled 3.5mm stereo jack into Video In and double cabled jack into Audio In. The default input
signal for DM8/10m is AV. If compact flash card is still inserted into DM8/10m, Audio/Video In, will
take precedence and compact flash will not play. If there is no image from source, please make sure
source is outputting to composite jacks.
AV Output - DM8/10m can output to any player with composite audio/video inputs, use AV Cable (Included).
Plug yellow connector into player video input. Plug white and red connectors into player audio inputs.
On DM8/10m plug single cabled 3.5mm stereo jack into Video Out and double cabled jack into Audio
Out. The default output signal for DM8/10m is AV. If no image shows on recieving player, please make
sure its input source is set correctly.
4.4 VGA Input
VIDEO
OUT
AUDIO
OUT
VIDEO
OUT
VGA
DC +12V
ANT
AUDIO
OUT
In
VGA
VGA Input - Source player must have VGA output, use VGA Cable (Included). Plug 15 pin VGA connector into
source player VGA output. Then plug mini VGA connector into DM10m VGA In. Since default
input signal for DM10m is AV, you will need to press AV/VGA button on remote control to be in VGA
input mode. In VGA input mode compact flash card will not play.
(DM10m only)
Power Adapter
Plug-In
AV Cable
VGA Cable

7
OUT
VGA
DC +12VANT AUDIO
OUT
4.5 Motion Sensor
Jumper
Wire Connector
Activate Motion Sensor -
If jumper is attached to wire connector you will
need to remove it. Please store jumper in a safe
location. Motion sensor is now activated. If no
motion is detected for 5 minutes DM8/10m will
go into sleep mode. Unit will restart at beginning
of media once motion is detected
Deactivate Motion Sensor - If jumper is not attached to the wire connector
you will need to attach it. Once jumper is in
place DM10m will play media continuously.
Motion Sensor Range - Sensor will detect motion at any angle greater
then 20 degrees out from face of DM8/10m,
up to a distance of 26.25 feet. ( See diagram below)
20 20
o
o
10 - 13 ft.
16.5 - 26.25 ft.
10
- 13 f
t.

VIDEO
OUT
AUDIOVIDEO
5.2 File Formats Supported
Photo: JPEG (file must have *.jpg extension. If left as *.jpeg it will not play)
Music: MP3 ( file must have *.mp3 extension)
Video: MPEG 1 (VCD, DAT format), MPEG 2 (SVCD, DVD), MPEG4, DivX 3.11/4.x/5.x, XviD
Video File Formats: MPG, AVI, MP4, DAT, VOB
5.3 Compact Flash Setup
After copying desired files, carefully insert CF card into CF port, it will only fit one way.
Never force card, as damage to pins in CF port can result.
5.4 DM8/10m Multimedia Settings
5.4.1 SETUP MENU—MAIN PAGE
8
SETUP MENU—MAIN PAGE
• PHOTO SETUP (Change Photos Settings)
• MUSIC SETUP (Change Music Settings)
• SLIDE SHOW SETUP (Change Slide Show Settings)
• MOVIE SETUP (Change Movie Settings)
• PREFERENCES (Change Menu Settings)
• EXIT SETUP (Exit Main Page)
5. Multimedia Player System
5.1 Memory Cards
DM8/10m supports Compact Flash cards.
Compact Flash Port
To access settings press SETUP button on remote control. On remote use arrows to move around screen and
ENTER button to make selections.

9
PHOTO THUMBNAIL DIGEST
ON/OFF—turn this function on/off
Enter main page
Press
ENTER
to open submenu PHOTO SETUP
Press to highlight item to change, press to
highlight your selection, press ENTER to save.
press to the previous menu, choose MAIN PAGE
and press ENTER to go to the previous menu.
PHOTO—THUMBNAIL DIGEST
PHOTO TRANSITION MODE
FAST NORMAL SLOW
Enter PHOTO SETUP menu
Press to highlight TRANSITION MODE,
press to show submenu on right,
press ENTER to confirm.
Press to go back to , choose MAIN PAGE and
press ENTER to go to previous menu.
PHOTO—TRANSITION MODE
PHOTO ORIENTATION
DEFAULTS IGNORE
Enter PHOTO SETUP menu
Press to highlight ORIENTATION,
press to show submenu on the right,
press to select desired item,
press ENTER to save.
Press to go back to , choose MAIN PAGE
and press ENTER to go to previous menu.
PHOTO—ORIENTATION
5.4.1 SETUP MENU—PHOTO

5.4.3 SETUP MENU—MUSIC
MUSIC—REPEAT MODE
MUSIC Repeat
ONE: repeat one music file
ALL: repeat all music files
OFF: turn repeat function off
Operation as above
10
5.4.4 SETUP MENU—SLIDE SHOW
SLIDE SHOW—SLIDE SHOW MODE
SLIDE SHOW playing function setup
MANUAL: slide show playing manually
AUTO: slide show playing automatically
Operation as above
SLIDE SHOW—FOLDER REPEAT
SLIDE SHOW folder repeat function setup
ON/OFF: turn folder repeat function on/off
Operation as above

SLIDE SHOW—INTERVAL TIME
SLIDE SHOW—TRANSITION
SLIDE SHOW—INTERVAL TIME
ONE SECOND
THREE SECONDS
FIVE SECONDS
TEN SECONDS
SLIDE SHOW—TRANSITION
FULL SCREEN None
TOP->BOTTOM Wipe Down
BOTTOM->TOP Wipe Up
T/B->CENTER Box In
CENTER->T/B Box Out
BLIND;T/B Blinder
LEFT->RIGHT Tile Fill Left
RIGHT->LEFT Tile Fill Right
L/R->CENTER Tile Box In
SLIDE SHOW—AUTO START
SLIDE SHOW—AUTO START
ON/OFF: Turn auto start on/off
Operation as above
11

5.4.5 SETUP MENU—MOVIE
MOVIE—INTERVAL TIME
MOVIE—INTERVAL TIME
FAST: Fast Speed
NORMAL: Normal Speed
Operation as above
12
5.4.6 SETUP MENU—PREFERENCES PAGE
NOTE: PREFERENCES PAGE menu can only be accessed when CF card is not inserted into DM8/10m.
SLIDE SHOW—REPEAT MODE
MOVIE
OFF: Turn it off
ONE: Repeat one file
ALL: Repeat all files
PREFERENCES PAGE—TV TYPE
PREFERENCES PAGE—TV TYPE
MULTI.SYSTEM:
NTSC: For countries adopt NTSC system
PAL: For countries adopt PAL system

PREFERENCES PAGE—VIDEO OUTPUT
PREFERENCES PAGE—VIDEO OUTPUT
S-VIDEO: S-VIDEO signal output (recommended)
YPBPR: YPBPR signal output
RGB: RGB signal output
13
PREFERENCES PAGE—OSD LANG
PREFERENCES PAGE—OSD LANGUAGE
ENGLISH: OSD in English
CHINESE: OSD in Chinese
PREFERENCES PAGE—OSD MESSAGE
PREFERENCES PAGE—OSD MESSAGE
ON/OFF: Turn it on or off

14
PREFERENCES PAGE—DEFAULTS
5.4.7 SETUP MENU—EXIT SETUP
PREFERENCES PAGE—DEFAULTS
RESET: Restore the default settings
SETUP MENU—MAIN PAGE
Press to exit.
Press ENTER to exit OSD menu
Note:
You can press SETUP to exit OSD menu after changing
the settings.
EXIT SETUP

6. MENU Setup
Press MENU button until desired option is highlighted.
General Menu:
• VIDEO ADJUST
• MENU ADJUST
• EXIT
6.1 VIDEO ADJUST
6.2 MENU ADJUST
15
BRIGHTNESS - To adjust press VOL- to decrease and VOL+ to increase
CONTRAST - To adjust press VOL- to decrease and VOL+ to increase
SATURATION - To adjust press VOL- to decrease and VOL+ to increase
TINT - To adjust press VOL- to decrease and VOL+ to increase
SHARP - To adjust press VOL- to decrease and VOL+ to increase
6.3 EXIT
LANGUAGE - Press VOL- or VOL+ until desired language is highlighted
RESET - Press VOL- or VOL+ to highlight YES to reset player to factory settings
HORIZONTAL - Press VOL+ to move menu to right. Press VOL- to move menu to left
VERTICAL - Press VOL+ to move menu up. Press VOL- to move menu down
DURATION - Press VOL+ to increase and VOL- to decrease time menu stays on screen
EXIT - To exit MENU setup press VOL+
TV-SEARCH - Not functional

7. Specifications
DM8m
Dimensions: 7.25"h x 11.00"w
Panel: 8-inch Active Matrix TFT LCD
Viewing Area (mm): 161 (H) × 121 (V)
Lamp Life: 40,000 Hours
Viewing Angel: Vertical 90° / Horizontal 120°
Resolution: 800 x 600
Power: DC 12V
Operating Current: 1.6A
Power Consumption: 19.2W
DM10m
Dimensions: 9.00"h x 12.00"w
Panel: 10-inch Active Matrix TFT LCD
Viewing Area (mm): 215 (H) × 162 (V)
Lamp Life: 40,000 Hours
Viewing Angel: Vertical 110° / Horizontal 140°
Resolution: 800 x 600
Power: DC 12V
Operating Current: 1.6A
Power Consumption: 19.2W
16
 Loading...