

Page 1
Giant / Food
Technical Manual Revision 1.0
PENTA GmbH
Zeppelinstrasse 2
82178 Puchheim
GERMANY
Email:
Internet: www.penta.de
info@penta.de
Page 2

Document:
Page
2 of 47
pages
Last change date:
25-Oct-11
1. T
1. T
2. C
3. U
ABLE OF CONTENTS
ABLE OF CONTENTS
OMMON INFORMATION
SER INFORMATION
........................................................................................................... 2
........................................................................................................ 4
............................................................................................................. 5
3.1. General ............................................................................................................................... 5
3.2. Trademarks ........................................................................................................................ 5
3.3. Warranty information ......................................................................................................... 5
3.4. Support, problems and failure analysis ........................................................................... 6
3.4.1. Drivers ..................................................................................................................... 6
3.5. Maintenance and service intervals ................................................................................... 6
4. U
NPACKING
......................................................................................................................... 7
4.1. Packing List ........................................................................................................................ 7
4.2. Optional Items .................................................................................................................... 7
5. S
YSTEM OVERVIEW
.............................................................................................................. 8
5.1. Block diagram of system components ............................................................................. 8
5.2. Technical Data .................................................................................................................... 8
6. D
ESCRIPTION OF INTERFACES
............................................................................................. 10
6.1. Control elements .............................................................................................................. 10
6.2. Interfaces for attachable devices .................................................................................... 10
6.2.1. Overview connector side ....................................................................................... 10
6.2.2. Serial Port COM1/3/4 ............................................................................................. 11
6.2.3. Ext. Monitor VGA ................................................................................................... 11
6.2.4. Ethernet ................................................................................................................. 11
6.2.5. USB ....................................................................................................................... 12
6.2.6. Audio Connector .................................................................................................... 12
7. BIOS
CONFIGURATION OVERVIEW
....................................................................................... 13
7.1. Introduction ...................................................................................................................... 13
7.1.1. Starting Setup ........................................................................................................ 13
7.1.2. Using Setup ........................................................................................................... 13
7.1.3. Getting help ........................................................................................................... 13
7.1.4. BIOS Menu ............................................................................................................ 14
7.2. Main .................................................................................................................................. 14
7.3. Advanced .......................................................................................................................... 15
Manual_Giant_Food_Series.docx
7.3.1. ACPI Settings ........................................................................................................ 16
7.3.2. Trusted Computing ................................................................................................ 17
7.3.3. CPU Configuration ................................................................................................. 18
7.3.4. IDE Configuration .................................................................................................. 19
7.3.5. USB Configuration ................................................................................................. 20
7.3.6. Super IO Configuration .......................................................................................... 21
7.3.7. H/W Monitor........................................................................................................... 23
7.3.8. Secondary Super IO Configuration ........................................................................ 24
7.3.9. Serial Port Console Redirection ............................................................................. 25
Page 3

Document:
Page
3 of 47
pages
Last change date:
25-Oct-11
7.4. Chipset .............................................................................................................................. 26
7.4.1. Host Bridge Configuration ...................................................................................... 26
7.4.2. South Bridge Configuration .................................................................................... 27
7.4.3. Intel IGD SWSCI OpRegion Configuration ............................................................. 29
7.5. Boot .................................................................................................................................. 31
7.6. Security ............................................................................................................................. 33
7.7. Exit .................................................................................................................................... 34
8. O
PTIONS
........................................................................................................................... 35
8.1. Cable cover ...................................................................................................................... 35
9. S
PECIFICATIONS
................................................................................................................ 36
9.1. Mechanical specifications ............................................................................................... 36
9.2. Electrical specifications .................................................................................................. 37
9.3. Environmental specifications ......................................................................................... 37
9.4. Labels ............................................................................................................................... 38
9.4.1. Serial number label ................................................................................................ 38
9.4.2. Food mITX AC Power Version : ............................................................................. 38
9.4.3. Food mITX 24V-DC Version .................................................................................. 38
9.4.4. Giant mITX AC Power Version :............................................................................ 38
9.4.5. Giant mITX 24V-DC Version .................................................................................. 39
9.4.6. Explanation of serial number label symbols ........................................................... 39
10. C
ERTIFICATIONS AND NORMS
............................................................................................. 40
10.1. Declaration of conformity ................................................................................................ 40
10.2. EMC test compliance ....................................................................................................... 40
10.3. Environmental test compliance ...................................................................................... 40
10.4. IP65 compliance ............................................................................................................... 40
10.5. Tables according EN60601-1-2:2001: ............................................................................. 40
10.5.1. Table 201 – Guidance and manufacturer´s declaration – electromagnetic
emission – for all EQUIPMENT AND SYSTEMS (see 6.8.3.201 a) 3)) ............................... 40
10.5.2. Table 202 – Guidance and manufacturer’s declaration – electromagnetic
immunity – for all EQUIPMENT and SYSTEMS (see 6.8.3.201 a) 6)) ............................... 41
10.5.3. Table 204 – Guidance and manufacturer´s declaration – electromagnetic
immunity – for EQUIPMENT and SYSTEM that are not LIFE-SUPPORTING (see 6.8.3.201
b)) 43
10.5.4. Table 206 – Recommended separation distances between portable and mobile RF
communications equipment and the EQUIPMENT or SYSTEM - for EQUIPMENT and
SYSTEMS that are not LIFE-SUPPORTING (see 6.8.3.201 b)) ......................................... 44
11. C
OMMON WARNINGS, HANDLING AND SAFETY INSTRUCTIONS
12. R
EVISION HISTORY
............................................................................................................ 47
................................................. 45
Manual_Giant_Food_Series.docx
Page 4

Document:
Page
4 of 47
pages
Last change date:
25-Oct-11
2. C
OMMON INFORMATION
This technical manual is neither thought to provide all details, or variations in equipment, nor to
provide for every possible contingency to be met in connection with installation, operation or
maintenance.
If further information’s are needed or in case of particular problems arise which are not covered
sufficiently for the purchaser’s purposes, do not hesitate to contact your next PENTA GmbH office.
The contents of this technical manual shall not become part or modify any prior or existing agreement,
commitment or relationship. The sales contract contains the entire obligations of PENTA GmbH. The
warranty contained in the contract between the parties is the sole warranty of PENTA GmbH.
Manual_Giant_Food_Series.docx
Page 5

Document:
Page
5 of 47
pages
Last change date:
25-Oct-11
3. U
SER INFORMATION
3.1. General
In this document PENTA GmbH will also be referred to by the short form PENTA or PENTA GmbH.
The information in this document has been checked carefully. However, no responsibility is assumed
for inaccuracies. Furthermore, PENTA reserves the right to make changes to any portion of this
manual - also without advertising it before. PENTA does not assume any liability for damages, which
refer directly or indirectly to the delivery, performance or usage of this material.
For the latest documentation, tools or drivers please visit the PENTA web page at www.penta.de or
contact your nearest PENTA (sales) representative.
This documentation is under copyright. The reproduction, transmission or use of this document or its
contents is not permitted without prior written approval of PENTA GmbH.
Documentation from 20th September 2011.
© 2011, PENTA GmbH
Zeppelinstrasse 2
82178 Puchheim
GERMANY
Email: info@penta.de
Internet: www.penta.de
All rights reserved.
3.2. Trademarks
XT, AT, PS/2 and Personal System/2 are trademarks of International Business Machines Corporation.
Microsoft, MS-DOS and Windows are registered trademarks of Microsoft Corporation.
Intel, Pentium®, MMX and Celeron are registered trademarks of Intel Corporation.
Adobe and Acrobat are registered trademarks of Adobe Corporation.
Realtek is a trademark of Realtek Semiconductor Corporation.
Fintek is a registered trademark of Feature Integration Technology, Inc..
All other products and designations mentioned in this documentation are in most cases also
registered trademarks of their respective owners and are thus subject to law.
3.3. Warranty information
Each shipped PENTA product is tested carefully and thoroughly before being shipped. If unlikely
some problems will occur during operation, please check the BIOS and operating system settings of
your system. This is often the source of problems due to resource conflicts.
If you need to send back your PENTA IPC because of unsolvable problems, please request, fill out
and sent back a R
In order to repair your PENTA IPC as fast as possible this information is urgently required.
Within the warranty period the repair is free of charge as long as the warranty conditions are observed.
Because of the high test expenditure you will be charged with the test cost if no fault is found. Repair
after warranty period will be charged.
eturn Material Authorization
(RMA) form first, available at the PENTA web site.
Manual_Giant_Food_Series.docx
Page 6

Document:
Page
6 of 47
pages
Last change date:
25-Oct-11
Your PENTA product is warranted against defects in material and workmanship for the warranty
period from the date of shipment. During the warranty period, PENTA will as its option either repair or
replace defective products.
For warranty service or repair, the product must be returned to a service facility designated by PENTA
free of charge!
The foregoing warranty shall not apply to defects resulting from improper or inadequate maintenance
or handling by customer, unauthorised modification or misuse, operation outside of the product’s
environmental specifications, improper handling, shipment, installation or maintenance.
PENTA will not be responsible for any defects or damages to other products not supplied by PENTA,
which are caused by a faulty PENTA product.
3.4. Support, problems and failure analysis
A base knowledge about standard PC technology is required for using PENTA products which will
not be explained within this manual.
Before contacting PENTA, please visit the PENTA web page or the hard- and/or software
manufacturers web page. If you can’t solve the problem with this documents and/or updates by your
own, do not hesitate to contact PENTA by email or phone.
Please prepare yourself to answer a few questions like:
•
which PENTA product is concerned?
•
what serial number does this system have?
•
which BIOS version does this system have?
•
is this problem already reported (by whom/to whom)?
•
since when is the problem known?
•
etc……
3.4.1. Drivers
Drivers for your PENTA Giant / Food are available on provided Drivers & Manual CD or on
http://www.penta.de. If you experience any problems, please always download latest drivers for your
system on http://www.penta.de before contacting PENTA support team (support@penta.de).
3.5. Maintenance and service intervals
There is no recommended service or maintenance interval for the PENTA Giant / Food as all of them
are made of highest quality, industrial components.
Nevertheless we suggest a complete system check after about 5000 hours of operation.
Manual_Giant_Food_Series.docx
Page 7
Document:
Page
7 of 47
pages
Last change date:
25-Oct-11
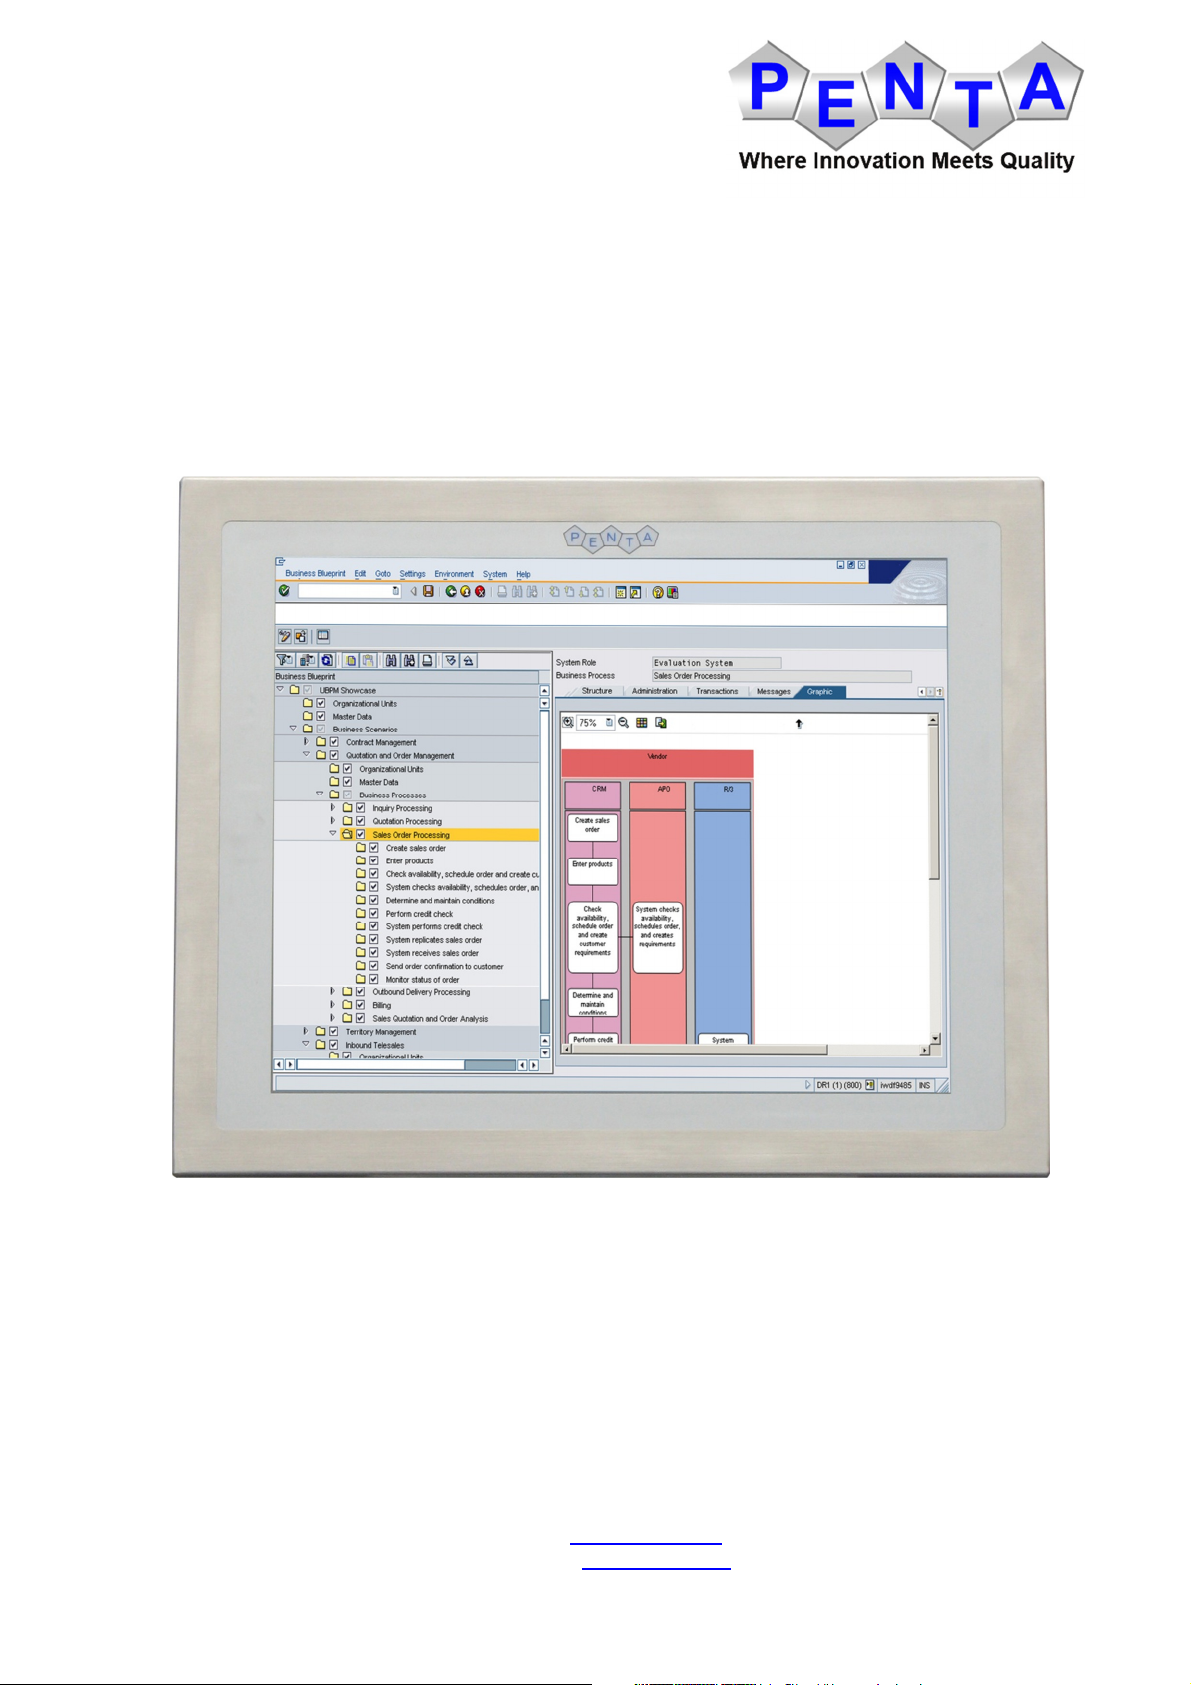
Qty.
Item and Part number
Picture
Qty.
Item and Part number
Picture
4. U
NPACKING
4.1. Packing List
If any of the components listed below are missing, do not proceed with the installation. Contact your
PENTA reseller or vendor the Giant / Food was purchased from or contact your local PENTA sales
representative by sending an email to info@penta.de.
The PENTA Giant / Food is shipped with the following components:
1
1
1
PENTA Giant / Food
PENTA Part no.:
For Food mITX : FI34-xxxx-xx
For Giant mITX : GI34-xxxx-xx
Connector cable Europe
PENTA Part no.: 040-01-COS-001
Drivers & Manual CD
4.2. Optional Items
The following items are optional components which may be separately purchased:
1
1
Cable cover for PENTA Giant / Food
PENTA Part no.:
For Food mITX :ZUB-08-COV-014
For Giant mITX :ZUB-08-COV-015
Connector cable US
PENTA Part no.: 040-01-COS-002
Manual_Giant_Food_Series.docx
Page 8
Document:
Page
8 of 47
pages
Last change date:
25-Oct-11
Giant / Food
System
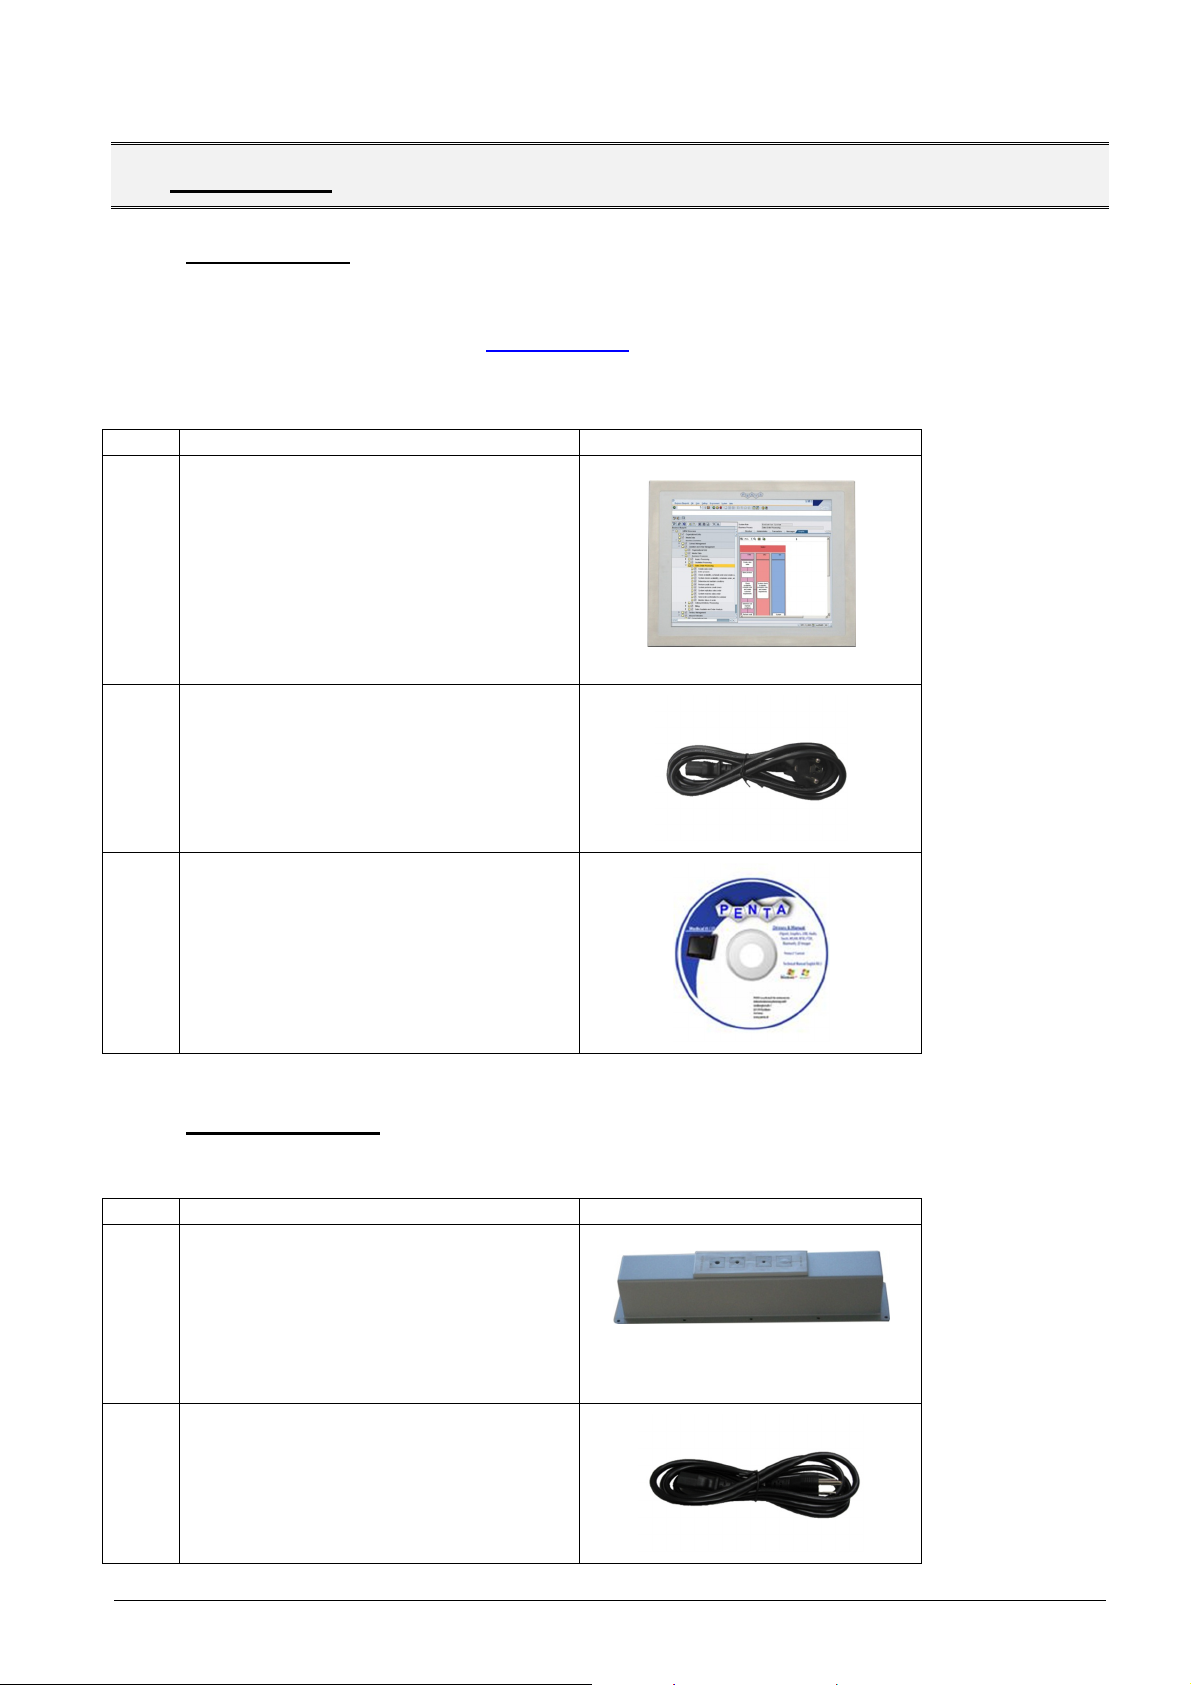
5. S
YSTEM OVERVIEW
5.1. Block diagram of system components
5.2. Technical Data
Processor Intel® Atom™ D525 (1MB L2 Cache, 1.8GHz)
Chipset Intel® ICH8M
Memory Two 204-pin SO-DIMM sockets support 800 MHz
BIOS UEFI BIOS
Video Intel® GMA 3150
Supported API DirectX 9c, OpenGL 1.5
Display resolution max. 1366x768 18bit single channel LVDS or
Graphic memory max. 384MB
Audio Realtek ALC888 HD 7.1 channel audio codec
Network controller 2x Realtek RTL8111E PCIe GbE controllers with
Super I/O Fintek F81865
Watchdog 1~255 sec. system reset
Operating System Windows 7
4.0 GB (max.) DDR3 SDRAM SO-DIMM
1920x1080 24bit dual channel LVDS via Novatek
68667UFG
ASF 2.0 support on LAN1
Windows XP
Windows 2000
Windows XP embedded
Linux (on request, customized)
Manual_Giant_Food_Series.docx
Page 9

Document:
Page
9 of 47
pages
Last change date:
25-Oct-11
Power Supply
Display
Touchpanel
Mass Storage
Interfaces
Network
Slots
Media
interface
Capacitive keys
Housing
Power
Environmental
Certificates
Specification
conditions
Power Supply Integrated fanless 100W power supply
Integrated TFT-LCD 15” version:
1024 x 768 pixel resolution, 16.7 mio. colors,
brightness 400Cd, contrast ration 700:1, viewing
angle H/V:
17” version:
1280 x 1024 pixel resolution, 16.7 mio. colors,
brightness 250Cd, contrast ration 1000:1, typical
response time 6ms, viewing angle H/V: 170°/160°
19” version:
1280 x 1024 pixel resolution, 16.7 mio. colors,
brightness 250Cd, contrast ration 1000:1, typical
response time 6ms, viewing angle H/V: 170°/160
One-point Touch resistive touch-screen
Harddisk 2,5” automotive S-ATA harddisk up to 100 GB
(more capacity on request)
(-25° to +85°C operating temperature)
CD-/DVD Burner N/A
Floppy Drive N/A
COM ports 3x RS232
1x RS485 (optional)
Parallel Ports 1x LPT (optional)
USB Ports 4x USB 2.0
S-ATA Interface 2x S-ATA 3.0GBit/s (S-ATA II)
Keyboard/Mouse Via USB-Interface
Monitor 1x VGA
RJ45 2x Realtek RTL8111E PCIe GbE controllers with
ASF 2.0 support on LAN1
Wireless LAN Optional: WLAN on mini-PCIe
PCI/PCI Express 1x PCIe mini slot
1x PCIe 1x slot
1x PCI slot
MIC in Mic in for microphone connection (e.g. Headset)
Line out Line out for speaker connection
System keys Power on/off
Device Stainless steel or anodized aluminum
Mounting VESA 100 on back of the system and different
VESA adapters for wall- and ceiling-mounting
Size See dimensioned sketch
Weight 15” Version: 8.6kg
17” Version: 10.7kg
19” Version: 11.2kg
Power Consumption
Ambient temperature
-10°C to +50°C
(operating)
Ambient temperature
-20°C to +60°C
(storage)
Humidity (operating) 10% to 90% relative humidity (not condensing)
Humidity (storage) 5% to 95% relative humidity (not condensing)
CE Certificate of Conformity
Proofed on:
Medical Directive
93/42/EEC + 2007/47/EC
Manual_Giant_Food_Series.docx
Page 10
Document:
Page
10 of 47
pages
Last change date:
25-Oct-11
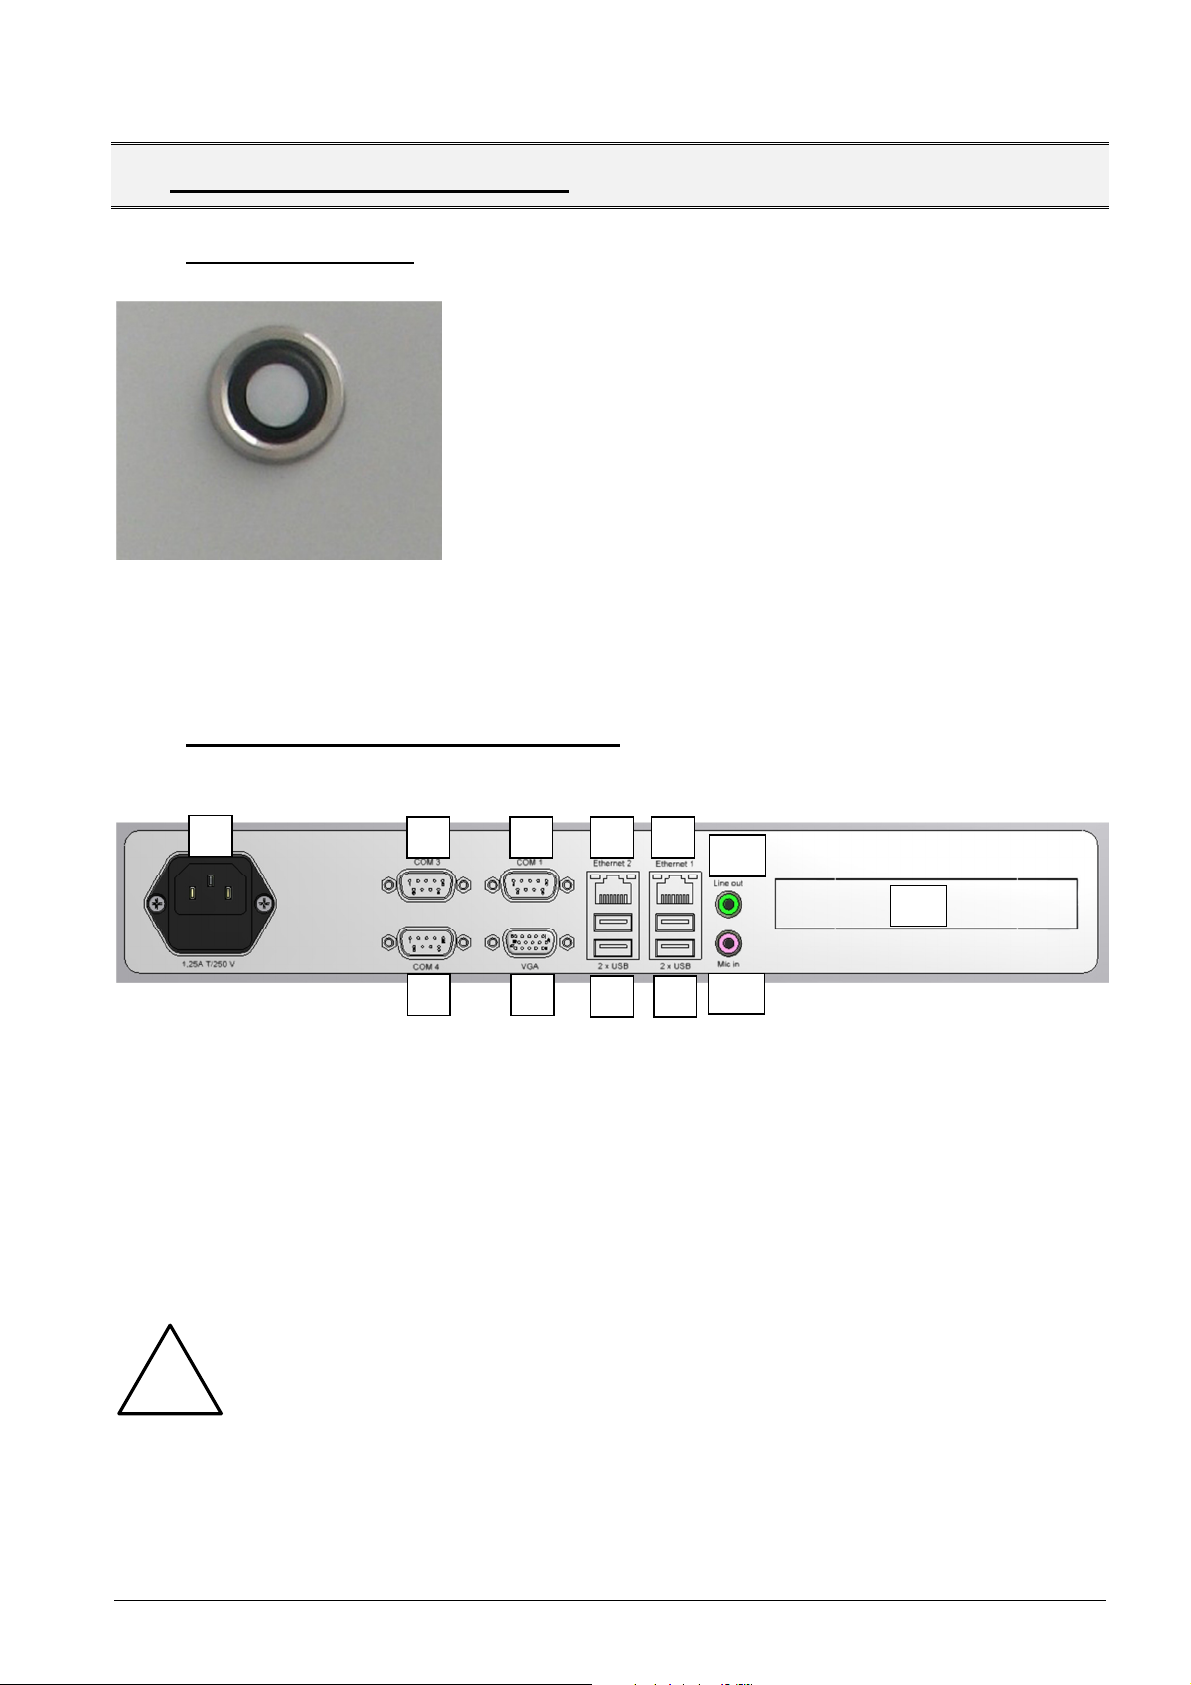
•
1 AC in
7
Ethernet 1
2 COM
3 8 2x USB 2.0
3 COM4
9
2x USB 2.0
4 COM1
10
Line out
5 VGA
11
Mic in
6 Ethernet 2
12
PCI Slot bracket
Warning for medical appliances:
2
7
9
11
6. D
ESCRIPTION OF INTERFACES
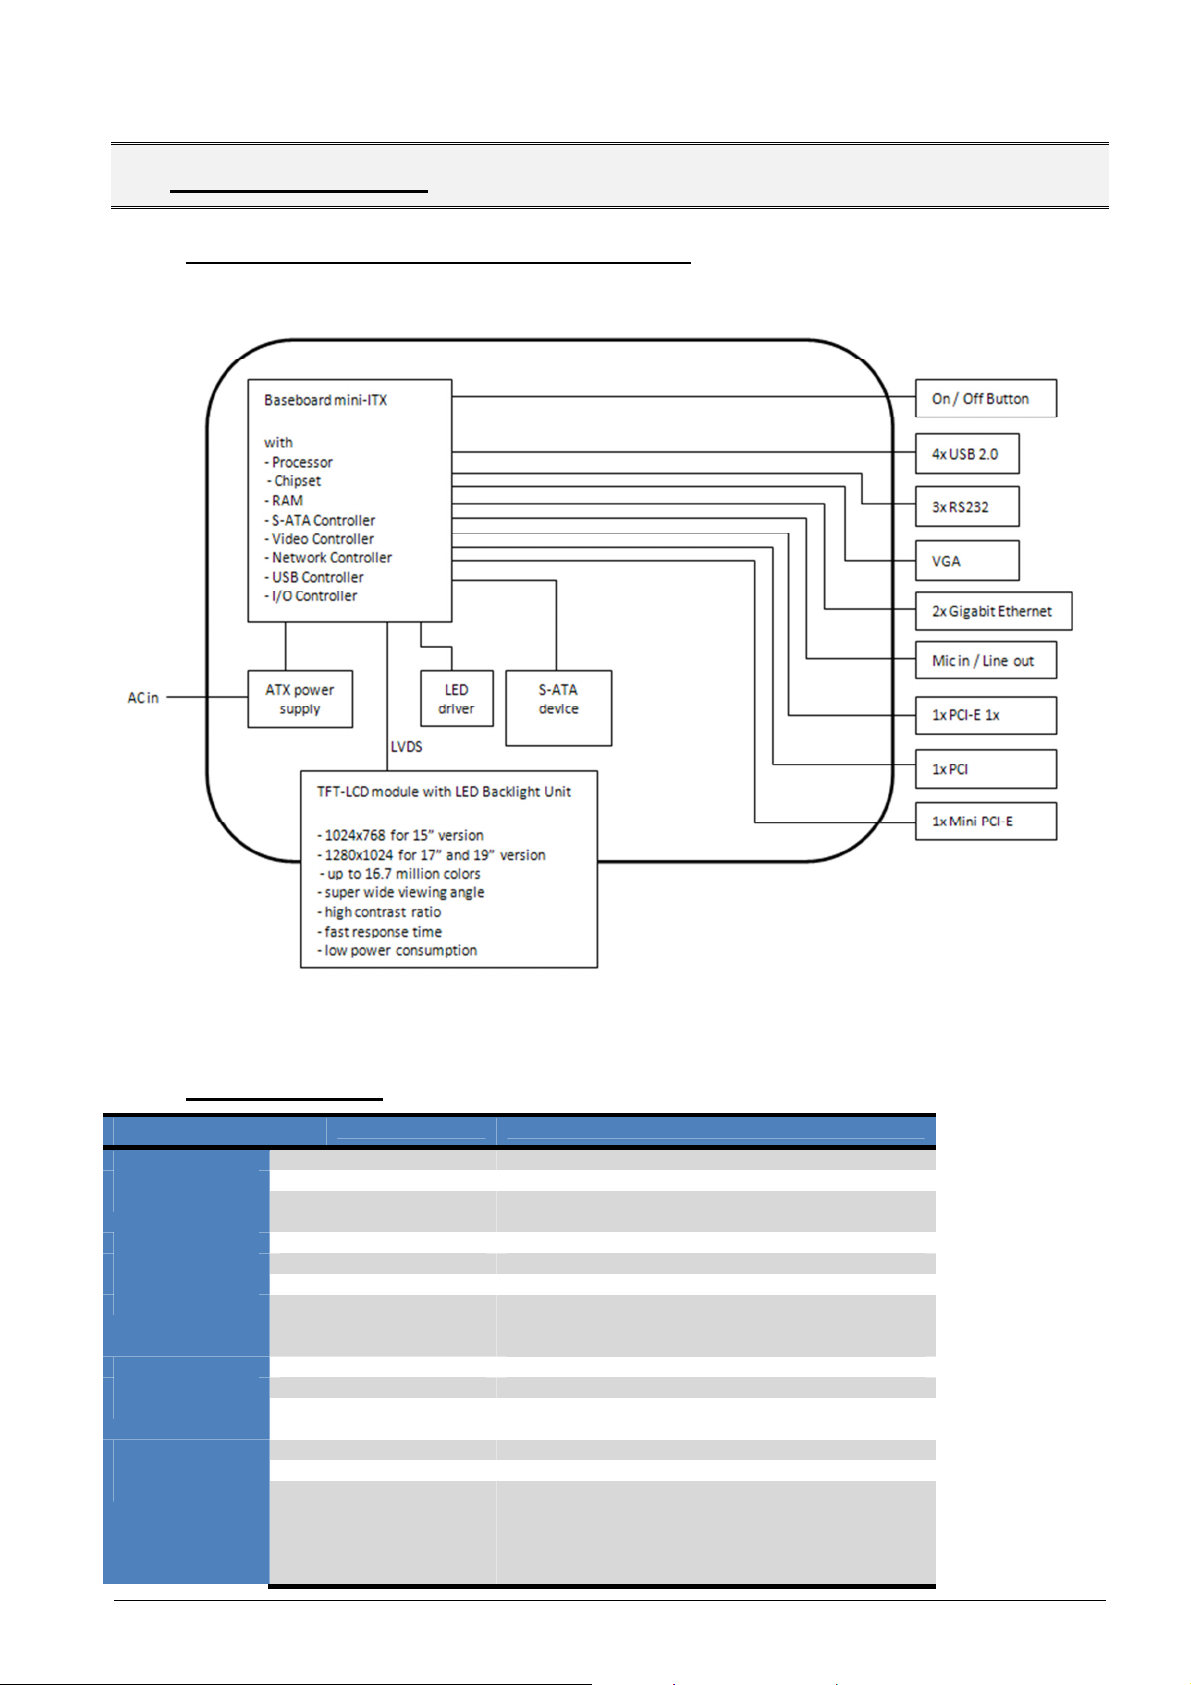
6.1. Control elements
The Power switch is located at the right side of the system
Power on/off:
operates as power switch.
6.2. Interfaces for attachable devices
6.2.1. Overview connector side
1
3
Accessory equipment connected to the analogue and digital interfaces must be
certified according to the respective IEC standards (e.g. IEC 950 for data
processing equipment and IEC 601-1 for medical equipment). Furthermore all
configurations shall comply with the valid version of the system standard IEC
!
601-1-1. Everybody who connects additional equipment to the signal input part
or signal output part configures a medical system, and is therefore responsible
that the system complies with the requirements of the valid version of the
system standard IEC 601-1-1. If in doubt, consult the technical service
department or your local representative.
4
6
10
12
5
8
Manual_Giant_Food_Series.docx
Page 11
Document:
Page
11 of 47
pages
Last change date:
25-Oct-11
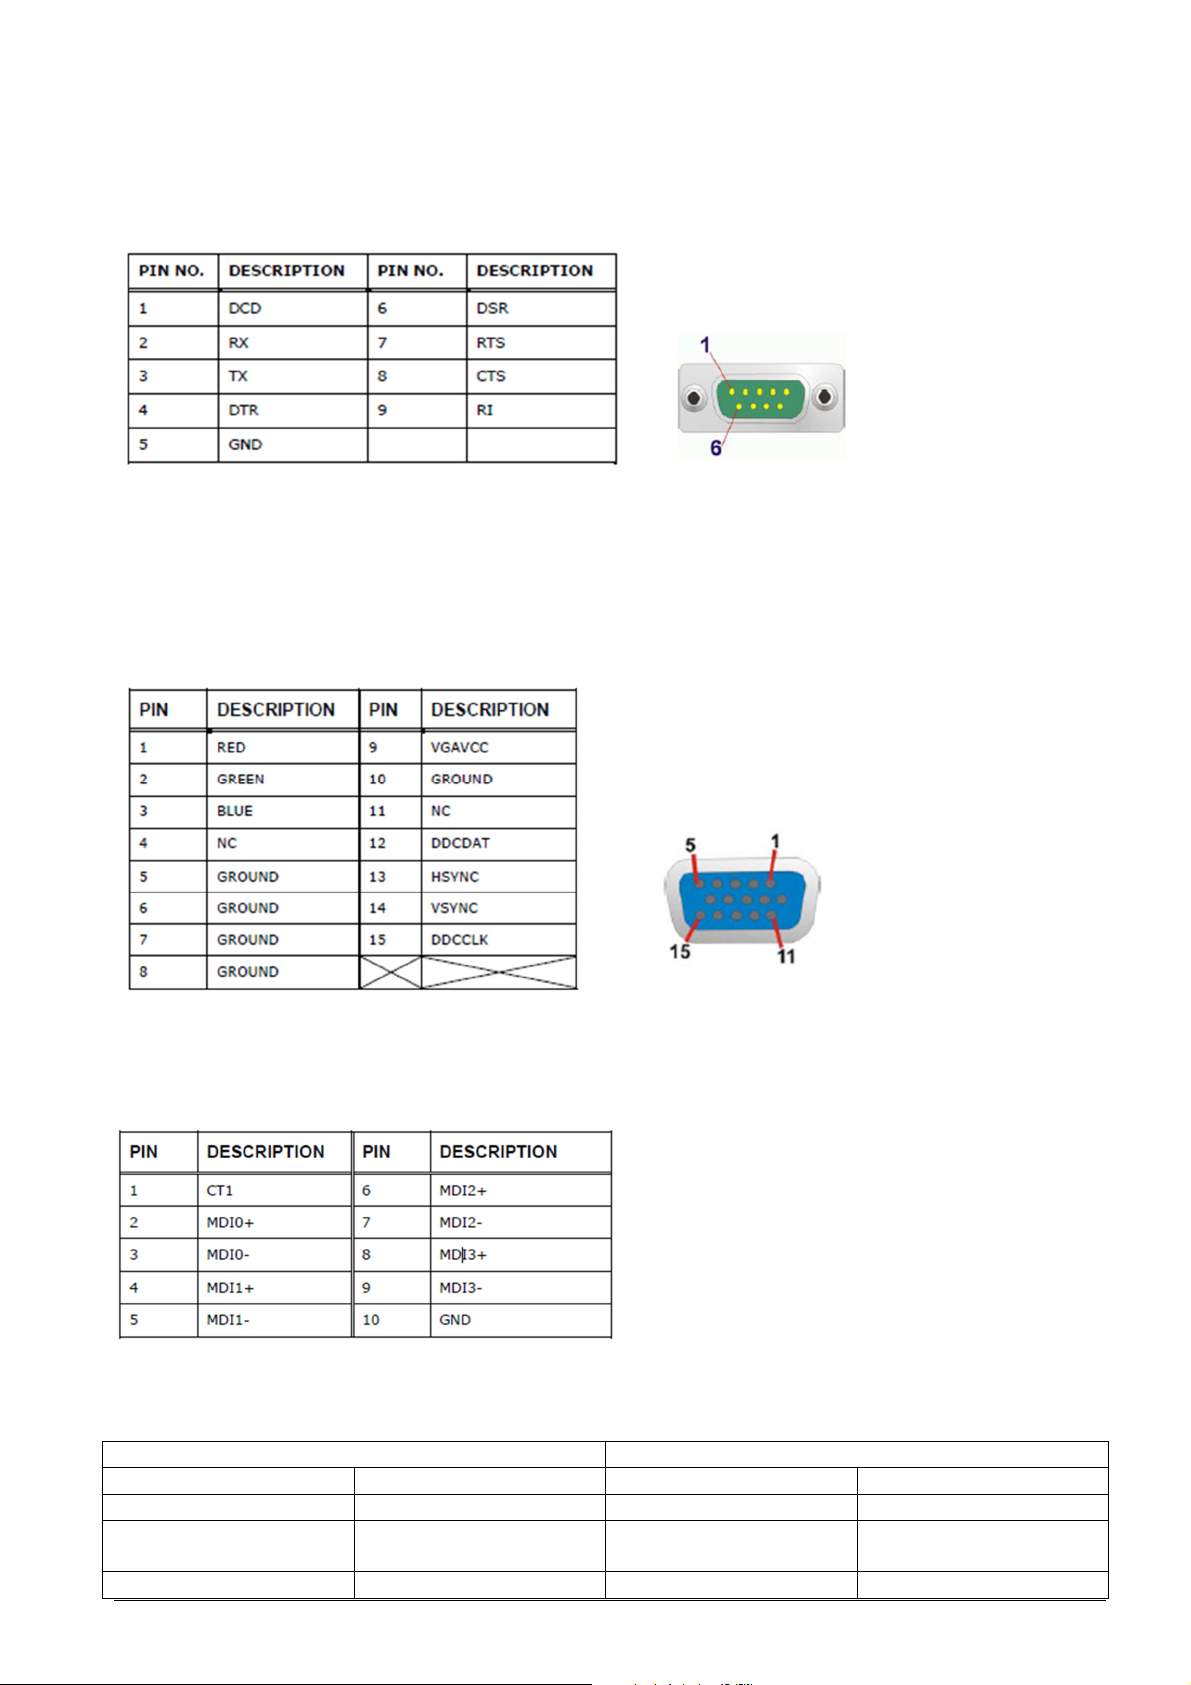
6.2.2. Serial Port COM1/3/4
RS232, max. 115.200 Baud (max. cable length <2m), DB-9, 9pin, male
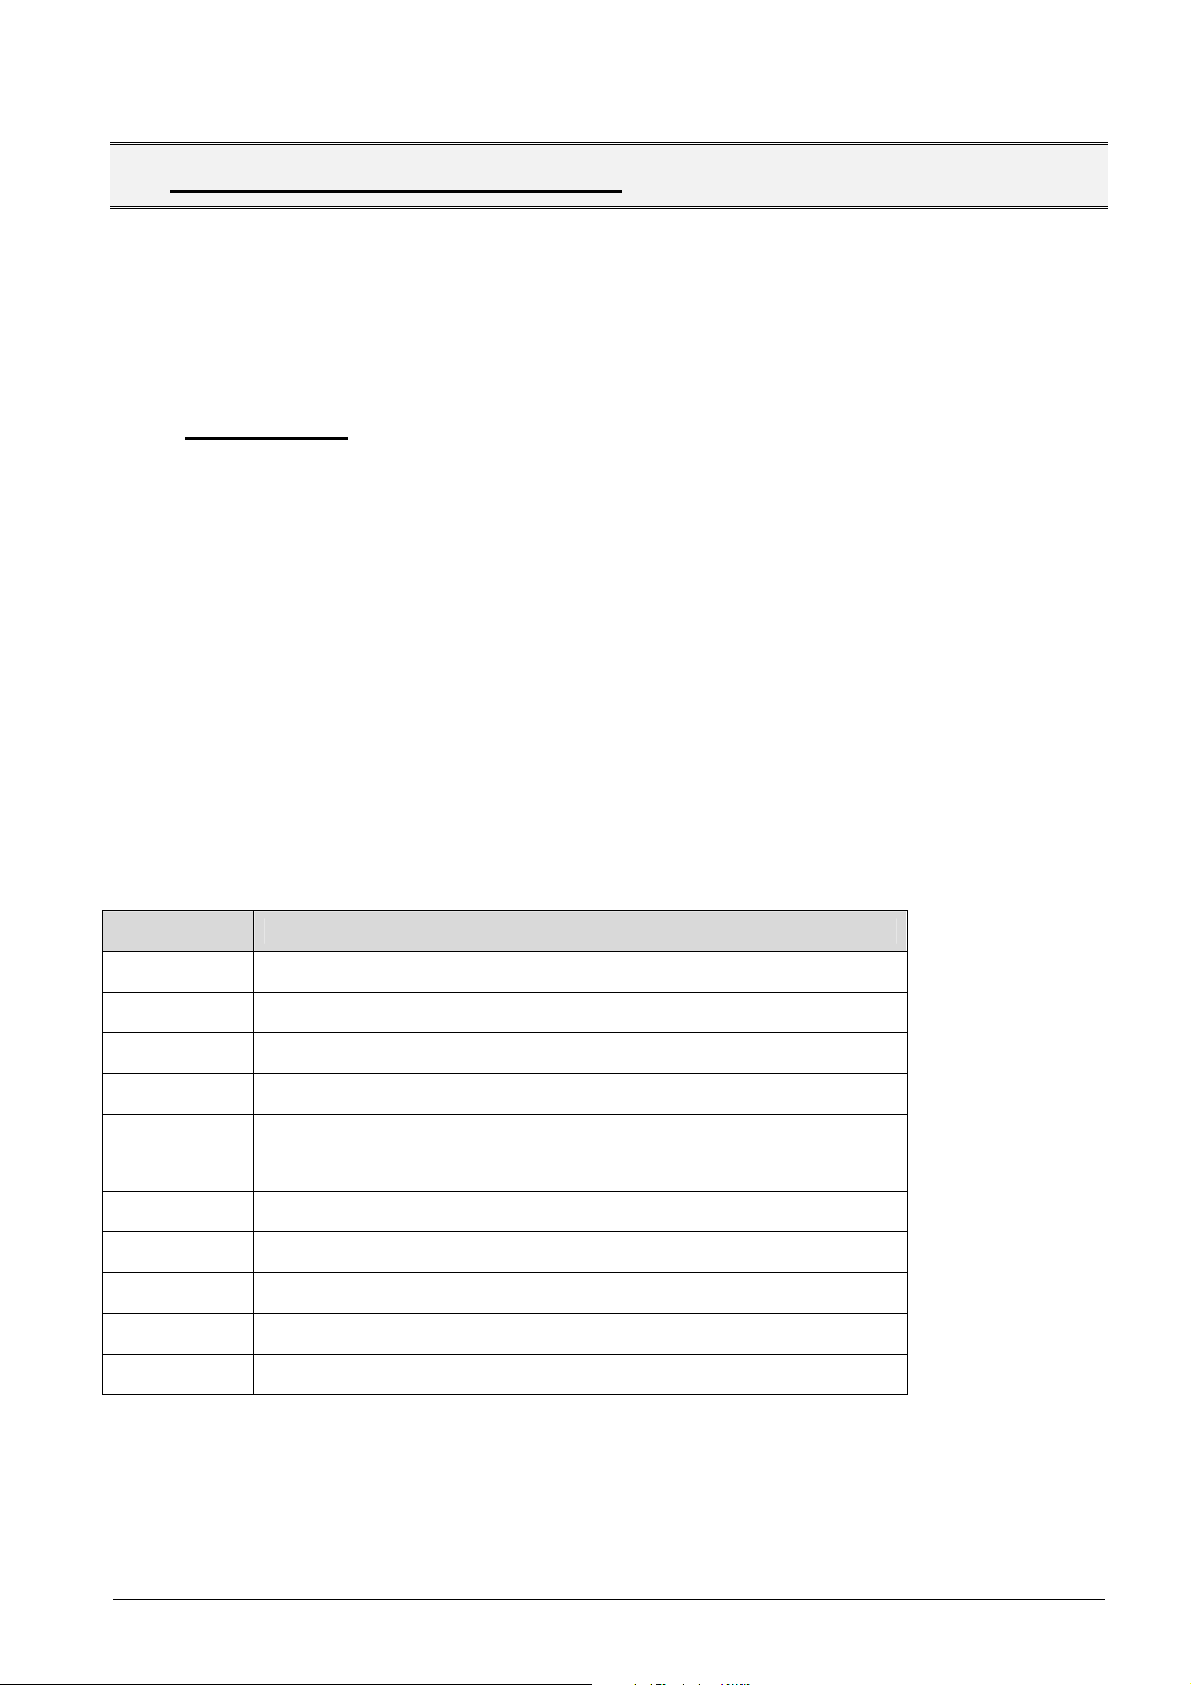
6.2.3. Ext. Monitor VGA
The PENTA Giant / Food has a single 15-pin female connector for connectivity to standard display
devices.
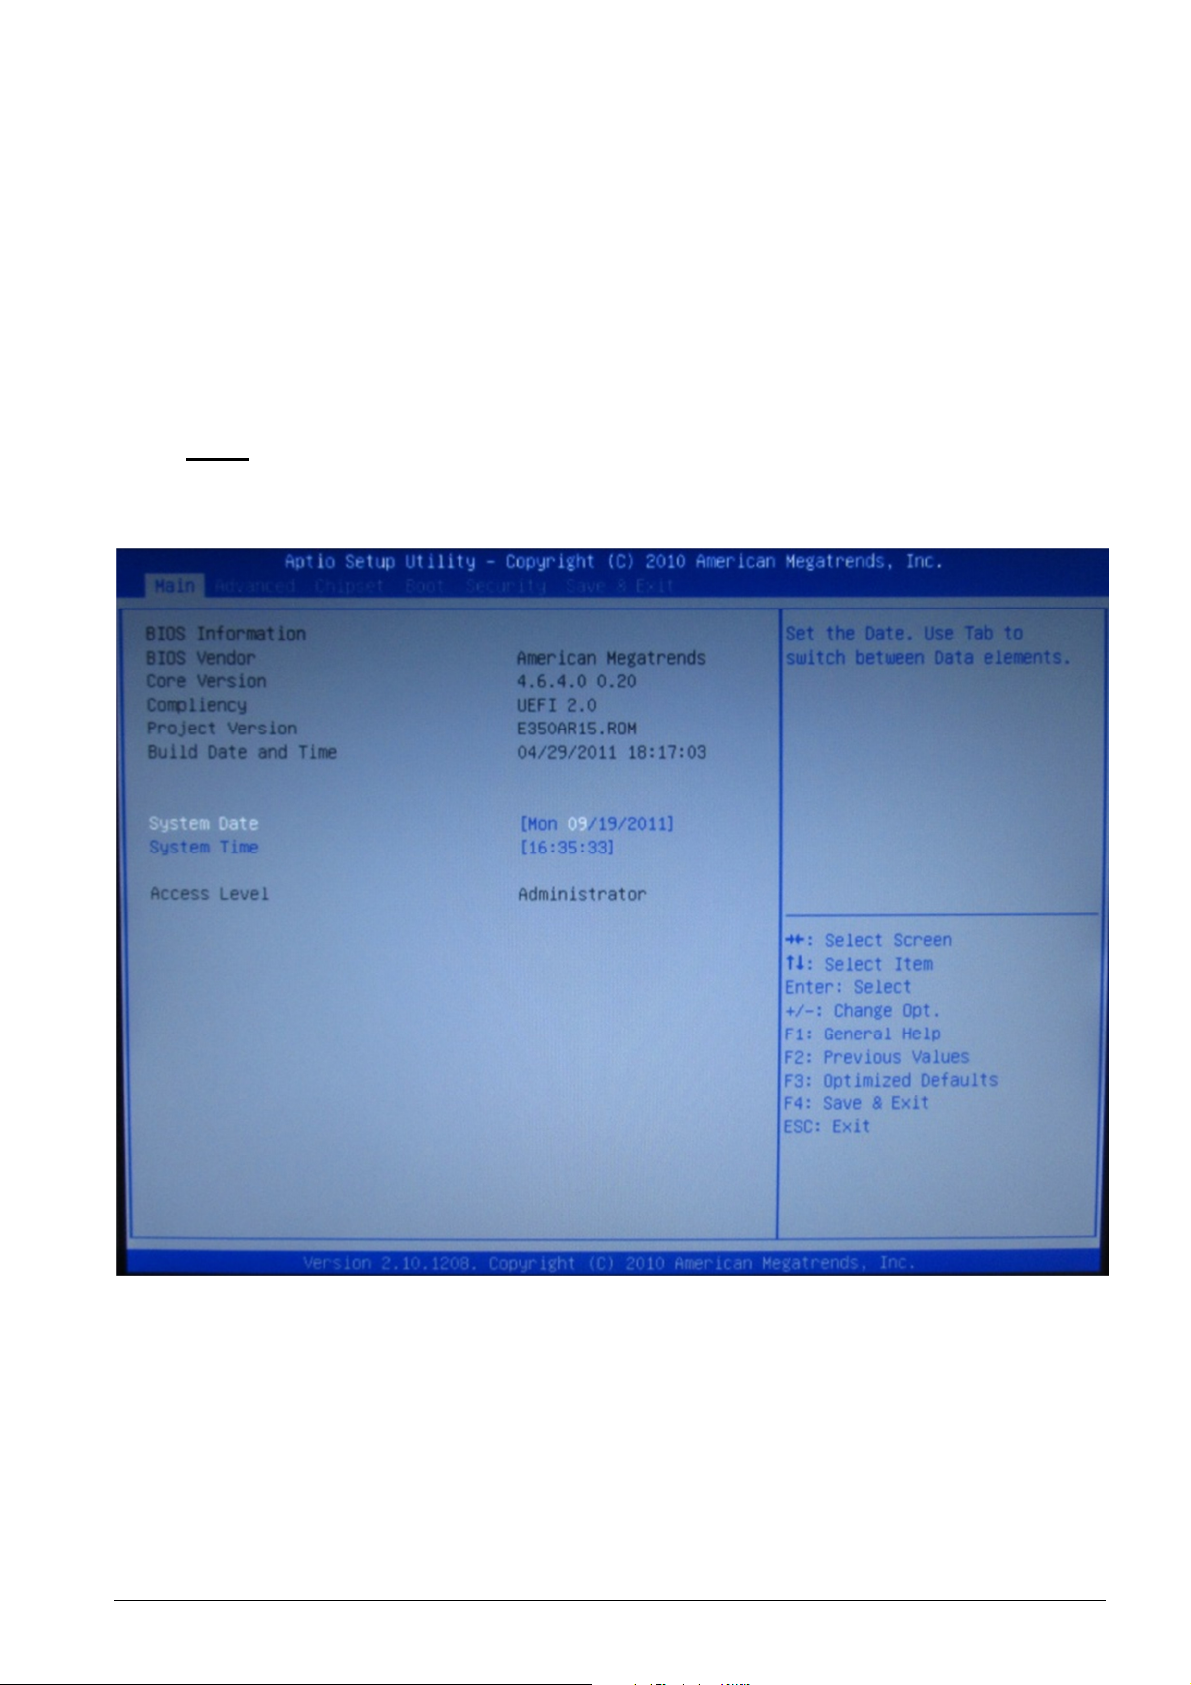
6.2.4. Ethernet
The PENTA Giant / Food is equipped with two built-in R-J45 1000Mbit/s Ethernet controllers.
The RJ-45 Ethernet connector has two status LEDs, one orange and one red. The orange LED
indicates activity on the port and the red LED indicates the connection.
Activity LED Link LED
Status Description Status Description
Off No activity Off 10Mbps connection
Orange Linked Red 100/1000Mbps
Blinking TX/RX Activity
Manual_Giant_Food_Series.docx
connection
Page 12

Document:
Page
12 of 47
pages
Last change date:
25-Oct-11
6.2.5. USB
The PENTA Giant / Food has four external USB 2.0 ports. The ports connect to both USB 2.0 and
USB 1.1 devices.
6.2.6. Audio Connector
The audio jacks connect to external audio devices.
• Line Out port (lime): Connects to a headphone or a speaker. With multi-
channel configurations, this port can also connect to front speakers.
• Microphone (pink): Connects a microphone
Manual_Giant_Food_Series.docx
Page 13
Document:
Page
13 of 47
pages
Last change date:
25-Oct-11
7. BIOS
CONFIGURATION OVERVIEW
This chapter provides information about necessary BIOS settings. These settings have been carefully
tested by PENTA and are recommended for proper operation.
On any problems please restore the default BIOS settings first by pressing <F9> key, then change the
different values to the one as documented below.
Default BIOS settings are marked as “Default”.
7.1. Introduction
The Bios is programmed onto the BIOS chip. The BIOS setup program allows changes to certain
system settings.
7.1.1. Starting Setup
The American Megatrends, Inc. (AMI) BIOS is activated when the computer is turned on. The setup
can be started in one of two ways.
• Press the DEL key as soon as the system is turned on or
• Press the DEL key when the “Press DEL to enter Setup” message is shown on the screen
If the message disappears before the DEL key is pressed, restart the system by pressing
CTRL+ALT+DEL and try again.
7.1.2. Using Setup
Use the arrow keys to highlight items, press Enter to select, use + and - to change entries, press F1
for help and ESC to quit.
Key Function
Up arrow Move to previous item
Down arrow Move to next item
Left arrow Move to the item on the left hand side
Right arrow Move to the item on the right hand side
Main Menu – Quit and not save changes into CMOS
Esc
F1 General help
F2 Load previous values
F3 Load optimized defaults (AMI default settings)
F4 Save all the CMOS changes and exit
+/- Change Option directly
Status Page Setup Menu and Option Page Setup Menu – Exit
current page and return to Main Menu
7.1.3. Getting help
When F1 is pressed a small help window describing the appropriate keys to use and the possible
selections for the highlighted item appears. To exit the Help Window press Esc or the F1 key again.
Manual_Giant_Food_Series.docx
Page 14
Document:
Page
14 of 47
pages
Last change date:
25-Oct-11
7.1.4. BIOS Menu
The menu bar on top of the BIOS screen has the following main items:
• Main – changes the basic system configuration
• Advanced – changes the advanced system settings
• Chipset – changes the chipset settings
• Boot – changes the system boot configuration
• Security – sets user and supervisor passwords
• Save & Exit – selects exit options and loads default settings
7.2. Main
The Main menu appears when the BIOS setup program is entered. The Main menu gives an overview
of the basic system information.
BIOS Main Menu
BIOS Information
The BIOS Information lists a brief summary of the BIOS. The fields in BIOS Information cannot be
changed. The Items shown in the system overview include:
Manual_Giant_Food_Series.docx
• BIOS Vendor: Installed BIOS vendor
• Core Version: Current BIOS version
• Compliancy: Compliancy with Standards
• Project Version: BIOS version
• Build Date: Date the current BIOS version was made
Page 15
Document:
Page
15 of 47
pages
Last change date:
25-Oct-11
System Date [DD/MM/YYYY]
Use the System Date option to set the system date. Manually enter the day, month and year.
System time [HH:MM:SS]
Use the System Time option to set the system time. Manually enter the hours, minutes and seconds.
Access Level
This value cannot be changed.
7.3. Advanced
Use the Advanced menu to configure the CPU and peripheral devices through the following sub-
menus:
Manual_Giant_Food_Series.docx
BIOS Advanced Menu
Page 16

Document:
Page
16 of 47
pages
Last change date:
25-Oct-11
•
•
7.3.1. ACPI Settings
The ACPI Settings menu configures the Advanced Configurationd Power Interface (ACPI) options.
ACPI Configuration Menu
• ACPI Sleep State
Use the ACPI Sleep State option to specify the sleep state the system enters when it’s not
being used.
S1 (CPU Stop Clock)
S3 (Suspend to RAM)
Default The system enters S1 sleep state. The system
appears off. The CPU is stopped; RAM is
refreshed; the system is running a low power
mode.
The caches are flushed and the CPU is
powered off. Power to the RAM is maintained.
The computer returns slower to a working
state, but more power is saved.
Manual_Giant_Food_Series.docx
Page 17

Document:
Page
17 of 47
pages
Last change date:
25-Oct-11
•
•
7.3.2. Trusted Computing
The Trusted Computing configures TPM support:
TPM Configuration Menu
• TPM Support
Use the TPM Support option to enable or disable TPM support.
Disabled
Enabled
Default TPM Support disabled
TPM Support enabled
Manual_Giant_Food_Series.docx
Page 18

Document:
Page
18 of 47
pages
Last change date:
25-Oct-11
•
•
7.3.3. CPU Configuration
The CPU Configuration menu lists details about the integrated Intel(R) Atom(TM) CPU
• Processor Type: Lists the brand name of the CPU being used
• EMT64: Indicates if the EM64T is supported by the CPU
• Processor Speed: Lists the CPU processing speed
• System Bus Speed: Lists the System Bus processing speed
• Ratio Status:
• Actual Ratio
• Processor Stepping: Lists the CPU processing stepping
• Microcode Revision: Lists the microcode revision
• L1 Cache RAM:
• L2 Cache RAM:
• Processor Cores: Lists the number of the processor cores
• Hyper Threading: Indicates if the Intel HT Technology is supported by the CPU
• Hyper Threading
Use the Hyper Threading option to configure Hyper Threading (HT) support
Enabled
Default Enables HT support.
Disabled
Disables HT support
Manual_Giant_Food_Series.docx
Page 19

Document:
Page
19 of 47
pages
Last change date:
25-Oct-11
•
•
7.3.4. IDE Configuration
Use the IDE Configuration menu to change ATA/IDE Configuration
ATA/IDE Configuration
• Disabled
Disable ATA/IDE ports
• Compatible
Configure ATA/IDE ports to use compatibility mode.
• Enhanced
Configure SATA as
IDE
AHCI
Configure SATA HDD as IDE for older OS
Default Configure SATA HDD to use AHCI mode
Manual_Giant_Food_Series.docx
Page 20

Document:
Page
20 of 47
pages
Last change date:
25-Oct-11
7.3.5. USB Configuration
Use the USB Configuration menu to enable or disable Legacy USB Support
Enables Legacy USB support.
• Enabled Enables Legacy USB support
• Disabled Disable Legacy USB support
• Auto Auto configure Legacy USB support
Manual_Giant_Food_Series.docx
Page 21

Document:
Page
21 of 47
pages
Last change date:
25-Oct-11
•
•
•
7.3.6. Super IO Configuration
• Serial Port n Configuration
Use the Serial Port n Configuration menu to configure the serial port ‘n’.
• Serial Port
Use the Serial Port option to enable or disable the serial port.
Disabled
Enabled
Default for
Port 1
Default for
Port 0,2,3
Disable the serial port
Enable the serial port
• Change Settings
Use the Change Settings option to change the serial port IO address and interrupt
address. The assortment of settings differs according to the selected Serial Port.
Possible settings will not be listed below. The default setting is [Auto].
Auto
Default The serial port IO address and interrupt
address are automatically detected.
Manual_Giant_Food_Series.docx
Page 22

Document:
Page
22 of 47
pages
Last change date:
25-Oct-11
•
•
•
•
• Parallel Port Configuration
• Parallel Port
Disabled
Default Disable the parallel port
Enabled
Enable the parallel port
• Change setting
Use the Change Settings option to change the parallel port IO address and interrupt address.
The assortment of settings differs according to the Serial Ports. Possible settings will not be listed
below. The default setting is [Auto].
Auto
Default The serial port IO address and interrupt
address are automatically detected.
• Device Mode
Use the Change Settings option to change the Device Mode of the parallel Port. Default mode is
[Printer Mode]
Printer Mode
Default
Manual_Giant_Food_Series.docx
Page 23

Document:
Page
23 of 47
pages
Last change date:
25-Oct-11
7.3.7. H/W Monitor
The H/W Monitor menu shows the operating temperature, fan speeds and system voltages.
PC Health Status
The following system parameters and values are shown. The system parameters that are monitored
are:
• CPU Temperature
• Accuracy: Accuracy of the readouts
• System Temperature
• CPU Fan Speed
• System Fan Speed
• VCC3V
• VCore
• +5V
• +12V
• +1.5V
• VSB3V
• VBAT
CPU Smart Fan control and SYS Smart Fan control allow controlling fans which are connected to the
system. As PENTA Giant / Food devices operate without fans, these options will not be explained
more detailed.
Manual_Giant_Food_Series.docx
Page 24

Document:
Page
24 of 47
pages
Last change date:
25-Oct-11
•
•
7.3.8. Secondary Super IO Configuration
• Serial Port n Configuration
Use the Serial Port n Configuration menu to configure the serial port ‘n’.
• Serial Port
Use the Serial Port option to enable or disable the serial port.
Disabled
Enabled
Default for
Port 5,6
Disable the serial port
Enable the serial port
Manual_Giant_Food_Series.docx
Page 25

Document:
Page
25 of 47
pages
Last change date:
25-Oct-11
7.3.9. Serial Port Console Redirection
The Serial Port Console Redirection menu allows the console redirection options to be configured.
Console redirection allows users to maintain a system remotely by redirecting keyboard input and text
output through the serial port.
• Console Redirection Port n Configuration
Use the Console redirection menu to configure redirection for port ‘n’.
Manual_Giant_Food_Series.docx
Page 26

Document:
Page
26 of 47
pages
Last change date:
25-Oct-11
7.4. Chipset
Use the Chipset menu to access the Northbridge and Southbridge configuration menu.
7.4.1. Host Bridge Configuration
Use the Host Bridge Configuration menu to configure the integrated graphics controller.
• Initiate Graphics Adapter
Use the Initiate Graphics Adapter option to select the graphics controller used as the primary
device. Select either an integrated graphics controller (IGD) or a combination of PCI graphics
controller and the IGD:
• IGD Default
• PCI/IGD
The Host Bridge Configuration menu also shows the memory information about the installed
memory and memory frequency.
• Memory Frequency: Shows the frequency of the installed memory
• Total Memory: Amount of installed RAM
• DIMM#0: RAM in Slot 0
• DIMM#1: RAM in Slot 1
Manual_Giant_Food_Series.docx
Page 27

Document:
Page
27 of 47
pages
Last change date:
25-Oct-11
•
•
•
•
•
7.4.2. South Bridge Configuration
Use the South Bridge Configuration menu to configure the Southbridge chipset.
• Restore AC Power Loss
Use the Restore AC Power Loss to select which AC power state is applied after power failure
Power Off
Power On
Last State
• HD Audio Controller
Use the HD Audio Controller option to enable or disable the High Definition Audio controller.
Disabled
Enabled
Default Restores the system to power off.
Restores the system to power on.
Restores the system to last power state.
The onboard High Definition Audio controller is
disabled.
Default The onboard High Definition Audio controller is
automatically detected and enabled.
Manual_Giant_Food_Series.docx
Page 28

Document:
Page
28 of 47
pages
Last change date:
25-Oct-11
•
•
•
•
•
•
• USB Function
Use the USB Function option to enable or disable the USB function support.
Disabled
Enabled
• USB 2.0(EHCI) Support
Use the USB 2.0(EHCI) Support option to enable or disable the USB 2.0(EHCI) support.
Disabled
Enabled
• Set Spread Spectrum function
The Set Spread Spectrum Function option can help to improve CPU EMI issues.
Disabled
Enabled
The onboard USB function support is disabled.
Default The onboard USB function support is enabled.
USB 2.0 (EHCI) support disabled
Default USB 2.0 (EHCI) support enabled
Default The spread spectrum mode is disabled.
The spread spectrum mode is enabled.
Manual_Giant_Food_Series.docx
Page 29

Document:
Page
29 of 47
pages
Last change date:
25-Oct-11
•
•
•
•
7.4.3. Intel IGD SWSCI OpRegion Configuration
Use the Intel IGD SWSCI OpRegion configuration menu to configure the video device connected to
the system.
• DVMT Mode Select
Use the DVMT Mode Select option to select DVMT or Fixed Mode.
Fixed Mode
DVMT Mode
• DVMT/Fixed Memory
Use the DVMT/FIXED Memory option to specify the maximum amount of memory that can be
allocated as graphics memory. Configuration options are listed below.
128MB
256MB
Configure IGD in Fixed Mode
Default Configure IGD in DVMT Mode
Default
Manual_Giant_Food_Series.docx
Page 30

Document:
Page
30 of 47
pages
Last change date:
25-Oct-11
• IGD – Boot Type
Use the IGD - Boot Type option to select the display device used by the system when it boots.
Configuration options are listed below.
• VBIOS Default Default
• CRT
• LFP
• CRT + LFP
• LCD Panel Type
Use the LCD Panel Type option to select the type of flat panel connected to the system.
Configuration options are listed below:
• Select by Panel ID Default
• 640x480 18bit
• 800x480 18bit
• 600x600 18bit
• 1024x768 18bit
• 1280x1024 18bit
• 1366x768 18bit
• 1280x800 18bit
• 1280x600 18bit
• Backlight Control
Use Backlight Control setting to select whether the panel is light on Hi-Signal (Normal) or LoSignal (Inverted)
• Normal Default
• Inverted
Manual_Giant_Food_Series.docx
Page 31

Document:
Page
31 of 47
pages
Last change date:
25-Oct-11
•
•
7.5. Boot
Use the Boot menu to configure system boot options.
• Bootup NumLock State
• Off Default
• On
• Quiet Boot
Use the Quiet Boot BIOS option to select the screen display when the system boots.
Disabled
Enabled
Normal POST messages displayed
Default OEM Logo displayed instead of POST
messages
Manual_Giant_Food_Series.docx
Page 32

Document:
Page
32 of 47
pages
Last change date:
25-Oct-11
•
•
• Launch PXE OpROM
Use the Launch PXE OpROM option to enable or disable boot option for legacy network
devices.
Disabled
Enabled
• Boot Option #1
Select Boot Device #1
• Boot Option #2
Select Boot Device #2
• Hard Drive BBS Priorities
Select Hard Drive Boot Priority
• Network Device BBS Priorities
Select Network Device Boot Priority
Default
Ignore all PXE Option ROMs
Load PXE Option ROMs.
Manual_Giant_Food_Series.docx
Page 33

Document:
Page
33 of 47
pages
Last change date:
25-Oct-11
7.6. Security
Use the Security menu to set system and user passwords.
• Administrator Password
Use the Administrator Password to set or change a administrator password.
• User Password
Use the User Password to set or change a user password.
• HDD Security Configuration
Use the User HDD Security Configuration to set or change a HDD password.
Manual_Giant_Food_Series.docx
Page 34

Document:
Page
34 of 47
pages
Last change date:
25-Oct-11
7.7. Exit
Use the Exit menu to load default BIOS values, optimal failsafe values and to save configuration
changes.
• Save Changes and Reset
Use the Save Changes and Reset option to save the changes made to the BIOS options and
to exit the BIOS configuration setup program.
• Discard Changes and Reset
Use the Discard Changes and Reset option to exit the system without saving the changes
made to the BIOS configuration setup program.
• Restore Defaults
Use the Restore Defaults option to load the optimal default values for each of the
parameters on the Setup menus. F3 key can be used for this operation!
• Save as User Defaults
Save the changes done so far as User Defaults.
• Restore User Defaults
Restore the User Defaults to all the setup options.
Manual_Giant_Food_Series.docx
Page 35

Document:
Page
35 of 47
pages
Last change date:
25-Oct-11
8. O
PTIONS
8.1. Cable cover
The PENTA Giant / Food can optionally be ordered with a cable cover. Only with this PENTA Giant /
Food cable cover, PENTA will assure that the system full fills the IP65 compliance.
PENTA part no.:
For Food mITX :ZUB-08-COV-014
For Giant mITX :ZUB-08-COV-015
Manual_Giant_Food_Series.docx
Page 36

Document:
Page
36 of 47
pages
Last change date:
25-Oct-11
a b c d e f g h i
15“ 408 314,1
6
289,3
86,3 166,5
137,8
154 125,3
17“ 438 354 5 299,2
96,2 181,5
147,7
169 135,2
19“ 465,1
390,6
5
319,7
116,7
195,05
168,2
182,55
155,7
9. S
PECIFICATIONS
9.1. Mechanical specifications
The following drawings show the dimensions of the PENTA Giant / Food in sizes 15”, 17” and 19”:
With mounted Cablecover
Manual_Giant_Food_Series.docx
All sizes in mm
Page 37

Document:
Page
37 of 47
pages
Last change date:
25-Oct-11
9.2. Electrical specifications
The system is equipped with a wide input range power supply which allows the usage nearly all
around the world.
Input range: 90V~ to 263V~
Max. input current: 1A
Frequency: 50Hz – 60Hz
Main Fuse: T1.25A / 250V~
9.3. Environmental specifications
Operating ambient temperature range
Storage ambient temperature range
Operating ambient humidity range
Non operating ambient humidity range
0°C to +45°C
-10°C to +65°C
10%..90% (non condensing)
5%..95% (non condensing)
Manual_Giant_Food_Series.docx
Page 38

Document:
Page
38 of 47
pages
Last change date:
25-Oct-11
9.4. Labels
9.4.1. Serial number label
The device itself is labelled on its back side. The label complies in detail the following example layout.
9.4.2. Food mITX AC Power Version :
9.4.3. Food mITX 24V-DC Version
9.4.4. Giant mITX AC Power Version :
Manual_Giant_Food_Series.docx
Page 39

Document:
Page
39 of 47
pages
Last change date:
25-Oct-11
Symbol
Explanation/Meaning
9.4.5. Giant mITX 24V-DC Version
Giant mITX
S/N: GI34-xxxx-xx
Input Voltage: 20V - 29V
Input Current: max 2.5A
Achtung:
Gerät darf nur von geschultem Personal geöffnet werden !
Vor dem Öffnen von der Spannung trennen !
Attention:
To be opend by authorized persons only !
Disconnect power before opening !
Manufactured and assembled in Germany by :
PENTA GmbH , Ulrichsberger Str. 17, 94469 Deggendorf
9.4.6. Explanation of serial number label symbols
Marks a warning or attention advice
!
Do not dispose this device or parts of it!
For further information, refer to:
DIRECTIVE 2002/96/EC OF THE EUROPEAN PARLIAMENT AND OF THE COUNCIL
of 27 January 2003
on waste electrical and electronic equipment (WEEE)
CE mark to confirm, that this device meets all appropriate regulations and
directives
Manual_Giant_Food_Series.docx
Page 40

Document:
Page
40 of 47
pages
Last change date:
25-Oct-11
10. C
ERTIFICATIONS AND NORMS
10.1. Declaration of conformity
The complete CE Declaration of conformity is provided with your PENTA IPC on Drivers & Manual
CD. If you don´t have your Drivers & Manual CD available, please ask your local dealer for the
following document:
CE Selbsterklärung FI34.pdf / GI34.pdf
10.2. EMC test compliance
If you need to have the complete EMC test report, please ask your local sales representative.
10.3. Environmental test compliance
If you need to have the complete environmental test report, please ask your local sales representative.
10.4. IP65 compliance
The unit full fills with appropriate cable cover the IP65 compliance.
IP6x compliance according to EN 60529 (dust intrusion) is met.
IPx5 compliance according to EN 60529 (splash water intrusion) is met.
10.5. Tables according EN60601-1-2:2001:
10.5.1. Table 201 – Guidance and manufacturer´s declaration – electromagnetic
emission – for all EQUIPMENT AND SYSTEMS (see 6.8.3.201 a) 3))
The PENTA is intended for use in the electromagnetic environment specified below. The
customer or the user of the PENTA should assure that it is used in such an environment.
Emissions test
RF emissions
CISPR 11
RF emissions
CISPR 11
Harmonic
emissions
IEC 61000-3-2
Voltage
fluctuations /
flicker emissions
IEC 61000-3-3
Guidance and manufacturer´s declaration – electromagnetic emission
Compliance Electromagnetic environment – guidance
The PENTA uses RF energy only for its
Group 1
Class B
Class A
Complies
internal function. Therefore, its RF emissions are very
low and are not likely to cause any interference in
nearby electronic equipment.
The PENTA is suitable for use in all
establishments, including domestic establishments and
those directly connected to the public low-voltage power
supply network that supplies buildings used for domestic
purposes.
Manual_Giant_Food_Series.docx
Page 41

Document:
Page
41 of 47
pages
Last change date:
25-Oct-11
IEC 60601
Electromagnetic environment
-
10.5.2. Table 202 – Guidance and manufacturer’s declaration – electromagnetic
immunity –
for all EQUIPMENT and SYSTEMS (see 6.8.3.201 a) 6))
Guidance and manufacturer´s declaration – electromagnetic immunity
The PENTA is intended for use in the electromagnetic environment specified below. The customer
or the user of the PENTA should assure that it is used in such an environment.
Immunity test
Electrostatic
discharge
(ESD)
IEC 61000-4-2
Electrical fast
transient / burst
IEC 61000-4-4
Surge
IEC 61000-4-5
Voltage dips,
short
interruptions
and
voltage
variations
on power
supply
input lines
IEC 61000-4-11
test level
± 6 kV contact
± 8 kV air
± 2 kV for power
supply lines
± 1 kV for
input/output
lines
± 1 kV differential
mode
± 2 kV common
mode
< 5 % UT
(>95 % dip in UT )
for 0,5 cycle
40 % UT
(60 % dip in UT )
for 5 cycles
70 % UT
(30 % dip in UT )
for 25 cycles
< 5 % UT
(>95 % dip in UT )
for 5 sec
Compliance level
± 6 kV contact
± 8 kV air
± 2 kV for power
supply lines
± 1 kV for input/output
lines
± 1 kV differential
mode
± 2 kV common mode
< 5 % UT
(>95 % dip in UT )
for 0,5 cycle
40 % UT
(60 % dip in UT )
for 5 cycles
70 % UT
(30 % dip in UT )
for 25 cycles
< 5 % UT
(>95 % dip in UT )
for 5 sec
guidance
Floors should be wood, concrete
or
ceramic tile. If floors are covered
with
synthetic material, the relative
humidity
should be at least 30 %.
Mains power quality should be
that of a
typical commercial or hospital
environment.
Mains power quality should be
that of a
typical commercial or hospital
environment.
Mains power quality should be
that of a
typical commercial or hospital
environment. If the user of the
PENTA requires
continued operation during
power
mains interruptions, it is
recommended
that the PENTA be powered from
an uninterruptible power supply
or a battery.
Manual_Giant_Food_Series.docx
Page 42

Document:
Page
42 of 47
pages
Last change date:
25-Oct-11
Power
frequency
(50/60 Hz)
magnetic field
3 A/m 30 A/m
IEC 61000-4-8
NOTE U
Power frequency magnetic fields
should be at levels characteristic
of a typical location in a typical
commercial or hospital
environment.
is the a. c. mains voltage prior to application of the test level.
T
Manual_Giant_Food_Series.docx
Page 43

Document:
Page
43 of 47
pages
Last change date:
25-Oct-11
IEC 60601 test
Compliance
Electromagnetic environment
–
a
10.5.3. Table 204 – Guidance and manufacturer´s declaration – electromagnetic
immunity –
for EQUIPMENT and SYSTEM that are not LIFE-SUPPORTING (see 6.8.3.201 b))
Guidance and manufacturer´s declaration – electromagnetic immunity
The PENTA is intended for use in the electromagnetic environment specified below. The customer
or the user of the PENTA should assure that it is used in such an environment.
Immunity test
Conducted RF
IEC 61000-4-6
Radiated RF
IEC 61000-4-3
level
3 V
150 kHz to 80 MHz
3 V/m
80 MHz to 2,5 GHz
level
10 V
10 V/m
guidance
Portable and mobile RF communications equipment
should be used no closer to any part of the PENTA,
including cables, than the recommended separation
distance calculated from the equation applicable to
the frequency of the transmitter.
Recommended separation distance
Pd 35,0=
80 MHz to 800 MHz
Pd 35,0=
800 MHz to 2,5 GHz
Pd 7,0=
where p is the maximum output power rating of the
transmitter in watts (W) according to the transmitter
manufacturer and d is the recommended separation
distance in metres (m).
Field strengths from fixed RF transmitters, as
determined by an electromagnetic site survey,
should be less than the compliance level in each
frequency range.
Interference may occur in the vicinity of equipment
marked with the following symbol:
b
a
b
NOTE 1 At 80 MHz and 800 MHz, the higher frequency range applies.
NOTE 2 These guidelines may not apply in all situations. Electromagnetic is affected by absorption and reflection from
structures, objects and people.
Field strengths from fixed transmitters, such as base stations for radio (cellular/cordless) telephones and land mobile
radios, amateur radio, AM and FM radio broadcast and TV broadcast cannot be predicted theoretically with accuracy. To
assess the electromagnetic environment due to fixed RF transmitters, an electromagnetic site survey should be considered.
If the measured field strength in the location in which the PENTA is used exceeds the applicable RF compliance level above,
the PENTA should be observed to verify normal operation. If abnormal performance is observed, additional measures may
be necessary, such as reorienting or relocating the PENTA
b
Over the frequency range 150 kHz to 80 MHz, field strengths should be less than 3 V/m.
Manual_Giant_Food_Series.docx
.
Page 44

Document:
Page
44 of 47
pages
Last change date:
25-Oct-11
10.5.4. Table 206 – Recommended separation distances between portable and mobile
RF communications equipment and the EQUIPMENT or SYSTEM for EQUIPMENT and SYSTEMS that are not LIFE-SUPPORTING (see 6.8.3.201 b))
Recommended separation distances between
portable and mobile RF communications equipment and the PENTA
The PENTA is intended for use in an electromagnetic environment in which radiated RF
disturbances are controlled. The customer or the user of the PENTA can help prevent
electromagnetic interference by maintaining a minimum distance between portable and mobile RF
communications equipment (transmitters) and the PENTA as recommended below, according to the
maximum output power of the communications equipment
Separation distance according to frequency of transmitter
m
Rated maximum
output of
transmitter
W
150 kHz to 80 MHz
Pd 35,0=
80 MHz to 800 MHz
Pd 35,0=
800 MHz to 2,5 GHz
Pd 7,0=
0,01 0,04
0,1 0,11
1 0,35
10 1,11
100 3,50
0,04
0,11
0,35
1,11
3,50
0,07
0,22
0,70
2,21
7,00
For transmitters rated at a maximum output power not listed above the recommended separation
distance d in metres (m) can be estimated using the equation applicable to the frequency of the
transmitter, where P is the maximum output power rating of the transmitter in watts (W) according to
the transmitter manufacturer.
NOTE 1 At 80 MHz and 800 MHz, the separation distance for the higher frequency range applies.
NOTE 2 These guidelines may not apply in all situations. Electromagnetic propagation is affected by
absorption and reflection from structures, objects and people.
Manual_Giant_Food_Series.docx
Page 45

Document:
Page
45 of 47
pages
Last change date:
25-Oct-11
PENTA
Warning for medical appliances:
PENTA
Information and warning for medical appliances:
11. C
OMMON WARNINGS, HANDLING AND SAFETY INSTRUCTIONS
Only use an original power-supply provided by
another power-supply, ask your PENTA partner for authorisation. Non
!
!
!
!
observance can result in property damage, severe personal injury and the loss
of your warranty!
Before connecting the power cable all peripheral devices (e.g.
keyboard/mouse …) must be connected to your PENTA IPC. Non-Observance
can result in property damage. Please see appropriate chapters for additional
information about installation of peripheral devices!
Before connecting peripheral devices, switch off the power supply of your
PENTA IPC. The system has to be grounded as well. Otherwise the PENTA
IPC and/or connected devices may be damaged.
Electrical installation only should be done by qualified personal. Non
observance of the safety instructions can result in personal injury, death or
property damage!
. If you need to use
Do not touch unused interfaces like USB or COM ports and a patient at the
!
!
!
!
same time!
Secure unused interfaces with supplied covers.
Although your
some of them like acids and others can damage the housing, the seals and
your display or touch panel. Please ask your local PENTA (sales)
representative for further information.
The PENTA IPC can be disinfected with all common used disinfectants.
Power down the system and use a moistened tissue to clean the device.
Avoid unconditionally intrusion of disinfectants and chemicals (i.e. via
interfaces)!
The PENTA IPC is designed to meet IP65 class specifications.
This specification is met only, if all (interface) covers are mounted.
IPC is resistant against a lot of aggressive chemicals,
If you use a touch panel it will only operate with your fingers or a special input
pen.
!
Manual_Giant_Food_Series.docx
Never use hard, sharp, pointed, wooden, metal, plastic… devices, pencils,
pens, knives ….. They will destroy your touch panel.
Page 46

Document:
Page
46 of 47
pages
Last change date:
25-Oct-11
Hazardous voltages
Warning for medical appliances:
Never shock, hit, overheat, burn, scratch, smash, … your PENTA IPC. This will
!
!
!
destroy your PENTA IPC or parts thereof.
The administrator password for the used operating system and/or BIOS is very
important! The loss of the password can cause data loss or will heavily
influence the software installation of your system.
Because the administrator password is the main key for your system (access
to all data, possibility to change all options … ) it is very important, that only
authorised persons will have access to this password!
Invalid changes of BIOS settings can make your system useless or will cause
data loss and/or hardware damage!
Any damages and/or problems caused through invalid BIOS changes will not
be covered by warranty!
are present in this electrical equipment during operation.
Failure to proper equipment maintenance can result in death, severe personal
injury or substantial property damage. The instructions contained in this
chapter have to be followed.
•
Maintenance shall be performed only by qualified personal.
•
Always de-energise and ground the equipment before maintenance.
!
!
!
•
ESD can destroy your Hardware – always ground yourself before touching
parts inside the PENTA product.
•
Use only authorised parts to repair/upgrade the equipment.
•
Unqualified intervention will cause system damage and leads to warranty
loss.
Computer components are highly sensitive devices. ESD and wrong treatment
can damage and destroy your IPC and / or your add-on cards.
Only qualified personnel should handle your computer hardware
Beware from ESD – ground yourself and your hardware first!
Accessory equipment connected to the analog and digital interfaces must be
certified according to the respective IEC standards (e.g. IEC 950 for data
processing equipment and IEC 601-1 for medical equipment). Furthermore all
configurations shall comply with the valid version of the system standard IEC
601-1-1. Everybody who connects additional equipment to the signal input part
or signal output part configures a medical system, and is therefore responsible
that the system complies with the requirements of the valid version of the
system standard IEC 601-1-1. If in doubt, consult the technical service
department or your local representative.
Manual_Giant_Food_Series.docx
Page 47

Document:
Page
47 of 47
pages
Last change date:
25-Oct-11
Date Doc.-Revision #
Author
Changes
17.02.2011
PENTA
21.09.2011
PENTA
25.10
.2011
PENTA
12. R
EVISION HISTORY
0.1
0.2
0.3
M. Schuhbaum /
D. Steinbeisser /
P. Wierobski /
Document created
Added: Cover, Packing List, Labels, Mechanical
Specifications
Manual_Giant_Food_Series.docx
 Loading...