

Page 1
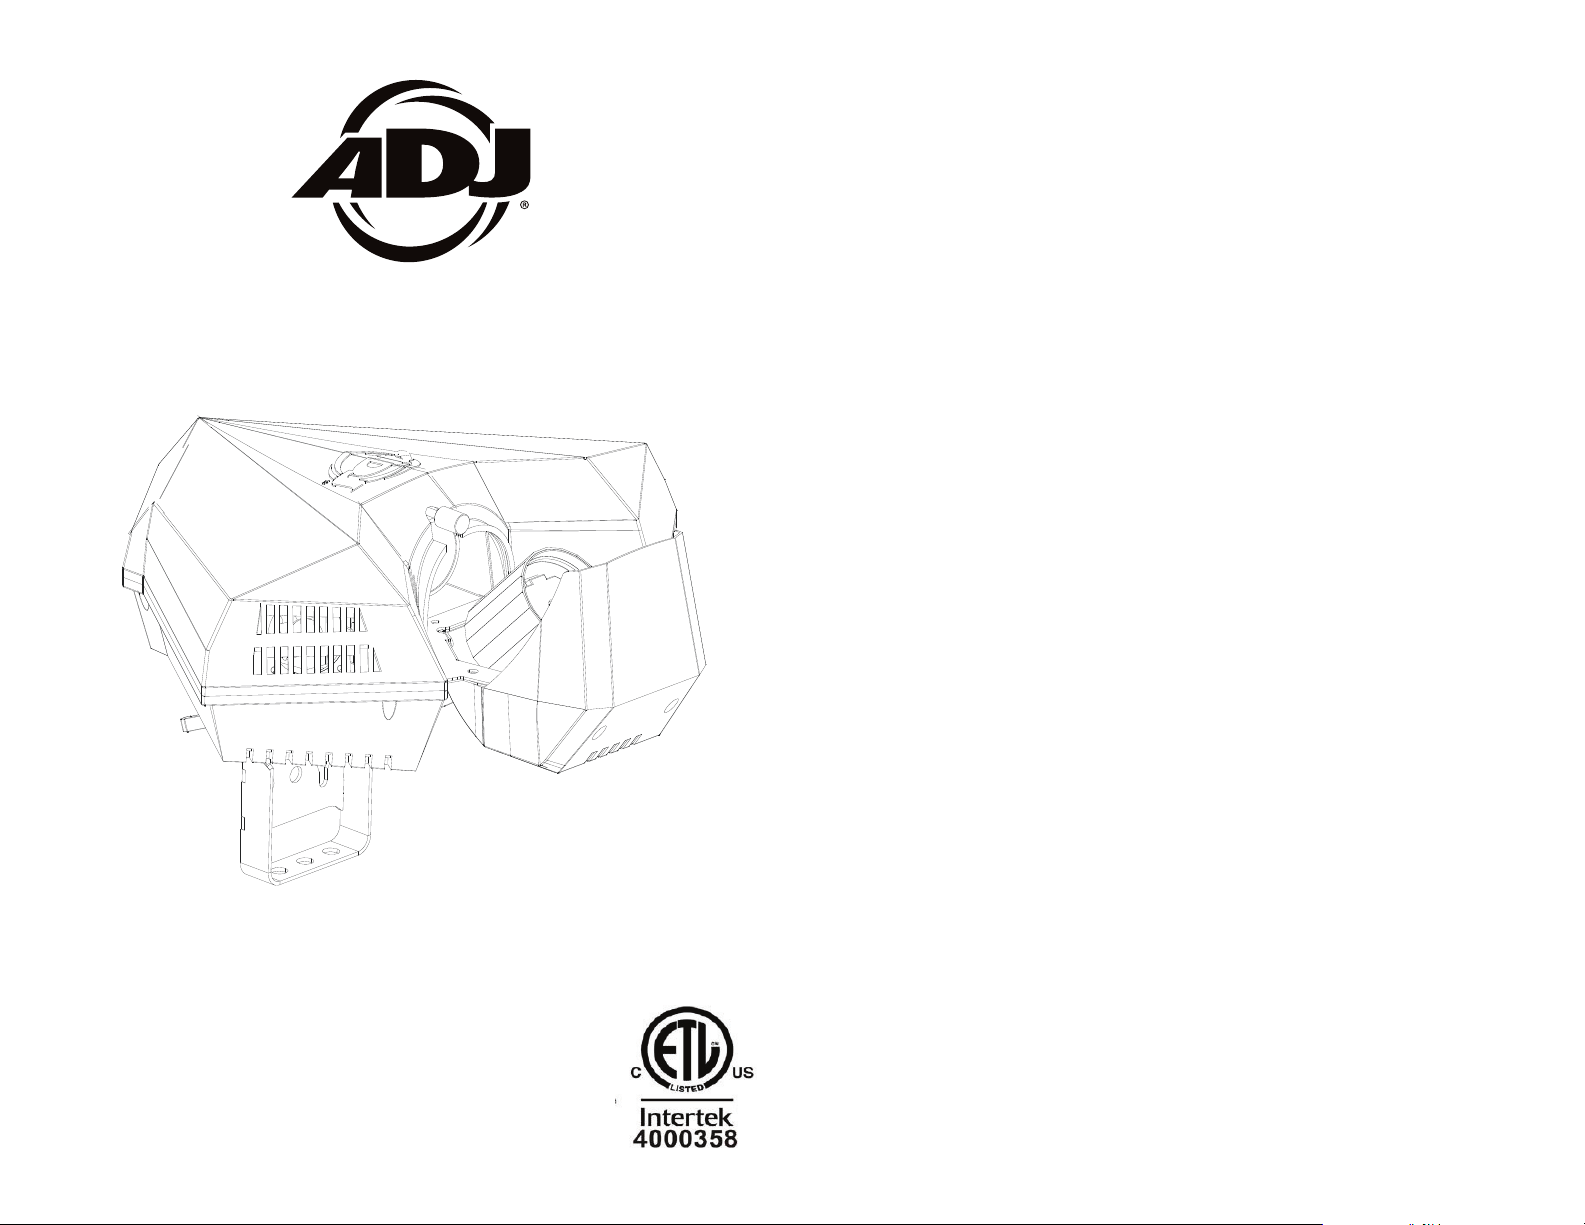
Warlock
©2015 ADJ Products, LLC all rights reserved. Information,
specications, diagrams, images, and instructions herein are
subject to change without notice. ADJ Products, LLC logo and
identifying product names and numbers herein are trademarks
of ADJ Products, LLC. Copyright protection claimed includes all
forms and matters of copyrightable materials and information
now allowed by statutory or judicial law or hereinafter granted.
Product names used in this document may be trademarks or
registered trademarks of their respective companies and are
hereby acknowledged. All non-ADJ Products, LLC brands and
product names are trademarks or registered trademarks of their
respective companies.
ADJ Products, LLC and all aliated companies hereby disclaim any and all liabilities for property, equipment, building,
and electrical damages, injuries to any persons, and direct or
indirect economic loss associated with the use or reliance of
any information contained within this document, and/or as a
result of the improper, unsafe, unsucient and negligent assembly, installation, rigging, and operation of this product.
2/15
User Instructions
Europe Energy Saving Notice
Energy Saving Matters (EuP 2009/125/EC)
Saving electric energy is a key to help protecting the enviroment.
Please turn o all electrical products when they are not in use. To
avoid power consumption in idle mode, disconnect all electrical
equipment from power when not in use. Thank you!
Page 2

Warlock General Information
Warlock General Instructions
Unpacking: Thank you for purchasing the Warlock by ADJ Products,
LLC. Every Warlock has been thoroughly tested and has been shipped
in perfect operating condition. Carefully check the shipping carton for
damage that may have occurred during shipping. If the carton appears
to be damaged, carefully inspect your xture for any damage and be
sure all equipment necessary to operate the unit has arrived intact. In
the event damage has been found or parts are missing, please contact
our toll free customer support number for further instructions. Please
do not return this unit to your dealer without contacting customer support rst.
Introduction: The Warlock is a DMX intelligent LED barrel roller. The
Warlock has three operating modes; sound active mode, show mode,
and DMX controlled. The Warlock has 8 DMX channels. The Warlock
can be set up as a stand alone fixture or in a Master/Slave configura-
tion. For best results use fog or special effects smoke to enhance the
beams projections.
Customer Support: ADJ Products, LLC provides a toll free cus-
tomer support line, to provide help and to answer any question should
you encounter problems during your set up or initial operation. You
may also visit us on the web at www.adj.com for any comments or
suggestions. Service Hours are Monday through Friday 8:00 a.m. to
4:30 p.m. Pacic Standard Time.
Voice: (800) 322-6337
Fax: (323) 582-2941
E-mail: [email protected]
To purchase parts online visit http://parts.americandj.com
Warning! To prevent or reduce the risk of electrical shock or re, do
not expose this unit to rain or moisture.
Warning! This may cause severe eye damage. Avoid looking directly
into the light source at all times!
To optimize the performance of this product, please read these
operating instructions carefully to familiarize yourself with the basic
operations of this unit. These instructions contain important safety
information regarding the use and maintenance of this unit. Please
keep this manual with the unit, for future reference.
Warlock Features
• 8 DMX Channels
• 3 Operating Modes - Sound Active, Show Mode, & DMX Control
• Internal Microphone
• Digital Display for Address and Function Setting
• 6 Preprogrammed Shows
• Power Cord Daisy Chain (See page 26)
• UC IR Compatiable (Sold Separately)
Warlock Warranty Registration
The Warlock carries a 2 year (730 days) limited warranty. Please fill
out the enclosed warranty card to validate your purchase and war-
ranty. You may also register your product online at www. americandj.
com. All returned service items whether under warranty or not, must
be freight pre-paid and accompany a return authorization (R.A.) number. If the unit is under warranty you must provide a copy of your
proof of purchase invoice. Please contact ADJ customer support for
a R.A. number.
Warlock Handling Precautions
Caution! There are no user serviceable parts inside this unit. Do not
attempt any repairs yourself, doing so will void your manufactures
warranty. In the unlikely event your unit may require service please
contact ADJ Products, LLC.
During operation the housing may become extremely hot. Avoid touching the unit with bare hands while in use.
ADJ Products, LLC will not accept any liability for any resulting damages caused by the non-observance of this manual or any unauthor-
ized modication to this unit.
ADJ Products, LLC - www.adj.com - Warlock Instruction Manual Page 3ADJ Products, LLC - www.adj.com - Warlock Instruction Manual Page 2
Page 3
Warlock Safety Precautions
Warlock Safety Precautions
For Your Own Personal Safety, Please Read and Understand This
Manual Completely Before You Attempt To Install Or Operate
This Unit!
• To reduce the risk of electrical shock or re, do not expose this unit
rain or moisture
• Do not spill water or other liquids into or on to your unit.
• Do not attempt to operate this unit if the power cord has been
frayed or broken.
• Do not attempt to remove or break o the ground prong from
the electrical cord. This prong is used to reduce the risk of electrical
shock and re in case of an internal short.
• Disconnect from main power before making any type of connection.
• Do not remove the cover under any conditions. There are no user
serviceable parts inside.
• Never operate this unit when it’s cover is removed.
• Always be sure to mount this unit in an area that will allow proper
ventilation. Allow about 6” (15cm) between this device and a wall.
• Do not attempt to operate this unit, if it becomes damaged.
• This unit is intended for indoor use only, use of this product out doors voids all warranties.
• Always mount this unit in safe and stable matter.
• Power-supply cords should be routed so that they are not likely to
be walked on or pinched by items placed upon or against them,
paying particular attention to cords at plugs, convenience recep tacles, and the point where they exit from the appliance.
• Cleaning -The fixture should be cleaned only as recommended by
the manufacturer. See page 27 for cleaning details.
• Heat -This fixture should be situated away from heat sources such
as radiators, heat registers, stoves, or other appliances (including
amplifiers) that produce heat.
• The fixture should be serviced by qualified service personnel when:
A. Objects have fallen, or liquid has been spilled into the appliance.
B. The appliance has been exposed to rain or water.
C. The appliance does not appear to operate normally or exhibits
a marked change in performance.
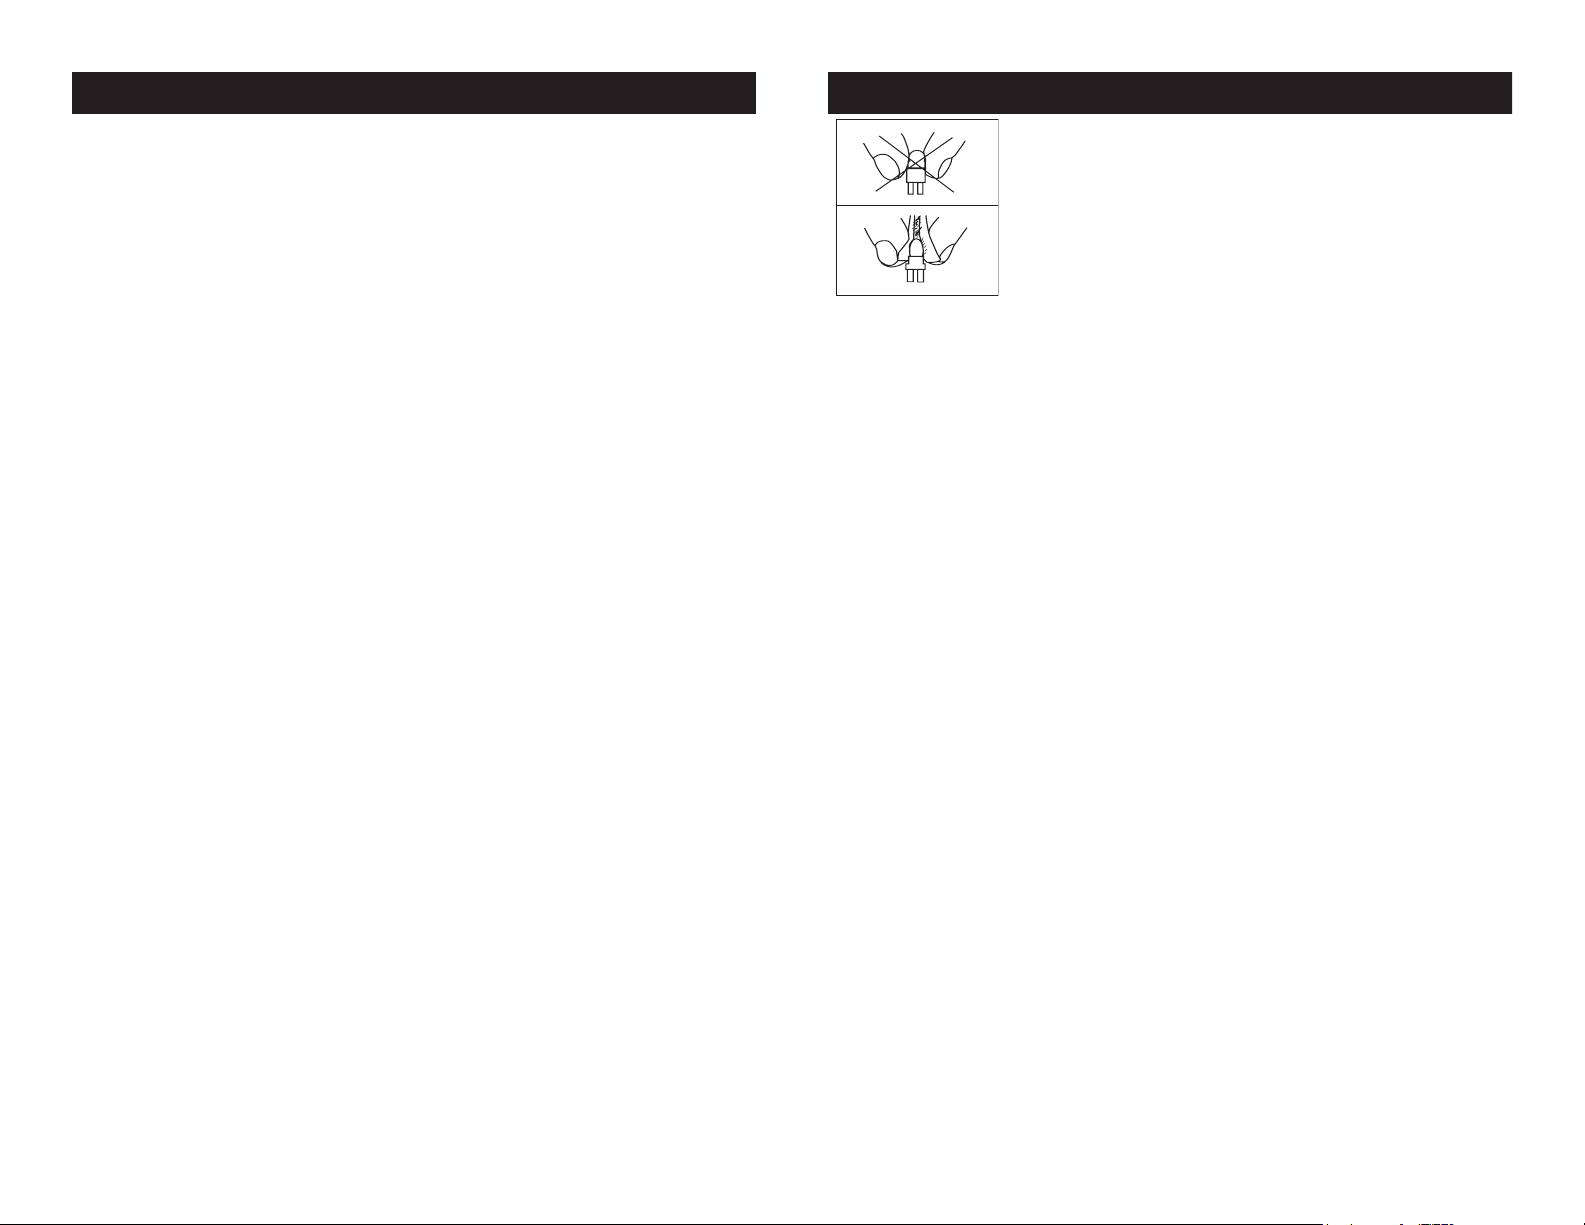
This fixture is fitted with a discharge lamp which is
highly susceptible to damage if improperly handled.
Never touch the lamp with your bare fingers as the
oil from your hands will shorten lamp life. Also, never
move the fixture until the lamps have had ample time
to cool. Remember, lamps are not covered under war-
ranty conditions.
This unit emits intense UV radiation which is harmful to the eyes and skin.
The intense luminance of the lamp can cause severe damage to the retina.
Never operate this unit without it’s covers, these covers have been specially
designed to shield against UV radiation.
Epileptic Warning: Those suering from epilepsy should avoid looking
directly into the lamp at all times.
Avoid switching the xture on and o repeatedly in short intervals as this will
reduce lamp life and intensity.
To achieve the intensity associated with discharge lamps, these lamps use
gas sealed in a high pressure environment to emit a brilliant output. Due to
the high pressure involved with the construction of the lamp, the lamp may
explode during prolonged extensive use. This risk is increased with age,
added care is encouraged when dealing with older lamps. Extreme caution
should be used when operating this or any xture tted with a gas discharge
lamp. Never open this unit while in use.
VERY IMPORTANT: This is for your safety and the life length of the unit.
The Philips® Platinum 2R Discharge lamp has lifetime of 6000 hours.
ADJ recommends periodically checking the lamp running time. See page 17
“Lamp Time”. When the lamp reaches the 6000 hour mark, or close to it, we
strongly suggest you switch the lamp out.
Clear the LAMP RUNNING TIME after you have replaced the lamp. See page
17 “Reset Lamp Time”
Warning: DO NOT use this lamp more then 6000 hours. Using the lamp
any longer then the set life could seriously damage your unit.
ADJ Products, LLC - www.adj.com - Warlock Instruction Manual Page 5ADJ Products, LLC - www.adj.com - Warlock Instruction Manual Page 4
Page 4
Warlock Mounting Warlock Mounting
When installing the unit, the trussing or area of installation must be
able to hold 10 times the weight without any deformation. When
installing the unit must be secured with a secondary safety attachment, e.g. and appropriate safety cable. Never stand directly below
the unit when mounting, removing, or servicing the unit.
Overhead mounting requires extensive experience, including calculating working load limits, installation material being used, and perodic
safety inspection of all installation material and unit. If you lack these
qualications, do not attempt the installation yourself.
These installaiton should be checked by a skilled person once a year.
NOTICE: The suitable enviromental temperature for this lighting xture is between -25˚ C to 45˚ C. Do not place this lighting
xture in an enviroment where the temperatures are under or
above the temperatures stated above. This will allow the xture
to run at its best and help prolong the xture life.
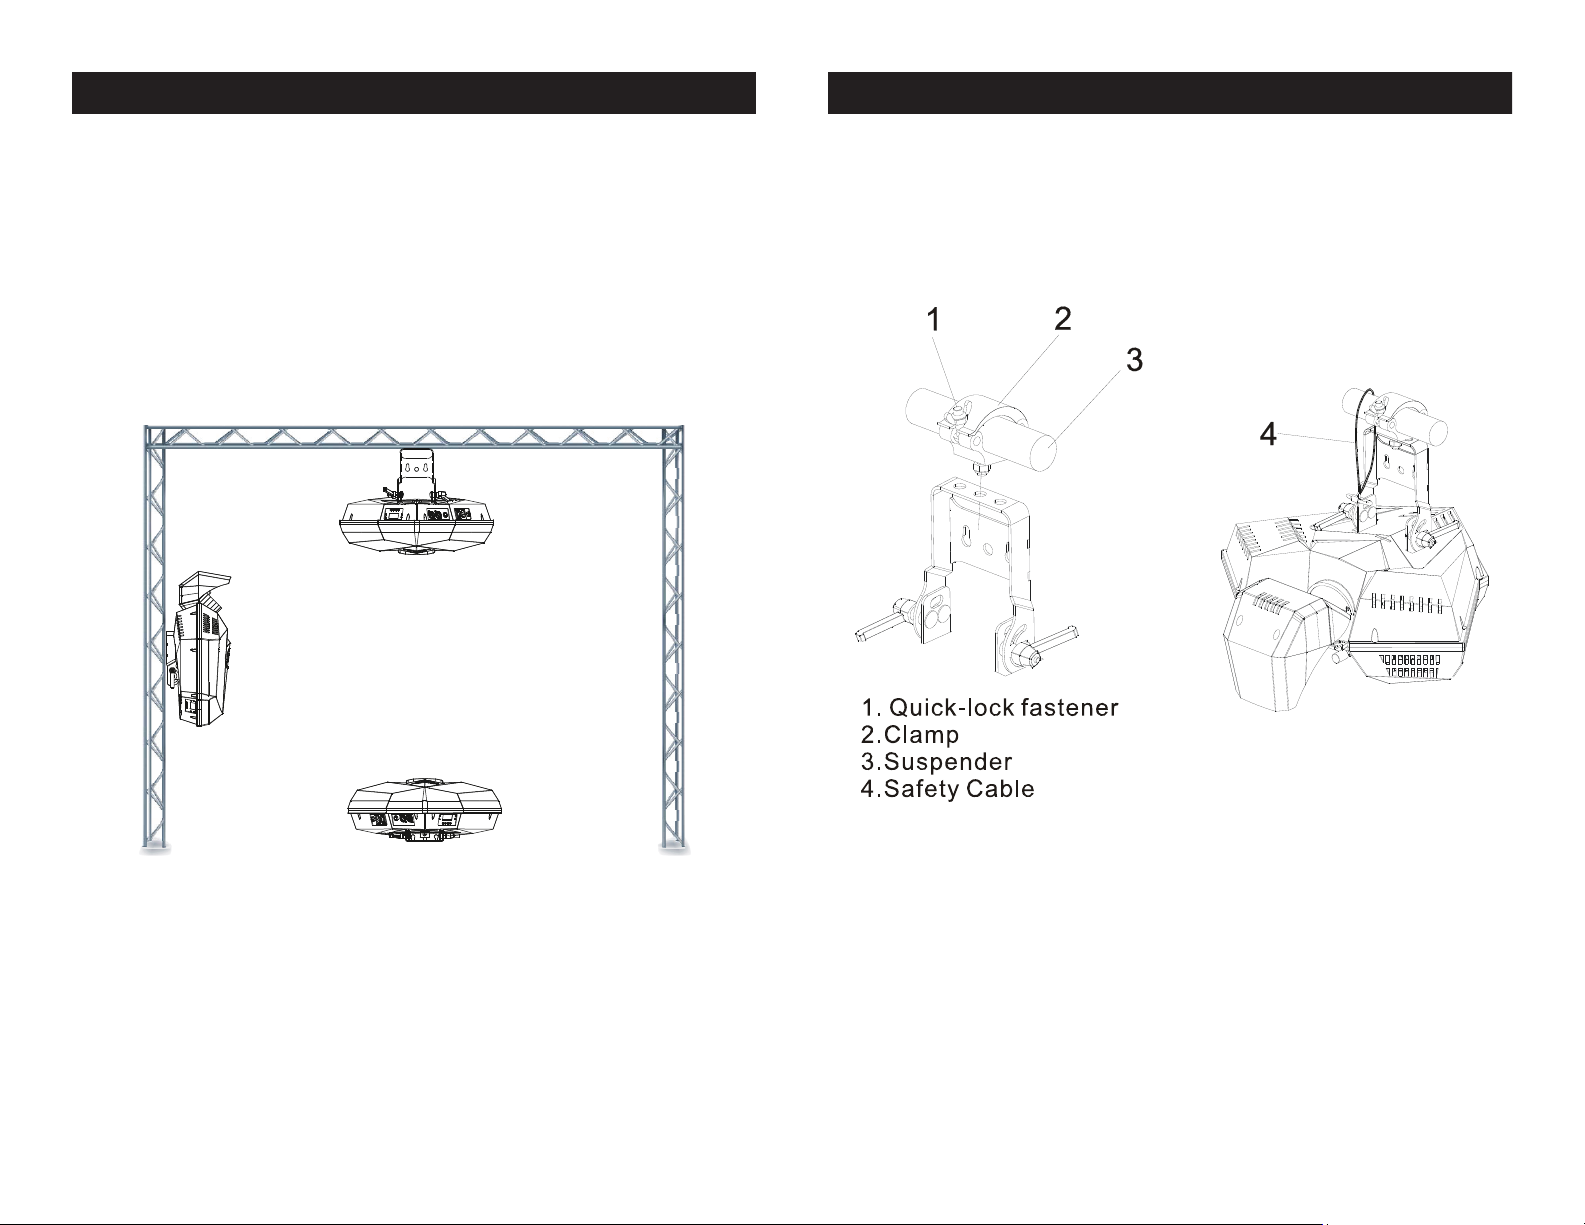
The Warlock is fully operational in three dierent mounting positions,
hanging upside-down from a ceiling, mounted sideways on trussing,
or set on a at level surface. Be sure this xture is kept at least 0.5m
away from any ammable materials (decoration etc.). Always use
and install the supplied safety cable as a safety measure to prevent
accidental damage and/or injury in the event the clamp fails (see next
page). Never use the carrying handles for secondary attachment.
ADJ Products, LLC - www.adj.com - Warlock Instruction Manual Page 6 ADJ Products, LLC - www.adj.com - Warlock Instruction Manual Page 7
Screw one clamp via a M12 screw and nut onto the supplied
mounting bracket. Pull the safety-cable through the hole on the
safety cable bracket that is attached to back of unit and over
the trussing system or a safe xation spot. Insert the end in the
carabine and tighten the safety screw.
Page 5
REMOTE
CONTROL
INPUT
POWER
INPUT OUTPUT
SOUND
REMOTE
CONTROL
INPUT
POWER
INPUT OUTPUT
SOUND
REMOTE
CONTROL
INPUT
POWER
INPUT OUTPUT
DMX512
DMX+,DMX-,COMMON
1
2
3
Termination reduces signal errors and
avoids signal transmission problems
and interference. It is always advisable
to connect a DMX terminal, (Resistance
120 Ohm 1/4 W) between PIN 2 (DMX-)
and PIN 3 (DMX +) of the last fixture.
POWER
SOUND
REMOTE
CONTROL
INPUT
POWER
INPUT OUTPUT
and PIN 3 (DMX +) of the last fixture.
Warlock Set Up
Warlock Set Up
Power Supply: The ADJ Warlock contains an electronic ballast,
which will auto sense the voltage when it is plugged into a power
source. With this switch there is no need to worry about the correct
power voltage, this unit can be plugged in anywhere.
DMX-512: DMX is short for Digital Multiplex. This is a universal pro-
tocol used by most lighting and controller manufactures as a form of
communication between intelligent fixtures and controllers. A DMX
controller sends DMX data instructions from the controller to the fixture. DMX data is sent as serial data that travels from fixture to fixture
via the DATA “IN” and DATA “OUT” XLR terminals located on all DMX
fixtures (most controllers only have a DATA “OUT” terminal).
DMX Linking: DMX is a language allowing all makes and models
of dierent manufactures to be linked together and operate from a
single controller, as long as all xtures and the controller are DMX
compliant. To ensure proper DMX data transmission, when using
several DMX fixtures try to use the shortest cable path possible. The
order in which fixtures are connected in a DMX line does not influence
the DMX addressing. For example; a fixture assigned a DMX address
of 1 may be placed anywhere in a DMX line, at the beginning, at the
end, or anywhere in the middle. Therefore, the first fixture controlled
by the controller could be the last fixture in the chain. When a fixture
is assigned a DMX address of 1, the DMX controller knows to send
DATA assigned to address 1 to that unit, no matter where it is located
in the DMX chain.
Data Cable (DMX Cable) Requirements (For DMX and Master/Slave
Operation): The Warlock can be controlled via DMX-512 protocol.
The Warlock has 8 DMX channels. The DMX address is set electronically using the controls on the rear side panel of the unit. Your unit
and your DMX controller require a approved DMX-512 110 Ohm Data
cable for data input and data output (Figure 1). We
recommend Accu-Cable DMX cables. If you are
making your own cables, be sure to use standard
110-120 Ohm shielded cable (This cable may be
purchased at almost all professional sound and
lighting stores). Your cables should be made with
a male and female XLR connector on either end of
the cable. Also remember that DMX cable must be
Figure 1
daisy chained and cannot be split.
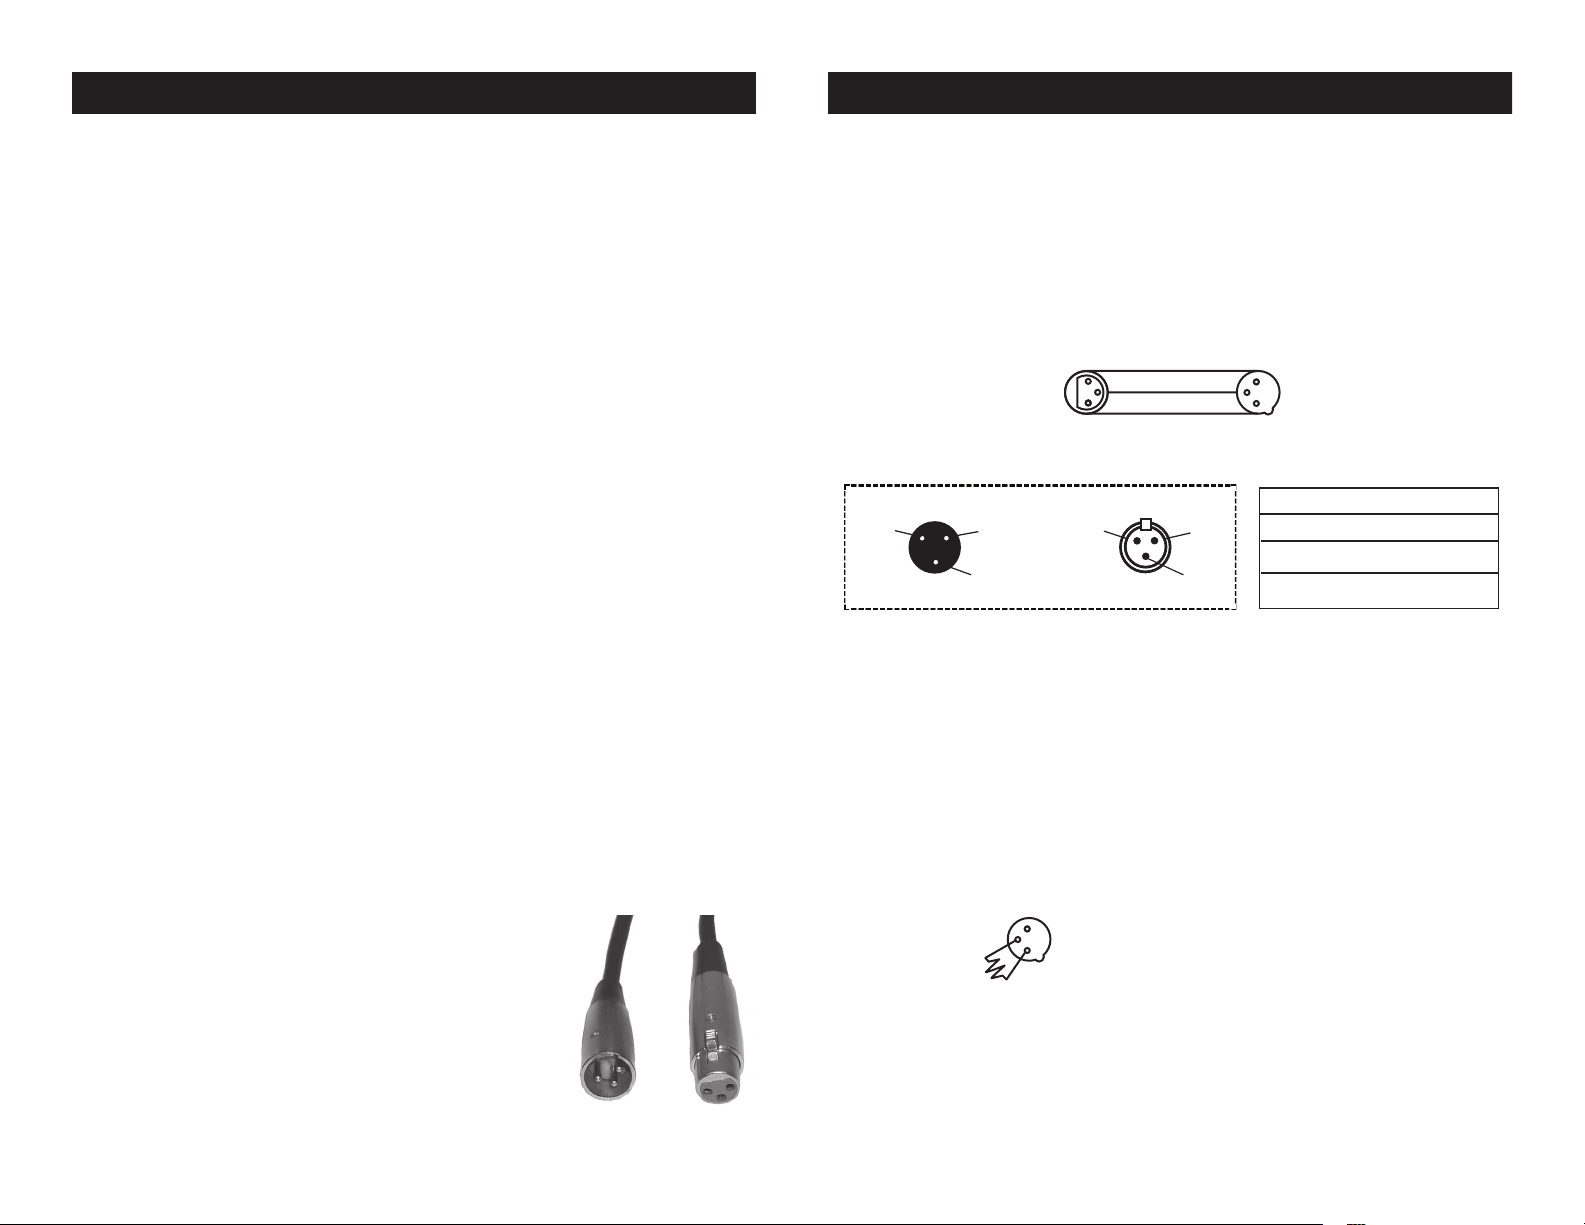
Notice: Be sure to follow gures two and three when making your own
cables. Do not use the ground lug on the XLR connector. Do not connect the cable’s shield conductor to the ground lug or allow the shield
conductor to come in contact with the XLR’s outer casing. Grounding
the shield could cause a short circuit and erratic behavior.
COMMON
1
DMX512 IN
3
3-PIN XLR
2
Figure 2
XLR Pin Conguration
Pin 1 = Ground
Pin 2 = Data Compliment (negative)
Pin 3 = Data True (positive)
Figure 4
XLR Male Socket
1 Ground
DMX512 OT
3-PIN XLR
2 Cold
3 Hot
1
3
2
XLR Female Socket
2 Cold
DMX +
DMX -
1 Ground
3 Hot
Figure 3
Special Note: Line Termination.
When longer runs of cable are
used, you may need to use a terminator on the last unit to avoid erratic
behavior. A terminator is a 110-120 ohm 1/4 watt resistor which is connected between pins 2 and 3 of a male XLR connector (DATA + and
DATA -). This unit is inserted in the female XLR connector of the last
unit in your daisy chain to terminate the line. Using a cable terminator
(ADJ part number Z-DMX/T) will decrease the possibilities of erratic
behavior.
Termination reduces signal errors and
1
avoids signal transmission problems
ADJ Products, LLC - www.adj.com - Warlock Instruction Manual Page 9ADJ Products, LLC - www.adj.com - Warlock Instruction Manual Page 8
3
and interference. It is always advisable
2
to connect a DMX terminal, (Resistance
120 Ohm 1/4 W) between PIN 2 (DMX-)
Page 6
Warlock Set Up
Warlock System Menu
5-Pin XLR DMX Connectors.
Some manufactures use 5-pin DMX-
512 data cables for DATA transmission in place of 3-pin. 5-pin DMX
xtures may be implemented in a 3-pin DMX line. When inserting standard 5-pin data cables in to a 3-pin line a cable adaptor must be used,
these adaptors are readily available at most electric stores. The chart
below details a proper cable conversion.
3-Pin XLR to 5-Pin XLR Conversion
Conductor 5-Pin XLR Male (In)3-Pin XLR Female (Out)
Ground/Shield
Data Compliment (- signal)
Data True (+ signal)
Not Used
Not Used
Pin 1
Pin 2
Pin 3
Pin 1
Pin 2
Pin 3
Pin 4 - Do Not Use
Pin 5 - Do Not Use
ADJ Products, LLC - www.adj.com - Warlock Instruction Manual Page 10
ADJ Products, LLC - www.adj.com - Warlock Instruction Manual Page 11
Page 7

Warlock System Menu
Warlock System Menu
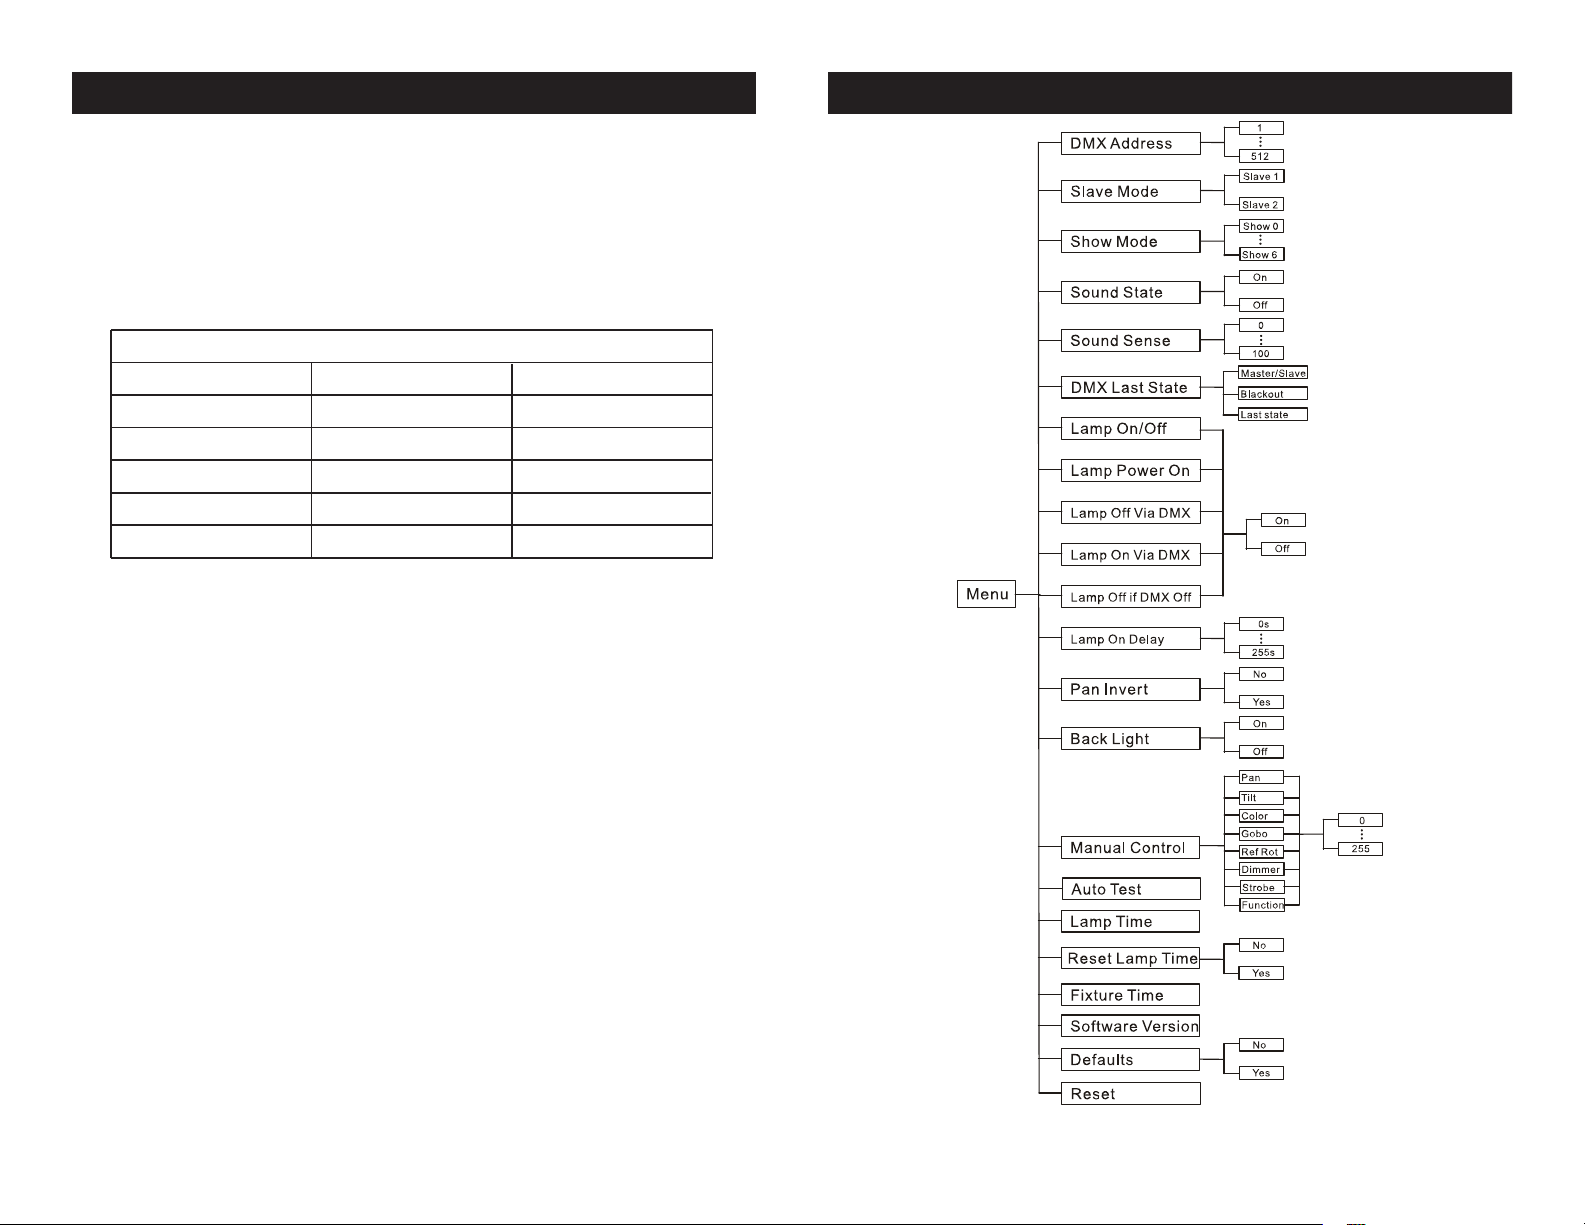
System Menu: When making adjustments press ENTER to
conrm your setup then press and hold the MENU button
for at least 3 seconds. To exit without making any adjust-
ments press the MENU button. The display will lock after 30
seconds, press the MENU button for 3 seconds to unlock.
DMX Address - Set the DMX Address -
1. Press the MENU button until “DMX Addresss” is displayed,
press ENTER.
2. “X” will now be displayed, “X” represents the displayed
address. Press the UP or DOWN buttons to nd your desired
address.
3. Press ENTER to conrm, and then press and hold the MENU
button for at least three seconds to assign.
Slave Mode - This will let you set unit as a master or
slave in a master/slave conguration.
1. Press the MENU button until “Slave Mode” is displayed,
press ENTER. Either “Slave 1” or “Slave 2” will be displayed.
2. Press the UP or DOWN buttons until your desired setting is
displayed, then press ENTER to conm.
0” is random mode. Press the UP or DOWN buttons to nd your
desired show and press ENTER to select your show.
Sound State - In this mode the unit will run in sound
active mode.
1. Press the MENU button until “Sound State” is displayed, press
ENTER.
2. Either “On” or “O” will now be displayed. Use the UP or
DOWN buttons to toggle between “On” and “O”.
3. Press ENTER to conrm your selection, the press and hold the
MENU button to activate.
Sound Sense - In this mode you can adjust the sound
sensitivity of the sound active mode.
1. Press the MENU button until “Sound Sense” is displayed,
press ENTER.
2. Press the UP or DOWN buttons to adjust the sensitivity level.
The sensitivity level can be adjusted between 0 (the lowest) and
100 (most sensitive).
3. Press ENTER to set you desired level.
NOTE: In a Master/Slave conguration you can make one
xture the Master and then set the next xture to “Slave 2”, the
xtures will now have contrast movement to each other.
Show Mode - Show modes 0 - 6 (Factory Shows).
1. Press the MENU button until “Show Mode” is displayed, press
ENTER.
2. “Show X” will now be displayed, “X” representing a number
between 0-6. Programs 1-6 are factory programs, while “Show
ADJ Products, LLC - www.adj.com - Warlock Instruction Manual Page 12 ADJ Products, LLC - www.adj.com - Warlock Instruction Manual Page 13
DMX Last State - This mode can be used as a precau-
tion mode, that in case the DMX signal is lost, the operating
mode chosen in the setup is the running mode the xture
will go into when the DMX signal is lost. You can also set
this as the operating mode you would like the unit to return
to when power is applied.
1. Press the MENU button until “DMX State” is displayed, press
ENTER.
2. Either “Master/Slave”, “Blackout”, or “Last State” will be dis-
Page 8

Warlock System Menu
Warlock System Menu
played. Choose an operating mode you would like the unit to
start up in when power is applied or the DMX signal is lost.
• Master/Slave - If the DMX signal is lost or power is applied, the
unit will automatically go into Master Slave mode.
• Blackout - If the DMX signal is lost or power is applied, the unit
will automatically go into stand by mode.
• Last State - If the DMX signal is lost the xture will stay in the
last DMX set up. If power is applied and this mode is set, the unit
will automatically go into the last DMX set up.
3. Press ENTER to conrm your desired set up.
Lamp On/O - With this function you can turn the lamp
on or off via the control panel.
1. Press the MENU button until “Lamp On/O” is displayed,
press ENTER.
2. Either “ON” or “OFF” will now be displayed. Press the UP or
DOWN buttons to select “ON” to turn the lamp on, or “OFF” to
shut the lamp o.
Lamp O Via DMX - With this function you can turn
the lamp off using a DMX controller.
1. Press the MENU button until “Lamp O Via DMX” is displayed,
press ENTER.
2. Either “ON” or “OFF” will now be displayed. Press the UP or
DOWN buttons to select “ON” to turn the lamp on, or “OFF” to
shut the lamp o.
3. Press ENTER to conrm.
Lamp On Via DMX - With this function you can turn
the lamp on using a DMX controller.
1. Press the MENU button until “Lamp On Via DMX” is displayed,
press ENTER.
2. Either “ON” or “OFF” will now be displayed. Press the UP or
DOWN buttons to select “ON” to turn the lamp on, or “OFF” to
shut the lamp o.
3. Press ENTER to conrm.
3. Press ENTER to conrm.
Lamp Power On - With this function you can turn the
lamp on or off via the control panel.
1. Press the MENU button until “Lamp Power On” is displayed,
press ENTER.
2. Either “ON” or “OFF” will now be displayed. Press the UP or
DOWN buttons to select “ON” to turn the lamp on, or “OFF” to
shut the lamp o.
3. Press ENTER to conrm.
Lamp O if DMX OFF - With this function the lamp
will turn off if the DMX signal is missing.
1. Press the MENU button until “Lamp O if DMX OFF” is displayed, press ENTER.
2. Either “ON” or “OFF” will now be displayed. Press the UP or
DOWN buttons to select “ON” to turn the lamp on, or “OFF” to
shut the lamp o.
3. Press ENTER to conrm.
ADJ Products, LLC - www.adj.com - Warlock Instruction Manual Page 15ADJ Products, LLC - www.adj.com - Warlock Instruction Manual Page 14
Page 9

Warlock System Menu
Warlock System Menu
Lamp On Delay - With this function you set a delay
time for the lamp to light.
1. Press the MENU button until “Lamp On Delay” is displayed,
press ENTER.
2. A number between 0s-255s will be displayed. Use the UP and
DOWN buttons to adjust the delay time to your desire.
3. Press ENTER to conrm.
Pan Invert - Pan Inversion
1. Press the MENU button until “Pan Invert” is displayed, press
ENTER. Either “Yes” or “No” will be displayed.
2. To activate the Pan inversion press the UP or DOWN buttons
until “Yes” is displayed, press ENTER to conm. To deactivate
Pan inversion, select “No” and press Enter.
Back Light - With this function you can make the back-
light automatically turn off after one minute.
1. Press the MENU button until “Back Light” is displayed, press
ENTER.
2. Either “ON” or “OFF” will now be displayed. Press the UP or
DOWN buttons to select “ON” to keep the backlight on at all
times, or “OFF” to allow the backlight to turn o after 2 minutes.
Press any button to turn the backlight on again.
3. Press ENTER to conrm.
2. The xture will now run a self test. Press the MENU button to
exit.
Manual Control - With this function you can manually
test the individual features.
1. Press the MENU button until “Manual Contol” is displayed,
press ENTER.
2. Use the UP or DOWN buttons to nd the functions that you
wish to test.
3. Once you nd a function you wish to test, press the ENTER
button, the displayed value will begin to ash. You can now
adjust the values by pressing the UP and DOWN buttons. Once
you have nished testing press the ENTER button.
4. To exit the manual test mode, press the MENU button.
Lamp Time - With this function you can check the lamp
running time.
1. Press the MENU button until “Lamp Time” is displayed, press
ENTER.
2. The current lamp running time will now be displayed, press the
MENU button to exit.
Reset Lamp Time - With this function you can clear
the lamp running time. This should be done everytime you
change out the lamp.
Auto Test - This function will run a self test program.
1. Press the MENU button until “Auto Test” is displayed, press
ENTER.
ADJ Products, LLC - www.adj.com - Warlock Instruction Manual Page 16 ADJ Products, LLC - www.adj.com - Warlock Instruction Manual Page 17
1. Press the MENU button until “Rest Lamp Time” is displayed,
press ENTER.
2. Press the UP or DOWN buttons so that “Yes” is displayed and
press ENTER to clear the lamp running time.
Page 10
Warlock System Menu
Fixture Time - With this function you can display the
running time of the unit.
1. Press the MENU button until “Function Hours” is displayed,
press ENTER.
2. The running time of the xture will now be displayed. Press
MENU to exit.
Software Version - This will display the software ver-
sion.
1. Tap the MENU button until “Software Version” is displayed.
Press the ENTER button and the software vesion will be dis-
played.
2. Press the MENU button to leave this function.
Defaults - This will reset the unit to its default settings.
1. Tap the MENU button until “Defaults” is displayed. Press the
ENTER button and either “Yes” or “No” will be displayed.
2. Press the UP or DOWN buttons to so that either “Yes” (reset
to default) or “No” (do not reset to default) and press ENTER to
conrm.
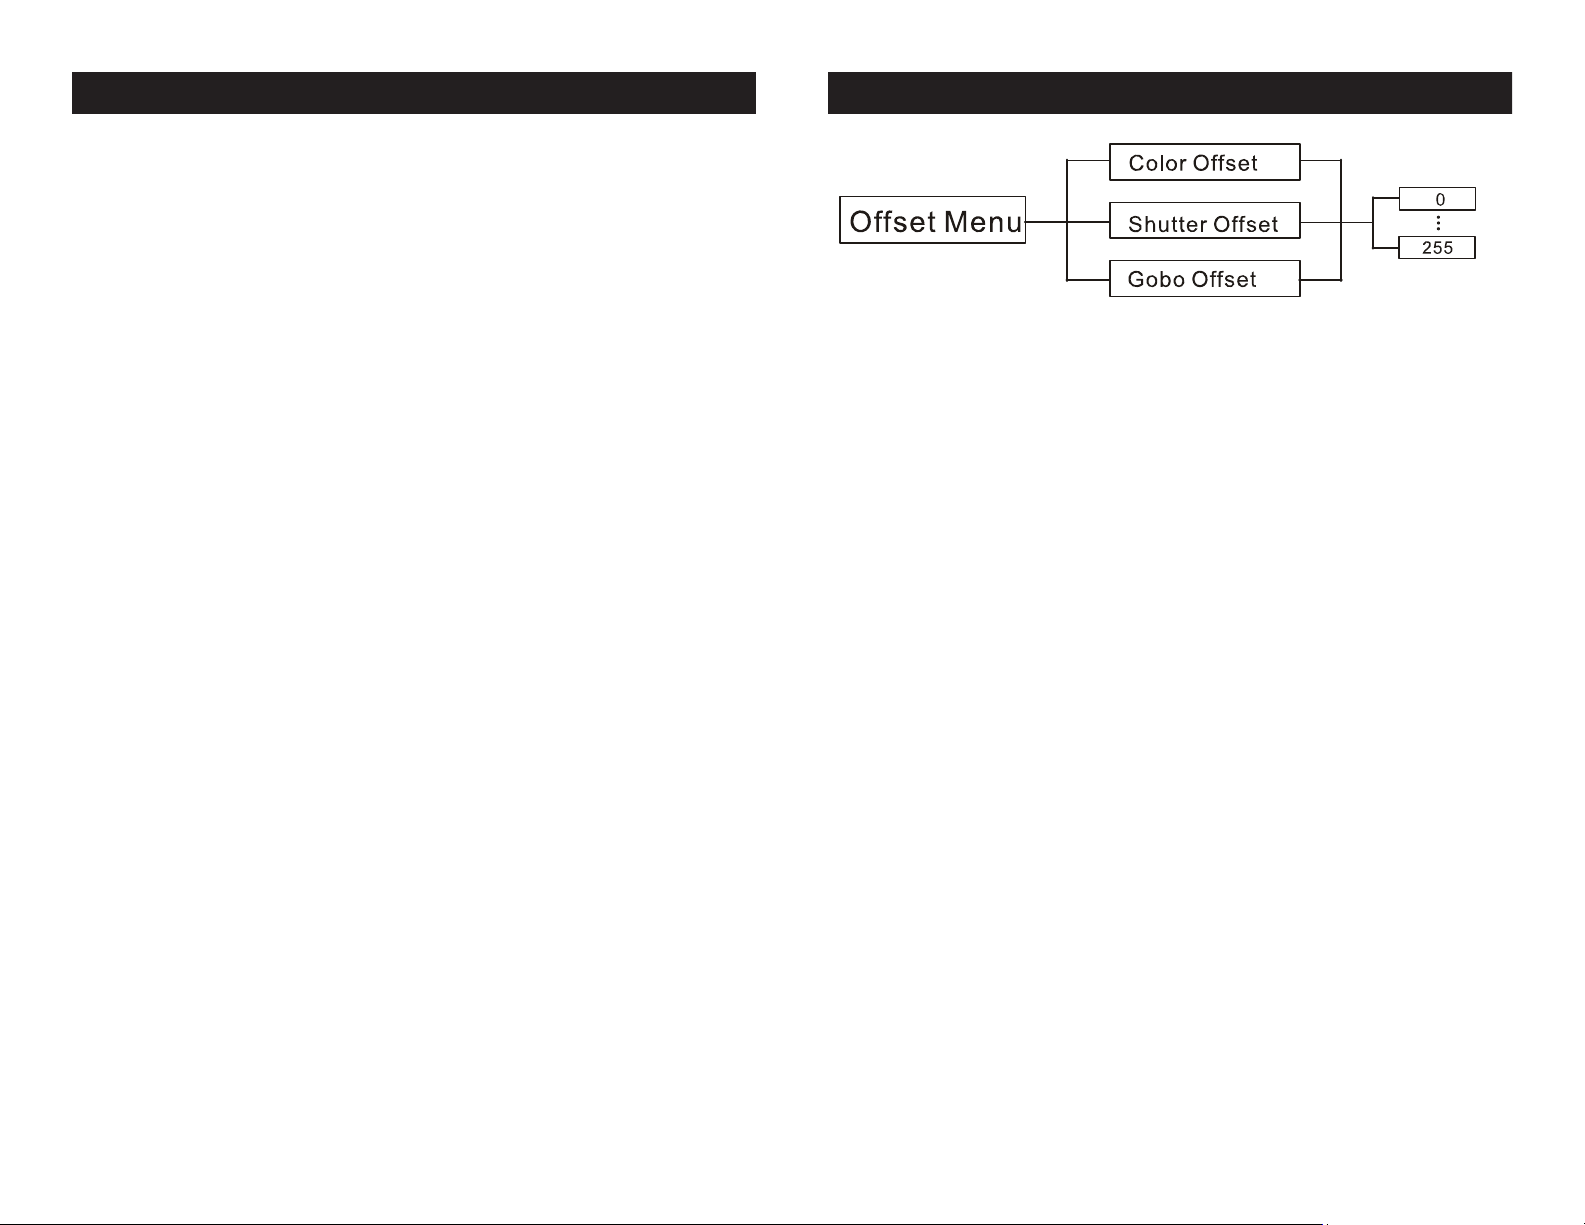
Warlock Offset Adjustment Menu
To enter the oset adjustment submenu, press the ENTER button for
at least 5 seconds. In this submenu you are able to adjust the original
position of the gobo wheel, shutter, and color wheel.
Color Oset - Adjustment of the color wheel.
1. Press the ENTER button for at least 5 seconds, then press the UP
or DOWN buttons so that “Color Oset” is displayed, press ENTER.
2. Use the UP and DOWN buttons to make your adjustments, and
then press ENTER to conrm. Press the MENU button for one second
to exit.
Shutter Oset - Adjustment of the shutter.
1. Press the ENTER button for at least 5 seconds, then press the UP
or DOWN buttons so that “Shutter Oset” is displayed, press ENTER.
2. Use the UP and DOWN buttons to make your adjustments, and
then press ENTER to conrm. Press the MENU button for one second
to exit.
Restart - Use this function to reset the unit.
1. Tap the MENU button until “Restart” is displayed, press
ENTER.
2. The xture will now reset.
ADJ Products, LLC - www.adj.com - Warlock Instruction Manual Page 18 ADJ Products, LLC - www.adj.com - Warlock Instruction Manual Page 19
Gobo Oset - Adjustment of the gobo wheel.
1. Press the ENTER button for at least 5 seconds, then press the UP
or DOWN buttons so that “Gobo Oset” is displayed, press ENTER.
2. Use the UP and DOWN buttons to make your adjustments, and
then press ENTER to conrm. Press the MENU button for one second
to exit.
Page 11

Warlock Operation
Warlock Operation
Operating Modes: The Warlock can operate in three different
modes. In each mode you can run the fixture as a stand alone
fixture or in a master/slave confiugration.
• Sound Active mode -
The fixture will react to sound, chasing through the built-in programs.
• Show mode -
The fixture will run one of 6 shows.
• DMX control mode -
This function will allow you to control each individual fixtures traits
with a standard DMX-512 controller.
Universal DMX Control: This function allows you to use a univer-
sal DMX-512 controller to control the pan/tilt, colors, gobos, reflector,
strobe and master dimmer. A DMX controller allows you to create
unique programs tailored to your individual needs.
1. The Warlock has 8 DMX channels. See pages 23-25 for detailed
description of the DMX values, and traits.
2. To control your fixture in DMX mode, follow the set-up procedures
on pages 8-10 as well as the set-up specifications that are includ ed with your DMX controller.
3. Use your DMX controller’s faders to control the various DMX fix ture traits.
4. Follow the instructions on page 12 to set your DMX address.
5. For longer cable runs (more than a 100 feet) use a terminator on
the last fixture.
6. For help operating in DMX mode consult the manual included
with your DMX controller.
Sound Active Mode: This mode allows either a single unit or several
units linked together, to run to the beat of the music.
1. Press the MENU button until “Sound State” is displayed, and
press ENTER. Press the UP or DOWN buttons so that “ON” is dis played and press ENTER.
2. To adjust the sound sensitivity level press the MENU button until
“Sound Sense” is displayed, and press ENTER. Use the UP or
DOWN buttons to adjust the sensitivity level, “0” being least sen sitive, “100” being the most sensitive. Press ENTER to set your
level.
Show Mode: This mode allows either a single unit or several units
linked together, to run one of 6 shows that you choose. Show mode
can run with or without sound active mode.
1. Press the MENU button until “Show Mode” is displayed, and
press ENTER.
2. Press the UP or DOWN buttons until you nd your desired show,
and press ENTER, then press and hold the MENU button for at
least 3 seconds to activate. After you have set your desired show
show, it can be changed at any time using the UP or DOWN but-
tons.
Warlock Master-Slave Set Up
Master-Slave Conguration This function will allow you to link up
to 16 units together and operate without a controller. The units will be
sound activated. In a Master-Slave set up one unit will act as the controlling unit and the others will react to the controlling units programs.
Any unit can act as a Master or as a Slave.
1. Using approved DMX data cables, daisy chain your units togeth-
er via the XLR connector on the rear of the units. Remember the
Male XLR connector is the input and the Female XLR connector
is the output. The rst unit in the chain (master) will use the female
XLR connector only - The last unit in the chain will use the male
XLR connector only. For longer cable runs we suggest a termina tor at the last fixture.
2. Set your “Master” unit to your desired operating mode.
4. On the “Slave units” press the MENU button until “Slave Mode”
is displayed, and press ENTER. Choose either “Slave 1” or
“Slave 2” and press ENTER. See page 12 for more info.
5. The slave units will now follow the Master unit.
ADJ Products, LLC - www.adj.com - Warlock Instruction Manual Page 20 ADJ Products, LLC - www.adj.com - Warlock Instruction Manual Page 21
Page 12
Warlock UC IR Remote Control
Warlock DMX Traits & Values
The optional UC-IR infrared remote (sold separately) has many differnet functions and gives you complete control of your Warlock. To
control the your desired fixture you must aim the controller at the
front of the fixture and be no more the 30 feet away.
STAND BY - Pressing this button will blackout the fixture.
FULL ON - Press and hold this button to show full intensity. When
this button is released the intensity will return to normal
FADE/GOBO - Press this button and then use buttons 1-9 to select
the 1 of 9 gobos. To select gobo 10, press the FADE/GOBO button
twice. To select gobo 11, press button #1 twice. To select gobo 12,
press button #2 twice.
COLOR - Press this button and then use buttons 1-9 to select the 1
of 9 colors. To select color 10, press the COLOR button twice. To select color 11, press button #1 twice. To select color 12, press button
#2 twice.
STROBE - Press this button for synchronous strobe, asynchronous,
and sound active strobe.
SOUND ON & OFF - These buttons activate and deactivate the
sound active mode.
SHOW 0 - Press this button to activate show mode. Use buttons 0-6
to select your desired show. Show 0 is random show.
“DIMMER +” and “DIMMER -” - These buttons are used to adjust
the output intensity.
ADJ Products, LLC - www.adj.com - Warlock Instruction Manual Page 22 ADJ Products, LLC - www.adj.com - Warlock Instruction Manual Page 23
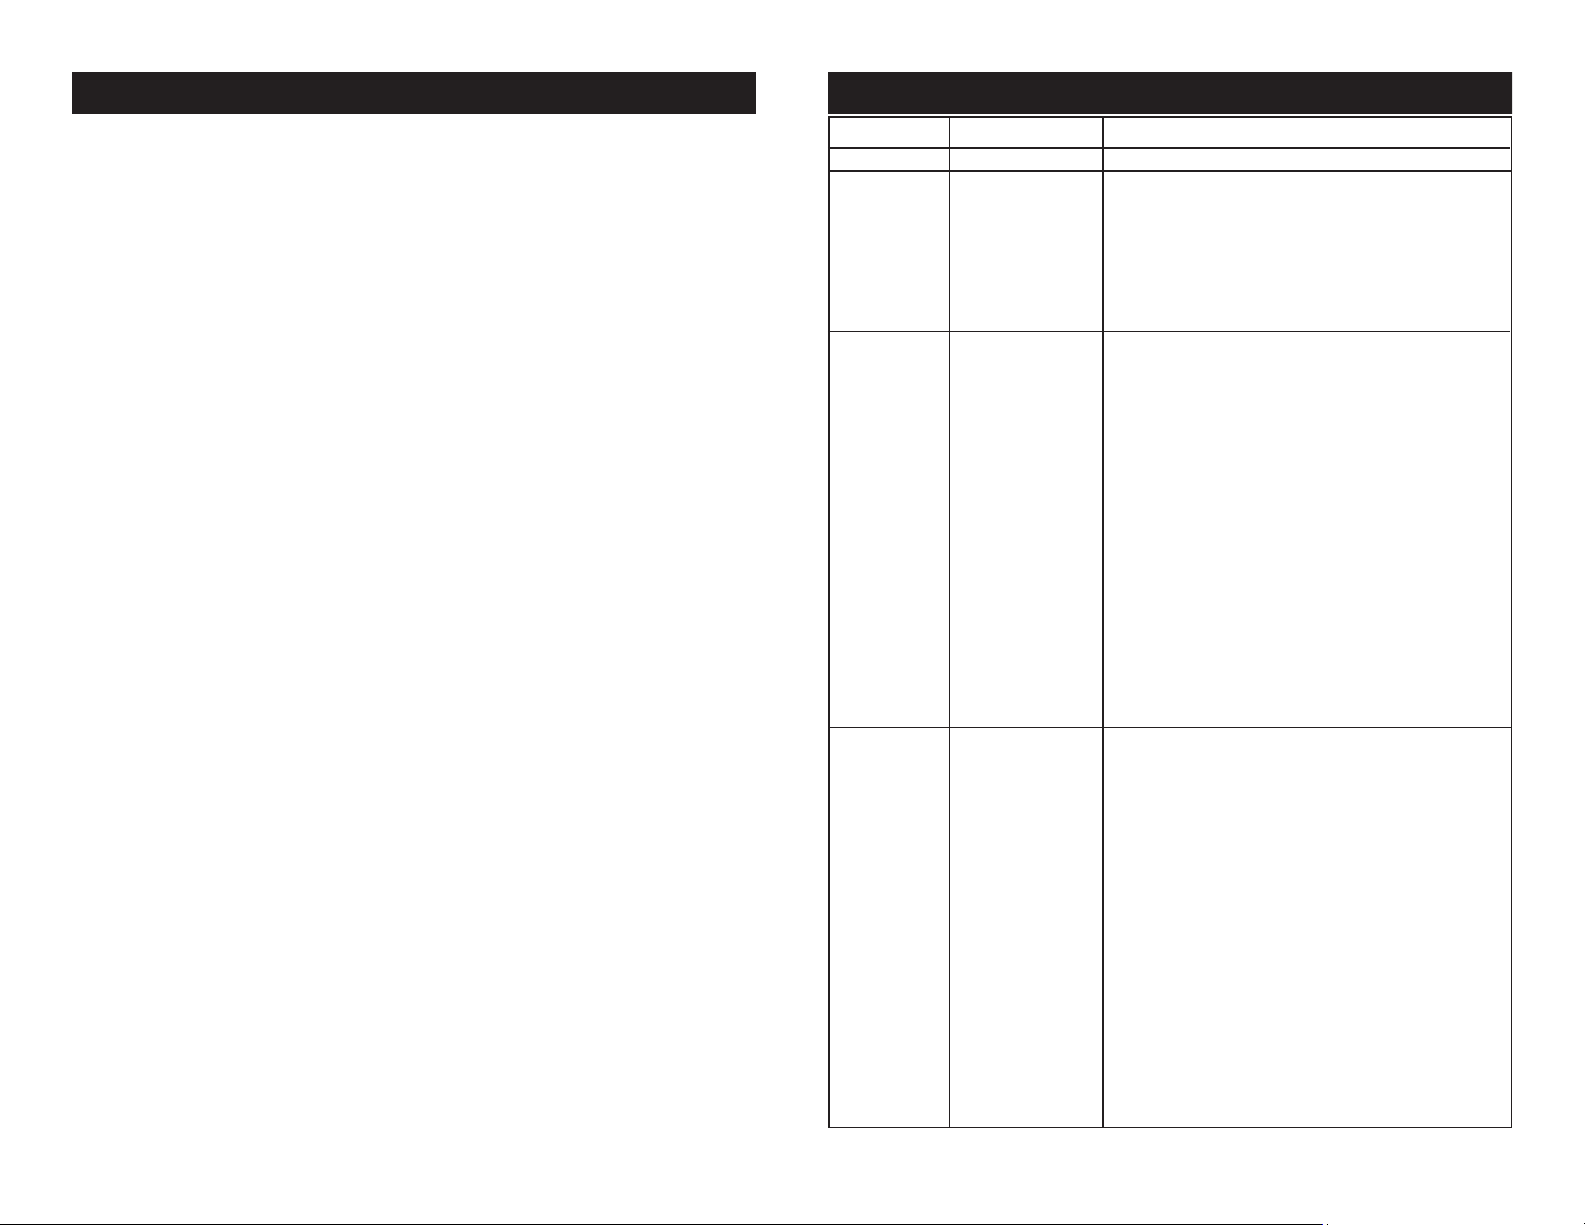
Channel Value Function
1 0 - 255 PAN
2 TILT
0 - 9 STOP
10 - 120 CLOCKWISE FAST - SLOW
121 - 134 STOP
135 - 245 COUNTER CLOCKWISE FAST - SLOW
246 - 255 STOP
3 COLORS
0 - 8 WHITE
9 - 17 RED
18 - 26 BLUE
27 - 35 GREEN
36 - 44 CLAY
45 - 53 ORANGE
54 - 62 MAGENTA
63 - 71 AQUA
72 - 80 LIGHT PURPLE
81 - 89 PINK
90 - 98 YELLOW
99 - 107 PURPLE
108 - 127 UV
128 - 255 RAINBOW EFFECT SLOW - FAST
3 *COLORS*
0 - 8 WHITE - RED
9 RED
10 - 17 RED - BLUE
18 BLUE
19 - 26 BLUE - GREEN
27 GREEN
28 - 35 GREEN - CLAY
36 CLAY
37 - 44 CLAY - ORANGE
45 ORANGE
46 - 53 ORANGE - MAGENTA
54 MAGENTA
55 - 62 MAGENTA - AQUA
63 AQUA
Page 13

Warlock DMX Traits & Values
Warlock DMX Traits & Values
Channel Value Function
3 *COLORS*
64 - 71 AQUA - LIGHT PURPLE
72 LIGHT PURPLE
73 - 80 LIGHT PURPLE - PINK
81 PINK
82 - 89 PINK - YELLOW
90 YELLOW
91 - 98 YELLOW - PURPLE
99 PURPLE
100 - 107 PURPLE - UV
108 - 127 UV
128 - 255 RAINBOW EFFECT SLOW - FAST
4 GOBOS
0 - 4 OPEN
5 - 9 GOBO 1
10 - 14 GOBO 2
15 - 19 GOBO 3
20 - 24 GOBO 4
25 - 29 GOBO 5
30 - 34 GOBO 6
35 - 39 GOBO 7
40 - 44 GOBO 8
45 - 49 GOBO 9
50 - 54 GOBO 10
55 - 59 GOBO 11
60 - 64 GOBO 12
65 - 127 GOBO ANIMATION
128 - 255 GOBO WHEEL ROTATION SLOW - FAST
5 REFLECTOR ROTATION
0 - 9 STOP
10 - 120 CLOCKWISE ROTATION FAST - SLOW
121 - 134 STOP
135 - 245 COUNTER CLOCKWISE ROTATION
FAST - SLOW
246 - 255 STOP
Channel Value Function
6 SHUTTER
0 - 7 BLACKOUT
8 - 15 OPEN
16 - 131 STROBING SLOW - FAST
132 - 139 OPEN
140 - 181 FAST OPEN - SLOW CLOSE
182 - 189 OPEN
190 - 231 FAST CLOSE - SLOW OPEN
232 - 239 OPEN
240 - 247 RANDOM STROBE
248 - 255 OPEN
7 MASTER DIMMER
0 - 255 0% - 100%
8 SPECIAL FUNCTIONS
0 - 29 NO FUNCTION
30 - 39 ENABLE COLOR WHEEL TO ANY
POSITION*
40 - 59 LAMP ON
60 - 79 LAMP OFF
80 - 84 ALL MOTORS RESET
85 - 87 PAN/TILT MOTORS RESET
88 - 90 COLOR WHEEL MOTOR RESET
91 - 93 GOBO WHEEL MOTOR RESET
94 - 96 SHUTTER/DIMMER MOTOR RESET
97 - 99 OTHER MOTORS RESET
100 - 109 ENABLE BLACKOUT WITH PAN/TILT
MOVEMENT
110 - 119 ENABLE BLACKOUT WITH COLOR
CHANGE
120 - 129 ENABLE BLACKOUT WITH GOBO
CHANGE
130 - 139 ENABLE BLACKOUT WITH ANY
CHANGE
140 - 255 NO FUNCTION
*When Channel 8 is between the values of 30-39, the
second Channel 3 split color values are used.
ADJ Products, LLC - www.adj.com - Warlock Instruction Manual Page 24 ADJ Products, LLC - www.adj.com - Warlock Instruction Manual Page 25
Page 14
WARLOCK
Warlock Manual Focus
Warlock Fuse Replacement
The Warlock can be manually focused using the knob located on the
front of the unit directly in front of the lens. Turn the know clockwise
and counter-clockwise until you desired focus is reached.
Warlock Power Cord Daisy Chain
With this feature you can connect the xtures to one another
using the IEC input and output sockets. The quantity that can be
connected is 3 xtures maximum for 120V and 3 xtures maximum for 240V. After the maximum xtures has been reached you
will need to use a new power outlet. They must be the same xtures. DO NOT mix xtures.
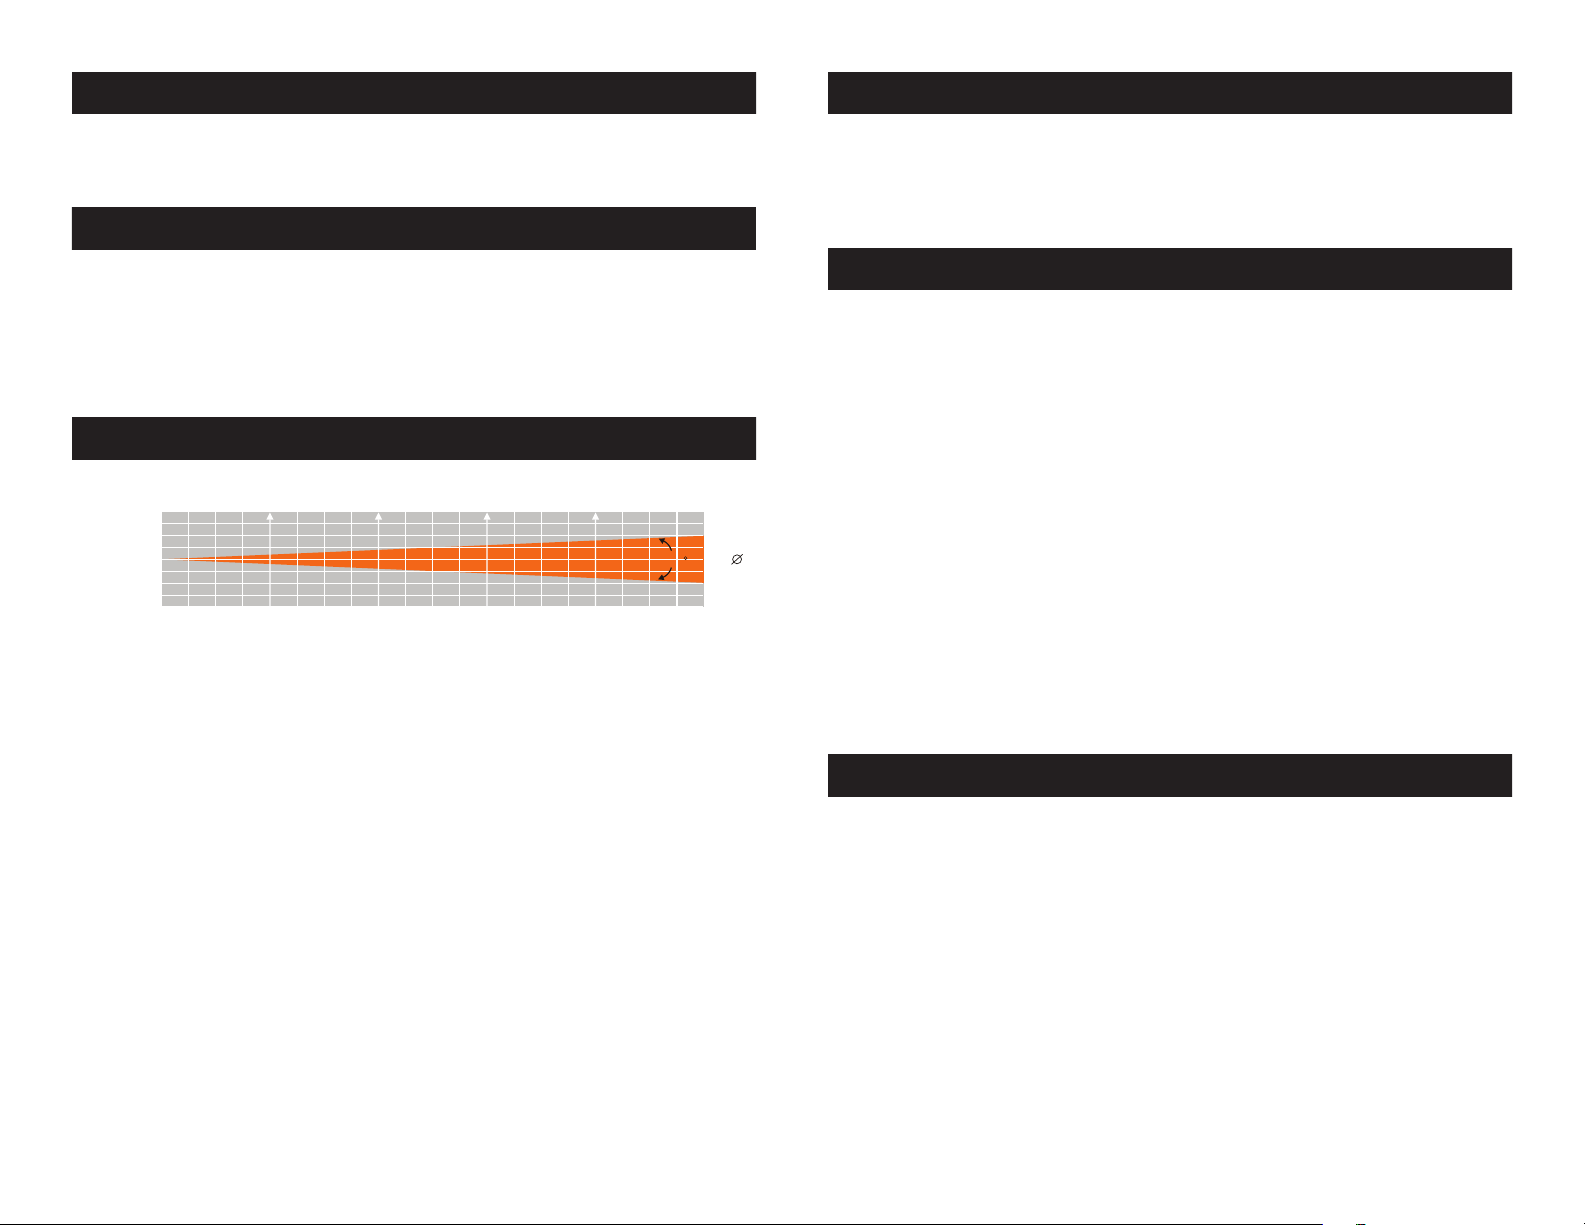
Warlock Photometric Chart
(LUX)
Distance(m)
Diameter(m)
0
186 50 535 5 2 680
2.0
0.01 0.2 0.29
4.0 6.0
100
0m( )
Locate the fuse holder is located at the rear of unit next to the power
cord. Using a phillips head screwdriver, remove the fuse holder.
Remove the used fuse and replace with a matching fuse. Insert the
fuse holder and fuse into the unit and secure the fuse holder.
Warlock Cleaning
Fixture Cleaning: Due to fog residue, smoke, and dust cleaning
the internal and external optical lenses and mirror should be carried
out periodically to optimize light output. Cleaning frequency depends
on the environment in which the fixture operates (I.e. smoke, fog
residue, dust, dew). In heavy club use we recommend cleaning on a
monthly basis. Periodic cleaning will ensure longevity, and crisp output.
1. Use normal glass cleaner and a soft cloth to wipe down the out-
side casing.
2. Use a brush to wipe down the cooling vents and fan grill.
3. Clean the external optics with glass cleaner and a soft cloth every
20 days.
4. Clean the internal optics with glass cleaner and a soft cloth every
30-60 days.
5. Always be sure to dry all parts completely before plugging the unit
back in.
ADJ Products, LLC - www.adj.com - Warlock Instruction Manual Page 26
Warlock Trouble Shooting
Trouble Shooting: Listed below are a few common problems that
you may encounter, with solutions.
No light output from the unit;
1. Be sure the external fuse has not blown. The fuse is located next
to the power cord connection.
2. Be sure the fuse holder is completely and properly seated.
Unit does not respond to sound;
1. Low frequencies (bass) should cause the unit to react to sound.
Tapping on the microphone, quiet or high pitched sounds may
not activate the unit.
ADJ Products, LLC - www.adj.com - Warlock Instruction Manual Page 27
Page 15

Warlock Warranty
MANUFACTURER’S LIMITED WARRANTY
A. ADJ Products, LLC hereby warrants, to the original purchaser, ADJ Products, LLC products
to be free of manufacturing defects in material and workmanship for a prescribed period from
the date of purchase (see specific warranty period on reverse). This warranty shall be valid only if the
product is purchased within the United States of America, including possessions and
territories. It is the owner ’s responsibility to establish the date and place of purchase by acceptable
evidence, at the time service is sought.
B. For warranty service you must obtain a Return Authorization number (RA#)
before sending back the product–please contact ADJ Products, LLC Service Department
at 800-322-6337. Send the product only to the ADJ Products, LLC factory. All
shipping charges must be pre-paid. If the requested repairs or service (including
parts replacement) are within the terms of this warranty, ADJ Products, LLC will pay return
shipping charges only to a designated point within the United States. If the entire instrument is
sent, it must be shipped in it’s original package. No accessories should be shipped with the product. If
any accessories are shipped with the product, ADJ Products, LLC shall have no liability whatsoever for
loss of or damage to any such accessories, nor for the safe return thereof.
C. This warranty is void if the serial number has been altered or removed; if the product is modified in any
manner which ADJ Products, LLC concludes, after inspection, affects the reliability of the product; if the
product has been repaired or serviced by anyone other than the ADJ Products, LLC factory unless prior
written authorization was issued to purchaser by ADJ Products, LLC; if the product is damaged because
not properly maintained as set forth in the instruction manual.
D. This is not a service contract, and this warranty does not include maintnance, cleaning or periodic check
up. During the period specified above, ADJ Products, LLC will replace defective parts at its expense
with new or refurbished parts, and will absorb all expenses for warranty service and repair labor by
reason of defects in material or workmanship. The sole responsibility of ADJ Products, LLC under this
warranty shall be limited to the repair of the product, or replacement thereof, including parts, at the sole
discretion of ADJ Products, LLC. All products covered by this warranty were manufactured after August
15, 2012, and bear indentifying marks to that effect.
E. ADJ Products, LLC reserves the right to make changes in design and/or improvements upon its products
without any obligation to include these changes in any products theretofore manufactured.
No warranty, whether expressed or implied, is given or made with respect to any accessory supplied with
products described above. Except to the extent prohibited by applicable law, all implied warranties made
by ADJ Products, LLC in connection with this product, including warranties of merchantability or fitness,
are limited in duration to the warranty period set forth above. And no warranties, whether expressed or
implied, including warranties of merchantability or fitness, shall apply to this product after said period
has expired. The consumer’s and/or Dealer’s sole remedy shall be such repair or replacement as is
expressly provided above; and under no circumstances shall ADJ Products, LLC be liable for any loss or
damage, direct or consequential, arising out of the use of, or inability to use, this product.
This warranty is the only written warranty applicable to ADJ Products, LLC Products and
supersedes all prior warranties and written descriptions of warranty terms and conditions heretofore
published.
MANUFACTURER’S LIMITED WARRANTY PERIODS:
•LightingProducts=1-year(365days)LimitedWarranty(Such as: Special Effect Lighting, Intelligent
Lighting, UV lighting, Strobes, Fog Machines, Bubble Machines, Mirror Balls, Par Cans, Trussing,
Lighting Stands etc. excluding LED and lamps)
•LaserProducts=1Year(365Days)LimitedWarranty(excluding laser diodes which have a 6 month
limited warranty)
•L.E.D.Products=2-year(730days)LimitedWarranty(excluding motors, PCB boards, and power
supplies, which have a 1-year (365 day Limited Warranty) batteries which have a 180 day limited war-
ranty). Only the L.E.D.s carry a 2-year warranty (excluding StarTec Series which a carries a 90 Day
Limited Warranty)
•ADJDMXControllers=2Year(730Days)LimitedWarranty(excluding faders and tact switches)
ADJ Products, LLC - www.adj.com - Warlock Instruction Manual Page 28
Warlock Notes
ADJ Products, LLC - www.adj.com - Warlock Instruction Manual Page 29
Page 16

Warlock Specifications
Model: Warlock
Voltage: 100V ~ 240V/50~60Hz
Lamp: Philips® Platinum MSD 2R Discharge
Lamp 132W, 8,000°K - 6,000 hr. aver-
age long life
Power Consumption: 202W
Power Cord Daisy Chain: 3 Fixtures Max. (120V)
6 Fixtures Max. (230V)
Dimensions: 20.25”(L) x 20.25”(W) x 14”(H)
512 x 516 x 354mm
Weight: 22 Lbs. / 10 kgs.
Beam Angle: 100 Degrees
Fuse: 7 Amp
Duty Cycle: None
DMX: 8 DMX Channels
Colors: 12 Colors + White w/ Split Colors
Sound Active: Ye s
Working Position: Any Safe, Secure Position
Warranty: 2 Year (730 days)
Auto Sensing Voltage: This xture contains an electronic
ballast, which will auto sense the voltage when it is plugged into
the power source.
Please Note: Specications and improvements in the design
of this unit and this manual are subject to change without any
prior written notice.
ADJ Products, LLC - www.adj.com - Warlock Instruction Manual Page 30
ADJ Products, LLC
6122 S. Eastern Ave. Los Angeles, CA 90040 USA
Tel: 323-582-2650 / Fax: 323-725-6100
Web: www.adj.com / E-mail: [email protected]
A.D.J. Supply Europe B.V.
Junostraat 2
6468 EW Kerkrade
The Netherlands
[email protected] / www.adj.eu
Tel: +31 45 546 85 00 / Fax: +31 45 546 85 99
 Loading...