

Page 1
user manual
Page 2

©2019 ADJ PRODUCTS LLC all rights reserved. Information, specications, diagrams, images, and instructions herein
are subject to change without notice. ADJ logo and identifying product names and numbers herein are trademarks of ADJ
PRODUCTS LLC. Copyright protection claimed includes all forms and matters of copyrightable materials and information
now allowed by statutory or judicial law or hereinafter granted. Product names used in this document may be trademarks
or registered trademarks of their respective companies and are hereby acknowledged. All non-ADJ brands and product
names are trademarks or registered trademarks of their respective companies.
ADJ PRODUCTS LLC and all aliated companies hereby disclaim any and all liabilities for property, equipment, building,
and electrical damages, injuries to any persons, and direct or indirect economic loss associated with the use or reliance
of any information contained within this document, and/or as a result of the improper, unsafe, insucient and negligent
assembly, installation, rigging, and operation of this product.
ADJ PRODUCTS LLC USA
6122 S. Eastern Ave. Los Angeles, CA 90040
323-582-2650 | Fax 323-582-2610 | www.adj.com | info@adj.com
ADJ SUPPLY Europe B.V
Junostraat 2 6468 EW Kerkrade, The Netherlands
+31 (0)45 546 85 00 | Fax +31 45 546 85 99 | www.adj.eu | info@americandj.eu
ADJ PRODUCTS GROUP Mexico
AV Santa Ana 30 Parque Industrial Lerma, Lerma, Mexico 52000
+52 (728) 282-7070 | ventas@adj.com
FCC STATEMENT
This device complies with Part 15 of the FCC Rules. Operation is subject to the following two conditions: (1) this device
may not cause harmful interference, and (2) this device must accept any interference received, including interference that
may cause undesired operation.
FCC RADIO FREQUENCY INTERFERENCE WARNINGS & INSTRUCTIONS
This product has been tested and found to comply with the limits as per Part 15 of the FCC Ru
designed to provide reasonable protection against harmful interference in a residential installation. This device uses and
can radiate radio frequency energy and, if not installed and used in accordance with the included instructions, may cause
harmful interference to radio communications. However, there is no guarantee that interference will not occur in a particular
installation. If this device does cause harmful interference to radio or television reception, which can be determined by turning
the device o and on, the user is encouraged to try to correct the interference by one or more of the following methods:
• Reorient or relocate the device.
• Increase the separation between the device and the receiver.
• Connect the device to an electrical outlet on a circuit dierent from which the radio receiver is connected.
• Consult the dealer or an experienced radio/TV technician for help.
Energy Saving Matters (EuP 2009/125/EC)
Saving electric energy is a key to help protecting the environment. Please turn o all electrical products
in use. To avoid power consumption in idle mode, disconnect all electrical equipment from power when not in use. Thank you!
Document Version: An updated version of this document may be available online. Please check www.adj.com for the latest
revision/update of this document before beginning installation and use.
Date
Document
Version
iOS
Version
Android
Version
Notes
les. These limits are
when they are not
2/22/19 1 ≥ 1.02 ≥ 0.5.7 Initial release.
2
Page 3

CONTENTS
General Information 4
Limited Warranty (USA Only) 5
Safety Guidelines 6
Overview 8
Installation 9
Set Up Instructions
• Connecting to WiFi 10
• Downloading the Application 11
App Instructions
• Create a New Project 14
• Adding Fixtures 14
• Addressing and Changing the Order of the Features 15
• Setting Pan/Tilt Limitations 17
• Live Screen 18
• Color Eects 20
• Move Eects 21
• Flash and Special FX 22
• Strobe, Dimmer and Presets 23
• Pulse and Sync 24
• BPM 25
• MIDI Control (iPad Only) 26
• Other Settings 27
Trouble Shooting Tips and Frequently Asked Questions 28
Specications 29
Dimensions 30
3
Page 4

GENERAL INFORMATION
INTRODUCTION
Please read and understand all instructions in this manual carefully and thoroughly before attempting to operate this
product. These instructions contain important safety and use information.
UNPACKING
The products in this kit have been thoroughly tested and have been shipped in perfect operating condition. Carefully check
the shipping carton for damage that may have occurred during shipping. If the carton appears to be damaged, carefully
inspect each unit included for damage and be sure all accessories necessary to operate the units have arrived intact. In
the event damage has been found or parts are missing, please contact our customer support team for further instructions.
Please do not return this kit to your dealer without rst contacting customer support at the number listed below. Please do
not discard the shipping carton in the trash. Please recycle whenever possible.
WARRANTY RETURNS
All returned service items whether under warranty or not, must be freight pre-paid and accompany a return authorization
(R.A.) number. The R.A. number must be clearly written on the outside of the return package. A brief description of the
problem as well as the R.A. number must also be written down on a piece of paper and included in the shipping container.
If the unit is under warranty, you must provide a copy of your proof of purchase invoice. Items returned without a R.A.
number clearly marked on the outside of the package will be refused and returned at customer’s expense. You may obtain
a R.A. number by contacting customer support.
CUSTOMER SUPPORT
Contact ADJ Service for any product related service and support needs.
Please visit forums.adj.com with questions, comments or suggestions.
ADJ SERVICE USA - Monday - Friday 8:00am to 4:30pm PST
800-322-6337 | Fax 323-582-2941 | support@adj.com
ADJ SERVICE EUROPE - Monday - Friday 08:30 to 17:00 CET
+31 45 546 85 60 | Fax +31 45 546 85 96 | support@adj.eu
REPLACEMENT PARTS please visit parts.adj.com
Apple, the Apple logo, iPhone, iPad, and iPod Touch are trademarks of Apple Inc., registered in the U.S. and other
countries. App Store is a service mark of Apple Inc.
The “Android” name, the Android logo, the “Google Play” brand, and other
The “Amazon” name, “Amazon Appstore” brand, marks, and other Amazon trademarks are property of Amazon.com, Inc.
and its aliates.
Google trademarks, are property of Google LLC.
4
Page 5

LIMITED WARRANTY (USA ONLY)
1. ADJ Products, LLC hereby warrants, to the original purchaser, ADJ Products, LLC products to be free of
manufacturing defects in material and workmanship for a prescribed period from the date of purchase
(see specic warranty period on reverse). This warranty shall be valid only if the product is purchased
within the United States of America, including possessions and territories. It is the owner’s responsibility
to establish the date and place of purchase by acceptable evidence, at the time service is sought.
2. For warranty service, please contact ADJ Products, LLC Service Department at 800-322-6337. You must
obtain a Return Authorization number (RA#) before sending back the product. Send the product only to the
ADJ Products, LLC factory. All shipping charges must be pre-paid. If the requested repairs or service (including parts
replacement) are within the terms of this warranty, ADJ Products, LLC will pay return shipping charges only to a
designated point within the United States. If the entire instrument is sent, it must be shipped in its original package.
No accessories should be shipped with the product. If any accessories are shipped with the product, ADJ Products,
LLC shall have no liability whatsoever for loss of or damage to any such accessories, or for the safe return thereof.
3. This warranty is void of the serial number has been altered or removed; if the product is modied in any manner which
ADJ Products, LLC concludes, after inspection, aects the reliability of the product, if the product has been repaired or
service by anyone other than ADJ Products, LLC factory unless prior written authorization was issued to purchaser by
ADJ Products, LLC; if the product is damaged because not properly maintained as set forth in the instruction manual.
4. This is not a service contact, and this warranty does not include maintenance, cleaning or periodic check up.
During the period specied above, ADJ Products, LLC will replace defective parts at its expense with new or
refurbished parts, and will absorb all expenses for warrant service and repair labor by reason of defects in material
or workmanship. The sole responsibility of ADJ Products, LLC under this warranty shall be limited to the repair
of the product, or replacement thereof, including parts, at the sole discretion of ADJ Products, LLC. All products
covered by this warranty were manufactured after August 15, 2012, and bear identifying marks to that eect.
5. ADJ Products, LLC reserves the right to make changes in design and/or improvements upon its
products without any obligation to include these changes in any products theretofore manufactured.
6. No warranty, whether expressed or implied, is given or made with respect to any accessory supplied with products
described above. Except to the extent prohibited by applicable law, all implied warranties made by ADJ Products, LLC
in connection with this product, including warranties of merchantability or tness, are limited in duration to the warranty
period set forth above. And no warranties, whether expressed or implied, including warranties of merchantability or
tness, shall apply to this product after said period has expired. The consumer’s and/or Dealer’s sole remedy shall
be such repair or replacement as is expressly provided above; and under no circumstances shall ADJ Products, LLC
be liable for any loss or damage, direct or consequential, arising out of the use of, or inability to use, this product.
7. This warranty is the only written warranty applicable to ADJ Products, LLC Products and supersedes all prior
warranties and written descriptions of warranty terms and conditions heretofore published.
LIMITED WARRANTY PERIODS
1. Non L.E.D. Lighting Products = 1-year (365 days) Limited Warranty (Such as: Special Eect Lighting,
Intelligent Lighting, UV lighting, Strobes, Fog Machines, Bubble Machines, Mirror Balls, Par Cans, Trussing,
Lighting Stands etc. excluding LED and lamps)
2. Laser Products = 1 Year (365 Days) Limited Warranty (excludes laser diodes which have 6 month limited
warranty)
3. L.E.D. Products = 2-year (730 days) Limited Warranty (excluding batteries which have a 180 day limited
warranty) Note: 2 Year Warranty only applies to purchases within the United States.
4. StarTec Series = 1 Year Limited Warranty (excluding batteries which have a 180 day limited warranty)
5. ADJ DMX Controllers = 2 Year (730 Days) Limited Warranty
5
Page 6
SAFETY GUIDELINES
To guarantee a smooth operation, it is important to follow all instructions and guidelines in this manual.
ADJ PRODUCTS LLC is not responsible for injury and/or damages resulting from the misuse of this
device due to the disregard of the information printed in this manual. Only qualied and/or certied
personnel should perform installation of this device and only ADJ Approved accessories (such as the
original rigging parts included with this device) should be used for installation. Any modications to
this device and/or the included mounting hardware will void the original manufactures warranty and
increase the risk of damage and/or personal injury.
THERE ARE NO USER SERVICEABLE PARTS INSIDE THIS DEVICE. DO
NOT ATTEMPT ANY REPAIRS YOURSELF; DOING SO WILL VOID YOUR
MANUFACTURES WARRANTY. DAMAGES RESULTING FROM MODIFICATIONS
TO THIS DEVICE AND/OR THE DISREGARD OF SAFETY INSTRUCTIONS AND
GUIDELINES IN THIS MANUAL VOID THE MANUFACTURES WARRANTY AND
ARE NOT SUBJECT TO ANY WARRANTY CLAIMS AND/OR REPAIRS.
DO NOT DISASSEMBLE UNDER ANY CONDITIONS!
UNPLUG POWER DURING LONG PERIODS OF NON-USE
DO NOT EXPOSE DEVICE TO HEAT OR FIRE!
DO NOT EXPOSE DEVICE TO FLAMMABLE MATERIALS!
DO NOT EXPOSE DEVICE TO HIGH HUMIDITY!
DO NOT EXPOSE DEVICE TO EXTREME VIBRATIONS!
DO NOT EXPOSE DEVICE TO RAIN AND/OR MOISTURE!
PLACE UNIT IN A WELL VENTILATED AREA.
6
Page 7

SAFETY GUIDELINES
DO NOT attempt installation and/or operation of device without knowledge how to do so.
DO NOT permit operation by persons who are not qualied to operate this type of device.
DO NOT shake device, avoid brute force when installing and/or operating.
DO NOT operate device if the power supply cable has become frayed, crimped and/or damaged, or if
any of the connectors do not insert into the device securely with ease.
DO NOT force cable connectors into device.
DO NOT remove or disassemble device, there are NO user serviceable parts inside.
ALWAYS disconnect device from main power source before cleaning.
ALWAYS be sure to use this device in an area that will allow proper ventilation.
ALWAYS disconnect power cable during long periods of non-use.
All cables should be safely routed and secured so they are not likely pinched.
Only use recommended rigging hardware as described in this guide.
Use the original packaging and materials to transport this device in for service.
This device should be serviced by qualied service personnel when:
• The power cord or plug has become damaged.
• Objects have fallen on and/or liquid has spilled into the device.
• The device has been exposed to rain and/or moisture.
• The device does not operate normally or exhibits a marked change in performance.
7
Page 8
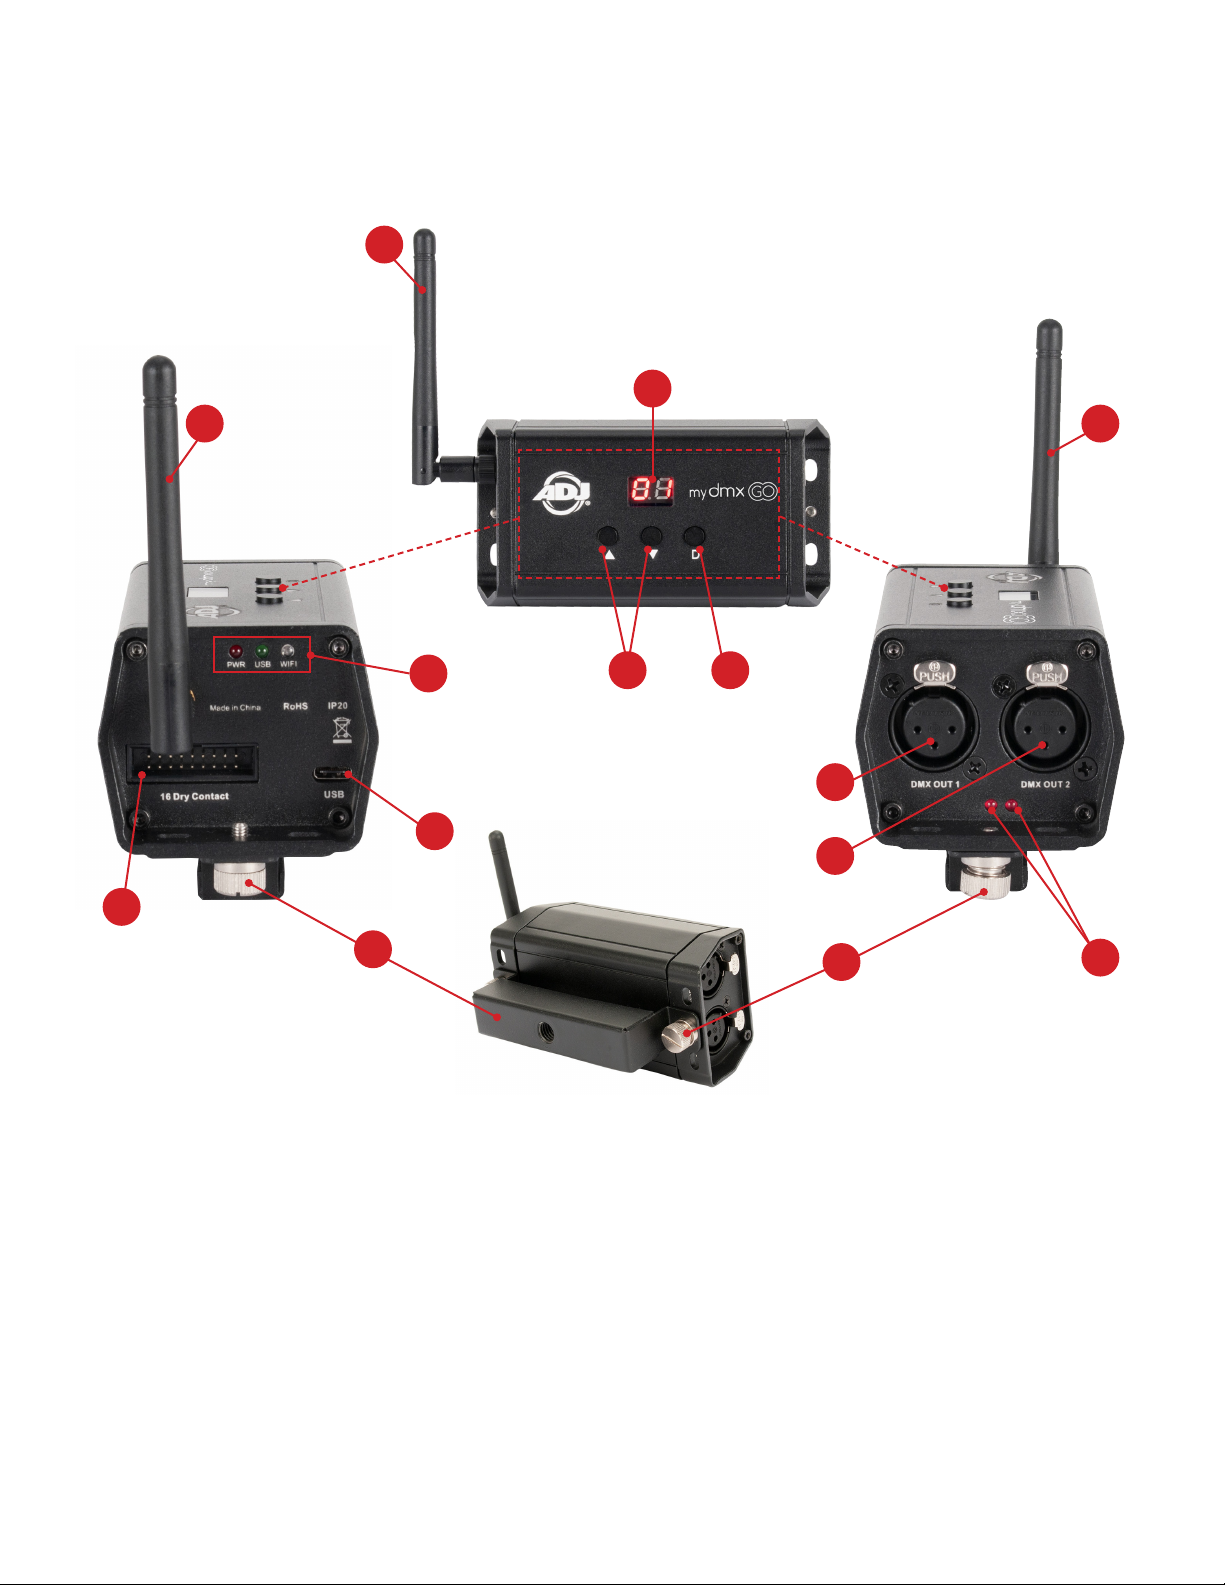
OVERVIEW
A
B
AA
H
I
J
L
A. WiFi Antenna
B. LED Display
C. DMX Out Signal Indicator (1 and 2)
D. 3-PIN DMX Out Port 2*
†
E. 3-PIN DMX Out Port 1
F. Dimmer Button
G
F
E
D
K
G. Up/Down Buttons*
H. Power/USB/WiFi LED Indicators
I. Power/USB-C Input
J. 16 Dry Contact*
K. Mounting Bracket Knob
L. Mounting Bracket
C
* Not active with the myDMX GO app at this time. To activate functions or
to add an additional 256 channels, visit store.dmxsoft.com
†
2nd DMX output is only available when using MyDMX3 or Compu Show.
8
Page 9
INSTALLATION
FLAMMABLE MATERIAL WARNING!
Keep device at least 5.0 feet (1.5m) away from any ammable materials,
decorations, pyrotechnics, etc.
DO NOT INSTALL THE DEVICE IF YOU ARE NOT QUALIFIED TO DO SO!
The myDMX GO WiFi DMX device MUST be installed following all local, national, and country
commercial electrical and construction codes and regulations.
Ambient operating temperature range for this device is 35° to 113°F (2° to 45°C).
DO NOT use the device under or above this temperature range.
DO NOT install the device in areas were unauthorized personnel might reach the device.
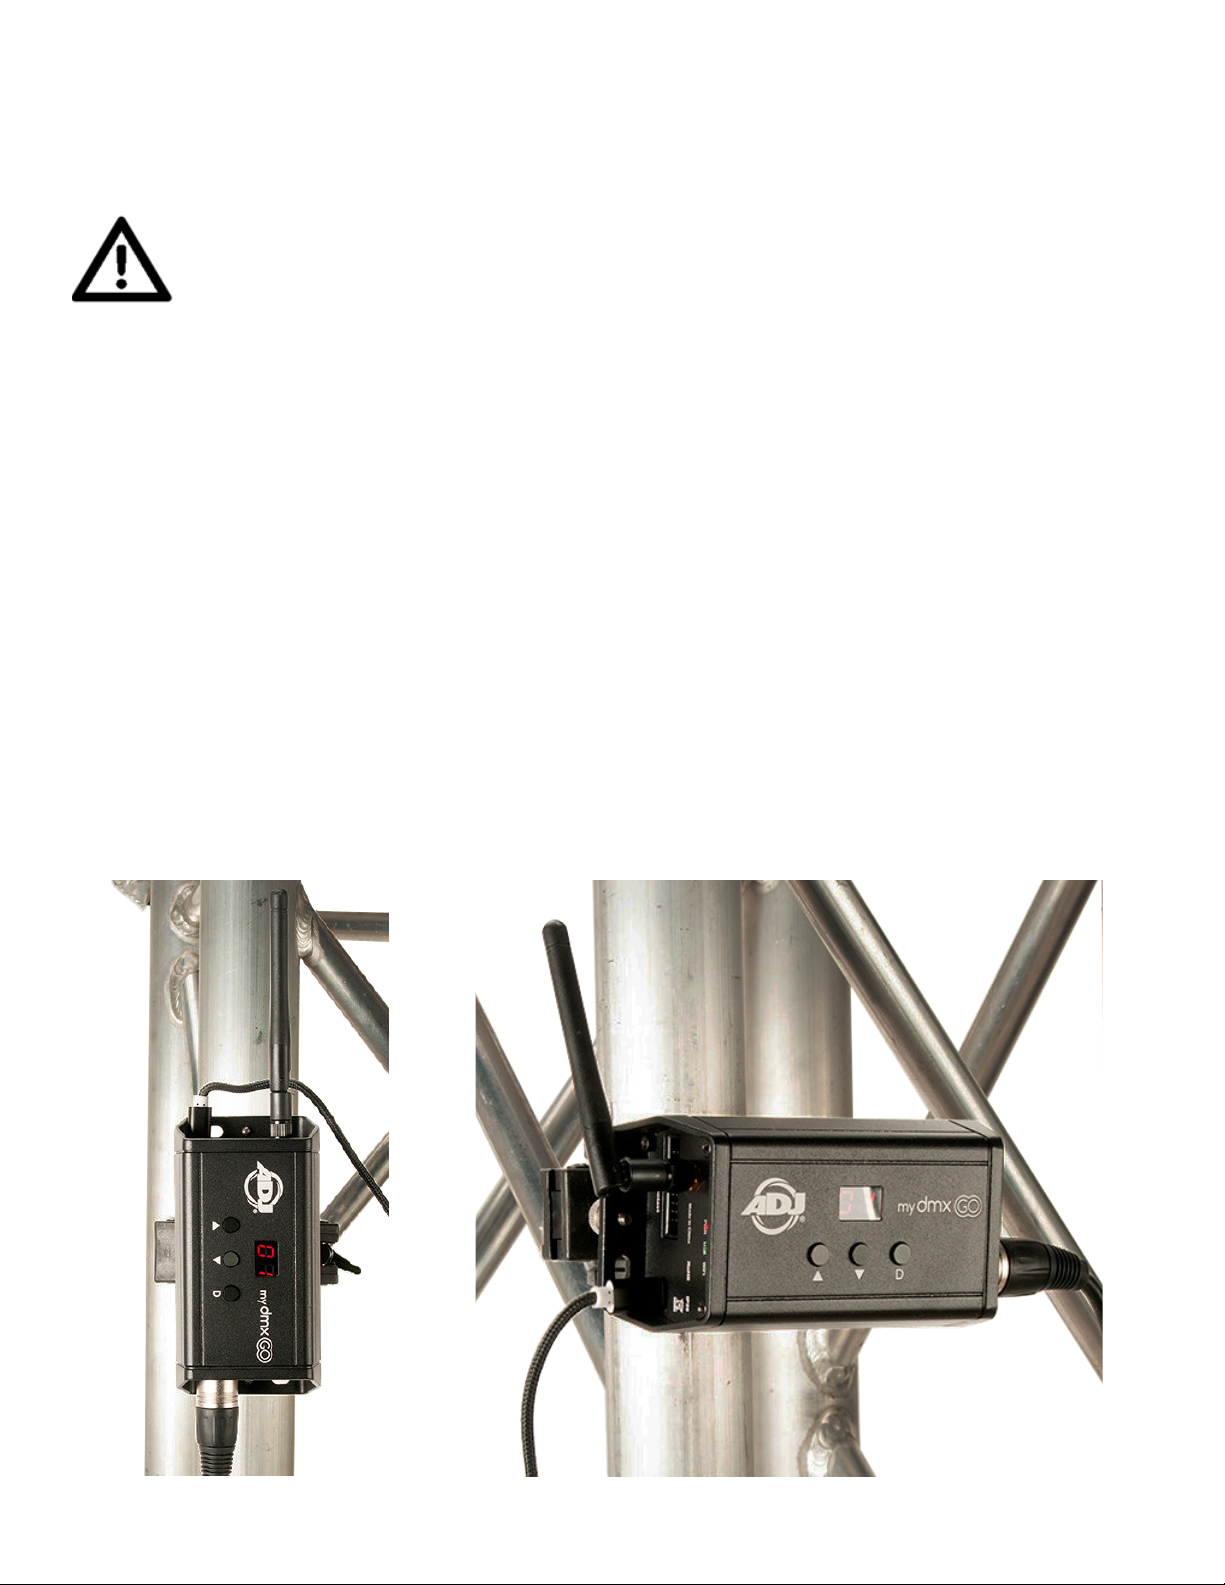
MINI OMEGA BRACKET / CLAMP INSTALLATION
The myDMX GO WiFi DMX device can be placed on the at surface, attached to a surface
using the provided mounting bracket or attached to truss using included mini omega bracket
and a properly rated clamp. (Clamp not included) (See images below)
INSTALLATION LOCATION ON TRUSS MUST BE CLEAR OF ANY MOVING HEAD FIXTURES!
9
Page 10
SET UP INSTRUCTIONS
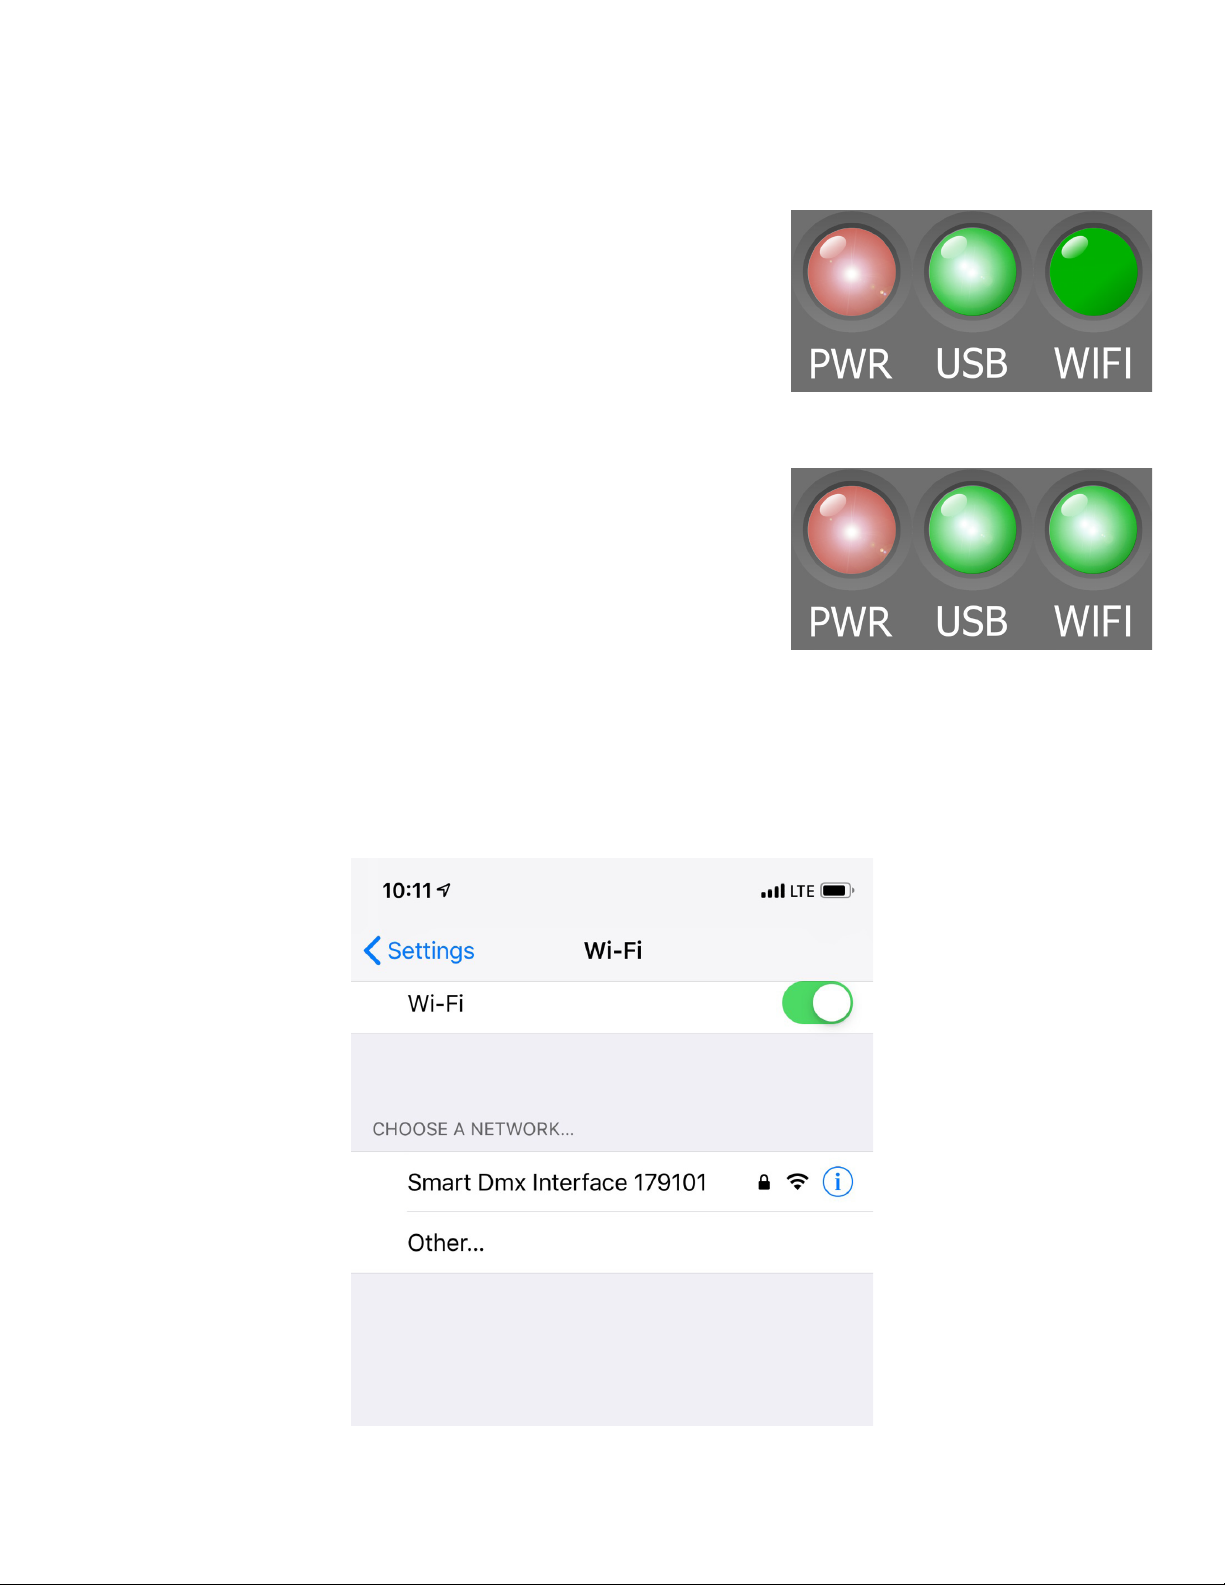
Connecting Power
The myDMX GO WiFi DMX device is powered through the USB
connection port. Power can be supplied via the provided power
adapter or it can be supplied via an Android powered tablet with
USB out port.
When power is connected, the Power LED indicator will remain
steady while the LED indicator for USB will slowly ash.
Connecting to WiFi
When the myDMX GO WiFi DMX device is powered ON for the
rst time, it will be congured in the default mode. The device will
create and broadcast a local WiFi access point, which should be
available to any WiFi equipped device.
When a device is connected via WiFi, the green LED indicator for
WiFi will remain steady.
The default DMX512 network password is smartdmx0000.
10
Page 11
SET UP INSTRUCTIONS
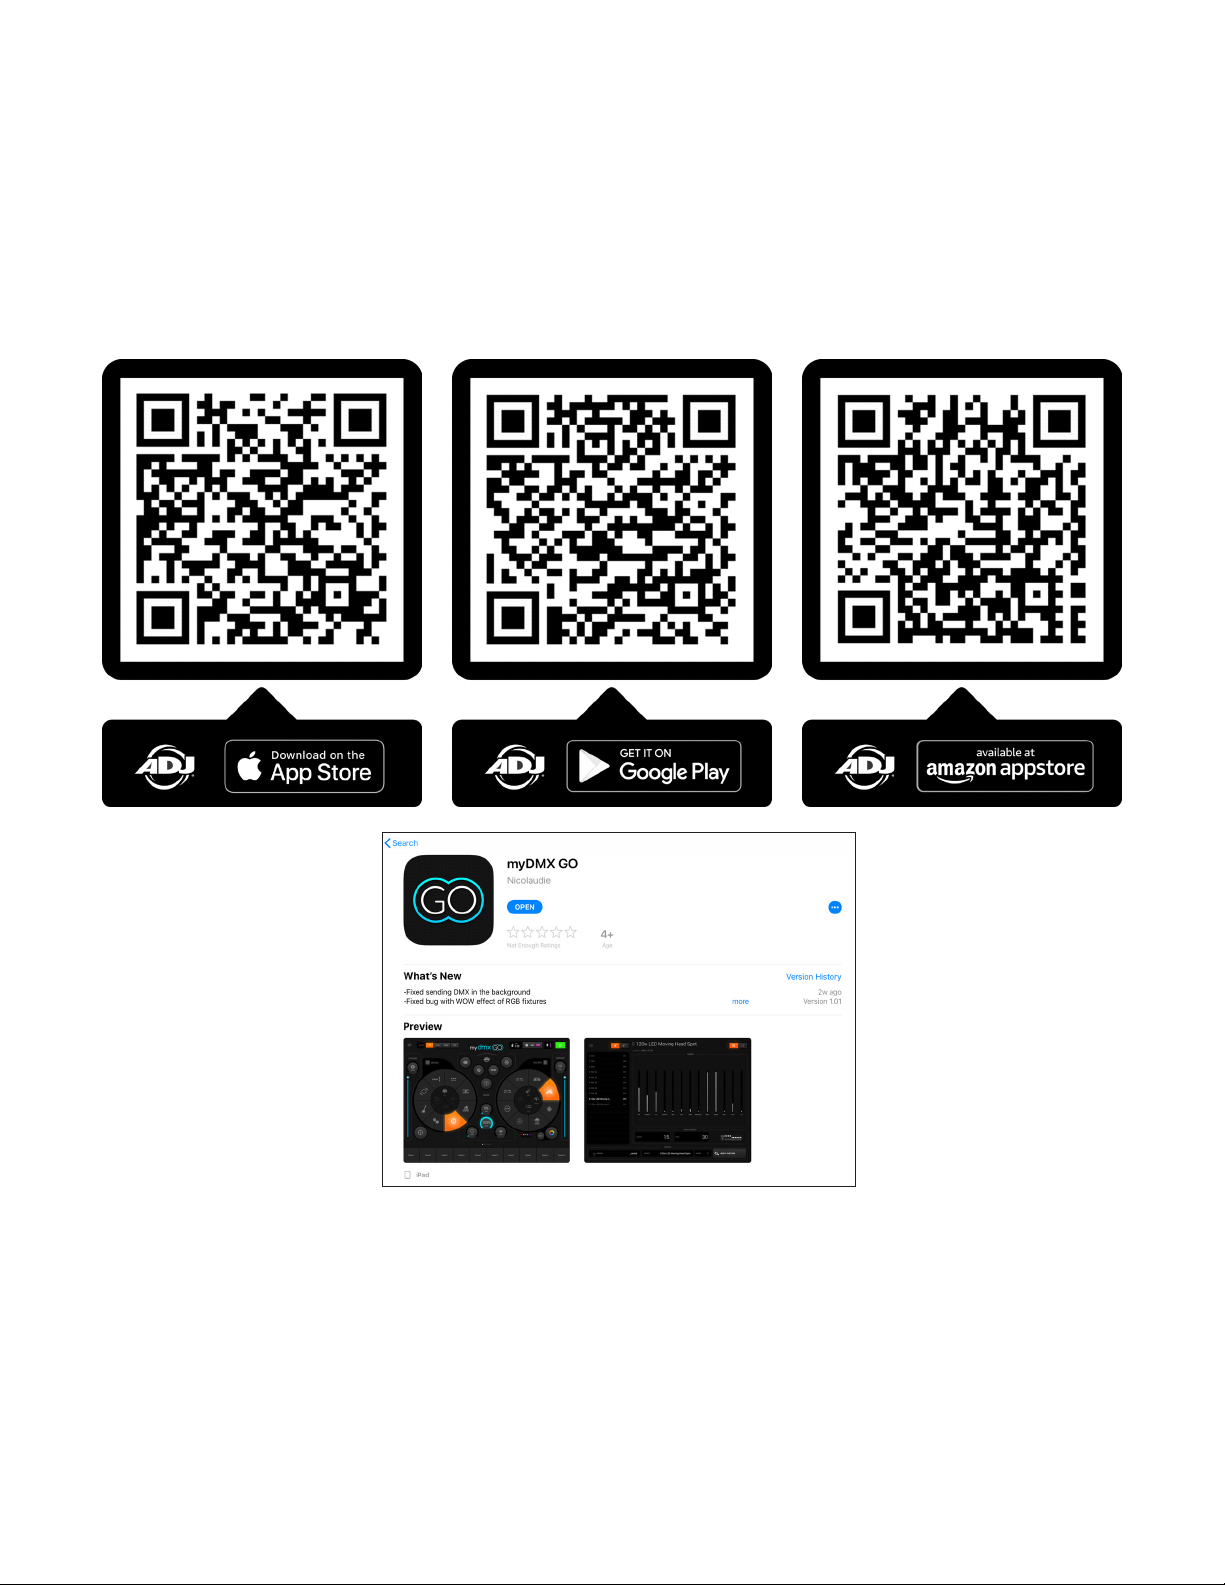
Downloading The Application
To download the myDMX Go application for your tablet:
1. Open the Camera app on your mobile device.
2. Position your camera over the QR Code so it is visible in the camera app’s viewnder.
3. Your device will recognize the QR Code and show a notication on the screen.
4. Tap the notication to open the link to the app store for your device.
The iOS version of the App from here (iPad only, not available for iPhone or iTouch):
https://itunes.apple.com/us/app/mydmx-go/id1439050013?mt=8
The Android tablet version of the App is available here:
https://play.google.com/store/apps/details?id=com.lightingsoft.mydmxgo
The Amazon version of the Android App is available here:
https://www.amazon.com/gp/product/?ie=UTF8&ASIN=B07MBBJ1XB&ref=mas_ty
11
Page 12

SET UP INSTRUCTIONS
Getting Started
Before launching the myDMX GO app, connect to the myDMX GO WiFi device via WiFi (iPad and
Android) or via USB (Android only).
Launch the myDMX GO app on your device.
A login screen will appear and ask if you would like to login or create a Light Cloud account.
• A Light Cloud account is free and will give you the ability to synchronize your own xture
proles across multiple tablets.
If you choose not to use a Light Cloud account, simply select “Log In Later” to proceed.
Tap the menu on the left and select your interface from the list if it is not already selected (see page
13 for instructions to connect to a DMX interface).
12
Page 13

SET UP INSTRUCTIONS
Connecting To A DMX Interface
myDMX GO has been designed for use with the myDMX GO WiFi DMX device.
To begin, connect to the DMX device over WiFi, then start the myDMX GO App.
Note: The device may take up to 20 seconds to connect. No further purchases are required.
myDMX GO can also be used with other specic devices with the correct additional purchases described below.
myDMX GO for iPad:
• myDMX GO, Daslight DVC4-GZM & Sunlite SUITE2-FC Ethernet-DMX interface.
myDMX GO for Android:
• Any Smart Upgrade Technology (SUT) USB-DMX interface with the myDMX GO license. See
our website for a list of compatible SUT devices
• Daslight DVC4-GZM & Sunlite SUITE2-FC Ethernet-DMX interfaces
To connect to a DMX interface, tap the menu button and tap on the interface you would like to use.
13
Page 14

APP INSTRUCTIONS
Create A New Project
To create a project, tap the menu button and tap “Create a Project”.
If you currently have an open project, you will have the option to copy the presets and xtures from the
current open project, or start a new project.
Tapping the 3 dots next to the project name allows you to rename a project or delete it.
Adding Fixtures
To add xtures to your project, tap the menu button and then “Fixtures”. To add a xture:
1. Tap the “Brand” button at the bottom of the screen and select the brand.
2. Select a device prole. Notice each prole has a colored dot to the right:
• Red means the device must be downloaded from the cloud. (An Internet connection is
required for this.)
• Green means you have the device on your tablet already.
• Yellow means you have the device on your tablet, however an updated version is available.
3. Select a “Mode”.
Some xtures have dierent operation modes that take up dierent amounts of channels.
Be sure you have the same mode selected on your xture. (To check the settings your xture,
please refer to the owner’s manual that was provided with your xture).
4. Tap “Add A Fixture”.
If you do not see a prole for your xture, visit https://store.lightriderapp.com/en/ssl to create a New Fixture Request.
* There are over 15,000+ xture proles available.
14
Page 15
APP INSTRUCTIONS
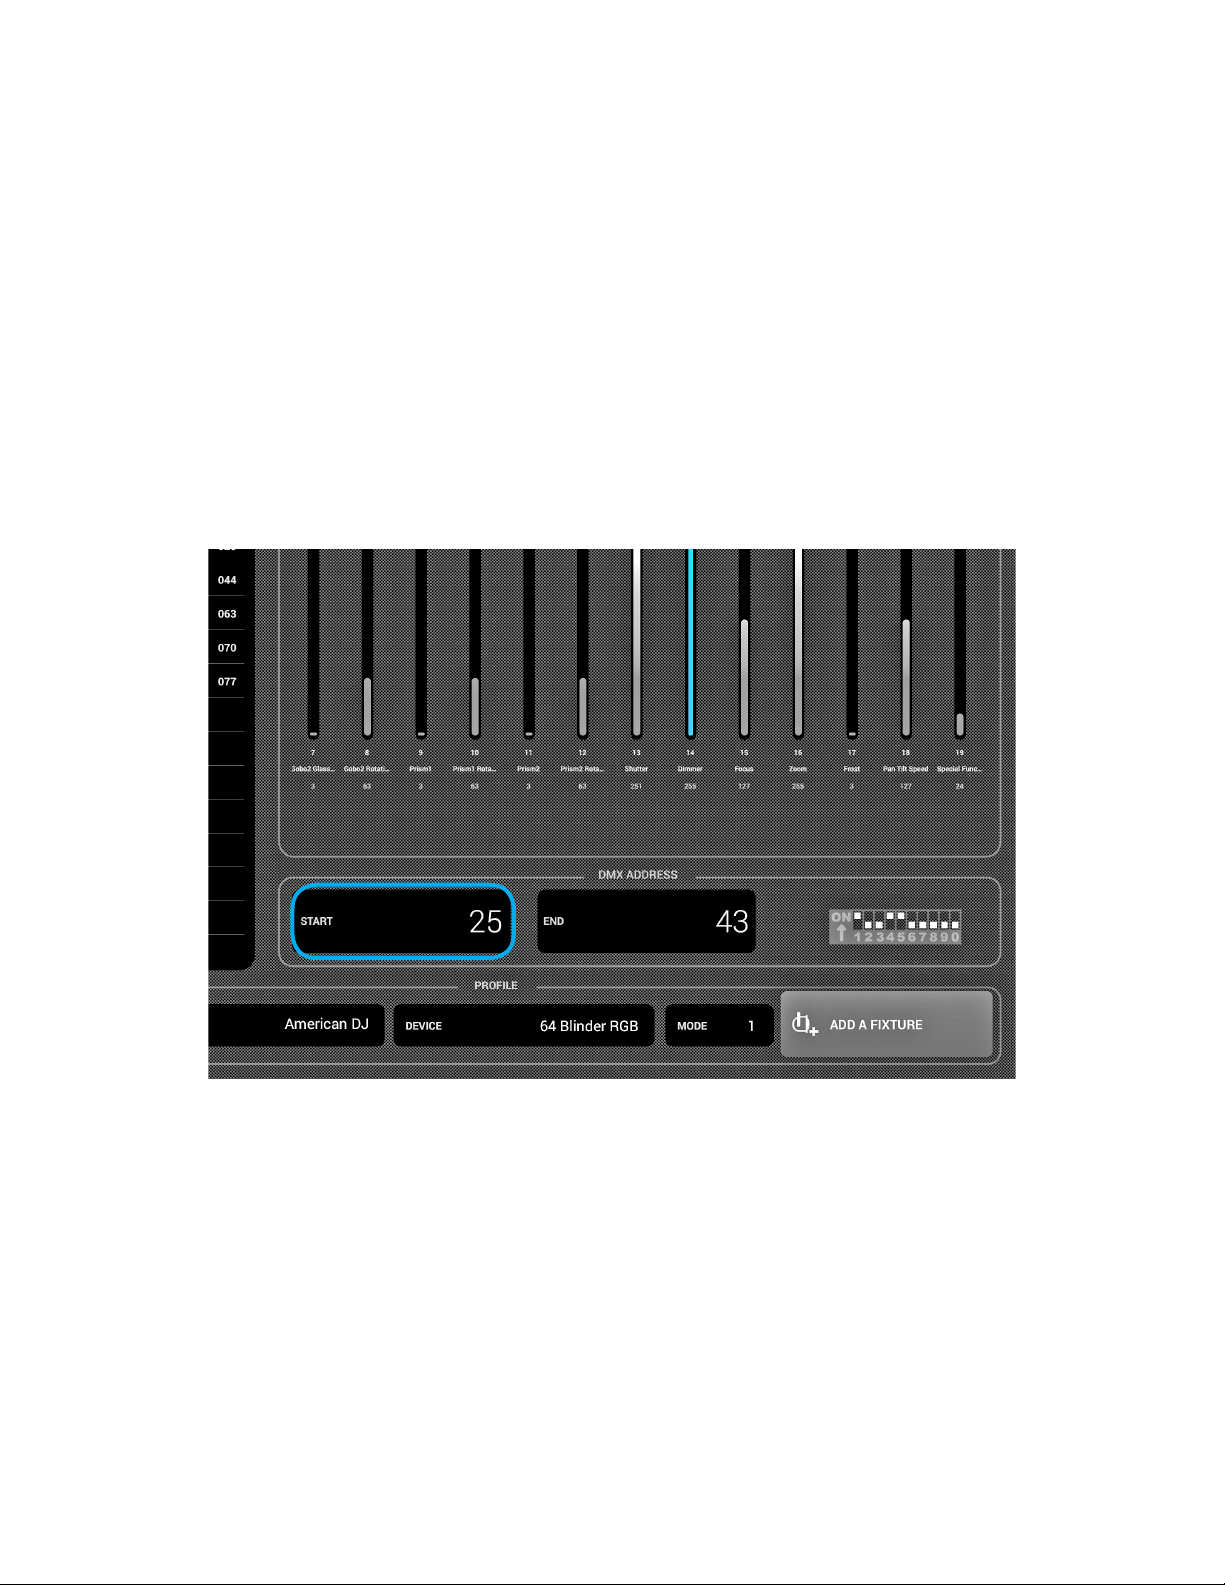
Addressing Features
Each DMX xture is assigned a unique number so that myDMX GO knows which xture to send the
correct information to.
To address a xture:
1. Tap the xture in the list and look at the Start address number
2. Use the digital display on the actual xture to set the same number.
Refer to the xture manufacturers manual on how to do this.
Some xtures use DIP switches instead of a digital display. The correct DIP switches are shown
on the right.
* If you have already set up your xture and it’s not practical to change the DMX address, this can
be changed by tapping the Start Address number. Note that the end address is xed because the
number of channels a xture uses is xed.
Changing The Order Of The Fixtures
All eects are applied in the order the xtures appear in the list.
For example, if you have the myDMX GO color eect chasing between xtures, it will start at xture 1
and end at the last xture in the list. To change the order of xtures, tap and hold a xture and drag it to
a dierent position in the list (this will not aect the DMX address of the xture).
15
Page 16

APP INSTRUCTIONS
Controlling With The Faders
myDMX GO has been designed to control xtures automatically, however you can manually override the
value of a xture’s channel.
To do this:
1. Select a xture by tapping it in the list.
2. Scroll left or right to nd the fader you would like to control. Tap the desired fader to select.
Once selected, the fader will turn blue.
3. Drag the fader up and down to change the value
• To reset the fader back to automatic mode, tap the reset icon at the top of the fader
16
Page 17

APP INSTRUCTIONS
Setting Pan/Tilt Limitations
The limitations grid allows you to limit and invert the pan and tilt values of a xture or group of xtures.
There are several reasons why this is important:
1. Moving-Head lights can typically pan 360-600 degrees. For myDMX GO’s eects to look good,
it’s best that they only pan no more than 180 degrees.
2. Depe
3. The pan or tilt is sometimes inverted, meaning that the beam won’t move in the correct direction
Setting the limitations for your xtures is a simple task that will assist in cleaning up and organizing your
light shows.
To set up the limitations:
1. Tap the xture group button to the top right of the xtures list.
2. Tap the limitations button.
3. Tap bottom center of the square and move until your lights are pointing at the oor.
4. Tap the top center of the square and move until your lights are pointing at the ceiling.
5. Tap the left center of the square and move until your lights are pointing to the left.
6. Tap the right center of the square and move until your lights are pointing to the right.
7. Tap the middle of the square and move left/right until your lights are centered.
For a Moving Head, the limitations square normally looks like in the image below.
For Scanners, limitations are not normally required due to the physical limitations of the mirror.
Repeat the above steps for each of your light groups, and then repeat with single xture selections
if some xtures are o-center.
nding on how a light is set up (or rigged), the center point is not always in the center of the
stage/dance oor.
compared with the other lights in the project.
17
Page 18

APP INSTRUCTIONS
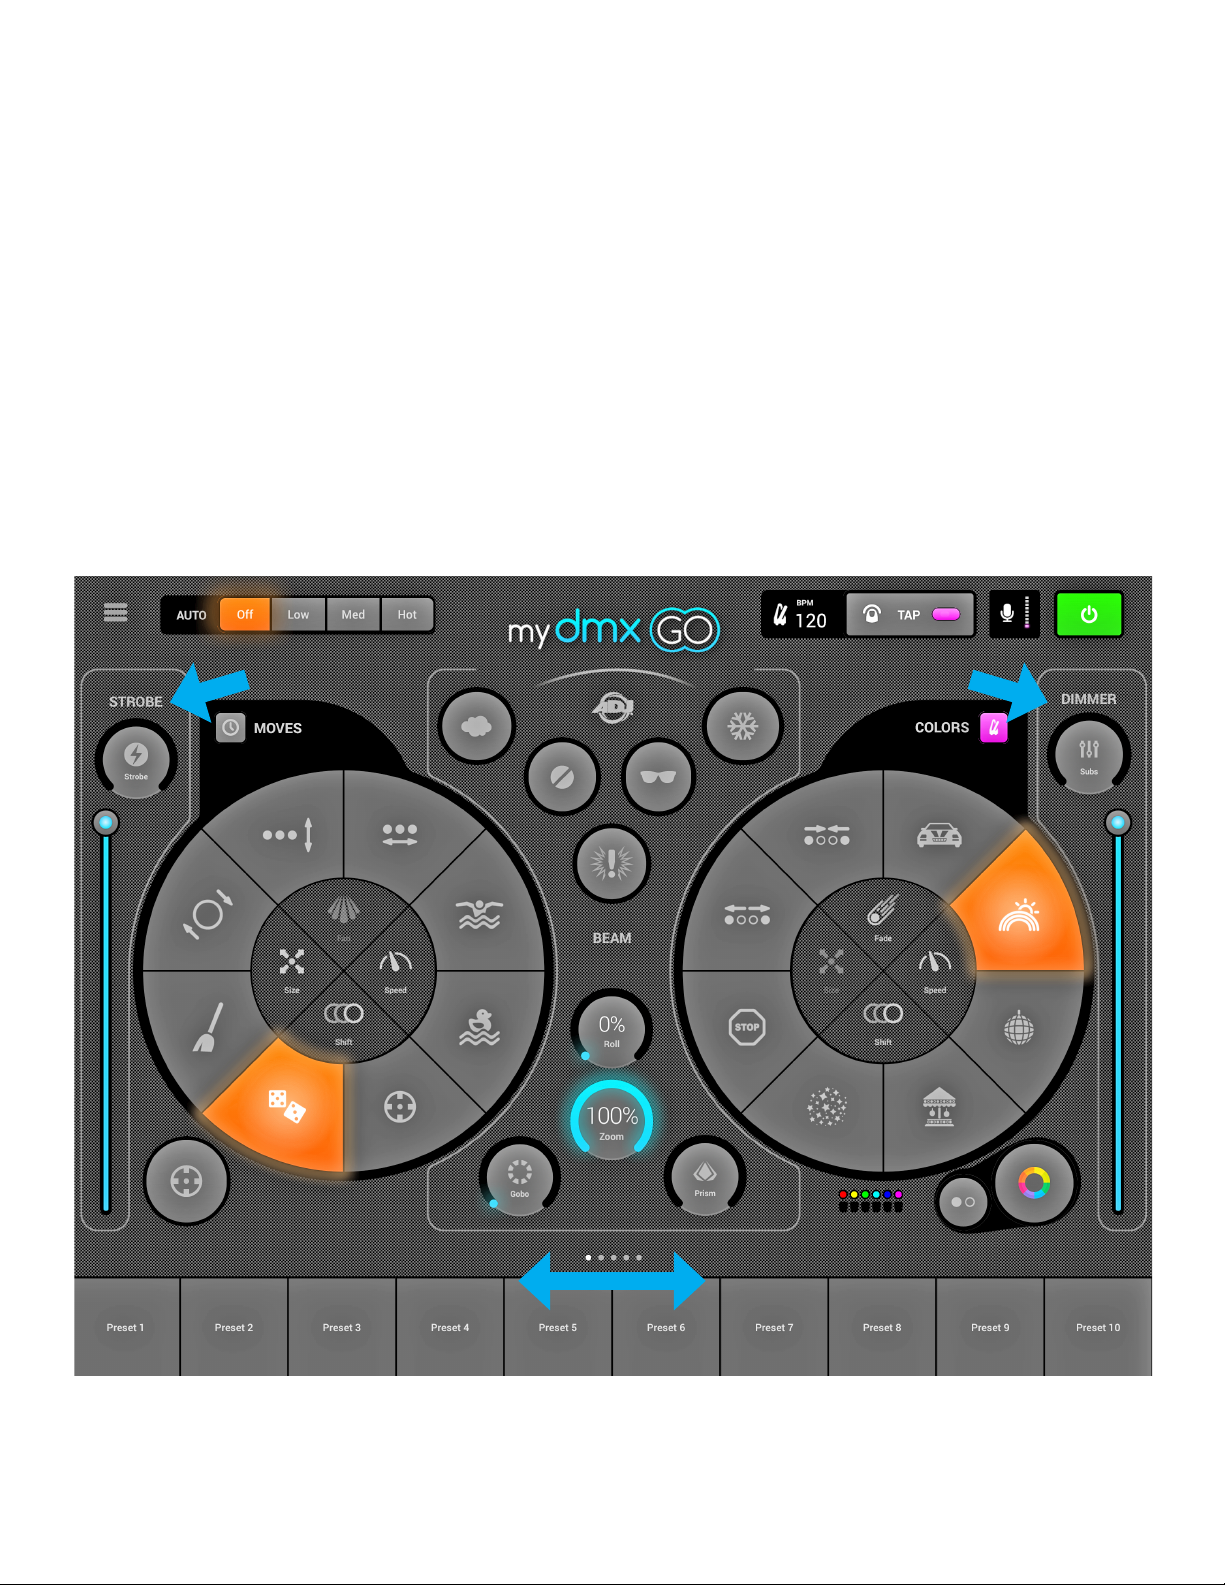
Live Screen
The live screen is your controller. It’s where all lighting eects are triggered.
• Moves on the left, Colors on the right and ash eects in the middle.
• Change the Fan/Speed/Size/Shift/Fade of the selected eect by tapping in the center of the
eect wheel.
• Select colors by tapping the color wheel in the bottom right.
• Touch and hold one of the 50 preset buttons to store a desired preset.
• Sync with the music by tapping the square button next to MOVES and COLORS.
• Tapping it once will sync with the BPM.
• A second tap will sync with the pulse using the tablet’s microphone.
• Touch the myDMX GO logo to show and hide on-screen tips (see page 19).
18
Page 19

19
Page 20

APP INSTRUCTIONS
Colors
The color eects are situated to the right of the console. 8 eects are available and will be applied to all
RGB/RGBW or CMY color mixing lights. Lights with xed colors may also be used with the color eects,
but they will not mix in the same way as color mixing xtures.
Choosing an Eect
Tap one of the 8 segments to play an eect across your lights. Once an eect has been chosen, the
Fade, Speed, Shift and Size of the eect can be adjusted by tapping any of the 4 buttons in the center.
The available options depend on the selected eect. Note: make sure that the xtures are in the correct
order because eect results may vary based on xture order.
Setting a color
To set which colors will be used in the eects; tap the color wheel at the bottom right. The color wheel
is used to set the colors for the eects, and the segments around the color wheel are used to override
the eect and recall static colors on all xtures with xed color wheels. Tap in an empty space in the
color wheel to add a color. Drag a color point outside the color wheel to remove it. Up to 6 colors can
be selected in the color wheel + 6 static colors with the segments. These are displayed below the color
wheel.
Static colors are always xed and are spread across lights with xed color wheels. Change the pattern
by tapping the button to the left of the color wheel button. This pattern button is also used with color
mixing xtures in the STOP eect.
20
Page 21

APP INSTRUCTIONS
Moves
Move eects are available to the left of the console and can be applied to any xture that has Pan and
Tilt channels. Before applying move eects, it is recommended to set the limitations rst.
Choosing an Eect
As with the color eects, the move eects are triggered by tapping the 8 segment buttons.
Each move eect can be adjusted using the 4 options in the center - Fan, Speed, Size and Shift.
Setting the Center Position
The center position of an eect should be set before using the limitations, however the eect can be
moved around to ne tune eects.
To do this:
1. Tap the center button to the bottom left of the moves area.
2. Drag the point around the grid to adjust the center point of the eect.
• Tapping the reset button on the right puts the center point back in the center of the grid.
The button on the left enables the gyro, which allows you to control the center point by physically moving
the iPad (not available on Android).
21
Page 22
APP INSTRUCTIONS
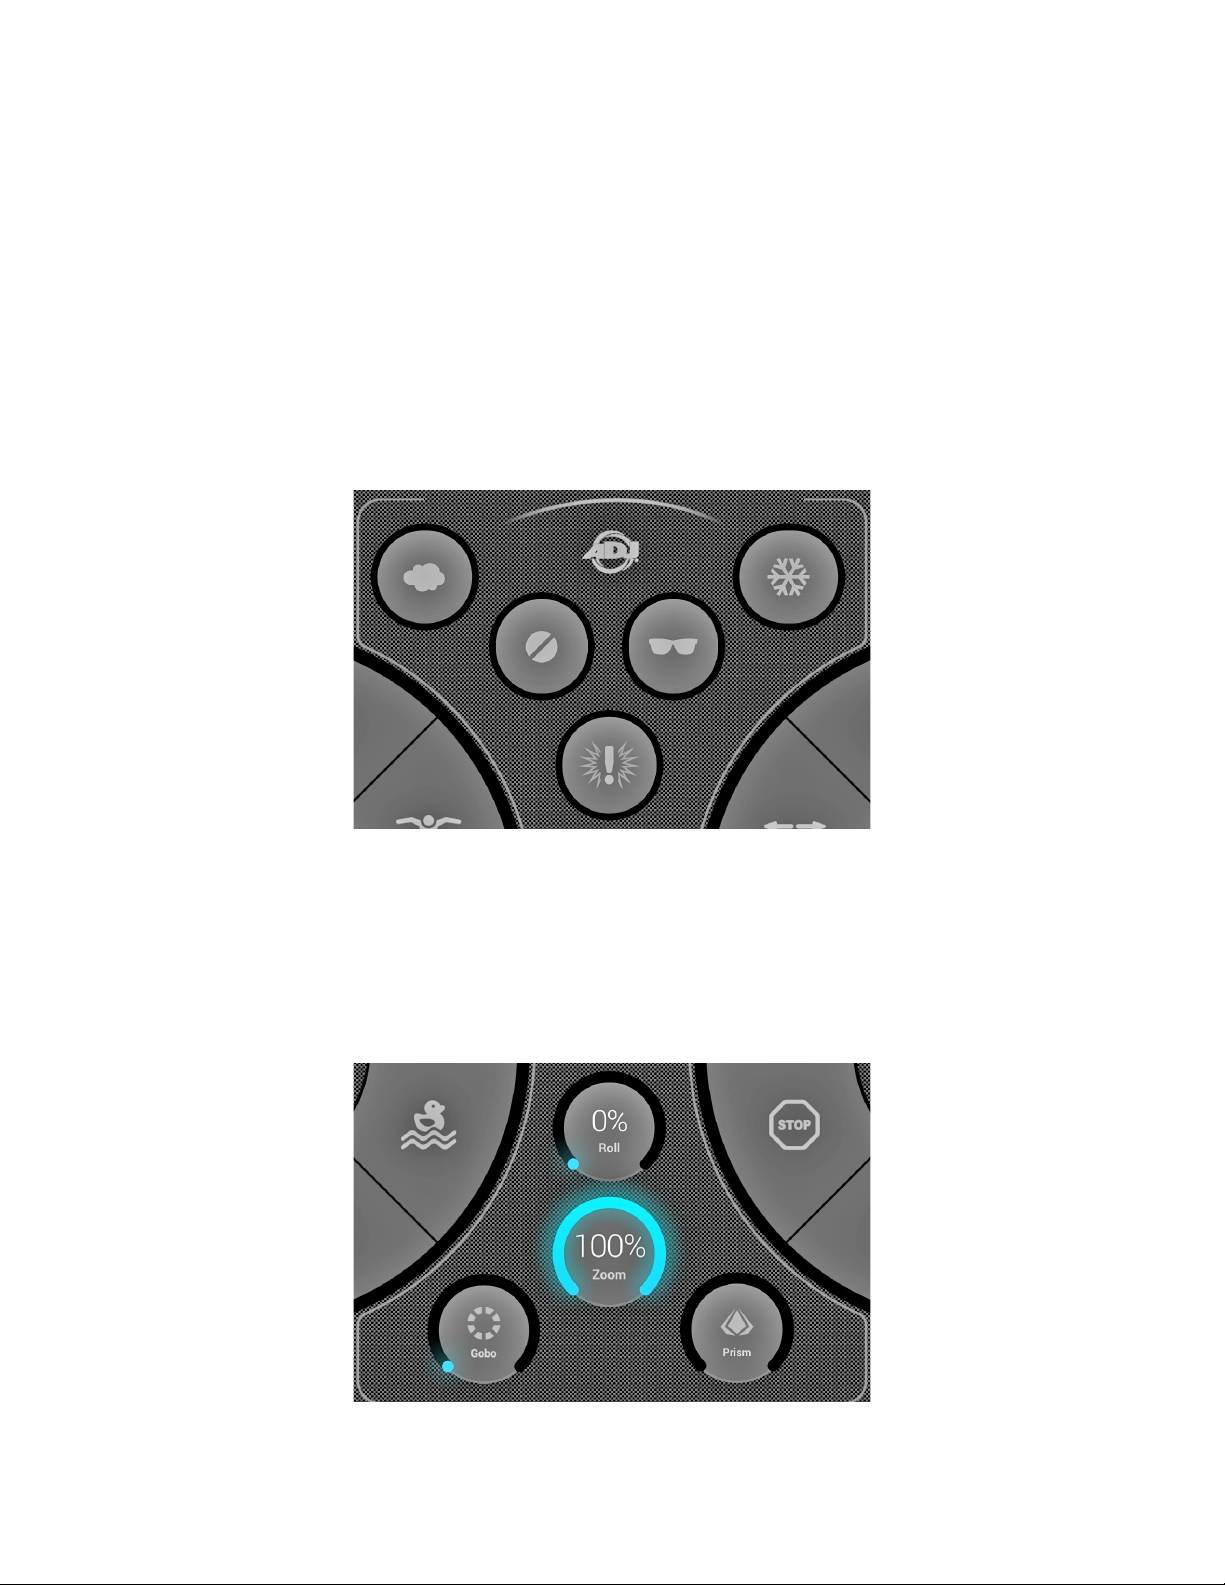
Flash FX
The 5 ash eects are in the center of the console and are only active when pressed. This allows you to
create quick bursts of eects. If you want to latch the eects on, this can be done by touching a ash
eect, dragging outside the button and releasing.
The following eects are available from left to right:
1. Smoke - activates a smoke machine.
2. Blackout - switches o all lights.
3. WOW! - creates a build-up of strobe eects synchronized with the BPM.
4. Blinder - directs a powerful bright light to the front.
5. Freeze - pauses the show, freezing the current levels being output.
Special FX
The special eects allow control of Iris, Zoom, Gobo and Prism (if your xtures support this functionality).
Tap the dial to enable the eect or select a gobo, then drag around the dial to control the selected
eect (e.g. gobo rotation speed, Iris level etc). By default these dials are rotary, but if you would prefer
to control these in a linear fashion by moving up and down, this can be set in the myDMX GO settings
which is accessible from the iPad settings on iPad, or the menu on Android.
22
Page 23
APP INSTRUCTIONS
Strobe
Tapping the strobe button will ash the lights at dierent speeds depending on the value of the slider.
Dimmer
The slider on the right controls the brightness of all lights. You can control the brightness of each xture
type, and ash the lights by tapping the Subs button.
Presets
The presets allow you to store a snapshot of your current show. There are 50 presets in total with 10
visible at a time. To jump to the previous/next bank of presets, swipe left/right along the bottom of the
screen. To store a preset, touch and hold it for 1 second, like with a car stereo! Choose a name for your
preset and tap “Save Preset”. Any manual channel values set on the xtures screen will also be saved.
23
Page 24
APP INSTRUCTIONS
Pulse
Music pulse sync uses the microphone of the tablet to listen to the music. When the volume level jumps
over a threshold, the eect will jump to the next section. The threshold is calculated automatically
depending on the volume level.
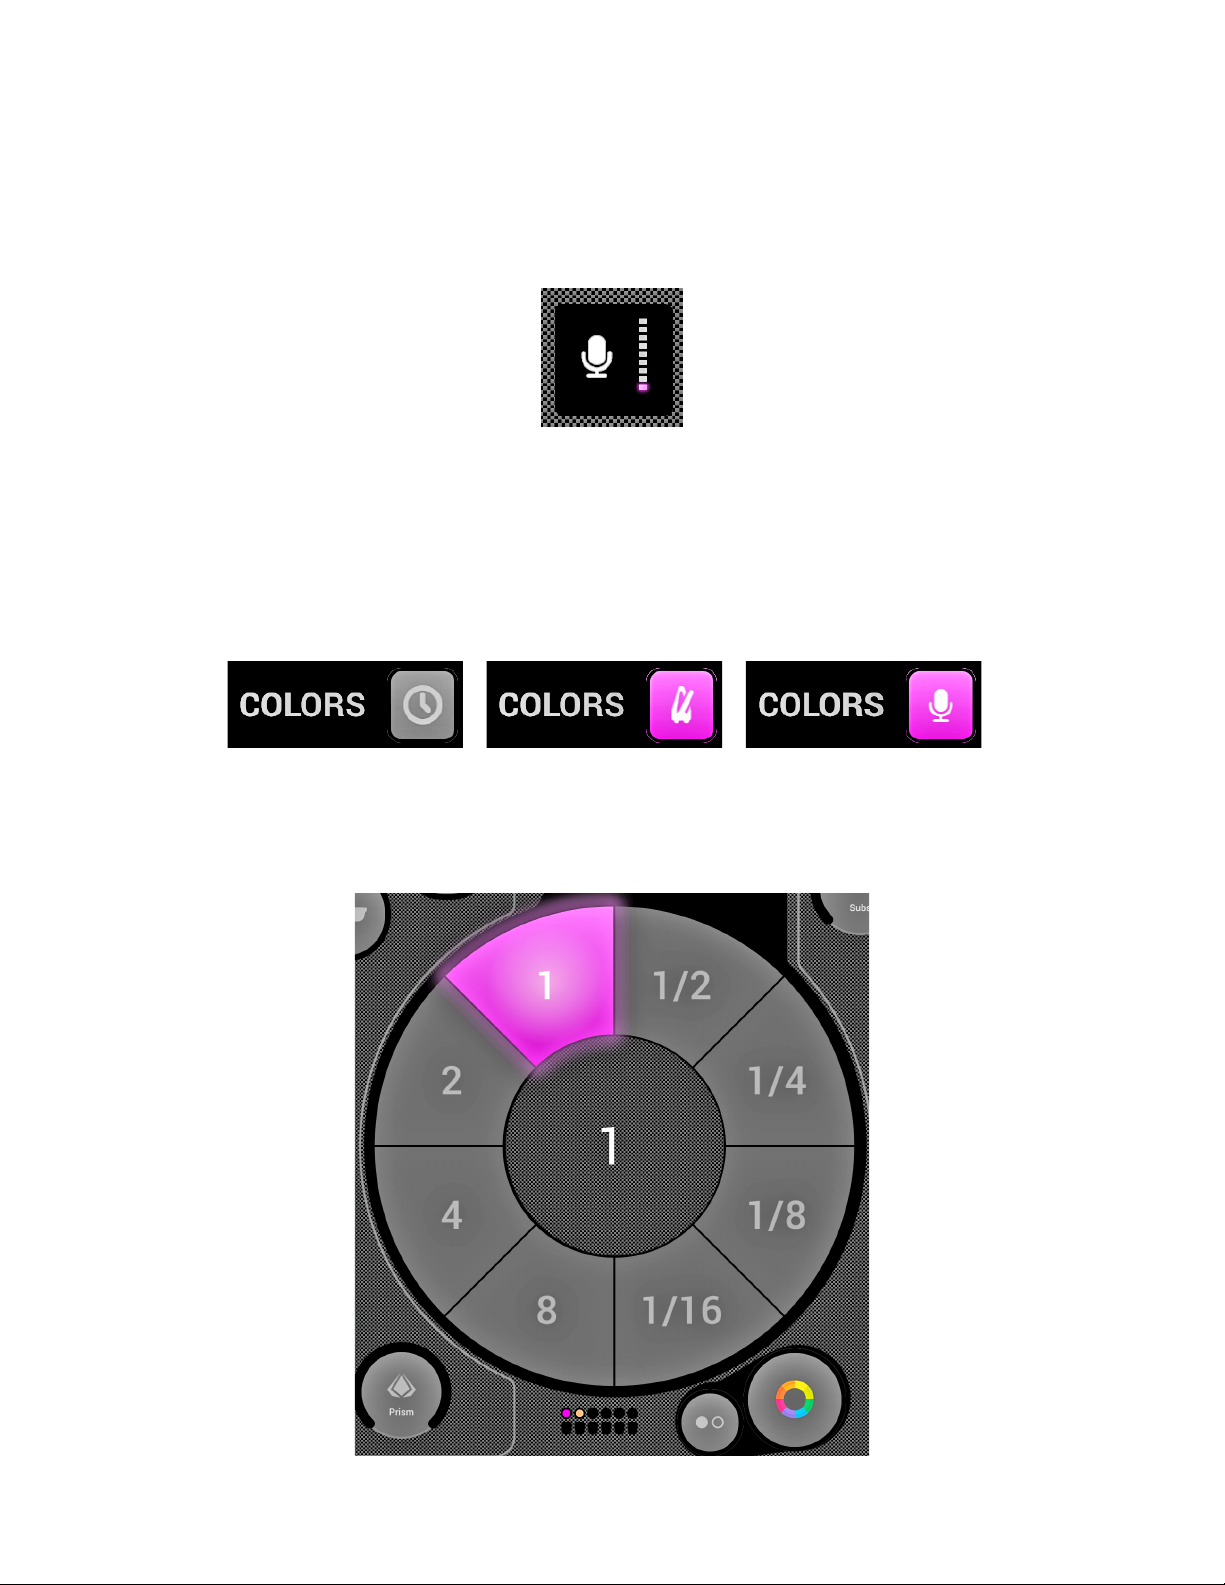
Sync
Sync eects are designed to sync music, either with a BPM (beats per minute) to create a consistent
beat-matched eect, or via the music pulse where the eects pause when the music stops.
1. Tap the square button next to Moves or Colors to sync the respective eects with the BPM, a
metronome icon will appear.
2. Tap a second time to sync with the pulse, a microphone icon will appear.
3. Tap again to stop the sync, a clock icon will appear.
When in BPM sync mode, the speed control of the eects will change from a slider to a selector
allowing you to choose the beat division. For example, if you have the disco eect selected, the 1x will
change the color on each beat, the 2x will change the color every 2 beats, and the 1/2x will change
the color twice for each beat.
24
Page 25

APP INSTRUCTIONS
BPM - Tap
Be sure the Color or Move eects are in BPM mode with the metronome icon visible. Once visible, tap
the BPM with the TAP button at least 3 times.
BPM - Ableton Link (iPad only)
myDMX GO can sync with over 100 dierent apps and software using Ableton Link. This is the most
accurate way to sync your lights with the music. To set up Ableton Link:
1. Ensure that the Ableton Link device and myDMX GO are on the same network.
2. Ope
3. Open the myDMX GO menu and tap “Ableton Link” (at the bottom).
4. Tap “Ableton Link”.
n your Ableton Link compatible software and enable LINK (refer to the software/app user manual).
When Ableton Link is enabled, you will see “LINK” written in the top right.
Note: the displayed BPM is rounded to the closest number, the BPM that is analyzed and used for
processing is much more accurate.
25
Page 26

APP INSTRUCTIONS
MIDI (iPad Only)
The eect buttons, preset buttons, ash buttons and sub master dimmers can be controlled by MIDI.
This is a bonus feature and custom mappings are not currently possible. If you have a controller such as
an Elation or Behringer controller, you can normally modify the commands the controller sends (refer to
the respective user manuals for further info). To control myDMX GO via MIDI, you’ll need a Lightning to
USB adapter.
The MIDI mappings are as follows:
Color Eects 1-8: Note 40-47
Move Eects 1-8: Note 48-55
Presets 1-8: Note 39-32
Presets 9-16: Note 31-24
Presets 17-24: Note 23-16
Presets 25-32: Note 15-8
Presets 33-40: Note 7-0
Sub master dimmers 1-8: CC 48-55
Sub ash buttons 1-8: Note 64-71
Master dimmer: CC 56
Strobe button: Note 56
Flash buttons 1-5: Note 58-62
TAP button: Note 63
26
Page 27
APP INSTRUCTIONS
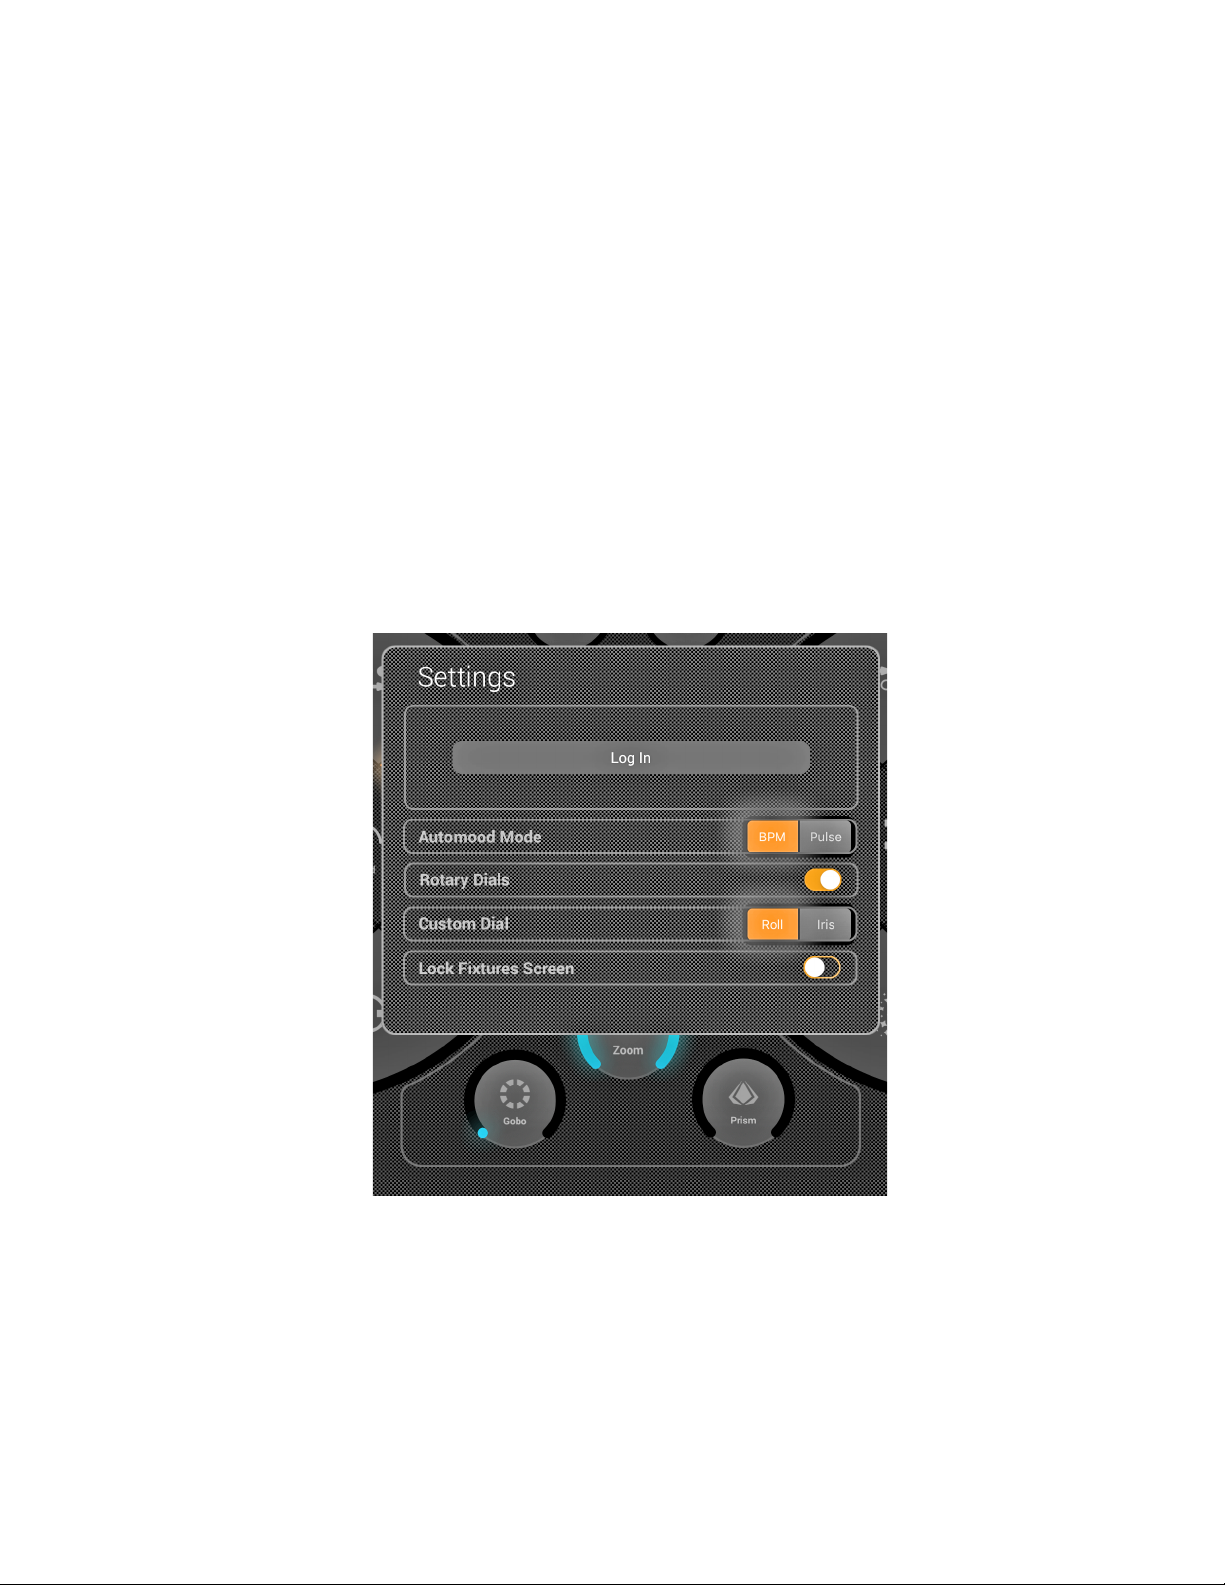
Other Settings
The settings screen can be accessed from the myDMX GO menu.
1. Light Cloud details - The name and e-mail address of the Light Cloud account is displayed here.
Light Cloud allows you to synchronize data with other apps and devices. In future this will include
xture proles, projects and in-app purchases.
2. Automood Mode - Determines if an eect is synchronized to the BPM or pulse when Automood
is activated.
3. Rotary Dials - Dials will be controlled by moving in a circle instead of up and down.
4. Custom Dial (iPad only) - Allows for the dial in the middle to control the size of an iris or the speed
of a roller barrel.
5. Lock Fixtures Screen - Locks the possibility to add/remove/change the order of xtures. This can
be useful if myDMX GO is being used in a bar or installation.
27
Page 28

TROUBLE SHOOTING TIPS
Unable to nd myDMX GO app in the app store:
The myDMX GO app is only available for iOS (10.0 and up) and Android (version 4.0.3 and up) powered
tablets. Please check your device compatibility when downloading.
Unable to download a prole for a lighting xture:
If the xture appears in the list but has a red dot to the right of the xture, the prole needs to be
downloaded. In order to download the prole, ensure that the tablet has an internet connection.
Unable to nd a xture prole for a lighting xture:
If you do not see a prole for your xture, visit https://store.lightriderapp.com/en/ssl to create a New
Fixture Request
Connection between the WiFi device and tablet are lost:
Refresh the connection by disconnecting the power to the WiFi device and reconnecting it after a 5
seconds. If problem persists, delete the device’s WiFi prole and re-connect using your tablet.
FREQUENTLY ASKED QUESTIONS
Listed below are a few answers to common questions users may have.
1. What is the WiFi password?
The password is smartdmx0000.
2. How many xture proles are there?
The xture library has over 15,000 lighting xture proles. If you do not see a prole for your xture,
visit https://store.lightriderapp.com/en/ssl to create a New Fixture Request.
3. Can you control the myDMX GO WiFi device via USB?
The USB-C port on the WiFi device can be used to power the WiFi unit connect the device to an
Android tablet for control (Android only).
For additional accessories, please visit www.adj.com
28
Page 29
SPECIFICATIONS
HARDWARE: ADJ myDMX GO WIFI DMX
Total Power Input: 5-5.5V DC 0.6A
Output Protocol: DMX512
DMX Channels:
256 DMX Channels
(*An upgrade to 512 channels is available at store.dmxsoft.com)
Presets: 50 User Dened Presets
WiFi: 2.4GHZ Frequency
Connections: USB-C, 2x XLR3, 2x HE10
Memory: 128K Flash
IP Rating: IP20
Weight: 4.2 oz. / 120 g
Dimensions
(without antenna or bracket):
Dimensions
(with antenna):
4.9” (L) x 2.6” (W) x 2” (H)
125 x 65 x 51mm
5.6” (L) x 2.6” (W) x 4.6” (H)
143 x 65 x 117mm
Warranty: 2 Year (730 Days)
APP: ADJ myDMX GO
Android Compatibility: Android 4.0.3 and up
Requires iOS 10.0 or later.
Compatible with iPad Air, iPad Air WiFi + Cellular, iPad mini 2, iPad mini 2 WiFi
+ Cellular, iPad Air 2, iPad Air 2 WiFi + Cellular, iPad mini 3, iPad mini 3 WiFi +
Cellular, iPad mini 4, iPad mini 4 WiFi + Cellular, 12.9 inch iPad Pro, 12.9 inch
iOS Compatibility:
iPad Pro WiFi + Cellular, 9.7 inch iPad Pro, 9.7 inch iPad Pro WiFi + Cellular,
iPad (5th generation), iPad WiFi + Cellular (5th generation), 12.9 inch iPad Pro
(2nd generation), 12.9 inch iPad Pro WiFi + Cellular (2nd generation), 10.5 inch
iPad Pro, 10.5 inch iPad Pro WiFi + Cellular, iPad (6th generation), iPad WiFi +
Cellular (6th generation), iPad Pro (11 inch), iPad Pro (11-inch), iPad Pro (12.9
inch) (3rd generation), and iPad Pro (12.9 inch) (3rd generation).
Please Note: Specications and improvements in the design of this unit and this manual are subject to change without any prior written notice.
OPTIONAL ACCESSORIES
Order Code Description
PWR571 POW-R BAR65 power block with protected AC power and USB in one.
C-CLAMP C-Clamp for light-medium duty hanging applications.
PRO-CLAMP 360 degree aluminum clamp with a max rating of 1,100 lbs.
*Additional accessories available at www.adj.com
29
Page 30

OPTIONAL ACCESSORIES
3.9”
(87 mm)
4.9”
(125 mm)
2.6”
(65 mm)
2.6”
(65 mm)
4.6”
(117 mm)
2”
(51 mm)
*Installation bracket shown
30
Page 31

Page 32

 Loading...