

Page 1

Page 2

OVERVIEW
The MIDIcon is a USB MIDI control panel designed to work alongside the Elation
lighting software packages. The Midicon is USB powered and uses the USB
class drivers so that no driver needs to be installed on the host PC. When you
power it on for the first time, your PC will automatically assign the MIDI driver that
is part of your operating system. It will work with both Windows and Apple
operating systems. The MIDIcon uses standard MIDI messages to communicate
with your software. At the end of this manual are tables showing the MIDI notes
and continuous control numbers assigned to the buttons and faders. The Elation
lighting software programs will have templates for the MIDIcon so that you can
start using it right away, without having to program each button. Elation will
continue to work with software vendors to provide templates for more programs
in the future. If you have software that allows input from a MIDI control panel, you
can also use the programming functions included with your software to configure
it to work with the MIDIcon.
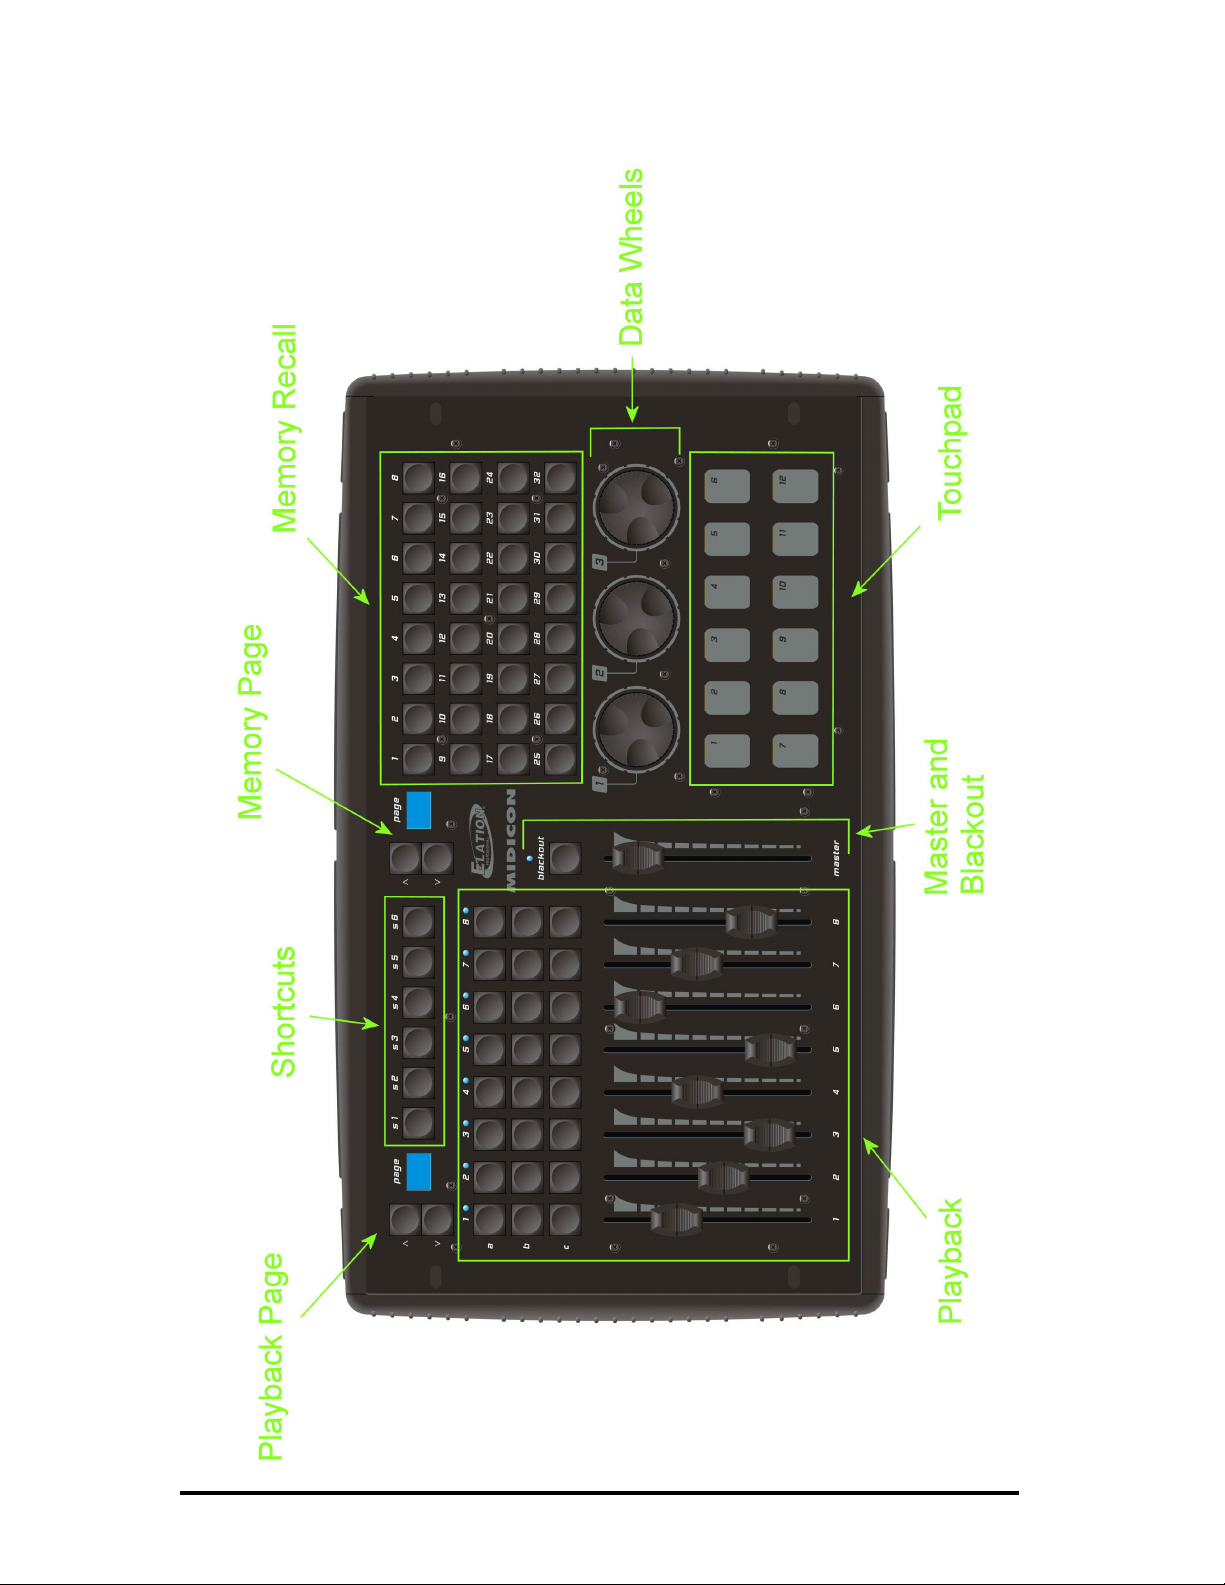
Refer to the picture of the MIDIcon on the next page, you will see that the
controls can be broken down into 6 sections. Playbacks: This includes most of
the left side of the control panel, 8 playback faders with 3 buttons above each
fader. The page select section in the upper left also applies to the playbacks.
Shortcuts: Above the playbacks are 6 shortcut keys labeled S1-S6. Memories:
In the upper right area are 32 buttons for recalling memories or scenes. The
page display next to this selection also applies to these 32 buttons. Data Entry
Wheels: Below the 32 buttons are 3 wheels that can be used for data entry or
direct control of lighting parameters. Touchpad: Below the wheels are 12 touch
buttons for triggering momentary lighting effects. Master and Blackout: In the
center is a grand master fader and a blackout button.
The MIDIcon sends MIDI note on and note off messages to your software
whenever buttons are pressed and when the data wheels are turned. It also
sends MIDI continuous controller messages when you move the faders or use
the page selects. When a button is pressed a MIDI note on message is sent and
when a button is released a MIDI note off message is sent. This will allow you to
control momentary effects.
The MIDIcon can receive note messages and continuous controller messages to
control the LEDs and the page displays. This allows your software to take
control of the MIDIcon so that they will be in sync with each other. As soon as the
MIDIcon receives any LED control message, it will defer to the software for LED
control from that point forward.
1
Page 3
2
Page 4

Playbacks
The playback section was designed to take advantage of the playback features in
the Elation lighting software programs. There are “A”, “B” and “C” buttons above
each playback fader. The function of each button will vary depending on the
software that you are using. The faders send standard 7 bit MIDI continuous
controller messages, this gives the faders a resolution of 128 steps. The
playback buttons send MIDI note messages. Consult the table at the end of this
manual for the continuous controller and note numbers used.
The page controls in the upper left will allow you to select from 16 playback
pages. The MIDIcon uses MIDI channels to page the playbacks. The page
number shows the current MIDI channel used by the playback faders and
buttons. The MIDIcon has a page lock feature that holds the MIDI channel on any
active playback. When a playback fader is above 0, the MIDI channel will hold for
that particular playback regardless of a page change until the fader is brought
back to 0. This will keep the current cue locked to it’s playback until it is released.
The LED above each playback is lit when it’s playback fader is active.
Shortcut Buttons
These 6 buttons are for frequently used software functions. Please refer to the
MIDI table at the end of the manual for each button’s note assignment.
Memory Buttons
These 32 buttons can be used to call lighting effects, scenes or other memories.
The page controls next to these will select the MIDI channel for these buttons,
giving you 16 pages of 32 buttons. Please refer to the MIDI table at the end of
the manual for the note assignments.
Data Wheels
The data wheels send MIDI note on messages for increment and decrement.
You can also press down on the wheels. This gives you an additional button
press and release. The wheels are not paged and always use MIDI channel 1.
Most of the time the wheels will match the context of any active programming
screen on your software program. They could also be used to adjust channel
values, color mixing, fade times, etc. Refer to your lighting software’s manual for
more specific way to use these.
3
Page 5

Touchpads
In the lower right are 12 touchpads. There is an LED above each touchpad that is
lit whenever a pad is touched. These can be used for momentary effects like
bumps or even scenes or chases that can be played like momentary effects.
These are not paged and always send MIDI note messages on MIDI channel 1.
Master
The grand master fader is generally used to control the overall level of the stage
dimmers. Above it is the blackout button that has an LED to show the current
blackout state. The MIDIcon will toggle the blackout LED when the blackout
switch is pressed. Some software programs have the ability to control the LED so
that it is in sync with the software.
Page Controls
The page controls give you additional sets of playbacks and memory buttons.
The MIDIcon uses all 16 MIDI channels to page the playbacks and memory
buttons. The exact number of pages and method of paging will depend on the
software program that you are using.
Rear Panel
On the back you will find the USB input connector and next to it the power on/off
switch. The MIDIcon gets it’s power from the USB connector so there is no
external power supply. In the center of the rear panel is a connector for a flexible
LED work light to illuminate the top panel. These are available from Elation
Lighting.
Firmware Updates
The firmware that runs the MIDIcon may need to be updated from time to time as
future software products become available. You can download the latest
firmware updates as well as the update utility program from the Elation Lighting
web site at elationlighting.com.
4
Page 6

Elation Emulation Software
The following is a brief summary of how to use the MIDIcon with the Emulation
lighting software. The first time you use the MIDIcon with Emulation you will need
to select it as your MIDI controller. Make sure the MIDIcon is turned on before
you start Emulation. Go to the “options view” by pressing the options button on
the Emulation screen, then press “MIDI”. Select the MIDIcon as the input and
the output device. If you are using Windows XP, the MIDIcon will be listed as
“USB audio device”. Next, select “MIDIcon” from the map list. The MIDIcon will
now be the default MIDI controller, you don’t need to set this again. The MIDIcon
must be powered on first whenever you start the Emulation software.
Right away you will notice that when you move the playback faders or the master
fader on the MIDIcon, the corresponding faders on the Emulation screen will
move. The playback section on the MIDIcon is very similar to the one on the
screen. The page buttons will select the playback fader bank, the “A” row of
buttons is “play” the “B” row is “back” and the “C” row is “flash”. To start a
playback, press the “A” button above the playback fader. To release a playback,
press “S2” followed by the “A” button.
The memory buttons on the MIDIcon control the eight cue buttons that are at the
top of the Emulation screen. The page controls the bank number. The top row of
eight MIDIcon buttons are “play”, the second row of buttons are “back” and the
third row of buttons are “release”. The bottom row is not used.
The data wheel’s functions will depend on which programmer screen is active;
position, beam, color mix, etc.
The master fader controls the grand master and the blackout button controls the
blackout state on the software.
The shortcut keys, S1 through S5, correspond to the row of function buttons on
the far right of the screen; stack, release, record, load and delete.
American DJ MyDMX Software
The following is a brief summary of how to use the MIDIcon with the American DJ
MyDMX lighting software. The MyDMX software will recognize any MIDI
controller so there is no setup required. Make sure the MIDIcon is turned on
before starting the software. You must also first add fixtures and create some
scenes before you can assign the MIDI triggers. MyDMX only supports MIDI
triggering for channel faders and scene buttons. You can assign the MIDIcon
faders to any of the MyDMX channel faders and assign any MIDIcon button to
any MyDMX scene button. A fader can also trigger a scene but for this to be
useful you should also assign the fader to some dimmer channels as well.
5
Page 7

MyDMX uses “MIDI learn” to assign the triggers. For a channel fader, right click
anywhere on the MyDMX fader, you will get the message “learn MIDI command”.
Left click this box to get the message “waiting of MIDI command”. Move the
MIDIcon fader that you want to assign to this channel. You must repeat this for
every channel you want to trigger. One MIDIcon fader can control many MyDMX
channels.
To assign a MIDIcon button to a MyDMX scene button, first select the scene by
left clicking on it’s button, then right click the button. You will get the same
message box as when assigning faders. Press the MIDIcon button you want to
assign to the scene. You can also use the touchpads to trigger a scene. The
MIDIcon’s page controls will give you additional buttons or faders if needed.
Elation Compuware
Please consult the Compuware help files for instructions on how to select a MIDI
controller. At the time of the printing of this manual, a template was being
designed to support the MIDIcon.
6
Page 8

MIDI Messages
The following is a list of the MIDI messages sent to your software from the
MIDIcon for each button press, wheel or fader movement.
Playback Faders (MIDI channel set by playback page)
Playback fader 1 – continuous controller 1
Playback fader 2 – continuous controller 2
Playback fader 3 – continuous controller 3
Playback fader 4 – continuous controller 4
Playback fader 5 – continuous controller 5
Playback fader 6 – continuous controller 6
Playback fader 7 – continuous controller 7
Playback fader 8 – continuous controller 8
Playback Buttons (MIDI channel set by playback page)
Playback 1 Button A – Note 29
Playback 1 Button B – Note 30
Playback 1 Button C – Note 31
Playback 2 Button A – Note 32
Playback 2 Button B – Note 33
Playback 2 Button C – Note 34
Playback 3 Button A – Note 35
Playback 3 Button B – Note 36
Playback 3 Button C – Note 37
Playback 4 Button A – Note 38
Playback 4 Button B – Note 39
Playback 4 Button C – Note 40
Playback 5 Button A – Note 41
Playback 5 Button B – Note 42
Playback 5 Button C – Note 43
Playback 6 Button A – Note 44
Playback 6 Button B – Note 45
Playback 6 Button C – Note 46
Playback 7 Button A – Note 47
Playback 7 Button B – Note 48
Playback 7 Button C – Note 49
Playback 8 Button A – Note 50
Playback 8 Button B – Note 51
Playback 8 Button C – Note 52
Shortcut Buttons (Always MIDI channel 1)
S1 – Note 22
S2 – Note 23
S3 – Note 24
S4 – Note 25
7
Page 9

S5 – Note 26
S6 – Note 27
S7 – Note 28
Data Wheels (Always MIDI channel 1)
Wheel 1 Up – Note 13
Wheel 1 Down – Note 14
Wheel 1 Press in – Note 15
Wheel 2 Up – Note 16
Wheel 2 Down – Note 17
Wheel 2 Press in – Note 18
Wheel 3 Up – Note 19
Wheel 3 Down – Note 20
Wheel 3 Press in – Note 21
Memory Buttons (MIDI channel set by the page)
Button 1 – Note 53
Button 2 – Note 54
Button 3 – Note 55
Button 4 – Note 56
Button 5 – Note 57
Button 6 – Note 58
Button 7 – Note 59
Button 8 – Note 60
Button 9 – Note 61
Button 10 – Note 62
Button 11 – Note 63
Button 12 – Note 64
Button 13 – Note 65
Button 14 – Note 66
Button 15 – Note 67
Button 16– Note 68
Button 17 – Note 69
Button 18 – Note 70
Button 19 – Note 71
Button 20 – Note 72
Button 21 – Note 73
Button 22 – Note 74
Button 23 – Note 75
Button 24 – Note 76
Button 25 – Note 77
Button 26 – Note 78
Button 27 – Note 79
Button 28 – Note 80
Button 29 – Note 81
Button 30 – Note 82
Button 31 – Note 83
8
Page 10

Button 32 – Note 84
Touchpad (Always MIDI channel 1)
Pad 1 – Note 1
Pad 2 – Note 2
Pad 3 – Note 3
Pad 4 – Note 4
Pad 5 – Note 5
Pad 6 – Note 6
Pad 7 – Note 7
Pad 8 – Note 8
Pad 9 – Note 9
Pad 10 – Note 10
Pad 11 – Note 11
Pad 12 – Note 12
Grand Master Fader – continuous controller 9 (Always MIDI channel 1)
Blackout Button – Notes 28 and 89 (Always MIDI channel 1)
To be compatible with several different lighting programs, this button sends 2
messages; note 28 (on/off) indicates the blackout state (on/off), note 89 indicates
the switch state (press/release)
Playback Page – continuous controller 10
Up button – Note 85
Down button – Note 86
The page number is embedded in the MIDI channel for continuous controller 10.
The continuous controller value can be ignored. The notes will show the buttons
as pressed or released. (Notes are always MIDI channel 1).
Memory Page – continuous controller 11
Up button – Note 87
Down button – Note 88
The page number is embedded in the MIDI channel for continuous controller 11.
The continuous controller value can be ignored. The notes will show the buttons
as pressed or released. (Notes are always MIDI channel 1).
9
Page 11

LED Control
The following messages can be sent to the MIDIcon by the software to control
the states of the LEDs and displays.
The MIDIcon will control the LEDs and page displays on powerup. As soon as
any valid LED control message is received, the MIDIcon will defer all LED control
to external software.
Playback Page Display – continuous controller 10 or continuous controller 12
If using continuous controller 10, the MIDI channel will set the page number 1-16,
If using continuous controller 12, the value byte will set the page number to 0-99.
Continuous controller 10 will also set the playback’s MIDI channel, continuous
controller 12 will only change the display. Continuous controller 12 can only use
MIDI channel 1.
Memory Page Display – continuous controller 11 or continuous controller 13
If using continuous controller 11, the MIDI channel will set the page number 1-16,
If using continuous controller 13, the value byte will set the page number to 0-99.
Continuous controller 11 will also set the playback’s MIDI channel, continuous
controller 13 will only change the display. Continuous controller 13 can only use
MIDI channel 1.
Blackout LED – Note 28 or 89
Note 28 will also set the blackout state flag, 89 will only set or clear the LED. Use
MIDI channel 1.
Playback LEDs – For playbacks 1 through 8; use notes 31, 34, 37, 40, 43, 46,
49, 52, these are the same as the “C” row of buttons. Use MIDI channel 1.
Touchpad LEDs – Notes 1 through 12 (same notes as the pads). Use MIDI
channel 1.
10
 Loading...