

Page 1
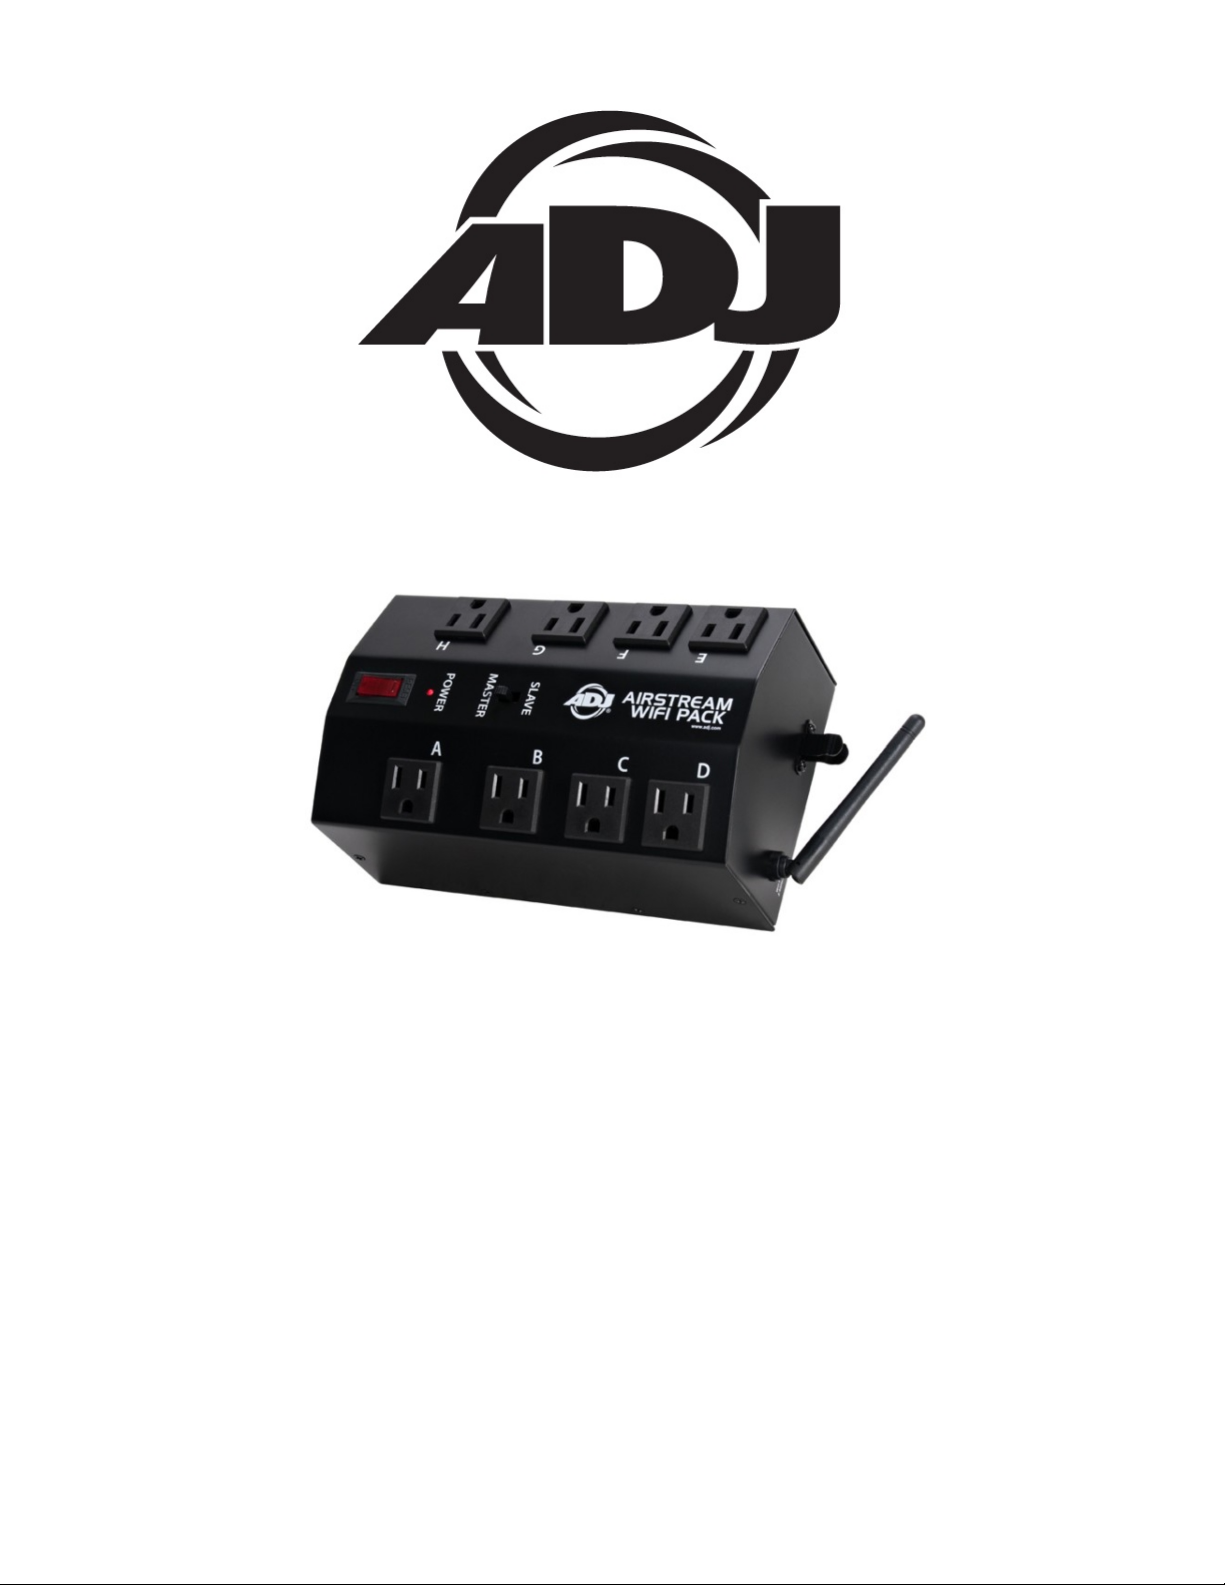
AIRSTREAM WIFI PACK™
user guide
Page 2

2
©2017 ADJ PRODUCTS LLC all rights reserved. Information, specifications, diagrams, images, and
instructions herein are subject to change without notice. ADJ logo and identifying product names and
numbers herein are trademarks of ADJ PRODUCTS LLC. Copyright protection claimed includes all
forms and matters of copyrightable materials and information now allowed by statutory or judicial law
or hereinafter granted. Product names used in this document may be trademarks or registered
trademarks of their respective companies and are hereby acknowledged. All non-ADJ brands and
product names are trademarks or registered trademarks of their respective companies.
ADJ PRODUCTS LLC and all affiliated companies hereby disclaim any and all liabilities for property,
equipment, building, and electrical damages, injuries to any persons, and direct or indirect economic
loss associated with the use or reliance of any information contained within this document, and/or as
a result of the improper, unsafe, insufficient and negligent assembly, installation, rigging, and
operation of this product.
Apple, the Apple logo, iPhone, iPad, and iPod Touch are trademarks of Apple Inc., registered in the
U.S. and other countries. App Store is a service mark of Apple Inc.
ADJ PRODUCTS LLC World Headquarters
6122 S. Eastern Ave. | Los Angeles, CA 90040 USA
Tel: 800-322-6337 | Fax: 323-582-2941 | www.adj.com |support@americandj.com
ADJ Supply Europe B.V.
Junostraat 2 | 6468 EW Kerkrade | Netherlands
Tel: +31 45 546 85 00 | Fax: +31 45 546 85 99 | www.americandj.eu |service@adjgroup.eu
DOCUMENT VERSION
Please check www.adj.com for the latest revision/update of this guide.
Date
Document
Version
App
Software
Version
≥
Pack
Firmware
Version ≥
Notes
05/18/17 1.3
1.1.0413 2.07
www.adj.com
Updated version.
Page 3

3
CONTENTS
General Information
4
Limited Warranty
6
Safety Instructions and Guidelines
7
Device Set Up & Overview
9
Device Installation
10
Wireless Operation Guidelines
12
App Set Up & Overview
13
App Operation
16
Trouble Shooting Tips
34
Frequently Asked Questions
36
Pack Color ID and Outlet List
37
Technical Specifications
39
www.adj.com
Page 4

4
GENERAL INFORMATION
INTRODUCTION
Congratulations, you have just purchased one of the most innovative products on the market today! It
has been designed to perform reliably for years when the guidelines in this manual are followed.
Please read and understand the instructions in this manual carefully and thoroughly before
attempting to operate this device. These instructions contain important safety and use information.
The ADJ AIRSTREAM WIFI PACK™ is an 8-power outlet distribution device (ON/OFF) controlled via
the AirstreamWiFi™ app, available for download from App Store® and compatible with iPhone®,
iPad®, and iPod Touch® mobile digital devices. The AirstreamWiFi app creates a private standalone
WiFi network, so no existing network infrastructure is required. After connecting the AIRSTREAM
WIFI PACK to the AirstreamWiFi app, you can wirelessly switch the 8 power outlets ON/OFF manually,
automatically, or based on a specific schedule from iPhone, iPad, and iPod Touch mobile digital
devices. The AIRSTREAM WIFI PACK network operates on a 2.4 GHz wireless frequency. The
AIRSTREAM WIFI PACK is an ideal indoor solution for mobile entertainers, mobile DJs, bands,
nightclubs, bars, production events, where data or power cables need to be hidden from sight.
UNPACKING
Every device has been thoroughly tested and has been shipped in perfect operating condition.
Carefully check the shipping carton for damage that may have occurred during shipping. If the carton
appears to be damaged, carefully inspect your unit for damage and be sure all accessories necessary
to operate the unit have arrived intact. In the event damage has been found or parts are missing,
please contact our customer support team for further instructions. Please do not return this unit to
your dealer without first contacting customer support at the number listed below. Please do not
discard the shipping carton in the trash. Please recycle whenever possible.
www.adj.com
Page 5

5
CUSTOMER SUPPORT
ADJ® provides a customer support line, to provide set up help and to answer any question should
you encounter problems during your set up or initial operation. You may also visit us on the web at
www.adj.com for any comments or suggestions. For service related issue please contact ADJ.
ADJ SERVICE USA - Monday - Friday 8:00am to 4:30pm PST
Voice: 800-322-6337 Fax: 323-532-2941
E-mail: support@americandj.com
ADJ GROUP SERVICE EUROPE - Monday - Friday 08:30 to 17:00 CET
Voice: +31 45 546 85 30 Fax: +31 45 546 85 96
E-mail: support@adjgroup.eu
WARRANTY REGISTRATION
Please complete and mail in the enclosed warranty card to validate your purchase. All returned
service items whether under warranty or not, must be freight pre-paid and accompany a return
authorization (R.A.) number. The R.A. number must be clearly written on the outside of the return
package. A brief description of the problem as well as the R.A. number must also be written down on
a piece of paper and included in the shipping container. If the unit is under warranty, you must
provide a copy of your proof of purchase invoice. Items returned without a R.A. number clearly
marked on the outside of the package will be refused and returned at customer’s expense. You may
obtain a R.A. number by contacting customer support.
IMPORTANT NOTICE!
THERE ARE NO USER SERVICEABLE PARTS INSIDE THIS DEVICE. DO NOT ATTEMPT ANY
REPAIRS YOURSELF; DOING SO WILL VOID THE WARRANTY. DAMAGES RESULTING FROM
MODIFICATIONS TO THIS DEVICE AND/OR THE DISREGARD OF SAFETY AND OPERATION
INSTRUCTIONS IN THIS USER MANUAL VOIDS THE MANUFACTURES WARRANTY AND ARE
NOT SUBJECT TO ANY WARRANTY CLAIMS AND/OR REPAIRS.
www.adj.com
Page 6

6
LIMITED WARRANTY
A. ADJ Products, LLC hereby warrants, to the original purchaser, ADJ Products, LLC products to be free of
manufacturing defects in material and workmanship for a prescribed period from the date of purchase (see specific
warranty periods below). This warranty shall be valid only if the product is purchased within the United States of America,
including possessions and territories. It is the owner’s responsibility to establish the date and place of purchase by
acceptable evidence, at the time service is sought.
B. For warranty service you must obtain a Return Authorization number (RA#) before sending back the product–please
contact ADJ Products, LLC Service Department at 800-322-6337. Send the product only to the ADJ Products, LLC
factory. All shipping charges must be pre-paid. If the requested repairs or service (including parts replacement) are within
the terms of this warranty, ADJ Products, LLC will pay return shipping charges only to a designated point within the
United States. If the entire instrument is sent, it must be shipped in its original package. No accessories should be
shipped with the product. If any accessories are shipped with the product, ADJ Products, LLC shall have no liability
whatsoever for loss of or damage to any such accessories, or for the safe return thereof.
C. This warranty is void if the serial number has been altered or removed; if the product is modified in any manner which
ADJ Products, LLC concludes, after inspection, affects the reliability of the product; if the product has been repaired or
serviced by anyone other than the ADJ Products, LLC factory unless prior written authorization was issued to purchaser
by ADJ Products, LLC; if the product is damaged because not properly maintained as set forth in the instruction manual.
D. This is not a service contract, and this warranty does not include maintenance, cleaning or periodic check up. During
the period specified above, ADJ Products, LLC will replace defective parts at its expense with new or refurbished parts,
and will absorb all expenses for warranty service and repair labor by reason of defects in material or workmanship. The
sole responsibility of ADJ Products, LLC under this warranty shall be limited to the repair of the product, or replacement
thereof, including parts, at the sole discretion of ADJ Products, LLC. All products covered by this warranty were
manufactured after August 15, 2012, and bear identifying marks to that effect.
E. ADJ Products, LLC reserves the right to make changes in design and/or improvements upon its products without any
obligation to include these changes in any products theretofore manufactured. No warranty, whether expressed or
implied, is given or made with respect to any accessory supplied with products described above. Except to the extent
prohibited by applicable law, all implied warranties made by ADJ Products, LLC in connection with this product, including
warranties of merchantability or fitness, are limited in duration to the warranty period set forth above. And no warranties,
whether expressed or implied, including warranties of merchantability or fitness, shall apply to this product after said
period has expired. The consumer’s and/or Dealer’s sole remedy shall be such repair or replacement as is expressly
provided above; and under no circumstances shall ADJ Products, LLC be liable for any loss or damage, direct or
consequential, arising out of the use of, or inability to use, this product. This warranty is the only written warranty
applicable to ADJ Products, LLC Products and supersedes all prior warranties and written descriptions of warranty terms
and conditions heretofore published.
LIMITED WARRANTY PERIODS
Non LED Lighting Products = 1-Year (365 Days) (Including Special Effect Lighting, Intelligent Lighting, UV lighting, Strobes, Fog
Machines, Bubble Machines, Mirror Balls, Par Cans, Trussing, Lighting Stands, Power/Data Distribution, etc. excluding LED and lamps)
Laser Products = 1-Year (365 Days) (excluding laser diodes which have a 6-Month Limited Warranty)
LED Products = 2-Year (730 Days) (excluding batteries which have a 180 Day Limited Warranty)
NOTE: 2-Year (730 Days) Limited Warranty ONLY applies to product purchased within the United States.
StarTec Series = 1-Year (365 Days) (excluding batteries which have a 180 Day Limited Warranty)
ADJ DMX Controllers = 2 Year (730 Days)
American Audio Products = 1 Year (365 Days)
www.adj.com
Page 7
7
SAFETY INSTRUCTIONS AND GUIDELINES
This device is designed for indoor venues, on stage, in nightclubs, theatres, etc. Use of
this device outdoors and/or wet environments voids all manufacturers warranties. For
proper operation, follow the guidelines described in this manual. Only qualified and
certified personnel should perform installation of this device. Any modifications to any part of this
device will void the original manufactures warranty and increase the risk of damage and/or personal
injury. To guarantee a smooth operation, it is important to follow the guidelines in this manual. The
manufacturer of this device will not accept responsibility for damages resulting from the misuse
and/or disregard of the information printed in this manual.
This device falls under PROTECTION CLASS 1. It’s essential this device be grounded
properly. Only qualified personnel should perform all electrical connections.
INDOOR/DRY LOCATIONS ONLY!
DO NOT EXPOSE DEVICE TO RAIN OR MOISTURE!
DO NOT PLUG INTO A DIMMER PACK!
DO NOT EXCEED 8 A / 960W POWER LOAD PER OUTLET!
DO NOT EXCEED 15A / 1800W POWER LOAD PER PACK!
FCC STATEMENT
This device complies with Part 15 of the FCC Rules. Operation is subject to the following two
conditions: (1) this device may not cause harmful interference, and (2) this device must accept
any interference received, including interference that may cause undesired operation.
FCC RADIO FREQUENCY INTERFERENCE WARNINGS & INSTRUCTIONS
This product has been tested and found to comply with the limits as per Part 15 of the FCC Rules. These limits
are designed to provide reasonable protection against harmful interference in a residential installation. This
equipment uses and can radiate radio frequency energy and, if not installed and used in accordance with the
included instructions, may cause harmful interference to radio communications. However, there is no guarantee
that interference will not occur in a particular installation. If this equipment does cause harmful interference to
radio or television reception, which can be determined by turning the equipment off and on, the user is
encouraged to try to correct the interference by one or more of the following methods:
Reorient or relocate the device and/or antenna.
Increase the separation between the equipment and the receiver.
Connect the equipment into an electrical outlet on a circuit different from that which the radio receiver is connected.
Consult the dealer or an experienced radio/TV technician for help.
www.adj.com
Page 8

8
SAFETY INSTRUCTIONS AND GUIDELINES
DO NOT position device close to any FLAMMABLE MATERIALS while operating.
DO NOT attempt installation and/or operation without knowledge how to do so.
DO NOT permit operation by persons who are not qualified to operate this type of device.
DO NOT shake device, avoid brute force when installing and/or operating.
DO NOT operate this device if the main power cord have become frayed, crimped and/or
damaged. Replace any damaged power cords with a similar power rating.
DO NOT remove or break-off the ground plug from the power cord.
DO NOT remove disassemble device, there are NO user serviceable parts inside.
ALWAYS disconnect device from main power source before performing any cleaning.
ALWAYS be sure to install this device in an area that will allow proper ventilation.
Power cords plugged into the device should be safely routed and secured so they are not likely
walked on, pinched, or placed under heavy items.
Disconnect the main power during long periods of non-use.
Only use recommended rigging hardware as described in this guide.
Use the original packaging and materials to transport the device in for service.
This device should be serviced by qualified service personnel when:
A. The power cord or plug has become damaged.
B. Objects have fallen on and/or liquid has spilled into the device.
C. The device has been exposed to rain and/or moisture.
D. The device does not operate normally or exhibits a marked change in performance.
www.adj.com
Page 9
9
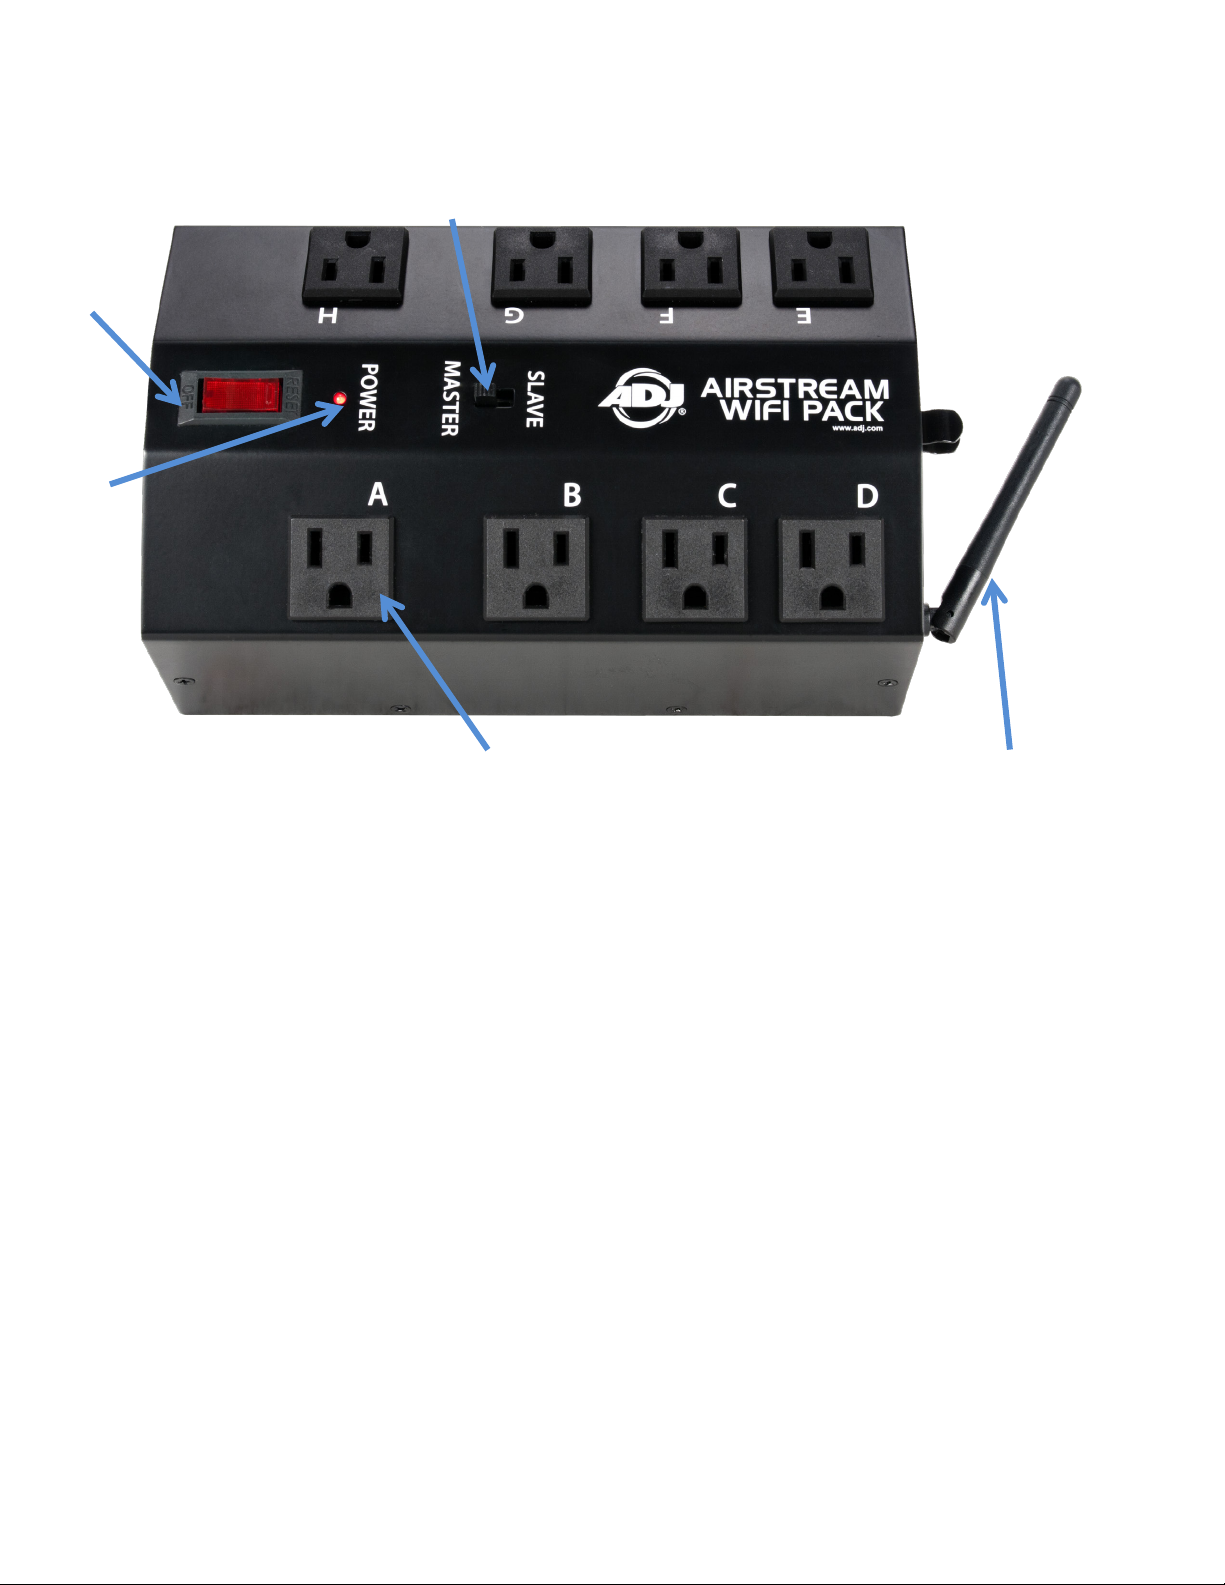
DEVICE SET UP & OVERVIEW
1
2 3 4
5
1. Power / Reset Switch -
Power device ON/OFF and RESET if max power exceeded
2. Power Indicator LED - Indicates device is powered ON
3. Master / Slave Mode Switch - Determines the mode of the device
4. Power Outlets A-H - Power Outlets that can be controlled ON/OFF
5. WiFi
MASTER-SLAVE CONFIGURATION
Each WIFI PACK must be set up as a MASTER or SLAVE unit, where 1 MASTER unit wirelessly links
to up to 3 SLAVE units. The mobile digital device wirelessly controls the MASTER unit exclusively,
and the MASTER unit transmits this control wirelessly to additional SLAVE units in the network. To set
Antenna - Receives wireless signal from connected mobile digital device
up a WIFI PACK as a MASTER or SLAVE, toggle the MASTER/SLAVE Mode switch located on top
of the WIFI PACK above the power switch. (See image above)
NOTE: ANY WIFI PACK CAN BE A MASTER OR SLAVE, BUT THERE CAN ONLY BE ONE MASTER UNIT.
www.adj.com
Page 10
10
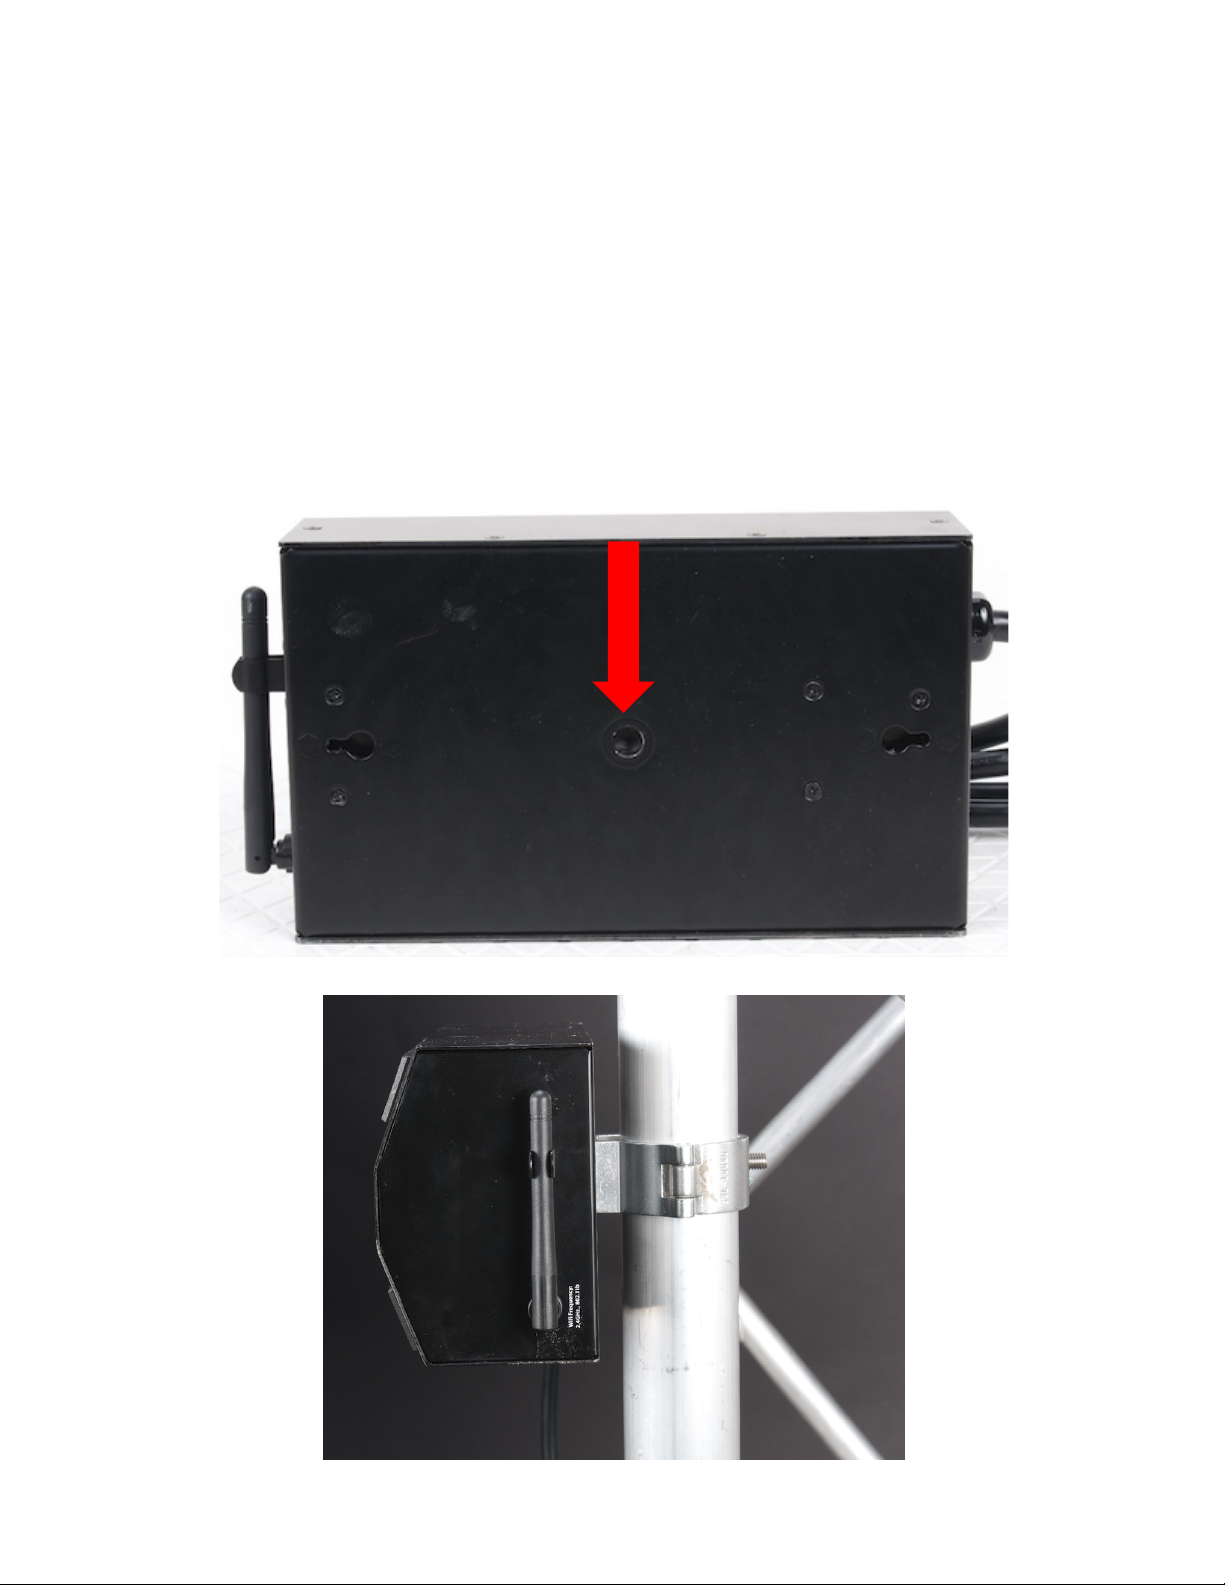
DEVICE INSTALLATION
CLAMP MOUNTING
POINT
CLAMP / TRUSS MOUNTING
The device can be mounted to truss or a lighting stand using an ADJ clamp (not included).
1. Attach clamp securely to the mounting hole on the bottom of the device using an M10-1.5 screw.
2. Make sure the clamp is firmly attached to the device before mounting to truss or a lighting stand.
MAKE SURE STRUCTURE CAN SUPPORT THE WEIGHT OF THE DEVICE!
MAKE SURE MOUNTING LOCATION DOES NOT RESTRICT MOVEMENT OF ANTENNA!
www.adj.com
Page 11

11
DEVICE INSTALLATION
WALL MOUNTING
The device can be mounted to a wall using the mounting holes on the back of the device.
1. Download the wall-mounting template from www.adj.com and print on US letter size 8.5 x 11 inch paper.
2. Place the paper on the wall and use the outline to position device where you want to mount it.
MAKE SURE MOUNTING LOCATION DOES NOT RESTRICT MOVEMENT OF ANTENNA!
3. Mark the (2) center points for the screws on the wall with a sharp object. (i.e. punch tool)
4. Using (2) small round head screws (not included) that are appropriate for the wall material (i.e.
wood, drywall, or metal), drill screws into the wall at the center point locations you marked.
MAKE SURE SCREWS FIT INTO MOUNTING HOLES BEFORE DRILLING THEM INTO WALL!
DO NOT DRILL THE SCREWS COMPLETELY INTO THE WALL!
Depending on the head size of the screw, leave approximately 0.25 inch (6.35mm) exposed so the
device can hang properly when attached to wall.
5. Align the mounting holes on the back of the device to the (2) screws in the wall, push the device
onto the screws so the device is completely against the wall.
6. Slide device slightly to secure both screws into the device. Depending on the installation
orientation (vertical with wireless antenna at the top or horizontal with antenna on the side), slide the
device accordingly to secure it onto the screws.
MAXIMUM POWER LOAD PER OUTLET AND PER PACK
Each WIFI PACK POWER OUTLET can support a maximum load of 8A / 960W.
Each WIFI PACK can support a maximum total load of 15A / 1800W.
NOTE: ALWAYS CHECK THE POWER CONSUMPTION OF EACH DEVICE BEFORE YOU CONNECT
IT TO THE WIFI PACK. DO NOT EXCEED THE MAXIMUM LOAD CAPACITY OF THE WIFI PACK.
www.adj.com
Page 12
12
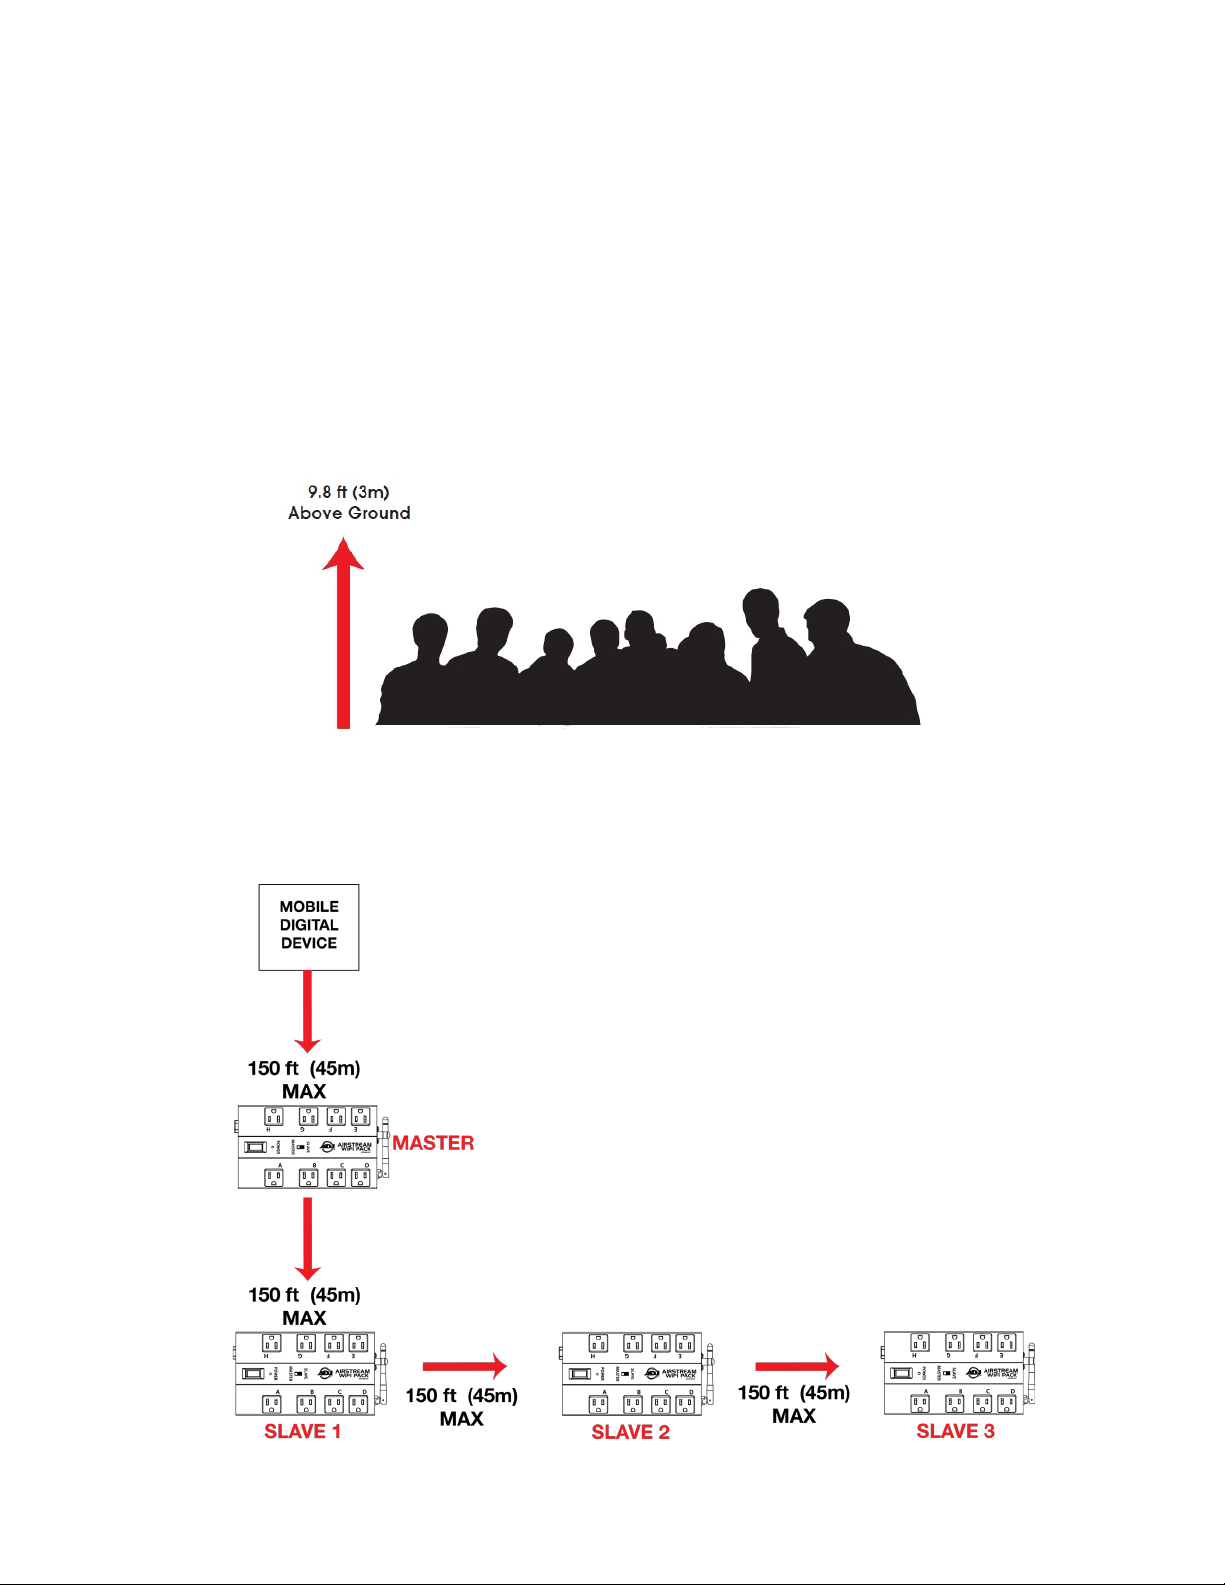
WIRELESS OPERATION GUIDELINES
There are many factors that affect and/or interrupt a wireless signal such as walls, glass, metal,
objects, and people. Therefore it is highly recommended to:
Install device a minimum of 9.8 ft. (3m) above audiences and/or ground level
Adjust the wireless antenna in a vertical upright position
Position device in direct line of sight of the controlling mobile digital device
Careful planning and testing of the selected installation location with the controlling mobile digital
device is critical to ensure optimum and reliable wireless operation.
WiFi RANGE
The maximum distance between the controlling mobile digital device and MASTER WIFI PACK, and
between the MASTER WIFI PACK and additional SLAVE WIFI PACKS is 150 feet (45m).
NOTE: UP TO 3 SLAVE WIFI PACKS CAN BE ADDED TO THE AIRSTREAM WIFI NETWORK.
www.adj.com
Page 13
13
A PP SET UP & OVERVIEW
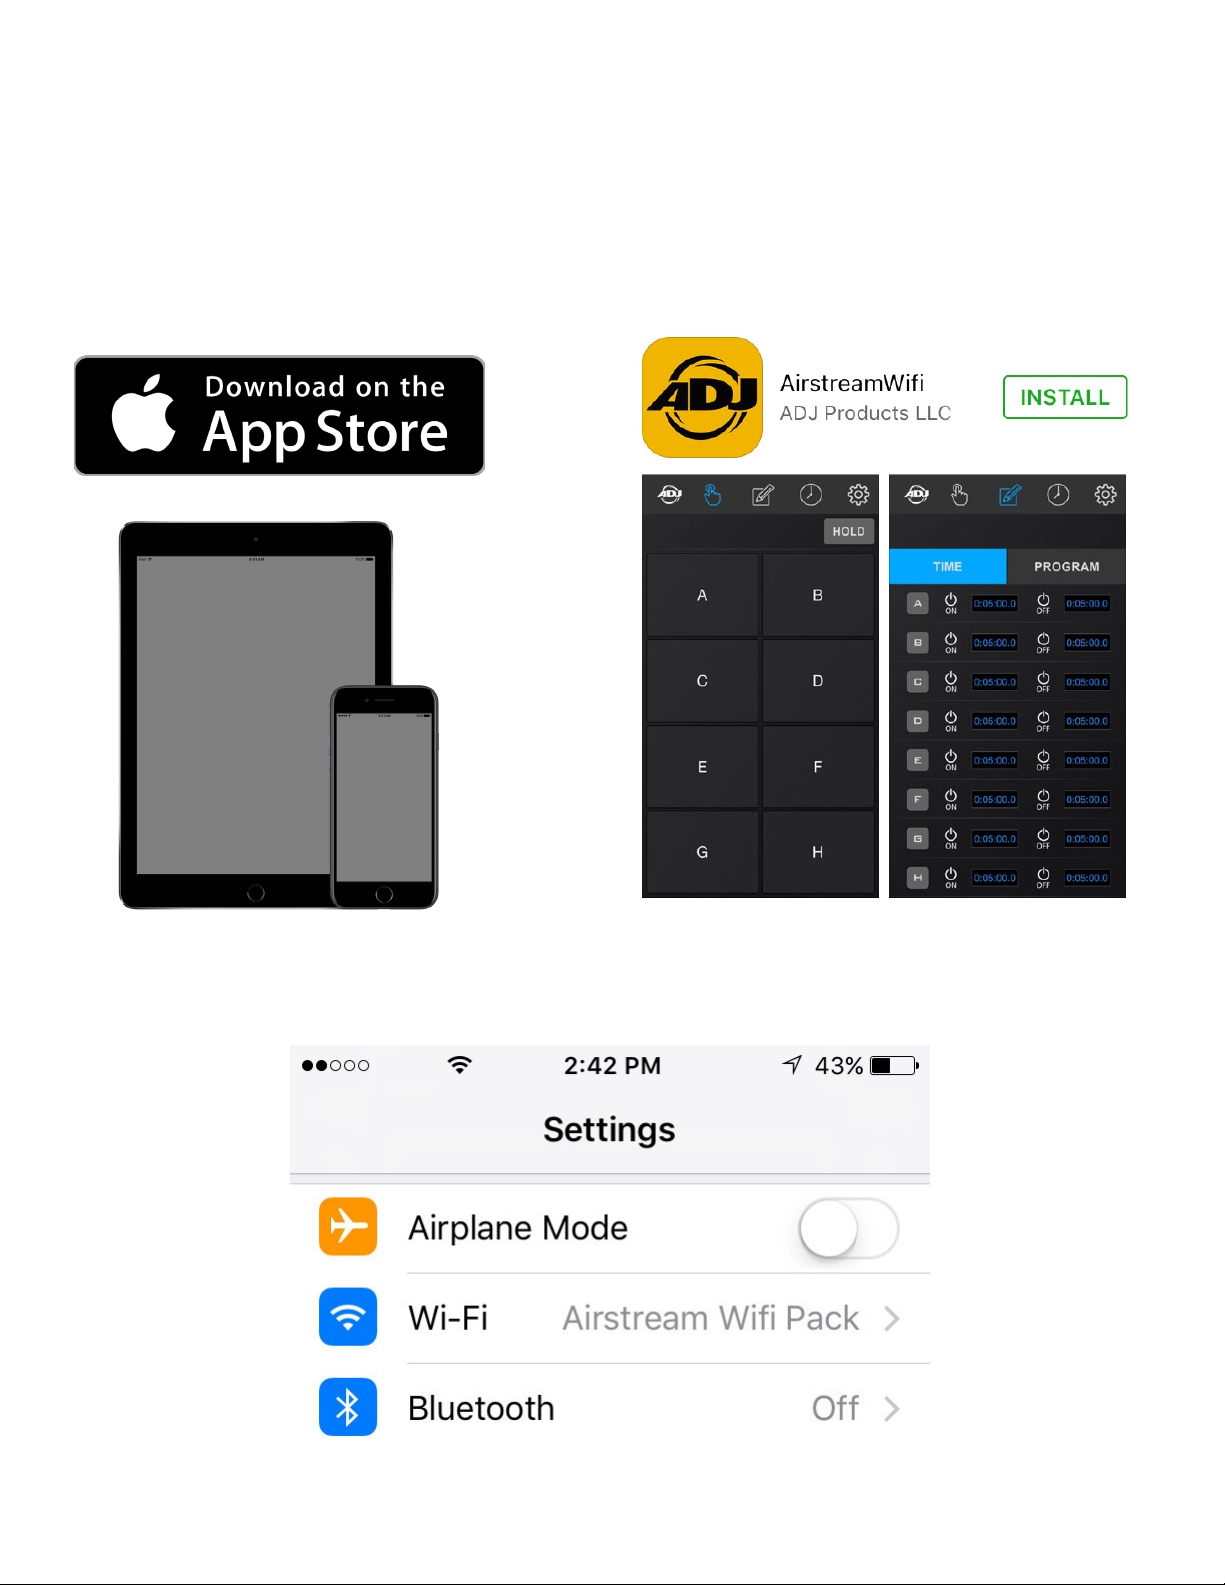
1. Check your mobile digital device is updated to the latest iOS version (8.0 or later) and update device if
necessary before installing app.
NOTE: THIS IS VERY IMPORTANT TO ENSURE THE APP AND WIFI PACKS FUNCTION CORRECTLY!
2. Download the AirstreamWiFi app from the App Store and install on an iPhone, iPad, or iPod Touch.
3. Enable Wi-Fi on your mobile digital device and select the Airstream WiFi Pack wireless network,
entering the default password airstreamwifi to join.
www.adj.com
Page 14

14
A PP SET UP & OVERVIEW [continued]
4. After successfully connecting to the Airstream WiFi Pack wireless network, set the mode switch
on the first WIFI PACK to Master and set the mode switch on additional packs to Slave.
(Up to 3 Slave units max per wireless network)
5. Connect your lighting effect devices to any of the 8 power outlets (A-H) on each WIFI PACK.
NOTE: ALL CONNECTED DEVICES WITH A POWER SWITCH MUST BE POWERED ON.
6. Power ON all WIFI PACKS.
7. Open the app and immediately it starts searching for WIFI PACKS.
If no WIFI PACKS are found, an error will display:
“NOTE Connection Failed, Please check the wifi connection.” (See images below)
8. Confirm all your WIFI PACKS are connected to your mobile digital device.
NOTE: TO PREVENT OTHERS FROM ACCESSING YOUR WIFI NETWORK, AND TO PREVENT
WIRELESS CONNECTIVITY AND/OR INTERFERENCE ISSUES, IT IS HIGHLY RECOMMENDED
TO CHANGE THE WIFI NETWORK NAME AND PASSWORD. SEE RENAME THE WIFI
NETWORK and CHANGE THE WIFI PASSWORD SECTIONS FOR MORE DETAILS.
www.adj.com
Page 15

15
APP SET UP & OVERVIEW [continued]
APP and PACK
Versions
APP and PACK
Versions
Below is an overview of the different app icons and their functions. This example illustrates 1 Master
and 2 Slave WIFI PACKS connected to the app.
NOTE: (1) Master and up to (3) Slave packs can be connected to a single digital mobile device.
Software
MANUAL
CONTROL
TIME
PROGRAM
SCHEDULE
ACTIVE
WIFI PACKS
SETTINGS
Software
APP and PACK Software Versions - Press and hold to display app and pack software versions.
MANUAL CONTROL - Press to control connected WiFi PACKS manually.
TIME/PROGRAM - Press to setup custom TIME and PROGRAM control settings.
SCHEDULE - Press to setup custom SCHEDULE control settings.
SETTINGS - Press to access and modify multiple app settings.
ACTIVE WIFI PACKS - Press desired icon to switch between connected WIFI PACKS.
www.adj.com
Page 16

16
APP O PERATION
POWER
A / C / E / G
POWER
B / D / F / H
MANUAL CONTROL
Pressing this icon displays the MANUAL CONTROL page where you can easily turn ON or OFF any
of the 8 power outlets (A-H) on any connected WIFI PACK manually. As illustrated below, 3 Airstream
WIFI PACKS are active and receiving a wireless signal as indicated by the numbered icons at the top
of the screen. The first numbered WIFI PACK is always the Master, and additional WIFI PACKS are
Slaves. NOTE: ADDITIONAL CONNECTED PACKS WILL APPEAR AS NUMBERED ICONS (2-4).
MANUAL
CONTROL
HOLD
ACTIVE
WIFI PACKS
OUTLETS
OUTLETS
1. To momentarily power ON a device connected to the WIFI PACK, press the corresponding WIFI
PACK icon then press and hold the corresponding power outlet letter button (A-H) of the device.
NOTE: ONLY 1 OUTLET CAN BE ACTIVATED AT A TIME.
2. To power OFF a device, release the corresponding power outlet letter button (A-H) of the device.
3. To power ON multiple devices at the same time or to keep any one device powered ON without
holding the power outlet letter button, press the HOLD button, which will illuminate in blue indicating
the HOLD feature is active. Now you can toggle any power outlet button between ON and OFF. To
remove this function, press the HOLD button again, which will no longer illuminate in blue.
www.adj.com
Page 17

17
APP OPERATION
MANUAL CONTROL [continued]
You can momentarily or HOLD any of the power outlets (A-H) on any of the connected WIFI PACKS.
As illustrated below, a total of (3) WIFI PACKS (1 master and 2 slave packs) are connected to the
Airstream WIFI network. The image below shows the HOLD feature engaged on power outlet A.
You can also add text labels and photos to each of the power outlets (A-H), which provides a more
visual representation of the lighting devices you have connected to each WIFI PACK. Please the
SETTINGS - PHOTO section in this manual for more details.
NOTE: MANUAL SETTINGS ARE NOT SAVED TO THE WIFI PACK AND THEREFORE WILL BE
LOST WHEN POWER IS LOST TO THE WIFI PACK!
MANUAL
CONTROL
HOLD
www.adj.com
Page 18

18
APP OPERATION
ON TIMER
OFF TIMER
TIMERS
ACTIVATED
CONNECTED
WIFI PACKS
TIME / PROGRAM
Pressing this icon displays the TIME and PROGRAM pages. Pressing the TIME tab lets you to create
custom ON and OFF timer settings for each power outlet (A-H) of any connected WIFI PACK.
NOTE: DEFAULT TIMER SETTINGS ARE 5 MINUTES ON AND 5 MINUTES OFF.
TIME / PROGRAM TIME
TIMER
WINDOW
A, B, C, D
1. Press a desired WIFI PACK button, then press the TIME button that displays the timer settings.
2. Press the ON Timer next to the desired outlet letter (A-H) and a Timer Window will open where
you can set the ON time for each outlet, then press SAVE. (See image above left)
3. Press the OFF Timer next to the same selected outlet letter (A-H) and another Timer Window will
open where you can set the OFF time for each outlet, then press SAVE. (See image above left)
NOTE: YOU CAN SET HOURS, MINUTES, SECONDS, AND DECISECONDS (DS) FOR THE ON / OFF TIMER SETTINGS.
RUNNING TIMES CAN VARY FOR EACH CONNECTED DEVICE; THEY DO NOT NEED TO BE THE SAME.
4. Now press the selected outlet letter button (A-H) and the letter will illuminate blue indicating the
timer settings are now activated. In the example (image above right), buttons A-D are illuminated blue
meaning the timers for those outlets are active. To deactivate an outlet timer, press the outlet letter
button again and the letter will no longer be illuminated blue indicating it is now deactivated.
www.adj.com
Page 19

19
APP OPERATION
ADD
PROGRAM
CONNECTED
WIFI PACKS
TIME / PROGRAM [continued]
Pressing this icon displays the TIME and PROGRAM pages. Pressing the PROGRAM tab lets you to
create custom running programs for each power outlet (A-H) of any connected WIFI PACK. Programs
will use the timer settings set for each power outlet. (See previous section) If no custom timer settings
are set, programs will use the default 5 minutes ON and 5 minutes OFF timer settings.
TIME / PROGRAM PROGRAM
NEW
SELECT
PROGRAM
PROGRAMS
OFF
PROGRAMS
ON
UNSELECTED
PROGRAM
1. Press a desired WIFI PACK button, then press the PROGRAM button that displays the program settings.
2. Press the PLUS button to add a NEW PROGRAM and a white BOX will appear without any letters.
3. Press the space next to the white BOX and use the pop up keyboard to type in the desired outlet
letters (A-H) to create a program with and then press SAVE.
4. Multiple outlet letters can be selected for a program for example ABC. In this scenario, the
program will start with powering outlet A ON per its timer settings, then power outlet B ON per its
timers settings, and then power outlet C ON per its timer settings. This cycle will repeat indefinitely
until you toggle off the PROGRAM ON/OFF switch (see step 7 on the next page), or per the WIFI
PACK SCHEDULE. (See SCHEDULE ICON section for more details)
www.adj.com
Page 20

20
APP OPERATION
CONNECTED
WIFI PACKS
SETTINGS
WHEEL
(-) MINUS
TIME / PROGRAM [continued]
5. Multiple outlet letters can also be selected for a program however with a plus sign (+) in between
each outlet letter for example A+B+C. In this scenario, the program will start powering all outlet
letters A, B, and C at the same time. This cycle will repeat indefinitely until you toggle off the
PROGRAM ON/OFF switch (see step 7 below), or per the WIFI PACK SCHEDULE.
(See SCHEDULE ICON section for more details)
6. To cue a program to run, press the empty white box next to it and a check mark will display
indicating the program is now cued to run.
7. Toggle the small PROGRAM ON/OFF switch located in the upper right to illuminate it in blue
indicating programs are ON, and again to illuminate it in black indicating programs are OFF.
8. To DELETE a program, press the white color settings wheel on the left side under the TIME button,
which will illuminate blue. Then press the red minus
(See images below)
TIME / PROGRAM PROGRAM
icon and then press the red DELETE button.
(-)
NOTE: PROGRAMS WILL RUN INDEFINITELY UNTIL THEY ARE SWITCHED OFF, OR PER THE
WIFI PACK SCHEDULE. (See SCHEDULE ICON section for more details)
DELETE
PROGRAM
www.adj.com
Page 21

21
APP OPERATION
SCHEDULE
Pressing this icon displays the SCHEDULE page where you can create a custom ON/OFF Schedule
for specific Times and Days of the week for each connected WIFI PACK.
NOTE: THERE MUST BE SAVED WIFI PACK PROGRAMS IN ORDER TO CREATE A SCHEDULE.
(See TIME / PROGRAM ICON sections)
WIFI PACKS
SCHEDULE
www.adj.com
Page 22

22
APP OPERATION
SCHEDULE
SCHEDULE
MASTER
PACK
ADD
SCHEDULE
SCHEDULE [continued]
The example below illustrates a SCHEDULE for the master WIFI PACK #1.
SCHEDULE
WIFI
NEW
WINDOW
12 HOUR*
TIME / DAY
WINDOW
24 HOUR*
TIME / DAY
1. Make sure you have set the desired TIMER and PROGRAM settings for each power outlet (A-H)
on each connected WIFI PACK in your network, and each desired PROGRAM is turned ON.
(See previous sections for TIMER and PROGRAM setting details)
2. To create a new ON SCHEDULE, press the desired WIFI PACK and then press the plus sign (+) to
open the Schedule Window, which will display the time in 12-HOUR (AM/PM) or 24-HOUR format.
NOTE: HOUR FORMAT CAN BE TOGGLED ON THE SETTINGS PAGE (See SETTINGS section)
3. Select the Time and Days of the week for the ON SCHEDULE and push SAVE.
4. To create a new OFF SCHEDULE, press the desired WIFI PACK and then press the plus sign (+)
to open the Schedule Window, which will display the time in 12-HOUR (AM/PM) or 24-HOUR format.
NOTE: HOUR FORMAT CAN BE TOGGLED ON THE SETTINGS PAGE (See SETTINGS section)
5. Select the Time and Days of the week for the OFF SCHEDULE and push SAVE.
www.adj.com
Page 23

23
APP OPERATION
TO ON
TOGGLE
TO OFF
SLIDE
SCHEDULES
MASTER
PACK
WHEEL
(-) MINUS
SCHEDULE [continued]
6. SCHEDULES will always default to ON as indicated by the power icon. (See below left)
7. Toggle power icons from ON to set OFF SCHEDULES. (See below right)
8. To activate a SCHEDULE slide switch towards the right and it will turn blue. (See below top right)
9. To deactivate a SCHEDULE slide switch towards the left and it will turn black. (See below bottom right)
10. To DELETE a SCHEDULE, press the white color settings wheel on the left side of the word SCHEDULE,
which will illuminate blue. Then press the minus
SCHEDULE
icon and then press the red DELETE button. (See below)
(-)
WIFI
POWER
ICONS
DEFAULT
SETTINGS
POWER
ICONS
DELETE
SCHEDULE
SWITCH
TO ACTIVATE
www.adj.com
Page 24

24
APP OPERATION
ENTER 1 - 6 CHARACTER
PASSWORD
SETTINGS - LOCK
Pressing this icon displays the SETTINGS page and pressing the LOCK tab lets you set a password
for the AirstreamWiFi app. Passwords can be of any combination of at least 1 to a maximum of 6
characters. After you lock the app, NO changes can be made to any of the app settings without first
entering the password.
LOCK
CONFIRM
SETTINGS
1. Press the top bar below the text “Please enter new password” and use the pop up keyboard to
enter your desired 1 - 6 character password into the bar.
2. Press the bottom bar below the text “Please confirm password” and use the pop up keyboard to
enter the exact same 1 - 6 character password into the bar.
3. After successfully entering the desired password, press DONE button. (See image above right)
4. To lock the app press the Confirm button. (See image above left)
NOTE: DEVICE AND APP WILL LOCK ONLY AFTER THE PASSWORD IS CONFIRMED.
WRITE AND SAVE PASSWORD IN A SAFE PLACE FOR FUTURE REFERENCE.
NOTE: PASSWORD MUST BE 1-6 CHARACTERS.
DONE
www.adj.com
Page 25

25
APP OPERATION
SETTINGS - LOCK [continued]
When the app is locked, the screen image below left is displayed.
1. To unlock the app, press the LOCK icon and the screen image below right is displayed.
2. Enter your 1 - 6 character password and the app will unlock.
3. If you enter an incorrect password, an error will display. (See image below)
www.adj.com
Page 26

26
APP OPERATION
SETTINGS - LOCK [continued]
IF YOU FORGET THE PASSWORD OR ARE NOT ABLE TO ACCESS THE APP,
CONTACT ADJ CUSTOMER SUPPORT TO REQUEST A MASTER CODE.
ADJ SERVICE USA - Monday - Friday 8:00am to 4:30pm PST
Voice: 800-322-6337 Fax: 323-532-2941
E-mail: support@americandj.com
ADJ GROUP SERVICE EUROPE - Monday - Friday 08:30 to 17:00 CET
Voice: +31 45 546 85 30 Fax: +31 45 546 85 96
E-mail: support@adjgroup.eu
1. Enter the Master Code and the app should unlock.
2. If not, please contact ADJ Customer Support for further instructions.
3. To lock the app again enter another 1 - 6 character password as explained in previous section.
NOTE: WRITE AMD SAVE PASSWORD IN A SAFE PLACE FOR FUTURE REFERENCE.
www.adj.com
Page 27

27
APP O PERATION
SETTINGS - PHOTO
Pressing this icon displays the SETTINGS page and pressing the PHOTO tab lets you add a custom
9-character TEXT label and PHOTO to each power outlet button (A-H) of a connected WIFI PACK
(1-4). These text labels and photos will replace the lettered squares (A-H) on the MANUAL
CONTROL page. You can add a text label and a photo or add only a text label or add only a photo.
Photos can be new from the camera or existing photos from the library of the controlling mobile
device.
NOTE: WIFI PACK(s) MUST BE CONNECTED TO MOBILE DIGITAL DEVICE TO ADD TEXT AND
PHOTOS. TEXT AND PHOTOS CANNOT BE ADDED WITHOUT WIFI PACKS CONNECTED.
SETTINGS
PHOTO
TEXT
EDIT
PHOTO
EDIT
www.adj.com
Page 28

28
APP O PERATION
ADD TEXT
ADD PHOTO
EXAMPLES
SETTINGS - PHOTO [continued]
To add a TEXT label to a power outlet button, WIFI PACKS must connected to your WiFi Network.
1. Press text icon in upper left corner of a power outlet button to open a text edit window.
2. Using the pop up keyboard enter a text label of up to 9-characters and press DONE. (See below Left)
To add a PHOTO to a power outlet button, WIFI PACKS must connected to your WiFi Network.
1. Press photo icon in upper right corner of a power outlet button to open a photo selection window.
2. Select Take Photo to use mobile digital device camera or select Choose Existing to select photo
from mobile digital device library. (See below Center)
Example of TEXT labels and PHOTOS for each power outlet button (A-H). (See below Right)
www.adj.com
Page 29

29
APP OPERATION
TEXT/PHOTOS
PHOTOS
TEXT
SETTINGS - PHOTO [continued]
After adding TEXT labels and/or assigning PHOTOS to each power outlet button of a connected WIFI
PACK, the MANUAL CONTROL page will now no longer display the blank squares with letters A-H.
TEXT labels will now display for each power outlet button in the OFF mode.
TEXT labels will now illuminate blue for each power outlet button in the momentary or HOLD mode.
PHOTOS will now display for each power outlet button in the momentary or HOLD mode.
(See images below)
OFF MODE
ON MODE
ON MODE
www.adj.com
Page 30

30
APP O PERATION
SETTINGS
SETTINGS - PHOTO [continued] - RENAMING THE WiFi NETWORK NAME
Pressing this icon displays the SETTINGS page and pressing the PHOTO tab lets you also change
the WiFi Network Name (SSID).
NOTE: THE WIFI NETWORK NAME MUST BE BETWEEN 8 - 32 CHARACTERS.
PHOTO
WiFi NETWORK
NAME
1. Press the bar next to the text “SSID”.
2. Use the pop up keyboard to rename the default WiFi network name Airstream Wifi Pack.
NOTE: THE WIFI NETWORK NAME MUST BE BETWEEN 8 - 32 CHARACTERS.
3. Press DONE and the new name will appear.
4. Power the Master WIFI PACK OFF / ON for the new WiFi network name to take effect.
NOTE: TO PREVENT OTHERS FROM ACCESSING YOUR WIFI NETWORK, AND TO PREVENT
WIRELESS CONNECTIVITY AND/OR INTERFERENCE ISSUES, IT IS HIGHLY RECOMMENDED
TO CHANGE THE WIFI NETWORK NAME AND PASSWORD.
www.adj.com
Page 31

31
APP OPERATION
SETTINGS
SETTINGS - SETTINGS [continued] - CHANGE THE WiFi NETWORK PASSWORD
Pressing this icon displays the SETTINGS page and pressing the SETTINGS tab lets you change the
WiFi Network Password. The default password is airstreamwifi.
NOTE: THE WIFI NETWORK PASSWORD MUST BE BETWEEN 8 - 32 CHARACTERS.
SETTINGS
WiFi NETWORK
PASSWORD
1. Press the bar next to the text “CURRENT PASSWORD” and enter the current WiFi Password.
2. Press he bar next to the text “NEW PASSWORD” and enter your new desired password.
NOTE: THE WIFI NETWORK PASSWORD MUST BE BETWEEN 8 - 32 CHARACTERS.
3. Finally press the bar next to the text “Confirm” and reenter your new password.
4. Now press the Confirm button.
5. Power the Master WIFI PACK OFF / ON for the new WiFi network password to take effect.
NOTE: TO PREVENT OTHERS FROM ACCESSING YOUR WIFI NETWORK, AND TO PREVENT
WIRELESS CONNECTIVITY AND/OR INTERFERENCE ISSUES, IT IS HIGHLY RECOMMENDED
TO CHANGE THE WIFI NETWORK NAME AND PASSWORD.
www.adj.com
Page 32

32
APP OPERATION
SLIDE SWITCH
TIME FORMAT
SLIDE SWITCH
TIME FORMAT
12 HOUR
TIME FORMAT
24 HOUR
TIME FORMAT
SETTINGS - SETTINGS [continued] - TIME FORMAT
Pressing this icon displays the SETTINGS page and pressing the SETTINGS tab lets you change the
time format used in the app. You can select 12-Hour (AM/PM) or 24-Hour (Military) format.
LEFT TO TOGGLE
TO 12 HOUR
SETTINGS
SETTINGS
RIGHT TO TOGGLE
TO 24 HOUR
www.adj.com
Page 33

33
APP OPERATION
MASTER
SELECTED
SETTINGS - SETTINGS [continued] - PACK COLOR ID
Pressing this icon displays the SETTINGS page and pressing the SETTINGS tab lets you change the
Pack Color ID. You can select 1 of 6 colors (see below) for each connected WIFI PACK.
SETTINGS
WIFI PACK
SETTINGS
Pack Color ID
1. Press the desired WIFI PACK icon so it is highlighted. (See Red number 1 WIFI PACK above)
2. Press the desired color from the Pack Color ID grid to assign to the WIFI PACK. (See above)
3. Repeat these steps for each WIFI PACK connected to your WiFi Network.
4. Use the PACK COLOR ID AND OUTLET LIST in the back of this manual to keep track of your packs.
NOTE: ALTHOUGH EACH CONNECTED WIFI PACK HAS A NUMBER 1-4 WITH 1 ALWAYS
BEING THE MASTER PACK, PACKS 2, 3, and 4 MAY NOT ALWAYS CONNECT TO THE APP IN
THE EXACT SAME ORDER. (See example below) THEREFORE IT IS STRONGLY SUGGESTED
TO ASSIGN A COLOR TO EACH CONNECTED WIFI PACK, AND USE THE PACK COLOR ID AD
OUTLET LIST IN THE BACK OF THIS MANUAL.
www.adj.com
Page 34

34
TROUBLE SHOOTING TIPS
Mobile Digital Device Does Not See the Airstream WIFI Pack Network
1. Confirm your mobile digital device WiFi is ON and the master WIFI PACK is in Master mode.
2. Power the Master Airstream WIFI Pack OFF / ON, then power ON remaining Slave WIFI Packs.
3. Confirm your mobile digital device sees the Airstream WIFI Pack network.
4. If not, repeat step 1 above.
5. If not, close the Airstream WIFI app and restart and wait to see if the WIFI connection is restored.
6. If none of these solutions work, please contact ADJ Customer Service.
Mobile Digital Device Looses Connection with WIFI Pack(s)
1. Wait until the spinning Searching wheel stops to see if the WIFI connection is restored.
2. Confirm your mobile digital device WiFi is ON and the master WIFI PACK is in Master mode.
3. Confirm your mobile digital device is connected to the correct WiFi Network name.
4. If not, close the Airstream WIFI app and restart and wait to see if the WIFI connection is restored.
5. If not, power the Master Airstream WIFI Pack OFF / ON then power ON remaining Slave WIFI Packs.
6. If none of these solutions work, please contact ADJ Customer Service.
WiFi Network Name and Password Reset
1. Switch OFF the Master WIFI PACK and make sure the Master/Slave switch is set to MASTER.
2. Switch the WIFI PACK ON, wait 2 seconds, and then toggle the Master/Slave switch at least 3-4
times (master to slave, master to slave, master to slave) within 10 seconds after powering ON.
NOTE: MAKE SURE THE MASTER/SLAVE SWITCH IS SET TO MASTER AFTER TOGGLING
BEFORE POWERING ON THE MASTER WIFI PACK.
3. The WIFI Network Name and Password will now reset to default.
Network Name: Airstream WiFi Pack | Network Password: airstreamwifi
4. If not, repeat steps 1 and 2 above.
5. If none of these solutions work, please contact ADJ Customer Service.
www.adj.com
Page 35

35
TROUBLE SHOOTING TIPS [continued]
Forgot “LOCK” Password For the App
1. Contact ADJ Customer Service for a Master Code.
2. Enter Master Code as instructed by ADJ Customer Service to unlock the app.
3. Update the LOCK password and save password in a safe place.
Unable To Join the network “Airstream Wifi Pack” Error Message
This error message is displayed on the mobile digital device due to one of these reasons:
1. The WIFI PACK is being controlled by another mobile digital device. Locate the controlling mobile
digital device or reset the Master WIFI PACK to the default Network Name and Password.
2. The WiFi Network Name and/or Network Password have been changed. Reset the Master WIFI
PACK to the default Network Name and Password.
3. There are NO WIFI PACKS that are set as the Master pack. Set 1 WIFI PACK to Master mode.
4. The controlling mobile digital device is out of range from the master WIFI PACK. Move the
controlling mobile digital device within 150 feet (45m) of the Master WIFI PACK.
“Over Load!” and “Please relaunch App!” Error Messages
These error messages are displayed on the mobile digital device due to one of these reasons:
1. A device connected to one of the outlets (A-H) is drawing over the 8A / 960W maximum load.
Remove the device, reset the Power / Reset switch on the WIFI PACK, and relaunch the app.
2. A combination of multiple devices connected to the WIFI PACK is drawing over the 15A / 1800W
maximum load. Remove all devices, reset the Power / Reset switch on the WIFI PACK, and relaunch
the app. Carefully check/confirm the max power consumption of each device before connecting to
WIFI PACK. Make sure not to exceed the maximum load rating for the WIFI PACK.
www.adj.com
Page 36

36
FREQUENTLY ASKED QUESTIONS
Listed below are a few answers to common questions users may have.
1. How many WIFI PACKS can you connect to single mobile digital device?
You can connect (1) Master pack and up to (3) Slave packs for a total of (4) packs per mobile device.
2. What is the maximum distance you can control a WIFI PACK from your mobile digital device?
The maximum distance between the controlling mobile digital device and MASTER WIFI PACK, and
between the MASTER WIFI PACK and additional SLAVE WIFI PACKS is 150 feet (45m).
3. What happens to WIFI PACK settings when it looses WiFi connection to your mobile device?
All timer, program, and schedule settings are saved directly to the WIFI PACK, so in the event it
looses connection to the mobile digital device, all settings will remain unchanged. This also includes
manual settings, which are saved in the app.
4. What happens to WIFI PACK settings when it looses AC power?
All timer, program, and schedule settings are saved directly to the WIFI PACK, so in the event it
looses connection to the controlling mobile digital device, all settings will remain unchanged. All
manual settings however will be lost and must be reset once power is regained to the WIFI PACK.
5. Can you add a name to each connected WIFI PACK instead of the numbers 1-4?
No, each connected WIFI PACK will be automatically assigned a number (1-4) depending on the
order it connects to your Airstream WIFI network. However to help you differentiate between each
connected WIFI PACK, you assign a different Pack Color ID besides the default red color. You can
change the Pack Color ID in the Settings page in the app.
6. What is the maximum power draw per each power outlet (A-H)?
8A / 960W
7. What is the maximum power draw per each WIFI PACK?
15A / 1800W
8. What kind of lighting effect devices can you connect to the WIFI PACK?
You can connect any type of lighting effect to the WIFI PACK, as long as it does not exceed the
maximum power draw for a single power outlet.
9. How many lighting effect devices can you connect to the WIFI PACK?
You can connect a total of (8) lighting effect devices to the WIFI PACK, as long as the combined total
power draw of all (8) devices does not exceed the maximum power draw for a WIFI PACK.
www.adj.com
Page 37

37
PACK COLOR ID and OUTLET LIST
Keep track of the color of each of your WIFI PACKS and the devices connected to each outlet.
MASTER PACK
(device name | location)______________________________________
A: ______________________________________________________________
B: ______________________________________________________________
C: ______________________________________________________________
D: ______________________________________________________________
E: ______________________________________________________________
F: ______________________________________________________________
G: ______________________________________________________________
H: ______________________________________________________________
SLAVE PACK
(device name | location)______________________________________
A: ______________________________________________________________
B: ______________________________________________________________
C: ______________________________________________________________
D: ______________________________________________________________
E: ______________________________________________________________
F: ______________________________________________________________
G: ______________________________________________________________
H: ______________________________________________________________
www.adj.com
Page 38

38
PACK COLOR ID and OUTLET LIST
Keep track of the color of each of your WIFI PACKS and the devices connected to each outlet.
SLAVE PACK
(device name | location)______________________________________
A: ______________________________________________________________
B: ______________________________________________________________
C: ______________________________________________________________
D: ______________________________________________________________
E: ______________________________________________________________
F: ______________________________________________________________
G: ______________________________________________________________
H: ______________________________________________________________
www.adj.com
Page 39

39
TECHNICAL SPECIFICATIONS
CONTROL / CONNECTIONS
Airstream WiFi App on iPhone, iPad, or iPod Touch mobile digital device with iOS 8.0 or later
Max On/OFF Cycles: > 50,000
WiFi Frequency: 2.4 GHz 802.11b
WiFi Range: Up To 150 Ft. (45m)*
*150 Ft. (45m) from controlling mobile digital device to Master WIFI PACK
*150 Ft. (45m) from Master WIFI PACK to first Slave WIFI PACK
*150 Ft. (45m) from first Slave WIFI PACK and to second Slave WIFI PACK
*150 Ft. (45m) from second Slave WIFI PACK to third Slave WIFI PACK
*150 Ft (45m) from third Slave WIFI PACK to forth/final Slave WIFI PACK
*Actual range may vary depending on several factors
SIZE / WEIGHT
Length: 7.9” (200 mm)
Width: 4.7” (120 mm)
Horizontal Height: 3.2” (82 mm)
Weight: 3.0 lbs. (1.4 kg)
ELECTRICAL / THERMAL
AC 100-240V - 50/60Hz
Single Channel Max Loading: 8A / 960W
Total Max Loading: 15A / 1800W
No Load Max Power Consumption: 7.7W
Working Humidity: <85%RH
Working Temperature: 32°F to 131°F (0°C to 55°C)
APPROVALS / RATINGS
CE | | IP20
www.adj.com
Page 40

40
DIMENSIONAL DRAWINGS
Specifications and improvements in the design of this unit and this manual are subject to change without any prior written notice.
www.adj.com
Page 41

41
NOTES
www.adj.com
Page 42

 Loading...