

Page 1

SNFS
StorNext® File System
Installation Guide for UNIX Users
StorNext FS Version 2.2
Document Number: 6-00905-01 Rev A
Page 2

Copyright Notice
© 2002, 2003 ADIC
The information contained in this document is subject to change without notice.
This document contains proprietary information which is protected by copyright. All rights are reserved. No part
of this document may be photocopied, reproduced, or translated to another language without prior written
consent of ADIC.
ADIC shall not be liable for errors contained herein or for incidental or consequential damages (including lost
profits) in connection with the furnishing, performance or use of this material whether based on warranty,
contract, or other legal theory.
All trademarks within this document are the property of their respective owners.
®
Copyright Notice (Europe)
© 2002, 2003 ADIC Europe
All rights reserved. No part of this document may be copied or reproduced in any form or by any means, without
prior written permission of ADIC Europe, ZAC des Basses Auges, 1 rue Alfred de Vigny, 78112 Fourqueux,
France.
ADIC Europe assumes no responsibility for any errors that may appear in this document, and retains the right
to make changes to these specifications and descriptions at any time, without notice.
This publication may describe designs for which patents are pending, or have been granted. By publishing this
information, ADIC Europe conveys no license under any patent or any other right.
ADIC Europe makes no representation or warranty with respect to the contents of this document and
specifically disclaims any implied warranties of merchantability or fitness for any particular purpose. Further,
ADIC Europe reserves the right to revise or change this publication without obligation on the part of ADIC
Europe to notify any person or organization of such revision of change.
Every effort has been made to acknowledge trademarks and their owners. Trademarked names are used
solely for identification or exemplary purposes; any omissions are made unintentionally.
ADIC is a registered trademark and ADIC Europe is a trademark of Advanced Digital Information Corporation.
TM
ADIC USA
Tel.: +1 303-705-3900
Fax: +1-303-792-2465
ATAC: 1-800-827-3822
http://www.adic.com
ADIC Europe
ZAC des Basses Auges
1, rue Alfred de Vigny
78112 Fourqueux, France
Tel.: +33.1.3087.5300
ADIC Germany Beteiligungs
GmbH, KG
Eschenstraße 3
D-89558 Böhmenkirch, Germany
Tel:+00.800.9999.3822
Fax: +33.1.3087.5301
Published: August 2003 Printed in the USA
ADIC CORPORATE • 11431 WILLOWS ROAD, NE • REDMOND, WASHINGTON, USA • 1-800-336-1233
ADIC • 8560 UPLAND DRIVE • ENGLEWOOD, COLORADO, USA • 1-800-827-3822
ADIC • 10 BROWN ROAD • ITHACA, NEW YORK, USA • 1-607-241-4800
Page 3

SNFS
Advanced Digital Information Corporation Software Licenses
Agreement
This Software License is entered into and effective as of this _____, day
of_____________ 2003 ("Effective Date"), by and between:
and
Advanced Digital
Information Corporation
PO Box 97057
Redmond, WA 98073-9757
(Referred to as “ADIC")
Company:
_______________________
Located at:
_______________________
_______________________
_______________________
(Referred to as “Licensee")
This License sets forth the terms and conditions under which ADIC agrees to grant and
Licensee agrees to accept a license to use certain of ADIC's proprietary software and
related documentation. Any software programs or related materials provided to Licensee
by ADIC will be subject to the terms and conditions of this License.
Definitions
“Designated Computer(s)” means that computer equipment, identified to ADIC in Exhibit
A by serial number, upon which the Software is installed.
“Documentation
not limited to operator and user manuals, training materials, guides, listings,
specifications, or other written documentation.
"Release
number, but may add functionality. New Releases are provided to the Licensee at no
charge when Licensee maintains a current Software Maintenance Agreement with ADIC.
License Agreement iii
" means a modification to the Software that does not change ADIC's base version
” means ADIC provided materials related to the Software, including, but
Page 4

SNFS
“Software” means only the current version of those software products specified in Exhibit
A hereto, in object code form only, and the Documentation provided by ADIC in
connection therewith or any portions thereof, and any subsequent Releases.
"Upgrade" means a modification to the Software that adds significant features and/or
functionality and causes a change in ADIC's base version number. Upgrades may have a
new initial License fee or upgrade charge associated with it.
Software License
a. License. In consideration of Licensee's full payment of the License fees and subject to
the terms and conditions of this License, ADIC hereby grants to Licensee a personal,
non-exclusive, non-transferable license to use and copy the Software. A separate
license is required for use of each Software program on each Designated Computer.
b. Use. Licensee is authorized hereby to use the Software on the Designated
Computer(s) only, or on backup equipment if the Designated Computer is inoperative
until such time as the Designated Computer is restored to operation and processing on
the back-up equipment is completed. This grant is specifically limited to use by the
Licensee for normal, customary internal data processing, and specifically excludes
Licensee's time-sharing or the rental of the Software or use of the Software in the
development or marketing of a competitive or compatible product. No right to use,
print, copy or display the Software or Documentation, in whole or in part, is granted
hereby except as expressly provided in this License.
c. Copying. Licensee may make one (1) copy of the Software in a non-printed, machine-
readable form for archival and back-up purposes only. In order to protect ADIC's
trade secret and copyrights in the Software, Licensee agrees to reproduce and
incorporate Licensee's trade secret or copyright notice in any copy or partial copy, and
will maintain appropriate records of the location of such copy.
iv 6-00905-01 Rev A
Page 5
SNFS
d. Transfer Rights. The Software will be installed initially on Licensee's Designated
Computer(s) set forth in Exhibit A. Licensee may thereafter transfer the Software to
another one of its computers of the same machine architecture, provided that the
Software is installed on one (1) Designated Computer at a time, b) is covered under a
current maintenance support plan with ADIC, and c) provides ADIC with written
notice thirty (30) days prior to the transfer. If Licensee transfers the Software to a
machine of a different architecture, Licensee may be subject to a transfer fee.
e. US Government Rights. If the Licensee is the United States government, Licensee
understands and agrees that ADIC Software and documentation are provided as
"Commercial Items" as defined at 48 CFR 2.101 and are being licensed to U.S.
Government end users consistent with 48 CFR 12.212.
Price and Payment
Licensee will make payment to ADIC for the Software license pursuant to those fees set
forth in the agreement of the parties. The Licensee must pay any such fees within thirty
(30) days of the date of ADIC's invoice.
Software Ownership and Protection
a. ADIC's Warranty. ADIC warrants that it is the owner of the Software and all portions
thereof, except for any embedded third party software for which ADIC holds a license
that is not inconsistent with the license granted under this agreement, and that it has
the right to modify the Software and to grant this License for its use.
b. Title to Software. The Software and all copies thereof (except for any embedded third
party software) are proprietary to ADIC and title thereto remains in ADIC. All
applicable rights to patents, copyrights, trademarks, trade secrets or other proprietary
rights in the Software and any modifications made at Licensee's request are and will
remain in ADIC.
c. Restrictions. Licensee will not itself or permit others to:
i. sell, sublicense, transfer, publish, disclose, display, provide access via a network or
otherwise make or allow available the Software or any copy thereof, in any form
whatsoever, to others;
License Agreement v
Page 6
SNFS
ii. remove, obscure, or alter any copyright, trade secret, trademark, patent or other
proprietary rights notice affixed to or displayed on the Software or Documentation
or affixed to or printed on any of its factory packaging;
iii. modify, merge with other programs or translate any portion of the Software into
any other assembly or foreign language; and
iv. reverse-assemble, reverse-compile or attempt to derive a source code equivalent of
the Software.
d. Protections. Licensee agrees to secure and protect the Software, the Documentation
and copies thereof in a manner consistent with ADIC's rights therein and to take
appropriate action to satisfy its obligations in this Article by instruction or agreement
with its employees, agents, subcontractors or others who are permitted access to the
Software. All programs or copies developed by or for the Licensee in violation of this
License, including translations, compilations, partial copies with modifications and
up-dated works, are the property of ADIC.
e. Responsibility. Licensee has sole responsibility for use of the program and any
information entered, used, or stored thereon. This responsibility includes protection of
data from modification, destruction, or disclosure, and for the accuracy and integrity
of the results from improper use. ADIC assumes no responsibility for Licensee's
negligence or failure to protect data from modification, destruction, or disclosure.
Installation
Installation. Licensee will, at its own expense, ensure that the installation site conforms to
the requirements of the Software and, at its own expense, prepare and maintain the
environmental conditions at the installation site in accordance with the requirements of the
relevant hardware manufacturer. ADIC will be responsible for reasonable support during
the initial installation process.
vi 6-00905-01 Rev A
Page 7

SNFS
Use and Training
Licensee will limit the use of the Software to those individuals who have been
appropriately trained. ADIC will make training for the Software available to Licensee
pursuant to its standard training procedures. Unless otherwise mutually agreed, any
additional training will be provided at ADIC's Englewood, Colorado facility at ADIC's
then current rates.
Warranty and Warranty Servicing
a. Warranty. ADIC warrants that for a period of ninety (90) days from installation the
Software will conform to all substantial operational features in ADIC's current
published specifications and will be free of defects which substantially affect
performance of the Software. ADIC does not warrant that the Software will meet the
Licensee’s requirements or that the operation of the Software will be uninterrupted or
error free.
b. Compatibility. It is the intent of ADIC to provide Software which is compatible with
the current releases of common computer operating systems, however, ADIC does not
warrant that the Software is compatible with the current releases of all operating
systems, nor that the Software, including any future Releases, will be made
compatible with new releases of the operating system within a specified amount of
time, or at all. At Licensee's request, ADIC will notify Licensee of the version level
of the operating system with which the current version of the Software is intended to
be compatible, and the version level of operating systems for which a subsequent
release of the Software is intended to be compatible.
c. Warranty Servicing. The Licensee must notify ADIC in writing, within ninety (90)
days after installation of the Software of Licensee’s claim of any defect. If the
Software is found defective by ADIC, ADIC’s sole obligation under this warranty is
for ADIC, at its option, either to correct, in a manner consistent with ADIC's regular
support practices, any defect in the Software or to accept the return of the Software.
Where Software is returned for claims made during the warranty period, Licensee
will be provided a full refund for the Software and related products sold under the
same Purchase Agreement.
License Agreement vii
Page 8
SNFS
d. Warranty Exclusions. This warranty is made void if the Licensee or any other third
party makes any modifications to the Software. Licensee will pay ADIC for
corrections necessitated by difficulties or defects traceable to Licensee's errors or
system changes in accordance with ADIC's then current standard time and material
charges.
e. Warranty Disclaimer. EXCEPT FOR THE EXPRESS LIMITED WARRANTY
STATED ABOVE, ADIC MAKES NO WARRANTIES, EXPRESS OR IMPLIED,
FOR THE SOFTWARE, INCLUDING THE WARRANTIES OF
MERCHANTABILITY AND FITNESS FOR A PARTICULAR PURPOSE.
f. Third Party Warranties. No reseller or distributor of the Software who may have
participated in offering, demonstrating, promoting or delivering the Software subject
to this License makes any warranty whatsoever. All limitations and exclusions of
warranty, disclaimers of warranty, limitations of damages and remedies are as set
forth hereinabove and the terms of all portions of this License apply to such reseller or
distributor to the full extent applicable to ADIC.
Maintenance
Maintenance, enhancements and Updates for the Software are not covered under this
License. If desired by the Licensee, such services must be provided for under separate
agreement.
Infringement Indemnification
a. ADIC will defend, indemnify, save, and hold Licensee harmless against claims,
demands, liability, damages, and judgments which are finally adjudicated, including
attorney's fees and court costs arising or resulting directly from any claim, suit or
litigation brought against Licensee based on infringement of any U. S. patent or
copyright by the Software (except that indemnification does not apply to any third
party software which may be embedded therein), provided, however, that such
indemnity is conditioned upon receipt by ADIC of prompt notification in writing of
such claim and that Licensee provides continuing information and reasonable
assistance for the defense and settlement of any claim. ADIC will retain attorneys, as
viii 6-00905-01 Rev A
Page 9

SNFS
deemed necessary, and conduct the defense and settlement of such claim. ADIC may,
at its own expense and at its option, either (1) procure for Licensee the right to
continue using the Software, or (2) replace the same with non-infringing software, or
(3) modify the Software so that it becomes non-infringing provided such modified
intellectual property will reasonably meet Licensee's needs.
b. Upon failure of (1), (2) or (3) above, despite the reasonable efforts of ADIC, Licensee
may terminate this License only with respect to the Software adversely affected by
such action or claim. Upon such termination ADIC will promptly refund to Licensee
any License Fees paid and other payments made for the adversely affected Software.
ADIC may deduct from the refund a fair market value for usage, which will be a pro
rata share of the License charge for the time period used, assuming a three (3) year
straight line depreciation with no salvage value.
c. Notwithstanding the foregoing ADIC has no liability if any such claim or suit is based
upon or arises out of: 1) alterations of the Software by Licensee or any third party; 2)
Licensee's failure to install updated Software provided by ADIC for avoiding such
infringement; 3) use of the Software in combination with apparatus or software not
furnished by ADIC; 4) use of the Software in a manner for which it was neither
designed nor contemplated; 5) third party software embedded in the Software; 6)
Software modified by ADIC for Licensee in accordance with Licensee's
specifications or requests; or 7) a patent, trademark or copyright in which Licensee or
any of its affiliates or subsidiaries has a direct or indirect interest by license or
otherwise.
Term and Termination
a. Ter m. The term of this License is perpetual, unless terminated by ADIC as provided
herein.
License Agreement ix
Page 10

SNFS
b. Termination. This License commences on the Effective Date and will continue in
perpetuity unless Licensee fails to comply with any of the material conditions of this
License. ADIC may, after allowing Licensee a reasonable time to cure its default,
terminate this License upon written notice to the Licensee. Within thirty (30) days
after termination of this License, Licensee will certify, in writing, to ADIC, that
Licensee has discontinued the use of all Software; and either destroyed or, at ADIC’s
election, returned to ADIC the original and all copies of the Software and
Documentation in any form maintained by Licensee.
c. Termination for Cause. A violation of any provision of Paragraph 3. above will be
deemed a material breach and the basis for immediate termination of this License.
d. Termination upon Insolvency. This License may be terminated by ADIC if the
Licensee (i) terminates or indefinitely suspends its business; (ii) becomes subject to
any bankruptcy or insolvency proceeding under governmental statute; or (iii)
becomes insolvent or becomes subject to direct control by a trustee, receiver or
similar authority.
e. Remedies upon Termination. If this License is terminated by ADIC, ADIC will have
the right to take immediate possession of the Software, Documentation, and all copies
wherever located, without demand or notice. Termination of this License is in
addition to and not in lieu of any equitable or legal remedies available to ADIC.
Notices and Correspondence
All notices and correspondence sent by one party to the other in all matters will be sent to
the addresses listed in the initial paragraph hereof, except as otherwise requested in
writing.
DISCLAIMER AND LIMITATION OF LIABILITY
THE LICENSEE HAS THE SOLE RESPONSIBILITY FOR THE ADEQUATE
PROTECTION AND BACK-UP OF ITS DATA USED IN CONNECTION WITH THE
SOFTWARE. IN NO EVENT WILL ADIC BE LIABLE FOR SPECIAL, INDIRECT,
INCIDENTAL OR CONSEQUENTIAL DAMAGES OR ANY DAMAGES
WHATSOEVER RESULTING FROM THE LOSS OF USE, DATA OR PROFITS,
RERUN TIME, INACCURATE INPUT OR WORK DELAYS, OR ANY PERSONAL
x 6-00905-01 Rev A
Page 11
SNFS
OR PROPERTY DAMAGE ARISING OUT OF OR IN CONNECTION WITH THIS
LICENSE OR THE USE, PERFORMANCE OR NON-PERFORMANCE OF THE
SOFTWARE, WHETHER IN ACTION, IN CONTRACT, OR TORT INCLUDING
NEGLIGENCE, EVEN IF ADIC KNEW, SHOULD HAVE KNOWN OR HAS BEEN
ADVISED OF THE POSSIBILITY OF SUCH DAMAGES. ADIC's LIABILITY FOR
DAMAGES HEREUNDER WILL IN NO EVENT EXCEED THE AMOUNT OF FEES
PAID BY LICENSEE UNDER THIS LICENSE.
General
a. No Assignment. This License is not assignable. None of the Software or
Documentation may be sublicensed, assigned, or transferred to any other party
without ADIC’s prior written consent. Any effort contradictory with this is null and
void.
b. Modification. This License or any Exhibit hereto can only be modified by a written
agreement executed by Licensee and ADIC.
c. Governing Law. The laws of the state of Washington will govern this license. All
litigation between the parties, including all applications for injunctive relief, must be
conducted before a court of competent jurisdiction within King County, Washington,
USA and both parties consent to personal jurisdiction of such court. If any of the
provisions of this License are held to be invalid under any applicable statute or law,
they are, to that extent, deemed omitted.
d. Enforcement Costs. The party prevailing in any litigation or legal proceeding,
including arbitration, arising out of any dispute under this Agreement will be entitled
to recover reasonable attorneys’ fees and costs from the other party.
e. Limitations on Actions. Any action, regardless of form, arising out of the transactions
under this License, may not be brought by either party more than one (1) year after
the cause of action has accrued, except that an action for nonpayment may be brought
within four (4) years after the last payment date.
License Agreement xi
Page 12

SNFS
Entirety
Licensee acknowledges that it has read this Software License, understands it, and agrees
to be bound by its terms and conditions. Further, Licensee agrees that this is the complete
and exclusive statement of the agreement between the parties and supersedes all proposals
or prior agreements, oral or written and all other communications between the parties
relating to the subject matter of this License. Any variance from the terms and conditions
of this License or any supplement in any Licensee purchase order or other written
notification or agreement will be of no effect.
xii 6-00905-01 Rev A
Page 13
SNFS
Introduction
Purpose of This Book . . . . . . . . . . . . . . . . . . . . . . . . . . . . . . . . . . . . . . . . . . . . . . . . . . . . . . . 1-1
Who Should Read this Book . . . . . . . . . . . . . . . . . . . . . . . . . . . . . . . . . . . . . . . . . . . . . . . . . . 1-1
How This Book is Organized . . . . . . . . . . . . . . . . . . . . . . . . . . . . . . . . . . . . . . . . . . . . . . . . . 1-2
Explanation of Symbols . . . . . . . . . . . . . . . . . . . . . . . . . . . . . . . . . . . . . . . . . . . . . . . . . . . . . 1-3
Conventions . . . . . . . . . . . . . . . . . . . . . . . . . . . . . . . . . . . . . . . . . . . . . . . . . . . . . . . . . . . . . . 1-4
Books . . . . . . . . . . . . . . . . . . . . . . . . . . . . . . . . . . . . . . . . . . . . . . . . . . . . . . . . . . . . . . . . . . . 1-4
Online Books . . . . . . . . . . . . . . . . . . . . . . . . . . . . . . . . . . . . . . . . . . . . . . . . . . . . . . . . . . . . . 1-5
Related Publications . . . . . . . . . . . . . . . . . . . . . . . . . . . . . . . . . . . . . . . . . . . . . . . . . . . . . . . . 1-5
Getting Started
System Requirements . . . . . . . . . . . . . . . . . . . . . . . . . . . . . . . . . . . . . . . . . . . . . . . . . . . . . . 2-2
Disk Space Requirements . . . . . . . . . . . . . . . . . . . . . . . . . . . . . . . . . . . . . . . . . . . . . . . . . . . 2-2
Supported Platforms . . . . . . . . . . . . . . . . . . . . . . . . . . . . . . . . . . . . . . . . . . . . . . . . . . . . . . . . 2-2
StorNext FS Components . . . . . . . . . . . . . . . . . . . . . . . . . . . . . . . . . . . . . . . . . . . . . . . . . . . . 2-3
Configure File System Server . . . . . . . . . . . . . . . . . . . . . . . . . . . . . . . . . . . . . . . . . . . . . . . . . 2-5
Dedicated Setup . . . . . . . . . . . . . . . . . . . . . . . . . . . . . . . . . . . . . . . . . . . . . . . . . . . . . . . . 2-5
Shared Setup . . . . . . . . . . . . . . . . . . . . . . . . . . . . . . . . . . . . . . . . . . . . . . . . . . . . . . . . . . 2-6
Contents 1
Page 14
SNMS
Using Optional Pre-Installation Configuration . . . . . . . . . . . . . . . . . . . . . . . . . . . . . . . . . . . . . 2-7
Summary of Installation Steps . . . . . . . . . . . . . . . . . . . . . . . . . . . . . . . . . . . . . . . . . . . . . . . . 2-8
Power Up Sequence . . . . . . . . . . . . . . . . . . . . . . . . . . . . . . . . . . . . . . . . . . . . . . . . . . . . . . . 2-12
Power Down Sequence . . . . . . . . . . . . . . . . . . . . . . . . . . . . . . . . . . . . . . . . . . . . . . . . . . . . 2-13
Setting Up StorNext FS on AIX
Roadmap . . . . . . . . . . . . . . . . . . . . . . . . . . . . . . . . . . . . . . . . . . . . . . . . . . . . . . . . . . . . . . . . 3-1
Installation Procedure for AIX . . . . . . . . . . . . . . . . . . . . . . . . . . . . . . . . . . . . . . . . . . . . . . . . . 3-2
Install StorNext FS on AIX . . . . . . . . . . . . . . . . . . . . . . . . . . . . . . . . . . . . . . . . . . . . . . . . 3-3
Obtain License for AIX Server . . . . . . . . . . . . . . . . . . . . . . . . . . . . . . . . . . . . . . . . . . . . . 3-4
Label Drives on AIX . . . . . . . . . . . . . . . . . . . . . . . . . . . . . . . . . . . . . . . . . . . . . . . . . . . . . 3-5
Configure StorNext FS Software on AIX . . . . . . . . . . . . . . . . . . . . . . . . . . . . . . . . . . . . . . 3-7
Mount StorNext FS on AIX . . . . . . . . . . . . . . . . . . . . . . . . . . . . . . . . . . . . . . . . . . . . . . . 3-11
Setting Up StorNext FS on IRIX
Roadmap . . . . . . . . . . . . . . . . . . . . . . . . . . . . . . . . . . . . . . . . . . . . . . . . . . . . . . . . . . . . . . . . 4-1
Installation Procedure for IRIX . . . . . . . . . . . . . . . . . . . . . . . . . . . . . . . . . . . . . . . . . . . . . . . . 4-2
Install StorNext FS on IRIX . . . . . . . . . . . . . . . . . . . . . . . . . . . . . . . . . . . . . . . . . . . . . . . . 4-3
Obtain License for IRIX Server . . . . . . . . . . . . . . . . . . . . . . . . . . . . . . . . . . . . . . . . . . . . . 4-5
Label Drives on IRIX . . . . . . . . . . . . . . . . . . . . . . . . . . . . . . . . . . . . . . . . . . . . . . . . . . . . . 4-6
Configure StorNext FS Software on IRIX . . . . . . . . . . . . . . . . . . . . . . . . . . . . . . . . . . . . . 4-8
Mount StorNext FS on IRIX . . . . . . . . . . . . . . . . . . . . . . . . . . . . . . . . . . . . . . . . . . . . . . 4-12
2 6-00905-01 Rev A
Page 15
SNFS
Setting Up StorNext FS on Linux
Roadmap . . . . . . . . . . . . . . . . . . . . . . . . . . . . . . . . . . . . . . . . . . . . . . . . . . . . . . . . . . . . . . . . 5-1
Installation Procedure for Linux . . . . . . . . . . . . . . . . . . . . . . . . . . . . . . . . . . . . . . . . . . . . . . . 5-2
Prerequisites . . . . . . . . . . . . . . . . . . . . . . . . . . . . . . . . . . . . . . . . . . . . . . . . . . . . . . . . . . . 5-3
Install StorNext FS on Linux . . . . . . . . . . . . . . . . . . . . . . . . . . . . . . . . . . . . . . . . . . . . . . . 5-9
Obtain License for Linux Server . . . . . . . . . . . . . . . . . . . . . . . . . . . . . . . . . . . . . . . . . . . 5-11
Label Drives on Linux . . . . . . . . . . . . . . . . . . . . . . . . . . . . . . . . . . . . . . . . . . . . . . . . . . . 5-12
Configure StorNext FS Software on Linux . . . . . . . . . . . . . . . . . . . . . . . . . . . . . . . . . . . 5-14
Mount StorNext FS on Linux . . . . . . . . . . . . . . . . . . . . . . . . . . . . . . . . . . . . . . . . . . . . . . 5-18
Setting Up StorNext FS on Solaris
Roadmap . . . . . . . . . . . . . . . . . . . . . . . . . . . . . . . . . . . . . . . . . . . . . . . . . . . . . . . . . . . . . . . . 6-1
Installation Procedure for Solaris . . . . . . . . . . . . . . . . . . . . . . . . . . . . . . . . . . . . . . . . . . . . . . 6-2
Install StorNext FS on Solaris . . . . . . . . . . . . . . . . . . . . . . . . . . . . . . . . . . . . . . . . . . . . . . 6-3
Obtain License for Solaris Server . . . . . . . . . . . . . . . . . . . . . . . . . . . . . . . . . . . . . . . . . . . 6-4
Label Drives on Solaris . . . . . . . . . . . . . . . . . . . . . . . . . . . . . . . . . . . . . . . . . . . . . . . . . . . 6-4
Configure StorNext FS Software on Solaris . . . . . . . . . . . . . . . . . . . . . . . . . . . . . . . . . . . 6-7
Mount StorNext FS on Solaris . . . . . . . . . . . . . . . . . . . . . . . . . . . . . . . . . . . . . . . . . . . . 6-11
Contents 3
Page 16
SNMS
Resolving Installation Problems
Roadmap . . . . . . . . . . . . . . . . . . . . . . . . . . . . . . . . . . . . . . . . . . . . . . . . . . . . . . . . . . . . . . . . 7-1
Resolving Problems with AIX . . . . . . . . . . . . . . . . . . . . . . . . . . . . . . . . . . . . . . . . . . . . . . . . . 7-2
Check Drive Connectivity . . . . . . . . . . . . . . . . . . . . . . . . . . . . . . . . . . . . . . . . . . . . . . . . . 7-3
Verify that the File System is Active . . . . . . . . . . . . . . . . . . . . . . . . . . . . . . . . . . . . . . . . . 7-3
Check Error Messages . . . . . . . . . . . . . . . . . . . . . . . . . . . . . . . . . . . . . . . . . . . . . . . . . . . 7-3
Check AIX Patches . . . . . . . . . . . . . . . . . . . . . . . . . . . . . . . . . . . . . . . . . . . . . . . . . . . . . . 7-3
Verify the StorNext FS Setup . . . . . . . . . . . . . . . . . . . . . . . . . . . . . . . . . . . . . . . . . . . . . . 7-4
Verify the Mounted File System . . . . . . . . . . . . . . . . . . . . . . . . . . . . . . . . . . . . . . . . . . . . 7-5
Reinitialize StorNext FS . . . . . . . . . . . . . . . . . . . . . . . . . . . . . . . . . . . . . . . . . . . . . . . . . . 7-7
Resolving Problems with IRIX . . . . . . . . . . . . . . . . . . . . . . . . . . . . . . . . . . . . . . . . . . . . . . . . 7-9
Check Drive Connectivity . . . . . . . . . . . . . . . . . . . . . . . . . . . . . . . . . . . . . . . . . . . . . . . . . 7-9
Verify that the File System is Active . . . . . . . . . . . . . . . . . . . . . . . . . . . . . . . . . . . . . . . . 7-10
Check Error Messages . . . . . . . . . . . . . . . . . . . . . . . . . . . . . . . . . . . . . . . . . . . . . . . . . . 7-10
Check IRIX Patches . . . . . . . . . . . . . . . . . . . . . . . . . . . . . . . . . . . . . . . . . . . . . . . . . . . . 7-10
Verify the StorNext FS Setup . . . . . . . . . . . . . . . . . . . . . . . . . . . . . . . . . . . . . . . . . . . . . 7-11
Verify the Mounted File System . . . . . . . . . . . . . . . . . . . . . . . . . . . . . . . . . . . . . . . . . . . 7-12
Reinitialize StorNext FS . . . . . . . . . . . . . . . . . . . . . . . . . . . . . . . . . . . . . . . . . . . . . . . . . 7-13
Resolving Problems on Linux . . . . . . . . . . . . . . . . . . . . . . . . . . . . . . . . . . . . . . . . . . . . . . . . 7-15
Check Drive Connectivity . . . . . . . . . . . . . . . . . . . . . . . . . . . . . . . . . . . . . . . . . . . . . . . . 7-15
Verify File System is Active . . . . . . . . . . . . . . . . . . . . . . . . . . . . . . . . . . . . . . . . . . . . . . . 7-16
Check Error Messages . . . . . . . . . . . . . . . . . . . . . . . . . . . . . . . . . . . . . . . . . . . . . . . . . . 7-16
Check Linux Patches . . . . . . . . . . . . . . . . . . . . . . . . . . . . . . . . . . . . . . . . . . . . . . . . . . . 7-16
Verify the StorNext FS Setup . . . . . . . . . . . . . . . . . . . . . . . . . . . . . . . . . . . . . . . . . . . . . 7-17
Verify the Mounted File System . . . . . . . . . . . . . . . . . . . . . . . . . . . . . . . . . . . . . . . . . . . 7-18
Reinitialize StorNext FS . . . . . . . . . . . . . . . . . . . . . . . . . . . . . . . . . . . . . . . . . . . . . . . . . 7-19
4 6-00905-01 Rev A
Page 17
SNFS
Resolving Problems on Solaris . . . . . . . . . . . . . . . . . . . . . . . . . . . . . . . . . . . . . . . . . . . . . . . 7-20
Check Drive Connectivity . . . . . . . . . . . . . . . . . . . . . . . . . . . . . . . . . . . . . . . . . . . . . . . . 7-21
Verify File System is Active . . . . . . . . . . . . . . . . . . . . . . . . . . . . . . . . . . . . . . . . . . . . . . 7-21
Check Error Messages . . . . . . . . . . . . . . . . . . . . . . . . . . . . . . . . . . . . . . . . . . . . . . . . . . 7-21
Check Solaris Patches . . . . . . . . . . . . . . . . . . . . . . . . . . . . . . . . . . . . . . . . . . . . . . . . . . 7-21
Verify the StorNext FS Setup . . . . . . . . . . . . . . . . . . . . . . . . . . . . . . . . . . . . . . . . . . . . . 7-22
Verify the Mounted File System . . . . . . . . . . . . . . . . . . . . . . . . . . . . . . . . . . . . . . . . . . . 7-23
Reinitialize StorNext FS . . . . . . . . . . . . . . . . . . . . . . . . . . . . . . . . . . . . . . . . . . . . . . . . . 7-24
Customer Assistance
Contacting Support . . . . . . . . . . . . . . . . . . . . . . . . . . . . . . . . . . . . . . . . . . . . . . . . . . . . . . . . . 8-1
Publications . . . . . . . . . . . . . . . . . . . . . . . . . . . . . . . . . . . . . . . . . . . . . . . . . . . . . . . . . . . . . . 8-1
Website . . . . . . . . . . . . . . . . . . . . . . . . . . . . . . . . . . . . . . . . . . . . . . . . . . . . . . . . . . . . . . . . . . 8-1
Contents 5
Page 18
SNMS
6 6-00905-01 Rev A
Page 19
SNFS
Introduction
StorNext File System (StorNext FS), formerly known as CentraVision™, lets heterogeneous clients
share files across high-speed storage Fibre Channel (FC) connections. By eliminating the need to
duplicate, manage, and move multiple copies of the same file, StorNext FS increases storage
efficiency, improves workflow productivity, and reduces network bottlenecks. StorNext FS is the
core file system technology used in the StorNext Management Suite (SNMS).
• To install the StorNext FS in a supported UNIX environment, refer to the installation
procedures in this Guide. (Abbreviated installation procedures for StorNext FS in a UNIX
environment also appear in the StorNext Management Suite Installation Guide, a separate
document.)
• To install the StorNext File System in a supported Windows environment, refer to the
StorNext FS installation procedures in the StorNext Management Suite Installation Guide,
a separate document.
Other helpful documents include:
• StorNext Management Suite Release Notes
• StorNext File System Quick Reference Booklet
Purpose of This Book
This book describes how to install StorNext FS on AIX, IRIX, Linux and Solaris clients in UNIX
environments.
Who Should Read this Book
This book is intended as a guide for the StorNext FS installation team, which is usually the site
system administrators.
It assumes the system administrators have a strong familiarity with the following items.
• The appropriate operating system: a supported UNIX environment (AIX, IRIX, RedHat or
SuSE Linux, or Solaris).
• Applications running in their site environment.
Introduction 1-1
Page 20
SNFS
How This Book is Organized
This book contains the following chapters.
• Chapter 2: Getting Started — Component descriptions and summary of installation steps.
• Chapter 3: Setting Up StorNext FS on AIX — Instructions for installing and configuring
the StorNext File System.
• Chapter 4: Setting Up StorNext FS on IRIX — Instructions for installing and configuring
the StorNext File System.
• Chapter 5: Setting Up StorNext FS on Linux — Instructions for installing and configuring
the StorNext File System.
• Chapter 6: Setting Up StorNext FS on Solaris — What to do if you have trouble with the
installation process.
• Chapter 7: Resolving Installation Problems — Describes how to resolve problems
installing StorNext FS.
• Chapter 8: Customer Assistance — Provides information on different types of customer
assistance available for StorNext FS.
1-2 6-00905-01 Rev A
Page 21
SNFS
Explanation of Symbols
The following symbols indicate important information.
Symbol Description Definition Consequence
WARNING: Advises you to take or avoid a
specified action
CAUTION: Advises you to take or avoid a
specified action
NOTE: Indicates important information
that helps you make better use of
the software
Failure to take or avoid
this action could result
in physical harm to the
user or hardware
Failure to take or avoid
this action could result
in loss of data
No hazardous or
damaging
consequences
Introduction 1-3
Page 22
Conventions
Conventions used throughout this book are listed below.
Convention Example
SNFS
Screen text, file names, program names, and
commands are in Courier font.
The root prompt for UNIX is shown as the number/
pound symbol.
Site-specific or user-defined variables are enclosed
within greater than and less than characters, < >.
A menu name with a greater-than character refers
to a sequence of menus.
# mkdir -p <mount point>
# tar xvf <filename>
# chmod 777 <mount point>
Programs > StorNext File System > Help
Books
The following items comprise the technical documents supporting StorNext FS installed in a UNIX
environment. These documents are shipped on CD along with the StorNext FS software.
• StorNext FS Installation Guide (for UNIX Users) — Provides procedures to install the
StorNext FS in a supported UNIX environment.
• StorNext File System Quick Reference Booklet — Summarizes StorNext FS commands,
syntax, options, arguments, and command examples.
1-4 6-00905-01 Rev A
Page 23

SNFS
Online Books
The documentation CD accompanying the StorNext FS product contains StorNext FS technical
documents as PDF files. To view and print these PDFs, you need Adobe® Acrobat® Reader, which
is available as a download from www.adobe.com.
Related Publications
The publications described in the following table are created and distributed on an as-needed basis.
Related Publications Description
Release Notes Information about StorNext FS is contained within the
StorNext Management Suite Release Notes. The
Release Notes provide:
• Summary of enhancements.
• Description of fixed problems.
• Description of known problems.
Product Alerts Informs customers of technical problems and solutions
Product Bulletins Conveys technical information — not problems —
to customers.
Introduction 1-5
Page 24

SNFS
1-6 6-00905-01 Rev A
Page 25
SNFS
Getting Started
Topic Refer to Chapter
Getting started:
• Component description.
• Installation summary.
• Power up sequence.
• Power down sequence.
On AIX:
• Install StorNext FS.
• Obtain license for the server.
• Label the disk drives.
• Configure the StorNext FS software.
• Mount StorNext FS.
On IRIX:
• Install StorNext FS.
• Obtain license for the server.
• Label the disk drives.
• Configure the StorNext FS software.
• Mount StorNext FS.
On Linux:
2
3
4
5
• Install StorNext FS.
• Obtain license for the server.
• Label the disk drives.
• Configure the StorNext FS software.
• Mount StorNext FS.
Getting Started 2-1
Page 26
Topic Refer to Chapter
SNFS
On Solaris:
• Install StorNext FS.
• Obtain license for the server.
• Label the disk drives.
• Configure the StorNext FS software.
• Mount StorNext FS.
Troubleshooting procedures 7
6
Supported Platforms
StorNext File System (StorNext FS) is supported on the following platforms: IBM AIX, SGI IRIX,
Linux (RedHat and SuSE), Sun Solaris, Windows 2000, and Windows NT.
This Guide provides instructions to install StorNext FS on supported UNIX platforms (AIX, IRIX,
Linux or Solaris). For information on installing StorNext FS in a Windows 2000 or NT environment,
refer to the StorNext Management Suite Installation Guide.
System Requirements
For a list of system requirements and operating system patches, refer to the StorNext Management
Suite Release Notes.
Disk Space Requirements
To install the StorNext FS in a supported UNIX environment, verify that server and client machines
have the required amount of hard disk space:
• Server machines require 350 MB of disk space
• Client machines require 20 MB of disk space
2-2 6-00905-01 Rev A
Page 27
SNFS
StorNext FS Components
The following components comprise the StorNext FS software.
• StorNext FS server. Runs on a machine designated as the server for all StorNext FS
activities. The StorNext FS server controls space allocation and regulates meta-data
operations for all StorNext file systems.
• StorNext FS client. Runs on all machines that access file systems managed by the
StorNext FS server.
The following table lists major StorNext FS files.
File Description
Base StorNext FS server
software Manages
files and shared
access to the
StorNext FS
network and
storage area.
Program files that
contain installation
and program files,
administrative
commands,
scripts, utilities,
GUI, and
communication
interfaces.
File System
Database that
contains file
system logs.
AIX
Directory
/usr/cvfs /usr/cvfs /usr/cvfs /usr/cvfs
/usr/cvfs/bin
/usr/cvfs/config
/usr/cvfs/data /usr/cvfs/data /usr/cvfs/data /usr/cvfs/data
IRIX
Directory
/usr/cvfs/bin
/usr/cvfs/config
Linux
Directory
/usr/cvfs/bin
/usr/cvfs/config
Solaris
Directory
/usr/cvfs/bin
/usr/cvfs/config
Getting Started 2-3
Page 28
SNFS
File Description
StorNext FS
server’s startup
script.
Client Software on all
StorNext FS
clients. Contains
the protocol
interface required
to communicate
with the StorNext
FS server.
Mount
Point
Directory mounted
(mapped) by the
StorNext FS
clients.
AIX
Directory
/etc/rc.cvfs /etc/init.d/cvfs /etc/init.d/cvfs /etc/init.d/cvfs
/usr/cvfs /usr/cvfs /usr/cvfs /usr/cvfs
(user-defined) (user-defined) (user-defined) (user-defined)
IRIX
Directory
Linux
Directory
Solaris
Directory
2-4 6-00905-01 Rev A
Page 29
SNFS
Configure File System Server
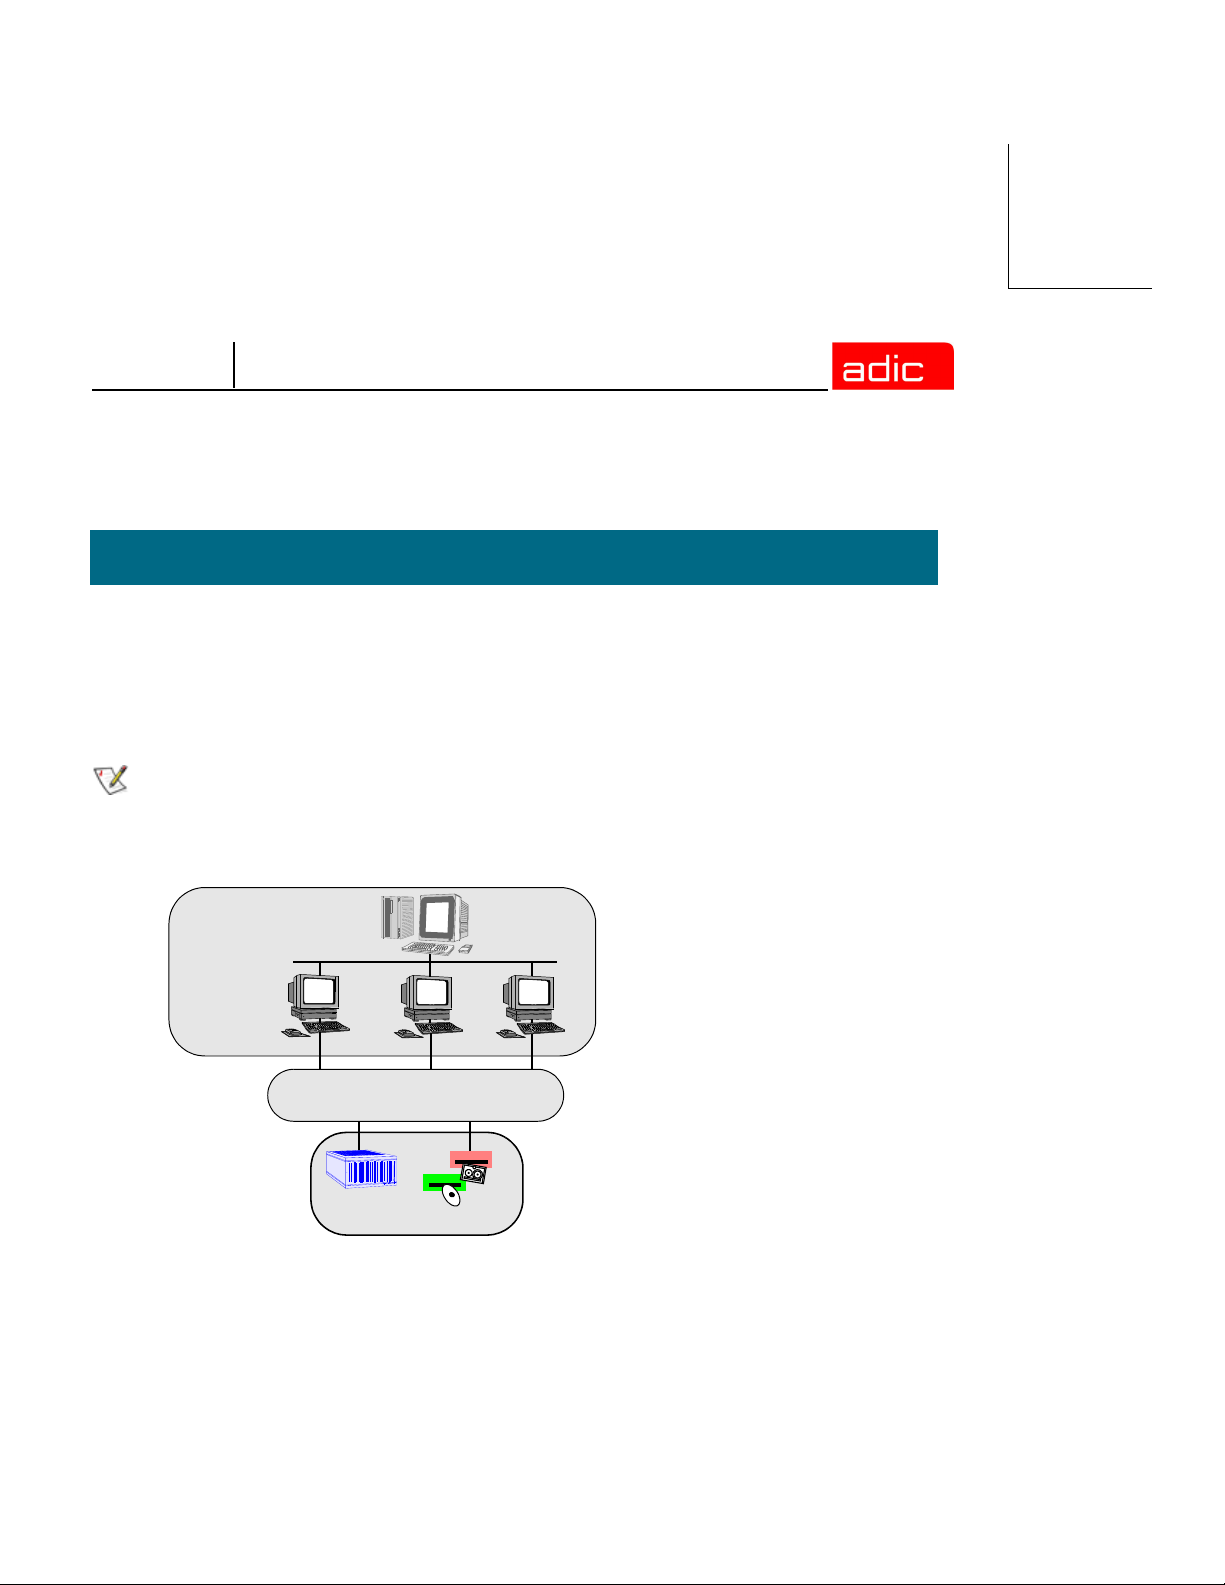
The StorNext FS server can be configured as either a dedicated or shared setup.
Dedicated Setup
In a dedicated setup, the StorNext FS server has TCP/IP connectivity to all StorNext FS clients, but
it does not have Fibre Channel (FC) connectivity to the Storage Area Network (SAN).
NOTE
Failover cannot be used in a dedicated setup. To use failover, the StorNext FS
must have a Fibre Channel connection.
Figure 2-1 illustrates a dedicated setup.
Dedicated StorNext
FS server
TCP/IP
StorNext FS
clients
Fibre Channel Switch
Storage Area Network
(SAN)
Disk Array
Disk Drives
Figure 2-1 StorNext FS server - dedicated setup
Getting Started 2-5
Page 30
SNFS
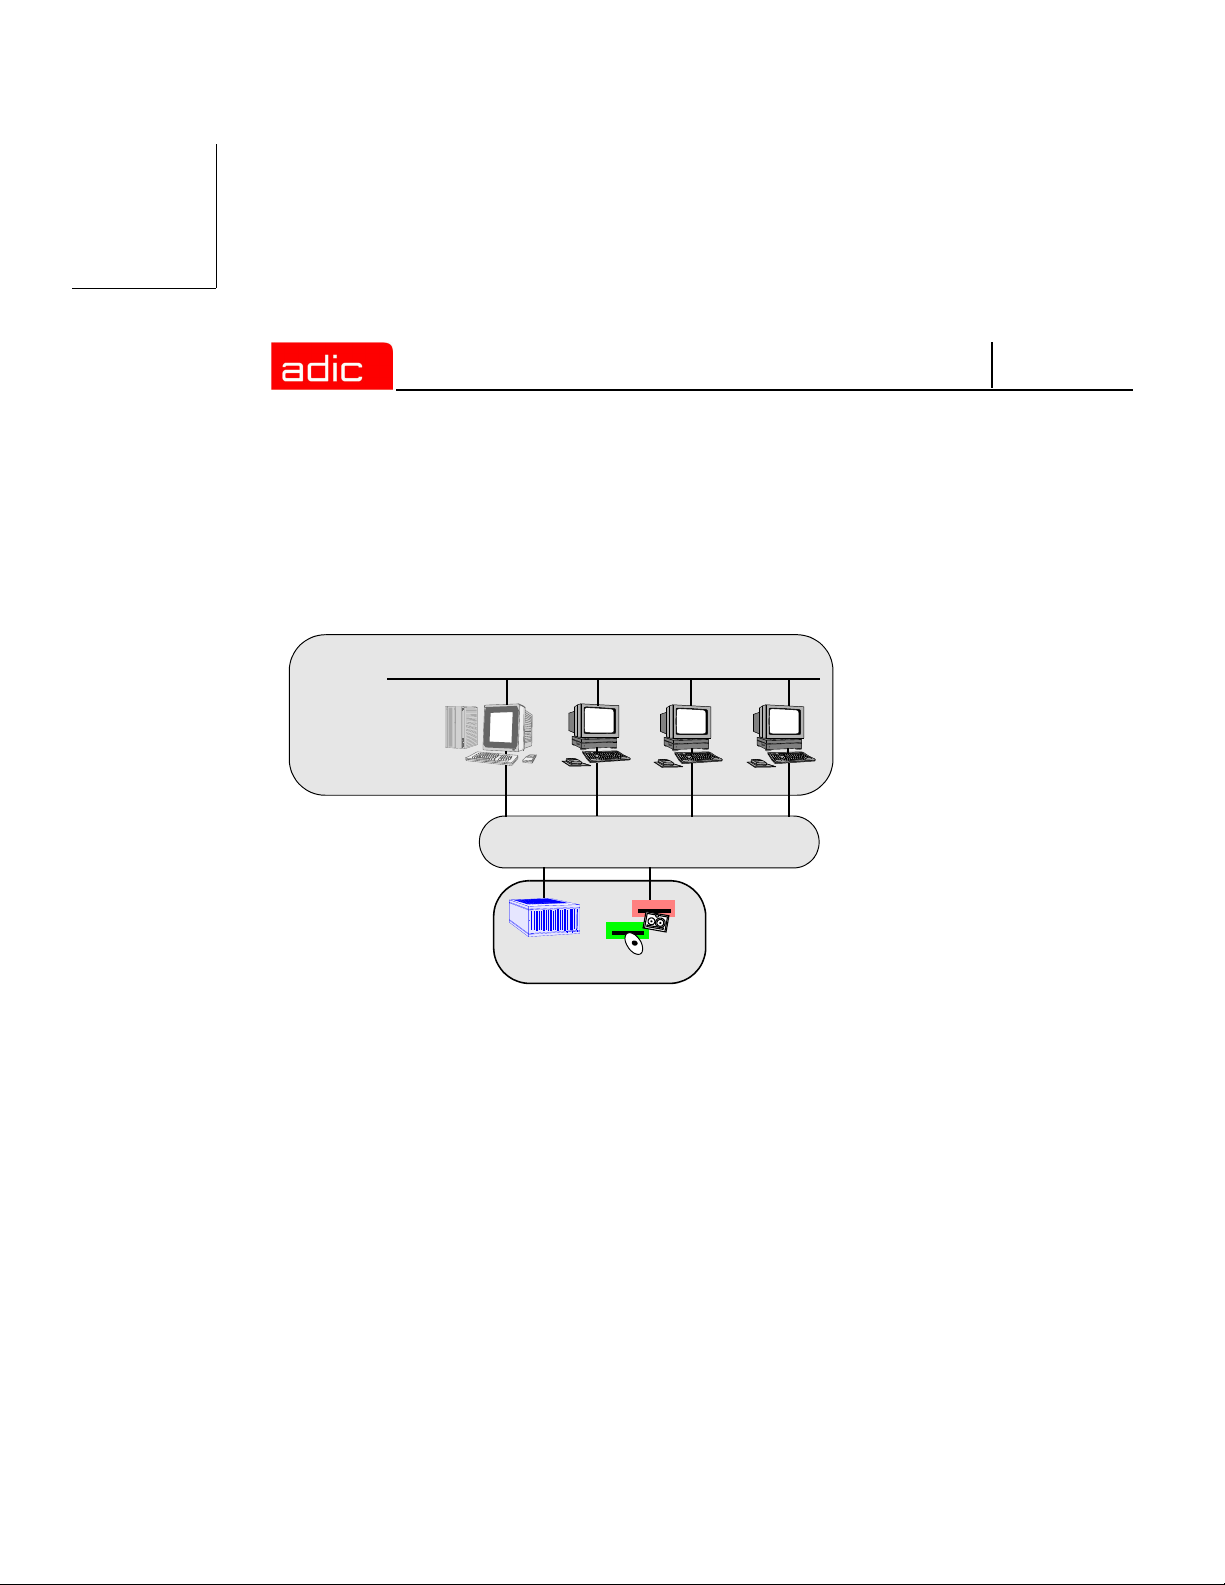
Shared Setup
In a shared setup, the StorNext FS server is also set up as a StorNext FS client with Fibre Channel
connectivity to the SAN.
Figure 2-2 illustrates a shared setup.
TCP/IP
StorNext FS server
& StorNext FS client
Storage Area Network
(SAN)
Disk Array
StorNext FS clients
Fibre Channel Switch
Disk Drives
Figure 2-2 StorNext FS server - shared setup
2-6 6-00905-01 Rev A
Page 31

SNFS
Using Optional Pre-Installation Configuration
StorNext FS requires the user account www to exist in the passwd file, and the group account
adic to exist in the group file. During installation, StorNext FS uses a system utility to create these
accounts if it cannot find them.
• If you want the system utility to create the accounts, skip this section.
• If you prefer to manually add these accounts, use the procedure described below. You must
not only perform this procedure for each machine on which you install the StorNext FS
software, but also on each machine that you set up as a client.
Step 1 Add the user account www.
Username UserID GroupID Login Shell Home Directory
www 101 100 /bin/ksh /usr/adic/www
Step 2 Add the group account adic.
Group Name GroupID Members List
adic 100 root, tdlm, www
Getting Started 2-7
Page 32

SNFS
Summary of Installation Steps
The steps listed below summarize the StorNext FS installation process. These steps are only
guidelines, since the actual steps required for your site are unique.
Step Task
1 CAUTION: Back up the system data of all client machines
before changing or installing any hardware or software.
2 Connect all client machines that will access the StorNext FS to a
TCP/IP network, such as Ethernet.
The StorNext FS software uses the TCP/IP connection to control
and manage data access and data sharing on the Fibre Channel
SAN.
For assistance with your TCP/IP network connections to your
client machines, contact your StorNext FS reseller.
3 Install the Fibre Channel disk arrays and disk drives according
to the instructions shipped with the equipment.
The disk arrays and disk drives must be powered up and ready
for use before installing StorNext FS.
4 Set up the Fibre Channel hardware and software components
for each machine according to the instructions shipped with the
equipment.
The machines must be powered up and ready to use before
installing the StorNext FS software.
2-8 6-00905-01 Rev A
Page 33

SNFS
Step Task
5 Set up the SAN machine components, which include the
following items:
• Install a Fibre Channel card.
• Connect Fibre Channel optical and copper cables to the
switches or hubs.
• Install Fibre Channel software and drivers.
• If required, configure the Fibre Channel software for a loop or
switch network.
6 Select one of your machines to run the StorNext FS server
component. This machine is referred to as the StorNext FS
server.
Select the machines to run the StorNext FS client component.
These machines are referred to as the StorNext FS clients.
Install the appropriate StorNext FS software components on the
selected machines. For instructions:
• Refer to Install StorNext FS on AIX on page 3-3
• Refer to Install StorNext FS on IRIX on page 4-3
• Refer to Install StorNext FS on Linux on page 5-9
• Refer to Install StorNext FS on Solaris on page 6-3
.
.
.
.
7 Generate a host ID string for the StorNext FS server and email
this information to support@adic.com. Customer Support will
respond with a license. For instructions:
• Refer to Obtain License for AIX Server on page 3-4
• Refer to Obtain License for IRIX Server on page 4-5
• Refer to Obtain License for Linux Server on page 5-11.
• Refer to Obtain License for Solaris Server on page 6-4
Getting Started 2-9
.
.
Page 34

Step Task
8 Label all the Fibre Channel disk drives used by
StorNext FS. For instructions:
SNFS
• Refer to Label Drives on AIX on page 3-5
• Refer to Label Drives on IRIX on page 4-6
• Refer to Label Drives on Linux on page 5-12
• Refer to Label Drives on Solaris on page 6-4
9 The StorNext FS server maintains operation and file structure
integrity of the shared StorNext File Systems.
Configure the StorNext FS software for all machines. For
instructions:
• Refer to Configure StorNext FS Software on AIX on
page 3-7.
• Refer to Configure StorNext FS Software on IRIX on
page 4-8.
• Refer to Configure StorNext FS Software on Linux on
page 5-14.
• Refer to Configure StorNext FS Software on Solaris on
page 6-7.
9A Optional: For failover scenarios, use the fsnameservers file in
the config directory to list the primary and secondary host
names of the StorNext FS server used in your failover
environment.
.
.
.
.
9B To create a StorNext FS-managed file system, modify the
example.cfg file in the examples directory on the StorNext FS
server.
NOTE: Make sure you use a unique, descriptive,
<file_system_name>.cfg for each StorNext File System on the
StorNext FS server.
2-10 6-00905-01 Rev A
Page 35

SNFS
Step Task
10 Mount the StorNext File System on each client machine. For
instructions,
• Refer to Mount StorNext FS on AIX on page 3-11
• Refer to Mount StorNext FS on IRIX on page 4-12
• Refer to Mount StorNext FS on Linux on page 5-18
• Refer to Mount StorNext FS on Solaris on page 6-11
11 On all StorNext FS clients:
Add the uniquely named StorNext File System to the list of
devices to be mounted at boot.
12 IRIX and Linux users: At startup, use the ckconfig cvfs
command to enable the StorNext File System on the StorNext
FS server.
13 Reboot the StorNext FS clients.
.
.
.
.
Getting Started 2-11
Page 36

Power Up Sequence
To power up StorNext FS as part of a Fibre Channel environment:
Step 1 Enable FC fabric switches, if present.
Step 2 Enable FC hubs, if present.
SNFS
Step 3 Enable FC disk arrays or disk drives.
Step 4 Start the StorNext FS server.
StorNext
FS
server
2-12 6-00905-01 Rev A
Page 37

SNFS
Step 5 Start all StorNext FS clients, in any order.
StorNext
FS clients
StorNext
FS clients
StorNext
FS clients
Power Down Sequence
To power down StorNext FS:
Step 1 Unmount all StorNext FS clients.
Step 2 Shut down all StorNext FS clients, in any order.
Step 3 Shut down the StorNext FS server.
Step 4 Disable FC disk arrays or disk drives.
Step 5 Disable FC hubs, if present.
Step 6 Disable FC fabric switches, if present.
Getting Started 2-13
Page 38

SNFS
2-14 6-00905-01 Rev A
Page 39

SNFS
Setting Up StorNext FS on AIX
Roadmap
Topic Refer to Chapter
Getting started:
• Component description.
• Installation summary.
• Power up sequence.
• Power down sequence.
On AIX:
• Install StorNext FS.
• Obtain license for the server.
• Label the disk drives.
• Configure the StorNext FS software.
• Mount StorNext FS.
On IRIX:
• Install StorNext FS.
• Obtain license for the server.
• Label the disk drives.
• Configure the StorNext FS software.
• Mount StorNext FS.
On Linux:
2
3
4
5
• Install StorNext FS.
• Obtain license for the server.
• Label the disk drives.
• Configure the StorNext FS software.
• Mount StorNext FS.
Setting Up StorNext FS on AIX 3-1
Page 40

Topic Refer to Chapter
SNFS
On Solaris:
• Install StorNext FS.
• Obtain license for the server.
• Label the disk drives.
• Configure the StorNext FS software.
• Mount StorNext FS.
Troubleshooting procedures 7
6
Installation Procedure for AIX
The installation and configuration of the StorNext File System (StorNext FS) on AIX includes the
following procedures.
Topic Page
Install StorNext FS on AIX 3-3
Obtain License for AIX Server 3-4
Label Drives on AIX 3-5
Configure StorNext FS Software on AIX 3-7
Mount StorNext FS on AIX 3-11
3-2 6-00905-01 Rev A
Page 41

SNFS
Install StorNext FS on AIX
NOTE
To install StorNext FS on AIX:
Step 1 Designate one AIX machine as the StorNext FS server.
Step 2 Log onto the machine as root.
Step 3 Insert the StorNext File System CD into the drive and wait for the hardware to access it.
Step 4 Run the installp utility to start the AIX installation.
# installp -ac -d cdrom path all
Step 5 When the installation is complete, set up the path to the StorNext FS man pages by
including /usr/cvfs/man in the global MANPATH environment variable.
For a list of man pages about the StorNext FS commands, refer to the /usr/cvfs/man
directory. To display a man page about a specific command, enter:
# man command_name
Step 6 Set up the path to the StorNext FS binaries by including /usr/cvfs/bin in the global
PATH environment variable.
Step 7 Remove the CD from the CD drive.
Step 8 Reboot the machine.
For upgrade instructions, refer to the StorNext Management Suite Release Notes.
Step 9 Return to Step 1 to install StorNext FS on another AIX machine.
Setting Up StorNext FS on AIX 3-3
Page 42

SNFS
Obtain License for AIX Server
The StorNext FS server must have a valid license.
To obtain the license file:
Step 1 Run the StorNext FS host identifier utility. Enter:
# usr/cvfs/bin/cvfsid
The output looks similar to this.
690CB94A sun 1 <host_name>
The hexadecimal number is unique to the server and the host_name parameter should
match the server’s host name. This number is known as the ID string.
Step 2 Email the ID string and the number of client machines to ATAC at support@adic.com. If
you cannot access email, call ATAC for assistance at 1-800-827-3822.
An ATAC Technical Support representative will provide a license.dat file.
Step 3 Place license.dat in the /usr/cvfs/config directory on the server.
NOTE
3-4 6-00905-01 Rev A
If you have a temporary StorNext license, remove the temporary license file and
replace it with the permanent license file.
Page 43

SNFS
Label Drives on AIX
You must label each drive to be used by StorNext FS. A new drive needs to be labeled only one
time. Drive labeling can be performed from any StorNext client that has a Fibre Channel connection
to the drive.
CAUTION
To label a drive:
Step 1 From the system prompt on any StorNext FS client, display a list of connected drives.
Enter:
# /usr/cvfs/bin/cvlabel -1
Step 2 From the output information, identify any drives that are unused or do not have a
recognized Volume Type and write down their associated device names.
CAUTION
Step 3 Create /usr/cvfs/config/cvlabels from the copy of the StorNext FS label file
example. Enter:
# cd/usr/cvfs/config
# cp ../examples/cvlabels.example ./cvlabels
Step 4 Edit /usr/cvfs/config/cvlabels so that it contains a list of StorNext FS label names
that correspond to the device names of the drives identified in Step 2.
The process of disk labeling re-partitions the drives. If you select an
incorrect drive, you may lose data.
Identify any drives that already contain a recognized Volume Type.
Do not write a label to these drives or you may lose data.
Setting Up StorNext FS on AIX 3-5
Page 44

SNFS
You can create any convention for the label names. For example, if a site consists of
12 Fibre Channel drives, you can use CvfsDisk[n] for each label name. Replace [n]
with a decimal number starting at 0 and increment the number for each drive. In this case,
the label name entries in the file would be: CvfsDisk0, CvfsDisk1, CvfsDisk2, and
so on. For example:
# AIX Example
# Drives 0 through 11 will be used for Regular Stripe Groups,
# so the entire volumes are used (total sector sizes are used
# since optional sector sizes are not specified).
#
# Regular file disks - use entire volume
CvfsDisk0 [device_name0]
CvfsDisk1 [device_name1]
CvfsDisk2 [device_name2]
CvfsDisk3 [device_name3]
CvfsDisk4 [device_name4]
CvfsDisk5 [device_name5]
CvfsDisk6 [device_name6]
CvfsDisk7 [device_name7]
CvfsDisk8 [device_name8]
CvfsDisk9 [device_name9]
CvfsDisk10 [device_name10]
CvfsDisk11 [device_name11]
Step 5 After the cvlabels file is complete, use the cvlabel command to label the disk drives.
# cd /usr/cvfs/bin
# ./cvlabel
Follow the on-screen instructions to label the disk drives.
3-6 6-00905-01 Rev A
Page 45

SNFS
Configure StorNext FS Software on AIX
To configure the StorNext FS software on an AIX machine, you have to configure the software on
both the StorNext FS server and clients.
Server Configuration
Step 1 Create a StorNext FS-managed file system by copying /usr/cvfs/examples/
example.cfg and renaming it. Enter:
# cd/usr/cvfs/config
# cp ../examples/example.cfg ./<file_system>.cfg
NOTE
Step 2 Edit the example configuration using the following information.
NOTE
DISK TYPE section - Defines valid disk types. A disk type describes a category of disks
with a capacity specified in number of sectors. The following parts comprise a disk type:
• The required keyword DiskType preceded by the open bracket symbol ( [ ) and
• On the next line, the required keyword Sectors and the value of sectors, in terms of
For example:
The SectorSize should reflect the Sector Format Size of the disk drives, for example:
512, 4096, 8192, 16384.
The example.cfg file supplied by ADIC contains commented text (entries that begin
with a #) with descriptions of the various sections and parameters in the file.
For information about editing the configuration file, refer to the man page by
entering man cvfs_config at a system shell prompt.
followed by the closed bracket symbol ( ] ).
512 bytes per sector, for the disk type.
[DiskType ST318202FC]
Sectors 35563520
SectorSize 512
To obtain the number of sectors where the disks are set, use the cvlabel -1 command.
If you are using disk devices that do not have the same number of sectors, then several
disk types can be specified to handle each common number of sectors.
Setting Up StorNext FS on AIX 3-7
Page 46

SNFS
DISK section - Identifies the disk drive that is labeled and available to StorNext FS. A disk
type describes a category of disks with a capacity specified in number of sectors. The
following parts comprise a disk definition:
• The required keyword Disk preceded by the open bracket symbol ( [ ) and followed by
the closed bracket symbol ( ] ).
• On the next line, the words Status UP
• On the next line, the required keyword Type and the name of the disk type assigned to
the disk definition. The name of the disk must match the label name of the drive as
displayed by the cvlabel -1 command. This is how the label names of the Fibre
Channel disks are associated with a StorNext FS.
For example:
[Disk CvfsDisk0]
Status UP # UP/DOWN
Type 9GB_drive # A type defined in a DiskType Section
STRIPEGROUP DEFINITION section - Describes a group of disks that comprise a stripe
group. One or more stripe groups describe the entire file system. A stripe group is the
smallest entity that can be manipulated by a system administrator using the File System
Administration utility (cvadmin).
NOTE
3-8 6-00905-01 Rev A
All disks defined in any given stripe group must have the same number of sectors,
as reported by cvlabel -1.
Page 47

SNFS
Examples of stripe groups appear in the configuration file.
• Find the stripe group named RegularFiles.
• Edit the Node entries so that all the disk names are listed, with each entry followed by
a space and then the stripe order number (0, 1, 2, etc.).
For example:
[StripeGroup RegularFiles]
Status UP
Type Regular
Read Enabled
Write Enabled
StripeBreadth 64
Node CvfsDisk0 0
Node CvfsDisk1 1
Node CvfsDisk2 2
Node CvfsDisk3 3
Step 3 Save, name and exit the /usr/cvfs/config/<file_system_name>.cfg file.
NOTE
Step 4 Verify that fsmpm is running so that cvmkfs works properly. Enter:
# ps -ef|grep fsmpm
Step 5 Initialize StorNext FS by running the following commands.
CAUTION
# cd /usr/cvfs/bin/cvmkfs <file_system_name>
# cp ../examples/fsmlist.example ./fsmlist
Setting Up StorNext FS on AIX 3-9
Make sure you have a <file_system_name>.cfg file for each uniquely named
StorNext File System on the StorNext FS server.
This step cannot be undone and all data on the file system will be
lost, so make sure you are ready to initialize the file system before
you proceed.
Page 48

SNFS
Step 6 Create the fsmlist file. Enter:
# cd /usr/cvfs/config
# cp ../examples/fsmlist.example ./fsmlist
Step 7 Edit /usr/cvfs/config/fsmlist so that it contains the names of all StorNext File
Systems.
Client Configuration
Step 1 Create the fsnameservers file by copying /usr/cvfs/examples/
fsnameservers.example and renaming it.
# cd /usr/cvfs/config
# cp ../examples/fsnameservers.example ./fsnameservers
Step 2 Edit /usr/cvfs/config/fsnameservers so that it contains the hostname or
IP address of all StorNext FS servers. This file must be identical across all servers and
clients.
For information about failover environments, refer to the cvfs_failover man page.
Start the System
Manually start the StorNext FS server. Enter: # /etc/rc.cvfs start
The StorNext FS service files for the new file system are started and run in the background on the
StorNext FS server.
3-10 6-00905-01 Rev A
Page 49

SNFS
Mount StorNext FS on AIX
To mount StorNext FS:
Step 1 Create the StorNext FS mount directory. For example:
# mkdir /usr/clips
Step 2 Add the uniquely named StorNext FS-managed file system to the /etc/filesystems
file. Use cvfs as the vfs and file system type. The entry should be similar to this format:
/usr/clips:
dev = <file_system_name>
vfs = cvfs
mount = true
type = cvfs
verbose = true
acount = false
On startup or reboot of the StorNext FS server, StorNext FS automatically mounts any file
systems listed in the /etc/filesystems file.
NOTE
Step 3 Return to Step 1 to repeat this procedure for each StorNext FS client.
After StorNext FS has been mounted on each client, the /usr/clips directory is
available to store and share data.
Setting Up StorNext FS on AIX 3-11
If you do not want a cvfs mount point in your filesystems file, manually start a
file system using the cvadmin command. Then, mount the file system using the
mount command.
Page 50

SNFS
3-12 6-00905-01 Rev A
Page 51

SNFS
Setting Up StorNext FS on IRIX
Roadmap
Topic Refer to Chapter
Getting started:
• Component description.
• Installation summary.
• Power up sequence.
• Power down sequence.
On AIX:
• Install StorNext FS.
• Obtain license for the server.
• Label the disk drives.
• Configure the StorNext FS software.
• Mount StorNext FS.
On IRIX:
• Install StorNext FS.
• Obtain license for the server.
• Label the disk drives.
• Configure the StorNext FS software.
• Mount StorNext FS.
On Linux:
2
3
4
5
• Install StorNext FS.
• Obtain license for the server.
• Label the disk drives.
• Configure the StorNext FS software.
• Mount StorNext FS.
Setting Up StorNext FS on IRIX 4-1
Page 52

Topic Refer to Chapter
SNFS
On Solaris:
• Install StorNext FS.
• Obtain license for the server.
• Label the disk drives.
• Configure the StorNext FS software.
• Mount StorNext FS.
Troubleshooting procedures 7
6
Installation Procedure for IRIX
The installation and configuration of the StorNext File System (StorNext FS) on IRIX includes the
following procedures.
Topic Page
Install StorNext FS on IRIX 4-3
Obtain License for IRIX Server 4-5
Label Drives on IRIX 4-6
Configure StorNext FS Software on IRIX 4-8
Mount StorNext FS on IRIX 4-12
4-2 6-00905-01 Rev A
Page 53

SNFS
Install StorNext FS on IRIX
NOTE
To install StorNext FS on IRIX:
Step 1 Designate one IRIX machine as the StorNext FS server.
Step 2 Log onto the machine as root.
Step 3 Insert the StorNext File System CD into the drive and wait for the hardware to access it.
Step 4 Mount the CD by associating it with a mount point. For example, use CDROM as shown
in the example in Step 5.
Step 5 Install StorNext FS using either the inst command or the Software Manager from the
desktop.
• If using the inst command, enter the following commands (where L = list and
For upgrade instructions, refer to the StorNext Management Suite Release Notes.
I all = install all) and go to Step 13.
# inst
inst> f /CDROM/StorNextFS/sgi/dist/dist65[mf]
inst> L
inst> I all
inst> go
• If using the Software Manager from the desktop, go to Step 6.
NOTE
Setting Up StorNext FS on IRIX 4-3
StorNext FS is shipped as separate, installable versions for the maintenance
(m) and feature (f) releases of IRIX. You need to select the correct versions for
StorNext FS, otherwise you will encounter problems during installation and while
running the product. Use the uname -R command to find the running version of
IRIX.
• If you are using the maintenance version of StorNext FS, the version will be
listed as 6.5 6.5.16m.
• If you are using the feature version of StorNext FS, the version will be listed
as 6.5.6.5.16f.
Page 54

SNFS
Step 6 Click Toolchest > System > Software Manager.
Step 7 In the Available Software text box, type this path:
f /CDROM/StorNextFS/sgi/dist/dist65 [mf]
Step 8 Click Customize Installation.
Step 9 From the list, select the items you want to install.
• Install the base and services files on all StorNext FS clients.
• Install the base and services files on all StorNext FS clients.
Step 10 Click Start.
Step 11 After the installation is complete, close the Software Manager utility.
Step 12 Set up paths to the StorNext FS man pages and commands. For example, if you are using
csh, edit the /etc/.login on the client to look like the following lines.
set path= ($path /usr/cvfs/bin)
setenv MANPATH ‘/usr/share/catman:/usr/cvfs/man’
At the system prompt, enter:
# source /etc/.login
For a list of man pages about the StorNext FS commands, refer to the /usr/cvfs/man
directory. To display a man page about a specific command, enter:
# man command_name
Step 13 Remove the CD from the CD drive.
Step 14 Reboot the machine.
Step 15 Return to Step 1 to install StorNext FS on another IRIX machine.
4-4 6-00905-01 Rev A
Page 55

SNFS
Obtain License for IRIX Server
The StorNext FS server must have a valid license. To obtain the license file:
Step 1 Run the StorNext FS host identifier utility. Enter:
# usr/cvfs/bin/cvfsid
The output looks similar to this.
690CB94A sgi 1 <host_name>
The hexadecimal number is unique to the server and host_name should match the
server’s host name. This number is known as the ID string.
Step 2 Email the ID string and the number of client machines to ATAC at support@adic.com.
If you cannot access email, call ATAC for assistance at 1-800-827-3822.
An ATAC Technical Support representative will provide a license.dat file.
Step 3 Place license.dat in the /usr/cvfs/config directory on the server.
NOTE
Setting Up StorNext FS on IRIX 4-5
If you have a temporary StorNext license, first remove the temporary license file
before replacing it with the permanent license file.
Page 56

SNFS
Label Drives on IRIX
You must label each drive to be used by StorNext FS. A new drive needs to be labeled only one
time. Drive labeling can be performed from any StorNext client that has a Fibre Channel connection
to the drive.
CAUTION
To label a drive:
Step 1 From the system prompt on any StorNext FS client, display a list of connected drives.
Enter:
# /usr/cvfs/bin/cvlabel -1
Step 2 From the output information, identify any drives that are unused or do not have a
recognized Volume Type and write down their associated device names.
CAUTION
Step 3 Create /usr/cvfs/config/cvlabels from the copy of the StorNext FS label file
example. Enter:
# cd/usr/cvfs/config
# cp ../examples/cvlabels.example ./cvlabels
Step 4 Edit /usr/cvfs/config/cvlabels so that it contains a list of StorNext FS label names
that correspond to the device names of the drives captured in Step 2.
The process of disk labeling re-partitions the drives. If you select an
incorrect drive, you may lose data.
Identify any drives that already contain a recognized Volume Type.
Do not write a label to these drives or you may lose data.
4-6 6-00905-01 Rev A
Page 57

SNFS
You can create any convention for the label names. For example, if a site consists of
12 Fibre Channel drives, you can use CvfsDisk[n] for each label name. Replace [n]
with a decimal number starting at 0 and increment the number for each drive. In this case,
the label name entries in the file would be: CvfsDisk0, CvfsDisk1, CvfsDisk2, and
so on. For example:
# IRIX Example
# Drives 0 through 11 will be used for Regular Stripe Groups,
# so the entire volumes are used (total sector sizes are used
# since optional sector sizes are not specified).
#
# Regular file disks - use entire volume
CvfsDisk0 [device_name0]
CvfsDisk1 [device_name1]
CvfsDisk2 [device_name2]
CvfsDisk3 [device_name3]
CvfsDisk4 [device_name4]
CvfsDisk5 [device_name5]
CvfsDisk6 [device_name6]
CvfsDisk7 [device_name7]
CvfsDisk8 [device_name8]
CvfsDisk9 [device_name9]
CvfsDisk10 [device_name10]
CvfsDisk11 [device_name11]
Step 5 After the cvlabels file is complete, label the disk drives using the cvlabel command.
# cd /usr/cvfs/bin
# ./cvlabel
Follow the on-screen instructions for labeling the disk drives.
Setting Up StorNext FS on IRIX 4-7
Page 58

SNFS
Configure StorNext FS Software on IRIX
To configure the StorNext FS software on an IRIX machine, you have to configure the software on
the StorNext FS server and StorNext FS clients.
Server Configuration
Step 1 Create a StorNext FS-managed file system by copying /usr/cvfs/examples/
example.cfg and renaming it.
# cd/usr/cvfs/config
# cp ../examples/example.cfg ./<file_system>.cfg
NOTE
Step 2 Edit the example configuration using the following information.
NOTE
DISK TYPE section - Defines valid disk types. A disk type describes a category of disks
with a capacity specified in number of sectors. The following parts comprise a disk type:
• The required keyword DiskType preceded by the open bracket symbol ( [ ) and
• On the next line, the required keyword Sectors and the value of sectors, in terms of
For example:
The SectorSize should reflect the Sector Format Size of the disk drives, for example:
512, 4096, 8192, 16384.
The example.cfg file supplied by ADIC contains commented text (entries that
begin with a #) with descriptions of the various sections and parameters in the file.
For information about editing the configuration file, refer to the man page by
entering man cvfs_config at a system shell prompt.
followed by the closed bracket symbol ( ] ).
512 bytes per sector, for the disk type.
[DiskType ST318202FC]
Sectors 35563520
SectorSize 512
4-8 6-00905-01 Rev A
Page 59

SNFS
To obtain the number of sectors where the disks are set, use the cvlabel -1 command.
If you are using disk devices that do not have the same number of sectors, then several
disk types can be specified to handle each common number of sectors.
DISK section - Identifies the disk drive that is labeled and available to StorNext FS. A disk
type describes a category of disks with a capacity specified in number of sectors. The
following parts comprise a disk definition:
• The required keyword Disk preceded by the open bracket symbol ( [ ) and followed by
the closed bracket symbol ( ] ).
• On the next line, the words Status UP
• On the next line, the required keyword Type and the name of the disk type assigned to
the disk definition. The name of the disk must match the label name of the drive as
displayed by the cvlabel -1 command. This is how the label names of the Fibre
Channel disks are associated with a StorNext FS.
For example:
[Disk CvfsDisk0]
Status UP # UP/DOWN
Type 9GB_drive # A type defined in a DiskType Section
STRIPEGROUP DEFINITION section - Describes a group of disks that comprise a stripe
group. One or more stripe groups describe the entire file system. A stripe group is the
smallest entity that can be manipulated by a system administrator using the File System
Administration utility (cvadmin).
NOTE
Setting Up StorNext FS on IRIX 4-9
All disks defined in any given stripe group must have the same number of sectors,
as reported by cvlabel -1.
Page 60

SNFS
Examples of stripe groups appear in the configuration file.
• Find the stripe group named RegularFiles.
• Edit the Node entries so that all the disk names are listed, with each entry followed by
a space and then the stripe order number (0, 1, 2, etc.).
For example:
[StripeGroup RegularFiles]
Status UP
Type Regular
Read Enabled
Write Enabled
StripeBreadth 64
Node CvfsDisk0 0
Node CvfsDisk1 1
Node CvfsDisk2 2
Node CvfsDisk3 3
Step 3 Save, name and exit the /usr/cvfs/config/<file_system_name>.cfg file.
NOTE
Step 4 Enable and start the StorNext File System. Enter:
# chkconfig cvfs on
# /etc/init.d/cvfs start
For more information, refer to the cvfs man page.
4-10 6-00905-01 Rev A
Make sure you have a <file_system_name>.cfg file for each uniquely named
StorNext File System on the StorNext FS server.
Page 61

SNFS
Step 5 Initialize StorNext FS. Enter:
# cd /usr/cvfs/bin/cvmkfs <file_system_name>
CAUTION
Step 6 Create the fsmlist file. Enter:
# cd /usr/cvfs/config
# cp ../examples/fsmlist.example ./fsmlist
Step 7 Edit /usr/cvfs/config/fsmlist so that it contains the names of all StorNext File
Systems.
This step cannot be undone and all data on the file system will be
lost, so make sure you are ready to initialize the file system before
you proceed.
Client Configuration
Step 1 Create the fsnameservers file by copying /usr/cvfs/examples/
fsnameservers.example and renaming it. Enter:
# cd /usr/cvfs/config
# cp ../examples/fsnameservers.example ./fsnameservers
Step 2 Edit /usr/cvfs/config/fsnameservers so that it contains the hostname or
IP address of all StorNext FS servers. This file must be identical across all servers and
clients.
Start the System
Manually start the StorNext FS server. Enter: # /etc/init.d/cvfs start
The StorNext FS service files for the new file system are started and run in the background on the
StorNext FS server.
Setting Up StorNext FS on IRIX 4-11
Page 62

SNFS
Mount StorNext FS on IRIX
To mount StorNext FS:
Step 1 Create the StorNext FS mount directory. For example, enter:
# mkdir /usr/clips
Step 2 Add the uniquely named StorNext FS-managed file system to the /etc/fstab file.
Use cvfs as the file system type.
<file_system_name> /usr/clips cvfs rw,threads=6 0 0
where:
Option Description
<file_system_name> Uniquely named StorNext FS-managed file system.
On startup or reboot of the StorNext FS server, StorNext FS automatically mounts any file
systems listed in the /etc/fstab file.
NOTE
Step 3 Enable automatic mounting of StorNext FS on the StorNext FS server as startup. Enter:
# chkconfig cvfs on
For more information, refer to the cvfs man page.
Step 4 Return to Step 1 to repeat this procedure for each StorNext FS client.
After StorNext FS has been mounted on each client, the /usr/clips directory is
available to store and share data.
4-12 6-00905-01 Rev A
If you do not want a cvfs mount point in your fstab file, manually start a file system
using the cvadmin command. Then, mount the file system using the mount
command.
Page 63

SNFS
Setting Up StorNext FS on Linux
Roadmap
Topic Refer to Chapter
Getting started:
• Component description.
• Installation summary.
• Power up sequence.
• Power down sequence.
On AIX:
• Install StorNext FS.
• Obtain license for the server.
• Label the disk drives.
• Configure the StorNext FS software.
• Mount StorNext FS.
On IRIX:
• Install StorNext FS.
• Obtain license for the server.
• Label the disk drives.
• Configure the StorNext FS software.
• Mount StorNext FS.
On Linux:
2
3
4
5
• Install StorNext FS.
• Obtain license for the server.
• Label the disk drives.
• Configure the StorNext FS software.
• Mount StorNext FS.
Setting Up StorNext FS on Linux 5-1
Page 64

Topic Refer to Chapter
SNFS
On Solaris:
• Install StorNext FS.
• Obtain license for the server.
• Label the disk drives.
• Configure the StorNext FS software.
• Mount StorNext FS.
Troubleshooting procedures 7
6
Installation Procedure for Linux
The installation and configuration of the StorNext File System (StorNext FS) on Linux includes the
following procedures.
Topic Page
Prerequisites 5-3
Install StorNext FS on Linux 5-9
Obtain License for Linux Server 5-11
Label Drives on Linux 5-12
Configure StorNext FS Software on Linux 5-14
Mount StorNext FS on Linux 5-18
5-2 6-00905-01 Rev A
Page 65

SNFS
Prerequisites
Consider these prerequisites when working with Linux servers and clients:
• Kernel requirements
• Multiple LUN support
Kernel Requirements
StorNext FS supports two Linux operating systems, RedHat and SuSE, that have separate kernel
requirements.
RedHat Linux - Kernel Requirements
To run StorNext FS on RedHat Linux, you must use one of these kernels:
• For uniprocessor and multiprocessor systems, RedHat Linux 7.3, kernels 2.4.17-2.4.27
• For uniprocessor and multiprocessor systems, RedHat Linux 8.0, kernels 2.4.14-2.4.27
StorNext FS is distributed as a loadable kernel module. To build the kernel module, the RedHat
Linux software must be installed with the Linux kernel source and tools, including compilers.
To build and install the StorNext FS modules, a symbolic link must exist in the /usr/src directory
that points to the kernel source for the running kernel. For example, for the Linux 2.4.18-27.8 kernel,
the symbolic link in the /usr/src directory is: linux-2.4 > linux-2.4.18-27.8.x.
If the symbolic link is missing or if it is pointing to the source of a different kernel, the StorNext FS
modules either will not install or will not function.
You must also verify that pdksh is installed.
Setting Up StorNext FS on Linux 5-3
Page 66

SNFS
SuSE Linux - Kernel Requirements
To run StorNext FS on SuSE Linux, use this procedure to determine and install the required kernels,
including compilers.
Step 1 Check to see whether the compiler was installed at the same time as the rest of the
system.
a. Query the kernel. Enter:
# rpm -qi `rpm -qa | grep k_`
Output similar to the following displays.
Name: k_smp Relocations:(not relocateable)
Version: 2.4.19 Vendor:UnitedLinux LLC
Release: 113 Build Date:Mon Oct 21 13:04:32 2002
Install Date: Tue Jul 29 15:13:38 2003 Build Host:D63.suse.de
Group: System Kernel Source RPM: k_smp-2.4.19-113.src.rpm
Size: 47672209 License: GPL
Packager: http://www.unitedlinux.com/feedback
Summary: kernel with multiprocessor support
Description: CONFIG_SMP=y
SuSE series: images
Distribution: UnitedLinux 1.0 (i586)
5-4 6-00905-01 Rev A
Page 67

SNFS
b. Query gcc. Enter:
# rpm -qi `rpm -qa | grep gcc`
Output similar to the following displays.
Name: gcc-info Relocations:(not relocateable)
Version: 3.2 Vendor:UnitedLinux LLC
Release: 45 Build Date:Wed Oct 16 04:51:46 2002
Install Date: Tue Jul 29 15:10:52 2003 Build Host:D143.suse.de
Group: Dev/Languages/C and C++ Source RPM: k_gcc-3.2-45.src.rpm
Size: 699504 License: GPL
Packager: http://www.unitedlinux.com/feedback
Summary: GNU info-pages for gcc
Description: GNU info-pages for gcc
SuSE series: images
Distribution: UnitedLinux 1.0 (i586)
Name: libgcc Relocations:(not relocateable)
Version: 3.2 Vendor:UnitedLinux LLC
Release: 45 Build Date:Wed Oct 16 04:51:46 2002
Install Date: Tue Jul 29 15:11:44 2003 Build Host:D143.suse.de
Group: System/Base Source RPM: gcc-3.2-45.src.rpm
Size: 41022 License: GPL
Packager: http://www.unitedlinux.com/feedback
Summary: C compiler runtime library
Description: Needed for dynamically linked C programs.
Name: gcc Relocations:(not relocateable)
Version: 3.2 Vendor:UnitedLinux LLC
Release: 45 Build Date:Wed Oct 16 04:51:46 2002
Install Date: Tue Jul 29 15:10:52 2003 Build Host:D143.suse.de
Group: Dev/Languages/C and C++ Source RPM: gcc-3.2-45.src.rpm
Size: 5680346 License: GPL
Packager: http://www.unitedlinux.com/feedback
Summary: The GNU C compiler and support files
Description: NOTE: Be sure to install at least the following packages
besides this one, or you won’t be able to compile: binutils
and glibc-devel.
If the dates are substantially different (hours or days rather than minutes), then the
compiler was probably added afterwards and the update will not work. In this situation,
SuSE Linux Enterprise 8.1 must be re-installed.
Setting Up StorNext FS on Linux 5-5
Page 68

SNFS
Step 2 Install the base system.
a. Select the language in which to run the install.
A system page displays with an area titled “Timezone” and a place to change the
“Software”.
b. Click on “Software” and then click “Detailed Selections”.
A two-paned window displays with check boxes on the left pane and list of packages
on the right pane.
c. On the left side, only click the box that is not already checked and click Accept.
d. Complete the installation.
Step 3 After installing the initial install of SuSE Linux Enterprise 8.1, update the system by
running Online Update. Enter:
# yast2
When yast2 comes up, Software should be selected in the left pane. In the right pane,
select the "Online Update" icon. Another window displays.
Step 4 Select Automatic Update and then click Next.
A prompt for Code and Password displays. The Registration Code is located in the SuSE
Installation booklet (on the back of the second page after the plastic cover "1"). To obtain
a password, follow the registration procedure described on the page where the
Registration Code is printed.
Step 5 If your Registration Code is not registered, navigate to www.suse.de/register and enter in
the Registration Code.
Several prompts display. A password will be sent to you.
Step 6 Once you provide the Code and Password and click Login, the update should launch.
The update is interactive, requiring an administrator, and takes several hours to complete.
The update is complete when the Installation Successful dialog window displays.
5-6 6-00905-01 Rev A
Page 69

SNFS
Step 7 Change directory (cd) into /usr/src and create a link to the kernel source. Enter:
# cd /usr/src
# ln -s linux-2.4.19.SuSE linux-2.4
Step 8 Change directory (cd) into linux-2.4 and delete any leftover config files in the directory.
Copy the original config file into the current directory and re-name the .cfg file. Enter:
# cd linux-2.4
# cp /boot/vmlinuz.config /usr/src/linux-2.4/.config
Step 9 Configure the kernel, build the kernel, build the modules and install the modules. Enter:
# make oldconfig
# make dep bzImage modules modules_install
Step 10 Copy the kernel into the /boot directory. Edit the /etc/sysconfig/kernel line that
reads INITRD_MODULES="aacraid reiserfs" to include qla2300.
Step 11 Create a ramdisk. Enter:
# pwd
/usr/src/linux-2.4
# cp `find . -name bzImage` /boot/vmlinuz-suse
# grep INITRD /etc/sysconfig/kernel
INITRD_MODULES="aacraid reiserfs"
# vi /etc/sysconfig/kernel
# grep INITRD /etc/sysconfig/kernel
INITRD_MODULES="aacraid reiserfs qla2300"
# cd /boot
# mkinitrd -k vmlinuz-suse -i initrd-suse
Setting Up StorNext FS on Linux 5-7
Page 70

SNFS
Step 12 Edit the /boot/grub/menu.lst file so the kernel can be booted. Make edits to reflect
the new kernel configuration parameters.
file /boot/grub/menu.lst before changes:
title linux
kernel (hd1,0)/boot/vmlinuz root=/dev/sdb1 vga=791
initrd (hd1,0)/boot/initrd
title floppy
root (fd0)
chainloader +1
file /boot/grub/menu.lst after changes (in bold):
title linux-suse
kernel (hd1,0)/boot/vmlinuz-suse root=/dev/sdb1 vga=791
initrd (hd1,0)/boot/initrd-suse
title floppy
root (fd0)
chainloader +1
Step 13 Verify that pdksh is installed.
Multiple LUN Support
If your file system storage device user non-zero SCSI Logical Unit Numbers (LUNs), configure the
RedHat Linux kernel to scan for all SCSI LUNs. By default, RedHat Linux only scans for LUN 0.
To configure the Linux kernel for multiple LUNs:
Step 1 In the /etc/modules.conf file, add the following line:
options scsi_mod max_scsi_luns=luns=nLUNs
where the nLUNs value equals the number of LUNs that are required by your file system
storage device.
5-8 6-00905-01 Rev A
Page 71

SNFS
For example:
alias parport_lowlevel parport_pc
alias scsi_hostadapter aic7xxx
alias eth0 eepro100
alias eth1 e1000
alias scsi_hostadapter1 qla2300
options scsi_mod max_scsi_luns=128
Step 2 Create a new initial RAM disk file by using the mkinitrd command.
For example:
# cd /boot
mkinitrd -f initrd-2.4.18.17.7.xsmp.img 2.4.18-17.7.xsmp
Step 3 Reboot the system.
Install StorNext FS on Linux
NOTE
To install StorNext FS on Linux:
Step 1 Log onto the machine as root.
Step 2 Insert the StorNext File System CD into the drive and wait for the hardware to access it.
NOTE
Step 3 Change to the Linux directory.
# cd /mnt/cdrom/StorNextFS/linux
Step 4 Install the server and client files on your system.
Setting Up StorNext FS on Linux 5-9
For upgrade instructions, refer to the StorNext Management Suite Release Notes.
If the RedHat Linux CD automatic facility does not automatically mount the CD to
/mnt/cdrom, enter mount /mnt/cdrom to mount the CD.
Page 72

SNFS
• If you use a Uniprocessor system, install the server and client files, including the word
up in the filenames. For example:
# rpm -ivh cvfs-server.7.3_2417up-2.1.1-62.i386.rpm
# rpm -ivh cvfs-client.7.3_2417up-2.1.1-62.i386.rpm
• If you use a Multiprocessor system, install the server and client files, including the word
smp in the filenames.
# rpm -ivh cvfs-server.7.3_2419smp-2.1.1-62.i386.rpm
# rpm -ivh cvfs-client.7.3_2418smp-2.1.1-62.i386.rpm
Step 5 Add /usr/cvfs/bin to root’s search path and /usr/cvfs/man to the MANPATH.
Step 6 In the /etc/profile file, modify the ulimit command to enable the system to produce
core files. Enter:
# ulimit -S -c 0 > /dev/null 2 > &1
# ulimit -c unlimited > /dev/null 2 >&1
Step 7 Remove the CD from the drive.
Step 8 Edit the /etc/sysconfig/rawdevices file to provide mapping from block device to
raw device for all Fibre Channel (FC) devices.
CAUTION
Every FC device that StorNext FS will use must have an entry with the format <rawdev>
<blockdev> in this file. For example, to add three SCSI devices to the file, the format would
be:
/dev/raw/raw1 /dev/sdb
/dev/raw/raw2 /dev/sdc
/dev/raw/raw3 /dev/sdd
Step 9 Activate the raw devices. Enter:
# /etc/init.d/rawdevices restart
5-10 6-00905-01 Rev A
To prevent the accidental overwriting of disks and/or LUNs not used
by StorNext FS (such as the system boot disk), do not include them
in the rawdevices file.
Page 73

SNFS
Step 10 Return to Step 1 to install StorNext FS on another Linux machine.
Obtain License for Linux Server
The StorNext FS server must have a valid license. To obtain the license file:
Step 1 Verify that /etc/hosts has a proper entry for the system name.
NOTE
Step 2 Run the StorNext FS host identifier utility on the server. Enter:
# usr/cvfs/bin/cvfsid
Output from this utility for system name snpc4 looks similar to this.
E0290E3F83 linux 0 snpc4
The hexadecimal number is unique to the server and host_name should match the
server’s host name. This number is known as the ID string.
Step 3 Email the ID string, number of client machines to ATAC at support@adic.com and product
serial number to ATAC at support@adic.com. If you do not have email access, contact
ATAC at 1-800-827-3822.
In certain situations, the Linux installation program attaches the system name to
127.0.0.1, instead of an entry for the Ethernet card. The following example
illustrates this situation for /etc/hosts with the system name, snpc4:
127.0.0.1 snpc4 localhost.localdomain localhost # bad
If this situation occurs, StorNext FS will not work properly. To correct the /etc/hosts
entry, edit the file so that the system name is attached to the Ethernet card. For
example, if the IP address for the system name, snpc4, is 172.16.50.39, the host
file should read:
127.0.0.1 localhost.localdomain localhost 172.16.50.39 snpc4 # good
An ATAC Technical Support representative will provide a license.dat file.
Step 4 Place license.dat in the /usr/cvfs/config directory on the server.
NOTE
Setting Up StorNext FS on Linux 5-11
If you have a temporary StorNext license, first remove the temporary license file
before replacing it with the permanent license file.
Page 74

SNFS
Label Drives on Linux
You must label each drive to be used by StorNext FS. A new drive needs to be labeled only one
time. Drive labeling can be performed from any StorNext client that has a Fibre Channel connection
to the drive.
CAUTION
To label a drive:
Step 1 From the system prompt on any StorNext FS client, display a list of connected drives.
Enter:
# /usr/cvfs/bin/cvlabel -1
Sample output looks like this:
sdb [SEAGATE ST19171FS 0018] unknown Sectors: 17691712. Sector Size: 512.
sdc [SEAGATE ST19171FS 0018] unknown Sectors: 17691712. Sector Size: 512.
sdd [SEAGATE ST19171FS 0018] unknown Sectors: 17691712. Sector Size: 512.
NOTE
Step 2 From the output information, identify any drives that are unused or do not have a
recognized Volume Type and write down their associated device names.
CAUTION
The process of disk labeling re-partitions the drives. If you select an
incorrect drive, you may lose data.
The cvlabel command only lists or modifies drives listed in
/etc/sysconfig/rawdevices. For more information about the rawdevices file,
see page
5-10.
Identify any drives that already contain a recognized Volume Type.
Do not write a label to these drives or you may lose data.
5-12 6-00905-01 Rev A
Page 75

SNFS
Step 3 Create /usr/cvfs/config/cvlabels from the copy of the StorNext FS label file
example. Enter:
# /usr/cvfs/bin/cvlabel -c > /usr/cvfs/config/cvlabels
The created file displays an entry for disk located by the cvlabel command.
CvfsDisk_UNKNOWN sdb
CvfsDisk_UNKNOWN sdc
CvfsDisk UNKNOWN sdd
Step 4 Edit /usr/cvfs/config/cvlabels file to provide a unique name for each drive used
by StorNext FS.
In this example, _UNKNOWN has been changed to a sequential list.
CvfsDisk0 sdb
CvfsDisk1 sdc
CvfsDisk2 sdd
Step 5 In the /usr/cvfs/config/cvlabels file, delete any lines that refer to disks you will
not label.
Step 6 Save the /usr/cvfs/config/cvlabels file and label the disk drives using the cvlabel
command.
Setting Up StorNext FS on Linux 5-13
Page 76

SNFS
Configure StorNext FS Software on Linux
To configure the StorNext FS software on a Linux machine, you have to configure the software on
the StorNext FS server and StorNext FS clients.
Server Configuration
Step 1 Create a StorNext FS-managed file system by copying /usr/cvfs/examples/
example.cfg to /usr/cvfs/config/<file_system_name>.cfg where
file_system_name is a unique, descriptive name. For example:
# cd/usr/cvfs/config
# cp ../examples/example.cfg ./projA.cfg
NOTE
Step 2 Edit each configuration file using the following information.
NOTE
DISK TYPE section - Defines valid disk types. A disk type describes a category of disks
with a capacity specified in number of sectors. The following parts comprise a disk type:
• The required keyword DiskType preceded by the open bracket symbol ( [ ) and
• On the next line, the required keyword Sectors and the value of sectors, in terms of
For example:
To obtain the number of sectors and the sector size for each storage device, use the
cvlabel -1 command. Multiple entries for DiskTypes can be created to support multiple
hard disks and RAID LUNs of different sizes.
The example.cfg file supplied by ADIC contains commented text (entries that
begin with a #) with descriptions of the various sections and parameters in the file.
For information about editing the configuration file, refer to the man page by
entering man cvfs_config at a system shell prompt.
followed by the closed bracket symbol ( ] ).
512 bytes per sector, for the disk type.
[DiskType ST31917FC]
Sectors 17780736
SectorSize 512
5-14 6-00905-01 Rev A
Page 77

SNFS
DISK section - Identifies the disk type to be assigned to a disk drive that is labeled and
available for StorNext FS. A disk type describes a category of disks with a capacity
specified in number of sectors. The following parts comprise a disk definition:
• The required keyword Disk preceded by the open bracket symbol ( [ ) and followed by
the closed bracket symbol ( ] ). The name of the disk must match the label name of the
drive as displayed by the cvlabel -1 command, and the sectors must match the
Sectors value defined in DiskType. This is how the label names of the Fibre Channel
disks are associated with a StorNext FS.
• On the next line, the words Status UP
• On the next line, the required keyword Type and the name of the disk type assigned to
the disk definition.
For example:
[Disk CvfsDisk12]
Status UP
Type ST1917FS
STRIPEGROUP DEFINITION section - Describes a group of disks that comprise a stripe
group. One or more stripe groups describe the entire file system. A stripe group is the
smallest entity that can be manipulated by a system administrator using the File System
Administration utility (cvadmin).
NOTE
Setting Up StorNext FS on Linux 5-15
All disks defined in any given stripe group must have the same sector size and
number of sectors, as listed in the DiskType section.
Page 78

Examples of stripe groups appear in the configuration file.
• Find the stripe group named RegularFiles.
• Edit the Node entries so that all the disk names are listed, with each entry followed by
a space and then the stripe order number (0, 1, 2, etc.).
For example:
[StripeGroup RegularFiles]
Status UP
Read Enabled
Write Enabled
StripeBreadth 16
Node CvfsDisk12 0
Node CvfsDisk13 1
Step 3 Save the configuration file.
SNFS
NOTE
Step 4 Launch the StorNext FS software. Enter:
/etc/init.d/cvfs start
Step 5 Initialize each StorNext FS.
CAUTION
For example:
# cd /usr/cvfs/bin/cvmkfs_projA
Step 6 Create the file system list (fsmlist). Enter:
# cd /usr/cvfs/config
# cp ../examples/fsmlist.example ./fsmlist
5-16 6-00905-01 Rev A
Make sure you have a <file_system_name>.cfg file for each uniquely named
StorNext File System on the StorNext FS server.
Once this command has been executed, all data on the file system
will be lost. Do not initialize the file system until you are ready to
proceed.
Page 79

SNFS
Step 7 In the fsmlist file, add the names of all of the StorNext File Systems.
Step 8 Create a nameserver list by copying the
/usr/cvfs/examples/fsnameservers.example to the
/usr/cvfs/config/fsnameservers file. Enter:
# cd /usr/cvfs/config
# cp ../examples/fsnameservers.example ./fsnameservers
Step 9 In the fsnameservers file, add the host IP address or name of the StorNext FS server.
For more information about failover environments, refer to the cvfs_failover man
page.
Client Configuration
Copy /usr/cvfs/config/fsnameservers from the StorNext FS server to
/usr/cvfs/config/fsnameservers on all clients.
Enable and Start the System
Manually re-start the StorNext FS server. Enter:
# /etc/init.d/cvfs restart
The StorNext FS service files for the new file system are now started and running in the
background on the StorNext FS server.
Setting Up StorNext FS on Linux 5-17
Page 80

SNFS
Mount StorNext FS on Linux
To mount StorNext FS:
Step 1 Create the StorNext FS mount directory. This is the path by which users access the file
system. For example:
# mkdir /usr/clips
# chmod 777 /usr/clips
Step 2 Add the StorNext FS name to the /etc/fstab file. Use cvfs as the file system type.
For example:
# projA /usr/clips/ cvfs rw,threads=6 0 0
When the StorNext FS server starts up or reboots, StorNext FS automatically mounts any
file systems listed in the /etc/fstab file.
NOTE
Step 3 Repeat Steps 1 and 2 to mount each StorNext FS on all client machines.
If you do not want a cvfs mount point in your fstab file, manually start a file
system using the cvadmin command. Then, mount the file system using the
mount command, as shown in the following example:
During the boot process, the file systems listed in /etc/fstab tries to be
mounted. On the first mount attempt, StorNext FS fails because the cvfs-loadable
modules are loaded later in the boot process. These errors can be safely ignored,
and StorNext FS mounts toward the end of the system startup process.
5-18 6-00905-01 Rev A
Page 81

SNFS
Setting Up StorNext FS on Solaris
Roadmap
Topic Refer to Chapter
Getting started:
• Component description.
• Installation summary.
• Power up sequence.
• Power down sequence.
On AIX:
• Install StorNext FS.
• Obtain license for the server.
• Label the disk drives.
• Configure the StorNext FS software.
• Mount StorNext FS.
On IRIX:
• Install StorNext FS.
• Obtain license for the server.
• Label the disk drives.
• Configure the StorNext FS software.
• Mount StorNext FS.
On Linux:
2
3
4
5
• Install StorNext FS.
• Obtain license for the server.
• Label the disk drives.
• Configure the StorNext FS software.
• Mount StorNext FS.
Setting Up StorNext FS on Solaris 6-1
Page 82

Topic Refer to Chapter
SNFS
On Solaris:
• Install StorNext FS.
• Obtain license for the server.
• Label the disk drives.
• Configure the StorNext FS software.
• Mount StorNext FS.
Troubleshooting procedures 7
6
Installation Procedure for Solaris
The installation and configuration of the StorNext File System (StorNext FS) on Solaris includes the
following procedures.
Topic Page
Install StorNext FS on Solaris 6-3
Obtain License for Solaris Server 6-4
Label Drives on Solaris 6-4
Configure StorNext FS Software on Solaris 6-7
Mount StorNext FS on Solaris 6-11
6-2 6-00905-01 Rev A
Page 83

SNFS
Install StorNext FS on Solaris
NOTE
To install StorNext FS on Solaris:
Step 1 Designate one Solaris machine as the StorNext FS server.
Step 2 Log onto the machine as root.
Step 3 Insert the StorNext File System CD into the drive and wait for the hardware to access it.
Step 4 Run the pkgadd utility to start the Solaris installation.
# pkgadd -d <cdrom path>
Step 5 Select the package for ADICcvfs.
Step 6 When the installation is complete, set up the path to the StorNext FS man pages by
including /usr/cvfs/man in the global MANPATH environment variable.
For a list of man pages about the StorNext FS commands, refer to the /usr/cvfs/man
directory. To display a man page about a specific command, enter:
# man command_name
Step 7 Set up the path to the StorNext FS binaries by including /usr/cvfs/bin in the global
PATH environment variable.
Step 8 Remove the CD from the CD drive.
For upgrade instructions, refer to the StorNext Management Suite Release Notes.
Step 9 Reboot the machine
Step 10 Return to Step 1 to install StorNext FS on another Solaris machine.
Setting Up StorNext FS on Solaris 6-3
Page 84

SNFS
Obtain License for Solaris Server
The StorNext FS server must have a valid license. To obtain the license file:
Step 1 Run the StorNext FS host identifier utility. Enter:
# usr/cvfs/bin/cvfsid
The output looks similar to this.
690CB94A sun 1 <host_name>
The hexadecimal number is unique to the server and host_name should match the
server’s host name. This number is known as the ID string.
Step 2 Email the ID string and the number of client machines to ATAC at support@adic.com.
If you cannot access email, call ATAC for assistance at 1-800-827-3822.
An ATAC Technical Support representative will provide a license.dat file.
Step 3 Place license.dat in the /usr/cvfs/config directory on the server.
NOTE
If you have a temporary StorNext license, first remove the temporary license file
before replacing it with the permanent license file.
Label Drives on Solaris
You must label each drive to be used by StorNext FS. A new drive needs to be labeled only one
time. Drive labeling can be performed from any StorNext client that has a Fibre Channel connection
to the drive.
CAUTION
To label a drive:
Step 1 From the system prompt on any StorNext FS client, display a list of connected drives.
Enter:
# /usr/cvfs/bin/cvlabel -1
6-4 6-00905-01 Rev A
The process of disk labeling re-partitions the drives. If you select an
incorrect drive, you may lose data.
Page 85

SNFS
Step 2 From the output information, identify any drives that are unused or do not have a
recognized Volume Type and write down their associated device names.
CAUTION
Step 3 Create /usr/cvfs/config/cvlabels from the copy of the StorNext FS label file
example. Enter:
# cd/usr/cvfs/config
# cp ../examples/cvlabels.example ./cvlabels
Identify any drives that already contain a recognized Volume Type.
Do not write a label to these drives or you may lose data.
Setting Up StorNext FS on Solaris 6-5
Page 86

SNFS
Step 4 Edit /usr/cvfs/config/cvlabels so that it contains a list of StorNext FS label names
that correspond to the device names of the drives captured in Step 2.
You can create any convention for the label names. For example, if a site consists of
12 Fibre Channel drives, you can use CvfsDisk[n] for each label name. Replace [n]
with a decimal number starting at 0 and increment the number for each drive. In this case,
the label name entries in the file would be: CvfsDisk0, CvfsDisk1, CvfsDisk2, and
so on. For example:
# Solaris Example
# Drives 0 through 11 will be used for Regular Stripe
Groups, # so the entire volumes are used (total sector
sizes are used # since optional sector sizes are not
specified).
#
# Regular file disks - use entire volume
CvfsDisk0 [device_name0]
CvfsDisk1 [device_name1]
CvfsDisk2 [device_name2]
CvfsDisk3 [device_name3]
CvfsDisk4 [device_name4]
CvfsDisk5 [device_name5]
CvfsDisk6 [device_name6]
CvfsDisk7 [device_name7]
CvfsDisk8 [device_name8]
CvfsDisk9 [device_name9]
CvfsDisk10 [device_name10]
CvfsDisk11 [device_name11]
Step 5 After the cvlabels file is complete, label the disk drives using the cvlabel command.
# cd /usr/cvfs/bin
# ./cvlabel
Follow the on-screen instructions for labeling the disk drives.
6-6 6-00905-01 Rev A
Page 87

SNFS
Configure StorNext FS Software on Solaris
To configure the StorNext FS software on a Solaris machine, you have to configure the software on
the StorNext FS server and StorNext FS clients.
Server Configuration
Step 1 Create a StorNext FS-managed file system by copying /usr/cvfs/examples/
example.cfg and renaming it.
# cd/usr/cvfs/config
# cp ../examples/example.cfg ./<file_system>.cfg
NOTE
Step 2 Edit the example configuration using the following information.
NOTE
DISK TYPE section - Defines valid disk types. A disk type describes a category of disks
with a capacity specified in number of sectors. The following parts comprise a disk type:
• The required keyword DiskType preceded by the open bracket symbol ( [ ) and
• On the next line, the required keyword Sectors and the value of sectors, in terms of
The example.cfg file supplied by ADIC contains commented text (entries that
begin with a #) with descriptions of the various sections and parameters in the file.
For information about editing the configuration file, refer to the man page by
entering man cvfs_config at a system shell prompt.
followed by the closed bracket symbol ( ] ).
512 bytes per sector, for the disk type.
Setting Up StorNext FS on Solaris 6-7
Page 88

SNFS
For example:
[DiskType ST318202FC]
Sectors 35563520
SectorSize 512
The SectorSize should reflect the Sector Format Size of the disk drives, for example:
512, 4096, 8192, 16384.
To obtain the number of sectors where the disks are set, use the cvlabel -1 command.
If you are using disk devices that do not have the same number of sectors, then several
disk types can be specified to handle each common number of sectors.
DISK section - Identifies the disk drive that is labeled and available to StorNext FS. A disk
type describes a category of disks with a capacity specified in number of sectors. The
following parts comprise a disk definition:
• The required keyword Disk preceded by the open bracket symbol ( [ ) and followed by
the closed bracket symbol ( ] ).
• On the next line, the words Status UP
• On the next line, the required keyword Type and the name of the disk type assigned to
the disk definition. The name of the disk must match the label name of the drive as
displayed by the cvlabel -1 command. This is how the label names of the Fibre
Channel disks are associated with a StorNext FS.
For example:
[[Disk CvfsDisk0]
Status UP # UP/DOWN
Type 9GB_drive # A type defined in a DiskType Section
6-8 6-00905-01 Rev A
Page 89

SNFS
STRIPEGROUP DEFINITION section - Describes a group of disks that comprise a stripe
group. One or more stripe groups describe the entire file system. A stripe group is the
smallest entity that can be manipulated by a system administrator using the File System
Administration utility (cvadmin).
NOTE
Examples of stripe groups appear in the configuration file.
• Find the stripe group named RegularFiles.
• Edit the Node entries so that all the disk names are listed, with each entry followed by
For example:
All disks defined in any given stripe group must have the same number of sectors,
as reported by cvlabel -1.
a space and then the stripe order number (0, 1, 2, etc.).
[StripeGroup RegularFiles]
Status UP
Type Regular
Read Enabled
Write Enabled
StripeBreadth 64
Node CvfsDisk0 0
Node CvfsDisk1 1
Node CvfsDisk2 2
Node CvfsDisk3 3
Step 3 Save, name and exit the /usr/cvfs/config/<file_system_name>.cfg file.
NOTE
Step 4 Verify that fsmpm is running so that cvmkfs works properly. Enter:
# ps -ef | grep fsmpm
Setting Up StorNext FS on Solaris 6-9
Make sure you have a <file_system_name>.cfg file for each uniquely named
StorNext File System on the StorNext FS server.
Page 90

Step 5 Initialize StorNext FS. Enter:
# cd /usr/cvfs/bin/cvmkfs <file_system_name>
# cp ../examples/fsmlist.example ./fsmlist
SNFS
CAUTION
Step 6 Create the fsmlist file. Enter:
# cd /usr/cvfs/config
# cp ../examples/fsmlist.example ./fsmlist
Step 7 Edit /usr/cvfs/config/fsmlist so that it contains the names of all StorNext File
Systems.
This step cannot be undone and all data on the file system will be
lost, so make sure you are ready to initialize the file system before
you proceed.
Client Configuration
Step 1 Create the fsnameservers file by copying /usr/cvfs/examples/
fsnameservers.example and renaming it. Enter:
# cd /usr/cvfs/config
# cp ../examples/fsnameservers.example ./fsnameservers
Step 2 Edit /usr/cvfs/config/fsnameservers so that it contains the hostname or IP
address of all StorNext FS servers. This file must be identical across all servers and
clients.
For information about failover environments, refer to the cvfs_failover man page.
Start the System
Manually start the StorNext FS server. Enter: # /etc/init.d/cvfs start
The StorNext FS service files for the new file system are now started and running in the background
on the StorNext FS server.
6-10 6-00905-01 Rev A
Page 91

SNFS
Mount StorNext FS on Solaris
To mount StorNext FS:
Step 1 Create the StorNext FS mount directory. For example:
# mkdir /usr/clips
Step 2 Add the uniquely named StorNext FS-managed file system to the /etc/vfstab file. Use
cvfs as the file system type.
<file_system_name> /usr/clips cvfs - yes rw,threads=6
where:
Option Description
<file_system_name> Uniquely named StorNext FS-managed file system.
On startup or reboot of the StorNext FS server, StorNext FS automatically mounts any file
systems listed in the /etc/vfstab file.
NOTE
Step 3 Return to Step 1 to repeat this procedure for each StorNext FS client.
After StorNext FS has been mounted on each client, the /usr/clips directory is
available to store and share data.
Setting Up StorNext FS on Solaris 6-11
If you do not want a cvfs mount point in your vfstab file, manually start a file
system using the cvadmin command. Then, mount the file system using the
mount command.
Page 92

SNFS
6-12 6-00905-01 Rev A
Page 93

SNFS
Resolving Installation Problems
Roadmap
Topic Refer to Chapter
Getting started:
• Component description.
• Installation summary.
• Power up sequence.
• Power down sequence.
On AIX:
• Install StorNext FS.
• Obtain license for the server.
• Label the disk drives.
• Configure the StorNext FS software.
• Mount StorNext FS.
On IRIX:
• Install StorNext FS.
• Obtain license for the server.
• Label the disk drives.
• Configure the StorNext FS software.
• Mount StorNext FS.
On Linux:
2
3
4
5
• Install StorNext FS.
• Obtain license for the server.
• Label the disk drives.
• Configure the StorNext FS software.
• Mount StorNext FS.
Resolving Installation Problems 7-1
Page 94

Topic Refer to Chapter
SNFS
On Solaris:
• Install StorNext FS.
• Obtain license for the server.
• Label the disk drives.
• Configure the StorNext FS software.
• Mount StorNext FS.
Troubleshooting procedures 7
6
Resolving Problems with AIX
To resolve problems with a StorNext File System (StorNext FS) installation on AIX:
Topic Page
Check Drive Connectivity 7-3
Verify that the File System is Active 7-3
Check Error Messages 7-3
Check AIX Patches 7-3
Verify the StorNext FS Setup 7-4
Verify the Mounted File System 7-5
Reinitialize StorNext FS 7-7
7-2 6-00905-01 Rev A
Page 95

SNFS
Check Drive Connectivity
Step 1 On the StorNext FS server, log in as root.
Step 2 Check for access to the Fibre Channel drives. Enter:
cvlabel -l
Verify that the File System is Active
Step 1 On the StorNext FS server, log in as root.
Step 2 Verify that the file system is active. Enter:
cvadmin>
select file_system_name
show long
All stripe groups should display a status of “UP.”
Step 3 After verifying the file system’s active status, enter quit.
Check Error Messages
Step 1 On the StorNext FS server, log in as root.
Step 2 Check for error messages in the system log file. Enter:
tail -50 /system log
Check AIX Patches
If any program errors cannot be resolved, check for AIX patches (or equivalents) in the
StorNext Management Suite Release Notes.
Resolving Installation Problems 7-3
Page 96

Verify the StorNext FS Setup
Step 1 On the StorNext FS server, log in as root.
Step 2 Verify the number of active StorNext FS clients using the default file system.
a. Launch cvadmin. Enter: cvadmin
Several status messages display.
b. Select the file system. Enter: select file_system_name
Output similar to the following displays:
Created: Date
Active Clients 3
Fs Block Size 4K
SNFS
Msg Buffer Size 4K
Disk Devices 16
Stripe Groups 4
Mirror Groups 0
Fs Blocks
Fs Blocks Free
Step 3 Verify that the number of StorNext FS clients configured during this installation matches
the number of StorNext FS clients shown in the Active Clients field.
7-4 6-00905-01 Rev A
Page 97

SNFS
Verify the Mounted File System
To verify that StorNext FS is correctly mounted on a StorNext FS client:
Step 1 On a StorNext FS client, log in as root.
Step 2 Verify the StorNext FS mount on the client. Enter: df -k
A status message, similar to the following, displays:
File System kbytes Use Avail % use Mounted On
/dev/hd4 65536 47596 28% 2881 22% /
/dev/hd2 5242880 1988880 63% 35067 8% /usr
/dev/hd9var 32768 2848 92% 664 48% /var
/dev/hd3 327680 275064 17% 76 1% /tmp
/dev/hd1 524288 351836 33% 2328 3% /home
/proc - - - - - /proc
/dev/hd10opt 32768 19876 40% 376 8% /opt
/dev/cvfsct1:storz1 72128768 55285152 24% 359 36% /stornext/snfs1
Resolving Installation Problems 7-5
Page 98

SNFS
Unmount and Remount All File Systems
To unmount and remount all StorNext File Systems listed in /etc/filesystems (such as to
troubleshoot or for system maintenance):
Step 1 On a StorNext FS client, log in as root.
Step 2 Unmount all StorNext File Systems listed in the /etc/filesystems file. Enter:
umount -t cvfs
Step 3 Remount all StorNext File Systems on a client. Enter:
umount -at cvfs
Unmount and Remount Specific File System
To unmount and remount a specific StorNext FS, follow these steps.
Step 1 On a StorNext FS client, log in as root.
Step 2 Unmount a specific StorNext FS. Enter:
umount mount_directory
For example:
umount /usr/clips
Step 3 Remount a specific StorNext FS on a client. Enter:
mount mount_directory
For example:
mount /usr/clips
7-6 6-00905-01 Rev A
Page 99

SNFS
Reinitialize StorNext FS
To reinitialize a StorNext FS:
CAUTION
Step 1 On the StorNext FS server, log in as root.
Step 2 Unmount the specific StorNext FS from all clients.
Step 3 In a system shell window, use the File System Administrator utility to stop the specific file
system.
a. Start cvadmin. Enter: cvadmin
Several status messages display.
b. Stopr the file system. Enter: stop file_system_name
c. Exit cvadmin. Enter: quit
Step 4 Run the StorNext FS initialize utility. Enter: cvmkfs file_system_name
Step 5 Reinitialize the specific StorNext FS by following the online instructions.
CAUTION
Use caution when performing this procedure because it will erase all
existing data on the specified StorNext FS.
This step cannot be undone and all data on the file system will be lost,
so make sure you are ready to initialize the file system before you
proceed.
Resolving Installation Problems 7-7
Page 100

SNFS
Step 6 Start the file system using the File System Administrator utility.
a. Start cvadmin. Enter: cvadmin
Several status messages display.
b. Start the file system. Enter: start file_system_name
c. Activate the file system. Enter: activate file_system_name
d. Select the file system. Enter: select file_system_name
The file system configuration status displays.
e. Exit cvadmin. Enter: quit
Step 7 Mount StorNext FS. Enter: mount mount_directory
If the configuration status does not display or if the file system does not start, check the system
log for errors and check file_system_name.cfg for syntactic or typographical errors.
7-8 6-00905-01 Rev A
 Loading...