

Page 1

AMASS
Managing the
®
File System
AMASS Version 5.3
August 2002
6-00028-01 Rev A
Page 2

Trademark Notice
ADIC, AMASS, CentraVision, DAS, DataMgr, FileServ, and VolServ are either
trademarks or registered trademarks of ADIC, Advanced Digital Information Corporation.
All other product names and identifications are trademarks or registered trademarks of their
respective owners.
Copyright Notice
Copyright © 1996-2002 by Advanced Digital Information Corporation. All rights reserved.
This document is the property of ADIC. No part of this document may be reproduced,
transmitted, transcribed, stored in a retrieval system, or translated into any language or
computer language in any form or by any means, electronic, mechanical, magnetic, optical,
chemical, manual, or otherwise, without the express written permission of:
ADIC
11431 Willows Road, NE
PO Box 97057
Redmond, WA 98073-9757 USA
Phone: 425-881-8004
FAX: 425-881-2296
U.S. Government Rights Restricted
Use, duplication, or disclosure of either the software or documentation is subject to
restrictions set forth by the U.S. Government in FAR 52.227-19(c)(2) and subparagraph
(c)(1)(ii) of the Rights in Technical Data and Computer Software clause at DFARS 52.2277013 and/or in similar or following clauses in the FAR, DoD, or NASA FAR Supplement.
Technical Assistance
ADIC Technical Assistance Center:
• In the USA and Canada, call 1-800-827-3822
• Outside the USA and Canada, call 303-874-0188 or toll-free 00800-9999-3822
• Send e-mail to: support@adic.com
Documentation
Although the material contained herein has been carefully reviewed, ADIC does not
warrant it to be free of errors or omissions. We reserve the right to make corrections,
updates, revisions, or changes to the information contained herein.
Page 3

READER COMMENT FORM
ADIC includes this Form in an effort to provide the best possible documentation to our
customers. Please take a few moments to mail or FAX your response to:
ADIC
Technical Publications
8560 Upland Drive
Englewood, CO 80112
FAX: 303-792-2465
Email: techdocs@adic.com
Question Circle One
Information was complete Agree Disagree
Information was easy to find Agree Disagree
Information was easy to follow Agree Disagree
like
or
Is there anything you especially
dislike
about the organization, presentation,
or writing in this manual?
Book Title Document Number
Customer Name Telephone
E-mail Address
Company Name
Address
City, State, Zip
Page 4

NOTES
Page 5

Preface
P
Page 6

Managing the AMASS File System
NOTES
P-2 Preface 6-00028-01 Rev A
Page 7

Managing the AMASS File System
Purpose of This Book
Who Should Read This Book
How This Book is Organized
This book describes the management tasks, commands, utilities,
and troubleshooting tools used to operate AMASS and manage
the AMASS file system.
This book is written for the system administrators who use the
command line to operate and troubleshoot AMASS.
It assumes the administrators have a strong familiarity with:
• The appropriate UNIX operating system
• Applications running in their site environment
This book contains the following chapters:
Chapter 1: Initial Setup Tasks — Use AMASS commands to
prepare the file system and media for use by AMASS. These
tasks include the following:
• Preparing a Backup Volume
• Creating an entry in the File System Database for all media
• Assigning volume groups
Chapter 2: Operational Tasks — Use AMASS commands to
manage the AMASS file system. These tasks include the
following:
• Modifying the schedule to back up the AMASS File System
Database
• Switching drives in and out of service
6-00028-01 Rev A Preface P-3
Page 8

Managing the AMASS File System
• Reading offline media
• Adding space to volume groups
• Activating and inactivating the file system
Chapter 3: Command Reference — Alphabetical list of
AMASS commands
Chapter 4: Utility Reference — Alphabetical list of AMASS
utilities
Chapter 5: Troubleshooting Tools — Procedures, scripts, and
utilities for diagnosing problems
Appendix A: HP-UX Backup Scripts — Examples of backup
scripts for HP environments
Appendix B: Fine-Tune Block Size — Configuring
site-specific tape block sizes
Appendix C: Cache Commands — Using new AMASS
commands to assign cache block list priority values for reads
and writes per volume group.
A system administrator can keep files for a specific
volume group in cache longer and the files can
consequently be accessed more quickly by client
applications.
P-4 Preface 6-00028-01 Rev A
Page 9

Managing the AMASS File System
Conventions
The conventions used throughout the AMASS technical books
are listed below:
Convention Example
The word “library” usually includes “jukebox”
and “standalone drive” and is a generic way to
reference a storage device.
Screen text, file names, program names, and
commands are in Courier font.
The root prompt is shown as a number
symbol.
What you should type in is shown in Courier
bold font.
Site-specific variables are in a Times italics
font.
A backward slash ( \ ) denotes the input is
continued onto the next line; the printed page
is just not wide enough to accommodate the
line.
If using HP SunSpot jukeboxes, install patch
1234.
Request to add a new volume:
Volume group will be “20”
Volume position will be “A123”
# su root
bulkinlet 1,2-10,21,23
tar -xvf tapedevicename
# rsh nodename -n dd \
if=/cdrompath/amass/load.tar\
bs=20b | tar xvBfb - 20
(Type the entire command without the
backward slash.)
Pressing <Return> after each command is
assumed.
A menu name with an arrow refers to a
sequence of menus.
6-00028-01 Rev A Preface P-5
Edit Policy —> Add Library
Page 10

Managing the AMASS File System
Books
The CD contains the AMASS books formatted as PDF
documents. The books described below are part of the technical
documentation set:
AMASS Overview
An introduction to AMASS (Archival
Management and Storage System).
Contains a glossary.
Accessing Storage Devices
Alphabetically lists supported libraries and
drives and provides AMASS-specific
operating information. Describes how to use
AMASS with standalone drives.
Installing AMASS
Describes: server requirements, installation
and troubleshooting procedures, and
configuration parameters.
Managing the AMASS File System
Perform system administrative tasks with
AMASS commands and troubleshoot
problems with AMASS utilities and
scripts.
Errors and Corrective Action
Provides corrective action for system log
errors.
Quick Reference Guide
Summarizes commands and utilities.
Contact Publications
P-6 Preface 6-00028-01 Rev A
To make corrections or to comment on AMASS publications,
please contact Technical Publications at techdocs@adic.com.
Page 11

Managing the AMASS File System
Related Publications
Related Publications Description
Release Notes For each version of AMASS, the Release Notes contain:
Product Alerts Informs customers of technical problems and solutions.
Product Bulletins Conveys technical information — not problems — to
Secured Web Site
The publications described in the following table are created
and distributed on an as-needed basis:
• Summary of enhancements.
• Describes:
- Fixed problems.
- Known problems.
customers.
To receive access to the secured site on the ADIC home page
containing technical product information (Release Notes,
Product Alerts, Product Bulletins, FAQs), visit
http://partners.adic.com/ and follow the password request
procedure. In return, ADIC will send instructions and a
password.
6-00028-01 Rev A Preface P-7
Page 12

Managing the AMASS File System
NOTES
P-8 Preface 6-00028-01 Rev A
Page 13

Contents
Preface
Purpose of This Book . . . . . . . . . . . . . . . . . . . . . . . . . . . . . . . . . . . . . . . . . . . . . . . . P-3
Who Should Read This Book . . . . . . . . . . . . . . . . . . . . . . . . . . . . . . . . . . . . . . . . . P-3
How This Book is Organized . . . . . . . . . . . . . . . . . . . . . . . . . . . . . . . . . . . . . . . . . P-3
Conventions . . . . . . . . . . . . . . . . . . . . . . . . . . . . . . . . . . . . . . . . . . . . . . . . . . . . . . . P-5
Books . . . . . . . . . . . . . . . . . . . . . . . . . . . . . . . . . . . . . . . . . . . . . . . . . . . . . . . . . . . . . P-6
Contact Publications . . . . . . . . . . . . . . . . . . . . . . . . . . . . . . . . . . . . . . . . . . . . . P-6
Related Publications . . . . . . . . . . . . . . . . . . . . . . . . . . . . . . . . . . . . . . . . . . . . . P-7
Secured Web Site . . . . . . . . . . . . . . . . . . . . . . . . . . . . . . . . . . . . . . . . . . . . . . . . P-7
Initial Setup Tasks 1
Prepare Media to be the Backup Volume . . . . . . . . . . . . . . . . . . . . . . . . . . . . . . . .1-3
Slot Position . . . . . . . . . . . . . . . . . . . . . . . . . . . . . . . . . . . . . . . . . . . . . . . . . . . . .1-3
Create File System Organization . . . . . . . . . . . . . . . . . . . . . . . . . . . . . . . . . . . . . . .1-8
Create Entries in Database for Your Media . . . . . . . . . . . . . . . . . . . . . . . . . . . . . .1-9
Volume Groups Defined . . . . . . . . . . . . . . . . . . . . . . . . . . . . . . . . . . . . . . . . . . . . .1-13
Uniform Media in Numeric and Cleaning Groups . . . . . . . . . . . . . . . . . . . .1-14
Disparate Media in the Space Pool . . . . . . . . . . . . . . . . . . . . . . . . . . . . . . . . .1-15
Using Numeric Volume Groups . . . . . . . . . . . . . . . . . . . . . . . . . . . . . . . .1-15
Scenario . . . . . . . . . . . . . . . . . . . . . . . . . . . . . . . . . . . . . . . . . . . . . . . . . . . . .1-16
Assign Directory to a Volume Group . . . . . . . . . . . . . . . . . . . . . . . . . . . . . . . . . .1-19
Create a Cleaning Volume Group . . . . . . . . . . . . . . . . . . . . . . . . . . . . . . . . . . . . .1-20
6-00025-01 Rev A Contents ix
Page 14

Accessing Storage Devices
Operational Tasks 2
Database and Journal Backups . . . . . . . . . . . . . . . . . . . . . . . . . . . . . . . . . . . . . . . . .2-3
Automatic Backups Via Cron Job . . . . . . . . . . . . . . . . . . . . . . . . . . . . . . . . . . .2-4
Assign Backup Volume . . . . . . . . . . . . . . . . . . . . . . . . . . . . . . . . . . . . . . . . . 2-5
How to Modify Automated Schedule . . . . . . . . . . . . . . . . . . . . . . . . . . . . .2-5
Manual Backup . . . . . . . . . . . . . . . . . . . . . . . . . . . . . . . . . . . . . . . . . . . . . . . . . . .2-7
How to Use Backup Command . . . . . . . . . . . . . . . . . . . . . . . . . . . . . . . . . .2-7
Replace a Full Backup Volume . . . . . . . . . . . . . . . . . . . . . . . . . . . . . . . . . . . . . . . .2-9
Restore AMASS Database . . . . . . . . . . . . . . . . . . . . . . . . . . . . . . . . . . . . . . . . . . . .2-10
Restore with Earlier AMASS Version . . . . . . . . . . . . . . . . . . . . . . . . . . . . . . .2-11
Reinitialize Database . . . . . . . . . . . . . . . . . . . . . . . . . . . . . . . . . . . . . . . . . . . . .2-12
Back Up Media in Library . . . . . . . . . . . . . . . . . . . . . . . . . . . . . . . . . . . . . . . . . . . .2-14
Use UNIX Utilities . . . . . . . . . . . . . . . . . . . . . . . . . . . . . . . . . . . . . . . . . . . . . . .2-14
Use Both UNIX Utilities and AMASS Commands . . . . . . . . . . . . . . . . . . . .2-14
Use Redundant Media . . . . . . . . . . . . . . . . . . . . . . . . . . . . . . . . . . . . . . . . . . . .2-15
Take a Drive Out of Service . . . . . . . . . . . . . . . . . . . . . . . . . . . . . . . . . . . . . . . . . .2-16
Return a Drive to Service . . . . . . . . . . . . . . . . . . . . . . . . . . . . . . . . . . . . . . . . . . . .2-17
Delete Files and Volume Number . . . . . . . . . . . . . . . . . . . . . . . . . . . . . . . . . . . . .2-18
Delete Volume Group . . . . . . . . . . . . . . . . . . . . . . . . . . . . . . . . . . . . . . . . . . . . . . .2-20
Recycle a Volume . . . . . . . . . . . . . . . . . . . . . . . . . . . . . . . . . . . . . . . . . . . . . . . . . . . 2-21
Remove Media From Library . . . . . . . . . . . . . . . . . . . . . . . . . . . . . . . . . . . . . . . . . 2-23
Read Offline Volume . . . . . . . . . . . . . . . . . . . . . . . . . . . . . . . . . . . . . . . . . . . . . . . .2-25
Optional Feature . . . . . . . . . . . . . . . . . . . . . . . . . . . . . . . . . . . . . . . . . . . . . . . .2-25
Prerequisites . . . . . . . . . . . . . . . . . . . . . . . . . . . . . . . . . . . . . . . . . . . . . . . . .2-25
Read Offline Volumes . . . . . . . . . . . . . . . . . . . . . . . . . . . . . . . . . . . . . . . . .2-26
Return Media Without Starting AMASS . . . . . . . . . . . . . . . . . . . . . . . . . . . . . . .2-28
xContents 6-00025-01 Rev A
Page 15

Accessing Storage Devices
Add Space to Volume Group . . . . . . . . . . . . . . . . . . . . . . . . . . . . . . . . . . . . . . . . .2-29
Add Volumes . . . . . . . . . . . . . . . . . . . . . . . . . . . . . . . . . . . . . . . . . . . . . . . . . . . 2-29
Create Space Pool . . . . . . . . . . . . . . . . . . . . . . . . . . . . . . . . . . . . . . . . . . . . . . . .2-30
Reassign Volume Group . . . . . . . . . . . . . . . . . . . . . . . . . . . . . . . . . . . . . . . . . . . . .2-31
Activate the File System . . . . . . . . . . . . . . . . . . . . . . . . . . . . . . . . . . . . . . . . . . . . .2-33
Inactivate the File System . . . . . . . . . . . . . . . . . . . . . . . . . . . . . . . . . . . . . . . . .2-33
Modify Configuration File . . . . . . . . . . . . . . . . . . . . . . . . . . . . . . . . . . . . . . . . . . .2-35
MAXIOSZ Changes . . . . . . . . . . . . . . . . . . . . . . . . . . . . . . . . . . . . . . . . . . . . . .2-37
Command Reference 3
Commands . . . . . . . . . . . . . . . . . . . . . . . . . . . . . . . . . . . . . . . . . . . . . . . . . . . . . . . . . 3-3
Syntax . . . . . . . . . . . . . . . . . . . . . . . . . . . . . . . . . . . . . . . . . . . . . . . . . . . . . . . . . .3-3
Use in Scripts . . . . . . . . . . . . . . . . . . . . . . . . . . . . . . . . . . . . . . . . . . . . . . . . .3-3
adf . . . . . . . . . . . . . . . . . . . . . . . . . . . . . . . . . . . . . . . . . . . . . . . . . . . . . . . . . . . . . . . . . 3-5
Options . . . . . . . . . . . . . . . . . . . . . . . . . . . . . . . . . . . . . . . . . . . . . . . . . . . . . . . . .3-5
Example . . . . . . . . . . . . . . . . . . . . . . . . . . . . . . . . . . . . . . . . . . . . . . . . . . . . . . 3-6
amassbackup . . . . . . . . . . . . . . . . . . . . . . . . . . . . . . . . . . . . . . . . . . . . . . . . . . . . . . . .3-8
Prerequisites . . . . . . . . . . . . . . . . . . . . . . . . . . . . . . . . . . . . . . . . . . . . . . . . . . . . .3-9
Options . . . . . . . . . . . . . . . . . . . . . . . . . . . . . . . . . . . . . . . . . . . . . . . . . . . . . . . . .3-9
Example . . . . . . . . . . . . . . . . . . . . . . . . . . . . . . . . . . . . . . . . . . . . . . . . . . . . . 3-10
amassreport . . . . . . . . . . . . . . . . . . . . . . . . . . . . . . . . . . . . . . . . . . . . . . . . . . . . . . . .3-12
Generated Column Titles . . . . . . . . . . . . . . . . . . . . . . . . . . . . . . . . . . . . . . . . .3-12
Options . . . . . . . . . . . . . . . . . . . . . . . . . . . . . . . . . . . . . . . . . . . . . . . . . . . . . . . .3-13
Example . . . . . . . . . . . . . . . . . . . . . . . . . . . . . . . . . . . . . . . . . . . . . . . . . . . . . 3-17
amassrestore . . . . . . . . . . . . . . . . . . . . . . . . . . . . . . . . . . . . . . . . . . . . . . . . . . . . . . .3-19
Options . . . . . . . . . . . . . . . . . . . . . . . . . . . . . . . . . . . . . . . . . . . . . . . . . . . . . . . .3-19
Example . . . . . . . . . . . . . . . . . . . . . . . . . . . . . . . . . . . . . . . . . . . . . . . . . . . . . 3-21
6-00025-01 Rev A Contents xi
Page 16

Accessing Storage Devices
amassstat . . . . . . . . . . . . . . . . . . . . . . . . . . . . . . . . . . . . . . . . . . . . . . . . . . . . . . . . . .3-24
Shutdown Tasks . . . . . . . . . . . . . . . . . . . . . . . . . . . . . . . . . . . . . . . . . . . . . . . . .3-24
Options . . . . . . . . . . . . . . . . . . . . . . . . . . . . . . . . . . . . . . . . . . . . . . . . . . . . . . . .3-25
astats . . . . . . . . . . . . . . . . . . . . . . . . . . . . . . . . . . . . . . . . . . . . . . . . . . . . . . . . . . . . .3-27
Examples . . . . . . . . . . . . . . . . . . . . . . . . . . . . . . . . . . . . . . . . . . . . . . . . . . . .3-28
astats Output Fields Defined . . . . . . . . . . . . . . . . . . . . . . . . . . . . . . . . . . . 3-28
astats -c Output Fields Defined . . . . . . . . . . . . . . . . . . . . . . . . . . . . . . . . .3-30
astats -j Output Fields Defined . . . . . . . . . . . . . . . . . . . . . . . . . . . . . . . . .3-31
astats -v Output Fields Defined . . . . . . . . . . . . . . . . . . . . . . . . . . . . . . . . .3-32
astats -w Output Fields Defined . . . . . . . . . . . . . . . . . . . . . . . . . . . . . . . .3-33
bulkinlet . . . . . . . . . . . . . . . . . . . . . . . . . . . . . . . . . . . . . . . . . . . . . . . . . . . . . . . . . . .3-34
Network Libraries . . . . . . . . . . . . . . . . . . . . . . . . . . . . . . . . . . . . . . . . . . . . . . .3-34
Tasks . . . . . . . . . . . . . . . . . . . . . . . . . . . . . . . . . . . . . . . . . . . . . . . . . . . . . . .3-34
Options . . . . . . . . . . . . . . . . . . . . . . . . . . . . . . . . . . . . . . . . . . . . . . . . . . . . . . . .3-35
Load New Volumes . . . . . . . . . . . . . . . . . . . . . . . . . . . . . . . . . . . . . . . . . . .3-36
SCSI, Multislot Libraries . . . . . . . . . . . . . . . . . . . . . . . . . . . . . . . . . . . . . . . . . .3-37
Unsuccessful Loads . . . . . . . . . . . . . . . . . . . . . . . . . . . . . . . . . . . . . . . . . . .3-38
Options . . . . . . . . . . . . . . . . . . . . . . . . . . . . . . . . . . . . . . . . . . . . . . . . . . . . . . . .3-38
Reload Existing Volumes . . . . . . . . . . . . . . . . . . . . . . . . . . . . . . . . . . . . . . 3-39
bulkload . . . . . . . . . . . . . . . . . . . . . . . . . . . . . . . . . . . . . . . . . . . . . . . . . . . . . . . . . . .3-41
Supported Network Libraries . . . . . . . . . . . . . . . . . . . . . . . . . . . . . . . . . . . . .3-41
Tasks . . . . . . . . . . . . . . . . . . . . . . . . . . . . . . . . . . . . . . . . . . . . . . . . . . . . . . .3-41
Library Interfaces . . . . . . . . . . . . . . . . . . . . . . . . . . . . . . . . . . . . . . . . . . . . .3-42
Options . . . . . . . . . . . . . . . . . . . . . . . . . . . . . . . . . . . . . . . . . . . . . . . . . . . . . . . .3-42
Create Entries for Existing Volumes . . . . . . . . . . . . . . . . . . . . . . . . . . . . .3-44
Manually Load New Volumes . . . . . . . . . . . . . . . . . . . . . . . . . . . . . . . . . .3-45
bulkoutlet . . . . . . . . . . . . . . . . . . . . . . . . . . . . . . . . . . . . . . . . . . . . . . . . . . . . . . . . .3-47
Tasks . . . . . . . . . . . . . . . . . . . . . . . . . . . . . . . . . . . . . . . . . . . . . . . . . . . . . . .3-47
xii Contents 6-00025-01 Rev A
Page 17

Accessing Storage Devices
Options . . . . . . . . . . . . . . . . . . . . . . . . . . . . . . . . . . . . . . . . . . . . . . . . . . . . . . . .3-47
Outlet Volumes . . . . . . . . . . . . . . . . . . . . . . . . . . . . . . . . . . . . . . . . . . . . . .3-48
Unsuccessful Ejects . . . . . . . . . . . . . . . . . . . . . . . . . . . . . . . . . . . . . . . . . . .3-49
cdimport . . . . . . . . . . . . . . . . . . . . . . . . . . . . . . . . . . . . . . . . . . . . . . . . . . . . . . . . . .3-50
Optional Feature . . . . . . . . . . . . . . . . . . . . . . . . . . . . . . . . . . . . . . . . . . . . . . . .3-50
Prevent Mount of Internal CD Drive . . . . . . . . . . . . . . . . . . . . . . . . . . . .3-50
Options . . . . . . . . . . . . . . . . . . . . . . . . . . . . . . . . . . . . . . . . . . . . . . . . . . . . . . . .3-52
Example . . . . . . . . . . . . . . . . . . . . . . . . . . . . . . . . . . . . . . . . . . . . . . . . . . . . . 3-53
dirfilelist . . . . . . . . . . . . . . . . . . . . . . . . . . . . . . . . . . . . . . . . . . . . . . . . . . . . . . . . . .3-56
Options . . . . . . . . . . . . . . . . . . . . . . . . . . . . . . . . . . . . . . . . . . . . . . . . . . . . . . . .3-56
Verbose Example . . . . . . . . . . . . . . . . . . . . . . . . . . . . . . . . . . . . . . . . . . . . .3-57
Nonverbose Example . . . . . . . . . . . . . . . . . . . . . . . . . . . . . . . . . . . . . . . . .3-57
Practical Application . . . . . . . . . . . . . . . . . . . . . . . . . . . . . . . . . . . . . . . . . .3-59
driveclean . . . . . . . . . . . . . . . . . . . . . . . . . . . . . . . . . . . . . . . . . . . . . . . . . . . . . . . . . 3-61
Prerequisites . . . . . . . . . . . . . . . . . . . . . . . . . . . . . . . . . . . . . . . . . . . . . . . . . . . .3-61
Options . . . . . . . . . . . . . . . . . . . . . . . . . . . . . . . . . . . . . . . . . . . . . . . . . . . . . . . .3-62
Example . . . . . . . . . . . . . . . . . . . . . . . . . . . . . . . . . . . . . . . . . . . . . . . . . . . . . 3-62
Automatic Cleaning . . . . . . . . . . . . . . . . . . . . . . . . . . . . . . . . . . . . . . . . . . . . . .3-66
Exceptions . . . . . . . . . . . . . . . . . . . . . . . . . . . . . . . . . . . . . . . . . . . . . . . . . . . 3-66
drivededicate . . . . . . . . . . . . . . . . . . . . . . . . . . . . . . . . . . . . . . . . . . . . . . . . . . . . . .3-68
Options . . . . . . . . . . . . . . . . . . . . . . . . . . . . . . . . . . . . . . . . . . . . . . . . . . . . . . . .3-68
drivelist . . . . . . . . . . . . . . . . . . . . . . . . . . . . . . . . . . . . . . . . . . . . . . . . . . . . . . . . . . .3-70
Options . . . . . . . . . . . . . . . . . . . . . . . . . . . . . . . . . . . . . . . . . . . . . . . . . . . . . . . .3-70
Reset to Zero . . . . . . . . . . . . . . . . . . . . . . . . . . . . . . . . . . . . . . . . . . . . . . . . .3-71
Example . . . . . . . . . . . . . . . . . . . . . . . . . . . . . . . . . . . . . . . . . . . . . . . . . . . . . 3-71
drivestat . . . . . . . . . . . . . . . . . . . . . . . . . . . . . . . . . . . . . . . . . . . . . . . . . . . . . . . . . . .3-73
Options . . . . . . . . . . . . . . . . . . . . . . . . . . . . . . . . . . . . . . . . . . . . . . . . . . . . . . . .3-73
IDLETIME . . . . . . . . . . . . . . . . . . . . . . . . . . . . . . . . . . . . . . . . . . . . . . . . . . .3-74
6-00025-01 Rev A Contents xiii
Page 18

Accessing Storage Devices
fileonmedia . . . . . . . . . . . . . . . . . . . . . . . . . . . . . . . . . . . . . . . . . . . . . . . . . . . . . . . .3-79
Options . . . . . . . . . . . . . . . . . . . . . . . . . . . . . . . . . . . . . . . . . . . . . . . . . . . . . . . .3-79
File States . . . . . . . . . . . . . . . . . . . . . . . . . . . . . . . . . . . . . . . . . . . . . . . . . . . .3-80
healthcheck . . . . . . . . . . . . . . . . . . . . . . . . . . . . . . . . . . . . . . . . . . . . . . . . . . . . . . . .3-81
Options . . . . . . . . . . . . . . . . . . . . . . . . . . . . . . . . . . . . . . . . . . . . . . . . . . . . . . . .3-81
Example . . . . . . . . . . . . . . . . . . . . . . . . . . . . . . . . . . . . . . . . . . . . . . . . . . . . . 3-84
setdrverr . . . . . . . . . . . . . . . . . . . . . . . . . . . . . . . . . . . . . . . . . . . . . . . . . . . . . . . . . .3-86
Options . . . . . . . . . . . . . . . . . . . . . . . . . . . . . . . . . . . . . . . . . . . . . . . . . . . . . . . .3-86
setvolerr . . . . . . . . . . . . . . . . . . . . . . . . . . . . . . . . . . . . . . . . . . . . . . . . . . . . . . . . . . .3-87
Options . . . . . . . . . . . . . . . . . . . . . . . . . . . . . . . . . . . . . . . . . . . . . . . . . . . . . . . .3-87
setvolgrp . . . . . . . . . . . . . . . . . . . . . . . . . . . . . . . . . . . . . . . . . . . . . . . . . . . . . . . . . .3-88
Options . . . . . . . . . . . . . . . . . . . . . . . . . . . . . . . . . . . . . . . . . . . . . . . . . . . . . . . .3-88
Initial File System . . . . . . . . . . . . . . . . . . . . . . . . . . . . . . . . . . . . . . . . . . . . .3-90
sysop . . . . . . . . . . . . . . . . . . . . . . . . . . . . . . . . . . . . . . . . . . . . . . . . . . . . . . . . . . . . .3-93
Options . . . . . . . . . . . . . . . . . . . . . . . . . . . . . . . . . . . . . . . . . . . . . . . . . . . . . . . .3-93
Tasks . . . . . . . . . . . . . . . . . . . . . . . . . . . . . . . . . . . . . . . . . . . . . . . . . . . . . . . . . .3-94
Running the Interface . . . . . . . . . . . . . . . . . . . . . . . . . . . . . . . . . . . . . . . . .3-95
sysperf . . . . . . . . . . . . . . . . . . . . . . . . . . . . . . . . . . . . . . . . . . . . . . . . . . . . . . . . . . . .3-97
Options . . . . . . . . . . . . . . . . . . . . . . . . . . . . . . . . . . . . . . . . . . . . . . . . . . . . . . . .3-97
Example . . . . . . . . . . . . . . . . . . . . . . . . . . . . . . . . . . . . . . . . . . . . . . . . . . . . . 3-98
tapelength . . . . . . . . . . . . . . . . . . . . . . . . . . . . . . . . . . . . . . . . . . . . . . . . . . . . . . . .3-103
Options . . . . . . . . . . . . . . . . . . . . . . . . . . . . . . . . . . . . . . . . . . . . . . . . . . . . . . .3-103
Create a Template File . . . . . . . . . . . . . . . . . . . . . . . . . . . . . . . . . . . . . . . .3-104
vgexport . . . . . . . . . . . . . . . . . . . . . . . . . . . . . . . . . . . . . . . . . . . . . . . . . . . . . . . . . .3-106
Optional Feature . . . . . . . . . . . . . . . . . . . . . . . . . . . . . . . . . . . . . . . . . . . . . . .3-106
Disable Volume Verification . . . . . . . . . . . . . . . . . . . . . . . . . . . . . . . . . .3-106
Limitations . . . . . . . . . . . . . . . . . . . . . . . . . . . . . . . . . . . . . . . . . . . . . . . . . 3-107
Name Contention . . . . . . . . . . . . . . . . . . . . . . . . . . . . . . . . . . . . . . . . . . . .3-107
xiv Contents 6-00025-01 Rev A
Page 19

Accessing Storage Devices
Options . . . . . . . . . . . . . . . . . . . . . . . . . . . . . . . . . . . . . . . . . . . . . . . . . . . . . . .3-107
Example . . . . . . . . . . . . . . . . . . . . . . . . . . . . . . . . . . . . . . . . . . . . . . . . . . . . 3-109
vgimport . . . . . . . . . . . . . . . . . . . . . . . . . . . . . . . . . . . . . . . . . . . . . . . . . . . . . . . . .3-111
Optional Feature . . . . . . . . . . . . . . . . . . . . . . . . . . . . . . . . . . . . . . . . . . . . . . .3-111
Name Contention . . . . . . . . . . . . . . . . . . . . . . . . . . . . . . . . . . . . . . . . . . . .3-111
Options . . . . . . . . . . . . . . . . . . . . . . . . . . . . . . . . . . . . . . . . . . . . . . . . . . . . . . .3-112
Example . . . . . . . . . . . . . . . . . . . . . . . . . . . . . . . . . . . . . . . . . . . . . . . . . . . . 3-113
vglist . . . . . . . . . . . . . . . . . . . . . . . . . . . . . . . . . . . . . . . . . . . . . . . . . . . . . . . . . . . . .3-117
Options . . . . . . . . . . . . . . . . . . . . . . . . . . . . . . . . . . . . . . . . . . . . . . . . . . . . . . .3-117
Example . . . . . . . . . . . . . . . . . . . . . . . . . . . . . . . . . . . . . . . . . . . . . . . . . . . . 3-118
vgpool . . . . . . . . . . . . . . . . . . . . . . . . . . . . . . . . . . . . . . . . . . . . . . . . . . . . . . . . . . .3-120
Options . . . . . . . . . . . . . . . . . . . . . . . . . . . . . . . . . . . . . . . . . . . . . . . . . . . . . . .3-120
Enable Volume Group to use Space Pool . . . . . . . . . . . . . . . . . . . . . . . .3-122
Limit Media Usage and Location of Space Pool . . . . . . . . . . . . . . . . . .3-123
Enable Volume Group to use Tape Media . . . . . . . . . . . . . . . . . . . . . . .3-124
vgreadonly . . . . . . . . . . . . . . . . . . . . . . . . . . . . . . . . . . . . . . . . . . . . . . . . . . . . . . .3-125
Characteristics . . . . . . . . . . . . . . . . . . . . . . . . . . . . . . . . . . . . . . . . . . . . . . . . .3-125
Options . . . . . . . . . . . . . . . . . . . . . . . . . . . . . . . . . . . . . . . . . . . . . . . . . . . . . . .3-125
vgroot . . . . . . . . . . . . . . . . . . . . . . . . . . . . . . . . . . . . . . . . . . . . . . . . . . . . . . . . . . . .3-127
Options . . . . . . . . . . . . . . . . . . . . . . . . . . . . . . . . . . . . . . . . . . . . . . . . . . . . . . .3-127
Example . . . . . . . . . . . . . . . . . . . . . . . . . . . . . . . . . . . . . . . . . . . . . . . . . . . . 3-128
volclattr . . . . . . . . . . . . . . . . . . . . . . . . . . . . . . . . . . . . . . . . . . . . . . . . . . . . . . . . . .3-129
Prerequisites . . . . . . . . . . . . . . . . . . . . . . . . . . . . . . . . . . . . . . . . . . . . . . . . . . .3-129
Options . . . . . . . . . . . . . . . . . . . . . . . . . . . . . . . . . . . . . . . . . . . . . . . . . . . . . . .3-130
volclean . . . . . . . . . . . . . . . . . . . . . . . . . . . . . . . . . . . . . . . . . . . . . . . . . . . . . . . . . . 3-132
Prerequisites . . . . . . . . . . . . . . . . . . . . . . . . . . . . . . . . . . . . . . . . . . . . . . . . . . .3-132
Options . . . . . . . . . . . . . . . . . . . . . . . . . . . . . . . . . . . . . . . . . . . . . . . . . . . . . . .3-133
volcomp . . . . . . . . . . . . . . . . . . . . . . . . . . . . . . . . . . . . . . . . . . . . . . . . . . . . . . . . . .3-134
6-00025-01 Rev A Contents xv
Page 20

Accessing Storage Devices
Prerequisites . . . . . . . . . . . . . . . . . . . . . . . . . . . . . . . . . . . . . . . . . . . . . . . . . . .3-135
Options . . . . . . . . . . . . . . . . . . . . . . . . . . . . . . . . . . . . . . . . . . . . . . . . . . . . . . .3-136
Example . . . . . . . . . . . . . . . . . . . . . . . . . . . . . . . . . . . . . . . . . . . . . . . . . . . . 3-136
volcopy . . . . . . . . . . . . . . . . . . . . . . . . . . . . . . . . . . . . . . . . . . . . . . . . . . . . . . . . . .3-138
Optional Feature . . . . . . . . . . . . . . . . . . . . . . . . . . . . . . . . . . . . . . . . . . . . . . .3-138
Requirements . . . . . . . . . . . . . . . . . . . . . . . . . . . . . . . . . . . . . . . . . . . . . . .3-139
Name Contention . . . . . . . . . . . . . . . . . . . . . . . . . . . . . . . . . . . . . . . . . . . .3-141
Standalone Optical Drives . . . . . . . . . . . . . . . . . . . . . . . . . . . . . . . . . . . .3-141
Options . . . . . . . . . . . . . . . . . . . . . . . . . . . . . . . . . . . . . . . . . . . . . . . . . . . . . . .3-141
Example . . . . . . . . . . . . . . . . . . . . . . . . . . . . . . . . . . . . . . . . . . . . . . . . . . . . 3-143
voldelete . . . . . . . . . . . . . . . . . . . . . . . . . . . . . . . . . . . . . . . . . . . . . . . . . . . . . . . . . 3-146
Options . . . . . . . . . . . . . . . . . . . . . . . . . . . . . . . . . . . . . . . . . . . . . . . . . . . . . . .3-147
Additional Information . . . . . . . . . . . . . . . . . . . . . . . . . . . . . . . . . . . . . . . 3-147
voldir . . . . . . . . . . . . . . . . . . . . . . . . . . . . . . . . . . . . . . . . . . . . . . . . . . . . . . . . . . . .3-148
Options . . . . . . . . . . . . . . . . . . . . . . . . . . . . . . . . . . . . . . . . . . . . . . . . . . . . . . .3-148
Example . . . . . . . . . . . . . . . . . . . . . . . . . . . . . . . . . . . . . . . . . . . . . . . . . . . . 3-149
volfilelist . . . . . . . . . . . . . . . . . . . . . . . . . . . . . . . . . . . . . . . . . . . . . . . . . . . . . . . . .3-150
Options . . . . . . . . . . . . . . . . . . . . . . . . . . . . . . . . . . . . . . . . . . . . . . . . . . . . . . .3-150
Verbose Example . . . . . . . . . . . . . . . . . . . . . . . . . . . . . . . . . . . . . . . . . . . .3-151
Nonverbose Example . . . . . . . . . . . . . . . . . . . . . . . . . . . . . . . . . . . . . . . .3-152
Inode Example . . . . . . . . . . . . . . . . . . . . . . . . . . . . . . . . . . . . . . . . . . . . . . 3-154
File Names Last Example . . . . . . . . . . . . . . . . . . . . . . . . . . . . . . . . . . . . .3-155
Practical Application . . . . . . . . . . . . . . . . . . . . . . . . . . . . . . . . . . . . . . . . .3-156
volformat . . . . . . . . . . . . . . . . . . . . . . . . . . . . . . . . . . . . . . . . . . . . . . . . . . . . . . . . . 3-158
Prerequisites . . . . . . . . . . . . . . . . . . . . . . . . . . . . . . . . . . . . . . . . . . . . . . . . . . .3-158
Options . . . . . . . . . . . . . . . . . . . . . . . . . . . . . . . . . . . . . . . . . . . . . . . . . . . . . . .3-159
Format a New Volume . . . . . . . . . . . . . . . . . . . . . . . . . . . . . . . . . . . . . . .3-162
Configure Block Size . . . . . . . . . . . . . . . . . . . . . . . . . . . . . . . . . . . . . . . . .3-164
xvi Contents 6-00025-01 Rev A
Page 21

Accessing Storage Devices
Configure Compression . . . . . . . . . . . . . . . . . . . . . . . . . . . . . . . . . . . . . .3-164
volgroup . . . . . . . . . . . . . . . . . . . . . . . . . . . . . . . . . . . . . . . . . . . . . . . . . . . . . . . . .3-166
Options . . . . . . . . . . . . . . . . . . . . . . . . . . . . . . . . . . . . . . . . . . . . . . . . . . . . . . .3-167
Change Volume Group Number . . . . . . . . . . . . . . . . . . . . . . . . . . . . . . .3-168
Assign Volume to Space Pool . . . . . . . . . . . . . . . . . . . . . . . . . . . . . . . . . .3-169
volinlet . . . . . . . . . . . . . . . . . . . . . . . . . . . . . . . . . . . . . . . . . . . . . . . . . . . . . . . . . . .3-170
Options . . . . . . . . . . . . . . . . . . . . . . . . . . . . . . . . . . . . . . . . . . . . . . . . . . . . . . .3-170
Load a New Volume . . . . . . . . . . . . . . . . . . . . . . . . . . . . . . . . . . . . . . . . .3-171
vollabel . . . . . . . . . . . . . . . . . . . . . . . . . . . . . . . . . . . . . . . . . . . . . . . . . . . . . . . . . .3-173
Options . . . . . . . . . . . . . . . . . . . . . . . . . . . . . . . . . . . . . . . . . . . . . . . . . . . . . . .3-173
Change Volume Label . . . . . . . . . . . . . . . . . . . . . . . . . . . . . . . . . . . . . . . .3-174
volleft . . . . . . . . . . . . . . . . . . . . . . . . . . . . . . . . . . . . . . . . . . . . . . . . . . . . . . . . . . . .3-175
Options . . . . . . . . . . . . . . . . . . . . . . . . . . . . . . . . . . . . . . . . . . . . . . . . . . . . . . .3-175
Example . . . . . . . . . . . . . . . . . . . . . . . . . . . . . . . . . . . . . . . . . . . . . . . . . . . . 3-175
vollist . . . . . . . . . . . . . . . . . . . . . . . . . . . . . . . . . . . . . . . . . . . . . . . . . . . . . . . . . . . .3-177
Options . . . . . . . . . . . . . . . . . . . . . . . . . . . . . . . . . . . . . . . . . . . . . . . . . . . . . . .3-177
Reset to Zero . . . . . . . . . . . . . . . . . . . . . . . . . . . . . . . . . . . . . . . . . . . . . . . .3-178
View Attributes for One Volume . . . . . . . . . . . . . . . . . . . . . . . . . . . . . . .3-179
View Attributes for All Volumes . . . . . . . . . . . . . . . . . . . . . . . . . . . . . . .3-179
View Attributes for Cleaning Group . . . . . . . . . . . . . . . . . . . . . . . . . . .3-180
volloc . . . . . . . . . . . . . . . . . . . . . . . . . . . . . . . . . . . . . . . . . . . . . . . . . . . . . . . . . . . .3-184
Options . . . . . . . . . . . . . . . . . . . . . . . . . . . . . . . . . . . . . . . . . . . . . . . . . . . . . . .3-184
Mark New Volume Online . . . . . . . . . . . . . . . . . . . . . . . . . . . . . . . . . . . . 3-185
volnew . . . . . . . . . . . . . . . . . . . . . . . . . . . . . . . . . . . . . . . . . . . . . . . . . . . . . . . . . . .3-187
Options . . . . . . . . . . . . . . . . . . . . . . . . . . . . . . . . . . . . . . . . . . . . . . . . . . . . . . .3-187
Create Database Entry for New Volume . . . . . . . . . . . . . . . . . . . . . . . .3-188
volnote . . . . . . . . . . . . . . . . . . . . . . . . . . . . . . . . . . . . . . . . . . . . . . . . . . . . . . . . . . .3-191
Options . . . . . . . . . . . . . . . . . . . . . . . . . . . . . . . . . . . . . . . . . . . . . . . . . . . . . . .3-191
6-00025-01 Rev A Contents xvii
Page 22

Accessing Storage Devices
voloutlet . . . . . . . . . . . . . . . . . . . . . . . . . . . . . . . . . . . . . . . . . . . . . . . . . . . . . . . . . .3-194
Tasks . . . . . . . . . . . . . . . . . . . . . . . . . . . . . . . . . . . . . . . . . . . . . . . . . . . . . . . . .3-194
Options . . . . . . . . . . . . . . . . . . . . . . . . . . . . . . . . . . . . . . . . . . . . . . . . . . . . . . .3-194
volreadonly . . . . . . . . . . . . . . . . . . . . . . . . . . . . . . . . . . . . . . . . . . . . . . . . . . . . . . .3-196
Options . . . . . . . . . . . . . . . . . . . . . . . . . . . . . . . . . . . . . . . . . . . . . . . . . . . . . . .3-196
volslot . . . . . . . . . . . . . . . . . . . . . . . . . . . . . . . . . . . . . . . . . . . . . . . . . . . . . . . . . . . .3-198
Options . . . . . . . . . . . . . . . . . . . . . . . . . . . . . . . . . . . . . . . . . . . . . . . . . . . . . . .3-198
Change Slot Assignment . . . . . . . . . . . . . . . . . . . . . . . . . . . . . . . . . . . . . .3-199
volspace . . . . . . . . . . . . . . . . . . . . . . . . . . . . . . . . . . . . . . . . . . . . . . . . . . . . . . . . . .3-201
Options . . . . . . . . . . . . . . . . . . . . . . . . . . . . . . . . . . . . . . . . . . . . . . . . . . . . . . .3-201
Example . . . . . . . . . . . . . . . . . . . . . . . . . . . . . . . . . . . . . . . . . . . . . . . . . . . . 3-202
volstat . . . . . . . . . . . . . . . . . . . . . . . . . . . . . . . . . . . . . . . . . . . . . . . . . . . . . . . . . . . .3-206
Name Contention . . . . . . . . . . . . . . . . . . . . . . . . . . . . . . . . . . . . . . . . . . . . . . .3-206
Options . . . . . . . . . . . . . . . . . . . . . . . . . . . . . . . . . . . . . . . . . . . . . . . . . . . . . . .3-206
Activate New Volume . . . . . . . . . . . . . . . . . . . . . . . . . . . . . . . . . . . . . . . .3-207
volusage . . . . . . . . . . . . . . . . . . . . . . . . . . . . . . . . . . . . . . . . . . . . . . . . . . . . . . . . . .3-209
Options . . . . . . . . . . . . . . . . . . . . . . . . . . . . . . . . . . . . . . . . . . . . . . . . . . . . . . .3-209
Example . . . . . . . . . . . . . . . . . . . . . . . . . . . . . . . . . . . . . . . . . . . . . . . . . . . . 3-209
Utility Reference 4
Utilities . . . . . . . . . . . . . . . . . . . . . . . . . . . . . . . . . . . . . . . . . . . . . . . . . . . . . . . . . . . .4-3
Scripts in /usr/amass/tools . . . . . . . . . . . . . . . . . . . . . . . . . . . . . . . . . . . . . . . . . . .4-4
amass_atboot . . . . . . . . . . . . . . . . . . . . . . . . . . . . . . . . . . . . . . . . . . . . . . . . . . . . . . .4-5
Options . . . . . . . . . . . . . . . . . . . . . . . . . . . . . . . . . . . . . . . . . . . . . . . . . . . . . . . . .4-5
Example . . . . . . . . . . . . . . . . . . . . . . . . . . . . . . . . . . . . . . . . . . . . . . . . . . . . . . 4-5
amass_log . . . . . . . . . . . . . . . . . . . . . . . . . . . . . . . . . . . . . . . . . . . . . . . . . . . . . . . . . .4-7
When to Use Script . . . . . . . . . . . . . . . . . . . . . . . . . . . . . . . . . . . . . . . . . . . . . . .4-7
xviii Contents 6-00025-01 Rev A
Page 23

Accessing Storage Devices
Options . . . . . . . . . . . . . . . . . . . . . . . . . . . . . . . . . . . . . . . . . . . . . . . . . . . . . . . . .4-7
amass_snap . . . . . . . . . . . . . . . . . . . . . . . . . . . . . . . . . . . . . . . . . . . . . . . . . . . . . . . . . 4-9
When to Use Script . . . . . . . . . . . . . . . . . . . . . . . . . . . . . . . . . . . . . . . . . . . . . . .4-9
Example . . . . . . . . . . . . . . . . . . . . . . . . . . . . . . . . . . . . . . . . . . . . . . . . . . . . . . 4-9
amass_start . . . . . . . . . . . . . . . . . . . . . . . . . . . . . . . . . . . . . . . . . . . . . . . . . . . . . . . . 4-10
When to Use Script . . . . . . . . . . . . . . . . . . . . . . . . . . . . . . . . . . . . . . . . . . . . . .4-10
Example . . . . . . . . . . . . . . . . . . . . . . . . . . . . . . . . . . . . . . . . . . . . . . . . . . . . . 4-10
amass_tests . . . . . . . . . . . . . . . . . . . . . . . . . . . . . . . . . . . . . . . . . . . . . . . . . . . . . . . .4-12
Prerequisites . . . . . . . . . . . . . . . . . . . . . . . . . . . . . . . . . . . . . . . . . . . . . . . . .4-12
When to Use Script . . . . . . . . . . . . . . . . . . . . . . . . . . . . . . . . . . . . . . . . . . . . . .4-12
install_tests . . . . . . . . . . . . . . . . . . . . . . . . . . . . . . . . . . . . . . . . . . . . . . . . . . . . . . . .4-16
When to Use Script . . . . . . . . . . . . . . . . . . . . . . . . . . . . . . . . . . . . . . . . . . . . . .4-16
Options . . . . . . . . . . . . . . . . . . . . . . . . . . . . . . . . . . . . . . . . . . . . . . . . . . . . . . . .4-16
Prerequisites . . . . . . . . . . . . . . . . . . . . . . . . . . . . . . . . . . . . . . . . . . . . . . . . .4-17
List of Hardware Tests . . . . . . . . . . . . . . . . . . . . . . . . . . . . . . . . . . . . . . . .4-18
User Defined Test Volume Capability . . . . . . . . . . . . . . . . . . . . . . . . . . . . . .4-20
killdaemons . . . . . . . . . . . . . . . . . . . . . . . . . . . . . . . . . . . . . . . . . . . . . . . . . . . . . . . .4-22
When to Use Script . . . . . . . . . . . . . . . . . . . . . . . . . . . . . . . . . . . . . . . . . . . . . .4-22
Options . . . . . . . . . . . . . . . . . . . . . . . . . . . . . . . . . . . . . . . . . . . . . . . . . . . . . . . .4-22
Example . . . . . . . . . . . . . . . . . . . . . . . . . . . . . . . . . . . . . . . . . . . . . . . . . . . . . 4-23
Hardware Utilities in /usr/amass/utils . . . . . . . . . . . . . . . . . . . . . . . . . . . . . . .4-25
init_element . . . . . . . . . . . . . . . . . . . . . . . . . . . . . . . . . . . . . . . . . . . . . . . . . . . . . . .4-26
Prerequisites . . . . . . . . . . . . . . . . . . . . . . . . . . . . . . . . . . . . . . . . . . . . . . . . . . . .4-26
Options . . . . . . . . . . . . . . . . . . . . . . . . . . . . . . . . . . . . . . . . . . . . . . . . . . . . . . . .4-26
mediaeject . . . . . . . . . . . . . . . . . . . . . . . . . . . . . . . . . . . . . . . . . . . . . . . . . . . . . . . . .4-28
Options . . . . . . . . . . . . . . . . . . . . . . . . . . . . . . . . . . . . . . . . . . . . . . . . . . . . . . . .4-28
Example . . . . . . . . . . . . . . . . . . . . . . . . . . . . . . . . . . . . . . . . . . . . . . . . . . . . . 4-28
mediaerase . . . . . . . . . . . . . . . . . . . . . . . . . . . . . . . . . . . . . . . . . . . . . . . . . . . . . . . .4-30
6-00025-01 Rev A Contents xix
Page 24

Accessing Storage Devices
Options . . . . . . . . . . . . . . . . . . . . . . . . . . . . . . . . . . . . . . . . . . . . . . . . . . . . . . . .4-30
Example . . . . . . . . . . . . . . . . . . . . . . . . . . . . . . . . . . . . . . . . . . . . . . . . . . . . . 4-31
medialist . . . . . . . . . . . . . . . . . . . . . . . . . . . . . . . . . . . . . . . . . . . . . . . . . . . . . . . . . .4-33
Options . . . . . . . . . . . . . . . . . . . . . . . . . . . . . . . . . . . . . . . . . . . . . . . . . . . . . . . .4-33
View Status for All Elements . . . . . . . . . . . . . . . . . . . . . . . . . . . . . . . . . . .4-34
mediamove . . . . . . . . . . . . . . . . . . . . . . . . . . . . . . . . . . . . . . . . . . . . . . . . . . . . . . . .4-36
Options . . . . . . . . . . . . . . . . . . . . . . . . . . . . . . . . . . . . . . . . . . . . . . . . . . . . . . . .4-36
Example . . . . . . . . . . . . . . . . . . . . . . . . . . . . . . . . . . . . . . . . . . . . . . . . . . . . . 4-38
mediaread . . . . . . . . . . . . . . . . . . . . . . . . . . . . . . . . . . . . . . . . . . . . . . . . . . . . . . . . .4-39
When to Use Utility . . . . . . . . . . . . . . . . . . . . . . . . . . . . . . . . . . . . . . . . . . . . . .4-39
Options . . . . . . . . . . . . . . . . . . . . . . . . . . . . . . . . . . . . . . . . . . . . . . . . . . . . . . . .4-39
mediawrite . . . . . . . . . . . . . . . . . . . . . . . . . . . . . . . . . . . . . . . . . . . . . . . . . . . . . . . .4-41
Options . . . . . . . . . . . . . . . . . . . . . . . . . . . . . . . . . . . . . . . . . . . . . . . . . . . . . . . .4-41
Example . . . . . . . . . . . . . . . . . . . . . . . . . . . . . . . . . . . . . . . . . . . . . . . . . . . . . 4-42
printjournal . . . . . . . . . . . . . . . . . . . . . . . . . . . . . . . . . . . . . . . . . . . . . . . . . . . . . . . .4-43
Options . . . . . . . . . . . . . . . . . . . . . . . . . . . . . . . . . . . . . . . . . . . . . . . . . . . . . . . .4-43
quedisplay . . . . . . . . . . . . . . . . . . . . . . . . . . . . . . . . . . . . . . . . . . . . . . . . . . . . . . . . .4-45
Prerequisites . . . . . . . . . . . . . . . . . . . . . . . . . . . . . . . . . . . . . . . . . . . . . . . . . . . .4-45
Options . . . . . . . . . . . . . . . . . . . . . . . . . . . . . . . . . . . . . . . . . . . . . . . . . . . . . . . .4-45
When to Use Utility . . . . . . . . . . . . . . . . . . . . . . . . . . . . . . . . . . . . . . . . . . .4-46
Supported Drives . . . . . . . . . . . . . . . . . . . . . . . . . . . . . . . . . . . . . . . . . . . . .4-46
sl_logger . . . . . . . . . . . . . . . . . . . . . . . . . . . . . . . . . . . . . . . . . . . . . . . . . . . . . . . . . .4-49
Options . . . . . . . . . . . . . . . . . . . . . . . . . . . . . . . . . . . . . . . . . . . . . . . . . . . . . . . .4-49
Database Utilities . . . . . . . . . . . . . . . . . . . . . . . . . . . . . . . . . . . . . . . . . . . . . . . . . . .4-51
amassrecovery . . . . . . . . . . . . . . . . . . . . . . . . . . . . . . . . . . . . . . . . . . . . . . . . . . . . .4-52
When to Use Utility . . . . . . . . . . . . . . . . . . . . . . . . . . . . . . . . . . . . . . . . . . . . . .4-52
Options . . . . . . . . . . . . . . . . . . . . . . . . . . . . . . . . . . . . . . . . . . . . . . . . . . . . . . . .4-52
Example . . . . . . . . . . . . . . . . . . . . . . . . . . . . . . . . . . . . . . . . . . . . . . . . . . . . . 4-53
xx Contents 6-00025-01 Rev A
Page 25

Accessing Storage Devices
dbcheck . . . . . . . . . . . . . . . . . . . . . . . . . . . . . . . . . . . . . . . . . . . . . . . . . . . . . . . . . . .4-55
When to Use Utility . . . . . . . . . . . . . . . . . . . . . . . . . . . . . . . . . . . . . . . . . . . . . .4-55
Options . . . . . . . . . . . . . . . . . . . . . . . . . . . . . . . . . . . . . . . . . . . . . . . . . . . . . . . .4-55
Example . . . . . . . . . . . . . . . . . . . . . . . . . . . . . . . . . . . . . . . . . . . . . . . . . . . . . 4-56
fileincache . . . . . . . . . . . . . . . . . . . . . . . . . . . . . . . . . . . . . . . . . . . . . . . . . . . . . . . . .4-57
Options . . . . . . . . . . . . . . . . . . . . . . . . . . . . . . . . . . . . . . . . . . . . . . . . . . . . . . . .4-57
filepath . . . . . . . . . . . . . . . . . . . . . . . . . . . . . . . . . . . . . . . . . . . . . . . . . . . . . . . . . . . .4-59
Options . . . . . . . . . . . . . . . . . . . . . . . . . . . . . . . . . . . . . . . . . . . . . . . . . . . . . . . .4-59
Example . . . . . . . . . . . . . . . . . . . . . . . . . . . . . . . . . . . . . . . . . . . . . . . . . . . . . 4-59
fileprint . . . . . . . . . . . . . . . . . . . . . . . . . . . . . . . . . . . . . . . . . . . . . . . . . . . . . . . . . . .4-61
Options . . . . . . . . . . . . . . . . . . . . . . . . . . . . . . . . . . . . . . . . . . . . . . . . . . . . . . . .4-61
Example . . . . . . . . . . . . . . . . . . . . . . . . . . . . . . . . . . . . . . . . . . . . . . . . . . . . . 4-62
initamass . . . . . . . . . . . . . . . . . . . . . . . . . . . . . . . . . . . . . . . . . . . . . . . . . . . . . . . . . .4-64
Options . . . . . . . . . . . . . . . . . . . . . . . . . . . . . . . . . . . . . . . . . . . . . . . . . . . . .4-64
Example . . . . . . . . . . . . . . . . . . . . . . . . . . . . . . . . . . . . . . . . . . . . . . . . . . . . . 4-64
initjournal . . . . . . . . . . . . . . . . . . . . . . . . . . . . . . . . . . . . . . . . . . . . . . . . . . . . . . . . . 4-65
Example . . . . . . . . . . . . . . . . . . . . . . . . . . . . . . . . . . . . . . . . . . . . . . . . . . . . . 4-65
keybuild . . . . . . . . . . . . . . . . . . . . . . . . . . . . . . . . . . . . . . . . . . . . . . . . . . . . . . . . . . . 4-66
When to Use Utility . . . . . . . . . . . . . . . . . . . . . . . . . . . . . . . . . . . . . . . . . . . . . .4-66
Options . . . . . . . . . . . . . . . . . . . . . . . . . . . . . . . . . . . . . . . . . . . . . . . . . . . . . . . .4-66
Example . . . . . . . . . . . . . . . . . . . . . . . . . . . . . . . . . . . . . . . . . . . . . . . . . . . . . 4-67
sysdbchk . . . . . . . . . . . . . . . . . . . . . . . . . . . . . . . . . . . . . . . . . . . . . . . . . . . . . . . . . .4-68
When to Use Utility . . . . . . . . . . . . . . . . . . . . . . . . . . . . . . . . . . . . . . . . . . . . . .4-68
Options . . . . . . . . . . . . . . . . . . . . . . . . . . . . . . . . . . . . . . . . . . . . . . . . . . . . . . . .4-69
Example . . . . . . . . . . . . . . . . . . . . . . . . . . . . . . . . . . . . . . . . . . . . . . . . . . . . . 4-70
volprint . . . . . . . . . . . . . . . . . . . . . . . . . . . . . . . . . . . . . . . . . . . . . . . . . . . . . . . . . . .4-72
Name Contention . . . . . . . . . . . . . . . . . . . . . . . . . . . . . . . . . . . . . . . . . . . . . . . .4-72
Options . . . . . . . . . . . . . . . . . . . . . . . . . . . . . . . . . . . . . . . . . . . . . . . . . . . . . . . .4-73
6-00025-01 Rev A Contents xxi
Page 26

Accessing Storage Devices
Example . . . . . . . . . . . . . . . . . . . . . . . . . . . . . . . . . . . . . . . . . . . . . . . . . . . . . 4-74
Output Fields Defined . . . . . . . . . . . . . . . . . . . . . . . . . . . . . . . . . . . . . . . . . 4-74
writecachemru . . . . . . . . . . . . . . . . . . . . . . . . . . . . . . . . . . . . . . . . . . . . . . . . . . . . .4-77
Options . . . . . . . . . . . . . . . . . . . . . . . . . . . . . . . . . . . . . . . . . . . . . . . . . . . . . . . .4-77
55
Troubleshooting Tools 6
AMASS Appears Hung . . . . . . . . . . . . . . . . . . . . . . . . . . . . . . . . . . . . . . . . . . . . . . .5-3
Cancel Outstanding Requests . . . . . . . . . . . . . . . . . . . . . . . . . . . . . . . . . . . . . . . . .5-4
Operating Issues . . . . . . . . . . . . . . . . . . . . . . . . . . . . . . . . . . . . . . . . . . . . . . . . . . . . .5-5
AMASS Database is Bad . . . . . . . . . . . . . . . . . . . . . . . . . . . . . . . . . . . . . . . . . . . . . .5-6
AMASS Does Not Start . . . . . . . . . . . . . . . . . . . . . . . . . . . . . . . . . . . . . . . . . . . . . . 5-16
UNIX Server’s Partitions Crash . . . . . . . . . . . . . . . . . . . . . . . . . . . . . . . . . . . . . . .5-17
If Journal Partition Crashes . . . . . . . . . . . . . . . . . . . . . . . . . . . . . . . . . . . . . . .5-17
If Database Partition Crashes . . . . . . . . . . . . . . . . . . . . . . . . . . . . . . . . . . . . . .5-19
If Cache Partition Crashes . . . . . . . . . . . . . . . . . . . . . . . . . . . . . . . . . . . . . . . .5-21
Requests Not Getting to Library . . . . . . . . . . . . . . . . . . . . . . . . . . . . . . . . . . . . . .5-22
System Panics . . . . . . . . . . . . . . . . . . . . . . . . . . . . . . . . . . . . . . . . . . . . . . . . . . . . . .5-23
Set Up for a Core Dump . . . . . . . . . . . . . . . . . . . . . . . . . . . . . . . . . . . . . . . . . .5-23
HP . . . . . . . . . . . . . . . . . . . . . . . . . . . . . . . . . . . . . . . . . . . . . . . . . . . . . . . . . .5-23
IBM . . . . . . . . . . . . . . . . . . . . . . . . . . . . . . . . . . . . . . . . . . . . . . . . . . . . . . . . .5-24
SGI and Sun . . . . . . . . . . . . . . . . . . . . . . . . . . . . . . . . . . . . . . . . . . . . . . . . .5-24
Command Gives Unexpected Results . . . . . . . . . . . . . . . . . . . . . . . . . . . . . . . . . .5-26
Library or Drive is Nonfunctional . . . . . . . . . . . . . . . . . . . . . . . . . . . . . . . . . . . . .5-28
Power Failure . . . . . . . . . . . . . . . . . . . . . . . . . . . . . . . . . . . . . . . . . . . . . . . . . . . . . .5-29
xxii Contents 6-00025-01 Rev A
Page 27

Accessing Storage Devices
Messages Generated by AMASS . . . . . . . . . . . . . . . . . . . . . . . . . . . . . . . . . . . . . .5-30
Operator Interactive Messages . . . . . . . . . . . . . . . . . . . . . . . . . . . . . . . . . . . . .5-30
Technical Support Messages . . . . . . . . . . . . . . . . . . . . . . . . . . . . . . . . . . . . . .5-30
Customer-specific Messages . . . . . . . . . . . . . . . . . . . . . . . . . . . . . . . . . . . . . . .5-30
Prepare to Contact Technical Support . . . . . . . . . . . . . . . . . . . . . . . . . . . . . . . . .5-32
Backup Scripts for HP-UX A
Backup Example for Small File Systems . . . . . . . . . . . . . . . . . . . . . . . . . . . . . . . . A-3
Backup Example for Large File Systems . . . . . . . . . . . . . . . . . . . . . . . . . . . . . . . . A-6
Fine-tune Block Size B
Optimize Tape Block Size . . . . . . . . . . . . . . . . . . . . . . . . . . . . . . . . . . . . . . . . . . . . B-3
Supported Drives . . . . . . . . . . . . . . . . . . . . . . . . . . . . . . . . . . . . . . . . . . . . . . . . B-3
Calculating Block Size . . . . . . . . . . . . . . . . . . . . . . . . . . . . . . . . . . . . . . . . . . . . B-3
Correlate with File Size . . . . . . . . . . . . . . . . . . . . . . . . . . . . . . . . . . . . . . . . B-4
Correlate with MAXIOSZ . . . . . . . . . . . . . . . . . . . . . . . . . . . . . . . . . . . . . . B-4
Correlate with READ-BLOCK LIMIT . . . . . . . . . . . . . . . . . . . . . . . . . . . . B-5
Cache Commands C
Cache Commands . . . . . . . . . . . . . . . . . . . . . . . . . . . . . . . . . . . . . . . . . . . . . . . . . . C-3
setcblist . . . . . . . . . . . . . . . . . . . . . . . . . . . . . . . . . . . . . . . . . . . . . . . . . . . . . . . . C-3
Options . . . . . . . . . . . . . . . . . . . . . . . . . . . . . . . . . . . . . . . . . . . . . . . . . . . . . . . . C-4
Output . . . . . . . . . . . . . . . . . . . . . . . . . . . . . . . . . . . . . . . . . . . . . . . . . . . . . . C-5
cblist . . . . . . . . . . . . . . . . . . . . . . . . . . . . . . . . . . . . . . . . . . . . . . . . . . . . . . . . . . . C-5
Options . . . . . . . . . . . . . . . . . . . . . . . . . . . . . . . . . . . . . . . . . . . . . . . . . . . . . . . . C-6
6-00025-01 Rev A Contents xxiii
Page 28

Accessing Storage Devices
Output . . . . . . . . . . . . . . . . . . . . . . . . . . . . . . . . . . . . . . . . . . . . . . . . . . . . . . C-6
setcbwght . . . . . . . . . . . . . . . . . . . . . . . . . . . . . . . . . . . . . . . . . . . . . . . . . . . . . . C-7
Options . . . . . . . . . . . . . . . . . . . . . . . . . . . . . . . . . . . . . . . . . . . . . . . . . . . . . . . . C-8
Output . . . . . . . . . . . . . . . . . . . . . . . . . . . . . . . . . . . . . . . . . . . . . . . . . . . . . . C-9
cbwghtlist . . . . . . . . . . . . . . . . . . . . . . . . . . . . . . . . . . . . . . . . . . . . . . . . . . . . . . C-9
Output . . . . . . . . . . . . . . . . . . . . . . . . . . . . . . . . . . . . . . . . . . . . . . . . . . . . . . C-9
Index
xxiv Contents 6-00025-01 Rev A
Page 29

1
Initial Setup
Tasks
Page 30

Managing the AMASS File System
NOTES
1-2 Initial Setup Tasks 6-00028-01 Rev A
Page 31

Prepare Media to be the Backup Volume
Running the installation script created a Backup Volume entry
in the AMASS File System Database. To prepare media to be
the specified Backup Volume, perform the steps in the
following table.
The Backup Volume must be identified as volume number 1 and
have an INACTIVE status in the AMASS File System
Database. An INACTIVE status means that AMASS cannot
read or write to the volume.
Note
For detailed information on the AMASS commands, see the
"Command Reference" chapter.
Managing the AMASS File System
Slot Position
AMASS assumes the Backup Volume is in either the first or last
slot, depending on the library; therefore no slot designation is
required. If you have more than one library connected to
AMASS, put the Backup Volume in the last slot in the first
library. The Backup Volume in network-attached libraries can
be in any slot so a slot designation is required.
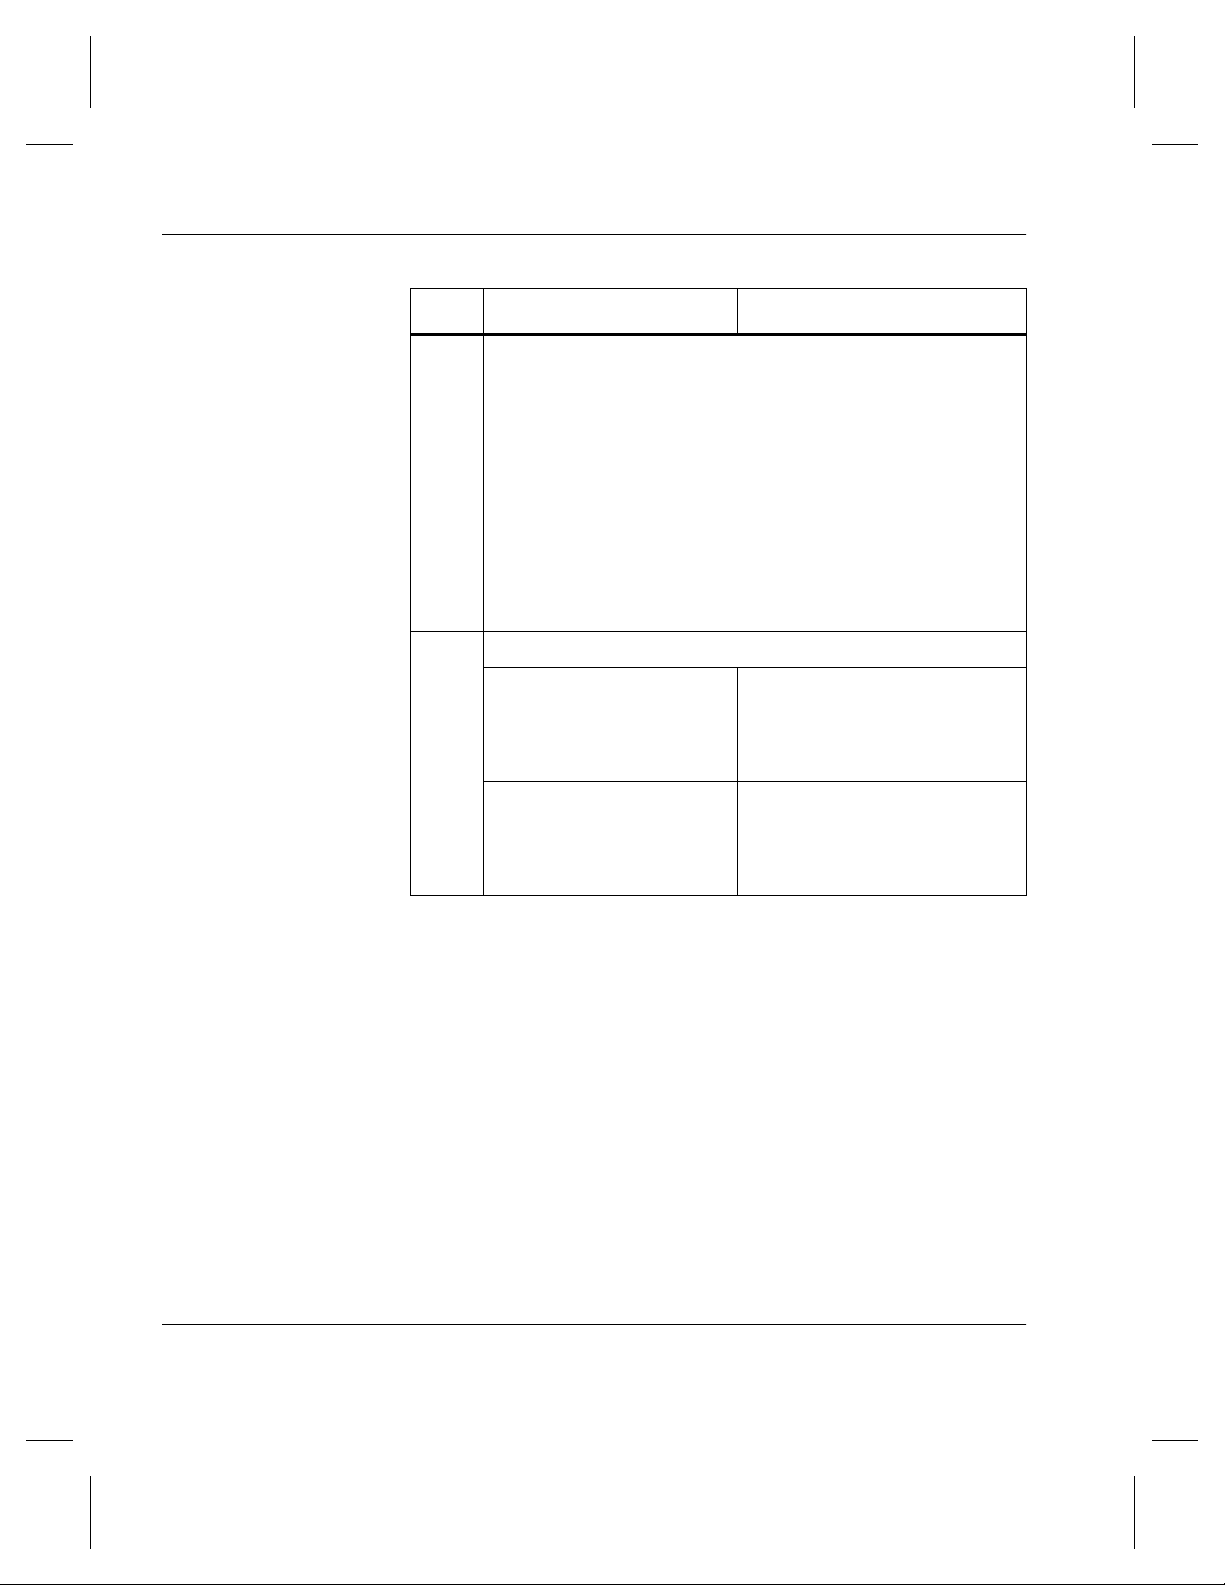
Step Command Description
1Log in as amass or root.
6-00028-01 Rev A Initial Setup Tasks 1-3
Page 32
Managing the AMASS File System
Step Command Description
2 Physically designate the media as the Backup Volume in
some outward way. See the following examples:
• Write the words “Backup Volume” on the media.
• Color code the media so it can be identified as a Backup
Volume.
• Make a note of either the home storage slot or the
preprinted barcode and prominently display it.
Even though the Backup Volume is in the last slot (such
as, slot 100), if you add an expansion bay with 50
additional slots, you now have a “new” last slot (slot 150).
3 For SCSI-attached libraries:
volinlet
NOTE: Not applicable for
volumes destined for
libraries without a mailbox.
volloc
NOTE: Not applicable for
volumes destined for
libraries without a mailbox.
Load volume through mailbox.
Mark the volume ONLINE (
-n)
in the AMASS File System
Database.
1-4 Initial Setup Tasks 6-00028-01 Rev A
Page 33

Managing the AMASS File System
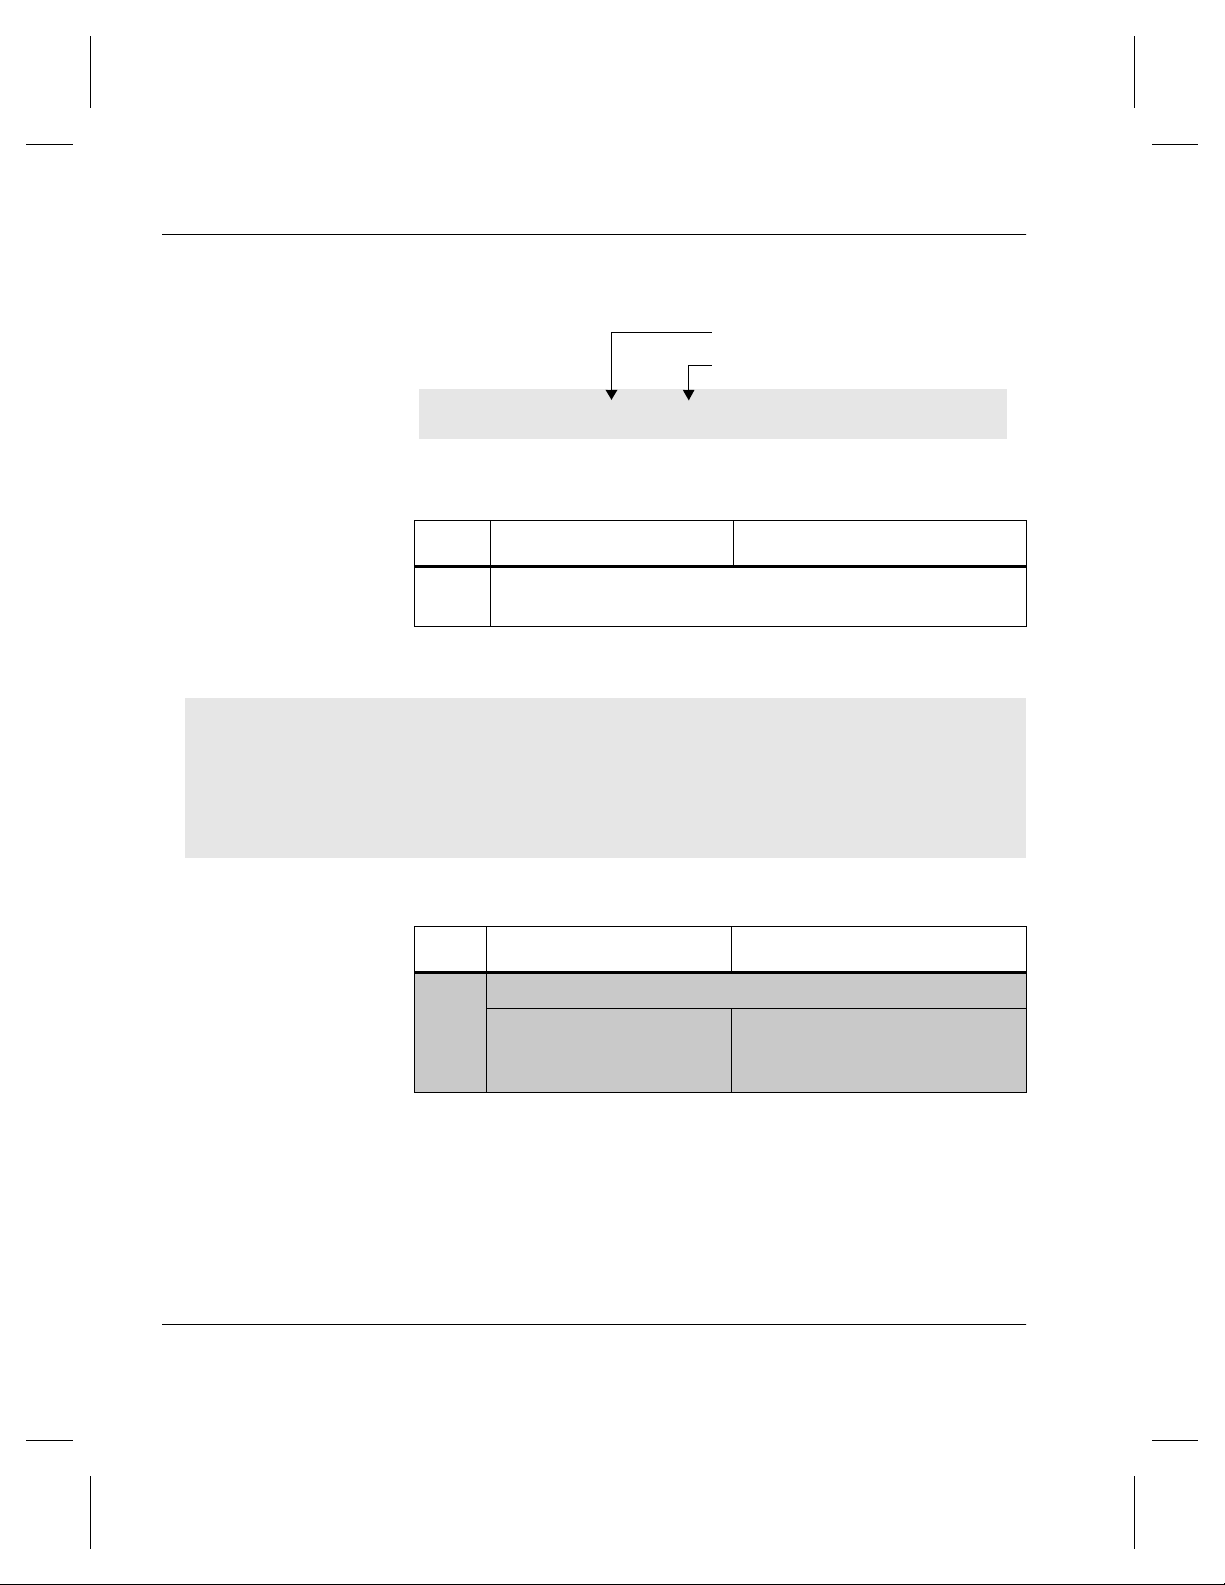
Step Command Description
For network-attached libraries:
# vollist
VOL
NUM
VOL
GRP
JUKE
NUM
bulkinlet
Barcode volumes must have their preprinted number in the
Volume Label field instead of the words
BACKUP-VOLUME. This field is displayed by the vollist
command shown in the following table:
POS VOL
LABEL
FLAGS USED
(MB)
Create an entry in the AMASS
File System Database.
Loads volume through
mailbox.
AMASS:
• Gives media a unique
volume number.
• Marks the volume ONLINE
in the AMASS File System
Database.
• Gives this first volume a
BACKUP-VOLUME label.
AVAIL
(MB)
DEAD
(%)
ERRS
1 0 1
backup
I 0 20000 0 0
Step Command Description
Change the Volume Label field from BACKUP-VOLUME to the
preprinted media number with the
shown below. In our example, the preprinted number is
112102.
6-00028-01 Rev A Initial Setup Tasks 1-5
vollabel command
Page 34
Managing the AMASS File System
# vollist
Volume number assigned by bulkinlet
Volume label printed on media
112102
# vollabel
Step Command Description
Now, the Volume Label field displays the preprinted
number (
1
112102).
VOL
NUM
VOL
GRP
1 0 1
JUKE
NUM
POS VOL
LABEL
112102
FLAGS USED
(MB)
AVAIL
(MB)
DEAD
(%)
I 0 20000 0 0
Step Command Description
4 For StorageTek Redwood tape drives only:
tapelength
Enter length of tape
in the AMASS File System
Database.
ERRS
(
lengthcode)
1-6 Initial Setup Tasks 6-00028-01 Rev A
Page 35

Managing the AMASS File System
Step Command Description
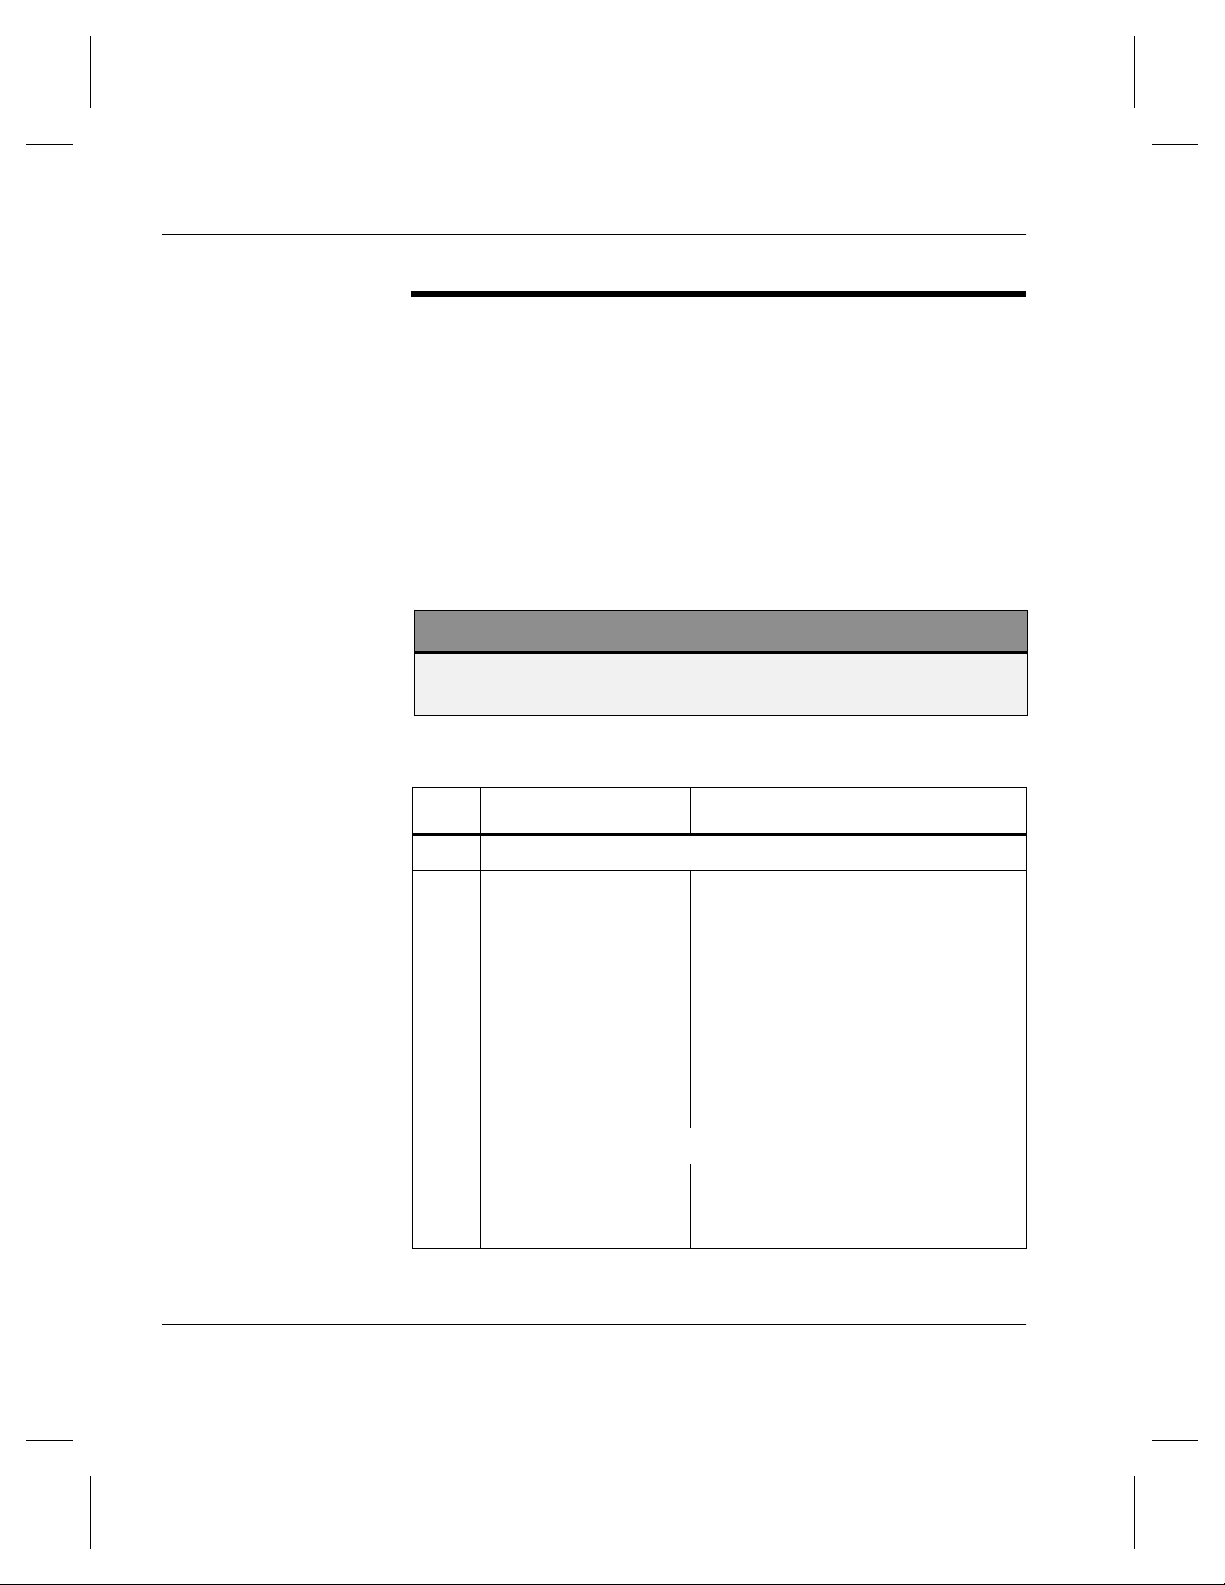
volformat
5
NOTE: Not applicable for
CDs.
6 Make AMASS aware of all your other media. For
instructions, see “Create Entries in Database for Your
Media” on Page 1-9.
amassbackup
7
Format the Backup Volume.
If you are using a standalone
drive, you must format the
volume from the sysop
interface. For information on
this interface,
Standalone Drives
Interface to
chapter in
Accessing Storage Devices
Perform a full backup (-f) with
the verbose (
-v) option of the
AMASS database
(
/usr/filesydb) and
transaction logs
(
/home/filesysdb/journal).
For instructions, see “Manual
Backup” on page 2-7.
.
volstat
8
Verify the status of the Backup
Volume is INACTIVE in the
AMASS File System Database.
An INACTIVE status means
that AMASS cannot read or
write to the volume. This
prevents AMASS from writing
to this volume thus corrupting
the backup data.
Before using the
amassrestore
command to restore these files,
change the status of the
Backup Volume to ACTIVE with
the volstat -a command.
6-00028-01 Rev A Initial Setup Tasks 1-7
Page 36

Managing the AMASS File System
Create File System Organization
The following tasks are presented as guidelines only since the
actual setup required for your specific site is unique.
Step 1. Decide how you want to organize the AMASS file
system. For example, what directories should be
under the /archive mount point?
Step 2. Set permissions for these directories to allow clients
to access the file system.
AMASS supports read and write permissions only;
Access Control Lists (ACLs) are not supported.
Step 3. Decide if you want to apportion media into volume
groups to keep project data or department data
together on a specified number of volumes. For
information, see “Volume Groups Defined” on
Page 1-13.
Step 4. Load media and create entries in the AMASS File
System Database for all your media. For
instructions, see “Create Entries in Database for
Your Media” on Page 1-9.
Step 5. See “Assign Directory to a Volume Group” on
Page 1-19 to assign a project directory or
department directory to a volume group and to
enable the volume group to use the space pool if it
runs out of space.
Step 6. Decide if you want to have a volume group for
cleaning cartridges. For instructions, see “Create a
Cleaning Volume Group” on Page 1-20.
1-8 Initial Setup Tasks 6-00028-01 Rev A
Page 37

Create Entries in Database for Your Media
Make AMASS aware of your media by creating an entry for
each volume in the AMASS File System Database by
performing the steps in the following table.
Note
For detailed information on the AMASS commands, see the
"Command Reference" chapter.
Step Command Description
1
Log in as
2A For SCSI-attached libraries:
amass or root.
Managing the AMASS File System
volnew
For example:
cdimport
volinlet
6-00028-01 Rev A Initial Setup Tasks 1-9
volnew 3 A64 test
Create an entry for each volume
in the AMASS File System
Database.
If desired, assign a volume to a
volume group (3).
Assign each volume to a home
storage slot (A64).
Give each volume a
user-definable label (test).
AMASS gives each piece of
media a unique volume number
(for example, 33).
Import a CD that already has data
on it.
Load volume (33) through the
mailbox.
Page 38

Managing the AMASS File System
Step Command Description
For example: volinlet 33
NOTE: Not applicable for
volumes destined for libraries
without a mailbox.
vgimport
volloc
For example:
Import metadata file for volume
that already has data on it.
NOTE: Must have used
vgexport to export metadata
file.
Mark the volume (33) ONLINE
(
Database.
volloc -n 33
NOTE: Not applicable for
volumes destined for libraries
without a mailbox.
-n) in the AMASS File System
1-10 Initial Setup Tasks 6-00028-01 Rev A
Page 39

Managing the AMASS File System
Step Command Description
2B For network-attached libraries:
bulkinlet
For example:
bulkinlet 4
vgimport
NOTE: Must have used
vgexport to export
metadata file.
vollabel
For example:
vollabel 12647NJK 34
Create an entry in the AMASS
File System Database for each
volume.
If desired, assign a volume to a
volume group (4).
Load multiple volumes through
the mailbox.
AMASS:
• Gives each volume a unique
volume number (for example,
34).
• Marks all volumes ONLINE in
the AMASS File System
Database.
Import metadata file for volume
that already has data on it.
AMASS enter the preprinted
barcode (
12647NJK) in the
AMASS File System Database for
a volume number (34).
6-00028-01 Rev A Initial Setup Tasks 1-11
Page 40

Managing the AMASS File System
Step Command Description
bulkload
2C
For example:
bulkload -s
You have just installed AMASS
and must create many entries in
the AMASS File System
Database and mark them
ONLINE.
The
-s option
synchronizes
the AMASS File System
Database and the library’s
interface.
both
vollabel
AMASS enter the preprinted
barcode in the AMASS File
System Database.
3 For StorageTek Redwood tape drives only:
tapelength
Enter length of tape in the
AMASS File System Database for
a volume number.
volformat
4
For example:
volformat -p 34
Format the volume (34).
NOTE: Not applicable for CDs.
If you are using a standalone
drive, you must format the volume
from the sysop interface. For
information on this interface, refer
to the Interface to Standalone
volstat
5
For example:
volstat -a 34
Drives chapter in
Storage Devices
Mark the volume (34) ACTIVE
(
-a) so AMASS can read and
write to it.
Accessing
.
1-12 Initial Setup Tasks 6-00028-01 Rev A
Page 41

Volume Groups Defined
A volume group is a method for partitioning the volumes in
AMASS. You can assign the following types of volume groups:
• Media verification group (MV) for the optional Infinite File
Life feature
For more information about IFL, see the “Infinite File Life”
manual.
• A numeric group, 1 through 2047
• A space pool (SP)
• A cleaning group (CL)
Managing the AMASS File System
6-00028-01 Rev A Initial Setup Tasks 1-13
Page 42

Managing the AMASS File System
The following figure illustrates these volume groups.
Numeric Volume Group
Space Pool
Cleaning Group
Media Verification
Volumes can be assigned to a numeric volume
group. The group can be a number from 1 through
2047.
Volumes can be assigned to the space pool (SP).
These are formatted volumes with specific
attributes. When a numeric volume group runs out
of space, and it has been enabled to use the space
pool, AMASS automatically takes a volume with the
same attributes from the space pool and assigns it
to the numeric group that ran out of space. Thus,
AMASS can continue to write data to the numeric
volume group.
Cleaning cartridges are assigned to the cleaning
group (CL). When a drive needs cleaning, AMASS
selects the appropriate cleaning volume from this
group.
Media verification group. A volume assigned to the
media verification (MV) volume group consists of
media verified as “good” for the AMASS Infinite File
Life (IFL) optional feature.
Uniform Media in Numeric and Cleaning Groups
Both numeric volume groups and the cleaning group must
contain a homogeneous type of media.
At a site using both WORM and erasable optical platters, for
example, volume group 47 can contain WORM platters or it can
contain erasable platters, but it cannot contain both media types.
1-14 Initial Setup Tasks 6-00028-01 Rev A
Page 43

Likewise, the cleaning group must contain volumes with
uniform, drive-specific attributes. For cleaning volume groups,
see “Create a Cleaning Volume Group” on page 1-20.
Disparate Media in the Space Pool
The space pool can contain volumes with a variety of formats.
Therefore, if a site uses both WORM and erasable optical
platters, AMASS always has a selection of media from which to
pick.
For example, if volume group 47 runs out of space, AMASS
automatically takes a volume from the space pool with the
appropriate attributes and reassigns it to the out-of-space
volume group. Thus, AMASS continues to write data to volume
group 47 and performance does not suffer.
Using Numeric Volume Groups
Managing the AMASS File System
You can archive a specific directory by using numeric volume
groups. This concept is shown in the following illustration:
Library
AMASS
/archive
/sales
~
AMASS archives /pubs
files to volume group 2.
6-00028-01 Rev A Initial Setup Tasks 1-15
/pubs
~
Volume Group 2
Page 44

Managing the AMASS File System
By allocating project files from a subdirectory to specific
volumes, the data generated by the project can easily be added
and removed from the library without affecting data generated
by other projects. Or, you can mark the volumes OFFLINE and
remove them from the library for offsite storage.
When you assign a subdirectory to a numeric volume group,
only writes from that subdirectory are written to the specified
volume group. No other data is placed in that volume group.
When a Group Runs Out-of-Space
Scenario
To continue writing to an out-of-space volume group, you have
two options:
• Assign more volumes to the numeric volume group.
• Allow AMASS to automatically take volumes from the
space pool and reassign them to the out-of-space volume
group. However, to allow AMASS to do this, you must
enable the volume group to use the space pool.
The following figure illustrates how directories can be defined
under the AMASS mount point and how volume groups can be
used to consign directories.
1-16 Initial Setup Tasks 6-00028-01 Rev A
Page 45
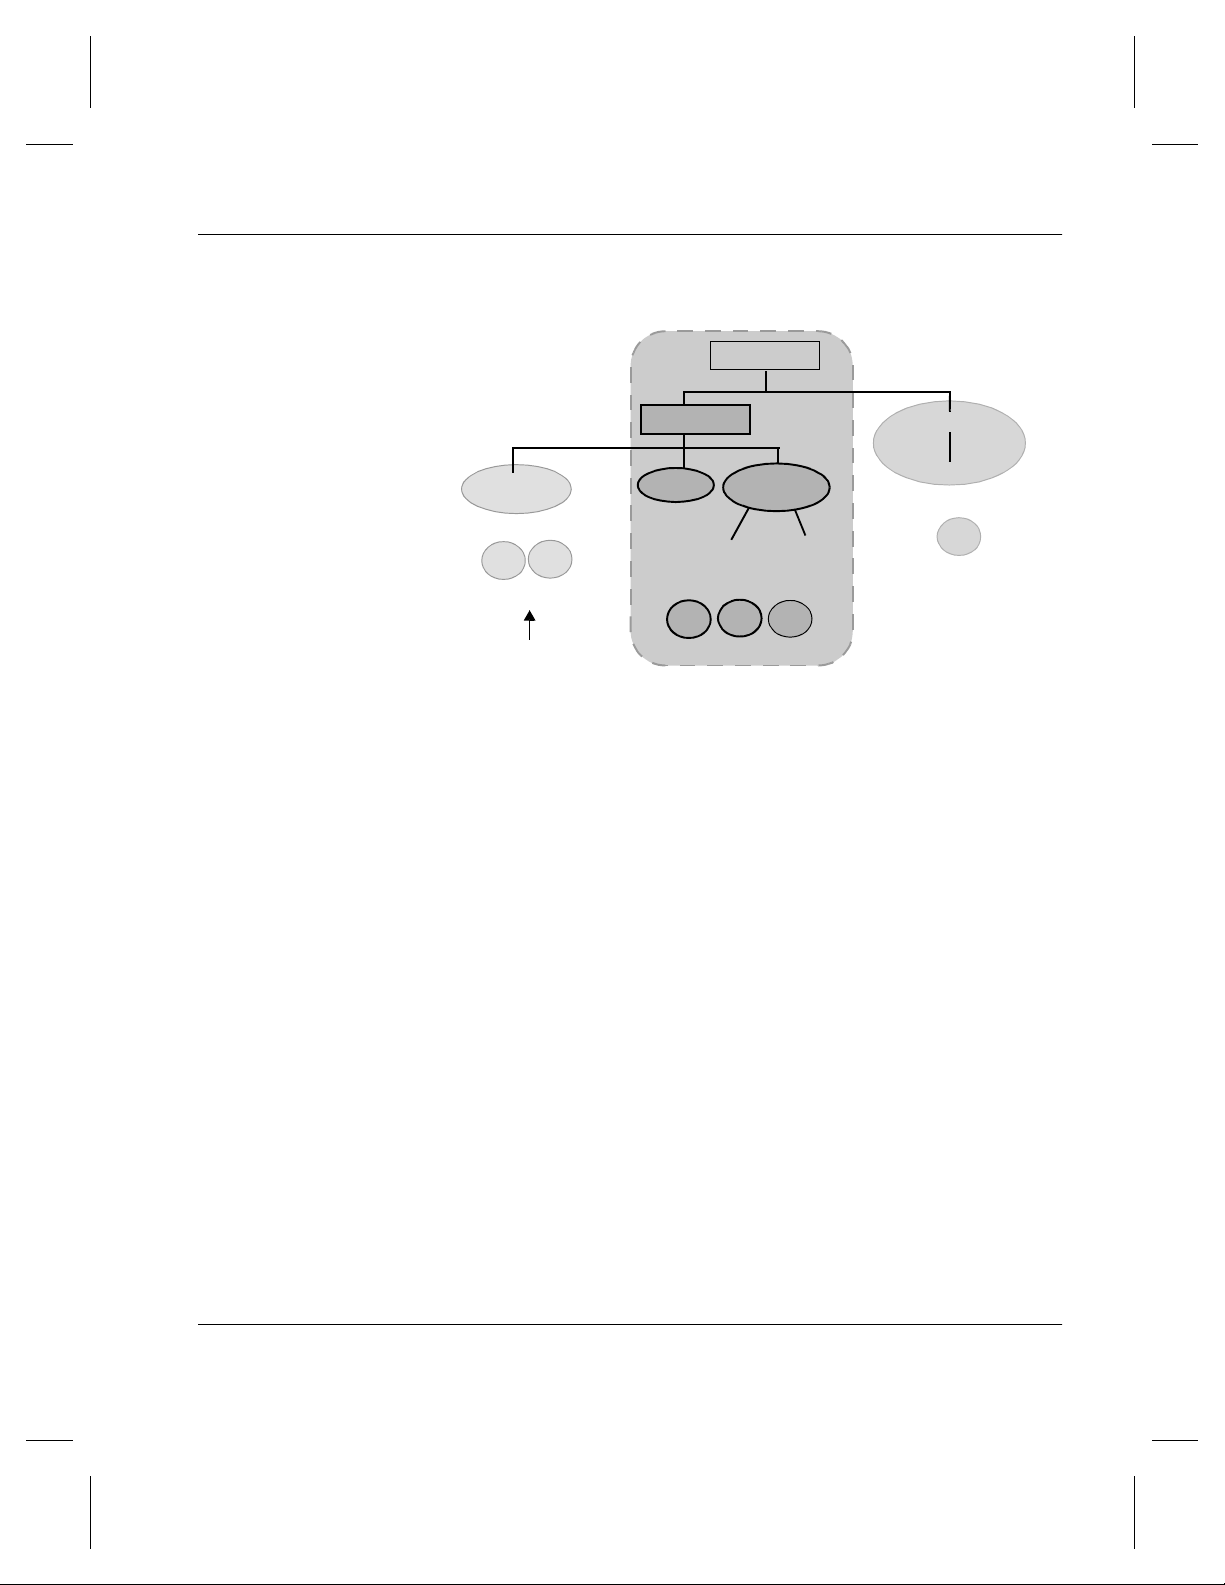
/archive
Managing the AMASS File System
amass_nt
Volume numbers 2 & 4
4
2
Volume Group 33
Space pool is enabled
for this volume group.
projects
amass
Volume numbers 3, 6 & 9
Volume Group 0
3
datamgr
server
6
client
9
production
reports
Volume number 5
5
Volume Group 6
• The projects directory, is the root directory for volume
group 0.
- If new files or new directories are added under
archive, they belong to volume group 0, unless you
assign them to a specific volume group.
• The amass_nt directory is the root directory for volume
group 33.
- When volume group 33 runs out of space, AMASS
automatically takes an appropriately formatted volume
from the space pool because volume group 33 has been
enabled to use the space pool.
•The production directory is the root directory for
volume group 6.
- When volume group 6 fills up, AMASS does not
automatically assign it a volume from the space pool
because it has not been enabled to use the space pool.
6-00028-01 Rev A Initial Setup Tasks 1-17
Page 46

Managing the AMASS File System
Instead, AMASS generates an out-of-space message,
and you must assign more volumes to the volume
group.
• If new directories are added under amass_nt or
production directories, they belong to those directories’
volume groups, either volume group 33 or 6.
1-18 Initial Setup Tasks 6-00028-01 Rev A
Page 47

Assign Directory to a Volume Group
To assign an existing directory to a volume group and enable
the volume group to use the space pool if it runs out of space,
perform the steps in the following table.
Note
For detailed information on the AMASS commands, see the
"Command Reference" chapter.
Step Command Description
1 Log in as amass or root.
setvolgrp
2
Managing the AMASS File System
Assign a directory
(
/archive/nt) to a volume
group (34).
For example:
vgpool
3
For example:
6-00028-01 Rev A Initial Setup Tasks 1-19
setvolgrp /archive/nt 34
Enable (-e) the volume
group (34) to use the space
pool if it runs out of space.
vgpool -e 34
Page 48
Managing the AMASS File System
Create a Cleaning Volume Group
To create a volume group used solely for cleaning cartridges,
use the procedure in the following table.
Currently the CL volume group can contain only one type of
cleaning cartridge. For example, if you have both a DTF drive
and a 3590 drive, your CL volume group must contain only
DTF cleaning cartridges or exclusively 3590 cleaning
cartridges.
Note
For detailed information on the AMASS commands, see the
"Command Reference" chapter.
Step Command Description
1Log in as amass or root.
volnew
2
For example:
1-20 Initial Setup Tasks 6-00028-01 Rev A
volnew CL A77 clean
Create an entry for each cleaning
volume in the AMASS File System
Database.
Assign the volume to the
(cleaning group) volume group.
Assign each cleaning volume to a
home storage slot (A77).
Give each cleaning volume a
user-definable label (clean).
AMASS gives each piece of media a
unique volume number (for
example, 23).
CL
Page 49

Managing the AMASS File System
Step Command Description
volclattr
3
Define drive-specific attributes to
the cleaning volume (23).
For example:
vollist -g CL
4
volclattr -t 6 23
View attributes for the cleaning
group.
6-00028-01 Rev A Initial Setup Tasks 1-21
Page 50

Managing the AMASS File System
NOTES
1-22 Initial Setup Tasks 6-00028-01 Rev A
Page 51

2
Operational
Tasks
Page 52

Managing the AMASS File System
NOTES
2-2 Operational Tasks 6-00028-01 Rev A
Page 53

Database and Journal Backups
File System Database—The File System Database contains
tables of attributes—or metadata—representing the directory
structure and media mounted under the AMASS file system.
The metadata includes: media ID, media type, media location,
ownership, and timestamp.
The default location of the Database is in /usr/filesysdb.
The File System Database tells AMASS where data is located
on the media archived in your library (or where data is located
on offline media). The following figure illustrates the concept
of how the Database maps the file system to the volumes in the
library.
The File System Database contains metadata,
which includes the directory structure, file attributes,
media information, and storage information.
Managing the AMASS File System
Volumes contain “real” data.
AMASS
File
System
Database
UNIX Server
Inodes
Inodes
Inodes map the metadata to “real”
data found on the media.
Journal—The Journal is a transaction log for the AMASS
Database.
The default location of the Journal is in
/usr/filesysdb/journal. Typically, this is a symbolic link
pointing to a separate physical disk to keep the Journal on a
different disk from the File System Database.
6-00028-01 Rev A Operational Tasks 2-3
Page 54
Managing the AMASS File System
The Journal tells AMASS what transactions—what
entries—have acted upon a file stored on a volume in a library.
It is a daily diary of logged events.
Both the Database and Journal can be backed up automatically
and manually. Both types of backups are described below.
Note
If your File System Database gets corrupted or the hard disk
crashes, restore the Database with the full and partial backups you
have taken.
Automatic Backups Via Cron Job
Because the File System Database and the Journal are
extremely important, this information must be protected.
Consequently, the amassbackup command, run from a cron
job, regularly backs up both the Database and Journal. This
cron job was created when AMASS was installed. The cron
job backs up the Database and Journal to a Backup Volume at 3
a.m. using the following schedule:
• First day of the month — Full Backup
• All other days — Partial Backup
After the backup completes, AMASS truncates the Journal
file.
If the above schedule is not suitable for your site, modify the
schedule by editing the crontab and changing the
amassbackup entries.
Caution
Make sure these backup are successful. Look in the system log
every morning for a “Backup was successful” message.
2-4 Operational Tasks 6-00028-01 Rev A
Page 55

The “full backup” (backs up the Database and Journal) and
“partial backups” (backs up just the Journal) will allow you to
successfully restore your File System Database (and, therefore,
allow you to know where data is located on what piece of
media) if your current File System Database gets corrupted or
the hard disk crashes.
If the Journal (/usr/filesysdb/journal) tends to fill up
the available disk space before the normally scheduled full
backup, increase the frequency of the full backups.
Assign Backup Volume
For detailed information on making a Backup Volume, see the
"Initial Setup Tasks" chapter.
How to Modify Automated Schedule
Managing the AMASS File System
To change the automatic backup schedule, use the procedure in
the following table.
Step Command Description
1 Log in as root.
2#
3 Edit the
6-00028-01 Rev A Operational Tasks 2-5
cd /var/spool/cron/crontabs Change directory to
where the crontab file
is located.
/var/spool/cron/crontabs/amass table entry.
The defaults are shown below.
• The first line runs a full backup at 3 a.m. (2 a.m. for IBM
platforms) on the first day of every month. The second line
runs a partial backup at 3 a.m. (2 a.m. for IBM platforms)
on all other days of the month.
The six active fields are: minute, hour, day, month, day of
week, and command. Each field, except the command field,
may be an asterisk.
Page 56

Managing the AMASS File System
day of month
hour
minute
month
day of week
0 3 1 * * /usr/amass/bin/amassbackup -fv
0 3 2-31 * * /usr/amass/bin/amassbackup -v
Step Command Description
4
0 3 * * 0
/usr/amass/bin/ama
ssbackup -fv
0 3 * * 1-6
/usr/amass/bin/ama
ssbackup -v
5 Save your edits.
In our example, we edit the
file so:
• The first line runs a full
backup at 3 a.m. every
Sunday.
• The second line runs a
partial backup at 3 a.m.
all other days, Monday
through Saturday.
The edits are shown in
bold.
2-6 Operational Tasks 6-00028-01 Rev A
Page 57

Manual Backup
Manually back up the Database and Journal under the following
conditions prior to:
• updating your operating system
• updating AMASS
• making any major change to your system
• replacing the hard disk on the UNIX server
How to Use Backup Command
To perform a backup with the AMASS command, use the
procedure in the following table.
Note
Managing the AMASS File System
For detailed information on the commands used in these steps, see
the "Command Reference" chapter.
Step Command Description
1 Log in as amass or root.
2 Make sure the Backup Volume is formatted and is the last
home storage slot in the first library. Moreover, the Backup
Volume must be volume number 1 and have an INACTIVE
status.
/usr/amass/utils/sysd
3
bchk
6-00028-01 Rev A Operational Tasks 2-7
To make sure there has been
no database corruption.
Page 58

Managing the AMASS File System
Step Command Description
amassbackup -u
4
As appropriate, perform either
a:
• Full (-f) backup with the
verbose (-v) option.
• Partial backup with the
verbose option.
5 Check the system log for a
message.
“Backup was successful”
2-8 Operational Tasks 6-00028-01 Rev A
Page 59

Replace a Full Backup Volume
AMASS issues a warning message when the Backup Volume is
almost full.
If you receive a “95% full” message before a backup starts,
initialize a new Backup Volume and perform a full backup as
described in the following table.
However, if you receive a “95% full” message while a backup
is in progress, the backup procedure may fail in which case you
must rerun the procedure with a new Backup Volume.
Note
For detailed information on the commands used in these steps, see
the "Command Reference" chapter.
Managing the AMASS File System
Step Command Description
1 Log in as amass or root.
2 After you have unloaded a full Backup Volume by entering
the following command, store the backup volume in a safe
place.
The volume number of a Backup
Volume must be number 1.
# voloutlet
Step Command Description
3 To continue, see “Prepare Media to be the Backup
Volume” on Page 1-3.
6-00028-01 Rev A Operational Tasks 2-9
1
Page 60

Managing the AMASS File System
Restore AMASS Database
To restore the AMASS File System Database and journal if the
original files on the UNIX server becomes lost or corrupt, use
the procedure in the following table.
To recover the AMASS File System Database if the database
becomes corrupt, see “AMASS Database is Bad” on page -6.
Note
For detailed information on the commands used in these steps,
see the "Command Reference" chapter.
Step Command Description
1Log in as amass or root.
amassstat -u
2
For example:
amassstat -i -t 600
3 Reboot AMASS using one of the following ways:
amass_atboot Disable the automatic startup of
Boot the system
single-user.
4
fsck Check integrity of the file system.
2-10 Operational Tasks 6-00028-01 Rev A
INACTIVATE (-i) the AMASS file
system.
AMASS inactivates in 600
seconds, 10 minutes.
AMASS. For information on using
this script, see amass_atboot in
Chapter 4.
Be sure to mount the partition
containing the AMASS database
(
/usr/filesysdb), the AMASS
journal
(
/home/filesysdb/journal),
and the AMASS program files
(
/usr/amass).
Page 61

Managing the AMASS File System
Step Command Description
5 Create the following two directories and one file, all with
owner as amass:
• /usr/filesydb
• /home/filesysdb/journal
• /home/filesysdb/journal/dbv4jrnl (This file must be
a minimum of 8 bytes in size.)
amassrestore -u
6
For example:
amassrestore -v -d
/dev/rst12 -L 12N6J
7 Transition the system to multi-user mode or reboot the
system.
Restore the AMASS File System
Database from the Backup
Volume.
Restores database with verbose
messages (
drive (
Volume’s barcode is 12N6J.
-v), from a standalone
/dev/rst12). The Backup
Restore with Earlier AMASS Version
To recover data on a Backup Volume containing a backup from
an earlier version of AMASS, make sure the current
MAXIOSIZE parameter on AMASS is configured to the same
value as when the Backup Volume was made.
For example, your current Backup Volume was made
when the MAXIOSZ value on AMASS was 256 KB.
(This value should be physically noted on the
volume.)
Upgrade AMASS and change the MAXIOSZ value to
1024 KB.
Before attempting to read the Backup Volume, return
the MAXIOSZ parameter on AMASS to 256 KB.
6-00028-01 Rev A Operational Tasks 2-11
Page 62

Managing the AMASS File System
Reinitialize Database
To empty the existing AMASS File System Database and
reinitialize it, use the procedure in the following table.
Caution
All file and directory entries as well as library, drive, and media
information are deleted.
Note
For detailed information on the commands used in these steps, see
the "Command Reference" chapter.
Step Command Description
1 Log in as amass or root.
amassstat -u
2
3 Reboot AMASS using one of the following ways:
amass_atboot
Boot the system single-user. Be sure to mount the
2-12 Operational Tasks 6-00028-01 Rev A
INACTIVATE (-i) the
AMASS file system.
Disable the automatic
startup of AMASS. For
information on using
this script, see
amass_atboot in
Chapter 4.
partition containing the
AMASS database
(
/usr/filesysdb), the
AMASS journal
(
/home/filesysdb/jo
urnal
), and the
AMASS program files
(
/usr/amass).
Page 63

Managing the AMASS File System
Step Command Description
4 # cd
# /usr/amass/utils/initamass
Change directory and
reinitialize the File
System Database.
CAUTION: All file and
directory entries as
well as library, drive,
and media information
are deleted.
6-00028-01 Rev A Operational Tasks 2-13
Page 64

Managing the AMASS File System
Back Up Media in Library
There are a variety of ways to back up the data residing in the
library. Even though a library is involved, the backup issues are
fundamentally the same as for hard disks. The main difference
is the amount of data contained in the library.
The solution depends on the available system resources and the
backup requirements of your specific environment. The correct
solution could even be a combination of the methods described
below. For that reason, a step-by-step procedure is not included
here. Three ways of backing up media are described below.
Use UNIX Utilities
One solution is to use conventional UNIX backup utilities for
your media.
The practicality of doing this depends on the amount of data
being written and the overall size of the library. Performing a
full backup against a large library takes a long time so
incremental backups may be appropriate.
Use Both UNIX Utilities and AMASS Commands
Another way to back up the media is to use AMASS commands
and UNIX utilities to generate a sorted list of files contained on
each volume in the library. Then, the sorted list can be directed
to a backup. An example of using the volfilelist command
to do this is described under “Practical Application” on
Page 3-156.
2-14 Operational Tasks 6-00028-01 Rev A
Page 65

This solution provides faster backups than if the data is
accessed randomly because it requires fewer volume swaps.
With this solution you can do full or incremental backups.
Use Redundant Media
A third solution is to use a second set of media stored offline, or
outside of the library.
You can use the AMASS volcopy command to copy data from
a source volume to a destination volume. If the original volume
is lost, destroyed, or damaged, you can use the duplicate
volume exactly like you would the original. For more
information on this command, see “volcopy” on page 3-138.
Managing the AMASS File System
6-00028-01 Rev A Operational Tasks 2-15
Page 66
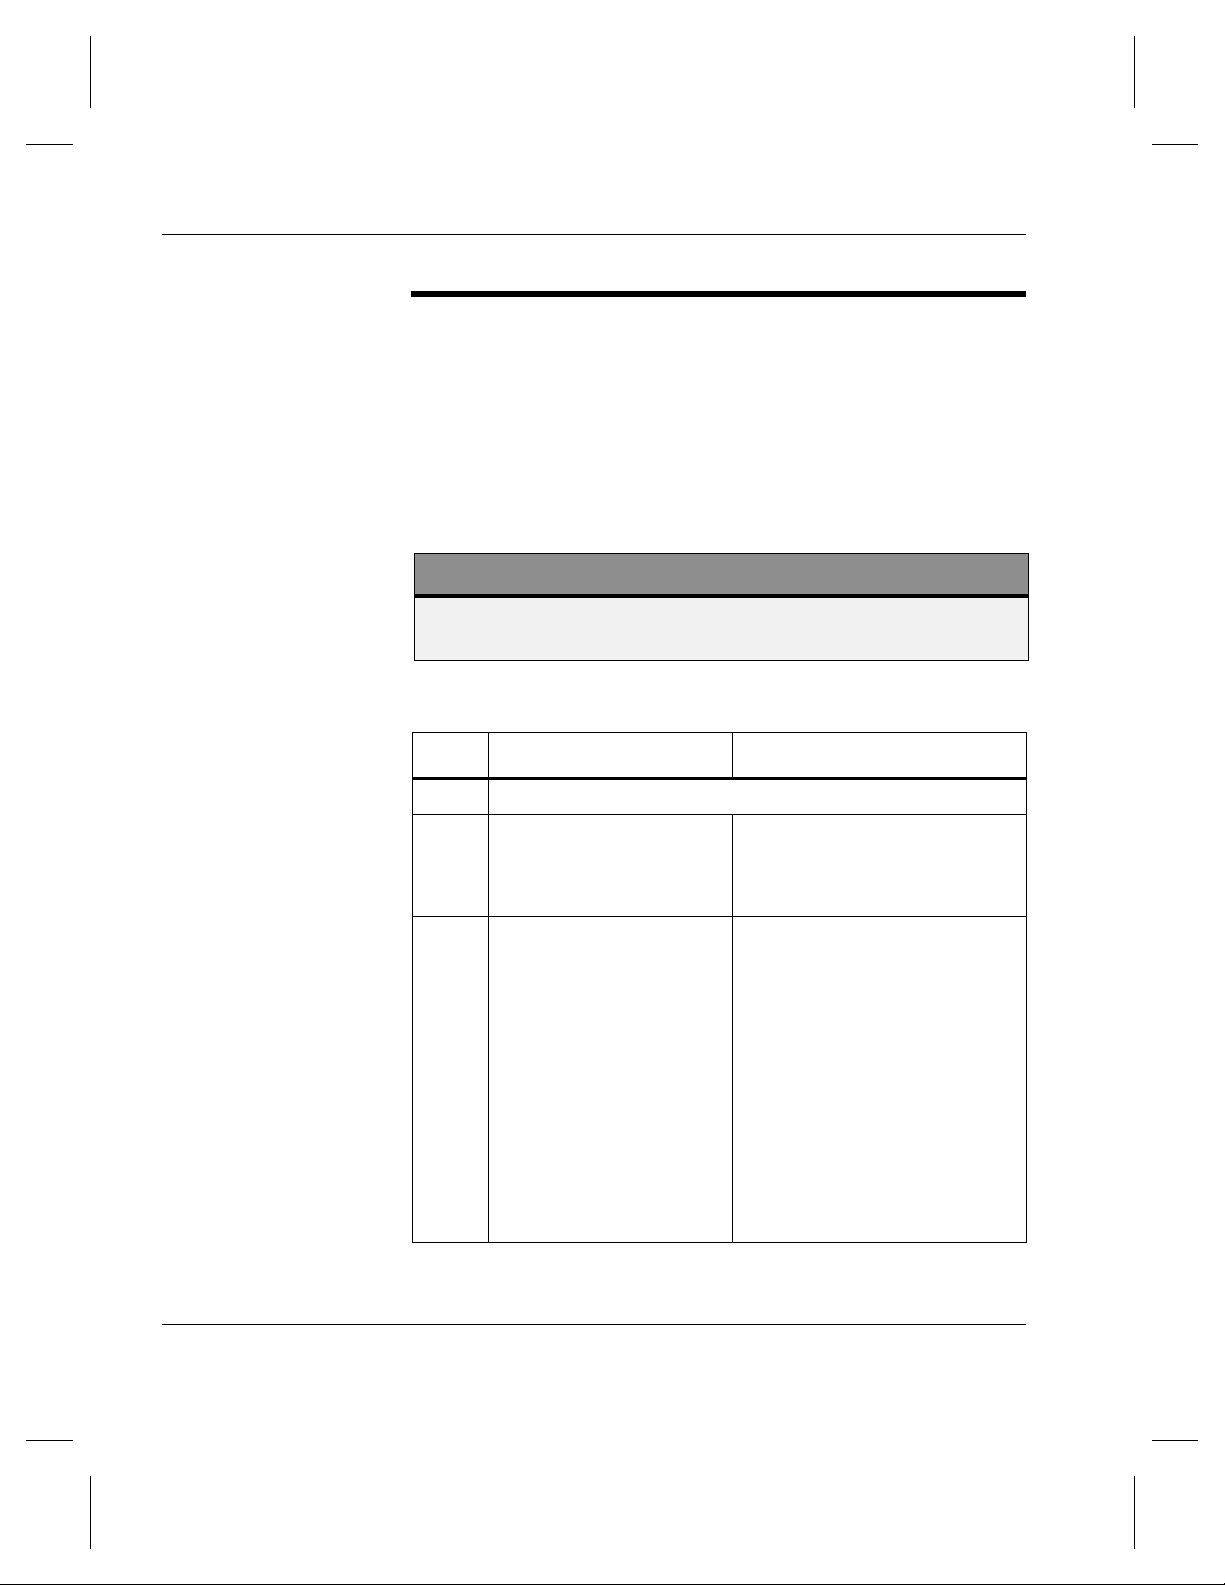
Managing the AMASS File System
Take a Drive Out of Service
To take a drive out of service — whether because of excessive
failures or for maintenance — use the procedure in the
following table.
If all drives are out of service, AMASS suspends requests until
a drive is returned to service.
Note
For detailed information on the commands used in these steps, see
the "Command Reference" chapter.
Step Command Description
1Log in as amass or root.
2
drivelist drivenumber
For example:
drivelist 2
drivestat -i
3
drivenumber
For example:
drivestat -i 2
2-16 Operational Tasks 6-00028-01 Rev A
AMASS displays the current
status of the specified drive.
INACTIVATE the specified
drive.
AMASS performs the following
tasks:
• If a volume is in the drive, it
is returned to its home
storage slot.
• All operations currently in
progress complete but no
further requests are queued
for the soon-to-be-inactive
drive.
Page 67

Return a Drive to Service
To return a drive to service, use the procedure in the following
table.
Note
For detailed information on the commands used in these steps, see
the "Command Reference" chapter.
Step Command Description
1 Log in as amass or root.
Managing the AMASS File System
2
drivelist drivenumber
For example:
drivelist 2
3
drivestat -a drivenumber
For example:
drivestat -a 2
AMASS displays the current
status of the specified drive.
ACTIVATE the specified drive.
6-00028-01 Rev A Operational Tasks 2-17
Page 68

Managing the AMASS File System
Delete Files and Volume Number
To delete:
• All files on a volume
• Volume number from the AMASS File System Database
Use the procedure in the following table.
Note
For detailed information on the commands used in these steps, see
the "Command Reference" chapter.
Step Command Description
1 Log in as amass or root.
2A
voldelete volumenumber
For example:
voldelete 9
voldelete
2B
3A For SCSI-attached libraries:
voloutlet volumenumber
For example:
voloutlet 9
2-18 Operational Tasks 6-00028-01 Rev A
Delete all files on the specified
volume and delete the volume
number from the AMASS
database.
Or, delete all files on the
specified volume without
deleting the volume number
from the database.
Eject the volume from the
library.
AMASS marks the media
OFFLINE in the database.
Page 69

Managing the AMASS File System
Step Command Description
3B For network-attached libraries:
bulkoutlet -u
For example:
bulkoutlet
1,2-10,21,23
Or, eject multiple volumes from
the library.
AMASS marks the media
OFFLINE in the database.
6-00028-01 Rev A Operational Tasks 2-19
Page 70

Managing the AMASS File System
Delete Volume Group
To delete a Volume Group, use the procedure in the following
table.
Note
For detailed information on the commands used in these steps, see
the "Command Reference" chapter.
Step Command Description
1 Log in as amass or root.
2
adf -u
For example:
adf -r
View directories and volumes
assigned to the volume group
that you want to eventually
remove.
Make sure there is no
information in this volume
group that you want to keep.
3
volgroup oldvolumenumber
newvolumegroup
Change the volume group
from 9 to zero.
For example:
volgroup 9 0
4
vgroot volumegroup
For example:
vgroot 9
View directories assigned to
this volume group.
It should return zero
directories.
5 However, if directories still remain for the volume group,
setvolgrp path volumegroup
For example:
setvolgrp techpubs 27
2-20 Operational Tasks 6-00028-01 Rev A
Reassign any remaining
directories (techpubs) to
another volume group (27).
Page 71

Recycle a Volume
To perform the following tasks, use the procedure described in
the table:
• Move non-contiguous data onto other volumes
• Recycle volumes
Managing the AMASS File System
Note
For detailed information on the commands used in these steps, see
the "Command Reference" chapter.
Step Command Description
1 Log in as amass or root.
2
volspace %deadspace
For example:
volspace 80
3
volcomp volumenumber
For example:
volcomp 3
volfilelist -u
6-00028-01 Rev A Operational Tasks 2-21
List all volumes with a specified
percentage of dead space. Media
with scattered or randomly
located data contains a lot of
dead space.
Lists all volumes with 80% dead
space.
Rewrite data to another volume.
At the end of this process, the
original volume is marked
INACTIVE.
See if any data remains on the
original volume. If it does, rerun
the volcomp command.
Page 72

Managing the AMASS File System
Step Command Description
4 volformat
volumenumber
For example:
volformat 3
5
volstat -a
volumenumber
For example:
volstat -a 3
Reformat the now-empty volume.
NOTE: Not applicable for CDs.
ACTIVATE volume so AMASS
can read and write to it.
2-22 Operational Tasks 6-00028-01 Rev A
Page 73
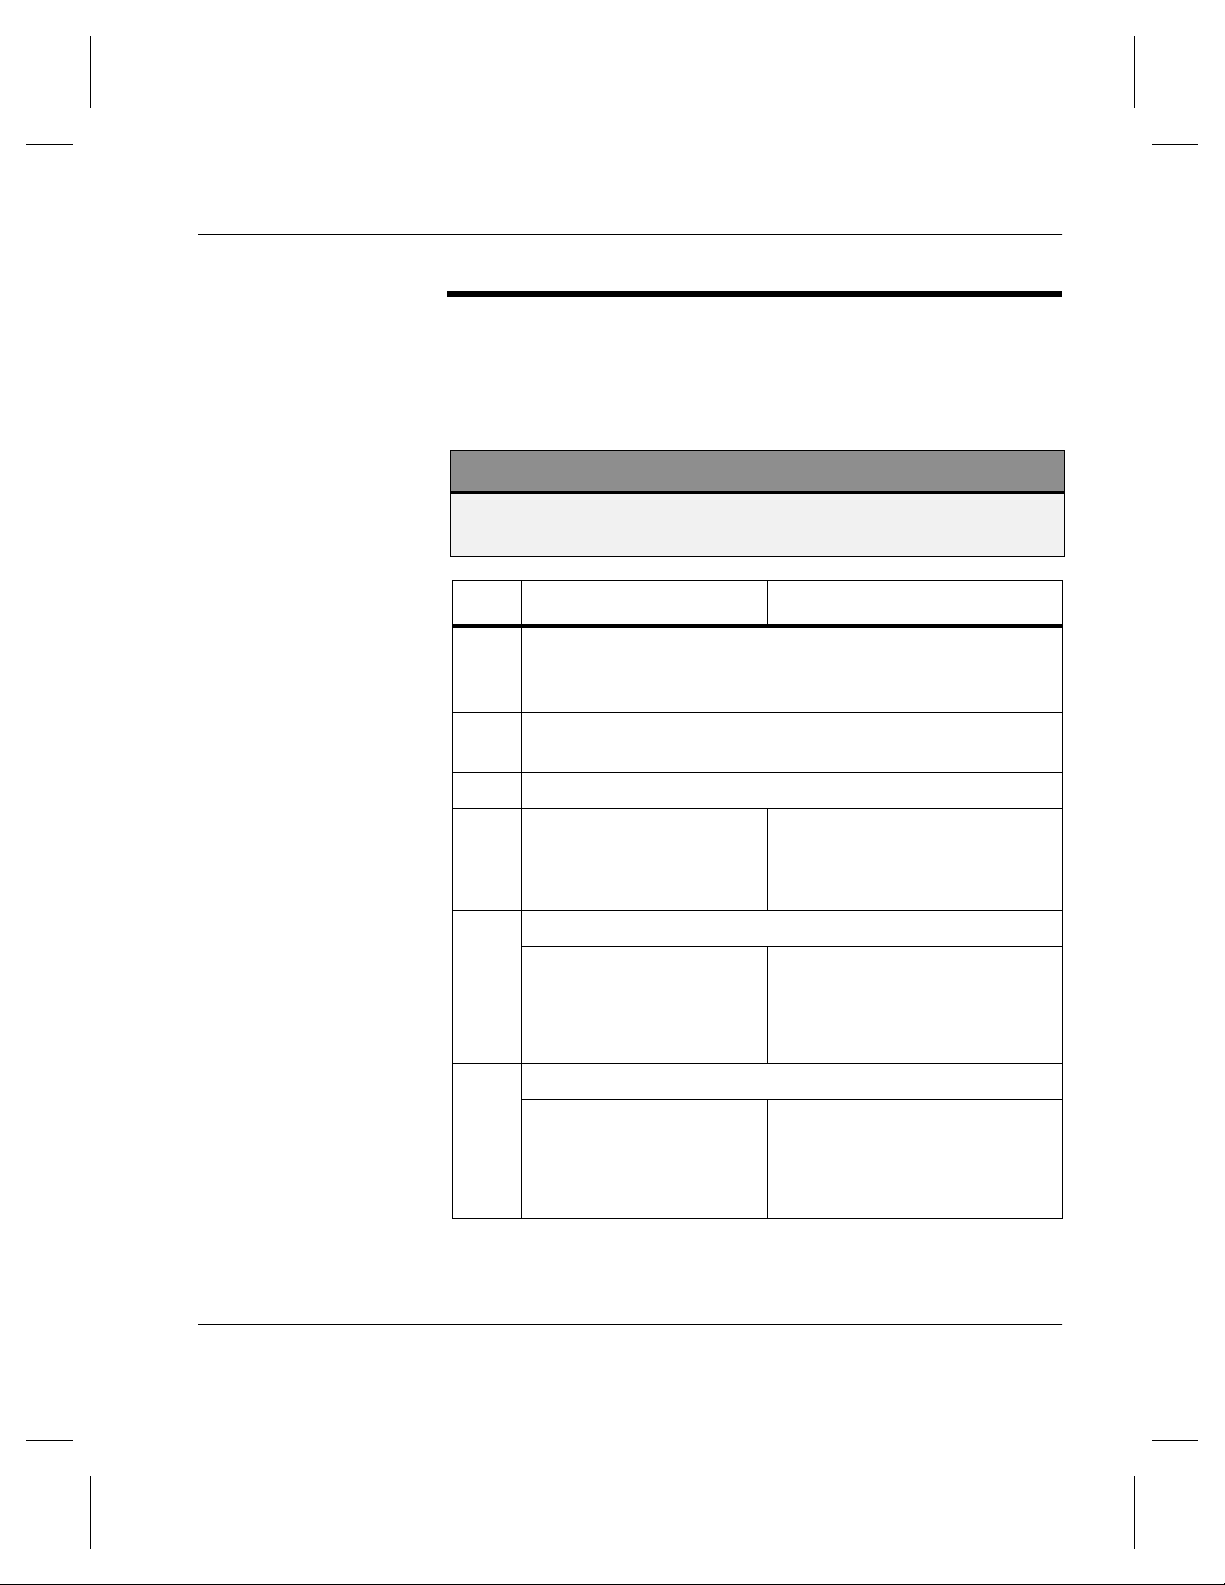
Remove Media From Library
The following steps describe how to remove a volume after it
has been written to by AMASS.
Note
For detailed information on the commands used in these steps, see
the "Command Reference" chapter.
Step Command Description
1 When you installed AMASS, you accept the default value
for the
parameter, which is 120 seconds (2 minutes).
2 Clients wrote files to a volume for example volume number
47.
omm_timeout (Offline Media Management)
Managing the AMASS File System
3 Log in as
4
volstat -i volumenumber
For example:
volstat -i 47
5A For SCSI-attached libraries:
voloutlet volumenumber
For example:
voloutlet 47
5B For network-attached libraries:
bulkoutlet -u
For example:
bulkoutlet 47
6-00028-01 Rev A Operational Tasks 2-23
amass or root.
Mark the specified volume
INACTIVE in the AMASS File
System Database.
Ejects the volume from the
library.
AMASS marks it OFFLINE in
the File System Database.
Ejects multiple volumes from
the library.
AMASS marks them OFFLINE
in the File System Database.
Page 74

Managing the AMASS File System
Step Command Description
5C If — for some reason — you manually remove a volume
from the library:
volloc -o volumenumber
For example:
volloc -o 47
Mark the volume OFFLINE(-o)
in the AMASS File System
Database.
2-24 Operational Tasks 6-00028-01 Rev A
Page 75

Read Offline Volume
Offline Media Manager (OMM) provides read-access to
volumes that have been removed from the library.
These volumes have a status of ACTIVE but OFFLINE in the
AMASS File System Database.
Optional Feature
Managing the AMASS File System
Note
AMASS supports only one stand-alone drive configured for
OMM. AMASS does not support two stand-alone drives
configured for OMM.
Optional Feature
Enable this optional feature with an authorization string obtained
from ADIC. To request a string, refer to the refer to the Site-Specific
Tasks chapter in
Installing AMASS
.
Prerequisites
To access offline media, the following items are required:
• Standalone drive daisy-chained to a library
• Enable Offline Media Manager with an authorization string
• When installing AMASS, use the omm_timeout parameter
For information on this parameter, refer to
“OMM_TIMEOUT” in Installing AMASS.
6-00028-01 Rev A Operational Tasks 2-25
Page 76

Managing the AMASS File System
Read Offline Volumes
• Use the Standalone Operator Interface to monitor load
requests. For information on this interface, see “sysop” on
page 3-93.
Note
For detailed information on the commands used in these
steps, see the "Command Reference" chapter.
The following steps describe how to read an offline volume:
Step Command Description
1
# sysop
OPERATOR LOAD VOLUME
2
REQUEST
Please load VOLUME NUMBER
47, SIDE A,LABEL pubs
into JUKEBOX #2 DRIVE #1
~
Press RETURN when LOADED:
3 You have 2 minutes to load volume 47 into the mailslot on
the standalone drive and press <Return>.
If the volume is not loaded within the time period, the
request fails and AMASS displays an error.
If 120 seconds is not long enough, increase the
Start the Standalone
Operator Interface.
AMASS receives a
request to read a file on
volume 47.
AMASS checks the File
System Database and
finds that volume is
OFFLINE so the
Standalone Operator
Interface prompts you to
load volume 47, side A,
into a standalone drive.
omm_timeout parameter with the installamass
script.
4 <Control-C> Exit the interface.
2-26 Operational Tasks 6-00028-01 Rev A
Page 77

Managing the AMASS File System
The sysop interface used by OMM creates a /tmp/sysop.out
file that contains entries similar to those shown in the following
example. A customer can link their own functions into OMM to
perform additional processing on each mount call by using
either the sysop.out file or the sysop_print.o file.
UNMOUNT
VOLNO xx SIDE A
LABEL user_name
JUKE n DRIVE nn
MOUNT REQUEST
VOLNO xxx SIDE A
LABEL user_name
JUKE n DRIVE nnn
6-00028-01 Rev A Operational Tasks 2-27
Page 78

Managing the AMASS File System
Return Media Without Starting AMASS
To return media in a drive to its home storage slot without
starting AMASS, perform the steps in the following table.
Note
For detailed information on the commands used in these steps,
see the "Command Reference" chapter.
Step Command Description
su amass
1
/usr/amass/daemons/amass
2
recovery -s
The user must be amass
when running the
amassrecovery utility.
The -s option returns
media in a drive to its
home storage slot.
2-28 Operational Tasks 6-00028-01 Rev A
Page 79

Add Space to Volume Group
To add space to a volume group so AMASS can continue to
write to the volume group, do one of the following:
• Add volumes to the volume group.
• Create a space pool and enable the volume group to use the
space pool so AMASS can automatically add volumes to the
out-of-space volume group.
For volume group information, see “Volume Groups Defined”
on page 1-13.
Note
For detailed information on the commands used in these steps, see
the "Command Reference" chapter.
Managing the AMASS File System
Add Volumes
Step Command Description
1 Log in as amass or root.
volgroup
2
For example:
volgroup 42 121
6-00028-01 Rev A Operational Tasks 2-29
Assign additional media to the
volume group.
Volume number 42 is assigned
to volume group 121.
Page 80
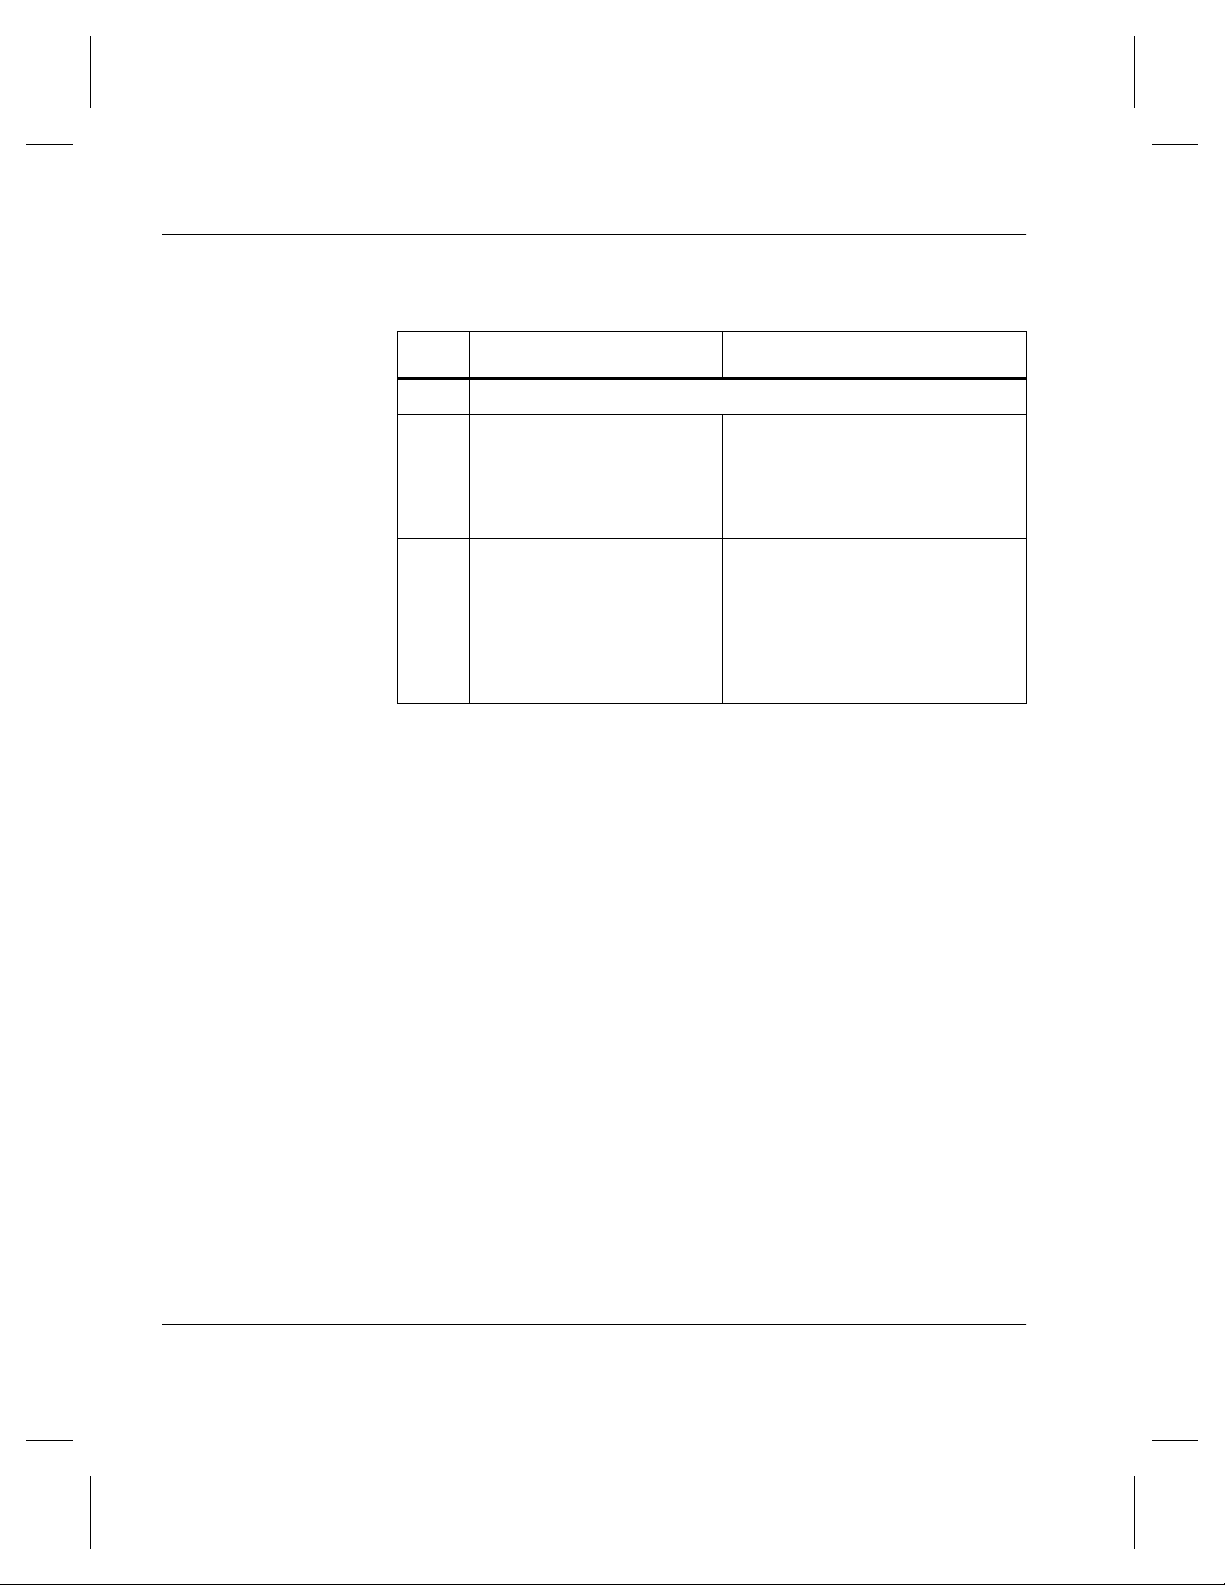
Managing the AMASS File System
Create Space Pool
Step Command Description
1 Log in as amass or root.
2
volgroup volumenumber
SP
For example:
volgroup 24 25 SP
3
vgpool -e volumegroup
For example:
vgpool -e 31
Assign a formatted volume to
the space pool.
Volume numbers 24 and 25 are
assigned to the space pool.
Enable a volume group to use
the space pool.
If volume group 31 runs out of
space, it takes a volume from
the space pool and writes
continue.
2-30 Operational Tasks 6-00028-01 Rev A
Page 81

Reassign Volume Group
To reassign new files in the amass_nt directory, as illustrated
in the following figure, to another volume group, use the
procedure in the following table.
Managing the AMASS File System
/archive
unix
datamgr
6
9
win_nt
amass
Volume numbers 3, 6 & 9
3
Volume Group 0
amass_nt
datamgr_nt
production
Volume numbers 2 & 4
4
2
Volume Group 33
Space pool is enabled
for this volume group.
Volume number 5
5
Volume Group 6
Note
For detailed information on the commands used in these steps, see
the "Command Reference" chapter.
6-00028-01 Rev A Operational Tasks 2-31
Page 82

Managing the AMASS File System
Step Command Description
1Log in as amass or root.
2
vollist -g volumegroup
For example:
vollist -g 33
3
vgroot volumegroup
For example:
vgroot 33
List the volumes in a volume
group (33).
The output lists volumes 2 and
4 in volume group 33.
List the root directory of all
subdirectories assigned to the
specified volume group.
Output lists the root directory
and subdirectory for volume
group 33 as:
/win_nt
/win_nt/amass
/win_nt/datamgr
4 setvolgrp pathname
volumegroup
To reassign the
/amass_nt directory to
Reassign the root directory
(
/amass_nt) so any new data
is archived to a different
volume group (49).
volume group 49 instead
of 33, enter:
setvolgrp /amass_nt
49
5
volgroup volumenumber
volumegroup
Assign a volume (5) to a
volume group (49).
For example:
volgroup 5 49
2-32 Operational Tasks 6-00028-01 Rev A
Page 83

Activate the File System
To activate the AMASS file system, which allows AMASS file
system files to be accessed, use the procedure in the following
table.
Note
For detailed information on the commands used in these steps, see
the "Command Reference" chapter.
Step Command Description
1 Log in as amass or root.
amassstat -a
2
Managing the AMASS File System
ACTIVATE the AMASS file
system.
Any operations that were queued
will complete.
Inactivate the File System
To deactivate the AMASS file system, which allows you to
perform maintenance without intervention by users, perform the
procedure in the following table.
Step Command Description
1 Log in as amass or root.
6-00028-01 Rev A Operational Tasks 2-33
Page 84

Managing the AMASS File System
Step Command Description
2 amassstat -u
For example:
amassstat -i -t 600
AMASS inactivate in 600
seconds, 10 minutes.
INACTIVATE the AMASS file
system.
AMASS generates an error if a
client attempts to access files
while the file system is
INACTIVE.
If files were waiting in the
cache for more space to be
added to a volume group,
AMASS prints a warning
message and maintains these
files until the file system is
reactivated and space is made
available.
2-34 Operational Tasks 6-00028-01 Rev A
Page 85

Modify Configuration File
Change the AMASS library configuration in response to the
following circumstances if you:
• change a library’s SCSI or RS-232 address
• upgrade or downgrade a library to a different model or
vendor and you receive a new authorization string from your
AMASS vendor
• change the number of drives in a library
• add a new library to the configuration and you receive a new
authorization string from your AMASS vendor
• resize or move the cache space
• change configuration values
Managing the AMASS File System
To modify the AMASS library configuration, use the procedure
in the following table.
Note
For detailed information on the commands used in these steps, see
the "Command Reference" chapter.
6-00028-01 Rev A Operational Tasks 2-35
Page 86

Managing the AMASS File System
Step Command Description
1Log in as amass or root.
2
sysperf [updateinterval] To make sure there are no
pending write requests in
the AMASS queue, view
the queue with the
sysperf command. Log in
as root and enter the
command as shown in the
following steps. To stop the
sysperf command, use
<Control-C>.
Run only one sysperf
command at a time.
cd /usr/amass/tools
3
./amass_atboot -d
4 Reboot the UNIX server and AMASS will not automatically
start.
Disable AMASS at system
startup.
cd /usr/amass/scripts
5
./installamass
Rerun the installamass
script and make the
necessary configuration
changes.
6 Reboot the system for the changes to take effect.
<AMASS_W_9031>: AMASS
7
configuration has been
changed...checkpoint
area is invalid
If you change any of the
AMASS cache-related
configuration parameters,
this error message may
appear after AMASS
restarts. Under these
circumstances, this
message can be ignored
2-36 Operational Tasks 6-00028-01 Rev A
Page 87

MAXIOSZ Changes
Managing the AMASS File System
If you want to change the MAXIOSZ, perform the following
steps:
Step Command
1 Log in as amass or root.
2 Remove your current Backup Volume (containing a backup
of the AMASS File System Database and transaction file)
from the library, label it with the “old”
store the volume in a safe place.
3 Upgrade to the current version of AMASS.
4 Immediately create a new Backup Volume with the
amassbackup command.
MAXIOSZ value, and
5 Label the new Backup Volume with the “new”
value.
6 To recover data on the old Backup Volume, return the
MAXIOSZ parameter on AMASS to the old setting before
attempting to read the old Backup Volume
MAXIOSZ
6-00028-01 Rev A Operational Tasks 2-37
Page 88

Managing the AMASS File System
NOTES
2-38 Operational Tasks 6-00028-01 Rev A
Page 89

3
Command
Reference
Page 90

Managing the AMASS File System
NOTES
3-2 Command Reference 6-00028-01 Rev A
Page 91
Commands
Managing the AMASS File System
The commands described in this chapter are located in the
directories listed in the following table. Specify this path in the
system administrator’s login PATH variable.
Command Login Path
sysop amass
Syntax
Use in Scripts
all other
commands
Caution
ADIC recommends that you control the execution privileges for all
commands as appropriate for the desired security level at your site.
amass
root
/usr/amass/bin
The command syntax is the same as standard UNIX style
commands. The options shown in square brackets ( [ ] ) in this
chapter are optional; all others are required.
For unattended operation, set up the cron file to run the
AMASS commands. Similarly, to automate tasks, all the
AMASS commands can be run from within a script. Make sure
you check the return codes of the messages. Return codes are
described in the following table:
6-00028-01 Rev A Command Reference 3-3
Page 92

Managing the AMASS File System
Return Code Description
-1 error
all other values success
3-4 Command Reference 6-00028-01 Rev A
Page 93

adf
Options
Managing the AMASS File System
View statistics for all volume groups in the AMASS File
System Database.
/usr/amass/bin
./adf
[-u]
[-hrV]
Option Description
-h Display a message describing the output
-r
(defaults to list the
first path
encountered in the
Database)
-u Usage statement
-V
(defaults to print and
underline column
titles)
6-00028-01 Rev A Command Reference 3-5
View all relative paths for this volume
group
Do not print and underline the column
titles in the output.
Non-printed column titles are useful if you
generate reports with UNIX utilities, like
awk, sort, and sed.
Page 94

Managing the AMASS File System
Example
Step 1. Log in as either amass or root.
# su root
Step 2. See an example of the output in the following
illustration:
The -r option lists 2 directories (techpubs and
swtest) assigned to volume group 100.
# adf -r
Volume Group Size Used Avail Volumes Rooted On
------------ ----- ----- ----- -------- -------0 128795 128700 48823 1 N/A
100 128795 11412 16274 3 swdev
3 techpubs
101 39006 894 36529 1 swtest
104 78012 4426 57869 2 support
Output Fields Defined
The following fields are generated by this command.
Field Description
Volume Group Volume group assignment
Valid assignments are a numeric value, 1
through 2047.
Size Total size of this volume group in MB
Used Amount of space, in MB, occupied by files in this
volume group
3-6 Command Reference 6-00028-01 Rev A
Page 95

Managing the AMASS File System
Field Description
Avail Amount of space, in MB, available in this volume
group
Volumes Number of volumes assigned to this volume
group
Rooted On Directory assigned to this volume group
6-00028-01 Rev A Command Reference 3-7
Page 96

Managing the AMASS File System
amassbackup
Back up to a Backup Volume in either a library or a standalone
drive the following files:
• File System Database (/usr/filesysdb)
• Journal (/usr/filesysdb/journal)
Note
When an external tape device is used to backup the AMASS
database (with -d flag) amassbackup will always unload the tape
from the drive after successful backup completion.
While the backup is being completed, the Database is locked.
Therefore, client requests cannot be satisfied.
Task
Copy files to Backup Volume in a
library.
Copy files to Backup Volume in a
standalone drive.
Back up the Journal (transaction logs)
located in
When backup completes, AMASS
truncates the Journal.
Back up the AMASS Database located
in
/usr/filesysdb.
3-8 Command Reference 6-00028-01 Rev A
/usr/filesysdb/journal.
Full
Backup
yes yes
yes no
yes yes
yes no
Partial
Backup
Page 97

Prerequisites
Options
Managing the AMASS File System
Before using this command, use the vollist command to make
sure the Backup Volume has the following characteristics:
• Volume number 1
• Formatted (not marked “U” for unformatted)
• Inactive “I” status
•In the last home storage slot or last position, in the first
library. The last slot (for SCSI-attached storage devices) or
the last barcode position (for network-attached storage
devices) is defined as what is listed by the medialist
utility. For information on this utility, see “medialist” on
page 4-33.
/usr/amass/bin
./amassbackup
[-uv]
[-f]
[-d tapedevice]
6-00028-01 Rev A Command Reference 3-9
Page 98

Managing the AMASS File System
Option Definition
For libraries only:
no options Perform a partial backup; back up just the
Journal file to a Backup Volume in a
library.
-f Perform a full back up of the Database
and Journal files to a Backup Volume in
either a library or standalone drive.
-u Usage statement
-v Verbose messages
For standalone drive only:
-d tapedevice Enter the standalone tape device that will
write to the Backup Volume. For example,
-d
/dev/rst0
.
Perform a full back up of the Database
and Journal to a Backup Volume in a
standalone drive.
Example
Step 1. Log in as either amass or root.
# su root
Step 2. To perform a full backup to a volume with verbose
information, enter the following options:
# amassbackup -fv
3-10 Command Reference 6-00028-01 Rev A
Page 99

Additional Information
Managing the AMASS File System
For more information, see “Database and Journal Backups” on
page 2-3.
6-00028-01 Rev A Command Reference 3-11
Page 100

Managing the AMASS File System
amassreport
Report file system information. The following types of reports
can be generated:
• Formatted
Column titles are printed at the top of each page.
• Raw
Although titles are not printed, data appears in the same
sequence as found in the formatted report and is separated
by tabs. A raw report is useful if you generate reports with
UNIX utilities, like awk, sort, and sed.
Generated Column Titles
Both formatted reports and raw reports generate data under the
topics listed in the following table. The sequence of the topics
cannot be changed.
Topics Description
Name Name of file
Parent Record ID of parent
Last Accessed Last accessed date on timestamp
Mode Permission IDs
Size Size of file in MB
File ID File number
UID User ID
GID Group ID
3-12 Command Reference 6-00028-01 Rev A
 Loading...