

Page 1
StorNext 3.0 Upgrade Guide
Introduction 3
Getting Ready to Upgrade 3
Running the Pre-Installation Script 5
Before You Begin..................................................................................................5
Running snPreInstall...........................................................................................6
Interpreting snPreInstall Output .......................................................................6
Upgrading to StorNext 3.0 (SNFS and SNSM) 7
Upgrading to StorNext 3.0 (SNFS Only) 8
Upgrading SNFS on Linux and Unix................................................................9
Upgrading SNFS on Windows...........................................................................9
Contacting Quantum 16
Document 6-01620-04 Rev A, March 2007 1
Page 2

StorNext 3.0 Upgrade Guide
Document 6-01620-04 Rev A
March 2007
Made in the USA.
Quantum Corporation provides this publication “as is” without warranty of any kind, either express or implied, including but not limited to
the implied warranties of merchantability or fitness for a particular purpose. Quantum Corporation may revise this publication from time to
time without notice.
®
© Copyright 2007 by ADIC
Your right to copy this document is limited by copyright law. Making copies or adaptations without prior written authorization of Quantum
Corporation is prohibited by law and constitutes a punishable violation of the law.
ADIC, Quantum, DLT, DLTtape, the Quantum logo, and the DLTtape logo are all registered trademarks of Quantum Corporation. SDLT and
Super DLTtape are trademarks of Quantum Corporation.
Other trademarks may be mentioned herein which belong to other companies.
. All rights reserved.
COPYRIGHT STATEMENT
TRADEMARK STATEMENT
2
Page 3

StorNext 3.0 Upgrade Guide
Document 6-01620-04 Rev A
March 2007
Introduction 0
This document provides information about upgrading to StorNext 3.0 from a
previous version. Instructions are provided for metadata controllers (MDCs)
running both StorNext File System (SNFS) and StorNext Storage Manager
(SNSM), as well as for MDCs running SNFS only.
For upgrade procedures, or to learn how to contact Quantum for assistance, see
the following sections:
• Getting Ready to Upgrade on page 3
• Running the Pre-Installation Script on page 5
• Upgrading to StorNext 3.0 (SNFS and SNSM) on page 7
• Upgrading to StorNext 3.0 (SNFS Only) on page 8
• Contacting Quantum on page 16
Getting Ready to Upgrade 0
This section includes important information about upgrading to StorNext 3.0.
Review the following sections before upgrading:
• Upgrade Guidelines
• Converting a Metadata Controller Running IRIX
• Upgrading HA Systems
• Upgrading the Client Software
Upgrade Guidelines 0
Before upgrading StorNext, review the following upgrade guidelines:
• The trashcan feature has been removed in StorNext 3.0. Before upgrading to
StorNext 3.0, you must empty the trashcan on all file systems where this
feature is enabled. If the trashcan directories are not removed, the upgrade
will fail.
To empty the trashcan on a file system where it is enabled, change to the file
system directory (for example
prompt, type:
rm -rf TrashCan
Repeat this procedure for all file systems.
/stornext/snfs1). Then, at the command
• Before upgrading, make sure there is no I/O activity. On the StorNext home
page, the number of store candidates should be 0. For tape drives, make sure
no media is mounted and no read/write operations are being performed. If
there is I/O activity, wait for the I/O activity to complete before upgrading. If
you attempt to perform an upgrade during a period of high activity, the
upgrade may fail.
Introduction 3
Page 4
StorNext 3.0 Upgrade Guide
Document 6-01620-04 Rev A
March 2007
• Before upgrading, Quantum recommends reviewing system configuration
settings and performing a backup procedure to back up StorNext
configuration files.
• Before upgrading, Quantum recommends storing all files. (If you do not store
files prior to upgrading, Quantum recommends running a rebuild policy after
the upgrade.)
• Before upgrading, Quantum recommends making sure all tape drives are at
approved firmware levels. After upgrading, you may not be able to use
drives that are not running an approved firmware version.
• Because the metadata dump format has changed in StorNext 3.0, a metadata
dump is automatically performed during the upgrade process. Depending on
the size of the file system, this can extend the time required to complete the
upgrade.
• After upgrading, your StorNext license remains valid. You do not need to
request a new licence if the system ID does not change.
Converting a Metadata Controller Running IRIX 0
StorNext 3.0 does not support metadata controllers running the SGI IRIX
operating system. To upgrade to StorNext 3.0, MDCs running IRIX must be
converted to a supported operating system. This conversion must be performed
by Quantum Professional Services. For more information, or to schedule an IRIX
conversion, contact the Quantum Technical Assistance Center (see
Contacting
Quantum on page 16).
Note: The StorNext 3.0 client software continues to support IRIX.
Upgrading HA Systems 0
Upgrades for MDCs running in a High Availability (HA) Failover environment
must be performed by Quantum Professional Services. If your system is running
with failover enabled, contact the Quantum Technical Assistance Center (see
Contacting Quantum on page 16).
Upgrading the Client Software 0
To upgrade to the StorNext 3.0 client software on Linux and Unix systems, install
the new client software package. There is no need to uninstall previous versions
of the client software. For more information about installing the client software on
Linux and Unix, see the StorNext 3.0 Installation Guide.
To upgrade to the StorNext 3.0 client software on Windows, follow the procedure
in
Upgrading SNFS on Windows on page 9.
Getting Ready to Upgrade 4
Page 5

StorNext 3.0 Upgrade Guide
Document 6-01620-04 Rev A
March 2007
Running the Pre-Installation Script 0
The StorNext pre-installation script (snPreInstall) is included on the StorNext
installation CD. When you run
about your system. The pre-installation script uses this information to estimate
the amount of local disk space required for SNFS and SNSM support directories.
In addition, the script recommends the optimal locations for support directories.
StorNext uses five directories to store application support information. These
directories are stored locally on the metadata controller, except for the
directory, which is stored on the managed file system.
The StorNext support directories are described in Table 1.
snPreInstall, you are prompted for information
Backup
Table 1 StorNext Support
Directories
Support Directory Description
Database
/adic/database
Journal
/adic/database_jnl
Mapping
/adic/mapping_dir
Metadata
/adic/database_meta
Backup
/backup
Records information about where and how data files
are stored.
Records changes made to the database.
Contains index information that enables quick
searches on the file system.
Stores metadata dumps (backups of file metadata).
Contains configuration files and support data
required for disaster recovery.
Before You Begin 0 Before running the pre-installation script, be prepared to answer the following
questions:
• Is this an upgrade installation?
• What local file systems can be used to store support information?
• What version of StorNext will be installed?
• What is the maximum number of directories expected (in millions)?
• What is the maximum number of files expected (in millions)?
• How many copies will be stored for each file?
• How many versions will be retained for each file?
Note: Keep in mind that storage needs typically grow rapidly. Consider
increasing the maximum number of expected directories and files by a
factor of 2.5x to ensure room for future growth.
Running the Pre-Installation Script 5
Page 6

StorNext 3.0 Upgrade Guide
Document 6-01620-04 Rev A
Note: The pre-installation script ignores unmounted file systems. Before
running
snPreInstall, be sure to mount all local file systems that will
hold StorNext support information.
Running snPreInstall 0 To run the pre-installation script, use the StorNext installation CD.
1 Log on to the MDC as root.
2 Mount the StorNext installation CD and change to the CD root directory.
3 List the installation directories on the CD. At the command prompt, type:
ls -l
4 Identify the correct installation directory for your operating system and
hardware platform, and then change to that directory.
For example, for Red Hat Linux 4 running on an x86 64-bit platform, change
to the
RedHat40AS_26x86_64 directory.
5 Run the script. At the command prompt, type:
March 2007
Figure 1 Pre-Installation Script
./snPreInstall
The pre-installation script runs (figure 1).
6 Follow the onscreen instructions, and answer each question when prompted.
The script outputs results based on the information you entered.
Interpreting snPreInstall Output
After you enter all requested information, the pre-installation script outputs the
following results:
0
• Estimated disk space required for each support directory.
• Recommended file system location for each support directory.
Running the Pre-Installation Script 6
Page 7

StorNext 3.0 Upgrade Guide
Document 6-01620-04 Rev A
March 2007
Tech Tip: For optimal performance, each support directory (other than
the
Backup directory) should be located on its own local file
system, and each local file system should reside on a separate
physical hard disk in the MDC.
There are three types of directory recommendations, as indicated by the text
preceding the recommendation. The three types of recommendations are
described in
Table 2.
Table 2 Pre-Installation Script
Recommendation Types
Type Description
RECOMMEND The suggested directory locations will result in
optimal system performance.
NOTE The suggested directory locations are valid but
system performance will not be optimal.
SPACE Additional hard disk space is required to store
the required support directories.
The pre-installation script bases directory location recommendations on the
following criteria:
• To aid disaster recovery, the Database and Journal directories should be
located on different file systems.
• For optimal performance, the Metadata directory should not be located on the
same file system as (in order of priority) the
Journal, Database, or Mapping
directory.
Note: Do not change the location of support directories manually.
Instead, use the installation script to specify the location for
support directories. For more information, see
Upgrading to
StorNext 3.0 (SNFS and SNSM) or Upgrading to StorNext 3.0
(SNFS Only).
Upgrading to StorNext 3.0 (SNFS and SNSM) 0
Use the StorNext installation script to upgrade to StorNext 3.0 on a metadata
controller running StorNext Storage Manager and StorNext File System. To
launch the script, use the correct StorNext installation CD for your operating
system.
1 Log on to the MDC as root.
2 Mount the StorNext installation CD and change to the CD root directory.
3 List the installation directories on the CD. At the command prompt, type:
ls -l
Upgrading to StorNext 3.0 (SNFS and SNSM) 7
Page 8

Figure 2 StorNext Installation
Script
StorNext 3.0 Upgrade Guide
Document 6-01620-04 Rev A
March 2007
4 Identify the correct installation directory for your operating system and
hardware platform, and then change to that directory.
For example, for Red Hat Linux 4 running on an x86 64-bit platform, change
to the
RedHat40AS_26x86_64 directory.
5 Run the script with the -upgrade option. At the command prompt, type:
./install.stornext -upgrade
The installation script runs (figure 2).
6 On the Upgrade Menu, type 2 and press <Enter>.
The StorNext installation script runs and displays the current progress of the
upgrade.
Note: To customize the installation, select option 1 on the Upgrade
Menu. For more information about changing configuration
options, see the StorNext 3.0 Installation Guide.
7 When the upgrade is complete, press <Enter> to return to the Main Menu.
8 To exit the installation script, type 4 and press <Enter>.
9 Run a rebuild policy.
Note: Backups are run on some operating systems immediately
following the upgrade procedure. Other operating systems run the
backup after the next reboot. These backups trigger a metadata
dump that (depending on the number of files and the type of
hardware) can cause backups to take several hours.
Upgrading to StorNext 3.0 (SNFS Only) 0
To upgrade to StorNext 3.0 on a metadata controller running StorNext File
System (without Storage Manager), use the appropriate method for your
operating system:
• Upgrading SNFS on Linux and Unix
• Upgrading SNFS on Windows
Upgrading to StorNext 3.0 (SNFS Only) 8
Page 9

StorNext 3.0 Upgrade Guide
Document 6-01620-04 Rev A
March 2007
Upgrading SNFS on Linux and Unix
Figure 3 SNFS Installation
Script
Use the SNFS installation script to upgrade to StorNext 3.0 on a metadata
controller running StorNext File System (without Storage Manager). To launch
0
the script, use the correct StorNext installation CD for your operating system.
1 Log on to the MDC as root.
2 Mount the StorNext installation CD and change to the CD root directory.
3 List the installation directories on the CD. At the command prompt, type:
ls -l
4 Identify the correct installation directory for your operating system and
hardware platform, and then change to that directory.
For example, for Red Hat Linux 4 running on an x86 64-bit platform, change
to the
RedHat40AS_26x86_64 directory.
5 Run the script with the -upgrade option. At the command prompt, type:
./install.snfs -upgrade
The installation script runs (figure 3).
Upgrading SNFS on Windows
6 On the Upgrade Menu, type 2 and press <Enter>.
The SNFS installation script runs and displays the current progress of the
upgrade.
Note: To customize the installation, select option 1 on the Upgrade
Menu. For more information about changing configuration
options, see the StorNext 3.0 Installation Guide.
7 When the upgrade is complete, press <Enter> to return to the Main Menu.
8 To exit the installation script, type 4 and press <Enter>.
The StorNext setup wizard guides you through the process of upgrading
StorNext File System on a metadata controller running Windows 2000 or
0
Windows 2003 Server. (The installation wizard also installs the client software on
the MDC.)
Before upgrading StorNext, remove any previously installed versions (see
Removing a Previous Version of StorNext).
When you are ready, use the setup wizard to upgrade StorNext (see Running the
Setup Wizard).
(Optional) After upgrading, restore the previous client configuration (see
Restoring a Previous Client Configuration on page 13).
Upgrading to StorNext 3.0 (SNFS Only) 9
Page 10

Figure 4 StorNext Installation
Window: Remove StorNext
StorNext 3.0 Upgrade Guide
Document 6-01620-04 Rev A
March 2007
Note: You must log on as an Administrator to install StorNext.
Removing a Previous Version of StorNext 0
If a previous version of StorNext exists on the system, you must remove it before
installing the new version.
1 Insert the StorNext installation CD.
2 Browse to the root directory of the installation CD and double-click the file
SnfsSetup32.exe (32-bit systems) or SnfsSetup64.exe (64-bit systems).
The StorNext Installation window appears (figure 4).
3 Click Remove StorNext.
A dialog box appears informing you that the current client configuration has
been saved.
4 Note the name and location of the saved configuration file, and then click OK.
5 If prompted, click Yes to continue, and then click OK to finish the removal.
6 When the removal is complete, click Yes to reboot the system.
Note: After installing the new version of StorNext, you can restore the saved
client configuration (see
Restoring a Previous Client Configuration on
page 13).
Running the Setup Wizard 0
To launch the setup wizard, use the correct StorNext installation CD for your
operating system.
1 Insert the StorNext installation CD.
2 Browse to the root directory of the installation CD and double-click the file
SnfsSetup32.exe (32-bit systems) or SnfsSetup64.exe (64-bit systems).
The StorNext Installation window appears (figure 5).
Upgrading to StorNext 3.0 (SNFS Only) 10
Page 11

Figure 5 StorNext Installation
Window: Install StorNext
Figure 6 SNFS Setup:
Welcome
StorNext 3.0 Upgrade Guide
Document 6-01620-04 Rev A
March 2007
3 Click Install StorNext to begin installation.
The StorNext setup wizard appears (figure 6).
Figure 7 SNFS Setup: EndUser License Agreement
4 Click Next to continue.
The License Agreement window appears (figure 7).
Upgrading to StorNext 3.0 (SNFS Only) 11
Page 12

Figure 8 SNFS Setup:
Customer Information
StorNext 3.0 Upgrade Guide
Document 6-01620-04 Rev A
March 2007
5 Click the option to accept the license agreement, and then click Next to
continue.
The Customer Information window appears (figure 8).
Figure 9 SNFS Setup: Choose
Setup Type
6 Type your name and the name of your company or organization in the boxes,
and then click
Next to continue.
The Choose Setup Type window appears (figure 9).
7 Click an installation option:
• Typical: (Recommended) Installs StorNext File System, client software,
and help files in the default location (
C:\Program Files\StorNext).
• Custom: Lets you choose which components to install and specify an
installation location. When ready, click
Next.
• Complete: Same as a typical installation.
The Ready to Install window appears (figure 10).
Upgrading to StorNext 3.0 (SNFS Only) 12
Page 13
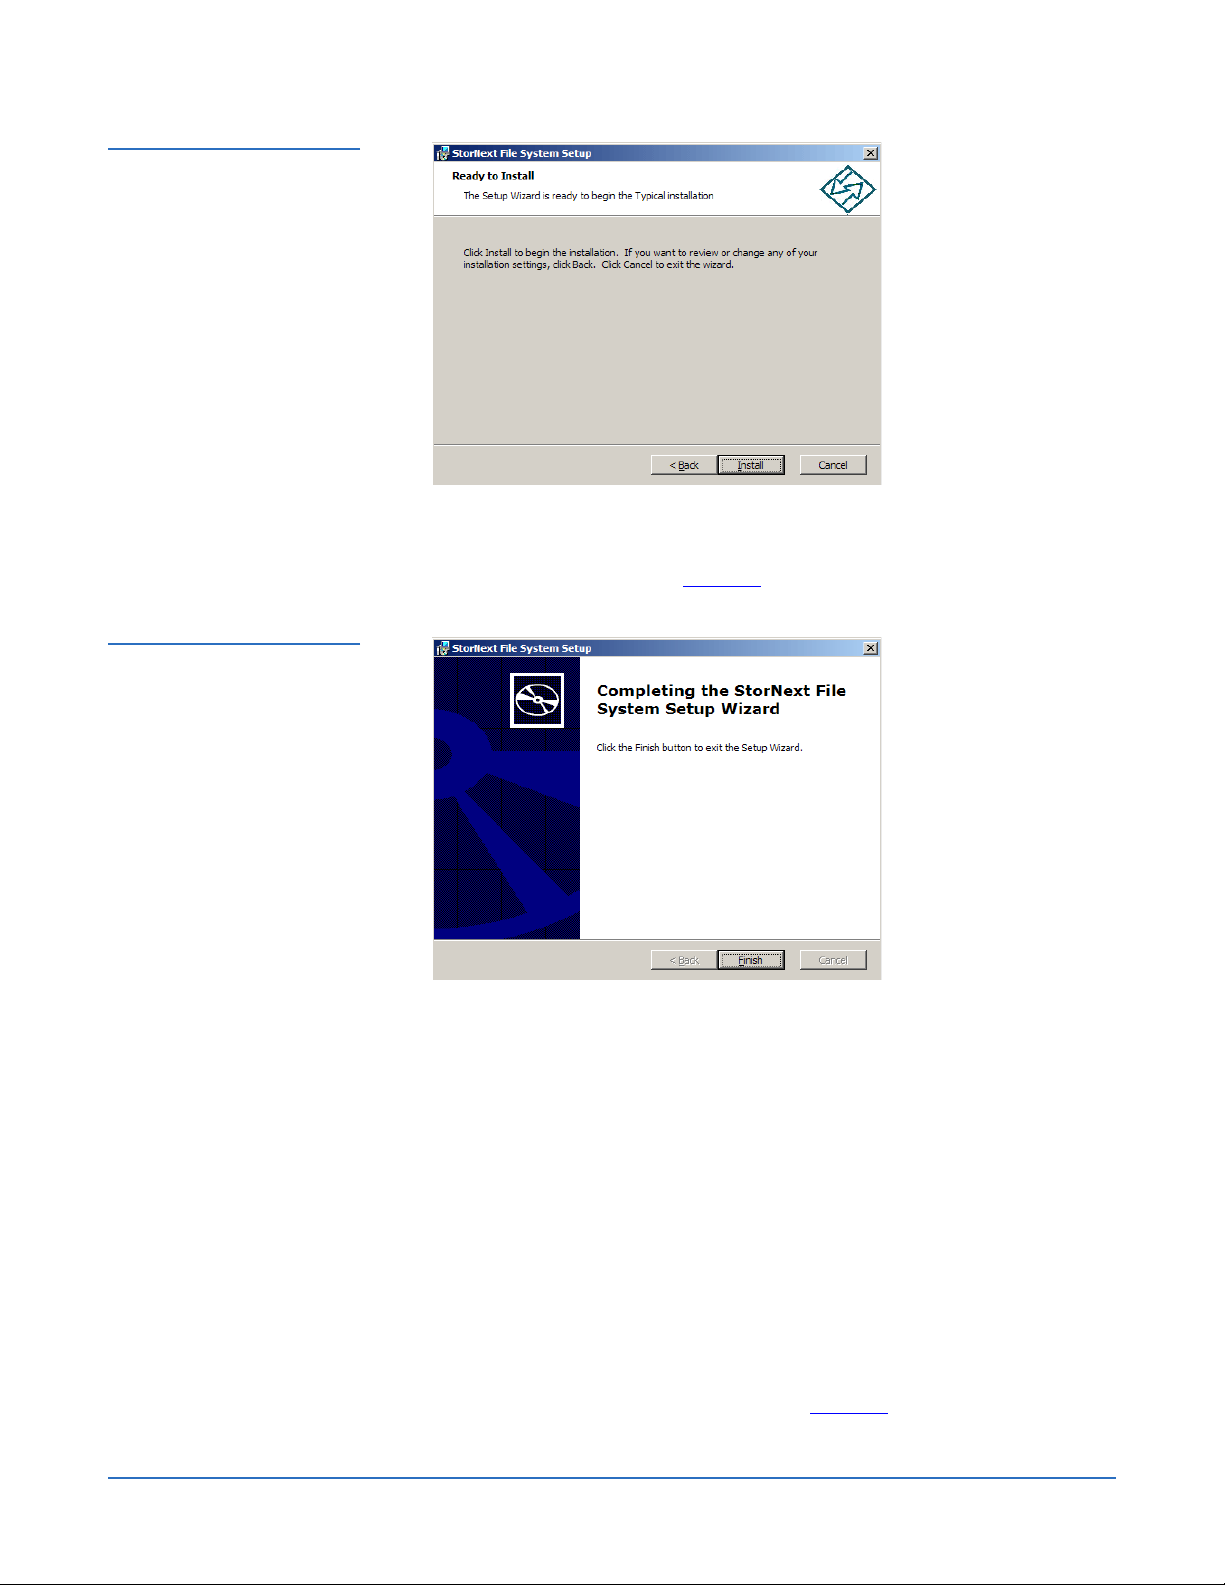
Figure 10 SNFS Setup: Ready
to Install
StorNext 3.0 Upgrade Guide
Document 6-01620-04 Rev A
March 2007
8 Click Install to continue.
Wait while the setup wizard installs StorNext. When installation is complete,
the
Finish window appears (figure 11).
Figure 11 SNFS Setup: Finish
9 Click Finish to close the setup wizard.
10 On the StorNext Installation window, click Exit.
You are prompted to reboot the system.
11 Click Yes to reboot.
Restoring a Previous Client Configuration 0
If you saved a client configuration file (for example, when removing a previous
version of StorNext), you can import it after installing StorNext. This configures
StorNext using the same settings as the previous installation.
1 Insert the StorNext installation CD.
2 Browse to the root directory of the installation CD and double-click the file
SnfsSetup32.exe (32-bit systems) or SnfsSetup64.exe (64-bit systems).
The StorNext Installation window appears (figure 12).
Upgrading to StorNext 3.0 (SNFS Only) 13
Page 14

Figure 12 StorNext Installation
Window: Configure StorNext
Figure 13 StorNext
Configuration Window
StorNext 3.0 Upgrade Guide
Document 6-01620-04 Rev A
March 2007
3 Click Configure StorNext.
The StorNext Configuration window appears (figure 13).
4 Click Import/Export Client Settings.
The Import/Export Client Configuration window appears (figure 14).
Upgrading to StorNext 3.0 (SNFS Only) 14
Page 15

Figure 14 Import/Export Client
Configuration Window
StorNext 3.0 Upgrade Guide
Document 6-01620-04 Rev A
March 2007
5 Under Import, click Browse. Locate the client configuration (*.reg) file to
import, and then click
Open.
Client configuration files saved during removal of a previous version of
StorNext are located in one the following directories:
• C:\SNFS\config\
• C:\Program Files\StorNext\config\
6 Click an option for handling current configuration settings:
• Merge with current configuration: The imported configuration is merged
with the current configuration settings.
• Replace current configuration: The imported configuration overwrites the
current configuration settings.
7 Click Import, and then click Yes to confirm.
A message appears informing you the configuration settings were
successfully added to the registry.
8 Click OK, and then click Quit to close the Import/Export Client Configuration
window.
Upgrading to StorNext 3.0 (SNFS Only) 15
Page 16

StorNext 3.0 Upgrade Guide
Document 6-01620-04 Rev A
March 2007
Contacting Quantum 0
More information about this product is available on the Customer Service Center
website at
contains a collection of information, including answers to frequently asked
questions (FAQs). You can also access software, firmware, and drivers through
this site.
To request a software upgrade, visit www.quantum.com/ServiceandSupport/
Upgrade/Index.aspx. For further assistance, or if training is desired, contact the
Quantum Technical Assistance Center:
www.quantum.com/ServiceandSupport. The Customer Service Center
North America
UK, France, and Germany
EMEA
World Wide Web
+1 800-284-5101
00800 4 QUANTUM
+44 1256 848 766
www.quantum.com/ServiceandSupport
Contacting Quantum 16
 Loading...