

Page 1

User's Guide
A515
A515
www.adi-deutschland.com
NEXT
Page 2

U.S.A.
Class B digital device pursuant to Part 15 of the FCC Rules.
BACK
NEXT
Page 3

Standards and Recommendations
Safety and Radio Interference Approvals
Conformity with the above basic requirements is certified by means of the CE marking on the product.
Manufacturer's Disclaimer
This product is designed in conformity with the following standards or other normative documents :
Safety : EN 60950 : 1992 + A1, A2, A3, A4, A11
EMC : EN 55022 : 1998, EN 55024 : 1998
EN 61000-3-2 : 1995+A1 : 1998+A2 : 1998
EN 61000-3-3 : 1995
to satisfy the basic requirements of Safety and EMC required by following Directives :
All responsibility is declined :
The manufacturer reserves the right to carry out modifications to the product described in this
documentation at any time and without notice.
EMC Directive 89/336/EEC
Low Voltage Directive 73/23/EEC & 93/68/EEC
If the product is stored, transported, installed, modified, or used in a way that is different from that
described in the documentation.
If the product is used in conditions different from those described in the documentation.
If any repair is carried out by unauthorised personnel.
For any damage caused by normal wear and tear, uncontrollable events and/or connection to devices
that are not original.
BACK
NEXT
Page 4

A515
15" TFT LCD Color Monitor
BACK
NEXT
4. Adjusting the picture ..................12/20
4-1. Using the On Screen Display ...........13/20
4-2. Direct access buttons ........................13/20
4-3. OSD Adjustments .............................14/20
5. Display power management ......16/20
Reducing power consumption ...............16/20
6. Troubleshooting ..........................17/20
7. Specifications ..............................20/20
1. Introduction ...................................1/20
2. Safety Information .......................1/20
3. Installing the monitor ..................4/20
3-1. Packing List .........................................4/20
3-2. Selecting a suitable location .............5/20
3-3. Connecting the monitor ....................5/20
USB hub ..............................................7/20
3-4. Setting the refresh rate .....................8/20
Preset Timing Table ............................9/20
3-5. User’s Environment ..........................10/20
VESA MOUNT’G ................................11/20
Page 5

A515
15" TFT LCD Color Monitor
1/20
BACK
NEXT
This manual contains instructions for installing and operating A515.
A515 is a highly ergonomic color display unit.
• 15" viewable XGA LCD
• Supporting full scan flicker-free picture quality
• With On Screen Display menus for user control
• 100-240V AC input voltage
• VESA DPMS (Display Power Management Signalling)
• VESA DDC1/2B compatibility
• High guality screen re-scaling capability
• Fast and accurate auto adjustment
• Most advanced image scaling
• USB (Universal Serial Bus) hub
• Supporting VESA Flat Panel Monitor Physical Mounting Interface
This Monitor has been engineered and manufactured to assure your safety.
You can prevent serious electrical shock and other hazards by keeping in mind
the following:
Do not place anything wet on the monitor or the power
cord. Never cover the ventilation openings with any
material and never touch them with metallic or
inflammable materials.
Page 6

A515
15" TFT LCD Color Monitor
2/20
BACK
NEXT
Avoid operating the monitor in extreme heat,
humidity or areas affected by dust.
Temperature : 5~35°C
Humidity : 30~80RH
Be sure to turn the monitor off before plugging the
power cord into the socket. Make sure that the power
cord and the other cords are securely and rightly
connected.
Overloaded AC outlets and extension cords are
dangerous, as are frayed power cords and broken
plugs, which may cause electric shock or fire. Call
your service technician for replacement.
Do not use sharp tools such as a pin or a pencil near
the monitor, as they may scratch the LCD surface.
Do not use a solvent, such as benzene, to clean the
monitor, as it will damage the LCD surface.
Page 7

A515
15" TFT LCD Color Monitor
• To avoid risk of electric shock, do not disassemble the display unit cabinet. The
unit is not user-serviceable. Remember to unplug the display unit from the
power outlet before cleaning.
• Do not use alcohol (methyl, ethyl or isopropyl) or any strong dissolvent. Do not
use thinner or benzene, abrasive cleaners or compressed air.
• Do not wipe the screen with a cloth or sponge that could scratch the surface.
• To clean your antistatic screen, use water and a special microfiber screen
cleaning tissue used in optical lens cleaning, or lightly dampen a soft, clean
cloth with water or a mild detergent.
• If the instructions above do not help in removing stains, contact an authorized
service agent.
3/20
BACK
NEXT
Page 8

A515
15" TFT LCD Color Monitor
4/20
BACK
NEXT
The following items should be found in the packaging.
Above power cord can be changed upon different voltage areas. Please
contact your dealer if anything is missing or damaged.
!
UK
America/Canada
Japan
Australia
Korea
Europe
South Africa
Power cord
Signal cable
AC/DC Power adapterUSB cable
Compact Disc
Page 9
A515
15" TFT LCD Color Monitor
5/20
BACK
NEXT
• Place the monitor at least 30cm from other electrical or heat-emitting
equipment and allow at least 10cm on each side for ventilation.
• Place the monitor in a position where no light shines directly onto or is
reflected on the screen.
• To reduce eye strain, avoid installing the display unit against a bright
background such as a window.
• Position the monitor so that the top of the screen is no higher than eye level.
• Position the monitor directly in front of you at a comfortable reading distance
(around 45 to 90cm)
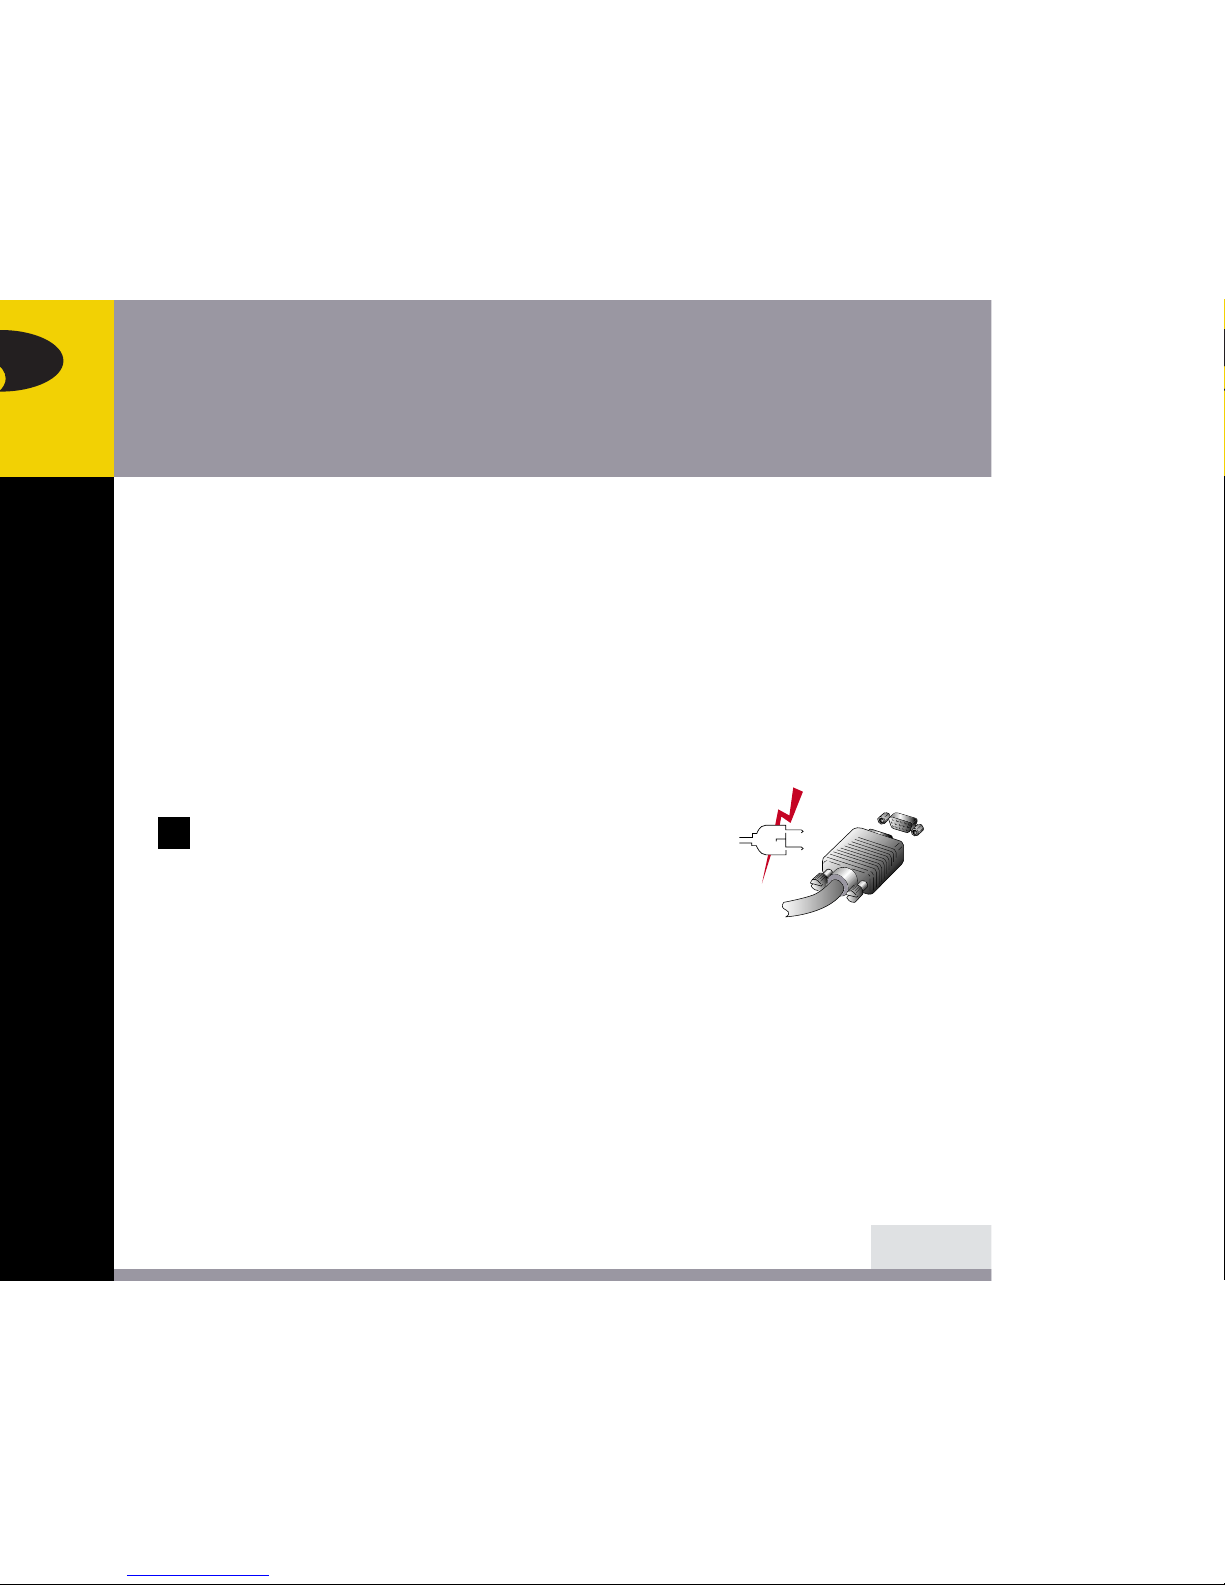
Before you start cabling your monitor, check that the
power is off on all units. To avoid any possibility of
electric shock, always connect your equipment to
properly earthed outlets.
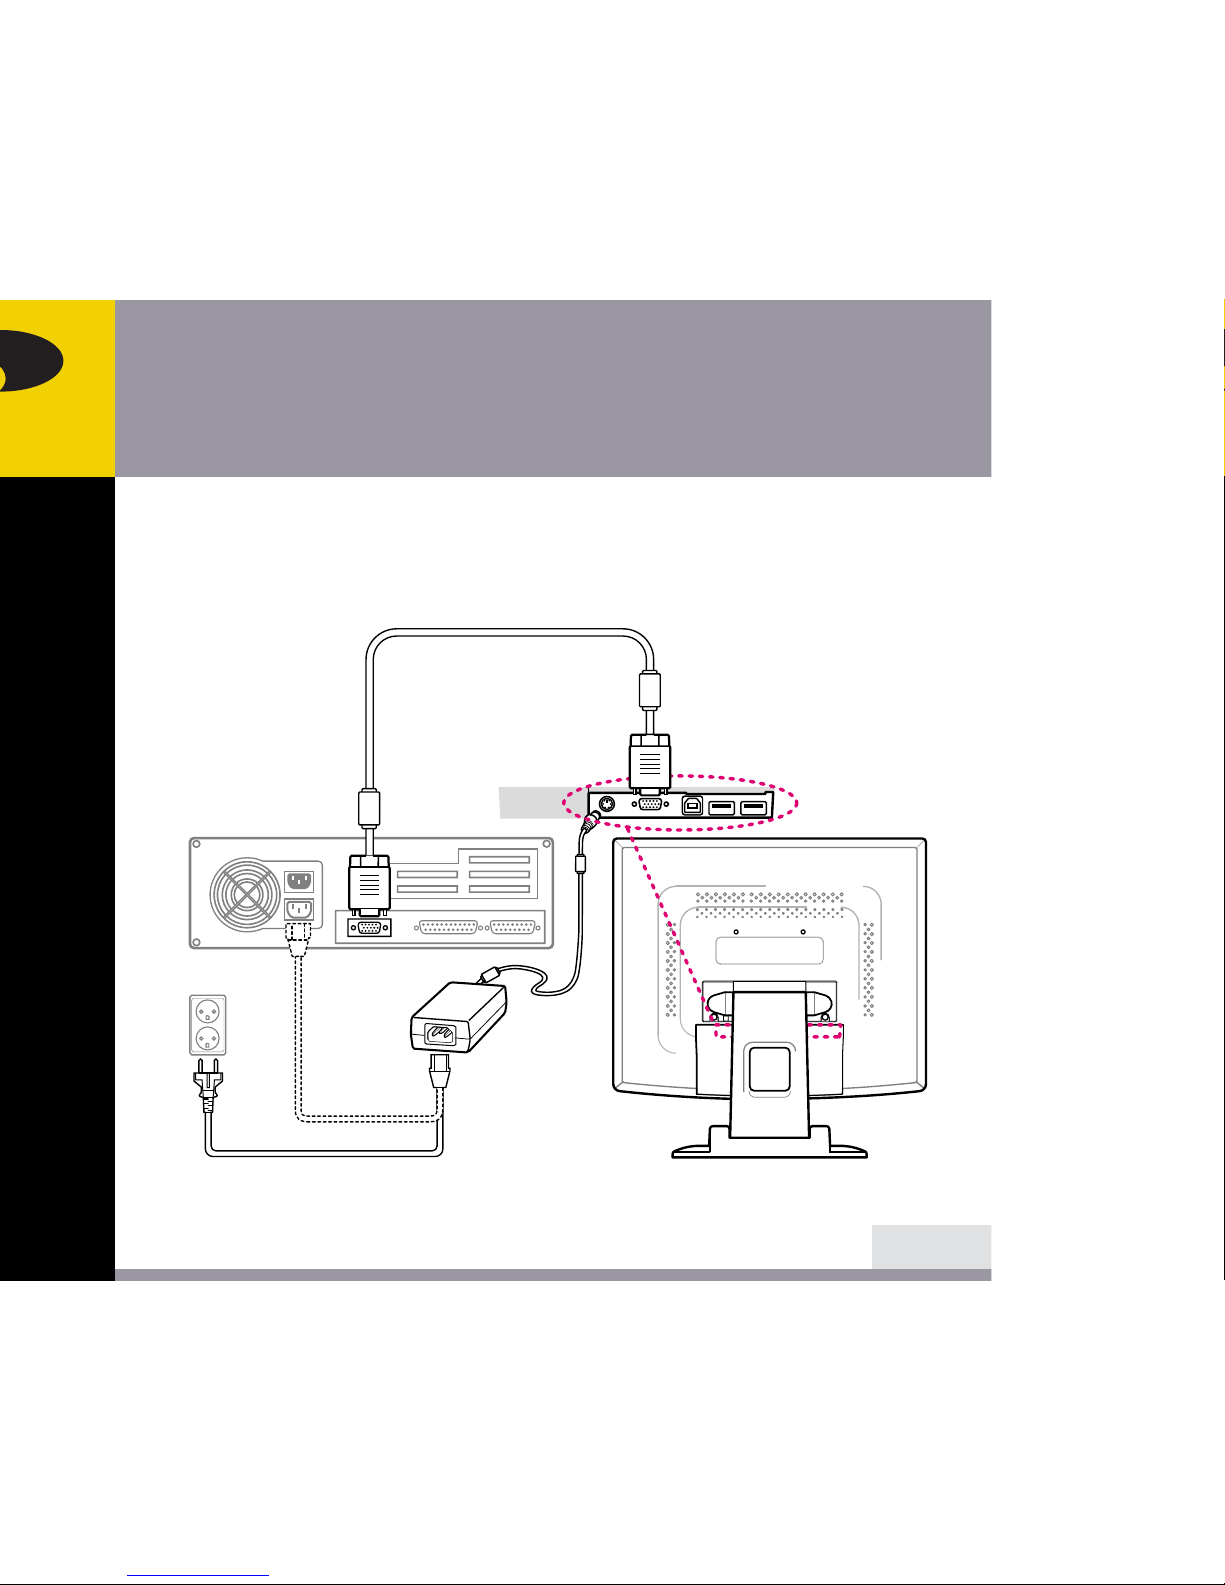
1. Insert the other 15-pin signal cable connector into the 15-pin VGA connection
on your computer and screw it down.
2. Plug the power cord connection to connection on the AC-DC Power adapter.
3. Plug the jack of the AC-DC Power adapter connection to connection on monitor.
4. Plug the other end of the power cord to your computer's main supply or to a
100V-240V earthed electrical outlet.
5. Turn on the monitor using the power switch and check that the power LED is
on. If not, repeat steps 1,2,3 and 4 or refer to the Troubleshooting section of
this guide.
!!
Page 10
A515
15" TFT LCD Color Monitor
6/20
BACK
NEXT
6. Turn on the power to the computer. The picture will appear within about 10
seconds. Adjust the picture to obtain optimum picture quality. See section
Adjusting the picture in this guide for more information.
Page 11
A515
15" TFT LCD Color Monitor
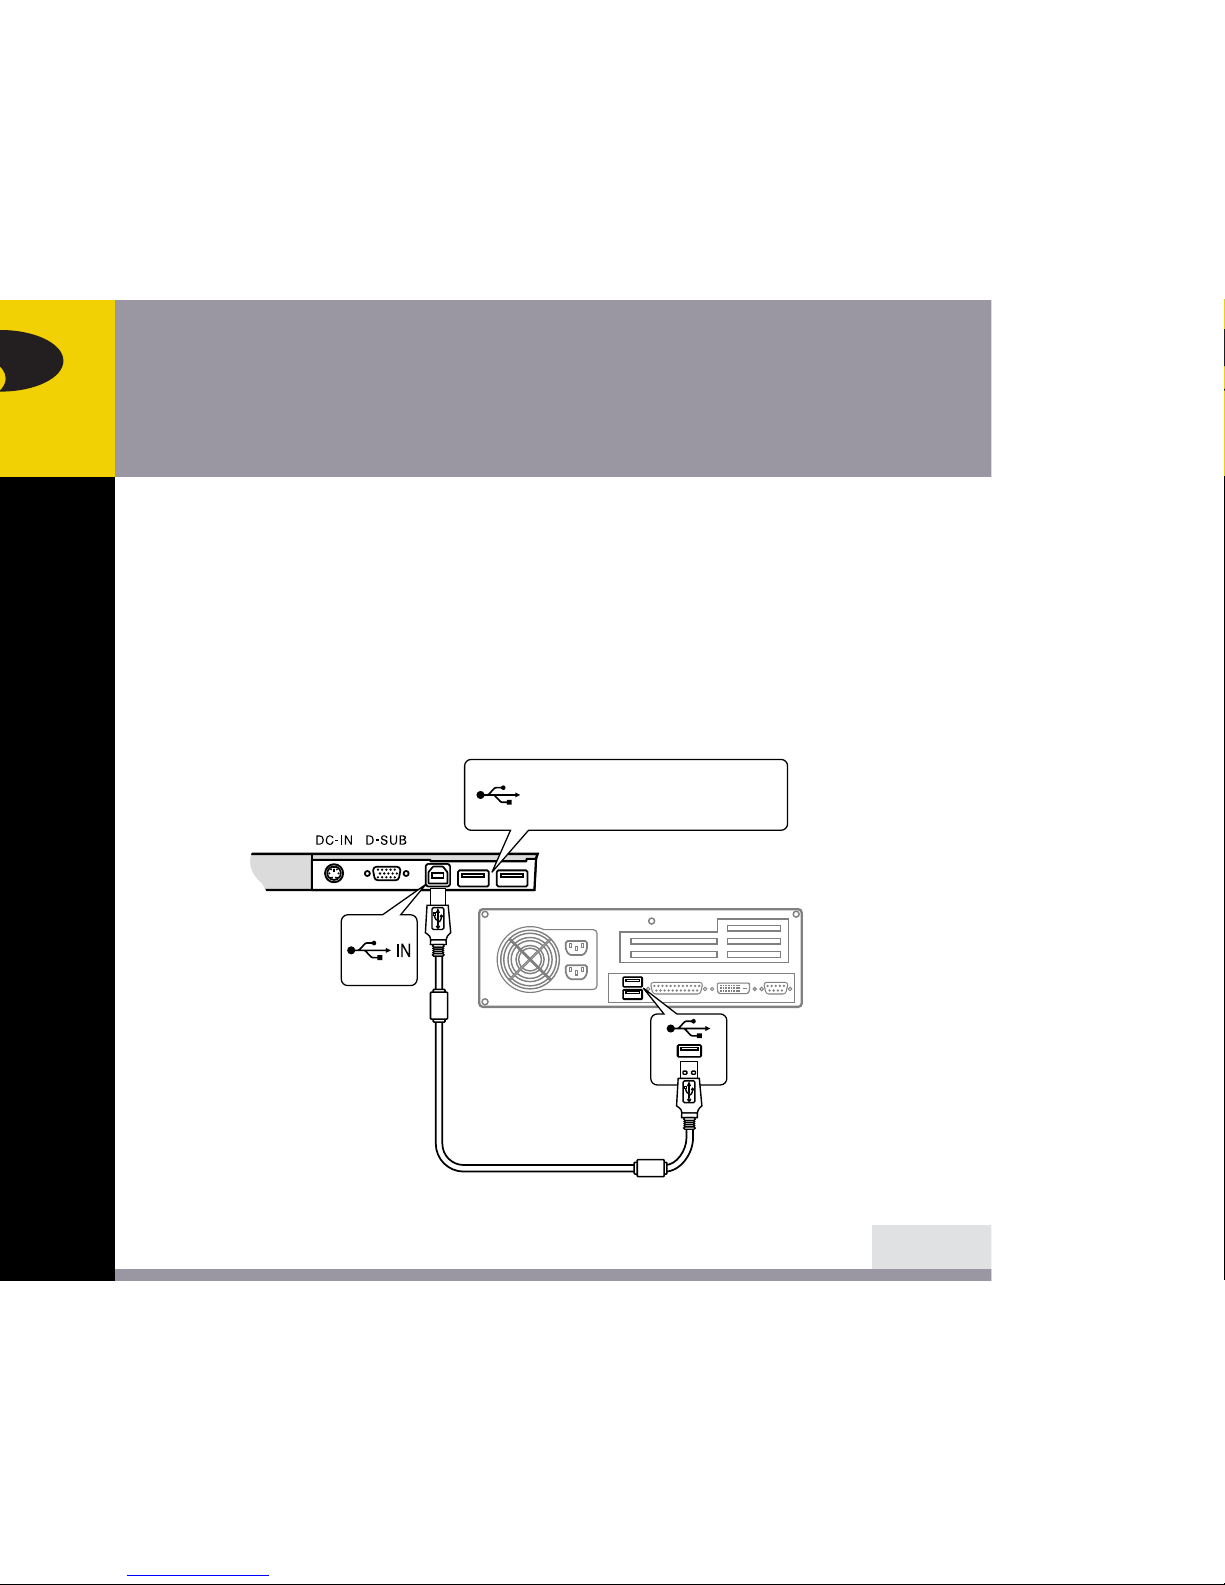
The USB hub(Bus-powered mode hub) have 1 upstream port and 2 downstream
ports. The upstream port can be connected to the root hub of host PC or other
downstream port. Two(2) downstream ports allow to connect another USB
device such as USB mouse, joystick, printer etc.
1) The maximum supply current of downstream port is 100mA each when
bus-powered mode hub.
2) To activate the USB hub, your host system should have USB capability.
7/20
BACK
NEXT
USB 2 downstream ports
Page 12
A515
15" TFT LCD Color Monitor
8/20
BACK
NEXT
Follow the instructions below to set your refresh rate in Windows 98/ME/XP/2000.
1. Go to the configuration window(Start-Settings-Configuration window).
2. Double click on the ‘Display’ icon.
3. Click on the ‘Settings’ tab.
4. Click on the ‘Advanced’ button.
5. Click on ‘Adapter’ and select 60Hz from the list.
6. Click on ‘Apply’ to accept the selected value.
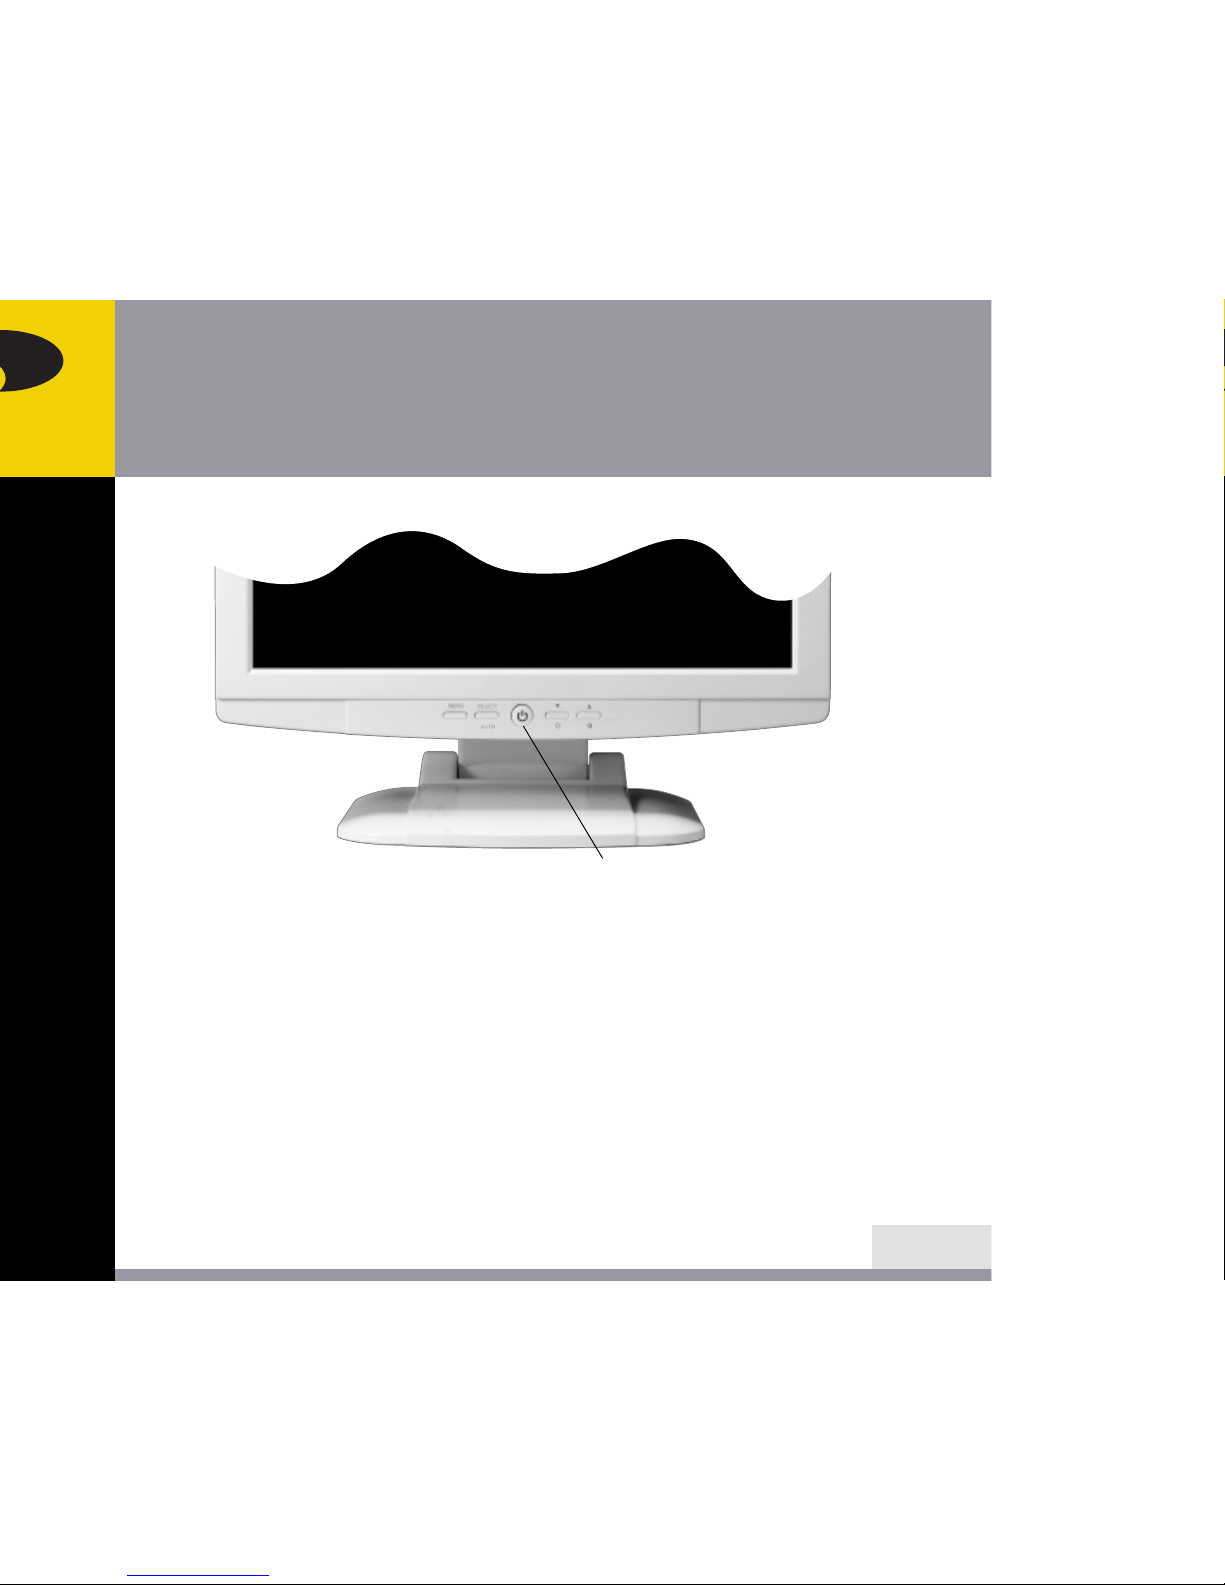
Power Switch / LED Indicator
Page 13

A515
15" TFT LCD Color Monitor
No.
1
2
3
4
5
6
7
8
Resolution
720
x
400
640
x
480
640
x
480
800 x 600
800
x
600
*1024 x 768
1024 x 768
1024 x 768
Horizontal Frequency
31.5 KHz
31.5 KHz
37.9 KHz
37.9 KHz
46.9 KHz
48.4 KHz
56.5 KHz
60.0 KHz
Refresh rate
70.1 Hz
59.9 Hz
72.8 Hz
60.3 Hz
75.0 Hz
60.0 Hz
70.1 Hz
75.0 Hz
* Recommended primary mode.
If the signal from the system doesn't equal to the preset timing mode, adjust
the mode with reference to the user guide of videocard because the screen
may not be displayed.
The recommended setting is a resolution of 1024x768 and a refresh rate of 60Hz.
9/20
BACK
NEXT
!!
Page 14
A515
15" TFT LCD Color Monitor
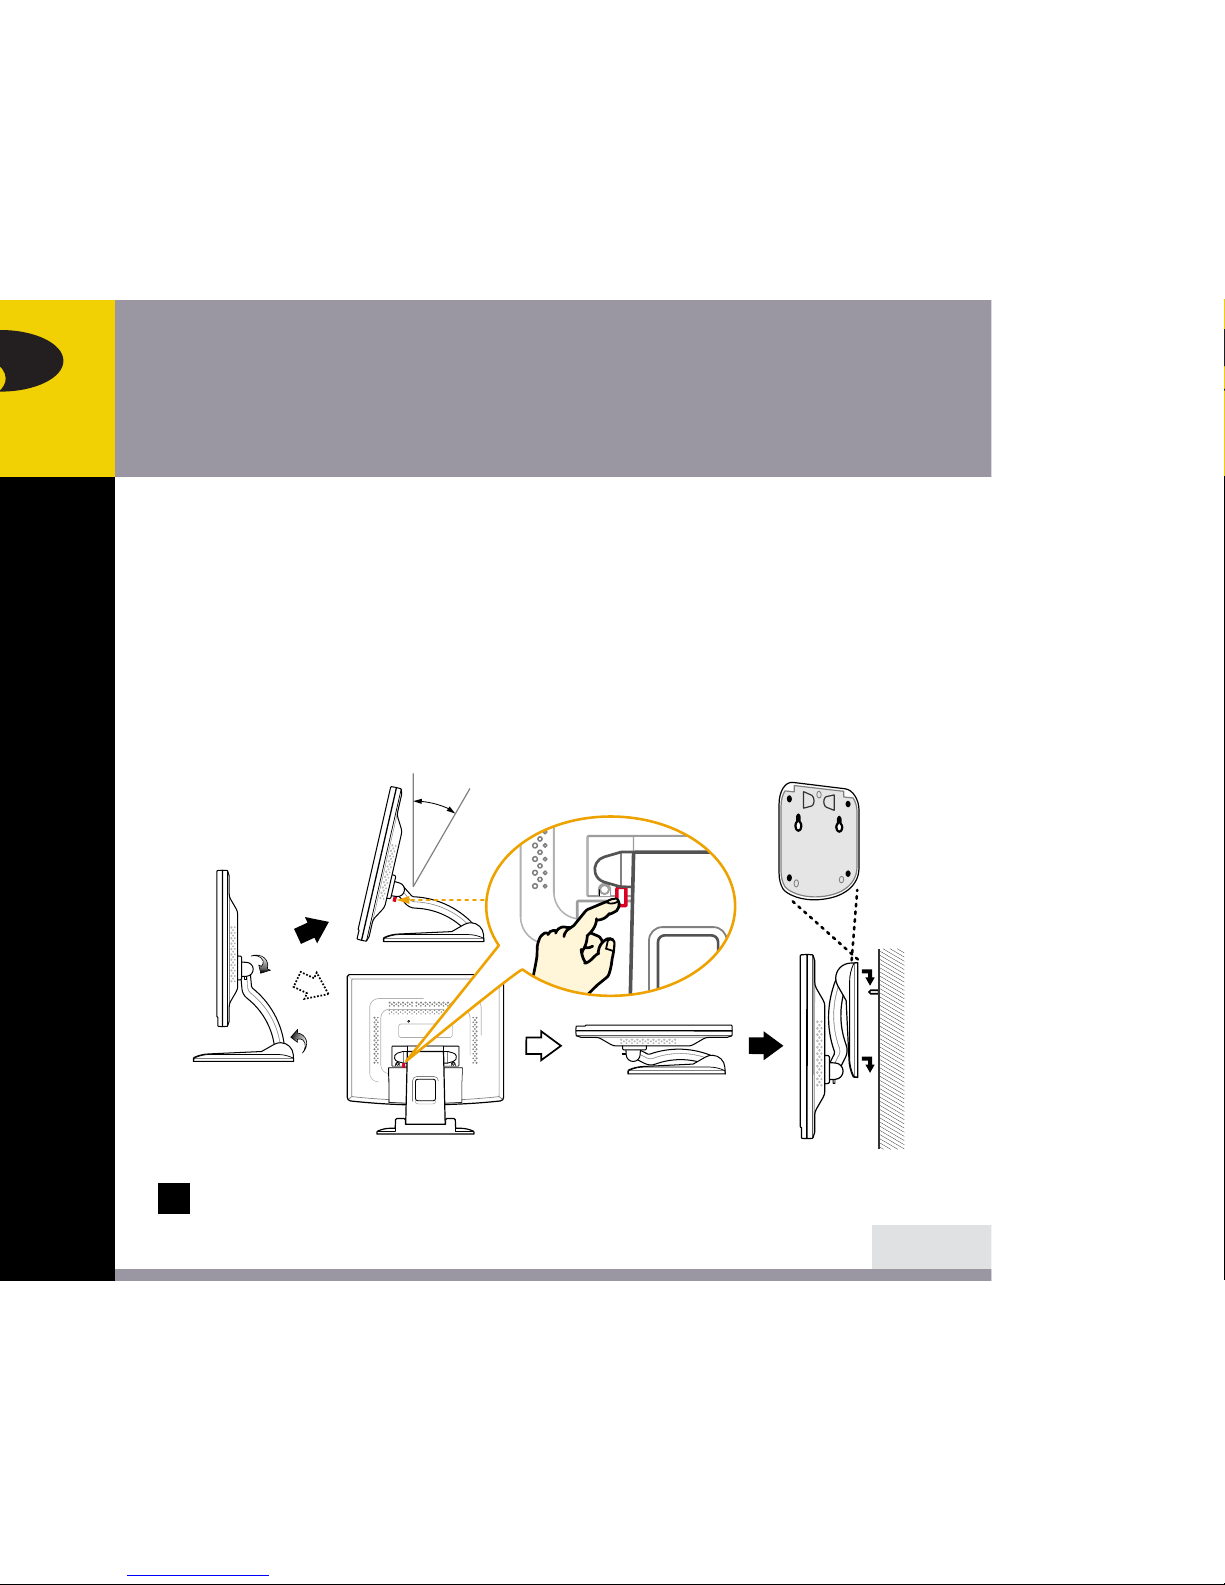
With the double-hinge structure in the stand, this display unit is designed to
Support the following user’s environment.
• Without special Mounting Devices for VESA FPMPMI Standard, you can hang
this display unit on the wall by using 2 holes in the bottom side of stand like
the below picture.
• You can fold the stand and the monitor by pushing STOPPER button.
• You can adjust the tilt angle and height at your suitable level and can fold the
stand during carriage.
If you cannot fold the stand and the monitor fully, please pull the monitor a
bit and then follow the above instruction again.
10/20
BACK
NEXT
30
O
!!
PUSH
Page 15
A515
15" TFT LCD Color Monitor
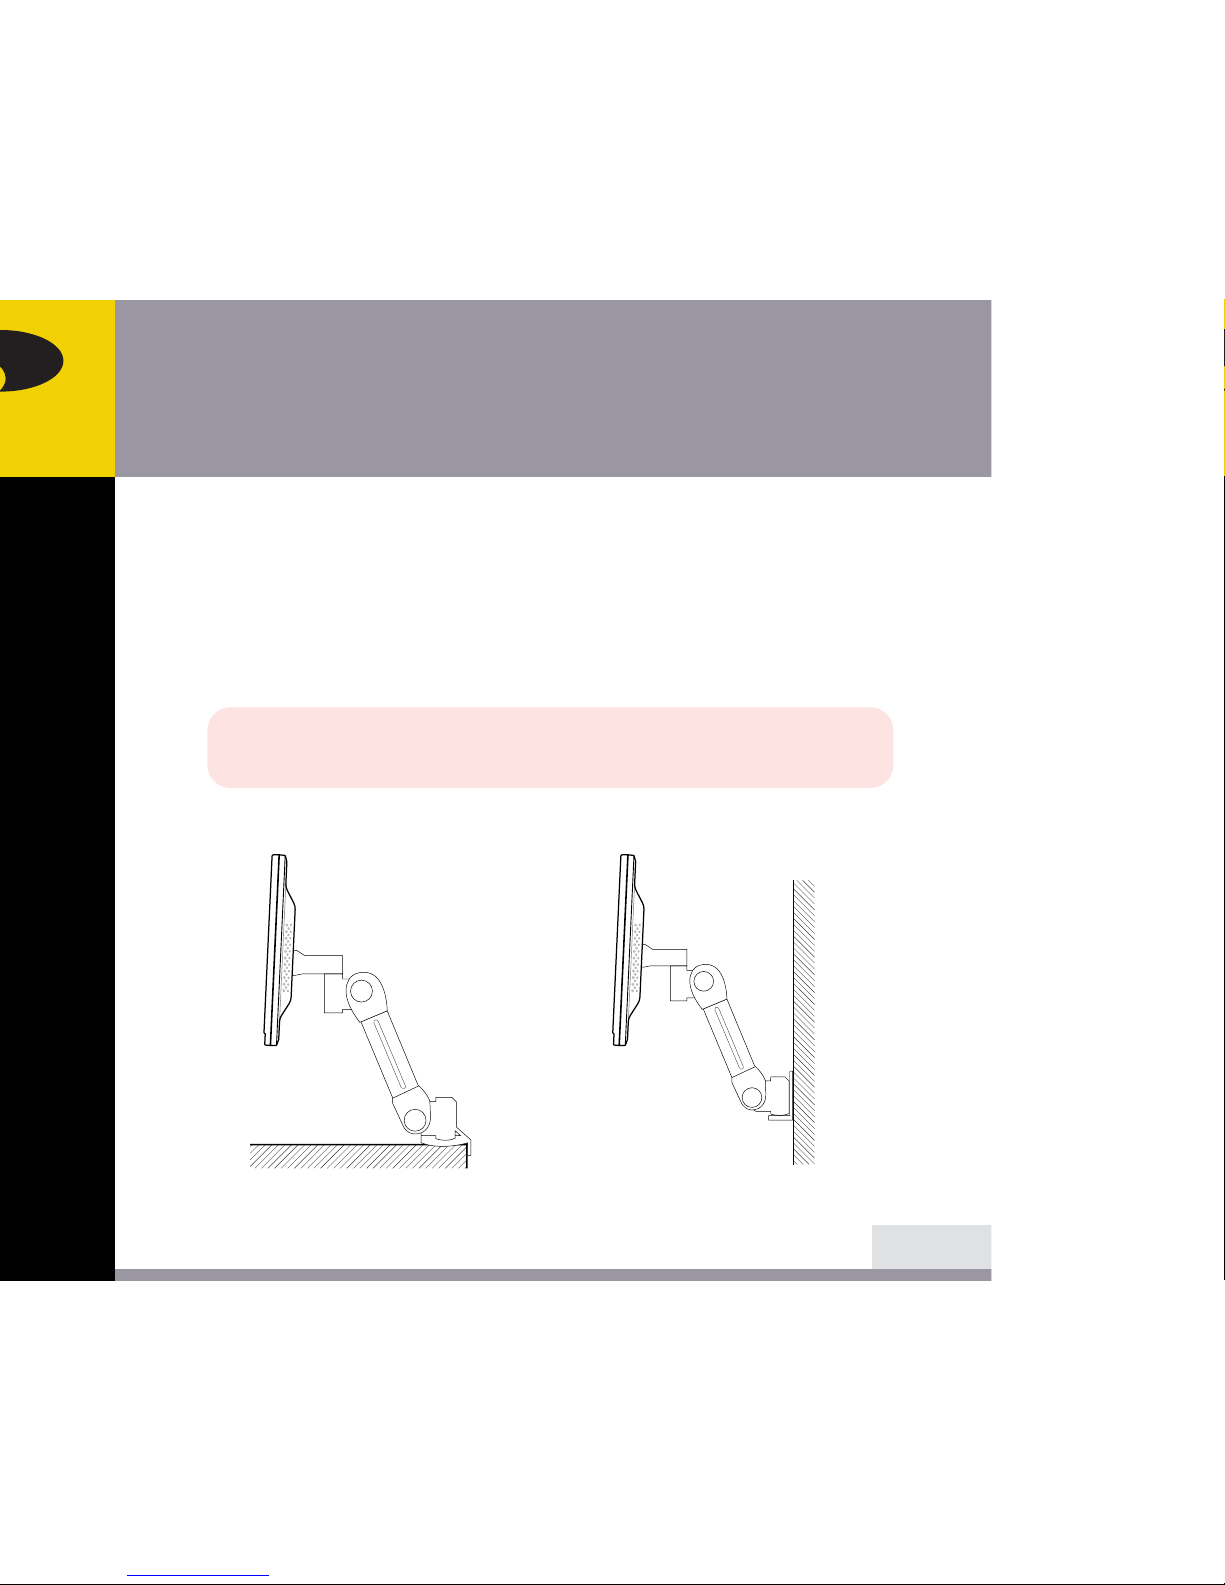
• This display unit supports VESA FPMPMI standard for 75mmx75mm screw
mounting by giving 4 screw holes inside the base stand of the unit. The base
stand shall be removed before connecting to Specialty Flat Panel Monitor
Mounting Device.
• To buy VESA Flat Panel Monitor Mounting Devices, please contact following
information.
* Ergotron, Inc.
· Address : Ergotron Europe Kuiperbergweg 50 1101 AG Amsterdam The Netherlands
· Tel : +3 1 20 696 60 65 · Fax : +3 1 20 609 04 59 · E-mail : [email protected]
11/20
BACK
NEXT
Desk Mount
Wall Mount
Page 16
A515
15" TFT LCD Color Monitor
12/20
BACK
NEXT
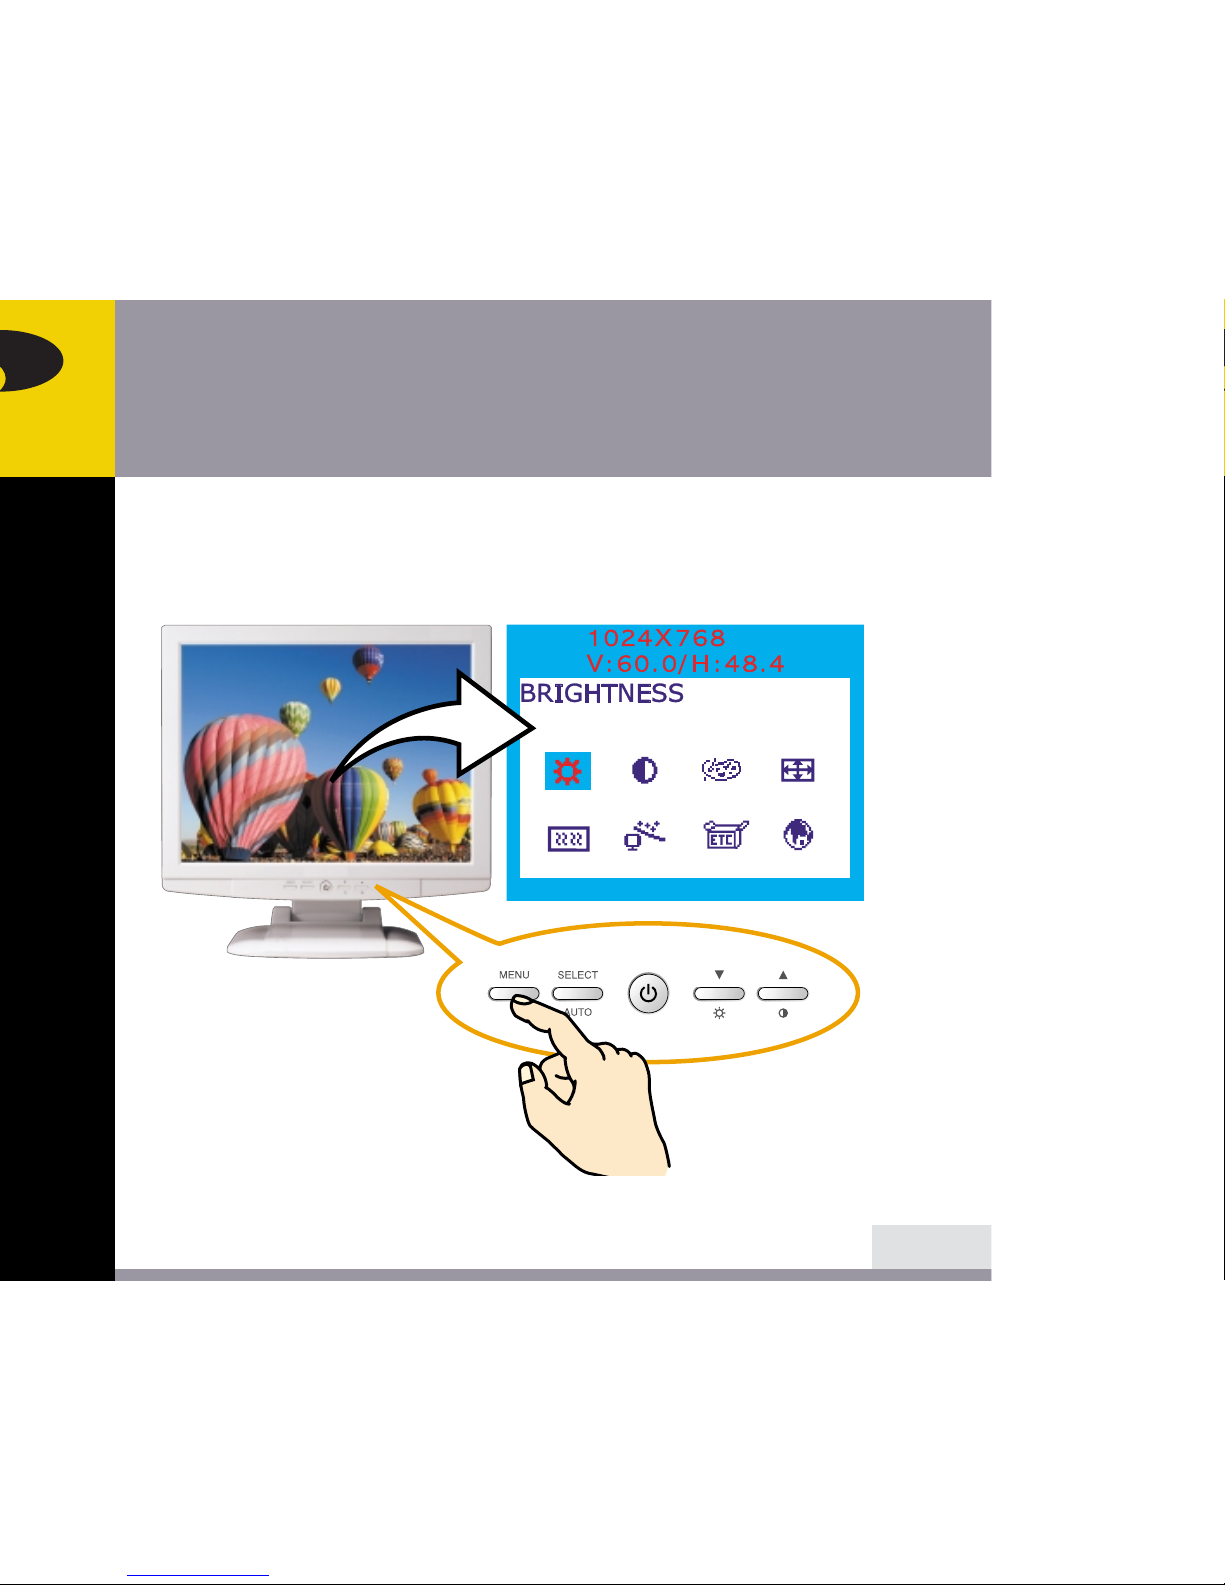
You can adjust the screen display by using the buttons located below the
screen.
Page 17
A515
15" TFT LCD Color Monitor
13/20
BACK
NEXT
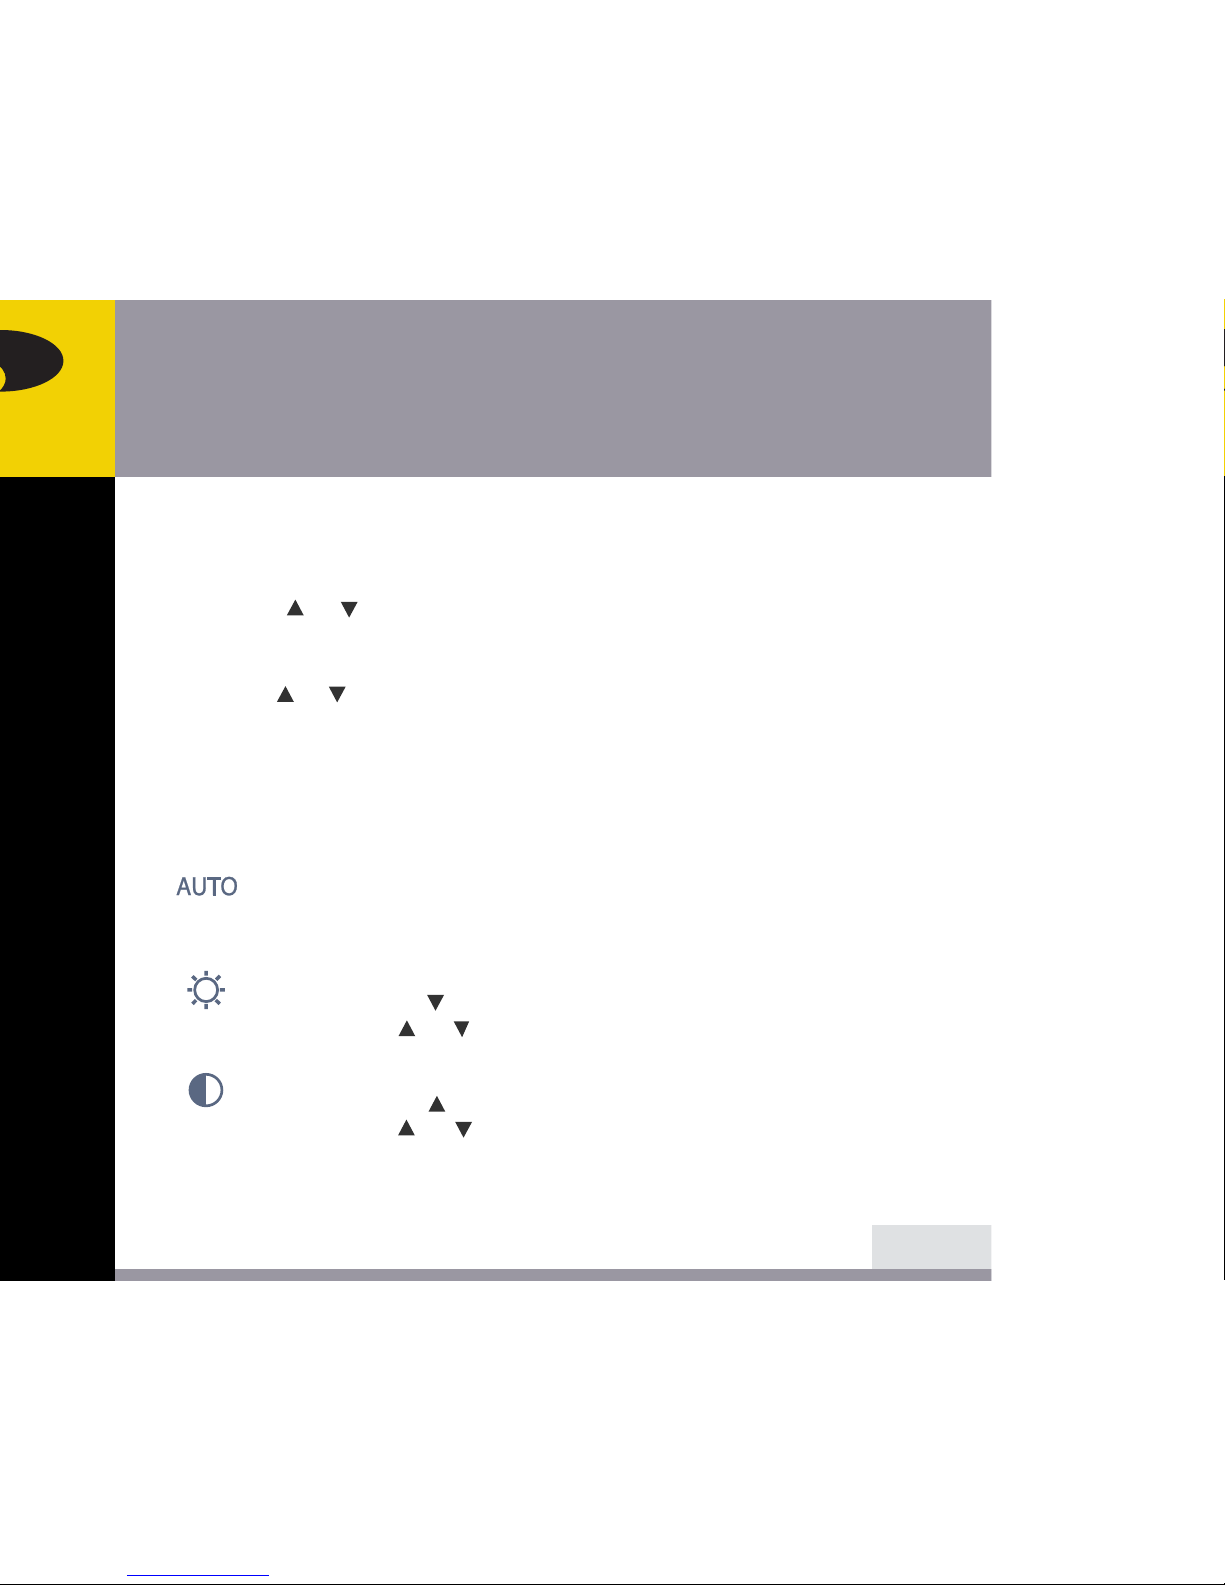
1. Push the MENU button to call the OSD to the screen. The resolution and
frequency are displayed at the top of the menu box for your information.
2. Push the or button to choose the item you want to adjust. The selected
item is highlighted.
3. Push the SELECT button to adjust the highlighted item.
4. Use the or button to adjust the selection.
5. Push the MENU button to return to the previous menu if you are in a submenu.
6. The display unit automatically saves the new settings in 1 second after your
last adjustments and the menu disappears. You can also push the MENU button
to make the menu disappear.
AUTO ADJUST
Push the button SELECT (AUTO) to adjust the shape of screen
automatically.
BRIGHTNESS
Use the button to select the brightness adjustment.
Adjust with or button.
CONTRAST
Use the button to select the contrast adjustment.
Adjust with or button.
Page 18
A515
15" TFT LCD Color Monitor
14/20
BACK
NEXT
The OSD adjustments available to you are listed below.
BRIGHTNESS
Adjust the brightness of the screen.
CONTRAST
Adjust the contrast of the screen.
COLOR CONTROL
Color temperature affects the tint of the image. With lower color
temperatures the image turns reddish and with higher temperatures
bluish.
There are three color settings available: Mode 1(a warm white), Mode 2(a
cool white) or USER. With the USER setting you can set individual values
for red, green and blue.
H/V POSITION
H-POSITION
Adjusts the horizontal position of the entire screen image.
V-POSITION
Adjusts the vertical position of the entire screen image.
Page 19
A515
15" TFT LCD Color Monitor
15/20
BACK
NEXT
CLOCK PHASE
PHASE
Adjust the noise of the screen image.
CLOCK
Adjust the horizontal size of the entire screen image.
AUTO ADJUST
You can adjust the shape of screen automatically at the full screen
pattern.
MISCELLANEOUS
RECALL
Recall the saved color data.
OSD TIMER
You can set the displayed time of OSD Menu window on the screen by
using this adjustment.
OSD POSITION
Adjust the OSD menu's horizontal or vertical position on the screen.
LANGUAGE
You can select the language in which adjustment menus are displayed.
The following languages are available : English, French, German, Italian,
Spanish, Swedish, Finnish, Danish, Portuguese and Dutch.
Page 20

A515
15" TFT LCD Color Monitor
If the power management function of your computer is enabled, your monitor
turns on and off automatically. You can control power management features from
your computer.
Your computer may have power management features which enable the computer
or monitor to enter a power saving mode when the system is idle. You can
reactivate the system by pressing any key or moving the mouse.
The power button does not disconnect the monitor from the mains. The only
way to isolate the monitor completely from the mains supply is to unplug the
mains cable.
The power modes listed are for the monitor only and do not include any USB
devices connected to the USB ports.
16/20
BACK
NEXT
!
Power consumption
40 W
5 W
0 W
Mode
Normal
off
Unplugged
LED
Green
Orange
Not illuminated
Page 21

A515
15" TFT LCD Color Monitor
17/20
BACK
NEXT
Problem
Blank screen
Error message:
Video mode not
supported
The display does
not enter power
management
mode
Possible solution
If the power LED is not lit, push the Soft power switch or check the
AC cord to turn the monitor on. If the display unit is powered
through the computer, check that the computer is switched on.
The display unit might be in standby mode. Push one of the
keyboard keys. Check that the keyboard is properly connected to
the computer.
Check that the signal cable connector is properly connected and that
the connection pins are not bent or damaged. If the connector is
loose, tighten the connector's screws.
Check that the power cable is correctly connected to the display unit
and to the power outlet.
Check the resolution and the frequency on the video port of your
computer.
Compare these values with the data in the Preset Timing Table.
The video signal from the computer does not comply with VESA
DPMS standard. Either the computer or the graphics adapter is not
using the VESA DPMS power management function.
If your monitor is not functioning properly, you may be able to solve the problem
by following the suggestions below :
Page 22

A515
15" TFT LCD Color Monitor
18/20
BACK
NEXT
Possible solution
Check that the signal cable connector is properly connected and that
the connection pins are not bent or damaged. Try another color
temperature.
Adjust the picture characteristics as described in the section OSD
Adjustment(4-3).
A problem with your graphics adapter or display unit. Contact your
service representative.
Check that the display resolution and frequency from your PC or
graphic adapter is an available mode for your monitor.
In your PC, you can check through Control panel, Display, Settings.
If the setting is not correct, use your computer utility program to
change the display settings.
Check that the signal cabel connector is properly connected and that
the connection pins are not bent or damaged.
If the connector is loose, tighten the connector’s screws.
Check that the computer is switched on.
To enter a power saving mode. You can reactivate the system by
pressing any key or moving the mouse.
Problem
Color defects
Size, position,
shape or quality
unsatisfactory
Duplicated
images
Image is not
stable
Message :
No signal
The power LED is a
orange color
Page 23

A515
15" TFT LCD Color Monitor
19/20
BACK
NEXT
Possible solution
LED Indicator can be orange color on changing of video mode or
Input Signal.
Check the Resolution and the frequency on the video part of your
computer. Compare these values with the data in the Preset Timing
Table.
Problem
The power LED is a
orange color
If the above troubleshooting hints do not help you find a solution to the problem,
contact an authorized service agent. If the monitor is sent for service, use the
original package if possible.
Unplug the display unit from the power outlet and contact a service agent when:
• The monitor does not operate normally according to the operating instructions.
• The monitor exhibits a distinct change in performance.
• The monitor has been dropped or the cabinet has been damaged.
• The monitor has been exposed to rain, or water or liquid has been spilled onto
the monitor.
Page 24
A515
15" TFT LCD Color Monitor
20/20
BACK
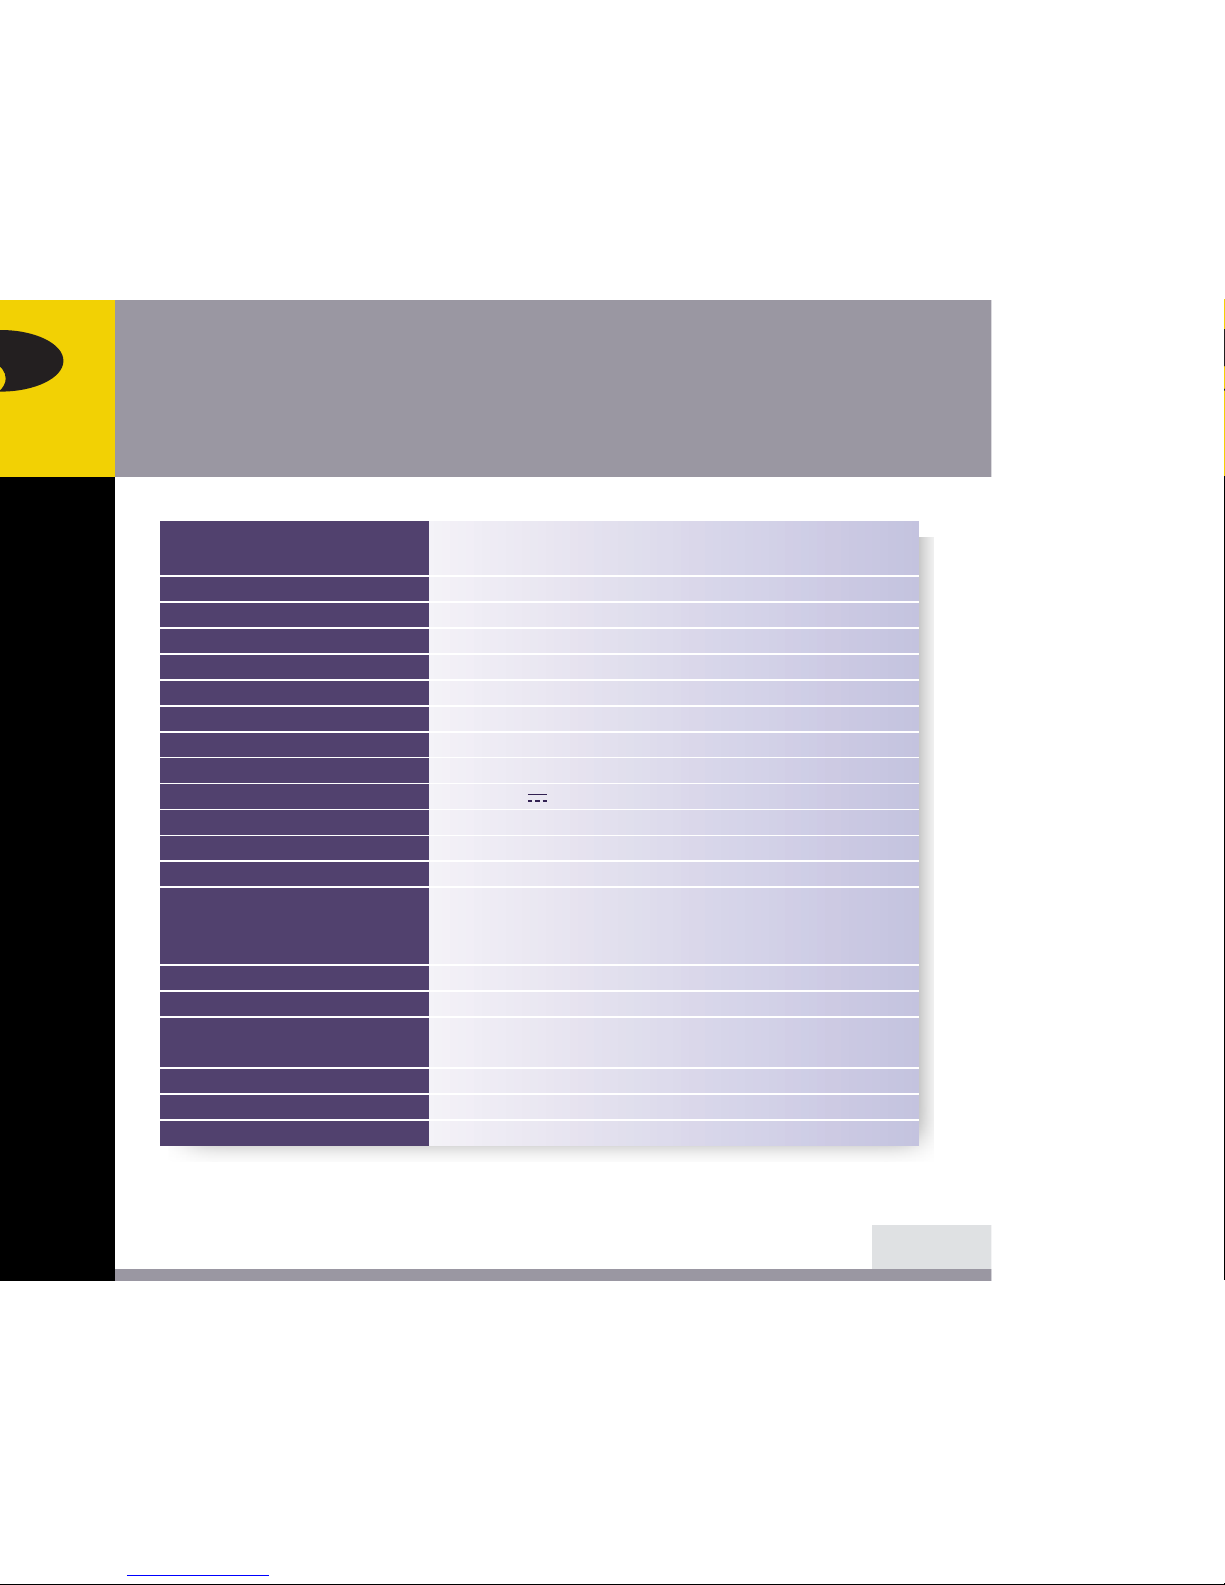
15"viewable, Diagonal
Pixel pitch 0.297 mm, A-Si TFT
250cd/m2(Typ.)
20msec
304 X 228 mm
16.2 million colors
R.G.B Analog, 15 pin D-sub
Horizontal : 31.0 to 60.0KHz, Vertical : 56 to 75Hz
80 MHz
1024X768@75Hz
DC 12V/5V 2.0A /2.0A
40W
VESA DPMS
VESA DDC 1/2B
BRIGHTNESS, CONTRAST, COLOR CONTROL,
MISCELLANEOUS, AUTO ADJUST, LANGUAGE,
H/V POSITION, CLOCK PHASE
1up x 2down (Bus-Powered Hub)
75 mm X 75 mm screw mounting
TCO,
FCC Class B, CE, cULus, TÜV-GS, SEMKO
5 ~ 35O C
3.5Kg unpacked, 5.0Kg packed
350 X 357 X 201 mm
LCD
Brightness
Response Time
Display area
Number of color
Input signals
Frequency rate
Maximum bandwidth
Maximum resolution
Input voltage
Power consumption
Power management
Plug & Play
OSD menu
USB
VESA FPMPMI
Ergonomics,
Safety and EMC
Operating Temperature
Weight
Dimensions (W X H X D mm)
• Specification is subject to change without notice for performance improvement.
 Loading...