

Page 1
33-00446EFS-01
Controller Kit Installation Manual
controller
MHK2
Installation guide for:
• Wireless Receiver and Cable
• Remote Controller
DISCONNECT POWER BEFORE BEGINNING INSTALLATION.
Can cause electrical shock or equipment damage.
Must be installed by a trained, experienced technician.
Read these instructions carefully. Failure to follow these instructions can damage the
product or cause a hazardous condition.
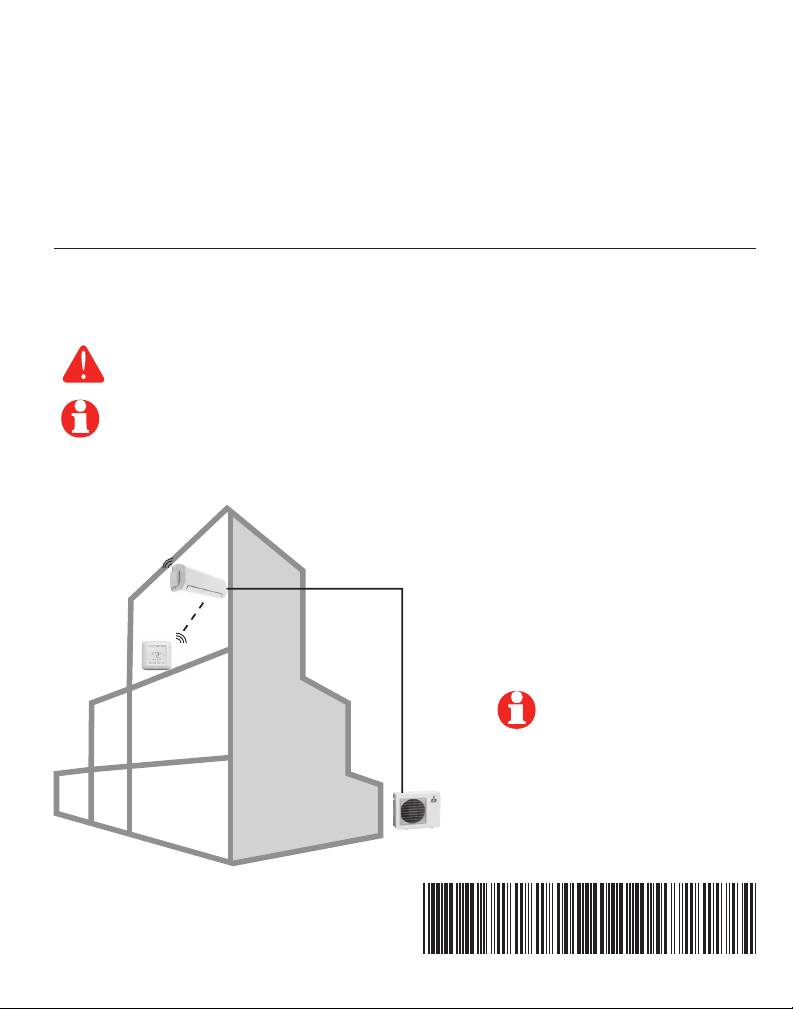
Installation at a glance
This document covers linking
and installation procedures for
the Mitsubishi Ducted Systems'
RedLINK™ control devices.
Before you begin, you must attach
the cable to the CN105 connector
on the indoor unit control board,
then follow the steps in this
document.
Remote
controller
Wireless
receiver
Remote controllers are
linked to specific indoor
units. Each indoor unit must
have a dedicated remote
controller and wireless
receiver.
M32309A
© 2019 Mitsubi shi Elect ric & Elec tronic s USA, Inc.
Suwanee, G A 30024 All R ights Re served .
The three diamond logo is a registered trademark
of Mitsubishi Electric Corporation
www.mitsubishipro.com
Page 2
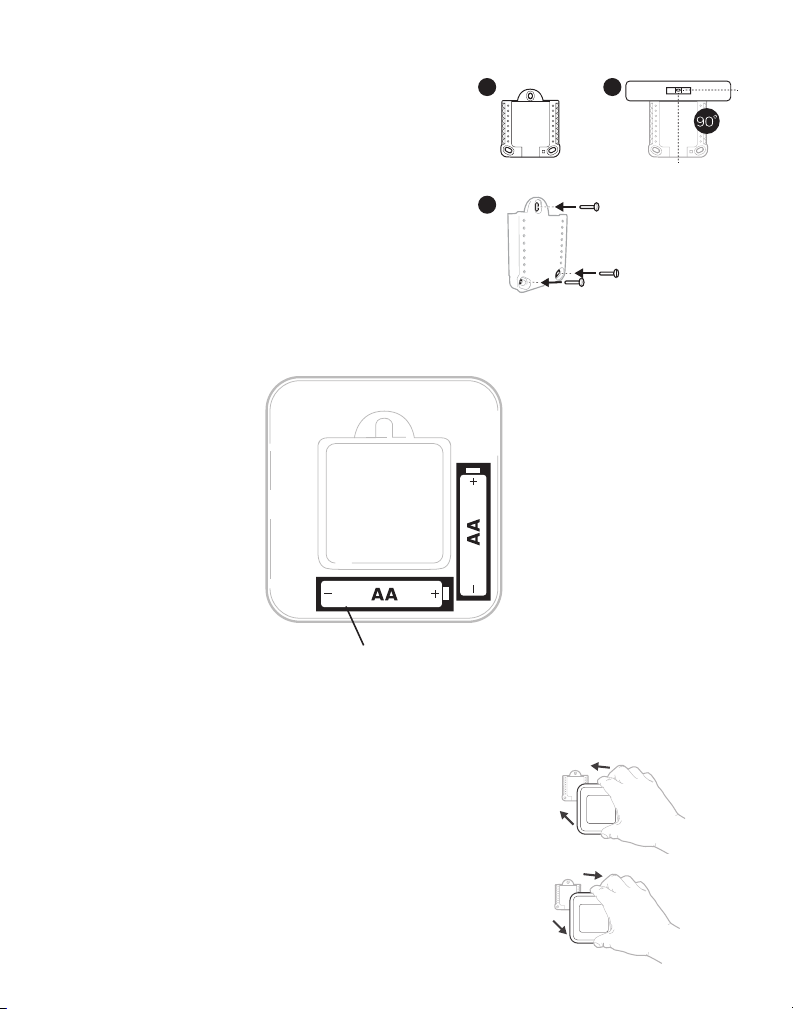
Mounting Wall Plate
1. Open package to find the Wall Plate. See Figure 1.
2. Position the Wall Plate on the wall. Level and mark
hole positions. See Figure 2.
Drill holes at marked positions, and then lightly tap
supplied wall anchors into wall using a hammer.
‒ Drill 7/32” holes for drywall.
3. Place the Wall Plate over the wall anchors. Insert and
tighten mounting screws supplied with the Wall Plate.
Do not overtighten. Tighten until the Wall Plate no
longer moves. See Figure 3.
Install batteries
Insert AA batteries
1 2
3
Use 3x supplied
screws #8 1-1/2”
Mounting MHK2 Controller
1 Align the Wall Plate with the MHK2 Controller and
push gently until the MHK2 snaps in place.
2 If needed, gently pull to remove the MHK2 Controller
from the Wall Plate.
2
Page 3
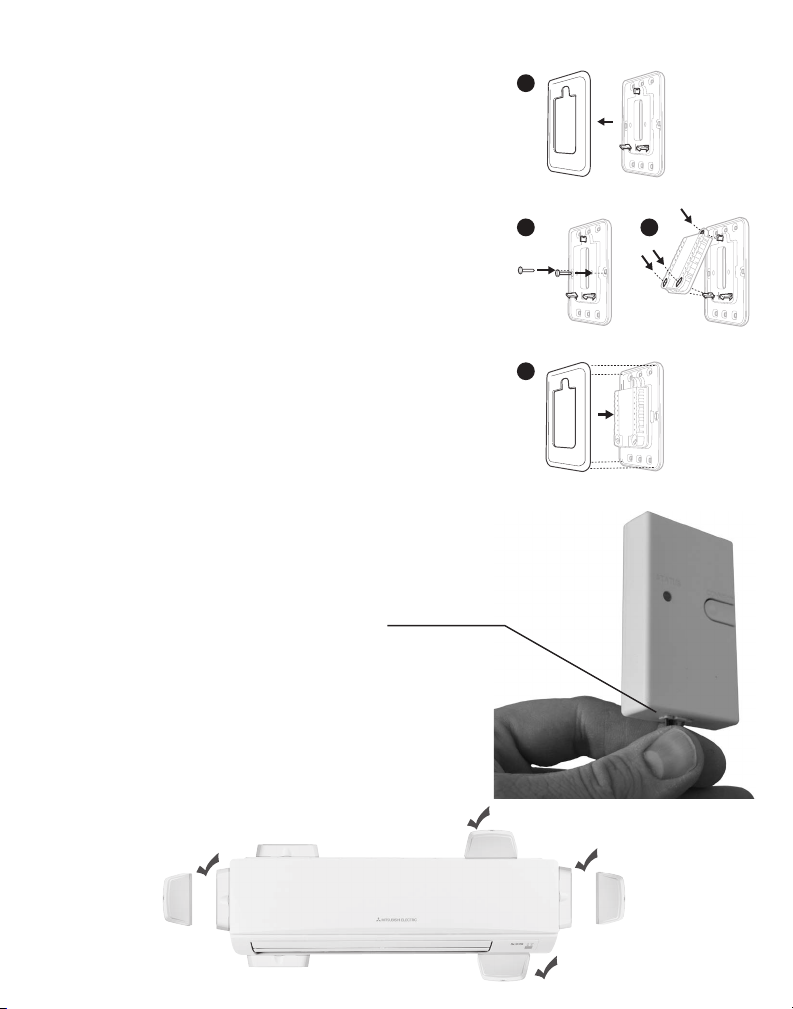
Optional Decorative Cover Plate installation
MCR31400
Use the Optional Cover Plate when you need to cover
paint gap from the old control.
4. Separate the Junction Box Adapter from the Cover
Plate. See Figure 4.
5. Mount the Junction Box Adapter to the wall or an
electrical box using any of the eight screw holes.
Insert and tighten mounting screws supplied with
Cover Plate Kit. Do not overtighten. Make sure the
Adapter Plate is level. See Figure 5.
6. Attach the Wall Plate by hanging it on the top hook
of the Junction Box Adapter and then snapping the
bottom of the Wall Plate in place. See Figure 6.
7. Snap the Cover Plate onto the Junction Box Adapter.
See Figure 7.
4
5
Use 2x
supplied
screws #6
5/8”
7
Install cable and receiver
1. Before mounting indoor unit, connect cable to the
5-pin CN105 connector on the control board in the
indoor unit.
2. Mount indoor unit. Route cable to preferred location of
the wireless receiver.
3. Attach the 5 pin connector to the receiver.
4. Push the excess cable back through the indoor unit or
behind the wireless receiver. Do not cut or modify the
cable. Use zip tie connections on back of receiver if
needed.
5. Mount wireless receiver next to the indoor unit (see
below) or in a remote location.
Mount in the orientations shown. Do not block vents.
6
X
OR
UPDATE
OR
IMAGE
X
3
Page 4
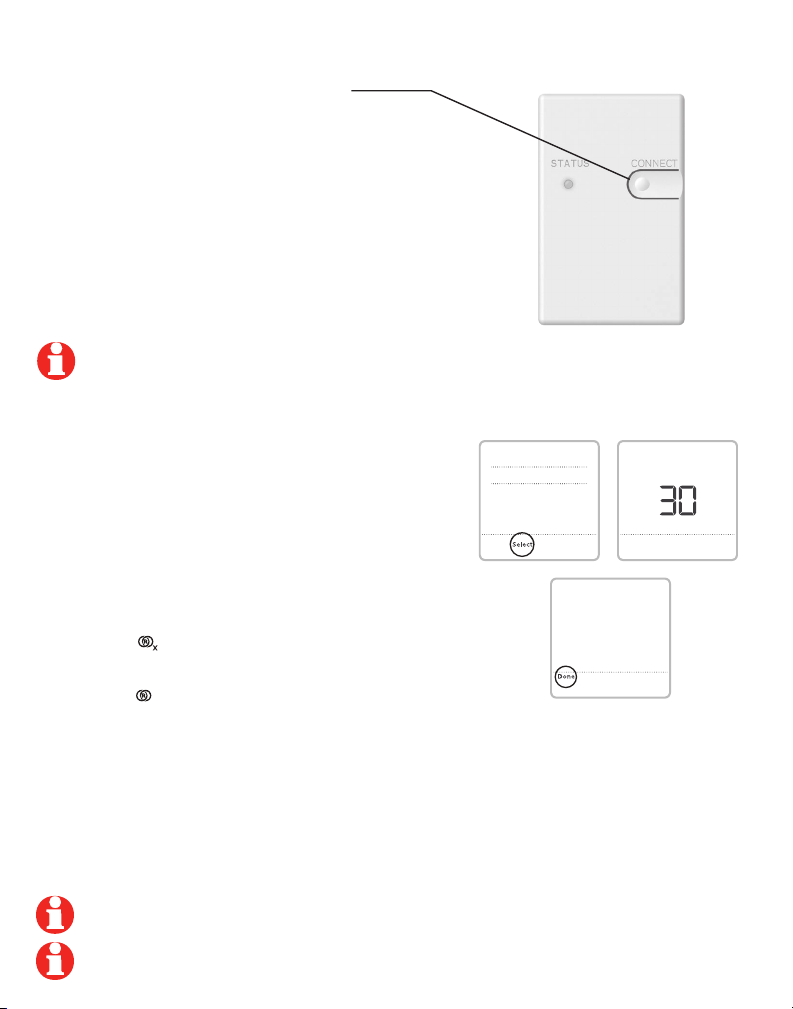
Link all devices to wireless network
1. Press and release the CONNECT button.
2. If CONNECT light does not flash, another receiver or
RedLINK wireless adapter may be in wireless setup
mode. Exit wireless setup at the other device.
CONNECT LED
• Flashing Green: In wireless setup mode.
• Solid Green: At least one Redlink device is enrolled
onto the receiver.
• Yello w: Please wait.
• Red: RedLINK device is not communicating.
• Off: No RedLINK devices are enrolled onto the
receiver.
Flashing status light times out after 15 minutes of
inactivity. Press CONNECT again if necessary.
Link remote controller to wireless network
1. Press CONNECT to establish a link to the wireless
network.
2. After a brief pause, the confirmation screen at
right should be displayed to verify that the wireless
connection has been established.
3. Press DONE to display the home screen.
4. The MHK2 Controller will display a "WAIT" screen
while it receives data from the air conditioner. While on
the "WAIT" screen:
• If the controller shows the RedLINK disconnected
icon at the top-right, the controller has lost
connection with the receiver.
• If the controller shows the RedLINK connected
icon , the controller is waiting for the air
conditioning to connect.
• To unenroll the receiver, press and hold the
bottom-center of the controller's screen for
5 seconds. The controller will then be unenrolled
regardless if the receiver is on or off.
CONNECT RECE CONNECTING
SUCCESS
Exit wireless setup
Press and release the CONNECT button at the wireless receiver to exit wireless setup (light should
stop flashing and remain solid). Replace cover on wireless receiver.
Note: The wireless receiver will automatically exit wireless setup after 15 minutes of
inactivity.
Note: If installing more than one receiver, you must exit wireless setup on previous receiver
before attempting wireless setup of subsequent controllers/receivers.
4
Page 5

Initial installer setup
After the MHK2 Controller has communicated with
the A/C correctly, MHK2 Controller will change
from the "Wait" screen to the "Initial Installer
Setup" screen and show START SETUP.
1. The MHK2 will search for A/C support. If it
finds A/C support, the controller will load the
Function Code setup. See page 6 for a full
list of Function Codes options. If the controller
does not find A/C support, the controller will
load the Installer Set Up (ISU). See page 7
for a full list of ISU options.
2. Touch or to toggle between Function
Code/ISU options.
3. Touch Edit or touch text area, and then touch
or to edit default setup option.
4. Touch Done or touch text area to confirm the
setting or press Cancel.
5. Touch or to continue to setup another
ISU option.
6. To finish setup and save your settings, scroll
to the FINISH SETUP screen at the end of the
ISU list.
Note: To see a list of all setup parameters, go to
"Installer setup options (ISU) – advanced menu"
on page 7. The MHK2 Controller displays the
ISU name and the ISU number.
ISU option and
name (scrolling)
ISU option blinking
Saves selected ISU
option moves on to
the next ISU screen
View ISU
Arrow buttons
used to scroll
through ISUs
Edit ISU
ISU #
Arrow buttons
used to scroll
through ISU
options
Cancels ISU option
selection, go back to
view ISU
Installer setup – advanced menu (after initial installation)
To access the advanced menu, press and hold the Menu button for 5 seconds.
Touch or to go through the options in the advanced menu.
Advanced menu options
Function Codes: This is used to access the
device Function Code settings.
Device Setup: This is used to access the device
ISU settings.
Screen Lock: The thermostat touch screen can be
set to fully lock.
System Test: Test the wireless communication or
heating and cooling equipment.
Unenroll Device: Remove a connected receiver or
controller.
5
Reset: Access all reset options
on the MHK2 Controller. This is
the only place to access factory
reset.
72
Auto
HeatHeat
Home
VaneVane
Page 6

Note: Default settings for Function Codes 1-28 are automatically determined by the HVAC equipment. It may take up to 40 seconds to enter
setup, and 30 seconds to exit setup.
Function # Name Options Notes
1 Power Failure
2 Temperature Sensing
3 Ventilation Air 1 = Not sup por ted
4 Power Vo lta ge 1 = 230V
5 Indoo r Unit Automatic
7 Change Fil ter Dur ation 1 = 100 H ours
8 Auto F an (Spe ed
6
9 Numbe r of Air O utle ts
10 High Performance
11 Airflow Direction
15 Frost Prevention
23 Airflow Oscillate Mode 1 = Not Availab le
24 Heat Mo de
25 Heat Mode Fan Option 1 = Ex tra Low
27 Cooling Mode Fa n
28 Display System Error 1 = Enable
Automatic Recovery
Location
Operation
Set ting)
(PLA Only)
Filter Installed
Settings
Temperature Offset
Temperature Offset
Option
1 = Disa bled
2 = Enabled
3 =Not s uppor ted
1 = Avera ge
2 = Sens e at Indoor Uni t
3 = Not sup por ted
2 = Indoo r Unit doesn’ t int ake ou tdoor air thr ough LO SSNAY
3 = Indoo r Unit does in take o utdo or air th rough LOSSN AY
2 = 208V
3 = not sup por ted
1 = On
2 = Off
3 = Not sup por ted
2 = 2500 Hours
3 = Not Us ed
1 = Quie t
2 = Standard
3 = High Ceiling
1 = 4 directio ns
2 = 3 directio ns
3 = 2 directio ns
1 = Not Sup por ted
2 = Suppo rte d
3 = Not Sup por ted
1 = No Vane s (or Vane # 3 f or PL A)
2 = Vane # 1 se tting
3 = Van # 2 settin g
1 = 36°F (2°C)
2 = 37°F (3 °C)
3 = Not Sup por ted
2 = Avail able
3 = Not Sup por ted
1 = On
2 = Off
3 = Not Sup por ted
2 = Stop
3 = Sele cta ble Fa n Spee d
1 = Sele cta ble Fa n Spee d
2 = Stop
3 = Not Sup por ted
2 = Disa ble
3 = Not Sup por ted
Unit Funct ion Option defaulted t o most c ommon s etting at power up by
Gate way (vi a Indo or Unit)
Eith er set ting 1 or 3 could be use d when t he unit does not supp ort t his fe atur e.
Function Code options – advanced menu
Page 7

ISU # ISU Name ISU Options (defaults in bold) Notes
134 Central Controller
136 Residential/
139 Fahrenheit
142 System Type 0 = Heat & C ool (heat pump)
144 Auto Changeover 0 = Manual Changeover
145 Deadband 3 to 8°F (in 1°F increments)
7
146 Drying Mode 0 = Disabled
150 Schedule Owner 0 = Cont roller
151 Schedule Type 0 = No Schedule
152 Schedule Of f
160 Full Lockout 0 = Disabled
161 Lockout S ystem On 0 = Disabled
162 Lockout S ystem Off 0 = Disabled
163 Lockout Mode 0 = Disabled
164 Lockout Fan Speed 0 = Disabled
Present
Commercial
Celsius
Periods
0 = Not installed
1 = Installed
0 = Residential
1 = Commercial
0 = Fahr enheit
1 = Celsius
1 = Cool only
1 = Auto Changeover
3 = Auto changeover Single S etpoint
2.0 to 4.5° C (in .5°C increments)
1 = Enabled
1 = Kumo Cloud
1 = Mo-Su
2 = Mo-Fr/Sa-Su
3 = Mo-Fr/Sa /Su
4 = M/T/W/T/F/S/S
0 = Disabled
1 = Enabled
1 = Enabled
1 = Enabled
1 = Enabled
1 = Enabled
1 = Enabled
The control determines the correct setting based on whether the central
controller was linked to the system. If the central controller is Installed in the
system, then the device will function as a non-programmable device and only
single setpoint will be suppor ted. When the central control is not install ed the
ISU options for "Schedul e Format", "Scheduled Of f", "Power Off Timer" and
"Perm Hold Lock" are displayed in the ISU menu.
When set for residential there is an option for per manent hold and the
Schedule periods are wake, away, home, sleep.
When set for commercial, we have a limited override duration and the schedule options are for occupied and unoccupied.
The control determines the correct setting based on the equipment the
receiver is plugged into.
If Auto Changeover is selected, sys tem mode options will be heat, off, cool,
and auto.
This ISU set ting is not shown when ISU 134 is set to 1 or ISU 142 is se t to 1.
Settings 0 or 1 are shown if ISU 134 is set to 0. Setting 3 is shown if ISU 134
is set to 1.
This ISU is shown if dual auto changeover is selected.
This ISU is shown if dr y mode is supported.
Not shown if wireless interface is NOT present.
If disabled, Schedule Power Off in schedule mode cannot be used.
If full lockout is configured the display will not allow user to adjust mode,
temperature setpoints, etc.
If enabled the display will not allow user to adjust mode from off to on.
If enabled the display will not allow user to adjust mode from on to of f.
If enabled the display will not allow user to adjust mode from current mode to
any other mode.
If user attempts to modify the fan setting, flash Locked segment and revert to
current mode if lockout is enabled.
Installer Setup options (ISU) – advanced menu
Page 8

ISU # ISU Name ISU Options (defaults in bold) Notes
165 Lockout Setpoint 0 = Disabled
167 Lockout Vane
170 Hide Indoor
171 Hide Indoor
172 Hide Outdoor
173 Hide Outdoor
180 Max Heat Setpoin t 40 to 90°F (4.5 to 32°C)
181 Min Cool Setpoint 50 to 99°F (10 to 37°C)
190 Indoor Temperature
191 Indoor Temperature
8
195 Indoor Humidity
196 Indoor Humidity
Direction
Tempera ture
Humidity Display
Tempera ture
Display
Humidity Display
Source
Display Offset
Source
Display Offset
1 = Enabled
0 = Disabled
1 = Enabled
0 = Disabled
1 = Enabled
0 = Disabled
1 = Enabled
0 = Disabled
1 = Enabled
0 = Disabled
1 = Enabled
0 = Ther mos tat
1 = Wall Unit
2 = Sensor
3 = Average
-5°F to 5°F (-2.5°C to 2.5°C)
0 = Ther mos tat
1 = Sensor
2 = Average
-10 % RH to 10% RH
If user attempts to modify the setpoint, fla sh Locked segment and revert to
current setpoint if lockout is enabled.
If user attempts to modify the vane direction, flash Locked segment if lockout
is enabled.
If enabled, indoor temperature is not shown in the display.
If enabled, indoor humidi ty is not shown in the display.
If enabled, outdoor temperature is not shown in the display.
If enabled, outdoor humidity is not shown in the display.
Options 2 and 3 not shown if the IAS is not enrolled.
Options 1 and 2 will not be shown if the IAS is not enrolled.
Installer Setup options (ISU) – advanced menu
Page 9

Performing a system test
You can test the system setup in ADVANCED MENU
under SYSTEM TEST option.
1 Press and hold Menu on the controller for 5
seconds to access ADVANCED MENU options.
2 Touch or to go to SYSTEM TEST.
3 Touch Select or touch text area.
4 Touch or to select system test type. Touch
Select or touch text area.
5 For the heat test, cool test, and fan test use
or to activate equipment.
Note: The clock is used as a timer while heat or cool
is running. The Heat and Cool indicators are displayed
when the system test is running.
Special functions
Schedule Off Periods (Setup Function 152) : Allows the user to schedule a period where the
split-zoning system is completely off and resumes operation at the next scheduled period.
9
Page 10

Key features
System status
information
Cool On, Heat On, Standby.
Schedule information
Following time-based
temperature control.
Desired Temperature
Displays the current desired
temperature setting.
Indoor Temperature
Displays the current indoor
temperature.
Vane
Touch to select air direction:
Auto, Swing, Ceiling, High,
Middle, Low, Floor.
Mode
Select system Mode: Heat,
Cool, Dry, Fan, Auto, Off.
Time, ISU #, or
Alert #
72
HeatHeat
VaneVane
Auto
RedLINK wireless
communication status
Indicates if the controller is
connected to the RedLINK
interface and communicating
correctly.
Connection status
information
Indicates if the wireless
interface is used on the
Mitsubishi unit.
Messaging
Shows device setup options,
menu options, reminders,
schedule overrides.
Schedule period
Shows schedule period:
Wake, Leave, Return, Sleep.
Fan
Select Fan speed.
Menu
Touch to display options. Start here to
set a program schedule.
Note: Long press of Menu button
for 5 seconds to access Advanced
Menu options.
The screen will wake up by pressing the center area of the displayed temperature. The screen
will stay lit for 8 seconds.
10
Page 11

RedLINK™ error codes
128 Duplicate ID
129 Invalid device type
130 Invalid instance
134 Weak signial. Move wireless device to a different location and try again.
137 Maximum number of clients reached.
138 No response
152 Out of order
153 Timeout
For full list of error codes, please refer to your equipment's technical service manual.
Replacing system components
NOTE: Only use Mitsubishi Electric components or other designated components for installation.
Failure to comply may damage the product or cause a hazardous condition.
Remote controller
To replace a remote controller, install batteries and follow the procedures on page 4 to link it to
the wireless network. If necessary, modify settings as needed (see tables on pages 7–8).
Wireless receiver
After installing a new wireless receiver, you must unenroll the remote controller so it can
communicate with the new equipment, as described below.
There are three ways to unenroll the controller from the old receiver:
• Press and hold the Menu button for 5 seconds to enter the Advanced Menu. Touch or to
select UNENROLL DEVICE. Touch Select. Connect the new receiver.
• Enter the Advanced Menu. Touch or to select RESET. Touch Select. Touch or to
select FACTORY. Touch Select. Touch Yes to confirm. Connect the new receiver.
• If the remote controller is on the "Wait" screen, press and hold the bottom-center of the
screen for 5 seconds. Connect the new receiver.
To remove all wireless devices:
1. Press and hold the CONNECT button on the wireless receiver for 10 seconds.
2. To reconnect, see procedure on page 4.
11
Page 12

Regulatory information
FCC Compliance Statement (Part 15.19) (USA only)
This device complies with Part 15 of the FCC Rules. Operation is subject to the following two conditions:
1 This device may not cause harmful interference, and
2 This device must accept any interference received, including interference that may cause undesired operation.
FCC Warning (Part 15.21) (USA only)
Changes or modifications not expressly approved by the party responsible for compliance could void the user’s authority to operate
the equipment.
FCC Interference Statement (Part 15.105 (b)) (USA only)
This equipment has been tested and found to comply with the limits for a Class B digital device, pursuant to Part 15 of the
FCC Rules. These limits are designed to provide reasonable protection against harmful interference in a residential installation.
This equipment generates uses and can radiate radio frequency energy and, if not installed and used in accordance with the
instructions, may cause harmful interference to radio communications. However, there is no guarantee that interference will not
occur in a particular installation. If this equipment does cause harmful interference to radio or television reception, which can be
determined by turning the equipment off and on, the user is encouraged to try to correct the interference by one of the following
measures:
• Reorient or relocate the receiving antenna.
• Increase the separation between the equipment and receiver.
• Connect the equipme nt into an ou tlet on a circuit d iffere nt from th at to whic h the receiver is co nnect ed.
• Consu lt the dealer or an ex perien ced rad io/ TV technician for hel p.
Wirel ess Rec eiver an d MHK2 Remote C ontro l
To comply with FCC and Industry Canada RF exposure limits for general population/ uncontrolled exposure, the antenna(s)
used for these transmitters must be installed to provide a separation distance of at least 20 cm from all persons and must not be
co-located or operating in conjunction with any other antenna or transmitter.
Section 7.1.3 of RSS- GEN
Operation is subject to the following two conditions:
1 This device may not cause interference, and
2 This device must accept any interference, including interference that may cause undesired operation of the device.
Section 7.1.2 of RSS- GEN
Under Industry Canada regulations, this radio transmitter may only operate using an antenna of type and maximum (or lesser)
gain approved for the transmitter by Industry Canada. To reduce potential radio interference to other users, the antenna type and
its gain should be so chosen that the equivalent istropically radiated power (e.i.r.p.) is not more than that necessary for successful
communication.
Specifications & replacement parts
Operating Ambient Temperature
• Remote Controller: 32 to 120 °F (0 to 48. 9 °C)
• Wireless Receiver: - 40 to 165 °F (- 40 to 73.9 °C)
Operating Relative Humidity
• Remote Controller: 5% to 90% (non-condensing)
• Wireless Receiver: 5% to 95% (non-condensing)
Physical Dimensions (height, width, depth)
• Remote Controller: 4- 5/ 64" x 4- 5/6 4" x 1-1/16"
(104 mm x 104 mm x 27 mm)
• Wireless Receiver: 3-3/32 x 1-3/4 x 39/64 inches
(74.8 x 44.4 x 15.4 mm)
Accessories & Replacement Parts
Item Part Number
Remote Controller MRCH2
Receiver and Cab le MIFH2
Cable MRC2
© 2019 Mitsubishi Electric & Electronics USA, Inc.
Suwanee, GA 30024 All Rights Reserved.
33-00446EFS—01 M.S. 01-19
Printed in U.S.A.
 Loading...