

Page 1

21
18
17
21
19
20
22 23 24 25 26 27
Page 2

Table of content Page
Safety information 25
Scope of delivery 26
Quick overview 27
Overview headphone: 27
Overview LR earpiece: 27
Overview sender: 27
Overview accessories: 27
Connect sender to a sound source 28
Connect sender to a Cinch female connector 29
Connect sender to a SCART female connector 29
Connect sender headphone connector 30
Connect the sender to the microphone (optional) 30
Connect sender to the USB connector 31
Connect sender to the mains supply 31
Use Swing digital 32
Use SWING digital standard version 32
Use SWING digital LR 32
Safety lock in the tele-loop 33
Listening with the 3.5 mm stereo output 33
Pairing of sender and receiver 34
Set balance 35
Adjust audio 35
Set volume 36
Transparent cover 36
Range 36
Charge battery 37
Cleaning and care 38
Clean transmitter and receiver 38
Cleaning of silicone ear adapters 38
Exchange of the silicone ear adapters 38
Important information 39
Warranty 39
Environmental information/disposal 40
Battery 40
Failure cause and resolution 41
Technical Data 43
English 24
Page 3

Safety information
UÊ Before you start operating this device, read these instructions carefully
and completely.
UÊ Please retain these operating instructions carefully to ensure that they are
accessible at any time also for other users.
UÊ The device and especially the power supply are designed exclusively
for operation in dry interior spaces. A flawless function is guaranteed for
a room temperature of 10 °C to 35 °C.
UÊ Please handle the device and the accessories always carefully and install
them only in low-dust and clean locations.
UÊ Clean the sender and the receiver regularly. For hygienic reasons, the
soft silicone ear adapters should be cleaned regularly. For the exchange,
please use the soft silicone ear adapters offered as special accessories.
UÊ Paints and furniture polishes can chemically attack the rubber feet of the
sender and therefore they may cause surface damage to your furniture.
UÊ To supply the sender, please use only the provided power supply.
UÊ We recommend to unplug the power supply from the electrical outlet in
case your are absent for several days.
Caution:
High volume can be set on your receiver. Please adhere to the following
information to protect your ears or the ears of persons with normal hearing,
especially children, from hearing impairments due to a high volume.
1. Please set a low volume level before you put the receiver on.
2. During use, adjust the volume to a level agreeable to you. Before using
this product together with a heart pacemaker, please contact your physician or the manufacturer of the pacemaker to ensure that the pacemaker
is not subjected to interference.
3. If you use other medical devices, please use the SWING only by adhering
to the safety information/safety directives of your physician or the manufacturer.
English 25
Page 4
Safety information for the lithium polymer battery
The battery used in SWING is a lithium polymer battery, which was produced
in accordance with the most current provisions and safety regulations. The
battery can be damaged when misused or if not used according to the specifications, in this case Humantechnik accepts no liability.
Warning!
The following risks exist in extreme cases:
– Heat development
– Fire development
– Explosion
– Smoke and gas development
UÊ Do not heat the battery above 70°C, e.g., through sun radiation or by
casting it into fire.
UÊ Do not subject the battery to moisture.
UÊ Do not short circuit the battery
UÊ Do not disassemble or deform the battery.
UÊ Store device/battery in cool and dry places at room temperature.
UÊ Use only the provided charger for the battery.
UÊ Recharge the battery in the device regularly in case the device is not
used for a longer time (every 6 months for app. 1 hour).
UÊ Charge the battery only at ambient temperatures of 10°C to 40°C.
UÊ Do not recharge the battery if the device is clearly damaged.
UÊ Please return defective devices or devices with worn out batteries to
your specialty retailer.
Scope of delivery
The scope of delivery of the SWING digital / SWING digital LR includes:
1 SWING digital receiver
1 SWING digital sender
1 battery AP12A
1 screwdriver
1 power supply
1 audio connection cable with 3.5 mm stereo stereo jack
1 audio adapter 3.5 mm on 6.3 mm stereo stereo jack
1 Cinch adapter
1 SCART adapter
1 pair of additional silicone ear adapters small (not LR version)
English 26
Page 5

Quick overview
These operating instructions let you fold the first 2 pages out. These pages
show images of the SWING with identification by numbers.
Overview headphone:
1 controller for volume
2 loud speaker ear adapters
3 battery compartment
4 status LED
5 pairing button (connect)
6 balance (Bal)
7 tone adjustment left right (tone)
Overview LR earpiece:
8 On/Off switch (On / Off)
9 controller for volume
10 induction loop
11 strangulation protection
12 battery compartment
13 status LED
14 pairing button (connect)
15 balance (Bal)
16 tone adjustment left right (tone)
Overview sender:
17 charging bay
18 charge LED for receiver in charging bay
19 replacement battery charging bay
20 charge LED for replacement battery charging bay
21 status LED sending
Overview accessories:
22 power supply connection
23 USB connection
24 AUDIO, MIC / USB selector switch
25 female connector for connection to a sound source (green)
26 female connector for connection to a microphone (black)
27 pairing button (connect)
English 27
Page 6
We congratulate you for purchasing your »SWING« headphones. You have
chosen a reliable state-of-the-art and reliable device. Please review these
operating instructions carefully to ensure that you commission the device correctly and that you are familiar with all functions of the device.
Connect sender to a sound source
Please switch the sound source off before connecting the sender.
CONNECT
MIC
DC 12V
USB AUDIO
AUDIO
USB
MIC
25
28
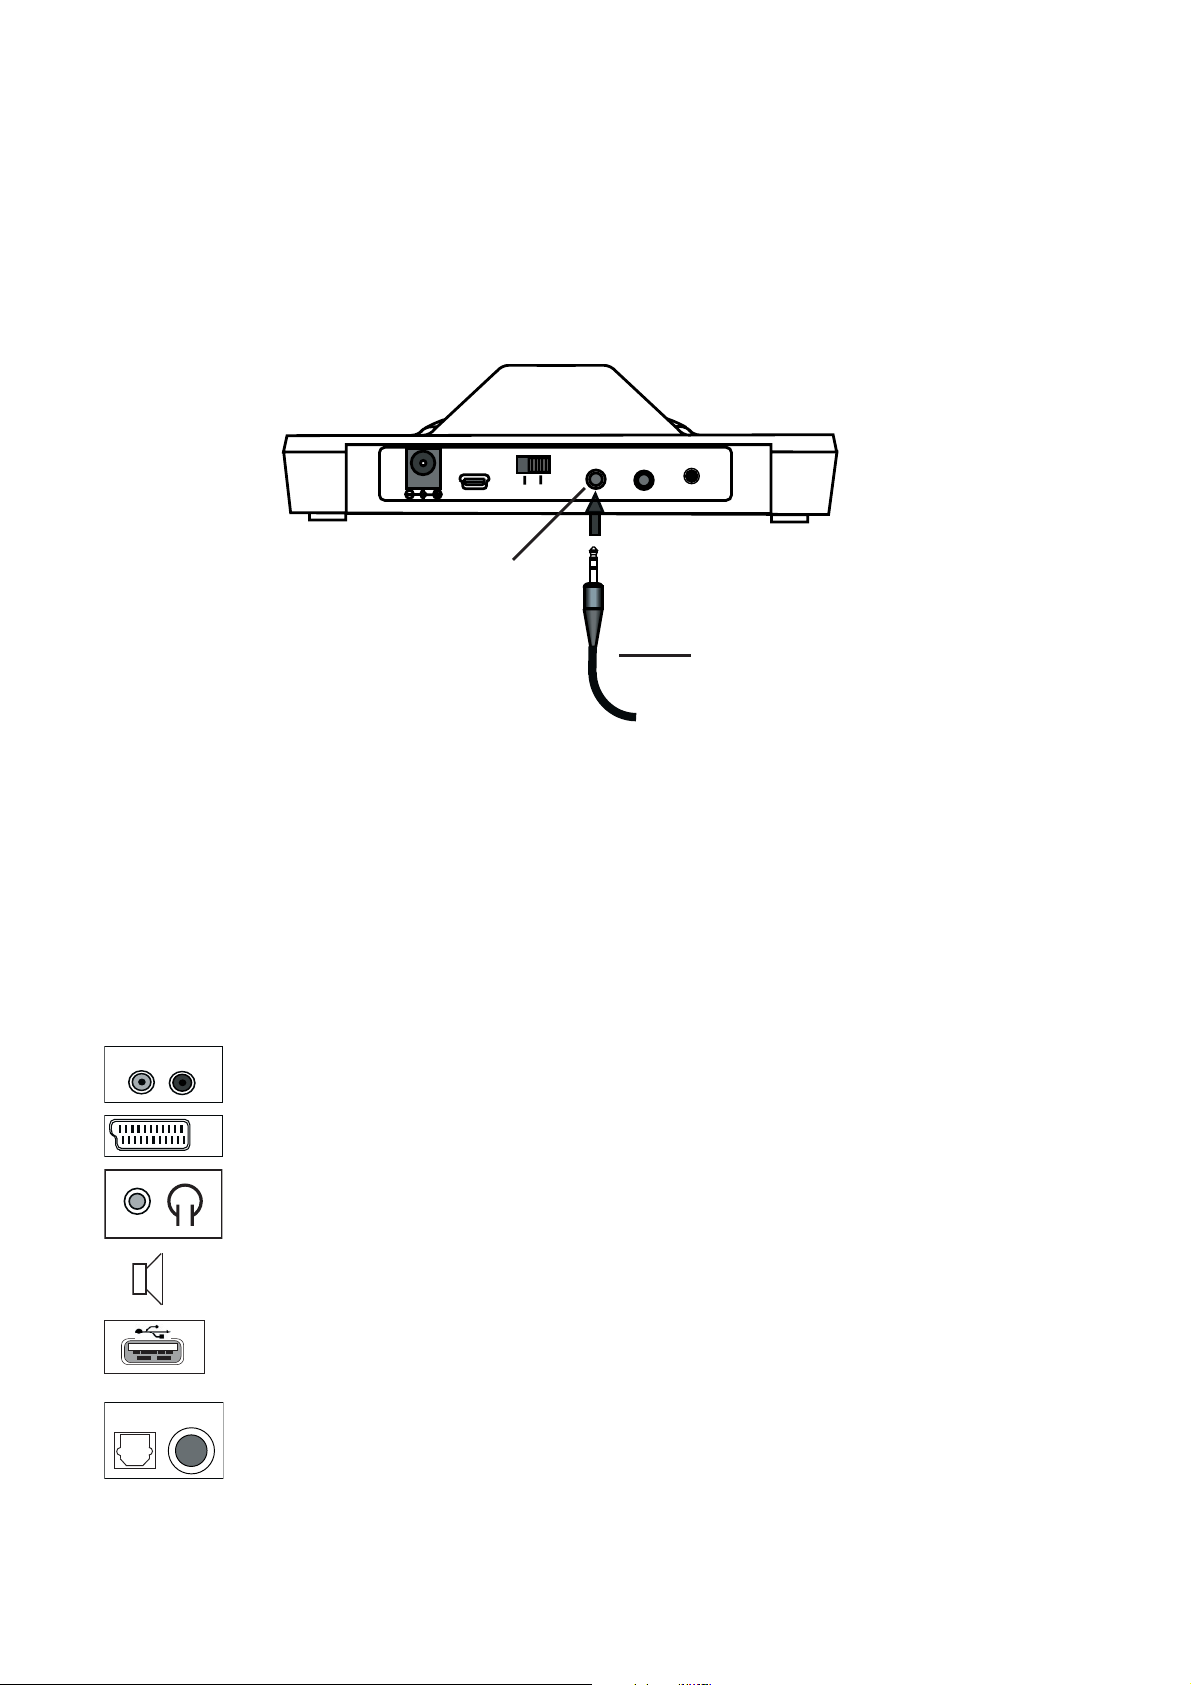
Plug the provided audio connection cable 28 into the green “Audio” female
connector 25 of the sender.
Several options exist to connect the SWING digital to a sound source (e.g. TV,
computer, etc.).
Please check the connection options of your sound source.
AUDIO OUT
– Cinch female connector
L
– SCART female connector
R
AV
– Headphone connection
)
)
– External microphone (optional)
)
)
– USB connection (e.g. computer)
DIGITAL OUT
COAXIAL
OPTICAL
– S/PDIF digital output (optional with adapter box A-4963-0)
English 28
Page 7
Connect sender to a Cinch female connector
CONNECT
MIC
AUDIO OUT
L
DC 12V
USB AUDIO
USB
AUDIO
MIC
R
28
29
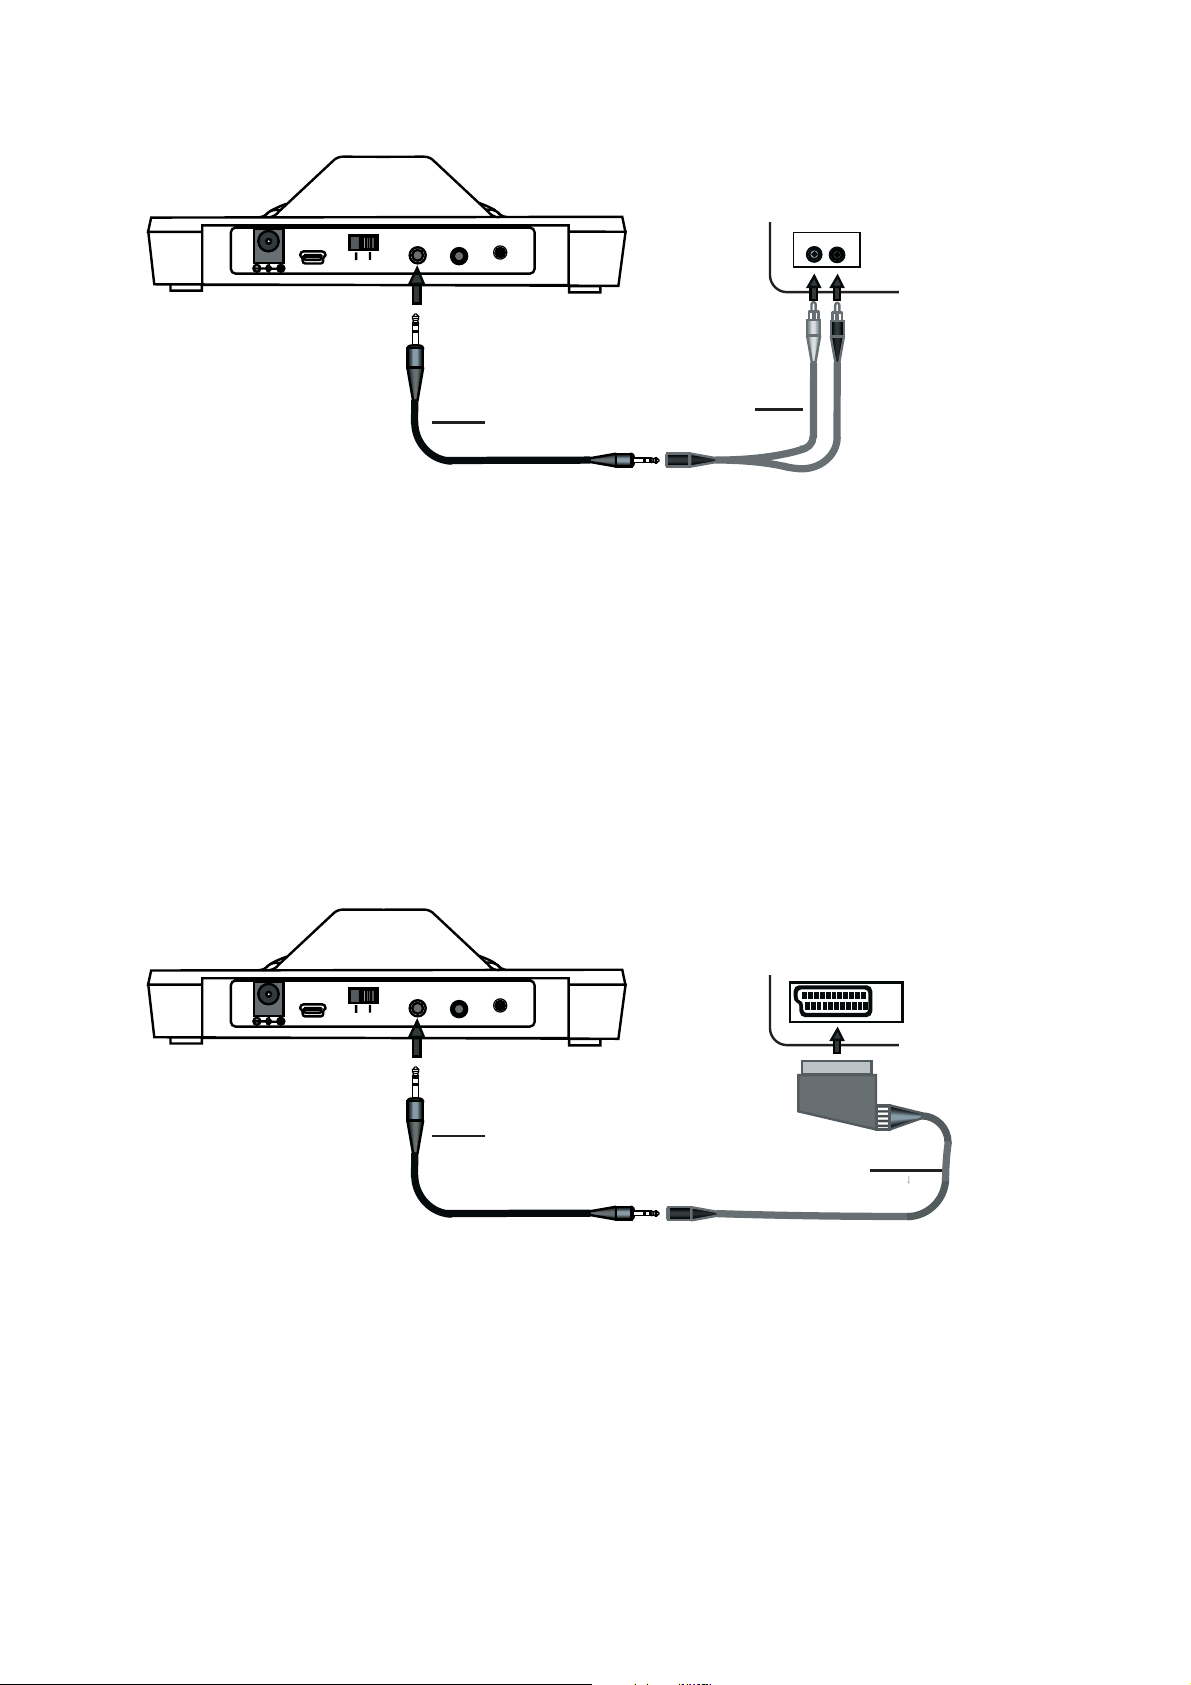
Connect the adapter cable with the Cinch plugs 29 to the audio connection
cable 28.
Plug the Cinch plug into the Cinch connection of your sound source. Please
ensure that the white connection is connected to the white connection of your
sound source.
Please ensure that the red connection is connected to the red connection of
your sound source.
Optionally, a S/PDIF is available for the Chinch adapter box A-4963-0. It will
be connected between your sound source and the Cinch plug 29.
Connect sender to a SCART female connector
CONNECT
MIC
AV
DC 12V
USB AUDIO
USB
AUDIO
MIC
SCART
OUT
28
30
Connect the SCART adapter 30 into the audio connection cable 28.
Plug the SCART adapter into the SCART female connection of your sound
source.
English 29
Page 8
Connect sender headphone connector
TV
CONNECT
MIC
PHON E
DC 12V
USB AUDIO
USB
AUDIO
MIC
28
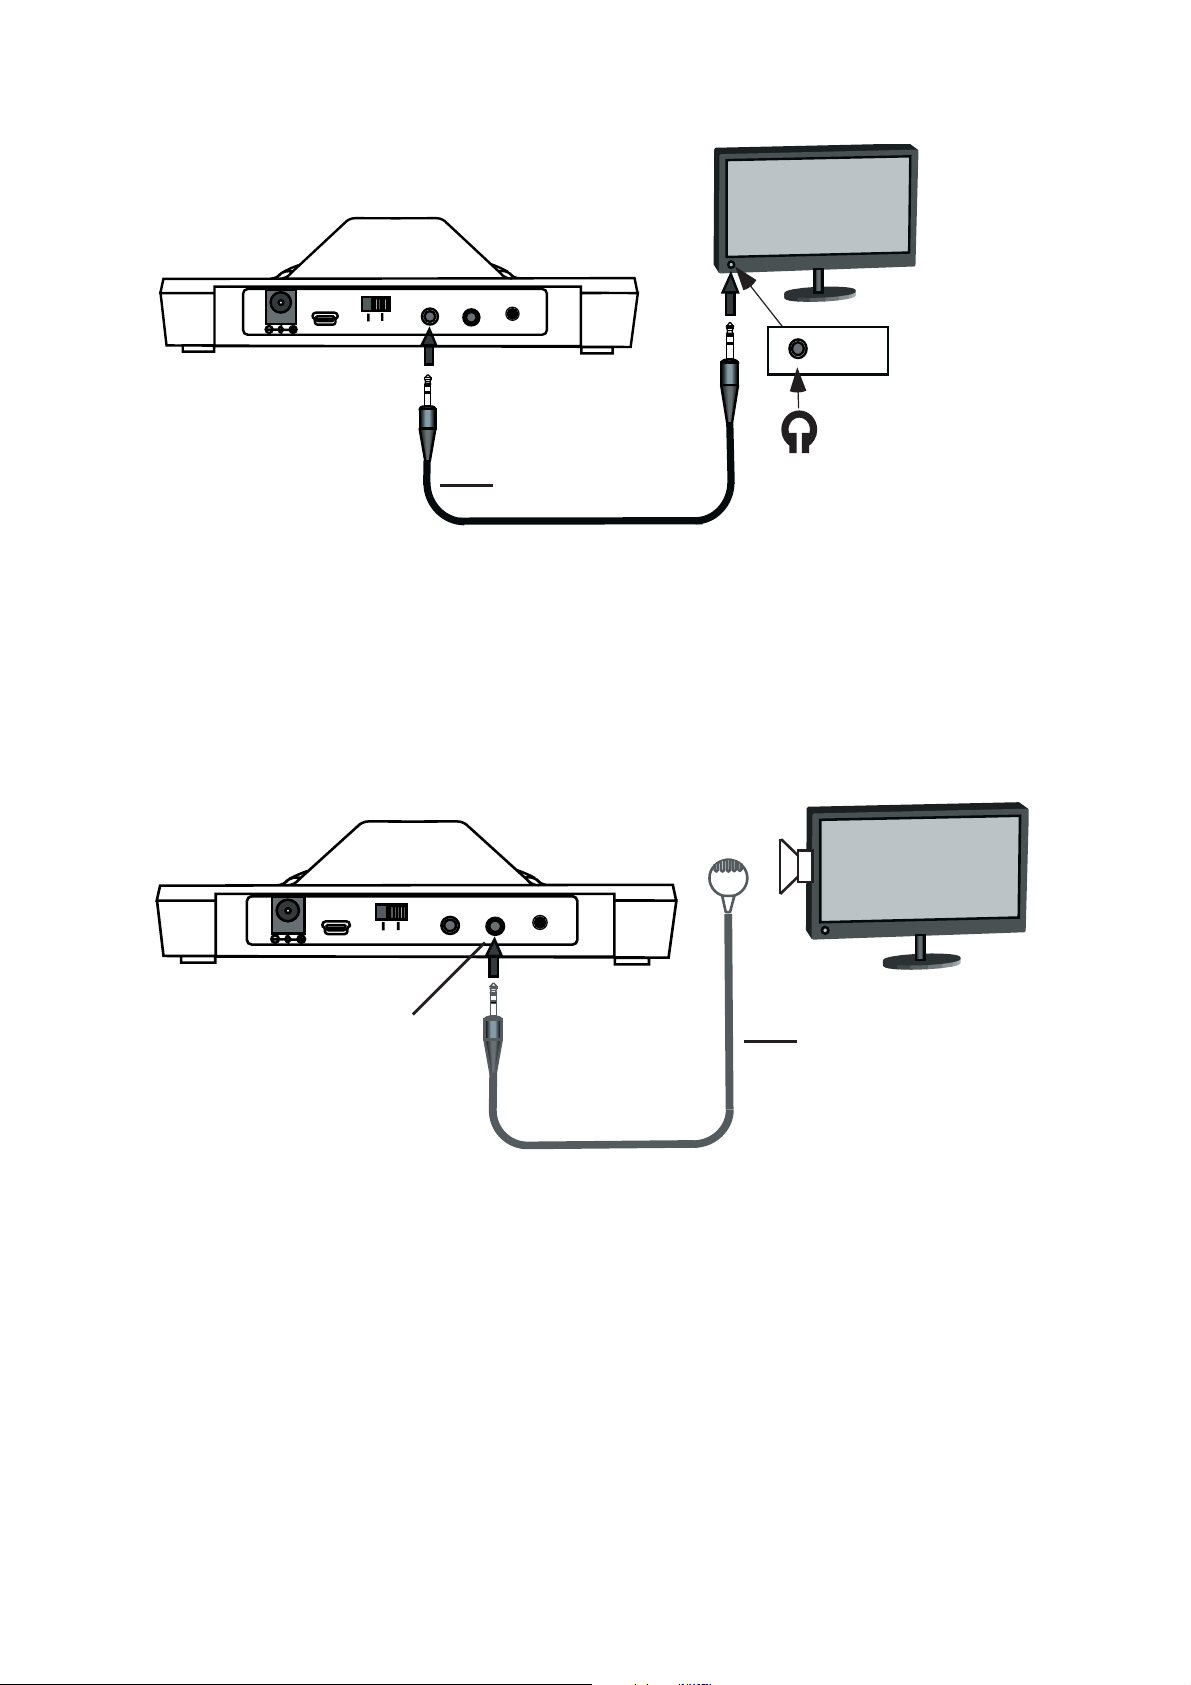
Plug the audio connection cable 28 into the headphone connection of your
sound source.
You may need the 6.5 mm headphone plug adapter for the connection of the
headphone to your sound source. Set the volume of your sound source to an
average volume.
Connect the sender to the microphone (optional)
)
)
)
)
CONNECT
MIC
32
DC 12V
USB AUDIO
USB
AUDIO
MIC
26
The microphone is not included in the scope of supply. It can be purchased
from your specialty retailer. Only the microphone A-4967-0 must be used.
Plug the microphone 32 into the black “MIC” connection 26 of the sender.
Fasten the microphone at the loudspeaker of your sound source.
TV
English 30
Page 9
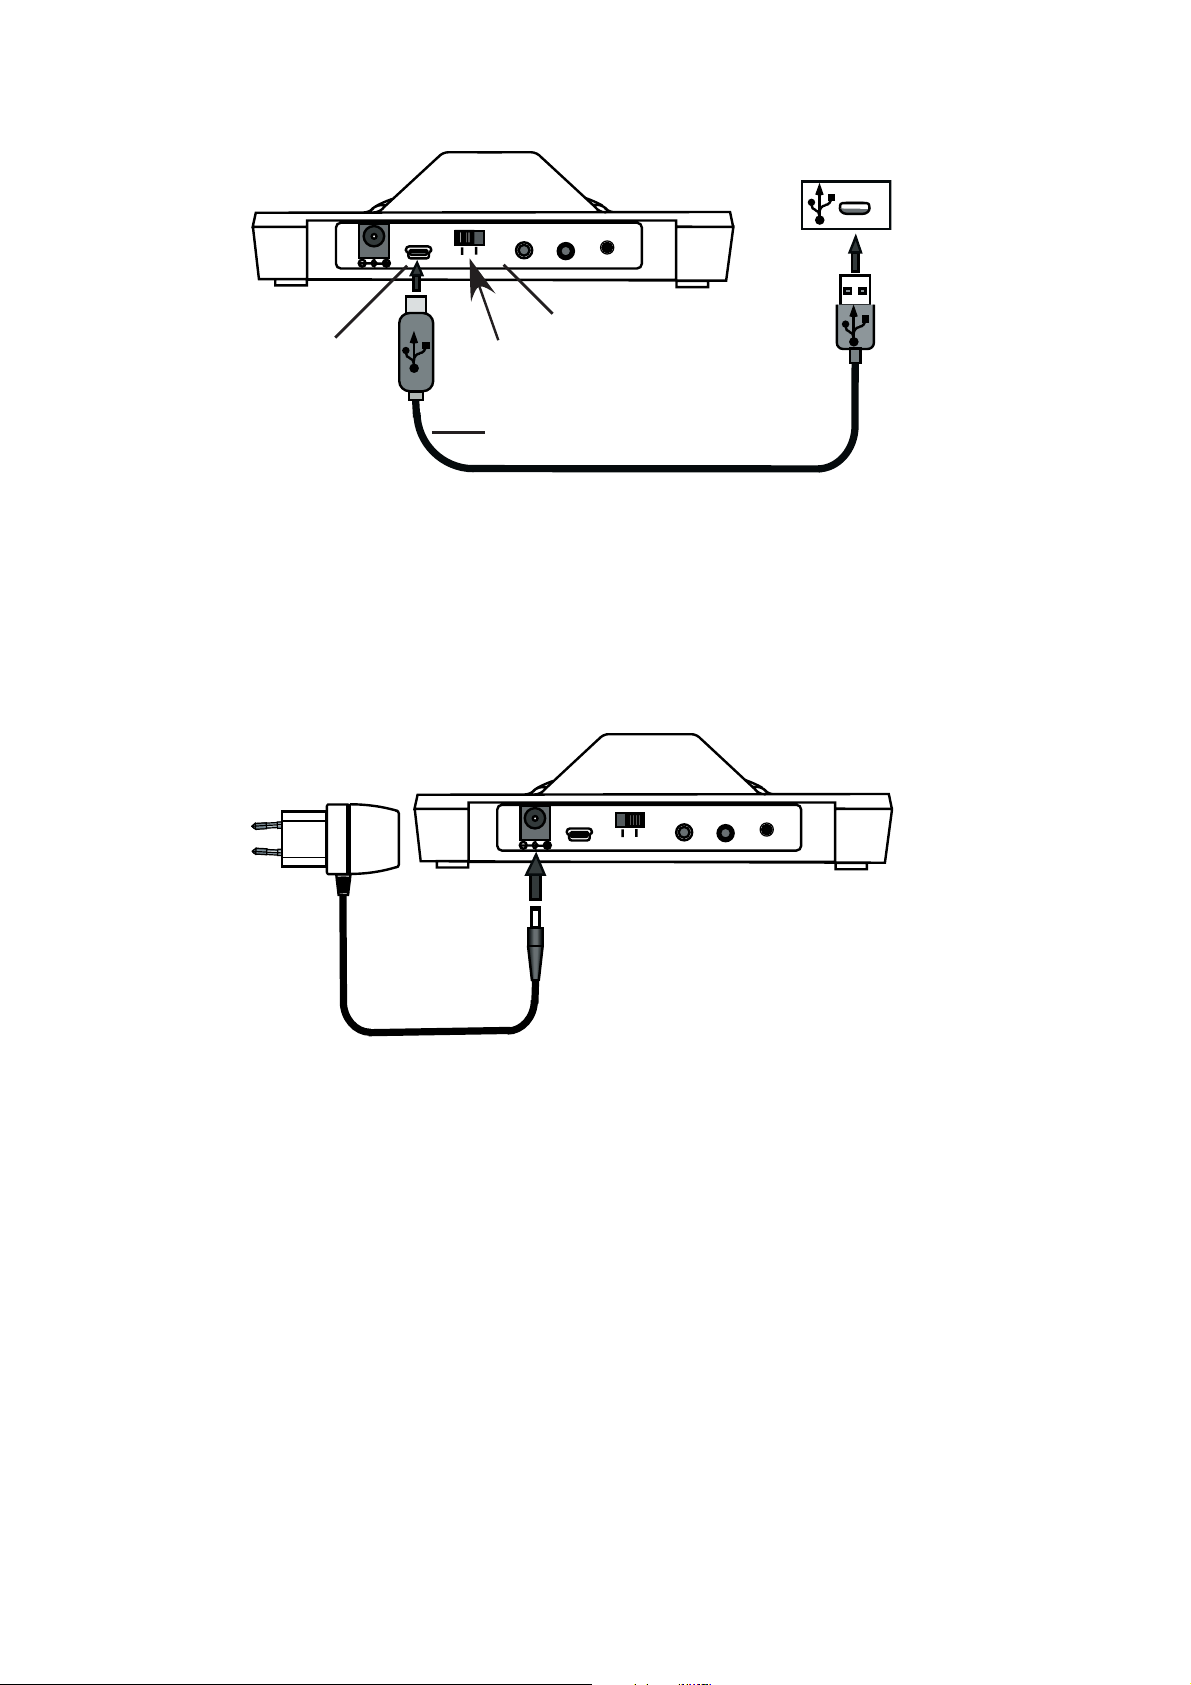
Connect sender to the USB connector
USB
CONNECT
USB AUDIO
DC 12V
USB
AUDIO
MIC
MIC
24
23
33
The USB cable 33 is not included in the scope of supply. It can be purchased
from your specialty retailer. The sender has a mini USB connection.
Plug the USB cable into the “USB” connection 23 of the sender and connect
it to your computer. The switch 24 must be set to “USB”.
Connect sender to the mains supply
CONNECT
USBAUDIO
DC 12V
AUDIO
USB
MIC
Connect the provided power supply with the sender through the power
supply connection “DC12V”. The power supply itself will be connected to
an electrical outlet.
Please charge the receiver with the installed battery for 6 hours before
commissioning the device for the first time.
MIC
English 31
Page 10

Use Swing digital
Use SWING digital standard version
Please follow the instruction to use your SWING digital:
1. Switch your sound source on (e.g. TV).
2. Adjust the volume level controller 1 initially to a low volume to protect your
ears. The volume increases when you turn the dial into the direction of “5”
and it decreases when you turn the dial into the direction of “0”.
3. Please put the headphone on. By spreading the speaker arms, the headphone switches automatically on. The green LED 4 always indicates that
the receiver is switched on.
4. The blue LED bar 21 is illuminated as soon as the sender has contact
and transmits to the receiver.
5. Set the desired volume 1.
6. If you remove the headphone then it will be switched off automatically.
We ecommend to put the headphone always back into the sender to
ensure that the battery is always charged.
Use SWING digital LR
Please follow the instruction to use your SWING digital:
1. Switch your sound source on (e.g. TV).
2. Adjust the volume level controller 9 initially to a low volume to protect your
ears. The volume increases when you turn the dial into the direction of “5”
and it decreases when you turn the dial into the direction of “0”.
3. Ensure that the ring loop lock has been closed completely. The ring loop
lock is used to comfortably wear the device and to minimize accidents.
4. The receiver will be switched on and off by using the ON/OFF switch on
the back. Caution: Always switch the receiver off after use because the
battery discharges itself otherwise. The green LED 13 always indicates
that the receiver is switched on.
5. The blue LED bar 21 is illuminated as soon as the sender has contact
and transmits to the receiver.
6. Set the desired volume.
7. Switch the receiver off after use. We recommend to put the receiver always back into the sender to ensure that the battery is always charged.
English 32
Page 11
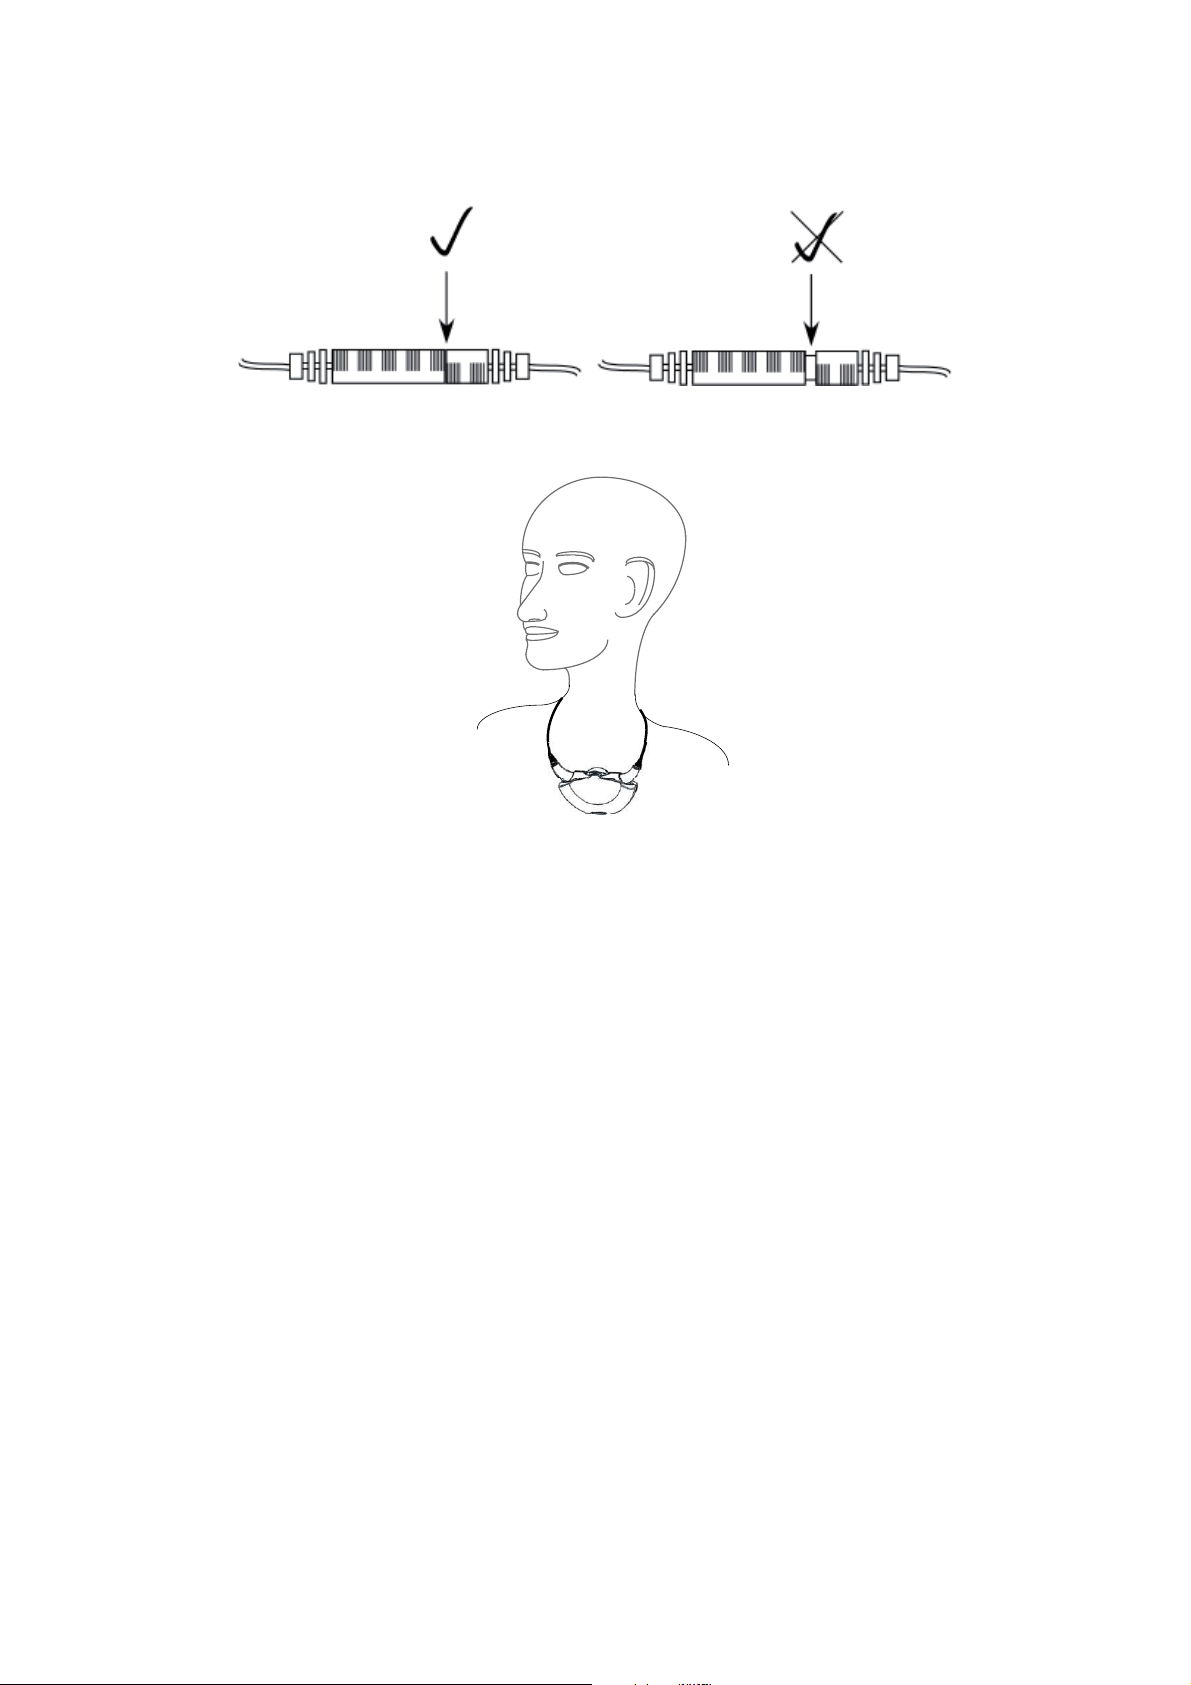
Safety lock in the tele-loop
(only for LR version)
Please ensure that the safety lock is completely closed in the tele-loop to
guarantee a flawless functioning.
Please ensure the receiver is worn correctly.
Listening with the 3.5 mm stereo output
(only for LR version)
The following accessories can be connected to the 3.5 mm stereo jack plug:
UÊ Earphones discreet design
UÊ Chin band headphone, closed system
UÊ Light weight headphones, traditional design
UÊ Induction plate Monaural
UÊ Induction plate Binaural
UÊ Euro-cable Monaural, damped
UÊ Euro-cable Binaural, damped
Important!
The overall transmission time of the receiver can be reduced significantly depending on the accessories connected to the stereo output. We recommend
to buy an additional battery to guarantee a large operating time.
English 33
Page 12
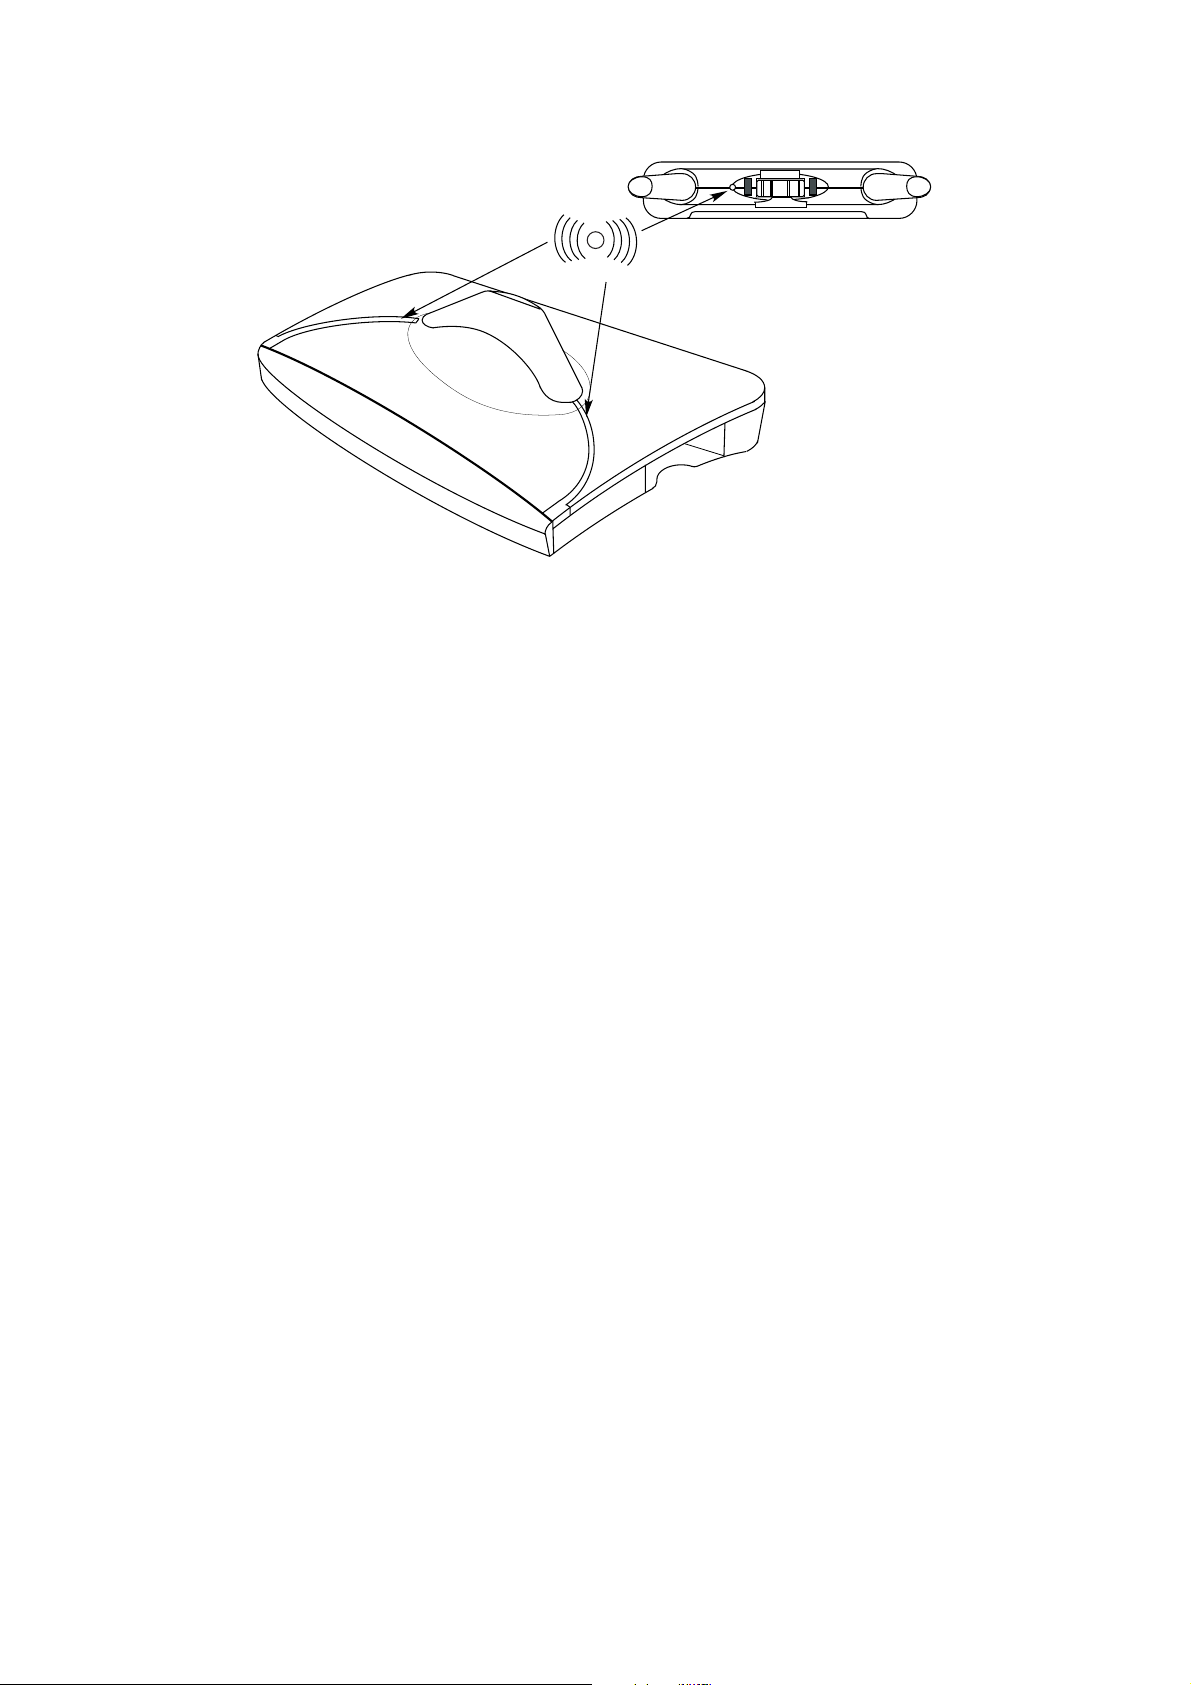
Pairing of sender and receiver
2 4
3
If you want to add an additional receiver to th sender then the new receiver
must first be paired with the sender. This is required to ensure that sender
and receiver recognize each other and that they can transmit the data
encrypted.
This is only required once for each headphone. A maximum of 4 headphones
can be paired with a sender.
If the headphone does not find a sender, then the red LED 4 blinks and no
signal will be received.
Please follow the instruction to pair the receiver with the sender:
1. Ensure that the sender is connected to an electrical outlet and that it is
provided with electricity.
2. Put the receiver on to ensure that it is switched on. For the SWING digital
LR version switch the LR receiver on.
3. Press the “Connect” button 27 briefly at the sender. The blue LED bar
starts flashing.
4. Press the “Connect” button 5 / 14 briefly at the receiver to complete the
pairing.
5. Once the paring has been completed, the sensor and the receiver
stop flashing.
English 34
Page 13
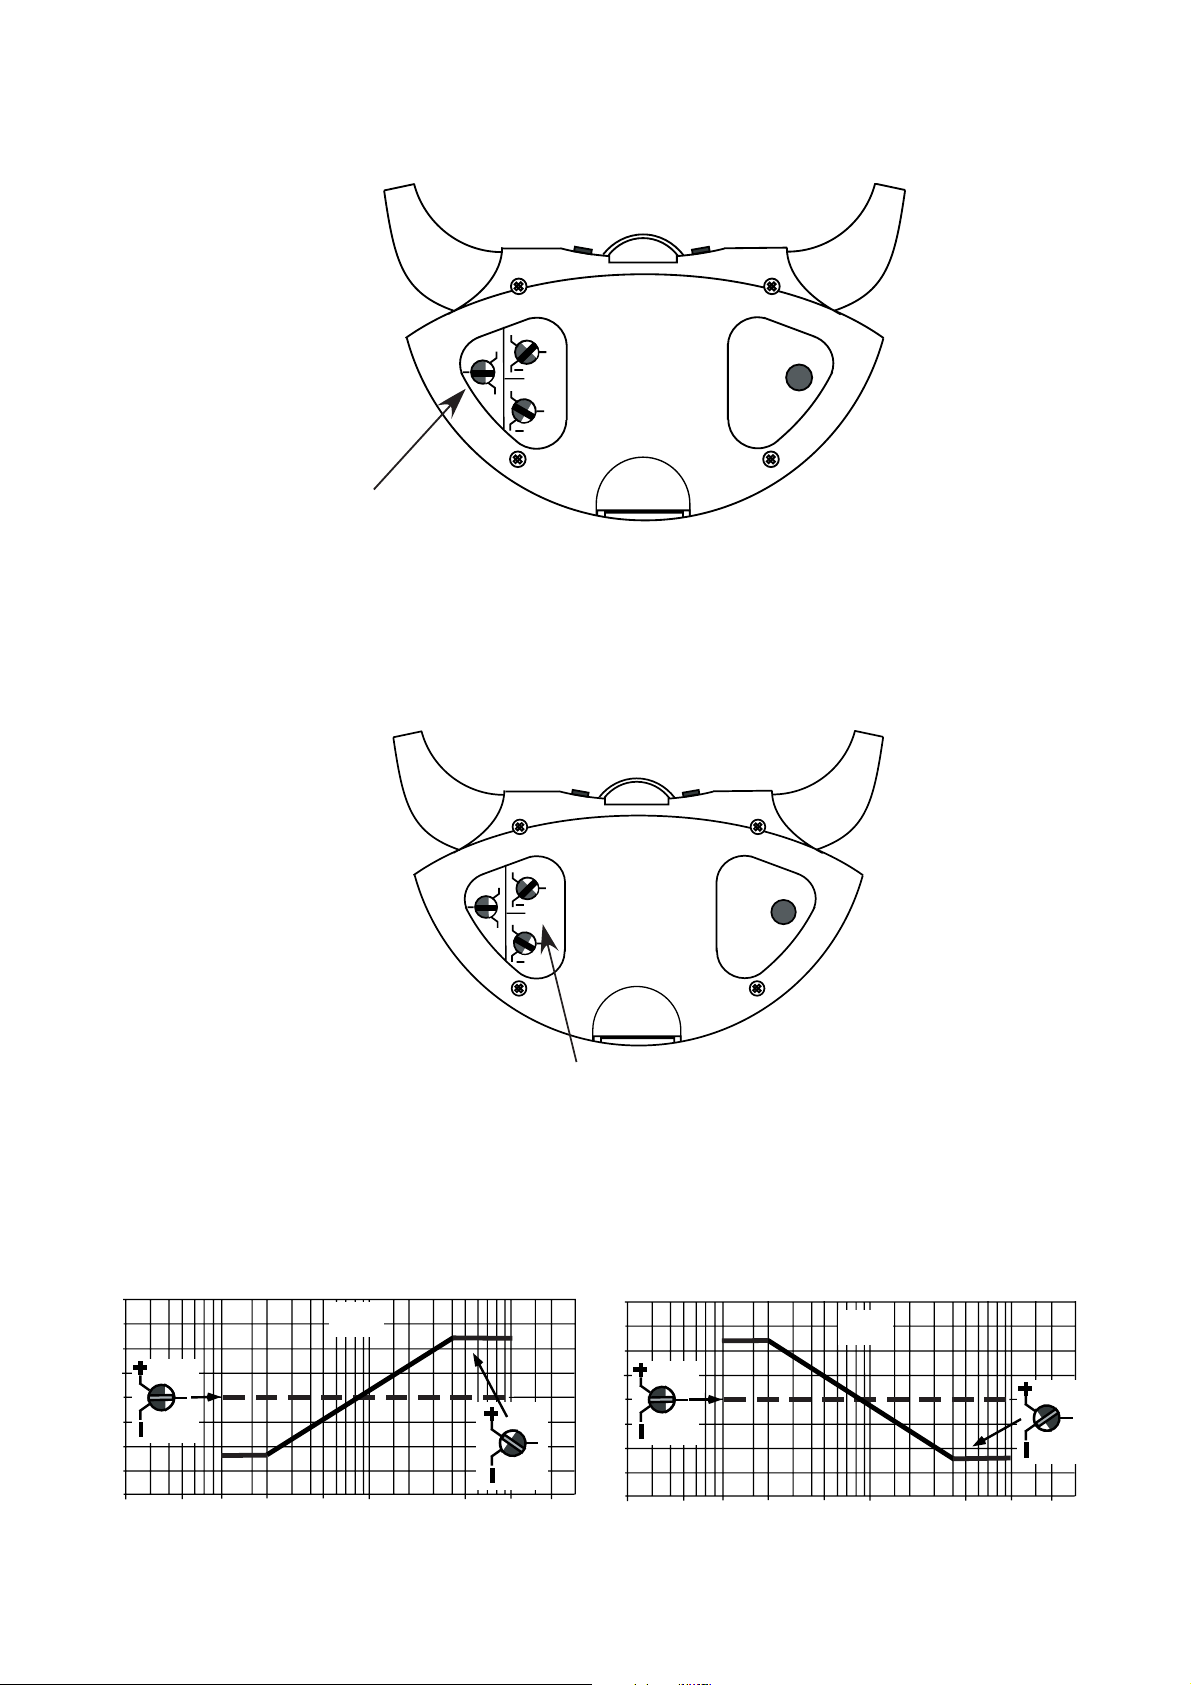
Set balance
(SWING digital and 3.5 mm stereo output SWING digital LR)
+
L
BAL
L
TONE
+
R
R
CONNECT
The balance controls the volume distribution between the right and the left
ear. Adjust the balance in such a way that you hear well on both ears.
Adjust audio
(SWING digital and SWING digital LR)
+
L
BAL
L
TONE
+
R
R
CONNECT
The audio control is used to adapt the audio to your ear independently on the
left and right.
Caution: The sound controller for right (R) can be used in the SWING
digital LR to adjust the sound in the ring loop.
dB
15
10
5
0
- 5
-10
-15
200 1000 2000 5000 10000 20000 Hz
20
100
L / R
500
dB
15
10
5
0
- 5
-10
-15
200 1000 2000 5000 10000 20000Hz
20
100
L / R
500
English 35
Page 14
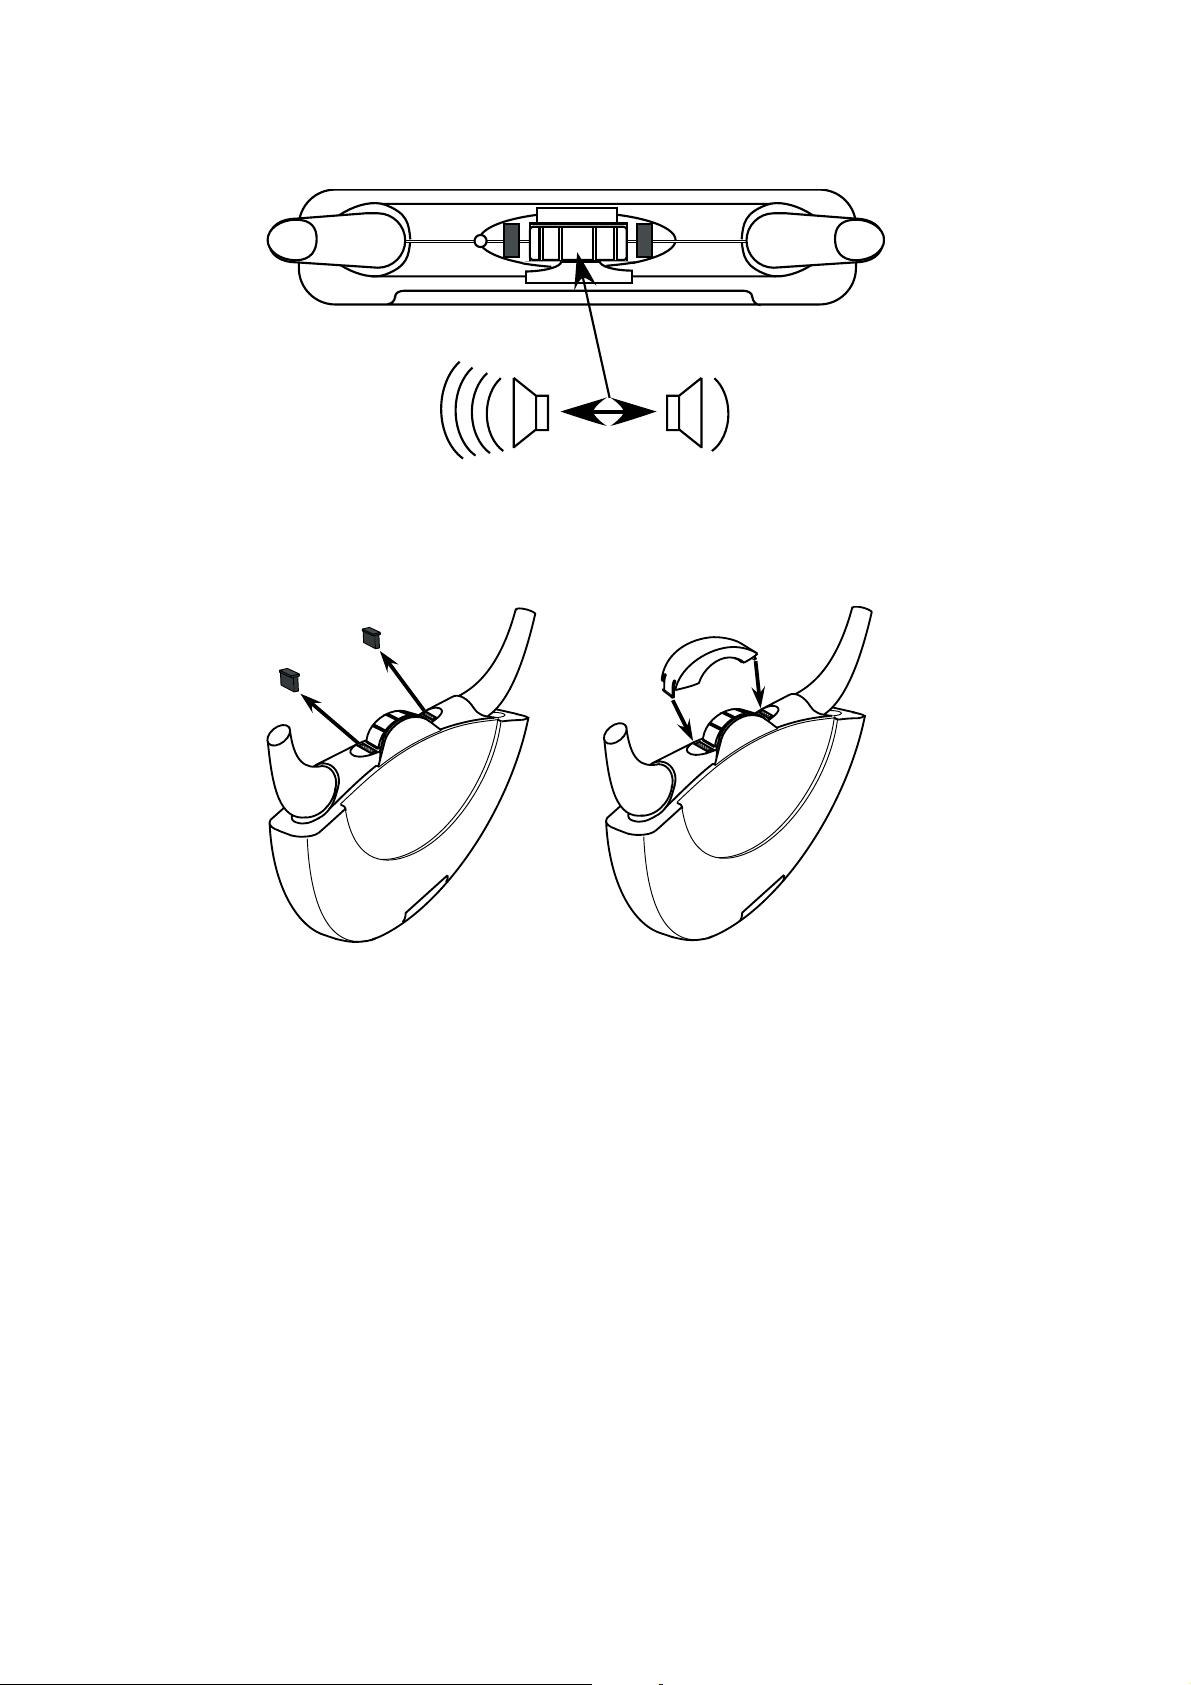
Set volume
Set the volume to a level agreeable to you by adjusting the volume control.
3
2 4
Transparent cover
The transparent cover protects the volume control against unintended adjustment of the volume control and against contamination by dust or fluids.
2
3
4
2
3
4
Remove both rubber covers and click the transparent cover into the openings.
Range
SWING digital uses the newest 2.4Ghz technology. In optimal cases the
range is up to 45 m.
The range depends strongly on the building and the environment. The 2.4Ghz
radio technology also works through walls.
English 36
Page 15
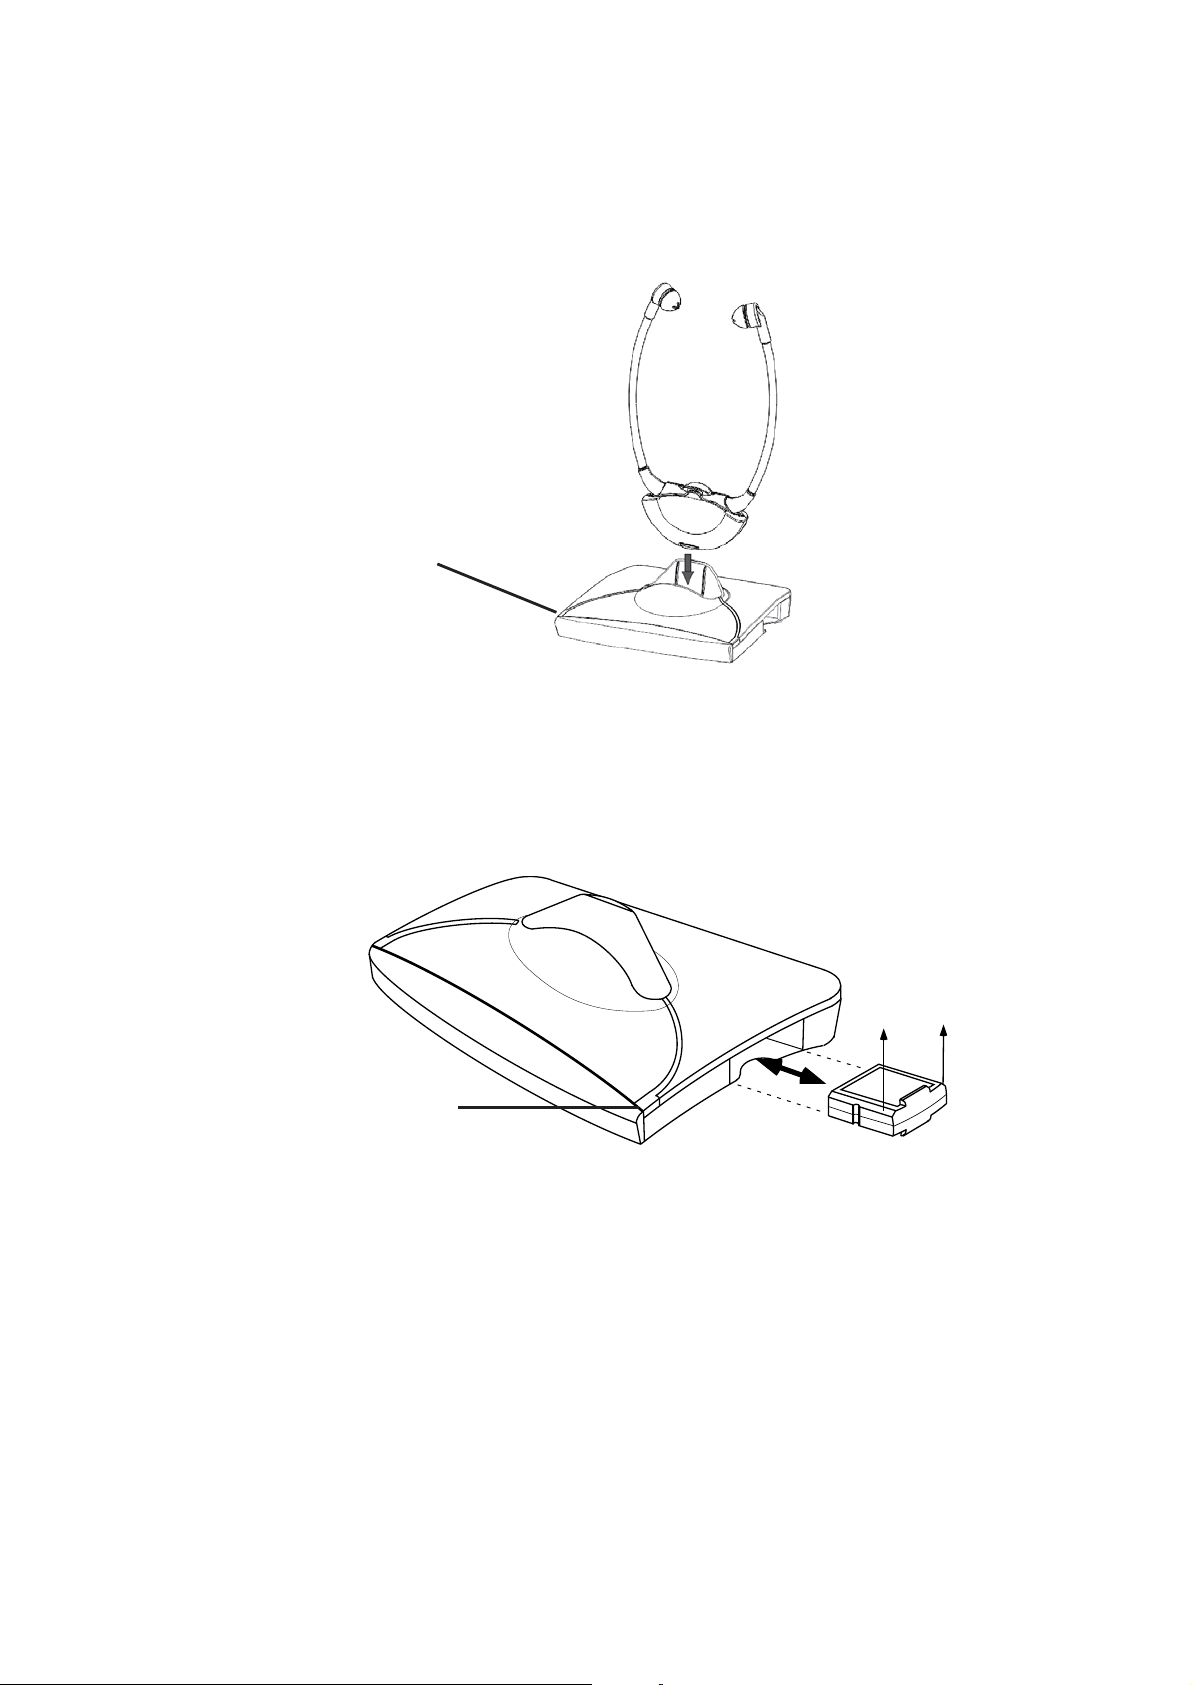
Charge battery
Once the battery is fully charged, it can be used for up to 6 hours. The red
LED 4/13 starts flashing once the battery is almost empty. The battery should
now be charged or exchanged. The operating time is dependent from the set
volume and from what you hear.
18
After use, put the receiver onto the charging bowl of the receiver without
applying pressure.
Ensure that the receiver is placed correctly. If the receiver is charged, the red
LED 18 at the left side of the receiver is illuminated. The LED 18 is illuminated
green as soon as the battery in the receiver is charged.
20
An additional battery can be charged in the sender. Additional batteries are
available at your specialty retailer.
The additional battery can be plugged in into the side charging bay 19.
Please ensure that the milled side points upward and that insert it without
applying too much force. If the LED 20 is illuminated red, then this battery is
charging, if the LED 20 is green then it is ready for use.
We recommend to exchange the battery in the receiver and the spare battery
in the sender weekly. This means that the batteries are used regularly and
that they achieve a maximum service life.
All batteries loose their capacity over time. This is characterized by a shorter
usage time.
English 37
Page 16
Cleaning and care
Clean transmitter and receiver
If the devices are dusty or dirty, please clean them now and then with a soft,
clean and slightly moist cloth.
Please disconnect the sender from the mains supply before you start with the
cleaning activity.
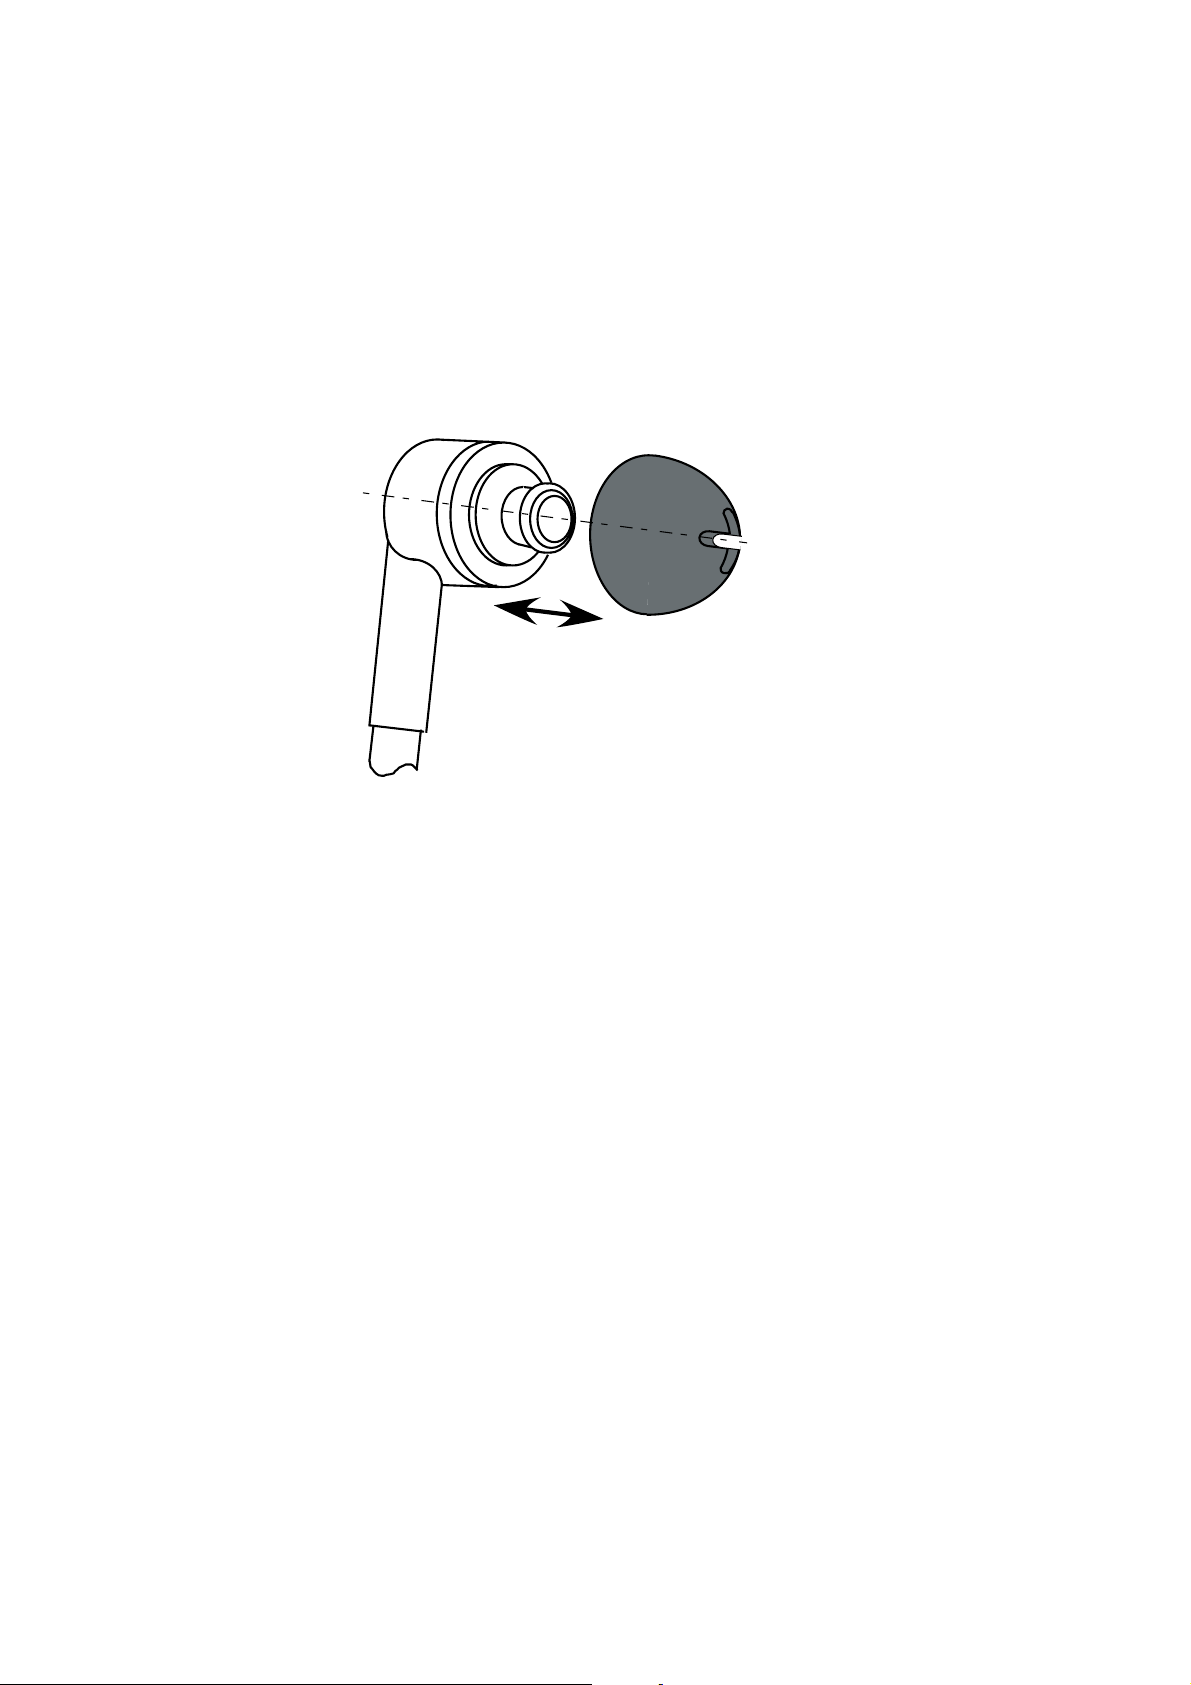
Cleaning of silicone ear adapters
You can pull the ear adapters from the fixture. Please clean the ear adapters
with mild soap water. Dry the ear adapters well and attach them afterwards.
Exchange of the silicone ear adapters
The skin-neutral silicone ear adapters must be exchanged if they are strongly
contaminated.
You can pull the ear adapters from the fixture. The new silicone ear adapters
can be plugged over the fixture.
English 38
Page 17
Important information
Chemical
Chemie
solvents
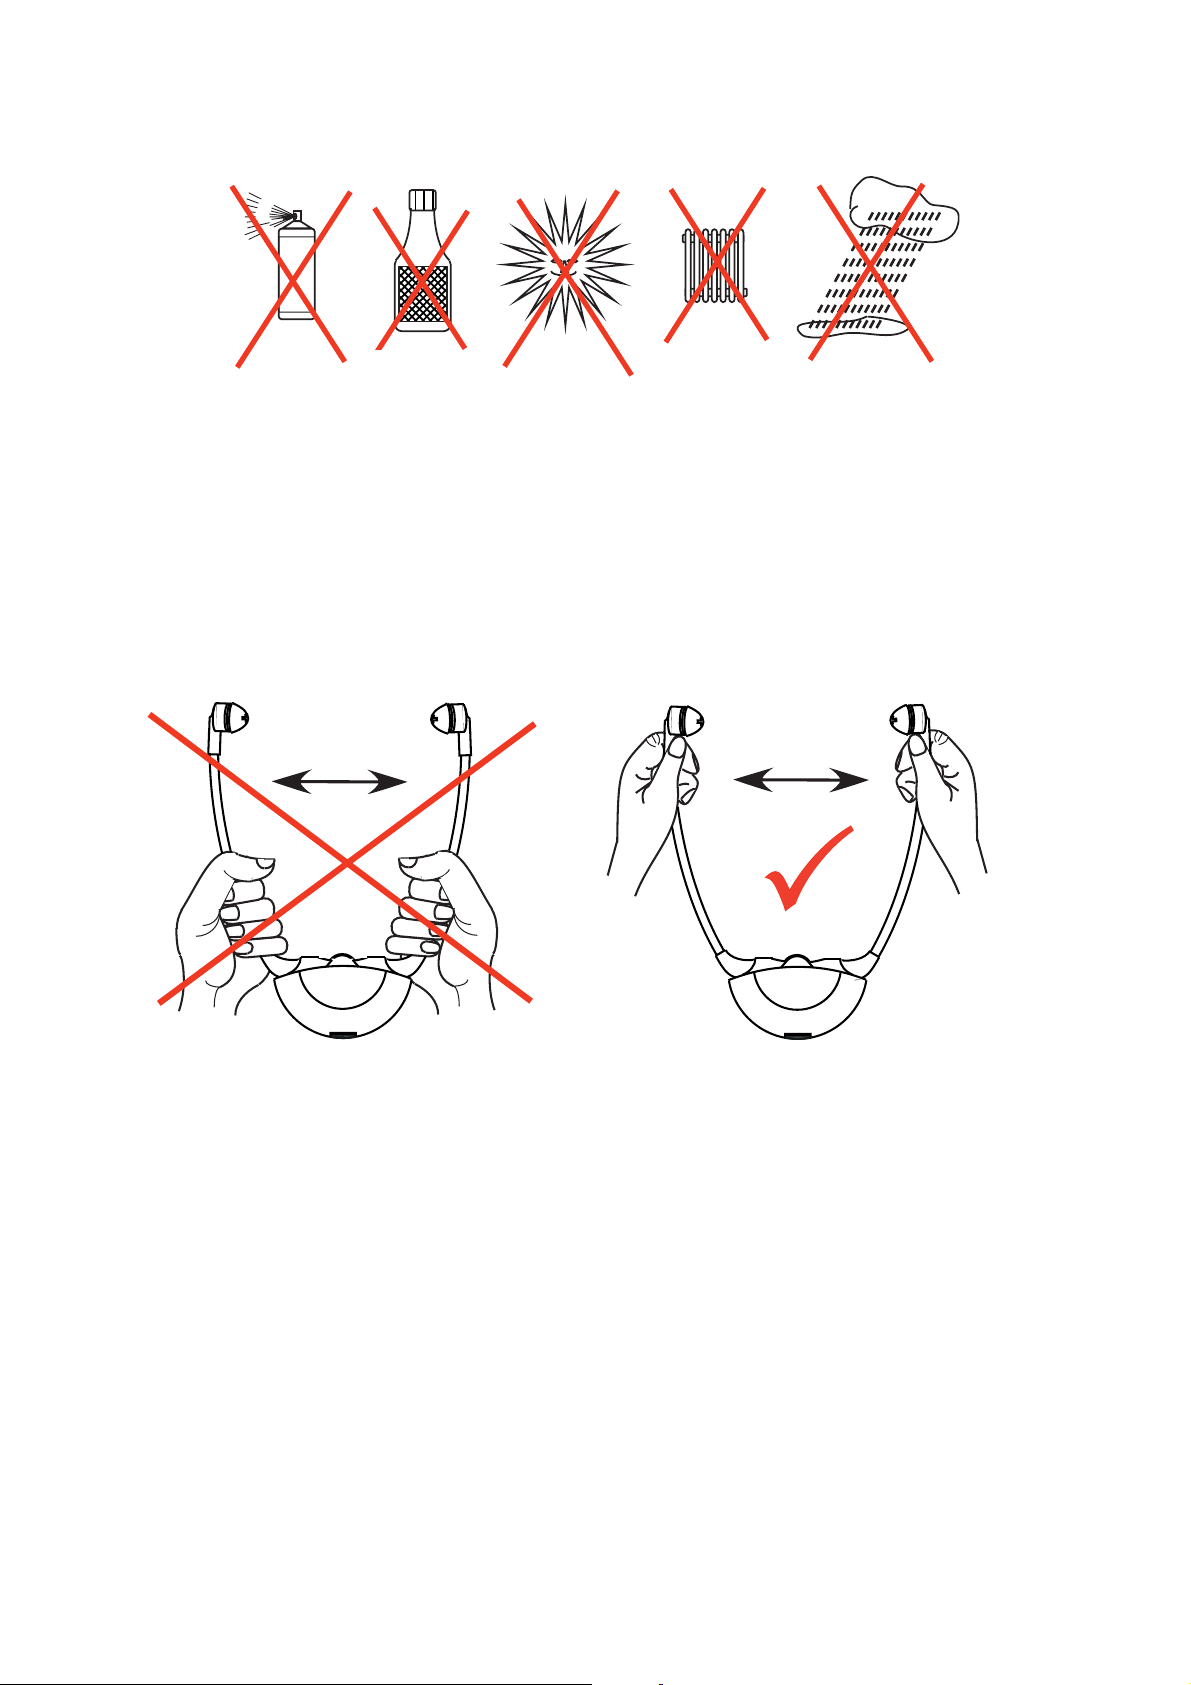
Product damages caused by improper handling as well as interference due
to strong contamination are excluded from the warranty.
The device is not protected against splash water. Do not put objects that are
filled with fluids on the device, e.g. vases.
Open fire sources such as burning candles, must also not be put on the
device.
Warranty
The Swing has a high operating safety. Please contact your specialty retailer
or contact the manufacturer directly in case that failures occur despite proper
assembly and operation. The warranty service includes the free repair as well
as the free return shipment. If possible, please send the device in the original
packing, therefore do not throw it away. The warranty expires for damages
that are caused by improper handling or repair attempts by unauthorized persons (destruction of the quality seal). Warranty repairs will only be performed
when sending the completed warranty card and a copy of the invoice/sales
slip by the specialty retailer. The device number must always be listed.
English 39
Page 18
Environmental information/disposal
Disposal of used electrical and electronic devices (to be applied in
countries of the European Union and other European countries with
a separate collection system for these devices). The symbol on the
product or on its packing indicates that this product must not be treated as
normal household waste, but that it must be returned to a recycling point of
acceptance for electrical and electronic devices or that it must be disposed
in a Yellow Bin. You are protecting the environment and the health of your
fellow men by contributing to the correct disposal. The environment and
the health are endangered by wrong disposal.
Material recycling helps to reduce the consumption of raw materials.
Additional information about recycling of this product can be obtained from
your community, the municipal disposal companies or the shop where you
bought the product.
Battery
The provided battery can be recycled. Please dispose the battery
through the battery container or the specialist shop. Please dispose
only discharged batteries to guarantee environmental protection.
This devices adheres to the requirements of the following EU directives:
– 1999/5/EG R&TTE directive
– 2002/95/EG RoHS directive
– 2002/96/EG WEEE directive
– 2004/108/EG EMV directive
– 2006/95/EG low voltage directive
The conformity of the a.m. directives is confirmed by the CE mark on
the device. CE conformity declarations are available on the Internet under
www.humantechnik.com.
Subject to technical changes
English 40
Page 19
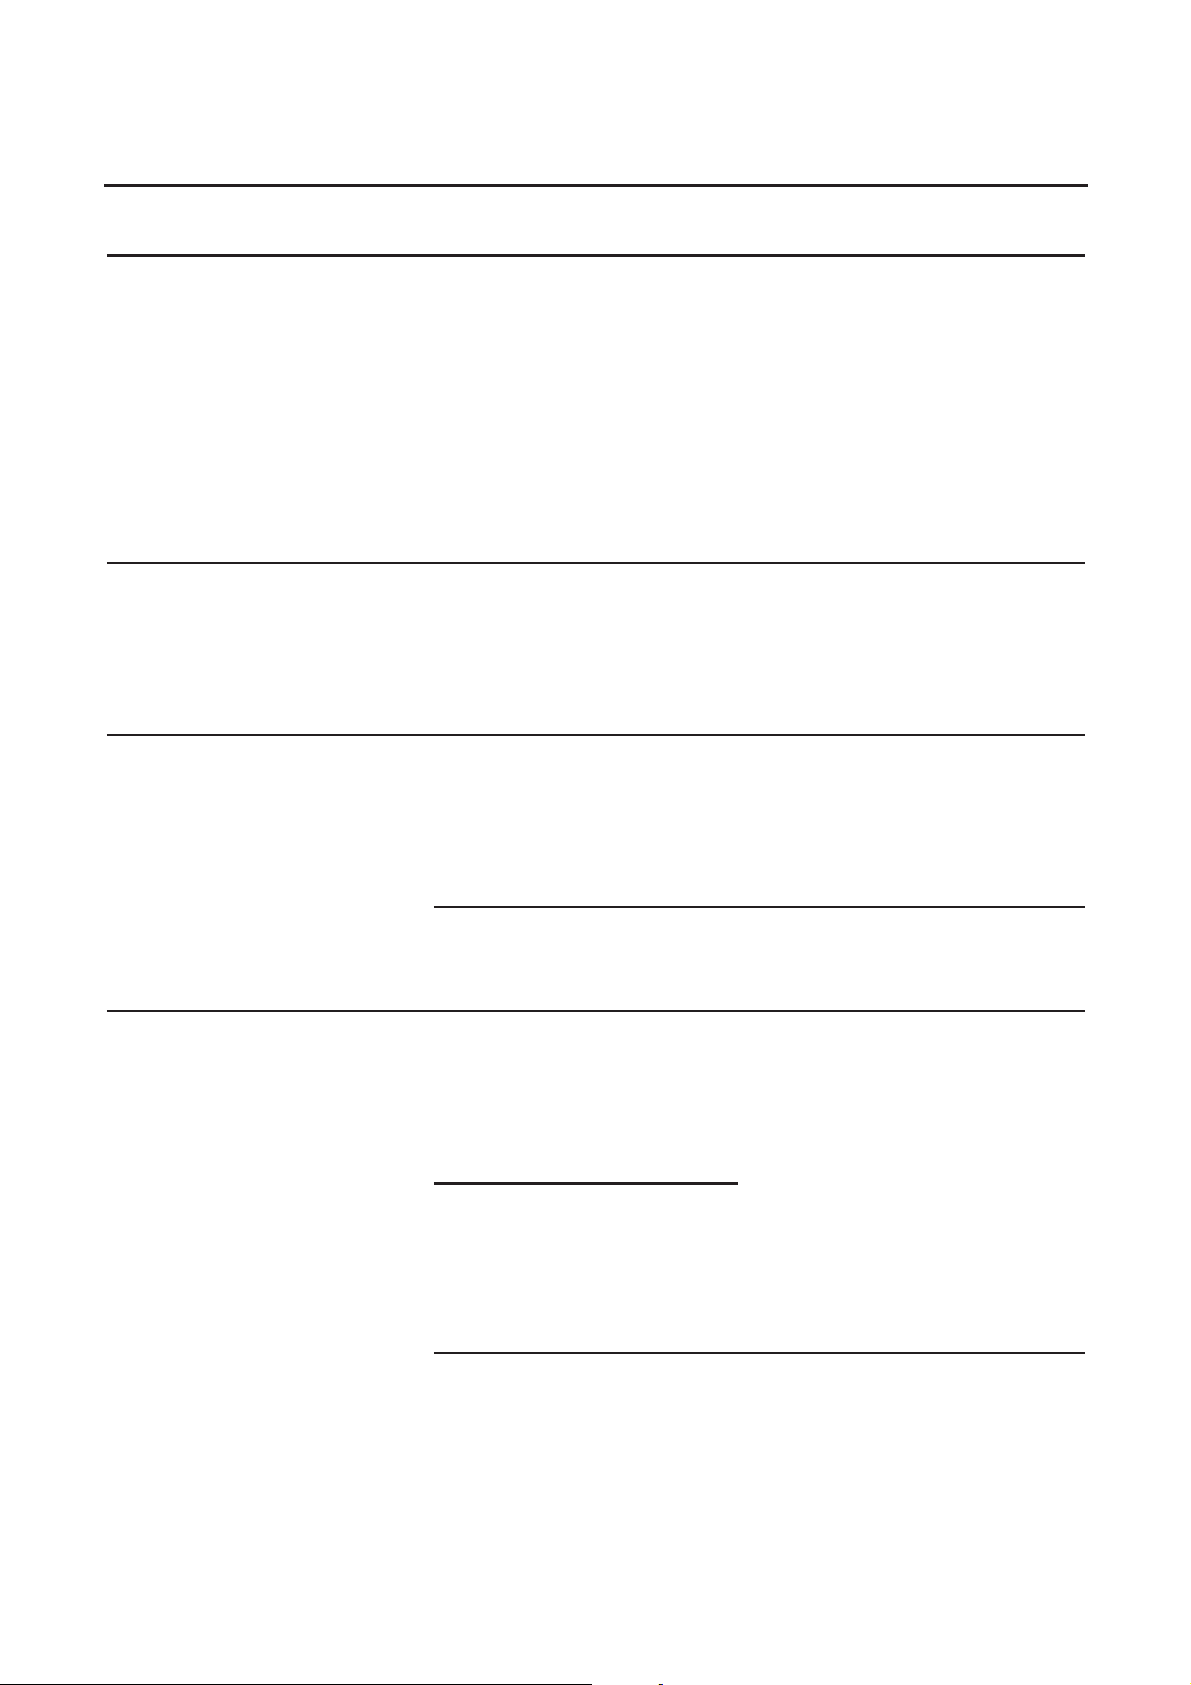
Failure cause and resolution
Symptoms Cause Resolution
Charge control lamps
do not illuminate – despite inserted battery
into the charge station
of the sender.
The charging control
lamp is not illuminated,
despite the fact that the
batteries are inserted.
Receiver charging
control lamp is not
illuminated, despite the
fact that the receiver
is inserted in the
charging station.
Sender has no electricity from power supply.
No contact between
battery and charging
station in sender.
No contact between
battery in the receiver
and the charging
station in sender.
No battery inserted into
the receiver.
Check whether the
power supply is connected to the electrical
outlet of the house and
at the plug and whether
the electrical outlet is
working and that no fuse
was triggered.
Insert the batteries correctly and completely
into sender.
Insert the batteries true
to side and completely
into sender and the
charging station..
Insert battery in receiver.
Receiver does not
work – no sound transmission.
The sender is not connected or not connected correctly to the TV
set or the HiFi system.
TV set or HiFi system is
not switched on.
Pairing was lost Re-pair sender and
Check the cable and the
plug connection between
the sender and the TV
or HiFi device. Use the
operating instructions of
the TV or HiFi device to
check whether the headphone output is correctly
connected.
receiver
English 41
Page 20
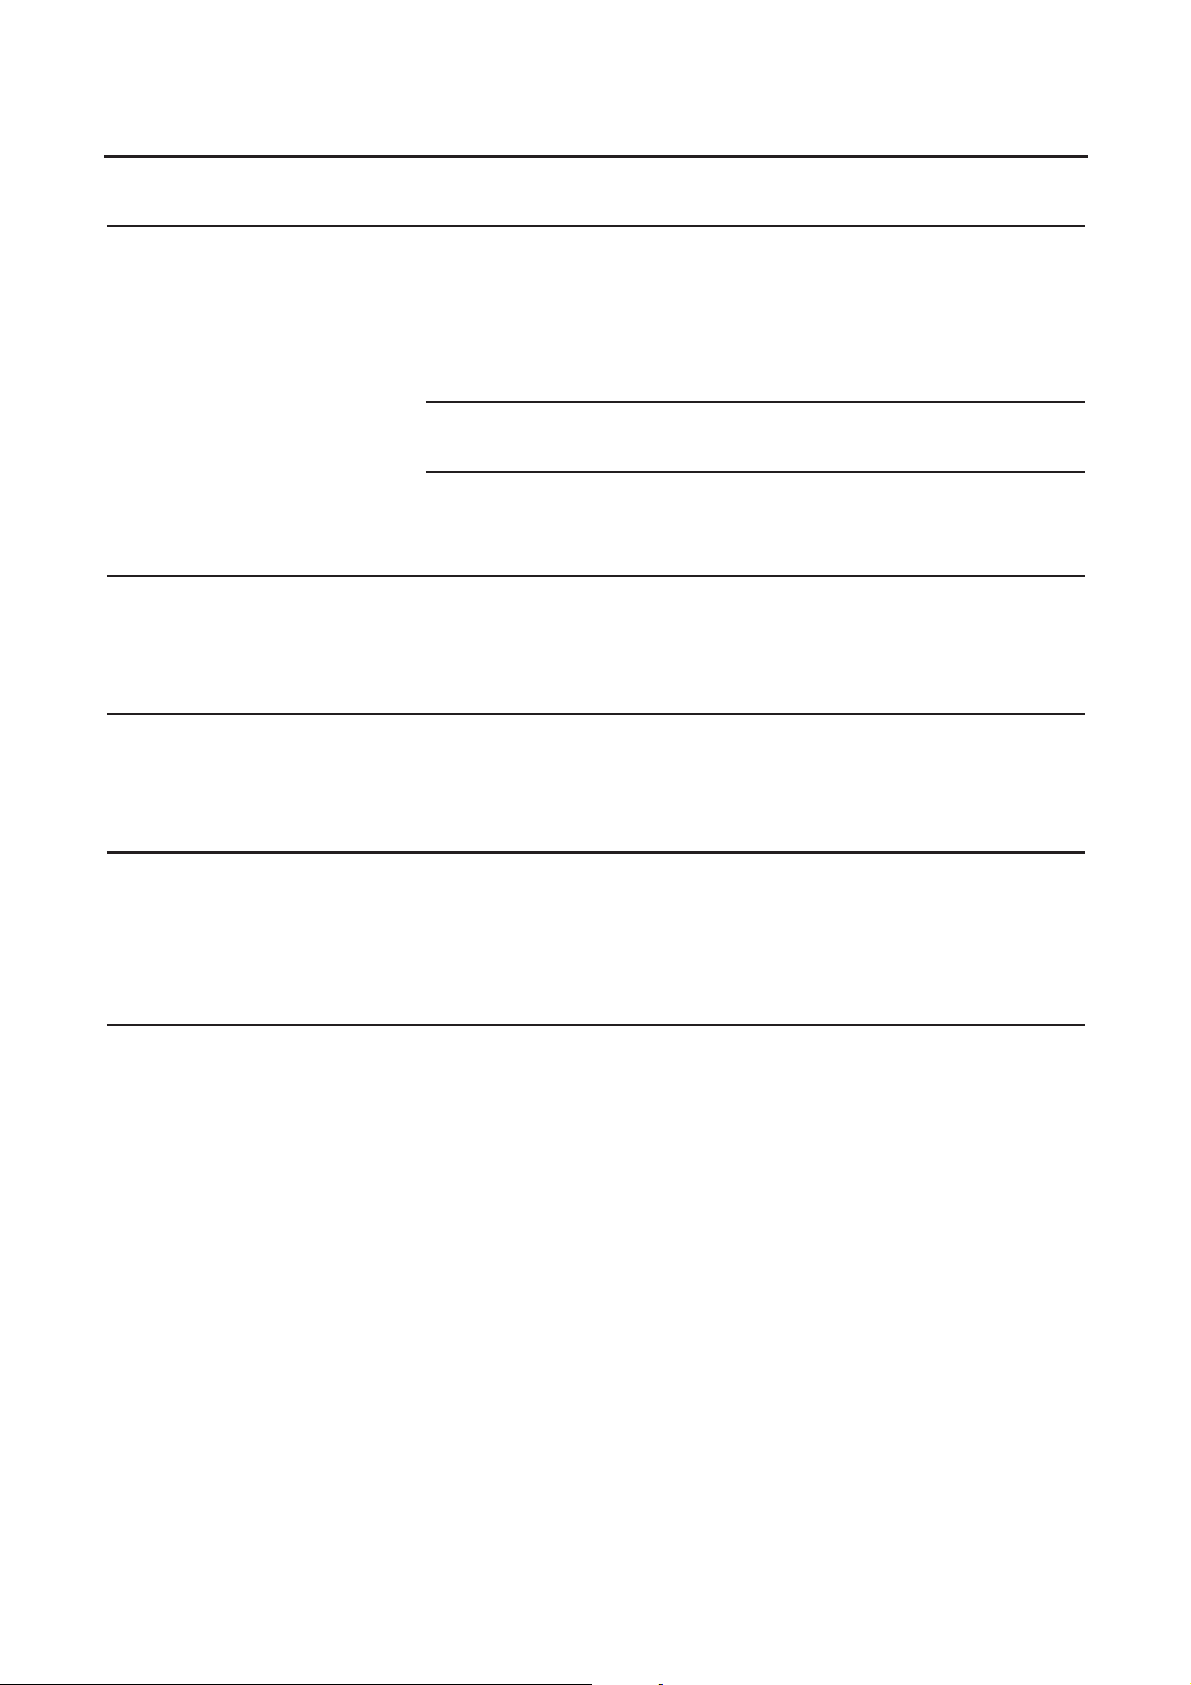
Symptoms Cause Resolution
Receiver does not
work – no sound
transmission.
The sound transmission is bad, noisy or it
is distorted.
The sound transmission is contorted and
blurred or distorted.
Receiver is not
switched on.
(SWING digital LR)
No battery in receiver. Insert battery in receiver.
Battery in receiver is discharged or not charged.
Receiver is too far away
from sender.
The battery energy is
almost totally consumed.
Switch the receiver on
by using the ON/OFF
switch on the back.
(SWING digital LR)
Charge battery or insert
fully charged battery.
Move receiver closer to
the sender.
Charge battery or insert
fully charged battery.
The sound transmission is interrupted for
a short time and works
well afterwards
The energy of the battery will only work for
a short time.
Receiver is too far away
from sender. The environment (e.g. walls)
distort the reception.
Battery is not completely
charged or defect and
therefore no longer
operational.
Move the receiver closer
to the sender.
Charge battery or insert
fully charged or new
battery.
English 42
Page 21
 Loading...