

Page 1

SAFARITM System User Guide
Copyright
© Copyright 2011 Addvalue Communications Pte Ltd
All rights reserved. This publication and its contents are proprietary to Addvalue Communications Pte
Ltd. No part of this publication may be reproduced in any form or by any means without the written
permission of Addvalue Communications Pte Ltd.
Warranty
Addvalue Communications Pte Ltd has made every effort to ensure the correctness and completeness
of the material in this document. Addvalue Communications Pte Ltd shall not be liable for errors
contained herein. The information in this document is subject to change without notice. Addvalue
Communications Pte Ltd makes no warranty of any kind with regard to this material, including, but not
limited to, the implied warranties of merchantability and fitness for a particular purpose.
Trademarks
All trademarks, marks, names, or product names referenced in this publication are the property of their
respective owners, and Addvalue Communications Pte Ltd neither endorses nor otherwise sponsors
any such products or services referred to herein.
Microsoft, Windows, Windows NT, Windows 2000, Windows XP and Windows 7 are registered
trademarks of Microsoft Corporation in the U.S.A. and/or other countries.
INMARSAT is a trademark of the International Mobile Satellite Organization. The Inmarsat LOGO and
the trademark BGAN are trademarks of Inmarsat (IP) Company Limited. All trademarks are licensed to
Inmarsat Limited.
All other company and product names may be the registered trademarks or trademarks of their
respective owners.
Page 2

SAFARITM System User Guide
Prefix
Federal Communication Commission Notice
FCC Identifier FCC ID: QY9-WESAFARI
USE CONDITIONS:
This device complies with part 15 of the FCC Rules. Operation is subject to the following two
conditions:
1. This device may not cause harmful interference.
2. This device must accept any interference received, including interference that may cause
undesired operation.
NOTE:
This equipment has been tested and found to comply with the limits for a Class B
digital device, pursuant to Part 15 of the FCC Rules. These limits are designed to
provide reasonable protection against harmful interference in a residential installation.
This equipment generates, uses and can radiate radio frequency energy and, if not
installed and used in accordance with the instructions, may cause harmful
interference to radio communications. However, there is no guarantee that
interference will not occur in a particular installation.
If this equipment does cause harmful interference to radio or television reception, which can
be determined by turning the equipment off and on, the user is encouraged to try to correct
the interference by one of the following measures:
Reorient or relocate the receiving antenna.
Increase the separation between the equipment and receiver.
Connect the equipment into an outlet on a circuit different from that to which the receiver
is connected.
Consult the dealer or an experienced radio/TV technician for help.
IMPORTANT NOTE: EXPOSURE TO RADIO FREQUENCY RADIATION
This Device complies with FCC radiation exposure limits set forth for an uncontrolled
environment. The Antenna used for this transmitter must be installed to provide a separation
distance of at least 100cm from all persons and must not be co-located or operating in
conjunction with any other antenna or transmitter
FCC CAUTION:
Any Changes or modifications not expressly approved by the manufacturer could void the
user's authority, which is granted by FCC, to operate this Inmarsat - Class 11, BGAN Land
Mobile satellite system.
Page 3

SAFARITM System User Guide
Industry Canada Statement:
IC Identifier IC: 5023A-WESAFARI
This device complies with Radio standard specification RSS -170 issue 1, Revision 1:1999
and RSS-GEN issue 3:2010 , RSS 210 issue 8:2010 of Industry Canada Rules. Operation is
subject to the following two conditions:
1. This device may not cause harmful interference, and
2. This device must accept any interference received, including interference that may cause
undesired operation.
IMPORTANT NOTE: Radiation Exposure Statement
This equipment complies with IC radiation exposure limits set forth for an uncontrolled
environment. This antenna used for this transmitter must be installed to provide a separation
distance of at least 100cm from all persons and must not be co-located or operating in
conjunction with any other antenna or transmitter.
EC Declaration of Conformity:
Addvalue Communications Pte Ltd, 28 Tai Seng Street, #06-02, Singapore 534106 declares
under our sole responsibility that the Product, brand name as Wideye and model: SAFARI ,
Inmarsat BGAN Land mobile satellite communication system, to which this declaration
relates, is in conformity with the following standards and/or other normative documents:
ETSI EN 301 444, ETSI EN 301 328, ETSI EN 301 489-1,-17, -19 &- 20, ITU-R M.1480,
IEC 60950-1 and EN 60950-1,
We hereby declare that all essential radio test suite have been carried out and that the above
named product is in conformity to all the essential requirements of Directive 1999/5/EC.
The Conformity Assessment procedure referred to Article 10 and detailed in Annex [III] or [IV]
of Directive 1999/5/EC has been followed with involvement of the following notified body
(ies):
TIMCO ENGINEERING, INC., P.O BOX 370, NEW BERRY, FLORIDA 32669.
Identification mark: 1177 (Notified Body number)
The technical documentation relevant to the above equipment are held at:
Addvalue Communications Pte Ltd, 28 Tai Seng Street, #06-02, Singapore 534106.
Signed by Mr. Tan Khai Pang (Chief Technology Officer, 26th July, 2011) and
Mr. Prabakar Kuttaniseeri (Quality Engineering Manager, 26th July, 2011).
Page 4
SAFARITM System User Guide
Safety Summary
For the sake of safety and protection, please read the user guide before you attempt to use
the SAFARITM Transceiver. In particular, read this safety section carefully. Keep this safety
information where you can refer to it if necessary.
The following general safety precautions must be observed during all phases of operation,
service and repair of this equipment. Failure to comply with these precautions or with specific
warnings elsewhere in this user guide violates safety standards of design, manufacture and
intended use of the equipment.
Addvalue Communications Pte Ltd assumes no liability for the customer's failure to comply
with these requirements.
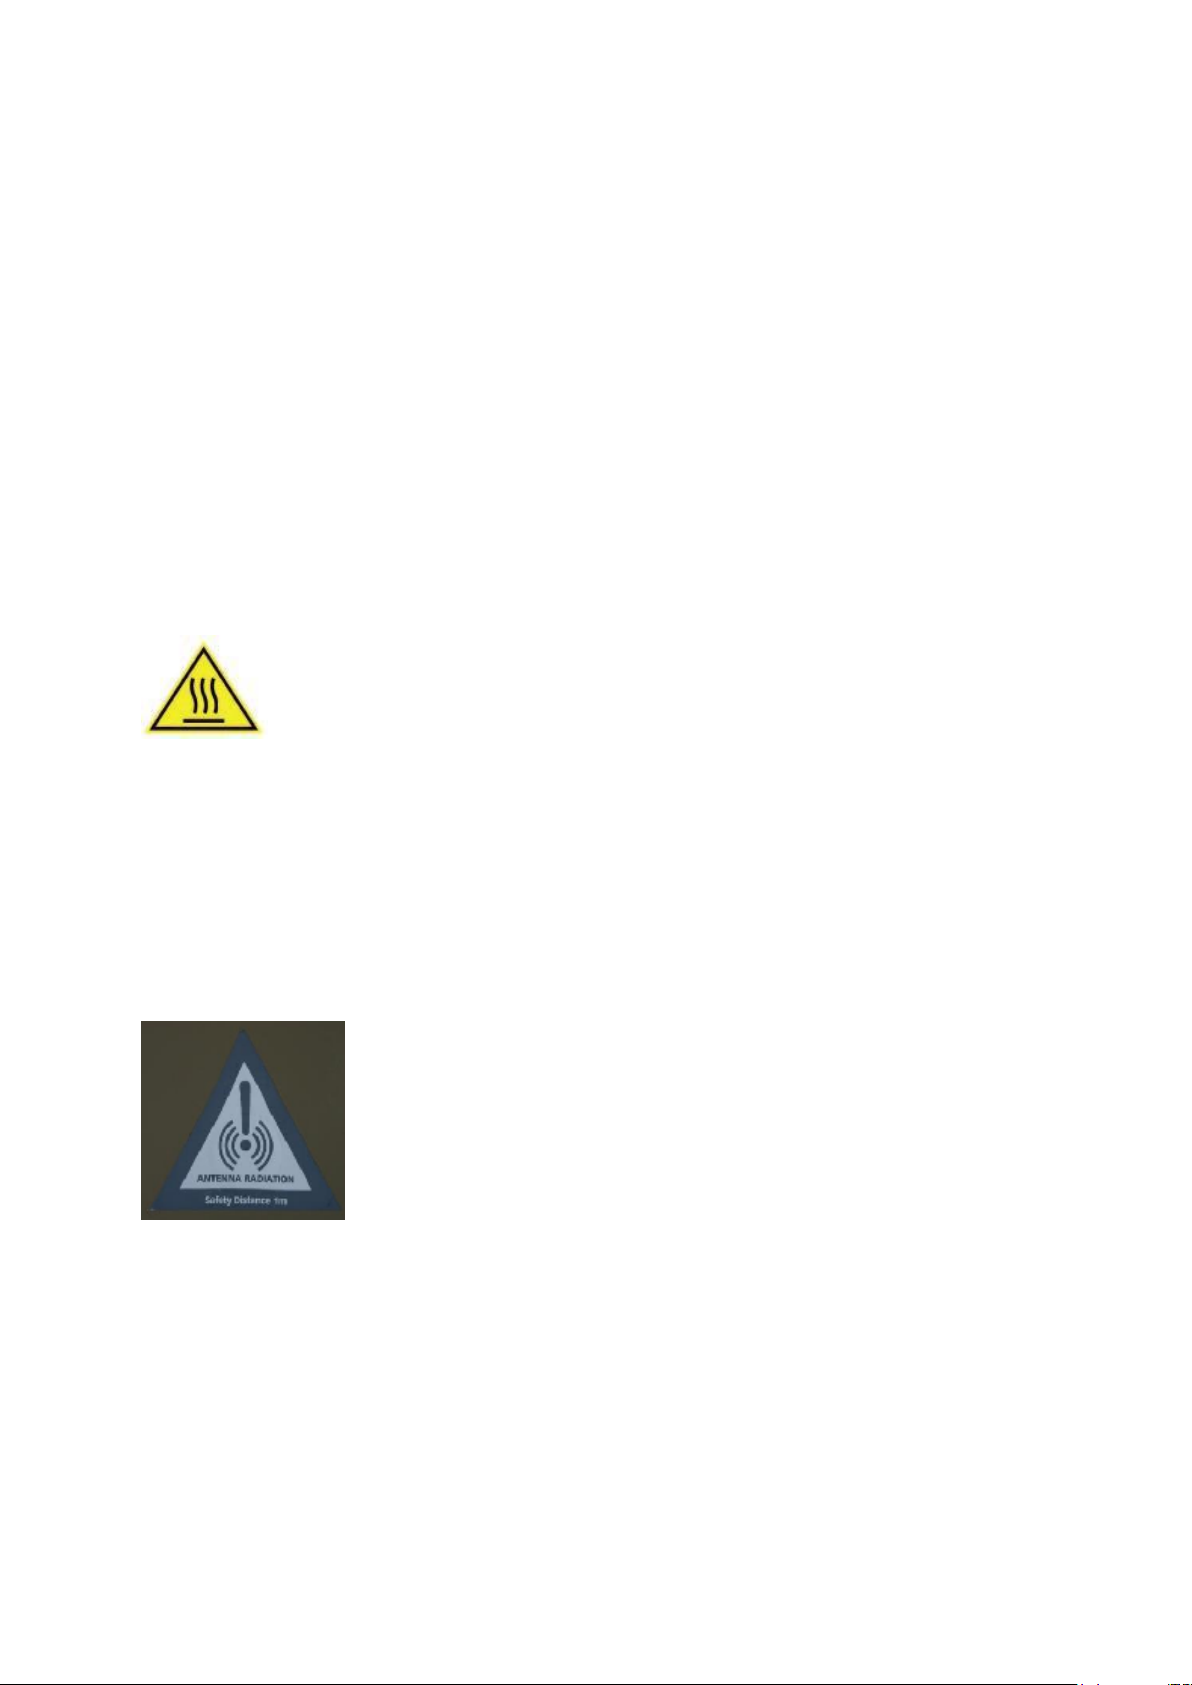
Hazard Symbols
Avoid touching those areas of the Transceiver during operation that are being marked with
this symbol otherwise it may result in injury.
“HOT”
Antenna Radiation Warning
During transmission the antenna in the system radiates high power levels of radio frequency.
This radiation is considered health hazardous to any personnel that come close to the
antenna.
It is important to maintain a separation distance from the transmitting antenna to any
personnel of at least 1-meter.
Page 5

SAFARITM System User Guide
Distance to Other Radiation Equipment
The antenna shall not be installed near any VSAT or radar at the minimum distance and
position specified in the later chapter of the user guide. It may cause damage or interference
to the antenna.
Service
User access to the interior of the transceiver is not allowed. Only a qualified personnel
authorized by its manufacturer may perform service. Failure to comply with this rule will result
in the warranty void.
Grounding and Antenna Cables
The transceiver has provided its mechanical stud, which is intended for the grounding wire to
be connected to the hull of ship.
The antenna cable between the transceiver and antenna can be extended with specified
distance as long as it can meet any type of antenna’s characteristic data, which does not
exceed its required attenuation.
The antenna cable is shielded and it should not be affected by any magnetic field. It is
recommended to avoid the cable being installed in parallel with any AC wiring as it may
possibly cause malfunction of the equipment.
Power Supply
The input DC voltage for SAFARITM Transceiver is +12V DC, 8A or 24V DC, 4A.
In case of unavailability DC power line provided, an external AC/DC power supply of
115/230V AC with its output of +24V DC can be used. Please note that the requirements of
the AC/DC power supply should take care of high surge current of 25A at 24V DC for
1ms.
Equipment Ventilation
To ensure adequate cooling of the transceiver, 5-centimeter of unobstructed space must be
maintained around all sides of the unit except the bottom side. The ambient temperature range of
the transceiver is: -25°C to +55°C.
The equipment shall not be operated in the presence of flammable gases or fumes as well as
any explosive atmosphere. Operation of any electrical equipment in such an environment
constitutes a definite safety hazard.
Keep Away from Live Circuits
Operating personnel shall not remove equipment covers. Component replacement and
internal adjustment has to he handled by qualified maintenance personnel. Do not attempt to
replace components with the power cable connected. Under certain conditions, dangerous
voltages may exist even with the power cable removed. To avoid injuries, always disconnect
power and discharge circuits before touching them.
Page 6

SAFARITM System User Guide
Obtaining Licensing For Inmarsat Transceivers
Under rights given under ITU Radio Regulations, local telecommunications administrations
establish and enforce national rules and regulations governing types of emissions, power
levels, and other parameters that affect the purity of signal, which may be radiated in the
various frequency bands of the radio spectrum.
To legally operate Inmarsat equipment, it is necessary to obtain permission from the local
telecommunications regulatory authorities of the country you are operating from. Using your
equipment in any country without permission causes you to run the risk of confiscation of the
equipment by the local authorities. The normal procedure to bring such equipment into
another country is to apply for a license before travel. If a license has not been obtained
before travel, the equipment may be put in to storage by local authorities until such time
license is obtained.
Page 7
SAFARITM System User Guide
Chapter 1 – Introduction
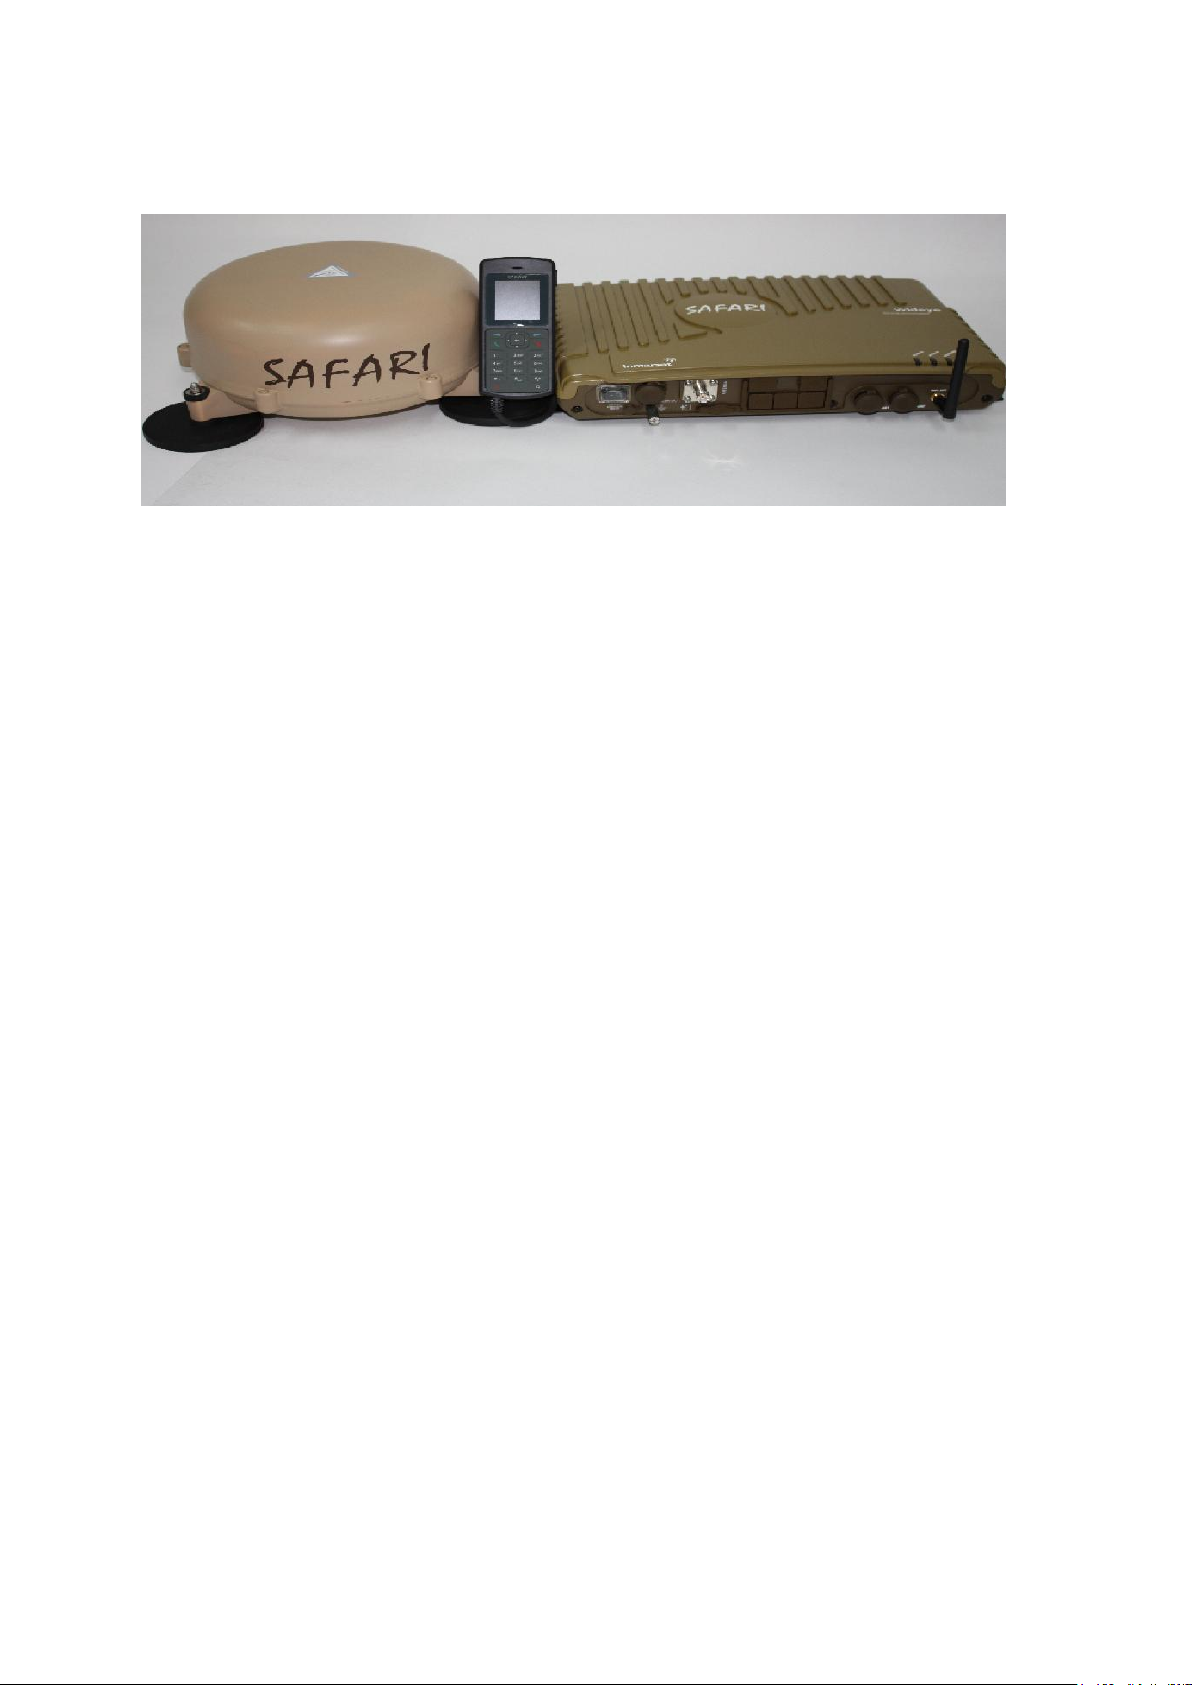
The SAFARITM is a Land Vehicular BGAN Terminal operating on the Inmarsat BGAN Satellite
Network.
The SAFARI
252mm Dia x 119.12 mm H (9.9 in. Dia x 4.7 in. H) and weighs only 1.9kg (4.2lbs.). The
complete system consists of three fully integrated units – an IP44 rated Transceiver Unit (TU)
with built-in Wi-Fi, an IP66 rated Handset and an IP56 rated roof mounted Antenna Unit
(AU). The Antenna Unit is compact and lightweight, ideal for vehicles on-the-move. It has
been designed for the most demanding environments – and is easy to carry when travelling
to various locations around the world.
The SAFARI
AMBE+2), optional 3.1 KHz high quality voice/fax, high speed Streaming and Standard IP
data service for various application, including internet browsing, email and file transfer
functions.
The terminal allows simultaneous use of all services including voice/fax, data and SMS.
Physical interfaces include, 2 x RJ-11 for Voice and Fax, 2 x RJ45 for Ethernet LAN
connections, a RS232 port for GPS output and 4 x GPIOs, for external control or indications.
TM
has one of the smallest Land Vehicular BGAN antennas in the market at
TM
Land vehicular BGAN Terminal offers the user standard voice (4kbps
1
Page 8

SAFARITM System User Guide
Special Features
Forced Dialing
Restricted Dialing
Call prioritisation
Remote Access
Backup/Restore of Configuration Settings
Remote Transmitter Off via GPIO
SIM Lock based on IMSI/DP Code/SP Code/APN
Multilingual WebConsole (English, Spanish, Chinese (Simplified & Traditional))
Multi-User access with configurable access rights
Time/Volume limited data sessions
MAC filtering
Port Forwarding
The antenna has built-in magnetic roof mounts. Simply place the antenna Unit on the roof of
the vehicle, connect it to the Transceiver Unit and connect the SAFARI
TM
to the vehicle’s
power source, The vehicle is now a mobile communications hub, which multiple users can
access at the same time via any web browser including Wi-Fi-enabled Smartphones such as
BlackBerrys, iPhones, iPads, and PDAs via the SAFARI
The SAFARI
sent out via the RS232 port in standard NMEA 0183 format. With in-built GPS module,
SAFARI
TM
also has a continuous GPS output feature which allows for GPS data to be
TM
is able to provide tracking and monitoring required in fleet management
TM
‘s secure Wi-Fi connections.
applications.
Technical Specifications
Type Approval Certificate
Certification mark: FCC, CE, Industry Canada
GMPCS MoU – ITU REGISTRY
Compliant to RoHS, WEEE Logo
Wi-Fi Complaint IEEE802.11b/g
Operating Frequency
Transmit: 1626.5MHz – 1660.5MHz
Receive: 1525MHz – 1559MHz
2
Page 9

SAFARITM System User Guide
Transceiver Unit to Antenna Unit RF Cabling max loss
12dB at 1.6GHz and 4 Ohms DC loop resistance
Services
Voice: 4kbps AMBE +2
Streaming IP: 32, 64 or 128kbps (send & receive)
Short Message Service (SMS): Up to 160 characters (3G standard)
Larger SMS content (>160 characters): supported as multipart or segmented
SMS
Background IP Data: Up to 448/464kbps (send & receive)
Router Functions
Single User Router Mode (Modem mode):
NAT disabled, with option to enable/disabler DHCP
Multi-User Router Mode:
NAT enabled, with option to enable/disable DHCP
3
Page 10

SAFARITM System User Guide
Interfaces
2 x RJ45 Ethernet ports (one is Power over Ethernet (PoE) port)
1 x Primary Handset connector
1 x GPS output connector (NMEA-0183, Offset latch RJ11)
WLAN 802.11b/g build in
1 x Antenna Connector:
o Transceiver Unit: TNC female
o Antenna Unit: TNC female
2 x Standard phone port (RJ11) for FAX and phone
1 x SIM Card Slot
3 x Status indicator LED
1 x Power On/Off Switch
1 x DC Power Input socket
1 x Ground stud connector
1 x GPIO signal port connector
o 1 x Transmitter On/Off
o 1 x ignition On/Off
o 1 x Buzzer
o 1 x Illuminate Remote On/Off
1 x Safe Mode switch
1 x Circuit breaker reset switch
Power Supply
DC input: +12V/24V ( +10.8V to 32V)
Power Requirement:
o Transmit mode (max): 58W
o Receive mode (max): 42W
Physical Data
Dimension
Weight
4
o Transceiver Unit: 340 x 253 x 61.5mm, 13.4 x 10.0 x 2.4 in
o Antenna Unit: 252mm (Dia) x 119.12mm (H), 9.9 in (Dia) x 4.7 in (H)
o Transceiver Unit: 3.5kg / 7.7Ibs
o Antenna Unit: 1.9kg / 4.2lbs
Page 11

SAFARITM System User Guide
Environmental Conditions Transceiver Unit
Operating Temperature: -25°C to +55°C
Storage Temperature: -40°C to +80°C
Operating Humidity: 95% non-condensing at +40°C
Ingress Protection: IP56
Antenna Unit
Operating Temperature: -25°C to +55°C
Storage Temperature: -40°C to +80°C
Operating humidity: 95% non-condensing at +40°C
Ingress protection: IP56
Turning Rate: 60deg/second
Turning acceleration: 50deg/second
Primary Handset
Display: 2inches, 65K color, 220 x 176 pixel, 2” TFT Liquid Crystal Display
Dimension: 142 x 56 x 22mm, 5.6 x 2.2 x 0.9 in
Weight: 390g/0.8lbs
Operational Temperature: -20°C to +55°C
Storage Temperature: -30°C to 70°C
Ingress protection: IP66
Feature Highlights of Primary Handset
Configuration setting
Basic circuit switched telephone functions
Phone book retrieval from the SIM card
Call Log for most recent 5 missed, received and dialed calls with date and time
stamps
Short Message Services (SMS)
User friendly Menu driven graphical user interface
Hands free Headset
5
Page 12
SAFARITM System User Guide
Chapter 2 – Using the Primary Handset
The Primary Handset
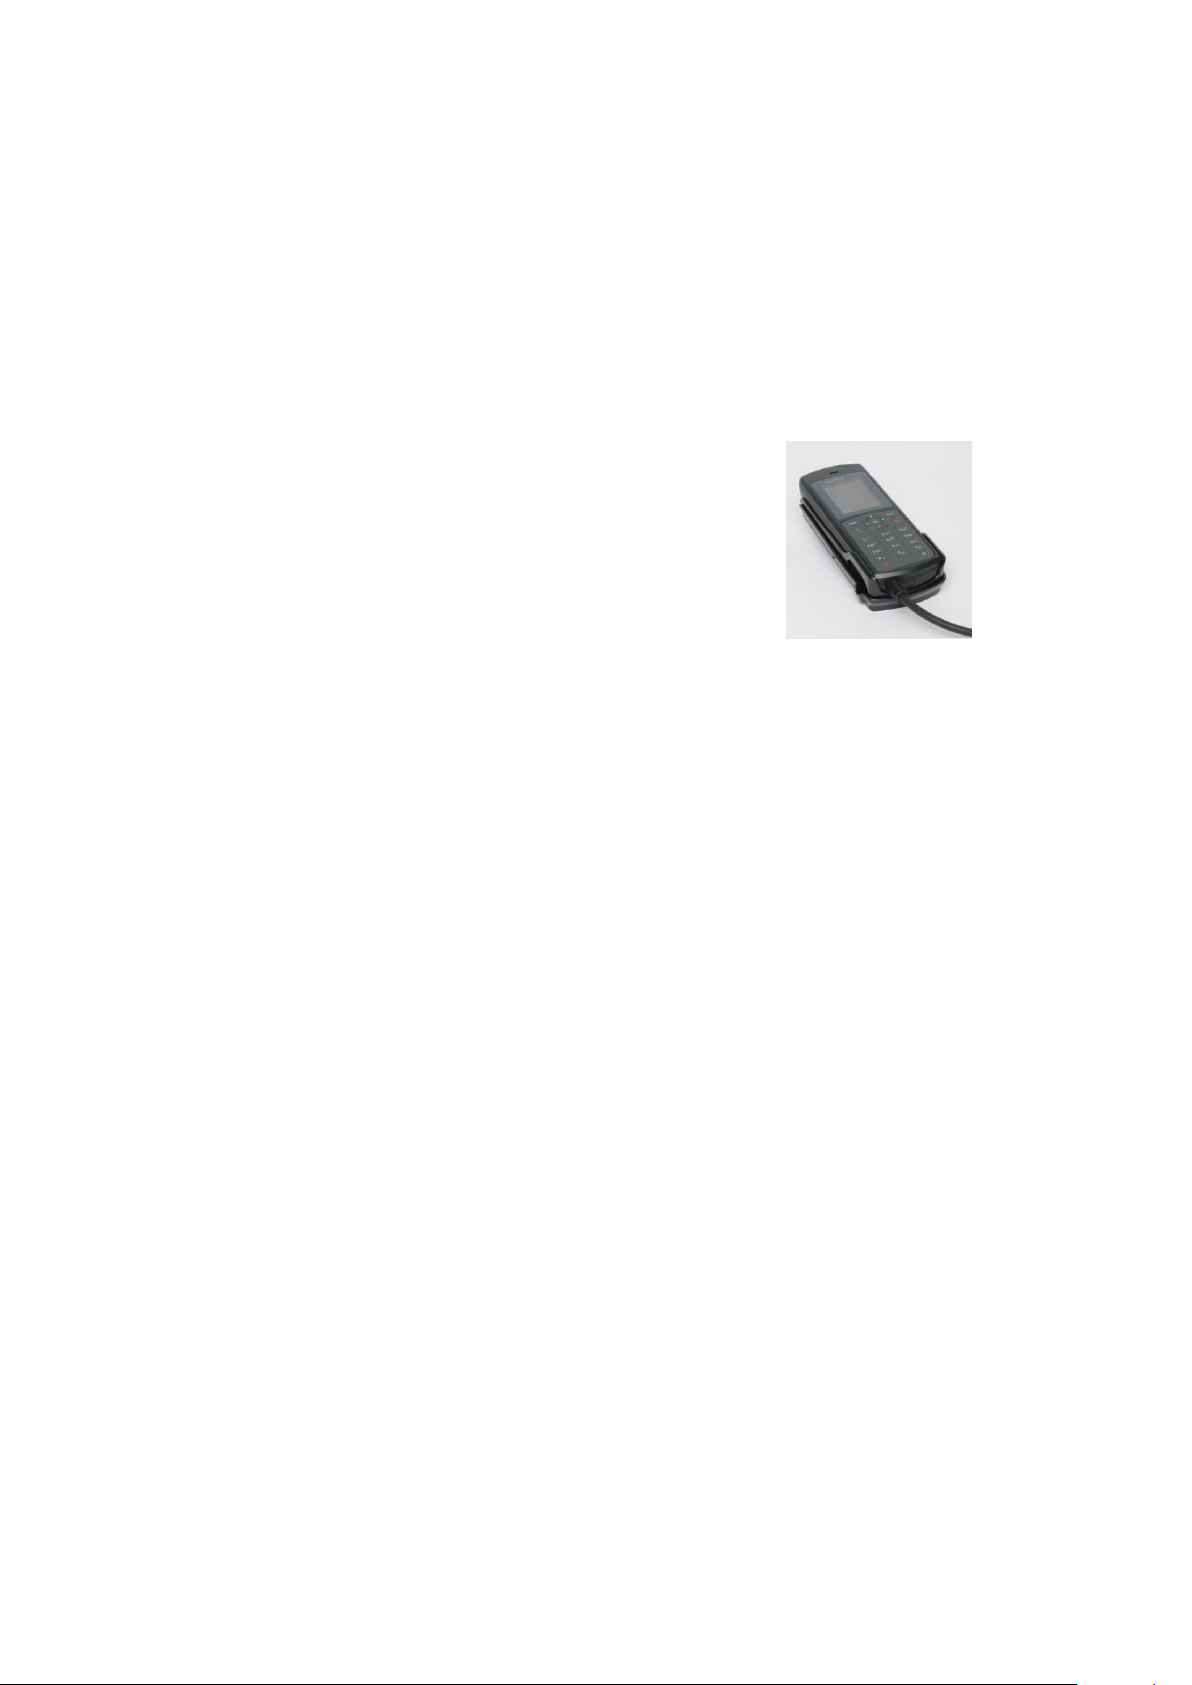
The Primary Handset is connected to the Transceiver Unit using the dedicated HANDSET
port and is powered directly from the UE. Equipped with a large 2’, 65K CSTN, 220 Liquid
Crystal Display (LCD), Primary Handset not only acts as a standard phone that allows you to
make/ receive voice calls, it also serves as a remote access TE (Transceiver Equipment) for
you to access various configurations supported by the UE.
Primary Handset offers the following features:
Making standard CS voice calls
Making standard PS background data connections
Messaging (SMS)
User contacts (combined SIM and UE storage)
Speed dial
Call logs
Managing UE security settings
Accessing UE settings that includes:
o Ethernet
o Ciphering control
o Satellite selection
o Supplementary services
o Transceiver restart
o Limited factory reset
Displaying various UE status and information
Local handset configurations
1
Page 13

SAFARITM System User Guide
Powering Up the Primary Handset
The Primary Handset is automatically powered up once it is connected to the dedicated
HANDSET port. Depending on the conditions of the UE, the Primary Handset may start in
the following modes:
Full functioning mode
Primary Handset starts in this mode once it has successfully connected to the UE and there
is no PIN authentication required. All UE settings including contacts, messages and call logs
are loaded into local memory of the Primary Handset once the UE is configured. You will be
able to access all the menus and making voice or data calls once the Primary Handset is
ready.
PIN mode
Primary Handset starts in this mode once it has successfully connected to the UE and PIN
authentication is required. Depending on the enabled PIN, you are required to enter the
correct PIN/password before proceeding to Full functioning mode. Refer to Security
settings menu for more information on the types of security PIN in the UE.
To enter the PIN:
1. Key in the PIN of the security key using the alpha-numeric keypad.
2. Press key to confirm.
To cancel PIN entering:
1. Press the Right selection key
2. Confirm to start in Emergency only mode by pressing the key.
Emergency only mode
Primary Handset starts in this mode once it has successfully connected to the UE and PIN
entering is bypassed (i.e. when you have forgotten the required PIN). You can only make
emergency calls or access local Phone manager menu in this mode.
2
Page 14
SAFARITM System User Guide
10
9 8 7 6 12
11 5 4 2 1
14 3 13
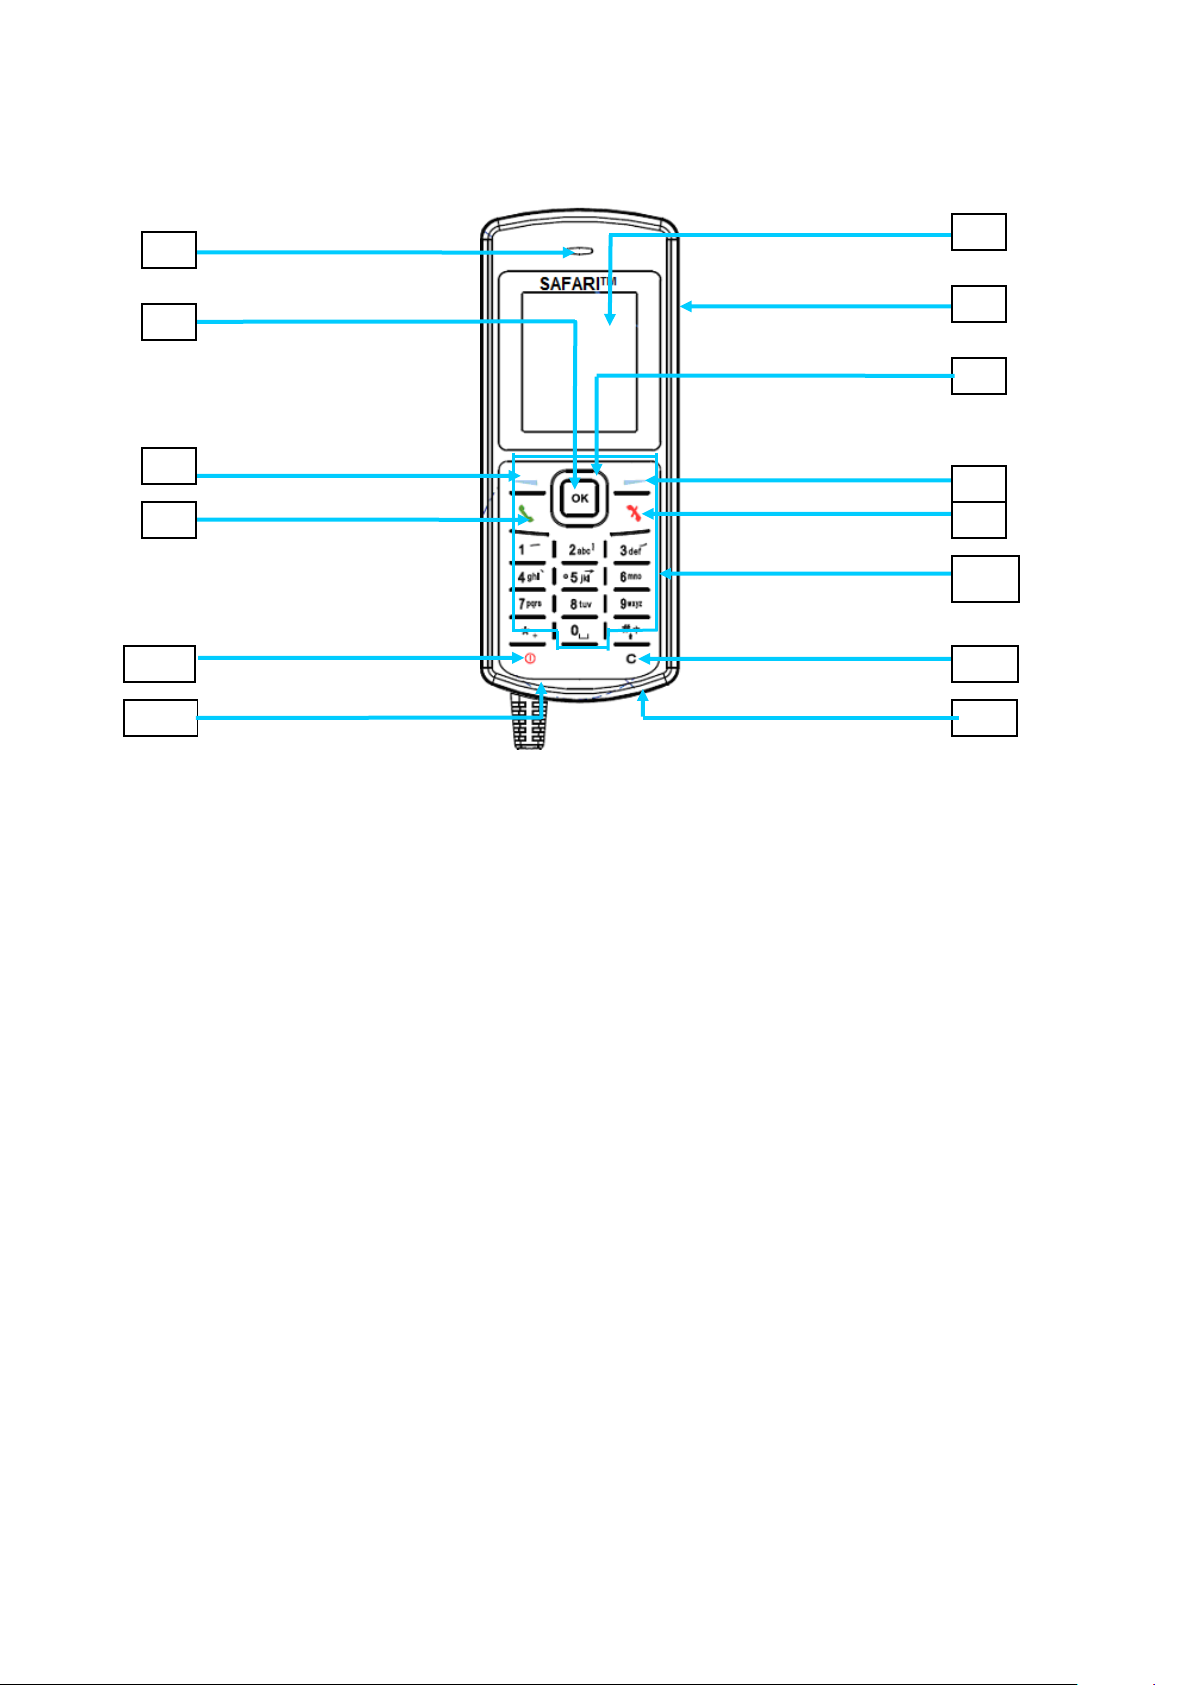
Primary Handset Keypad
1. Earpiece
2. Display
3. Ear-set jack
4. OK key
5. 4-way navigation ring
6. Select key (Left)
7. Select key (Right)
8. Call/Answer key
9. Call/Menu End key
10. Keypad (Alpha-numeric)
11. Power key
12. Clear key
13. Microphone
14. Service Port
15. Ringer*
*The Ringer is located at the back of the Primary Handset.
3
Page 15
SAFARITM System User Guide
Keys
Description/Functions
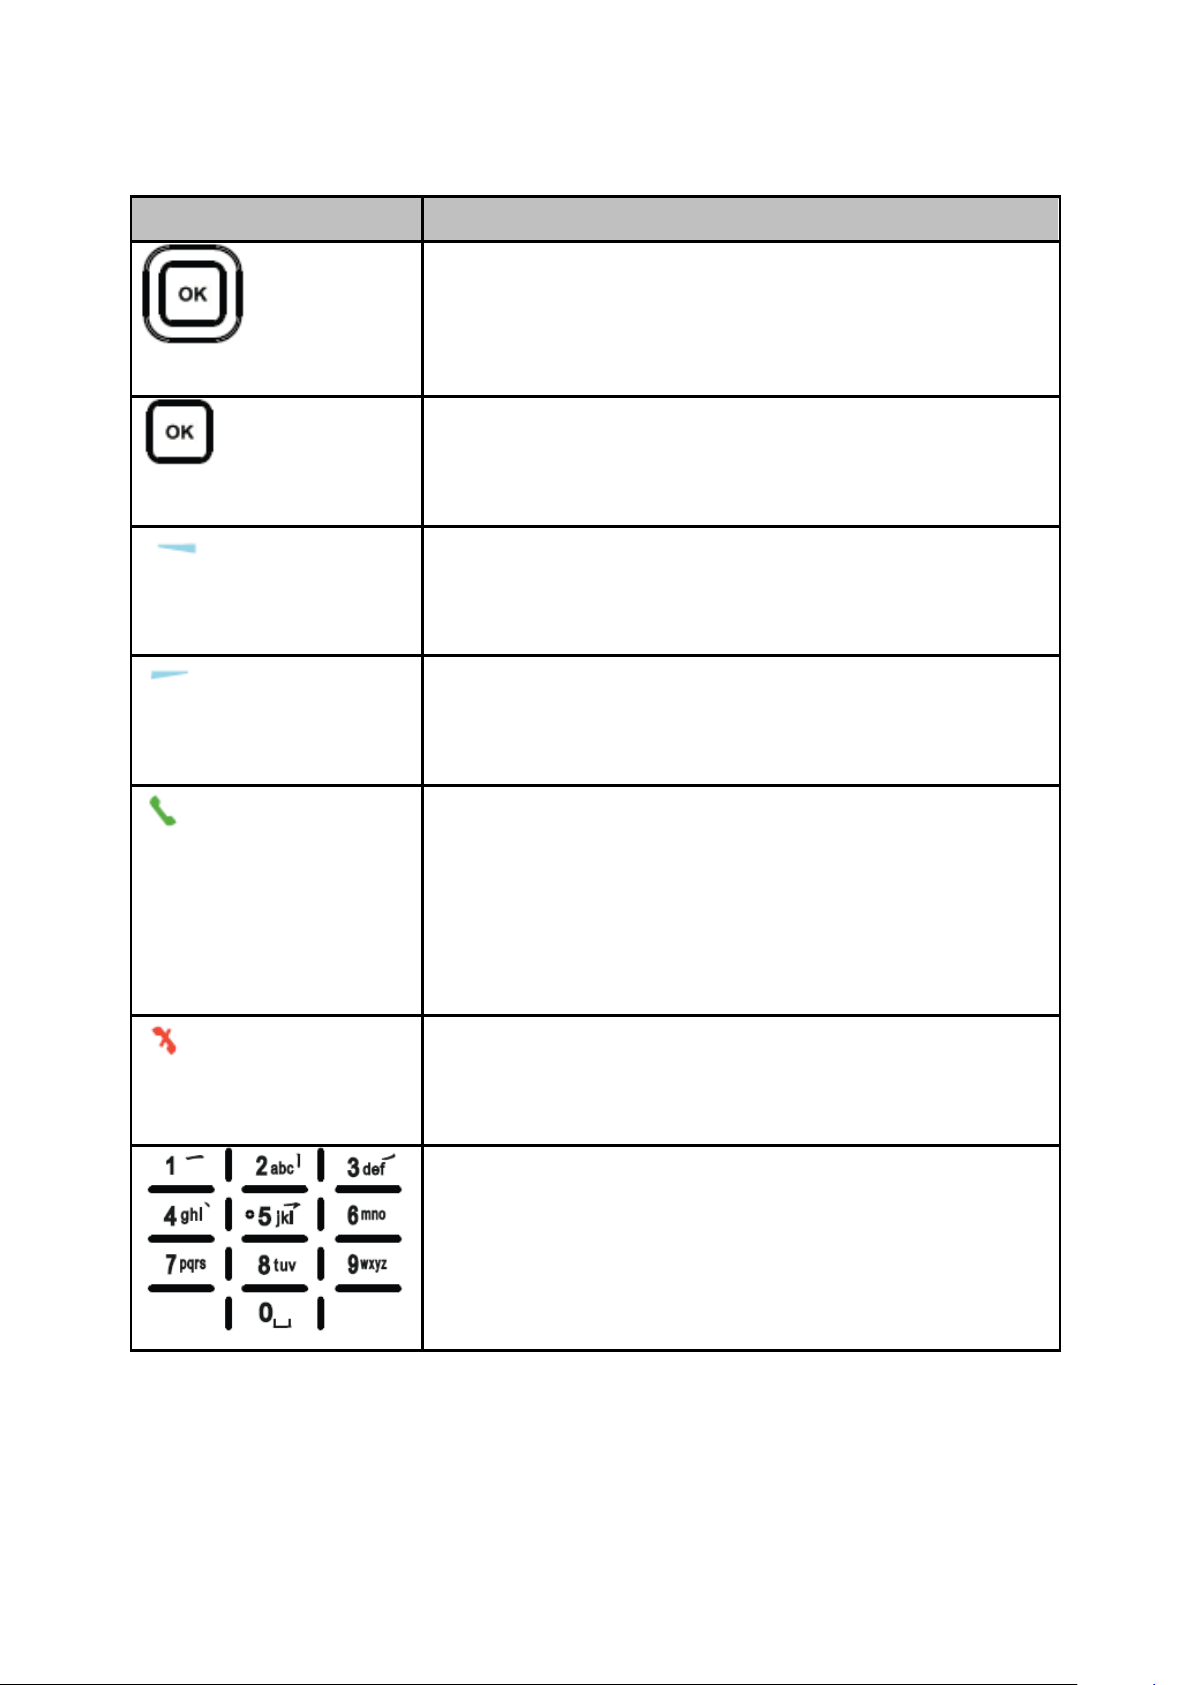
4-way navigation ring.
Press the 4-way navigation ring to scroll left, right, up, and
down on the display. Enables scrolling through names, phone
numbers, menus or settings.
OK key.
Pressing this key selects/confirms the function highlighted on
the display.
Left selection key.
The function of this key depends on the guiding text shown on
the display above the key.
Right selection key.
The function of this key depends on the guiding text shown on
the display above the key.
Call/Answer key
After entering a phone number: Initiates a call to the
number.
From Main Display screen: Opens a list of dialed calls
When Ringing: Answers the incoming call.
.
Call/Menu End key
Press this key to end active calls or exits from any menus or
sub menus.
Keypad
Used to enter numbers and characters.
Press 0 to add a space when writing text.
The functions available depend on whether you are typing a
phone number (number mode) or text (text mode).
Keypad - Description and Functions
4
Page 16
SAFARITM System User Guide
Keys
Description/Functions
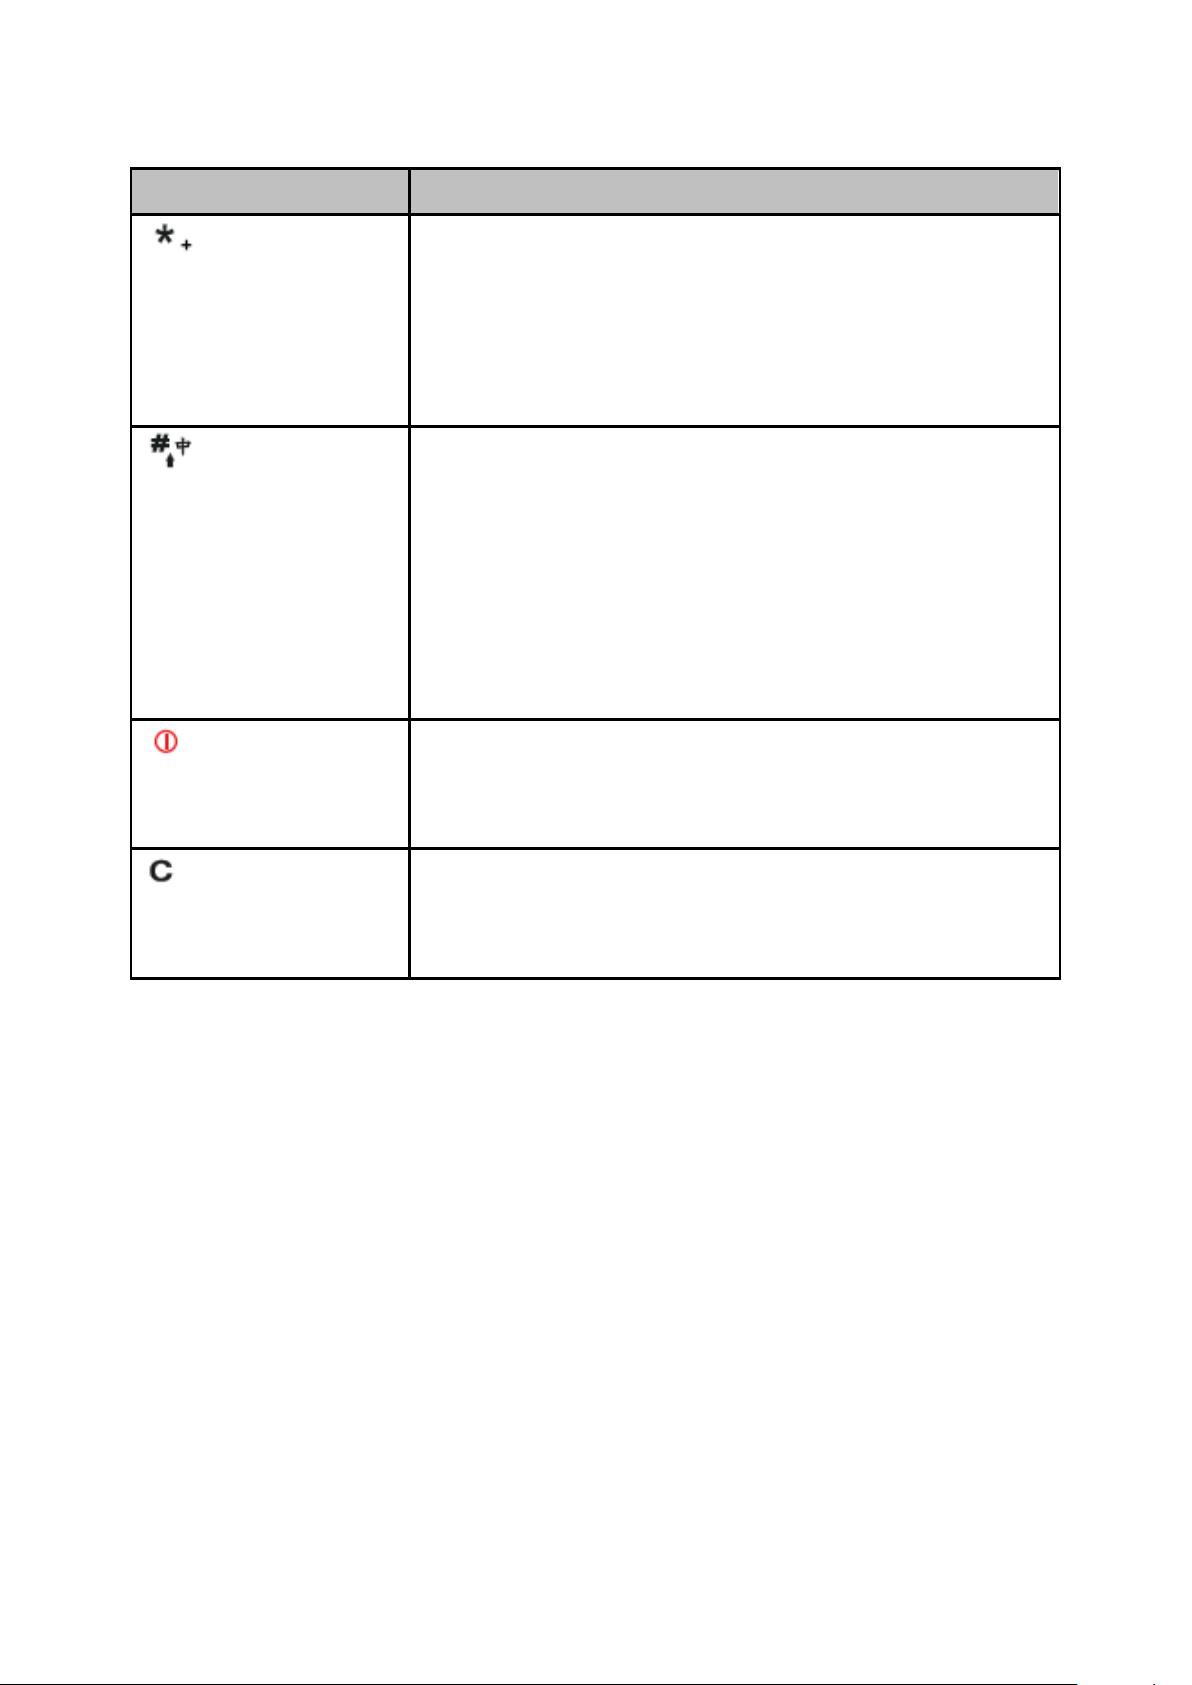
Star * key
When entering a phone number, press this key to insert a *.
Press and hold this key to insert a +.
When writing text, press this key to access a list of special
symbols.
Hash # key
When entering a phone number, press this key to insert a #.
To quickly change the text input method when writing text, press
this key repeatedly and check the indicator at the top of the
display
In standby mode, press and hold this key to set the Primary
Handset into silent mode.
Power key
Press and hold this key to power on/off the UE and Primary
Handset when the power button is enabled.
Clear Key
Press key once to clear one character at a time or press and
hold this key to clear the whole text entry.
5
Page 17
SAFARITM System User Guide
Satellite
Primary Handset Status Indicator
Selection Key Line
UE Status Indicator Line
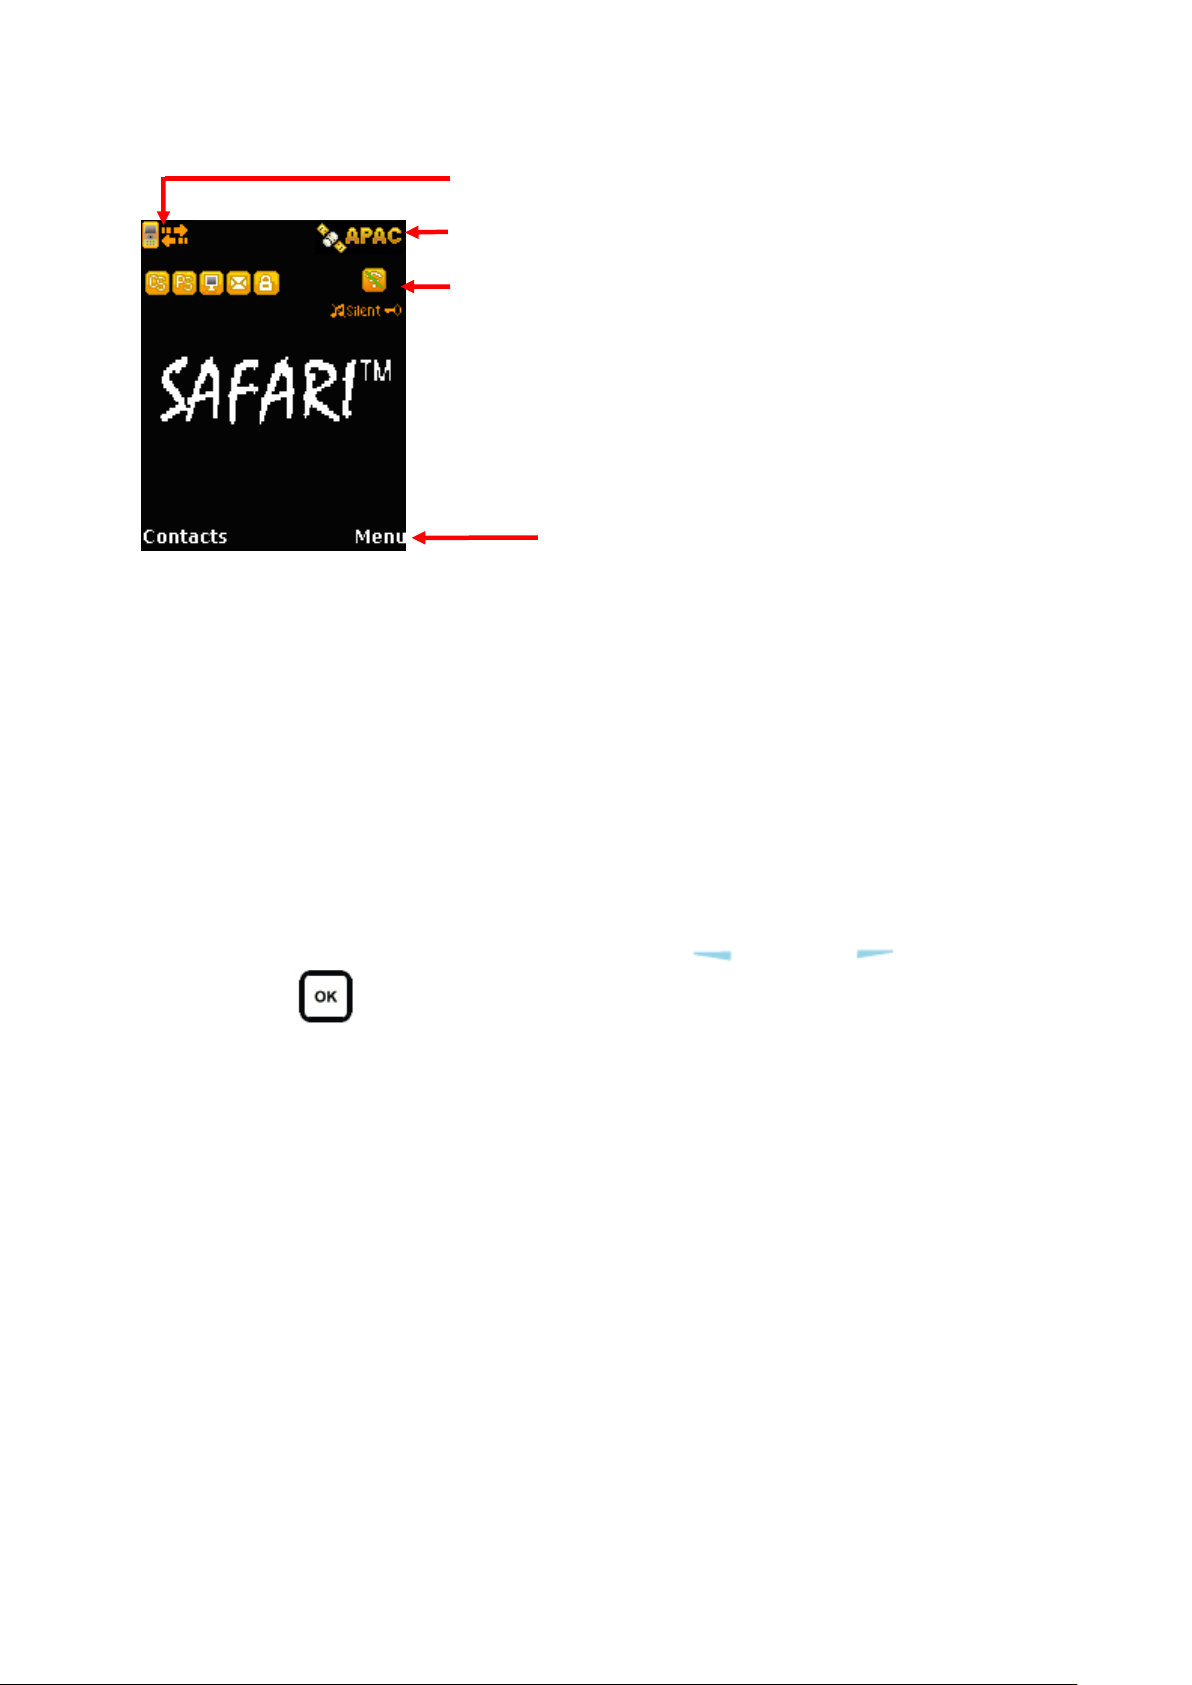
The Main Display Screen
UE Status Indicator line
The indicator line shows status symbol informing you about the operating conditions
of the UE.
Satellite
The indicator line shows status symbol informing you about the satellite service.
Handset Status Indicator line
The indicator line shows status symbols informing you about the operating conditions
of the Primary Handset.
Selection Key line
The Selection key line operates using the Left or Right selection keys
with the to access menus and controls.
6
Page 18
SAFARITM System User Guide
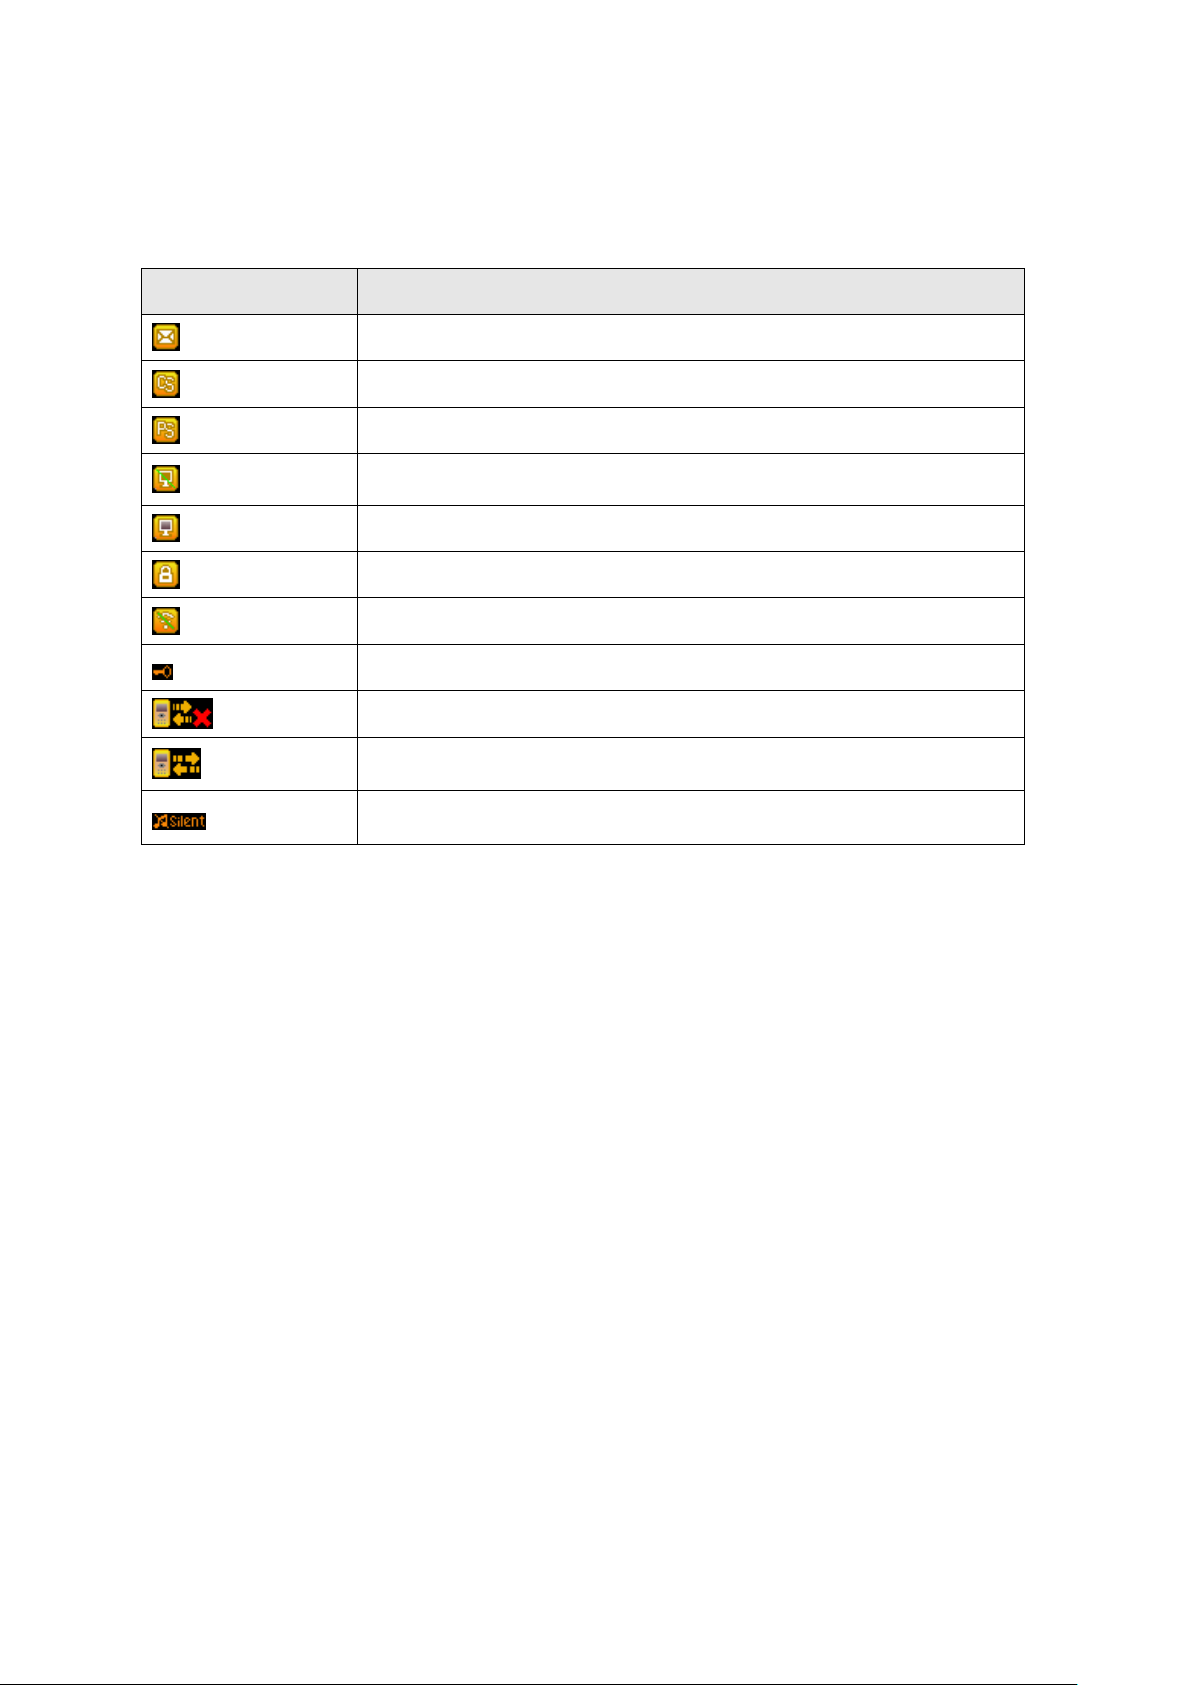
Statues Indicator
Description
New short message (SMS) in inbox.
Available CS domain services.
Available PS domain services.
Data connection is inactive (available in Manage profiles sub
menu only)
Data connection is active
Ciphering is enabled
Primary Handset in radio silent mode
Primary Handset keypad lock is active
Primary Handset disconnected from UE
Primary Handset connected to UE
Primary Handset in silent mode
Primary Handset Status Indicators
Table below explains the meaning of each status indicator displayed in the Main Display
screen.
7
Page 19
SAFARITM System User Guide
Making a Voice Call
Note:
Before making a voice call, please make sure that:
- The Primary Handset is connected to the UE ( status indicator should be
on)
- The Primary Handset is NOT radio silent( status indicator should be off)
- The UE has successfully registered with the network and ready for CS domain
(voice) services ( status indicator should be on)
You can use the following two options for making a voice call:
Manual Dial:
1. Using the alphanumeric keypad, dial 00 <country code> <phone number>.
2. Press key.
Using Contacts or Call Log list from the Primary Handset:
o Enter the Contacts list of the Primary Handset; scroll to the desired number
and press key, or
o Enter the Log list of the Primary Handset; scroll to the desired number and
press key.
Note:
For voice calls and SMS, you may also use '+' by pressing and holding the key
instead of “00” at the beginning of dialed number string as an alternative („+‟ <country
code> <phone number>).
To End a Voice Call
1. Press .
Receiving a call
When there is an incoming call, the Primary Handset will,
Ring
The calling party’s number will be displayed on the screen.
If the number is stored in the contacts, the corresponding name of contact will be
displayed.
To answer an incoming call, press the key.
8
Page 20
SAFARITM System User Guide
Press ‘up’ key to
increase the volume
Press ‘down’ key to
decrease the volume
Adjusting volume during a call
Use the 4-way navigation ring to adjust the volume.
9
Page 21
SAFARITM System User Guide
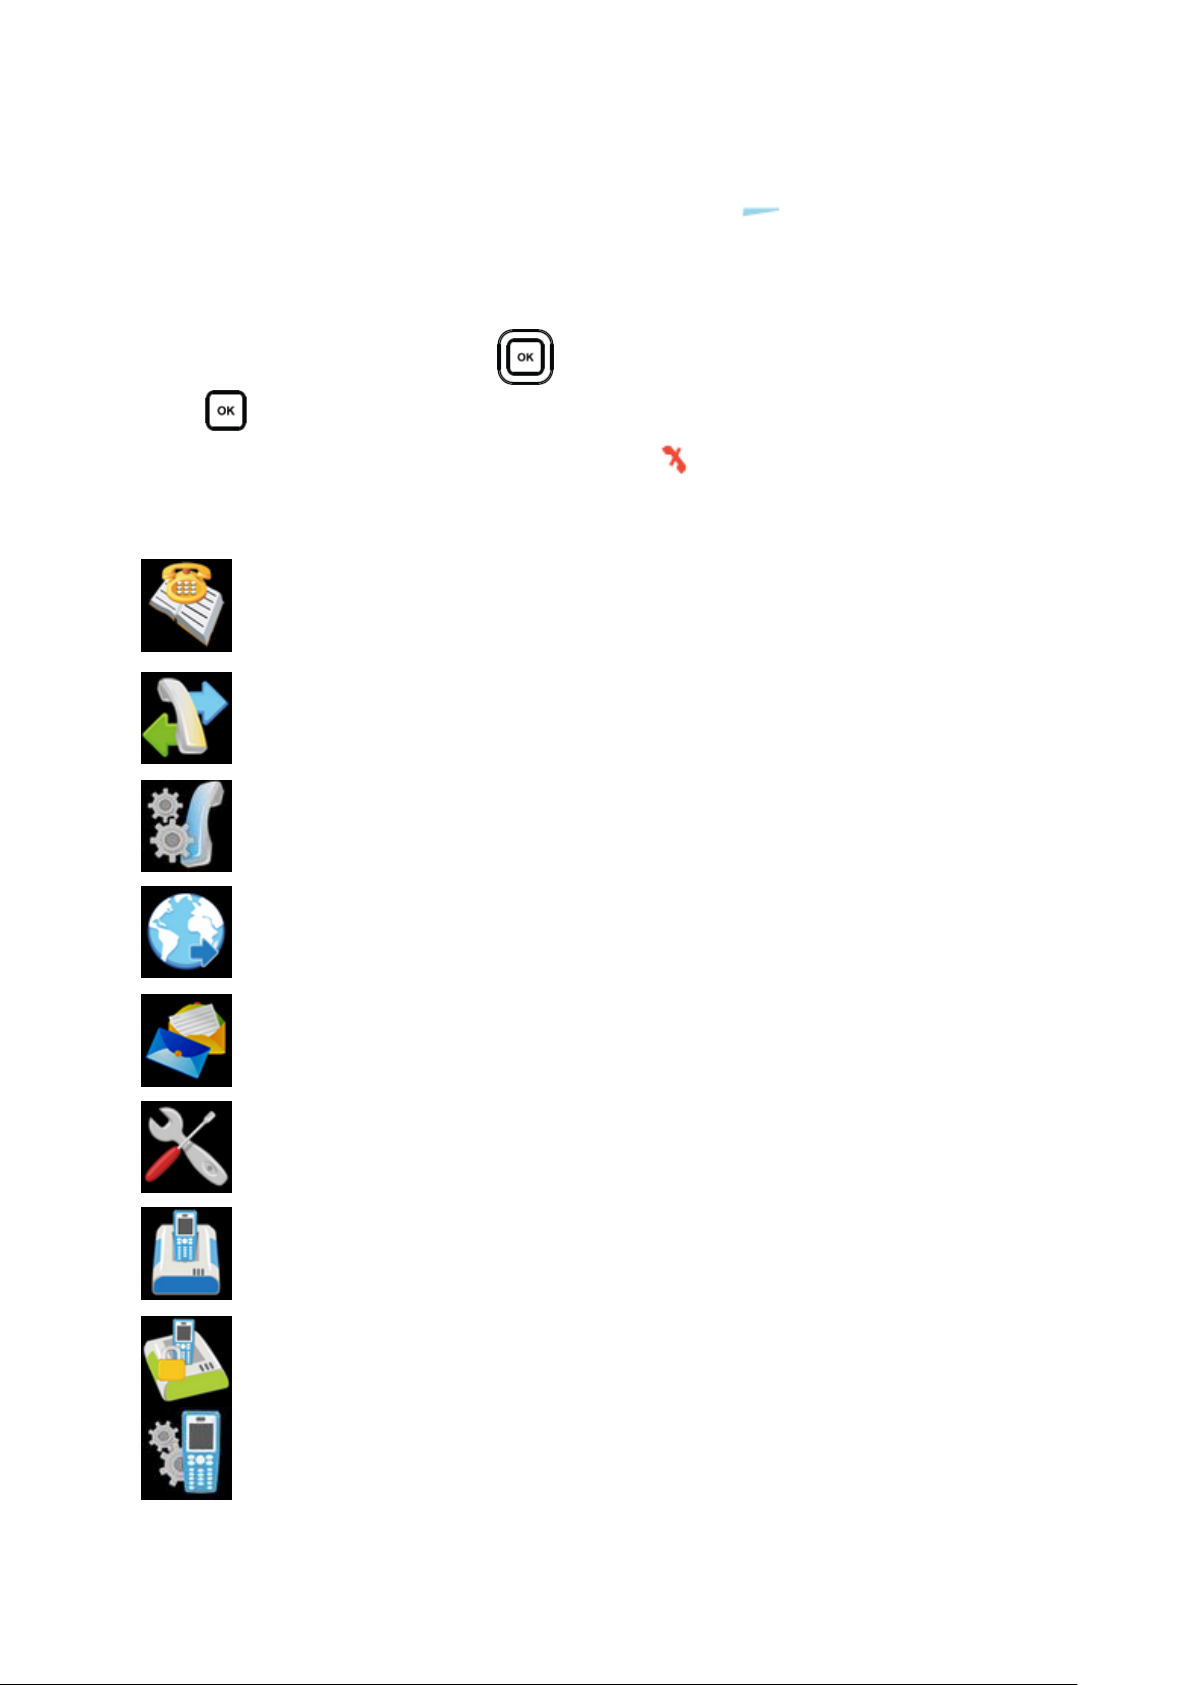
Contacts
This menu manages your user contacts.
Log
This menu allows you to view call histories.
Telephony
This menu configures settings related to CS voice telephony services.
Data
This menu configures settings or connections related to PS data services.
Messaging
This is menu is for SMS related services.
Settings
This menu configures general UE settings.
Transceiver
This menu displays general UE information.
Security settings
This menu configures security settings related to the UE.
Phone manager
This menu configures local handset settings.
Using the Menus
You can access the Menu System by pressing the Right selection key in the Main
Display screen.
The main menu of the Primary Handset includes nine (9) menu options with each menu
option having their respective sub-menus.
You can use the 4-way navigation ring to navigate to the desired menu option and
press to confirm your selection. You can also end the menu or sub menus and return to
the Main Display screen at any time by pressing the key.
Table below summarizes the functionalities within each menu option:
10
Page 22
SAFARITM System User Guide
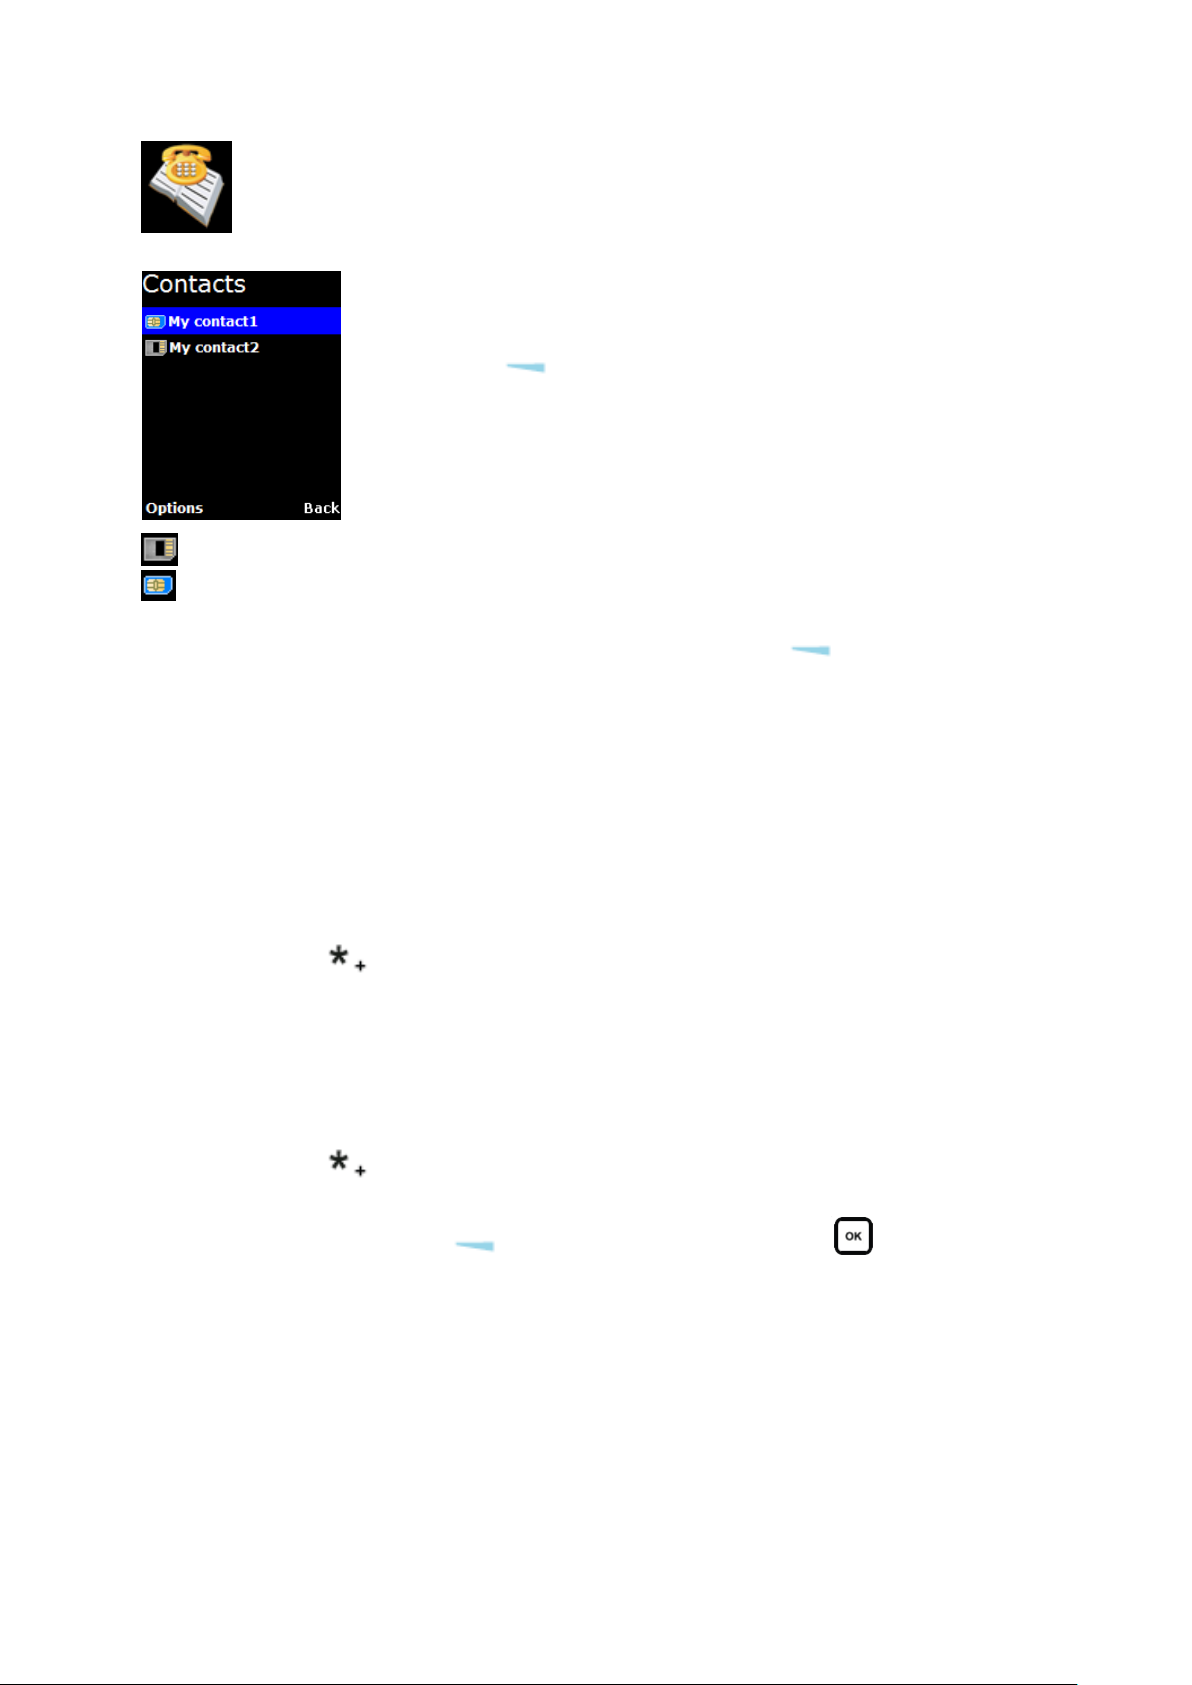
Contacts Menu
The Contacts menu allows you to store, retrieve and update names
and phone numbers of your contacts in the Primary Handset memory
and in the SIM card memory. You can also access this menu by
pressing Left selection key in Main Display screen.
This menu lists all the contacts saved in both the UE and SIM card
memory where,
Indicates contacts that are saved in UE and
Indicates contacts that are saved in SIM card.
The following options are available when pressing the Left selection key while
browsing through the contacts:
New contact
Add new contact to the memory. To add contact:
1. Select New contact.
2. Select where you want to store the contact (Transceiver or SIM).
3. Enter the name for the contact.
Note:
Search
Delete
Press key to browse for symbols.
4. Enter the number for the contact.
Note:
Stored number can be in any one of the following formats:
„+‟ <country code> <phone number>
00 <country code> <phone number>
Press key to insert '+' sign.
Saving of contact without number is not allowed.
5. Select Save (Left selection key) or pressing the key to save the
contact to the selected memory.
Note:
Refer to “Tips for writing the text” section under New message for more
information on text writing.
Select this to enter a specific name to search within the contact list.
Delete selected contact.
11
Page 23

SAFARITM System User Guide
Note:
You can also delete the selected contact by pressing the Clear key.
Copy
Select this to copy the selected contact from SIM card memory to UE memory or vice
versa.
View number
Display the number of the selected contact.
Assign Speed Dial
Add the selected contact to the speed dial list.
Reload Contacts
Select this to reload contacts from the UE/SIM card into the local memory of the
Primary Handset.
Memory Status
Select this to view the memory status of the contacts
While browsing through the contact list, press the key to view the phone name and
number or the selected contact. The following options are available when pressing the Left
selection key while viewing the selected contact:
Call
Make a voice call to this contact.
Send message
Open a SMS editor to send a text message to this contact.
Edit contact
Edit information of this contact.
Delete
Delete this contact.
Copy
Select this to copy this contact from SIM card memory to UE memory or vice versa.
Forward contact
Forward information of this contact using SMS
Assign Speed Dial
Add this contact to the speed dial list.
Note:
You can also make a voice call to the selected contact when browsing through or
viewing the contacts by pressing the Call key.
12
Page 24
SAFARITM System User Guide
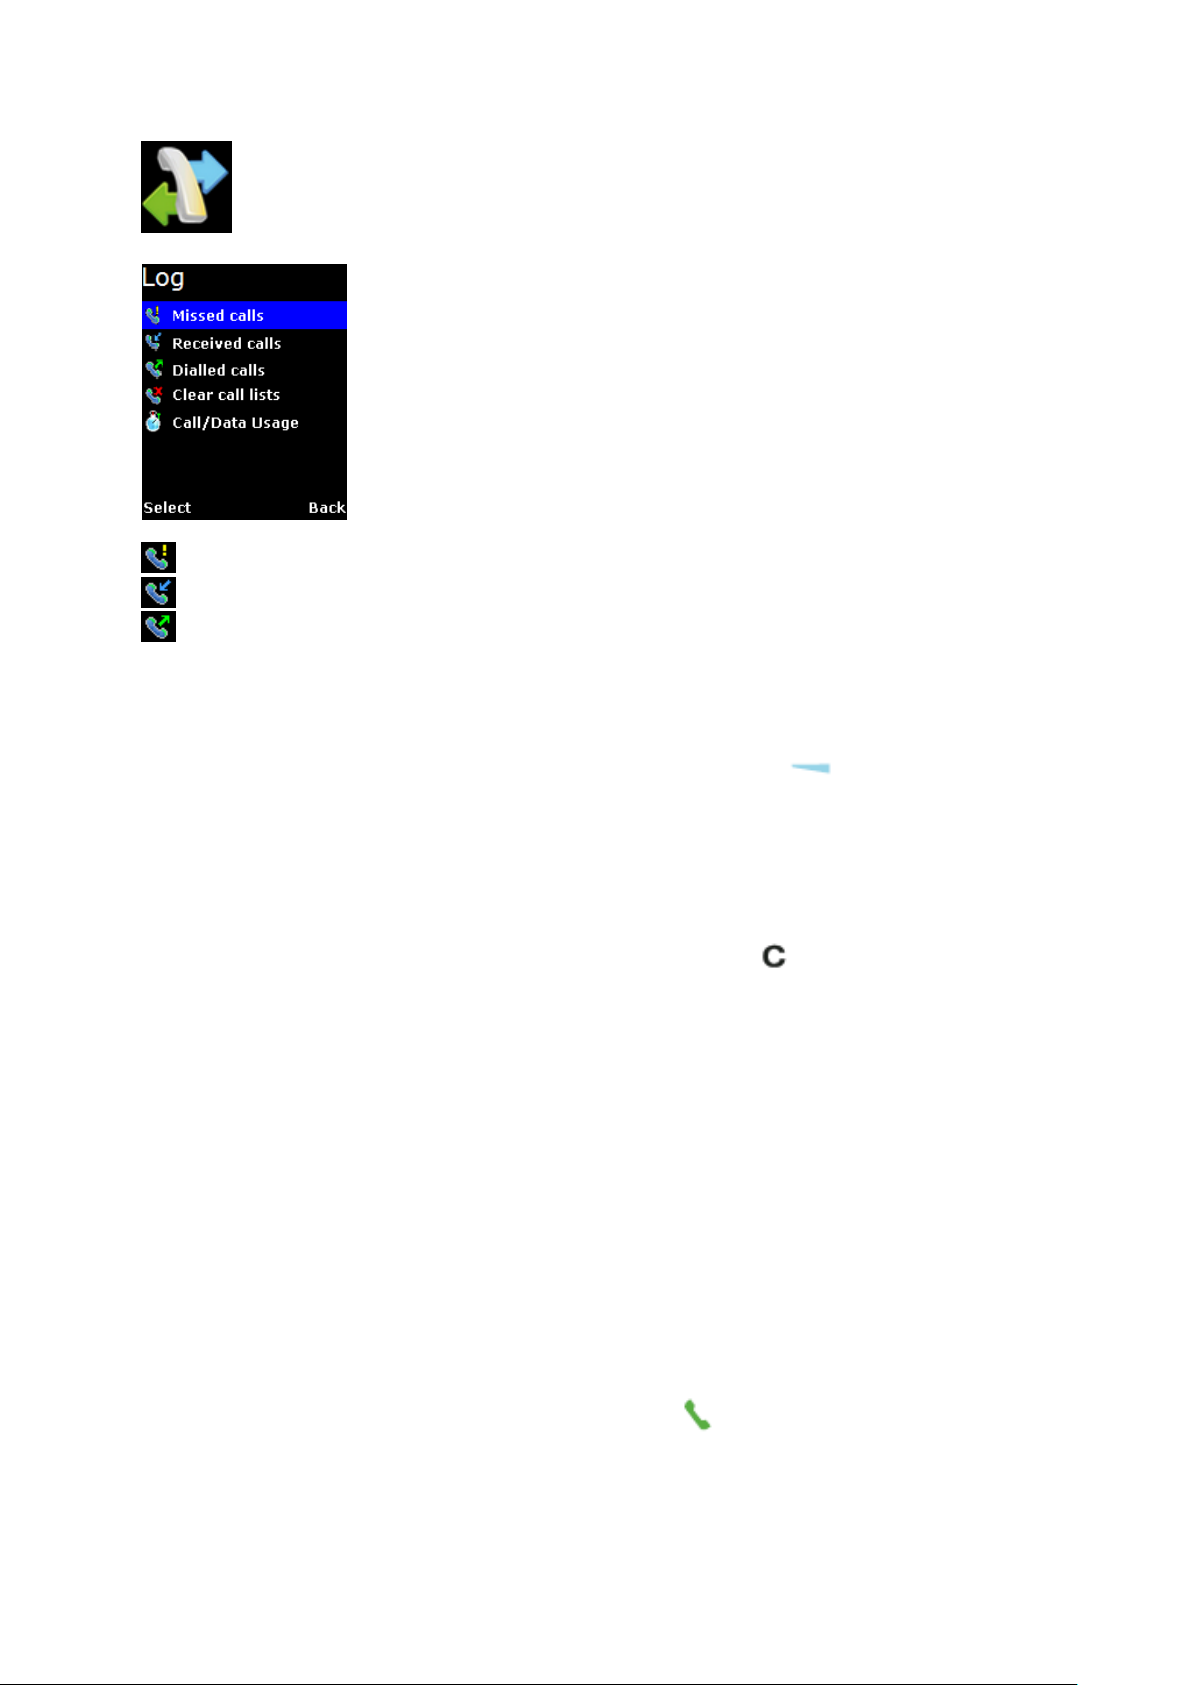
Log Menu
The Log menu allows you to view historical information about phone
calls and data usage in chronological order with the following sub
menus:
Missed calls
Received calls
Dialled calls
Call history of the particular category is displayed in chronological order when selected. Up to
5 latest entries of each category can be saved.
The following options are available when pressing the Left selection key while
browsing through or viewing the call log:
Delete
Delete the selected log entry from the list.
Note:
You can also delete the entry by pressing the Clear key.
Call
Call the number in the selected log entry.
Send
Send an SMS to the number in the selected log entry
Save
Save the number from the selected log entry to the contact list.
Note:
This option is not available when the log entry already has an entry in the
contact list
Note:
You can also make a voice call to the number of the selected log entry when browsing
through or viewing the call log by pressing the Call key.
13
Page 25

SAFARITM System User Guide
Clear call lists
Select this to clear the call log entries. Available log options are:
Missed calls
Received calls
Dialled calls
All calls
Delete all logs including Missed, Received and Dialled logs.
Call/Data usage
Display the accumulated call and data duration. Press Left selection key to clear the
call or data duration.
14
Page 26

SAFARITM System User Guide
Telephony Menu
The Telephony menu allows you to configure telephony related settings with the following
sub menus:
Port Settings
Primary Handset
Contain options for incoming and outgoing call types.
Select this to configure the call type settings. The following options is available when
pressing the Left selection key while browsing through the list:
Standard
NONE
Phone Port
Contain options for incoming and outgoing call types.
Select this to configure the call type settings. The following options is available when
pressing the Left selection key while browsing through the list:
Standard
High quality [fact: only applicable if purchase fax]
BOTH (only for incoming) [fact: only applicable if purchase fax]
NONE
Fax (OPT) Port
Contain options for incoming and outgoing call types.
Select this to configure the Fax type settings. The following options are available
when pressing the Left selection key while browsing through the list:
High quality [fact: only applicable if purchase fax]
NONE
15
Page 27

SAFARITM System User Guide
Speed dial
Setting
Contain options to enable/disable the speed dial feature
Speed Dial List
Select this to configure the speed dial list. The following options are available when
pressing the Left selection key while browsing through the list:
Assign
Assign a contact to the selected entry. To assign a contact:
1. Select Speed Dial List.
2. Browse through the list to locate an empty entry.
3. Select Options by pressing Left selection key.
4. Select Assign and press from the option.
5. Select the desired contact to assign to the speed dial list.
6. Press to confirm your selection.
Delete
Remove contact from the selected entry. This option is not available for empty
entry.
Note:
You can also delete the entry by pressing the Clear key.
Call
Make call using the number from the selected entry. This option is not available
for empty entry.
Note:
You can also make a voice call to the number of the selected entry by
pressing the Call key.
You can make a voice call directly from the Main Display screen by pressing the
corresponding speed dial entry number + Call key once the speed dial feature is
enabled with a valid contact entry.
16
Page 28
SAFARITM System User Guide
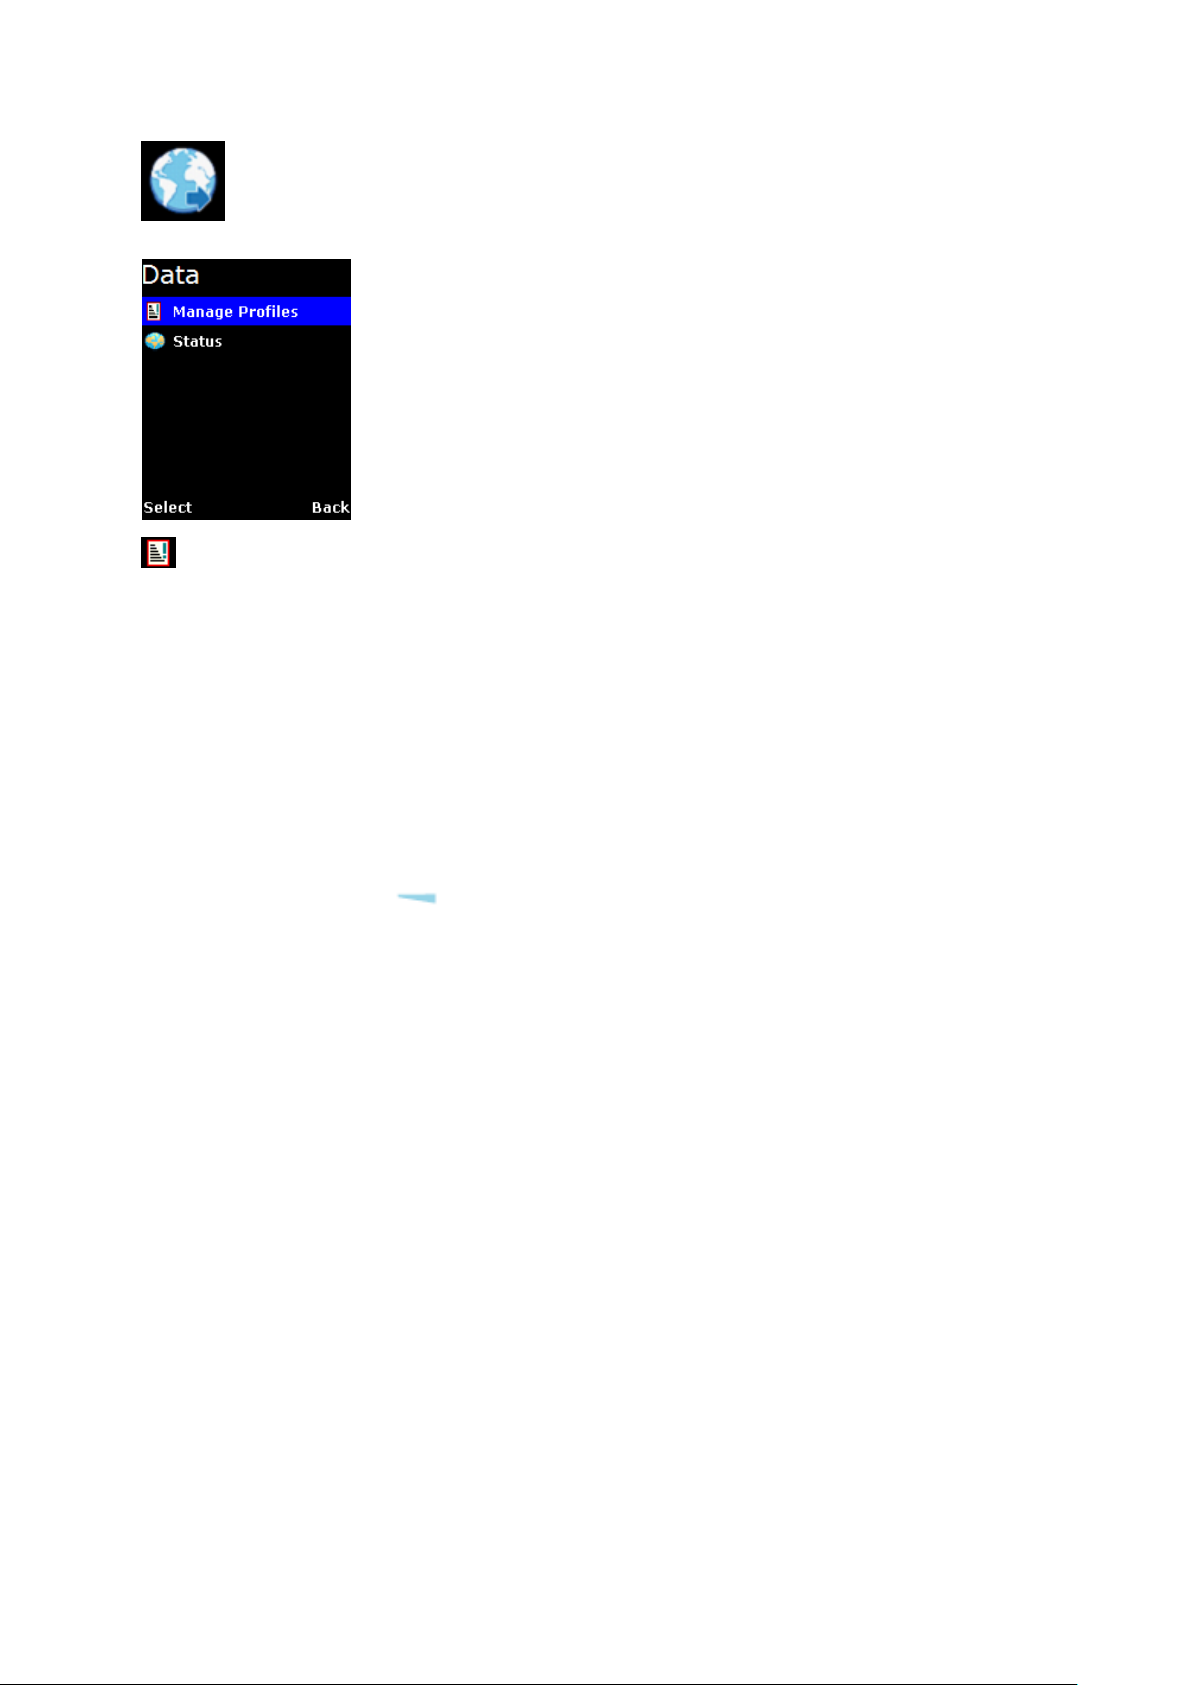
Data Menu
The Data menu provides the following sub menus to manage and
configure data connections (PDP profiles) for the UE:
Manage profiles
Allow you to manage the Primary and Secondary PDP profiles.
Primary profiles
One Standard Primary PDP profile has been created in the Primary profile list as
a default profile. The profiles listed in the list are:
Standard
8k Streaming
16k Streaming
32k Streaming
64k Streaming
128k Streaming
You can press the Left selection key for options available when browsing through
the profile list. The list of options is:
o Edit
Edit the selected profile.
o Delete
Delete the selected profile.
o Add
Add new profile into the list.
o Reset table
Reset profile list. All profiles will be deleted and a default profile is created.
17
Page 29

SAFARITM System User Guide
Adding/Editing profiles
You can press the Left selection or key from the option list to add new
or edit existing profile settings.
Profile name
Specify the name of the profile.
Connection type
Both Standard and Streaming connection types are supported.
APN
Specify information of the APN (Access Point Name). Further available
settings are:
APN: Specify the Access Point Name for the connection. Default APN is
according to SIM card. Enter your own APN if you do not want to use the
default APN from the SIM card.
Username: Specify the user name for Static IP configuration. Default is blank
for Dynamic IP configuration.
Password: Specify the password for Static IP configuration. Default is blank
for Dynamic IP configuration.
You can press the Left selection key for the following options:
o Edit
Edit the selected APN setting
o Fetch from SIM
Fetch the APN from the SIM card. This option is only available
when APN is highlighted.
IP configuration
Contain options for Static or Dynamic IP. Default is Dynamic IP
configuration.
IP address
Specify the IP address for Static IP configuration. This field is ignored for
Dynamic IP configuration. Default is blank for Dynamic IP configuration.
Header comp.
Contain options to enable or disable header compression. Default is Enabled.
18
Page 30

SAFARITM System User Guide
Note:
For 8k, 16k, 32k, 64k and 128k Streaming profiles, there are three additional options
when selecting editing their settings. The additional options are:
Desired rate
Choose the desired rate for the different profiles. Note that the default
setting for each profile is the profile chosen. For example, for 8k
Streaming, the default setting for minimum rate is 8k.
Minimum rate
Choose the minimum rate for the different profiles. Note that the default
setting for each profile is the profile chosen. For example, for 8k
Streaming, the default setting for minimum rate is 8k.
Error correction
Contain options to enable or disable error correction. Default is
disabled.
Secondary Profiles
The profiles listed in the list are:
FTP
Quick Link
Quick Time Media
Real Media
Stream Box
Win Media
Adding/Editing profiles
You can press the Left selection or key from the option list to add new
or edit existing profile settings.
Profile name
Specify the name of the profile.
TFT
Choose desire type of connection.
Desired rate
Choose the desired rate for the profile. Default settings for all secondary profiles
are set as 32K.
Minimum rate
Choose the minimum rate for the profile. Default settings for all secondary profiles
are set as 32K.
Error correction
Contain options to enable or disable error correction. Default is Disabled.
Note:
You will be prompted to save the changed settings before exiting the sub
menu. Press Left selection key or key to save the changes.
19
Page 31
SAFARITM System User Guide
Icon in the profile list indicates that the profile is not active and icon indicates that the
profile is currently active in use.
Status
Allow you to check the status of the data connection. You can also activate/ de-active a
specific profile in the status display list.
Note:
You will not be able to enter this sub menu if the UE has not been registered for PS
data service.
The status list shows you the current active data connection. Depending on whether there is
an active connection, you can press the Left selection key for the following options:
Activate primary
This option is available when there is no active data connection. Select this to
choose from the profile list for activation.
Deactivate
This option allows you to de-active an active data connection.
To active a primary data connection when there is no active connection:
1. From the data status list, select Options using the Left selection key.
2. Select Activate primary using Left selection key or key.
3. Select from a list of configured primary profile for activation. Press Left
selection key or key to confirm.
4. You are prompted to confirm activation. Confirm activation by selecting Yes using the
Left selection key or key.
Note:
It may take a while to active a data connection.
To de-active a primary data connection when there is an active connection:
1. From the data status list, select Options using the Left selection key.
2. Select Deactivate using Left selection key or key.
3. You are prompted to confirm de-activation. Confirm de-activation by selecting Yes
using the Left selection key or key.
20
Page 32
SAFARITM System User Guide
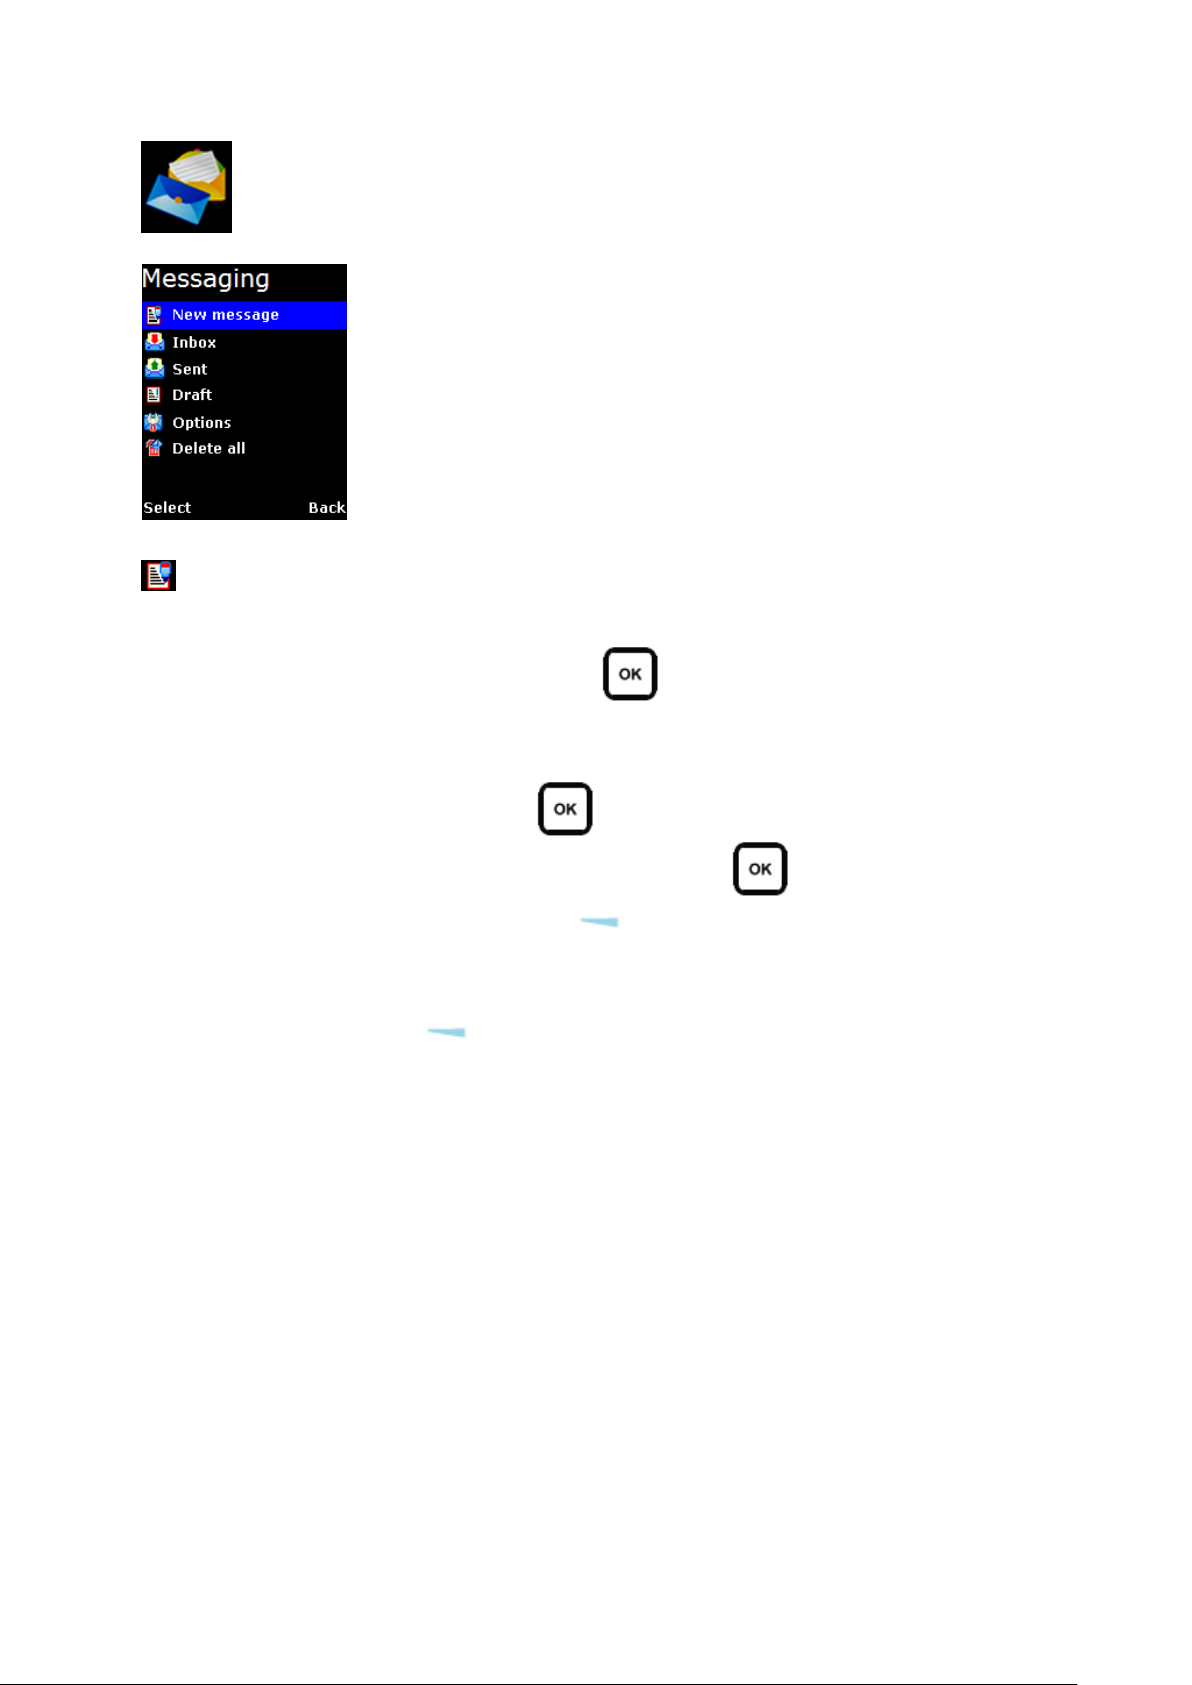
Messaging Menu
The Messaging menu allows the user to write a new messages, view
stored messages from Inbox, Drafts and/or Sent folders and
configure settings related to SMS with the following sub menus:
New Message
Select this to create and send a new message. To create new message:
1. Select New Message by pressing the key. A SMS editor will be displayed on
the Primary Handset screen for writing new message.
2. Type in your SMS message using the alphanumeric keypad.
3. To send the message, press the key and select Send.
4. Enter the recipient’s phone number, and press the key. Alternatively you can
select Search by pressing the Left selection key to select the phone number
from the contacts.
Options:
You can press the Left selection key to select options available when writing the
message.
Send
Select this when you are ready to send your message.
Save
Select this to save the message into the draft folder.
Clear screen
Select this to clear all the written text.
21
Page 33
SAFARITM System User Guide
Tips for writing the text:
Press the 0 key to add a space.
To quickly change the text input mode when writing text, press key
repeatedly and check the indicator at the top of the display:
o <ABC >: Capital letters
o <123>: Numbers
o <abc>: Small letters
o <Abc>: Initial Capital letter followed by small letters
To add a number in alphabet mode, press and hold the desired number key.
Inserting symbols to your message:
To get a list of special symbols, press the .key.
Using the 4-way navigation ring , navigate to the desired symbol.
Press to confirm selection.
Clearing text:
To clear text, press once to clear one character at a time.
To clear the whole text entry, press and hold to clear the whole text entry.
22
Page 34

SAFARITM System User Guide
Inbox
Contain new/opened text messages that you have received. When browsing through the
messages list using the 4-way navigation ring,
Indicates an unread (new) message and
Indicates read (opened) text messages.
The following are available options when pressing the Left selection key while
browsing through or viewing the messages in this folder:
Open
Open selected message. You can also press while browsing through the
message list to open the selected message (This option is not available when viewing
the message).
Reply
Select this to reply to the selected message sender.
Delete
Delete selected message.
Note:
You can also delete the selected message by pressing the Clear key.
Forward
Forward this message to another recipient.
Call
Make a voice call to the selected message sender.
Save
Save the selected message into the Draft folder.
Details
Display the details of the selected message.
Add to contact
Select this to add the phone number of the selected message into the contact list.
Note:
You can also make a voice call to the selected message contact when browsing
through the messages list by pressing the Call key.
23
Page 35

SAFARITM System User Guide
Sent
Contain text messages that you have sent. The following are available options when
pressing the Left selection key while browsing through or viewing the messages in
this folder:
Open
Open selected message. You can also press while browsing through the
message list to open the selected message (This option is not available when viewing
the message).
Delete
Delete selected message.
Note:
You can also delete the selected message by pressing the Clear key.
Send
Send the selected message to another recipient.
Save
Save the selected message into the Draft folder.
Add to contact
Select this to add the phone number of the selected message into the contact list.
Note:
You can also make a voice call to the selected message contact when browsing
through the message list by pressing the Call key.
24
Page 36

SAFARITM System User Guide
Draft
Contain text messages that you have saved. The following are available options when
pressing the Left selection key while browsing through or viewing the messages in
this folder:
Open
Open selected message. You can also press while browsing through the
message list to open the selected message (This option is not available when viewing
the message).
Delete
Delete selected message.
Note:
You can also delete the selected message by pressing the Clear key.
Send
Send this message to another recipient.
Save
Save the selected message into the Draft folder
Add to contact
Select this to add the phone number of the selected message into the contact list.
Note:
You can also make a voice call to the selected message contact when browsing
through the message list by pressing the Call key.
Options
The following settings are available in this sub menu:
Message Centre
Select this to set the number of the SMS service center.
Save sent message
Select this to enable or disable the saving of sent messages. When this option is
enabled, all successfully sent messages are saved in the Sent folder.
Memory status
Select this to view the memory status of the messages.
Reload Messages
Select this to reload messages from the UE into the local memory of the Primary
Handset.
25
Page 37

SAFARITM System User Guide
Delete all
Select this to clear the messages in a particular folder. Available folder options are:
All messages
Delete messages in all folders including Inbox, Sent and Draft.
Inbox
Sent
Draft
26
Page 38
SAFARITM System User Guide
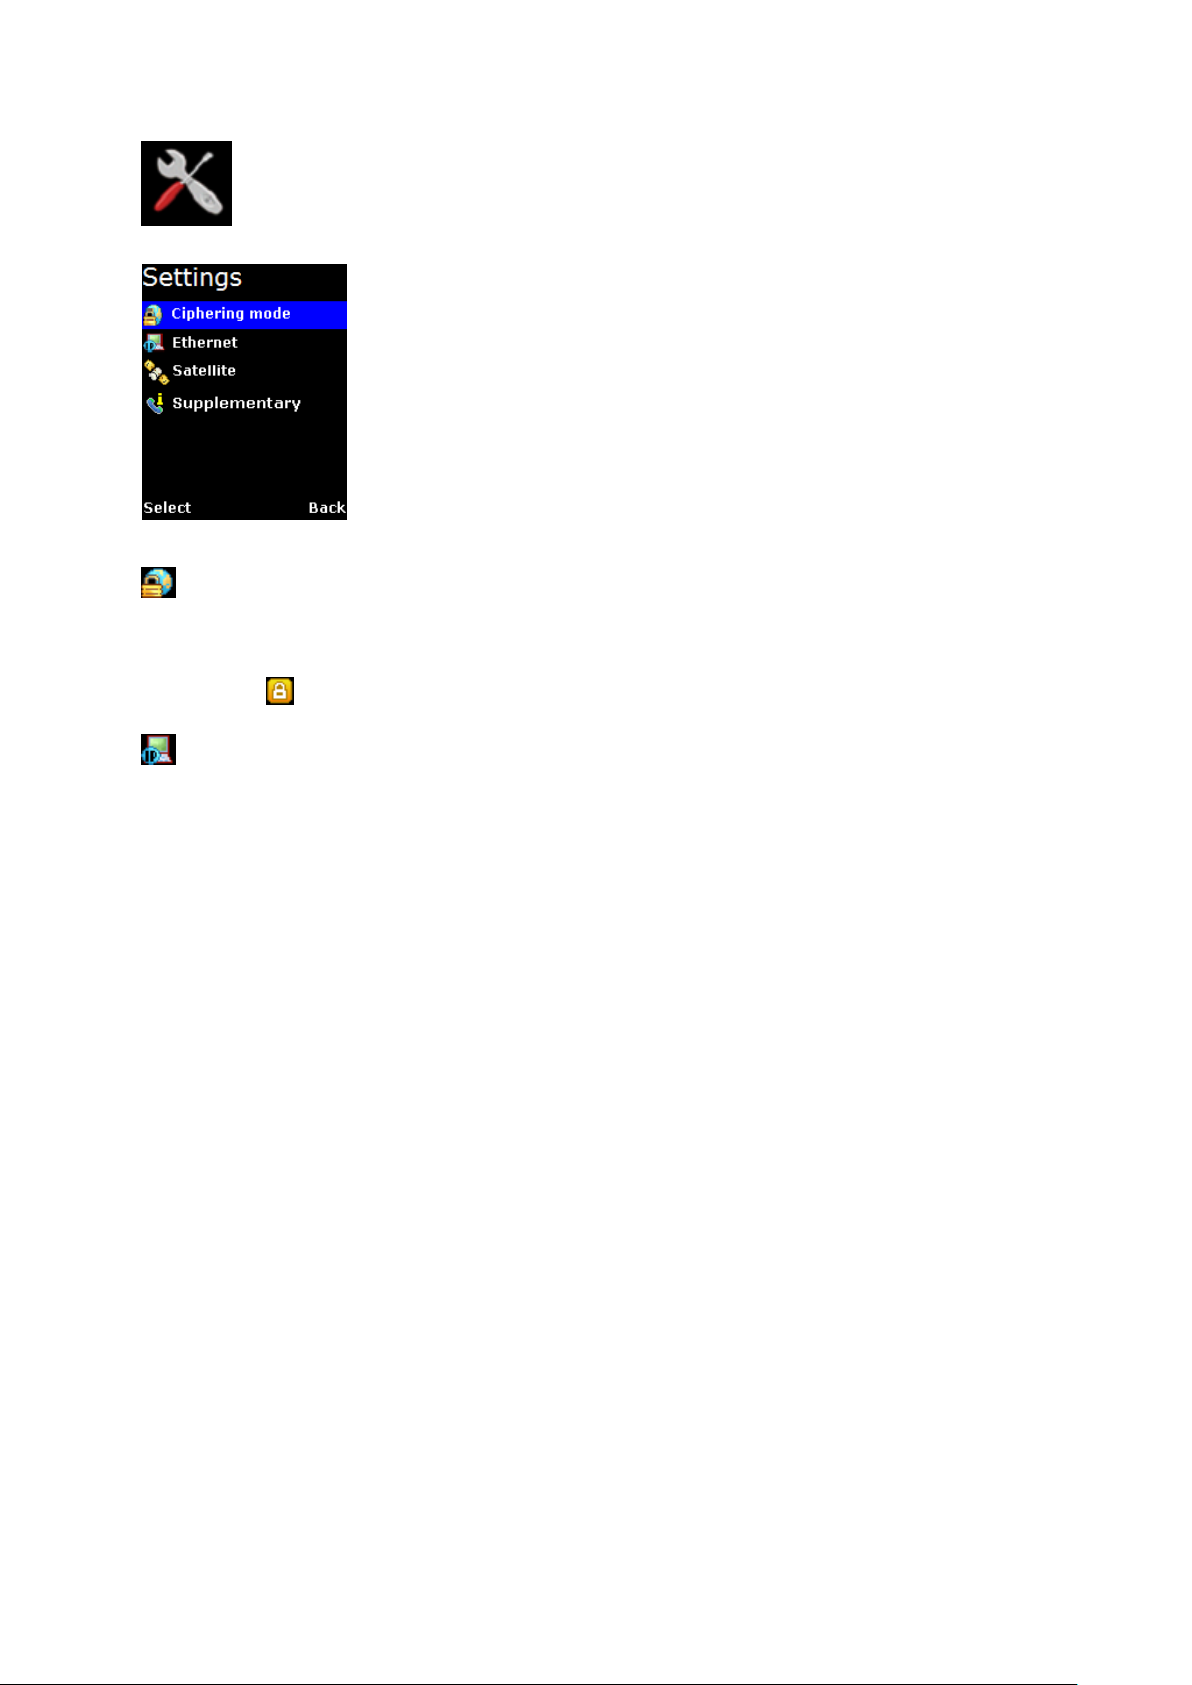
Settings Menu
The Settings menu provides the following sub menus to configure the
UE:
Ciphering mode
Contain options to enable/disable the use of ciphering mode between the network and UE.
Note:
Status icon is displayed in the Main Display screen when ciphering is enabled.
Ethernet
Allow you to configure settings related to Ethernet connection.
Transceiver IP Address
Specify the IP address of the UE. The default IP address of the UE is
192.168.1.35
DHCP settings
Display the status and settings of the DHCP server.
DHCP server
Display the status of the DHCP server.
Start IP address
Display the start IP address of the DHCP server. Default start IP address is
192.168.1.40.
End IP address
Display the end IP address of the DHCP server. Default end IP address is
192.168.1.59.
Primary DNS
Display primary DNS server address. Default primary server is 172.30.66.7.
Secondary DNS
Display secondary DNS server address. Default secondary server is
172.30.34.7.
Lease time
Display the lease time. Default lease time is 60.
27
Page 39

SAFARITM System User Guide
Except for DHCP server, the rest of the display settings can be edited by pressing
the Left selection or keys.
Note:
Make sure that the format is correct when entering an IP address. Press the
Star key multiple times to insert the “.” sign.
Satellite
Manage settings related to Inmarsat satellites.
Satellite selection
Allow you to select the preferred satellite to lock on to. Default is AUTO where the UE
automatically searches for the best satellite in view to lock on to.
Note:
Satellites visible to the UE are marked with *. The UE will de-register from the
network with all the CS (voice) and PS (data) services terminated whenever a
new satellite is manually selected from the list. The UE can only re-register with
the network once it has successfully locked onto the newly selected satellite.
Satellite status
Display current satellite status. The following information is displayed:
Status
Display status of the UE. The UE can be either searching or locked on to a
particular satellite
Satellite ID
Satellite ID that the UE is currently searching for or locked on
Satellite Name
Satellite Name that the UE is currently searching for or locked on
28
Page 40

SAFARITM System User Guide
Supplementary
Configure settings related to supplementary services. These settings are applicable to
standard CS voice services.
Note:
Depending on the network, some settings may not be available or may prevent other
settings from being activated.
The following sub menus are available:
Call forwarding
Allow you to configure for call forwarding services depending on various conditions.
The following forwarding conditions are available for configurations:
All Calls
All calls are unconditionally forwarded.
Busy
Calls are forwarded when the UE is busy.
No answer
Calls are forwarded when no answer from the UE for a specific time.
Not reachable
Calls are forwarded when UE is not reachable.
You can press the Left selection key for options available when browsing
through the list of forwarding conditions. The list of options is:
Retrieve all
Retrieve network settings of all the listed conditions.
Update all
Update configured settings of all the listed conditions to the network.
Cancel all
Deactivate all condition settings.
Note:
Operations on this level affect all forwarding conditions and hence it may take
some time to process.
Pressing the key configures a particular forwarding condition. The following
settings can be configured:
Status: Display active or Inactive status of the selected forwarding condition. Press
the key to change the status.
Number: Display number to forward calls to when selected forwarding condition is
29
active. Press the key to change the number.
Page 41

SAFARITM System User Guide
Time: Only applicable to No answer forwarding condition. To forward calls to
selected number if call no answer for a specific period of time. Press the key to
change the time.
You can press the Left selection key for options available when configuring a
particular forwarding condition. The list of options is:
Retrieve
Retrieve network settings of the selected condition.
Update
Update configured settings to the network for the selected condition.
Note:
Always use Retrieve all or Retrieve options to retrieve the latest settings from
the network. Use Update all or Update options to update the network settings
after configurations.
Call barring
Allow you to configure for call barring services depending on various barring
conditions. The following conditions are available for activations/deactivations by
pressing the key:
Outgoing calls
Barring of all outgoing calls.
Incoming calls
Barring of all incoming calls.
Int. except home
Barring of all outgoing international calls except to home country.
Incoming if abroad
Barring of all incoming when roaming.
You can press the Left selection key for options available when browsing
through the list of barring conditions. The list of options is:
Retrieve
Retrieve network settings of the highlighted condition.
Retrieve all
Retrieve network settings of all the listed conditions.
Update
Update configured settings to the network for the highlighted condition.
Update all
Update configured settings of all the listed conditions to the network.
30
Page 42

SAFARITM System User Guide
Cancel all
Deactivate all condition settings.
You will be asked to enter the call barring password when updating the settings to the
network. Consult your equipment distributor if necessary.
Note:
Always use Retrieve all or Retrieve options to retrieve the latest settings from
the network. Use Update all or Update options to update the network settings
after configurations.
Call waiting
Contain options to enable/disable call waiting services. You can also press the Left
selection key for the following options:
Retrieve
Retrieve network settings of the call waiting service
Update
Update configured settings to the network
Note:
Always use Retrieve option to retrieve the latest settings from the network. Use
Update option to update the network settings after configurations.
Caller ID
Allow you to configure settings that are related to caller identifications.
Setting
Contain options to configure for USA or Europe caller ID type
Send Caller ID
Allow you to enable/disable sending of your caller ID to the recipient
when making a call. Default is AUTO where the default network
settings are used. You can also press the Left selection key
for the following options:
Retrieve
Retrieve network settings of the call waiting service
Update
Update configured settings to the network
Note:
Always use Retrieve option to retrieve the latest settings from the network. Use
Update option to update the network settings after configurations.
31
Page 43
SAFARITM System User Guide
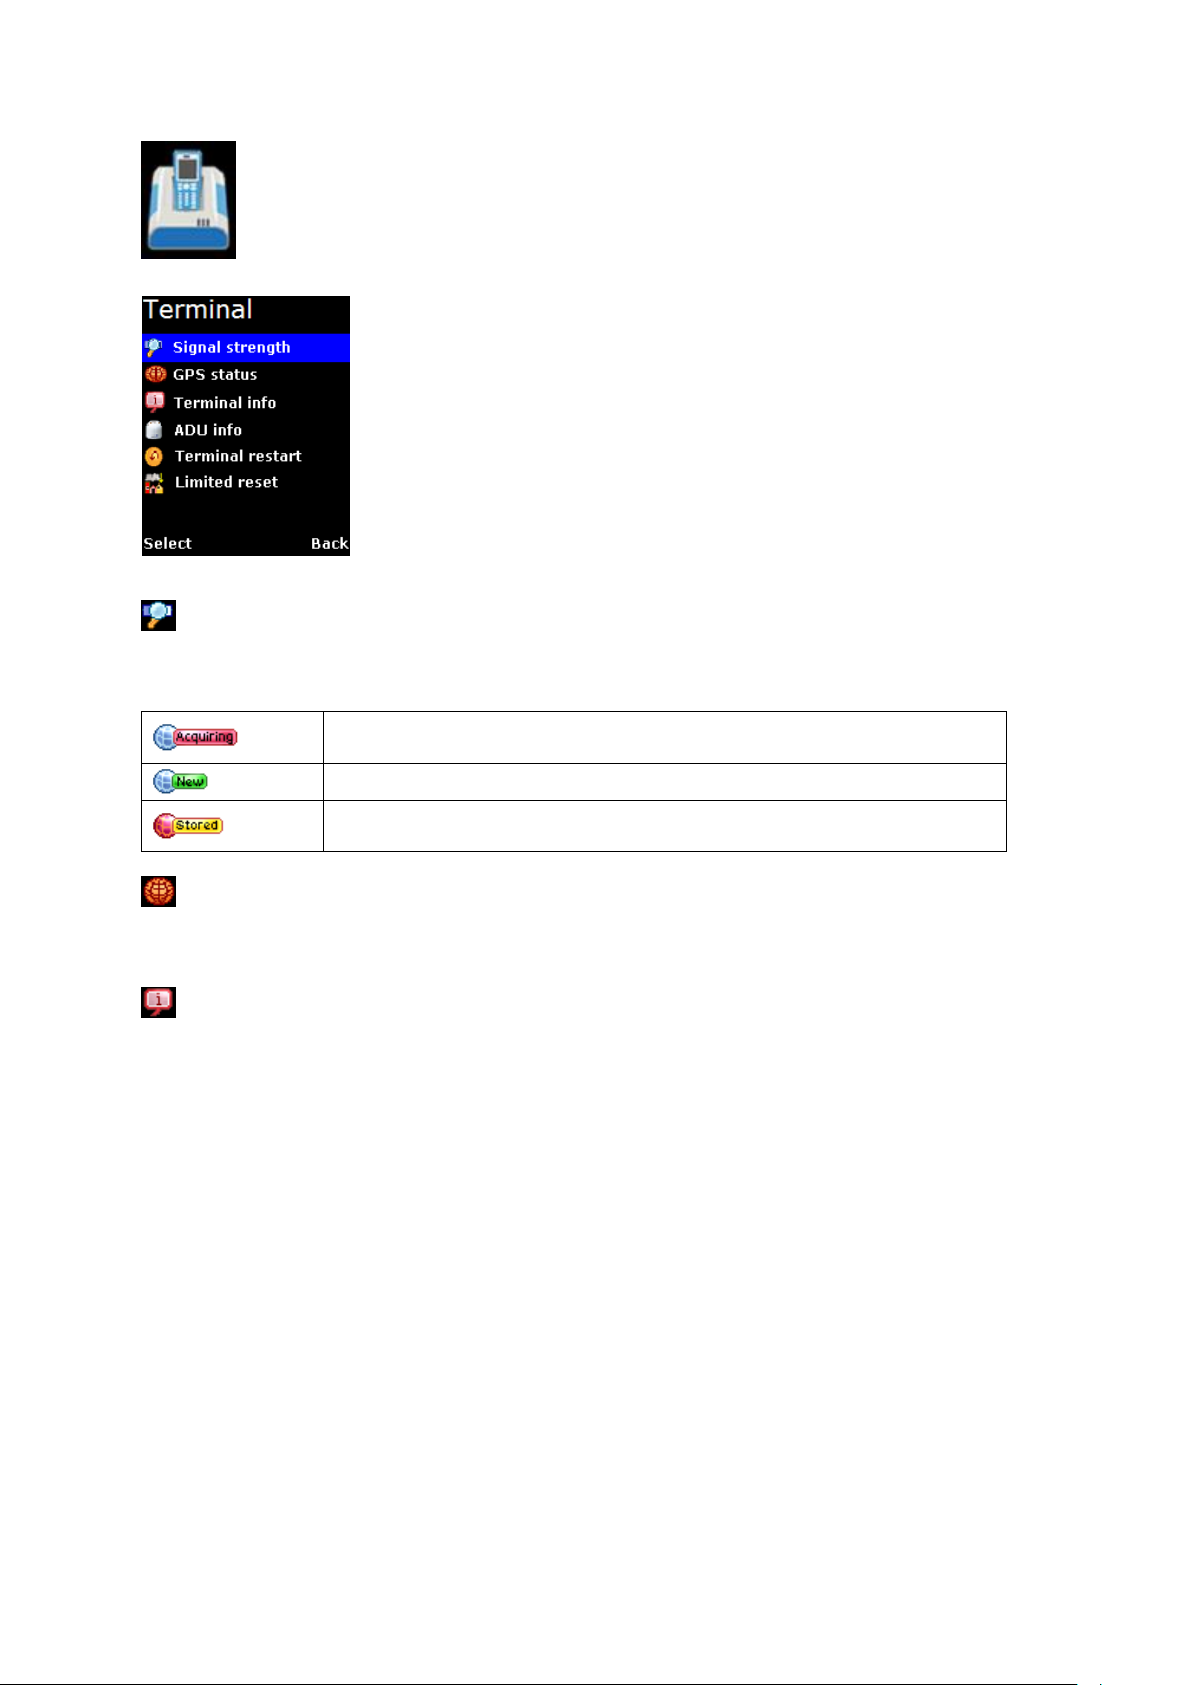
This icon shows that the UE is in the process of acquiring a GPS fix
when there is no previously stored GPS fix.
This icon shows that the UE is using New GPS coordinates.
This icon shows that the UE is using previously stored GPS
coordinates.
Transceiver Menu
The Transceiver menu provides the following sub menus to check for
information and perform resets on the UE:
Signal strength
Show graphical representation of current signal strength and GPS type. Table below
describes the available GPS type icons used in this sub menu:
GPS status
Show current Latitude and Longitude coordinates, the GPS type and Time of acquisition on
the UE.
Transceiver Info
Display a list of information of the UE.
Manufacturer
Manufacturer name of the UE
Software version
Software version of the UE
Model
Model name of the UE
IMEI number
IMEI number of the UE
IMSI number
IMSI number of the SIM card
Subscriber number
Subscriber’s telephone number
32
Page 44

SAFARITM System User Guide
Serial number
Serial number of the UE
Antenna Unit Info
Display a list of information of the Antenna.
Serial number
Serial number of the Antenna
Transceiver restart
Soft restarting the UE
Limited reset
Perform limited reset on the UE. Apart from full factory reset that is not available in Primary
Handset, limited reset only resets a small portion of the UE settings. Stored GPS status,
contacts, call logs and event logs are not cleared during limited reset.
You are also required to key in the password when performing the reset. The default
password is 0000.
Note:
This password is the same as Transceiver PIN.
33
Page 45
SAFARITM System User Guide
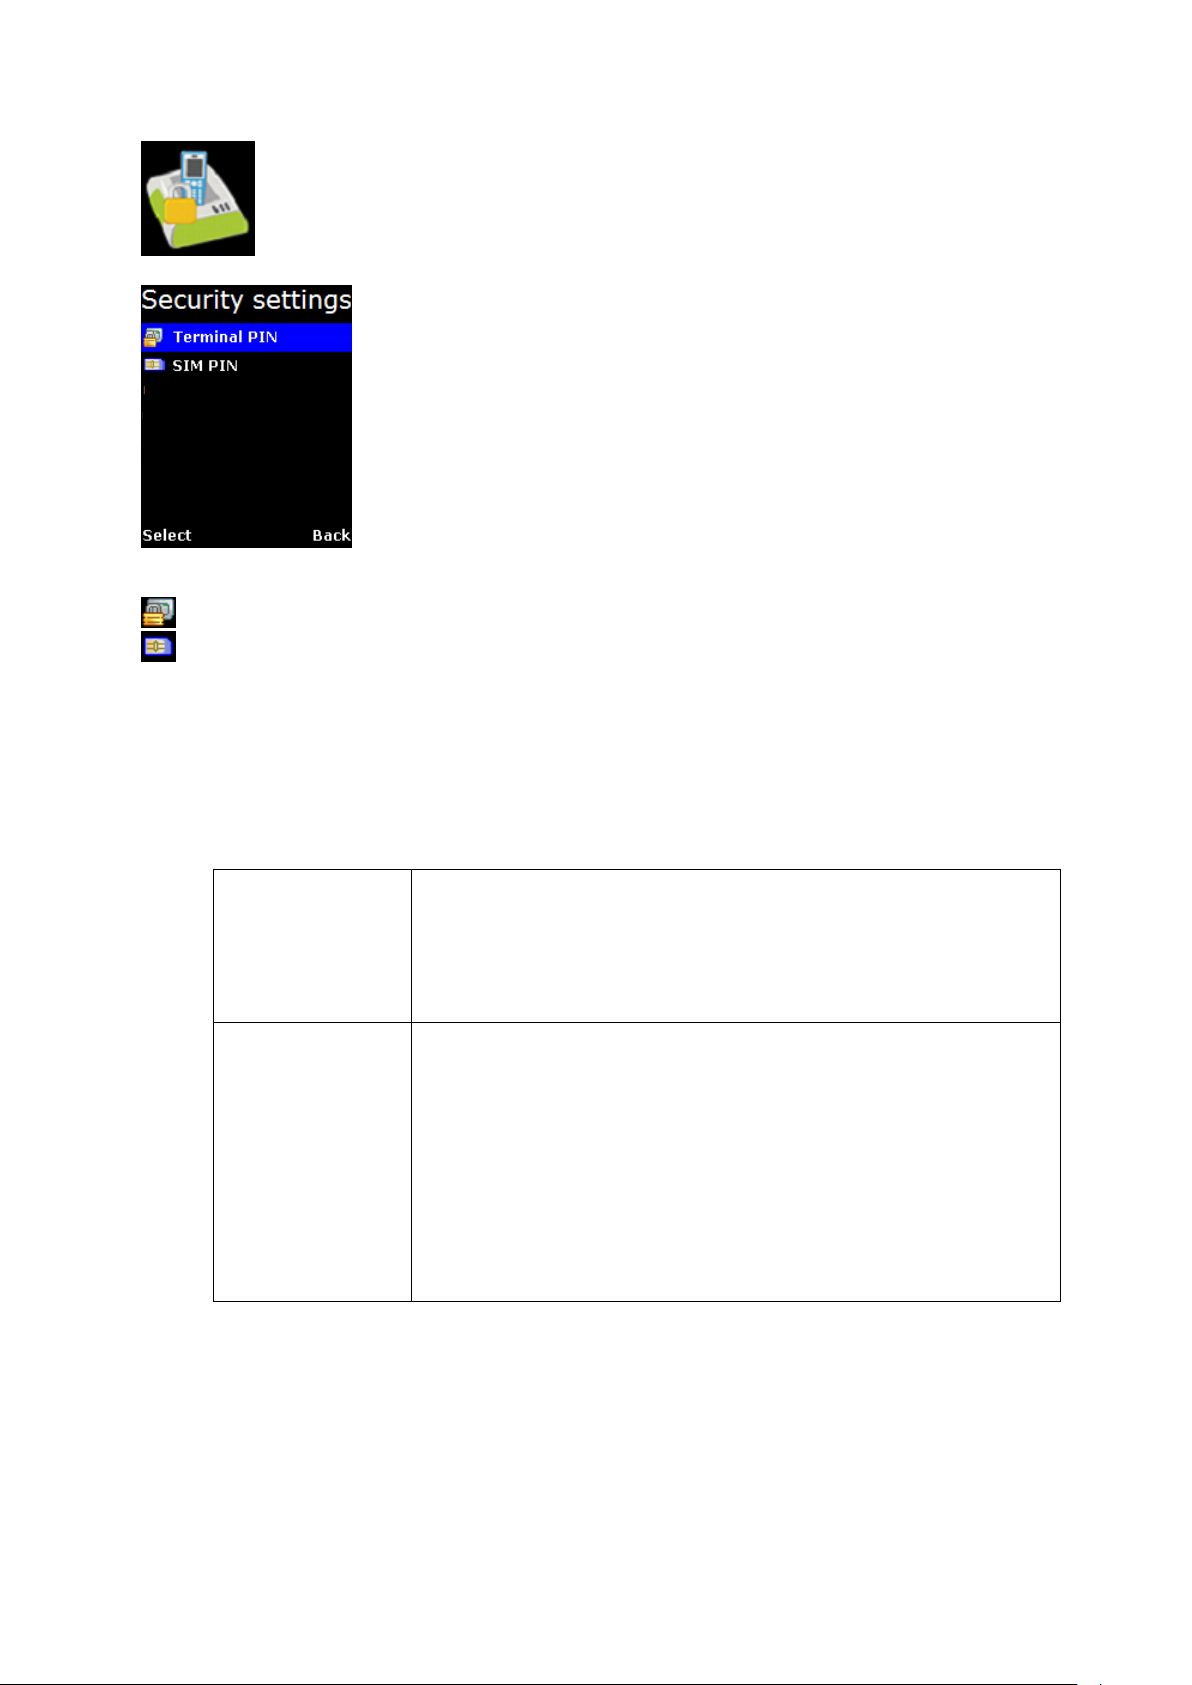
Transceiver PIN
0000
Note:
Transceiver PIN is the same PIN that has to be entered
when performing Limited Reset on the UE
SIM PIN
Depends on your SIM card. Consult your equipment distributor if
necessary.
Note:
You have to enter the PUK (PIN Unblocking Key) to access
the SIM card if a wrong PIN for SIM PIN and SIM PIN2 has
been entered for three times. You will be asked to enter the
new PIN code once you have entered the correct PUK.
However, the SIM card is no longer usable if you have
entered wrong PUK for 10 times.
Security settings Menu
The Security Settings menu provides the following sub menus to
configure the security settings of the UE using different PIN:
Transceiver PIN
SIM PIN
There are two options available for selection under each sub menus to manage the PIN and
security settings for the UE:
o Enable
Enable the selected PIN. Table below summarizes the default PIN codes for each
security setting:
You will be asked to key in the existing PIN (or default PIN if it has not been changed)
before the PIN can be enabled.
o Disable
Disable the selected PIN. You will be asked to key in the existing PIN (or default PIN
if it has not been changed) before the PIN can be disabled.
34
Page 46

SAFARITM System User Guide
o Change
Change the PIN to a new one. You will be asked to key in the existing PIN (or default
PIN if it has not been changed) before the PIN can be changed.
Note:
PIN has to be enabled before it can be changed
35
Page 47
SAFARITM System User Guide
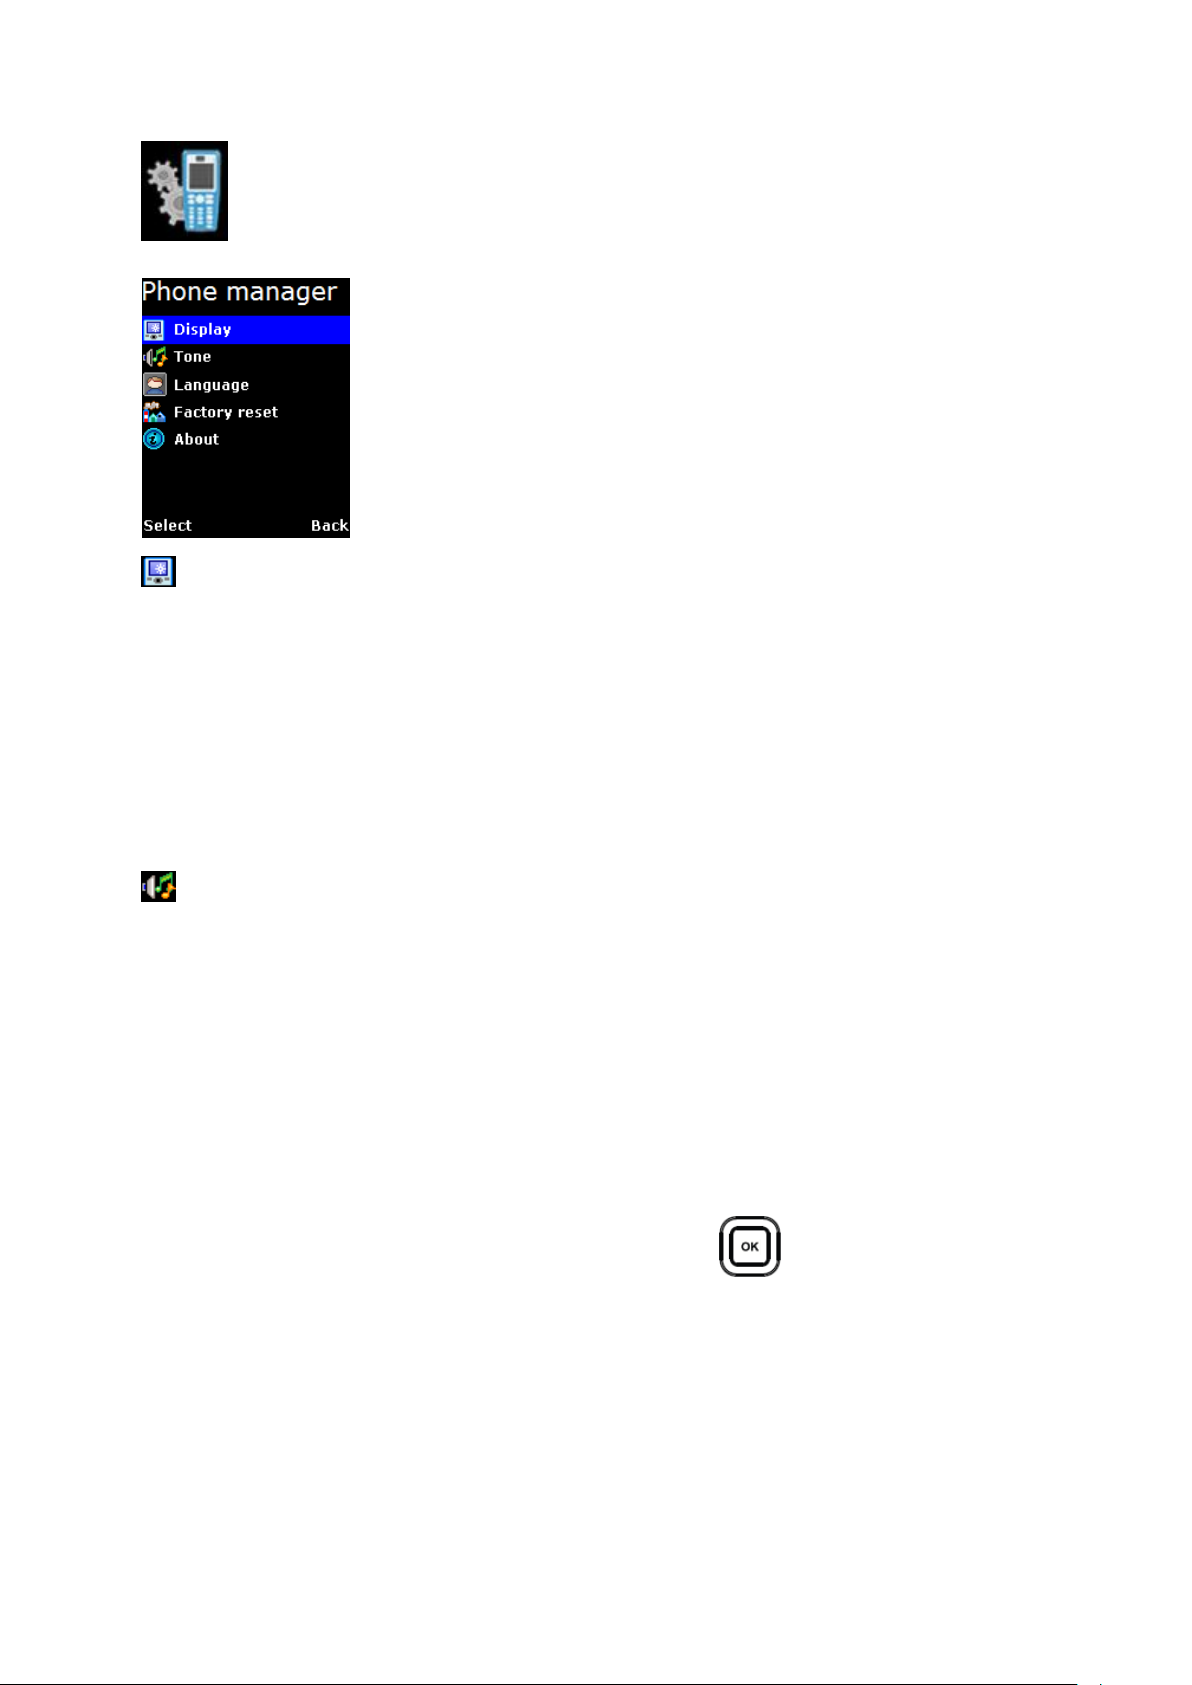
Phone manager Menu
The Phone manager menu provides the following sub menus to
configure settings that are local to the Primary Handset:
Display
Configure settings that are related to Primary Handset display.
Backlight
To set the duration of the display backlight to remain on. Settings range from Always
On (Backlight permanently on), 15 seconds to 1 minute.
Note:
The backlight will be slightly dimmer and finally off when there is no keypad
activity after sometime. However, this feature is not available when the setting
is set to Always On).
Tone
Configure tone setting for the standard and ring tones.
Standard tone
Key tone
Contain options to enable/disable the key tone.
Message tone
Contain options to enable/disable the message tone.
Volume
Configure the volume for the standard tones (both key and message
tones). Using the 4-way navigation ring , press up/right to increase
and down/left to decrease the volume.
36
Page 48

SAFARITM System User Guide
Ring tone
Tone
Select desired ring tone pattern.
Volume
Configure the volume of the ring tone. Using the 4-way navigation ring
, press up/right to increase and down/left to decrease the volume.
Language
Allow you to change the menu display language.
Factory settings
Allow you to configure default factory settings of the Primary Handset. Contains the following
settings:
Power button
Provide options to enable/disable the power button. You can press the Power
key to power on/off the UE and Primary Handset once the power button is enabled.
Factory reset
Perform factory reset on the Primary Handset
About
Display a list of information of the Primary Handset.
Model
Model name of the Primary Handset
Software version
Software version of the Primary Handset
Hardware version
Hardware version of the Primary Handset
Technical support
Web address for technical support
Copyright
Contain Copyright message
37
Page 49
SAFARITM System User’s Guide
Chapter 3 – Using the Web Console
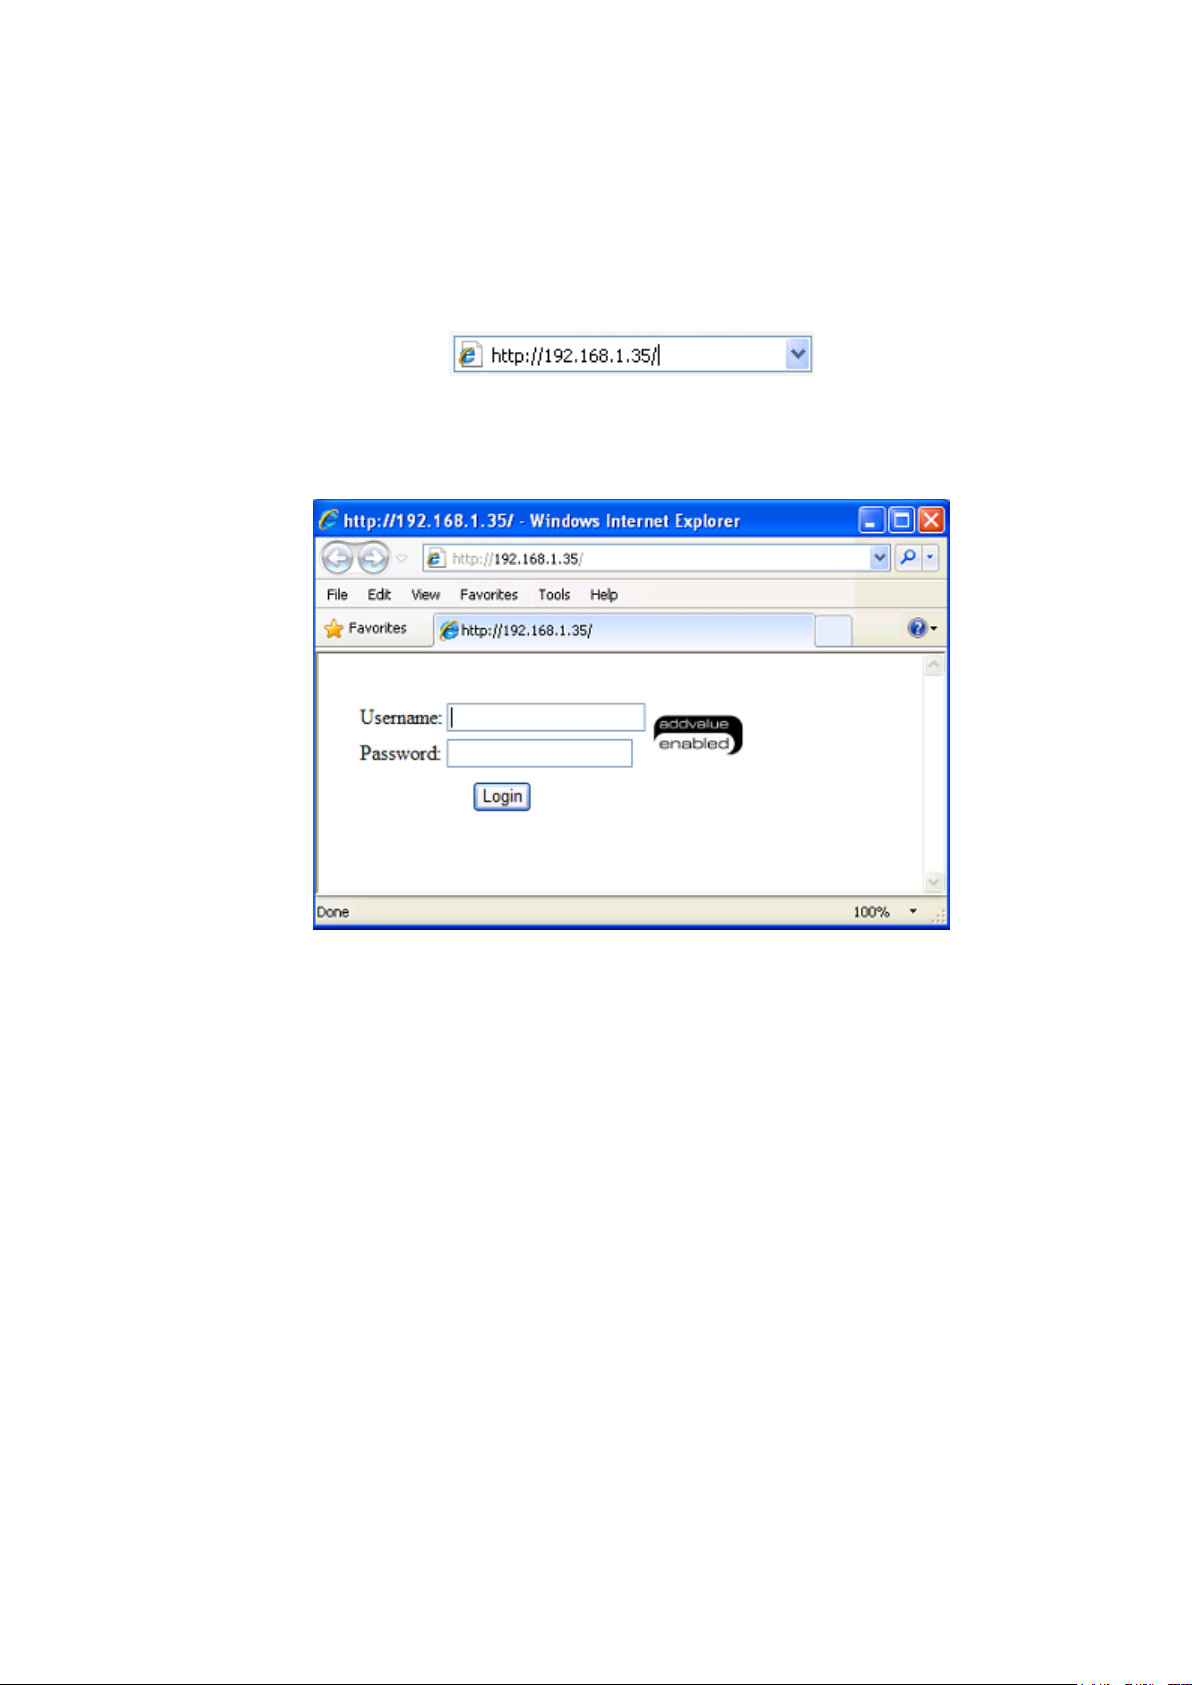
1. Connect your computer to the SAFARI UE using a LAN cable.
2. When the connection has been established, open the web browser.
3. Type http://192.168.1.35 in the Address field and press Enter.
The Login screen appears.
4. Type in admin in the Username field and 1234 in the password field. Click OK.
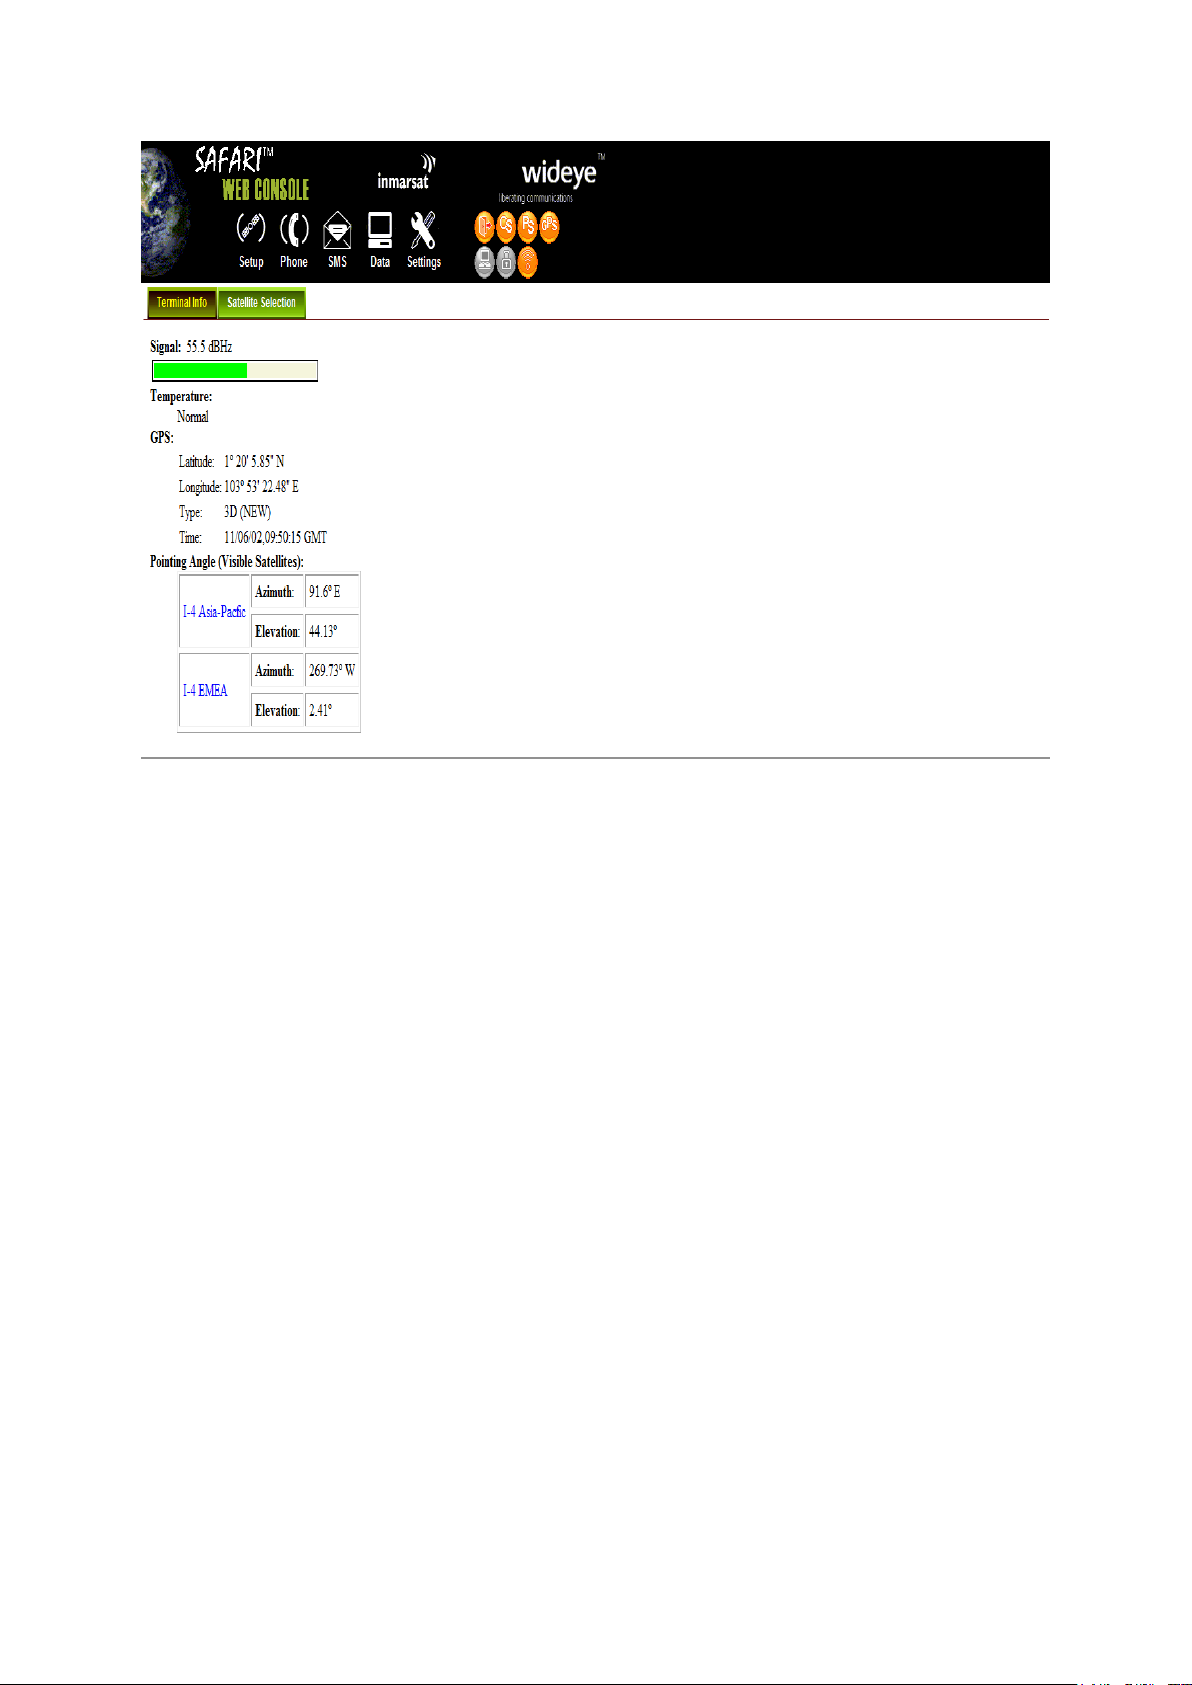
5. The SAFARI UE Web Console will appear on your screen.
The SAFARI UE will automatically register to the network. This process will
include GPS acquisition, satellite tracking and registration with the network, which
will take a few minutes. Once the process is completed, you will see the
“Registered to Network but no active data connection exists. You are now
able to make phone calls and send SMS. Please activate a data connection
before doing any data transfer” message appearing at the bottom line of the
Web Console.
1
Page 50
SAFARITM System User’s Guide
2
Page 51
SAFARITM System User’s Guide
Setup
Phone
SMS
Data
Settings
Terminal Info
Phonebook
Compose
Connection
Language
Satellite
Selection
Call History
Inbox
Primary
Profiles
Terminal Info
Sent
Secondary
Profiles
Ethernet
Draft
Port Forwarding
Telephony
Settings
PIN
SMS
Admin
Support
About
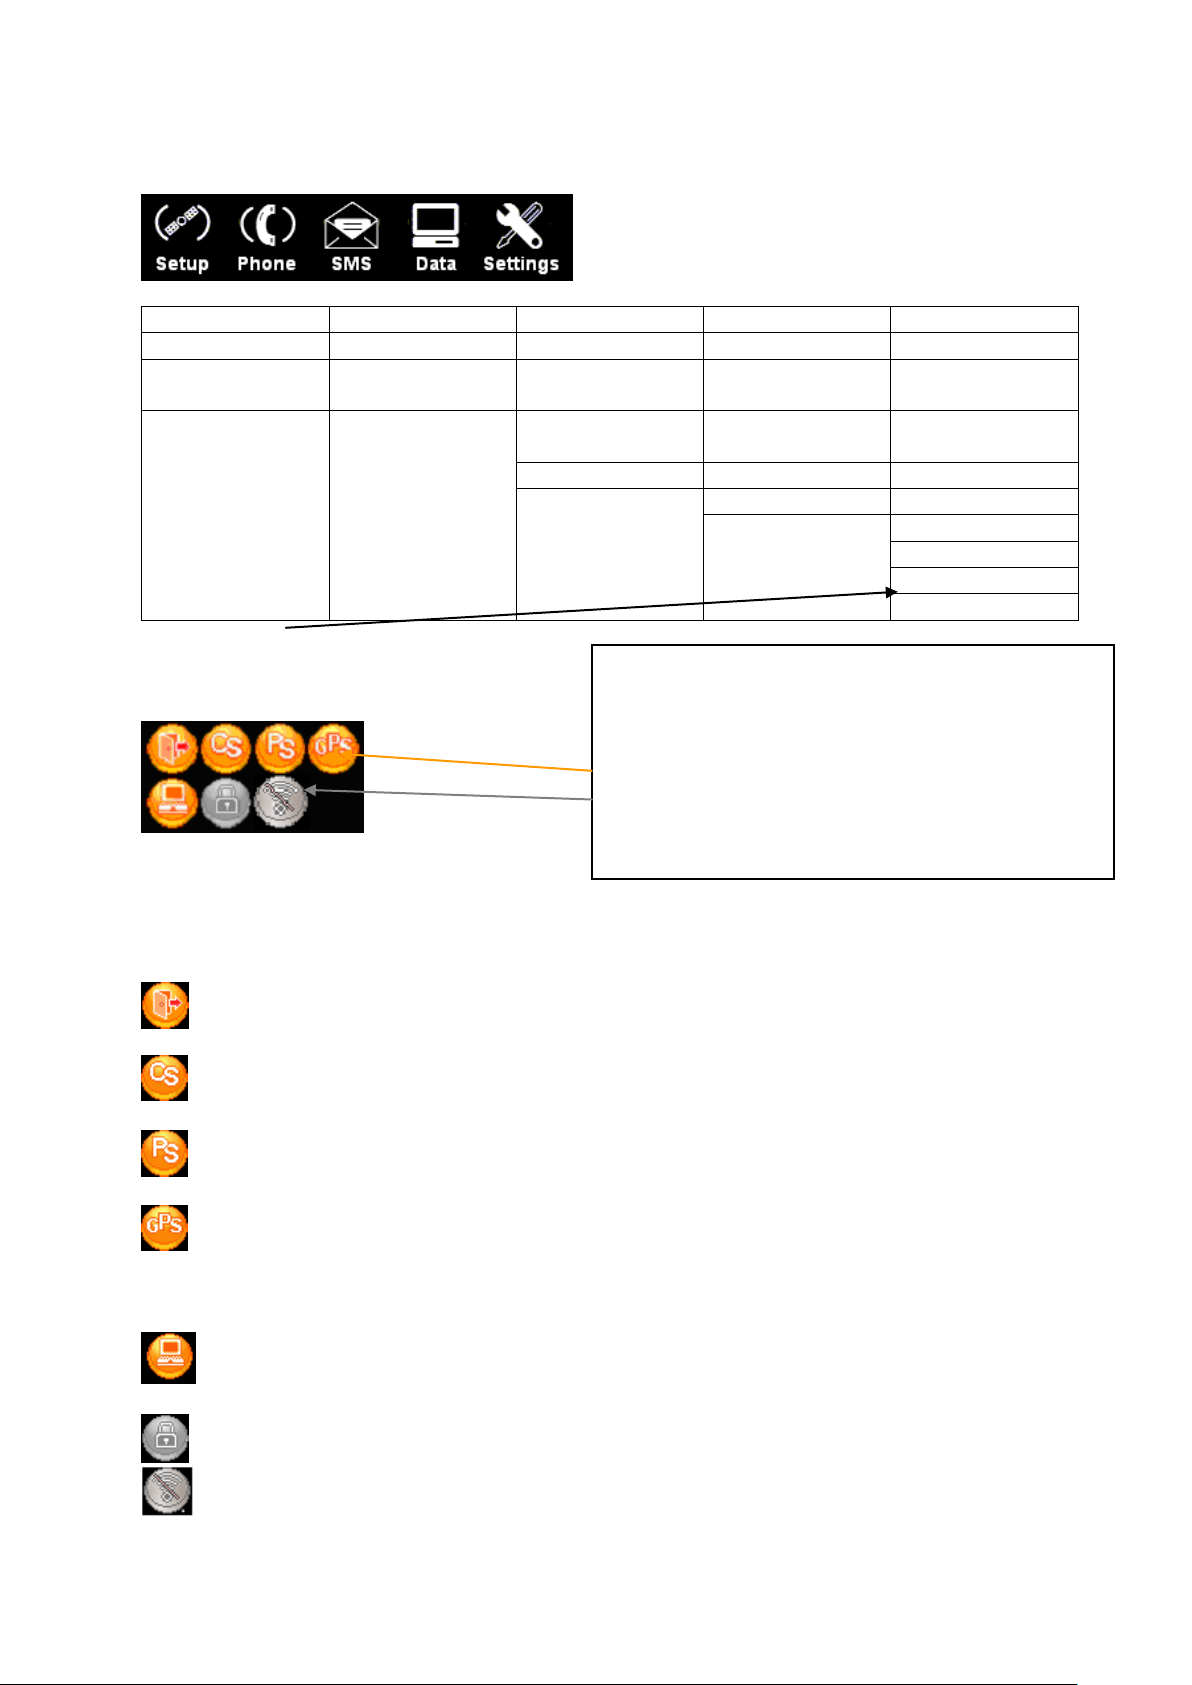
Note:
Clicking on these icons gives you a shortcut
to the desired menu.
Orange indicates the item is activated.
Grey indicates the item is not activated
Menu Overview
Deleted „Accounts‟ from the settings list above
Status Indicators
These icons indicate the status of SAFARI UE.
Status icons
Logout icon: User can log out from the web console.
CS icon: Indicates the Circuit Switch status (Voice calls, SMS, FAX).
PS icon: Indicates the Packet Switch information (Internet Browsing, FTP, email).
GPS icon: Indicates if the current GPS co-ordinates are valid or not.
Action icons
Internet icon: Click on this icon to activate or deactivate Internet connection.
Ciphering icon: Click on this icon to enable or disable ciphering.
Radio silence icon: Click on this icon to enable or disable radio silence.
3
Page 52
SAFARITM System User’s Guide
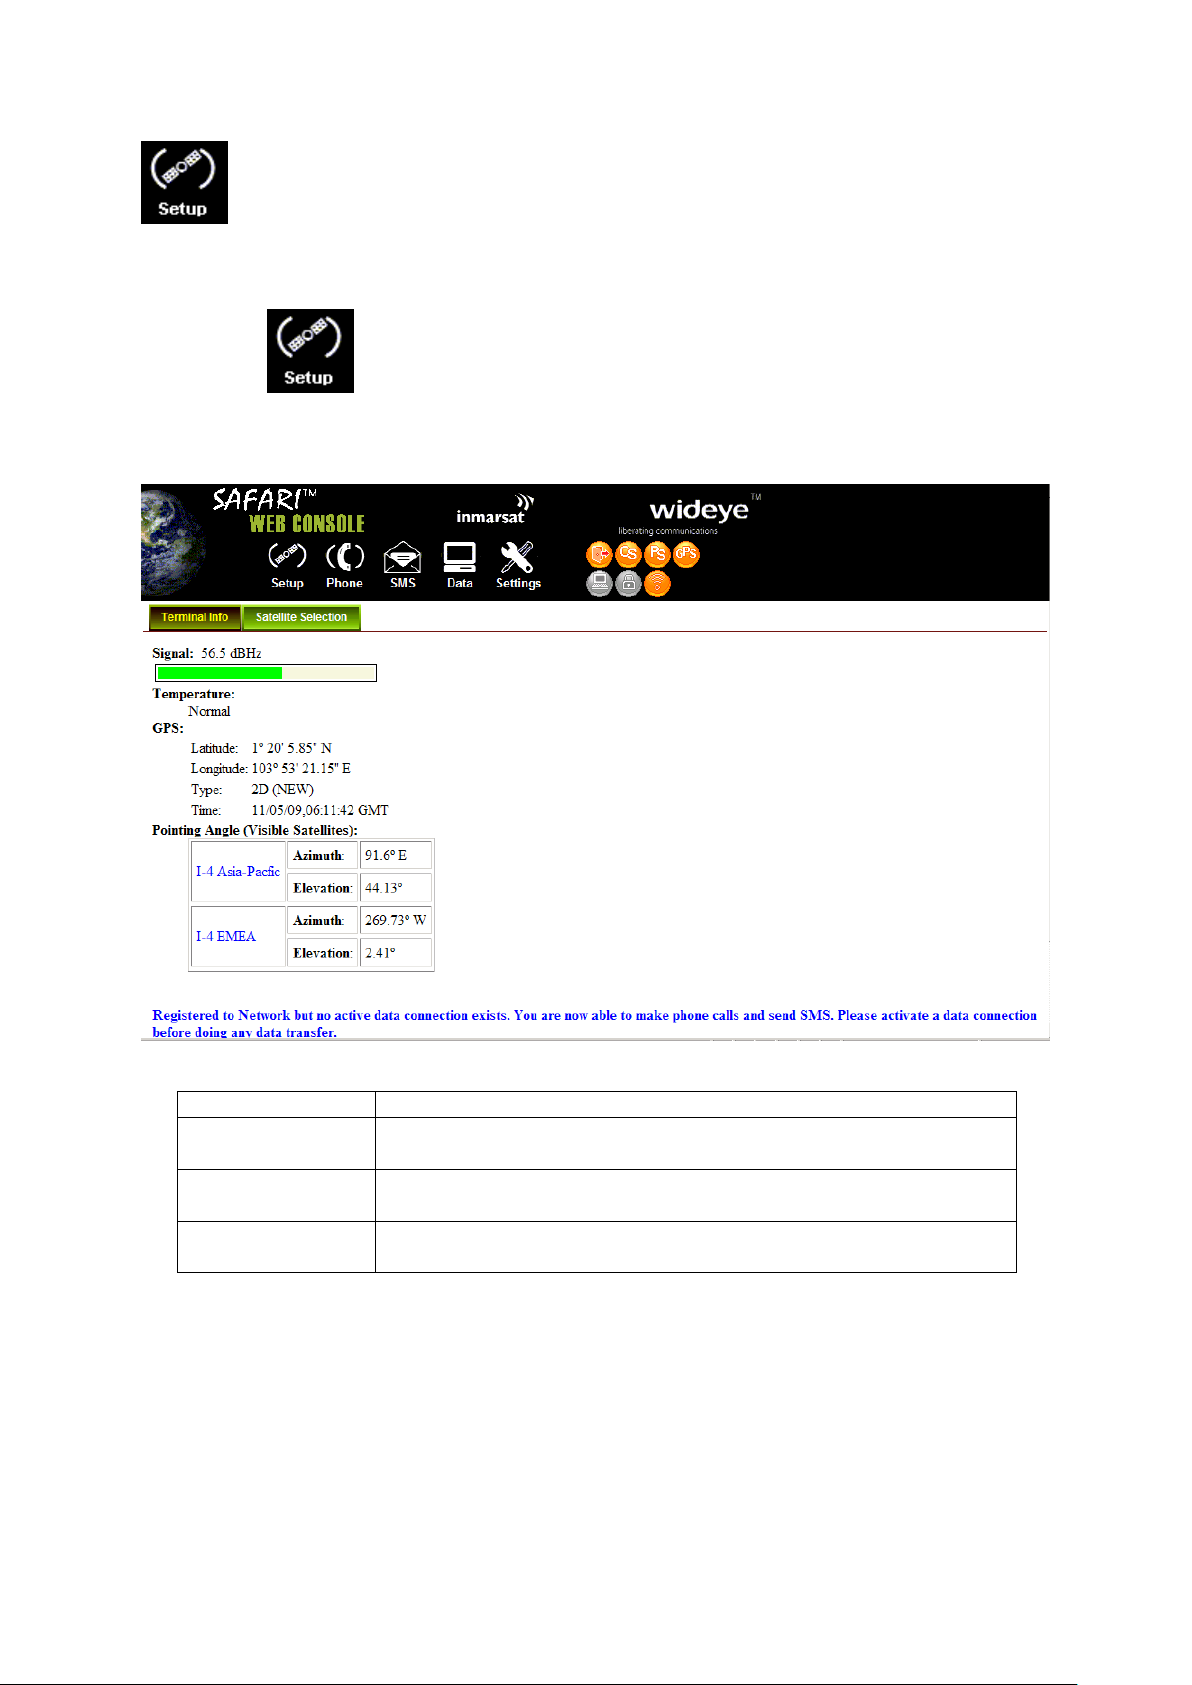
Signal
Indicates the received signal strength.
Temperature
Indicates the UE‟s Transceiver Unit current operating
temperature status.
GPS
Indicates the latitude, longitude, type and time of the GPS
acquisition.
Pointing Angle
Indicates the azimuth and elevation angle of the Antenna Unit‟s
antenna with the corresponding satellite in view.
Setup Menu
Viewing Terminal Information
1. Click .
2. Click Terminal Info to view the SAFARI UE Terminal information.
The Terminal information is displayed according to the Satellite Tracking mode.
4
Page 53
SAFARITM System User’s Guide
Satellite Selection
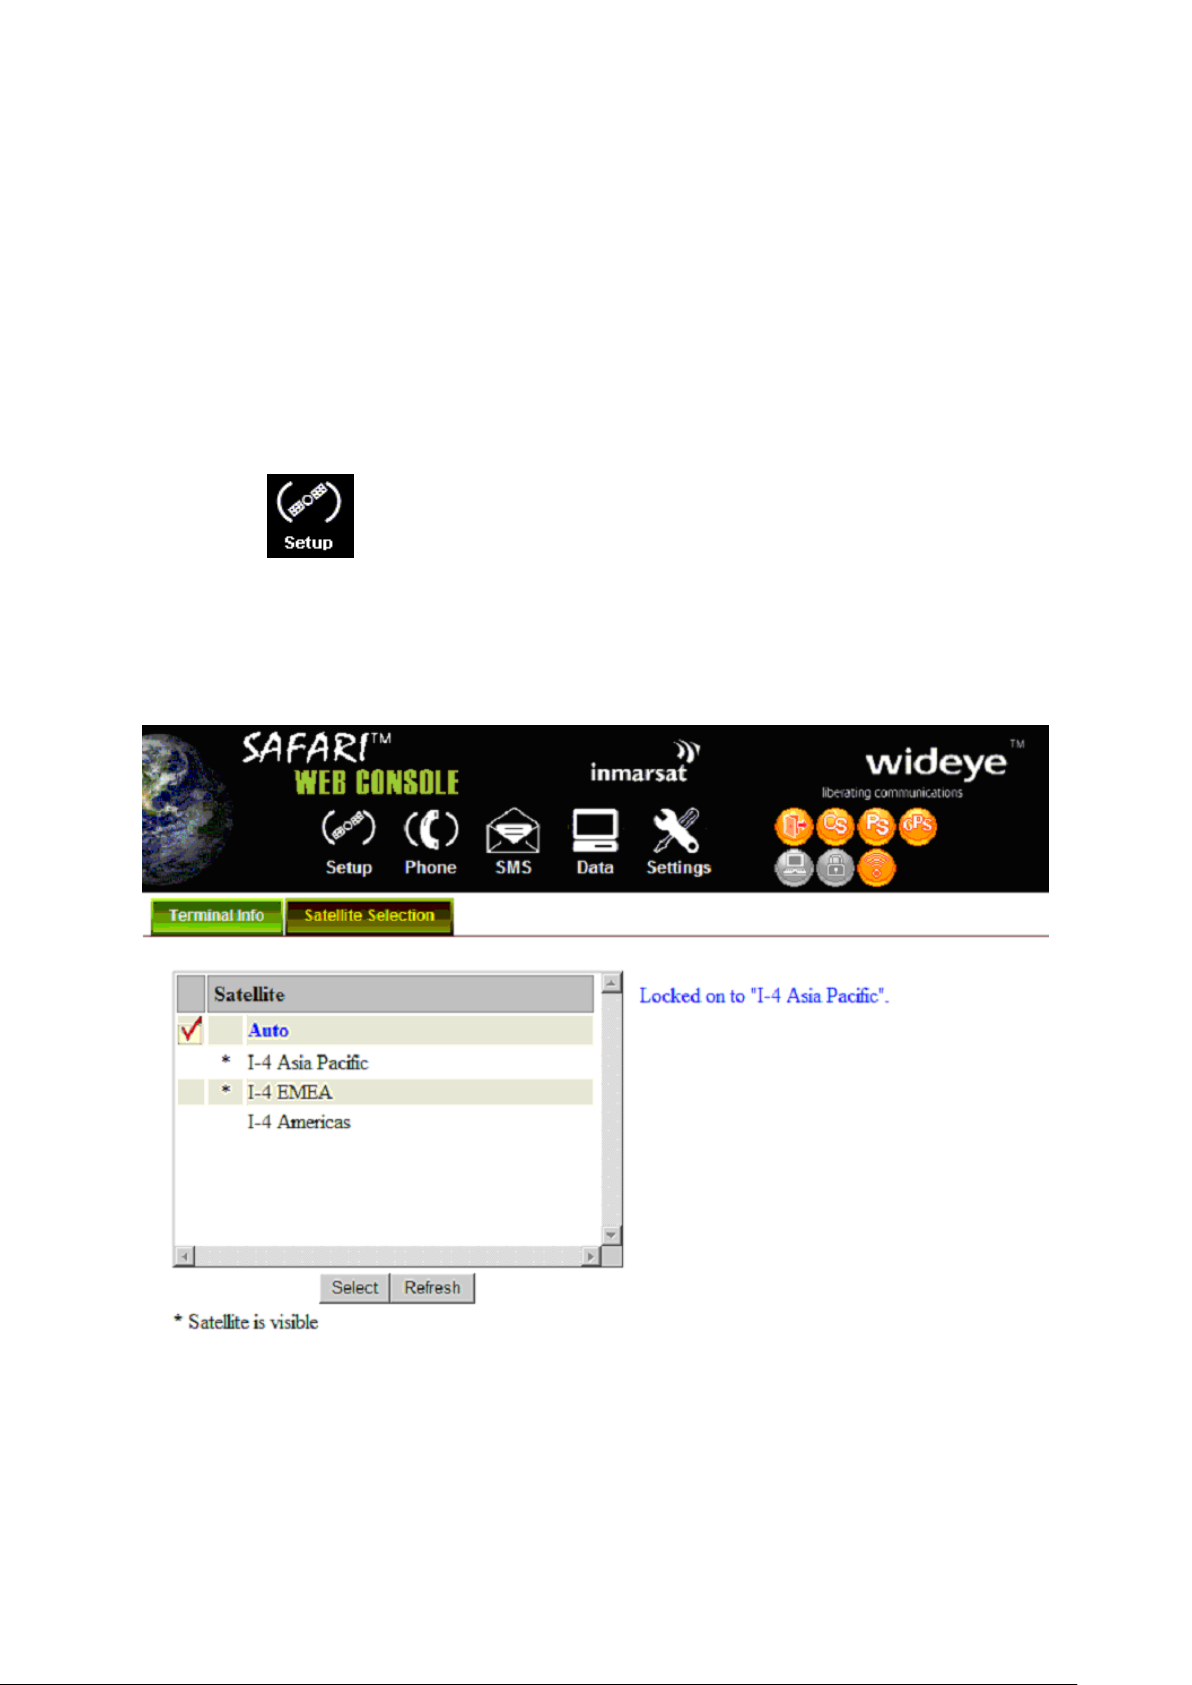
The default Satellite Selection is in Auto mode. In Auto mode, the UE will scan all the visible
satellites and track the satellite with the most optimum elevation angle or the last used
satellite.
Note:
Changing the satellite selection will terminate any existing active voice/fax call or data
connections.
Follow these steps to change your satellite selection:
1. Click .
2. Click Satellite Selection to view the visible satellites.
The visible satellites will be displayed for your selection.
It also displays the satellite information that your Antenna Unit‟s antenna is locked on
to.
3. Click on your choice of visible satellites.
4. Click Select to point the antenna to the selected satellite in exclusive mode.
5
Page 54
SAFARITM System User’s Guide
The satellite selection will be saved and each time you power up the UE, the satellite
selection choice will remain until you make the next selection change. The UE will
track the newly selected satellite even if the elevation angle is not optimum.
Click Refresh to refresh the Satellite list.
Phone Menu
Phone menu provide the following options:
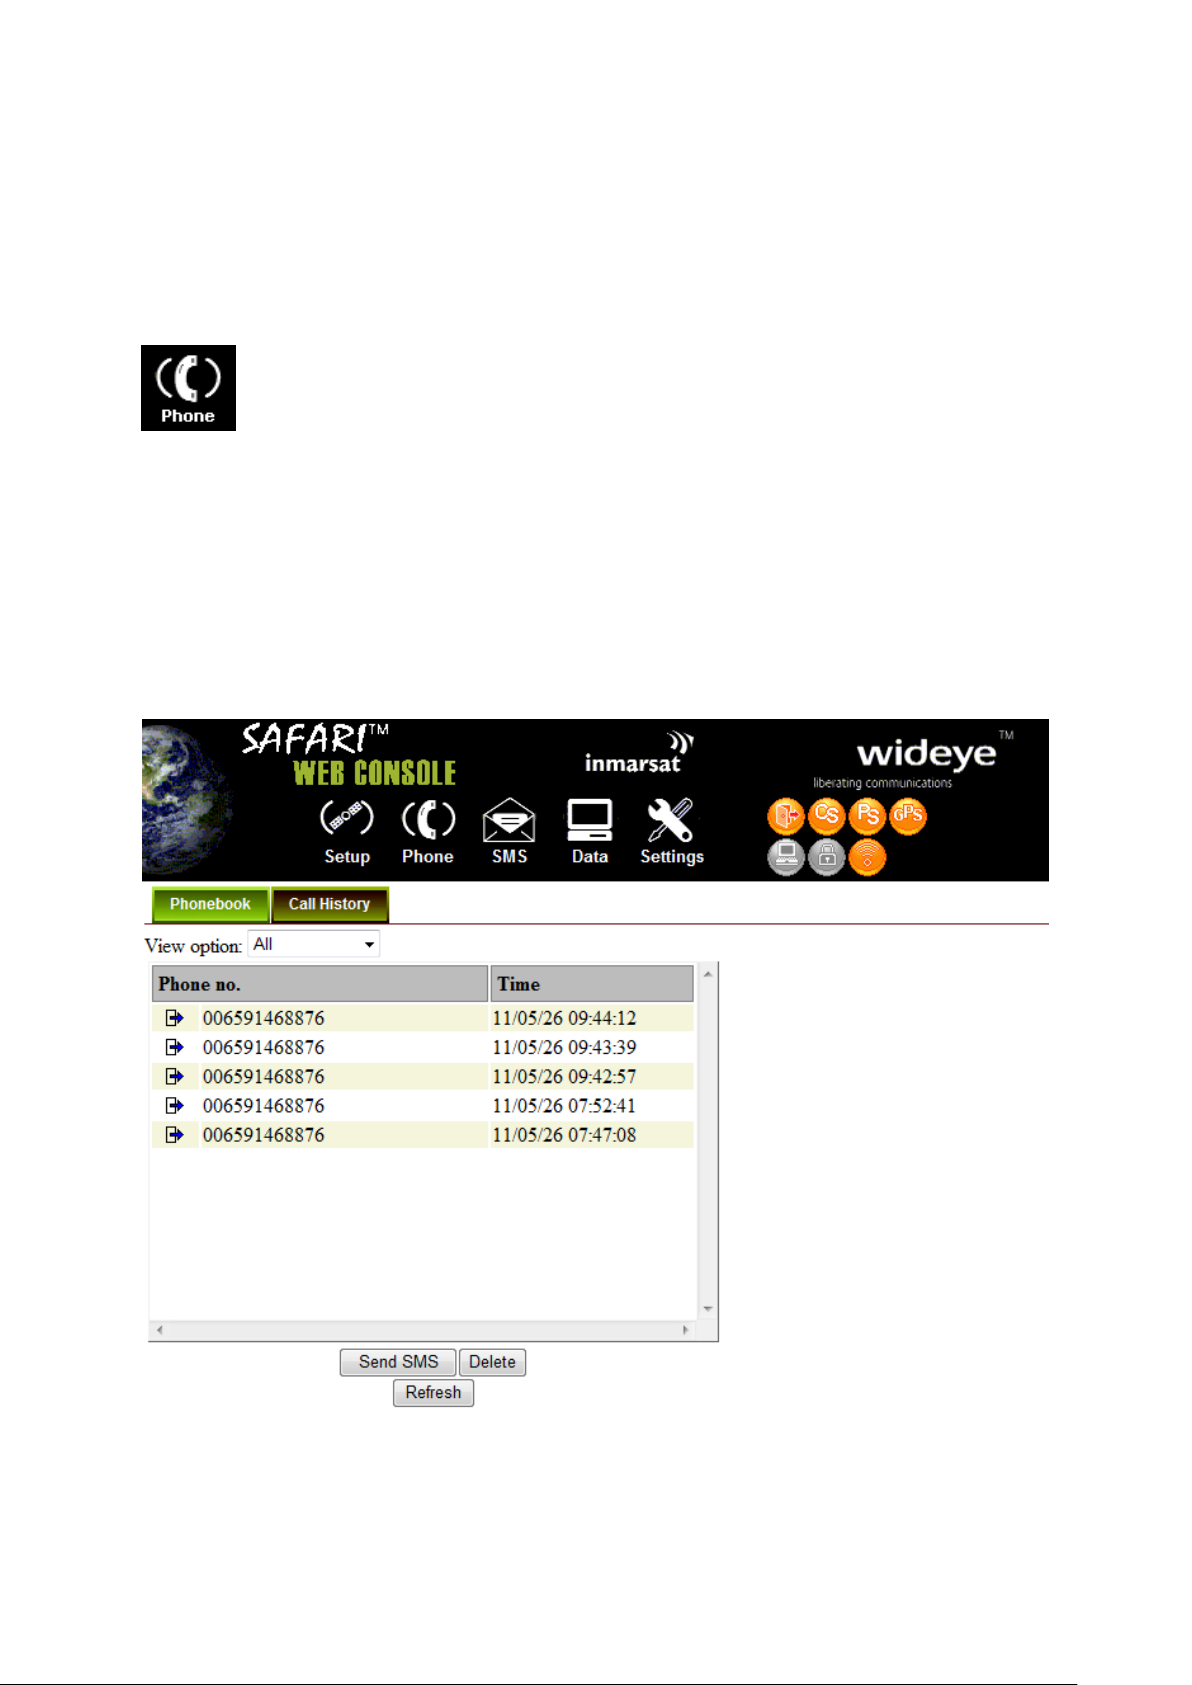
Phonebook
Allow you to view, add, edit and delete entries on your Phonebook list. You can make
and send SMS messages directly from your Phonebook entries. The Phonebook
entries can be stored on the SIM card or the SAFARI UE.
Call History
To check on the history log of calls made and received.
6
Page 55
SAFARITM System User’s Guide
All
To view the entries stored in the SIM card and SAFARI UE.
SIM only
To view the entries stored in the SIM card.
Transceiver only
To view the entries stored in the SAFARI UE.
Phonebook
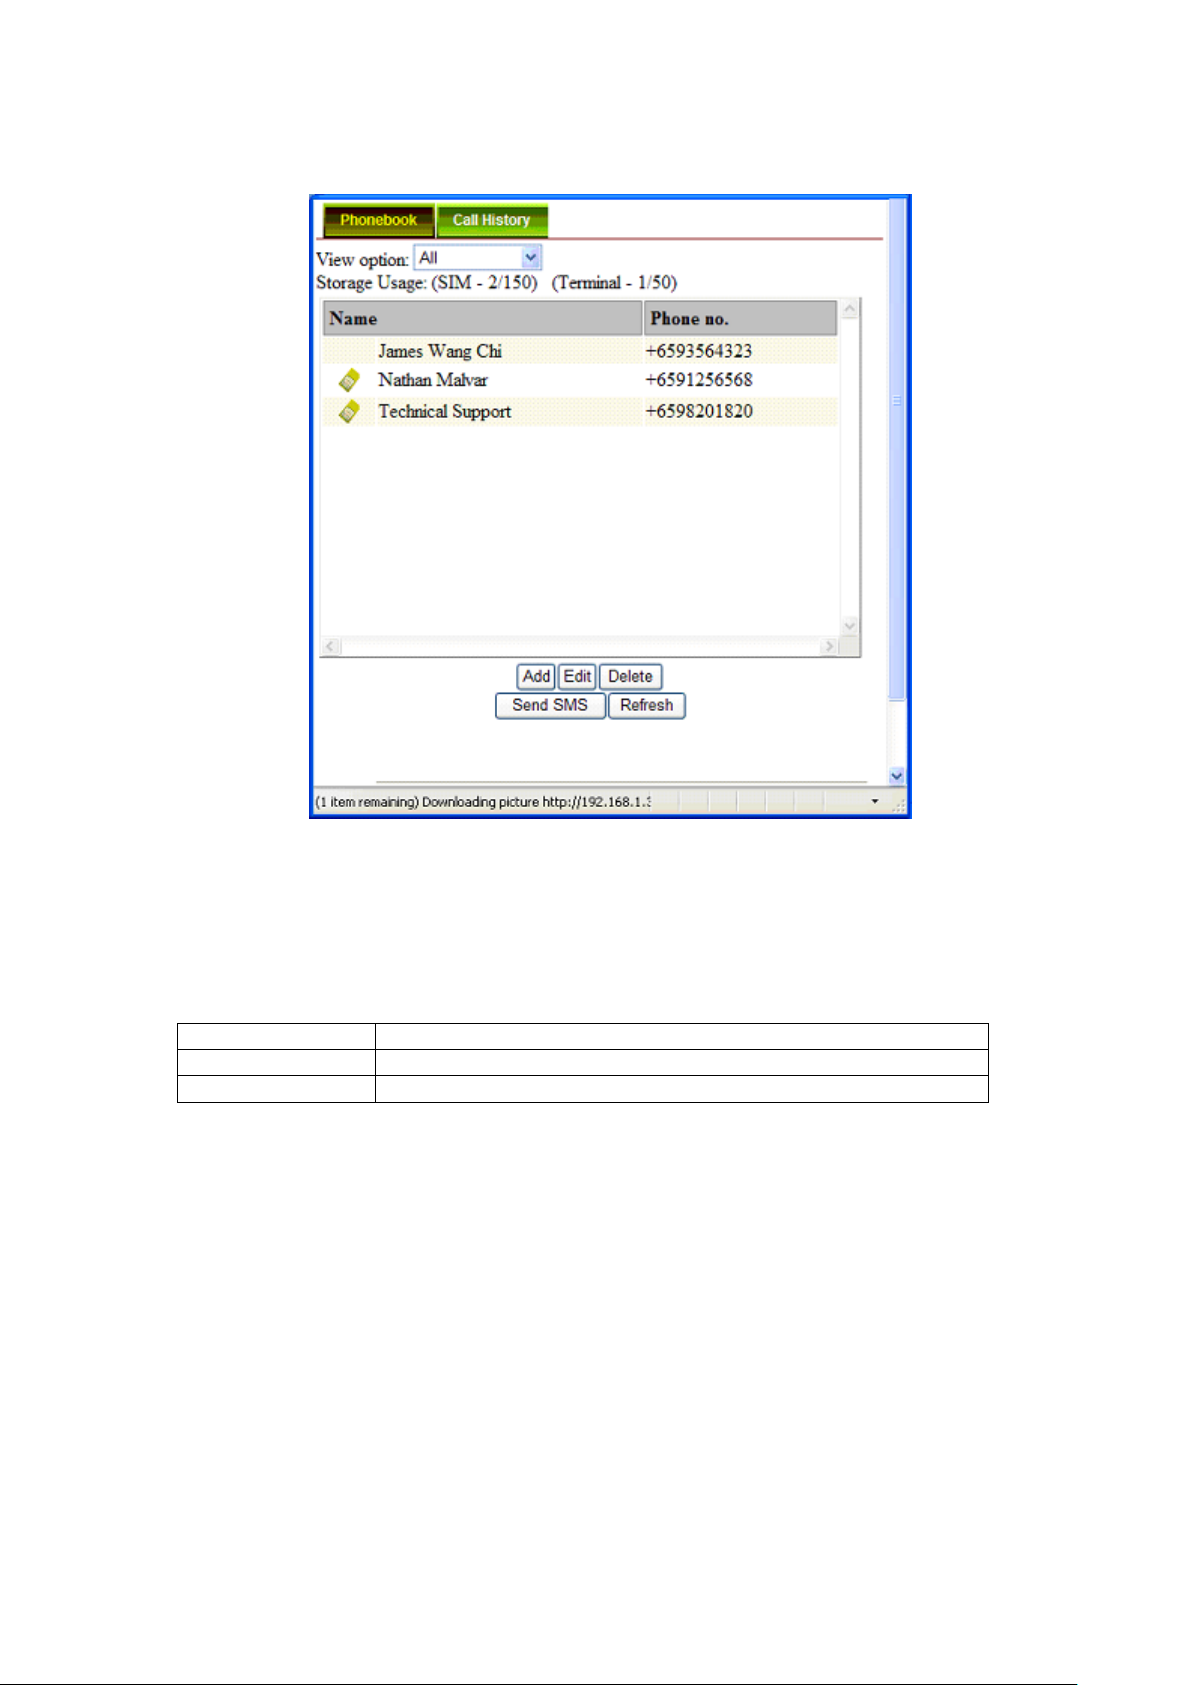
View option
The View option allows you to view the Phonebook entries from the different storage
locations.
From the drop-down menu, select:
Storage Usage
Shows the number for Phonebook entries used in the SIM card and UE locations.
For example: (SIM –2/150) indicates:
Storage location – SIM card
Total number of entries used = 2
Total number of entries available = 150
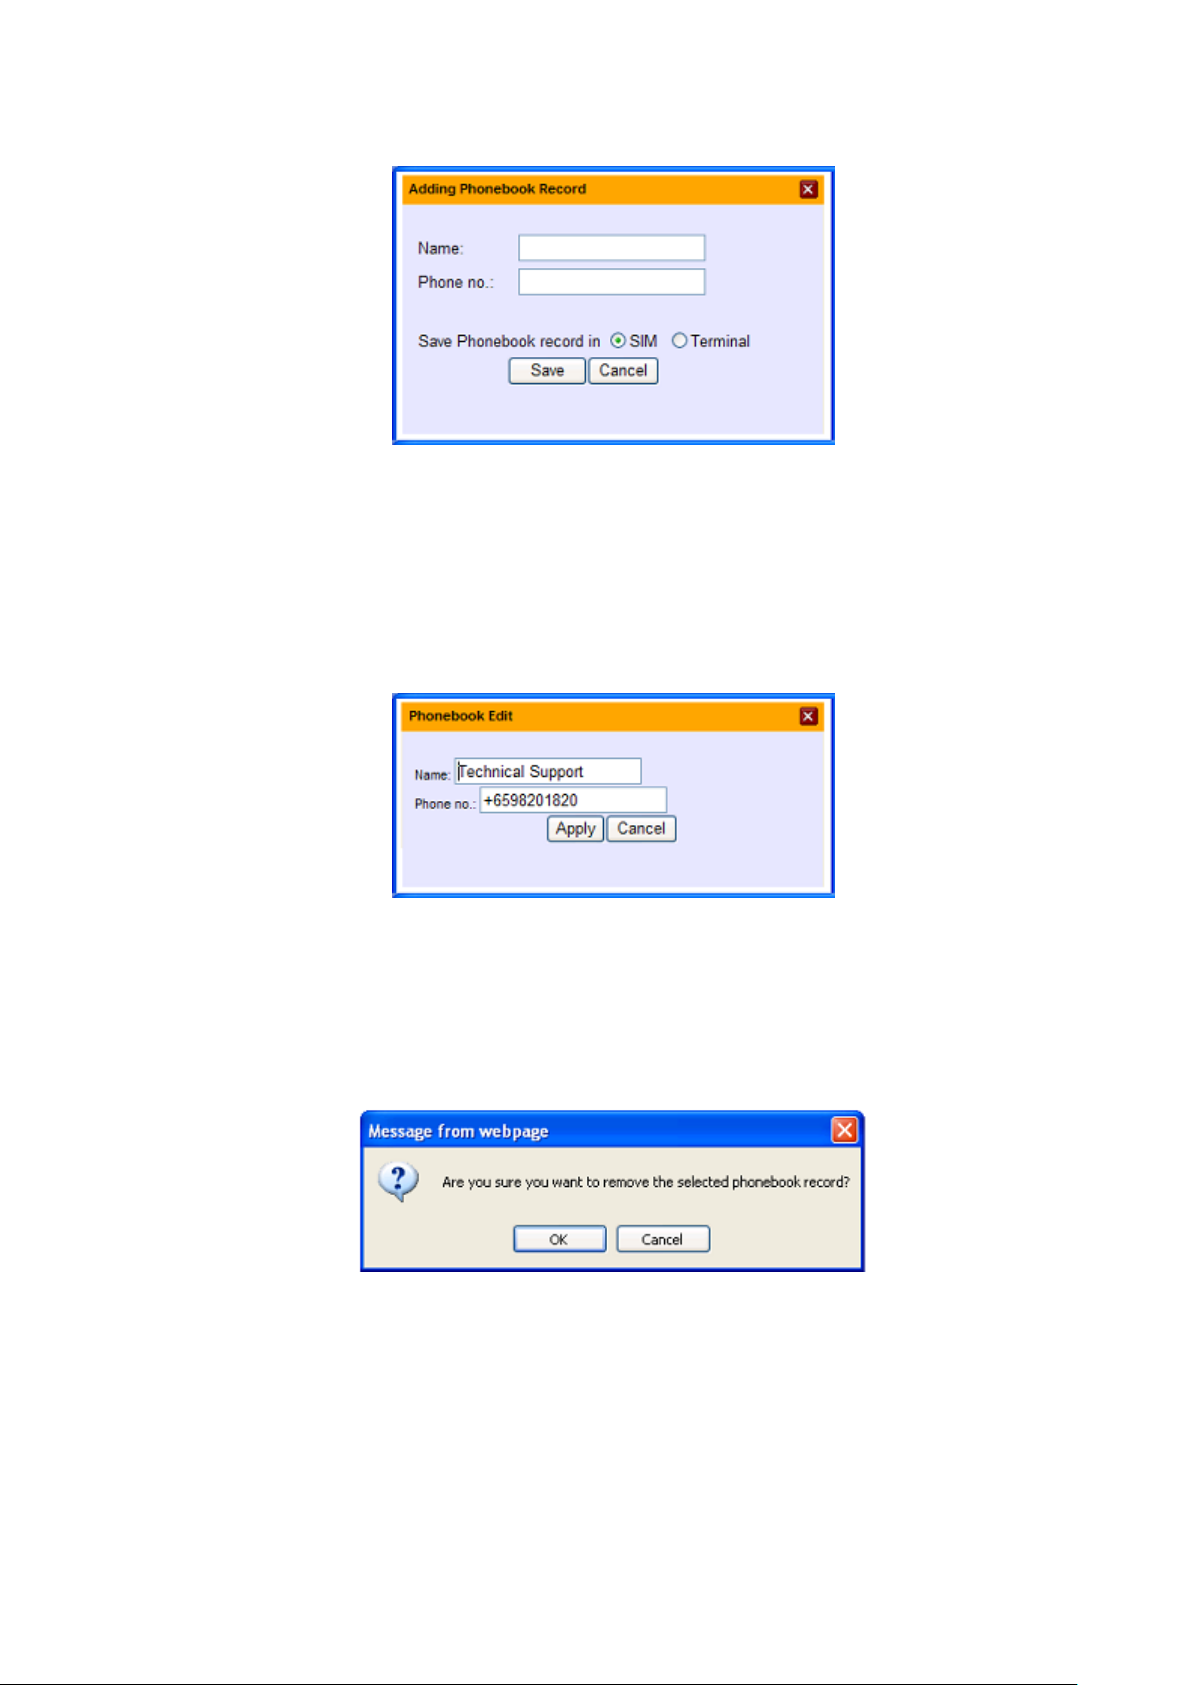
Adding a new Phonebook entry
Follow these steps to add a new Phonebook entry:
1. Click Add.
2. Enter the Name and Phone number.
3. Select the storage location and click Save.
7
Page 56
SAFARITM System User’s Guide
Editing a Phonebook entry
Follow these steps to edit a Phonebook entry:
1. Select the entry from the Phonebook list.
2. Click Edit.
3. Proceed to change the Name and/or Phone number.
4. Click Apply.
Deleting a Phonebook entry
Follow these steps to delete a Phonebook entry:
1. Select the entry from the Phonebook list.
2. Click Delete.
3. Click Ok to confirm to delete the entry. Click Cancel to abort delete.
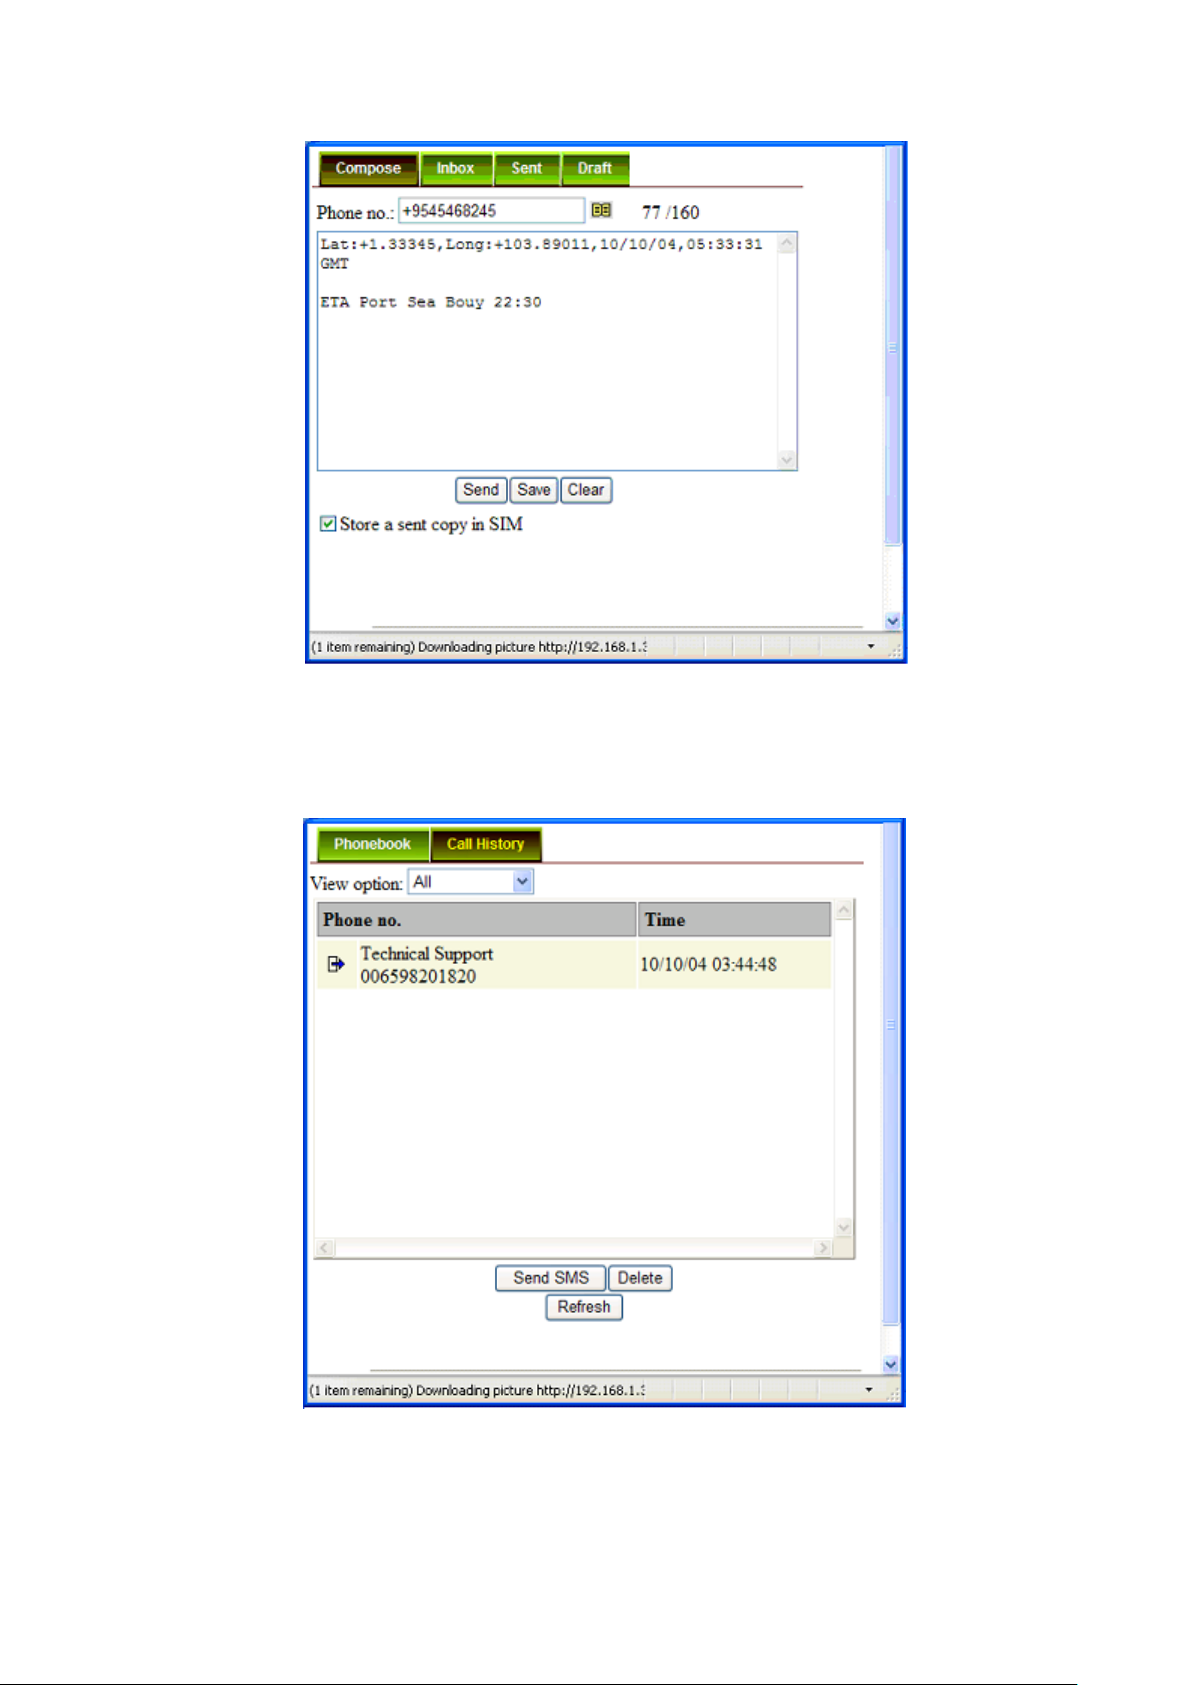
Sending SMS from the Phonebook
Follow these steps to send SMS from the Phonebook:
1. Select the entry from the Phonebook list.
2. Click Send SMS.
The Phonebook console switches over to the Compose SMS console.
8
Page 57
SAFARITM System User’s Guide
3. Type in the text message and click Send.
Click Refresh to refresh the Phonebook list.
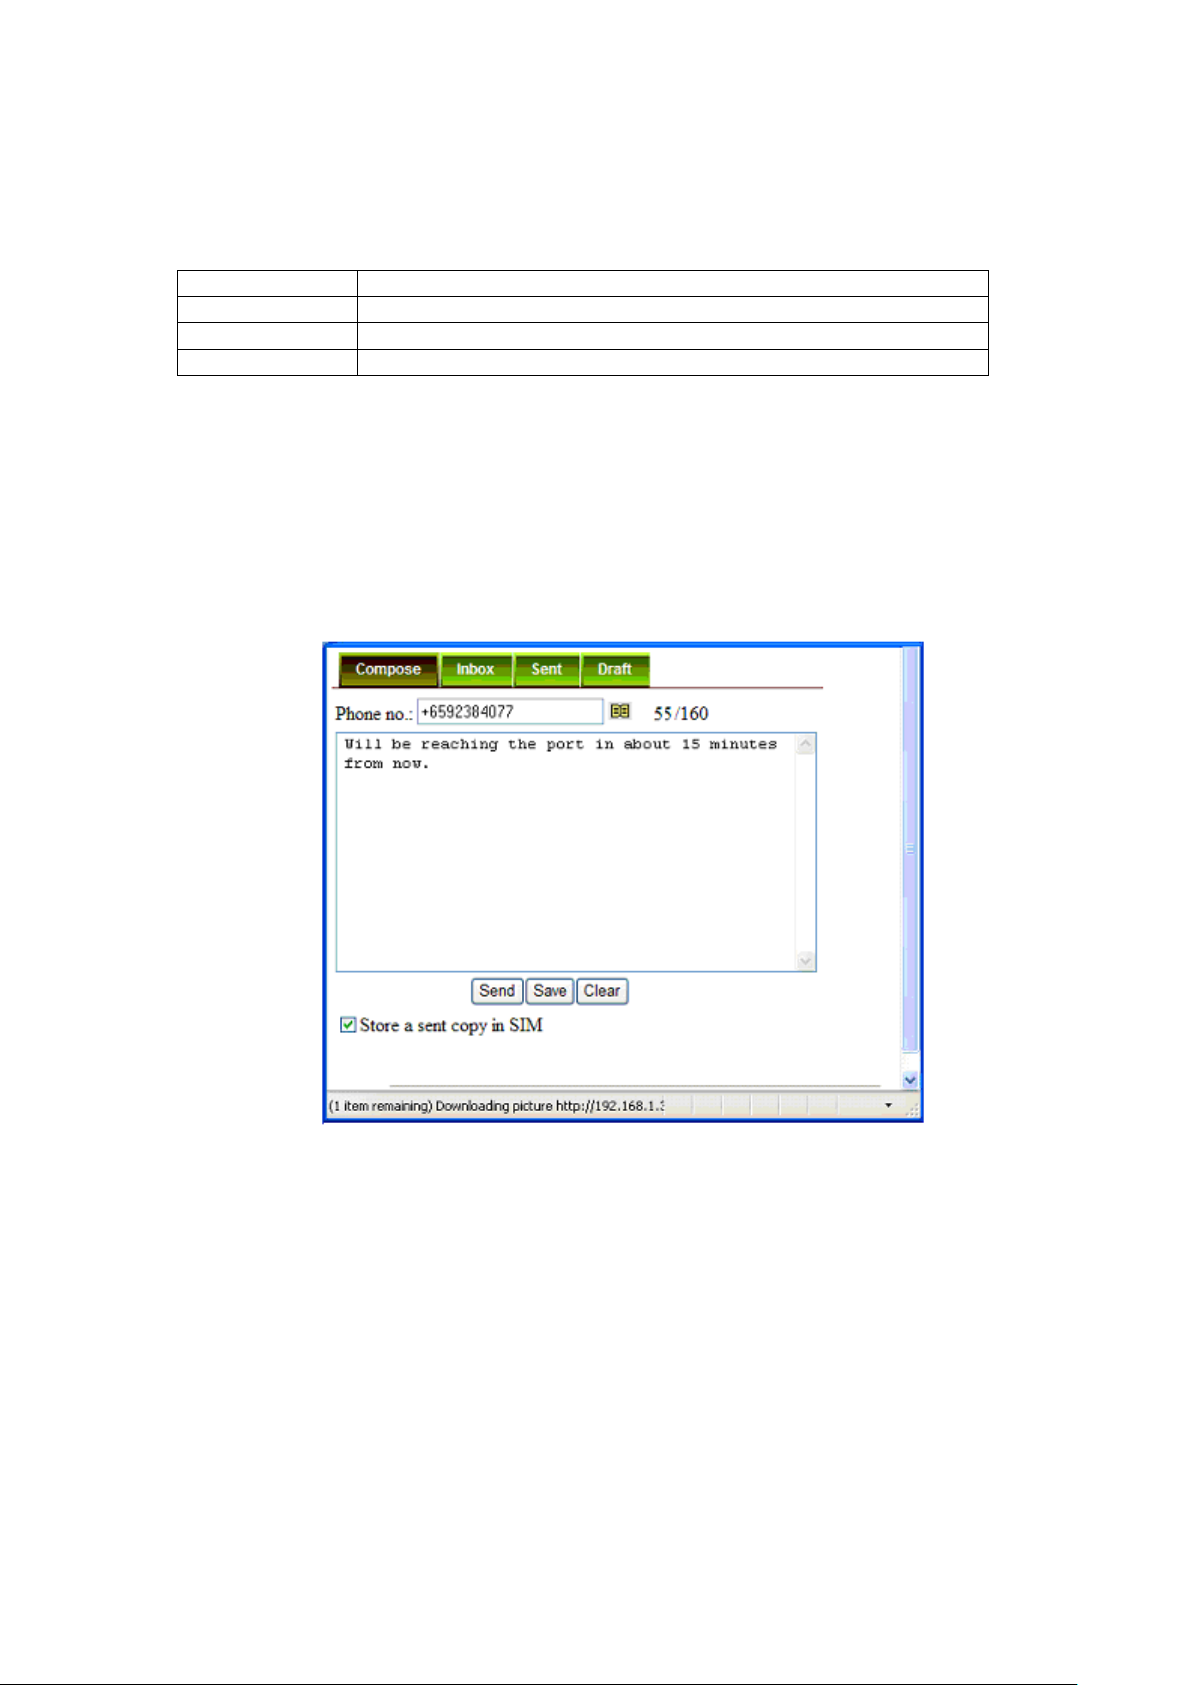
Call History
9
Page 58
SAFARITM System User’s Guide
All
To view the list of the dialed, received and missed calls.
Dialed Call
To view the list of dialed calls only.
Received Call
To view the list of received calls only.
Missed Call
To view the list of missed calls only.
View option
The View option allows you to view the Call History entries.
From the drop-down menu, select:
Sending SMS from the Call History list
Follow these steps to send SMS from the Call History list:
1. Select the entry from the list.
2. Click Send SMS.
The Call History console switches over to the Compose SMS console.
3. Type in the text message and click Send.
Deleting a Call History entry
Follow these steps to delete a Call History entry:
1. Select the entry from the Call History list.
2. Click Delete.
3. Click Ok to confirm or click Cancel to abort deleting the entry.
Click Refresh to refresh the Call History list.
10
Page 59
SAFARITM System User’s Guide
SMS Menu
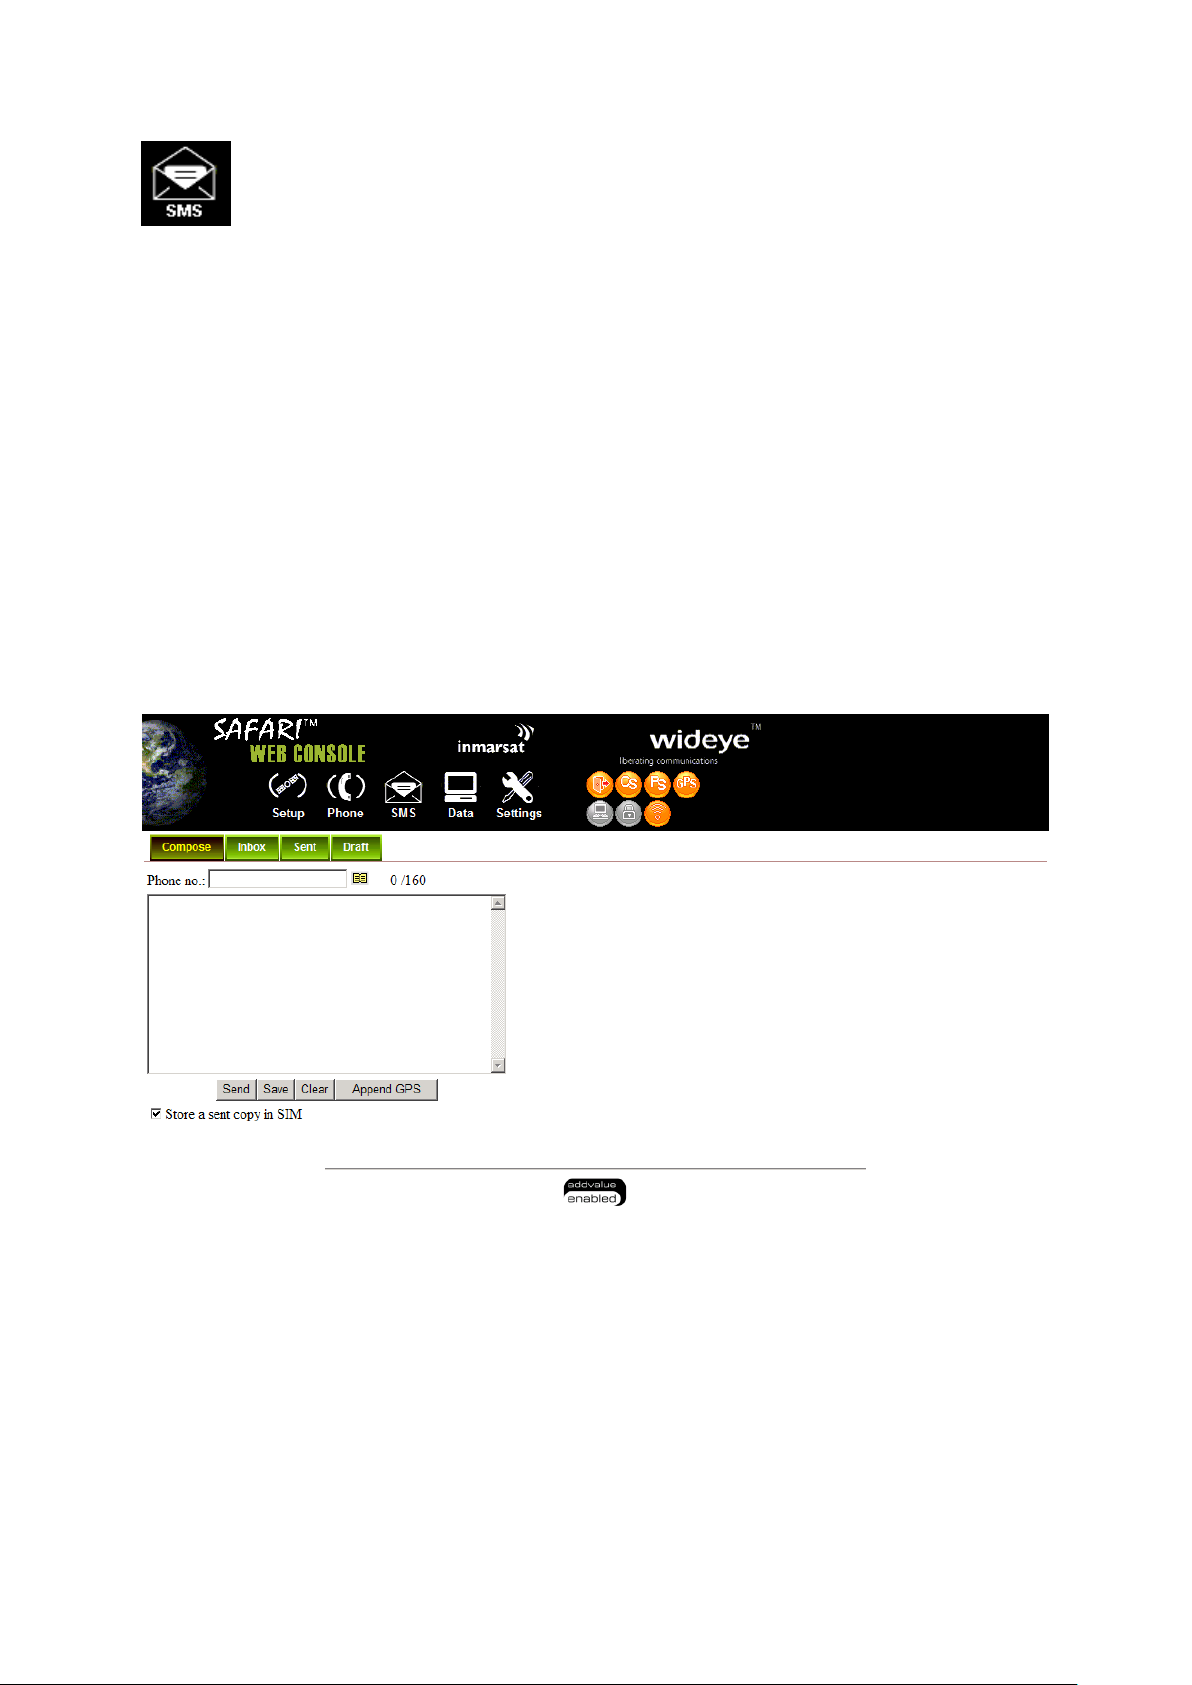
SMS menu provide the following options:
Compose
To compose and send text messages. Simply enter a mobile number, type your
message and click Send.
Inbox
Shows the details (Sender information, Message, Date and Time stamp) of all SMS
received.
Sent
Shows the details (Receiver information, Message, Date and Time stamp) of all SMS
sent.
Draft
Stores unsent messages for retrieval later.
11
Page 60
SAFARITM System User’s Guide
Composing a New Message
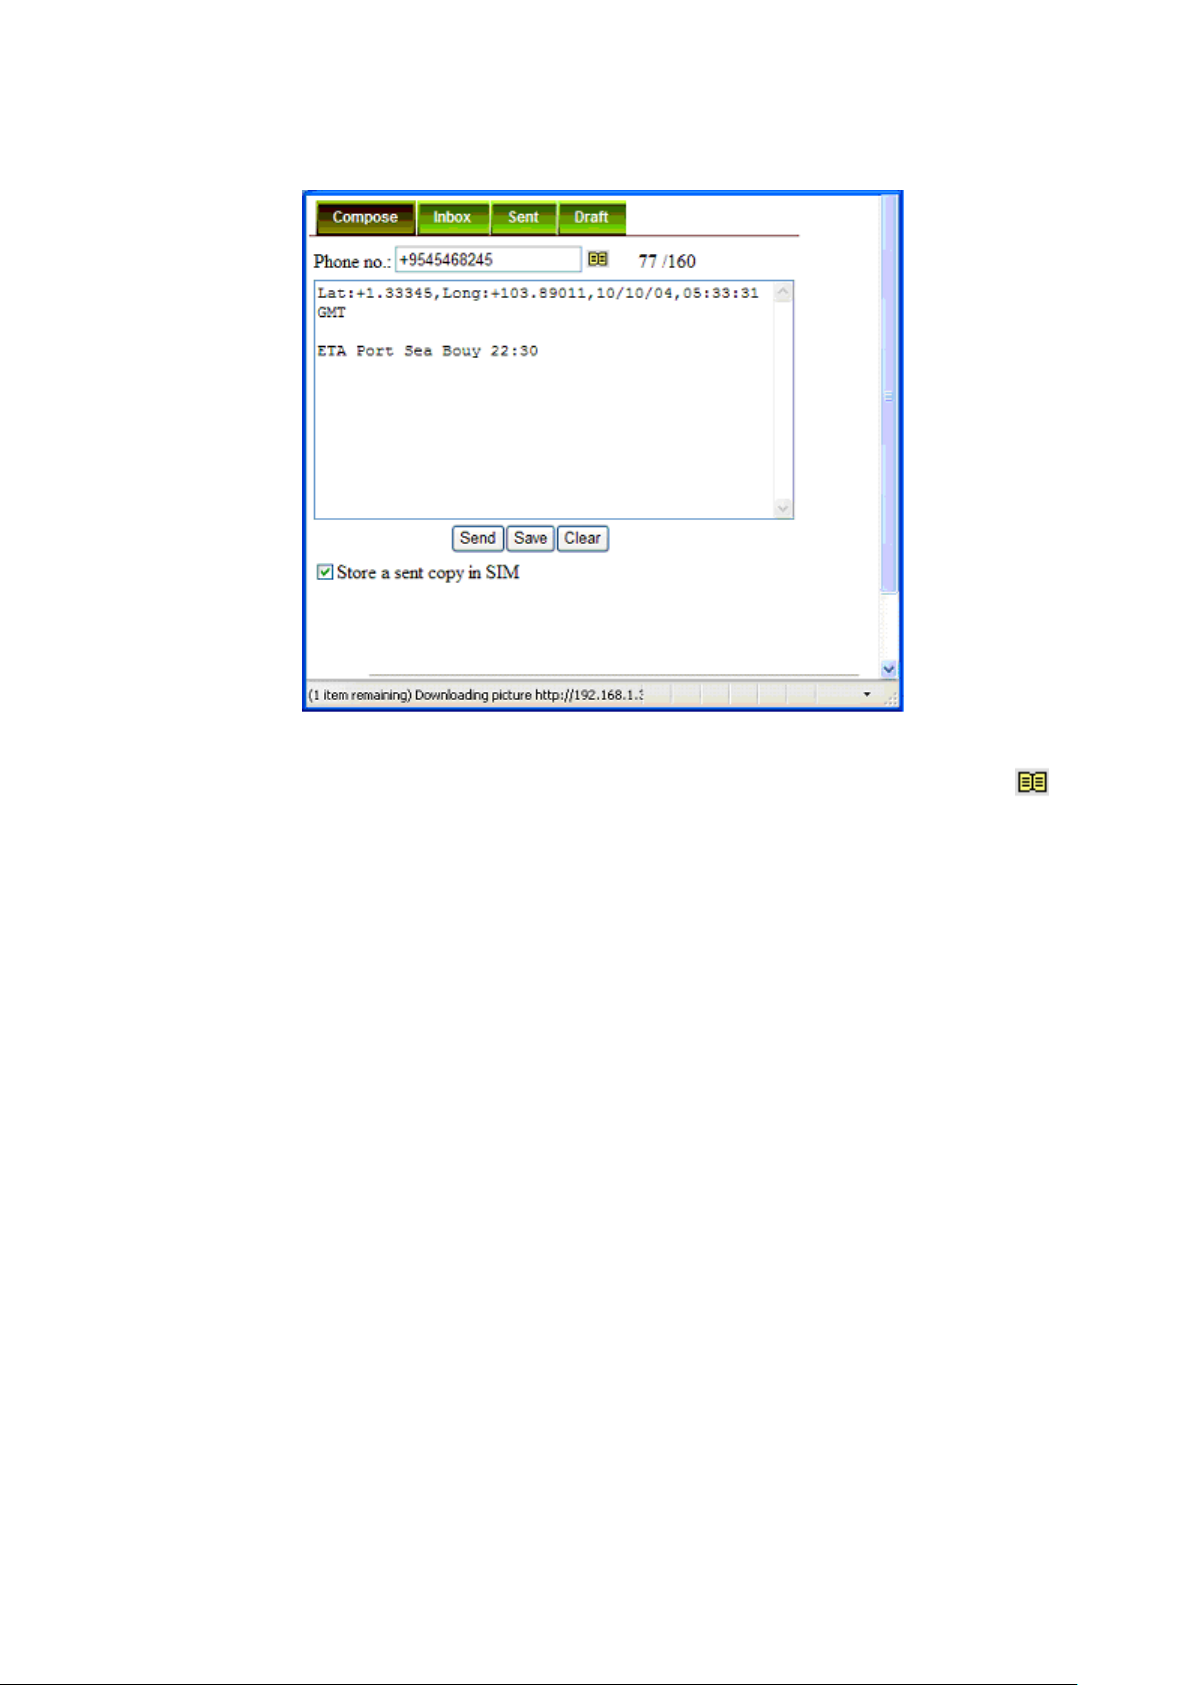
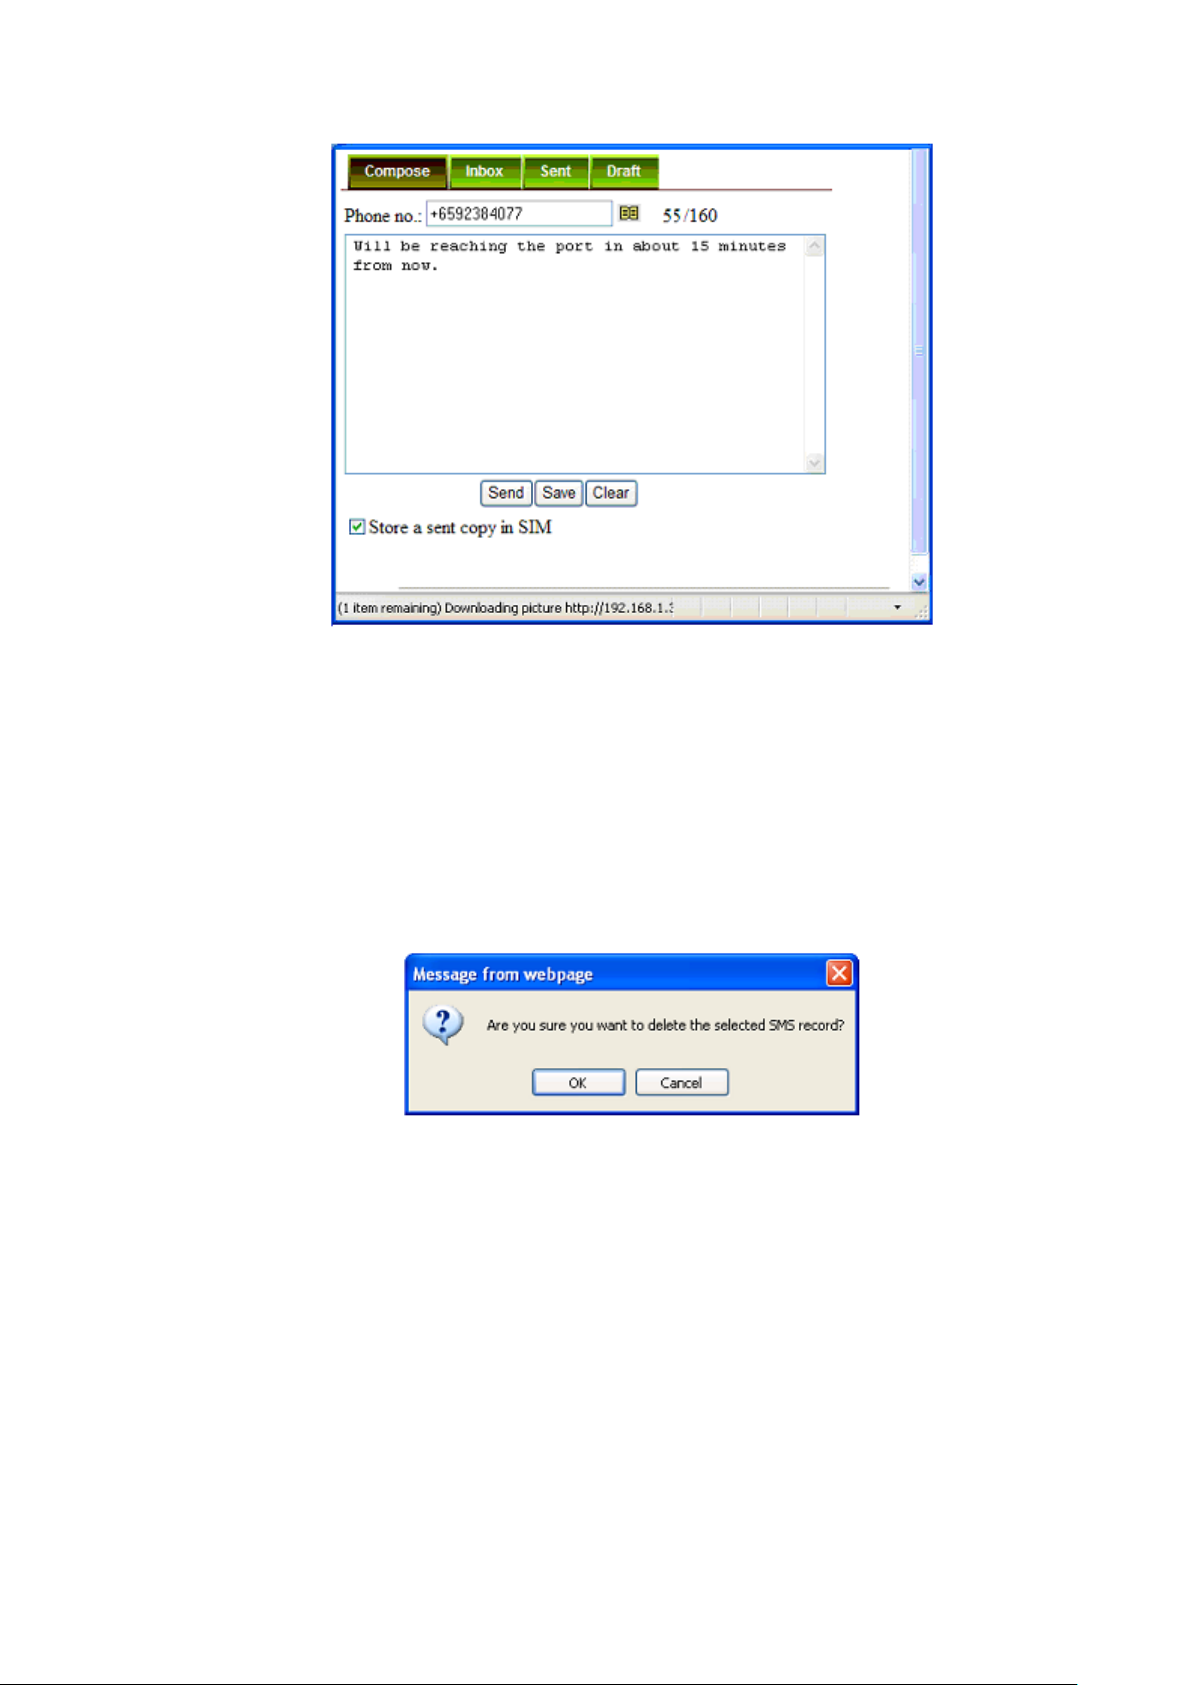
Follow these steps to compose a new SMS:
1. Enter the receiver‟s phone number in the Phone no. field or click the Phonebook icon
if the receiver‟s number is listed in the Phonebook
2. Type the message in the text editor box.
Note:
Message is limited to 160 characters (using 7 bit encoded default alphabets)
including spaces between words. But it is limited to 70 characters per message
using Unicode (UCS2) text message (such as message typed in Chinese,
Japanese, etc). For sending a long SMS to another BGAN transceiver, the message
is limited to 608 characters (using 7 bit encoded default alphabet) or 266
characters using Unicode (UCS2) text messages including spaces between words.
3. Uncheck Store a copy in SIM checkbox if you do not wish to store a copy of the sent
SMS into SIM card.
4. Click Send to send the SMS.
To save an unsent SMS, click Save and the unsent SMS will be saved in Draft.
To clear the typed message on the text editor, click Clear.
12
Page 61
SAFARITM System User’s Guide
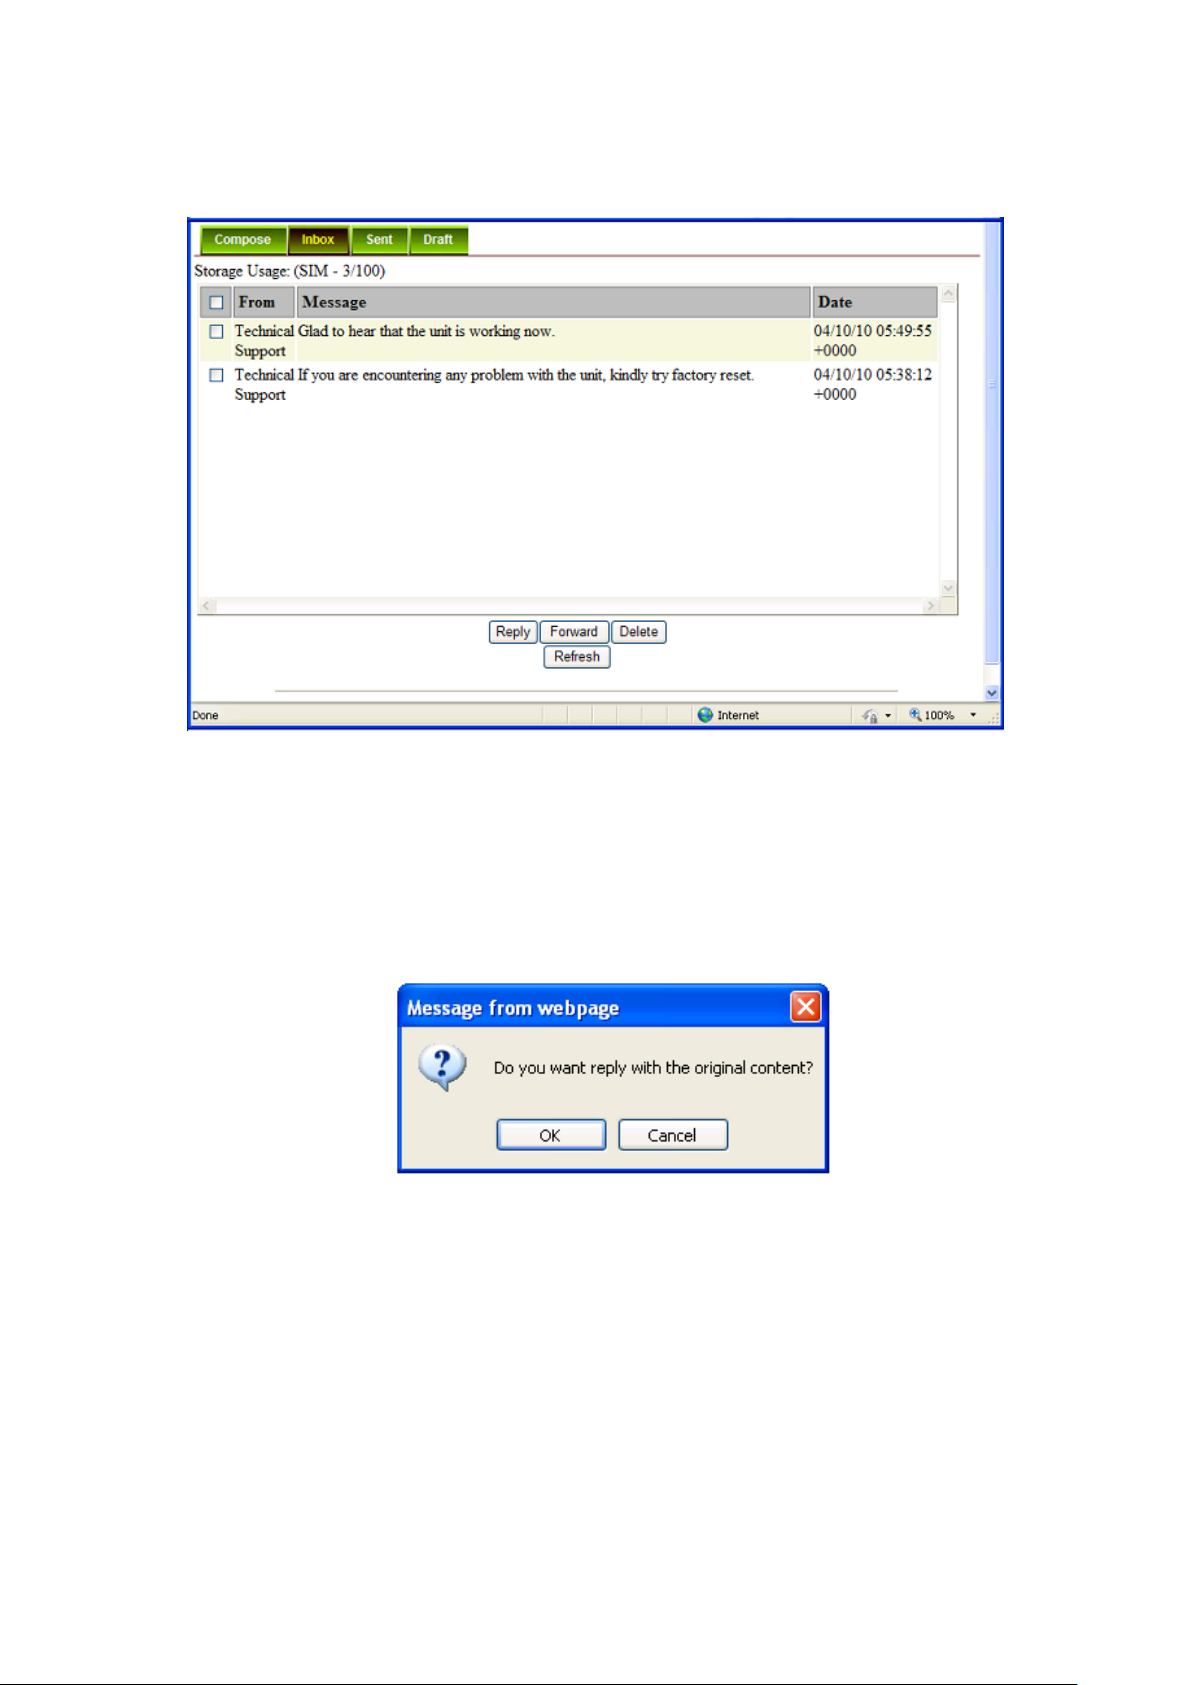
Inbox
Shows the details (Sender information, Message, Date and Time stamp) of all SMS received.
Replying to a SMS
Follow these steps to reply a SMS:
1. Click on a SMS to select it.
The selected SMS will be highlighted in light blue.
2. Click Reply.
3. Click OK to reply with the original contents or Cancel to reply without the original
content.
The Inbox console switches over to the Compose console.
4. Enter your reply in the text editor.
5. Click Send to send your reply SMS.
The reply SMS will be sent to the recipient.
13
Page 62
SAFARITM System User’s Guide
Forwarding an SMS
Follow these steps to forward an SMS:
1. Click on a SMS to select it.
The selected SMS will be highlighted in light blue.
2. Click Forward.
The Inbox console switches over to the Compose console.
3. Enter the receiver‟s number in the Phone No. field.
4. Click Send to forward the SMS. The SMS will be sent to the recipient.
Deleting a single SMS from the Inbox list
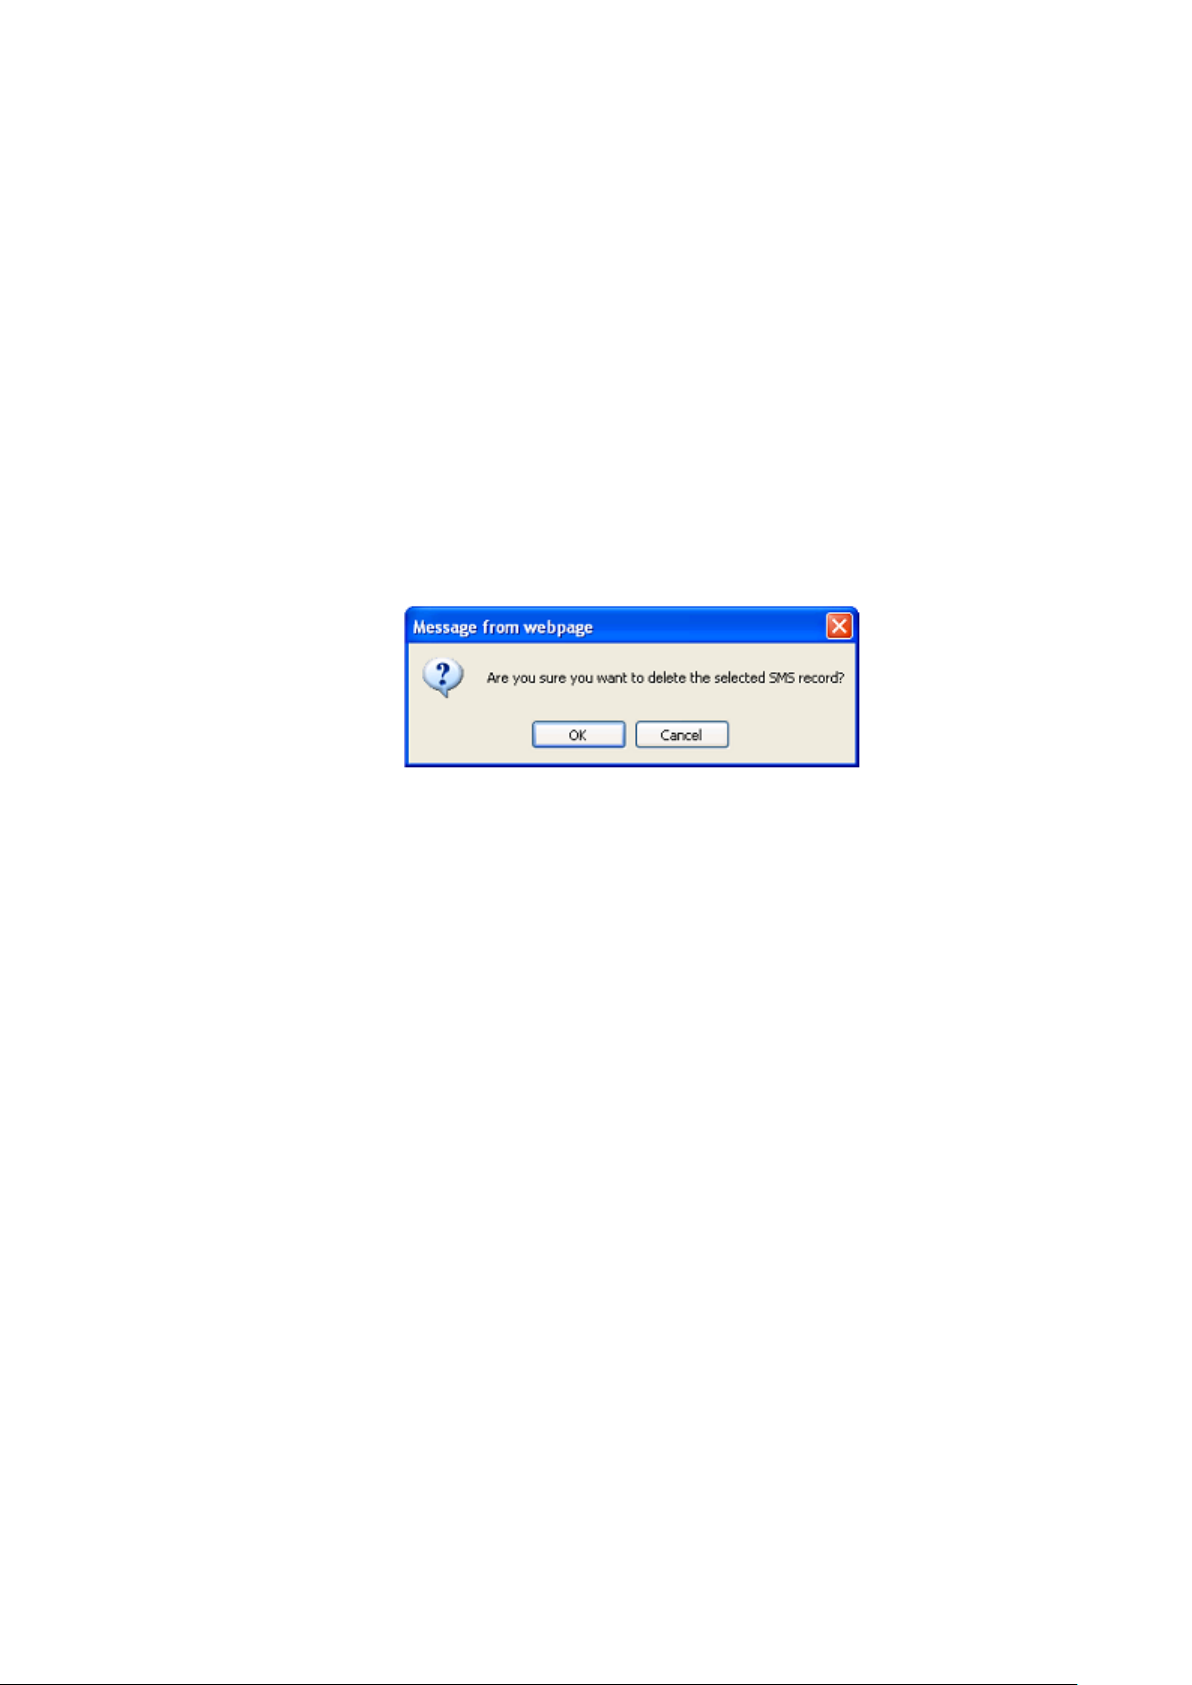
Follow these steps to delete a single SMS from the Inbox list:
1. Click on a SMS to select it.
2. Click Delete.
3. Click OK to confirm or click Cancel to abort deleting the SMS.
Deleting multiple SMS from the Inbox list
Follow these steps to delete multiple SMS from the Inbox list:
1. Select the message by checking the checkboxes beside each SMS.
2. Click Delete.
3. Click OK to confirm the delete, or Cancel to abort the delete.
Click Refresh to refresh the Inbox list.
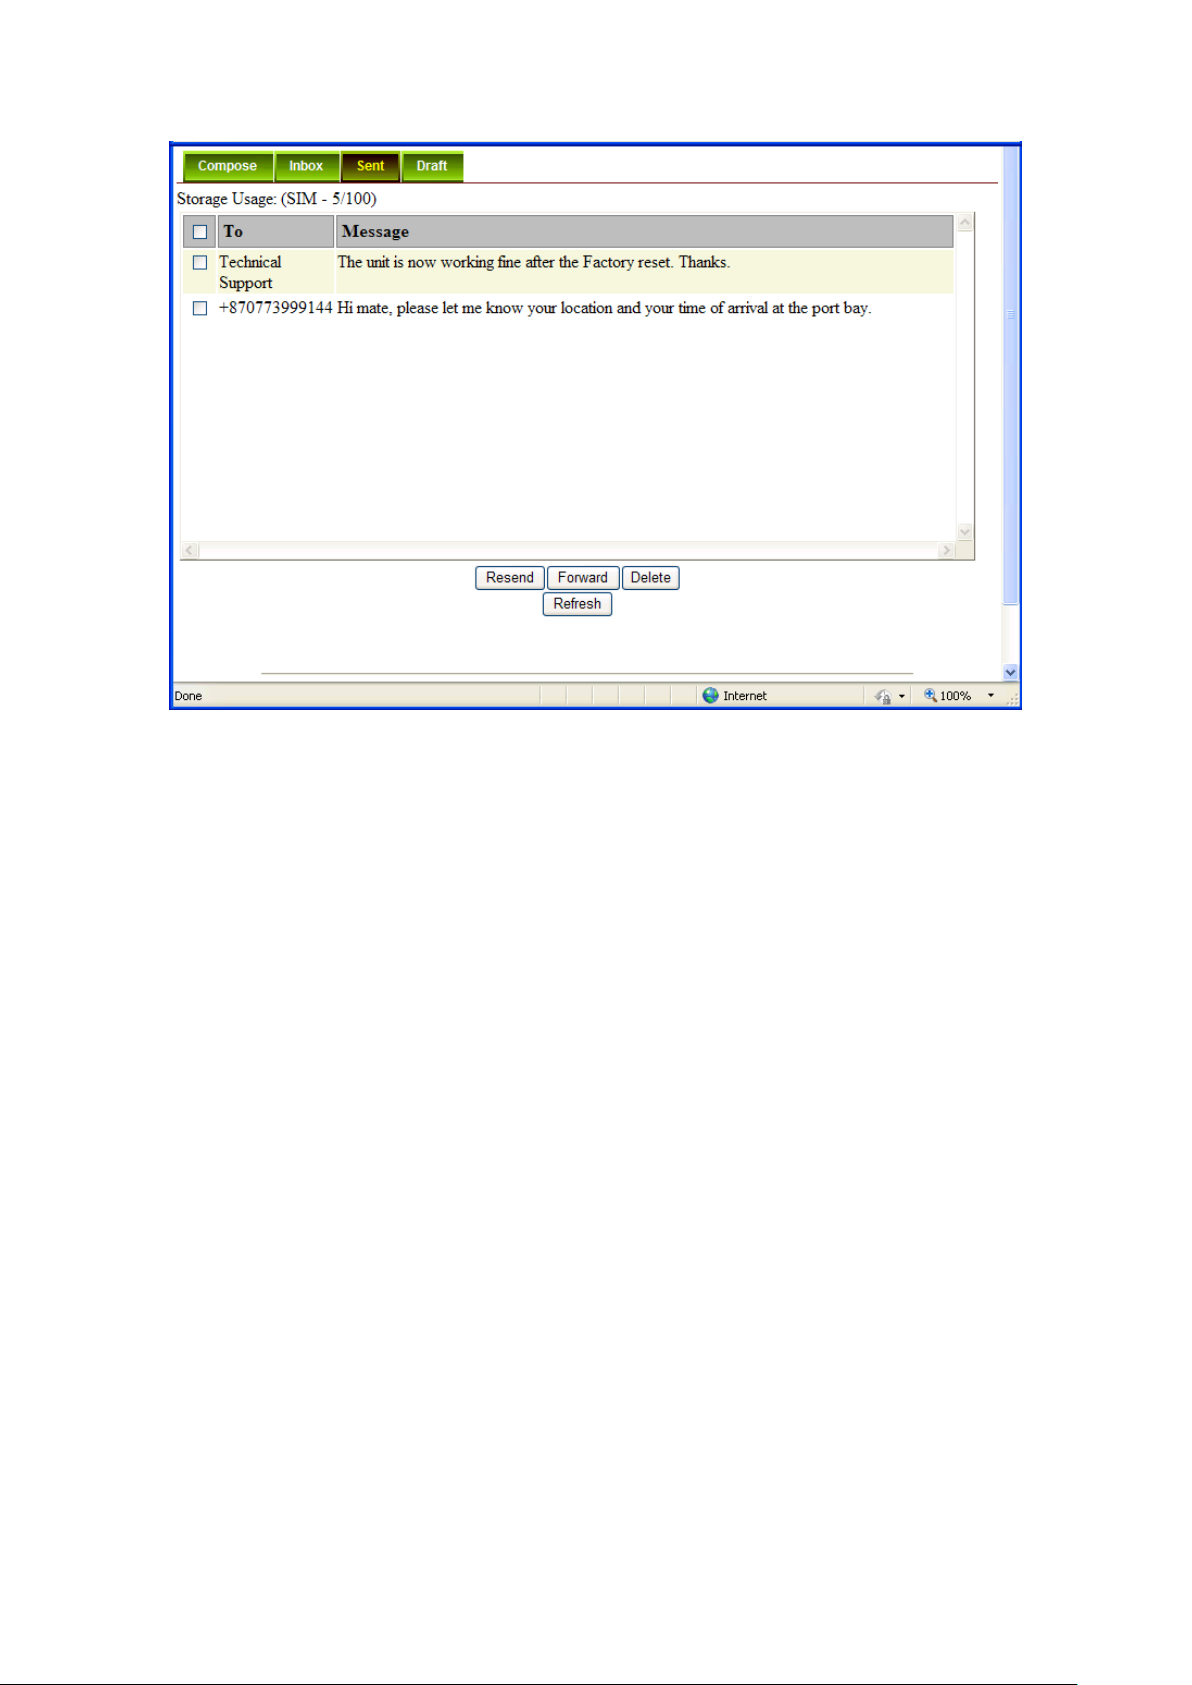
Sent
Shows the details (Receiver information, Message, Date and Time stamp) of all SMS sent.
14
Page 63
SAFARITM System User’s Guide
Resending a sent SMS
Follow these steps to resend a sent SMS (sending the same SMS to the same receiver):
1. Click on a SMS to select it.
2. Click Resend.
The SMS will be sent to the recipient.
Forwarding a sent SMS
Follow these steps to forward a sent SMS to another recipient:
1. Click on a SMS to select it.
2. Click Forward.
The Sent console switches over to the Compose console.
15
Page 64
SAFARITM System User’s Guide
3. Enter the receiver‟s number in the Phone No. field.
4. Click Send.
The SMS will be sent to the recipient.
Deleting a SMS from the Sent list
Follow these steps to delete a single SMS from the Sent list:
1. Click on a SMS to select it.
2. Click Delete.
3. Click OK to confirm or click Cancel to abort deleting the SMS.
Deleting multiple SMS from the Sent list
Follow these steps to delete multiple SMS from the from the Sent list:
1. Select the message by checking the checkboxes beside each SMS.
2. Click Delete.
3. Click OK to confirm the delete, or Cancel to abort the delete.
Click Refresh to refresh the Sent list.
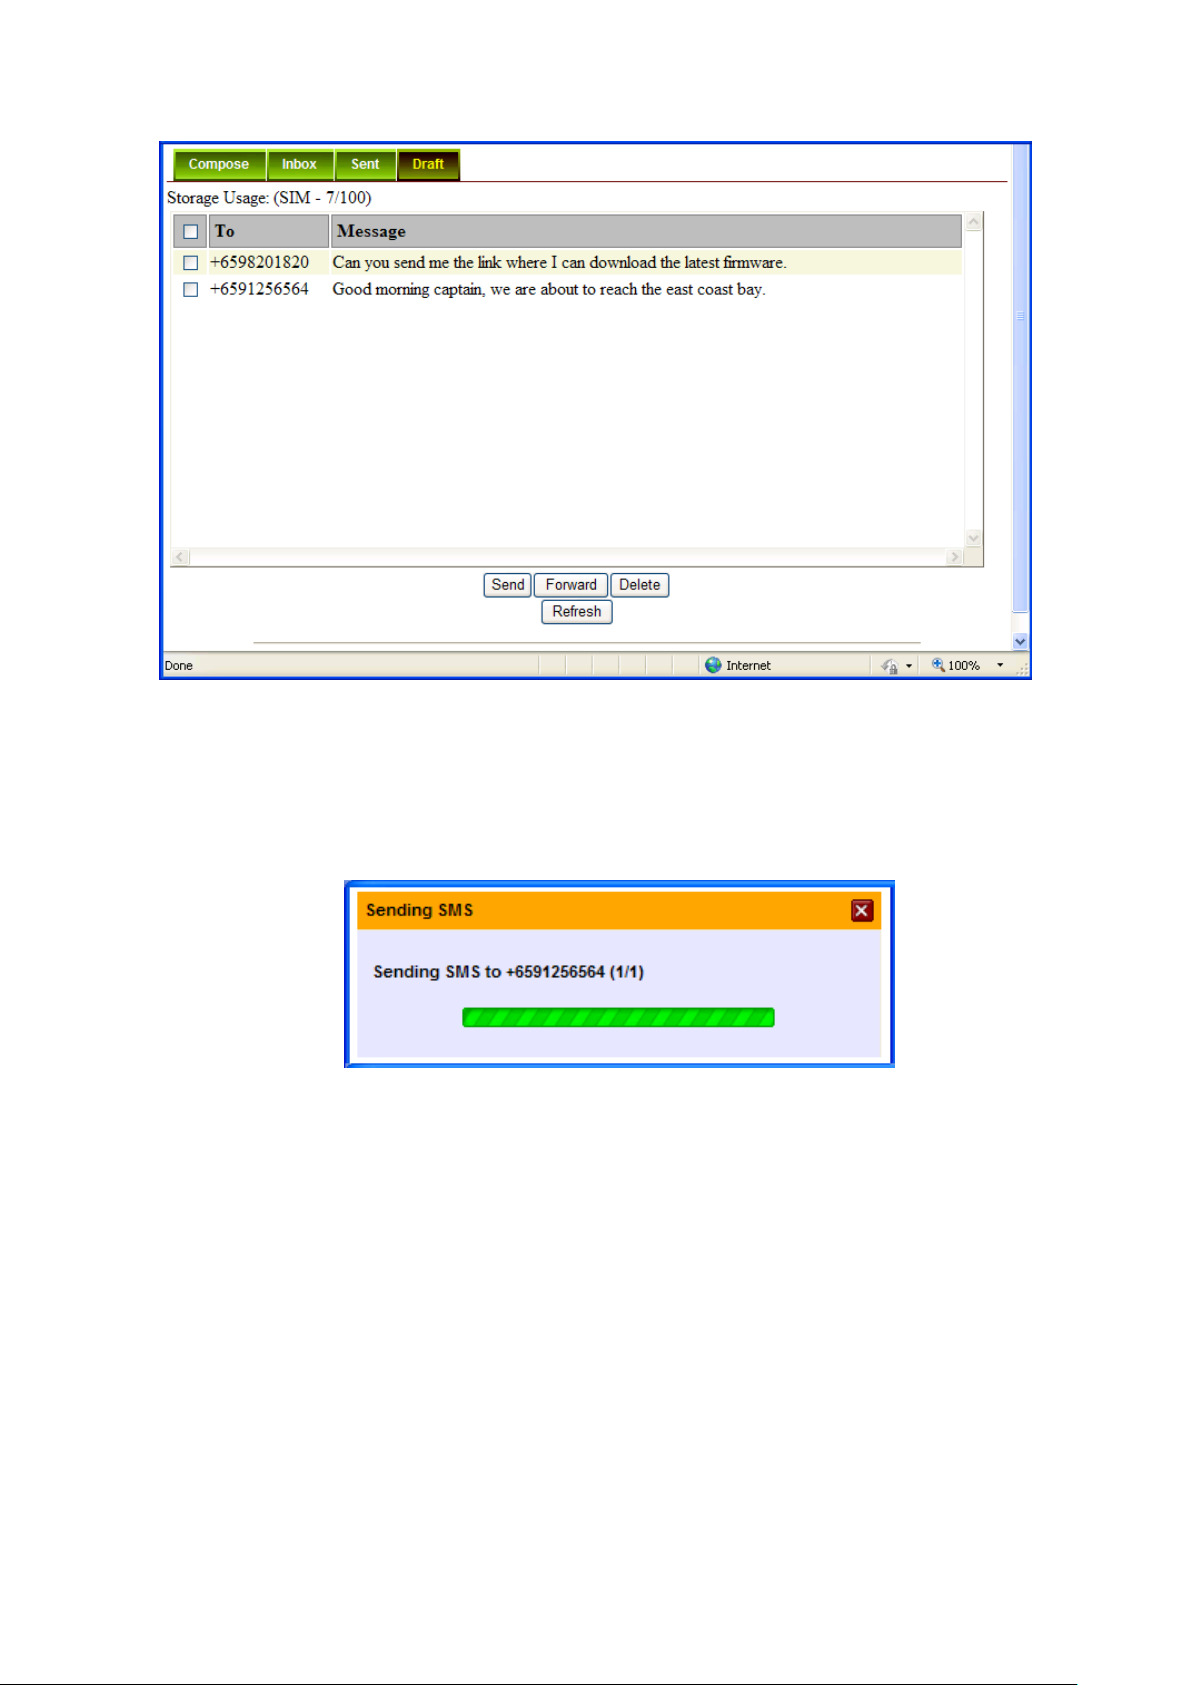
Draft
Stores SMS saved from the Compose console.
16
Page 65
SAFARITM System User’s Guide
Follow these steps to send a draft SMS:
1. Click on a SMS to select it.
2. Click Send.
The SMS will be sent to the recipient.
Forwarding a draft SMS to another recipient
Follow these steps to forward a draft SMS to another recipient:
1. Click on a SMS to select it.
2. Click Forward.
17
The Draft console switches over to the Compose console.
Page 66
SAFARITM System User’s Guide
3. Enter the receiver‟s number in the Phone No. Field.
4. Click Send to forward the SMS.
The SMS will be forwarded to the recipient.
Deleting a SMS from the Draft list
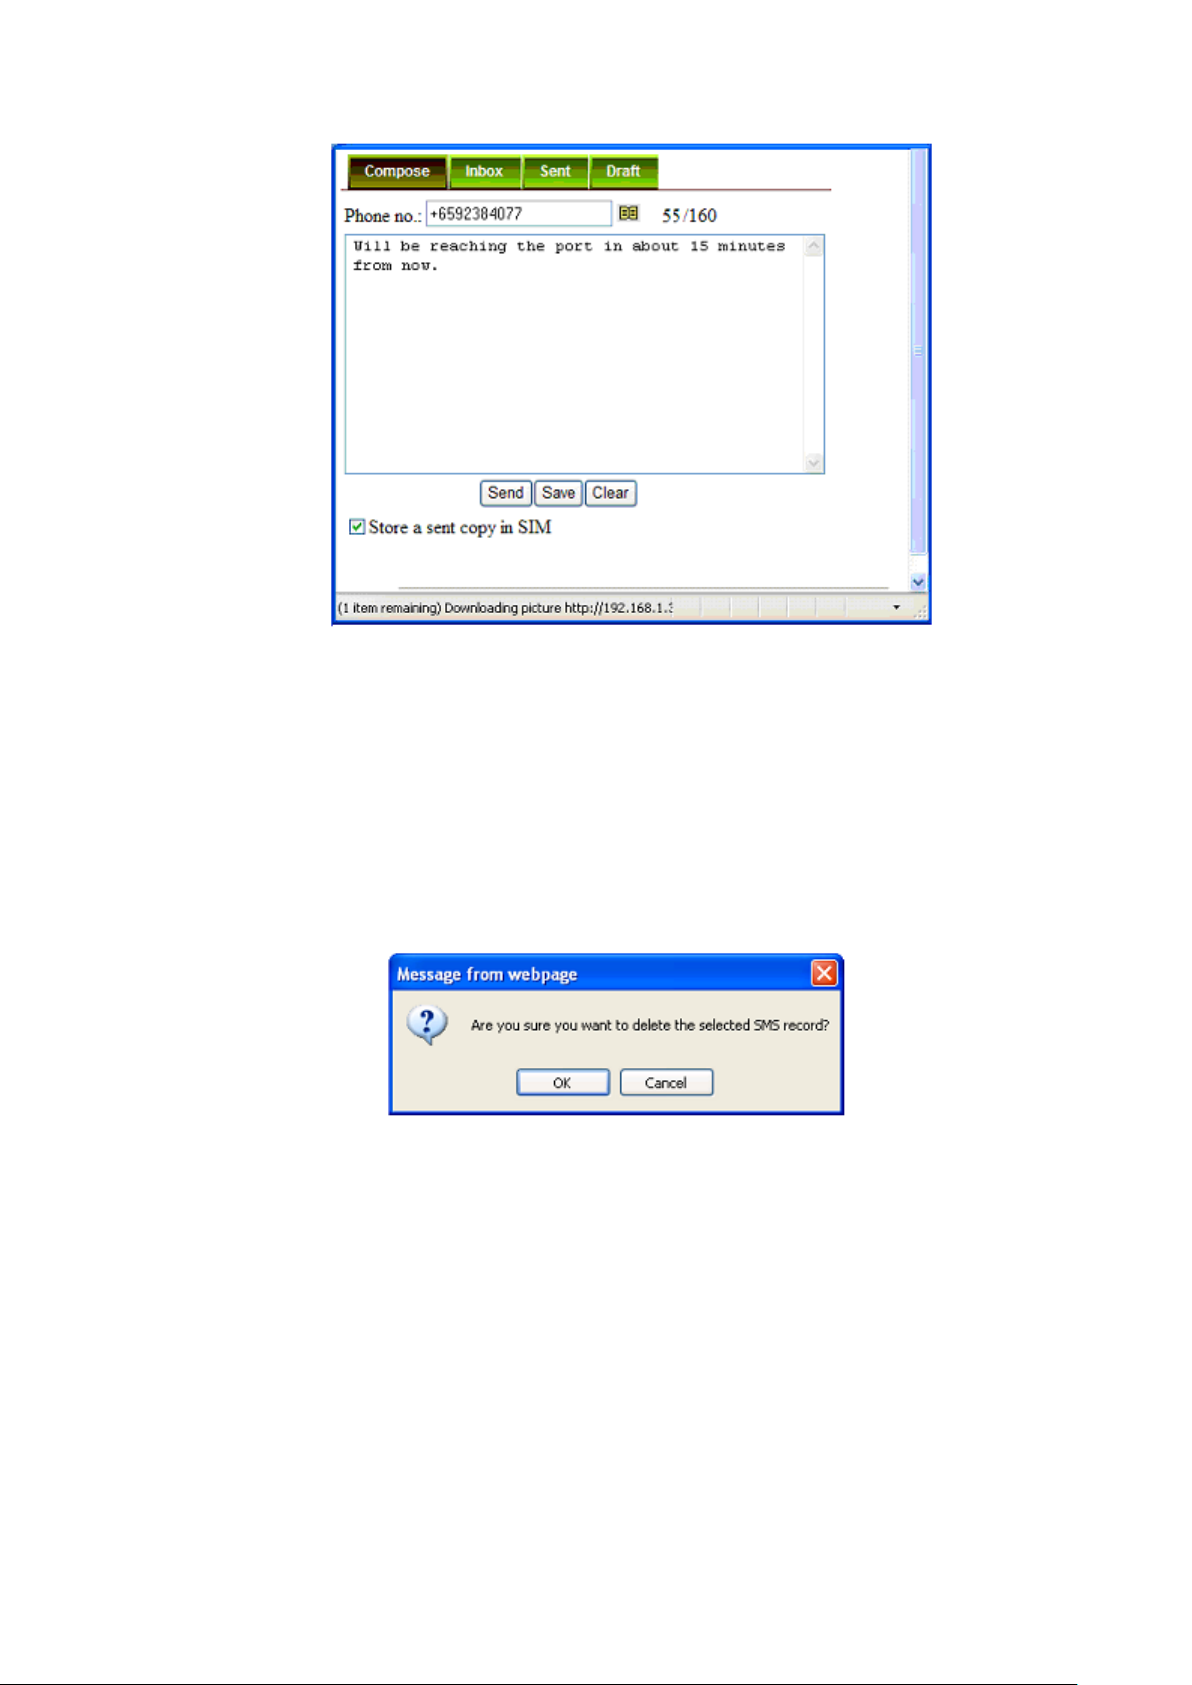
Follow these steps to delete a SMS from the Draft list:
1. Click on a SMS to select it.
2. Click Delete.
3. Click OK to confirm or click Cancel to abort deleting the SMS.
Deleting multiple SMS from the Draft list
Follow these steps to delete multiple SMS from the Draft list:
1. Select the message by checking the checkboxes beside each SMS.
2. Click Delete.
3. Click OK to confirm the delete, or Cancel to abort the delete.
Click Refresh to refresh the Draft list.
18
Page 67
SAFARITM System User’s Guide
Data Menu
Data menu provides the following options:
Connection
Primary Profiles
Secondary Profiles
Port Forwarding
Settings
Connection
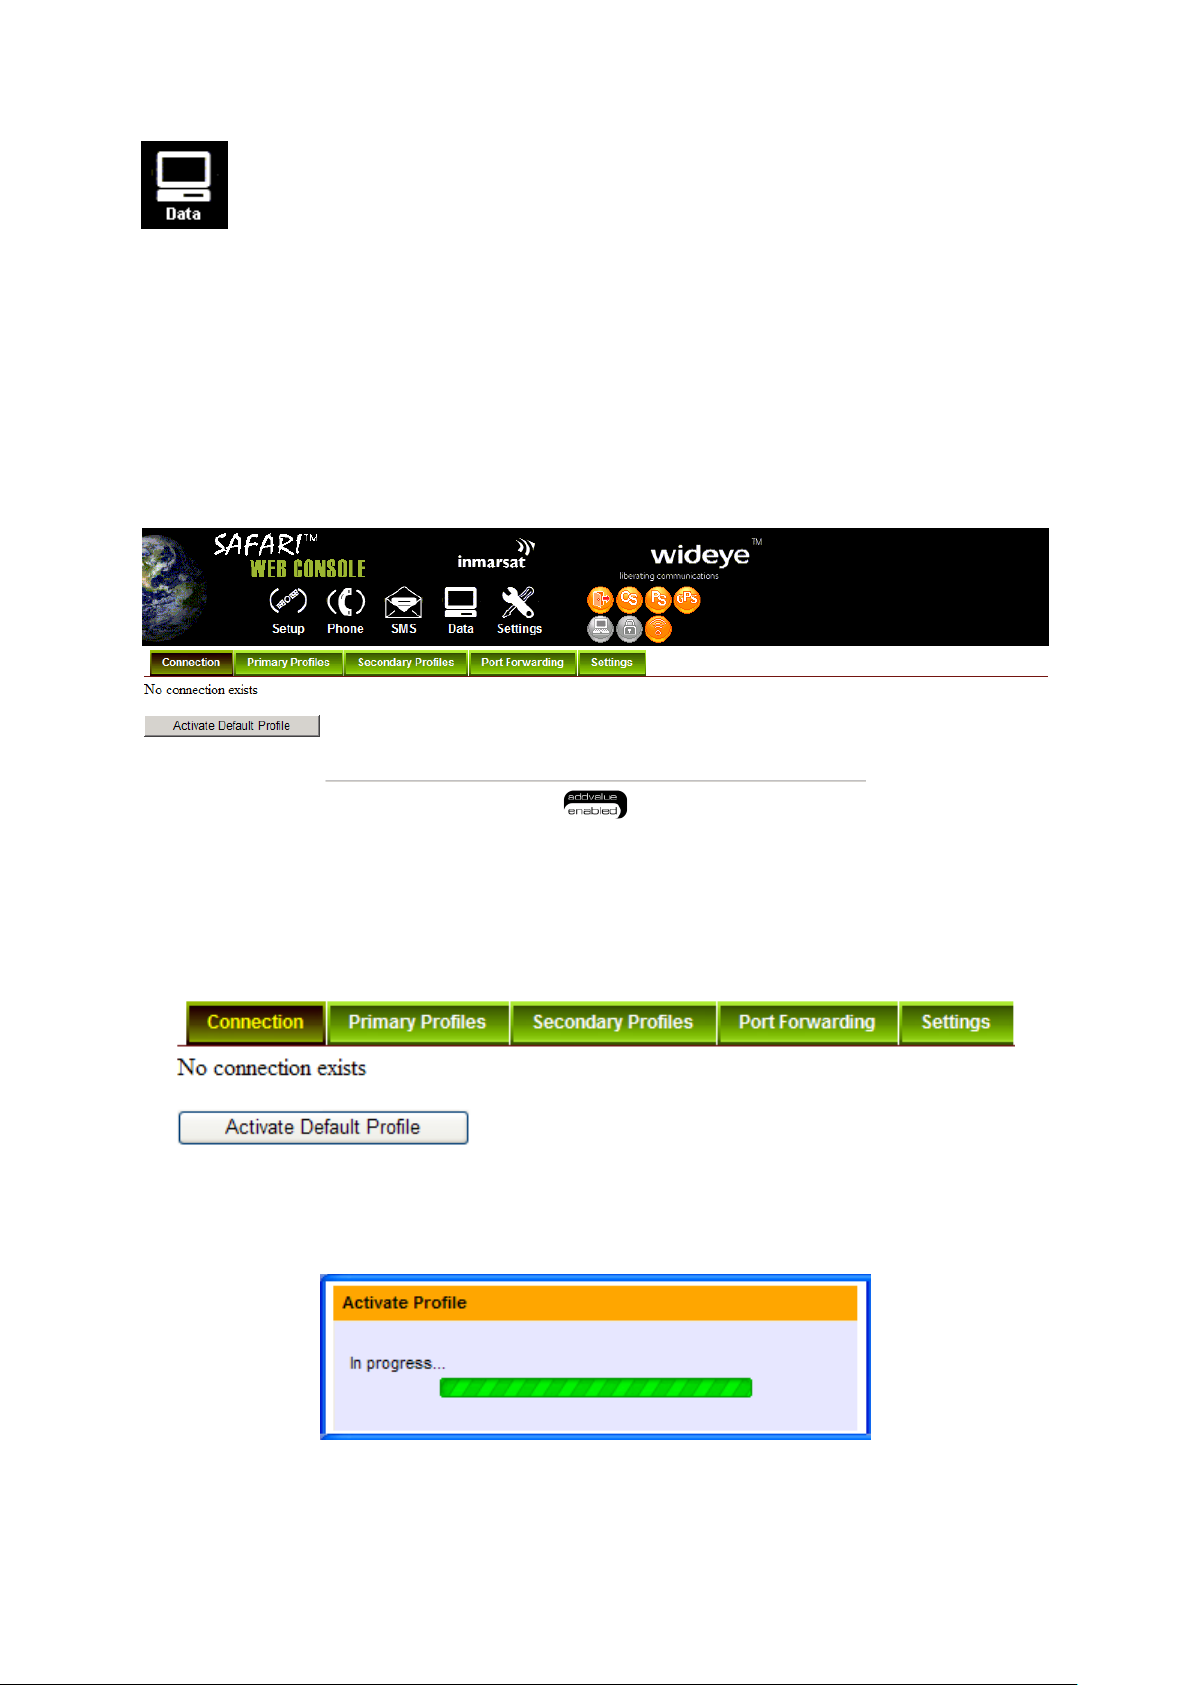
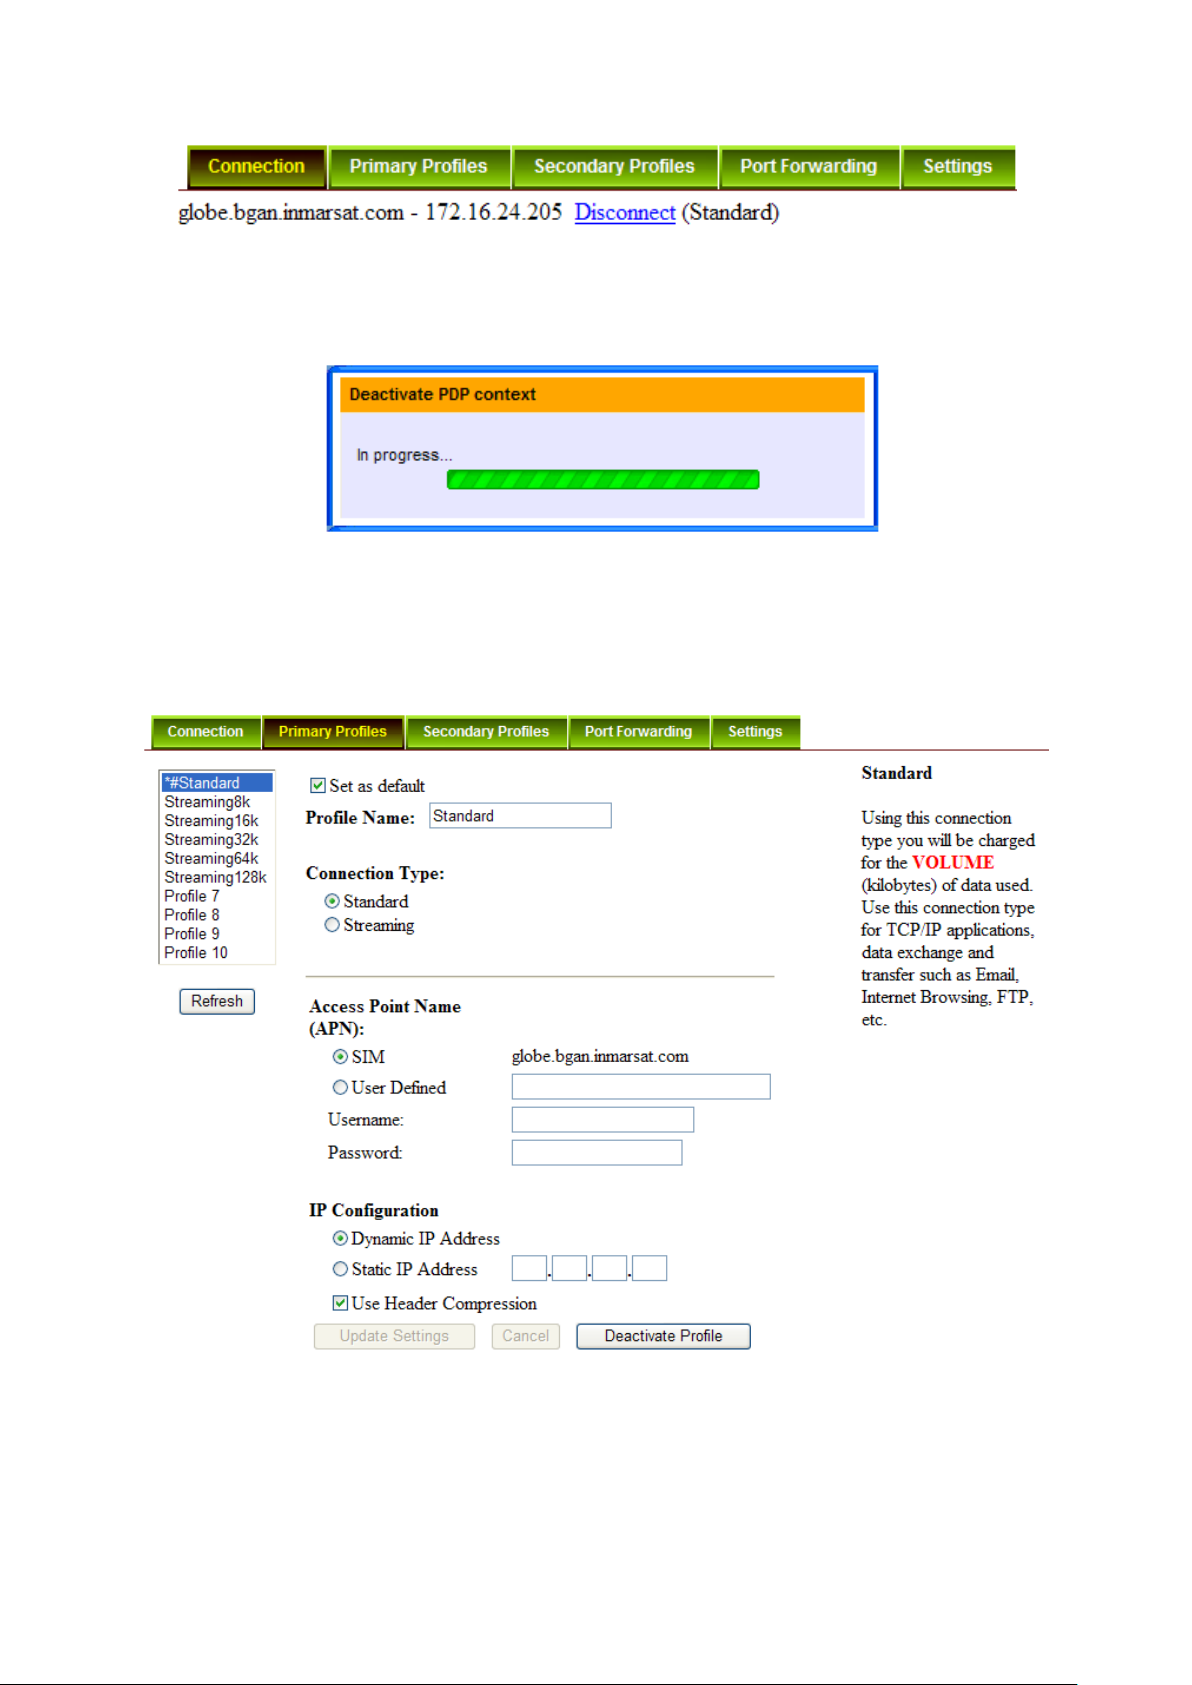
To activate the default profile, click Activate Default Profile.
The PDP context will be activated.
When connected, APN and the assigned public IP Address details will be displayed.
You can proceed to access the Internet and use the related features.
19
Page 68
SAFARITM System User’s Guide
To disconnect the data connection, click Disconnect.
The PDP context will be deactivated.
Primary Profiles
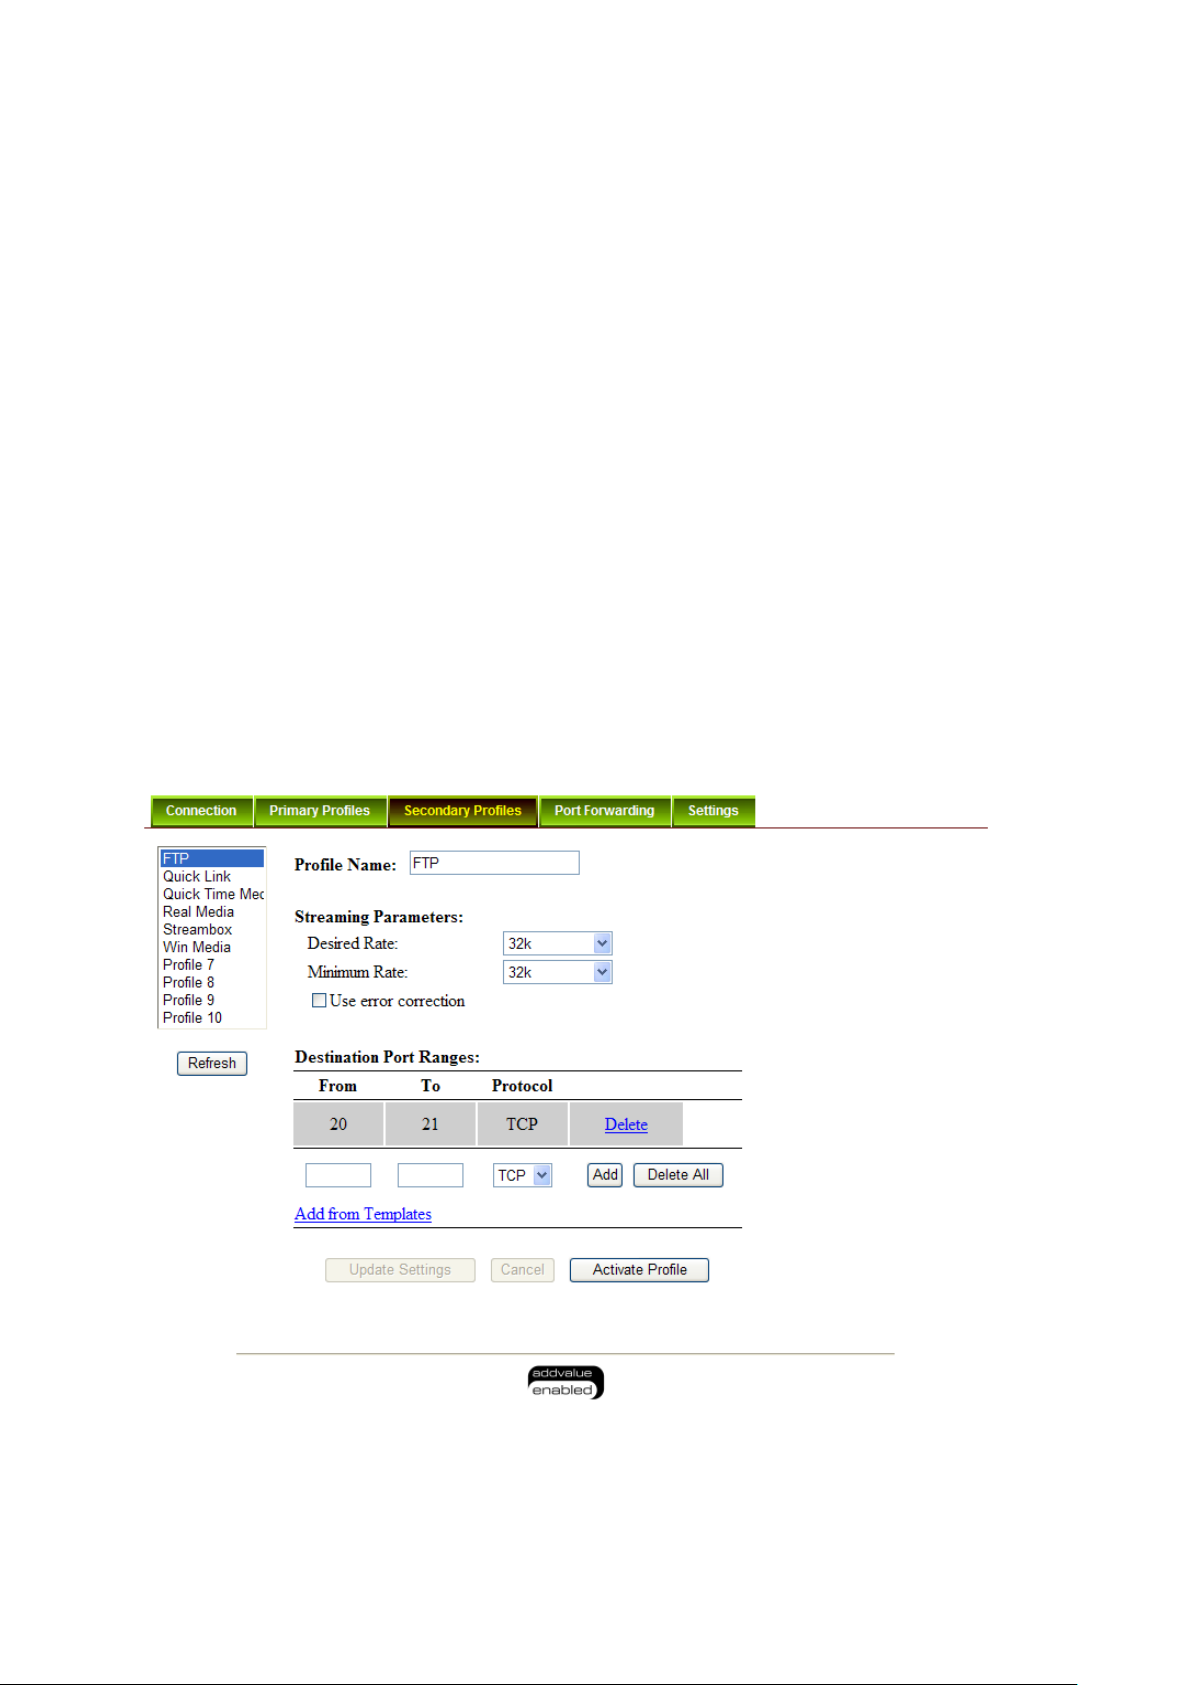
Primary profiles define the connection type. You can select from a list of profiles to be the
default primary profile and connection type. From Profile 7 to Profile 10, you can create your
own customized primary profile.
Note:
The Standard profile is set as the default primary profile and the default connection
type is standard (this is charged by the volume [in kilobytes] of data used).
20
Page 69
SAFARITM System User’s Guide
Profile Name
Change the profile name as desired.
Connection Type
Change the type of connection. By default the connection type will be standard.
Access Point Name (APN)
By default, the APN from the SIM will be selected.
Follow these steps to change the Access Point Name (APN):
1. Select User Defined.
2. Enter the new APN in the field space provided (e.g. BGAN inmarsat.com).
3. Enter the username and password if required.
IP Configuration
By default, the Dynamic IP Address is selected.
Follow these steps to use Static IP Address:
1. Select Static IP Address and enter the IP Address in the space provided.
2. Check the Header Compression checkbox if it is required to use Header
Compression.
Secondary Profiles
Secondary profiles setting are used mainly for streaming connection. You may select one of
the secondary profiles to be used during streaming connection. You may also create a
customized secondary profile, choose from profile 7 to 10.
21
Page 70
SAFARITM System User’s Guide
Port Forwarding
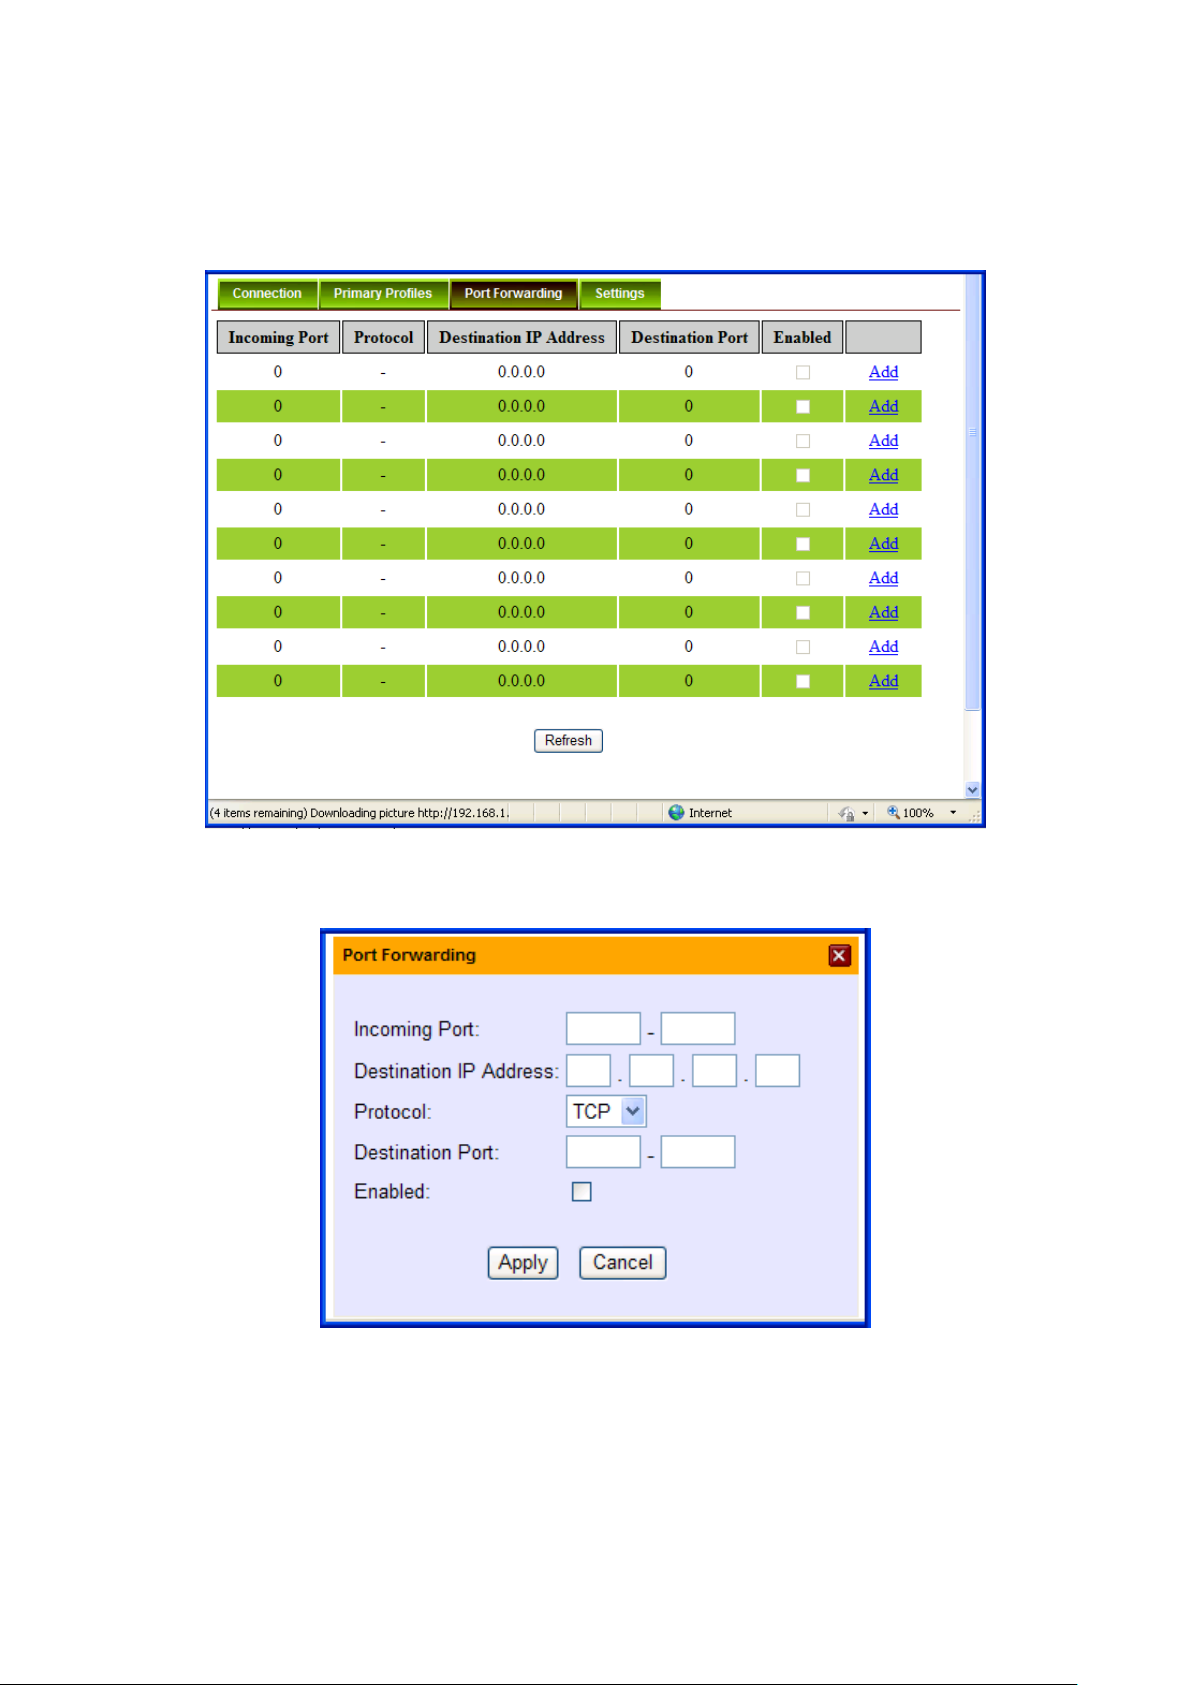
Port Forwarding is a feature for Router (multiple-user) mode. This feature sets the SAFARI
UE to direct incoming traffic on certain TCP/UDP port to a specific port on a local PC (IP
Address).
Follow these steps to add a new forwarding rule:
1. Click Add.
2. Enter the Incoming Port number in the space provided.
(For example, the user expecting HTTP traffic, the port is 80).
3. Enter the Destination IP Address.
(For example, the IP Address of the PC that is connected to the SAFARI UE).
4. Select the Protocol type:
22
Page 71
SAFARITM System User’s Guide
TCP (e.g. for HTTP, it will be TCP)
UDP
5. Enter the Destination Port number in the space provided (For example: listening port
of the particular service (for example TCP port 80 for web server) on the PC that is
connected to the SAFARI UE).
6. Click Apply to allow the settings to take effect.
Settings
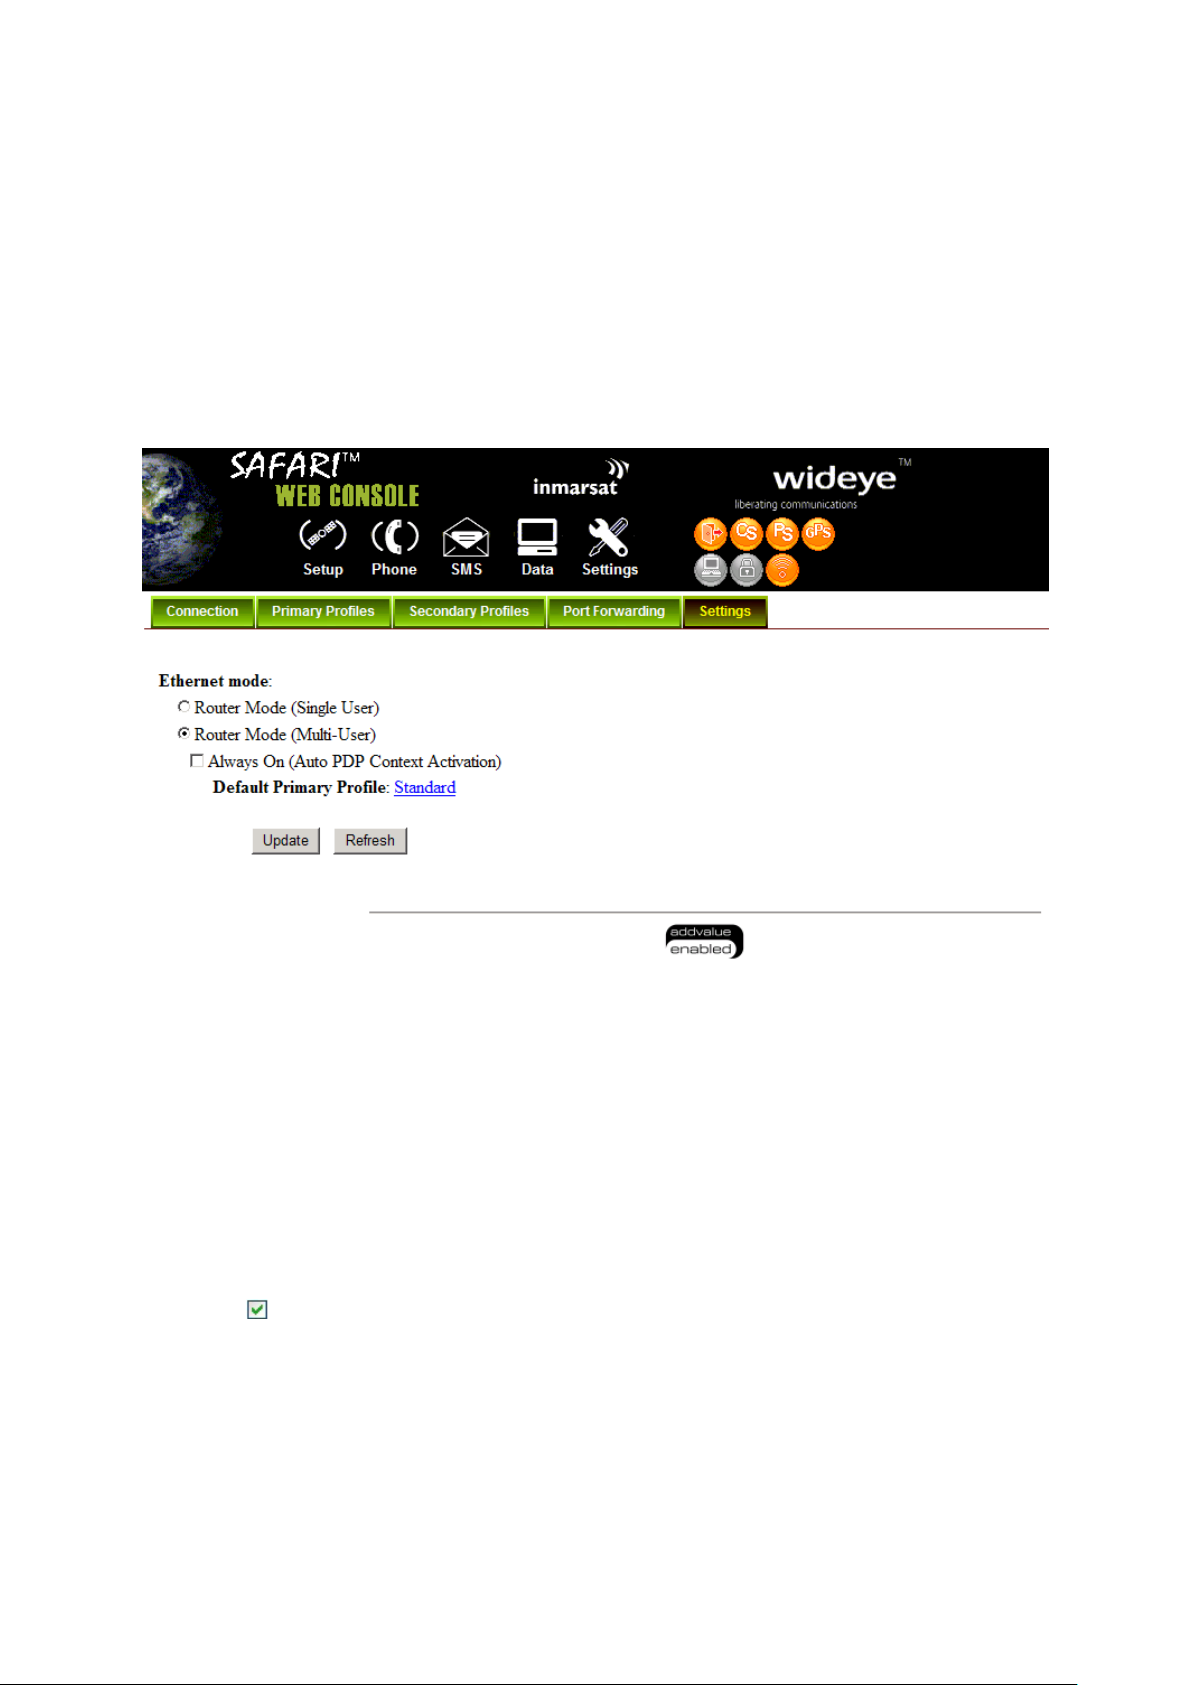
You can select the Ethernet mode to be used for data connection.
Follow these steps to select the Ethernet mode:
1. Select the desired mode to be used during the data connection:
Router (Single User) is with NAT/PAT disabled
Router (Multi-User) is with NAT/PAT enabled for multi-user.
Note:
You cannot change the Router settings while a Data connection is active, you must
first disconnect you Data session.
2. Check “Always On (Auto PDP Context Activation)” if required.
3. Click Update to allow the selection to take effect.
Click Refresh to query the current mode.
23
Page 72
SAFARITM System User’s Guide
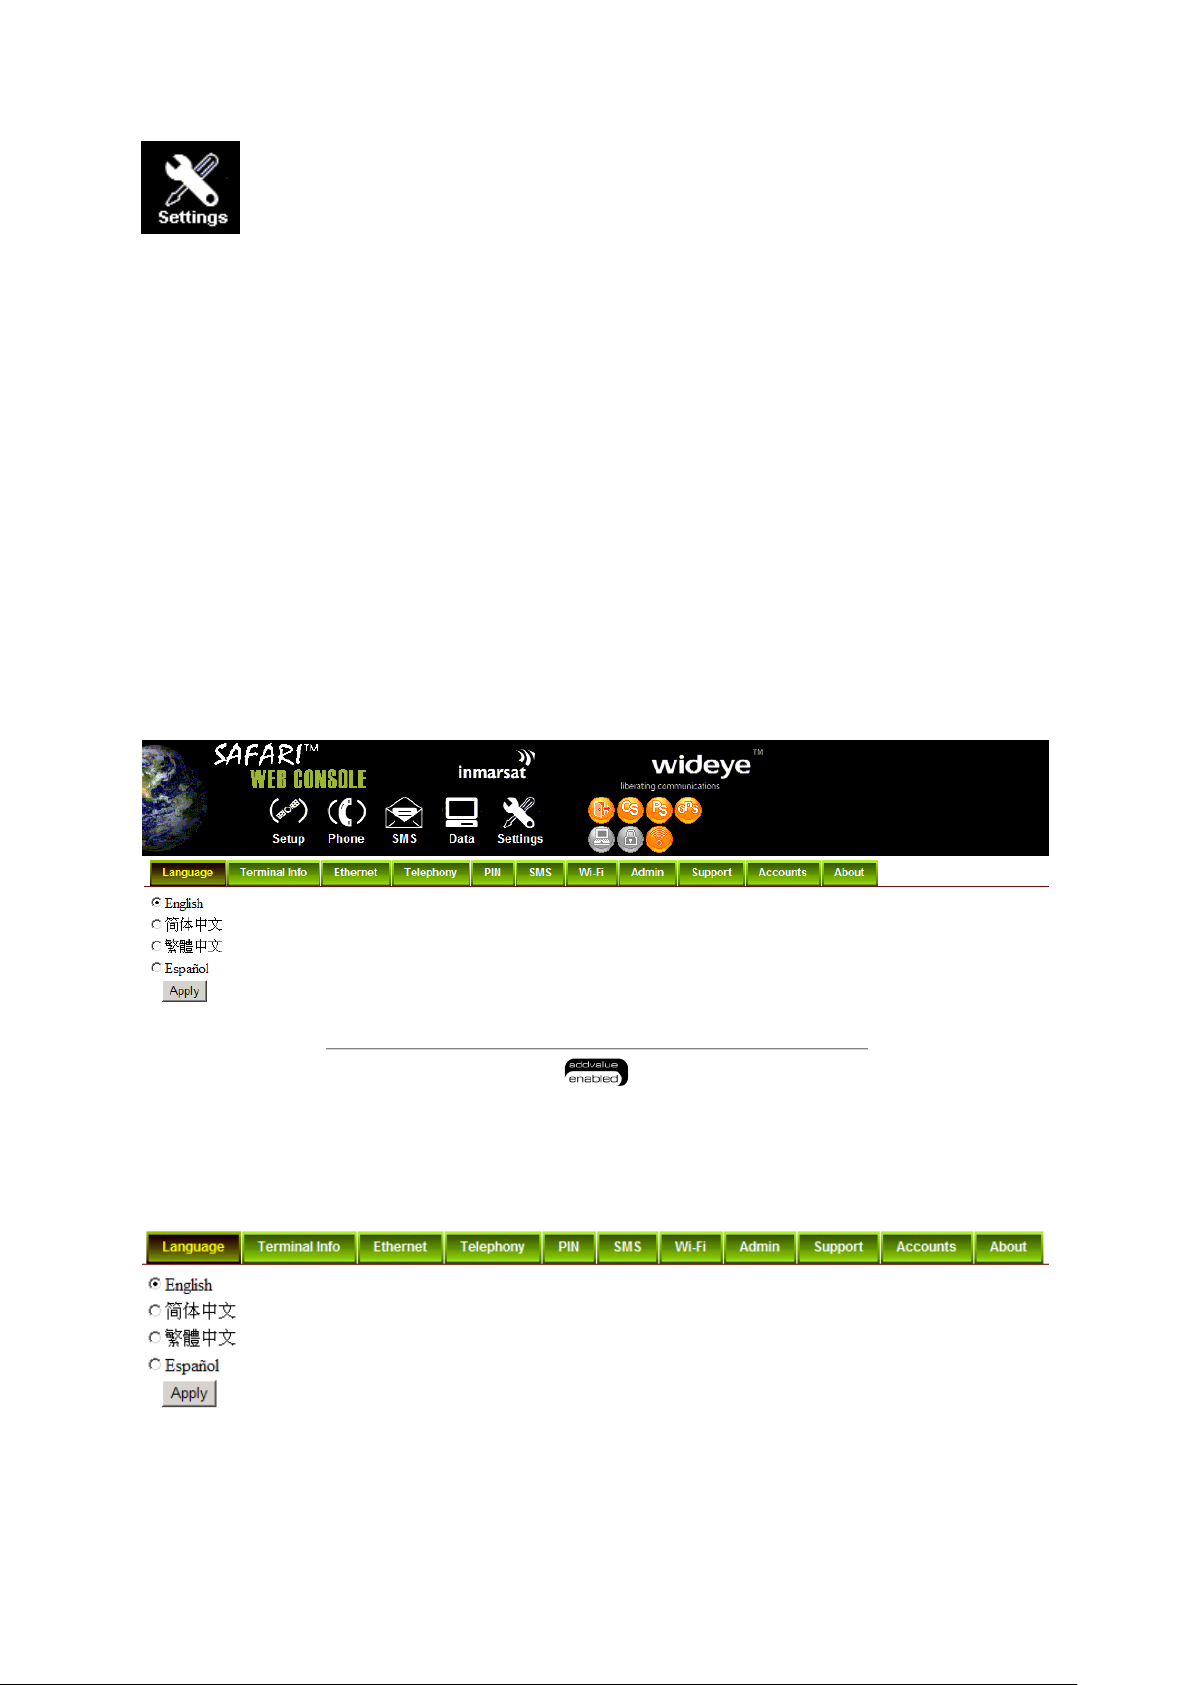
Settings Menu
Click the following tabs to view and edit the configuration settings for the SAFARI UE:
Language
Transceiver Info
Ethernet
Telephony
PIN
SMS
Wi-Fi
Admin
Support
Accounts
About
Language
Select the desired language for the Web Console to be displayed. (Spanish, Chinese-Simplified and
Chinese-Traditional may not be an option that is available at the time of purchase).
24
Page 73
SAFARITM System User’s Guide
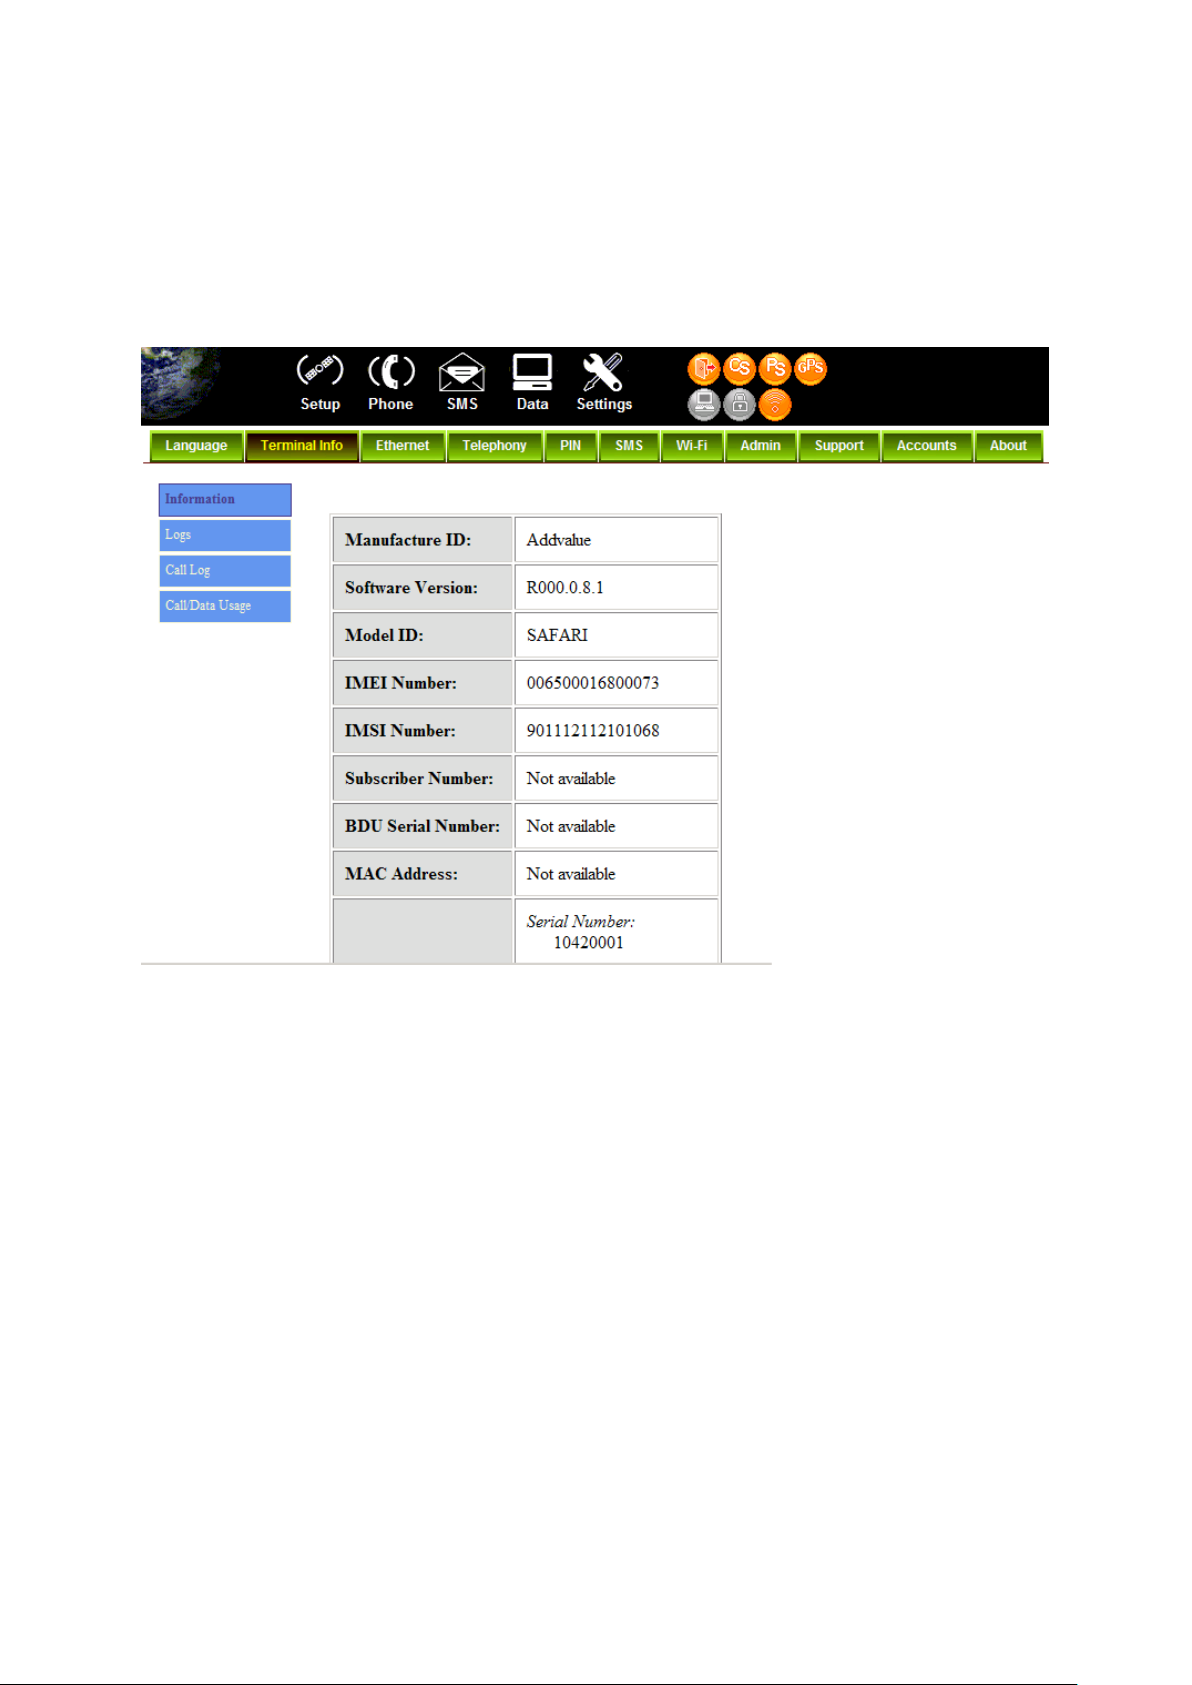
Transceiver Info
This tab shows general information about the UE, Error/Event Logs and Call Logs.
Information
Displays information about the Manufacture ID, Software version, Model ID, IMEI
number, IMSI number (only when a SIM card is inserted), Subscriber number and
Antenna Unit‟s serial Number.
25
Page 74
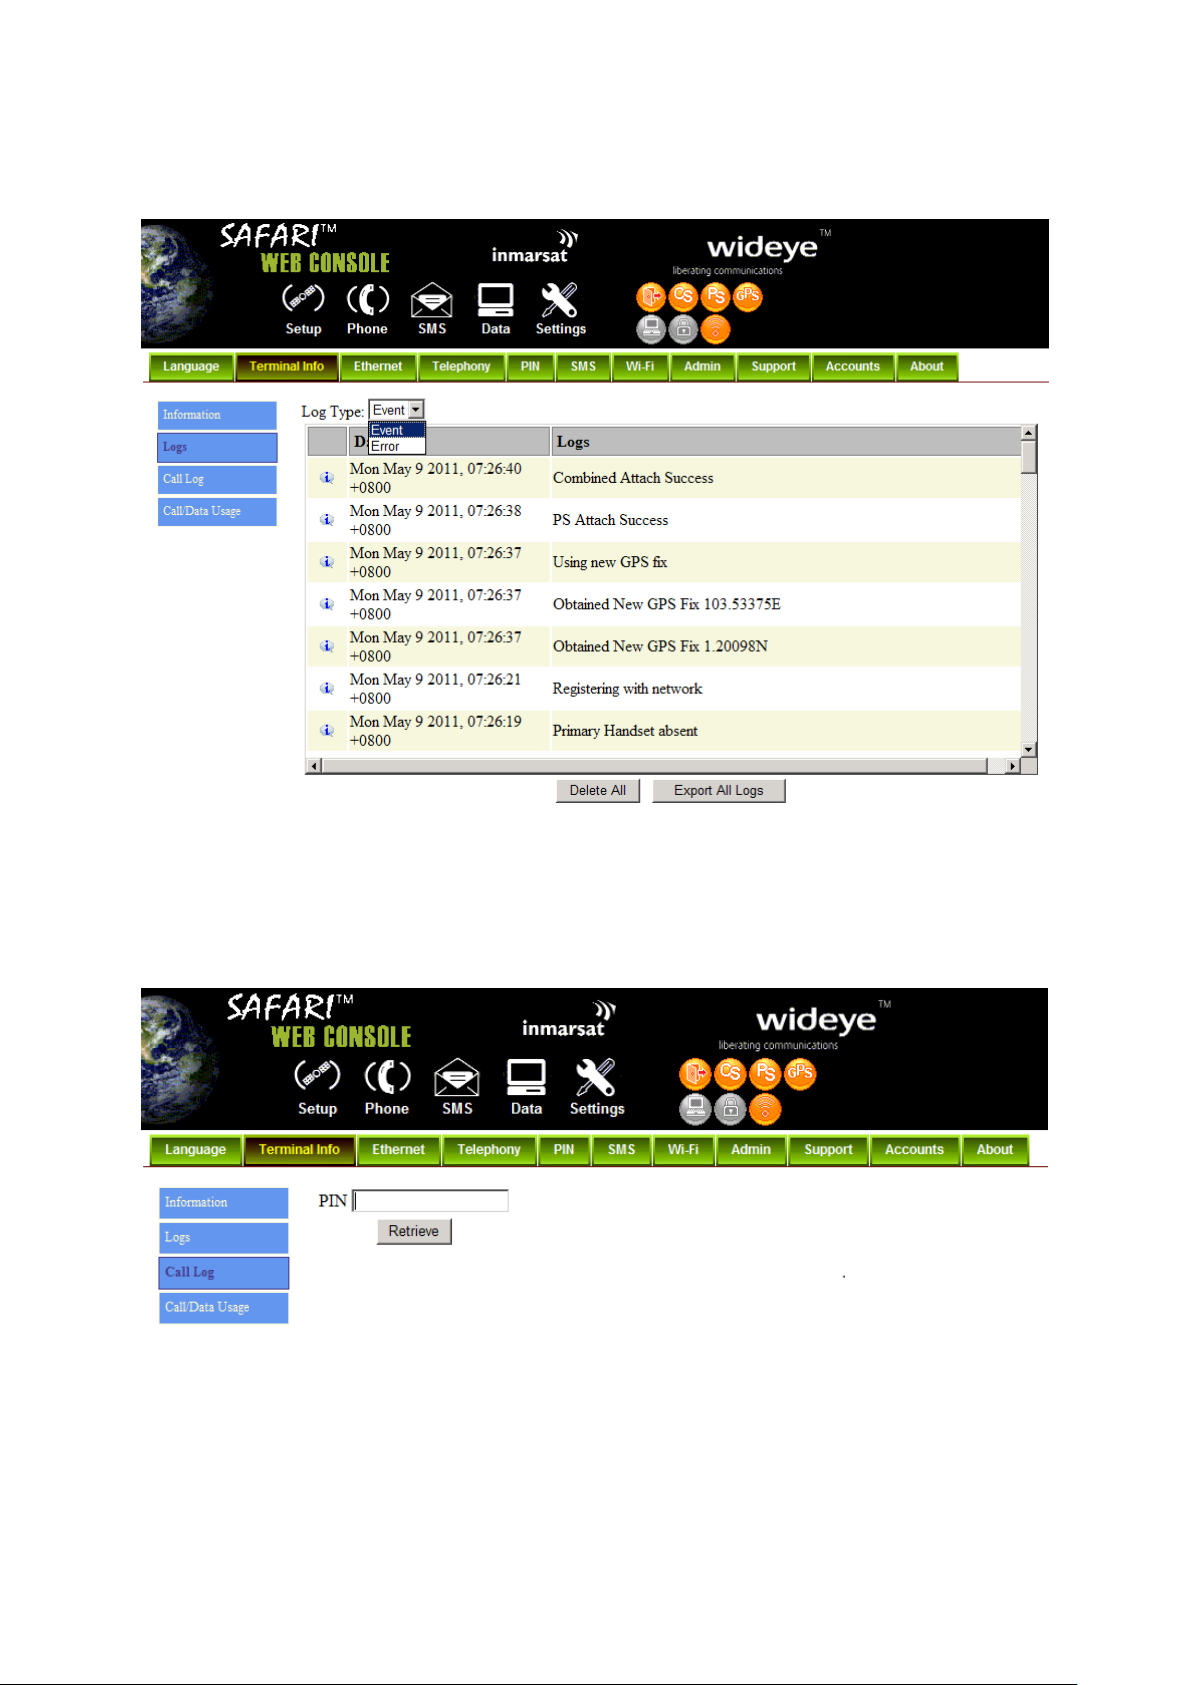
SAFARITM System User’s Guide
Logs
Displays event and error logs of the UE.
Call Log
Displays the call history including standard voice calls, high-quality/fax calls, standard
data sessions and streaming data sessions.
26
Page 75
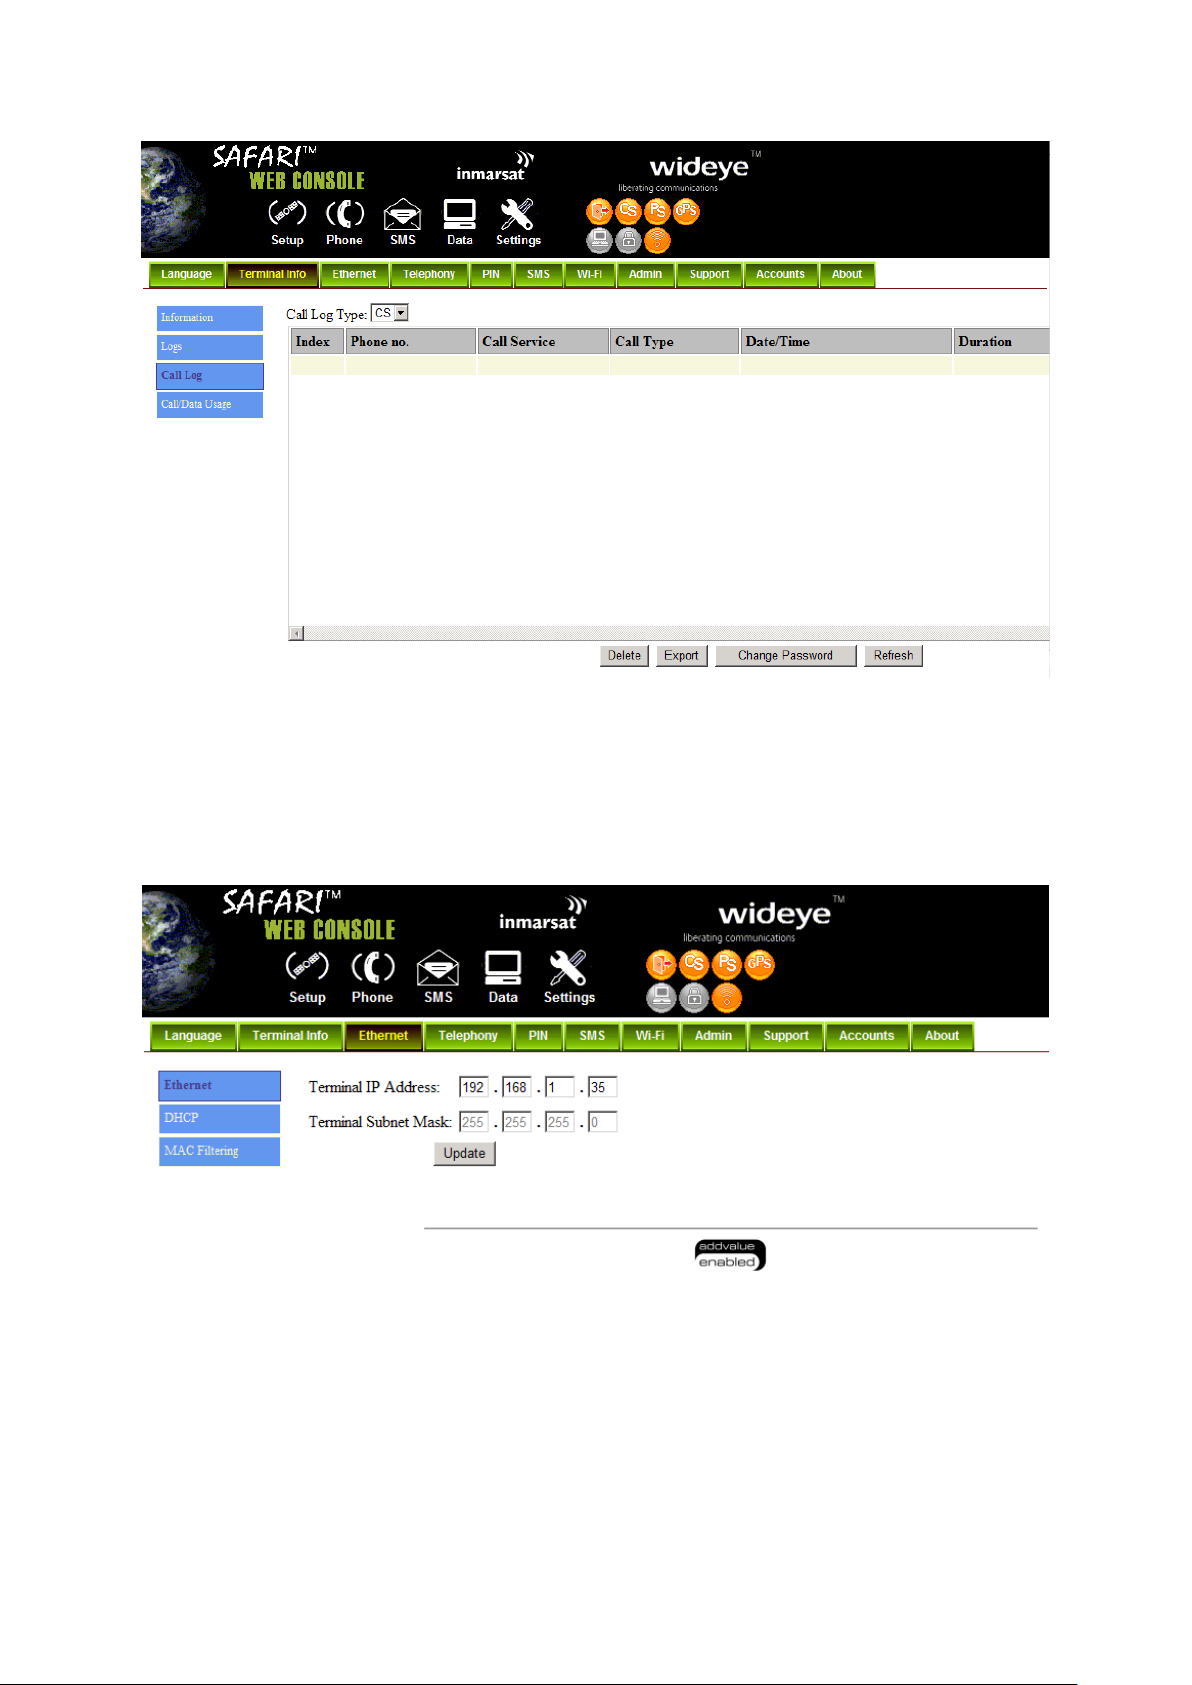
SAFARITM System User’s Guide
Ethernet
Ethernet
1. Click Ethernet to view and edit the Ethernet settings.
2. Click Update to allow the settings to take effect.
27
Page 76
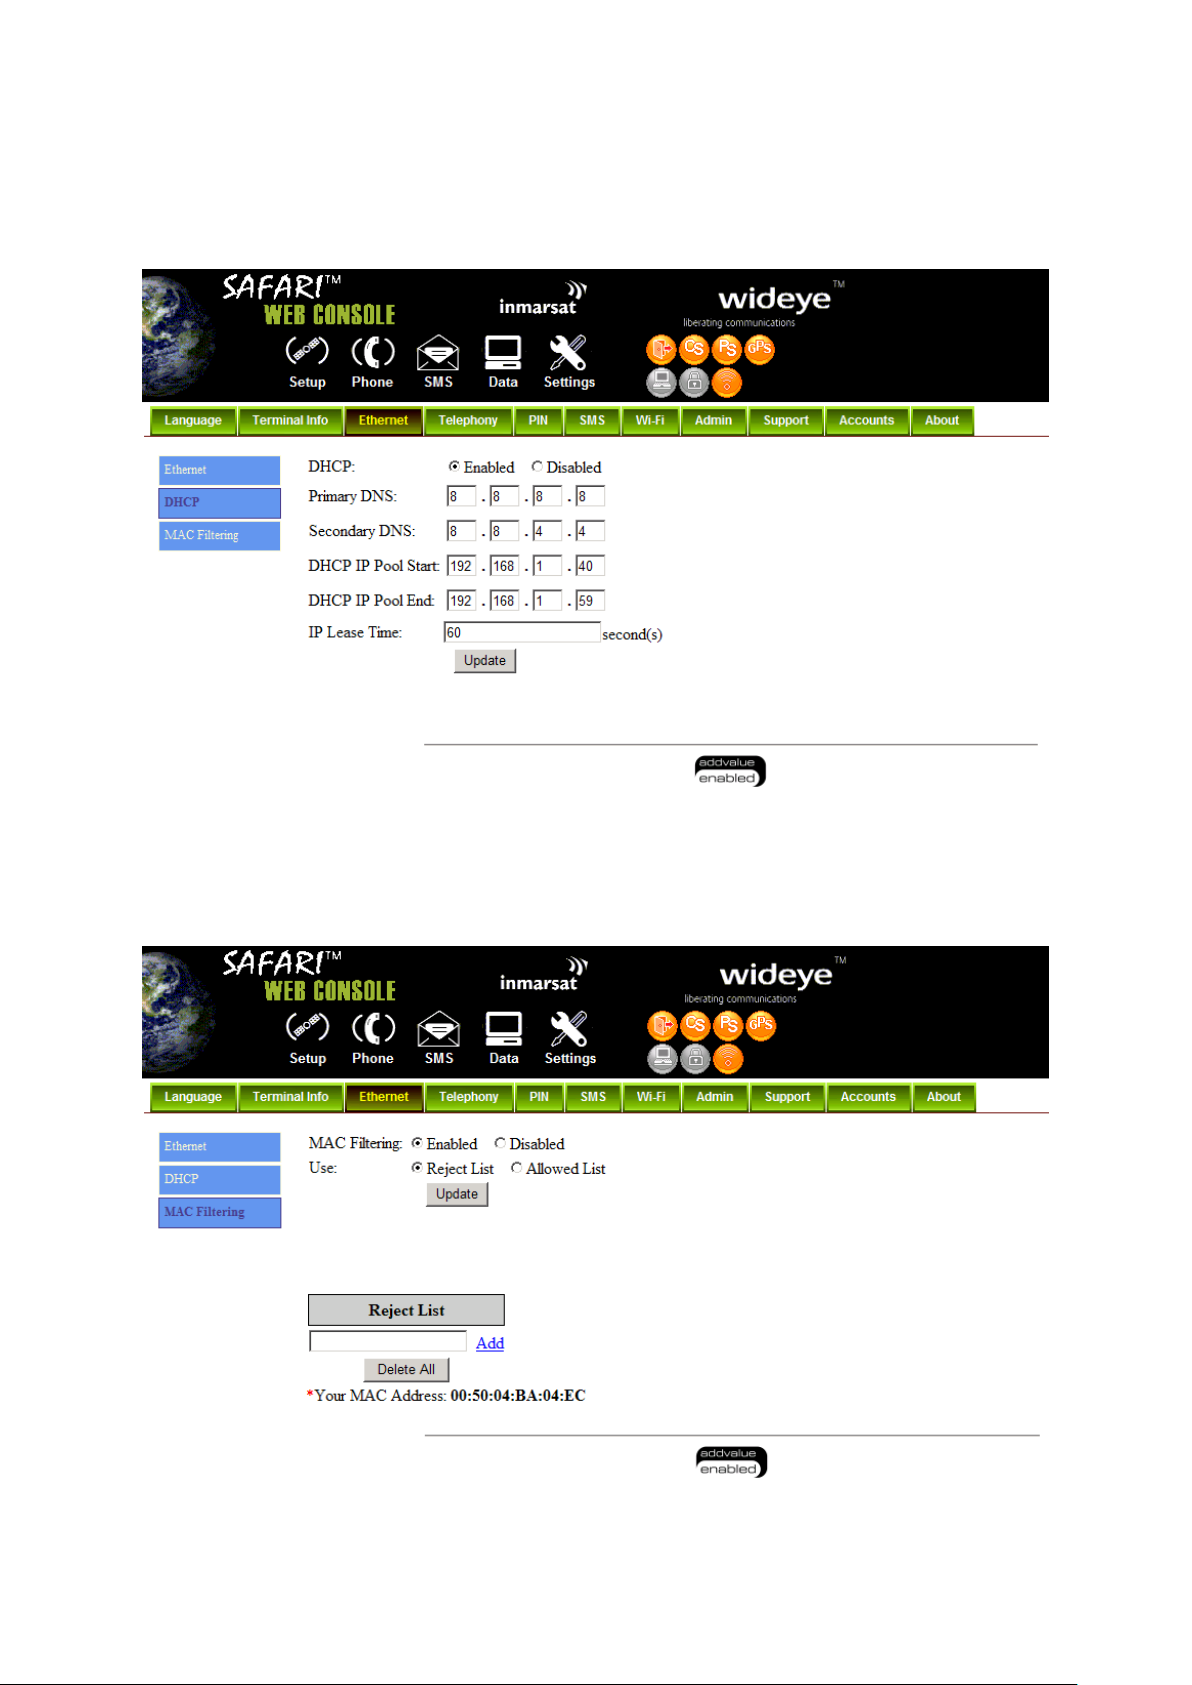
SAFARITM System User’s Guide
DHCP
1. Click DHCP to view and edit the DHCP settings.
2. Click Update to allow the settings to take effect.
Mac Address Filtering
1. Click Mac Filtering to view and edit the Mac Filtering settings.
2. Click Update to allow the settings to take effect.
28
Page 77
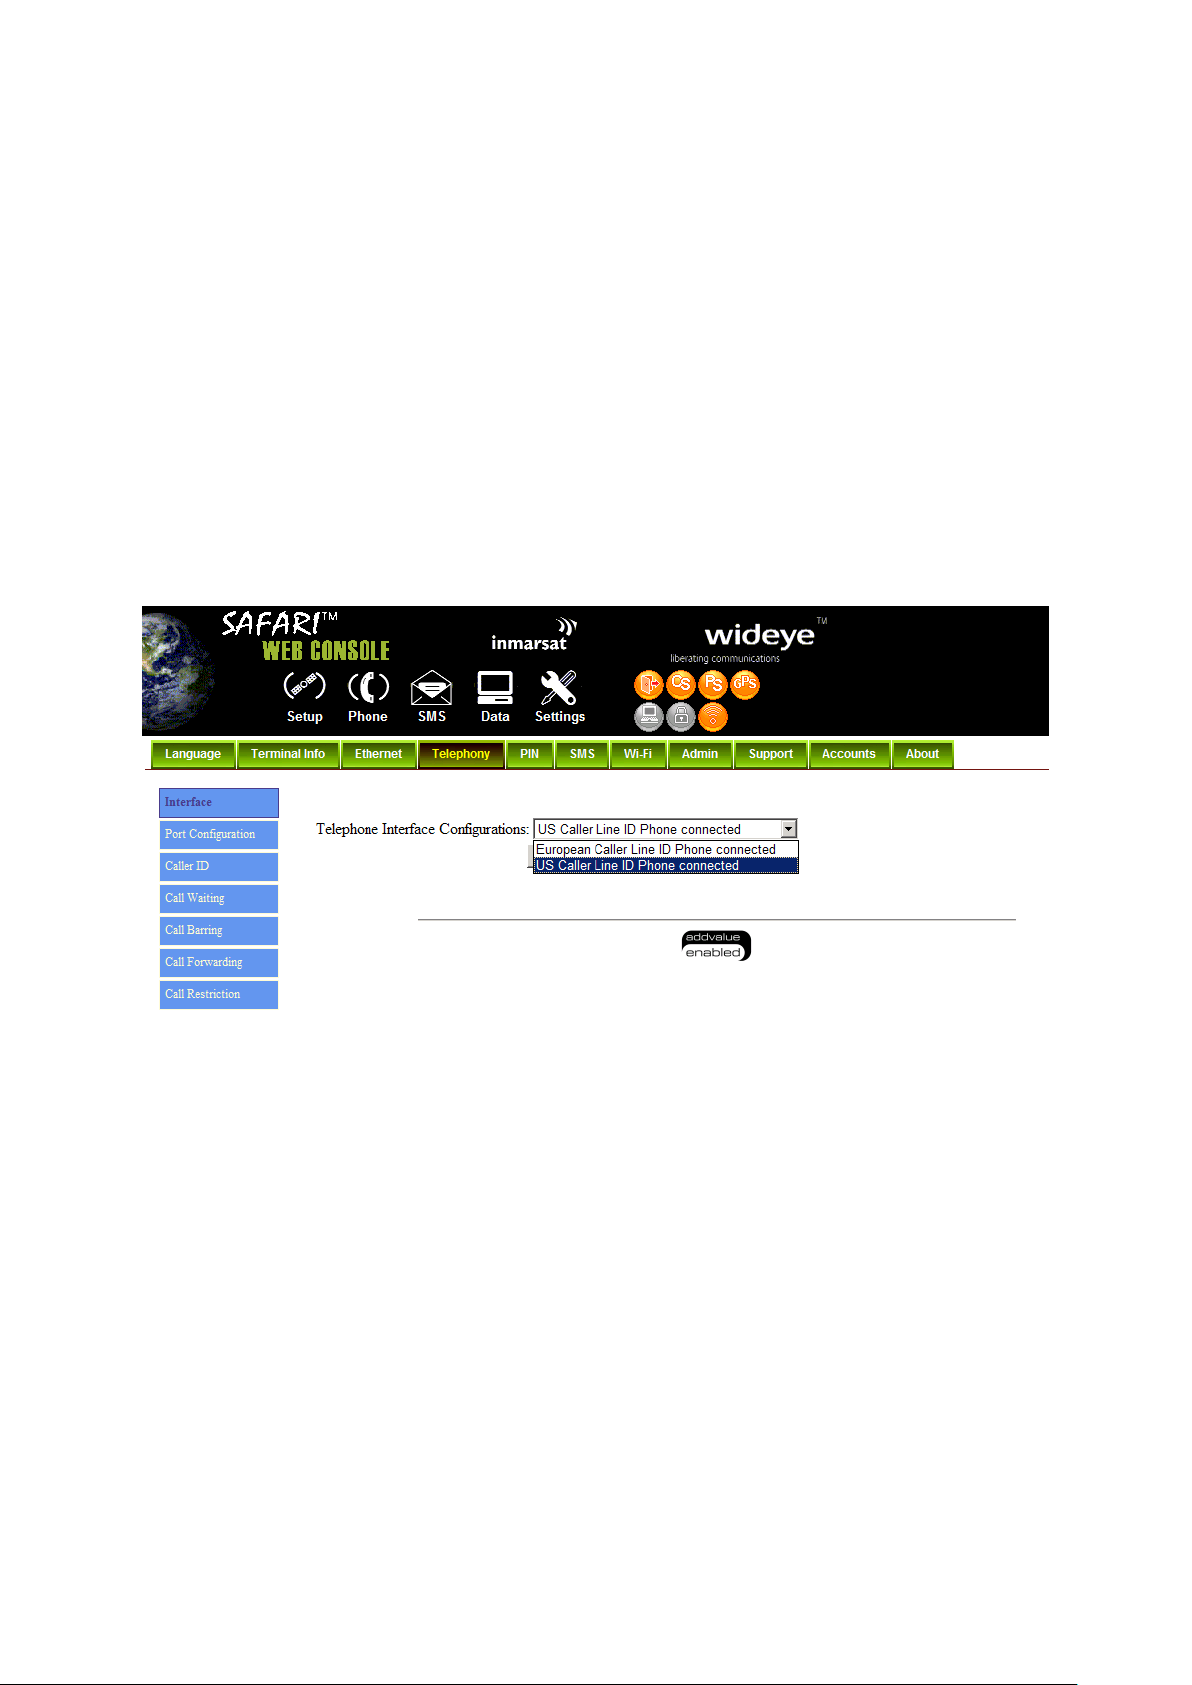
SAFARITM System User’s Guide
Reject List
All PCs/Laptops will be allowed to access the UE except for those (MAC addresses)
listed in the Reject List.
Allow List
All PCs/Laptops will be denied access to the UE except for those (MAC addresses)
listed in the Allow List. When selecting this list, at least one entry should be there to
access the UE.
Telephony
Interface
1. Select European Caller Line ID Phone connected or US Caller Line ID Phone
connected from the Telephone Interface Configuration drop-down menu.
2. Click Update to allow the setting to take effect.
29
Page 78
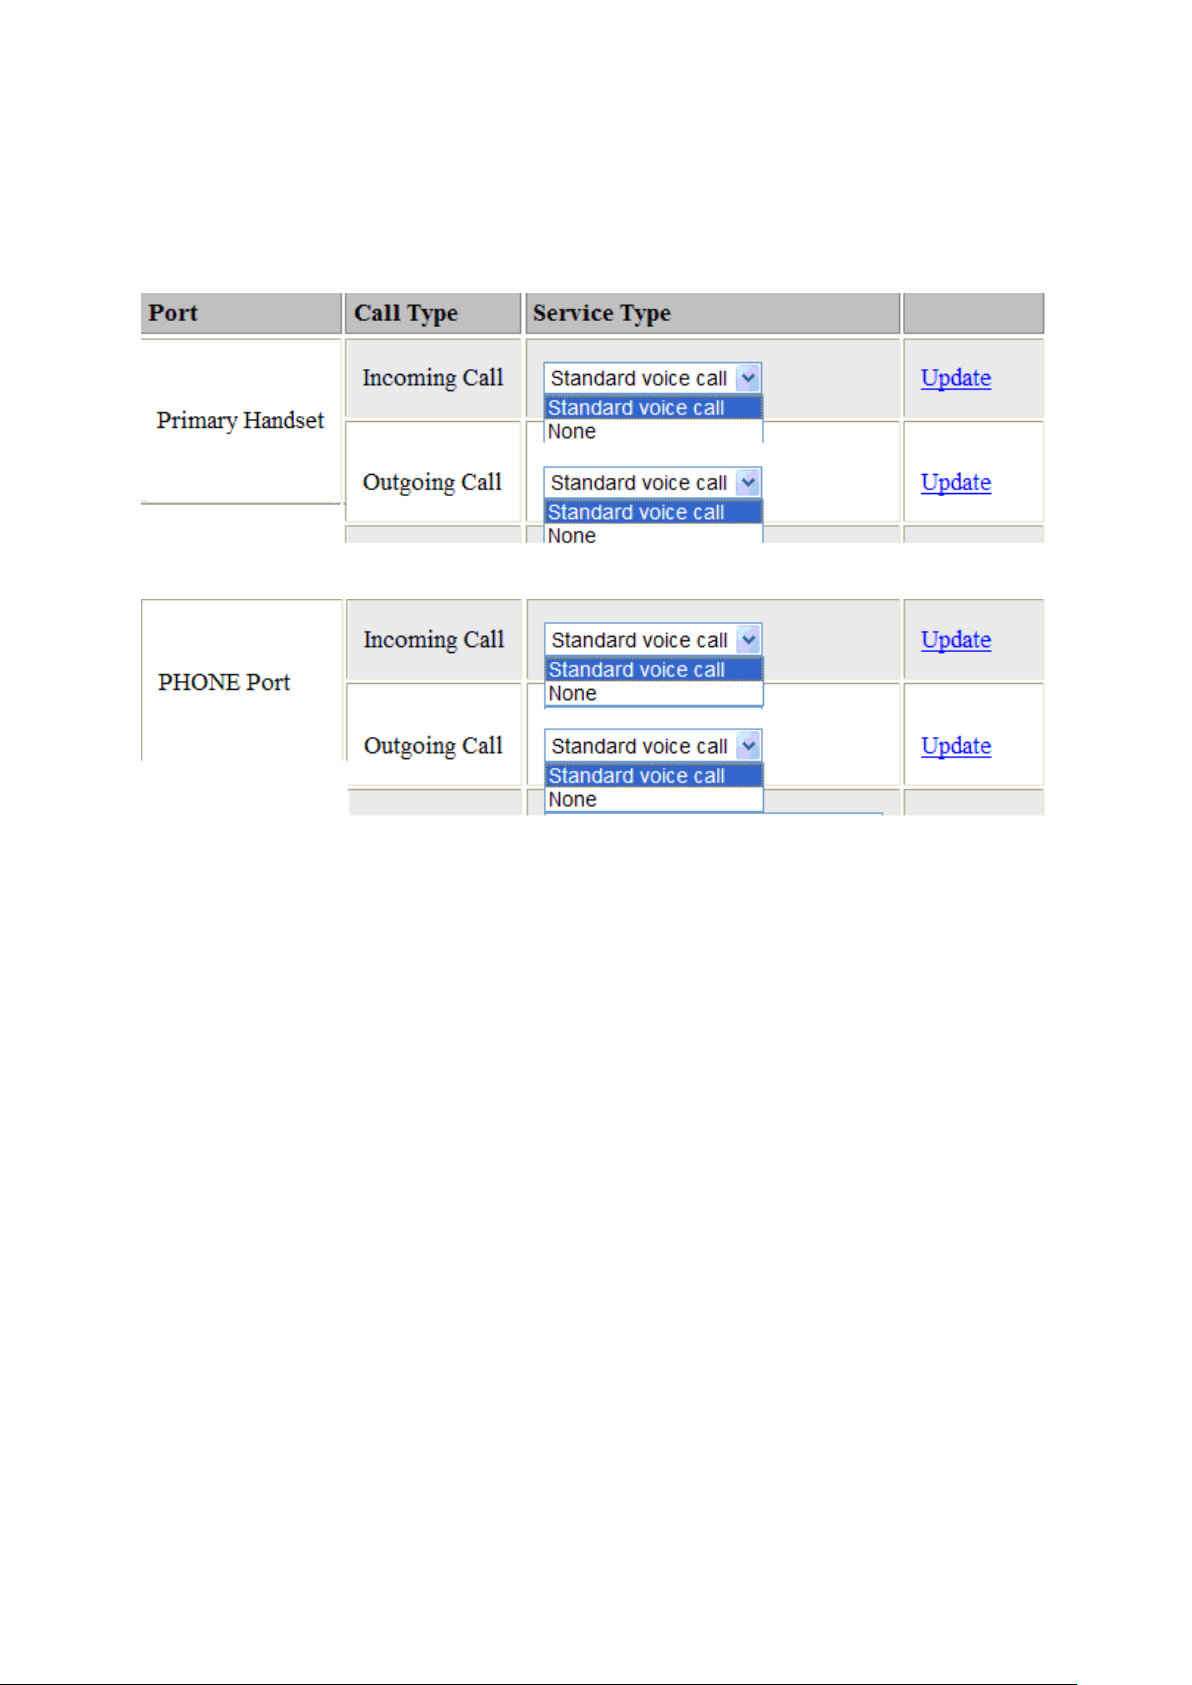
SAFARITM System User’s Guide
PORT CONFIGURATION
For each of the 3 ports, a choice of the quality calls can be selected. Select your ideal call
quality and click “Update”.
Primary Handset
Phone Port
30
Page 79
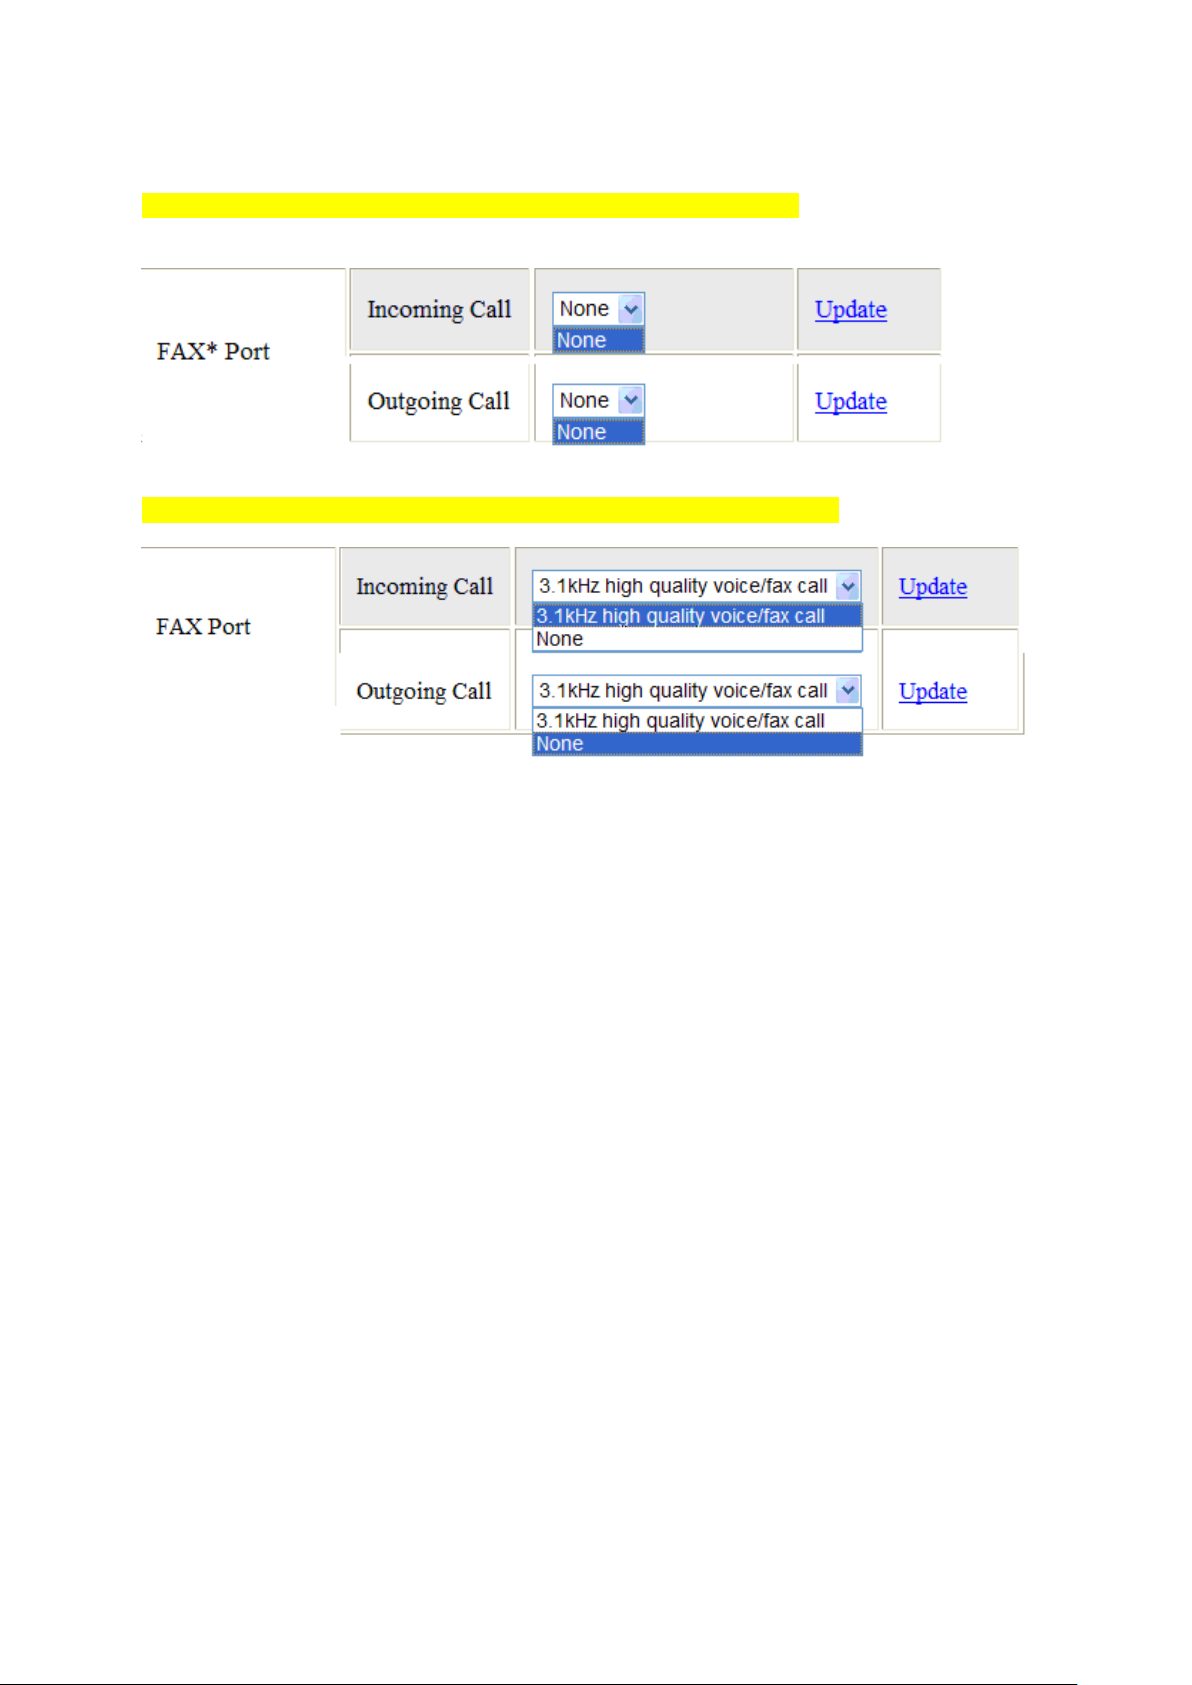
SAFARITM System User’s Guide
Fax Port
For the fax port, if no subscription is made, there will be no choices.
If fax subscription is made, 3.1KHz high quality fax call will be available.
31
Page 80
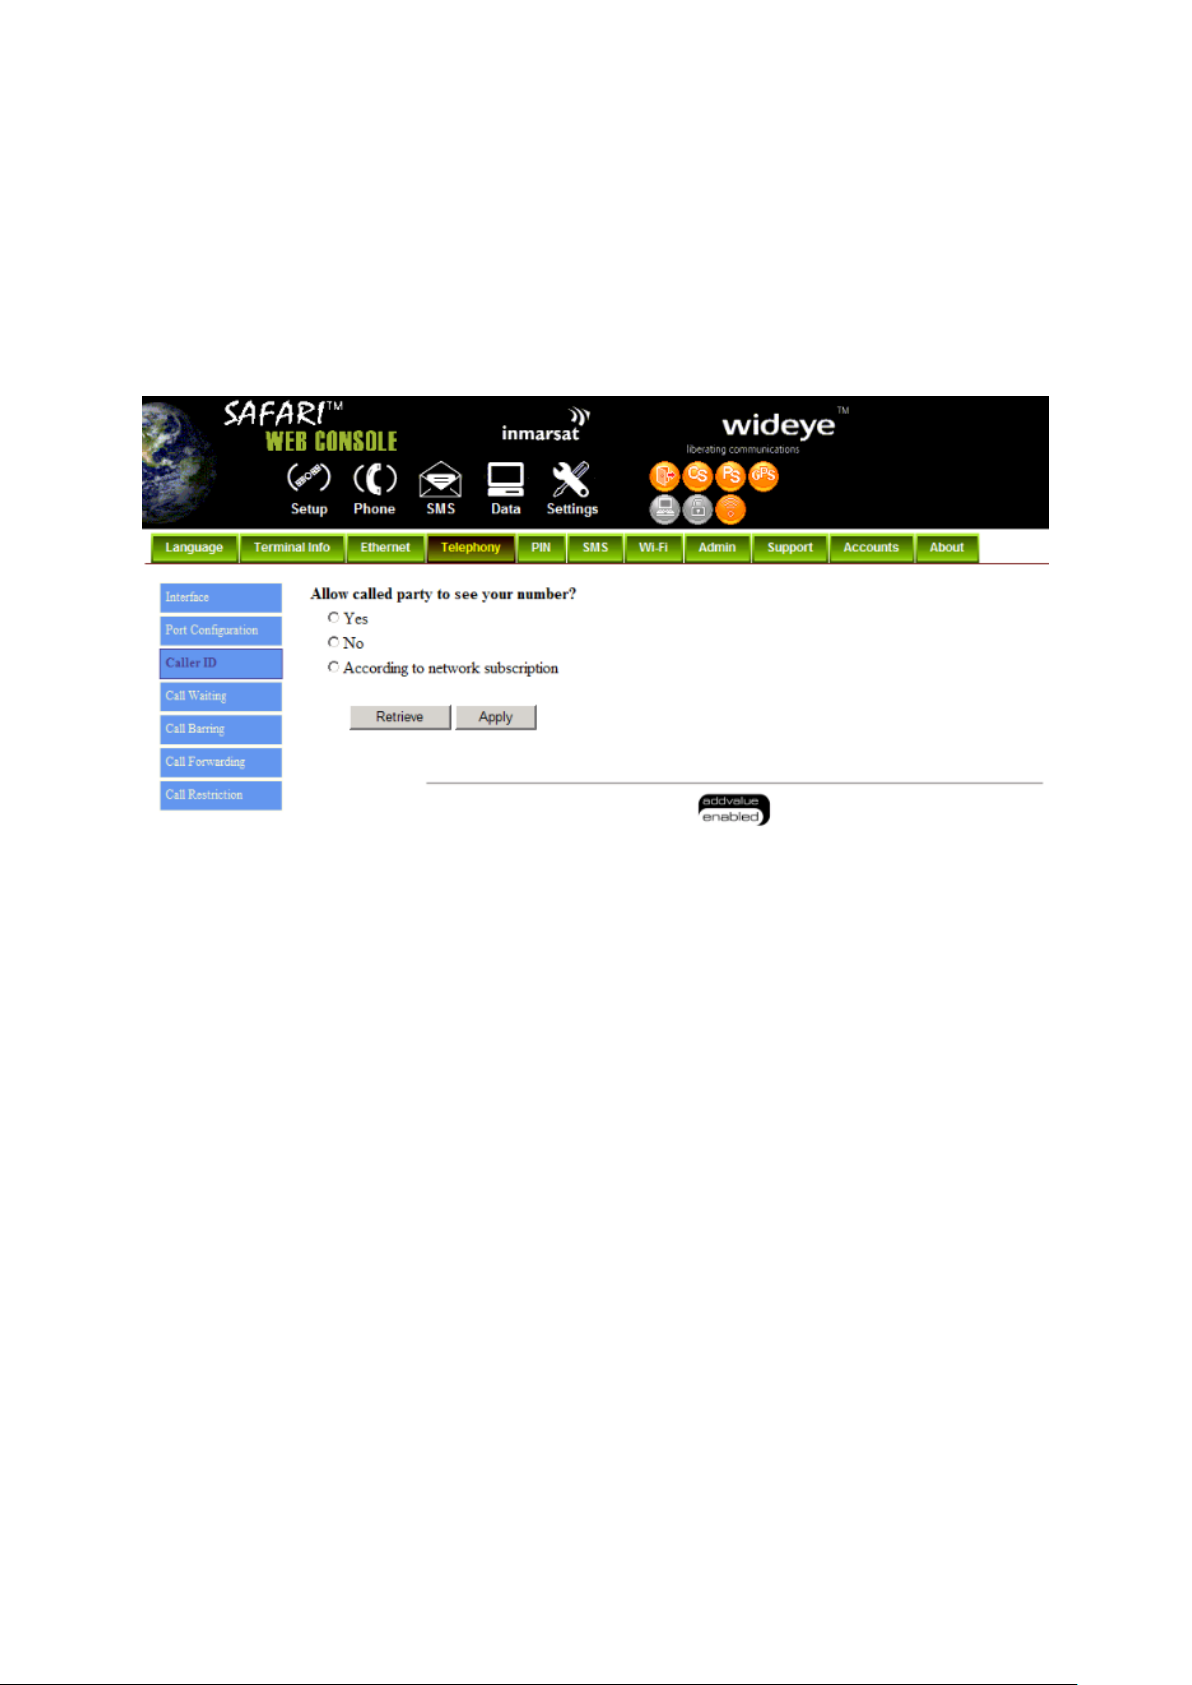
SAFARITM System User’s Guide
Caller ID
1. Click Retrieve to get current setting of the Allow called party to see your number
configuration.
2. To change the setting, select Yes, No, or According to network subscription for
the Allow called party to see your number configuration.
3. Click Apply to allow the setting to take effect.
Call Waiting
1. Click Retrieve to get current setting of the Enable call-waiting configuration.
2. To change the setting, select Yes or No for the Enable call waiting configuration.
3. Click Apply to allow the new setting to take effect.
32
Page 81
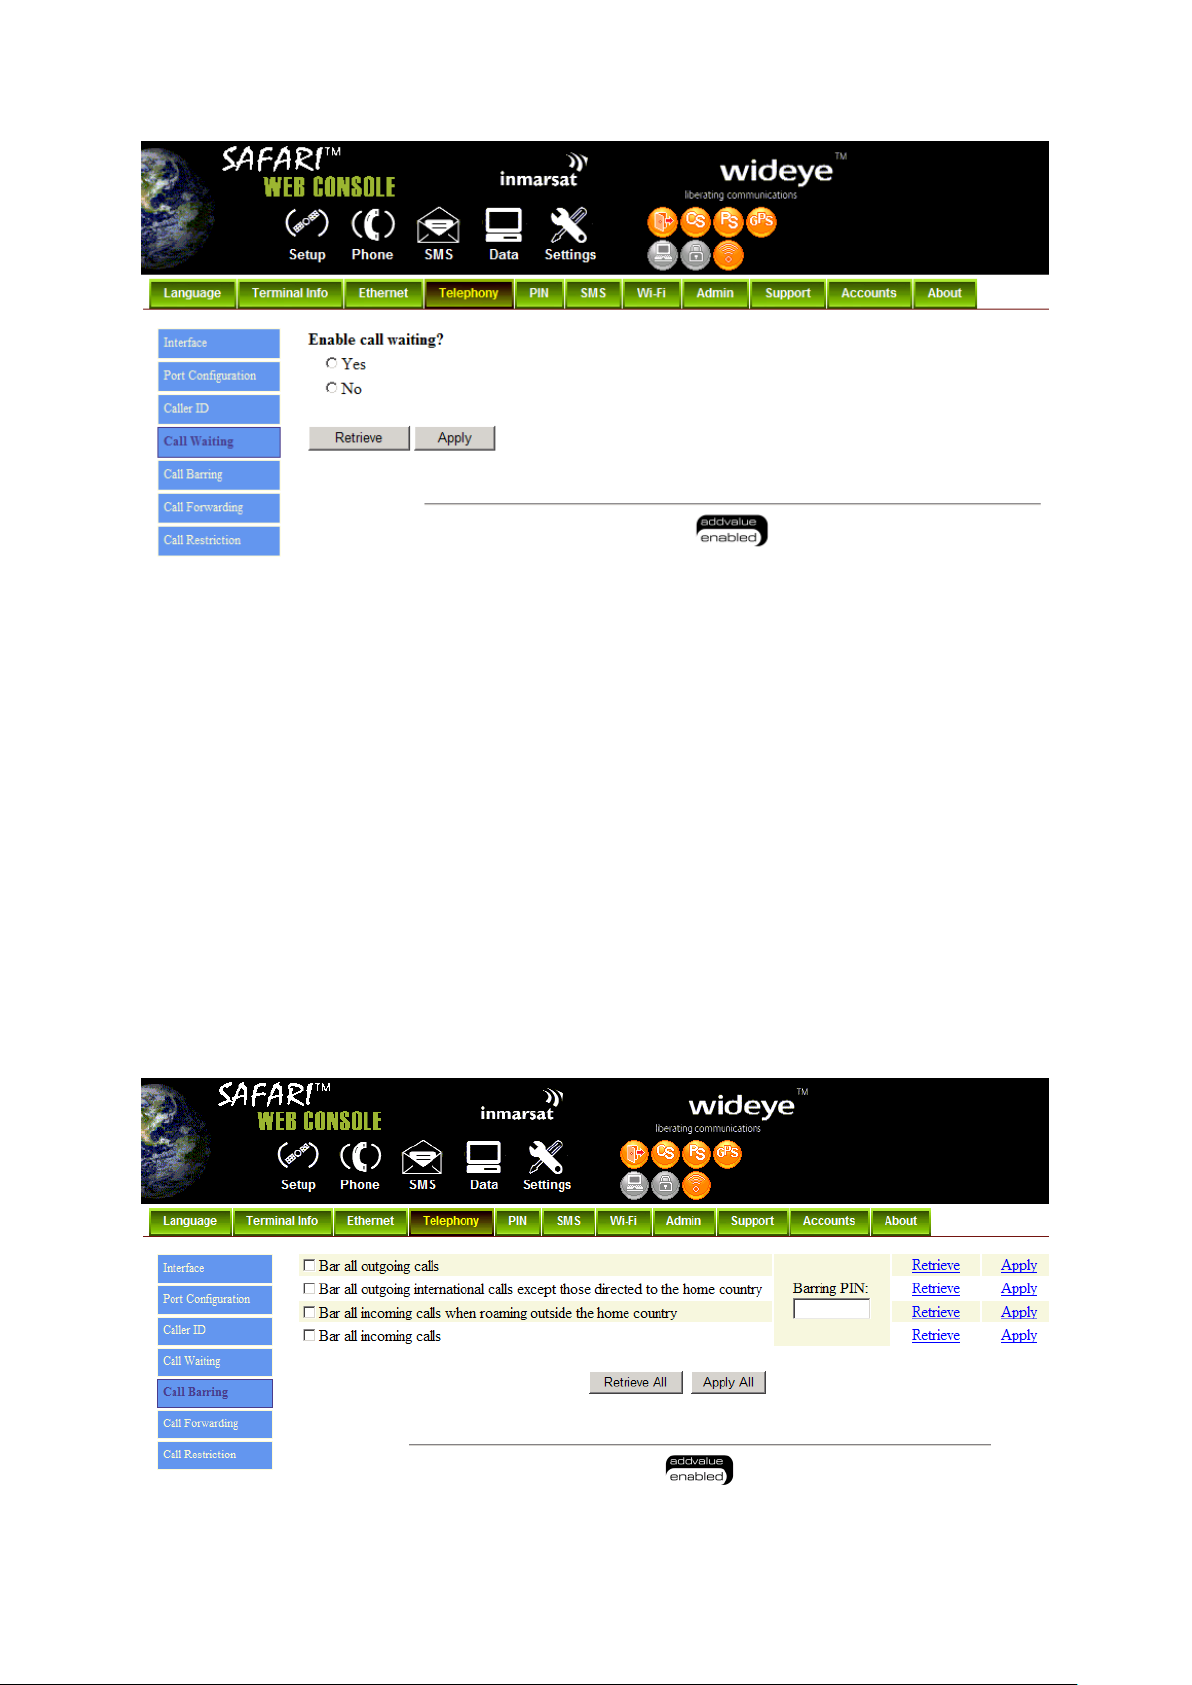
SAFARITM System User’s Guide
Call Barring
1. Click any individual Retrieve option to get the current setting of the corresponding
scenario in which the calls would be barred.
2. Select the scenario in which the calls would be barred, or deselect the scenario to
disable the corresponding call barring.
3. In the Barring PIN field, input a PIN for call barring setup.
4. Click Apply to allow the corresponding setting to take effect.
5. Clicking Retriever All will retrieve the current settings of all four call barring scenarios
at the same time.
6. Clicking Apply All will allow the settings of all four call barring scenarios to take effect
at the same time.
Call Forwarding
33
Page 82
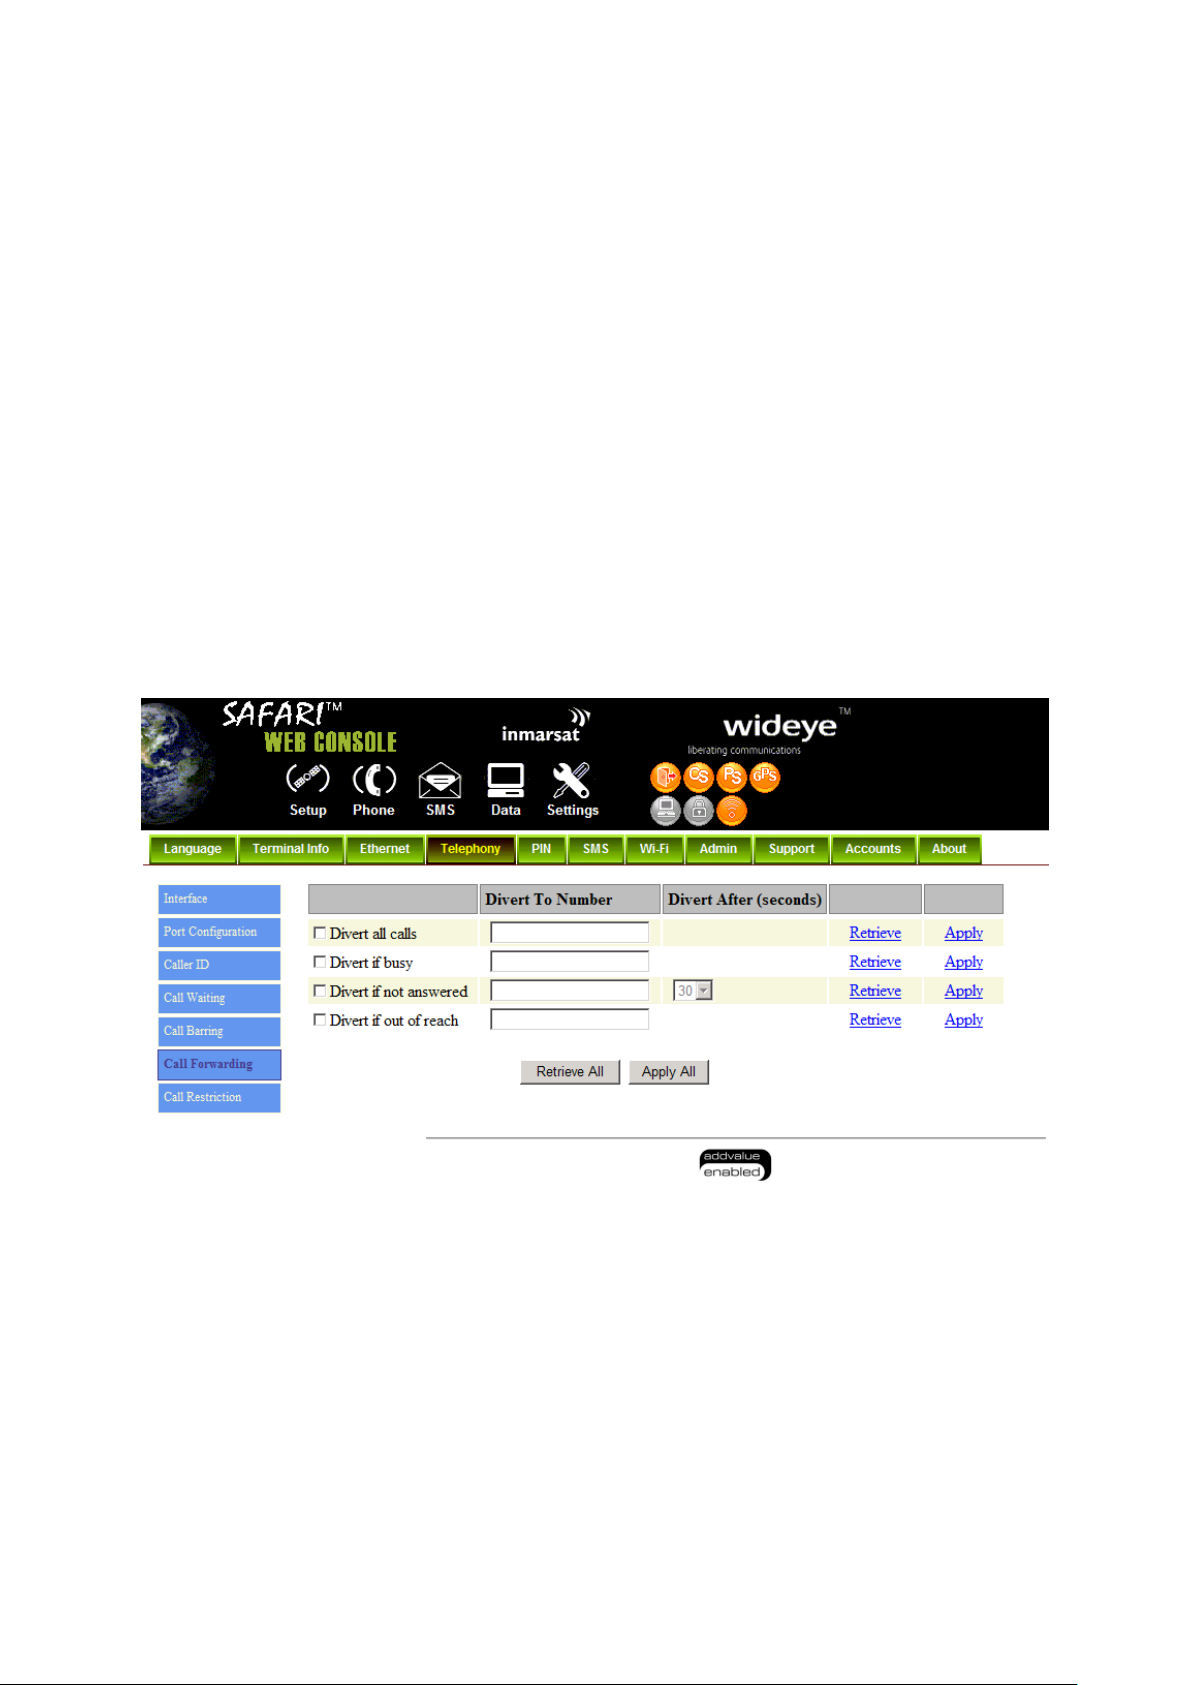
SAFARITM System User’s Guide
1. Click any individual Retrieve option to get current setting of the corresponding
scenario in which incoming calls would be forwarded.
2. Select the scenario in which the calls should be forwarded, or deselect the scenario
to disable the corresponding call forwarding setting.
3. In the Divert to Number field, input the phone number where the incoming calls
should be forwarded to (+<country code><telephone number>).
4. If the Divert if not answered option is selected, select from the Divert After
(seconds) drop-down list, the period of time the network should wait before
forwarding the calls.
5. Click Apply to allow the setting to take effect.
6. Clicking Retriever All will retrieve the current settings of all four scenarios in which
the calls would be forwarded, at the same time.
7. Clicking Apply All will allow the settings of all four scenarios to take effect at the
same time.
Call Restriction
1. Select “Enabled” or “Disabled” to activate or deactivate call restriction respectively.
2. Select “Call List” or “Phonebook” to choose which directory you want to be restricted
by.
3. Select “Allowed List” or “Block List” for each of the 3 ports to choose if that particular
port numbers are the allowed or block list.
4.
34
Page 83
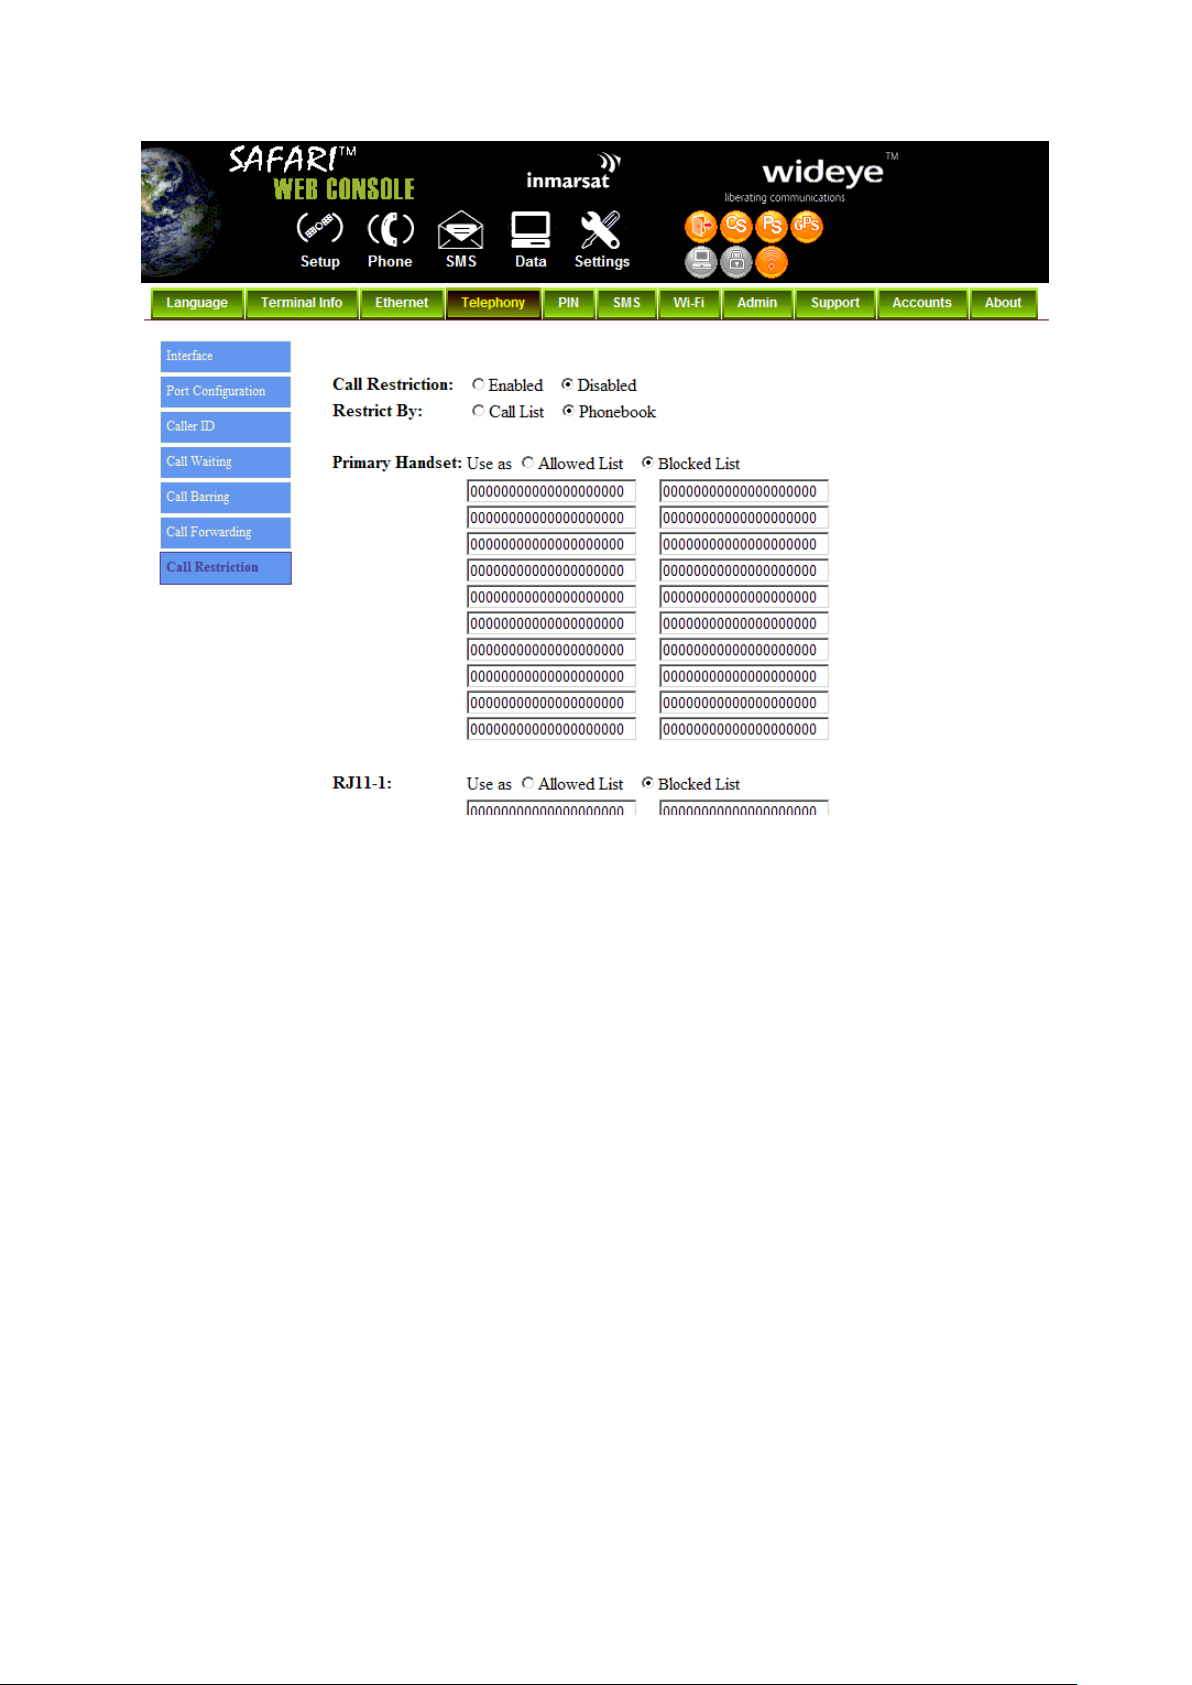
SAFARITM System User’s Guide
PIN
Transceiver PIN
1. Click Transceiver PIN to configure the Transceiver PIN settings.
2. Select Disabled if you do not need to set the Transceiver PIN.
3. Select Enabled to set the Transceiver PIN.
4. Enter the PIN number in the Enter PIN filed and click Update PIN.
Follow these steps to change the Transceiver PIN:
1. Enter the old PIN number in the Enter Old PIN field.
2. Enter the new PIN number in the Enter New PIN field.
3. Re-enter the new PIN number in the Re-enter New PIN field.
4. Click Change PIN Password.
The Transceiver PIN is now changed.
Note: The default Transceiver PIN is “0000”
35
Page 84
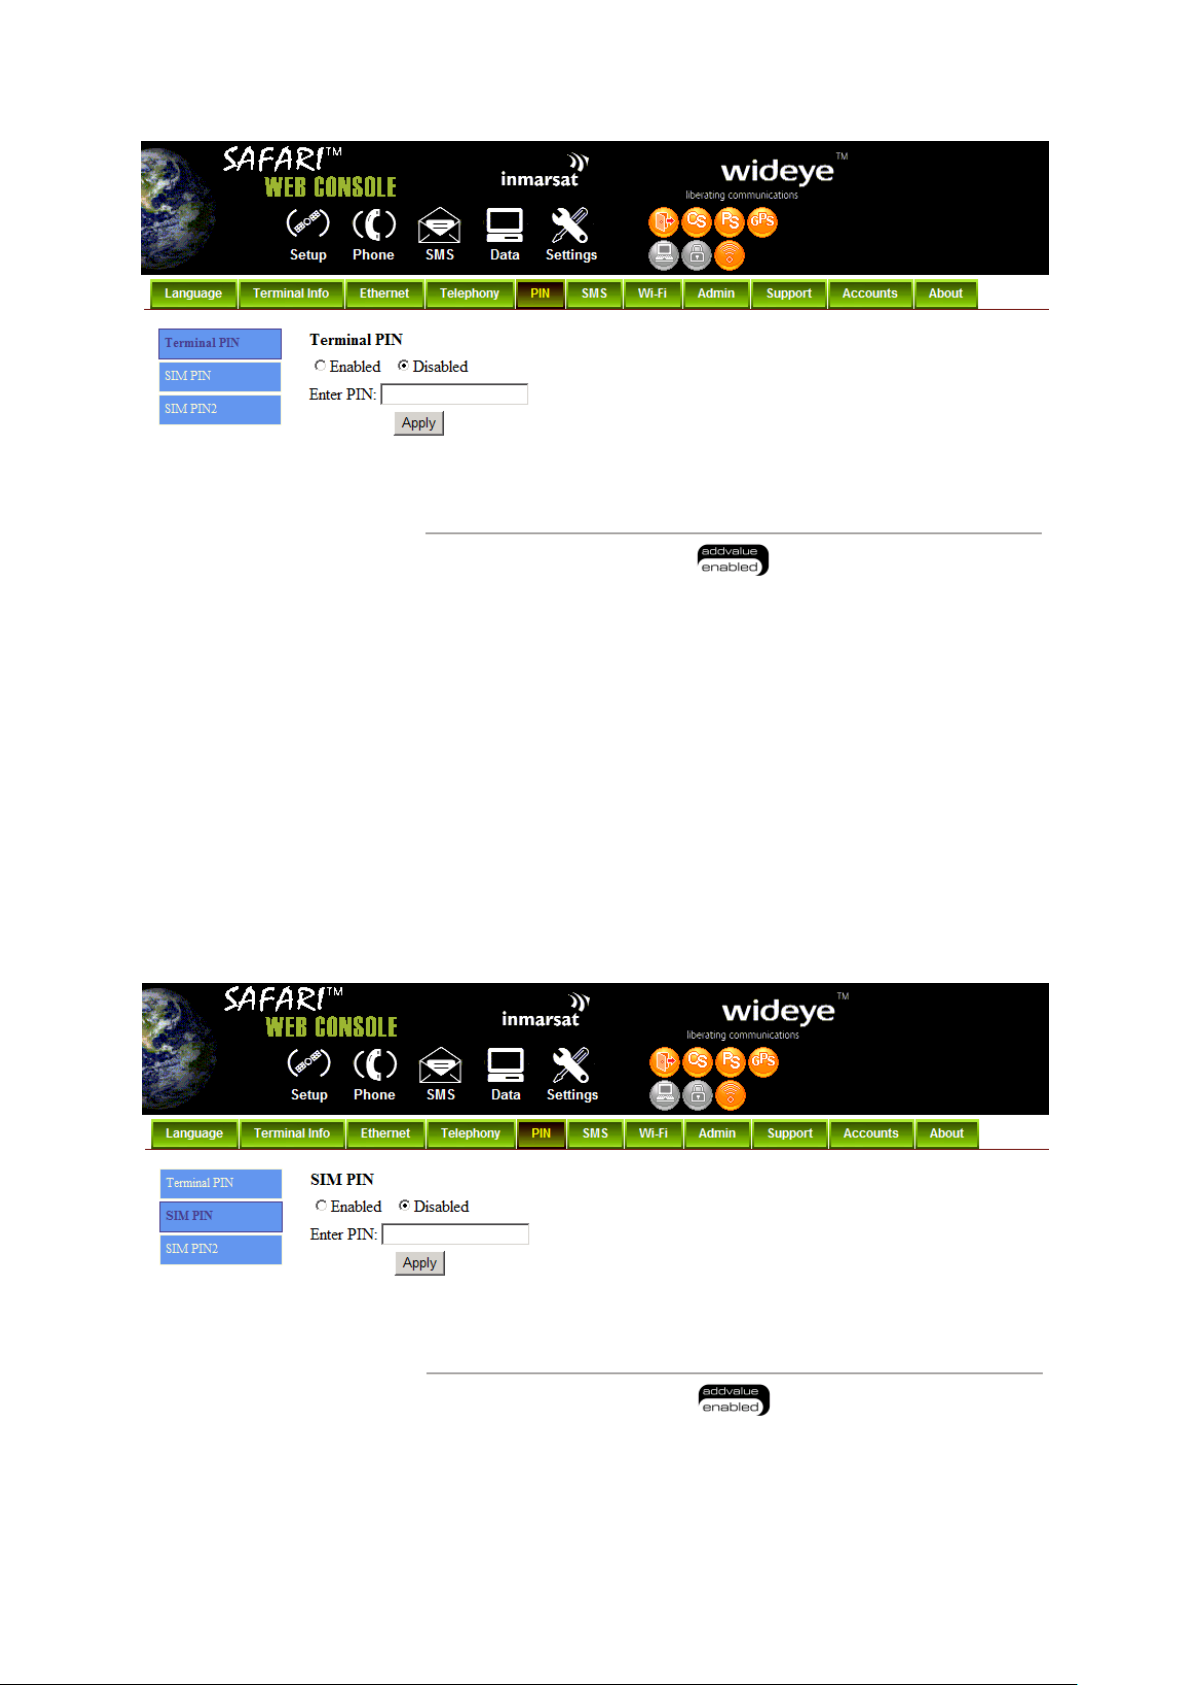
SAFARITM System User’s Guide
SIM PIN
1. Click SIM PIN to configure the SIM PIN settings.
2. Select Disabled if you do not need to set the SIM PIN.
3. Select Enabled to set the SIM PIN.
4. Enter the PIN number in the space provided and click Update PIN.
Note: The SIM PIN depends on the SIM card. Consult your equipment distributor if
necessary.
36
Page 85
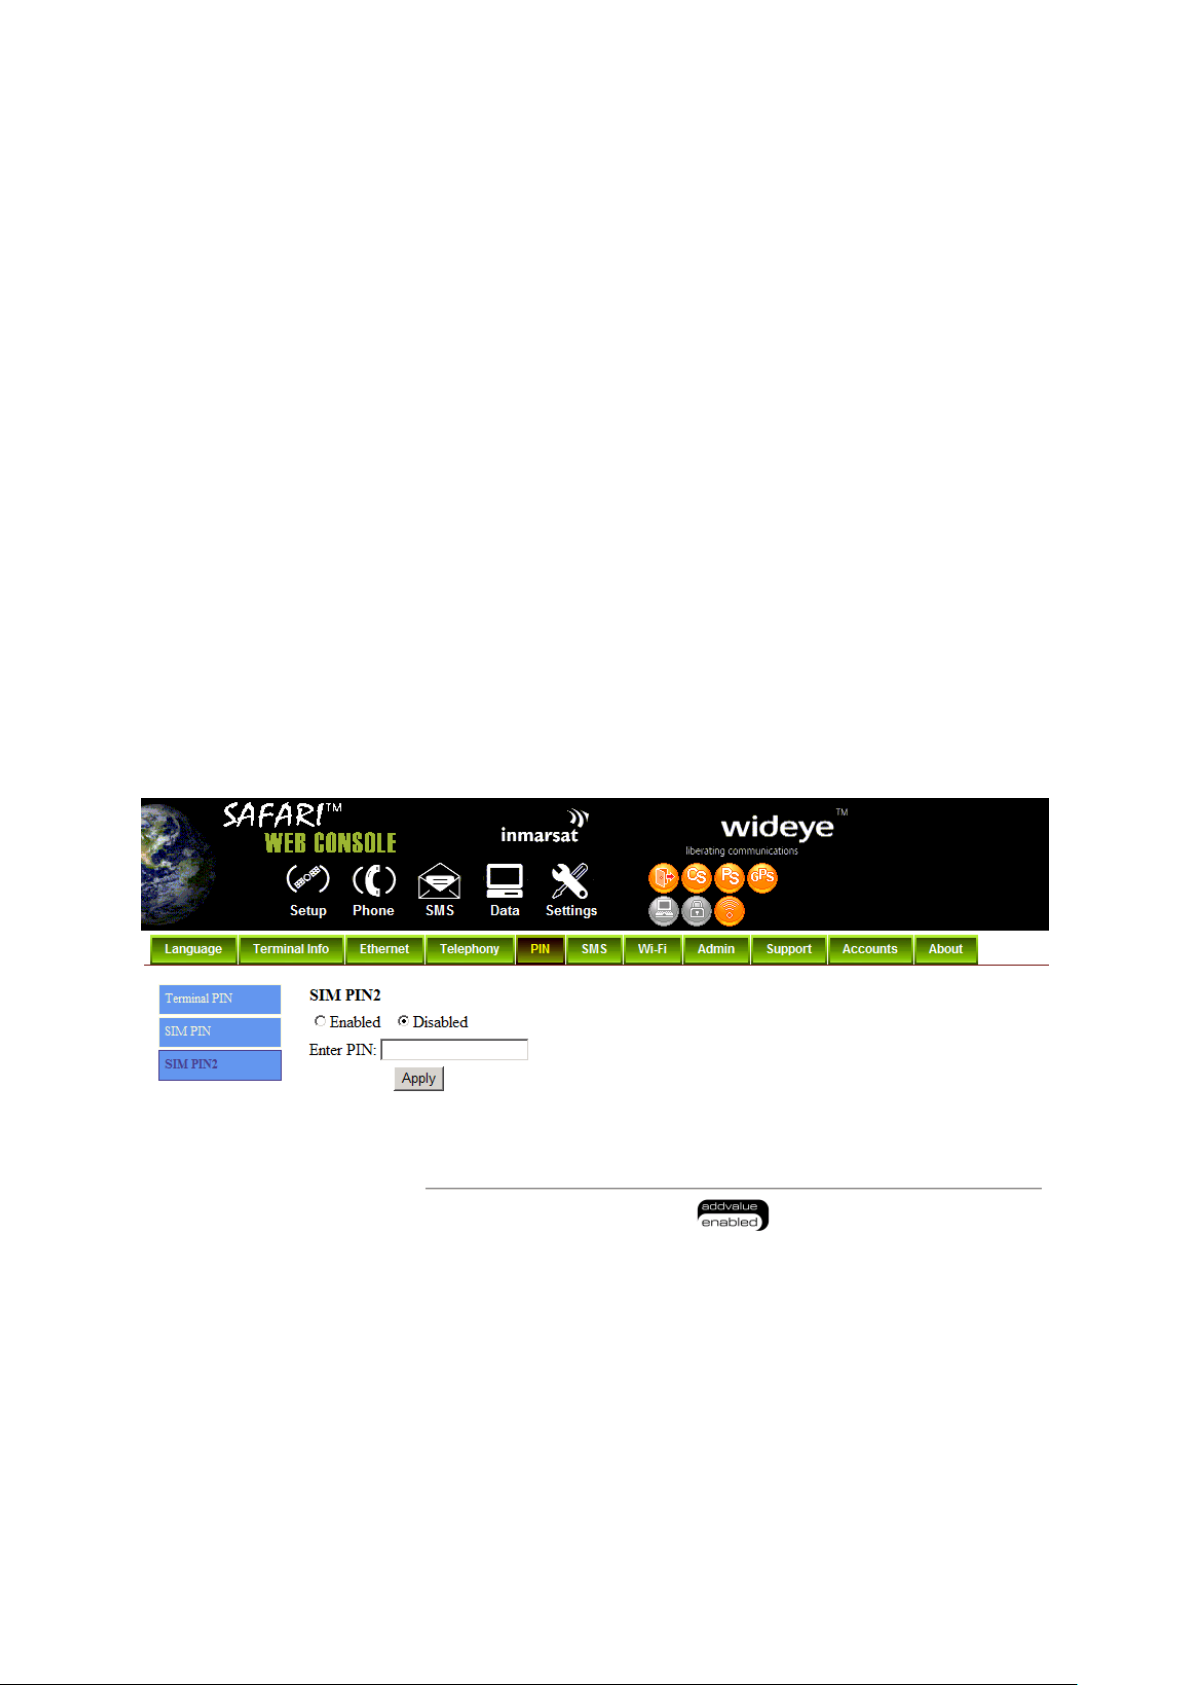
SAFARITM System User’s Guide
SIM PIN2
1. Click SIM PIN2 to configure the SIM PIN2 settings.
2. Select Disabled if you do not need to set the SIM PIN2.
3. Select Enabled to set the SIM PIN2.
4. Enter the PIN number in the space provided and click Update PIN.
Follow these steps to change the PIN Password:
5. Enter the old PIN number in the Enter Old PIN field.
6. Enter the new PIN number in the Enter New PIN field.
7. Re-enter the new PIN number in the Re-enter New PIN field.
8. Click Change PIN Password.
The Transceiver PIN is now changed.
Note: The SIM PIN2 depends on the SIM card. Consult your equipment distributor if
necessary.
37
Page 86
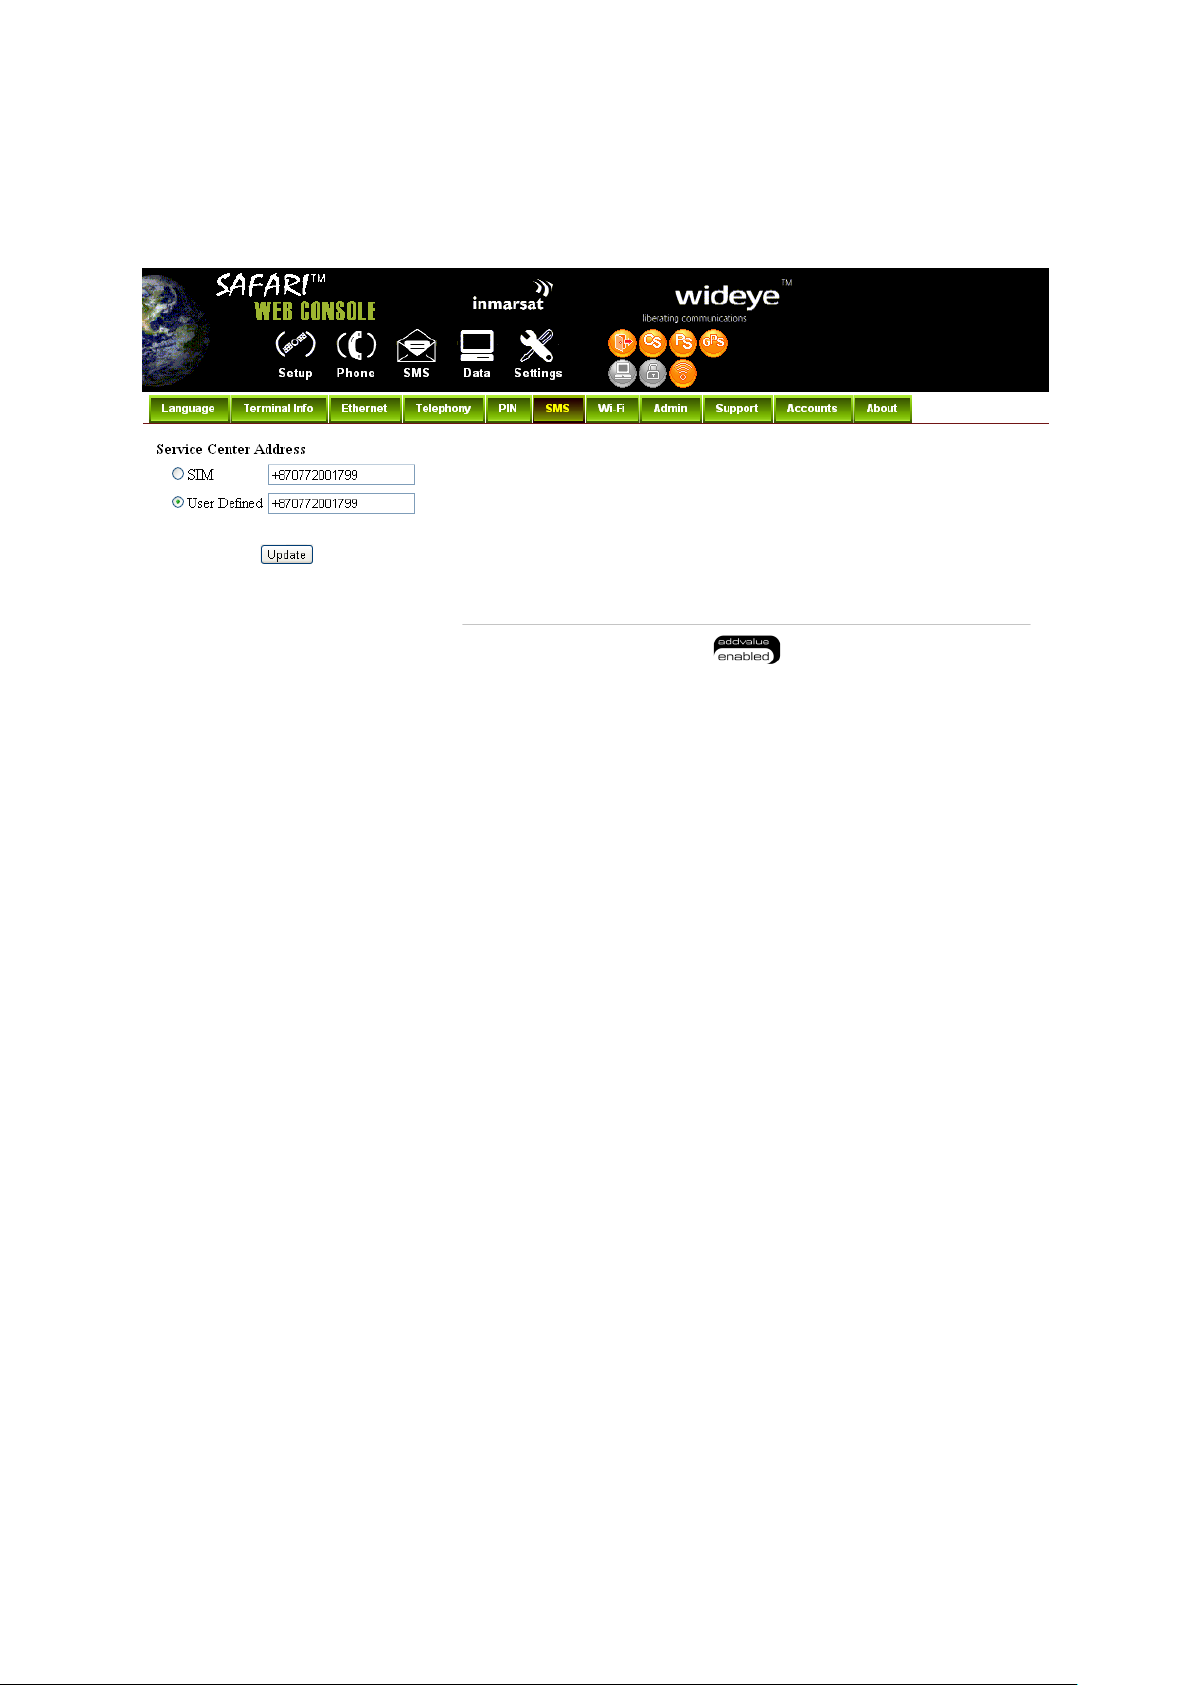
SAFARITM System User’s Guide
SMS
To change the SMS service Center Address number, enter the new number in the space
provided and click Update.
Note:
Please contact your distributor or service provider if you do not know the Service
Center Address.
38
Page 87
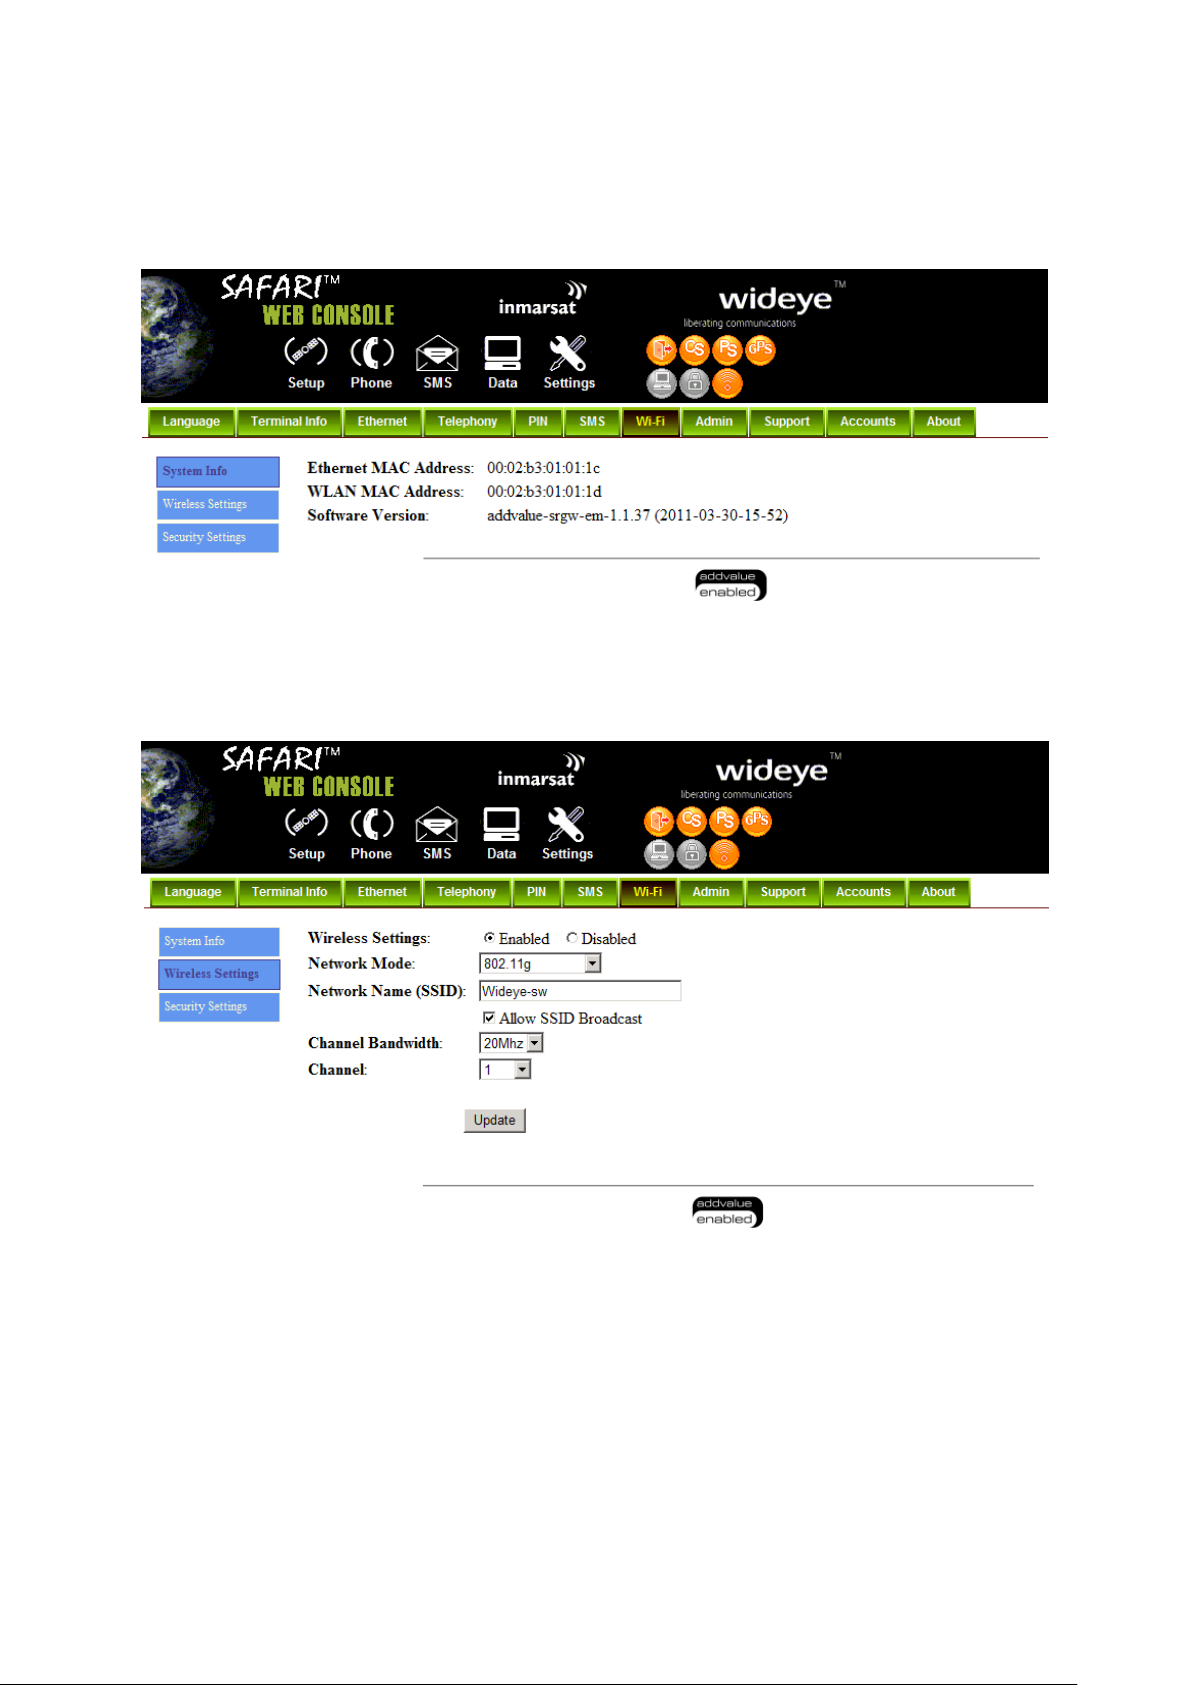
SAFARITM System User’s Guide
Wi-Fi Module Configuration
System info
1. Shows you software version and mac address.
Wireless Settings
1. Allow you to enable/disable wireless connection.
2. Choose ideal network mode, channel bandwidth and channel.
3. Allow you to name your network.
39
Page 88
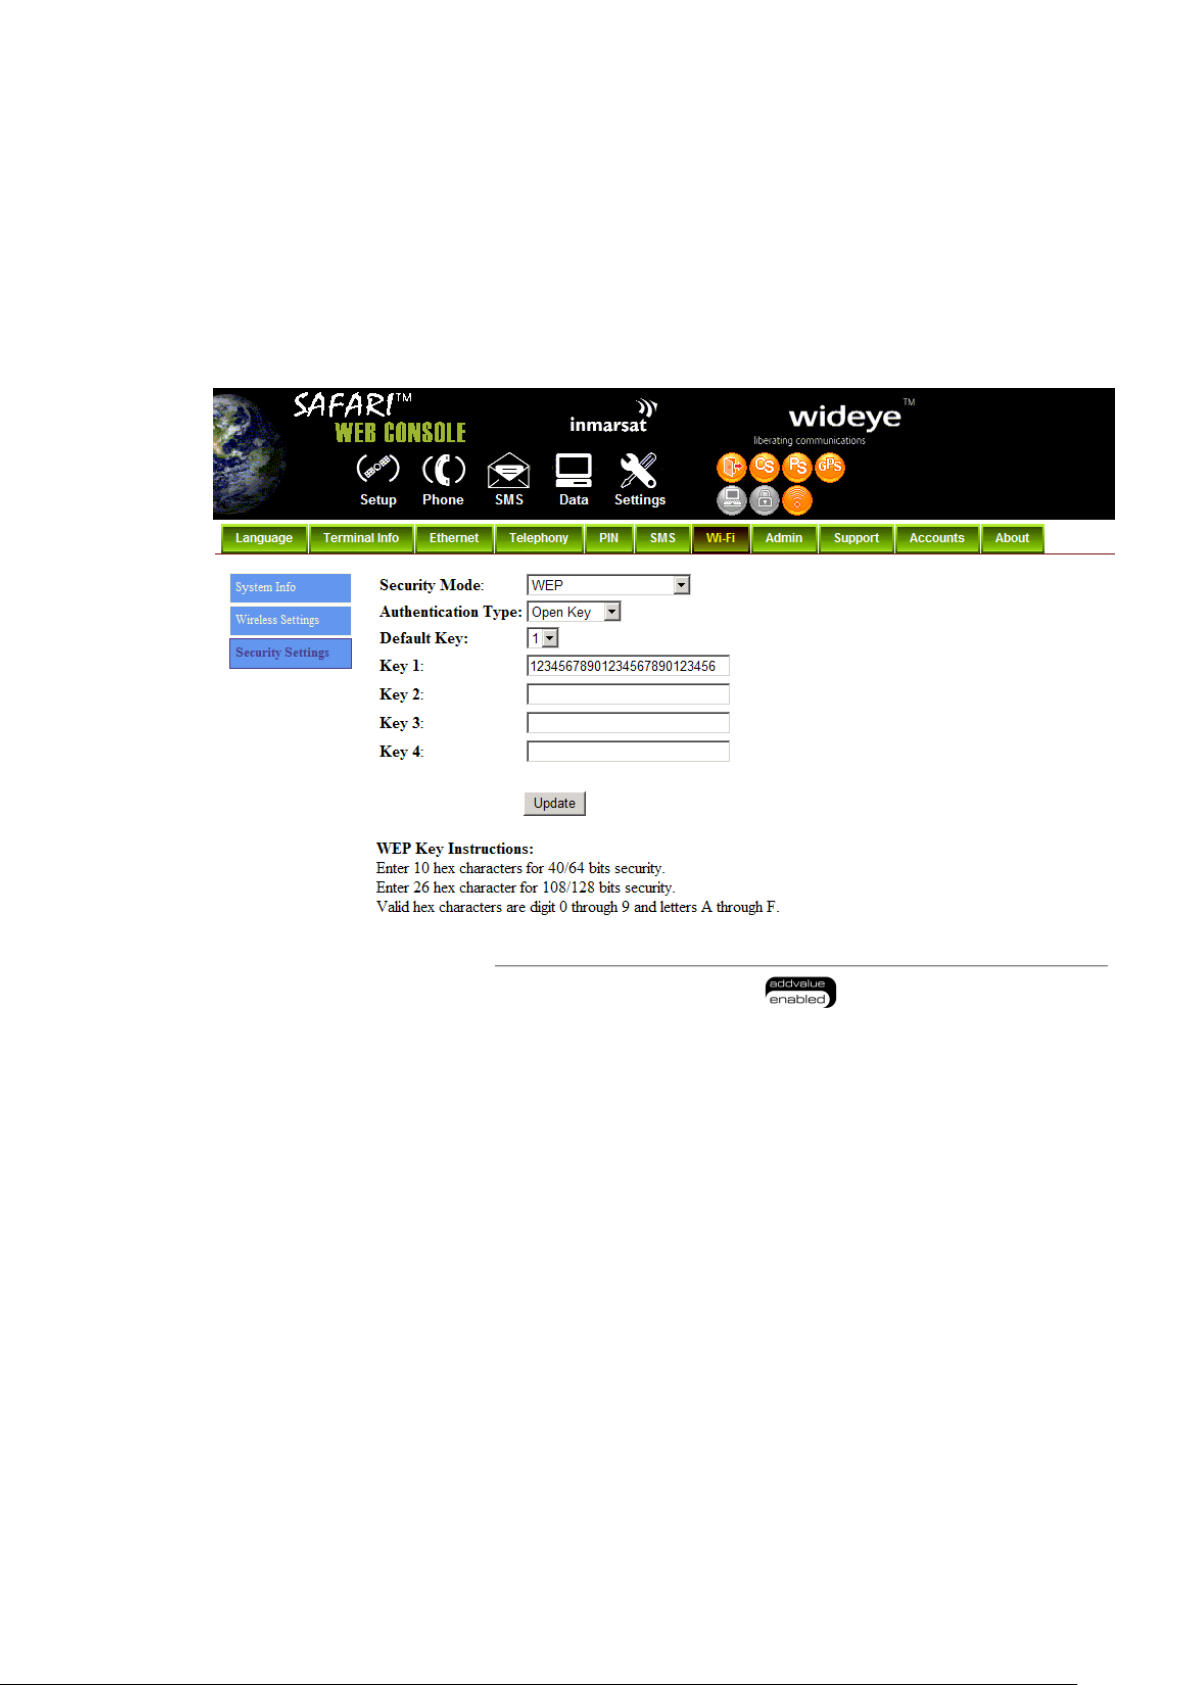
SAFARITM System User’s Guide
Security Settings
Follow the steps to configure the security settings of the Wi-Fi module.
1. Select the security mode and authentication key.
Note: There are four sets of security passwords available for your security configuration and
you can only select one set of password.
2. Select the default key to enable the desire password from “key 1” to “key 4”
respectively.
40
Page 89
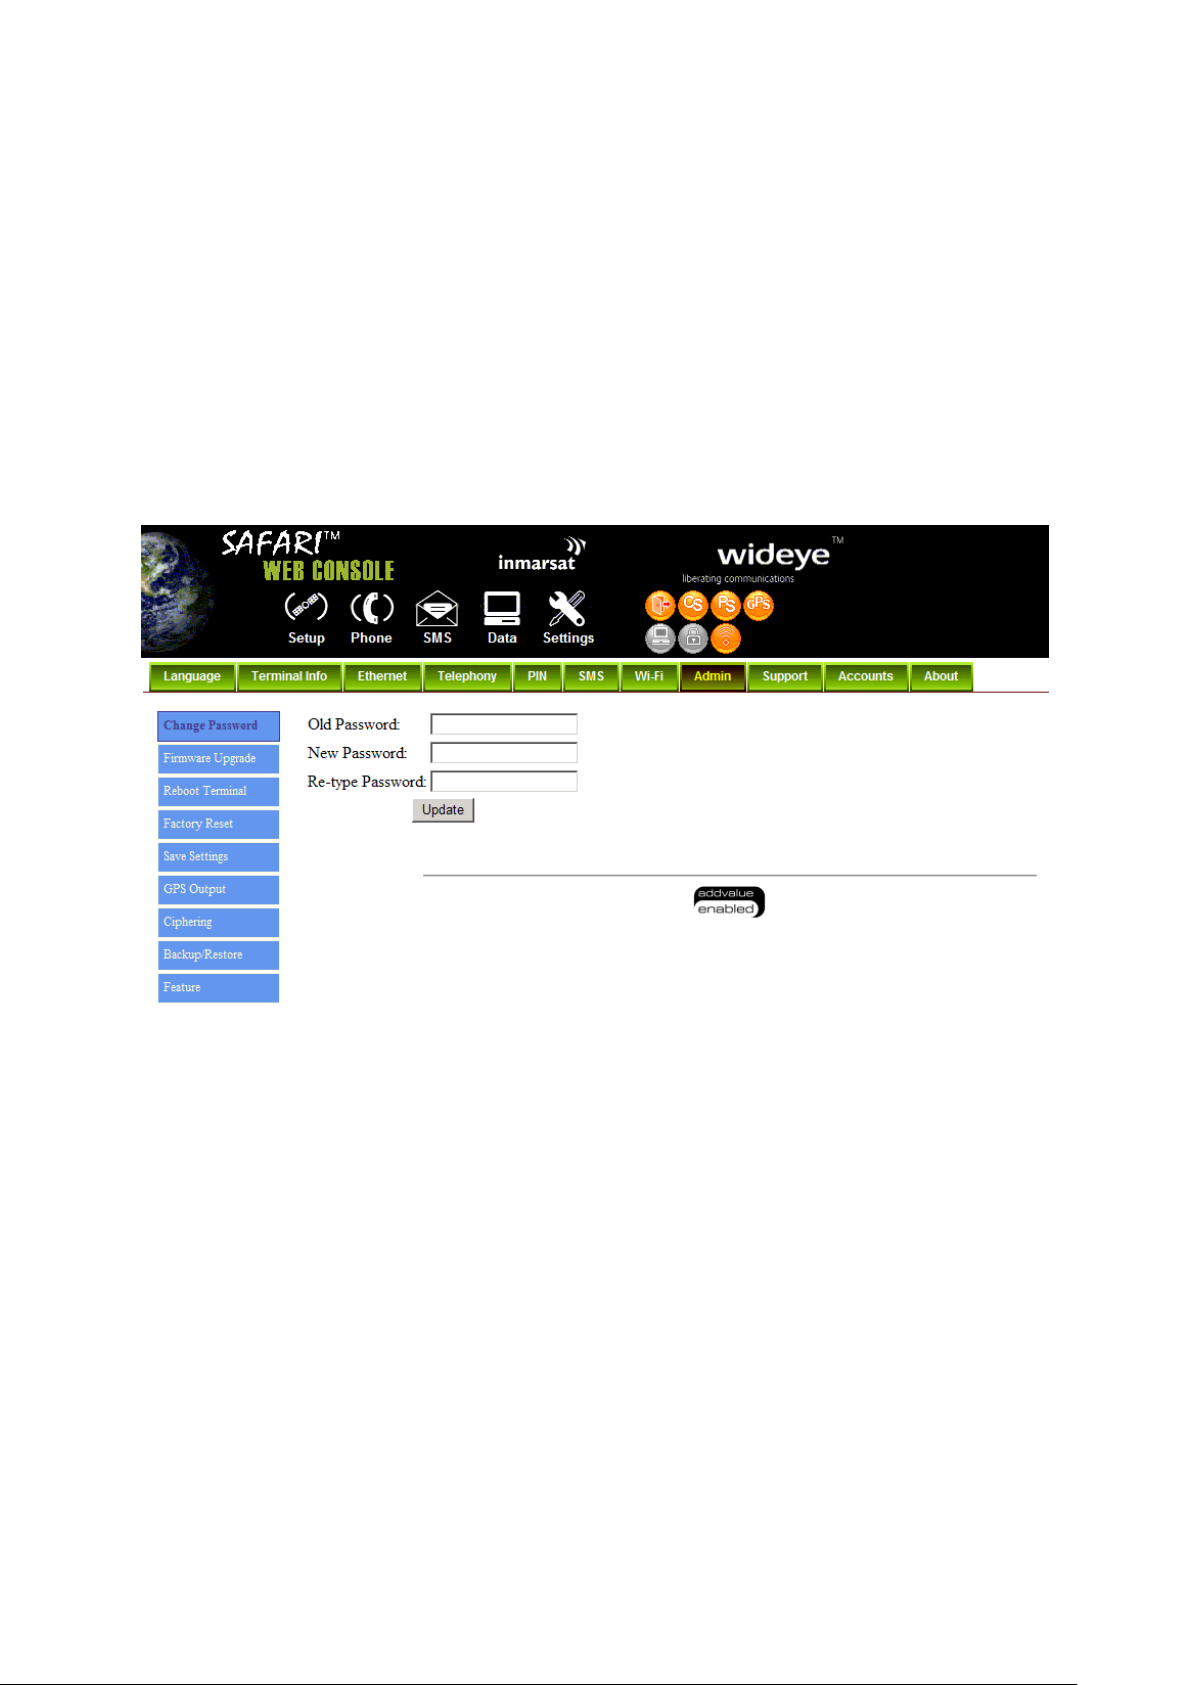
SAFARITM System User’s Guide
Admin
Change Password
Follow these steps to change the Web Console login Password:
1. Enter the old password in the Old Password field.
2. Enter the new password in the New Password field.
3. Re-enter the new password in the Re-type Password field.
4. Click Update.
The Web Console login password is now changed.
41
Page 90
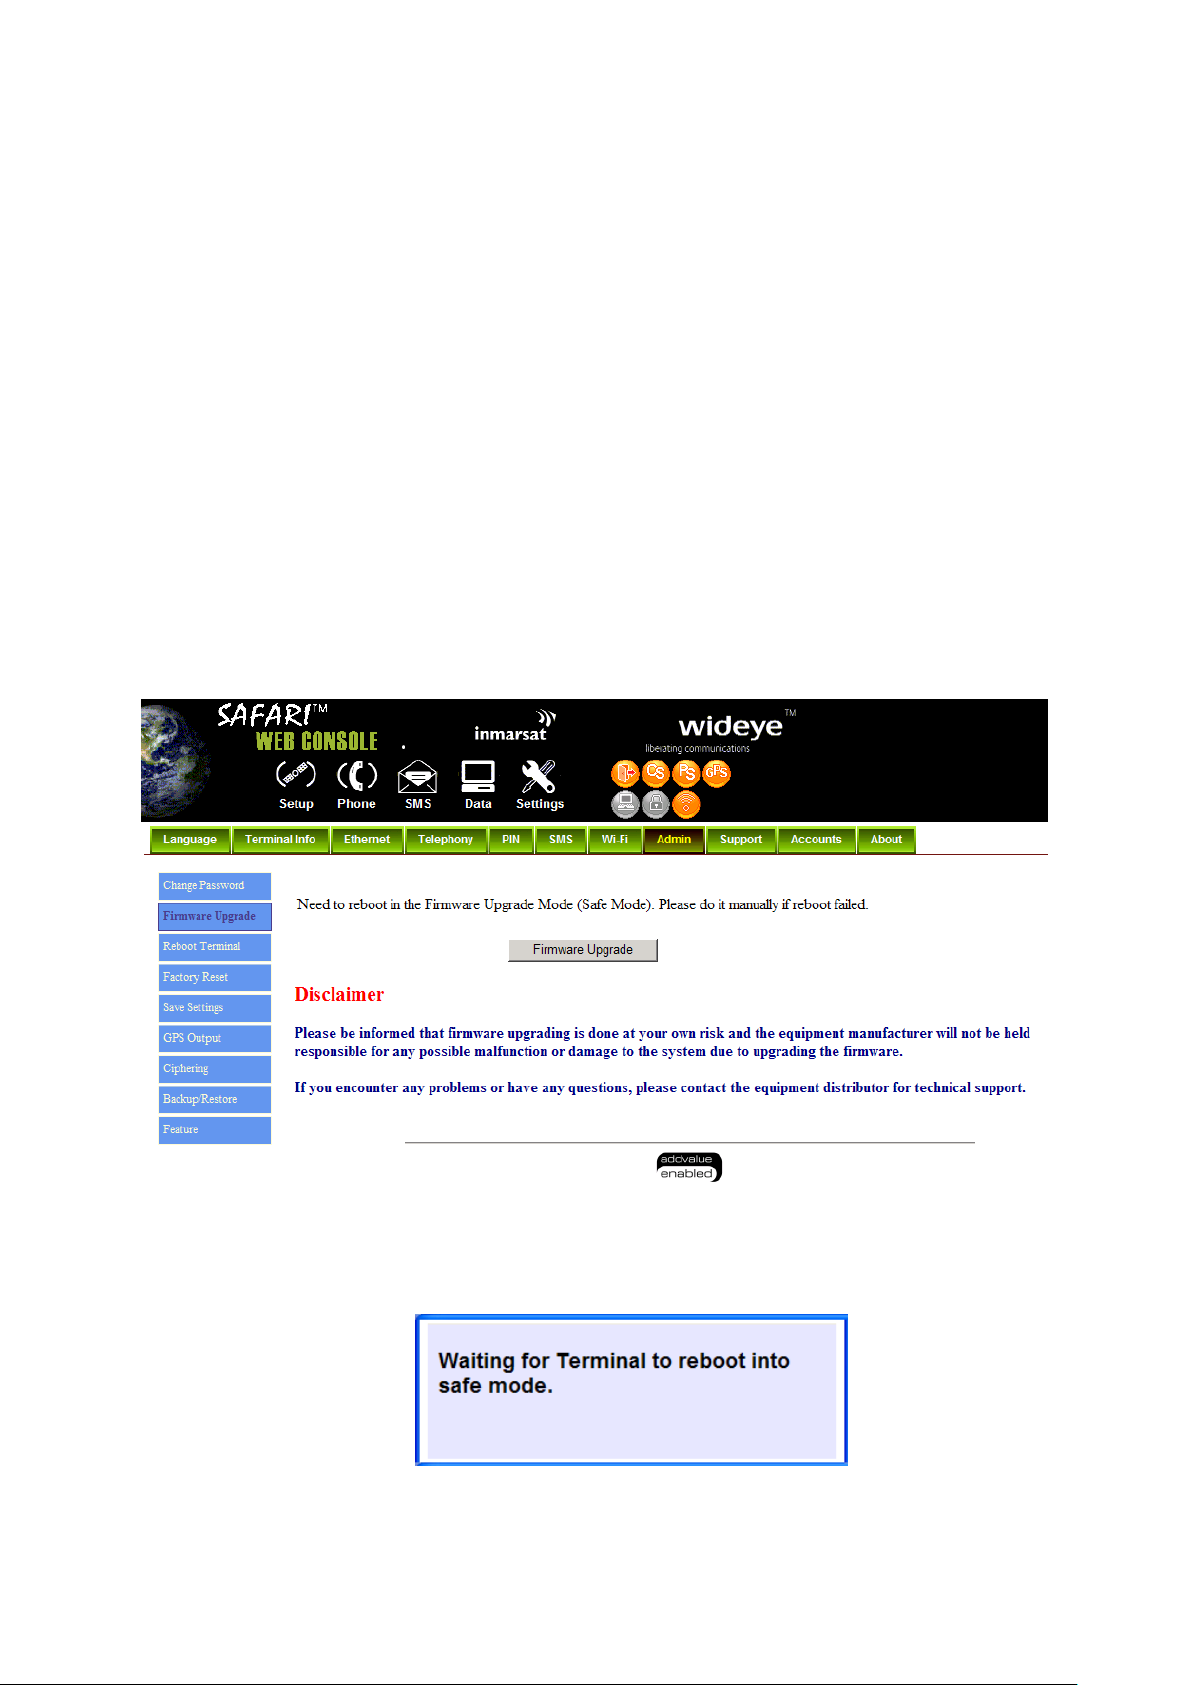
SAFARITM System User’s Guide
Firmware Upgrade
Firmware upgrade is to update your SAFARI UE with the latest firmware. Please refer to your
respective distributor for your firmware download.
Warning:
DO NOT abort the upgrading process or unplug the power of the SAFARI UE during
the firmware upgrade process at any time. Doing so will corrupt the existing firmware
loaded onto the SAFARI UE.
Follow these steps to upgrade the firmware for your SAFARI UE:
1. Download or acquire the new firmware from your respective distributor and save it in
your computer‟s hard drive.
Note:
Make sure the SAFARI UE is switched on and connected to the desktop/laptop
computer using the LAN cable.
2. Select Firmware Upgrade.
Read the Disclaimer message carefully before proceeding with the Firmware
Upgrade.
3. Click Firmware Upgrade.
The SAFARI UE will reboot into Safe mode.
Note: All LEDs will turn to amber color and start blinking, which means it’s on
Safe mode.
4. The SAFARI Web console will appear. Re-log in using the provided username and
password.
42
Page 91
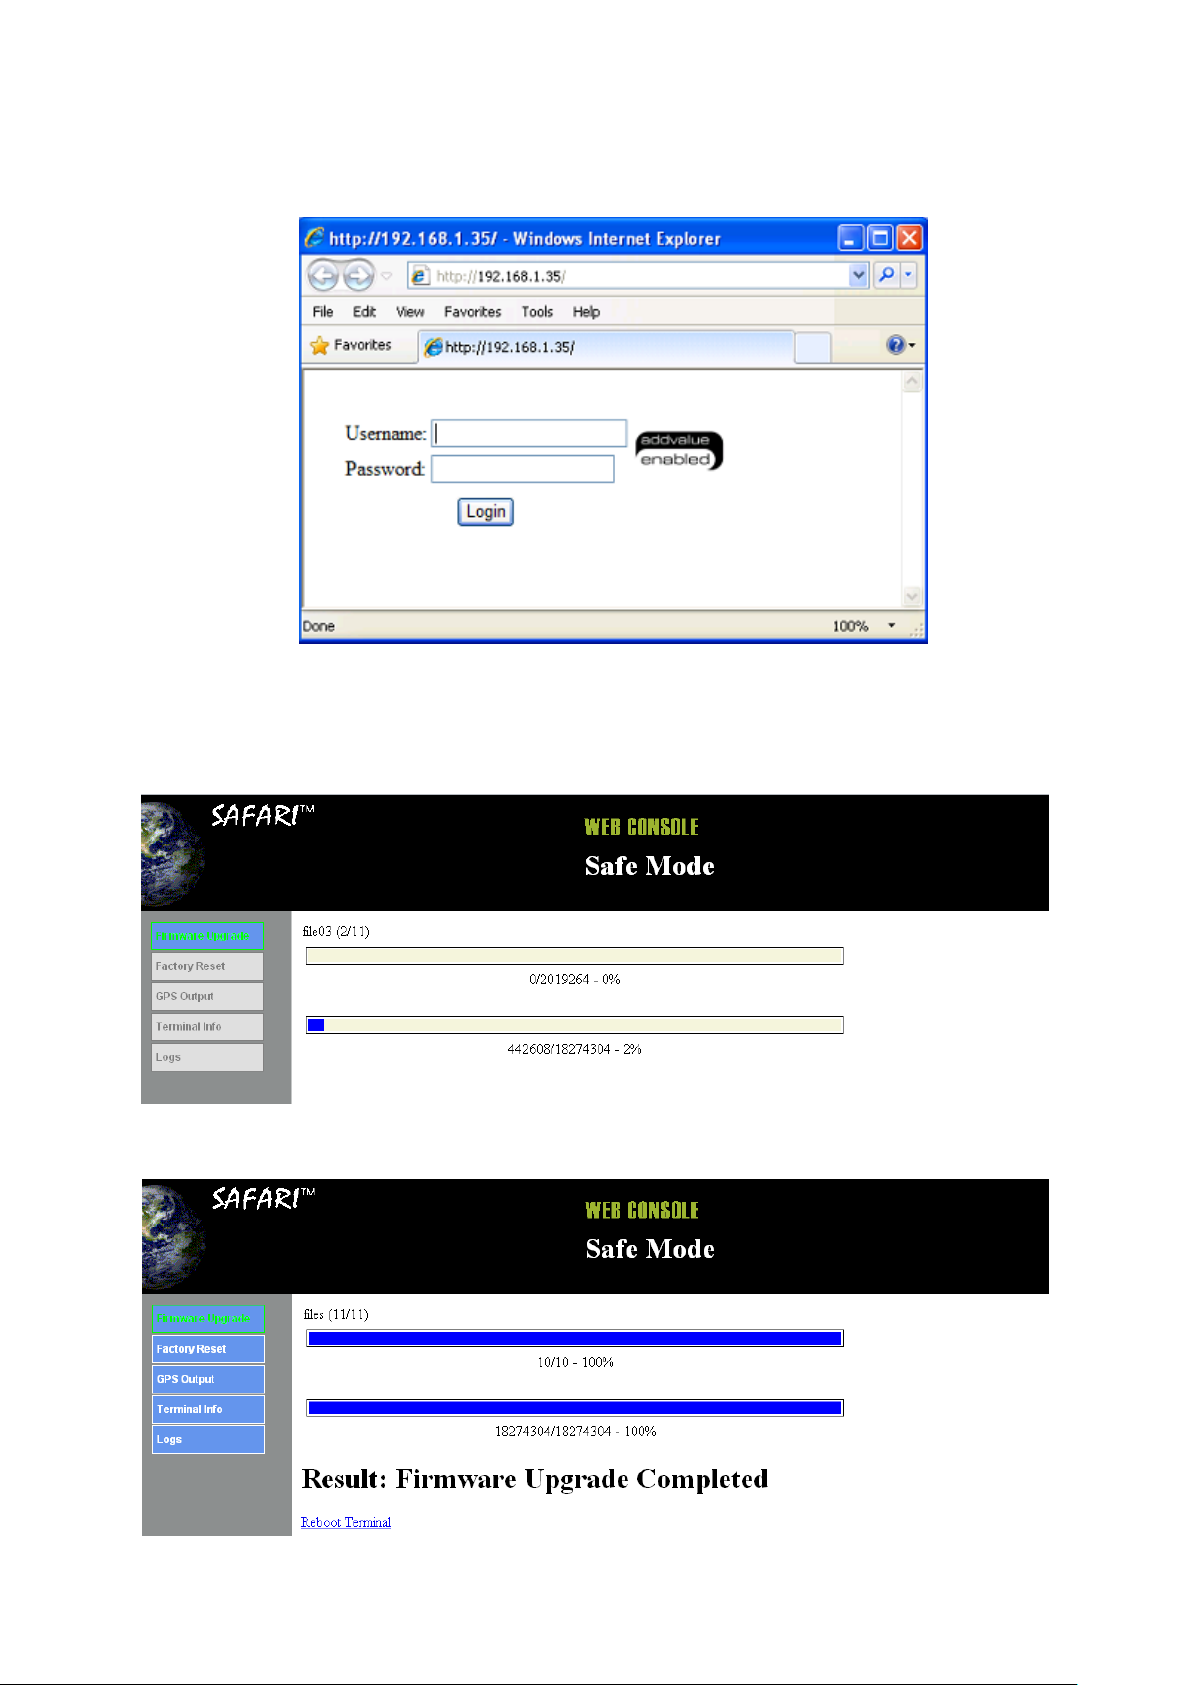
SAFARITM System User’s Guide
Note: If the Skipper web console didn’t appear, you can manually refresh the
web console by clicking the F5 on your keyboard.
5. Browse to the location of the new firmware, select, and click Upload.
6. Firmware upgrade will take approximately 10 to 12 minutes to complete.
You will be prompted with the Result: Firmware Upgrade Completed message.
7. Click Reboot Transceiver to reboot the SAFARI UE.
43
Page 92
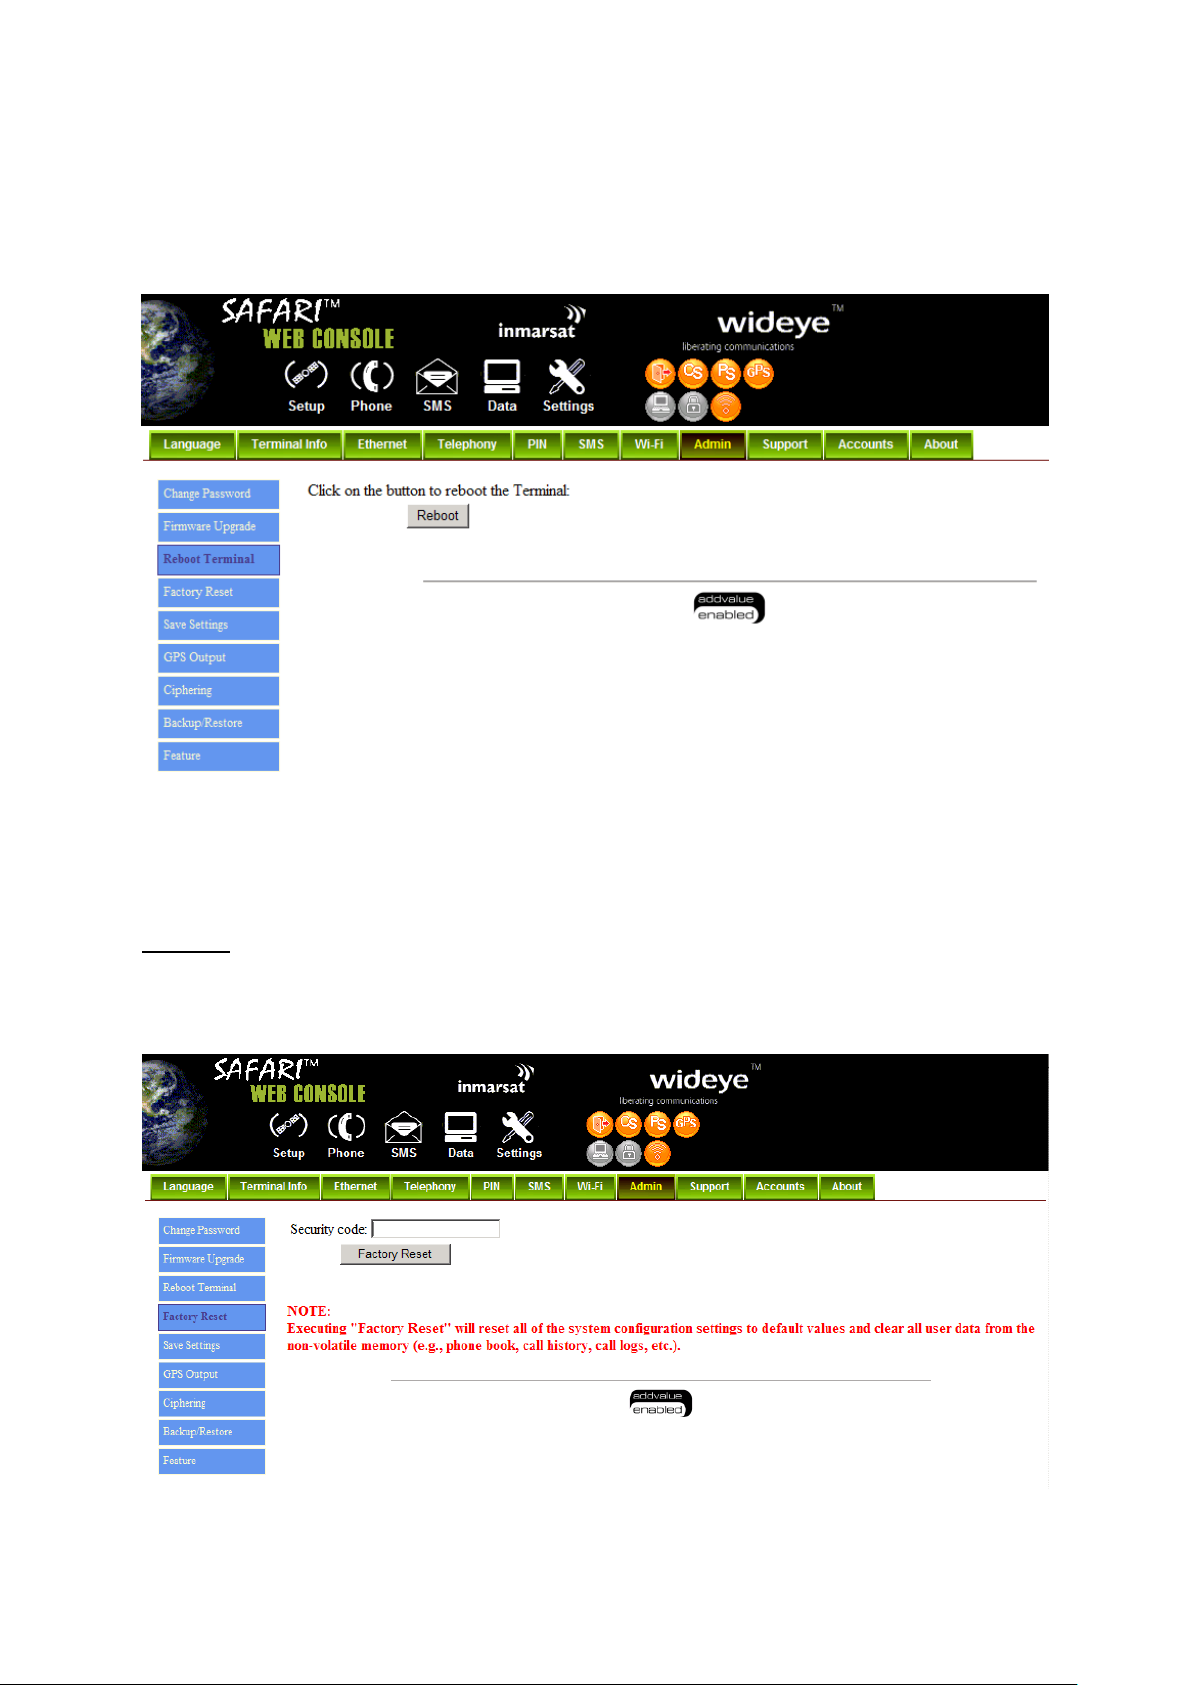
SAFARITM System User’s Guide
Reboot Transceiver
If you wish to reboot the SAFARI UE, click Reboot Transceiver. Click Reboot and wait for a
few minutes to allow the UE to reboot. Refresh your browser to update the Web Console
page after reboot.
Factory Reset
To perform a Factory Reset, enter the Security code 0000 and click Factory Reset.
Warning:
All the settings and user data (e.g., Phone Book, GPS, etc.) of the SAFARI UE will be
cleared and reset to the default settings. If you do not wish to lose critical user data
such as Phone Book, please use limited reset option available via Primary Handset
44
Page 93
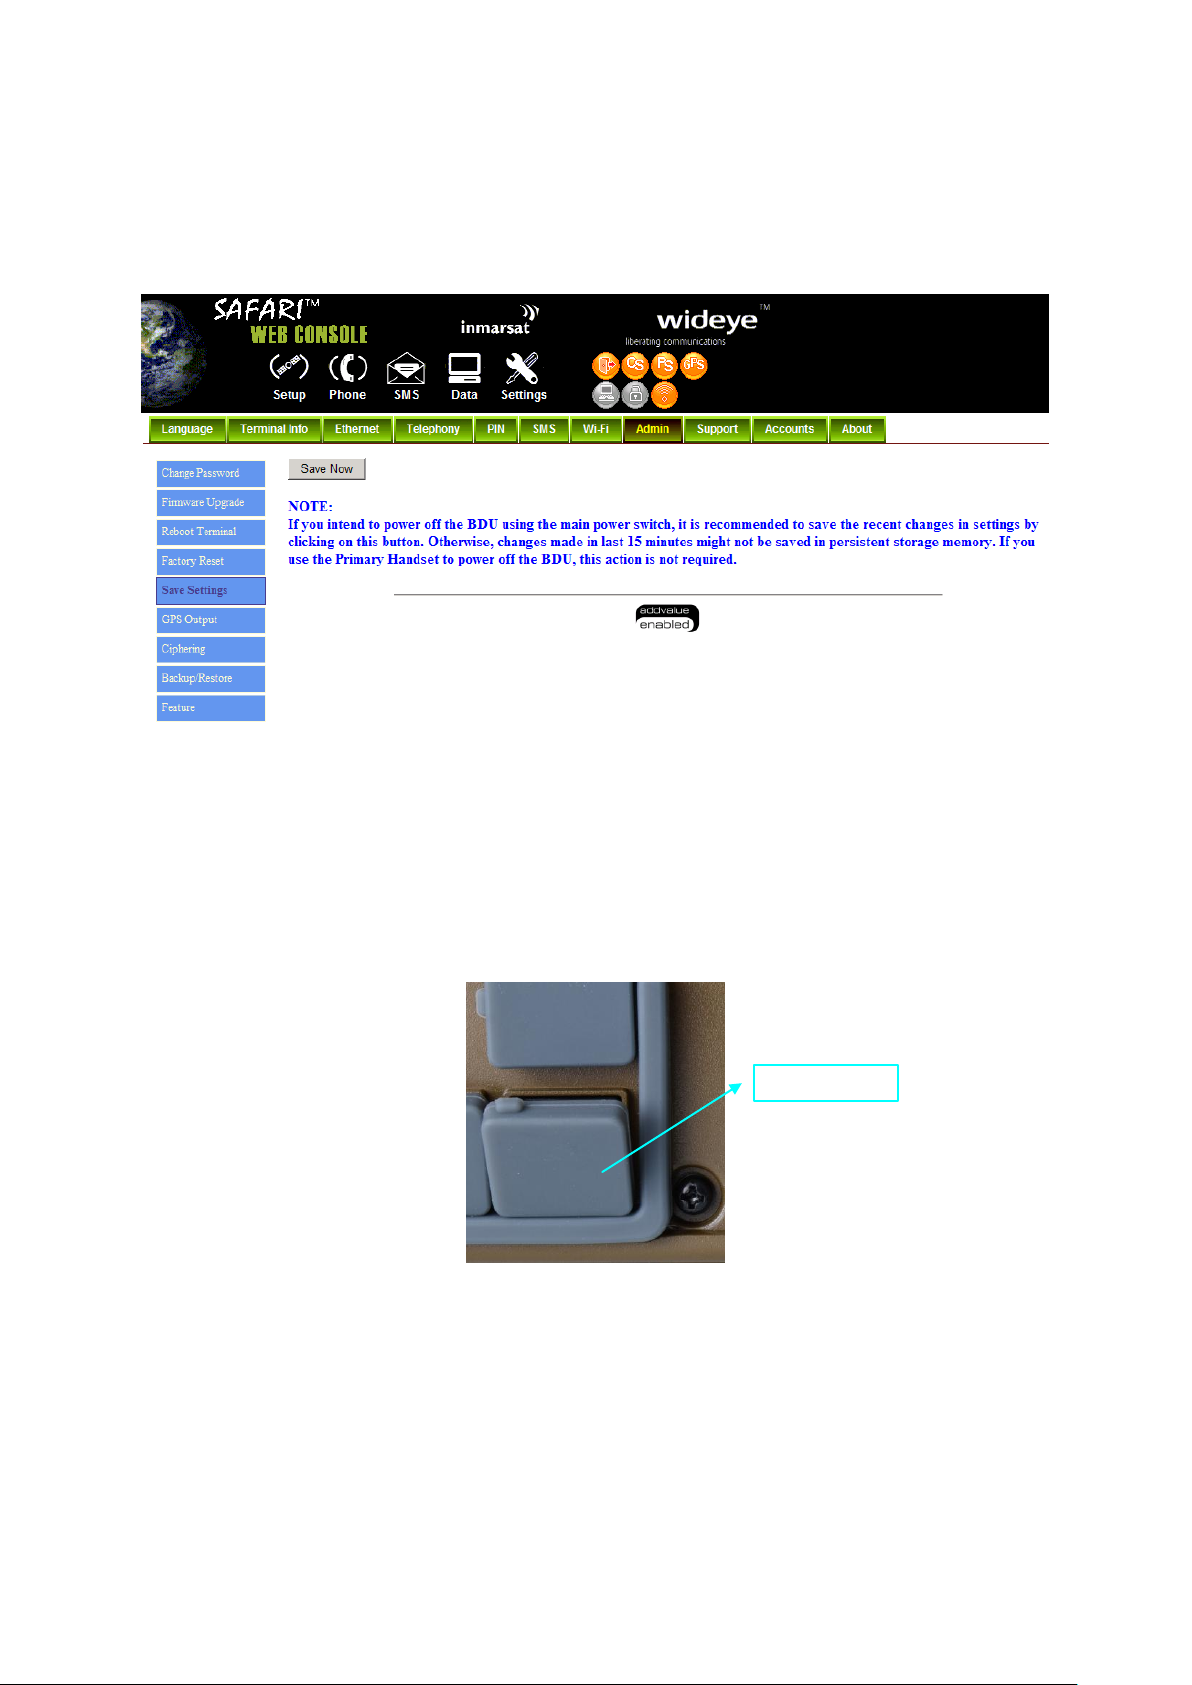
SAFARITM System User’s Guide
GPS output
Save Settings
To power down the SAFARI UE Transceiver Unit using the main power switch, it is
recommended to save the recent setting changes. To save the recent changes, click Save
Now.
GPS Output
By default, SAFARI UE Transceiver Unit outputs the GPS data in NMEA format (at 9600bps)
via the NMEA 0183 Connector for GPS output. For technician who wants to diagnose the
system, he/she may collect the debug log messages by selecting Output Debug Log. Since
the debug mode is not required for normal users, it is recommended not to make any
changes to this setting.
45
Page 94
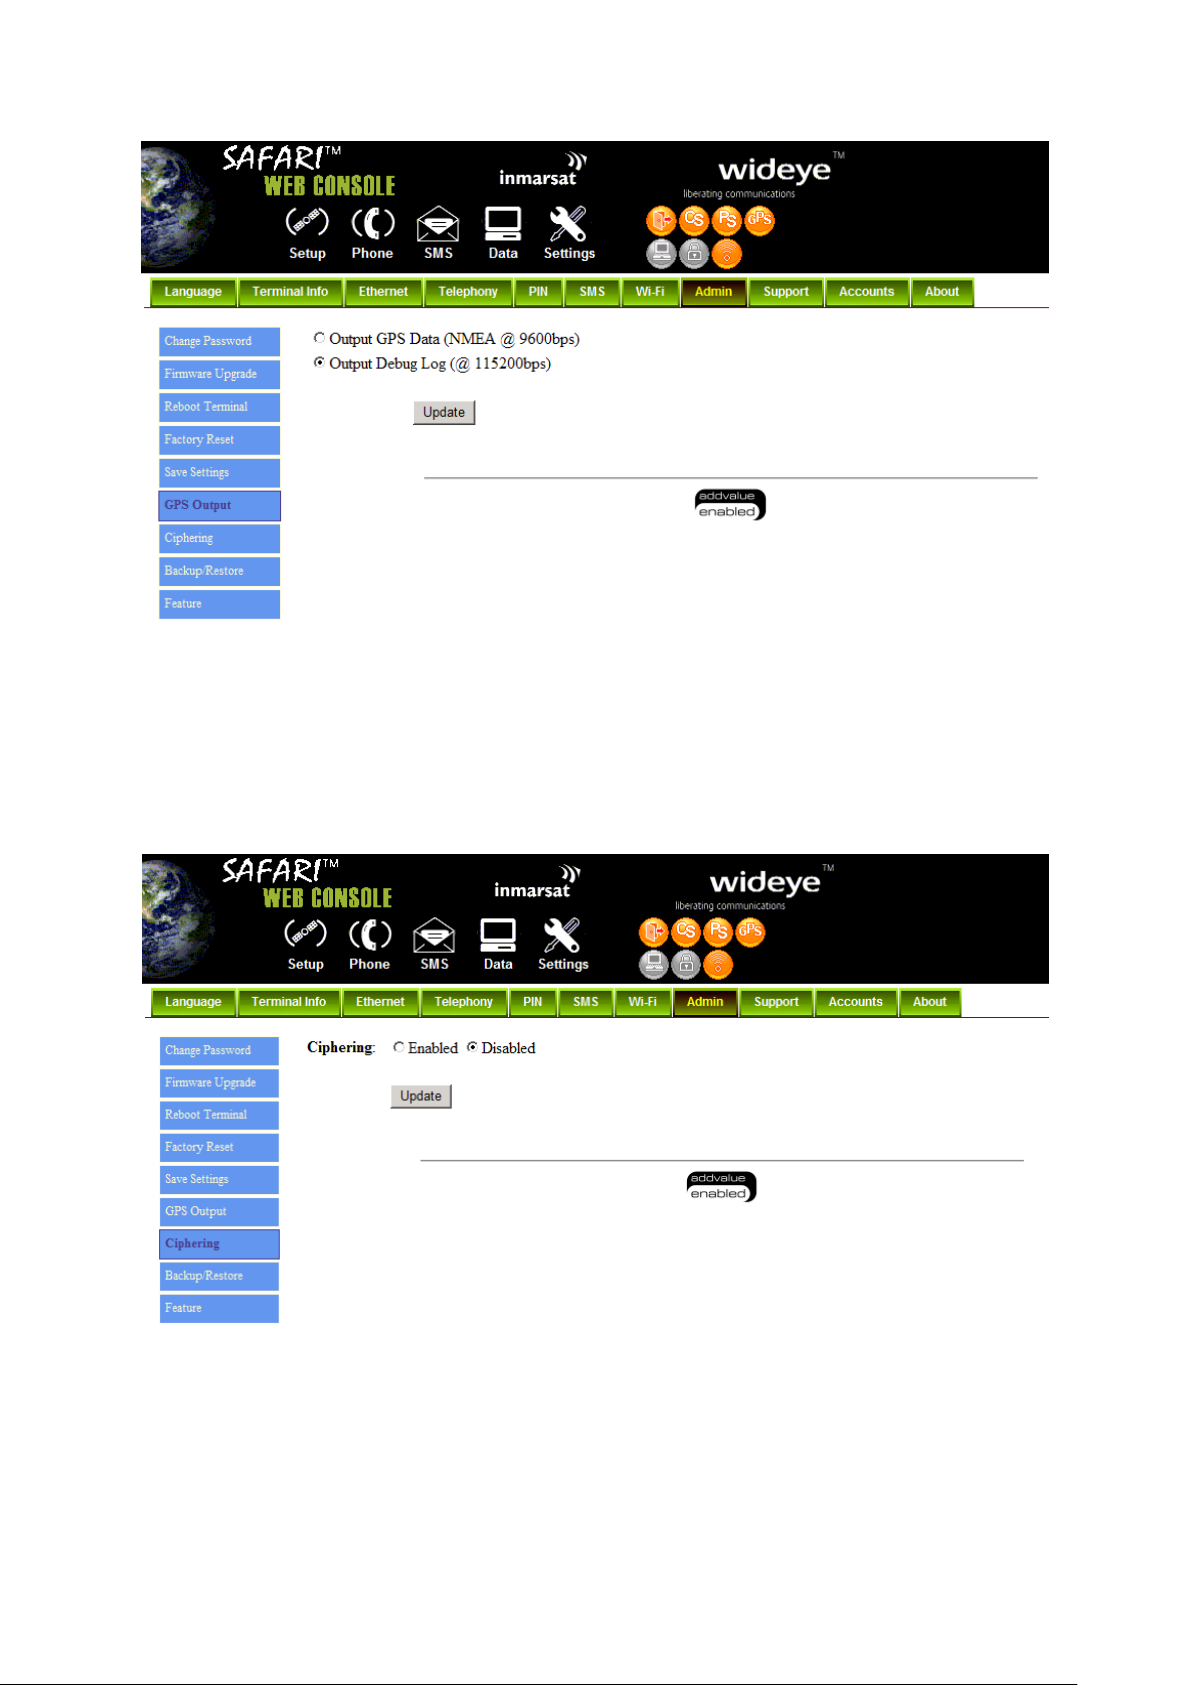
SAFARITM System User’s Guide
Ciphering
Enabling the Ciphering option will make the SAFARI UE to exchange voice and data in
secure mode by encrypting them over the air. To enable/disable the Ciphering, select the
option Enabled or Disabled respectively and click Update to make the change to take
effect.
46
Page 95
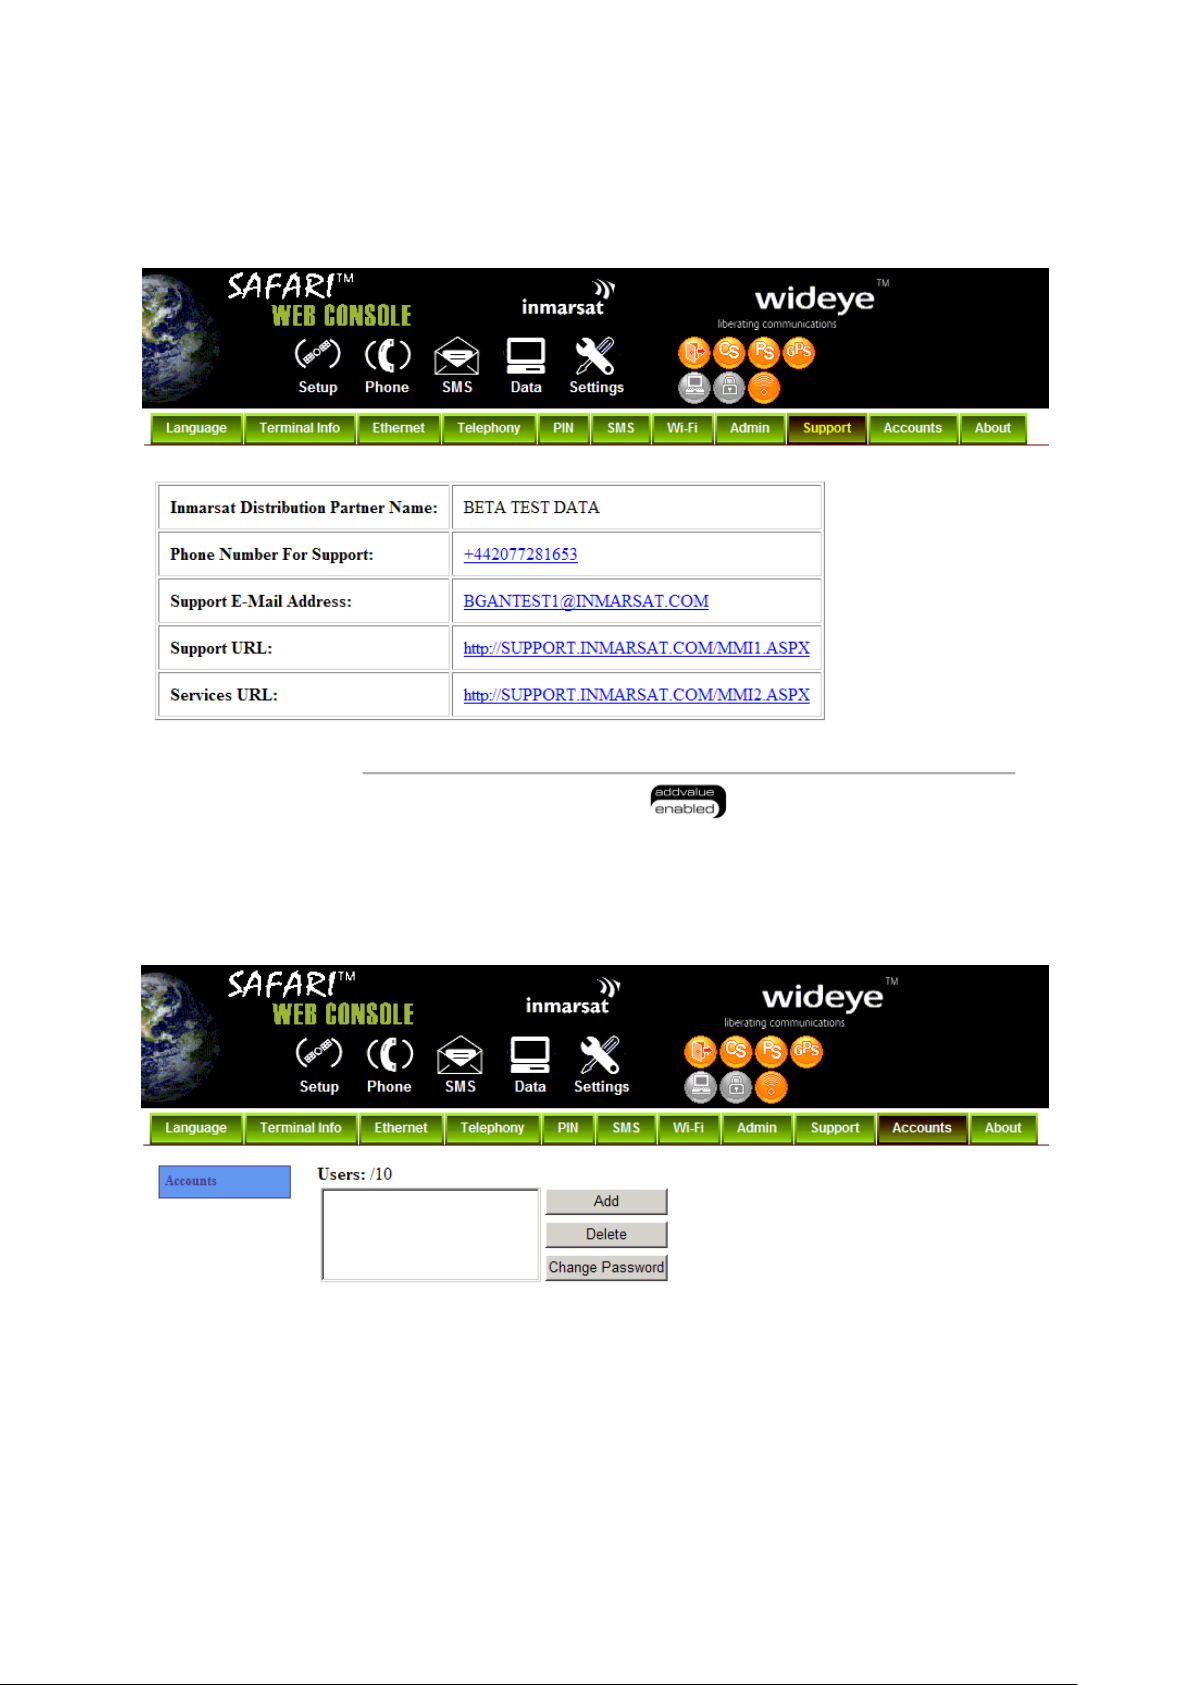
SAFARITM System User’s Guide
Support
Display information of the support telephone number, support email address, Support URL
and Services URL. (The information shown are for sample purpose only.)
Accounts
1. Select “Add” to add new user.
2. Select “Delete” to delete specific user.
3. Select “Change Password” to change specific user‟s password.
47
Page 96
SAFARITM System User’s Guide
About
48
Page 97
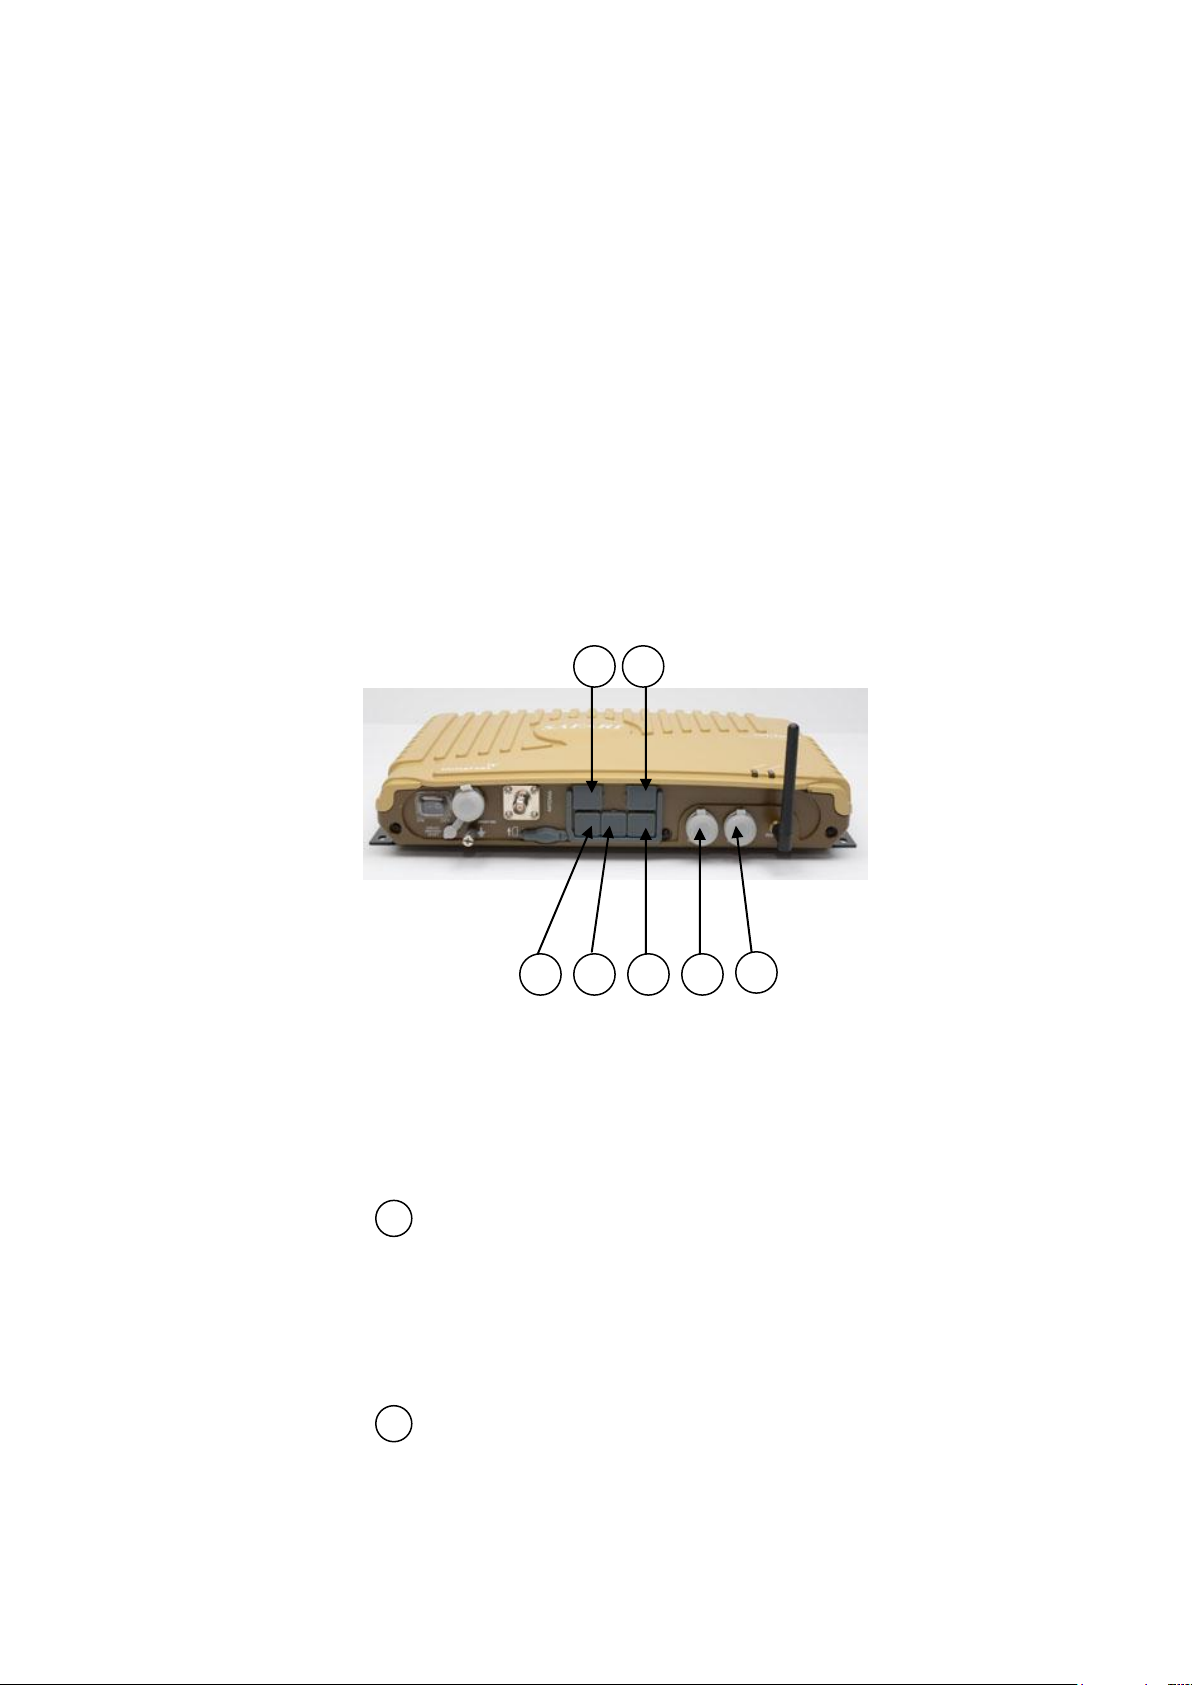
SAFARI
1
2 34
5
3
5
6
7
TM
System User’s Guide
Chapter 4 – Connecting Devices with SAFARITM
Transceiver
Available interfaces
There are multiple connectors available on the SAFARITM Transceiver for connecting to
different types of devices:
1. LAN RJ45 (PoE) connectors for standard PC and/or Network data connection
2. G3 FAX RJ11 connector connecting to the fax machine
3. Standard Analog Corded or Cordless Phone RJ11 connector for voice call
4. GPS output RJ11 connector (Offset) with NMEA 0183 format
5. Primary Handset circular connector for voice call and Transceiver setting
configuration
6. GPIO circular connector connecting to external devices
7. LAN RJ45 connectors for standard PC and/or Network data connection
Standard Analog Phone RJ11 Connector for Voice
The Transceiver has a dedicated connector labeled as “Phone” for connecting to a
standard analog phone.
Please refer to
Primary Handset Circular Connector
The Transceiver has a dedicated circular connector for connecting to the Primary
Handset.
Please refer to
1
Page 98
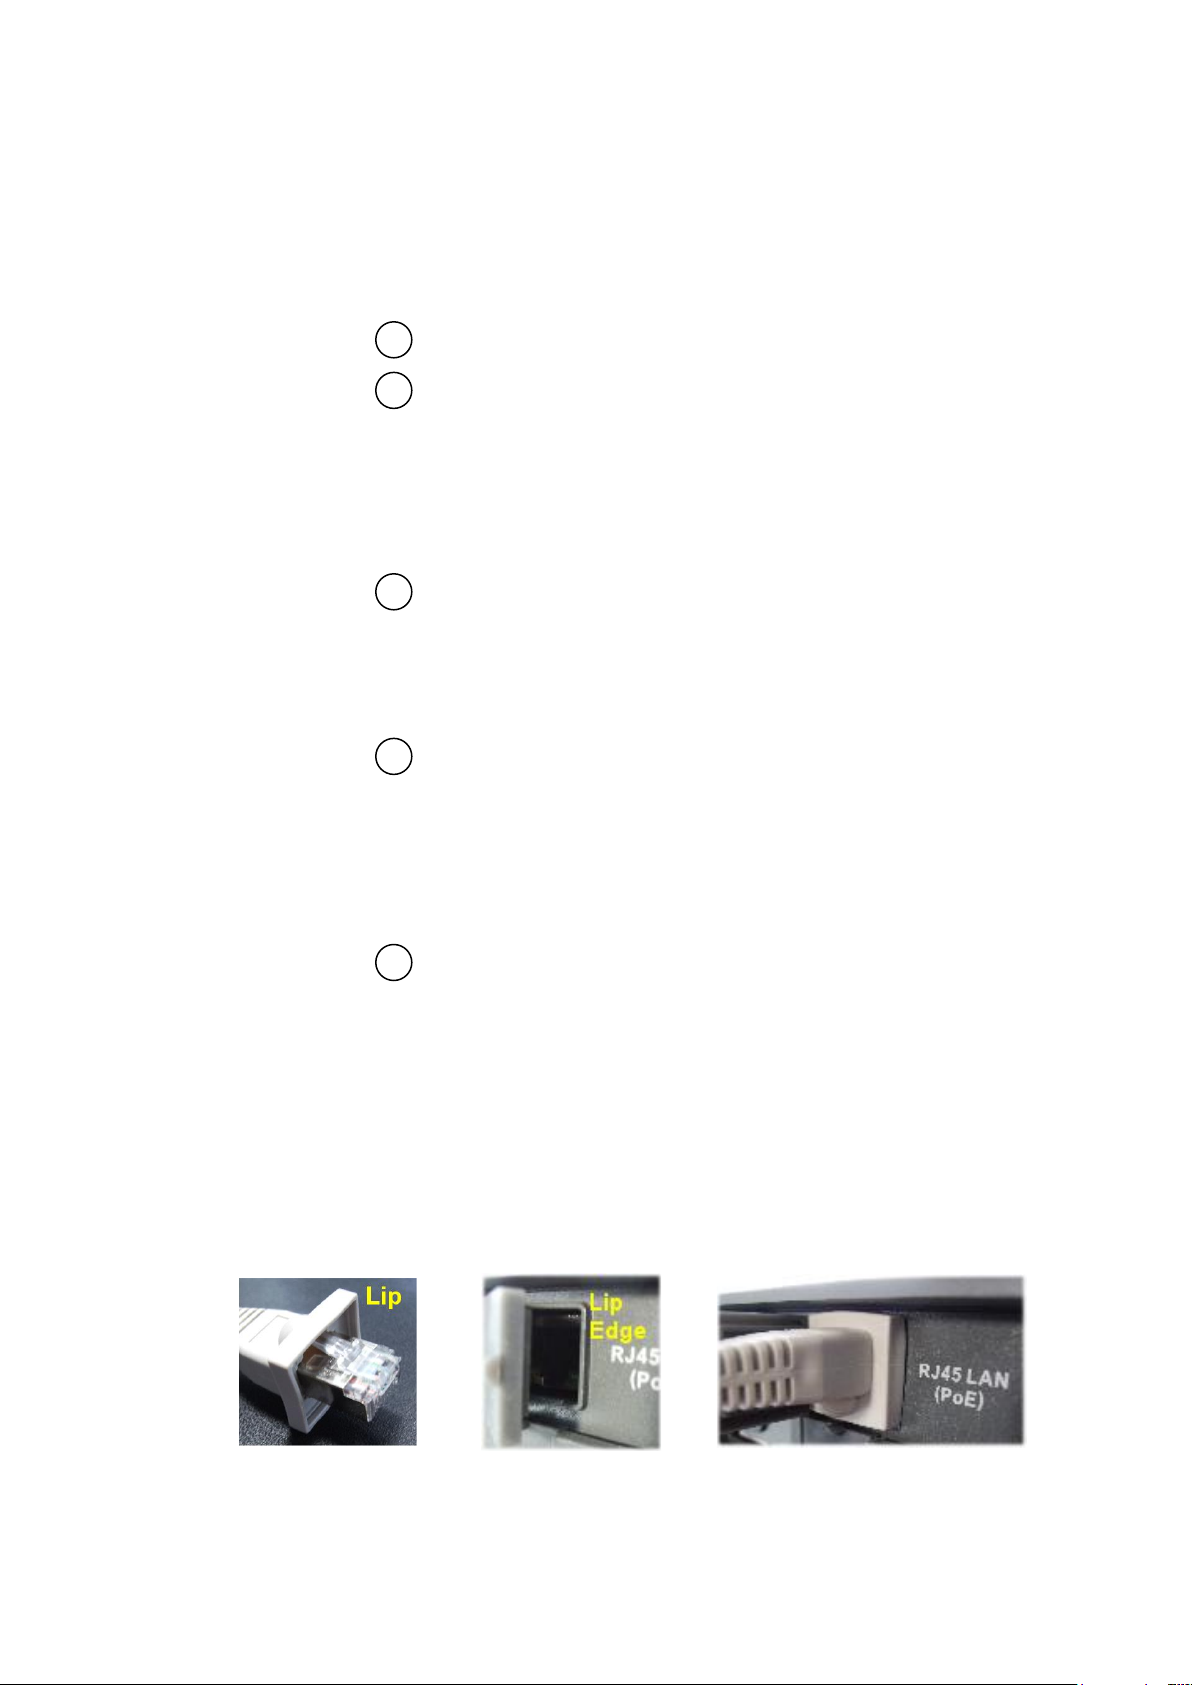
SAFARI
1
4
2 7 6
TM
System User’s Guide
Ethernet LAN (PoE) RJ45 Connectors for DATA
The Transceiver Unit has two Ethernet (LAN) RJ45 connectors with one connector
supports the Power over Ethernet (PoE).
Please refer to for Ethernet LAN PoE connector
Please refer to for standard Ethernet LAN connector
GPS Output RJ11 (Offset) Connector
The Transceiver has a GPS output RJ11 (Offset) connector to outputting the GPS
data with NMEA0183 format.
Please Refer to
G3 FAX RJ11 Connector
The Transceiver has a dedicated Fax connector for connecting to a fax machine.
Please Refer to
GPIO Circular Connector
The Transceiver has a dedicated circular connector to provide GPIO interface to the
external devices (Please refer to Appendix B for detailed information)
Please Refer to
IP 44 Protection
The SAFARITM Transceiver Unit meets or exceeds IP 44 requirements for environmental
protection, i.e. dust and water, provided the UE is used with the included RJ11 phone cord,
RJ45 LAN cable and the Primary Handset. To maintain proper environmental protection,
care should be taken to ensure that the cables are connected so that the connector “lip” fits
over the raised edge surrounding the corresponding port.
2
Page 99

SAFARI
TM
System User’s Guide
Connecting To a Computer
To connect a computer to the SAFARI
TM
Transceiver Unit you need a LAN (Category 5)
Cable.
1. Plug one end of the LAN cable to a PoE RJ-45 port meant for DATA and the other
end to your computer network port.
2. Use the Web Console as listed in the Data Menu section of Chapter 4 - Using the
Web Console, to configure the SAFARI
TM
Transceiver Unit and activate a data
connection.
Using a Standard Phone
You can connect a standard analog corded or cordless phone to the PHONE port using the
included IP44 rated RJ11 phone cable to make and receive voice calls.
When there is an incoming standard voice call, all the phones connected to those ports will
ring. Once one of them answers the call, all other phones will stop ringing.
3
Page 100
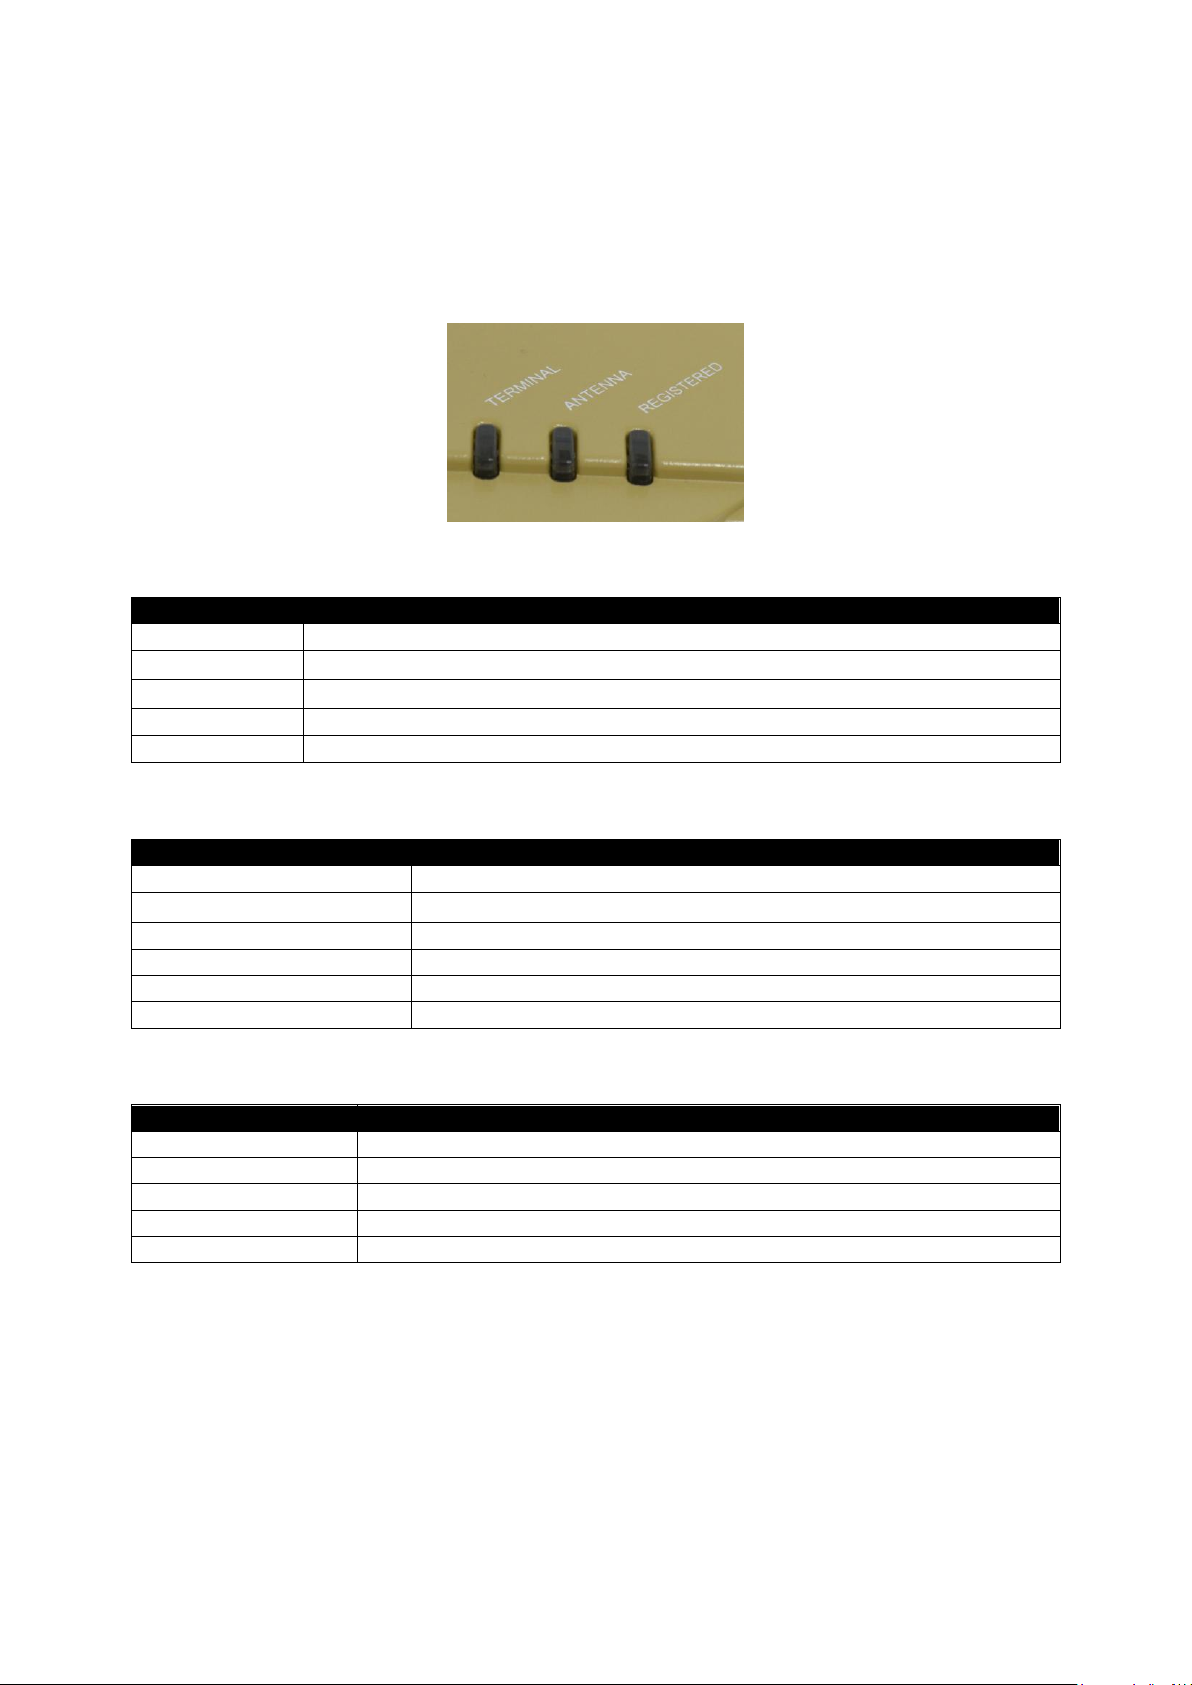
SAFARI
LED behavior
Descriptions / Remedial Actions
Off
Transceiver Unit is in power-off state.
Steady amber
Transceiver Unit is powering up.
Blinking green
Transceiver Unit is booting up.
Steady green
Transceiver Unit has powered up successfully.
Steady red
System failure during boot up or operation. User action required.
LED behavior
Descriptions / Remedial Actions
Off
ANTENNA status unknown.
Steady amber
ANTENNA is powering up.
Blinking amber
ANTENNA is calibrating.
Blinking green
ANTENNA is scanning for satellite.
Steady green
ANTENNA is tracking a satellite and ready for use.
Steady red
System failure in ANTENNA. User action required.
LED behavior
Descriptions / Remedial Actions
Off
BGAN registration has not started. Network service unknown.
Blinking green
Ready for packet data only.
Steady green
BGAN registration succeeded. Full network service available.
Blinking amber
Ready for voice only.
Steady red
System failure in BGAN network registration. User action required.
TM
System User’s Guide
Chapter 5 – Troubleshooting and FAQs
General LED Status
TERMINAL LED
ANTENNA LED
REGISTERED LED
1
 Loading...