

Page 1
Addonics
T E C H N O L O G I E S
Zebra Blu-Ray Burner/HD DVD player
Model: ZBW-H63DEU
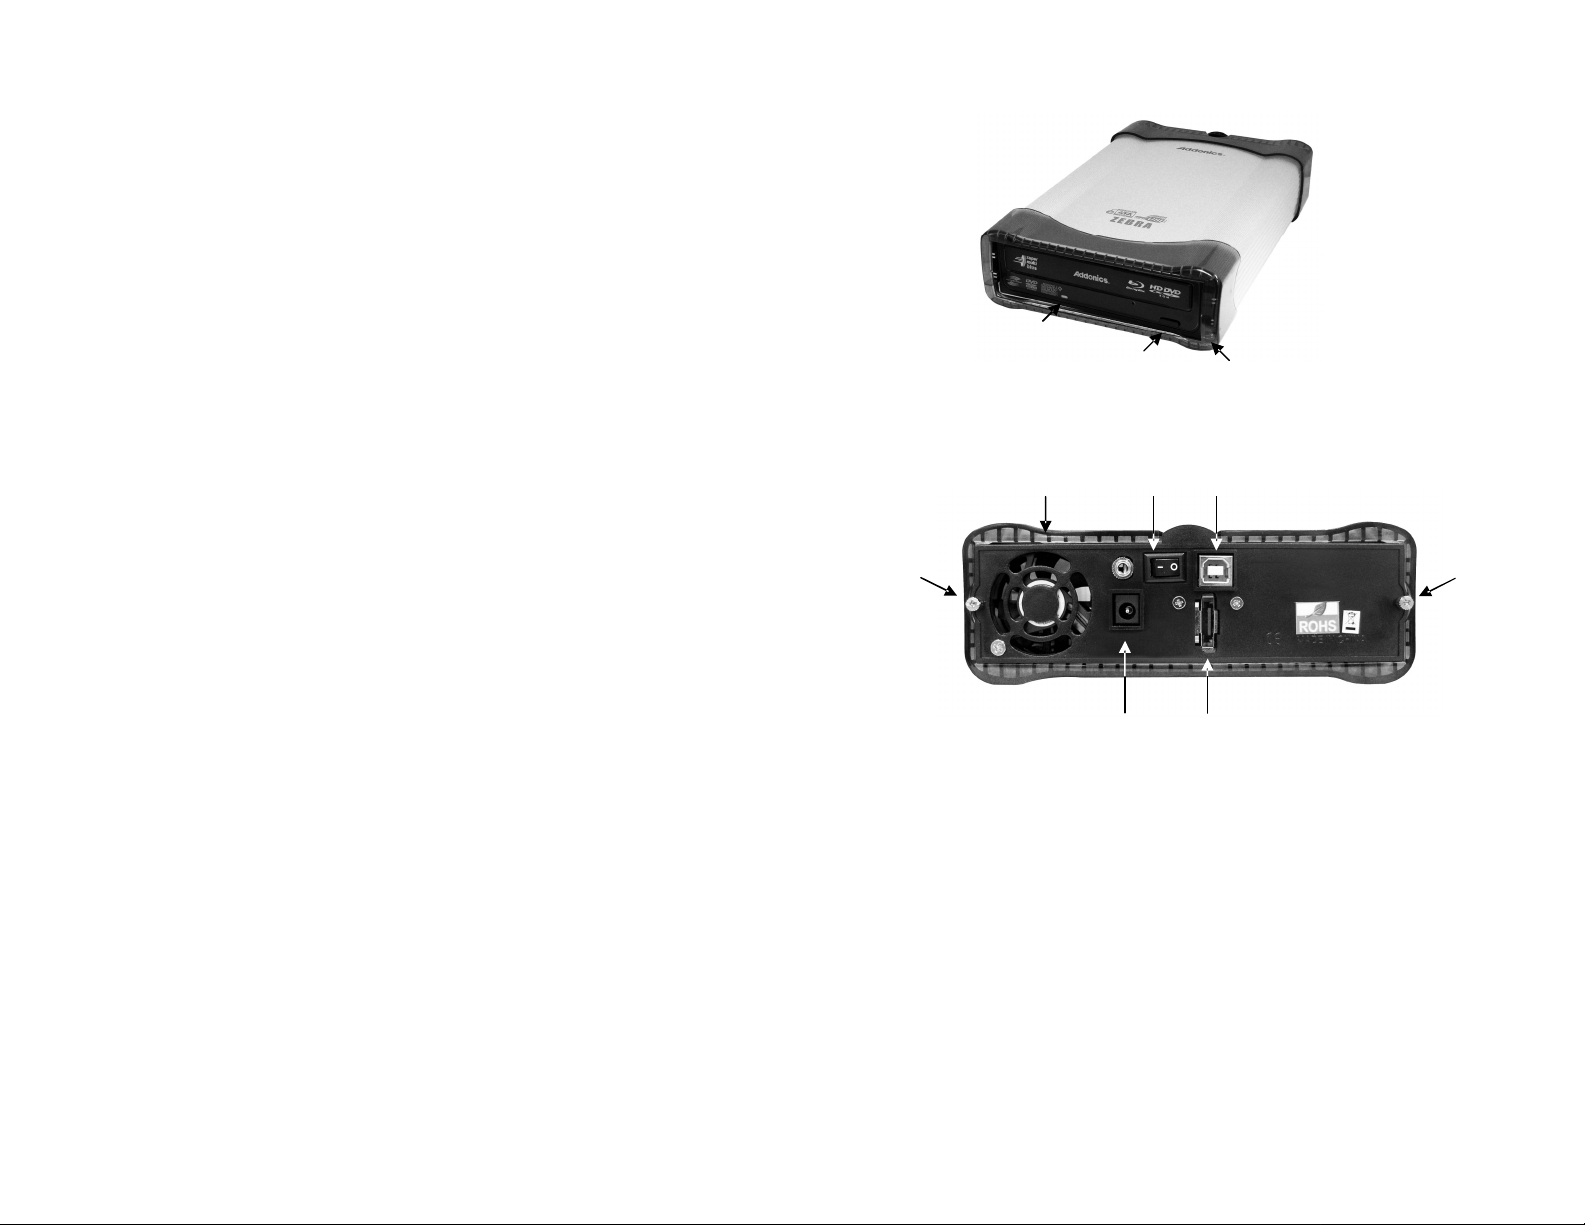
Enclosure Overview
Drive Activity LED
Eject Button
Power LED
Zebra Blu-Ray Burner/HD DVD player with eSATA and USB 2.0
Model: ZBW-H63DEU
Fan Switch USB Port
Screw 2
Screw 1
User’s Guide
Version 1.0
FCC Warning Statement
This equipment has been tested and found to comply with the limits for a class B digital
device pursuant to Part 15 of the FCC rules. These limits are designed to provide
reasonable protection against harmful interference in a residential installation. This
equipment generates, uses and can radiate radio frequency energy. If not installed and
used in accordance with the instructions, it may cause harmful interference to radio
communications. However, there is no guarantee that interference will not occur in a
particular installation. If the equipment does cause harmful interference to radio or
television reception, which can be determined by turning the equipment on and off, the user
is encouraged to try and correct the interference by one or more of the following
suggestions.
Reorient or relocate the receiving antenna
Increase the distance between the equipment and the receiver
Connect the equipment to a different power outlet other than the one where receiver is
connected
Consult a certified television or radio technician
Power
Connector
eSATA Port
Page 2
Configuring eSATA Connection:
Drive
The ZBW-H63DEU is plug and play in Windows. You should have configured the
eSATA host controller on your system before you connect the ZBW-H63DEU.
Once the eSATA host controller is configured, do the following steps below.
1. Connect the power adapter and eSATA cable to the enclosure.
Attached the other end of the eSATA cable to your eSATA host
controller.
2. Power ON the enclosure using the switch on the back panel. You
should see the Green Power LED on the front panel at the bottom right
light up.
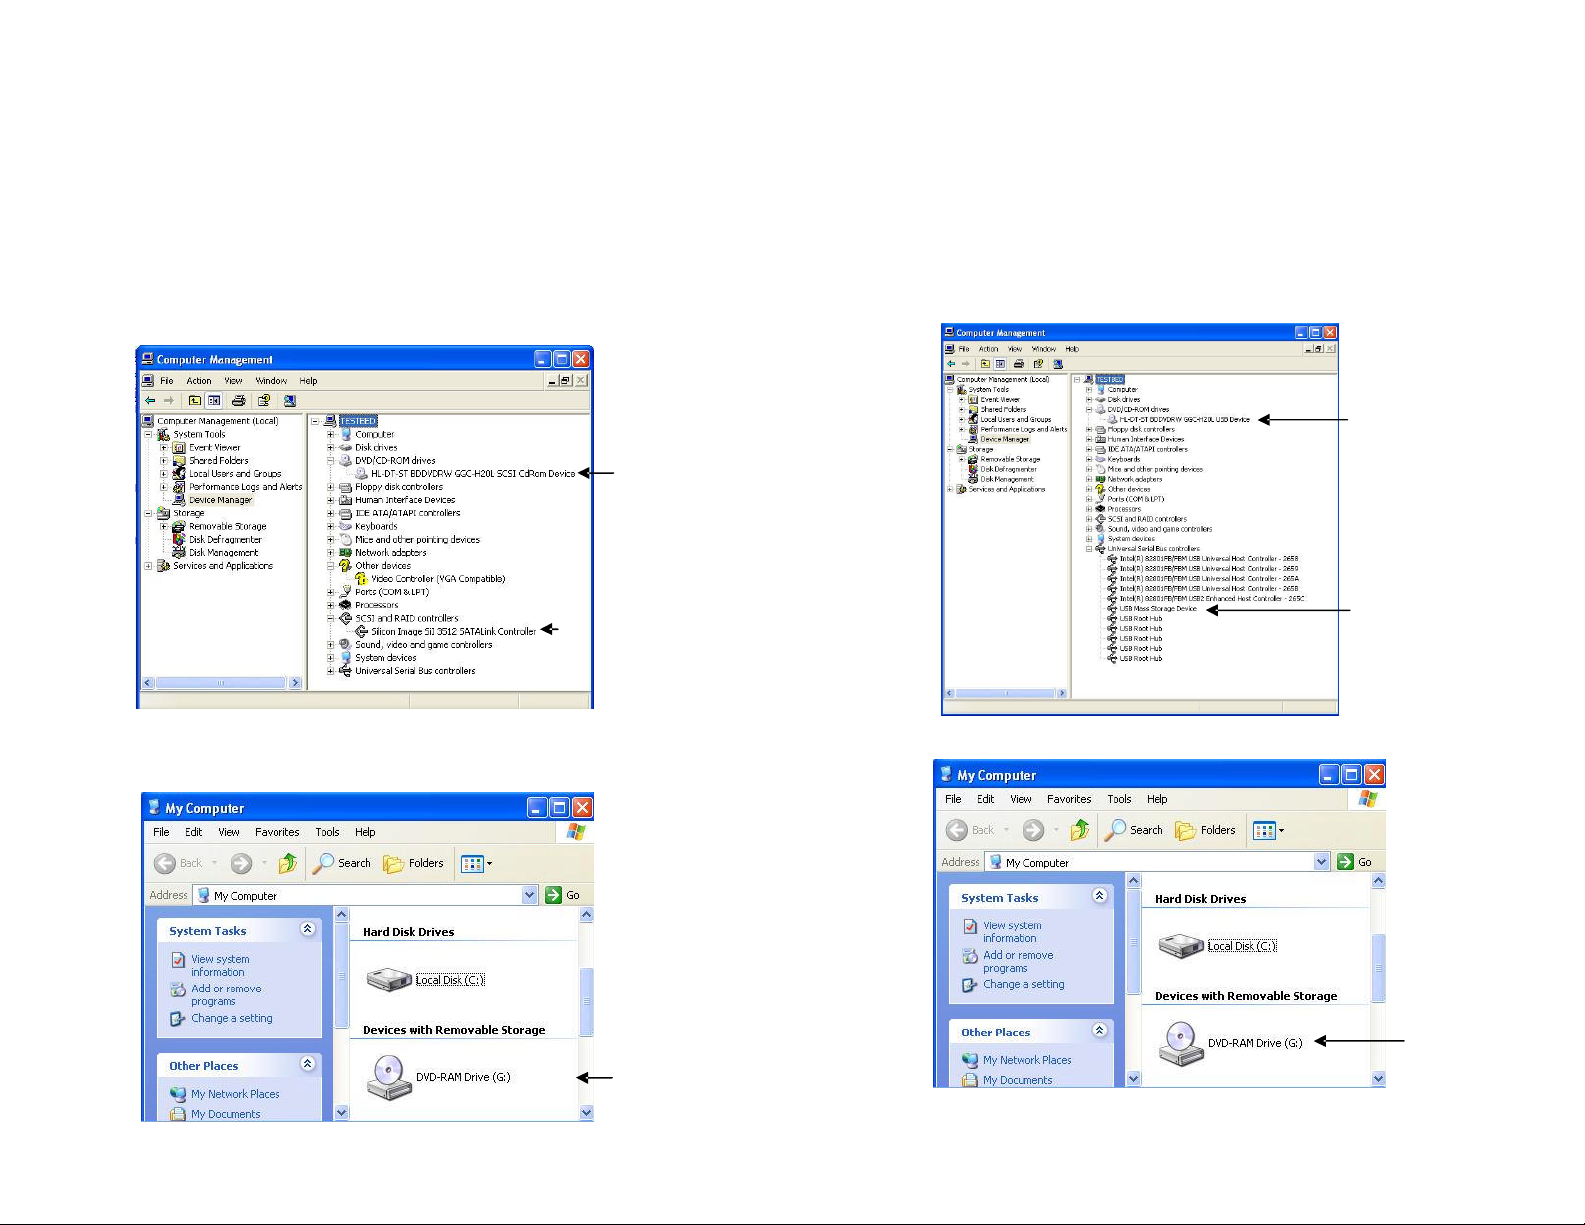
3. To check if your system detects the Blu Ray drive, go to Device
Manager.
Blu-ray/HD
DVD-ROM
The ZBW-H63DEU is plug and play in Windows using USB connection.
Using USB2.0 Connection:
1. Connect the power adapter to the back of the enclosure. Attach the
USB cable to the USB port on the enclosure and in your system.
2. Power ON the enclosure using the switch on the back panel. You
should see the Green Power LED on the front panel at the bottom right
light up.
3. To check if your system detects the Blu-ray/HD DVD-ROM drive, go to
Device Manager.
Blu-ray/HD DVD-ROM
Drive
Note: It is important that you have configured correctly the driver of your
eSATA host controller before connecting the ZBW-H63DEU.
4. The Blu Ray drive will also show up in My Computer.
Configuring USB Connection:
Driver of eSATA
host controller the
ZBW-H63DEU is
connected to.
Blu-ray/HD
DVD-ROM
Drive
USB Driver
4. The Blu-ray/HD DVD-ROM drive will also show up in My Computer.
Blu-ray/HD
DVD-ROM
Drive
Page 3

Installing PowerDVD from CyberLink Hi-Def Suite CD
Place the CyberLink BD & HD DVD-ROM Drive Solution CD to the BD & HD
DVD-ROM Drive.
Step 1. Click Install Now button.
Step 2. Select OK.
Step 4. Select Yes.
Step 5. Select Next. (The CD key will automatically show up)
Step 3. Select Next.
Step 6. Select Next.
Page 4

Step 7. Select Programs as needed:
PowerDVD Allows you to watch movies.
Power2Go Is a high featured CD and DVD burning utility.
PowerProducer Allows you to Create your own DVDs.
PowerBackup Allows you to back up all your PC’s data.
InstantBurn Allows you to Drag and Drop to burn discs.
LabelPrint Allows you to print your own CD Labels.
To determine if your system is capable of playing Blu-ray Disk or HD
DVD’s, install the CyberLink BD/HD Advisor.
Step 1. Click Install BD/HD Advisor.
Step 2. Run Advisor.
Step 8. Select Finish.
Step 3. Click on Scan.
Page 5

If you have a similar scan result you might not be able to play or write to Blu-ray
Disk or HD DVD’s
System Requirement to Play Blu-ray and HD DVD:
Systems not meeting these minimum requirements may not be able to play
Blu-ray and HD DVD.
CPU: Intel Pentium D 3.2GHz or equivalent (Recommended: Core 2 Duo E6300
or higher)
O/S: Windows XP (Home / Professional / Media Center Edition) with SP2,
Windows Vista (x86, x64)
RAM: 1 GB or more
HDD: 30 GB or more of available space
Graphic Card: Card with the following GPU (Graphic Processing Unit)
recommended.
-nVIDIA: GeForce 7800 GTX 512/7900 GT /7900 GX2 /7900 GTX
/7950 GX2 /8600 GS /8600 GT /8600 or
higher with 256MB minimum memory
(Download PureVideo HD driver)
-ATI: Radeon x1950/HD2300/HD2400/HD2600 series or higher with
256MB minimum memory.
(Download ATI catalyst 6.6 or above)
Power DVD Main Menu
Click on the Configuration Icon to access the Configuration Window.
In the Configuration Window, click on the Help button to access PowerDVD Help.
Help Button
Configuration Icon
Page 6

The Help Window opens.
Step 2: Select Produce Movie Disc, then Disc Type
Burning a DVD or Blu-Ray using Power Producer:
Step 1: Open PowerProducer
Step 3: Use Import to add video or image files and Capture to record live video
(such as from a digital camera).
Page 7

Step 4: Select the ZBW-H63DEU using Current drive. Name the disc, then select
“Burn to Disc” to burn or “Save as disc image” to create a disc image, then click
Burn.
LIMITED WARRANTY
Addonics guarantees that every product is free from physical defects in material and
workmanship during the warranty period specified for each product when used within the
limits set forth in the Specifications section in the user guide. Unauthorized tampering of the
product or using it outside the scope of the product specifications will result in voiding the
warranty. If the product proves defective during this warranty period, call Addonics
Technical Support to obtain a Return Authorization number. BE SURE TO HAVE YOUR
PROOF OF PURCHASE ON HAND WHEN CALLING. RETURN REQUESTS CANNOT BE
PROCESSED WITHOUT PROOF OF PURCHASE. When returning a product, mark the
Return Authorization number clearly on the outside of the package and include your original
proof of purchase. Customers are responsible for paying the shipping and handling of the
products to Addonics warranty service location.
IN NO EVENT SHALL ADDONICS’ LIABILITY EXCEED THE PRICE PAID FOR THE
PRODUCT FROM DIRECT, INDIRECT, SPECIAL, INCIDENTAL, OR CONSEQUENTIAL
DAMAGES RESULTING FROM THE USE OF THE PRODUCT, ITS ACCOMPANYING
SOFTWARE, OR ITS DOCUMENTATION. Addonics makes no warranty or representation,
expressed, implied, or statuary, with respect to its products or the contents or use of the user
guide and all accompanying software, and specifically disclaims its quality, performance,
merchantability, or fitness for any particular purpose. Addonics reserves the right to revise
or update its products, software, or documentation without obligation to notify any individual
or entity.
Technical Support
If you need assistance to get your unit functioning properly, please call Addonics
Technical Support. Our technical staff will be happy to assist you, but they will
need your help to do so. Calling the technical support staff without all the proper
information can be both time consuming and frustrating. Here are some tips to
help you out:
MODEL NUMBER – Please have this number on hand.
SYSTEM INFORMATION – Type of computer, peripherals, etc.
OPERATING SYSTEM – What version of Windows
WHAT’S THE TROUBLE? – Give enough information
about your problem so that we can recreate and diagnose it.
FREE Software Drivers for all Addonics Technologies
Products are available 24 hours per day at the
World Wide Web Site: www.addonics.com.
Contact Information
Phone: 408-573-8580
Fax: 408-433-8588
Email: http://www.addonics.com/sales/query/
Internet: http://www.addonics.com
TECHNICAL SUPPORT
Phone: 408-453-6212
Hours: 8:30 am - 6:00 pm PST
Email: http://www.addonics.com/support/query/
 Loading...