

Page 1
Addonics IDE DigiDrive Installation
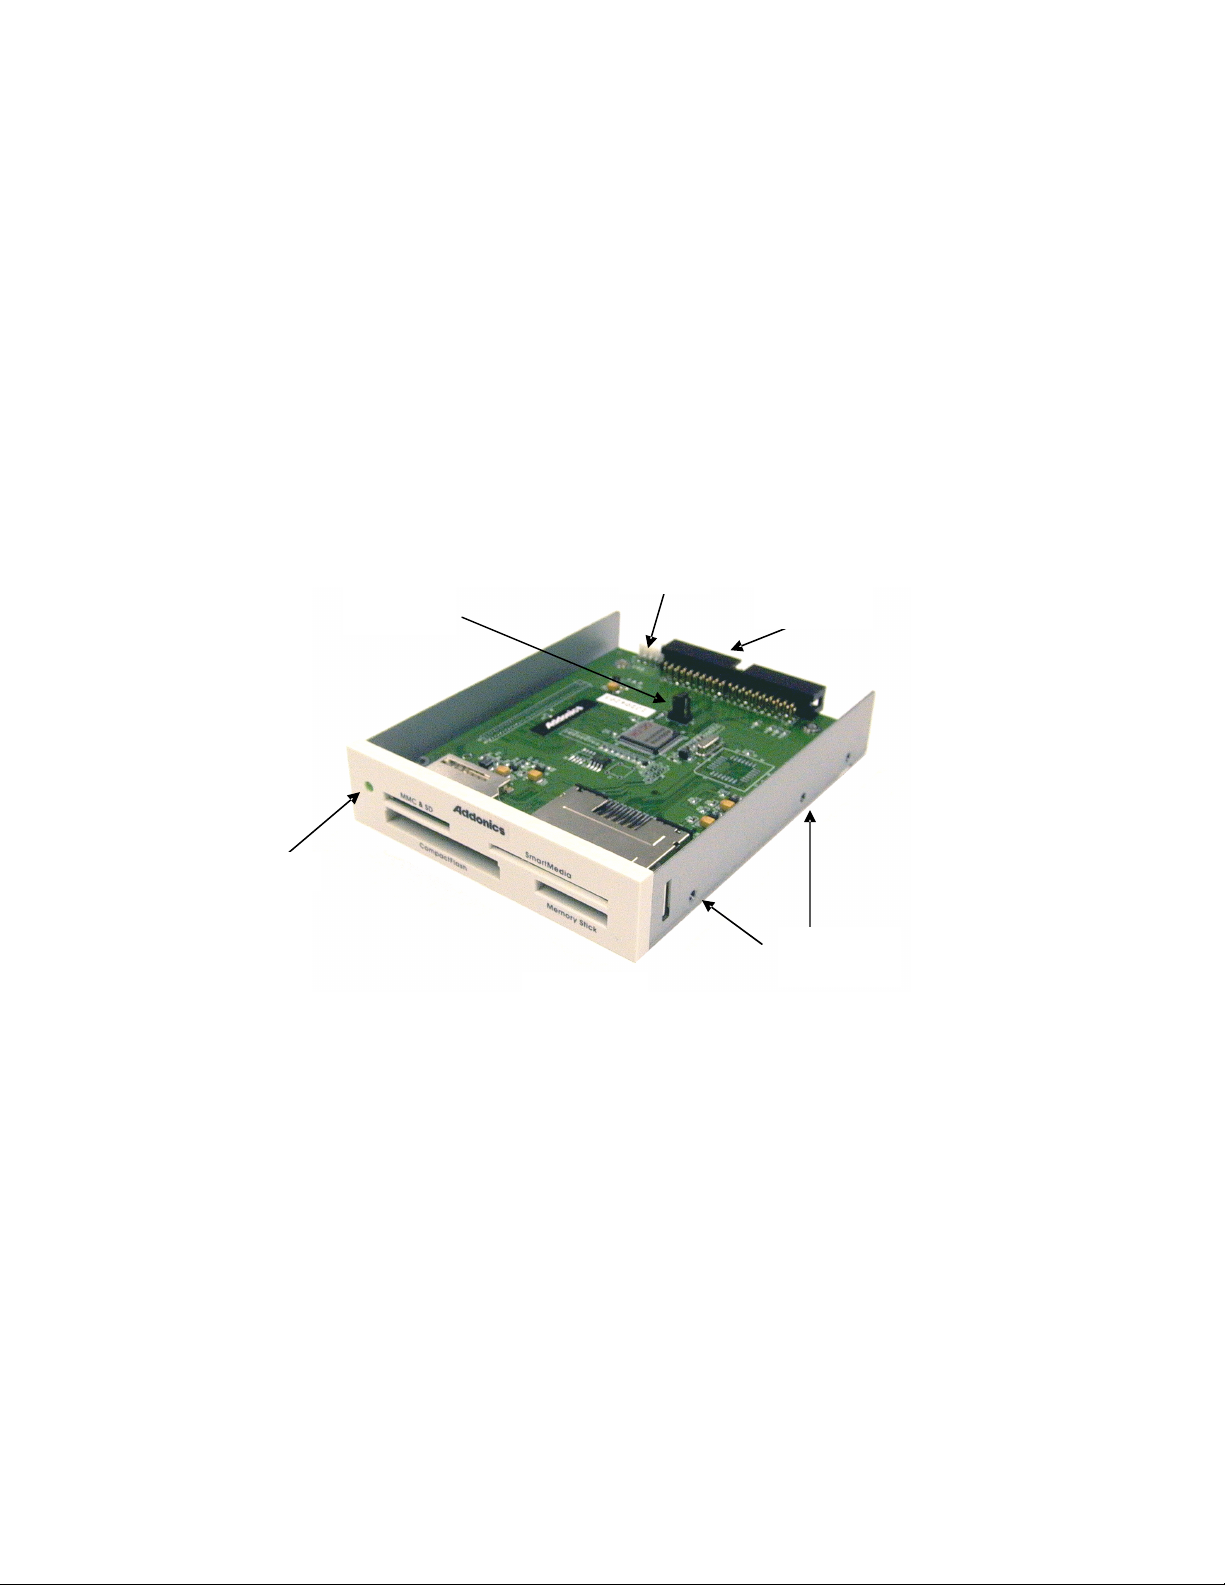
hole
(Model: AEIDEDMD4 )
Thank you for purchasing the Addonics IDE Digidrive. This drive is designed for installing into any PC or
equipment with a standard 3.5” drive bay and IDE interface. The drive works like a floppy device and requires no
special driver. Once connected, it can be used in computer running DOS and all Windows Operating Systems.
Hardware Installation
1. Power off the computer
2. Handle the device on the side and avoid touching the circuit board. Slide the IDE DigiDrive into one of the 3.5”
drive bay of the computer and secure the device to the drive bay with mounting screws from the side of the bay.
3. Refer to figure 1, connect the IDE cable from the motherboard and the power cable from the system power
supply to the IDE DigiDrive, making sure that the cable is plug into the correct direction (pin 1 should go to pin
1 and so on).
4. Jumper JP1 setting: 3,4 – master (factory default), 1,2 – slave, 5,6 – cable select
5. Power on the computer (for DOS machine, make sure there is a Flash media inside one of the slots), the LED
light on top left hand corner of the IDE DigiDrive should lit up. When the operating system is fully loaded, a
drive icon labeled as Removable Disk will appear in the My Computer folder.
Master or
slave jumper
Power
connector
IDE
LED
Mounting
Figure 1
IDE DigiDrive utility software
To install this software, load the CD into your computer and run the SETUP program in the CD.
Note: The IDE DigiDrive can operate with the utility software. The software fixes a bug in Windows 2000 OS and
adds a few user friendly features:
• Report the proper media capacity under Windows 2000 when switching media ( a software bug in Windows
2000 OS)
• Alert users when more than one media is inserted into the drive
• Icon to show the type of media being detected
• Format utility to ensure the correct format of different types of media
• Bootable from CF, SD and MMC – to use this feature, the media must be boot enabled via the IDE DigiDrive
format utility and the system BIOS need to be set to boot from the IDE DigiDrive
Addonics Technologies copyright 2002
Page 2

How to Use
To use, insert your memory card into the appropriate slot into the IDE DigiDrive. From here the card works similar
to a floppy disk. During operation, the LED light flashes when data is read or copied onto the media.
Switching to different media with one drive icon
1. Please note that if you have more than one media in the device, only the media that is inserted first into the
device is detected. To work with a new media inserted in another slot, the first media must be removed and
followed by double clicking on the drive icon again to reset the device.
2. If you have more than two media inside the device while booting up your computer, the first media that
will be detected will be in the following slot order: Compact Flash, Smart Media, Memory Stick and MMC
& SD.
For DOS only
When using the device on DOS machine, one of the slots must contain a media during the boot time. Otherwise, no
drive letter will appear under DOS. Switching media to different slot requires rebooting the system in order to detect
the new media.
Smart Media (SM)
Insert Card with metal contact strip facing down and the cut out notch on the left side going toward the drive. Push
gently all the way in and then release. To remove the card, merely pull out the media.
Sony Memory Stick (MS)
Insert Card with metal contact strip facing down and the cut out notch on the left side going toward the drive. Push
gently all the in and then release. To remove the card, merely pull out the media
Multimedia Card (MMC) or SecureDigital Card (SD)
Insert Card with metal contact strip facing down and the cut-out notch on the left side going toward the drive. To
remove the card, merely pull out the media.
Compact Flash (CF) or IBM Microdrive
Insert Card with the edge with the holes facing toward the Drive, making sure to line the card up with rails. To
remove the card, merely pull out the media
Technical Support Phone: 408-433-3855 Email: Techinfo@addonics.com
If you need assistance to get your unit functioning properly, please call Addonics Technical Support. Our technical
staff will be happy to assist you, but they will need your help to do so. When you call, please have the following
information ready: MODEL NUMBER, SYSTEM INFORMATION, OPERATING SYSTEM, HAT’S THE
TROUBLE? – Give enough information About your problem so that we can recreate and diagnose it.
Contact Information
Addonics Technologies Phone: 408-433-3899
2466 Kruse Drive Fax: 408-433-3898
San Jose CA, 95131 Email: ATC@Addonics.com
Please register your warranty online at http://www.addonics.com at your earliest convenience
Addonics Technologies copyright 2002
 Loading...