

Addon WBR9400 User Manual

Wireless Broadband Router User manual
Wireless Broadband Router
User Manual
Page 1 of 58

Wireless Broadband Router User manual
Table of Contents
Chapter1 Introduction....................................................................... 4
1.1 Welcome.................................................................................................................................... 4
1.2 AboutThisGuide........................................................................................................................ 4
1.3 Copyrightstatement...................................................................................................................4
Chapter2 DesigningYourWirelessNetwork......................................... 5
2.1 SystemRequirements................................................................................................................. 5
Chapter3 GettingtoKnowtheWireless-GBroadbandRouter.................. 6
3.1 BackPanel ................................................................................................................................. 6
3.2 LEDDescription........................................................................................................................ 7
Chapter4 hardwareconnection........................................................... 9
4.1 ConnectingtheWirelessBroadbandRouter.................................................................................9
Chapter5 ConfiguringLocalPCtoAccesstheWirelessRouter ............... 10
5.1 SettingupTCP/IP ..................................................................................................................... 10
5.1.1Windows2000................................................................................................................10
5.1.2WindowsXP/2003......................................................................................................... 14
5.2 AdditionalSettingsforWirelessClient....................................................................................... 18
5.3 CheckingPC’sIPandConnectionwiththeRouter ....................................................................... 19
Chapter6 WebConfiguration ............................................................ 21
6.1 LoggingIn................................................................................................................................ 21
6.2 QuickSetupWizard.................................................................................................................. 23
6.3 Status....................................................................................................................................... 25
6.3.1 SystemStatus................................................................................................................25
6.3.2 Statistics....................................................................................................................... 28
6.3.3 Syslog........................................................................................................................... 29
6.4 WANSetup .............................................................................................................................. 30
6.4.1 DynamicIPAddress....................................................................................................... 30
6.4.2 PPPoE...........................................................................................................................31
6.4.3 StaticIP......................................................................................................................... 32
6.4.4 PPTP ............................................................................................................................ 33
6.4.5 L2TP.............................................................................................................................34
6.5 LANSetup ............................................................................................................................... 35
6.5.1 LANSetup .................................................................................................................... 35
6.5.2 DHCPIPAddressReserving........................................................................................... 35
6.5.3 DHCPInfo .................................................................................................................... 36
6.6 WirelessSettings...................................................................................................................... 36
6.6.1 BasicWirelessSettings.................................................................................................. 36
6.6.2 AdvancedWirelessSettings........................................................................................... 37
6.6.3 WirelessSecurity...........................................................................................................38
6.6.4 WirelessMACFilter...................................................................................................... 43
6.6.5 AssociationT able..........................................................................................................44
6.6.6 WDSSet........................................................................................................................ 44
6.7 Routing.................................................................................................................................... 45
6.8 NAT......................................................................................................................................... 45
6.8.1 DMZHostSetup............................................................................................................ 45
6.8.2 FTPPrivatePort............................................................................................................. 46
6.8.3 V irtualServerSetup....................................................................................................... 46
6.8.4 PortTrigger................................................................................................................... 48
6.9 FireWall................................................................................................................................... 49
6.9.1 MACFiltering............................................................................................................... 49
Page 2 of 58

Wireless Broadband Router User manual
6.9.2 AccessControl .............................................................................................................. 50
6.9.3 URLFiltering................................................................................................................ 51
6.10 SPIFirewall............................................................................................................................ 52
6.11 DDNS.................................................................................................................................... 53
6.12 MISC..................................................................................................................................... 53
6.12.1 LoginID&PasswordSetup ..........................................................................................53
6.12.2 RemoteMgmt ............................................................................................................. 54
6.12.3 WANLinkStatus&Setup............................................................................................. 54
6.12.4 RestoreDefault/RestartSystem ................................................................................... 54
6.12.5 FirmwareUpgrade ...................................................................................................... 55
Appendix :TroubleshootingⅠ ............................................................ 56
1.IcannotaccesstheWeb-basedConfigurationUtilityfromtheEthernetcomputerusedtoconfigure
therouter................................................................................................................................ 56
2.IforgetPassword(ResettheRouterwithoutLogin)................................................................. 56
3.IhavesomeproblemsrelatedtoConnectionwithCableModempleasefollowthefollowingstepsto
checktheproblems: ................................................................................................................56
4.Icanbrowsetherouter’sWeb-basedConfigurationUtilitybutcannotaccesstheInternet........... 57
5.MywirelessclientcannotcommunicatewithanotherEthernetcomputer................................. 57
Appendix :FeaturesⅡ ........................................................................ 57
Page 3 of 58

Wireless Broadband Router User manual
Chapter 1 Introduction
1.1 Welcome
Congratulations on purchasing this Wireless Broadband Router. This Wireless
Broadband Router is a cost-effective IP Sharing Router that enables multiple
users to share the Internet through an ADSL or cable modem. Simply configure
your Internet connection settings in the Wireless Broadband Router and plug
your PC to the LAN port and you're ready to share files and access the Internet.
As your network grows, you can connect another hub or switch to the router’s
LAN ports, allowing you to easily expand your network. The Wireless
Broadband Router is embedded with an IEEE 802.11g/b access point that
allows you to build up a wireless LAN. With the support of new emerged
802.11g standard, the access point provides data transfer of up to 54Mbps, up
to 5 times faster than 802.11b, it is backwards compatible with existing
802.11b infrastructure while migrating to the new screaming fast 802.11g.The
Wireless Broadband Router provides a total solution for the Small and
Medium-sized Business (SMB) and the Small Office/Home Office (SOHO)
markets, giving you an instant network today, and the flexibility to handle
tomorrow's expansion and speed.
1.2 About This Guide
This User Manual contains information on how to install and configure your
Wireless Broadband Router to get your network started accessing the Internet.
It will guide you through the correct configuration steps to get your de vi ce up
and running.
Note and Caution in this manual are highlighted with graphics as below to
indicate important information.
Contains related information corresponds to a topic.
Necessary steps, actions or messages should not be ignored.
1.3 Copyright statement
No part of this publication may be reproduced, stored in a retrieval system, or
transmitted in any form or by any means, whether electronic, mechanical,
photocopying, recording, or otherwise without the prior writing of the
publisher.
Page 4 of 58
Wireless Broadband Router User manual
Chapter 2 Designing Your Wireless Network
2.1 System Requirements
z Cable/ADSL modem and an Internet access account for Internet connection
z One computer with 10/100Base-T Ethernet card and TCP/IP protocol
installed for initial setup
z Internet Explorer 5.0 or higher for Web configuration
z 802.11g or 802.11b compliant wireless adapters (for wireless connection)
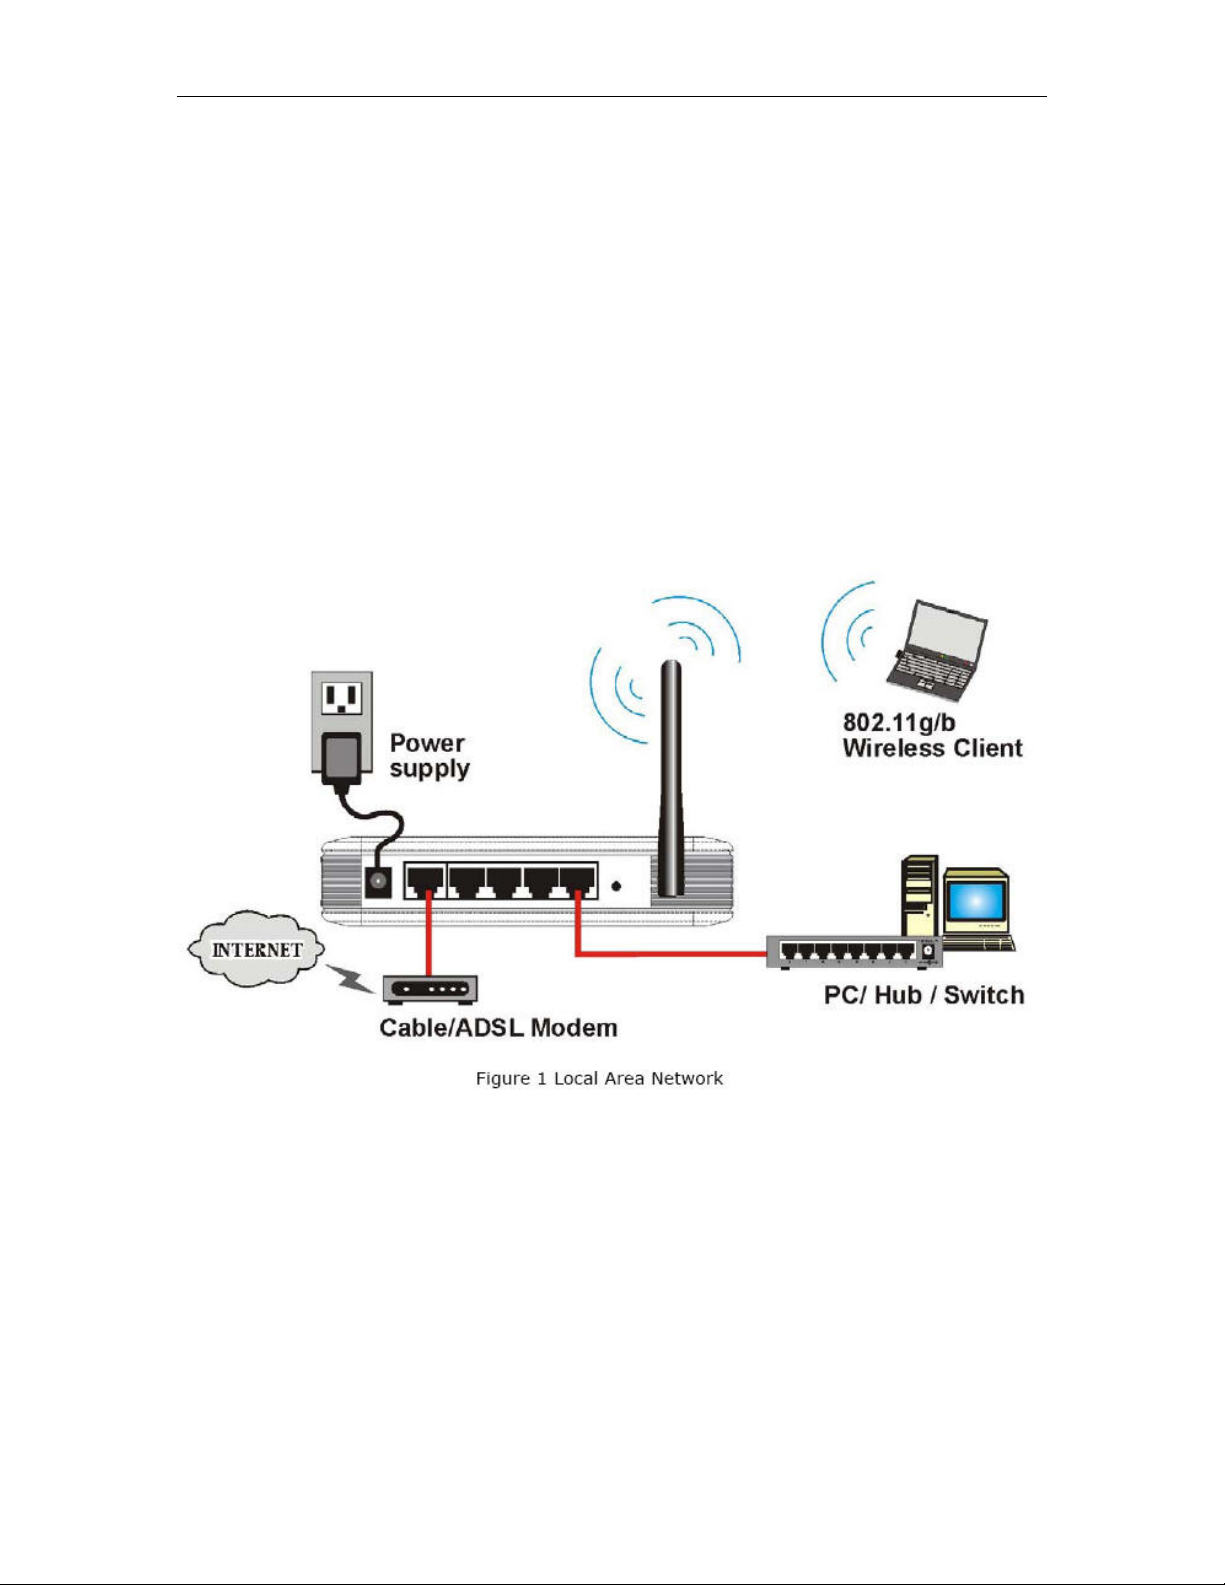
Figure 1 below shows a typical setup for a Local Area Network (LAN).
Figure 1 Local Area Network
Page 5 of 58
Wireless Broadband Router User manual
Chapter 3 Getting to Know the Wireless-G
Broadband Router
The following sections describe the physical characteristics of your router.
3.1 Back Panel
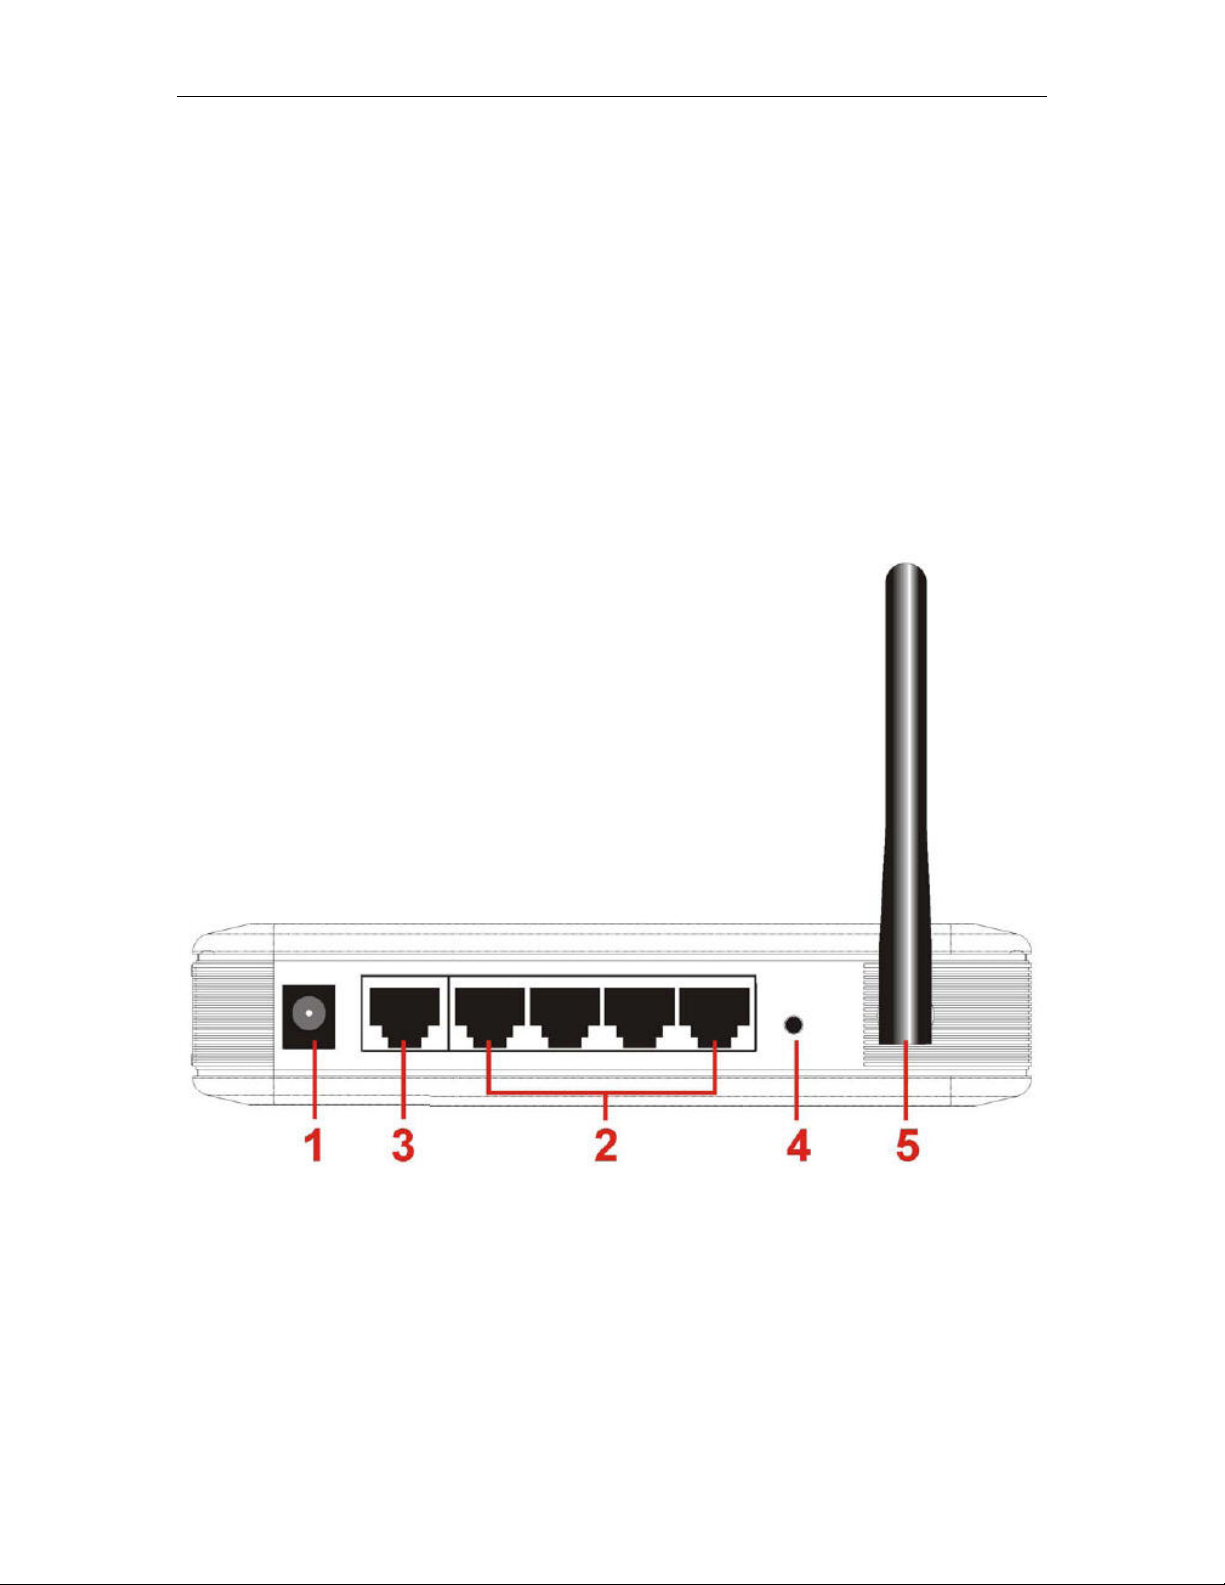
The following illustration shows the Wireless Broadband Router back panel:
Figure 2 back panel
Power: The receptacle where you plug in the power adapter.
LAN Ports 1-4: These four ports connect the router to your LAN or home
network using Ethernet cables. This enables communication among clients,
such as PCs, on the network. The LAN ports support either 10-BASE-T or
Page 6 of 58

Wireless Broadband Router User manual
100-BASE-T transmission speeds as well as straight-through and crossover
Ethernet cables. Any of these four ports can also serve as an uplink port to
other network devices, such as another ro uter or switch, which allows you to
extend your network.
WAN: Connect your modem to your router using this port with your su pplied
Ethernet cable. This is the only port you can use for this procedure. This enables
your router to access the Internet. The port supports 10/100 Mbps as well as
straight-through and crossover Ethernet cables.
Reset button: Resets your router or resets the router to the default login
settings.
Antenna: The antenna used for wireless connections. You are able to rotate
the antenna to gain the best signal reception.
If the router experiences trouble connecting to the Internet, briefly press
and release the Reset button to reset the router. To reset the router to the
factory defaults, press and hold the Reset button for more than five seconds.
This clears the router’s user settings, including User ID, Password, IP Address,
and Subnet mask. (Warning: your original configurations will be replaced with
the factory default settings)
3.2 LED Description
The following illustration shows the Wireless Broadband Router front panel:
Page 7 of 58
Wireless Broadband Router User manual
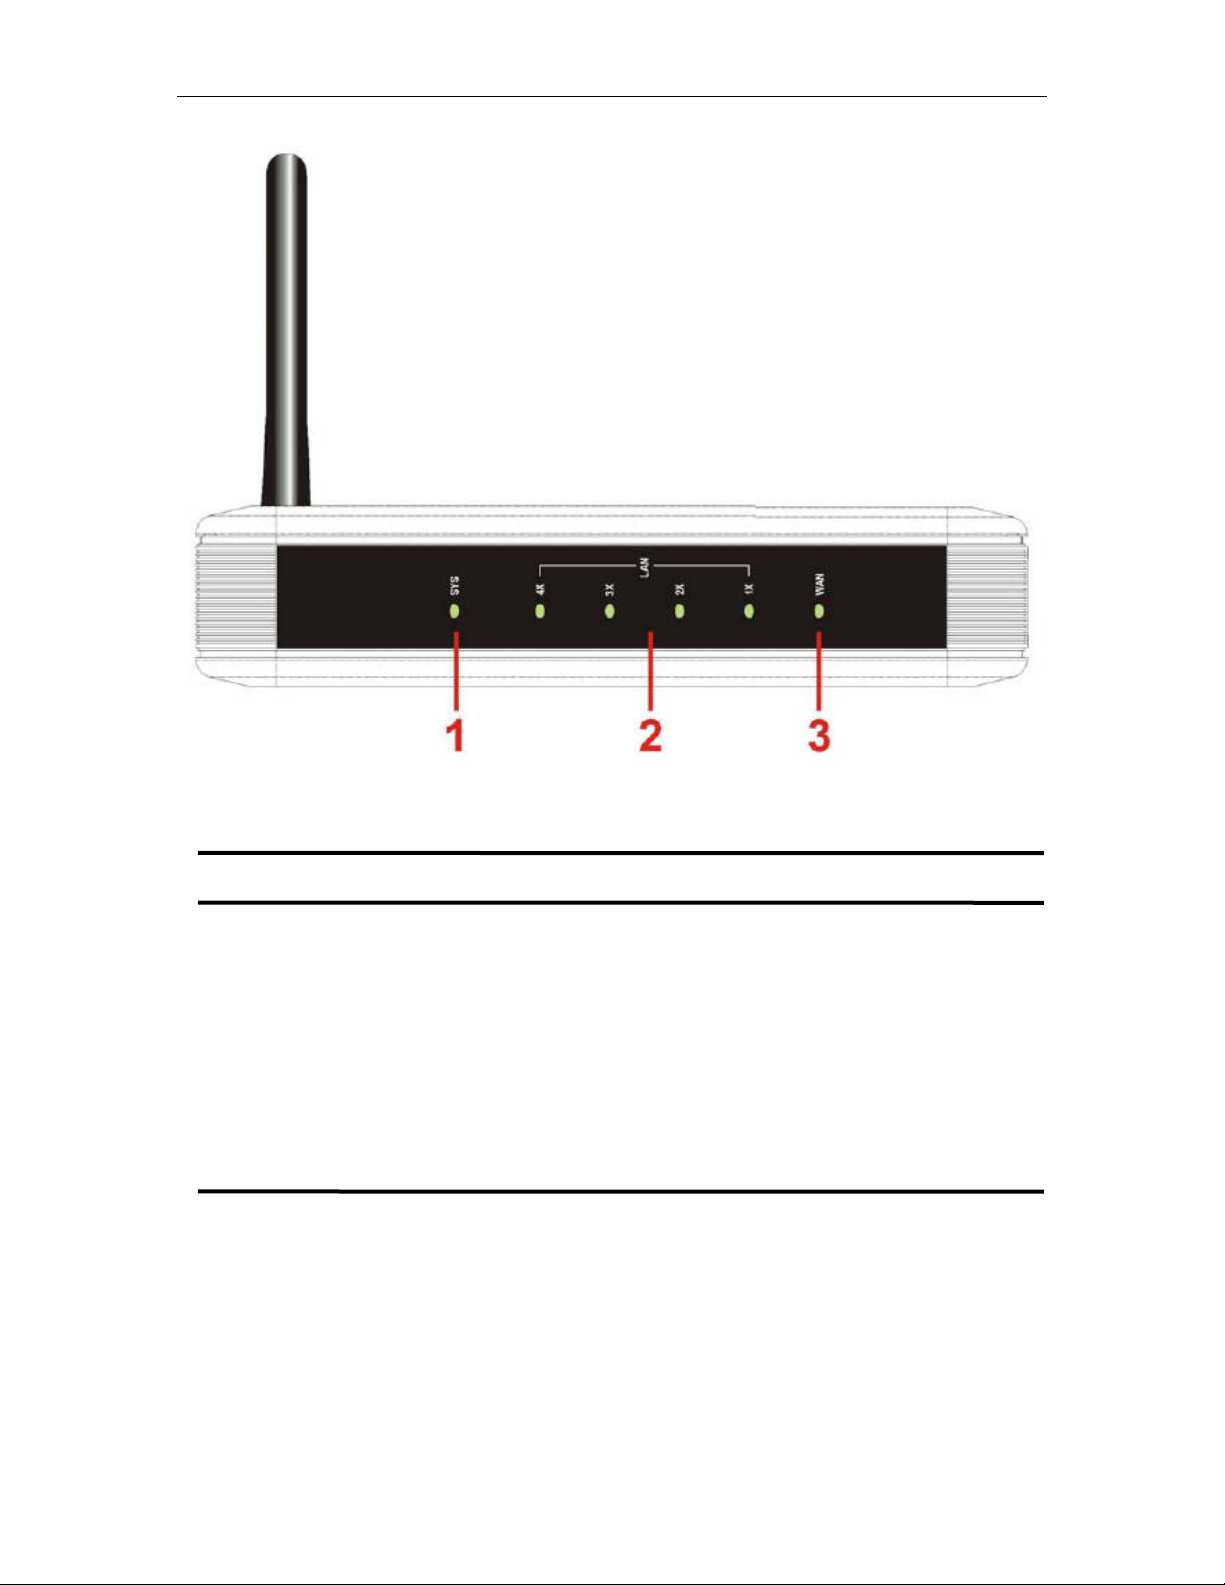
Figure 3 front panel
Number LED Light Status Description
1 SYS ON
POWER/CPU/WLAN ACT.
2 PC(1-4) ON PC is connected
Off No PC connection
Flashing LAN port has Activity (ACT), data being
sent
3 WAN ON WAN is connected
Off No WAN connection
Flashing WAN port has Activity (ACT), data being
sent
Page 8 of 58

Wireless Broadband Router User manual
Chapter 4 hardware connection
z Begin by finding a good place to set up your wireless broadband. Some
things to consider:Keep the access point as central in your work area as
possible. Signal strength and speed fall off with distance.
z Higher is often better. For instance, set it up on the top shelf of a bookcase
rather than the bottom one, if possible.
4.1 Connecting the Wireless Broadband Router
Prior to connecting the hardware, make sure to power off your Ethernet device,
Cable/ADSL modem and Wireless Broadband Router. Then follow the steps
below to connect the related devices.
Step 1: Connecting your computer to the LAN port.
Attach one end of the Ethernet cable with RJ-45 connector to your hub, switch
or a computer’s Ethernet port, and the other end to one of the LAN ports of your
Wireless Broadband Router.
Step 2: Connecting Cable/ADSL Modem to the WAN port.
Connect the Ethernet cable attaching to your Cable/ADSL modem to the WAN
port of your Wireless Broadband Router.
Step 3: Connecting the power adapter.
Connect the single DC output connector of the power adapter to the power jack
on the side of the Wireless Broadband Router. Then plug the Power Adapter into
an AC outlet,
Step 4: Power on the following devices in this order: Cable/ADSL
modem, Router, and PCs.
Page 9 of 58
Wireless Broadband Router User manual
Chapter 5 Configuring Local PC to Access the
Wireless Router
You can manage the Wireless Broadband Router through the Web
browser-based configuration utility. To configure the device via Web browser,
at least one properly configured computer must be connected to the device via
Ethernet or wireless network. The Wireless Broadband Router is configured
with the default IP address of 192.168.1.1 and subnet mask of 255.255.255.0
and its DHCP server is enabled by default. Before setting up the Router, make
sure your PCs are configured to obtain an IP (or TCP/IP) address automatically
from the Router by the steps below.
5.1 Setting up TCP/IP
5.1.1 Windows 2000
Please follow the steps below to setup your computer:
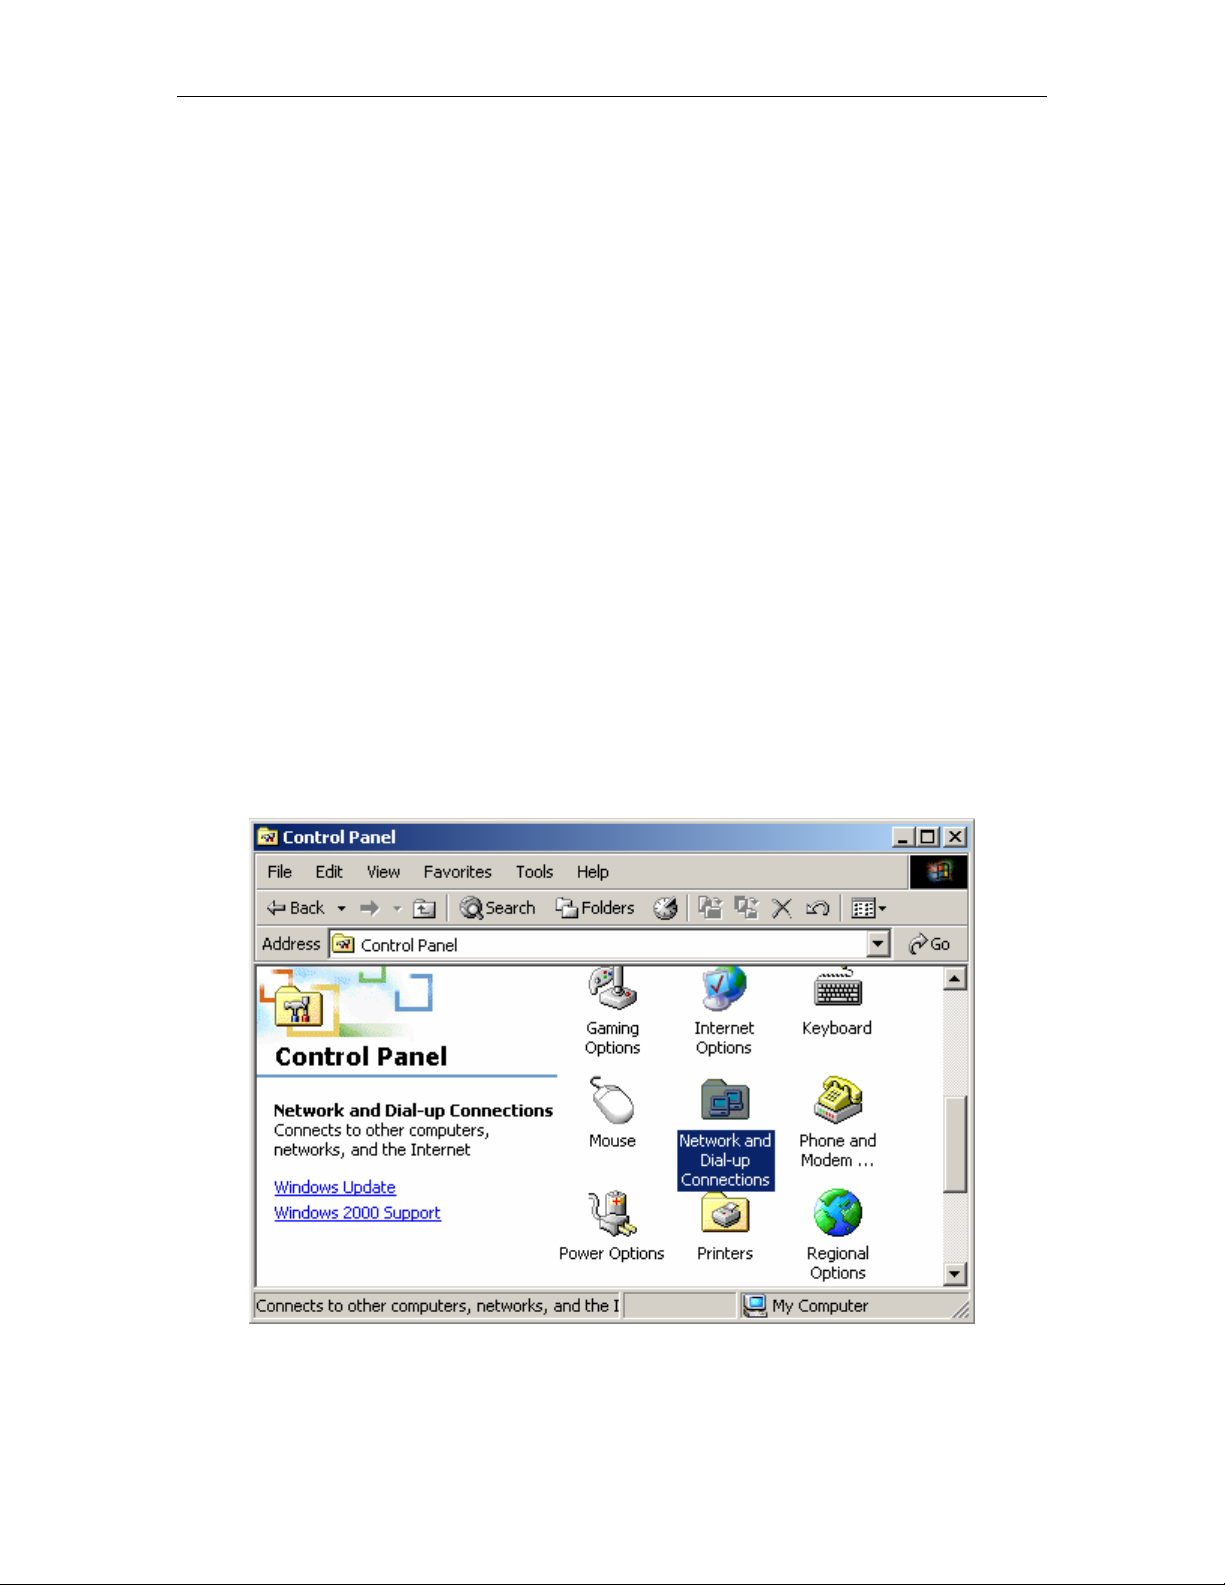
Step 1: Go to Start Æ Settings Æ Control Panel
Figure 4
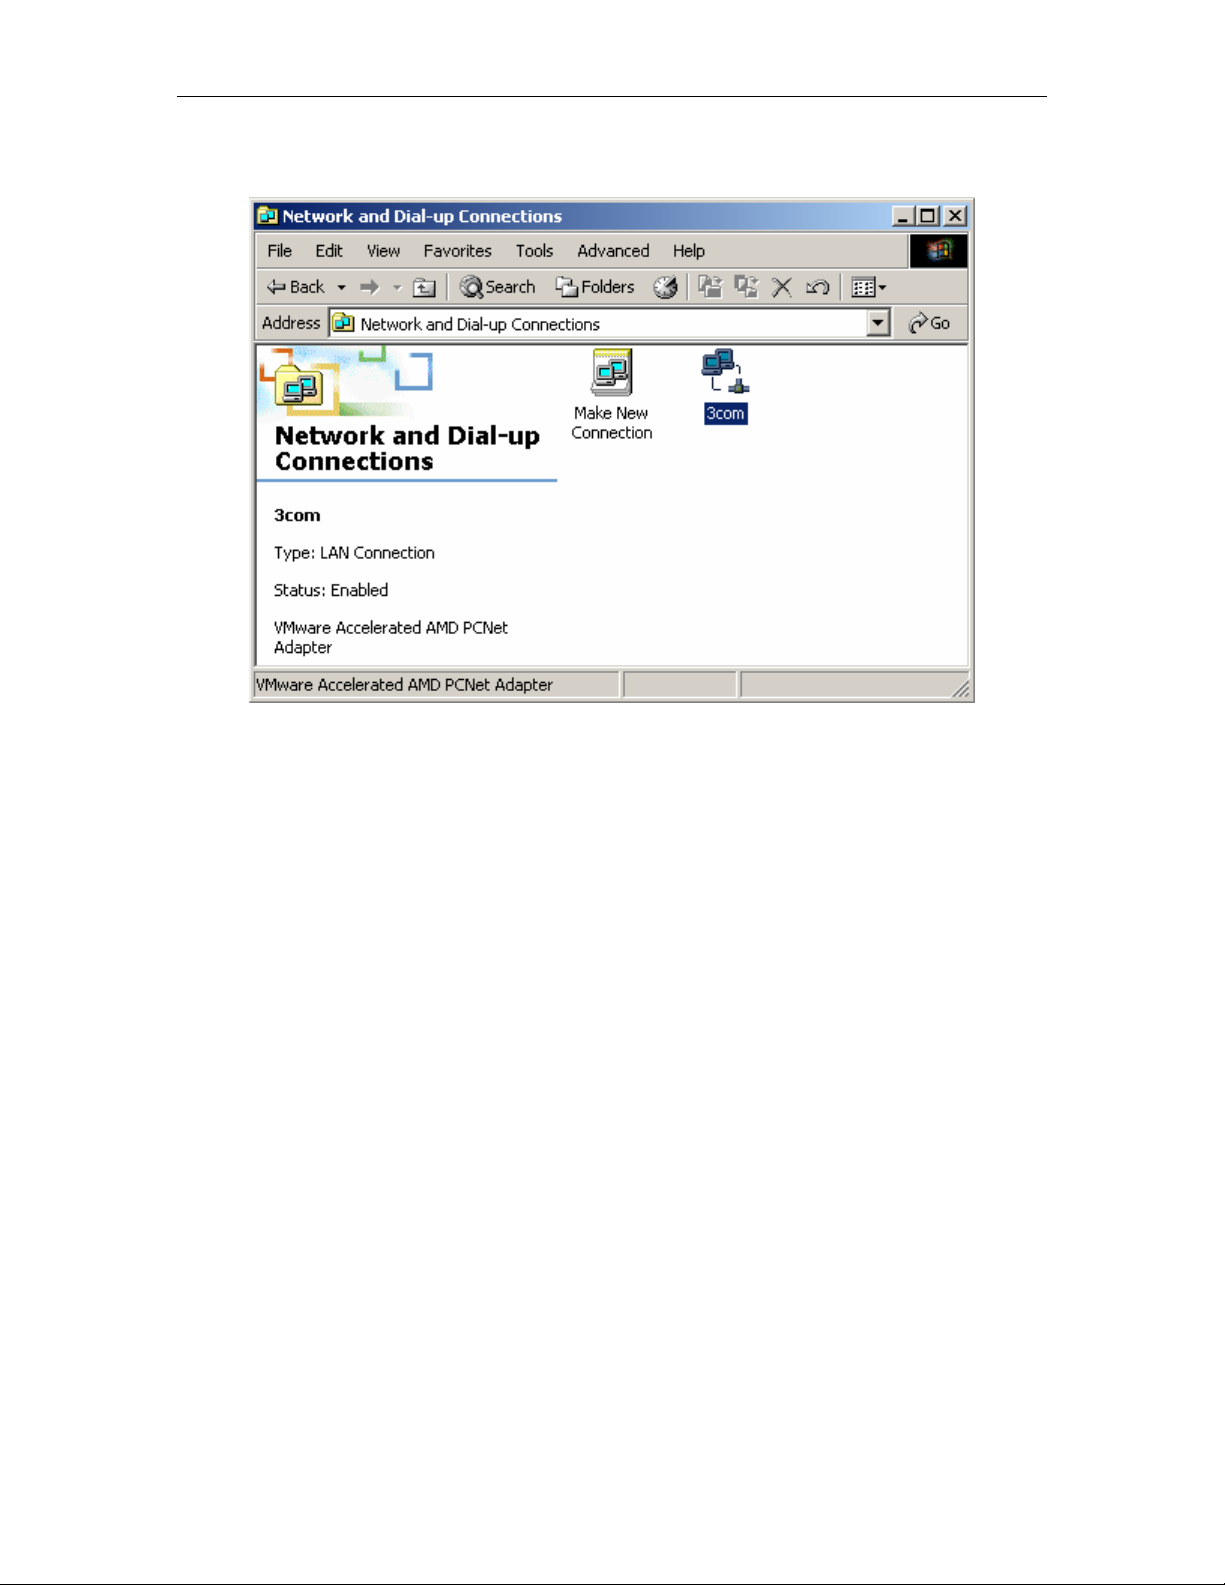
Step 2: Double click the icon Network and Dial-up Connections
Page 10 of 58
Wireless Broadband Router User manual
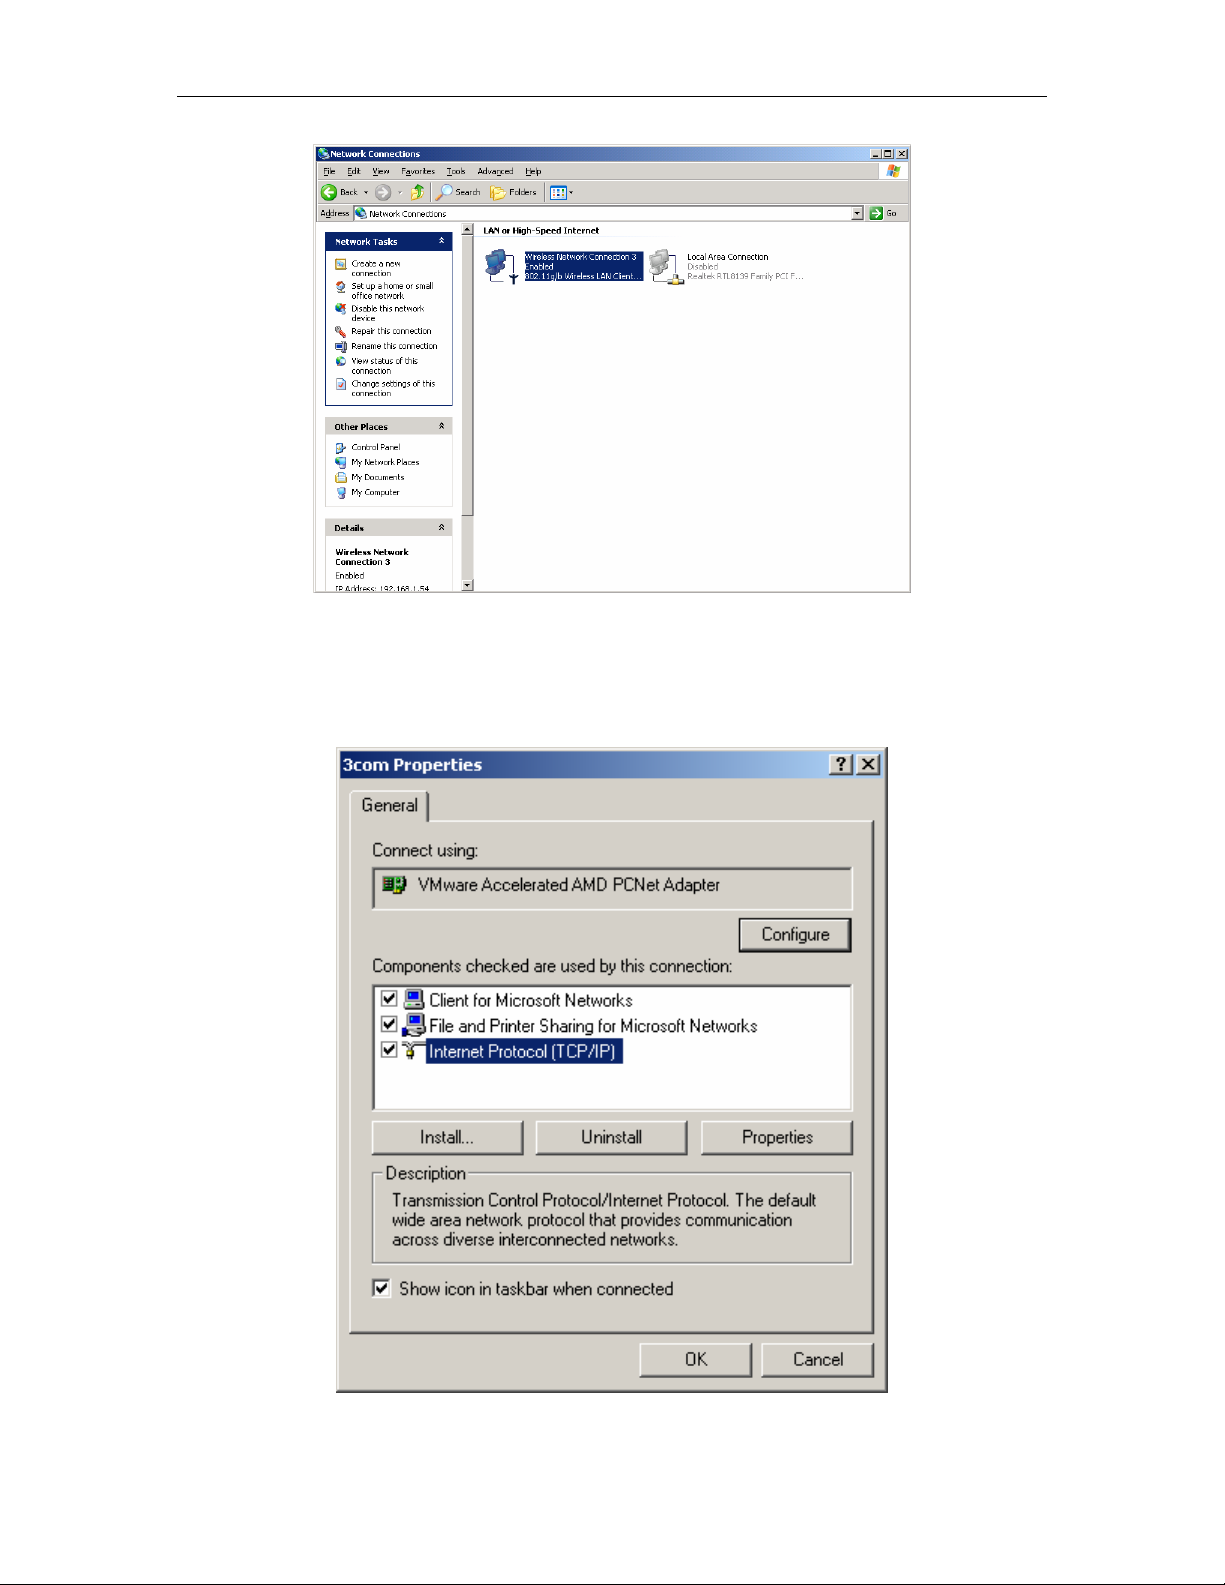
Step 3: Highlight the icon Local Area Connection, right click your
mouse, Click Properties
Figure 5
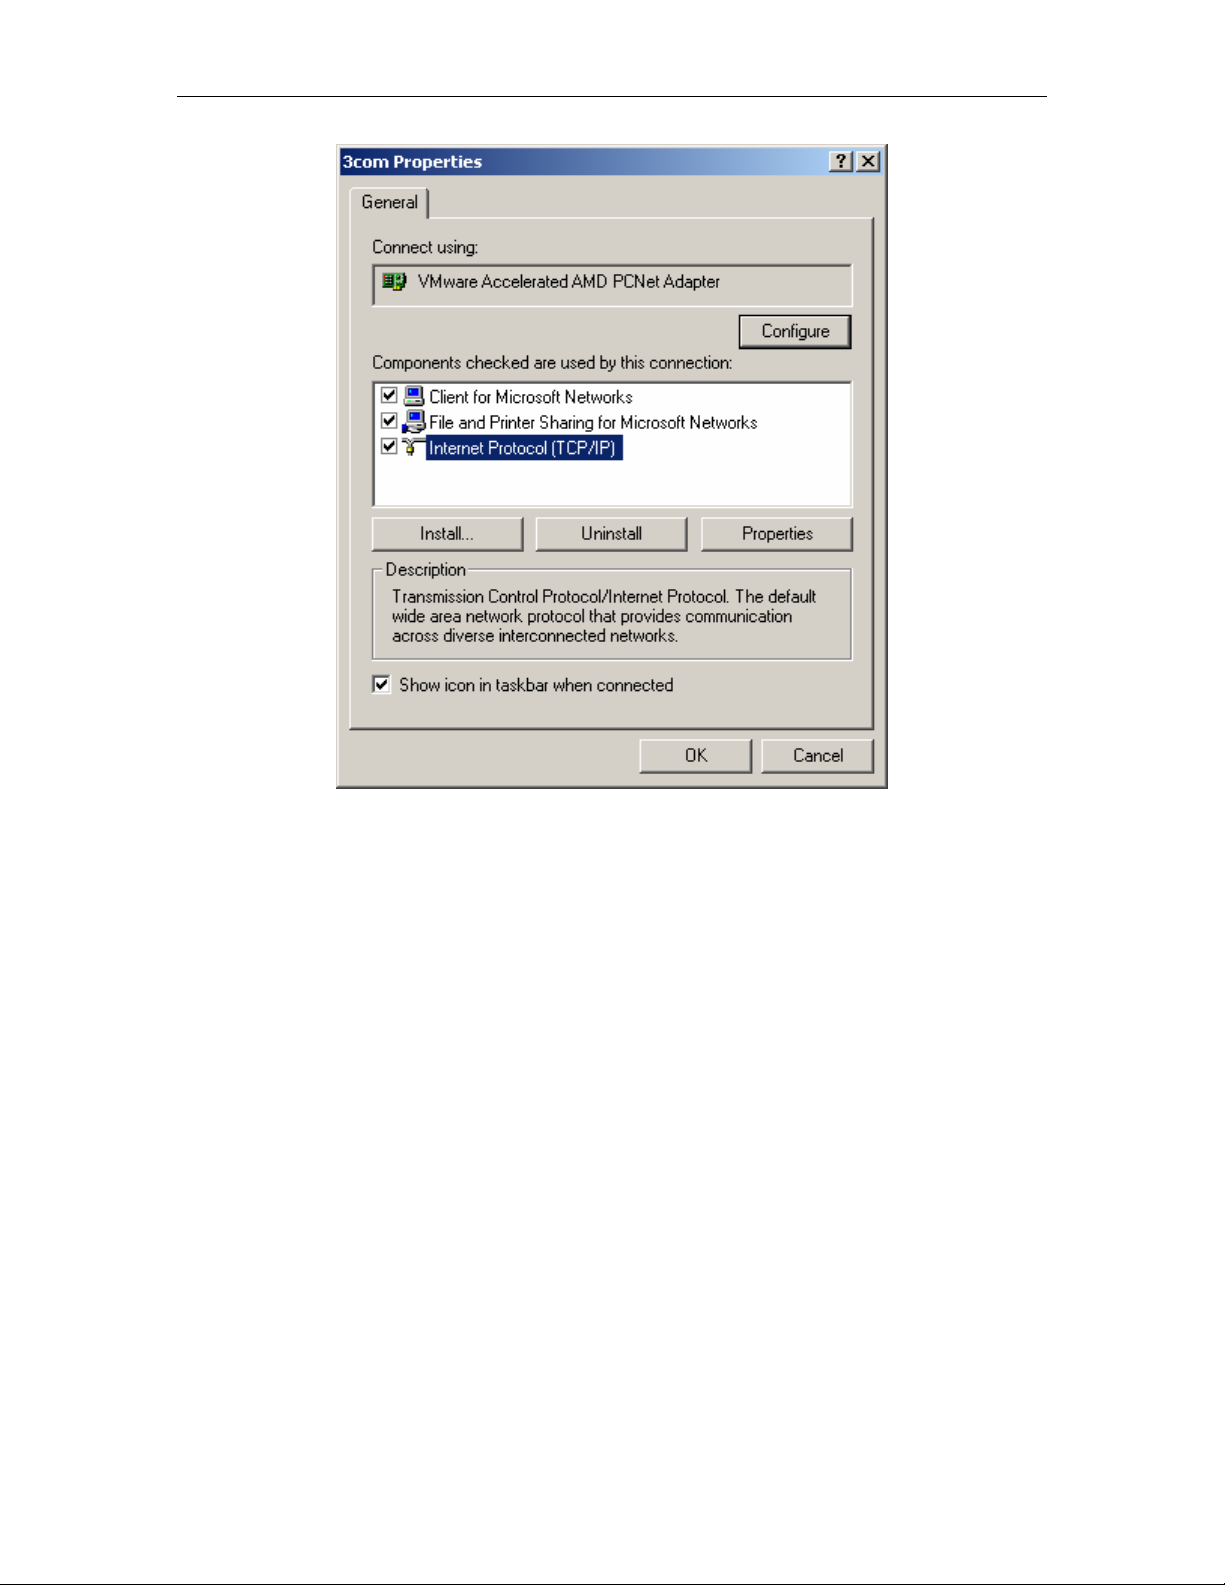
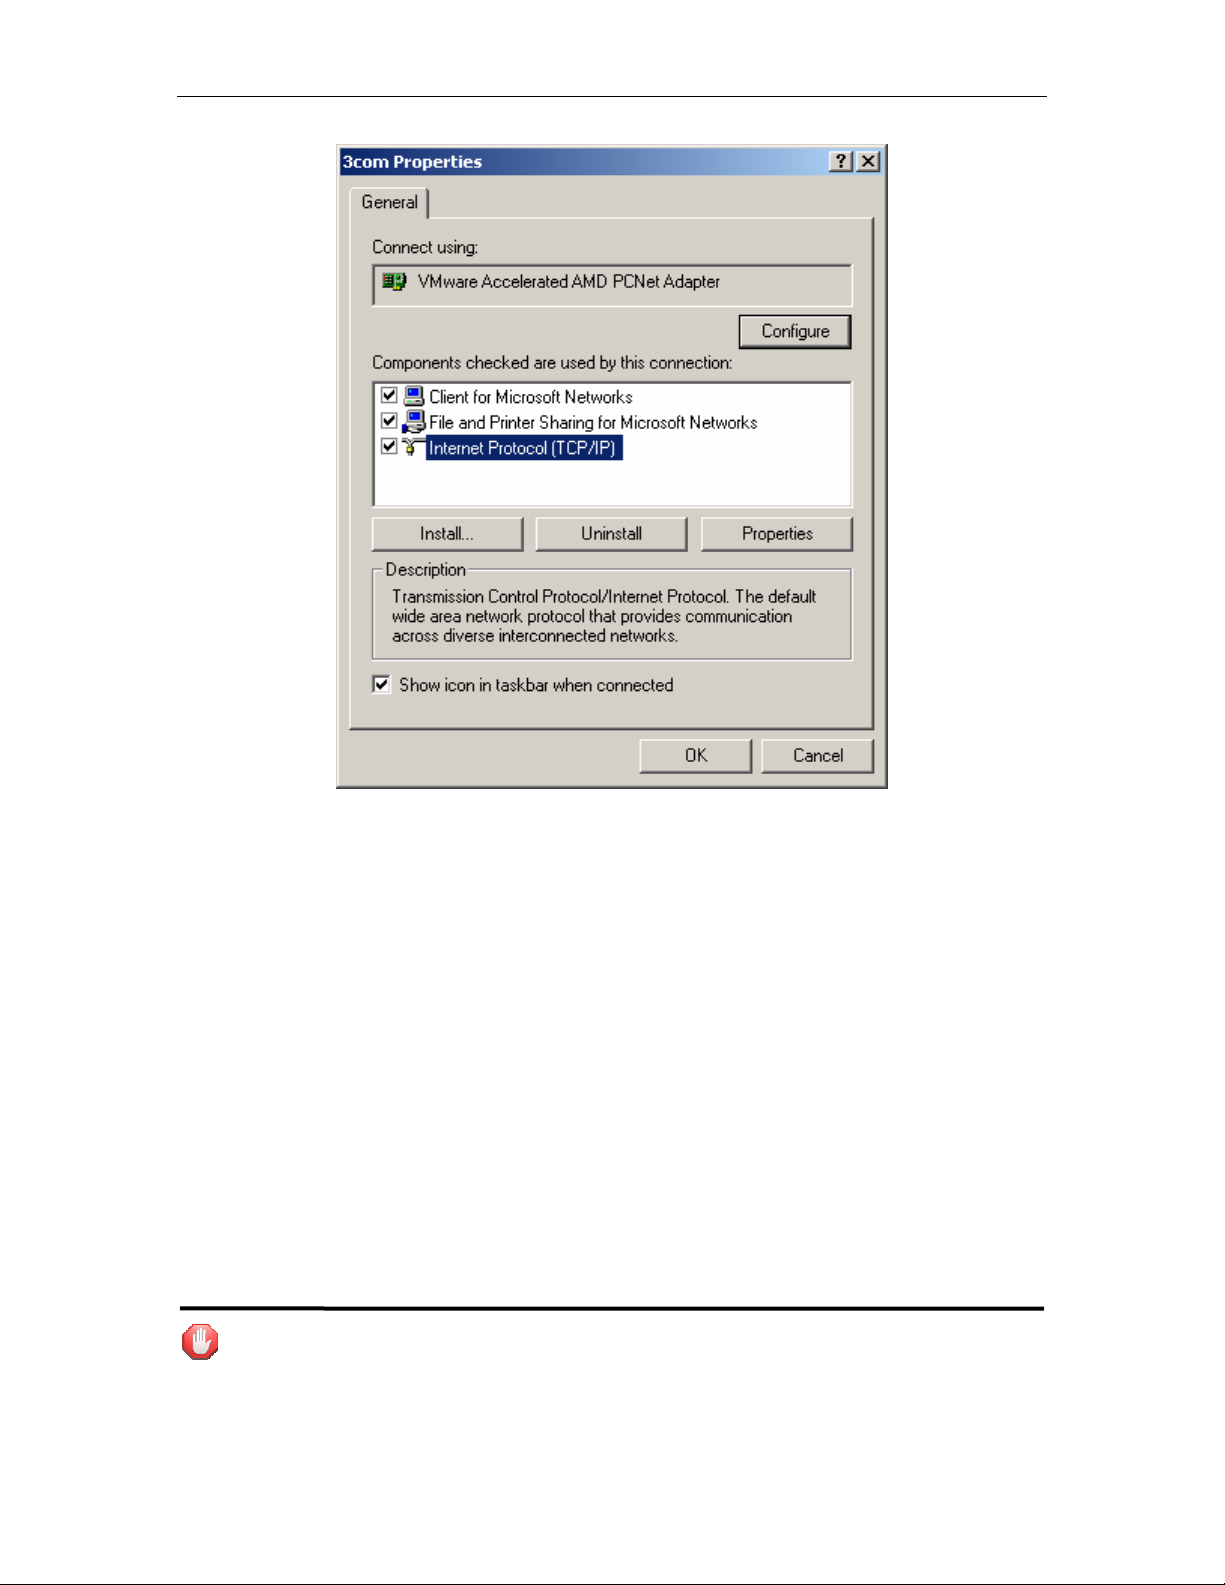
Step 4: Highlight Internet Protocol (TCP/IP), then press Properties
button
Page 11 of 58

Wireless Broadband Router User manual
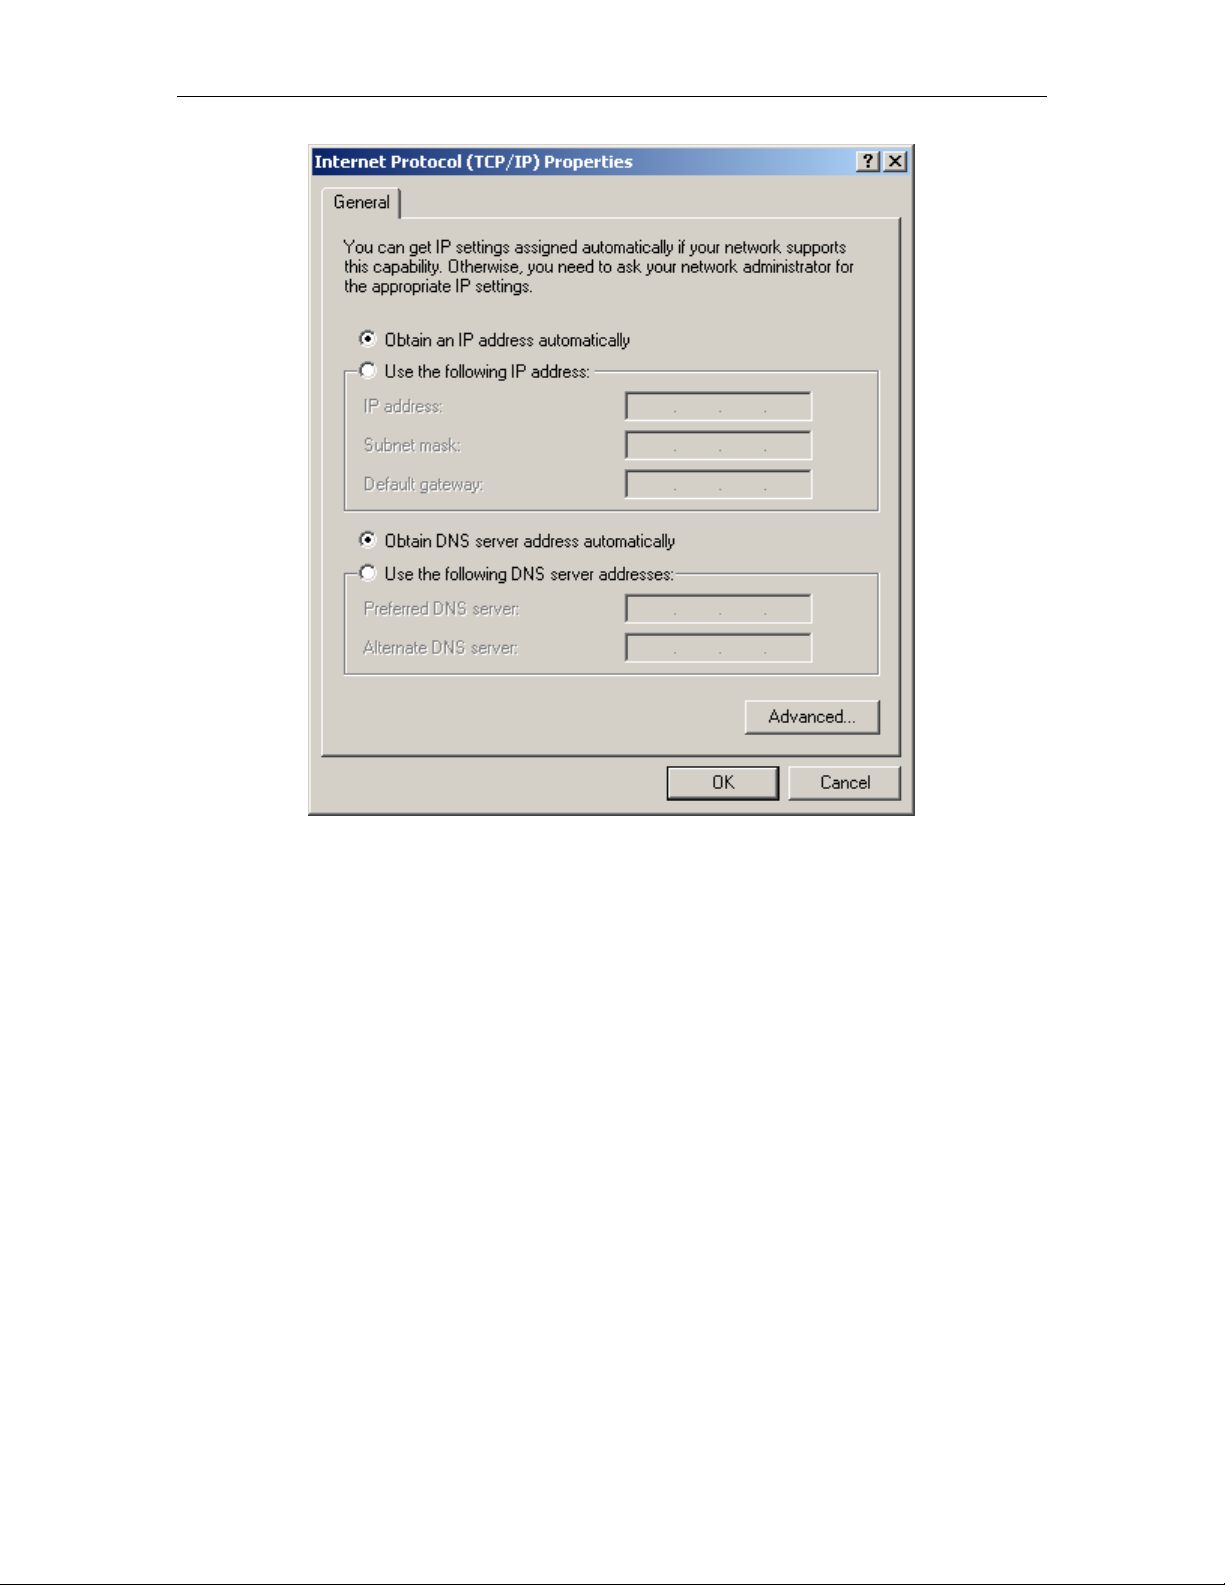
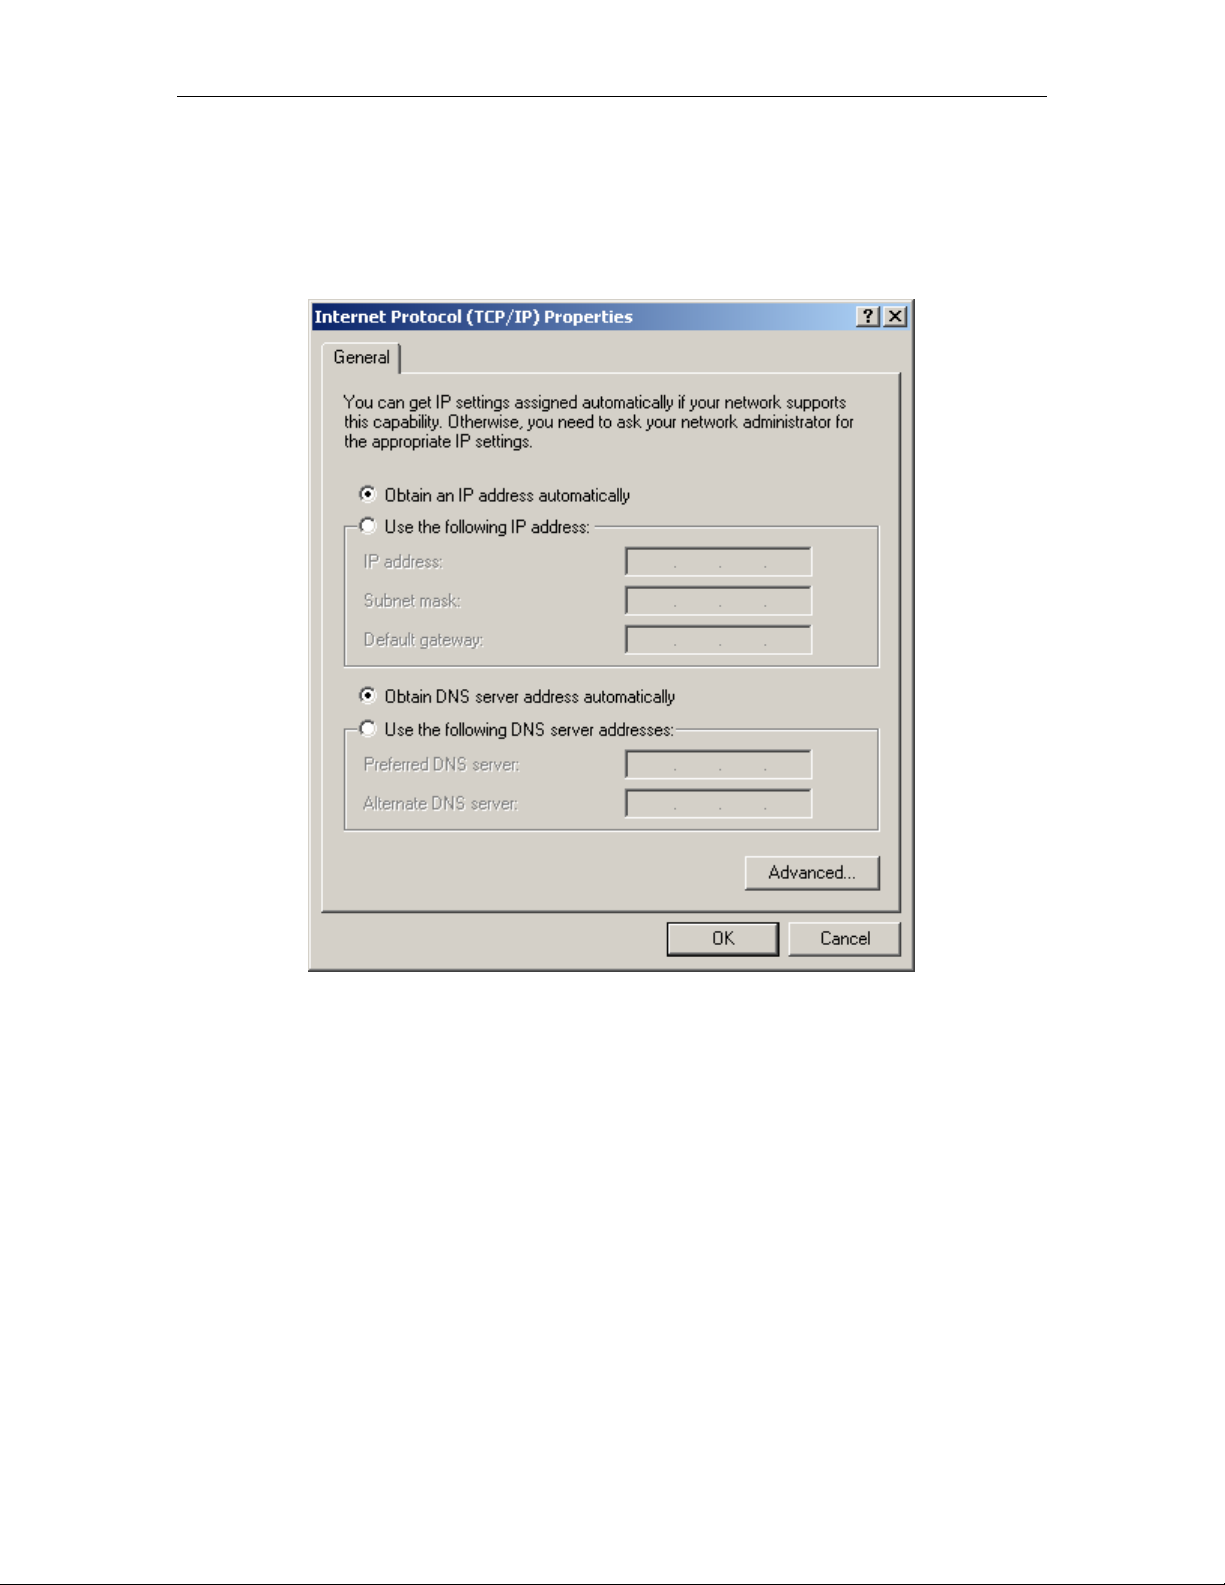
Figure 6
Step 5: Choose Obtain an IP address automatically and Obtain DNS
Server Address automatically, and then press OK to close the Internet
Protocol (TCP/IP) Properties window.
Page 12 of 58
Wireless Broadband Router User manual
Figure 7
Step 6: Press OK to close the Local Area Connection Properties window
Page 13 of 58
Wireless Broadband Router User manual
Figure 8
5.1.2 Windows XP/2003
Please follow the steps below to setup your computer:
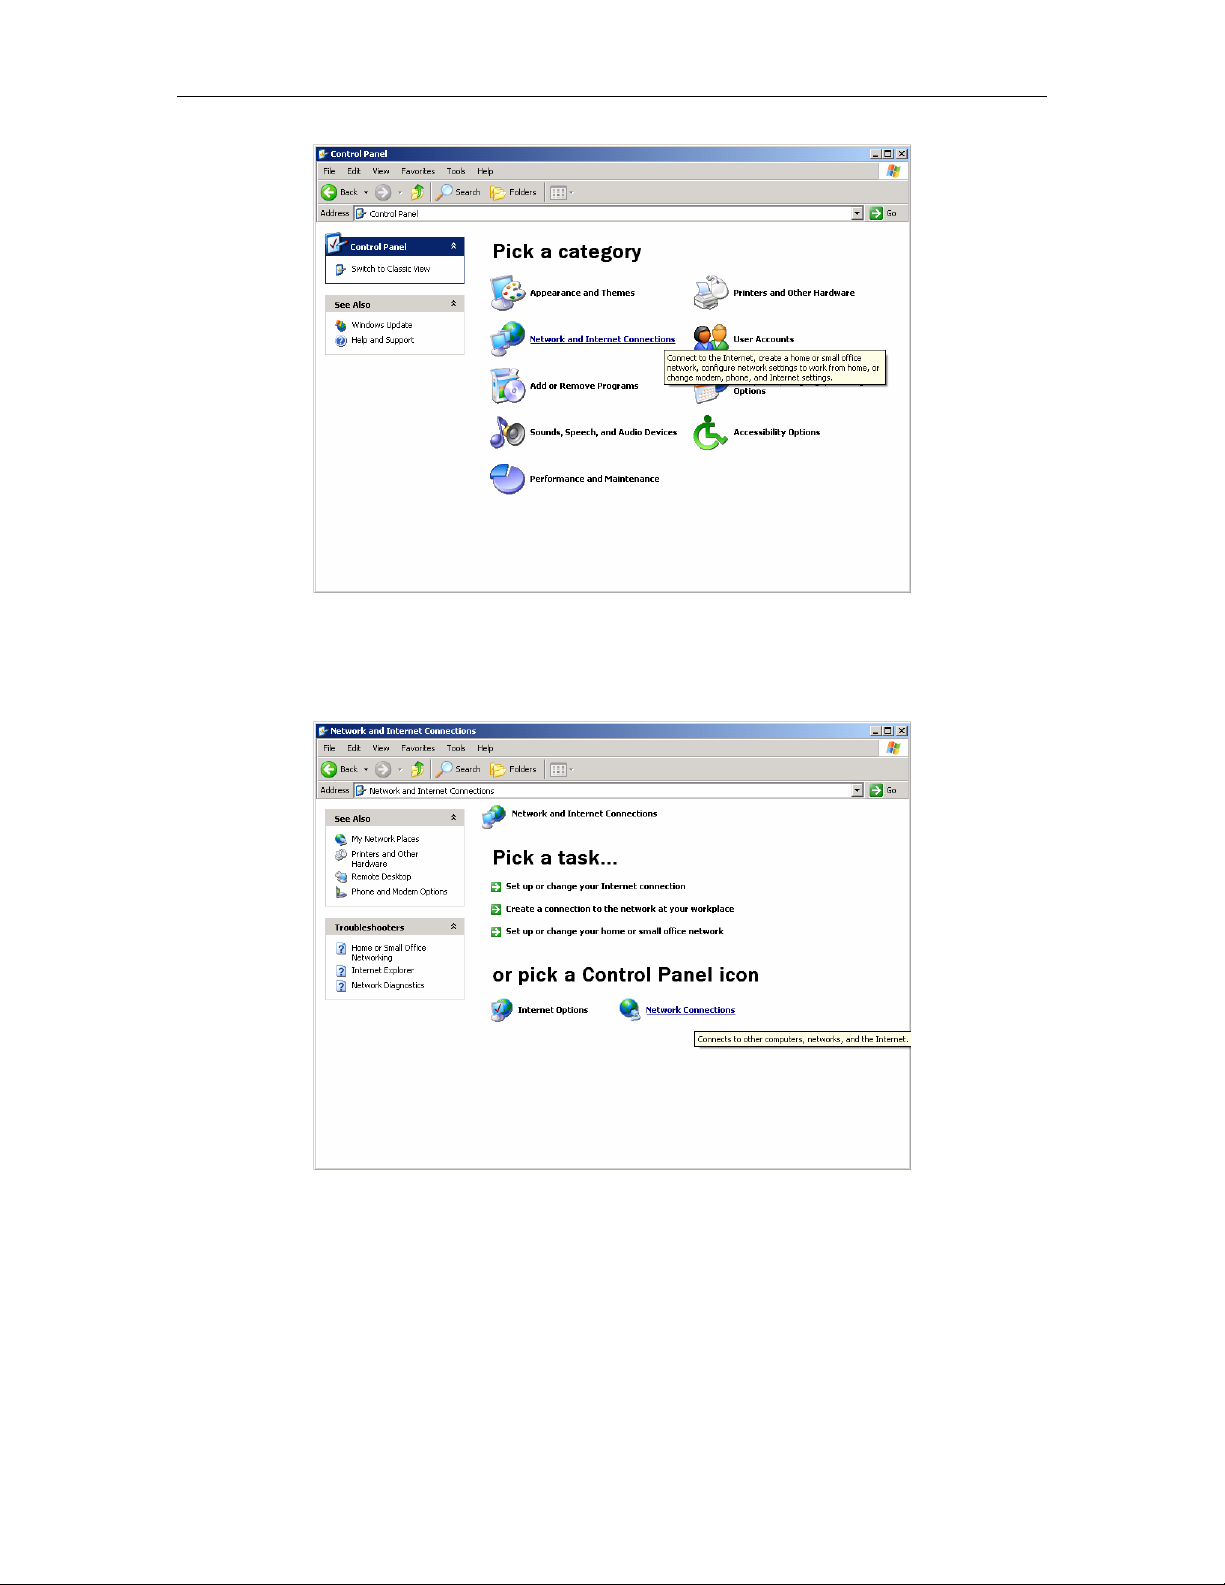
Step 1: Go to Start Æ Settings Æ Control Panel
Step 2: Click Network and Internet Connections
Page 14 of 58
Wireless Broadband Router User manual
Figure 9
Step 3: Click Network Connections
Figure 10
Step 4: Highlight the icon Local Area Connection, right click your
mouse, Click Properties
Page 15 of 58
Wireless Broadband Router User manual
Figure 11
Step 5: Highlight Internet Protocol (TCP/IP), then press Properties
button
Page 16 of 58
Wireless Broadband Router User manual
Figure 12
Step 6: Choose Obtain an IP address automatically and Obtain DNS
Server address automatically, and then press OK to close the Internet
Protocol (TCP/IP) Properties window
Figure 13
Step 7: Press OK to close the Local Area Connection Properties window
Page 17 of 58
Wireless Broadband Router User manual
Figure 14
5.2 Additional Settings for Wireless Client
If you chose to access the router via a wireless client, also verify the following:
Step 1: Make sure your PC is equipped with 802.11g or 802.11b wireless
adapter and has appropriate WLAN card driver/utility and TCP/IP installed.
Step 2: Set the wireless adapter to use appropriate TCP/IP settings as
described in previous section.
Step 3: Launch the wireless adapter’s provided utility and verify that your
wireless client is configured with these settings:
z Operation Mode: Infrastructure
z SSID: default
z Authentication: Disabled
z Encryption: Off
z Radio Band: 802.11B/G
If you only finished the wireless settings and did n’t configure the wireless
adapter’s TCP/IP settings, even your link status indicates a successful
connection with the AP. This connection applies to the “physical” network layer
Page 18 of 58
 Loading...