

Addon NWAR3650 Quick Install Guide
Indicator
Status
Description
Power
Off
The power is off.
Green
The power is on and the device operates normally.
Red
The power is self-testing.
The device enters the console mode of the boot loader.
The self-testing of the power fails if the LED is always red.
Blink Red
Upgrading software.
ADSL
Off
No signal is detected.
Blink Green
The DSL line is training.
Green
The DSL line connection is established.
Internet
Off
No internet connection.
Green
The users can access the Internet.
Red
Device attempts to become IP connected but fails.
LAN4/3/2/1
Off
No Ethernet signal is detected.
Blink Green
The user data is passing through Ethernet port.
Green
Ethernet interface is ready to work
WLAN
Off
No radio signal is detected.
Blink Green
The user data is passing through.
Green
WLAN interface is ready to work.
WPS
Off
WPS service is not during using, or WPS service is setup successfully.
Blink Green
The WPS service tries to establish.
USB
Off
No USB signal is detected.
Blink Green
The user data is passing through USB port.
Green
The USB interface is ready to work.
For any further information on ADDON product, please visit our website: www.addon-tech.com 1

Interface
Description
Line
RJ-11 port: Connect the Modem to ADSL connector or splitter by telephone line.
WLAN
Enable or disable the WLAN. Press the button to enable WLAN.
Reset
To restore the factory default, keep the device powered on and push a long needle into the hole. Press down the
button and then releas e.
WPS
Enable or disable the WPS. Press the button to enable W PS.
LAN1/2/3/4
RJ-45 port: Connect the Modem to a PC or other network device by network cable.
USB
USB host port, connect to another USB device to supply some value-added application.
Power
Power supplied port, plug in for power adapter that the power input is 12V DC, 1.25 A.
Power switch.
1. Hardware Connection
Rear panel:
Physical Connection
1. Connect the ADSL cable from BT filter to the Line port at the back of the router.
2. Connect the Ethernet cable from the Ethernet port on the router to the Ethernet port on the PC.
3. Plug the power cable to the router and turn on the power for the router.
PC Configuration
Windows XP
1. Click “start” -> “Control Panel” ->”Network Connections” .
2. Right click on “Local Area Connection” under “LAN or High Speed Internet” and choose “Properties”
3. Select “ Internet Protocol (TCP/IP)”, and cli
4. Select “Obtain an IP address automatically” and “Obtain DNS server address automatically”, click “OK” to save
the settings.
ck “Properties”, as shown in g.1 .
For any further information on ADDON product, please visit our website: www.addon-tech.com 2
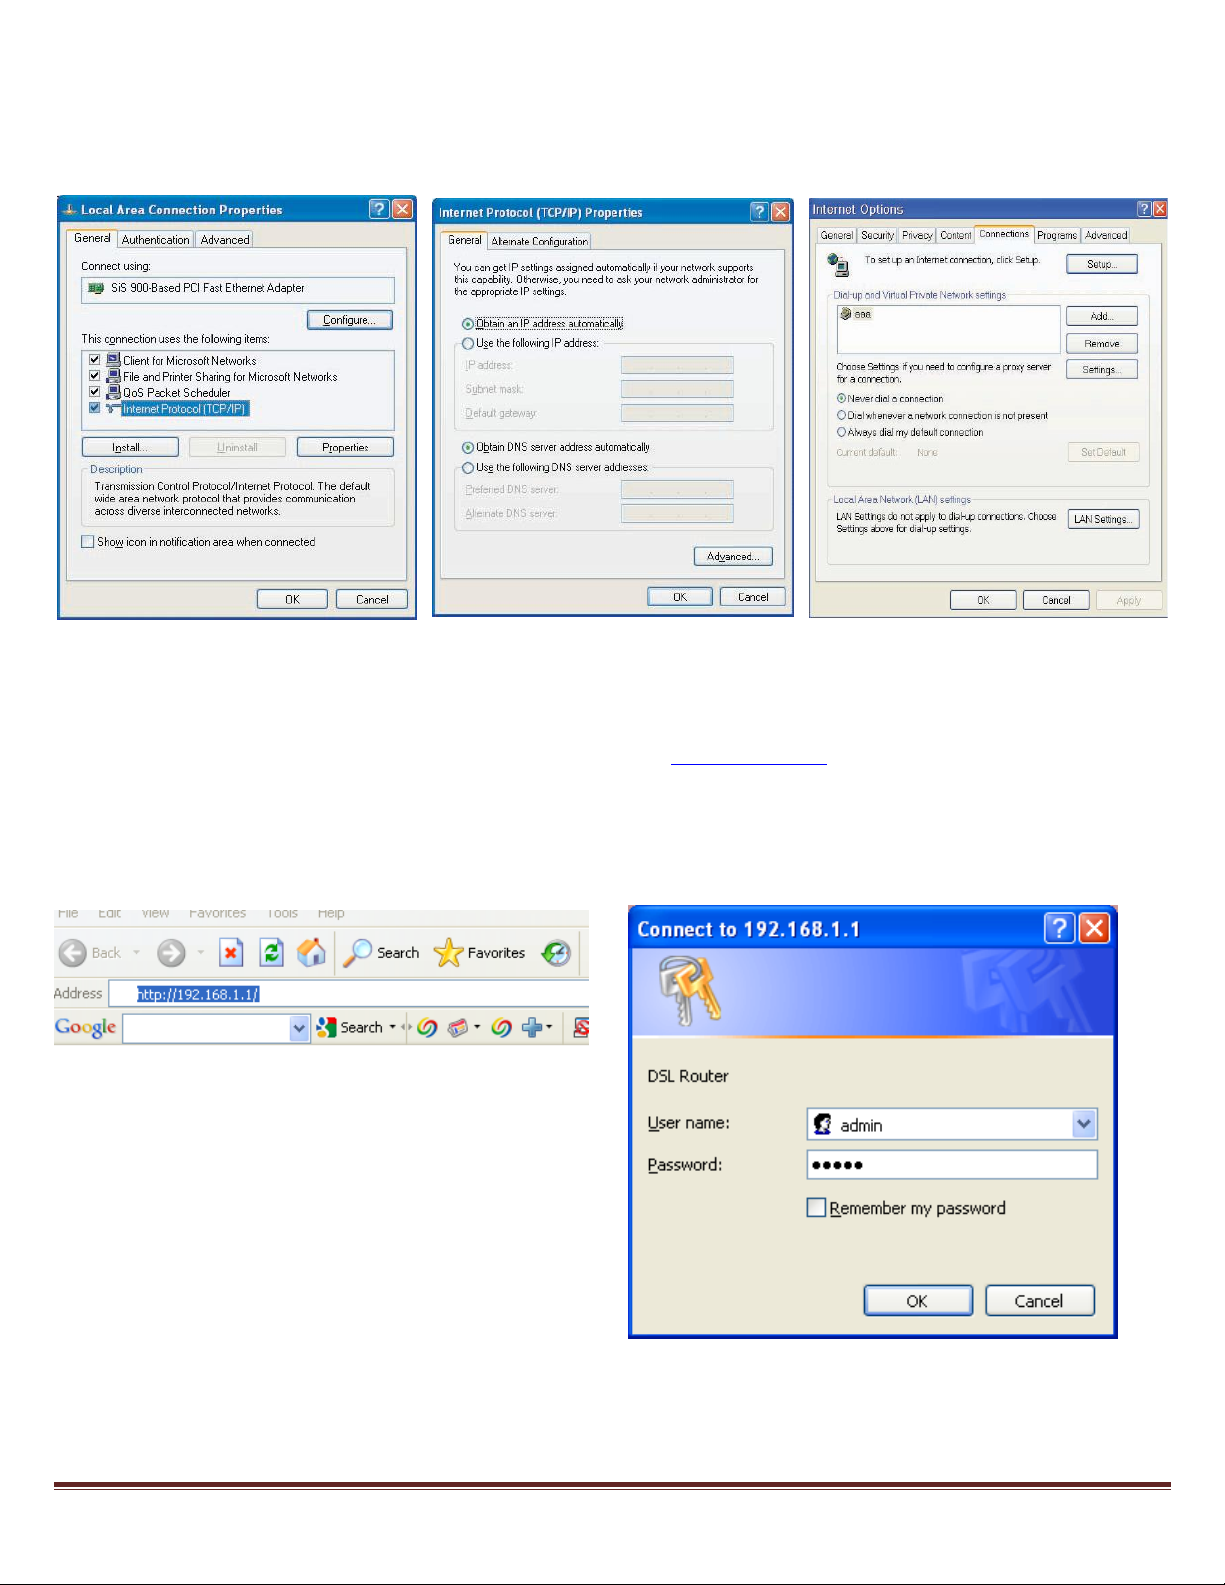
Fig.1
Fig.2
Fig.3
Fig.4
Fig.5
Internet Explorer Configuration
Windows XP
1. Click “start”->”control panel”->”Internet Options”, as shown in fig 3.
2. Click tab “Connections”, select “Never dial a connection”.
2. ADSL2+ Router Configuration
Step 1: Open Internet Explorer, enter NWAR3650 default IP address http://192.168.1.1 in the address bar and press Enter,
as shown in fig. 4
Step 2: Enter “admin” as the username and “admin” as the password, if the login box pops up. Click “OK” to login to the web
management site.
For any further information on ADDON product, please visit our website: www.addon-tech.com 3
 Loading...