

Page 1
Warningsand cautions
Operate the pump in the rated pressure range and do not exceed the
safety pressure of 9000 psi (600 bar).
Close the valves and tighten the ports when transporting the pump.
Always open the reservoir release valve during operation.
Do not over tighten the connectors or handles to avoid any damage.
Change contaminated media immediately.
Do not let the media level get below the mid line of the reservoir when
the pump is place horizontal.
Keep the outer threads clean.
Additel is not liable for any safety problems or damages caused by
misuse or incorrect operation.
Specification
Handheld Hydraulic Pressure Test Pump
Configuration & Pressure drawing
1
8
5
7
234
6
Pressure range:
Remark:.If local atmosphere pressure is 1 bar, the vacuum can reach to 0 85 bar;
Temperature:
ADT925
Humidity:
Adjustment resolution:
Safety pressure:
User s Manual'
Pressure media:
[Version number:1407V12]
Size:
Weight:
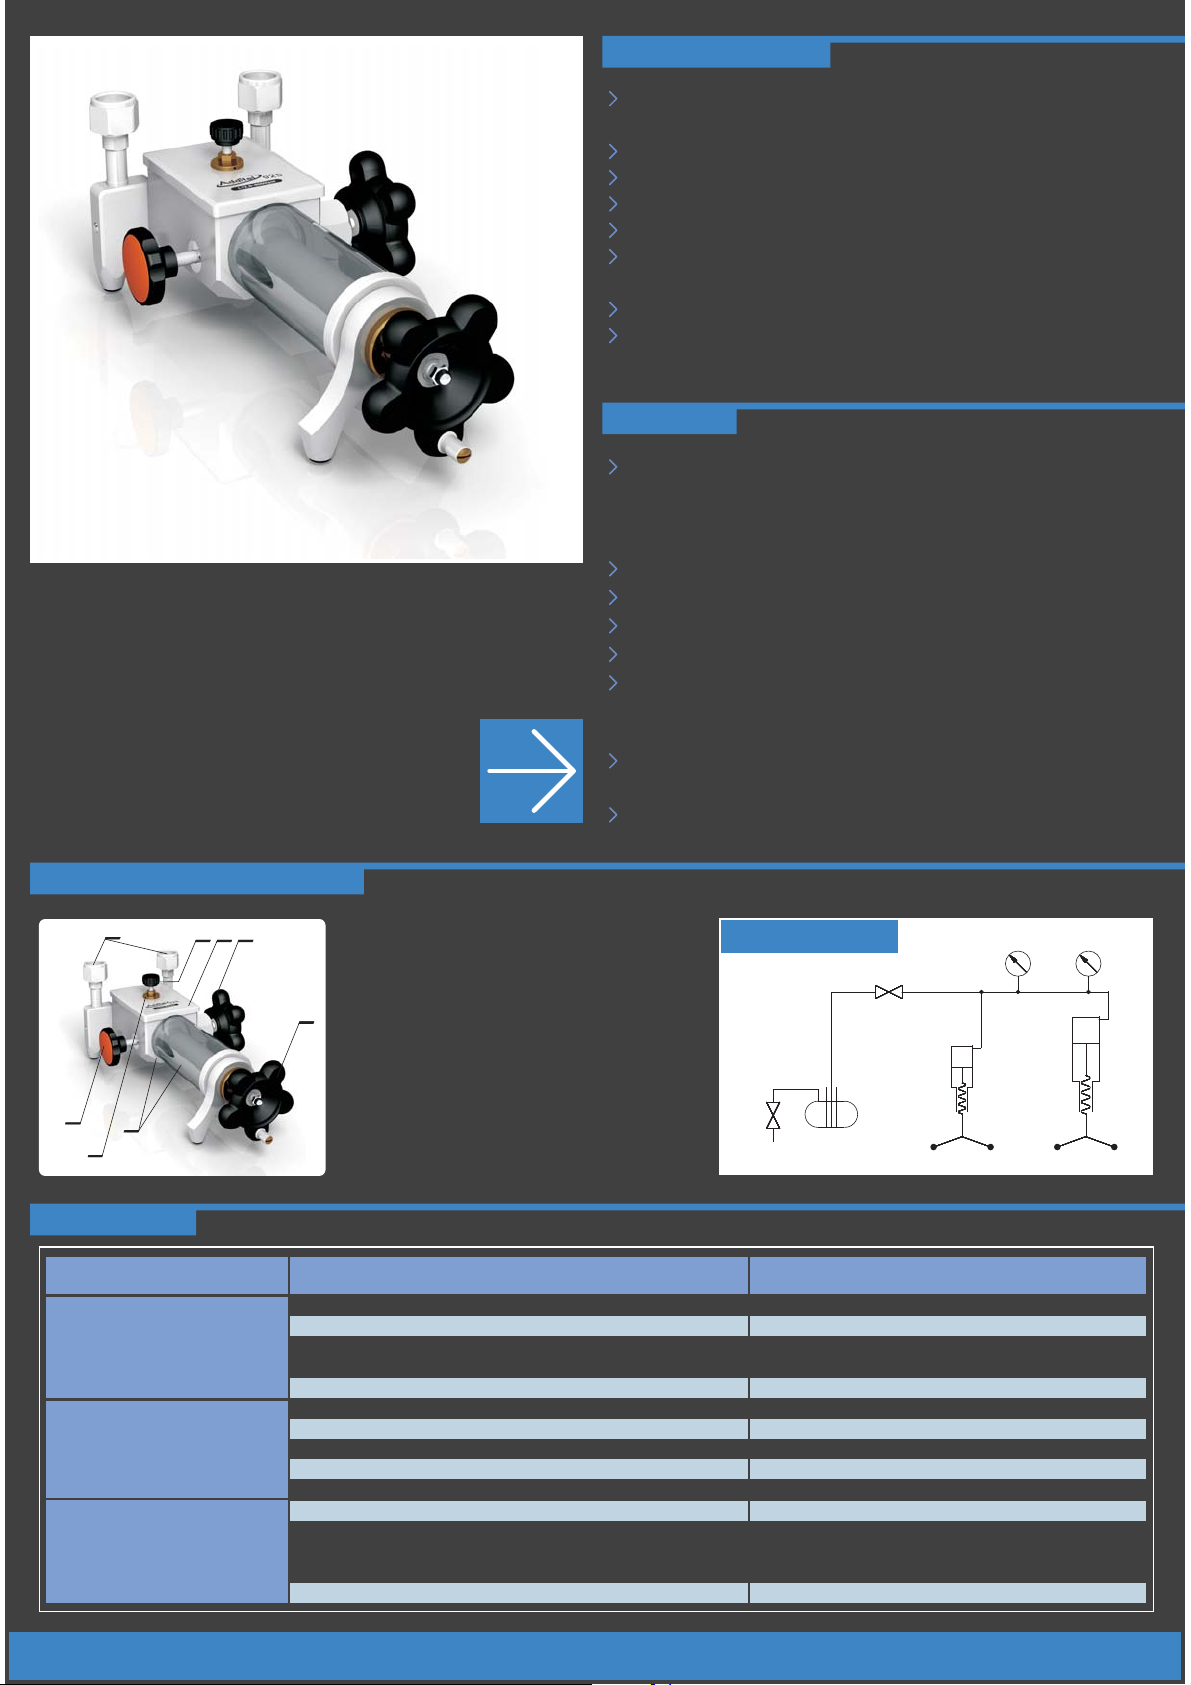
1 Quick connector2 - Reservoir release valve
(open it to connect with atmosphere)
3 - Upper cover of reservoir
4 - High-pressure pressurization and
fine pressure adjustment handle
(clockwise to increase pressure)
5 - Liquid reservoir
(inner is pressure media)
6 - Pre-pressurization handle
(clockwise to increase pressure)
7 - Screw of fitting cover
8 - Vent valve
(Open to connect with atmosphere)
12.5 psi ( 0.85 bar ) vacuum to
6000 psi ( 400 bar ) positive pressure
If local atmosphere pressure is P, the vacuum can reach to bar.( P 85% )
(
0~50)℃
< 95%RH
0.015 psi ( 1 mbar )
< 9000 psi ( 600 bar )
Oil or deionized water
Toreach the bestperformance oil is recommended
Recommended oil Di ethylhexyl Sebacate Isovoltine
:- , II.
,.
Height: 4.72'' ( 120 mm );
Base: 9.84'' ( 250 mm ) x 5.51'' ( 140 mm )
3.8 lb ( 1.7 kg ) ( excluding the media )
Pressure drawing
8
2
5
4
6
Troubleshooting
Problem
Difficult to increase pressure with
pre-pressurization handle
Hard to fine adjust
it is difficult to turn valves or quick
connectors
Cause
A. Vent valve is not closed.
B. The O-ring seal is loose or damaged.
C. Not enough media is in the reservoir.
D. The pump is not horizontal.
A. The vent valve is not closed.
B. The gauges are not connected tight.
C. The is aged or frayed.
sealing ring
D. The thread surface is not smooth
E. The connector type is mismatched to the gauge pressure port.
A. Too much force was previously applied.
B. The pre-pressurization handle may not adjust easily under high pressure.
C. The threads have no lubrication..
Solution
Close the vent valve.
Replace the O-ring
Fill with more fluid. Make sure fluid level is high enough after the
gas purging process.
Place the pump horizontally to prepare for pressure or vacuum.
Close the vent valve.
Tighten the gauges.
Replace sealing ring.
Use Teflon tape on the thread and turn it in tight.
Use the correct adapter.
Do not over tighten.
Adjust pressure by using fine adjustment handle. (Pressure may
need to be decreased with the fine adjustment handle before the
pre-pressure handle can be used).
Lubricate the thread.
Page 2
Preparation
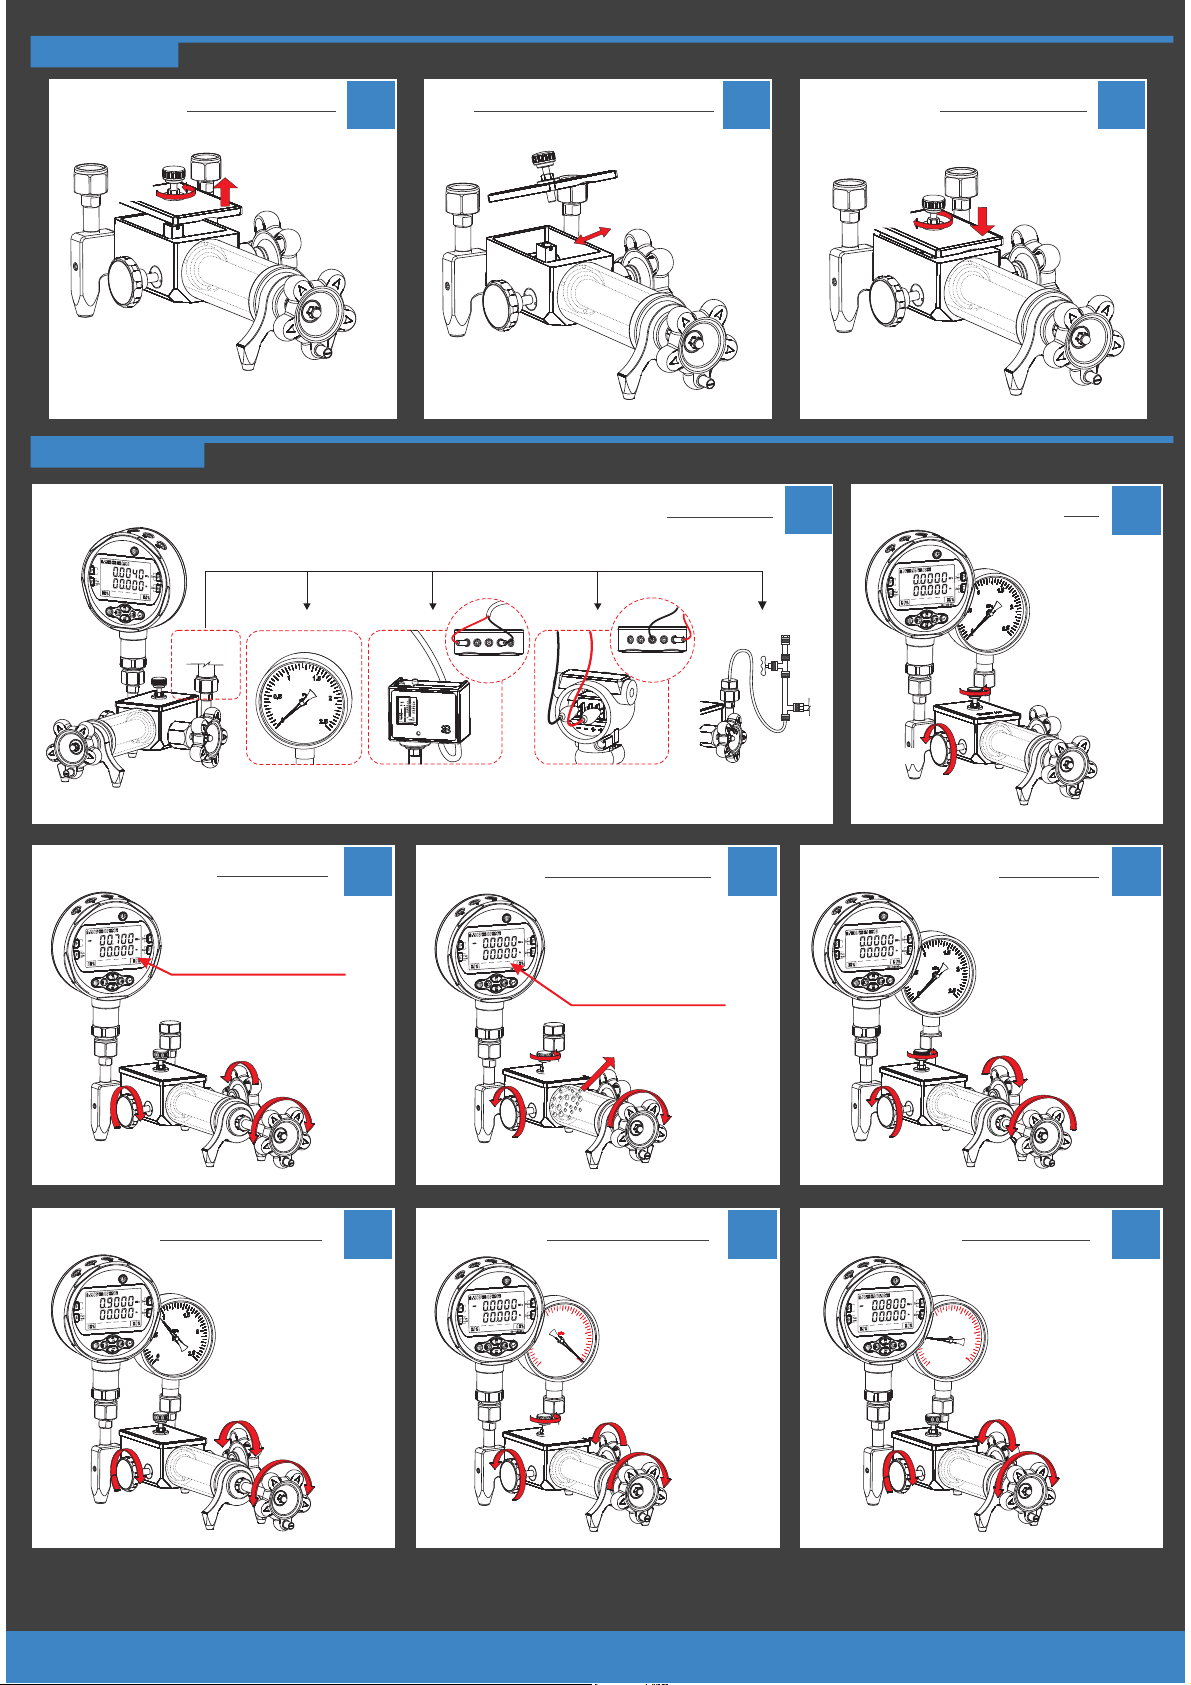
Open the reservoir
①open
The media level should be 2/3 the height of
the reservoir.
②open the upper cover
Basic Operation
DIGITALPRESSURE CALIBRATOR
Units
A
0255075100
A
Filling/emptying the reservoir
Fill or empty media
Clean any impurities
from the media and
reservoir.
SW V mA COM 24V
SW V mA COM 24V
B
Connection
A
②close
Units
Lock the reservoir
DIGITALPRESSURE CALIBRATOR
A
0255075100
Pressure Gauge
C
①close the upper cover
Vent
Zeroing should be
operated under
this condition only.
B
DIGITALPRESSURE CALIBRATOR
Units
0 25 50 75 100
①close
Purge process
A
a
P
(~)06M
Vacuum displayed on the gauge
③turn it to the smallest
degree
Pressurizing process
k
dial gauge pressure switch pressure transmitter
Purge process (cont.)
If air is still trapped in the pump
then repeat the purge process 2
A
or 3 more times until all the gas
is removed from the system.
Wait for gauge to vent to zero
bubble
①open
③
②Turn all the
way out
C
DIGITALPRESSURE CALIBRATOR
Units
0255075100
②open
F
Vacuum preparation
flexible hose
Turn all the way in
D
G
①open
②open
Pre-pressure
,
DIGITALPRESSURE CALIBRATOR
Units
0255075100
A
Pressure Gauge
①open
④turn it to the mid
position
③turn it to greatest
E
degree
②open
Vacuum process
H
DIGITALPRESSURE CALIBRATOR
Units
0 25 50 75 100
①close
If it is difficult to generate
pressure then repeat the
A
Pressure Gauge
a
P
(~)06M
③generate high-pressure
and fine adjust pressure
,
purging process to make
sure all the gas is removed
from the system.
②Pre-pressurization
DIGITALPRESSURE CALIBRATOR
Units
0255075100
A
0.06
u
u
c
a
V
.08
-0.1
①open
0.04
e
g
u
a
G
m
0.02
0
④turn it to the mid position
③turn it to the smallest
degree
②open
DIGITALPRESSURE CALIBRATOR
Units
0255075100
A
.08
-0.1
①close
If it is difficult to generate
vacuum pressure then
repeat the purging process
0.04
0.06
to make sure all the gas is
e
g
u
a
G
m
u
cu
a
V
0.02
removed from the system.
0
③fine adjust
②turn it to approach
the desire value
Remark:
A Additel has made a concerted effort to provide complete and current information for the proper use of the equipment. The product specifications and other information contained this
manual are subject to change without notice.
B:: Above pictures are just for reference.
Additel Corporation.USA
www.additel.com
,
 Loading...