

Additel 912 User Manual
Warningsand cautions
Low pressure gauges can very easily be over pressured if not careful.
Please take caution when applying pressures.
Do not exceed the safety pressure limit 90 psi (6 bar).
This test pump is not designed to be used in explosive or corrosive
environments.
Do not switch between pressure and vacuum mode under pressure.
Over tightening connectors may cause damage.
Store the pump in the dry and non-corrosive environments.
Additel is not liable for any safety problems or damages caused by
misuse or incorrect operation.
All moisture and contaminants should be cleaned out of the liquid
isolator before creating a vacuum. This is accomplished by venting
the pump when at high pressure.
For the least risk in contamination of the reference gauge, the DUT
should be installed to the pressure port which is closest to the vent
valve.
Specification
Low Pressure Test Pump User's Manual
Configuration & Air routine
5
3
1
2
7
4
6
9
ADT912
[Version number:1405V12]
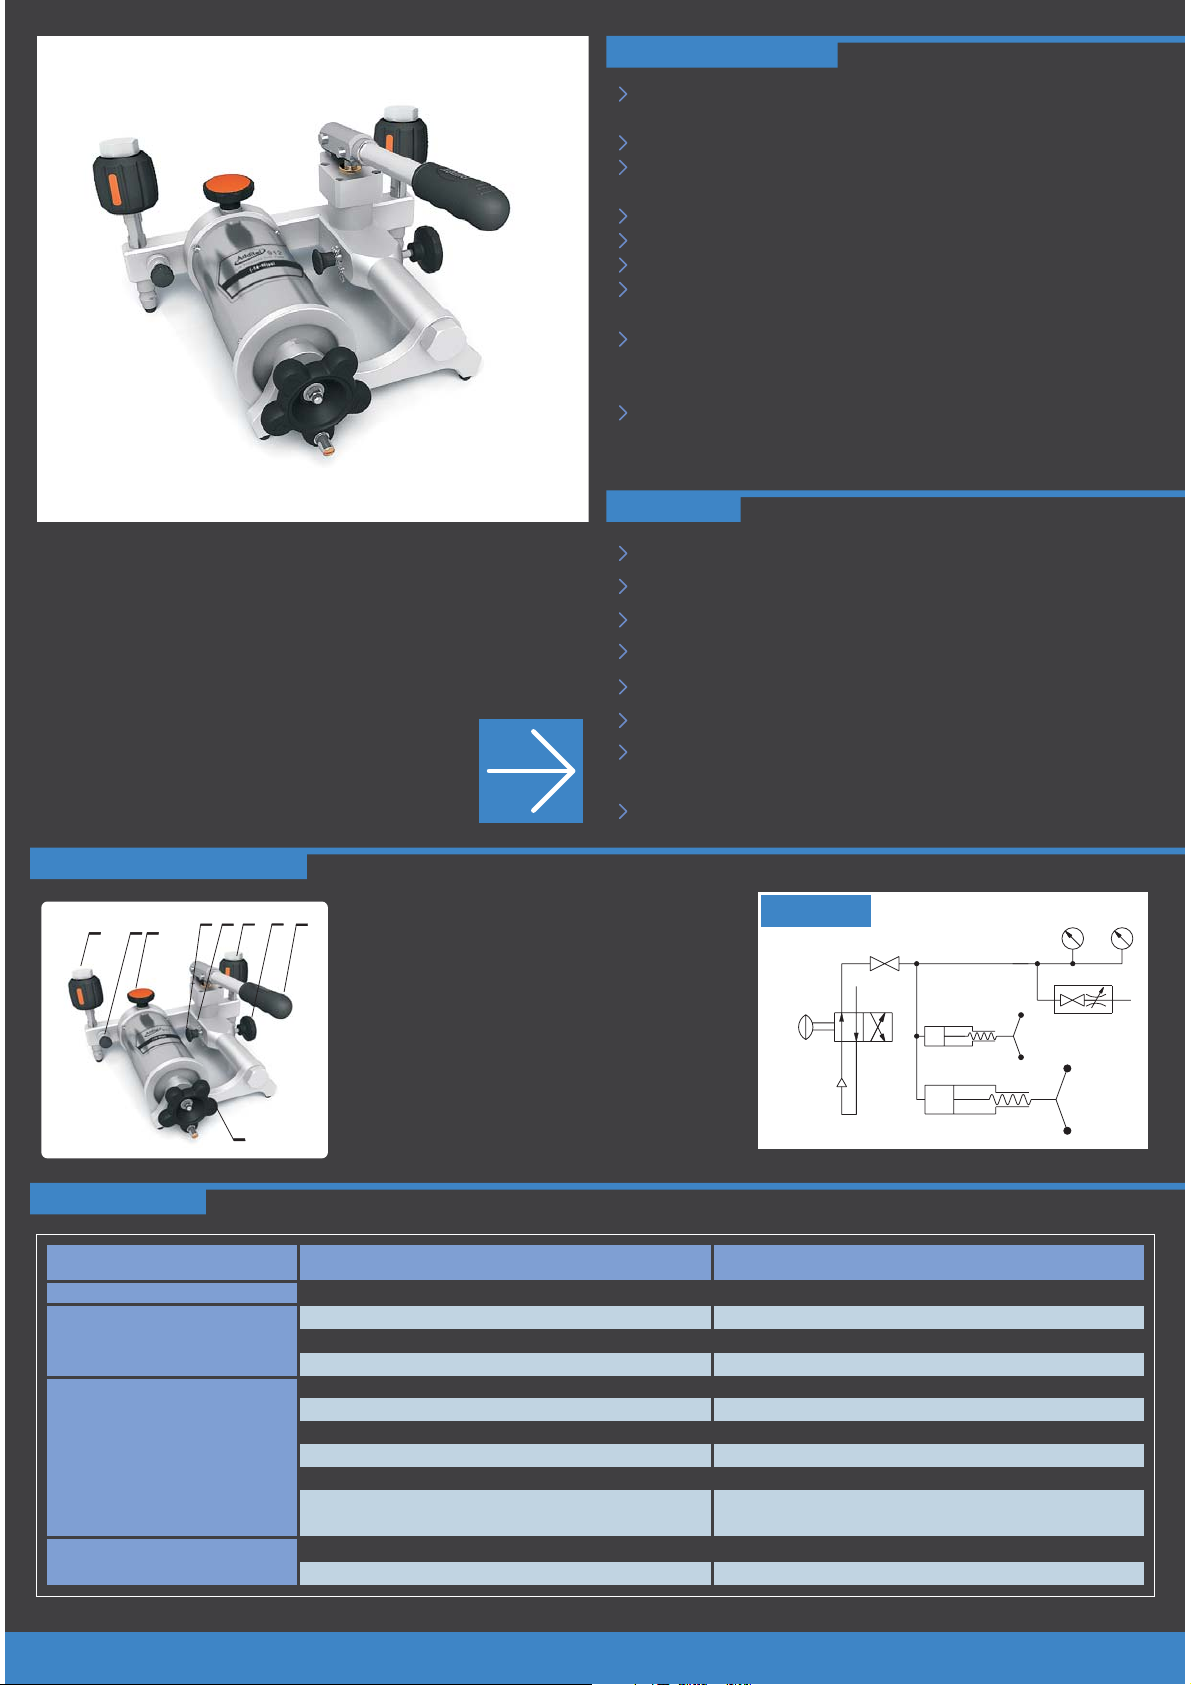
1 - Quick connector
8
2 - Vent valve
( clockwise to close/ counterclockwise to open )
3 - Fine adjust handle
( clockwise to increase pressure )
4 - Quick connector
5 - Pressure/vacuum (P/V) selector
(Positive pressure: pull it out; Vacuum: push it in )
6 - Safety bolt pin
( use it to ensure safety )
7 - Isolation valve
(isolates the calibration volumn from pressurizing system)
8 - Hand pump
9 - Main adjust handle
( clockwise to increase pressure )
Pressure range:
Temperature:
Humidity:
Pressure Resolution:
Safety pressure:
Pressure media:
Size:
Height: 5.51'' ( 140 mm );
Base: 10 10.16'' ( 258 mm )
Weight:
6.2 lb ( 2.8 kg )
95% vacuum to 60 psi ( 4 bar )
0~50
℃
< 95%RH
0.1 Pa ( 0.001 mbar )
<
90 psi (6 bar)
Air
.75'' ( 273 mm ) x
Air routine
7
5
8
2
3
9
Troubleshooting
Problem
Hand pump will not generate pressure
It is difficult to increase pressure
Hard to use fine adjustment handle
It is difficult to turn the quick connector
Cause
The isolation valve is not open.
A. Release valve is not closed.
B. The O-ring seal is loose or damaged.
C. P/V selector is in the wrong position
A. The isolation valve is not closed
B. The gauges are not tightened
C. The O-ring seal is damaged.
D. The thread surface is not smooth
E. The connector type is mismatched to the gauge pressure port
F. Dust or contaminants are blocking the
pressure flow
A. Too much force was previously applied
B. The threads have no lubrication
.
.
.
.
.
.
.
Solution
Open the isolation valve
Close the release valve.
Replace the O ring seal
:/ : / .
Pressure pull the P V selector out; Vacuum push the P V selector in
Close the isolation valve
Tighten the reference gauge or the gauge under test
Replace the O ring seal
Use Teflon tape on the thread and turn it in tight.
.
Use the correct adapter
Repeat pressurizing the pump several times and then suddenly vent
it which will push any contaminants out.
Secure the quick connection with less force
Apply lubrication to the threads
.
-.
.
.
-.
.
.
.
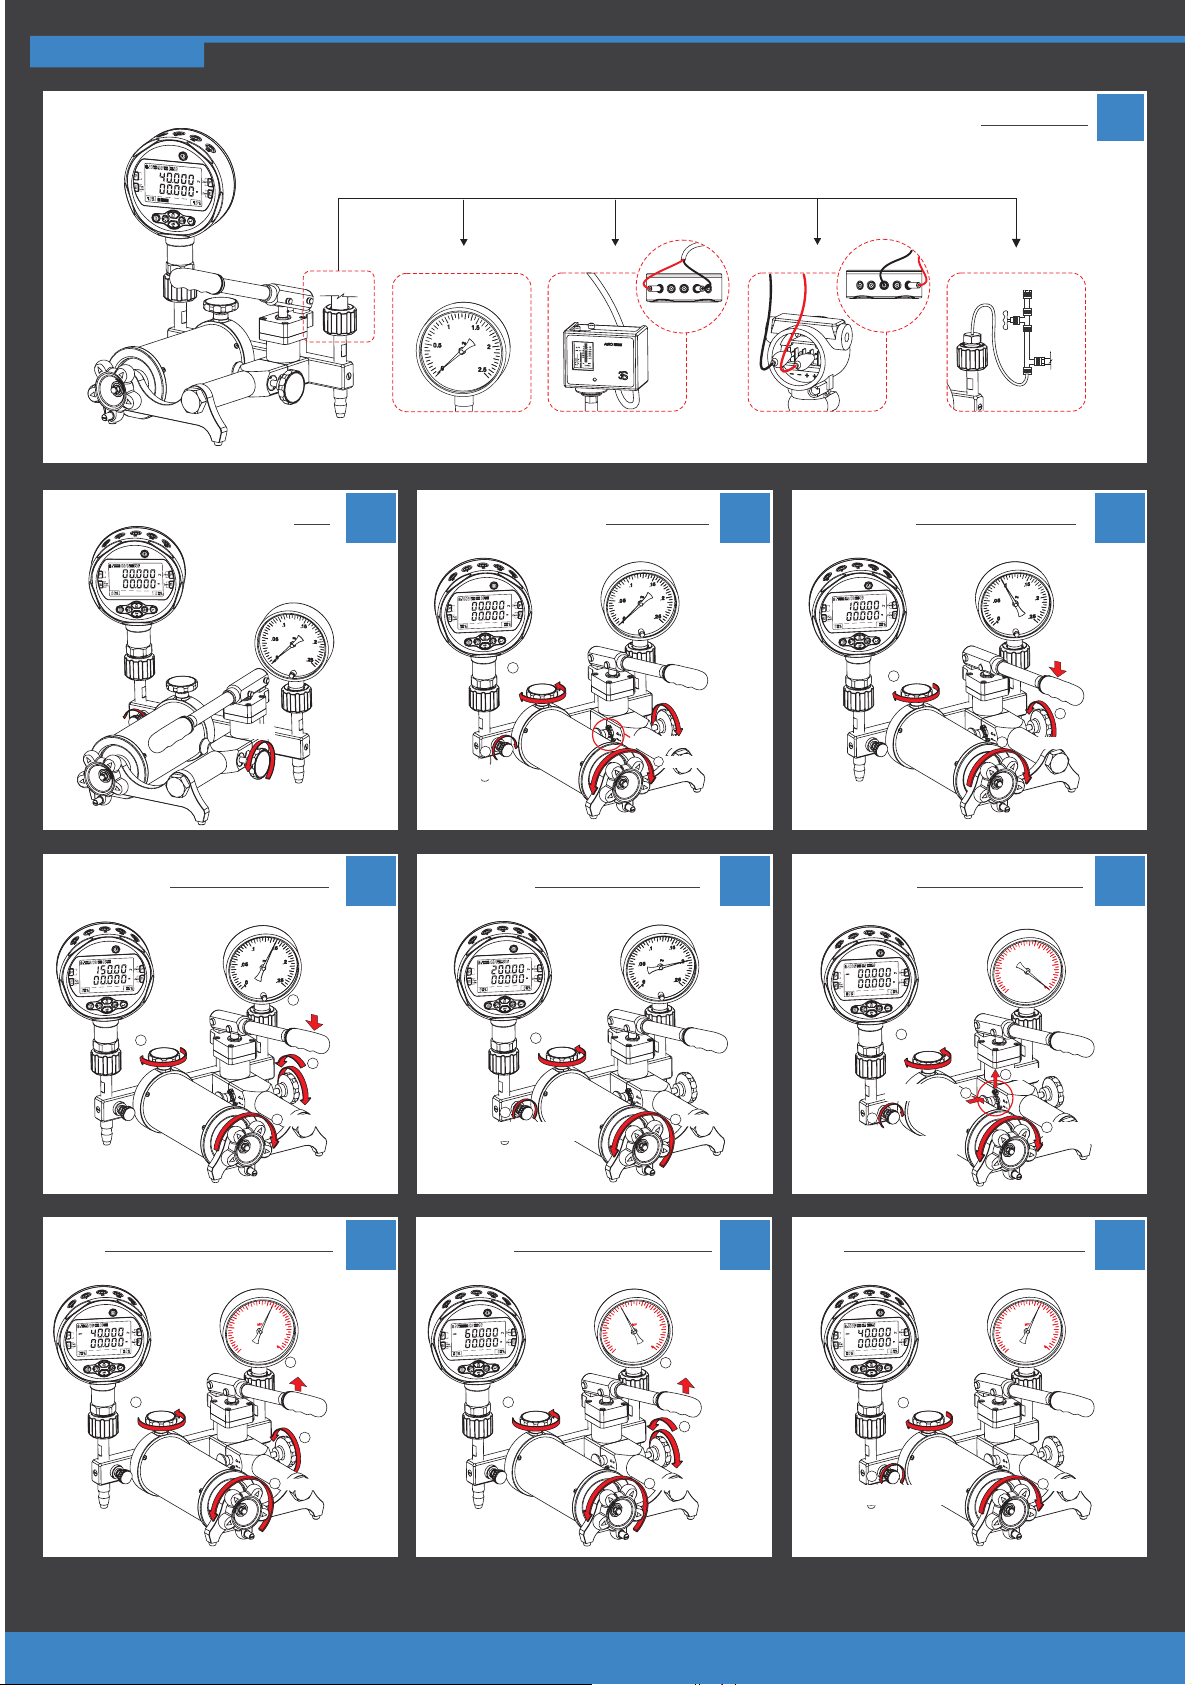
Basic Operation
DIGITALPRESSURE CALIBRATOR
Units
open
Units
0255075100
DIGITALPRESSURE CALIBRATOR
0255075100
k
A
k
A
0
0
open
Zeroing should be operated
under this condition only
Vent
P
Pressure Gauge
ressure
M
Connection
DIGITALPRESSURE CALIBRATOR
Units
SW V mA COM 24V
0255075100
flexible hose
Increasing pressure
k
A
4
fine adjust
0
Pressure GaugePressure Gauge
0
3
main adjust
0
M
0
0
operate it to approach
①
desired pressure
SW V mA COM 24V
Pressure Gauge
k
dial gauge
B
DIGITALPRESSURE CALIBRATOR
Units
0
G
aug
e
0
0
0255075100
5
close
()Do not over-tight
pressure switch pressure transmitter
k
A
2
set it to the mid
position of its travel
Pre-pressure
0
0
Pressure Gauge
M
0
0
0
push the security bolt pin in
①
3
set it to the suitable
C
open
④
position
2
A
D
close
.
Repeat pressurizing
DIGITALPRESSURE CALIBRATOR
Units
0255075100
k
A
5
fine adjust
0
0
Increasing vacuum pressure
0.06
DIGITALPRESSURE CALIBRATOR
Units
0255075100
k
A
4
fine adjust
Vacuum Gauge
.
008.008
-0.1
G
re
u
ss
re
P
Pressure Gauge
M
0.04
0
e
g
u
a
0
0
4
main adjust
0.02
0
1
3
main adjust
E
operate it to approach
2
desired pressure
close
3
open
①
H
operate it to approach
the desired value
2
close
Decreasing pressure
DIGITALPRESSURE CALIBRATOR
k
Units
A
0255075100
3
fine adjust
1
open it slowly to approach
the desired value, and close!
Repeat vacuum pressure
DIGITALPRESSURE CALIBRATOR
k
Units
A
0255075100
5
fine adjust
F
Vacuum preparation
G
Vent firstly.
0
0
Pressure Gauge
M
0
0
0
2
main adjust
I
0.04
0.06
Vacuum Gauge
a
0.02
.
008.008
0
-0.1
operate it to approach
2
the desired value
3
close
open
①
4
main adjust
DIGITALPRESSURE CALIBRATOR
k
Units
A
0255075100
4
set it to the mid
position of its travel
push in, select the
5
close
(but it must be open
switching the P/V selector)
vacuum mode
2
Decreasing vacuum pressures
DIGITALPRESSURE CALIBRATOR
k
Units
A
0255075100
3
fine adjust
1
open it slowly to approach
the desired value, and close!
.
008.008
-0.1
1
.
008.008
-0.1
0.06
Vacuum Gauge
pull out
0.06
Vacuum GaugeVacuum Gauge
0.04
MPa
0.02
0
3
set it to the
suitable position
0.04
0.02
0
2
main adjust
J
Remark: A Additel has made a concerted effort to provide complete and current information for the proper use of the equipment. The product
specifications and other information contained this manual are subject to change without notice.
B:: Above pictures are just for reference.
 Loading...