


ADDERLink™ ipeps mini
Experts in
Connectivity
Solutions
Extender
Solutions
User Guide
IPEPSMINI-VGA
IPEPSMINI-HM
IPEPSMINI-DP

Contents
Introduction
Welcome ................................................................................................................ 2
Supplied items ....................................................................................................... 3
Optional extras .....................................................................................................3
Installation
Connections .......................................................................................................... 4
Video link .........................................................................................................5
Link connection ..............................................................................................5
USB and power connections .......................................................................6
Conguration
Connecting to ipeps mini ...................................................................................7
Initial conguration .............................................................................................. 8
Performing a ash upgrade.................................................................................9
Restoring a backup rmware image ...............................................................10
Resetting...............................................................................................................10
Operation
Connecting with the host computer(s) ........................................................11
Remote connections....................................................................................11
Auto calibrate .........................................................................................12
Access mode - shared/private ..................................................................12
Controls .........................................................................................................13
Single Mouse Mode ................................................................................13
Resync Mouse .........................................................................................13
Refresh Screen ........................................................................................13
Mouse Control ........................................................................................13
Advanced mouse conguration ...........................................................14
Keyboard Control ..................................................................................15
Indicators .............................................................................................................16
Further information
Getting assistance ..............................................................................................17
Appendix 1 - Remote conguration menus (via VNC) ..............................18
User Accounts ...............................................................................................19
Menu Bar Edit (Gui Edit Conguration) .................................................20
Unit Conguration .......................................................................................21
EDID Conguration .....................................................................................22
Advanced Unit Conguration....................................................................23
Time & Date Conguration .......................................................................26
Network Conguration ..............................................................................27
Setting IP Access Control ...........................................................................28
Host Conguration ......................................................................................29
Logging and Status ........................................................................................30
Appendix 2 - Networking issues ....................................................................31
Positioning AdderLink ipeps mini in the network .................................31
Appendix 3 - Security considerations ...........................................................33
Appendix 4 - Product compatibility ..............................................................34
Appendix 5 - Hotkey sequences .....................................................................35
Appendix 6 - Open source licenses ...............................................................36
Index
INSTALLATION
CONFIGURATIONOPERATION
FURTHER
INFORMATION
INDEX
1

Introduction
WELCOME
Thank you for choosing the AdderLink ipeps mini KVM-over-IP module. Using the
tried and trusted Real VNC® software, each AdderLink ipeps mini module provides highly
secure remote connectivity across the Internet or corporate network. The AdderLink
ipeps mini module naturally permits secure remote access to a single host, however, with
the addition of a suitable KVM switch, a choice of many hosts becomes possible.
Highly secure
Enterprise grade security (using AES 128 or 256-bit encryption and RSA 2048-bit public
key authentication) is employed as standard. This is further enhanced by VNC®, which
allows the creation of ciphered user communications.
User management
The AdderLink ipeps mini can create up to 15 user proles (plus the admin user) with
dened access rights. Up to 8 remote users may access the unit simultaneously, subject
to available network bandwidth and content.
Viewer
Multiple remote
users (up to 8
concurrently)
High quality remote video
Despite its small size the AdderLink ipeps mini offers video streaming at resolutions up
to 1920 x 1200 with non-blocking access for up to eight remote users.
EDID management
The AdderLink ipeps mini has intelligent EDID management allowing the user to specify
the video modes generated by the controlled device.
INSTALLATION
CONFIGURATIONOPERATION
Viewer
Viewer
Local Area
Network
or Internet
FURTHER
INFORMATION
Single host computer
(or multiple hosts,
if using an optional
KVM switch)
INDEX
2

SUPPLIED ITEMS
Information wallet
containing:
Four self-adhesive rubber feet
Safety document
ipeps mini unit
Part numbers:
IPEPSMINI-VGA
IPEPSMINI-HM
IPEPSMINI-DP
OPTIONAL EXTRAS
12.5W power adapter
Part number: PSU-IEC-5VDC-2.5A
Country-specic power cords
CAB-IEC-AUS (Australia)
CAB-IEC-EURO (Europe)
CAB-IEC-UK (United Kingdom)
CAB-IEC-USA (United States)
INSTALLATION
CONFIGURATIONOPERATION
FURTHER
INDEX
3
INFORMATION
Installation
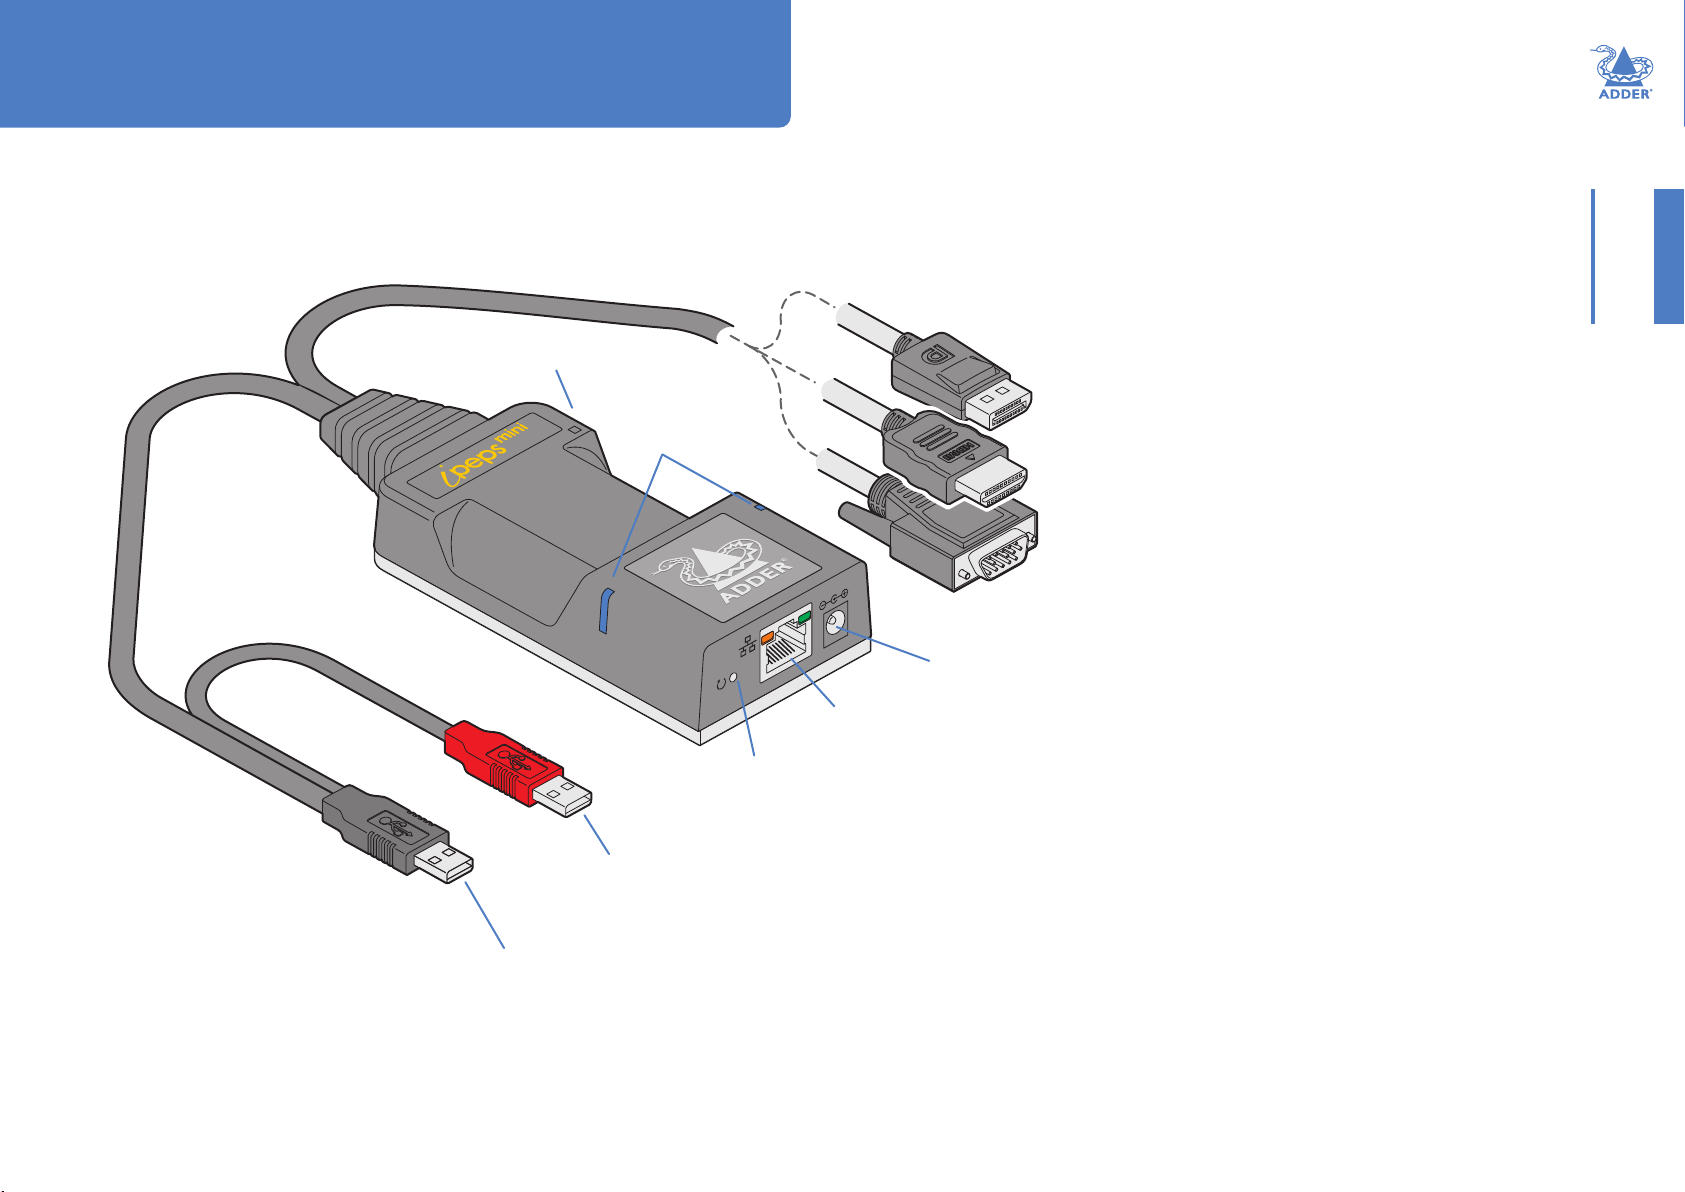
CONNECTIONS
Installation involves linking the ipeps mini unit to various ports on the host computer:
Cable tie
mounting slot
Status
indicators
(page 10)
Reset
button
(page 7)
Red USB plug provides
power only when the
external power adapter is
not present
Ethernet
port
(page 5)
Optional
external power
input
(page 6)
‘Suitable for installation in Information Technology
Rooms in accordance with Article 645 of the
National Electrical Code and NFPA 75.
Peut être installé dans des salles de matériel de
traitement de l’information conformément à l’article
645 du National Electrical Code et à la NFPA 75.’
Video connection
options:
DisplayPort
HDMI™
®
or
or
VGA
INSTALLATIONCONFIGURATIONOPERATION
FURTHER
INFORMATION
Black USB plug provides Hi-Speed USB
signals (plus power if the external power
adapter is not present)
(page 6)
INDEX
4

Video link
The ipeps mini unit is supplied with a single video connector - DisplayPort®, HDMI™
or VGA depending on the chosen ipeps mini variant. Video resolutions up to
1920x1200 are supported (maximum 1920x1080 for VGA variants).
To make a video link
1 Connect the ipeps mini video connector to the video socket of the host
computer:
Link connection
Use the network port to join the ipeps mini to a suitable a network switch. It is also
possible to connect a computer directly to the network port for conguration purposes.
To make a link connection
1 Insert a standard network cable into the socket on the front panel of the ipeps mini
unit.
Host
computer
DisplayPort
video
connector
Host
computer
HDMI video
port
Host
computer
VGA video
port
INSTALLATIONCONFIGURATIONOPERATION
CAT 5, 5e, 6, or 7
link from a Gigabit
Ethernet switch
2 Connect the other end of the cable either directly to a suitable network switch.
Please see Appendix D for important tips about networking ipeps mini units.
FURTHER
INFORMATION
INDEX
5

USB and power connections
The ipeps mini unit is designed to be as exible as possible. It can either operate using
an optional external power adapter (see page 3) or derive all of its power from its
two USB plugs. The main advantage offered by using an external power adapter is that it
allows the ipeps mini unit to be active before the host computer; thus allowing a remote
user to access the host’s initial boot up and access the BIOS menu, when required.
If powered by USB only, then both the black and red USB plugs need to be connected.
If powered by external power adapter, only the black Hi-Speed USB plug needs to be
connected, for signal purposes. Whenever, the external power adapter is attached and
operating, then power will be taken from it rather than the USB plugs. There is no
problem if the red USB plug remains connected while the power adapter is used.
This is summarized as follows:
Power Black Red
adapter USB USB Power sourcing behavior
Black USB plug provides
USB signals (plus power if
the external power adapter
is not present)
Host computer
USB ports
INSTALLATIONCONFIGURATIONOPERATION
û ü ü Power taken from both USB plugs.
ü ü û Power taken from power adapter only.
ü ü ü Power taken from power adapter only, unless it becomes
unavailable, in which case power will be taken from both
USB plugs after a short interruption.
Note: The USB plugs do not operate as a seamless failover for the external power adapter; there
will be a short interruption as operation switches from one power source to the other.
Red USB plug provides
power only when the
external power adapter is
not present
FURTHER
INFORMATION
From the optional
external power
adapter
INDEX
6

Conguration
CONNECTING TO IPEPS MINI
Connection to (and conguration of) ipeps mini is carried out over a network, using
a VNC Viewer® program running on a computer or mobile device. VNC Viewers are
available for most computers, tablets and smartphones.
• If you already have a VNC viewer, please follow the Initial conguration instructions
given on the next page.
If you do not already have a VNC viewer, you can download the latest VNC Viewers for
most operating systems via the RealVNC® website, or for tablets and smartphones from
the appropriate app store.
INSTALLATIONCONFIGURATIONOPERATION
FURTHER
INDEX
7
INFORMATION

INITIAL CONFIGURATION
To perform the initial conguration, you need to connect the ipeps mini to an IP network
and use a computer located on the same network to connect to it.
To perform the initial conguration
1 Connect the ipeps mini to an IP network where a suitable computer is available on the
same subnet.
2 Use a computer connected to the same subnet of the network. On that
computer, you will need to use the VNC Viewer® application, which is
available as a free download from www.realvnc.com. On the computer,
locate and select the VNC viewer icon
3 Within the VNC Viewer application, click the File menu and choose the
New connection... option. A connection details dialog will be displayed:
Options tab
Provides a range of viewer and
connection settings.
Enter the ipeps mini address
here and click OK
5 Click the OK button. If the module has not been previously congured, you will be
asked to set an admin password:
INSTALLATIONCONFIGURATIONOPERATION
6 Click the Enter Password button to display the Set Password popup:
7 Enter a suitably strong password: it must have 8 or more characters and contain
at least 1 letter, 1 digit and 1 special character. The input eld will change from red
to white when the password is suitably strong. Conrm the same password in the
second eld and click the OK button. Click the Continue button in the next popup to
complete the process and access the Viewer window:
If required, select the
encryption mode
4 In the VNC Server entry, type the default address of the ipeps mini: 192.168.1.42
Note: One or more warning messages may be displayed regarding the’ VNC server not being
recognized’ and/or ‘unencrypted connection’. If so, click the Continue button to proceed.
Click the Congure button
8 Click the Congure button to display the Conguration menu:
Use the various options
(particularly the ‘Unit
Conguration’ and ‘Network
Conguration’ options) to
arrange the ipeps mini to suit
your requirements.
See “Appendix 1 - Remote
conguration menus (via VNC)”
on page 18.
FURTHER
INFORMATION
INDEX
8
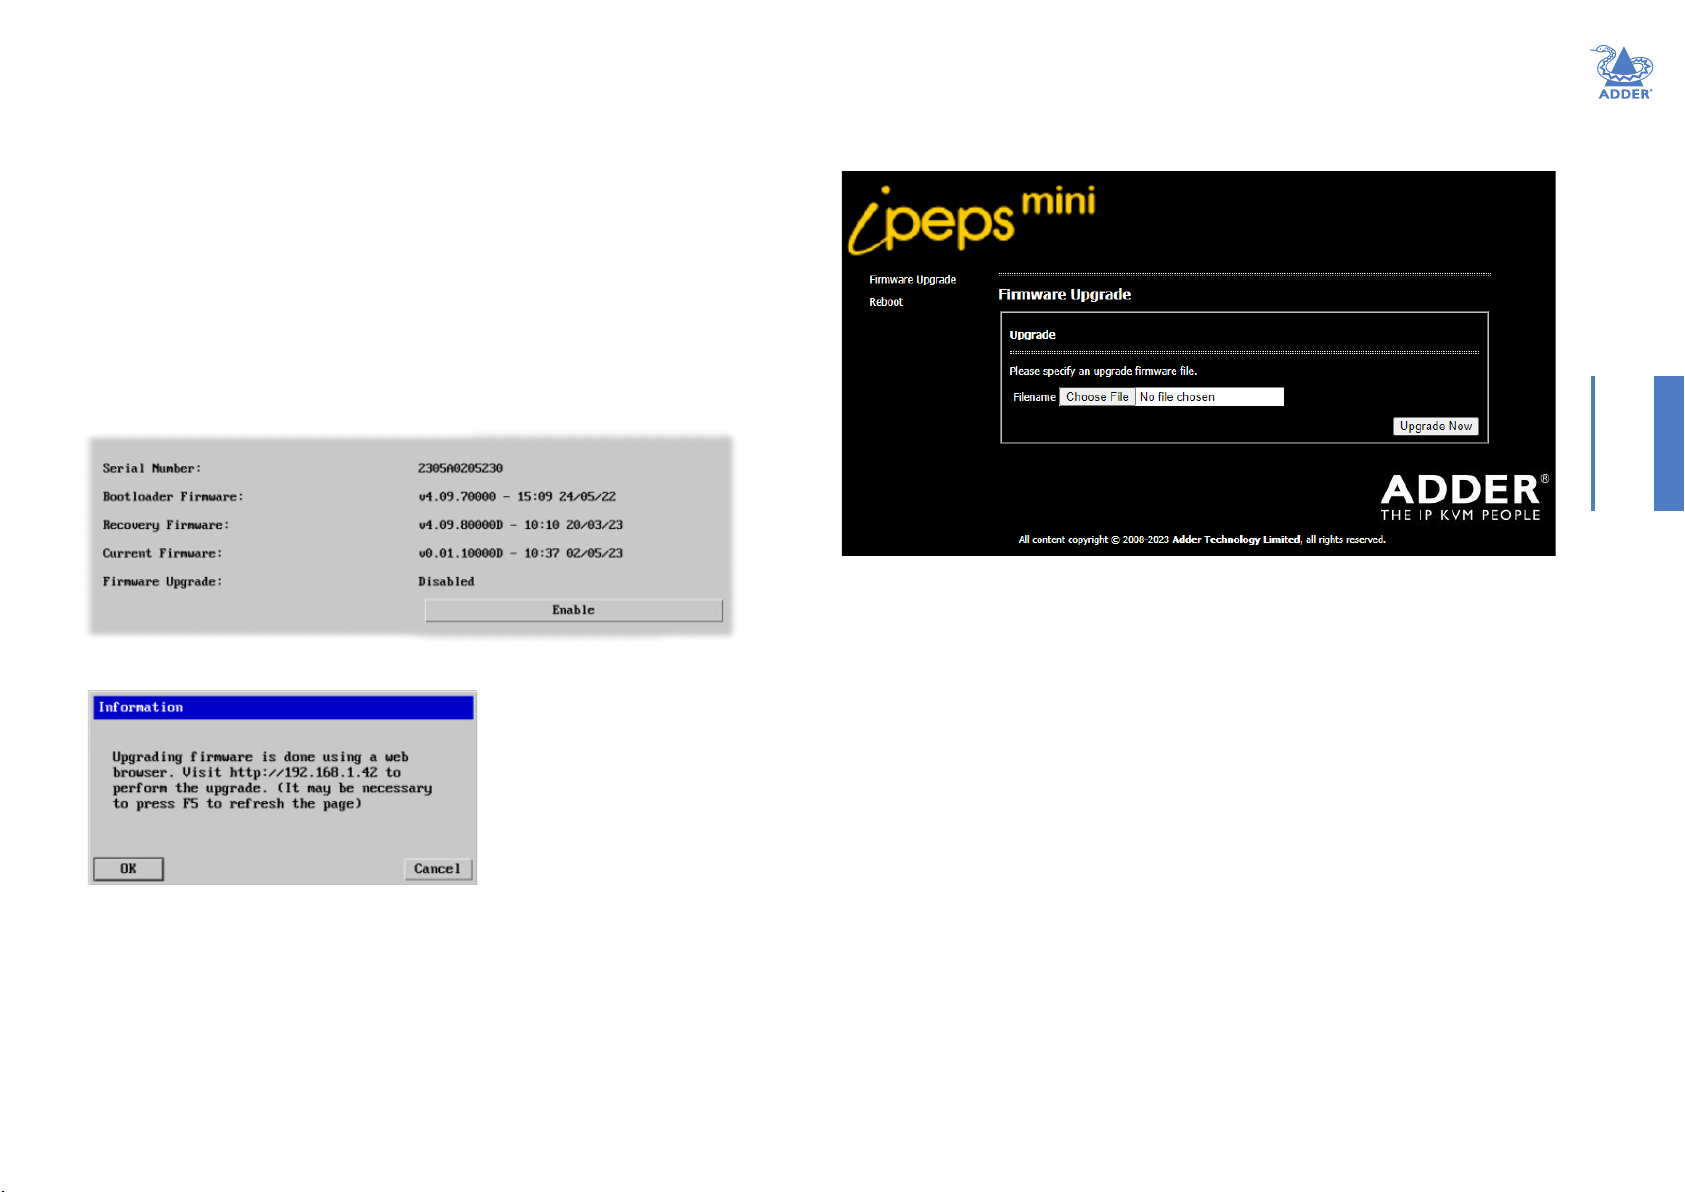
PERFORMING A FLASH UPGRADE
The rmware in ipeps mini is fully upgradable and is carried out via remote connection
(through the IP network port). Upgrades are digitally signed by Adder using a secure key.
This prevents unauthorized or altered rmware images being downloaded into the unit.
To perform a ash upgrade
1 Download the latest rmware revision for the ipeps mini from the Adder website and
decompress the download le. View the decompressed les and make a note of the
name and location of the .bin le that was part of the download le collection.
2 Make a remote connection to the ipeps mini unit and login as the admin user.
3 Once logged in, click the ‘Congure’ button in the top right corner of the window.
4 Click the ‘Unit Conguration’ button.
5 Click the ‘Advanced Unit Conguration’ button.
6 Click the ‘Firmware’ button to view the following page:
7 Click the Enable button. The following popup message will be displayed:
9 The unit is now ready to accept the upgrade les. Open your browser and log into the
ipeps mini using the IP address that was conrmed in the dialog. Once connected, the
unit will show the following:
INSTALLATIONCONFIGURATIONOPERATION
10 Click the ‘Choose File’ button and locate the .bin upgrade le that you downloaded
earlier. Click the ‘Upgrade Now’ button. The upgrade will take place and its progress
will be shown on screen. The unit will then reboot automatically once the upgrade
process has completed.
Note: If the ash upgrade fails, you can restore a backup rmware image to return the unit
to a fully working state. See “Restoring a backup rmware image” on page 10.
8 Note the IP address shown in the dialog box and click OK.
FURTHER
INFORMATION
INDEX
9

RESTORING A BACKUP FIRMWARE IMAGE
The AdderLink ipeps mini module retains a backup image of the previous rmware
version in order to provide a fallback in case of any issues with the primary image. The
backup image has no video or USB functionality; once invoked, you will need to load an
upgrade le using the web interface to load a new primary image - see “Performing a
ash upgrade” on page 9.
To restore the backup rmware image
1 Power on the AdderLink ipeps mini module.
2 Use a narrow implement (e.g. a straightened-out paper clip) to press-and-hold the
recessed reset button for roughly ten seconds until the indicators ash green/red.
Use a straightened-out paper
clip to press the reset button
for roughly 10 seconds
3 Release the reset switch.
4 The module will switch to the backup rmware image. Once complete, the module
will then continually ash green/red.
5 Perform an upgrade to reinstate a fresh primary rmware image - see “Performing a
ash upgrade” on page 9.
RESETTING
The recessed reset button provides a way to take control of the module if normal
operation is affected.
To reset the module
1 Power on the module.
2 Use a narrow implement (e.g. a straightened-out paper clip) to press-and-hold the
recessed reset button for more than 15 seconds until the status indicators turn blue:
INSTALLATIONCONFIGURATIONOPERATION
Use a straightened-out paper
clip to press the reset button
for more than 15 seconds
3 Release the reset switch.
NOTE: Allow the module to fully complete the reset process by waiting for
at least 30 seconds after you have released the reset button.
FURTHER
INFORMATION
10
INDEX

Operation
CONNECTING WITH THE HOST COMPUTER(S)
The AdderLink ipeps mini module allows up to eight concurrent users to remotely
connect with a host computer. If an optional KVM switch is attached, a choice of multiple
host computers becomes possible, although only one host may be selected at any one
time.
Remote connections
The VNC Viewer® application is available as a free download from www.
realvnc.com. It gives you the ability to view and control the AdderLink ipeps
mini and its host computer(s).
To remotely connect with a host
1 Install and run the VNC Viewer application. The connection dialog will be displayed:
3 Enter your username and password and click OK.
4 If a successful connection is made a new window will be opened with a VNC menu bar
along the top edge:
Ctrl Alt Del
Sends the
Ctrl Alt Del
sequence
to the
current host
computer.
Controls
Displays a menu
of options
concerning
keyboard, video,
mouse and
le transfer
operations.
Dialog area
Indicates the
framerate and
bitrate, plus the
number of remote
users.
INSTALLATIONCONFIGURATIONOPERATION
2 Enter the network address into the search bar (the default is 192.168.1.42) and press
Enter (or double click the connection entry for the ipeps mini - if one has previously
been created).
The VNC Viewer will attempt make a connection to the AdderLink ipeps mini module.
Once a connection is made, you should be presented with the login dialog:
Re-sync mouse
Ensures that
the mouse
pointer which
you move and
the mouse
pointer on the
host system
are correctly
synchronized.
Auto calibrate
Determines the
optimum mouse
settings (when using
Relative Mouse
mode) for the
currently selected
host computer.
This button will
ash red when a
new host screen is
encountered. Click
this button when
you rst visit a new
screen.
Hosts
Click to
display a list
of computers.
Choose an
entry to
connect to that
host computer.
For details about how to determine the options on the
menu bar, see User Accounts > Menu Bar Edit.
Access mode
Allows you
to choose
between
Shared and
Private access
modes.
Congure
This option is
only available to
the admin user
and provides
access to the main
conguration
menus.
Note: The VNC Viewer Idle Timeout option is set to zero by default, meaning that it will not
automatically disconnect.
FURTHER
INFORMATION
INDEX
11

Auto calibrate
Auto calibrate will calibrate the mouse only if relative mouse mode is selected. This
detects the mouse motion and will report back that the mouse has been calibrated
correctly depending upon the operating system.
Note: When performing an auto calibration, ensure that the screen image is static (no moving
images) and also try to remove any on-screen displays (such as host names or menus). This
is because they can affect the calibration process and result in a lower overall performance
level. For mouse calibration, ensure that there are no application windows located around the
upper left corner of the screen. This is because as the mouse calibration takes place, the cursor
may change (to match the application as it skims across the window) and this may confuse
the calculation. Also ensure that the host system does not have the mouse cursor trails option
enabled.
Click the button to display a dialog:
On VGA-equipped versions On DP/HDMI-equipped versions
Click the required option to proceed with calibration.
See the notes on Advanced mouse conguration for more details.
Once this has been done, providing you use the ‘Hosts’ button to switch between host
computers, the video settings for each machine will be re-used.
Access mode - shared/private
Up to eight remote users can be simultaneously logged-in and all will view the same host.
If you need to perform a sensitive task that should not be viewed by other users, you can
change the access mode to Private. This action prevents other users connecting at the
same time.
To change the access mode
1 Click one of the arrow buttons adjacent to the Shared/
Private indicator.
INSTALLATIONCONFIGURATIONOPERATION
Re-synchronize mouse
If you nd that your local mouse pointer and that of the host are not correctly
synchronized, use this feature to re-align their movements. This operation is also
selectable from the Controls menu.
To re-synchronize the mouse
1 Use the Hosts button to select the required computer.
2 Click the button and then click OK in the subsequent pop-up message.
Note: If you nd that this doesn’t work, you may need to perform a mouse calibration again.
FURTHER
INFORMATION
INDEX
12

Controls
When clicked, this button reveals a menu
of options concerned with keyboard, video
and mouse operation.
Single Mouse Mode
This mode is for fast network connections
where the cursor response is sufcient
to provide instant visual feedback on the
remote screen. When enabled, the cursor is
‘captured’ within the viewer window until
you use the ‘escape’ hot keys.
To quit from single mouse mode, press F8 and then P. Alternatively, enable and use the
mouse button escape sequences - see Advanced unit conguration for details.
The single mouse mode does not require calibration.
Resync Mouse
This option has the same effect as the button on the menu bar and re-synchronizes
the local and remote mouse pointers.
Refresh Screen
This option refreshes the whole screen image to remove any artefacts from moved
screen items. This is useful when using very low refresh rates on slow speed
communication links.
Mouse Control
This option displays a mouse control dialog and is useful when the remote cursor is
failing to respond correctly to your mouse movements, even after using the Resync
mouse option.
The mouse control dialog allows you to control the remote mouse cursor using a
selection of buttons that you click with your local mouse.
Click to produce a single
mouse click for the left,
centre or right mouse
buttons
Click to produce a
continuous mouse click
and hold for the left,
Click to move the
remote mouse cursor up,
down, left or right
centre or right mouse
buttons
Click to calibrate the
remote mouse
When ticked the unit
will attempt to switch to
Absolute Mouse mode
(recommended).
INSTALLATIONCONFIGURATIONOPERATION
Click to
display the
Advanced Mouse
Conguration
dialog. See next
page.
FURTHER
INFORMATION
INDEX
13
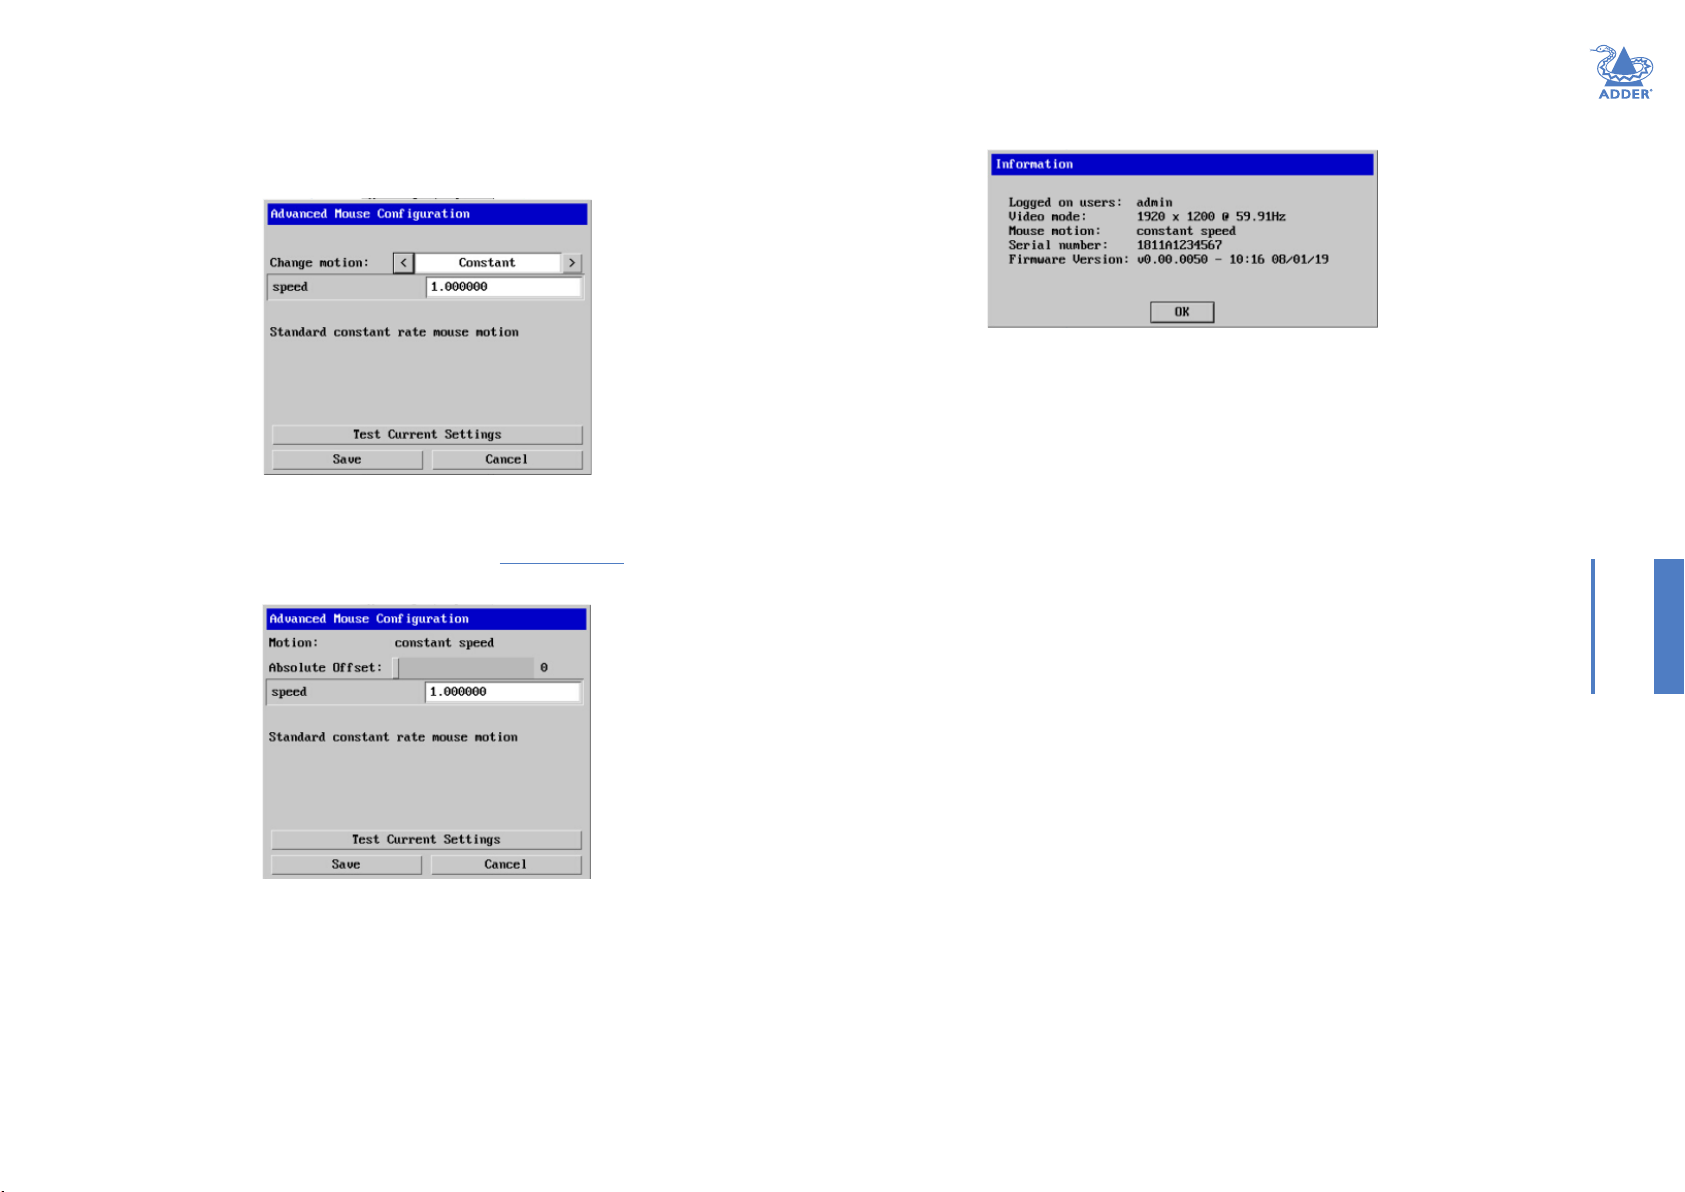
Advanced mouse conguration
This dialog (accessible via the Mouse Control popup) allows the mouse acceleration to
be congured according to the operating system in use and also permits manual ne
tuning for situations where problems are encountered with the Calibrate function.
For best results, choose the appropriate Change motion: entry to match the host in use.
The available Change Motion schemes are: Constant, Windows 7/8/10, Solaris, Solaris 9 and
Mac OSX.
When the Absolute Mode option is ticked in the main Mouse Control menu, this dialog
allows you to adjust the Absolute Offset scale:
Info
When selected, this option displays an information dialog showing the current logged on
users, the current host, its video mode and its mouse motion details.
INSTALLATIONCONFIGURATIONOPERATION
14
FURTHER
INFORMATION
INDEX

Keyboard Control
This option displays a keyboard control dialog and is useful for sending keyboard
combinations (to the host) that are needed regularly or that are trapped by the
AdderLink ipeps mini module.
Enter the
code here
When entering codes:
+ means press down the key that follows
– means release the key that follows
+– means press down and release the key that follows
* means wait 250ms (note: if a number immediately follows the asterisk, then
the delay will equal the number, in milliseconds)
It is automatically assumed that all keys specied will be released at the end, so there is
need to specify -Ctrl or -Alt if these keys are to be released together.
Examples:
‘Ctrl + Alt 12’ would be expressed as: +Ctrl+ Alt+1–1+2
+N means press the ‘N’ key
+Scroll means press the Scroll lock key
+Space means press the space key
Click to send
Click to send
the code
the code
Click to send the
Click to send the
contents of the
contents of the
clipboard to the host
clipboard to the host
Video Settings
This dialog provides access to all of the key video settings that determine image quality
and link performance.
®
VGA models (for DisplayPort
Threshold
The threshold is effectively a
noise lter that differentiates
between valid video signals
and background noise or
interference. This has the effect
of reducing unnecessary video
signals between the ipeps mini
and the remote system, thus
improving performance.
Phase
The phase setting adjusts the
alignment of the host video
output and the remote system
video display to achieve the
sharpest image.
Brightness & contrast
Provides manual sliders
and also automatic
settings to optimize
these important video
constituents for the
current host and
connection speed.
and HDMI™ models, please see the next page)
Calibrate all
Click to determine
the optimum
settings for
all aspects of
video the video
connection from
the host system.
Timing details
Click to view
specic horizontal
and vertical video
timings.
Display activity
Indicates the level
of video activity
currently in
progress.
Using automatic congurations
• Every setting can be individually subjected to an automatic conguration (click the
appropriate ‘Auto’ button) and most can also be manually adjusted.
• Use the ‘Calibrate All’ button to automatically determine the optimum settings for all
items.
Note: Before using the ‘Calibrate All’ option, if possible, remove on-screen display (OSD)
elements. These OSD elements use different video rates to those of the host system and can
affect the setting of the automatic threshold value. The ipeps mini module uses an improved
calculation procedure to lter out the effect of these elements. However, best results are
obtained when the screen contains only host system information.
Note: To maximise performance, the threshold level is automatically increased by 50% when a
slow link is detected.
INSTALLATIONCONFIGURATIONOPERATION
FURTHER
INFORMATION
INDEX
15

Setting the Threshold manually
Occasionally it can be useful to manually adjust the Threshold setting, in order to achieve
a setting that best suits your particular requirements.
1 Use the ‘Calibrate All’ function to ensure that all other settings are optimized.
2 Click the Threshold left arrow button to decrement the setting by one and observe
the ‘Display Activity’ indicator.
3 Repeat step 2 until the Display Activity indicator suddenly rises to a much higher
level (i.e. 50%). This will mean that you have reached the noise boundary. At this point,
increment the Threshold value by 2 or 3 points to achieve an optimum setting.
DisplayPort® and HDMI™ models (for VGA models, please see the previous page)
Threshold is effectively a noise lter that differentiates between valid video signals
and background noise or interference. This has the effect of reducing unnecessary
video signals between the ipeps mini module and the remote system, thus improving
performance. A good way to choose the value is to watch the Display Activity
indicator for a static screen. If the Threshold is too low, the Display Activity will be
a high percentage while nothing is really changing. If the Threshold is too high, the
Display Activity will be very low (or zero) but some real changes in the screen may be
missed.
INDICATORS
The AdderLink ipeps mini module contains various indicators to provide you with status
information.
Status indicators
The two top panel indicators on the unit provide a useful guide to operation:
Main status indicators
Network specic
indicators
Main status indicators
• Off No power
• Green Operating - Video, USB and network link all present
• Orange Operating - But video, USB and/or network link missing.
• Red (momentarily) Unit is booting up, or
(consistently) Unit has failed, try rebooting.
• Red/green
ashing Unit is in backup mode.
• Blue Factory reset has been activated.
• Red/blue ashing Unit is in upgrade mode.
INSTALLATIONCONFIGURATIONOPERATION
FURTHER
INFORMATION
Network specic indicators
• Orange Off: No link On: Link established
• Green Off: No link Flashing: Network activity On: Quiescent link
INDEX
16

Further information
This chapter contains a variety of information, including the following:
• Getting assistance - see right
• Appendix 1 - Remote conguration menus (via VNC®)
• Appendix 2 - Networking issues
• Appendix 3 - Security considerations
• Appendix 4 - Product compatibility
• Appendix 5 - Hotkey sequences
• Appendix 6 - Open source licenses
GETTING ASSISTANCE
If you are still experiencing problems after checking the information contained within this
guide, then please refer to the Support section of our website:
www.adder.com
INSTALLATIONCONFIGURATIONOPERATION
FURTHER
17
INFORMATION
INDEX

APPENDIX 1 - REMOTE CONFIGURATION MENUS (VIA VNC)
When connected remotely via VNC®, with admin privileges, a Congure button is made
available on the right side of the VNC menu bar. The resulting conguration menu provides
access to all main settings of the AdderLink ipeps mini module:
The various conguration pages are covered within this appendix:
• User Accounts
• Menu Bar (Gui edit conguration)
• Unit Conguration
• EDID Conguration
• Console Conguration
• Advanced unit Conguration
• Time & Date Conguration
• Network Conguration
• IP Access Control
• Host Conguration
• Logging and Status
INSTALLATIONCONFIGURATIONOPERATION
To view the main conguration menu
1 Using the VNC viewer® application, log on as the ‘admin’ user.
2 Click the ‘Congure’ button in the top right corner. The
main conguration menu will be displayed (shown above).
FURTHER
INFORMATION
INDEX
18

User Accounts
There is one admin user account, which has full access to the conguration menu. Up
to 15 users can be created by the admin user, each with their own password and access
privileges.
User Name
All user names must consist of lower case characters, numbers and certain nonalphanumeric characters (e.g. ‘_’) only. No symbols or upper case characters are
permissible. The user name can be between 1 and 32 characters in length but cannot
contain foreign characters.
Password
Click the button to display a password popup. Each password can be up to 16 characters
in length. Passwords must be at least 8 characters, including at least 1 letter, 1 number
and a special character.
View Only
When ticked, no control data (from keyboard or mouse) are sent to the ipeps mini.
Menu Bar
Optionally click to customize the menu bar for each user. See next page.
INSTALLATIONCONFIGURATIONOPERATION
To get here
1 Using VNC viewer®, log on as the ‘admin’ user.
2 Click the ‘Congure’ button in the top right corner.
3 Click the ‘User Accounts’ option.
FURTHER
INFORMATION
INDEX
19

Menu Bar Edit (Gui Edit Conguration)
If required, you can customize the menu bar of the viewer window to ensure that it
contains only the necessary options.
The menu bar can be edited locally by each user or edited singly by the admin or
alternatively, the admin can globally alter the menu bar for all users.
To globally edit the menu bar via admin
1 Using VNC viewer®, log on as the ‘admin’ user.
2 Click the ‘Congure’ button in the top right corner.
3 Click on User Accounts.
4 Click on the relevant Edit button to display the following page:
To edit the menu bar locally
1 Login remotely via VNC viewer and display the viewer window.
2 Place the mouse pointer on the menu bar and click the right mouse button. A popup
will be displayed:
3 Click on any option within the popup to add it to or remove it from the menu bar.
4 When all changes have been made, click anywhere else within the viewer window.
Changes made in this way will affect the individual user only.
INSTALLATIONCONFIGURATIONOPERATION
5 Tick/untick the required menu bar options and then click Save.
FURTHER
INFORMATION
INDEX
20

Unit Conguration
This page provides access to a selection of both basic and advanced settings for the
AdderLink ipeps mini module.
Firmware Version
Indicates the version of the internal software within the AdderLink ipeps mini module
ash memory.
Server Preferred Encoding
Determines the preferred graphics encoding method to be used across the VNC
connection. Options are: JPEG (High performance), Use Viewer Preference, raw, RRE,
hextile, TRLE, ZRLE. Note: If the Use Viewer Preference option is selected, the user may have to
reset the unit (see Advanced Unit Conguration) when switching between different VNC Viewer
Preferred Encoding property settings.
Host Keyboard Layout
Use the arrow buttons to match the keyboard layout expected by the host system.
Note: The chosen keyboard layout may be different from the keyboard layout being used by one
or more remote users.
Admin Password
Click the button to display a popup which allows you to optionally edit the password
that will be used to gain administrator access to the AdderLink ipeps mini module.
Unit Name
The name entered here will be displayed on the remote VNC viewer/browser windows.
To get here
1 Using VNC viewer®, log on as the ‘admin’ user.
2 Click the ‘Congure’ button in the top right corner.
3 Click the ‘Unit Conguration’ option.
New Connections Private
Allows you to determine whether new VNC connections should be set up as private
(when ticked) or as shared (when unticked).
Menu Bar Toggle Hot Key
Determines the function key that can be used to display/hide the menu bar within the
VNC screen.
Display Menu Bar for New Connections
If a menu bar hot key is set (see above), this tick box option becomes available and
determines whether or not a menu bar is shown when each new connection occurs.
Encryption
Four options are available: Always On, Always Maximum, Prefer Off or Prefer On. The
one to choose depends on the specic details of your installation. The use of encryption
imposes a slight performance overhead, but is highly secure against third party intrusion.
Maximum selects 256 bit encryption.
Number of simultaneous VNC Users
Allows you to restrict the number of concurrent VNC sessions. The maximum number is
8 and the default is 4.
VNC Viewer Hot Key Sequence
When using the VNC Viewer, you can use key press combinations to select host
computers and also to display the host selection menu. This option allows you to choose
which keys should be used to form the hotkeys that will precede a switching command.
The default setting is CTRL + ALT, so as an example when you press the CTRL ALT and
2 keys, the viewer will change to the host with “Hotkey Host Number” 2 - see Host
conguration.
There are three additional buttons at the foot of the page:
• EDID Conguration - Details the timings for the various video modes supported
by the host computer and also allows you to edit timings where necessary. It is not
normally necessary to make any changes within this section.
• Advanced Unit Conguration - Allows access to timings and calibration options which
do not usually require attention.
INSTALLATIONCONFIGURATIONOPERATION
FURTHER
INFORMATION
INDEX
21

EDID Conguration
This page details the timings for the various video modes supported by the host computer.
The Edit Preferred, Standard & DVT Timing page also allows you to edit timings where
necessary. It is not normally necessary to make any changes within these pages.
This string is displayed as the
monitor type when Display Settings
are displayed on the host PC.
Note: The HDMI checkbox is normally checked.
INSTALLATIONCONFIGURATIONOPERATION
FURTHER
INFORMATION
22
INDEX

Advanced Unit Conguration
Click this button to display advanced options that do not normally require alteration.
Background Refresh Rate
Use the arrow keys to alter the background refresh rate used to correct any screen
changes missed in normal operation. The options are: Slow, Medium, Fast, Auto or
Disabled. The Auto option automatically varies the refresh rate when multiple VNC
sessions are active to provide a balance between the sessions.
Note: When a low connection speed is detected, the background refresh is automatically
disabled, regardless of the settings of this option.
Force VNC Protocol 3.3
IMPORTANT: Protocol 3.3 is a legacy version that does not offer any encryption. Hashed
passwords are not supported with 3.3
Idle Timeout
Determines the period of inactivity on a global connection before the user is logged out.
The idle timeout period can be set to any time span, expressed in minutes.
Session Sleep Timeout
Determines the period of inactivity before the viewer screen will blank and a message is
displayed.
Protocol Timeout
Sets the time period by which responses should have been received to outgoing data
packets. If the stated period is exceeded, then a connection is considered lost and
terminated.
Mouse Latency Allowance
This option (used only for Relative Mouse mode) is used during calibration to account for
latency delays that may be caused as signals pass through a device.
During calibration, the AdderLink ipeps mini module waits for 40ms after each mouse
movement before sampling the next. If a device adds a signicant delay to the ow of
data, the calibration process can be lengthened or may fail entirely. The value entered
here is added to (or subtracted from) the default 40ms sampling time.
Note: You can enter negative values (down to -40) in order to speed up the calibration process
when using fast KVM switches. Use this option with caution as it can adversely affect the
calibration process.
Mouse Rate
Denes the rate at which mouse movement data are transmitted to the system. The
default option is 20ms, which equates to 50 mouse events per second. This is used to
slow down the rate in exceptional circumstances but normally requires no adjustment.
Single Mouse Mode Mouse Switch
Select the mouse button combination to exit from single mouse mode (when active).
Use Quick Mouse Calibration
Invokes optimized calibration techniques that handle the majority of mouse types (used
only for Relative Mouse mode).
Use Absolute Mouse by default
When selected, absolute mouse positioning data will be used rather than relative values.
Set viewer cursor to arrow
When checked, the viewer’s mouse cursor will default to an arrow.
Behaviour for admin connections when limit reached
Determines what should occur when the limit on VNC® users is reached. Options are:
Replace oldest connection, Replace newest connection and Don’t replace.
INSTALLATIONCONFIGURATIONOPERATION
FURTHER
INFORMATION
INDEX
23

Firmware
Allows you to upgrade the rmware of the AdderLink ipeps mini module. See page 9.
Remote Support
The AdderLink ipeps mini unit has a remote support feature which allows technical
support to connect, should the need arise. It works by establishing a secure SSL
connection with a managed secure server hosted on the internet. Using a reverse
tunnel, technical support can connect to the unit via the secure server. Each support
representative has their own unique SSL keys for full traceability when making a remote
connection.
Adder Technical Support will guide you through the enabling process and conrm
whether the standard port number 22 needs to be changed.
Multi Head
When clicked the Multi Head Support dialog (shown right) is displayed. This allows you
to congure connection to a multi-head computer that has up to 4 displays. A separate
ipeps mini module is used to connect to each head, each accessed by a separate VNC
session. All ipeps mini modules are required to have a video and USB connection to the
host computer.
The standard VNC Viewer® application, downloaded from www.realvnc.com, will sufce.
Note: Multi-head operation relies upon the host computer using Single mouse mode.
The Multi Head Support dialog is used to specify that multi-head mode is being used, as
well as conrming the monitor layout and which monitor within the layout this ipeps
mini module is connected to:
INSTALLATIONCONFIGURATIONOPERATION
Monitor Layout
Layout are specied in the format HxV, where H is number of horizontal displays and V
are the vertical number. The list of choices is: 1x1 (default single head), 2x1, 4x1, 2x2, 1x2.
Internet
Viewer
Viewer
Arrangement
The graphic shows the chosen monitor layout. You should select the position of the ipeps
mini module within the layout.
Note: There are no communications between ipeps mini modules, so it is up to you to ensure
that each one is congured correctly.
Although it is possible to move the mouse between displays, there is a restriction when
dragging items, such as windows. It is only possible to drag the mouse to the display edge.
You should then move the mouse to the target display to complete the drag. If this is not
possible, then you should use the Move command to move the window using cursor keys
instead.
FURTHER
INFORMATION
INDEX
24
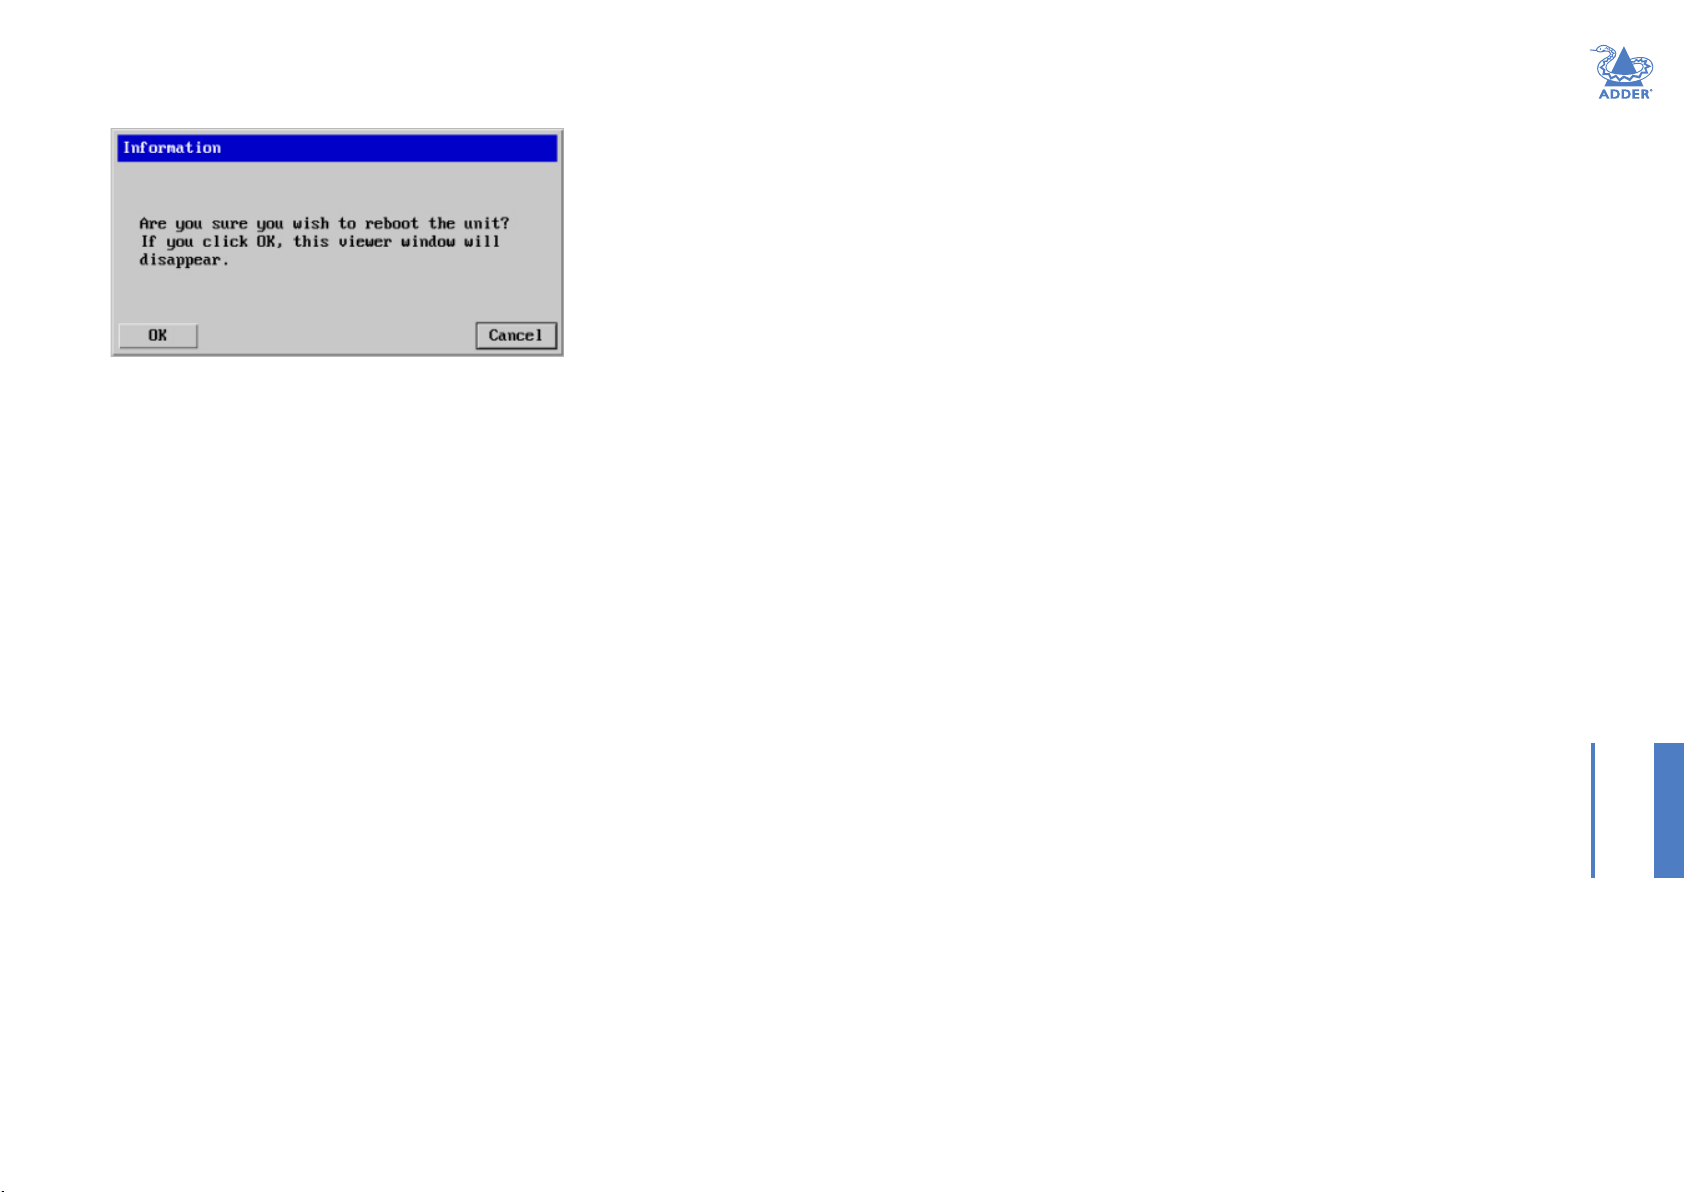
Reboot Unit
Performs a complete cold boot of the AdderLink ipeps mini module.
INSTALLATIONCONFIGURATIONOPERATION
FURTHER
25
INFORMATION
INDEX
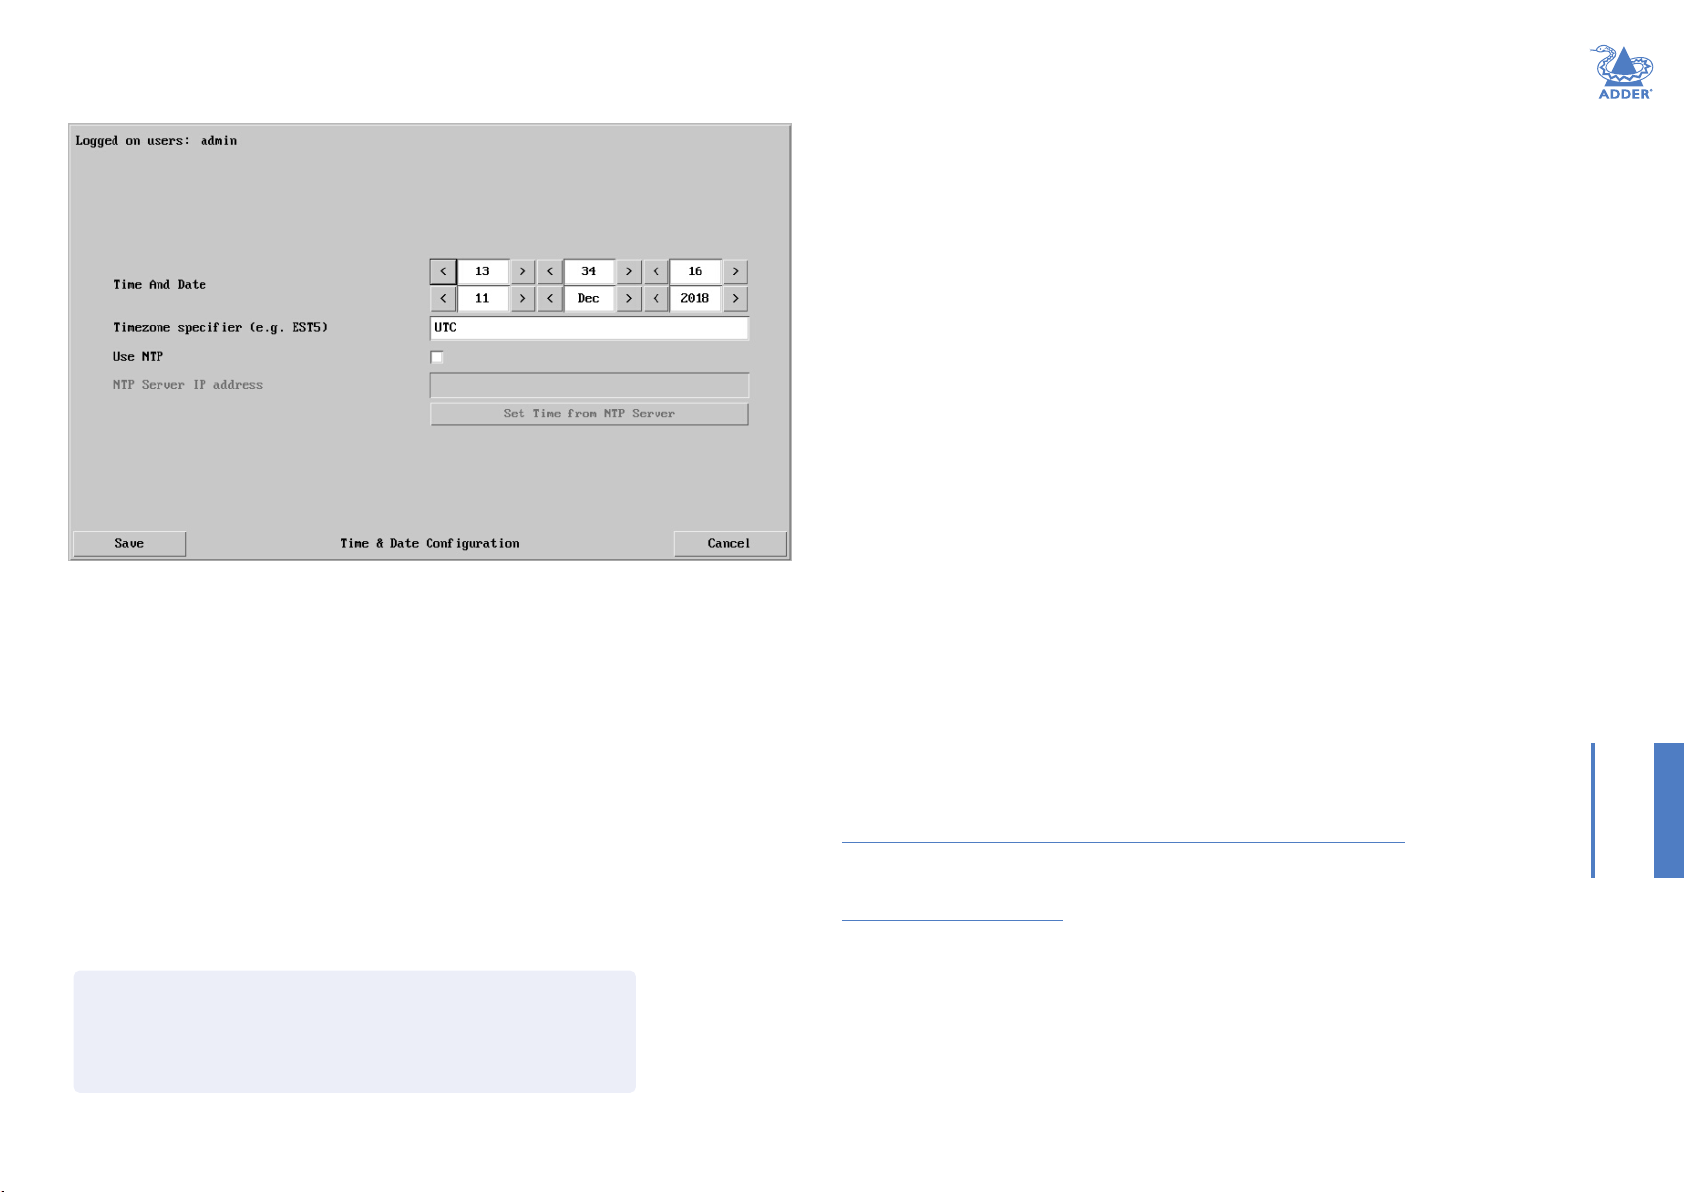
Time & Date Conguration
This page allows you to congure all aspects relating to time and date within the unit.
Use NTP
When this option is selected, the AdderLink ipeps mini module will synchronize its
internal clocks using information from the (Network Time Protocol) server listed in the
NTP Server IP address eld.
NTP Server IP address
Optionally enter the IP address for a known Network Time Protocol server (the Use
NTP option needs to be checked).
Set Time from NTP Server
Click to immediately use the time and date information from the listed NTP server.
Timezone specier
Optionally enter a recognized timezone specier related to the current position of the
AdderLink ipeps mini module. When an NTP server is used, the specier will be used to
provide the correct real time.
The timezone specier takes the following form:
std oset dst [oset],start[/time],end[/time]
The std and oset specify the standard time zone, such as GMT and 0, or CET and -1, or
EST and 5, respectively.
The dst string and [oset] specify the name and offset for the corresponding Daylight
Saving Time zone; if the oset is omitted, it defaults to one hour ahead of standard time.
The remainder of the specication describes when Daylight Saving Time is in effect. The
start eld is when Daylight Saving Time goes into effect and the end eld is when the
change is made back to standard time. The most common format used for the daylight
saving time is: Mm.w.d
Where: m species the month and must be between 1 and 12. The day d must be
between 0 (Sunday) and 6. The week w must be between 1 and 5; week 1 is the rst
week in which day d occurs, and week 5 species the last d day in the month.
The time elds specify when, in the local time currently in effect, the change to the other
time occurs. If omitted, the default is 02:00:00.
Typical examples are:
UK: GMT0BST,M3.5.0/1,M10.5.0/2
Central Europe: CET-1CEST,M3.5.0/2,M10.5.0/3
US Eastern: EST5EDT,M3.2.0/2,M11.1.0/2
US Pacic: PST5PDT,M3.2.0/2,M11.1.0/2
For further details
• For details of timezone specier formats, please refer to:
http://www.gnu.org/software/libc/manual/html_node/TZ-Variable.html
• For details of the Network Time Protocol (main RFC number: 1305; the SNTP subset
used as the basis for the AdderLink ipeps mini module: 4330)
http://www.ietf.org/rfc.html
INSTALLATIONCONFIGURATIONOPERATION
FURTHER
INFORMATION
To get here
1 Using VNC viewer®, log on as the ‘admin’ user.
2 Click the ‘Congure’ button in the top right corner.
3 Click the ‘Time & Date Conguration’ option.
INDEX
26

Network Conguration
This page allows you to congure the various aspects of the IP port. See also Appendix
3 - Networking issues for useful conguration advice.
MAC address
Media Access Control address – this is the unique and unchangeable code that was
hard coded within the module when it was built. It consists of six 2-digit hexadecimal
(base 16) numbers separated by colons. A section of the MAC address identies the
manufacturer, while the remainder is effectively the unique electronic serial number of
your particular unit.
Use DHCP
Determines whether a DHCP (Dynamic Host Conguration Protocol) server should be
consulted on the connected network to automatically set an appropriate IP Address, IP
Network Mask and IP Gateway.
IP Address
If the Use DHCP option is set to No, use this option to set an IP address for the
AdderLink ipeps mini module which is appropriate for the network to which it is
connected.
To get here
1 Using VNC viewer®, log on as the ‘admin’ user.
2 Click the ‘Congure’ button in the top right corner.
3 Click the ‘Network Conguration’ option.
IP Network Mask
If the Use DHCP option is set to No, use this option to set a subnet-mask for the
AdderLink ipeps mini module which is appropriate for the network to which it is
connected.
IP Gateway
If the Use DHCP option is set to No, use this option to set a gateway address for a
network router which gives access to another network, to be used whenever a required
address lies outside the current network.
DNS Server
If the Use DHCP option is set to No, enter a valid IP address here for a Domain Name
System server which is reachable through the connected network.
VNC Port
This is the logical link through which communications with a remote VNC viewer will be
channelled. The default setting is 5900 which is a widely recognized port number for use
by VNC software. However, in certain circumstances it may be advantageous to alter this
number - see ‘Security issues with ports’ for more details.
IP Access Control
This section allows you to optionally specify ranges of addresses which will or won’t be
granted access to the AdderLink ipeps mini module. If this option is left unchanged, then
the default entry of ‘+0.0.0.0/0.0.0.0’ ensures that access from all IP addresses will be
permitted. See Setting IP access control for details.
INSTALLATIONCONFIGURATIONOPERATION
FURTHER
INFORMATION
27
INDEX
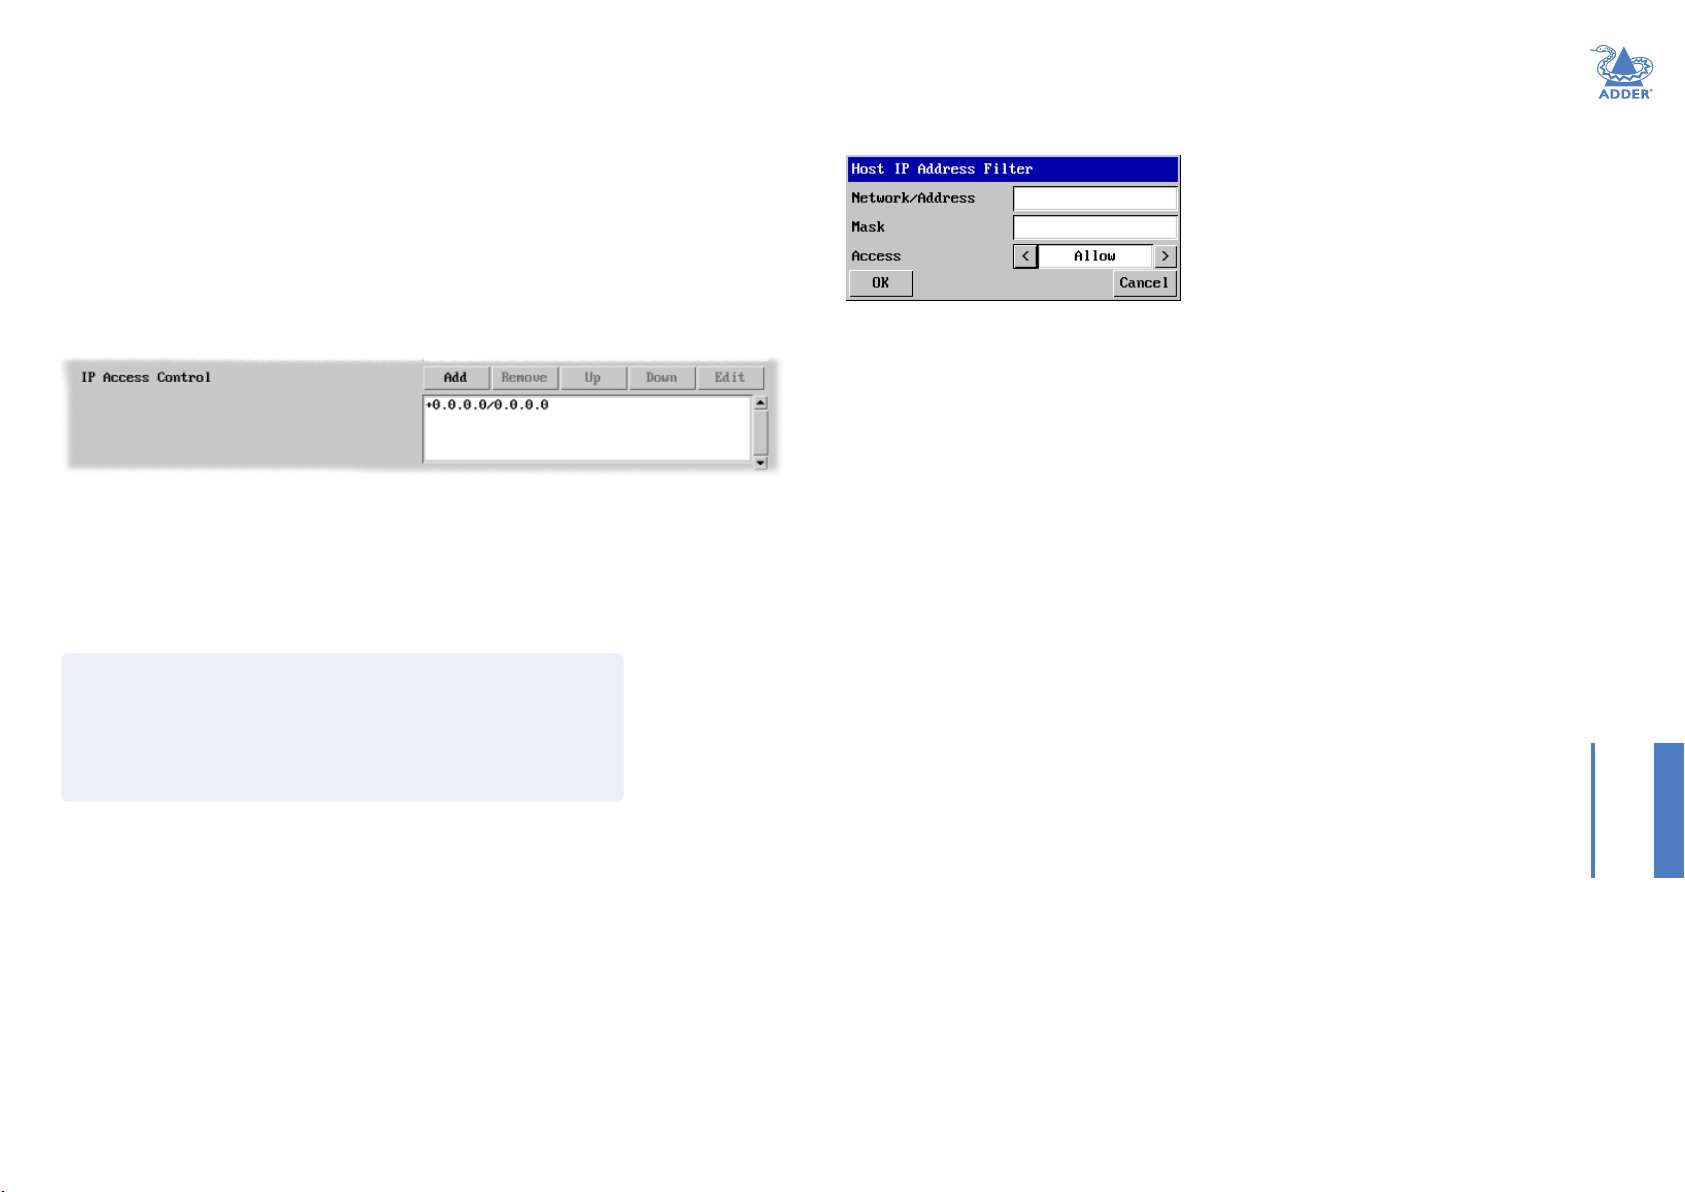
Setting IP Access Control
The golden rule with this feature is ‘Include before you exclude’ or to put it another way
‘Arrange allowed addresses in the list before the denied addresses’.
This is because the positions of entries in the list are vitally important. Once a range of
addresses is denied access, it is not possible to make exceptions for particular addresses
within that range. For instance, if the range of addresses from A to F are denied access
rst, then the address C could not be granted access lower down the list. Address C
needs to be placed in the list before the denied range.
IMPORTANT: This feature should be congured with extreme caution as it is possible to deny
access to everyone. If such an error occurs, you will need to perform a reset to factory default
settings in order to regain access.
In the list, access control addresses prexed by ‘+’ are allow entries while those prexed
by ‘– ‘ are deny entries.
To get here
1 Using VNC viewer®, log on as the ‘admin’ user.
2 Click the ‘Congure’ button in the top right corner.
3 Click the ‘Network Conguration’ option.
4 In the Set IP Access section, click Add or Edit, as necessary.
To dene a new IP access control entry
1 Click the Add button to display a popup dialog:
Network/Address
Enter the network address
that is to be allowed or denied
access. If a range of addresses is
being specied then specify any
one of the addresses within the
range and use the Mask entry to
indicate the size of the range.
Mask
Enter an IP network mask that
indicates the range of addresses
that are to be allowed or denied
access. For instance, if only a
single specied IP address were
to be required, the mask entry
would be 255.255.255.255 in
order to specify a single location.
Access
Use the arrow buttons
to select either ‘Allow’ or
‘Deny’ as appropriate.
2 Enter the base network address, the mask and select the appropriate access setting.
3 Click the OK button.
To reorder access control entries
IMPORTANT: When reordering, ensure that any specic allowed addresses are listed higher in
the list than any denied addresses. Take care not to invoke any deny access settings that would
exclude valid users.
1 In the access control list, click on the entry to be moved.
2 Click the Up or Down buttons as appropriate.
To edit/remove access control entries
1 In the access control list, click on the appropriate entry.
2 Click either the Edit or Remove button as appropriate.
INSTALLATIONCONFIGURATIONOPERATION
FURTHER
INFORMATION
28
INDEX
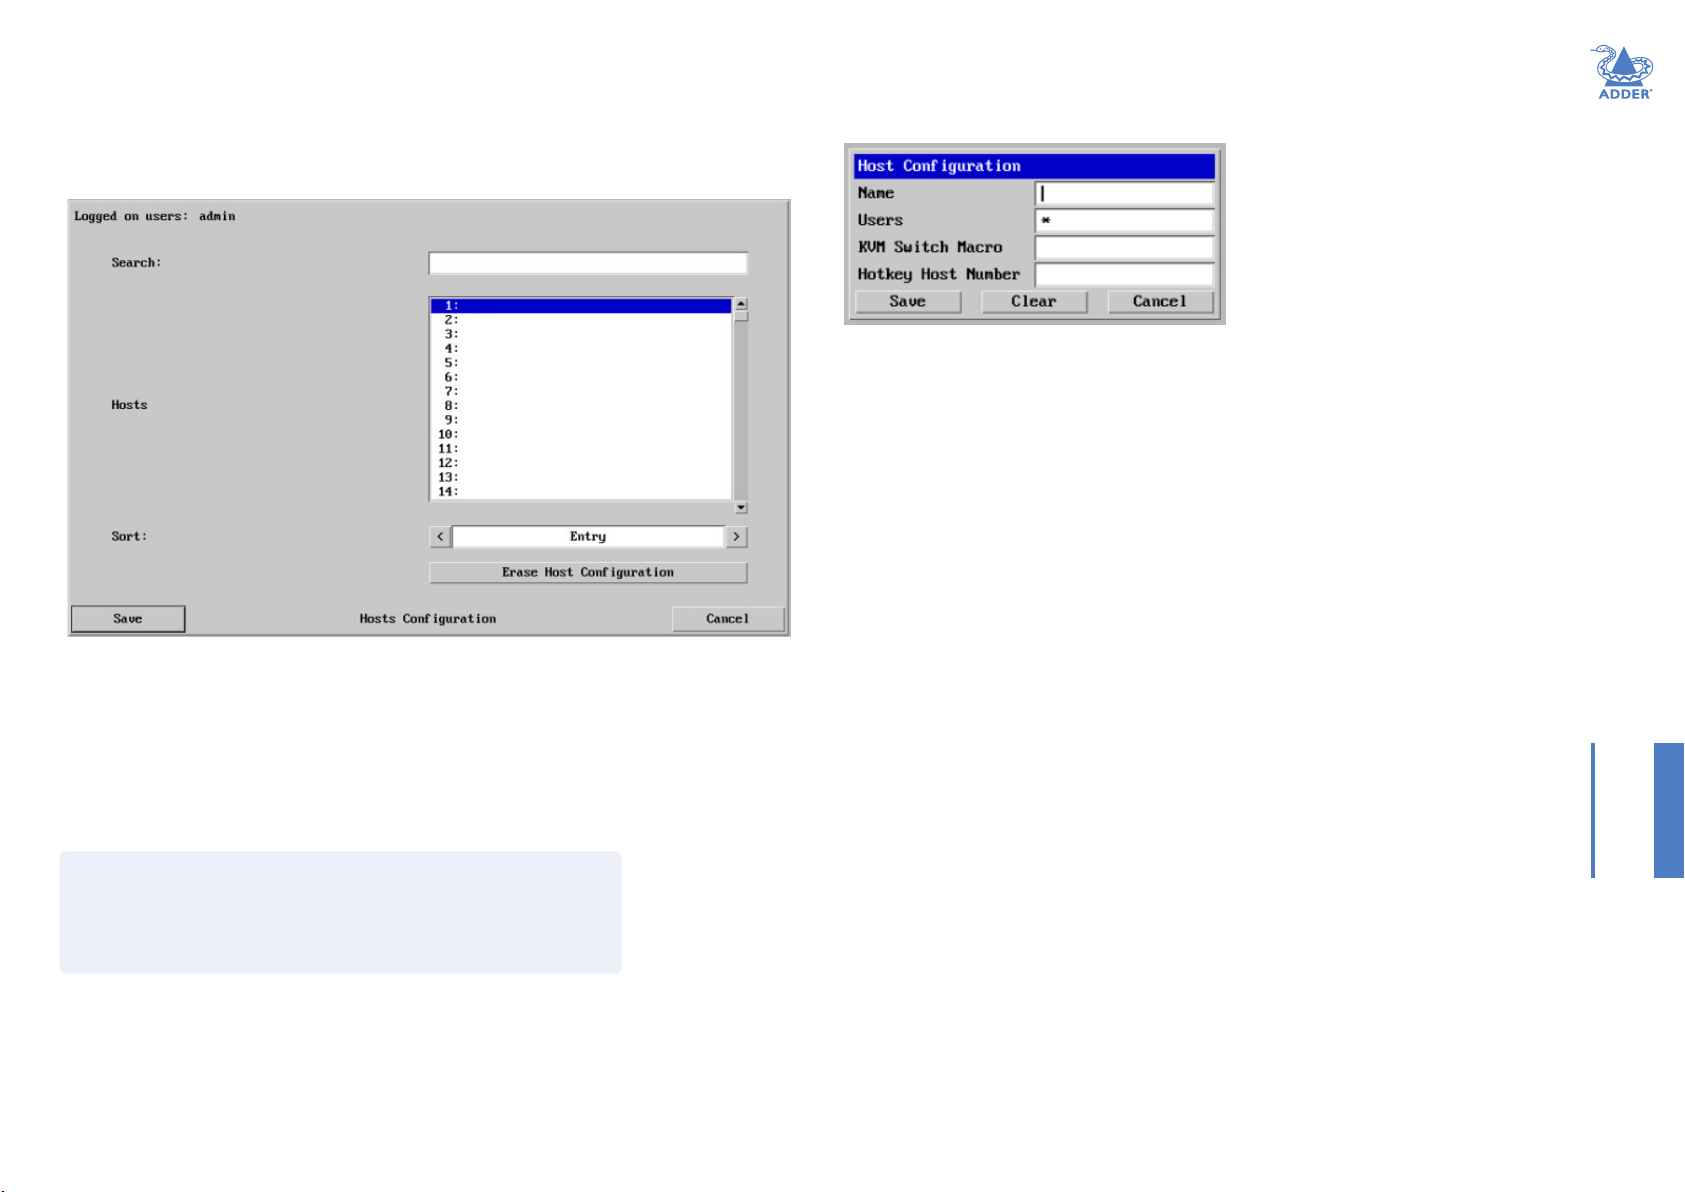
Host Conguration
This page provides the opportunity to congure various details for each of the host
systems that may be connected to the AdderLink ipeps mini module. Each entry can
be congured with a name, the permitted users, the hot key combinations required to
switch to it and, if required, appropriate power control commands.
To create a new host entry
1 Click one of the host entries to reveal a Host conguration dialog.
INSTALLATIONCONFIGURATIONOPERATION
2 Enter the required information in each eld.
3 Click the OK button.
Name
Enter the name that will be displayed in the viewer window when you click the Host
button.
Users
Select the users that will be permitted to connect to this host. Either enter * to allow all
users or a list of users separated by commas.
KVM Switch Macro
Declare the hot key sequence that will cause the KVM switch to link with the required
host system. Note: If this is left blank, the host will not be included in the Hosts menu.
Sort
Allows you to reorder the list of hosts either alphabetically or by entry number.
Erase Host Conguration
Removes all hosts from the list.
To get here
1 Using VNC viewer®, log on as the ‘admin’ user.
2 Click the ‘Congure’ button in the top right corner.
3 Click the ‘Host Conguration’ option.
Hotkey Host Number
Declare the numeric sequence that is pressed together with the VNC viewer hotkeys
(usually Ctrl + Alt) to select this host system, which is the same value as the KVM port
number.
FURTHER
INFORMATION
INDEX
29
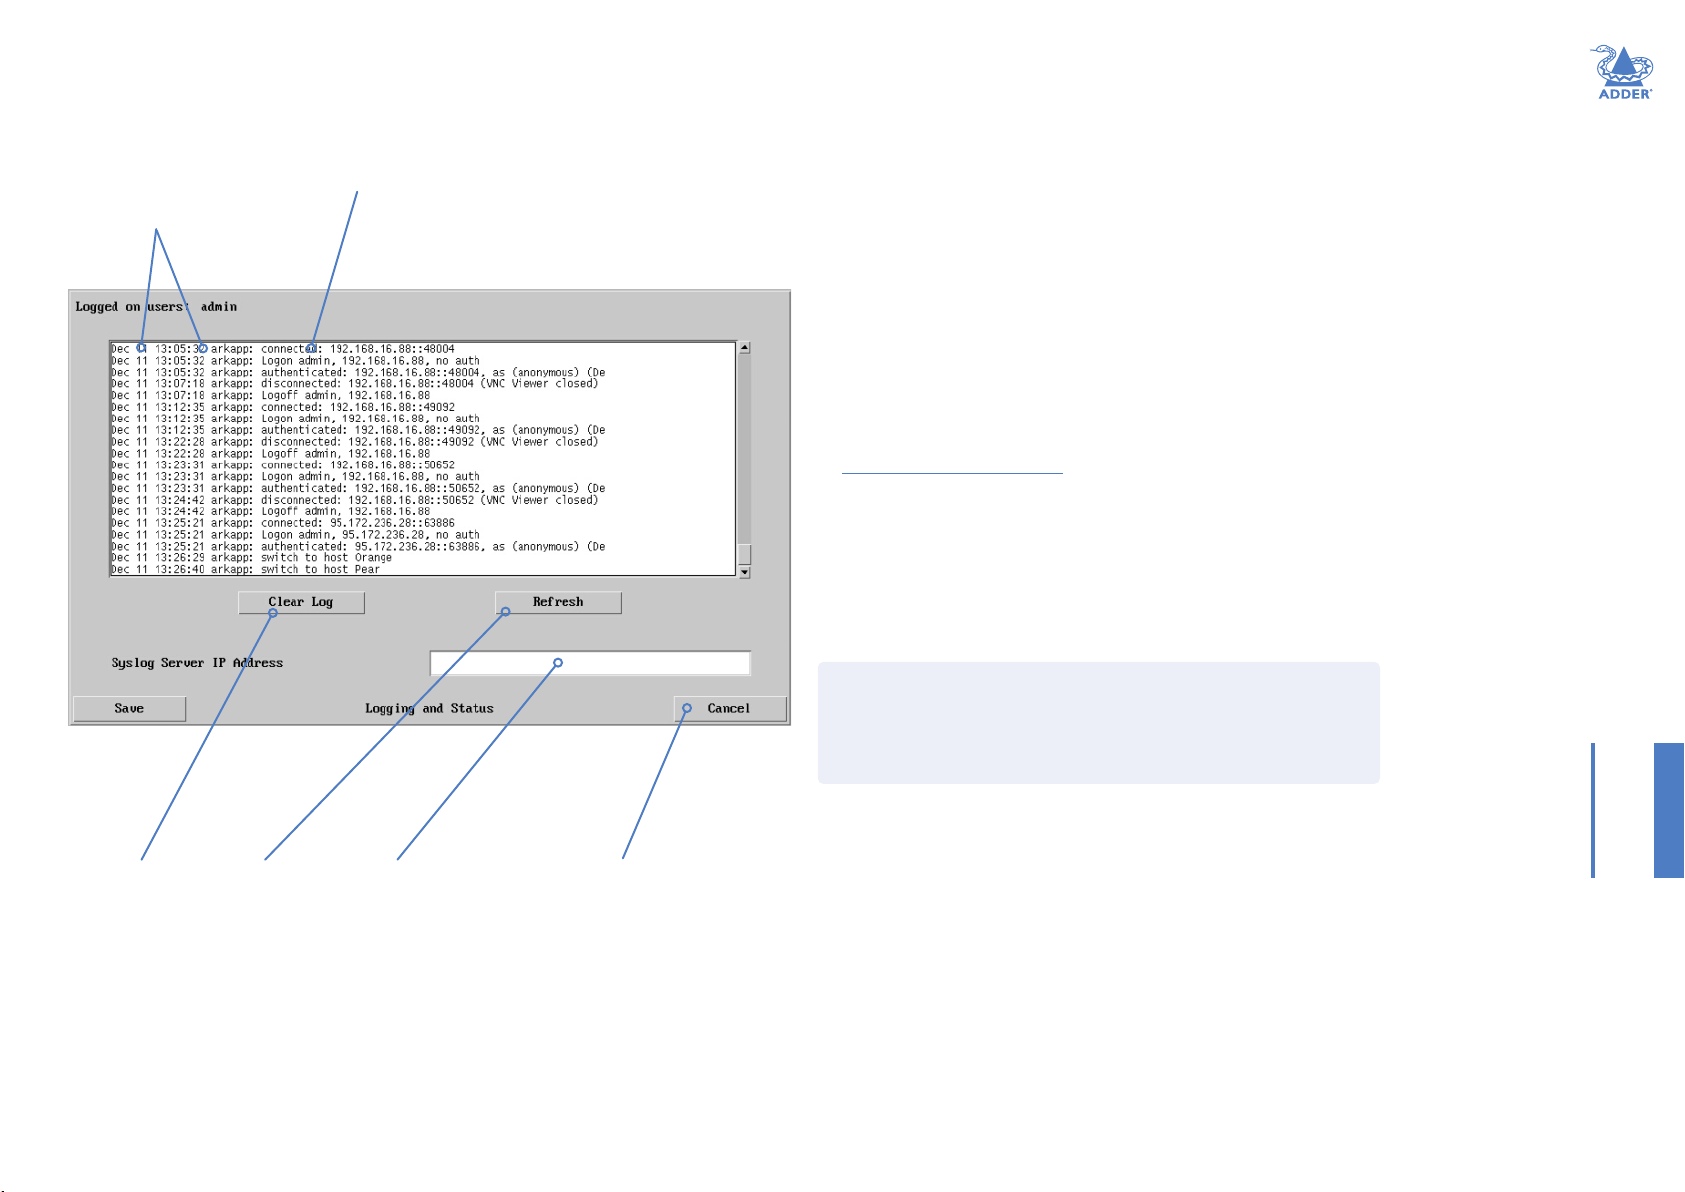
Logging and Status
This screen provides various details about the user activity on the AdderLink ipeps mini
module.
Date and
time the
event
occurred
Type of event, user name and access
method or remote IP address
To copy and paste the log
You can copy the information listed within the log and paste it into another application.
1 While viewing the log screen, press Ctrl and C, to copy the data into the clipboard.
2 In a text application (i.e. Word, WordPad, Notepad) press Ctrl and V, or right mouse
click and ‘Paste’.
INSTALLATIONCONFIGURATIONOPERATION
Syslog Server IP Address
Logging information can optionally be sent, as it occurs, to a separate system using the
standard Syslog protocol. Enter the IP address of a suitable system in the eld provided.
For further details
• For details of the Syslog protocol (RFC number: 3164)
http://www.ietf.org/rfc.html
Click to clear
all log entries
Click to
refresh
the list
Optionally enter an
IP address to which
the status log should
be sent
Click to
return to
the main
menu
To get here
1 Using VNC viewer® log on as the ‘admin’ user.
2 Click the ‘Congure’ button in the top right corner.
3 Click the ‘Logging and Status’ option.
FURTHER
INFORMATION
INDEX
30

APPENDIX 2 - NETWORKING ISSUES
Thanks to its robust security the AdderLink ipeps mini offers you great exibility in how
it integrates into an existing network structure. The AdderLink ipeps mini is designed to
reside either on an internal network, behind a rewall/router or alternatively with its
own direct Internet connection.
Positioning AdderLink ipeps mini in the network
Every network setup is different and great care needs to be taken when introducing
a powerful device such as the AdderLink ipeps mini into an existing conguration. A
common cause of potential problems can be in clashes with rewall congurations. For
this reason the AdderLink ipeps mini is designed to be intelligent, exible and secure.
With the minimum of effort the AdderLink ipeps mini can reside either behind the
rewall or alongside with its own separate Internet connection.
Internet
Local
network
connection
KVM link to
host system
Firewall/
router
Local
network
connection
Internet
Firewall/
router
Placing AdderLink ipeps mini behind a router or rewall
A possible point of contention between the AdderLink ipeps mini and a rewall can
occasionally arise over the use of IP ports. Every port through the rewall represents a
potential point of attack from outside and so it is advisable to minimize the number of open
ports. The AdderLink ipeps mini usually uses two separate port numbers, however, these are
easily changeable and can even be combined into a single port.
IMPORTANT: The correct conguration of routers and rewalls requires advanced
networking skills and intimate knowledge of the particular network. Adder Technology
cannot provide specic advice on how to congure your network devices and strongly
recommend that such tasks are carried out by a qualied professional.
Port settings
As standard, the AdderLink ipeps mini uses two ports to support its two types of viewer:
• Port 80 for users making contact with a web browser, and
• Port 5900 for those using the VNC viewer®.
When these port numbers are used, VNC viewers and web browsers will locate the
AdderLink ipeps mini correctly using only its network address. The rewall/router must
be informed to transfer trafc, requesting these port numbers, through to the AdderLink
ipeps mini.
If you need to change the VNC port number
If you change the VNC port to anything other than 5900, then each VNC viewer user
will need to specify the port address as well as the IP address. For instance, if you set the
VNC port to ‘11590’ and the IP address is ‘192.168.47.10’ then VNC viewer users will
need to enter:
192.168.47.10::11590
(Note the double colons that separate the IP address and port number).
The rewall/router would also need to be informed to transfer all trafc to the new port
number through to the AdderLink ipeps mini.
INSTALLATIONCONFIGURATIONOPERATION
KVM link to
host system
AdderLink ipeps mini
situated behind the rewall
AdderLink ipeps mini
situated alongside the
rewall
IMPORTANT: When the AdderLink ipeps mini is accessible from the Internet, you
must ensure that sufcient security measures are employed.
FURTHER
INFORMATION
INDEX
31

Addressing
When the AdderLink ipeps mini is situated within the local network, you will need to
give it an appropriate local IP address and IP network mask. This is achieved most easily
using the DHCP server option which will apply these details automatically. If a DHCP
server is not available on the network, then these details need to be applied manually in
accordance with the network administrator.
The rewall/router must then be informed to route incoming requests to port 5900 or
port 80 (if available) through to the local address being used by the AdderLink ipeps mini.
Remote user with VNC
viewer accesses IP address:
129.7.1.10 and automatically
uses port 5900.
Internet
Firewall/router address:
129.7.1.10
The rewall routes the request from the
VNC viewer on port 5900 through to
the AdderLink ipeps mini at local address
192.168.0.3
Placing AdderLink ipeps mini alongside the rewall
AdderLink ipeps mini is built from the ground-up to be secure. It employs a sophisticated
128bit public/private key system that has been rigorously analysed and found to be highly
secure (a security white paper is available upon request from Adder Technology Ltd).
Therefore, you can position the AdderLink ipeps mini alongside the rewall and control a
computer that is also IP connected within the local network.
IMPORTANT: If you make the AdderLink ipeps mini accessible from the public Internet, care
should be taken to ensure that the maximum security available is activated. You are strongly
advised to enable encryption and use a strong password. Security may be further improved by
restricting client IP addresses, using a non-standard port number for access.
Ports
In this conguration there should be no constraints on the port numbers because the
AdderLink ipeps mini will probably be the only device at that IP address. Therefore,
maintain the HTTP port as 80 and the VNC port as 5900.
Addressing
When the AdderLink ipeps mini is situated alongside the rewall, it will require a public
static IP address (i.e. one provided by your Internet service provider).
More addressing information:
Discover DHCP-allocated addresses
DNS addressing
INSTALLATIONCONFIGURATIONOPERATION
AdderLink ipeps mini has a
local address and net mask:
IP address: 192.168.0.3
Net mask: 255.255.255.0
FURTHER
INFORMATION
INDEX
32

APPENDIX 3 - SECURITY CONSIDERATIONS
The security capabilities offered by the AdderLink ipeps mini are only truly effective
when they are correctly used. An open or weak password or unencrypted link can
cause security loopholes and opportunities for potential intruders. For network links in
general and direct Internet connections in particular, you should carefully consider and
implement the following:
• Ensure that encryption is enabled.
• Ensure that you have selected secure passwords with at least 8 characters, a mixture
of upper and lower case and numeric characters plus a special character.
• Reserve the admin password for administration use only and use a non-admin user
prole for day-to-day access.
• Use the latest Secure VNC viewer (this has more in-built security than is available with
the Java viewer).
• Use non-standard port numbers.
• Restrict the range of IP addresses that are allowed to access the AdderLink ipeps mini
to only those that you will need to use. To restrict IP access.
• Do NOT Force VNC protocol 3.3.
• Ensure that the computer accessing the AdderLink ipeps mini is clean of viruses
and spyware and has up-to-date rewall and anti-virus software loaded that is
appropriately congured.
• Avoid accessing the AdderLink ipeps mini from public computers.
Security can be further improved by using the following suggestions:
• Place the AdderLink ipeps mini behind a rewall and use port the numbers to route
the VNC network trafc to an internal IP address.
• Review the activity log from time to time to check for unauthorized use.
• Lock your server consoles after they have been used.
A security white paper that gives further details is available upon request from Adder
Technology Limited.
Older versions of VNC Viewer
Although ipeps mini allows passwords of up to 16 characters, versions of VNC Viewer
pre 4.2 will only validate up to 8 characters. Administrators may prevent such access by
setting the encryption scheme to ‘Always On’ or ‘Always Max’. See page 21.
INSTALLATIONCONFIGURATIONOPERATION
FURTHER
INFORMATION
33
INDEX

APPENDIX 4 - PRODUCT COMPATIBILITY
AdderLink ipeps mini is compatible with the following Adder products:
• AdderView DDX and AdderLink XDIP small Matrix systems.
• AdderLink Innity 1000 and AdderLink Innity 2000 receivers to allow a VNC
connection into an Innity Matrix.
• AdderView AV4PRO KVM switch to allow remote access to four USB/DVI computers.
INSTALLATIONCONFIGURATIONOPERATION
FURTHER
34
INFORMATION
INDEX

APPENDIX 5 - HOTKEY SEQUENCES
AdderLink ipeps mini allows you to enter commands suitable for any KVM switch in order to
choose from up to 128 host systems. These switching commands can take the form of hotkey
sequences that emulate standard keypress combinations or, for KVM switches that support
the Adder Port Direct format, merely basic port numbers.
Hotkey sequences
Almost any combination of keypresses can be emulated using the following notations:
+ means press down the key that follows;
– means release the key that follows
+– means press and then release the key that follows
means add a delay. The standard delay period is 250ms, however, if a number
*
immediately follows the asterisk, this will dene an alternate delay period (in
milliseconds)
Notes
• The entries are not case sensitive.
• All characters can be entered using their ASCII codes, from 32 to 126 (i.e. A,B,C, …
1,2,3 etc.) with the exception of the special characters above.
• It is not necessary to specify all keys to be released at the end because they are all
released automatically after the last code.
• A number of KVM switches from alternative manufacturers use hot key sequences
that begin with a press/release of either the Scroll Lock or Ctrl keys. These often
require a delay between the initial key press and the channel number to allow the
switch to respond. A 500ms delay is usually sufcient.
Examples
To send the command Ctrl + Alt 4 you should use the following: +Ctrl+Alt+4.
To send the command Ctrl + Alt 12 you should use the following: +Ctrl+ALT+–1+2
(the ‘+–1’ entry causes the 1 key to be pressed and released before the 2 key is pressed).
To send the command Scroll lock 1 + Enter (with a 500ms delay) you should use the
following: +–Scr*500+1+Ent
Main control keys (see ‘Using abbreviations’)
Backspace | Ta b | Return | Enter | Ctrl | Alt | Win | Shift | LShift | RShift
LCtrl | RCtrl | LAlt | AltGr | RAlt | LWin | RWin | Menu | Escape | Space
CapsLock | NumLock | PrintScreen | Scrolllock
Math operand keys (see ‘Using abbreviations’)
Add (Plus) | Subtract (Minus) | Multiply
Central control keys (see ‘Using abbreviations’)
Insert | Delete | Home | End | PageUp | PageDown
Up | Down | Left | Right | Print | Pause
Keypad keys (see ‘Using abbreviations’)
KP_Insert | KP_Delete | KP_Home | KP_End | KP_PageUp
KP_PageDown | KP_Up | KP_Down | KP_Left | KP_Right | KP_Enter
KP_Add | KP_Subtract | KP_Divide | KP_Multiply
KP_0 to KP_9
Function keys
F1 | F2 | F3 | F4 | F5 | F6 | F7 | F8 | F9 | F10 | F11 | F12
Creating macro sequences
Hot key macro sequences can be up to 256 characters long. All keys are assumed to be
released at the end of a line, however, you can also determine that a key is pressed and
released within a sequence. Any of the following three examples will send a command
that emulates and a press and release of the Scroll Lock key:
+SCROLL-SCROLL
+-SCROLL
+SCROLL-
Example:
+-SCROLL+-SCROLL+1+ENTER
Press and release scroll twice, press 1 then enter then release all keys (equivalent
denition is +SCROLL-SCROLL+SCROLL-SCROLL+1+ENTER-1-ENTER)
Using abbreviations
To reduce the length of the key denitions, any unique abbreviation for a key can be
used. For example: “scroll”, “scr” and even “sc” all provide an identiable match for
“ScrollLock” whereas “en” could not be used because it might mean “Enter” or “End”
(“ent” would be suitable for “Enter”).
Note: Hotkey sequences and abbreviations are not case sensitive.
For information about where to enter these codes, please see the section Host
conguration.
INSTALLATIONCONFIGURATIONOPERATION
FURTHER
INFORMATION
INDEX
35

APPENDIX 6 - OPEN SOURCE LICENSES
This product includes binaries that are derived from the open source
community. The modules listed below are licenced under the GNU
General Public License v2 and must be provided, in source form, on
request:
dtc
u-boot-xlnx
linux-xlnx
busybox
util-linux
udev
termcap
mtd-utils
libpbe
stress
haserl
This product includes binaries that are derived from the open source
community. The modules listed below are licenced under the GNU
Lesser General Public License v2.1 and must be provided, in source form,
on request:
kmod
libdaemon
avahi
libgpg-error
libgcrypt
gnutls
libjwt
libmicrohttpd
In addition to the GPL modules listed, this product also includes binaries
derived from 3rd party open sources that have their own license
requirements. Each module is listed below with their required Copyright
statement and distribution conditions.
----------------------------------------------------------------------------
-
- Module: libupnp
-
----------------------------------------------------------------------------
Copyright (c) 2000-2003 Intel Corporation
All rights reserved.
Redistribution and use in source and binary forms, with or without
modication, are permitted provided that the following conditions are
met:
* Redistributions of source code must retain the above copyright notice,
this list of conditions and the following disclaimer.
* Redistributions in binary form must reproduce the above copyright
notice,
this list of conditions and the following disclaimer in the documentation
and/or other materials provided with the distribution.
* Neither name of Intel Corporation nor the names of its contributors
may be used to endorse or promote products derived from this
software
without specic prior written permission.
THIS SOFTWARE IS PROVIDED BY THE COPYRIGHT HOLDERS
AND CONTRIBUTORS ``AS IS’’ AND ANY EXPRESS OR IMPLIED
WARRANTIES, INCLUDING, BUT NOT LIMITED TO, THE IMPLIED
WARRANTIES OF MERCHANTABILITY AND FITNESS FOR A
PARTICULAR PURPOSE ARE DISCLAIMED. IN NO EVENT SHALL
INTEL OR CONTRIBUTORS BE LIABLE FOR ANY DIRECT, INDIRECT,
INCIDENTAL, SPECIAL, EXEMPLARY, OR CONSEQUENTIAL
DAMAGES (INCLUDING, BUT NOT LIMITED TO, PROCUREMENT
OF SUBSTITUTE GOODS OR SERVICES; LOSS OF USE, DATA, OR
PROFITS; OR BUSINESS INTERRUPTION) HOWEVER CAUSED AND
ON ANY THEORY OF LIABILITY, WHETHER IN CONTRACT, STRICT
LIABILITY, OR TORT (INCLUDING NEGLIGENCE OR OTHERWISE)
ARISING IN ANY WAY OUT OF THE USE OF THIS SOFTWARE, EVEN
IF ADVISED OF THE POSSIBILITY OF SUCH DAMAGE.
----------------------------------------------------------------------------
-
- Module: openssl
-
--------------------------------------------------------------------------- LICENSE ISSUES
==============
The OpenSSL toolkit stays under a dual license, i.e. both the conditions
of
the OpenSSL License and the original SSLeay license apply to the toolkit.
See below for the actual license texts. Actually both licenses are BSD-
style
Open Source licenses. In case of any license issues related to OpenSSL
please contact openssl-core@openssl.org.
OpenSSL License
---------------
/* =================================================
===================
* Copyright (c) 1998-2011 The OpenSSL Project. All rights reserved.
*
* Redistribution and use in source and binary forms, with or without
* modication, are permitted provided that the following conditions
* are met:
*
* 1. Redistributions of source code must retain the above copyright
* notice, this list of conditions and the following disclaimer.
*
* 2. Redistributions in binary form must reproduce the above copyright
* notice, this list of conditions and the following disclaimer in
* the documentation and/or other materials provided with the
* distribution.
*
* 3. All advertising materials mentioning features or use of this
* software must display the following acknowledgment:
* “This product includes software developed by the OpenSSL Project
* for use in the OpenSSL Toolkit. (http://www.openssl.org/)”
*
* 4. The names “OpenSSL Toolkit” and “OpenSSL Project” must not be
used to
* endorse or promote products derived from this software without
* prior written permission. For written permission, please contact
* openssl-core@openssl.org.
*
* 5. Products derived from this software may not be called “OpenSSL”
* nor may “OpenSSL” appear in their names without prior written
* permission of the OpenSSL Project.
*
* 6. Redistributions of any form whatsoever must retain the following
* acknowledgment:
* “This product includes software developed by the OpenSSL Project
* for use in the OpenSSL Toolkit (http://www.openssl.org/)”
*
* THIS SOFTWARE IS PROVIDED BY THE OpenSSL PROJECT ``AS IS’’
AND ANY
* EXPRESSED OR IMPLIED WARRANTIES, INCLUDING, BUT NOT
LIMITED TO, THE
* IMPLIED WARRANTIES OF MERCHANTABILITY AND FITNESS FOR
A PARTICULAR
* PURPOSE ARE DISCLAIMED. IN NO EVENT SHALL THE OpenSSL
PROJECT OR
* ITS CONTRIBUTORS BE LIABLE FOR ANY DIRECT, INDIRECT,
INCIDENTAL,
* SPECIAL, EXEMPLARY, OR CONSEQUENTIAL DAMAGES
(INCLUDING, BUT
* NOT LIMITED TO, PROCUREMENT OF SUBSTITUTE GOODS OR
SERVICES;
* LOSS OF USE, DATA, OR PROFITS; OR BUSINESS INTERRUPTION)
* HOWEVER CAUSED AND ON ANY THEORY OF LIABILITY,
WHETHER IN CONTRACT,
* STRICT LIABILITY, OR TORT (INCLUDING NEGLIGENCE OR
OTHERWISE)
* ARISING IN ANY WAY OUT OF THE USE OF THIS SOFTWARE,
EVEN IF ADVISED
* OF THE POSSIBILITY OF SUCH DAMAGE.
* =================================================
FURTHER
FURTHER
36
36
INSTALLATIONCONFIGURATIONOPERATION
INSTALLATIONCONFIGURATIONOPERATION
INFORMATION
INFORMATION
INDEX
INDEX

===================
*
* This product includes cryptographic software written by Eric Young
* (eay@cryptsoft.com). This product includes software written by Tim
* Hudson (tjh@cryptsoft.com).
*
*/
Original SSLeay License
-----------------------
/* Copyright (C) 1995-1998 Eric Young (eay@cryptsoft.com)
* All rights reserved.
*
* This package is an SSL implementation written
* by Eric Young (eay@cryptsoft.com).
* The implementation was written so as to conform with Netscapes SSL.
*
* This library is free for commercial and non-commercial use as long as
* the following conditions are aheared to. The following conditions
* apply to all code found in this distribution, be it the RC4, RSA,
* lhash, DES, etc., code; not just the SSL code. The SSL documentation
* included with this distribution is covered by the same copyright terms
* except that the holder is Tim Hudson (tjh@cryptsoft.com).
*
* Copyright remains Eric Young’s, and as such any Copyright notices in
* the code are not to be removed.
* If this package is used in a product, Eric Young should be given
attribution
* as the author of the parts of the library used.
* This can be in the form of a textual message at program startup or
* in documentation (online or textual) provided with the package.
*
* Redistribution and use in source and binary forms, with or without
* modication, are permitted provided that the following conditions
* are met:
* 1. Redistributions of source code must retain the copyright
* notice, this list of conditions and the following disclaimer.
* 2. Redistributions in binary form must reproduce the above copyright
* notice, this list of conditions and the following disclaimer in the
* documentation and/or other materials provided with the distribution.
* 3. All advertising materials mentioning features or use of this software
* must display the following acknowledgement:
* “This product includes cryptographic software written by
* Eric Young (eay@cryptsoft.com)”
* The word ‘cryptographic’ can be left out if the rouines from the
library
* being used are not cryptographic related :-).
* 4. If you include any Windows specic code (or a derivative thereof)
from
* the apps directory (application code) you must include an
acknowledgement:
* “This product includes software written by Tim Hudson (tjh@
cryptsoft.com)”
*
* THIS SOFTWARE IS PROVIDED BY ERIC YOUNG ``AS IS’’ AND
* ANY EXPRESS OR IMPLIED WARRANTIES, INCLUDING, BUT NOT
LIMITED TO, THE
* IMPLIED WARRANTIES OF MERCHANTABILITY AND FITNESS FOR
A PARTICULAR PURPOSE
* ARE DISCLAIMED. IN NO EVENT SHALL THE AUTHOR OR
CONTRIBUTORS BE LIABLE
* FOR ANY DIRECT, INDIRECT, INCIDENTAL, SPECIAL, EXEMPLARY,
OR CONSEQUENTIAL
* DAMAGES (INCLUDING, BUT NOT LIMITED TO, PROCUREMENT
OF SUBSTITUTE GOODS
* OR SERVICES; LOSS OF USE, DATA, OR PROFITS; OR BUSINESS
INTERRUPTION)
* HOWEVER CAUSED AND ON ANY THEORY OF LIABILITY,
WHETHER IN CONTRACT, STRICT
* LIABILITY, OR TORT (INCLUDING NEGLIGENCE OR OTHERWISE)
ARISING IN ANY WAY
* OUT OF THE USE OF THIS SOFTWARE, EVEN IF ADVISED OF THE
POSSIBILITY OF
* SUCH DAMAGE.
*
* The licence and distribution terms for any publically available version or
* derivative of this code cannot be changed. i.e. this code cannot simply
be
* copied and put under another distribution licence
* [including the GNU Public Licence.]
*/
----------------------------------------------------------------------------
-
- Module: libev
-
----------------------------------------------------------------------------
All les in libev are
Copyright (c)2007,2008,2009,2010,2011,2012,2013 Marc Alexander
Lehmann.
Redistribution and use in source and binary forms, with or without
modication, are permitted provided that the following conditions are
met:
* Redistributions of source code must retain the above copyright
notice, this list of conditions and the following disclaimer.
* Redistributions in binary form must reproduce the above
copyright notice, this list of conditions and the following
disclaimer in the documentation and/or other materials provided
with the distribution.
THIS SOFTWARE IS PROVIDED BY THE COPYRIGHT HOLDERS AND
CONTRIBUTORS
“AS IS” AND ANY EXPRESS OR IMPLIED WARRANTIES, INCLUDING,
BUT NOT
LIMITED TO, THE IMPLIED WARRANTIES OF MERCHANTABILITY
AND FITNESS FOR
A PARTICULAR PURPOSE ARE DISCLAIMED. IN NO EVENT SHALL
THE COPYRIGHT
OWNER OR CONTRIBUTORS BE LIABLE FOR ANY DIRECT,
INDIRECT, INCIDENTAL,
SPECIAL, EXEMPLARY, OR CONSEQUENTIAL DAMAGES
(INCLUDING, BUT NOT
LIMITED TO, PROCUREMENT OF SUBSTITUTE GOODS OR SERVICES;
LOSS OF USE,
DATA, OR PROFITS; OR BUSINESS INTERRUPTION) HOWEVER
CAUSED AND ON ANY
THEORY OF LIABILITY, WHETHER IN CONTRACT, STRICT LIABILITY,
OR TORT
(INCLUDING NEGLIGENCE OR OTHERWISE) ARISING IN ANY WAY
OUT OF THE USE
OF THIS SOFTWARE, EVEN IF ADVISED OF THE POSSIBILITY OF
SUCH DAMAGE.
----------------------------------------------------------------------------
-
- Module: libaes
-
----------------------------------------------------------------------------
Copyright (c) 1998-2008, Brian Gladman, Worcester, UK. All rights
reserved.
LICENSE TERMS
The redistribution and use of this software (with or without changes)
is allowed without the payment of fees or royalties provided that:
1. source code distributions include the above copyright notice, this
list of conditions and the following disclaimer;
FURTHER
FURTHER
37
37
INSTALLATIONCONFIGURATIONOPERATION
INSTALLATIONCONFIGURATIONOPERATION
INFORMATION
INFORMATION
INDEX
INDEX

2. binary distributions include the above copyright notice, this list
of conditions and the following disclaimer in their documentation;
3. the name of the copyright holder is not used to endorse products
built using this software without specic written permission.
DISCLAIMER
This software is provided ‘as is’ with no explicit or implied warranties
in respect of its properties, including, but not limited to, correctness
and/or tness for purpose.
BUT NOT LIMITED TO, PROCUREMENT OF SUBSTITUTE GOODS
OR SERVICES;
LOSS OF USE, DATA, OR PROFITS; OR BUSINESS INTERRUPTION)
HOWEVER
CAUSED AND ON ANY THEORY OF LIABILITY, WHETHER IN
CONTRACT, STRICT
LIABILITY, OR TORT (INCLUDING NEGLIGENCE OR OTHERWISE)
ARISING IN
ANY WAY OUT OF THE USE OF THIS SOFTWARE, EVEN IF ADVISED
OF THE
POSSIBILITY OF SUCH DAMAGE.
* BSD_3Clause
For les:
- cipher/sha256-avx-amd64.S
- cipher/sha256-avx2-bmi2-amd64.S
- cipher/sha256-ssse3-amd64.S
- cipher/sha512-avx-amd64.S
- cipher/sha512-avx2-bmi2-amd64.S
- cipher/sha512-ssse3-amd64.S
#+begin_quote
Copyright (c) 2012, Intel Corporation
INSTALLATIONCONFIGURATIONOPERATION
INSTALLATIONCONFIGURATIONOPERATION
----------------------------------------------------------------------------
-
- Module: libcvt
-
----------------------------------------------------------------------------
Copyright (c) 2001, Andy Ritger aritger@nvidia.com
All rights reserved.
Redistribution and use in source and binary forms, with or without
modication, are permitted provided that the following conditions
are met:
o Redistributions of source code must retain the above copyright
notice, this list of conditions and the following disclaimer.
o Redistributions in binary form must reproduce the above copyright
notice, this list of conditions and the following disclaimer
in the documentation and/or other materials provided with the
distribution.
o Neither the name of NVIDIA nor the names of its contributors
may be used to endorse or promote products derived from this
software without specic prior written permission.
THIS SOFTWARE IS PROVIDED BY THE COPYRIGHT HOLDERS AND
CONTRIBUTORS
“AS IS” AND ANY EXPRESS OR IMPLIED WARRANTIES, INCLUDING,
BUT
NOT LIMITED TO, THE IMPLIED WARRANTIES OF
MERCHANTABILITY AND
FITNESS FOR A PARTICULAR PURPOSE ARE DISCLAIMED. IN NO
EVENT SHALL
THE REGENTS OR CONTRIBUTORS BE LIABLE FOR ANY DIRECT,
INDIRECT,
INCIDENTAL, SPECIAL, EXEMPLARY, OR CONSEQUENTIAL
DAMAGES (INCLUDING,
This program is based on the Generalized Timing Formula(GTF TM)
Standard Version: 1.0, Revision: 1.0
The GTF Document contains the following Copyright information:
Copyright (c) 1994, 1995, 1996 - Video Electronics Standards
Association. Duplication of this document within VESA member
companies for review purposes is permitted. All other rights
reserved.
While every precaution has been taken in the preparation
of this standard, the Video Electronics Standards Association and
its contributors assume no responsibility for errors or omissions,
and make no warranties, expressed or implied, of functionality
of suitability for any purpose. The sample code contained within
this standard may be used without restriction.
----------------------------------------------------------------------------
-
- Module: libgcrypt
-
----------------------------------------------------------------------------
Additional license notices for Libgcrypt. -*- org -*-
This le contains the copying permission notices for various les in
the Libgcrypt distribution which are not covered by the GNU Lesser
General Public License (LGPL) or the GNU General Public License (GPL).
These notices all require that a copy of the notice be included
in the accompanying documentation and be distributed with binary
distributions of the code, so be sure to include this le along
with any binary distributions derived from the GNU C Library.
All rights reserved.
Redistribution and use in source and binary forms, with or without
modication, are permitted provided that the following conditions are
met:
* Redistributions of source code must retain the above copyright
notice, this list of conditions and the following disclaimer.
* Redistributions in binary form must reproduce the above copyright
notice, this list of conditions and the following disclaimer in the
documentation and/or other materials provided with the
distribution.
* Neither the name of the Intel Corporation nor the names of its
contributors may be used to endorse or promote products derived
from
this software without specic prior written permission.
THIS SOFTWARE IS PROVIDED BY INTEL CORPORATION “AS IS”
AND ANY
EXPRESS OR IMPLIED WARRANTIES, INCLUDING, BUT NOT
LIMITED TO, THE
IMPLIED WARRANTIES OF MERCHANTABILITY AND FITNESS FOR
A PARTICULAR
PURPOSE ARE DISCLAIMED. IN NO EVENT SHALL INTEL
CORPORATION OR
CONTRIBUTORS BE LIABLE FOR ANY DIRECT, INDIRECT,
INCIDENTAL, SPECIAL,
EXEMPLARY, OR CONSEQUENTIAL DAMAGES (INCLUDING, BUT
NOT LIMITED TO,
PROCUREMENT OF SUBSTITUTE GOODS OR SERVICES; LOSS OF
USE, DATA, OR
PROFITS; OR BUSINESS INTERRUPTION) HOWEVER CAUSED AND
ON ANY THEORY OF
LIABILITY, WHETHER IN CONTRACT, STRICT LIABILITY, OR TORT
FURTHER
FURTHER
38
38
INFORMATION
INFORMATION
INDEX
INDEX

(INCLUDING
NEGLIGENCE OR OTHERWISE) ARISING IN ANY WAY OUT OF
THE USE OF THIS
SOFTWARE, EVEN IF ADVISED OF THE POSSIBILITY OF SUCH
DAMAGE.
#+end_quote
For les:
- random/jitterentropy-base.c
- random/jitterentropy.h
- random/rndjent.c (plus common Libgcrypt copyright holders)
#+begin_quote
* Copyright Stephan Mueller <smueller@chronox.de>, 2013
*
* License
* =======
*
* Redistribution and use in source and binary forms, with or without
* modication, are permitted provided that the following conditions
* are met:
* 1. Redistributions of source code must retain the above copyright
* notice, and the entire permission notice in its entirety,
* including the disclaimer of warranties.
* 2. Redistributions in binary form must reproduce the above copyright
* notice, this list of conditions and the following disclaimer in the
* documentation and/or other materials provided with the distribution.
* 3. The name of the author may not be used to endorse or promote
* products derived from this software without specic prior
* written permission.
*
* ALTERNATIVELY, this product may be distributed under the terms of
* the GNU General Public License, in which case the provisions of the
GPL are
* required INSTEAD OF the above restrictions. (This clause is
* necessary due to a potential bad interaction between the GPL and
* the restrictions contained in a BSD-style copyright.)
*
* THIS SOFTWARE IS PROVIDED ``AS IS’’ AND ANY EXPRESS OR
IMPLIED
* WARRANTIES, INCLUDING, BUT NOT LIMITED TO, THE IMPLIED
WARRANTIES
* OF MERCHANTABILITY AND FITNESS FOR A PARTICULAR
PURPOSE, ALL OF
* WHICH ARE HEREBY DISCLAIMED. IN NO EVENT SHALL THE
AUTHOR BE
* LIABLE FOR ANY DIRECT, INDIRECT, INCIDENTAL, SPECIAL,
EXEMPLARY, OR
* CONSEQUENTIAL DAMAGES (INCLUDING, BUT NOT LIMITED
TO, PROCUREMENT
* OF SUBSTITUTE GOODS OR SERVICES; LOSS OF USE, DATA, OR
PROFITS; OR
* BUSINESS INTERRUPTION) HOWEVER CAUSED AND ON ANY
THEORY OF
* LIABILITY, WHETHER IN CONTRACT, STRICT LIABILITY, OR TORT
* (INCLUDING NEGLIGENCE OR OTHERWISE) ARISING IN ANY
WAY OUT OF THE
* USE OF THIS SOFTWARE, EVEN IF NOT ADVISED OF THE
POSSIBILITY OF SUCH
* DAMAGE.
#+end_quote
* X License
For les:
- install.sh
#+begin_quote
Copyright (C) 1994 X Consortium
Permission is hereby granted, free of charge, to any person obtaining a
copy
of this software and associated documentation les (the “Software”), to
deal in the Software without restriction, including without limitation the
rights to use, copy, modify, merge, publish, distribute, sublicense, and/or
sell copies of the Software, and to permit persons to whom the
Software is
furnished to do so, subject to the following conditions:
The above copyright notice and this permission notice shall be included
in
all copies or substantial portions of the Software.
THE SOFTWARE IS PROVIDED “AS IS”, WITHOUT WARRANTY OF
ANY KIND, EXPRESS OR
IMPLIED, INCLUDING BUT NOT LIMITED TO THE WARRANTIES OF
MERCHANTABILITY,
FITNESS FOR A PARTICULAR PURPOSE AND NONINFRINGEMENT.
IN NO EVENT SHALL THE
X CONSORTIUM BE LIABLE FOR ANY CLAIM, DAMAGES OR
OTHER LIABILITY, WHETHER IN
AN ACTION OF CONTRACT, TORT OR OTHERWISE, ARISING
FROM, OUT OF OR IN CONNEC-
TION WITH THE SOFTWARE OR THE USE OR OTHER DEALINGS
IN THE SOFTWARE.
Except as contained in this notice, the name of the X Consortium shall
not
be used in advertising or otherwise to promote the sale, use or other
deal-
ings in this Software without prior written authorization from the X
Consor tium.
#+end_quote
* Public domain
For les:
- cipher/arcfour-amd64.S
#+begin_quote
Author: Marc Bevand <bevand_m (at) epita.fr>
Licence: I hereby disclaim the copyright on this code and place it
in the public domain.
#+end_quote
* OCB license 1
For les:
- cipher/cipher-ocb.c
#+begin_quote
OCB is covered by several patents but may be used freely by most
software. See http://web.cs.ucdavis.edu/~rogaway/ocb/license.htm .
In particular license 1 is suitable for Libgcrypt: See
http://web.cs.ucdavis.edu/~rogaway/ocb/license1.pdf for the full
license document; it basically says:
License 1 — License for Open-Source Software Implementations of
OCB
(Jan 9, 2013)
Under this license, you are authorized to make, use, and
distribute open-source software implementations of OCB. This
license terminates for you if you sue someone over their
open-source software implementation of OCB claiming that you have
a patent covering their implementation.
License for Open Source Software Implementations of OCB
January 9, 2013
1 Denitions
1.1 “Licensor†means Phillip Rogaway.
FURTHER
FURTHER
39
39
INSTALLATIONCONFIGURATIONOPERATION
INSTALLATIONCONFIGURATIONOPERATION
INFORMATION
INFORMATION
INDEX
INDEX

1.2 “Licensed Patents†means any patent that claims priority to
United
States Patent Application No. 09/918,615 entitled “Method and
Apparatus
for Facilitating Efcient Authenticated Encryption,†and any utility,
divisional, provisional, continuation, continuations-in-part, reexamination,
reissue, or foreign counterpart patents that may issue with respect to
the
aforesaid patent application. This includes, but is not limited to, United
States Patent No. 7,046,802; United States Patent No. 7,200,227; United
States Patent No. 7,949,129; United States Patent No. 8,321,675 ; and any
patent that issues out of United States Patent Application No.
13/669,114.
1.3 “Use†means any practice of any invention claimed in the
Licensed Patents.
1.4 “Software Implementation†means any practice of any invention
claimed in the Licensed Patents that takes the form of software
executing on
a user-programmable, general-purpose computer or that takes the form
of a
computer-readable medium storing such software. Software
Implementation does
not include, for example, application-specic integrated circuits (ASICs),
eld-programmable gate arrays (FPGAs), embedded systems, or IP cores.
1.5 “Open Source Software†means software whose source code
is published
and made available for inspection and use by anyone because either (a)
the
source code is subject to a license that permits recipients to copy,
modify,
and distribute the source code without payment of fees or royalties, or
(b) the source code is in the public domain, including code released for
public use through a CC0 waiver. All licenses certied by the Open
Source
Initiative at opensource.org as of January 9, 2013 and all Creative
Commons
licenses identied on the creativecommons.org website as of January 9,
2013, including the Public License Fallback of the CC0 waiver, satisfy
these
requirements for the purposes of this license.
1.6 “Open Source Software Implementation†means a Software
Implementation in which the software implicating the Licensed Patents is
Open Source Software. Open Source Software Implementation does not
include
any Software Implementation in which the software implicating the
Licensed
Patents is combined, so as to form a larger program, with software that
is
not Open Source Software.
2 License Grant
2.1 License. Subject to your compliance with the term s of this license,
including the restriction set forth in Section 2.2, Licensor hereby
grants to you a perpetual, worldwide, non-exclusive, non-transferable,
non-sublicenseable, no-charge, royalty-free, irrevocable license to
practice
any invention claimed in the Licensed Patents in any Open Source
Software
Implementation.
2.2 Restriction. If you or your afliates institute patent litigation
(including, but not limited to, a cross-claim or counterclaim in a lawsuit)
against any entity alleging that any Use authorized by this license
infringes another patent, then any rights granted to you under this
license
automatically terminate as of the date such litigation is led.
3 Disclaimer
YOUR USE OF THE LICENSED PATENTS IS AT YOUR OWN RISK AND
UNLESS REQUIRED
BY APPLICABLE LAW, LICENSOR MAKES NO REPRESENTATIONS
OR WARRANTIES OF ANY
KIND CONCERNING THE LICENSED PATENTS OR ANY PRODUCT
EMBODYING ANY LICENSED
PATENT, EXPRESS OR IMPLIED, STATUT ORY OR OTHERWISE,
INCLUDING, WITHOUT
LIMITATION, WARRANTIES OF TITLE, MERCHANTIBILITY, FITNESS
FOR A PARTICULAR
PURPOSE, OR NONINFRINGEMENT. IN NO EVENT WILL LICENSOR
BE LIABLE FOR ANY
CLAIM, DAMAGES OR OTHER LIABILITY, WHETHER IN CONTRACT,
TORT OR OTHERWISE,
ARISING FROM OR RELATED TO ANY USE OF THE LICENSED
PATENTS, INCLUDING,
WITHOUT LIMITATION, DIRECT, INDIRECT, INCIDENTAL,
CONSEQUENTIAL, PUNITIVE
OR SPECIAL DAMAGES, EVEN IF LICENSOR HAS BEEN ADVISED OF
THE POSSIBILITY OF
SUCH DAMAGES PRIOR TO SUCH AN OCCURRENCE.
#+end_quote
----------------------------------------------------------------------------
-
- Module: jansson
-
----------------------------------------------------------------------------
Copyright (c) 2009-2014 Petri Lehtinen <petri@digip.org>
Permission is hereby granted, free of charge, to any person obtaining a
copy
of this software and associated documentation les (the “Software”), to
deal
in the Software without restriction, including without limitation the rights
to use, copy, modify, merge, publish, distribute, sublicense, and/or sell
copies of the Software, and to permit persons to whom the Software is
furnished to do so, subject to the following conditions:
The above copyright notice and this permission notice shall be included
in
all copies or substantial portions of the Software.
THE SOFTWARE IS PROVIDED “AS IS”, WITHOUT WARRANTY OF
ANY KIND, EXPRESS OR
IMPLIED, INCLUDING BUT NOT LIMITED TO THE WARRANTIES OF
MERCHANTABILITY,
FITNESS FOR A PARTICULAR PURPOSE AND NONINFRINGEMENT.
IN NO EVENT SHALL THE
AUTHORS OR COPYRIGHT HOLDERS BE LIABLE FOR ANY CLAIM,
DAMAGES OR OTHER
LIABILITY, WHETHER IN AN ACTION OF CONTRACT, TORT OR
OTHERWISE, ARISING FROM,
OUT OF OR IN CONNECTION WITH THE SOFTWARE OR THE USE
OR OTHER DEALINGS IN
THE SOFTWARE.
----------------------------------------------------------------------------
-
- Module: libpng
-
----------------------------------------------------------------------------
COPYRIGHT NOTICE, DISCLAIMER, and LICENSE
=========================================
PNG Reference Library License version 2
---------------------------------------
* Copyright (c) 1995-2019 The PNG Reference Library Authors.
* Copyright (c) 2018-2019 Cosmin Truta.
FURTHER
FURTHER
40
40
INSTALLATIONCONFIGURATIONOPERATION
INSTALLATIONCONFIGURATIONOPERATION
INFORMATION
INFORMATION
INDEX
INDEX

* Copyright (c) 2000-2002, 2004, 2006-2018 Glenn Randers-Pehrson.
* Copyright (c) 1996-1997 Andreas Dilger.
* Copyright (c) 1995-1996 Guy Eric Schalnat, Group 42, Inc.
The software is supplied “as is”, without warranty of any kind,
express or implied, including, without limitation, the warranties
of merchantability, tness for a particular purpose, title, and
non-infringement. In no event shall the Copyright owners, or
anyone distributing the software, be liable for any damages or
other liability, whether in contract, tort or otherwise, arising
from, out of, or in connection with the software, or the use or
other dealings in the software, even if advised of the possibility
of such damage.
Permission is hereby granted to use, copy, modify, and distribute
this software, or portions hereof, for any purpose, without fee,
subject to the following restrictions:
1. The origin of this software must not be misrepresented; you
must not claim that you wrote the original software. If you
use this software in a product, an acknowledgment in the product
documentation would be appreciated, but is not required.
2. Altered source versions must be plainly marked as such, and must
not be misrepresented as being the original software.
3. This Copyright notice may not be removed or altered from any
source or altered source distribution.
PNG Reference Library License version 1 (for libpng 0.5 through 1.6.35)
-----------------------------------------------------------------------
libpng versions 1.0.7, July 1, 2000, through 1.6.35, July 15, 2018 are
Copyright (c) 2000-2002, 2004, 2006-2018 Glenn Randers-Pehrson, are
derived from libpng-1.0.6, and are distributed according to the same
disclaimer and license as libpng-1.0.6 with the following individuals
added to the list of Contributing Authors:
Simon-Pierre Cadieux
Eric S. Raymond
Mans Rullgard
Cosmin Truta
Gilles Vollant
James Yu
Mandar Sahastrabuddhe
Google Inc.
Vadim Barkov
and with the following additions to the disclaimer:
There is no warranty against interference with your enjoyment of
the library or against infringement. There is no warranty that our
efforts or the library will fulll any of your particular purposes
or needs. This library is provided with all faults, and the entire
risk of satisfactory quality, performance, accuracy, and effort is
with the user.
Some les in the “contrib” directory and some congure-generated
les that are distributed with libpng have other copyright owners, and
are released under other open source licenses.
libpng versions 0.97, January 1998, through 1.0.6, March 20, 2000, are
Copyright (c) 1998-2000 Glenn Randers-Pehrson, are derived from
libpng-0.96, and are distributed according to the same disclaimer and
license as libpng-0.96, with the following individuals added to the
list of Contributing Authors:
Tom Lane
Glenn Randers-Pehrson
Willem van Schaik
libpng versions 0.89, June 1996, through 0.96, May 1997, are
Copyright (c) 1996-1997 Andreas Dilger, are derived from libpng-0.88,
and are distributed according to the same disclaimer and license as
libpng-0.88, with the following individuals added to the list of
Contributing Authors:
John Bowler
Kevin Bracey
Sam Bushell
Magnus Holmgren
Greg Roelofs
Tom Tanner
Some les in the “scripts” directory have other copyright owners,
but are released under this license.
libpng versions 0.5, May 1995, through 0.88, January 1996, are
Copyright (c) 1995-1996 Guy Eric Schalnat, Group 42, Inc.
For the purposes of this copyright and license, “Contributing Authors”
is dened as the following set of individuals:
Andreas Dilger
Dave Martindale
Guy Eric Schalnat
Paul Schmidt
Tim Wegner
The PNG Reference Library is supplied “AS IS”. The Contributing
Authors and Group 42, Inc. disclaim all warranties, expressed or
implied, including, without limitation, the warranties of
merchantability and of tness for any purpose. The Contributing
Authors and Group 42, Inc. assume no liability for direct, indirect,
incidental, special, exemplary, or consequential damages, which may
result from the use of the PNG Reference Library, even if advised of
the possibility of such damage.
Permission is hereby granted to use, copy, modify, and distribute this
source code, or portions hereof, for any purpose, without fee, subject
to the following restrictions:
1. The origin of this source code must not be misrepresented.
2. Altered versions must be plainly marked as such and must not
be misrepresented as being the original source.
3. This Copyright notice may not be removed or altered from any
source or altered source distribution.
The Contributing Authors and Group 42, Inc. specically permit,
without fee, and encourage the use of this source code as a component
to supporting the PNG le format in commercial products. If you use
this source code in a product, acknowledgment is not required but would
be appreciated.
----------------------------------------------------------------------------
-
- Module: libgd
-
----------------------------------------------------------------------------
Credits and license terms:
In order to resolve any possible confusion regarding the authorship of
gd, the following copyright statement covers all of the authors who
have required such a statement. If you are aware of any oversights in
this copyright notice, please contact Pierre-A. Joye who will be
pleased to correct them.
* Portions copyright 1994, 1995, 1996, 1997, 1998, 1999, 2000, 2001,
FURTHER
FURTHER
41
41
INSTALLATIONCONFIGURATIONOPERATION
INSTALLATIONCONFIGURATIONOPERATION
INFORMATION
INFORMATION
INDEX
INDEX

2002, 2003, 2004 by Cold Spring Harbor Laboratory. Funded under
Grant P41-RR02188 by the National Institutes of Health.
* Portions copyright 1996, 1997, 1998, 1999, 2000, 2001, 2002, 2003,
2004 by Boutell.Com, Inc.
* Portions relating to GD2 format copyright 1999, 2000, 2001, 2002,
2003, 2004 Philip Warner.
* Portions relating to PNG copyright 1999, 2000, 2001, 2002, 2003,
2004 Greg Roelofs.
and the intent is to assure proper credit for the authors of gd,
not to interfere with your productive use of gd. If you have
questions, ask. “Derived works” includes all programs that utilize
the library. Credit must be given in user-accessible
documentation.
This software is provided “AS IS.” The copyright holders disclaim
all warranties, either express or implied, including but not
limited to implied warranties of merchantability and tness for a
particular purpose, with respect to this code and accompanying
documentation.
2. Redistributions in binary form must reproduce the above copyright
notice, this list of conditions and the following disclaimer in the
documentation and/or other materials provided with the distribution.
3. All advertising materials mentioning features or use of this software
must display the following acknowledgement:
This product includes software developed by the University of
California, Berkeley and its contributors.
4. Neither the name of the University nor the names of its contributors
may be used to endorse or promote products derived from this
software
without specic prior written permission.
INSTALLATIONCONFIGURATIONOPERATION
INSTALLATIONCONFIGURATIONOPERATION
* Portions relating to gdttf.c copyright 1999, 2000, 2001, 2002,
2003, 2004 John Ellson (ellson@graphviz.org).
* Portions relating to gdft.c copyright 2001, 2002, 2003, 2004 John
Ellson (ellson@graphviz.org).
* Portions copyright 2000, 2001, 2002, 2003, 2004, 2005, 2006, 2007
Pierre-Alain Joye (pierre@libgd.org).
* Portions relating to JPEG and to color quantization copyright
2000, 2001, 2002, 2003, 2004, Doug Becker and copyright (C) 1994,
1995, 1996, 1997, 1998, 1999, 2000, 2001, 2002, 2003, 2004 Thomas
G. Lane. This software is based in part on the work of the
Independent JPEG Group. See the le README-JPEG.TXT for more
information.
* Portions relating to GIF compression copyright 1989 by Jef
Poskanzer and David Rowley, with modications for thread safety
by Thomas Boutell.
* Portions relating to GIF decompression copyright 1990, 1991, 1993
by David Koblas, with modications for thread safety by Thomas
Boutell.
* Portions relating to WBMP copyright 2000, 2001, 2002, 2003, 2004
Maurice Szmurlo and Johan Van den Brande.
* Portions relating to GIF animations copyright 2004 Jaakko Hyvätti
(jaakko.hyvatti@iki.)
Permission has been granted to copy, distribute and modify gd in
any context without fee, including a commercial application,
provided that this notice is present in user-accessible supporting
documentation.
This does not affect your ownership of the derived work itself,
Although their code does not appear in the current release, the
authors wish to thank David Koblas, David Rowley, and Hutchison
Avenue Software Corporation for their prior contributions.
----------------------------------------------------------------------------
-
- Module: libjpeg-turbo
-
----------------------------------------------------------------------------
This software is based in part on the work of the Independent JPEG
Group.
----------------------------------------------------------------------------
-
- Module: freebsd-libc
-
----------------------------------------------------------------------------
# @(#)COPYRIGHT 8.2 (Berkeley) 3/21/94
All of the documentation and software included in the 4.4BSD and
4.4BSD-Lite
Releases is copyrighted by The Regents of the University of California.
Copyright 1979, 1980, 1983, 1986, 1988, 1989, 1991, 1992, 1993, 1994
The Regents of the University of California. All rights
reserved.
Redistribution and use in source and binary forms, with or without
modication, are permitted provided that the following conditions
are met:
1. Redistributions of source code must retain the above copyright
notice, this list of conditions and the following disclaimer.
THIS SOFTWARE IS PROVIDED BY THE REGENTS AND
CONTRIBUTORS ``AS IS’’ AND
ANY EXPRESS OR IMPLIED WARRANTIES, INCLUDING, BUT NOT
LIMITED TO, THE
IMPLIED WARRANTIES OF MERCHANTABILITY AND FITNESS FOR A
PARTICULAR PURPOSE
ARE DISCLAIMED. IN NO EVENT SHALL THE REGENTS OR
CONTRIBUTORS BE LIABLE
FOR ANY DIRECT, INDIRECT, INCIDENTAL, SPECIAL, EXEMPLARY, OR
CONSEQUENTIAL
DAMAGES (INCLUDING, BUT NOT LIMITED TO, PROCUREMENT OF
SUBSTITUTE GOODS
OR SERVICES; LOSS OF USE, DATA, OR PROFITS; OR BUSINESS
INTERRUPTION)
HOWEVER CAUSED AND ON ANY THEORY OF LIABILITY,
WHETHER IN CONTRACT, STRICT
LIABILITY, OR TORT (INCLUDING NEGLIGENCE OR OTHERWISE)
ARISING IN ANY WAY
OUT OF THE USE OF THIS SOFTWARE, EVEN IF ADVISED OF THE
POSSIBILITY OF
SUCH DAMAGE.
The Institute of Electrical and Electronics Engineers and the American
National Standards Committee X3, on Information Processing Systems
have
given us permission to reprint portions of their documentation.
In the following statement, the phrase ``this text’’ refers to portions
of the system documentation.
Portions of this text are reprinted and reproduced in electronic form in
the second BSD Networking Software Release, from IEEE Std 1003.1-
1988, IEEE
Standard Portable Operating System Interface for Computer
Environments
(POSIX), copyright C 1988 by the Institute of Electrical and Electronics
Engineers, Inc. In the event of any discrepancy between these versions
and the original IEEE Standard, the original IEEE Standard is the referee
FURTHER
FURTHER
42
42
INFORMATION
INFORMATION
INDEX
INDEX

document.
In the following statement, the phrase ``This material’’ refers to portions
of the system documentation.
This material is reproduced with permission from American National
Standards Committee X3, on Information Processing Systems. Computer
and
Business Equipment Manufacturers Association (CBEMA), 311 First St.,
N W,
Suite 500, Washington, DC 20001-2178. The developmental work of
Programming Language C was completed by the X3J11 Technical
Committee.
The views and conclusions contained in the software and documentation
are
those of the authors and should not be interpreted as representing
ofcial
policies, either expressed or implied, of the Regents of the University
of California.
----------------------------------------------------------------------------
-
- Module: strace
-
----------------------------------------------------------------------------
Copyright (c) 1991, 1992 Paul Kranenburg <pk@cs.few.eur.nl>
Copyright (c) 1993 Branko Lankester <branko@hacktic.nl>
Copyright (c) 1993 Ulrich Pegelow <pegelow@moorea.uni-muenster.de>
Copyright (c) 1995, 1996 Michael Elizabeth Chastain <mec@duracef.
shout.net>
Copyright (c) 1993, 1994, 1995, 1996 Rick Sladkey <jrs@world.std.com>
Copyright (C) 1998-2001 Wichert Akkerman <wakkerma@
deephackmode.org>
Copyright (C) 2001-2017 The strace developers.
All rights reserved.
Redistribution and use in source and binary forms, with or without
modication, are permitted provided that the following conditions
are met:
1. Redistributions of source code must retain the above copyright
notice, this list of conditions and the following disclaimer.
2. Redistributions in binary form must reproduce the above copyright
notice, this list of conditions and the following disclaimer in the
documentation and/or other materials provided with the distribution.
3. The name of the author may not be used to endorse or promote
products
derived from this software without specic prior written permission.
THIS SOFTWARE IS PROVIDED BY THE AUTHOR ``AS IS’’ AND ANY
EXPRESS OR
IMPLIED WARRANTIES, INCLUDING, BUT NOT LIMITED TO, THE
IMPLIED WARRANTIES
OF MERCHANTABILITY AND FITNESS FOR A PARTICULAR PURPOSE
ARE DISCLAIMED.
IN NO EVENT SHALL THE AUTHOR BE LIABLE FOR ANY DIRECT,
INDIRECT,
INCIDENTAL, SPECIAL, EXEMPLARY, OR CONSEQUENTIAL
DAMAGES (INCLUDING, BUT
NOT LIMITED TO, PROCUREMENT OF SUBSTITUTE GOODS OR
SERVICES; LOSS OF USE,
DATA, OR PROFITS; OR BUSINESS INTERRUPTION) HOWEVER
CAUSED AND ON ANY
THEORY OF LIABILITY, WHETHER IN CONTRACT, STRICT LIABILITY,
OR TORT
(INCLUDING NEGLIGENCE OR OTHERWISE) ARISING IN ANY WAY
OUT OF THE USE OF
THIS SOFTWARE, EVEN IF ADVISED OF THE POSSIBILITY OF SUCH
DAMAGE.
----------------------------------------------------------------------------
-
- Module: libpcap
-
----------------------------------------------------------------------------
Copyright (C) 1993-2008 The Regents of the University of California.
Redistribution and use in source and binary forms, with or without
modication, are permitted provided that the following conditions
are met:
1. Redistributions of source code must retain the above copyright
notice, this list of conditions and the following disclaimer.
2. Redistributions in binary form must reproduce the above copyright
notice, this list of conditions and the following disclaimer in
the documentation and/or other materials provided with the
distribution.
3. The names of the authors may not be used to endorse or promote
products derived from this software without specic prior
written permission.
THIS SOFTWARE IS PROVIDED ``AS IS’’ AND WITHOUT ANY
EXPRESS OR
IMPLIED WARRANTIES, INCLUDING, WITHOUT LIMITATION, THE
IMPLIED
WARRANTIES OF MERCHANTABILITY AND FITNESS FOR A
PARTICULAR PURPOSE.
----------------------------------------------------------------------------
-
- Module: tcpdump
-
----------------------------------------------------------------------------
Licensed under the 3-clause BSD license:
Redistribution and use in source and binary forms, with or without
modication, are permitted provided that the following conditions
are met:
1. Redistributions of source code must retain the above copyright
notice, this list of conditions and the following disclaimer.
2. Redistributions in binary form must reproduce the above copyright
notice, this list of conditions and the following disclaimer in
the documentation and/or other materials provided with the
distribution.
3. The names of the authors may not be used to endorse or promote
products derived from this software without specic prior
written permission.
THIS SOFTWARE IS PROVIDED ``AS IS’’ AND WITHOUT ANY
EXPRESS OR
IMPLIED WARRANTIES, INCLUDING, WITHOUT LIMITATION, THE
IMPLIED
WARRANTIES OF MERCHANTABILITY AND FITNESS FOR A
PARTICULAR PURPOSE.
Some les in this package are licensed under the 4-clause BSD license,
the copyright on most of them belongs to The Regents of the University
of California. Since the license was retroactively changed in 1999 to
remove the advertising clause, they are effectively under the 3-clause
license even if the text of the license in the les hasn’t been
updated. See the following document for more details:
ftp://ftp.cs.berkeley.edu/pub/4bsd/README.Impt.License.Change>
Other les under the 4-clause BSD license and whose copyright doesn’t
belong to the The Regents of the University of California are listed
below:
- aodv.h, Copyright (c) 2003 Bruce M. Simpson
FURTHER
FURTHER
43
43
INSTALLATIONCONFIGURATIONOPERATION
INSTALLATIONCONFIGURATIONOPERATION
INFORMATION
INFORMATION
INDEX
INDEX

- atmuni31.h, Copyright (c) 1997 Yen Yen Lim and North Dakota State
University
- ieee802_11.h, Copyright (c) 2001 Fortress Technologies and Charlie
Lenahan
- print-802_11.c, Copyright (c) 2001 Fortress Technologies and Charlie
Lenahan
- print-aodv.c, Copyright (c) 2003 Bruce M. Simpson
- print-ascii.c, Copyright (c) 1997, 1998 The NetBSD Foundation, Inc.
- print-cnfp.c, Copyright (c) 1998 Michael Shalayeff
- print-gre.c, Copyright (c) 2002 Jason L. Wright
- print-mobile.c, Copyright (c) 1998 The NetBSD Foundation, Inc.
- print-sunatm.c, Copyright (c) 1997 Yen Yen Lim and North Dakota State
University
- print-telnet.c, Copyright (c) 1997, 1998 The NetBSD Foundation, Inc.
- print-timed.c, Copyright (c) 2000 Ben Smithurst
- missing/inet_aton.c, Copyright (c) 1995, 1996, 1997 Kungliga Tekniska
Högskolan (Royal Institute of Technology,
Stockholm,
Sweden).
- missing/inet_ntop.c, Copyright (c) 1995, 1996, 1997 Kungliga Tekniska
Högskolan (Royal Institute of Technology,
Stockholm,
Sweden).
- missing/inet_pton.c, Copyright (c) 1995, 1996, 1997 Kungliga Tekniska
Högskolan (Royal Institute of Technology,
Stockholm,
Sweden).
----------------------------------------------------------------------------
-
- Module: dhcp
-
----------------------------------------------------------------------------
# Copyright (c) 2004-2017 by Internet Systems Consortium, Inc. (“ISC”)
# Copyright (c) 1995-2003 by Internet Software Consortium
#
# Permission to use, copy, modify, and distribute this software for any
# purpose with or without fee is hereby granted, provided that the above
# copyright notice and this permission notice appear in all copies.
#
# THE SOFTWARE IS PROVIDED “AS IS” AND ISC DISCLAIMS ALL
WARRANTIES
# WITH REGARD TO THIS SOFTWARE INCLUDING ALL IMPLIED
WARRANTIES OF
# MERCHANTABILITY AND FITNESS. IN NO EVENT SHALL ISC BE
LIABLE FOR
# ANY SPECIAL, DIRECT, INDIRECT, OR CONSEQUENTIAL
DAMAGES OR ANY DAMAGES
# WHATSOEVER RESULTING FROM LOSS OF USE, DATA OR
PROFITS, WHETHER IN AN
# ACTION OF CONTRACT, NEGLIGENCE OR OTHER TORTIOUS
ACTION, ARISING OUT
# OF OR IN CONNECTION WITH THE USE OR PERFORMANCE OF
THIS SOFTWARE.
#
# Internet Systems Consortium, Inc.
# 950 Charter Street
# Redwood City, CA 94063
# <info@isc.org>
# https://www.isc.org/
----------------------------------------------------------------------------
-
- Module: ntp
-
----------------------------------------------------------------------------
___________________________________________________
______________
The following copyright notice applies to all les collectively
called the Network Time Protocol Version 4 Distribution. Unless
specically declared otherwise in an individual le, this entire
notice applies as if the text was explicitly included in the le.
***********************************************************************
* *
* Copyright (c) University of Delaware 1992-2015 *
* *
* Permission to use, copy, modify, and distribute this software and *
* its documentation for any purpose with or without fee is hereby *
* granted, provided that the above copyright notice appears in all *
* copies and that both the copyright notice and this permission *
* notice appear in supporting documentation, and that the name *
* University of Delaware not be used in advertising or publicity *
* pertaining to distribution of the software without specic, *
* written prior permission. The University of Delaware makes no *
* representations about the suitability this software for any *
* purpose. It is provided “as is” without express or implied *
* warranty. *
* *
***********************************************************************
Content starting in 2011 from Harlan Stenn, Danny Mayer, and Martin
Burnicki is:
***********************************************************************
* *
* Copyright (c) Network Time Foundation 2011-2017 *
* *
* All Rights Reserved *
* *
* Redistribution and use in source and binary forms, with or without *
* modication, are permitted provided that the following conditions *
* are met: *
* 1. Redistributions of source code must retain the above copyright *
* notice, this list of conditions and the following disclaimer. *
* 2. Redistributions in binary form must reproduce the above *
* copyright notice, this list of conditions and the following *
* disclaimer in the documentation and/or other materials provided *
* with the distribution. *
* *
* THIS SOFTWARE IS PROVIDED BY THE AUTHORS ``AS IS’’ AND
ANY EXPRESS *
* OR IMPLIED WARRANTIES, INCLUDING, BUT NOT LIMITED TO,
THE IMPLIED *
* WARRANTIES OF MERCHANTABILITY AND FITNESS FOR A
PARTICULAR PURPOSE *
* ARE DISCLAIMED. IN NO EVENT SHALL THE AUTHORS OR
CONTRIBUTORS BE *
* LIABLE FOR ANY DIRECT, INDIRECT, INCIDENTAL, SPECIAL,
EXEMPLARY, OR *
* CONSEQUENTIAL DAMAGES (INCLUDING, BUT NOT LIMITED TO,
PROCUREMENT *
* OF SUBSTITUTE GOODS OR SERVICES; LOSS OF USE, DATA, OR
PROFITS; OR *
* BUSINESS INTERRUPTION) HOWEVER CAUSED AND ON ANY
THEORY OF *
* LIABILITY, WHETHER IN CONTRACT, STRICT LIABILITY, OR TORT
*
* (INCLUDING NEGLIGENCE OR OTHERWISE) ARISING IN ANY
WAY OUT OF THE *
* USE OF THIS SOFTWARE, EVEN IF ADVISED OF THE POSSIBILITY
OF SUCH *
* DAMAGE. *
***********************************************************************
The following individuals contributed in part to the Network Time
Protocol Distribution Version 4 and are acknowledged as authors of
this work.
1. [1]Takao Abe <takao_abe@xurb.jp> Clock driver for JJY receivers
2. [2]Mark Andrews <mark_andrews@isc.org> Leitch atomic clock
controller
3. [3]Bernd Altmeier <altmeier@atlsoft.de> hopf Elektronik serial
line and PCI-bus devices
4. [4]Viraj Bais <vbais@mailman1.intel.com> and [5]Clayton Kirkwood
FURTHER
FURTHER
44
44
INSTALLATIONCONFIGURATIONOPERATION
INSTALLATIONCONFIGURATIONOPERATION
INFORMATION
INFORMATION
INDEX
INDEX

<kirkwood@striderfm.intel.com> port to WindowsNT 3.5
5. [6]Michael Barone <michael,barone@lmco.com> GPSVME xes
6. [7]Karl Berry <karl@owl.HQ.ileaf.com> syslog to le option
7. [8]Greg Brackley <greg.brackley@bigfoot.com> Major rework of
WINNT
port. Clean up recvbuf and iosignal code into separate modules.
8. [9]Marc Brett <Marc.Brett@westgeo.com> Magnavox GPS clock
driver
9. [10]Piete Brooks <Piete.Brooks@cl.cam.ac.uk> MSF clock driver,
Trimble PARSE support
10. [11]Nelson B Bolyard <nelson@bolyard.me> update and complete
broadcast and crypto features in sntp
11. [12]Jean-Francois Boudreault
<Jean-Francois.Boudreault@viagenie.qc.ca> IPv6 support
12. [13]Reg Clemens <reg@dwf.com> Oncore driver (Current
maintainer)
13. [14]Steve Clift <clift@ml.csiro.au> OMEGA clock driver
14. [15]Casey Crellin <casey@csc.co.za> vxWorks (Tornado) port and
help with target conguration
15. [16]Sven Dietrich <sven_dietrich@trimble.com> Palisade reference
clock driver, NT adj. residuals, integrated Greg’s Winnt port.
16. [17]John A. Dundas III <dundas@salt.jpl.nasa.gov> Apple A/UX port
17. [18]Torsten Duwe <duwe@immd4.informatik.uni-erlangen.de>
Linux
port
18. [19]Dennis Ferguson <dennis@mrbill.canet.ca> foundation code for
NTP Version 2 as specied in RFC-1119
19. [20]John Hay <jhay@icomtek.csir.co.za> IPv6 support and testing
20. [21]Dave Hart <davehart@davehart.com> General maintenance,
Windows
port interpolation rewrite
21. [22]Claas Hilbrecht <neoclock4x@linum.com> NeoClock4X clock
driver
22. [23]Glenn Hollinger <glenn@herald.usask.ca> GOES clock driver
23. [24]Mike Iglesias <iglesias@uci.edu> DEC Alpha port
24. [25]Jim Jagielski <jim@jagubox.gsfc.nasa.gov> A/UX port
25. [26]Jeff Johnson <jbj@chatham.usdesign.com> massive prototyping
overhaul
26. [27]Hans Lambermont <Hans.Lambermont@nl.origin-it.com> or
[28]<H.Lambermont@chello.nl> ntpsweep
27. [29]Poul-Henning Kamp <phk@FreeBSD.ORG> Oncore driver
(Original
author)
28. [30]Frank Kardel [31]<kardel (at) ntp (dot) org> PARSE
<GENERIC>
(driver 14 reference clocks), STREAMS modules for PARSE, support
scripts, syslog cleanup, dynamic interface handling
29. [32]Johannes Maximilian Kuehn <kuehn@ntp.org> Rewrote sntp to
comply with NTPv4 specication, ntpq savecong
30. [33]William L. Jones <jones@hermes.chpc.utexas.edu> RS/6000
AIX
modications, HPUX modications
31. [34]Dave Katz <dkatz@cisco.com> RS/6000 AIX port
32. [35]Craig Leres <leres@ee.lbl.gov> 4.4BSD port, ppsclock,
Magnavox
GPS clock driver
33. [36]George Lindholm <lindholm@ucs.ubc.ca> SunOS 5.1 port
34. [37]Louis A. Mamakos <louie@ni.umd.edu> MD5-based
authentication
35. [38]Lars H. Mathiesen <thorinn@diku.dk> adaptation of foundation
code for Version 3 as specied in RFC-1305
36. [39]Danny Mayer <mayer@ntp.org>Network I/O, Windows Port,
Code
Maintenance
37. [40]David L. Mills <mills@udel.edu> Version 4 foundation,
precision kernel; clock drivers: 1, 3, 4, 6, 7, 11, 13, 18, 19,
22, 36
38. [41]Wolfgang Moeller <moeller@gwdgv1.dnet.gwdg.de> VMS port
39. [42]Jeffrey Mogul <mogul@pa.dec.com> ntptrace utility
40. [43]Tom Moore <tmoore@evel.daytonoh.ncr.com> i386 svr4 port
41. [44]Kamal A Mostafa <kamal@whence.com> SCO OpenServer
port
42. [45]Derek Mulcahy <derek@toybox.demon.co.uk> and [46]Damon
Hart-Davis <d@hd.org> ARCRON MSF clock driver
43. [47]Rob Neal <neal@ntp.org> Bancomm refclock and cong/parse
code
maintenance
44. [48]Rainer Pruy <Rainer.Pruy@informatik.uni-erlangen.de>
monitoring/trap scripts, statistics le handling
45. [49]Dirce Richards <dirce@zk3.dec.com> Digital UNIX V4.0 port
46. [50]Wilfredo Sánchez <wsanchez@apple.com> added support for
NetInfo
47. [51]Nick Sayer <mrapple@quack.kfu.com> SunOS streams modules
48. [52]Jack Sasportas <jack@innovativeinternet.com> Saved a Lot of
space on the stuff in the html/pic/ subdirectory
49. [53]Ray Schnitzler <schnitz@unipress.com> Unixware1 port
50. [54]Michael Shields <shields@tembel.org> USNO clock driver
51. [55]Jeff Steinman <jss@pebbles.jpl.nasa.gov> Datum PTS clock
driver
52. [56]Harlan Stenn <harlan@pfcs.com> GNU automake/
autocongure
makeover, various other bits (see the ChangeLog)
53. [57]Kenneth Stone <ken@sdd.hp.com> HP-UX port
54. [58]Ajit Thyagarajan <ajit@ee.udel.edu>IP multicast/anycast
support
55. [59]Tomoaki TSURUOKA <tsuruoka@nc.fukuoka-u.ac.jp>TRAK
clock
driver
56. [60]Brian Utterback <brian.utterback@oracle.com> General
codebase,
Solaris issues
57. [61]Loganaden Velvindron <loganaden@gmail.com> Sandboxing
(libseccomp) support
58. [62]Paul A Vixie <vixie@vix.com> TrueTime GPS driver, generic
TrueTime clock driver
59. [63]Ulrich Windl <Ulrich.Windl@rz.uni-regensburg.de> corrected
and
validated HTML documents according to the HTML DTD
___________________________________________________
______________
----------------------------------------------------------------------------
-
- Module: dropbear
-
----------------------------------------------------------------------------
Dropbear contains a number of components from different sources,
hence there
are a few licenses and authors involved. All licenses are fairly
non-restrictive.
The majority of code is written by Matt Johnston, under the license
below.
Portions of the client-mode work are (c) 2004 Mihnea Stoenescu, under
the
same license:
Copyright (c) 2002-2020 Matt Johnston
Portions copyright (c) 2004 Mihnea Stoenescu
All rights reserved.
Permission is hereby granted, free of charge, to any person obtaining a
copy
of this software and associated documentation les (the “Software”), to
deal
in the Software without restriction, including without limitation the rights
to use, copy, modify, merge, publish, distribute, sublicense, and/or sell
copies of the Software, and to permit persons to whom the Software is
furnished to do so, subject to the following conditions:
The above copyright notice and this permission notice shall be included
in all
copies or substantial portions of the Software.
FURTHER
FURTHER
45
45
INSTALLATIONCONFIGURATIONOPERATION
INSTALLATIONCONFIGURATIONOPERATION
INFORMATION
INFORMATION
INDEX
INDEX

THE SOFTWARE IS PROVIDED “AS IS”, WITHOUT WARRANTY OF
ANY KIND, EXPRESS OR
IMPLIED, INCLUDING BUT NOT LIMITED TO THE WARRANTIES OF
MERCHANTABILITY,
FITNESS FOR A PARTICULAR PURPOSE AND NONINFRINGEMENT.
IN NO EVENT SHALL THE
AUTHORS OR COPYRIGHT HOLDERS BE LIABLE FOR ANY CLAIM,
DAMAGES OR OTHER
LIABILITY, WHETHER IN AN ACTION OF CONTRACT, TORT OR
OTHERWISE, ARISING FROM,
OUT OF OR IN CONNECTION WITH THE SOFTWARE OR THE USE
OR OTHER DEALINGS IN THE
SOFTWARE.
=====
LibTomCrypt and LibTomMath are written by Tom St Denis and others,
see
libtomcrypt/LICENSE and libtommath/LICENSE.
=====
sshpty.c is taken from OpenSSH 3.5p1,
Copyright (c) 1995 Tatu Ylonen <ylo@cs.hut.>, Espoo, Finland
All rights reserved
“As far as I am concerned, the code I have written for this software
can be used freely for any purpose. Any derived versions of this
software must be clearly marked as such, and if the derived work is
incompatible with the protocol description in the RFC le, it must be
called by a name other than “ssh” or “Secure Shell”. “
PuTTY is copyright 1997-2003 Simon Tatham.
Portions copyright Robert de Bath, Joris van Rantwijk, Delian
Delchev, Andreas Schultz, Jeroen Massar, Wez Furlong, Nicolas Barry,
Justin Bradford, and CORE SDI S.A.
Permission is hereby granted, free of charge, to any person
obtaining a copy of this software and associated documentation les
(the “Software”), to deal in the Software without restriction,
including without limitation the rights to use, copy, modify, merge,
publish, distribute, sublicense, and/or sell copies of the Software,
and to permit persons to whom the Software is furnished to do so,
subject to the following conditions:
The above copyright notice and this permission notice shall be
included in all copies or substantial portions of the Software.
THE SOFTWARE IS PROVIDED “AS IS”, WITHOUT WARRANTY OF
ANY KIND,
EXPRESS OR IMPLIED, INCLUDING BUT NOT LIMITED TO THE
WARRANTIES OF
MERCHANTABILITY, FITNESS FOR A PARTICULAR PURPOSE AND
NONINFRINGEMENT. IN NO EVENT SHALL THE COPYRIGHT
HOLDERS BE LIABLE
FOR ANY CLAIM, DAMAGES OR OTHER LIABILITY, WHETHER IN AN
ACTION OF
CONTRACT, TORT OR OTHERWISE, ARISING FROM, OUT OF OR IN
CONNECTION
WITH THE SOFTWARE OR THE USE OR OTHER DEALINGS IN THE
SOFTWARE.
Acknowledgments
This work was supported by the U.S. National Science Foundation under
grant
1018836. “Any opinions, ndings, and conclusions or recommendations
expressed
in this material are those of the author(s) and do not necessarily reect
the
views of the National Science Foundation.”
This work was supported by the Netherlands Organisation for Scientic
Research (NWO) under grant 639.073.005 and Veni 2013 project 13114.
INSTALLATIONCONFIGURATIONOPERATION
INSTALLATIONCONFIGURATIONOPERATION
=====
loginrec.c
loginrec.h
atomicio.h
atomicio.c
and strlcat() (included in util.c) are from OpenSSH 3.6.1p2, and are
licensed
under the 2 point BSD license.
loginrec is written primarily by Andre Lucas, atomicio.c by Theo de Raadt.
strlcat() is (c) Todd C. Miller
=====
Import code in keyimport.c is modied from PuTTY’s import.c, licensed
as follows:
=====
curve25519.c:
Modied TweetNaCl version 20140427, a self-contained public-domain C
library.
https://tweetnacl.cr.yp.to/
Contributors (alphabetical order)
Daniel J. Bernstein, University of Illinois at Chicago and Technische
Universiteit Eindhoven
Bernard van Gastel, Radboud Universiteit Nijmegen
Wesley Janssen, Radboud Universiteit Nijmegen
Tanja Lange, Technische Universiteit Eindhoven
Peter Schwabe, Radboud Universiteit Nijmegen
Sjaak Smetsers, Radboud Universiteit Nijmegen
FURTHER
FURTHER
46
46
INFORMATION
INFORMATION
INDEX
INDEX

www.adder.com
INSTALLATIONCONFIGURATIONOPERATION
FURTHER
INFORMATION
Documentation by:
www.ctxd.com
INDEX
© 2023 Adder Technology Limited
All trademarks are acknowledged.
Part No. MAN-000033 • Release 1.1
47

Index
A
Access control
conguration 28
Access mode
shared & private 12
Addressing 32
network issues 32
Admin password 8
Auto calibrate 12
B
Backup image 10
C
Cable specications 35
Calibrate
mouse 12
screen 12
Calibrate all
video settings 15
Conguration
advanced mouse 14
Connections
link 5
overview 4
Controls
viewer options 13
D
DisplayPort 5
E
Ethernet port 4
External power input 4
F
Firewall 31
Flash upgrade 9
H
HDMI 22
Host computer
conguration 29
Hotkey sequences 35
codes and macros 35
HTTP port
remote setting 27
I
Indicators 16
Initial conguration 7
IP access control 28
IP address
remote setting 27
IP network mask 27
K
Keyboard codes
sending 15
Keyboard Control 15
Keyboard layout
remote setting 21
L
Link connection 5
Local network
connection 31
Logging 30
Log on 8
M
MAC address 26,27
Mouse
advanced conguration 14
calibration 12
control 13
resync 12,13
N
Network conguration 27
Networking issues 31
P
Password 8
Power
external input 4,6
Power adapter 3
Power switching
user permissions 19
Private
access mode 12
R
Refresh screen 13
Remote conguration
host conguration 29
logging and status 30
network conguration 27
unit conguration 21
user accounts 19
Reset button 4
Reset module 10
Restore
backup rmware image 10
Resync mouse 13
Router 31
S
Screen
refresh 13
Server
conguration 29
Shared
access mode 12
Single mouse mode 13
Status indicators 4
Syslog 30
T
Threshold
adjustment 16
Time & date conguration 26
U
Unit Conguration 21
Unit name
remote setting 21
USB
connections 6
plugs 4
User accounts 19
User conguration 19,20
V
Video link 5
Video settings 14
Virtual media.See File Transfer
VNC port
remote setting 27
when altered 31
VNC Viewer 8,11
INSTALLATIONCONFIGURATIONOPERATION
FURTHER
INFORMATION
48
INDEX
 Loading...