

Page 1

ADCCM
fine stereo components
/CXXJM
fine stereo components
>OCOM
fine stereo components
/€XXM
fine stereo components
COMPACT DISC PLAYER
INSTRUCTION MANUAL
gcd-200/gcd-300
Page 2

11 Elkins Road
East Brunswick, N.J.
08616 U.S,A.
201/390-1130
Telex 844430
ADDENDUM TO THE ADCOM GCD 200/300 OWNER'S MANUAL
The following feature has been added to the ADCOM GCD 200/300 compact
disc player subsequent to the printing of the owner's manual.
ADCOM'S Sound Window Frequency Contour Selector
Our research indicated that the sound quality of many vocal and instrumental
CDs could be greatly Improved by introducing corrective frequency contouring
to compensate for the unnatural sonic energy balance in many CDs.
A three-position switch provides a choice of playback response curves which
can be used to improve the spectral balance of those CDs that need it.
As a result, such CDs can emulate the muslcallty of the finest analog
recordings while maintaining the low noise and dynamic range advantages
of digital technology.
The three-position selector is located on the rear panel of your compact
disc player.
Mid Position
In the mid position the Sound Window Frequency Contour Selector is
not in the audio circuit.
Upper Position
In the up position, the Sound Window Frequency Contour selector
attenuates the frequencies immediately above the range of the human
voice. This position can be used with any recordings that, due to close
microphone techniques, have a hardness or edge.
Lower Position
In the lower position, the Sound Window Frequency Contour selector
attenuates the iErequencles Just above the upper end of most musical
instruments. This position will help to relieve the harshness and glare
found in many instrumental recordings.
7M
Page 3
O
0 0
Remote Control Unit
Mortel gcd-300 oniÿ|
0
Page 4

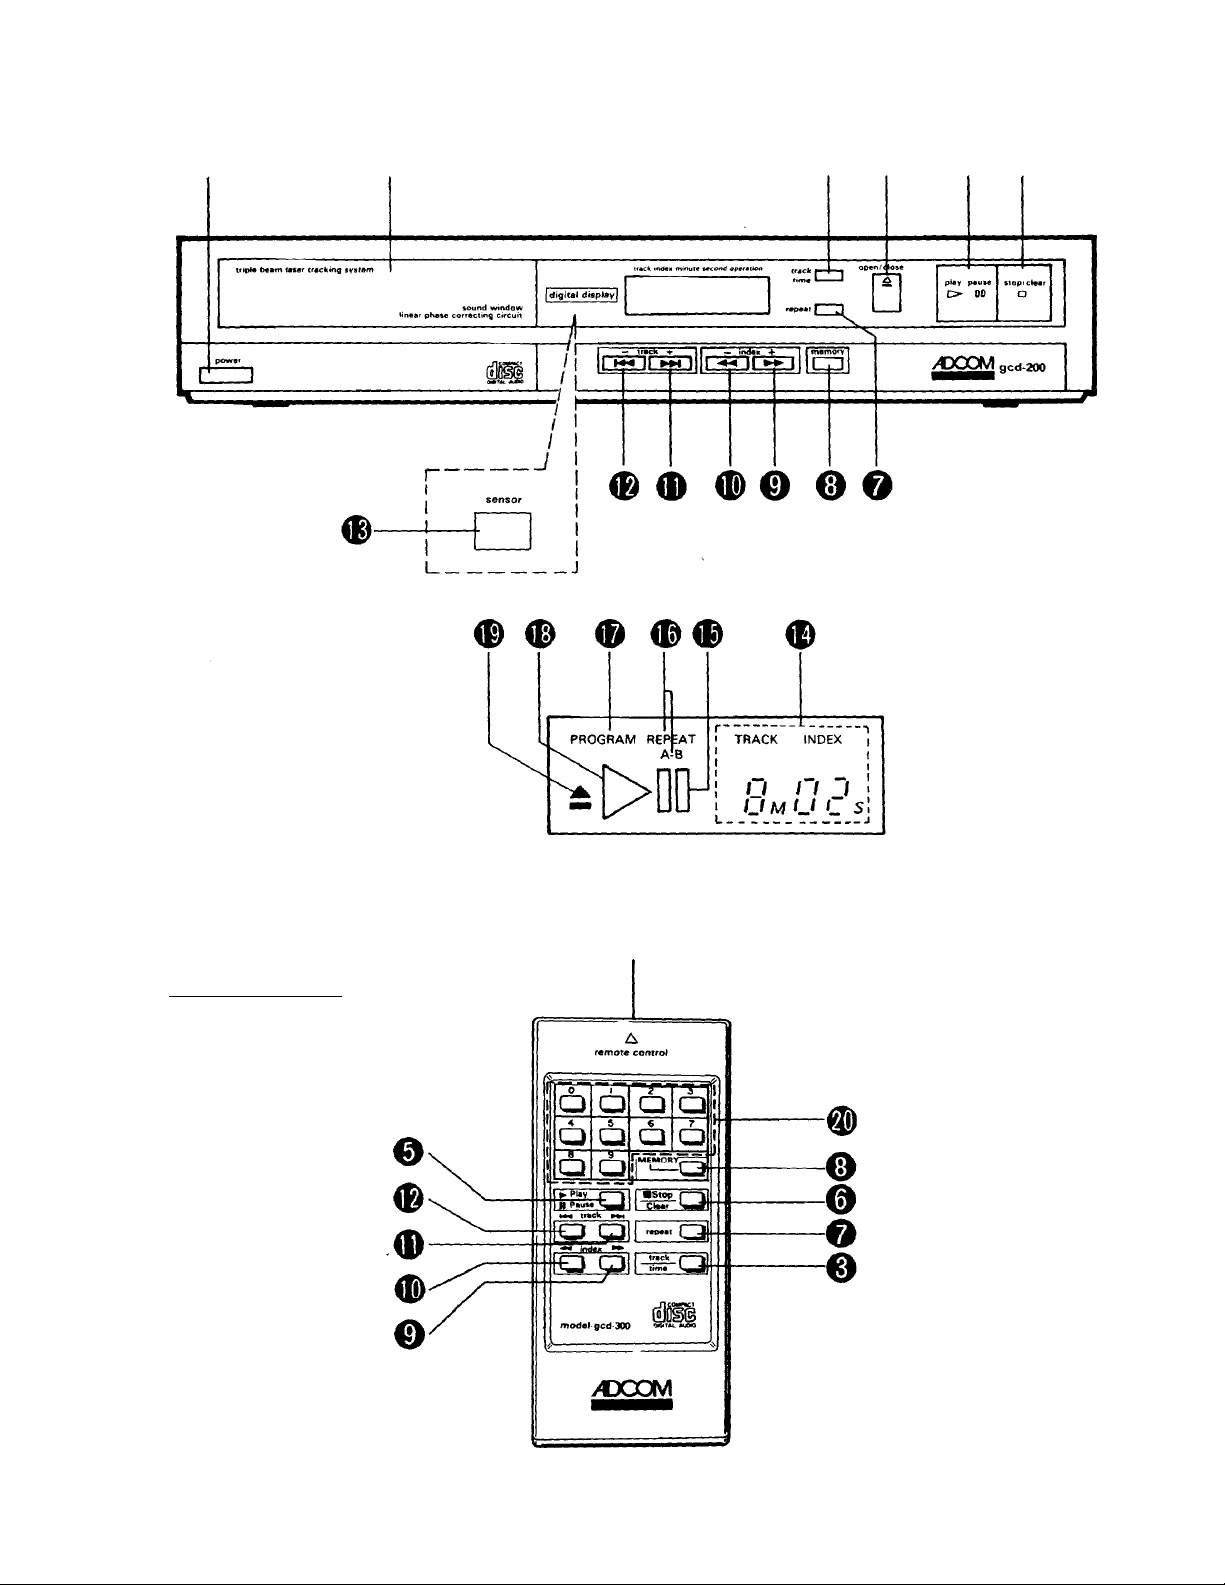
0 Track/Time button
Press to change the Digital display d> from track (/index)
display to time display, and vice versa.
O Drawer Open/Close button
Press this when loading or unloading a disc.
0 Play/Pause button (►/■■)
Press to begin play; the play indicator ©will light. Press
during play to temporarily stop play; the Pause indicator ©
will light. Press this button to resume play at the point
where it was ptaused.
0 Stop/Clear button ( ■ )
Press this button to stop play or to clear the program.
0 Repeat button
This button is pressed when performing repeat play.
0 Memory button
This button is pressed when memorizing programs for ran
dom memory search system.
0 Fast forward/Index button ( ►»-)
Press to advance the track number forward at high speed.
Also press to designate index numbers.
© Fast reverse/Index button ()
Press to move the track number in reverse at high
speed. Also press to designate index numbers.
0 Forward skip/Track number button ( )
Press to select a desired track number on the disc. Each
time the button is pressed, the track number moves for
ward.
0 Reverse skip/Track number button ( )
Press to select a desired track number on the disc. Each
time the button is pressed, the track number moves back
one track number.
0 Remote sensor window | Model gcd-SOO only|
Signals from the wireless remote control are received here.
I гаек/ I ime ounon
TRACK — with a disc loaded and in the stop mode, shows
the total number of tracks on the disc. During play, shows
the number of the track being played.
INDEX — during play, shows the index number of the por
tion of the track being played. If the disc does not have
index information, “01" will remain on the display.
M/S — with a disc loaded and in the stop mode, shows
the total playing time of the disc. During play, shows the
elapsed time from the beginning of the track, even if you
began in the middle of the track or used or ►► dur
ing play.
I Pause indicator
Lights during a pause.
I Repeat indicator
This indicator lights during normal repeat play, and
"A—B" lights during repeat play between two designated
points.
I Program indicator
Lights during program play when using the random
memory function.
I Play indicator
Flashes during access (high-speed movement) and lights
during play.
I Open/Close indicator
This indicator flashes when the drawer is opening and
closing. When the drawer is fully open or closed, the in
dicator goes out.
Model gcd-300 only
0 Program number buttons (0 — 9)
Used for program play with random memory search
system, or for track number selection by finding beginning
of selection with Direct Search System.
0 Remote control signal transmitter section
To use, point the transmitter section at the Remote sensor
window © and press the operating buttons.
Page 5

DISC LOADING
■ Opening
The drawer cannot be opened or closed unless the
power is switched on.
1. When the Power switch 0 is turned ON, the Digital
display @ will light "0".
2. When the Drawer Open/Close button 0 is pressed,
the Drawer opens. Simultaneously, the Open/Close
indicator (Q) flashes. When the Drawer is fully open,
the Open/Close indicator (Q) goes out.
TRACK INOCX
n
on
LI u u
■ Disc loading
1. Holding the disc so that your fingers do not touch its
surface, place it in the Drawer (2) with the label side
up. Check to make sure that it is resting securely on
the center hub in the Drawer recess.
2. When Drawer Open/Close button 0 is pressed, the
Drawer moves in and the disc is loaded. Simul
taneously, the Track number indicator and Index in
dicator flash "0”.
3. The loaded disc will rotate for several seconds while
the player reads its contents, and will then come to a
stop.
The Digital display (i|) will display the total number
of tracks on the disc. When the Track/Time button
0 is pressed, the Digital display ® will display the
total playing time on the disc.
Whenever the disc is in the stop mode, these indicators
will display the total number of tracks (or total playing
time).
• After placing the disc on the Drawer, if the
Play/Pause button 0 is pressed directly without
closing the Drawer, the Drawer will close and the
unit will enter the play mode.
• So long as the power is turned on, whenever the
Drawer Open/Close button 0 is pressed the Drawer
will open. If the Open/Close button is pressed while
the Drawer is opening or closing, the operation will
be reversed.
• If the Drawer Open/Close button 0 is pressed dur
ing play, the Drawer will open and the programmed
tracks or repeat command will be released.
CAUTION:
• Press the Drawer Open/Close button if you find
that your fingers or any objects are stuck or wedg
ed in the Drawer. The Drawer will open.
• Do not insert objects into the disc drawer. It
could result in a malfunction.
• Do not force the Drawer open or closed by hand.
• When not using the player, keep the Drawer closed
to prevent the entry of dust and dirt.
• Do not press down hard on the disc drawer when
loading a disc, since it may result in damage to or
malfunction of the drawer.
• To open the Drawer, press the Open/Close button
and confirm that the Open/Close indicator is lit.
DISC PLAY
1. Press the Power switch 0 . Then press the Drawer
Open/Close button 0 to open the Drawer and load
the disc.
2. Once the disc has been loaded, press the Drawer
Open/Close button 0 to close the Drawer.
NOTE:
The loaded disc will automatically rotate for several
seconds while the player reads the number of tracks,
playing time, etc., and then stops. Only perform the
various operations for playing after the total number
of tracks is displayed on the display.
3. Press the Play/Pause button (►/■i)® to start play.
4. Press the Play/Pause button (►/■i)® when a tem
porary halt is desired during disc play.
5. Press the Stop/Clear button ( ■ ) ® to stop play.
The program is cleared at the same time.
• When the disc comes to the end of the last track,
it will automatically stop.
Place with label side up.
If the total number of tracks is not displayed
after disc loading, check to make sure you have
not placed the disc upside down. Try to load
the disc again.
If playback does not begin after pressing the
Play/Pause button ®, try pressing the
Stop/Clear button ® once, then operate again
for playback.
If a disc is loaded, play will begin automatically
when the timer function operates to turn on the
power. To stop playback, press the Stop/Clear
button ®.
Page 6

(Tl Direct Search System
• To begin disc playback from a desired track
With the player in the stop mode, select the desired
starting track number using the Forward skip/Track
number button ( © or the Reverse skip/Track
number button () ®. The selected track
number will flash in the Digital display (0). When
the Play/Pause button (►/■■) (5) is pressed, the
number shown in the Digital display (0) will switch
from flashing to steadily lighted, and the playback
will begin from the selected track number.
• To move to a desired track during playback
When the player is already in the playback mode and
you wish to move to a different track, select the new
track number using the Forward skip/Track number
button ( ►M ) (Jj) or the Reverse skip/Track number
button ( ) ®. The selected track number will
light, and playback will begin at that track.
To use the Reverse skip/Track number button
( ® to return to a track several tracks
earlier than the presently playing track, refer to
the section on Skip Search System.
Model gcd-300 only
When the disc player is in the stop mode, if the
Forward skip/Track number button ( ®
or the Reverse skip/Track number button
( ) ® is pressed continuously, the track
number displayed will change continuously.
This allows you to select track numbers in the
forward or reverse directions quickly.
When the player is in the playback mode, even
if the Forward skip/Track number button
(►•<) (Jj) or the Reverse skip/Track number
button ( ) ® is pressed continuously, the
track numbers will not change continuously.
Select track numbers by pressing the ap
propriate button consecutively once at a time.
When the Digital display (0) is in the time
display mode, the display changes to the Track
display while the or button is
pressed.
[3] Program play with random
memory search system
The random memory track search function searches for
the desired tracks on the disc in the desired order and
plays them automatically.
1. Load the disc and start programming after the Digital
display (0) has displayed the total number of tracks.
2. First select the desired track numbers using the For
ward skip/Track number button ( ) (JJ) or the
Reverse skip/Track number button ( ) ®; press
the Memory button (8) after each selection. The
number of the selected track will be shown on the
Digital display (0) and the Program indicator ® will
light,
(Example)
To select the third track, press the Forward
skip/Track number button ( ) (Q) three times,
and then press the Memory button (J). To select
the twelfth track, press the Forward skip/Track
number button ( ••♦I ) (0) nine times, followed by
the Memory button (8). A maximum of 15 tracks
may be programmed in this way.
NOTE;
If more than 15 selections are programmed, the
selection after No. 15 will not be memorized.
(Example)
To program the third track
and the twelfth track
MEMORY MEMORY
Press 3 times
T
Press 9 times
[D Skip Search System
• To listen to the track following that presently
being played
When the player is in the playback mode, press the
Forward skip/Track number button ( ) (0)
once. The number of the track following that
presently playing will light in the Digital display (0),
and the playback will begin at that track.
• To listen to the presently playing track once
again
When the player is in the playback mode, press the
Reverse skip/Track number button ( ) ®
once. The number of the presently playing track will
light in the Digital display (0), and the playback will
start from the beginning of the track.
• To listen to the track previous to the one
presently playing
When the player is in the playback mode, press the
Reverse skip/Track number button ( @ two
times in succession. The Digital display ® will
display the number of the previous track, and
playback will begin from that track.
3. Press the Play/Pause button (►/■■) (^. The
tracks are automatically played in the programmed
order.
Possible manual operations during Program
play
Even when the random memory search system
has been used to initiate programmed playback,
the pause and manual search functions may still
be used without erasing the programmed tracks.
In addition, the Skip Search System may be used
as long as they are within the range of the pro
grammed contents.
Page 7

Displays with random memory track search
During programming, the track number of the
selected track only will be displayed on the Digital
display (Q).
— Lights when Memory
button is pressed.
T
J
Only the No. of the track selected
flashes. When Memory button is
pressed, the display becomes
continuous.
During program playback, the Digital display (Q) will
display the track number of the track being played,
and its index number. When the Track/Time button
(3) is pressed, Digital display @ will display the
elapsed playing time.
— Lights continuously
during program play.
TRAC < INi lEX
D nj
>
J U
C
Lights continuously during
progam play.
, Displays No. of track play
ing and index No.
Elapsed time
PROGRAM
1
D>
1 M f
■ Clearing the program contents during progam-
ming
If a mistaken track number is selected during program
ming, use the Forward skip/Track number button
{ ) ijj) or the Reverse skip/Track number button
( ® to select the correct track number before
pressing the Memory button ®.
NOTE; '
If you wish to correct a track number after press
ing the Memory button (g), it will be necessary to
press the Stop/Clear button {■)(§) and erase all
programmed contents, and thus start the pro
gramming again from the beginning.
_________________________________________
___
_____________y
■ Clearing all the programs
When you wish to clear all selections programmed,
press the Stop/Clear button (■)(!). When the pro
grams are cleared, the Program indicator ® will go
out, and the Digital display @ will display the total
number of tracks on the disc.
NOTES:
• When all programmed selections have been
played, the program will be cleared.
• If the Stop/Clear button ( ■) (g) is pressed
during program play, the playback will be stop
ped and the program will be cleared. At the
same time, the Program indicator @ will go
out.
H] Repeat play
Repeat play can be performed with all the tracks on the
disc, or only those tracks programmed. In addition,
you can perform repeat play between any two
designated points on the disc.
■ When you wish to repeat alt tracks, or only pro
grammed selections
• When the Repeat button (7) is pressed, the Repeat
indicator (i|) lights to indicate repeat play. Unless
the radom memory search system is used, all the
tracks will be played repeatedly until the Stop/Clear
button ( ■) (6) is pressed. If the random memory
search system is used, only those tracks which have
been programmed will be played repeatedly.
• When the Stop/Clear button ( ■) (6) is pressed,
repeat play is cancelled, and the Repeat indicator (}|)
will go out.
NOTES: '
• If the Repeat button (7) is pressed during nor
mal playback, repeat play of all programs on
the disc will commence.
* Even if the Repeat button (7) is pressed during
program play, repeat play will commence.
Repeat play between two points
During playback, press the Repeat button (7) at the
point at which you wish repeat play to begin; press
the Repeat button (J) again at the point at which you
wish repeat play to end. The playback will return to
the first point at which you pressed the Repeat but
ton ®, and repeat play will begin there.
"REPEAT" of the Repeat indicator (y) will light the
first time you press the Repeat button @, and
"A— B" will light the second time you press the but
ton, thus indicating "Repeat play between two
points".
To cancel "Repeat play between two points", press
the Repeat button (j) once again. The Repeat in
dicator @ will go out, and the unit will be switched
to the normal playback mode.
NOTE:
Repeat play between two points cannot be per
formed during play when the random memory
search system is being used.
V---------------------------------------------------------------------------------------------✓
© Manual search
With this function, you can listen quickly to chosen
selections. It is very convenient for searching for a
chosen portion of a long program and beginning
playback from that portion.
■ Fast forward manual search
During playback, if the Fast forward/Index button
( ►►) d) is pressed continuously, playback will be ad
vanced quickly during the time this button is held
depressed.
Elapsed time corresponding to the
track which is being fast reversed,
will be displayed.
8
Page 8

■ Fast reverse manual search
During playback, if the Fast reverse/1ndex button (
® is pressed continuously, playback will be
fast
reversed as long as the button is held down.
Elapsed time corresponding to the
track which is being fast reversed,
will be displayed.
During the manual search operation, when you have
found the part of the track you wish to hear, release
the Fast forward/1 ndex button ( ►►) (9) or the Fast
reverse/Index button (and normal play
back will resume from that point.
When performing manual search, the volume will be
lower than during normal play.
If the manual search operation is begun from the
pause mode, you can search for your desired lo
cation using the Digital display (Q) alone without any
sound being produced.
------------------------------------------------------^
• When the Digital display (Q) is in the Track/
Index display mode, the display changes to the
Time display mode automatically while the -4-^
or ►► button is pressed.
• For the manual search, two speed modes of
searching are reserved. If kept depressed, the
2nd faster mode will be performed.
[e] Index search
With this function, you can perform selection and
playback of specific portions of a track according to
their index numbers. Use the Forward skip/Track
number button ( ) (Q) or the Reverse skip/Track
number button ( ® to select the number of the
desired track. Then, use the Fast forward/Index
number button ( ) (J) or the Fast reverse/Index
number button () (jJ) to select the desired index
number. When the Play/Pause button (►/■■) (5) is
pressed, the playback will begin from the designated in
dex number of the selected track.
Your chosen track number and
index number wilt be displayed.
(Tl Pause-standby
By using the following four methods, you can search for
tracks or parts of tracks and place the unit in the pause
(standby) mode. When the Play/Pause button (►/■■)
(5) is pressed, playback will begin.
■ Searching for the first track on the disc
After loading the disc in the player, merely press the
Play/Pause button (►/■■)and press it again while
the Play indicator (i|) is flashing.
■ Searching by random memory search system
1, Perform random memory programming.
2. Press the Play/Pause button (►/■■) (f) and press it
again while the Play indicator (j|) is flashing. The
player will search for the first track entered in its
memory and enter the pause mode.
■ Searching by Direct Search System
1. Select the track number you wish to listen to using
the Forward skip/Track number button ( ) (Q)
or the Reverse skip/Track number button ( )
2. Press the Play/Pause button {►/■■) (D and press it
again while the Play indicator (Q) is flashing. The
unit will search for the selected track and enter the
pause mode.
■ Searching by index search
1. Perform index search operation.
2. Press the Play/Pause button {►/■■) ® and press it
again while the Play indicator (||) is flashing. The
player will search for the selected index portion and
enter the pause mode.
[|] Timer playback
Timer playback can be performed when the player is
used with a separately purchased audio timer.
1. Set your preamplifier or receiver's function switch to
the position corresponding to the gcd-200/gcd-300.
2. Turn on the power to the gcd-200/gcd-300 and load
a disc.
3. Set your timer to the time at which you wish
playback to begin (temporarily turn off power to the
preamplifier or receiver and gcd-200/gcd-300 when
doing this).
4. At the time set on the timer, playback will begin from
the first track of the disc.
Be sure to set the output volume of the preamplifier
or receiver to the desired level beforehand.
Audio timer |
Index fiN*oexi
• Indexing means that a single track has been
divided into even smaller divisions, and each
such division has been assigned an "index
number”. Before playing, consult the instruc
tions for your particular disc.
• If you press the Play/Pause button (►/■■) (5)
after selecting an index number not listed on
your disc's instructions, the player will
automatically stop.
Household electrical outlet
Page 9

WIRELESS REMOTE CONTROL [ MODEL gcd-300 only |
Corresponding operation buttons on the gcd-300 player
and the remote controller perform the same functions.
Operation can be performed with either this unit or the
remote control.
NOTE: '
This unit is for use only with the compact disc
player gcd-300. It cannot be used with other
components (cassette tape deck, etc.)
V
__________________________________________________________________
■ Program number buttons
Use the Program number buttons @) only when speci
fying a track number.
(You cannot specify an index number using the pro
gram number buttons.)
• Specifying the track number while the unit is in
the stop mode
1. Specify the desired track number using the Program
number buttons (^. The specified track number will
flash in the Digital display (Q).
[To change the track number (or if you pressed the
wrong track number), specify the correct track
number while the indicator is flashing.]
2. By pressing the Play/Pause button (^, the disc will
be played from the specified track.
• Specifying a track during play
1. Specify the desired track by pressing the program
number buttons
[The track number/index number (or time) for the
track being played will remain on the digital display
(0), the specified track number will not appear.]
2. By pressing the Play/Pause button (5), play will com
mence from the specified track number.
NOTE: '
A track number which is not on the disc can't be
selected. *
■ Loading batteries
(T] To remove the battery compartment lid, press
down on it while sliding as shown in the figure
below.
[2] Insert batteries with their @ Q polarities cor
rectly matched to the diagram inside the battery
compartment.
(3] Replace the battery compartment lid, sliding it on
✓
until it locks into place with a "click".
If the batteries are used incorrectly, there is a
danger of the internal fluid leaking or the bat
teries bursting.
Do not use new and old batteries together.
Do not use different kinds of batteries together.
Batteries consist of rechargeable and nonrechargeable types. Verify the type of battery by reading the
caution label on the battery.
If you are not going to use the remote control unit for
a long period, remove the batteries.
Do not heat, disassemble, or short circuit dry bat
teries, or throw them into a fire.
MAINTENANCE
■ Treat disc surfaces carefully
Handle the discs so that fingerprints and dust do not
adhere to the surfaces of the discs. To clean-off, use a
soft cloth. Do not use a rough cloth since this will mark
the disc.
■ Clean cabinet and panels when dirty
Clean off dirt on the surfaces with a dry cloth. Never
use thinners, benzene or alcohol since these will
damage the surface finish.
Page 10

TROUBLE SHOOTING
Trouble
Power is turned on, but indicators do
not light.
Drawer Open/Close button is
pressed, but Drawer does not open.
Disc is loaded, but total number of
programs is not displayed.
Play/Pause buttonf^/M) is
pressed, but play does not begin.
No sound is produced. 1. Connector pin-cords are not connected. 1. Connect the connector pin-cord to the output
Sound is distorted. 1. Connections to amplifier are wrong.
A particular spot on the disc does
not play correctly (sound cuts out. or
same spot is repeated).
1. Power plug is not connected securely.
1. Open signal is not received correctly.
1. Disc is loaded upside down.
2. Disc is dirty.
3. Disc used is nonstandard.
1. Disc is dirty.
2. Disc has scratches or is warped.
2. Amplifier output is set too high and sound is
being clipped.
1. Disc has scratch or Other damage.
2. Disc is dirty.
Cause
Remedy
1. Insert the power plug into the power outlet
securely.
1. Press the Drawer Open/Close button again
and confirm the Open/Close indicator is
flashing.
1. Load the disc correctly.
2. Clean the surface of the disc.
3. Replace the disc.
1. Clean surface of disc.
2. Replace disc.
terminals of the player and the input
terminals of the amplifier.
1. Connect player to amplifier correctly.
2. Turn down the amplifier output volume.
1. Use the Fast forward/Index button to pass
over the part scratched.
2. Clean the surface of the disc.
PRECAUTIONS FOR USE
• Discs which can be played on this _n compact
player have the following mark on
them
digital AUOtO
• During playback, if the player is subjected to a sud
den shock or jolt, some noise may be produced.
This is not a malfunction.
• If the player is operated while you are receiving an
FM/AM radio broadcast, you may hear noise on the
radio broadcast. In this case, turn the CD player's
power switch off.
• If other audio components or their connecting cords
are installed near this player, you may hear a hum
ming sound. In this event, try changing the location
of the other components or their wiring.
• Whenever moving the player, be sure to first remove
the disc from it. if the player is moved with a disc
loaded, the disc may be damaged.
• The gcd-200/gcd-300 has a wide dynamic range. As
a result, if you turn your amplifier's volume up too
high during soft (low volume) parts of a program,
your speakers may be damaged when the dynamic
range of a sudden loud passage is produced.
Do not move the player suddenly from a very cold
room into a warm room. When a chilled player is
moved suddenly to a warm location, moisture con
densation may form on the pickup lens, preventing
proper operation. In this case, wait 30 minutes
before resuming play.
Do not place foreign objects in the disc drawer and
attempt to operate the drawer control (Open/Close)
function. It may cause damage to the mechanism.
Do not store discs in high-temperature, highhumidity locations. The discs may develop warps
and become unplayable. Also, discs with moisture
on them may be unplayable. Wipe any moisture off
with a soft, dry cloth, and be sure discs are fully dry
before using.
If the unit is installed in a confined location, heat
dissipation will be poor and malfunctions may
occur. Also, do not install the unit on top of
amplifiers or other components liable to become hot.
11
Page 11

SPECIFICATIONS
AUDIO
Number of channels
Frequency response
Dynamic range
Signal-to-noise ratio
Harmonic distortion
Separation
Wow/flutter
Output voltage
DISCS USED
Playing time
Diameiet
SIGNAL FORMAT
Sampling frequency
Quantization number
Transmission bit rate
5- 20,000 Hz +0.5 dB
92 dB (IHF-AI
95 dB (IHF-A)
0.004% (at 1 kHz)
92 dB (at 1 kHz)
Less than measurable limits
(±0.001% W. peak)
2.0 V
Compact Disc
Approx. 60 minutes/one side
120 mm
44.1 kHz
16 bit linear/channel
4.3218 Mb/sec
DANGER
Invisliie laser
radiation when
open and inter lock
feied or defeated.
AVOID DIRECT EX
POSURE TO BEAM.
PICK-UP
System
Object lens drive system
Optical source
Wavelength
GENERAL
Power requirements
Power consumption
Dimensions
WIRELESS REMOTE CONTROL [Model gcd-300 only]
Dimensions 5-5/i6"(W) x 2-Vz"(H)
Weight 2.3 ounces
ACCESSORIES Connecting pin cords
Specifications and design may be changed without notice for
improvement.
WARNING LABEL INSIDE THE UNIT
Object lens drive system optical pick
up
2-dimensional parallel drive
Semiconductor laser
780 nm
AC 120 V, 60 Hz
12 W
17-Va"(W) x3-V4"(H|
X 10-3/8"(D)
9.5 poundsWeight
X Ii/16”(D)
Wireless remote control
(Model gcd-3(XI only)
THIS LASER COMPACT DISC PLAYER FUNCTIONS BY HELP OF
INVISIBLE LASER LIGHT AND IS EQUIPPED WITH SAFETY
SWITCHES TO AVOID EXPOSURE WHEN DOOR IS OPEN AND
SAFETY INTERLOCKS ARE DEFEATED. IT IS DANGEROUS TO
SET SAFETY SWITCHES OUT OF FUNCTION.
THERE ARE NO USER'S SERVICEABLE PARTS INSIDE THE UNIT,
LEAVE ALL SERVICE TO QUALIFIED SERVICE PERSONNEL.
Printed in Japan (N) 4953711
 Loading...