

Page 1
HiGain® Managed Shelf
19-inch, 3190 Mechanic, 22-Slot Managed
CO Shelf (HMS-318 List 3)
User Manual
CLEI:
Product Catalog:
Document Number:
T1MF2S04RA
HMS-318 List 3
LTPH-UM-1261-01
Page 2

REVISION HISTORY
The Revision History provides a summary of any changes in this manual. Please make sure you are using the
latest revision of this manual.
December 20, 2004
Revision Release Date Revisions Made
01 December 20, 2004 Initial Release
This manual is available online at ADC’s website (www.adc.com/documentationlibrary/) or you can order copies
of the manual by contacting your sales representative. Please ask for document LTPH-UM-1261-01.
Copyright
©2004 ADC Telecommunications, Inc. All rights reserved.
Trademark Information
ADC is a registered trademark of ADC T e lecommunications, Inc. LoopS t ar is a trademark of ADC Telecommunications, Inc.
No right, license, or interest to such trademarks is granted hereunder, and you agree that no such right, license, or interest
shall be asserted by you with respect to such trademark.
Other product names mentioned in this practice are used for identification purposes only and may be trademarks or registered trademarks of their respective companies.
Disclaimer of Liability
Information contained in this document is company private to ADC Telecommunications, Inc., and shall not be modified,
used, copied, reproduced or disclosed in whole or in part without the written consent of ADC.
Contents herein are current as of the date of publication. ADC reserves the right to change the contents without prior notice.
In no event shall ADC be liable for any damages resulting from loss of data, loss of use, or loss of profits, and ADC further
disclaims any and all liability for indirect, incidental, special, consequential or other similar dama ges. This disclaimer of
liability applies to all products, publications and services during and after the warranty period.
Page 3

Table of Contents
About This Manual ..........................................................................................................ix
Introduction ...............................................................................................................................ix
Audience ...................................................................................................................................ix
Related Publications .................................................................................................................ix
Organization ..............................................................................................................................ix
Conventions ...............................................................................................................................x
EU Compliance .........................................................................................................................xi
Safety Guidelines ......................................................................................................................xi
Inspecting Your Shipment ........................................................................................................xii
Chapter 1: Product Description .................................................................................... 1-1
Typical HMS-318 List 3 Shelf Applications .............................................................................. 1-2
Power and Alarm Connections ................................................................................................. 1-5
Connecting to HDSL, HDSL2, and HDSL4 Circuits ................................................................. 1-8
Connecting Sp a n Po wered xDSL Circuits to the HMS-318 List 3 Shelf ................................1-10
RS-232/X.25 Remote Management Ports ............................................................................. 1-12
Ethernet Remote Management Ports .................................................................................... 1-13
Heat Dissipation Factors ........................................................................................................ 1-13
Air Flow Guidelines ................................................................................................................ 1-15
Chapter 2: Installation .................................................................................................... 2-1
Before You begin ...................................................................................................................... 2-1
Safety Guidelines .....................................................................................................................2-4
Mounting the HMS-318 List 3 Shelf ......................................................................................... 2-4
DSX-1 and HDSLx Connections ..............................................................................................2-7
Sp a n Po wered xDSL Conne ctions ........................................................................................... 2-8
Bonding (Safety) Ground, Power and Frame Ground, Alarm, and Optional Fan Inputs ......... 2-9
Installing the HMU-319 with HLU-319, H2TU-C-319, H4TU-C-319 .......................................2-13
Installing LPS-300C Power Module ....................................................................................... 2-13
Appendix A: Signal and Pin Assignments .................................................................A-1
Appendix B: Standard PIC Color Code ......................................................................B-1
Appendix C: Circuit Card Preventive Measures ........................................................C-1
Handling Circuit Cards .............................................................................................................C-1
Storing Circuit Cards ................................................................................................................C-1
Installation/Replacement ..........................................................................................................C-1
Appendix D: Specifications .........................................................................................D-1
Appendix E: Product Support .....................................................................................E-1
Glossary ......................................................................................................................GL-1
LTPH-UM-1261-01 iii
Page 4

Table of Contents December 20, 2004
iv LTPH-UM-1261-01
Page 5

List of Figures
Figure 1-1. HMS-318 List 3 Shelf - Front View ......................................................... ..........1-2
Figure 1-2. HMS-318 List 3 Shelf - Rear View ....................................................................1-3
Figure 1-3. Input Power Terminal Block (TB1) ....................................................................1-5
Figure 1-4. Alarms Wire-Wrap Field (TB2) ............................................................... ..........1-6
Figure 1-5. HLU Slot Wire-wrap Pinouts for HDSL Circuits ................................................ 1-9
Figure 1-6. HLU Slot Wire-wrap Pinouts for HDSL2 Circuits .............................................. 1-9
Figure 1-7. HLU Slot Wire-wrap Pinouts for HDSL4 Circuits ............................................1-10
Figure 1-8. HLU Slot Wire-wrap Pinouts for Span Powered xDSL ................................... 1-11
Figure 1-9. HMS-318 List 3 Shelf RS-232/X.25 Remote Management Ports ..................1-12
Figure 1-10.Multishelf Network Ports ........................................................... .............. ........1-13
Figure 1-11.Central Office Equipment Rack Configuration ................................................1-14
Figure 2-1. Grounding Lug ................................................................................................2-10
Figure 2-2. Input Power Terminal Block (TB1) .................................................................. 2-11
Figure 2-3. Alarms Wire-wrap Field (TB2) ........................................................................2-12
LTPH-UM-1261-01 v
Page 6

List of Figures December 20, 2004
vi LTPH-UM-1261-01
Page 7

List of Tables
Table 1-1.HMS-318 List 3 Shelf Rear-Panel Connections (LPS-300C) ..............................1-4
Table 1-2.Alarms Wire-wrap Field Functional Description ..................................................1-7
Table 1-3.J26 – RS-232/X.25 Management Port (DTE) ...................................................1-12
Table 1-4.J27 – AUX RS-232 Management Port (DTE) ...................................................1-13
Table 2-1.HMS-318 List 3 Shelf Parts List ..........................................................................2-2
Table A-1.P1-DSX-1 Receive or Span Powered xDSL B IN, Tip and Ring .........................A-1
Table A-2.P2-DSX-1 Transmit or Span Powered xDSL A IN, Tip and Ring ............ ............A-2
Table A-3.P3-HDSL Span 1 or Span Powered xDSL A OUT, Tip and Ring ........................A-4
Table A-4.P3-HDSL Span 1 or Span Powered xDSL A OUT, Tip and Ring ........................A-5
Table B-1.Standard PIC Color Code ....................................................................................B-1
LTPH-UM-1261-01 vii
Page 8

List of Tables December 20, 2004
viii LTPH-UM-1261-01
Page 9
ABOUT THIS MANUAL
INTRODUCTION
This manual provides essential information about the HiGain® Management Shelf (HMS-318 List 3) along with stepby-step instructions on how to install the shelf into a Central Office (CO) or telco-style equipment rack.
AUDIENCE
This manual is written for people who install and plan the installation of ADC products in a Central Of fice
environment. If you are an installer, technician, or a local craft person, this manual contains in formation you ca n use
to install the HMS-318 List 3 shelf. It also provides information that can help you plan and make decisions about
your installation.
This manual is also appropriate for managers and planners who are thinking about inst alling HMS-318 List 3 shelves
into a CO or telco-style equipment rack, as well as people who are interested in the HMS-318 List 3 shelf in general .
This manual is written with the assumption that you are familiar with ADC equipment shelves or equivalent hardware
and cabling, electronic circuitry, and wiring practices.
RELATED PUBLICATIONS
Listed below are related ADC publications and their document catalog numbers. These document s pr ovide
supplementary information for the HMS-318 List 3 Shelf User Manu al. Copies of these manuals are available online
at ADC’s web site at www .adc.com/documentationlibrary/
your sales representative.
or you can order copies of these documents by contacting
Note: The list of related publications is not all-inclusive. It is only a representative sampling of the instruction
manuals that are available. Depending on your particular product model and List number, refer to that
instruction manual for proper installation and provisioning information.
Catalog Number Title
350-319-105 HLU-319 List 5 Quick Installation Guide
LTPH-UM-1182 H2TU-C-319 List 7 User Manual
LTPH-QI-1032 H4TU-C-319 List 1 Quick Installation Guide
LTPH-UM-1142 HMU-319 L7AV32 and L9V32 User Manual
SCP-LPS300-010 LoopStar LPS-300C L1 Power Module Technical Practice
ORGANIZATION
This manual includes the following chapters:
Chapter Description
Chapter 1: Product Description Summarizes the HMS-318 List 3 configuration, including details
on power and alarm connections, connecting to HDSL, HDSL2,
HDSL4 and xDSL circuits, and remote management via RS-232
and Ethernet interfaces.
Chapter 2: Installation Provides installation instructions for mounting the shelf,
connecting DSX/HDSL/xDSL connections, grounding the shelf ,
and installing the HMU-319, HLU-319, H2TU-C-319,
H4TU-C-319, and LPS-300C power module, as necessary.
LTPH-UM-1261-01 ix
Page 10
About This Manual December 20, 2004
Chapter Description
Appendix A: Signal and Pin Assignments Lists Tip and Ring signal and pin assignments to the HMS-318
List 3 shelf, including:
• P1-DSX-1 Receive or xDSL B IN, Tip and Ring
• P2-DSX-1 Transmit or xDSL A IN, Tip and Ring
• P3-HDSL Span 1 or xDSL A OUT, Tip and Ring
• P4-HDSL Span 2 or xDSL B OUT, Tip and Ring
Appendix B: Standard PIC Color Code Lists the standard PIC color codes with the Pair Number cross-
referenced with the colors of the Tip and Ring wires used by the
installer.
Appendix C: Circuit Card Preventive
Measures
Appendix D: Specifications Provides power requirements, physical dimensions,
Appendix E: Product Support Provides information on how to contact the ADC Technical
Glossary Defines abbreviations and acronyms used in this document and
Describes the preventive measures that should be observed
when using the shelf, including:
• Handling and storing of circuit cards
• Installing/replacing circuit cards sensitive to static electricity
recommended operational and storage environments, and
accessories for the HMS-318 List 3 shelf.
Support group.
that relate to the HMS-318 List 3 shelf.
CONVENTIONS
The following style conventions and terminology are used throughout this guide.
Element Meaning
Bold font Text that you must input exactly as shown (e.g., type 1 for card 1), menu buttons
(e.g., ACCEPT SHELF OPTIONS) or menu screen options (e.g., ALARMS screen) that
you must select
Italic font Variables that you must determine before inputting the correct value (e.g., Password )
Monospace font References to screen prompts (e.g., Invalid Password...Try Again:.)
Reader Alert Meaning
Alerts you to supplementary information
IMPORTANT
Alerts you to supplementary information that is essential to the completion of a task
!
Alerts you to possible equipment damage from electrostatic discharge
ATTENTION
x LTPH-UM-1261-01
Page 11
December 20, 2004 About This Manual
Reader Alert Meaning
CAUTION
Alerts you to possible data loss, service-affecting procedures, or other similar type
problems
WARNING
DANGER
Alerts you that failure to take or avoid a specific action might result in hardware damage or
loss of service
Alerts you that failure to take or avoid a specific action might result in personal harm
EU COMPLIANCE
The product complies with the requirements of the Low Voltage Directive 73/23/EEC, EMC Directive 89/336/EEC,
and the R&TTE Directive 1999/5/EC Articles 3.1a and 3.1b.
SAFETY GUIDELINES
The following safety guidelines are presented to help you avoid injury to yourself and avoid damage to the
equipment. These guidelines are recommended when working with any equipment that connect s to electrical power
or telco wiring.
• Locate the emergency power-off switch for the area in which you are working before beginning any procedures requiring access to the telco-style equipment rack. Then, if an electrical accident occurs, you can
quickly shut off the power.
• Disconnect all power before doing the following:
– Installing or removing the shelf
– Working near power supplies
• Never work alone if potentially hazardous conditions exist.
• Never assume that power has been disconnected from a circuit; always check.
• Never perform any action that creates a potential hazard to people or makes the equipment unsafe.
• Carefully examine your work area for possible hazards, such as moist floors, ungrounded power extension
cables, and missing safety grounds.
• Keep the work area free of obstructions before, during , and after shelf installation.
• If an electrical accident occurs, proceed as follows:
– Use caution; do not become a victim yourself.
– Turn power off to the telco-style rack that the shelf is located in.
– If possible, send another person to get medical aid. Otherwise, determine the condition of the victim and
then call for help.
– Determine if the victim needs rescue breathing or external cardiac compressions; then take appropriate
action.
• Circuit Overloading - Consideration should be given to the connection of the equipment to the supply circuit
and the effect that overloading of the circuits might have on overcurrent protection and supply wiring. Appropriate consideration of equipment nameplate ratings should be used when addressing this concern.
• Reliable Earthing - Reliable earthing of rack-mounted equipment should be maintained. Particular attention
should be given to supply connections other than direct connections to the branch circuit (e.g., use of power
strips).
• The following precautions may appear in this manual in procedures that, if performed incorrectly, may harm
you or your equipment.
LTPH-UM-1261-01 xi
Page 12
About This Manual December 20, 2004
DANGER
To prevent electrical shock, be careful whe n working near HDSL loops and telecommunications
circuits. Coming in contact with high electrical potential will result in death or severe personal
injury.
IMPORTANT
!
DANGER
The shelf chassis must be properly grounded to ensure personal and equipment safety.
To prevent electrical shock, never install telco equipment in a wet location or during a lightning
storm. When installing or modifying telco lines, disconnect lines on the network side before
working with uninsulated lines or terminals.
DANGER
To prevent electrical shock, be careful when wor king near power supplies. Telco equipment uses
-48 Vdc office power.
Electronic components can be damaged by electrostatic discharge (ESD). Before handling circuit
cards, wear an antistatic discharge wrist strap to prevent damage to electronic components.
ATTENTION
Place components in static-shielding protective bags when transporting or storing. When
working on components, always place them on an approved antistatic mat that is electrically
grounded.
INSPECTING YOUR SHIPMENT
Upon receipt of the equipment:
• Unpack each container and visually inspect the contents for signs of damage. If the equipment has been damaged in transit, immediately report the extent of damage to the transportation company and to ADC. Order
replacement equipment, if necessary.
• Check the packing list to ensure complete and accurate shipment of each listed item. If the shipment is short
or irregular, contact ADC as described in Appendix E: Product Support on page E-1. If you must store the
equipment for a prolonged period, store the equipment in its original co ntainer.
xii LTPH-UM-1261-01
Page 13

Chapter
1
PRODUCT DESCRIPTION
The HMS-318 L3 is a 22-slot, 3190 mechanics shelf that is capable of being managed locally or remotely. It can be
mounted in a 19-inch rack and is fully NEBS 3 and UL-60950 complaint.
®
The ADC HiGain
in. wide x 5.22 in. high x 12 in. deep (43.9 cm x 13.3 cm x 30.5 cm). These dimensions do not include the mounting
brackets that are factory-installed to the shelf.
The HMS-318 List 3 shelf can be mounted in three different types of rack mount configurations:
• A standard (EIA or WECO) 19-inch (48.3-cm) Central Office (CO) or telco-style equipment rack (using the
mounting rack adapter brackets provided). These brackets can be positioned for either 2- or 5-inch recess.
• A standard (EIA or WECO) 23-inch (58.4-cm) Central Office (CO) or telco-style equipment rack (using the
optional Extender Bracket: EB-52). These brackets can be positioned for either 2- or 5-inch recess.
• A European Telecommunications Standards Institute (ETSI) telco-style rack mounting (using ETSI mounting
adapter brackets and hardware provided).
The HMS-318 List 3 shelf supports:
• 1.544 Mbps (T1) full-duplex transmission over two uncondition ed, non-load ed copper loops
• DSX-1 interfaces at the CO and the remote end, with remote provisioning and performance monitoring
• CO power modules (LPS-300C) which provide xDSL span powering to ADC’s LoopStar
(AP) solution.
The HMS-318 List 3 shelf is shipped with:
• Adjustable mounting brackets ( as described above) that allow the shelf to be positio ned in the equipment r ack to
match the recess of the existing equipment (either 2- or 5-inch mounting).
• HMS-318 List 3 Shelf Rack Mounting Kit:
– 3 x 5 inch label holder (1)
– Label, HMS-318 (1)
– BNC-T female connector (1) – used with 10 BASE-2 managed systems
– 50-ohm BNC terminator (1) – used with 10BASE-2 managed systems
– #12-24 x .5 inch mounting screws (4).
• ETSI mounting hardware:
– #6-32 x 0.250 inch mounting Phillips head screws w/lock washer (8)
– M6-1.0 x14 mm mounting panhead screws (4)
• Shelf grounding kit:
– #10-32 x .5 inch mounting Hex screw w/washer (1)
– Ring terminal stud, taped 12-10 AWG (1)
– ground jumper, 2-position (1)
– Cable ties (10)
• ETSI mounting brackets (2)
• This instruction manual, HiGain Management Shelf (HMS-318 List 3) User Manual, catalog number
LTPH-UM-1261.
The following optional accessories are available:
• Extender Bracket Kit, 5.25 inches high for mounting a shelf into a 23-inch (58.4-cm) telco-style equ ip ment rack
Management Shelf (HMS-318 List 3) weighs approximately 17 pounds (7.7 kg). It measures 17.3
™
Wi-Fi® Access Point
LTPH-UM-1261-01 1-1
Page 14

Chapter 1: Product Description December 20, 2004
y
A
R
TYPICAL HMS-318 LIST 3 SHELF APPLICATIONS
Capable of using various components in different types of applications, the HMS-318 List 3 shelf is designed as a
very adaptable shelf. It can be used in the following applications:
• Managed HDSLx configuration - HMU-319 (HiGain Manag ement Unit) with HLU-3 19, H2TU-C-319, or H4TU-C319 (HiGain Line Unit) configuration
• LoopS tar™ (LPS-300C) Power Module configuration (for Wi-Fi)
The HMU-319 with HLU-319/H2TU-C-319/H4TU-C-319 use 23 slots in the HMS-318 List 3 shelf. The first 22 slots
are for the HLU-319/H2TU-C-319/H4TU-C-319 and the 23rd slot is for the HMU-3 19 (for in for matio n about
installation and provisioning, see “Installing the HMU-319 with HLU-319, H2TU-C-319, H4TU-C-319” on page 2-13
and refer to “Related Publications” on pageix).
The LPS-300C Power Module configuration is a double-wid th module th at su ppor ts two Span Powered xDSL or
ADSL pairs per module and is used as an integral part of the LoopStar Wi-Fi span powered Access Point (AP)
solution. A total of 11 LPS-300C modules can be installed in the UL-60950 compliant HMS-318 List 3 po wer shelf for
a total of 22 span powered pairs (for infor mation about inst allation and provisioning, see “Installing LPS-300 C Power
Module” on page 2-13 and refer to “Related Publications” on page ix).
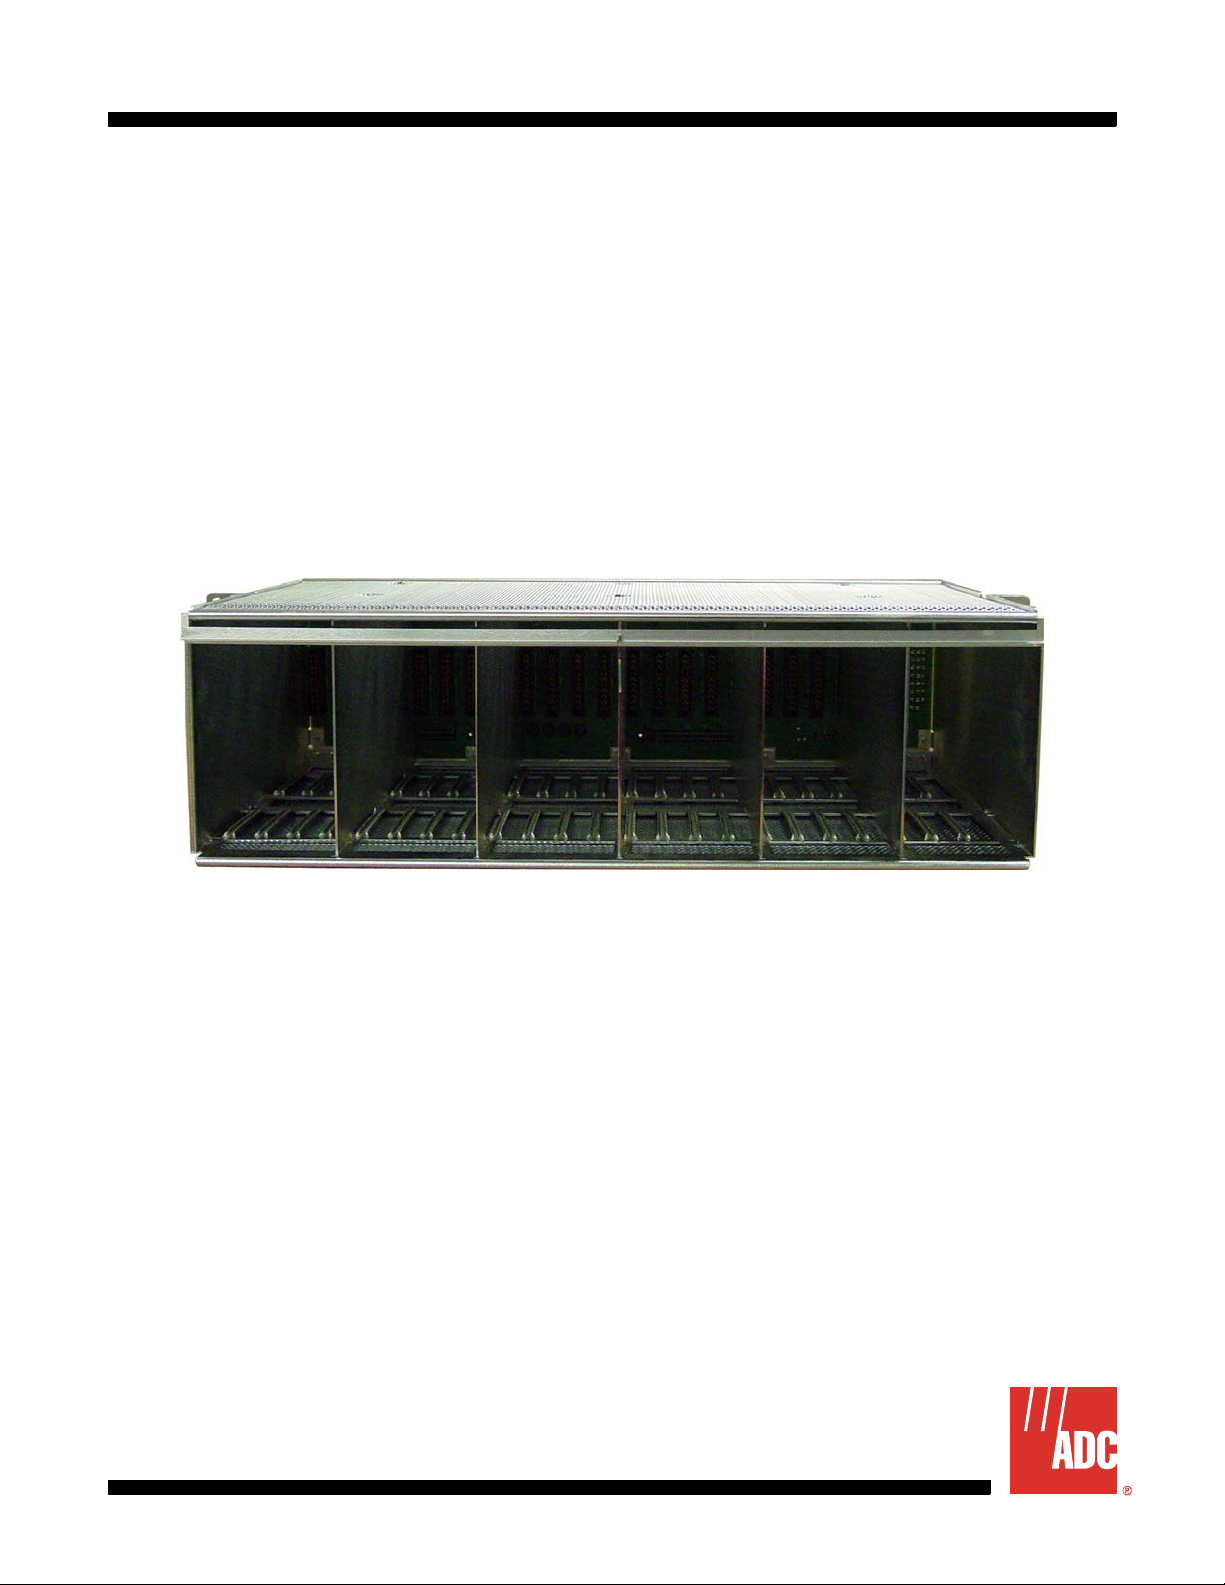
The following front and rear views show the HMS-318 List 3 shelf using the HMU-319 and HLU-319 configuration
and the LPS-300C.
HMS-318 List 3 Front View
On the front panel, viewing from left to right, the HMS-318 List 3 shelf (see Figure 1-1) shows the orientation of the
following components:
• HiGain Line Unit (HLU): first 22 (HLU1-HLU22) slots
• HiGain Management Unit (HMU): last or 23rd slot.
Communications between the HMU slot and the HLU card slots is routed through the rear panel.
• LPS-300C: the first 22 [odd numbered slots (1, 3, 5, 7, ... 21 connections)] slot
1
-1261
01
5.22 in.
(13.26 cm)
HMU
HLU 1-22 single-wide cards
LPS-300C 1-11 double-wide cards (fits in odd-numbered slots onl
)
Figure 1-1. HMS-318 List 3 Shelf - Front View
1-2 LTPH-UM-1261-01
Page 15
December 20, 2004 Chapter 1: Product Description
J
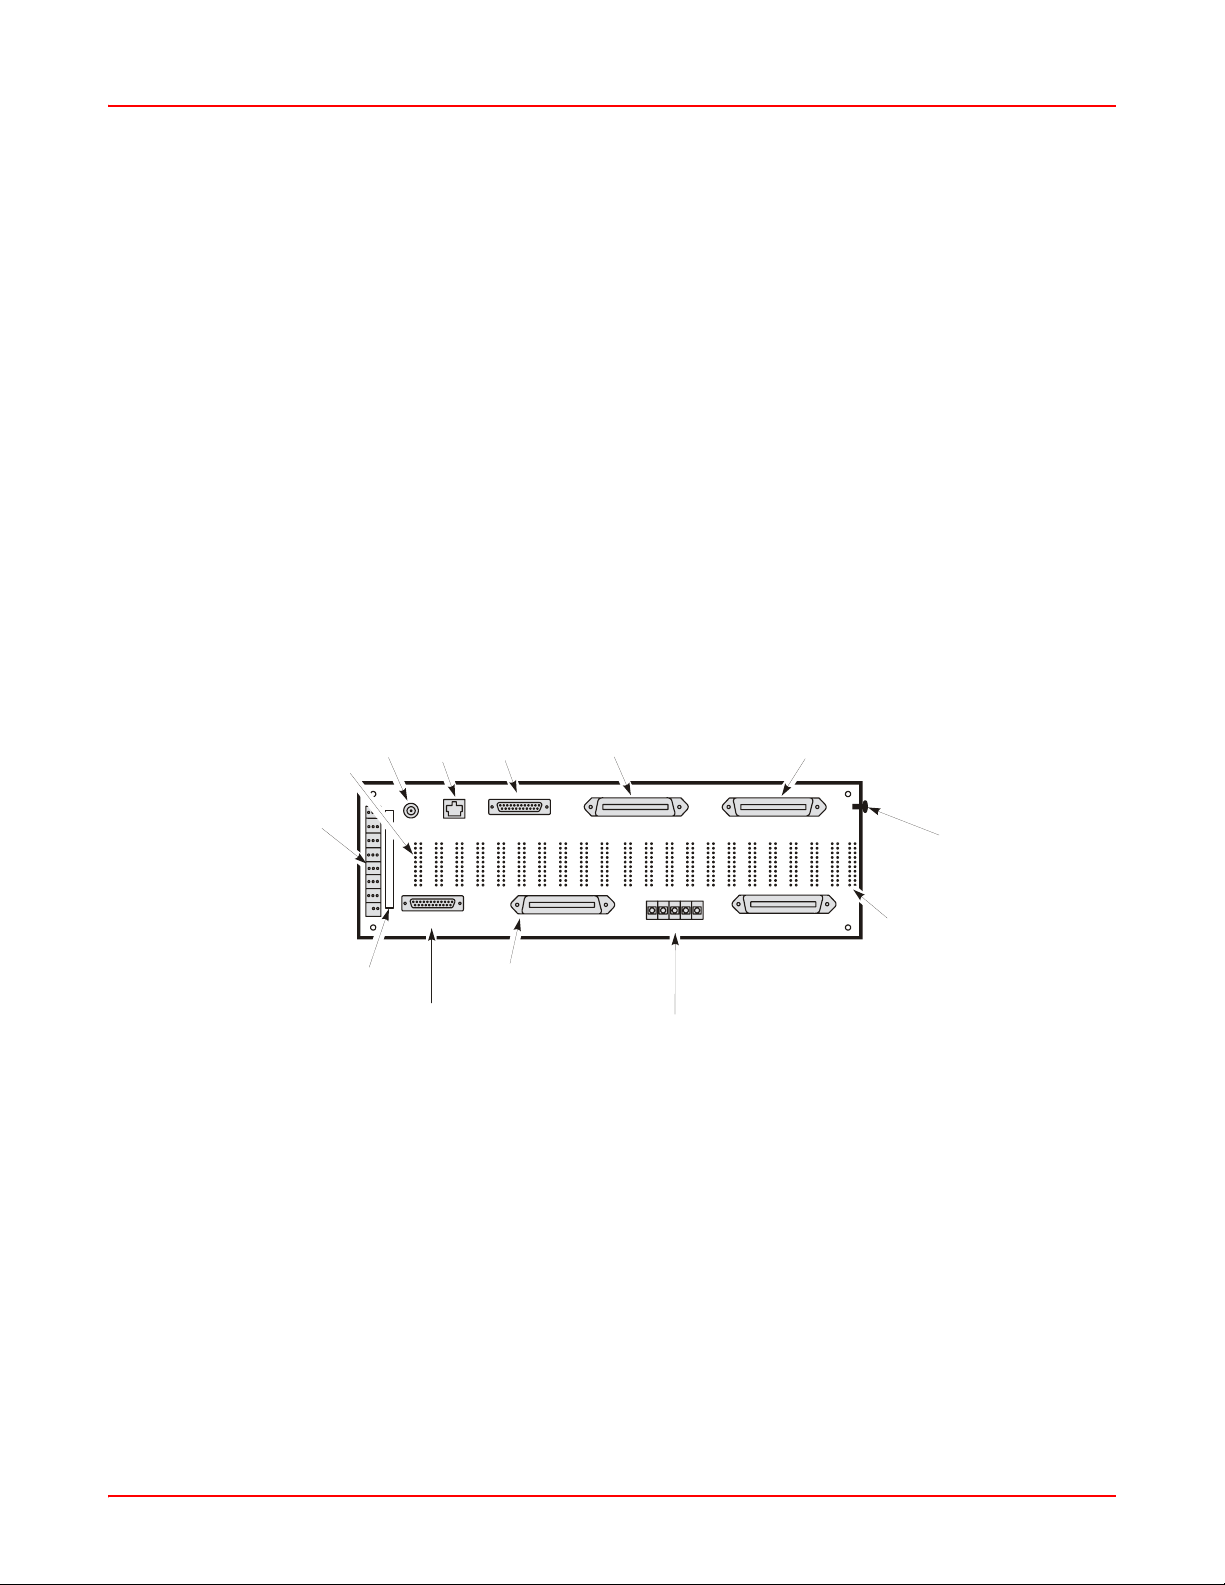
HMS-318 List 3 Rear View
The HMS-318 List 3 shelf input power, 5-position terminal block (labeled TB1) and the alarms (labeled Alarms) wirewrap connections are located on the rear panel (see Figur e 1-2). The Bonding (Safety ground) is located on the
upper right corner extension of the right p anel. The la bel (BONDING WIRE MIN #10 AWG) is located on the right
corner of the rear panel (see Grounding Lug and Hexhead Screw, Figure 1-2).
Managed HDSLx configuration
Also located on the rear panel, connectors P1 and P2 (labeled CO PAIR 1 and 2) are DSX-1 receive and transmit
connections. Connectors P3 and P4 (labeled SPAN PA IR 1 and 2) are HDSL Spans (Loops 1 and 2) receive and
transmit connections (see Figure 1-2). All of these plug-in connectors (P1, P2, P3, and P4) are 50-pin Amphenoltype male connectors and provide Tip and Ring for all the cards in the shelf. For information on the signal and pin
assignments, see Appendix A: ”Signal and Pin Assignments” on page A-1.
LoopSt ar™ (L PS-3 00C) Power Module configuration (for Wi-Fi)
Also located on the rear panel (for Visual & Audible Alarm Contact operation, install an HMU-319), connectors P1
and P2 (labeled CO P AIR 1 and 2) are xDSL B and A IN transmit and receive connections, r espectively. Connectors
P3 and P4 (labeled SPAN PAIR 1 and 2) are xDSL A and B OUT transmit and receive connections, respectively
(see Figure 1-2). All of these plug-in connectors (P1, P2, P3, and P4) are 50-pin Amphenol-type male con nector s
and provide Tip and Ring for all the cards in the shelf. For information on the signal and pin assignments, see
Appendix A: ”Signal and Pin Assignments” on page A-1.
Table 1-1 on page 1-4 provides a description of each rear-panel component.
Alarms wire-wrap
field (TB2)
J22
24J25J27
10 BASE-2
10 BASE-T
02A-1261R1
OS RS232 PORT
J23
J26
Connector (P3)
Connector (P1)
AUX RS232 DTE PORT
SPAN PAIR 1
CO PAIR 1
1234
-48VA-48VBBATRTNFGND
Input Power
Terminal Block
(T 1)B
Figure 1-2. HMS-318 List 3 Shelf - Rear View
Connector (P2)
CO PAIR 2
Grounding Lug
and Hexhead Screw
5
SPAN PAIR 2
J1
Connector (P4)
LTPH-UM-1261-01 1-3
Page 16

Chapter 1: Product Description December 20, 2004
T able 1-1. HMS-318 List 3 Shelf Rear-Pane l Connections (LPS- 300C)
Connector/Terminal
Block Connector T ype Connectory Label Description
J24 BNC-T (Female) 10 BASE-2 10BASE-2 Management
Port
J25 RJ-45 10 BASE-T 10BASE-T Management
Port
J26 RS-232 DB-25 (Female) OS RS232 DTE PORT RS-232/X.25 Management
Port
J27 RS-232 DB-25 (Female) AUX RS232 DTE PORT Auxiliary RS-232
Management Port
P1 Amphenol 50-pin (Male) CO PAIR 1 DS1/xDSL B IN Tip and
Ring (non-powered xDSL
signal to and from the
DSLAM)
P2 Amphenol 50-pin (Male) CO PAIR 2 DS1/xDSL A IN Tip and
Ring (non-powered xDSL
signal to and from the
DSLAM)
P3 Amphenol 50-pin (Male) SPAN PAIR 1 HDSL/xDSL A OUT Tip
and Ring (bi-directional
span powered xDSL signal
to and from the Customer
Premises)
P4 Amphenol 50-pin (Male) SPAN PAIR 2 HDSL/xDSL B OUT Tip
and Ring (bi-directional
span powered xDSL signal
to and from the Customer
Premises)
J1 - J22 20-pin wire-wrap J1 - J22 HLU connectors
J1 - J22 20-pin wire-wrap J1 - J22 (odd-numbered
LPS-300C connectors
slots only)
J23 DIN 96-pin (Female) J23
HMU connector
a
TB1 5-position terminal block TB1 Input Power connector
TB2 26-pin wire-wrap field Alarms Alarm connector
a.Not used in LPS-300C Power Module configuration.
1-4 LTPH-UM-1261-01
Page 17
December 20, 2004 Chapter 1: Product Description
5
POWER AND ALARM CONNECTIONS
The HMS-318 List 3 shelf has a separate split input power (TB1) and an Alarms wire-wrap field (TB2). The following
paragraphs provide information about TB1 and TB2.
Safety Precautions
Observe the following general precautions and recommendations in planning the source power r equirements for th e
HMS-318 List 3 shelf (for additional safety infor mation, please r efer to the section describ ing the “Safety Guidelines”
on page xi):
• Check the power at your site before shelf installation (an d periodically af ter inst allation) to ensure clean power is
being received.
• Always disconnect the power source and unplug all the power cables before working on the shelf.
• Install proper grounding for the site to avoid damage from lightning and power su rges.
DANGER
To avoid electrical shock, be careful when working near power supplies. Telco equipment uses 48 Vdc office power.
Input Power Terminal Block
CAUTION
Before making any power connections (CO primary power feeds A and B) to the HMS-318 List 3
shelf, ensure that the Main CO power breaker is off. Otherwise, severe injury to the installer or
damage to the unit may result.
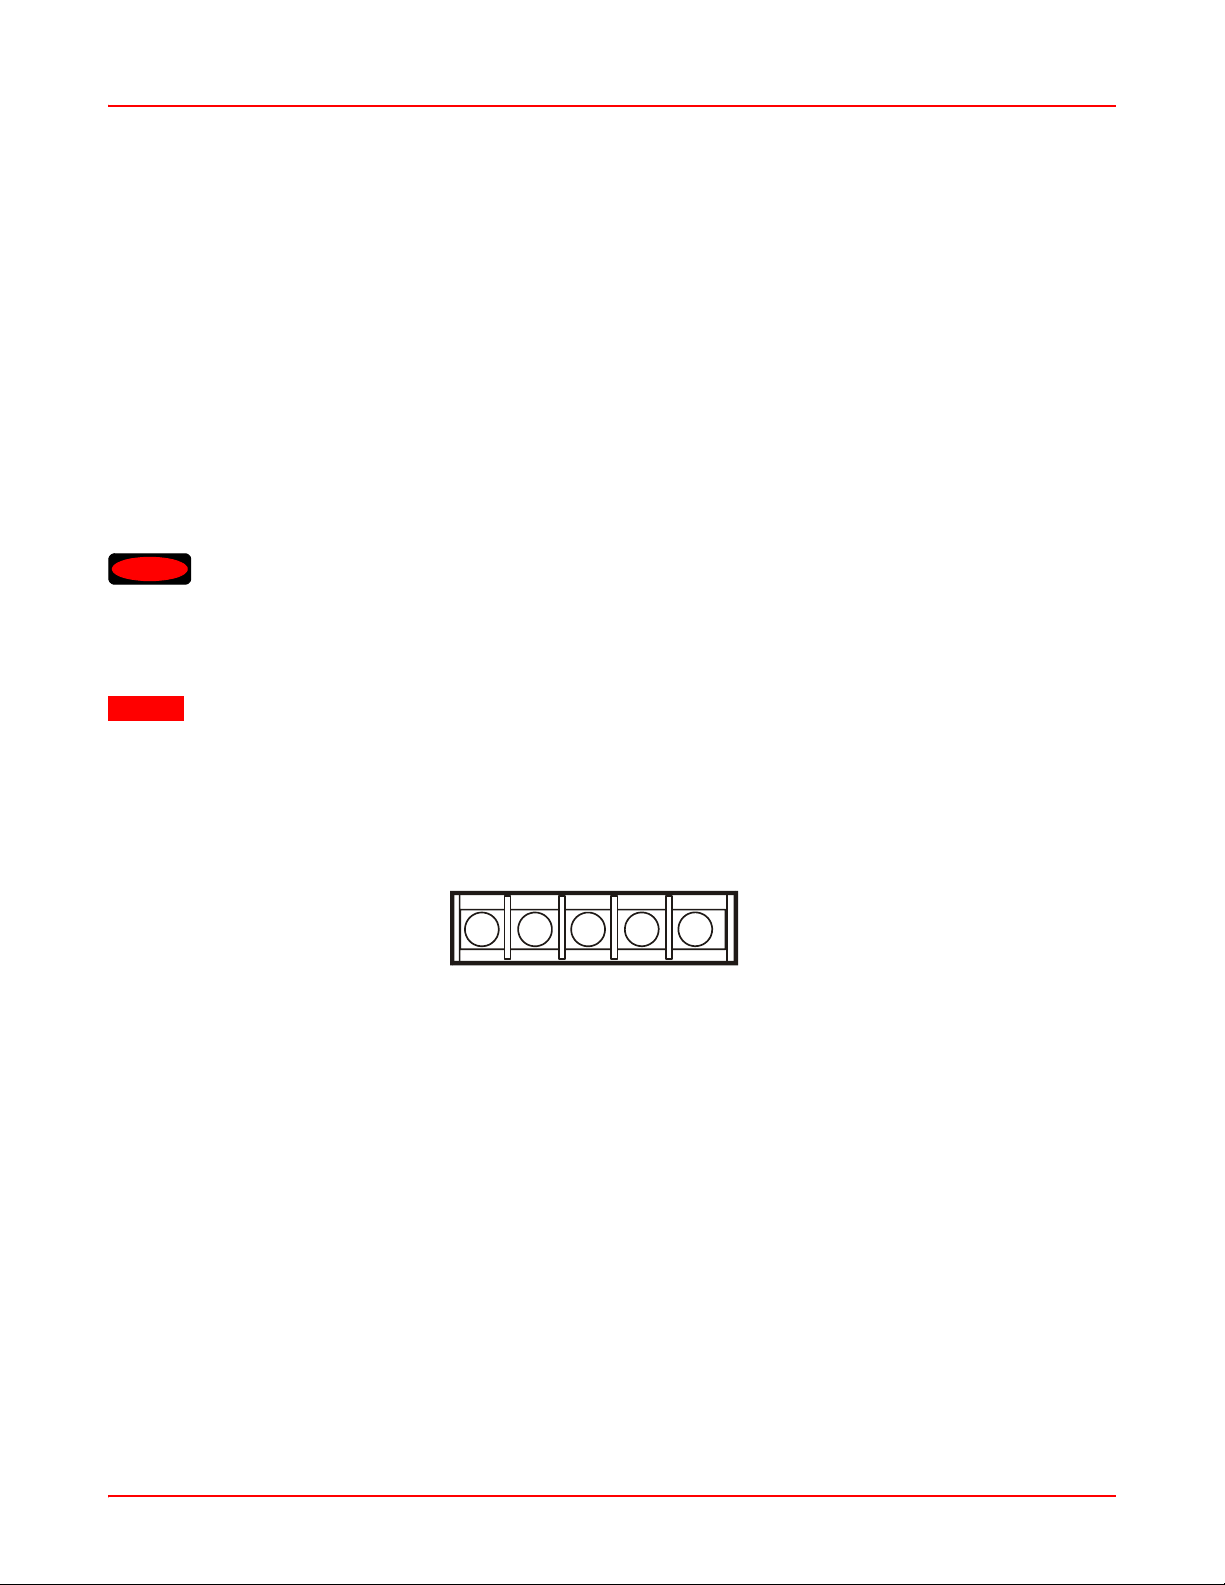
The 5-position input power terminal block (TB1, see Figure 1-3) provides a central connection point for the CO
primary power feeds (A and B).
1234
TB1
-48VA
-48VB
FUSE
FUSE
15A MAX 15A MAX
BAT RTN
US E
SUPPLIED BRIDGE
FGND
Figure 1-3. Input Power Terminal Block (TB1)
HMS-318 List 3 Shelf Input Power Connections
The input power terminal block supports split -48V battery power bussing. Slot s 1 through 11 on the HMS-318 List 3
shelf are powered by the -48 Vdc A bus (labeled -48VA). Slots 12 through 22 are powered by the -48 Vdc B bus
(labeled -48VB). The two GND terminals are tied together. In the HMU/HLU configuration, the HMU-319 is diodeOR’ed to both power busses, to guard against power failure in the event that one power supply is lost. This feature
requires the two ground terminals to be tied together on the HMU card (for proper power and grounding of the HLU319 and HMU-319, see “Related Publications” on page 1-ix and choose the most appropriate instruction manual for
your product).
LTPH-UM-1261-01 1-5
Page 18

Chapter 1: Product Description December 20, 2004
Alarms Wire-Wrap Field
IMPORTANT
!
Before making power connections (CO primary power feeds A and B) to the HMS-318 List 3 shelf,
ensure that the Main CO power breaker is off. Otherwise, sev ere injury to the installer or damage
to the unit may result.
Terminate the alarm leads from the CO alarm system to the HMS-318 List 3 shelf. The Alarms wire-wrap field (TB2,
see Figure 1-2) is a 26-pin wire-wrap connector and provides a central connection point to the Normally Closed
(NC), Common (COM), and Normally Open (NO) relay contacts for installing optional alarm input connections (see
Table 1-1 on page 1-4 for Alarm descriptions). When an alarm is not active, there is continuity between the NC and
COM connections; when an alarm is active, there is continuity between the NO and COM connections.
Note: The NO and COM alarm relay connections can be daisy-chained between HMS-318 List 3 shelves
for multi-shelf applications in the same equipment rack.
ALARMS
NC C NO
123
CRIT AUD
5
4
7
89
10 11 12
6
CRIT VIS
MAJ AUD
MAJ VIS
13 14 15
MIN AUD
MIN VIS
SYS ID
ACO
1
R
1
6
2
NO COM
1
6
FAN
0
GND
EXT
TEMP
16 17 18
19 20 21
23 24
22
25 26
Figure 1-4. Alarms Wire-Wrap Field (TB2)
Alarm Cutoff (ACO)
The Alarm Cutoff (ACO) function silences active audible alarms. Alarm cutoff can be achieved by pre ssing the ACO
button on the front panel of the Management Unit (for example, HMU-319) or by connecting the ACO pin 22 on the
HMS-318 List 3 shelf Alarms wire-wrap field (see Figure 1-4 on this page and Table 1-2) to ground through an
external NO push button switch. The ACO lead can be daisy-chained to other shelves for multi-shelf applications in
the same equipment rack.
1-6 LTPH-UM-1261-01
Page 19

December 20, 2004 Chapter 1: Product Description
In the HMU/HLU configuration, for example, for detailed information about the different types of alarms, refer to the
“Managing Alarms” section in the HMU-319, H2TU-C-319, or H4TU-C-319 User Manuals. Specifically, the manual
describes the types of alarms the HMU-319 reports, when the alarm occurs, and how to respond to the alarm usin g
the ACO.
Table 1-2. Alarms Wire-wrap Field Functional Description
Alarm Alarm Description Function
CRIT AUD Critical Audible There is a critical alarm active on the HMS-318
List 3 shelf. Connect this relay to the critical
alarm audible indicator of the CO alarm
system.
CRIT VIS Critical Visible There is a critical alarm active on the HMS-318
List 3 shelf. Connect this relay to the critical
alarm visual indicator of the CO alarm system.
MAJ AUD Major Audible There is a major alarm active on the HMS-318
List 3 shelf. Connect this relay to the major
alarm audible indicator of the CO alarm
system.
MAJ VIS Major Visible There is a major alarm active on the HMS-318
List 3 shelf. Connect this relay to the major
alarm visual indicator of the CO alarm system.
MIN AUD Minor Audible There is a minor alarm active on the HMS-318
List 3 shelf. Connect this relay to the minor
alarm audible indicator of the CO alarm
system.
MIN VIS Minor Visible There is a minor alarm active on the HMS-318
List 3 shelf. Connect this relay to the minor
alarm visual indicator of the CO alarm system.
SYS ID System ID There is a critical, major, or minor alarm active
on the HMS-318 List 3 shelf. Connect this relay
to the equipment rack alarm indicator.
ACO Alarm Cutoff External Alarm Cutoff (ACO) function silences
active audible alarms (see “Alarm Cutoff
(ACO)” on page 1-6).
GND Ground External ground
EXT TEMP External Temperature
Thermostat
NO COM FAN Fan Control The Fan Control manually disables a Fan
Thermal control (digital temperature sensor).
Connect this pin to an external snap-action
thermostat to activate the fan relay. This
thermostat provides a switch closure to ground
that is sensed by the HMU-319.
Assembly using the NO and COM fan control
contacts.
LTPH-UM-1261-01 1-7
Page 20

Chapter 1: Product Description December 20, 2004
CONNECTING TO HDSL, HDSL2, AND HDSL4 CIRCUITS
The following paragraphs provide information on making DSX-1 and HDSL, HDSL2, and HDSL4 connections to the
HMS-318 List 3 shelf.
Plug-in Connections DSX-1 and HDSL, HDSL 2, or HDSL4
DSX-1 connections to the HMS-318 List 3 shelf can be made through the HMS-318 List 3 shelf’s rear-panel 50-pin
Amphenol-type male connectors P1, RCV to DSX (labeled CO PAIR 1) and P2, XMT from DSX (labeled CO PAIR
2). HDSL, HDSL2, or HDSL4 connections to the shelf can be made through rear-panel 50-pin Amphenol-type male
connectors P3, HDSL Loop 1 (labeled SPAN PAIR 1) and P4, HDSL Loop 2 (labeled SPAN PAIR 2). All of these
connectors (P1, P2, P3 and P4) are described in the section titled “HMS-318 List 3 Rear View” on page 1-3.
Wire-Wrap Connections DSX-1 and HDSL, HDSL2, or HDSL4
DSX-1 and HDSL, HDSL2, or HDSL4 connections can be made to the individual card connectors through the HMS318 List 3 shelf’s rear-panel wire-wrap pins (0.045-inch square/1.14 mm). Straps for cable dressings and a
protective Lexan rear cover are provided with each shelf. Figure 1-5, Figure 1-6, and Figure 1-7 show the HLU card
slot pinouts for HDSL, HDSL2, and HDSL4, respectively on the HMS-318 List 3 shelf rear panel.
Each circuit card is identified by name and list ID (for example, HLU-319 HiGain G.703 L1). The name and list ID are
labeled on the upper portion of the front panel. All circuit cards are inserted straight into the slot, using guide pins to
align each circuit card.
ATTENTION
To ensure against da mage to electronic components, ESD protection must be employed in the
handling of all circuit cards. Therefore, antistatic discharge wrist-straps should be used
whenever circuit cards are being removed or replaced. The antistatic discharge straps should be
connected to frame ground. At all other times (shipping, storage, and so forth), these circuit cards
should remain in static-shielding protective bags (for a description of card preventive measures,
see Appendix C: ”Circuit Card Preventive Measures” on page C-1).
1-8 LTPH-UM-1261-01
Page 21

December 20, 2004 Chapter 1: Product Description
(
DSX-1 Tip (IN)
DSX-1 Tip 1 (OUT) DSX-1 Ring (OUT)
A
B
C
D
Error Alarm Bus Ground (GND)
HDSL Loop 1 - Tip
System Alarm*
Frame Ground -48 Vdc Battery
HDSL Loop 2 - Tip HDSL Loop 2 - Ring
FL (not used) Fuse Alarm **
Notes:
*
Minor alarm output is normally floating (0 to -60V maximum) and a
ground (10 ma maximum, +5 Vdc for HLU-319 List 2D) when activated
**
Fuse alarm is normally floating (0 to -80V maximum) and at -48V
10 ma maximum) when activated
E
F
H
J
K
L
1
2
3
4
5
6
7
8
9
10
Management Bus*
Figure 1-5. HLU Slot Wire-wrap Pinouts for HDSL Circuits
DSX-1 Tip (IN)
DSX-1 Tip 1 (OUT) DSX-1 Ring (OUT)
A
B
C
D
Error Alarm Bus Ground (GND)
HDSL Loop 1 Span Tip
System Alarm*
Frame Ground -48 Vdc Battery
HDSL2 Loop 2 - Tip*** HDSL2 Loop 2 - Ring***
Factory Use Only Fuse Alarm **
Notes:
*
Minor alarm output is normally floating (0 to -60V maximum) and a
ground (10 ma maximum, +5 Vdc for HLU-319 List 2D) when activated
**
Fuse alarm is normally floating (0 to -80V maximum) and at -48V
(10 ma maximum) when activated
***
Loop2 is used on H2TU-C-319-L7FX line of cards
E
F
H
J
K
L
1
2
3
4
5
6
7
8
9
10
Management Bus*
Figure 1-6. HLU Slot Wire-wrap Pinouts for HDSL2 Circuits
LTPH-UM-1261-01 1-9
Page 22

Chapter 1: Product Description December 20, 2004
DSX-1 (IN)Tip
DSX-1 Tip 1 (OUT)
A
B
C
D
E
HDSL4 Loop 1 Tip
System Alarm *
Frame Ground -48 Vdc Battery
HDSL4 Loop 2 Tip
Factory use only
Notes:
* System alarm and management bus reserved.
** Fuse alarm normally floating (0 to -80 Vdc maximum)
and at -48Vdc (10 ma maximum) when activated.
F
H
J
K
L
1
2
3
4
5
6
7
8
9
10
DSX-1 (IN)Ring
DSX-1 Ring 1 (OUT)
Ground (GND)
HDSL4 Loop 1 Ring
Management Bus *
HDSL4 Loop 2 Ring
Fuse Alarm **
Figure 1-7. HLU Slot Wire-wrap Pinouts for HDSL4 Circuits
CONNECTING SPAN POWERED XDSL CIRCUITS TO THE HMS-318 L IST 3 SHELF
The following paragraphs provide information on making Span Powered xDSL connections to the HMS-318
List 3 shelf.
Span Powered xDSL Plug-in Connections
Span Powered xDSL (labeled xDSL B and A IN) connections to the HMS-318 List 3 shelf can be made through
HMS-318 List 3 shelf’s rear-panel 50-pin Amphenol-type male connectors P1 (labe led CO PAIR 1) and P2 (labeled
CO PAIR 2), respectively. Span Powered xDSL (labeled xDSL A and B OUT) connections to the shelf can be made
through rear-panel 50-pin Amphenol-type male connectors P3 (labeled SPAN PAIR 1) and P4 (labeled SPAN PAIR
2). All of these connectors (P1, P2, P3 and P4) are described in the section titled “HMS-318 List 3 Rear View” on
page 1-3 (refer to the LoopStar LPS-300C L1 Power Module Technical Practice, cat alog number SCP-LPS300-010
for installation, initialize and power up information).
To ensure against da mage to electronic components, ESD protection must be employed in the
handling of all circuit cards. Therefore, antistatic discharge wrist-straps should be used
ATTENTION
whenever circuit cards are being removed or replaced. The antistatic discharge straps should be
connected to frame ground. At all other times (shipping, storage, and so forth), these circuit cards
should remain in static-shielding protective bags (for a description of card preventive measures,
see Appendix C: ”Circuit Card Preventive Measures” on page C-1).
1-10 LTPH-UM-1261-01
Page 23

December 20, 2004 Chapter 1: Product Description
Wire Wrap Connections – Span Powered xDSL
Figure 1-8 shows the LPS-300C slot pinouts on the HMS-318 List 3 shelf rear panel for xDSL circuits.
xDSL A IN
xDSL B IN
A
B
C
D
E
xDSL A OUT
F
H
Frame Ground -48 Vdc Battery
xDSL B OUT
J
K
L
Notes:
*
System alarm and managem ent bus reserved.
**
Fuse alarm nor mally floating (0 to -80 Vdc m aximum)
and at -48Vdc (10 ma maxim um) when activated .
1
2
3
4
5
6
7
8
9
10
xDSL A IN
xDSL B IN
Ground (GND)
Management Bus *
Fuse Alarm **
Figure 1-8. HLU Slot Wire-wrap Pinouts for Span Powered xDSL
LTPH-UM-1261-01 1-11
Page 24

Chapter 1: Product Description December 20, 2004
RS-232/X.25 REMOTE MANAGEMENT PORTS
Two EIA RS-232 communications por t s , J26 (labeled OS RS232 PORT) and J27 (labeled AUX RS232 PORT),
located on the HMS-318 List 3 shelf rear panel (see Figure 1-9 on p age 12), provide optional OS and AUX
management interfaces for connection to a HiGain system. Table 1-3 on page 1-12 lists the pin connections for the
OS communications port connector, and Table 1-4 on page 1-13 lists the pin connections fo r the AUX
communications port connector .
J27
2650
10 BA SE-2
13-1261R1
10 BASE-T
OS RS232 PORT
AUX RS 232 D TE PO RT
50
25 1
SPAN PAIR 1
25
CO PAIR 1
26
1
12345
-48VA -4 8V B BAT RTN
FUSE FUSE
15A MAX 15 A MAX
P INS 3 & 4
MUST BE BRIDGED
FGND
1
26 50
CO PAIR 2
1
26
SPAN PAIR 2
25
25
50
J26
Figure 1-9. HMS-318 List 3 Shelf RS-232/X.25 Remote Management Ports
Note: The HMU-319 requires that Data Set Ready (DSR) be asserted by the connected Data
Communications Equipment (DCE) in order to establish communications on this port. In the HMU/HLU
configuration, the HMU-319 always asserts Data Terminal Ready (DTR) on this port.
T a ble 1-3 . J26 – RS-23 2/X.25 Management Port (DTE)
Pin No. Signal Direction
1Shield —
2 Transmit Data (TD) Out
3 Receive Data (RD) In
4 Request to Send (RTS) Out
5 Clear to Send (CTS) In
6 Data Set Ready (DSR) In
7 Ground (GND) —
15 TCLK In
17 RCLK In
20 Data Terminal Ready (DTR) Out
24 TCLK In
1-12 LTPH-UM-1261-01
Page 25

December 20, 2004 Chapter 1: Product Description
T a ble 1-4 . J27 – AUX RS- 232 Manage men t Port (DTE)
Pin No. Signal Direction
1Shield —
2 Transmit Data (TD) Out
3 Receive Data (RD) In
6 Data Set Ready (DSR) In
7 Ground (GND) —
20 Data Terminal Ready (DTR) Out
ETHERNET REMOTE MANAGEMENT PORTS
The BNC connector J24 (labeled 10 BASE-2), see Figure 1-10, can be used to connect the management ports o f up
to 32 shelves into an integrated network through a 10 BASE-2 (Thinnet) Ethernet LAN (IEEE.802.3). The r ear-panel
RJ-45 connector J25 (labeled 10 BASE-T), see Figure 1-10, provides a 10 BASE-2 or a 10 BASE-T (Twisted-Pair)
Ethernet LAN (both IEEE.802.3 compatible).
J24 J25
50
10 BA SE-2
14-1261R1
10 BA SE- T
OS RS232 PORT
AUX RS 232 D TE PO RT
50
25 1
SPA N PAIR 1
25
CO PAIR 1
26
26
1
12345
-48VA -48VB BAT RTN
FUSE FUSE
15A MAX 15 A MAX
PINS 3 & 4
MUST BE BRIDGED
FGND
1
26
CO PA IR 2
1
26
SPAN PAIR 2
Figure 1-10. Multishelf Network Ports
Daisy-Chaining 10BASE-2 Connections
10BASE-2 management ports of up to x number of shelves can be hubbed together by daisy-chaining together
using the included BNC-T connector. The last 10BASE-2 connection must be terminated with the included 50 ohm
BNC terminator.
HEAT DISSIPATION FACTORS
The HMS-318 List 3 shelf is a 12-inch (30.48 cm) deep individual CO equipment shelf with open-fa ced mountings for
natural convection cooling. The maximum heat dissipation for open-faced, natural convection-cooled mountings is
limited to 134.7 Watts per square foot as defined in Section 4.1.4 of the NEBS standard for Physical Protection
(GR-63-CORE) for all equipment placed in a CO environment.
The heat dissipation footprint of an HMS-318 List 3 shelf is approximately 5.9 square fee t. Therefo re, the maxim um
permissible heat dissipation per rack is 5.9 square feet x 134.7 Watts per squar e foot equals 790 Watts.
The maximum allowable heat dissipation for each telco-style equipment rack is:
• 790 watts for a 19-inch (48.3-cm) wide rack
25
50
25
50
LTPH-UM-1261-01 1-13
Page 26

Chapter 1: Product Description December 20, 2004
Note: Refer to the respective ADC card user manuals to determine the maximum number of cards that can
be installed in a shelf before exceeding the maximum heat dissip ation density of the telc o-style eq uipment
rack configuration.
Figure 1-11 shows a typical example of a CO equipment rack layout using HMS-318 List 3 shelves. The figure
shows a rack with a fuse panel, eight HMS-318 List 3 shelves, each separated by a two rack space baffle with the
remaining shelf space open. As the figure illustrates, baffles should be placed between each shelf to reduce the
chimney heating effect (see “Air Flow Guidelines” on page 1-15 for further information about cooling the HMS-318
List 3 shelf).
Outdoor cabinet applications require forced air to ensure proper cooling.
Fuse Panel
Shelf
Baffle
Shelf
Baffle
Shelf
Baffle
Shelf
Baffle
Shelf
Baffle
Shelf
Baffle
Shelf
Baffle
Shelf
Baffle
16A-1261R1
Figure 1-11. Central Office Equipment Rack Configuration
1-14 LTPH-UM-1261-01
Page 27

December 20, 2004 Chapter 1: Product Description
AIR FLOW GUIDELINES
To ensure adequate air flow through the telco-style equipment rack, it is recommended that you maintain a
clearance of at least 6 inches (15.2 cm) in the front and the back of the rack at all times.
If airflow through the telco-style equipment rack and the shelves that occupy it is blocked or restricted, or if the
ambient air being drawn into the rack is too warm, an over temperature condition within the rack and the shelves that
occupy it can occur.
The site should also be as dust-free as possible. Dust tends to clog the shelves, reducing the flow of cooling air
through the telco-style equipment rack and the shelves that occupy it and increasing the risk of a n over temperature
condition.
Additional rack-mounting guidelines are:
• Install the shelf in an enclosed rack only if the rack has adequate air flow (see Chapter 2: “Installation” on
page 2-1); install the shelf in an open rack whenever possible.
• The proper use of heat (air) baffles inside an enclosed rack can help ensure adequate shelf cooling.
LTPH-UM-1261-01 1-15
Page 28

Chapter 1: Product Description December 20, 2004
1-16 LTPH-UM-1261-01
Page 29

Chapter
2
INSTALLATION
This section provides specific information about preparing your site for insta llation. Included are specific prep aratory
information, safety guidelines, specific rack-mounting guidelines, adapter bracket mounting, rack mounting, DSX
and HDSL or S pan Powered xDSL connections, and power and alarm connections. Once you have completed the
basic installation and verified that your shelf is functioning properly, you can refer to the instruction manuals for the
individual modules (HLU, HMU, or LPS-300C). These instruction manuals provide comprehensive config uration and
technical information that will help you further define the parameters to meet your particular requirements (see
“Related Publications” on page ix).
BEFORE YOU BEGIN
Before installing the HMS-318 List 3 shelf, it is important to prepare for installation by:
• Preparing the site (site preparations) or reviewing the installation plans by establishing a Method of
Procedure (MOP)
• Unpacking and inspecting the shelf shipment
• Gathering the tools and test equipment required to properly install the shelf.
Site Preparations
Typically, you should have prepared the installation site beforehand. As part of your pre p ar atio n, obtain a floor plan
of the site and the Central Office (CO) or telco-style equipment rack (either EIA with 1.75 in. mounting spaces or
WECO with 2 in. mounting spaces) where the HMS-318 List 3 shelf will be housed. Determine the location of any
existing shelves and their interconnections, including communications and power. The -48VA and -48VB busses
provide the -48V shelf battery feed. Each bus should be fused at 15 Amperes. All personnel involved in the
installation of the shelf, including installers, engineers, and supervisors, should participate in the preparation of a
MoP for approval by the customer.
Method of Procedure
An example of a Method of Procedure (pre-installation checklist of tasks and considerations that needs to be
addressed and agreed upon before proceeding with the installation) is given below:
• Assign personnel.
• Determine protection requirements for personnel, equipment, and too l s.
• Evaluate potential hazards that may affect service.
• Schedule time for installation.
• Determine any space requirements.
• Determine any power requirements.
• Identify any required procedures or tests.
• On an equipment plan, make a preliminary decision that locates each of the HMS-318 List 3 shelves that you
plan to install.
• Read this manual.
• Modify the preliminary plan, if necessary.
• Verify the list of replaceable parts for the installation (screws, bolts, washers, and so on) so that the parts are
identified (see Table 2-1 on page 2-2).
• Check the required tools list to make sure the necessary tools and test equipment are available (see Chapter 2:
“Required Tools” on page 2-3).
• Purchase necessary parts.
• Perform the installation (see Chapter 2: “Safety Guidelines” on page 2-4).
LTPH-UM-1261-01 2-1
Page 30

Chapter 2: Installation December 20, 2004
Unpacking and Checking the Contents of your Shipment
The shipping package for the HMS-318 List 3 is designed to reduce the possibility of product damage associated
with routine material handling experienced during shipment. To reduce the potential damage to the product,
transport the shelf in its ADC-specified packaging. Failure to do so may result in damage to the shelf. Also do not
remove the shelf from its shipping container until you are ready to install it. Refer to “Inspecting Your Shipment” on
page xii for unpacking instructions.
Note: Do not discard the packaging materials used in shipping your HMS-318 List 3 shelf. Y ou will need the
packaging materials in the future if you move or ship your HMS-318 List 3 shelf.
Table 2-1 lists the items included in the HMS-318 List 3 shipment. After inspecting each item, check and initial that it
has been received. A “Notes” section has bee n provid ed on the next page to record damaged or missing parts.
Table 2-1. HMS-318 List 3 Shelf Parts List
Check
9 Item Quantity Catalog/Part No.
HiGain Management Shelf (HMS-318
List 3)
Adjustable Mounting Brackets, two
(either 2-inch recess or 5-inch recess)
installed at factory
HMS-318 List 3 Shelf Installation Kit
includes mounting hardware (four #1224 x 0.5 inch panhead screws), label
holder, label, 50-ohm BNC terminator,
and BNC-T female connector
ETSI Mounting parts kit includes
mounting hardware (eight #6-32 x .250
inch Phillips head screws w/lock
washer, four M6-1.0 x 14 mm panhead
screws), and two ETSI Mounting
Brackets, one
Shelf Grounding kit includes one
cabletie, one #12-24 x 0.5 inch Hexhead
screw w/washer, one #12 Ring
Terminal, 12-10 AWG (used to connect
the grounding cables to the grounding
stud), and one ground jumper
HiGain Management Shelf (HMS-318
List 3) User Manual
(Optional) Extender Bracket for
mounting into 23-inch (58.4 cm) rack
includes two brackets and all the
appropriate mounting hardware.
1 HMS-318 List 3
1 set N/A
1 bag 130-1028-01
1 bag N/A
1 bag N/A
1 LTPS-UM-1261
1EB-52
Installer Initial
"
2-2 LTPH-UM-1261-01
Page 31

December 20, 2004 Chapter 2: Installation
Notes:
Required Tools
The following tools are required to install the shelf:
• Grounding or ESD-preventive wrist strap
• #2 Phillips-head screwdriver
• #1 Phillips-head screwdriver
• Straight-slot-head screwdriver
• Cable preparation tools
5
•A
/16-inch open-end wrench
• Tape measure
• Wire strippers
• An Amphenol crimping tool for making up connectors (if necessary).
Note: All other tools are normally carried in a craftsman’s tool set.
LTPH-UM-1261-01 2-3
Page 32

Chapter 2: Installation December 20, 2004
SAFETY GUIDELINES
The safety guidelines (see Chapter 1: “Safety Guidelines” on page 1-iv) are provided to help ensure your safety and
to protect your equipment. The list on page iv may not identify all potentially hazardous situations in your working
environment, so be alert and exercise good judgment at all times.
MOUNTING THE HMS-318 LIST 3 SHELF
Each HMS-318 List 3 shelf has a hardware kit. The rack adapter brackets are attached to the HMS-318 List 3 shelf
at the factory. They are supplied with the shelf to allow mounting on 19-inch (48.3-cm) telco-style EIA or WECO
equipment racks. Select the appropriate position for the brackets (2 or 5 inches) and mount the shelf to the bracket
as described in the Chapter 2: “Adapter Bracket Mounting Procedure (19-inch Telco-style Equipment Rack)” on
page 2-5 and the Chapter 2: “Adapter Bracket Mounting Procedure (23-inch Telco-style Equipment Rack)” on
page 2-5. When installed in an EIA rack, a total of three 1.75-inch (4.4-cm) mounting spaces [5.25 inches (13.3 cm)
of vertical rack space] are required for mounting an HMS-318 List 3 shelf. When installed in a WECO rack, a tot al of
three 2.0-inch (5.08-cm) mounting spaces [6 inches (15.2 cm) of vertical rack space] are required for mounting.
ETSI adapter brackets are included for inst allation of the HMS-318 List 3 sh elf in an ETSI-style equipment rack (see
Chapter 2: “Adapter Bracket Mounting Procedure (ETSI-style Equipment Rack)” on p ag e 2-6).
IMPORTANT
!
Special Rack-Mounting Precautions
Special rack-mounting precautions must be followed to ensure safety. They are:
• Never wear loose clothing, jewelry (such as rings, bracelets, or chains), or other items that could get caught in
the shelf housing during handling and use.
• When mounting the shelf to a telco-style rack, ensure that the rack is bolted to the floor.
• Since you will probably be installing more than one shelf into the rack, ensure that the weight of all the shelves
installed does not make the rack unstable.
IMPORTANT
!
• As mentioned in “Air Flow Guidelines” on page 1-15, maintain a clearance of 6 inches (15.2 cm) at the front and
back of the shelf to ensure adequate air int ake and exha ust.
• Avoid installing the shelves in an overly congested rack (see “Heat Dissipation Factors” on page 1-13). Air flowing to or from other shelves in the rack might interfere with the normal flow of cooling air through the shelves,
increasing the potential for over temperature condition s wi thin the shelves.
• Allow at least 19 inches (48.7 cm) of clearance at the front and back of the rack for shelf mainten ance.
• Follow your local practices for cable management. Ensure that cables to and from the shelves do not impair
access to perform equipment maintenance or upgrades.
Clearance above and below the shelf must be allowed for cooling air to be drawn in the front and
circulated through the shelf and out. A heat (air) baffle must be used between shelves to ens ure
that heated air is dissipated appropriately (see “Air Flow Guidelines” on page 21 for detailed
information about air flow guidelines).
Some telco-style racks are also secured to ceiling brackets, if necessary, due to the weight of the
equipment in the rack. Make sure that the rack you are using to install the shelves is secured to
the building structure.
2-4 LTPH-UM-1261-01
Page 33

December 20, 2004 Chapter 2: Installation
Adapter Bracket Mounting Procedure (19-inch Telco-style Equipment Rack)
Adapter bracket placement depends on the type of telco-style rack you plan to use to install the HMS-318 List 3
shelf. First, check the mounting adapter brackets on the shelf to determine whether the factory-installed
configuration is correct for the planned telco-style equipment rack installation. The following procedure describes
how to install the adapter brackets. Threaded holes on the HMS-318 Li st 3 shelf are str ategically located to p osition
and mount the adapter brackets.
Note: As mentioned in Chapter 1: “Product Description” on page1-1 and “Mounting the HMS-318 List 3
Shelf” on page 2-4, the adapter brackets are normally attached to the HMS-318 List 3 shelf at the factory
for a 19-inch telco-style equipment rack. When changing the position of the brackets from a 2- or 5-inch
recess mounting or vice versa, ensure that you place the appropriate hardware (screws, washers, and so
on) you remove in a convenient location for re-assembly.
Perform the following procedure to mount the HMS-318 List 3 shelf to the adapter brackets for a 19-inch telco-style
equipment rack.
Note: When mounting a 19-inch HMS-318 List 3 shelf into a 23-inch telco-style equipment rack (see
Adapter Bracket Mounting Procedure (23-inch Telco-style Equipment Rack)on this page, use extender
brackets (including mounting hardware: EB-52).
Step Action
1 Locate the mounting holes of the HMS-318 List 3 shelf for the desired rack width 19 inches (48.3 cm) and
position (2- or 5-inch recess mounting).
2 Align each adapter bracket with the HMS-318 List 3 shelf and attach to the desired rack width 19 inches
(48.3 cm) and position (2- or 5-inch recess mounting) with the #6-32 x .25 inch screws (provided).
3 Insert the screws (4 places) and tighten using a #2 Phillips screwdriver.
4 Repeat for the other adapter bracket.
5 You are now ready to install the HMS-318 List 3 shelf into the telco-style rack (see “Rack Mounting
Procedure” on page 2-7).
Adapter Bracket Mounting Procedure (23-inch Telco-style Equipment Rack)
To mount the adapter brackets for a 23-inch Telco-style Equipment Rack, select the appropriate position
(2- or 5-inch recess) and mount the HMS-318 List 3 shelf to the adapter brackets as described in this procedure.
Note: As mentioned in Chapter 1: “Product Description” on page1-1 and “Mounting the HMS-318 List 3
Shelf” on page 2-4, the adapter brackets are attached to the HMS-318 List 3 shelf at the factory for a 19-
inch telco-style equipment rack. When changing the position of the brackets from a 2- or 5-inch recess
mounting or vice versa, ensure that you place the appropriate hardware (screws, washers, and so on) you
remove in a convenient location for re-assembly.
Perform the following procedure to mount the HMS-318 List 3 shelf to the adapter brackets for a 23-inch telco-style
equipment rack.
Note: When mounting a 19-inch HMS-318 List 3 shelf into a 23-inch equipment rack, use e xtender brackets
(including mounting hardware: EB-52).
LTPH-UM-1261-01 2-5
Page 34

Chapter 2: Installation December 20, 2004
Step Action
1 Locate the mounting holes of the HMS-318 List 3 shelf for the desired rack width 23 inches (58.4 cm) and
position (2- or 5-inch recess mounting).
2 Align each adapter bracket with the HMS-318 List 3 shelf and attach to the desired rack width 23 inches
(58.4 cm) and position (2- or 5-inch recess mounting) with the #6-32 x .25 inch screws (provided).
3 Insert the screws (4 places) and tighten using a #2 Phillips screwdriver.
4 Repeat for the other adapter bracket.
5 You are now ready to install the HMS-318 List 3 shelf into the telco-style rack (see “Rack Mounting
Procedure” on page 2-7).
Adapter Bracket Mounting Procedure (ETSI-style Equipment Rack)
To mount the adapter brackets for a 600-mm ETSI-style Equipment Rack, mount the HMS-318 List 3 shelf to the
adapter brackets as described in this procedure.
Note: As mentioned in Chapter 1: “Product Description” on page1-1 and “Mounting the HMS-318 List 3
Shelf” on page 2-4, the adapter brackets are attached to the HMS-318 List 3 shelf at the factory for a 19-
inch telco-style equipment rack. When disassembling the brackets from the shelf, ensure that you place the
appropriate hardware (screws, washers, and so on) you remove in a convenient se aled package for
possible re-assembly later.
Perform the following procedure to mount the HMS-318 List 3 shelf to the adapter brackets for a 600-mm ETSI-style
equipment rack.
Note: When mounting a 19-inch (48.3-cm) HMS-318 List 3 shelf into a 600-mm ETSI-style equipment rack,
use the adapter brackets provided (see “Product Description” on page 1-1 and Table 2-1 on page 2-2).
Step Action
1 Locate the mounting holes of the HMS-318 List 3 shelf for the desired rack width 23 inches (58.4 cm) and
position (2- or 5-inch recess mounting).
2 Align each adapter bracket with the HMS-318 List 3 shelf and attach to the desired rack width 23 inches
(58.4 cm) and position (2- or 5-inch recess mounting) with the #6-32 x .25 inch screws (provided).
3 Insert the screws (4 places) and tighten using a #2 Phillips screwdriver.
4 Repeat for the other adapter bracket.
5 You are now ready to install the HMS-318 List 3 shelf into the ETSI-style rack (see “Rack Mounting
Procedure” on page 2-7).
2-6 LTPH-UM-1261-01
Page 35

December 20, 2004 Chapter 2: Installation
Rack Mounting Procedure
To secure the HMS-318 List 3 shelf to the telco-style rack, you must use the mounting screws provided or follow
your local practices for installing the shelves in to your te lco- st yle equipme nt rack. Ensur e that the adapter brackets
have been securely fastened [see “Adapter Bracket Mounting Procedure (19-inch Telco-style Equipment Rack)” on
page 2-5, “Adapter Bracket Mounting Procedure (23-inch Telco-style Equipment Rack)” on page 2-5, or “Adapter
Bracket Mounting Procedure (ETSI-style Equipment Rack)” on page 2-6 for more information].
Perform the following procedure to mount the HMS-318 List 3 shelf into a telco-style equipment rack.
IMPORTANT
!
To prevent injury, review the “Safety Guidelines” on page xi and the “Special Rack-Mounting
Precautions” on page 2-4 before installing the HMS-318 List 3 shelf in the telco-style equipment
rack.
Step Action
1 Locate the telco-style equipment rack position you plan to install the HMS-318 List 3 shelf into.
2 Verify that there are no obstructions and ensure that the telco-style equipment rack is stabilized.
3 Position the shelf in the telco-style equipment rack lining up the bracket holes on the shelf with the holes
on the rack and secure with the four #12-24 x .375 inch mounting screws (see Tabl e 2-1 on page 2-2).
Note: The vertical spacing for EIA racks is 1.75 inches (4.44 cm), with mounting holes
spaced 1.5 inches (3.81 cm) apart. V e rtical spacing for WECO racks is 2.0 inches (5.08 cm),
with mounting holes spaced 1.0 inch (2.54) apart.
4 Tighten the screws using a 1/4-in ch flat -b lad e scr ew dr ive r.
5 You are now ready to begin interconnecting the communications cables that apply to your application
(see “DSX-1 and HDSLx Connections” on page 2-7 or “Span Powered xDSL Connections” on page 2-8).
DSX-1 AND HDSLX CONNECTIONS
Perform the following procedure to connect the DSX-1 and HDSLx interface cables to connectors P1, P2, P3 and P4
(see Figure 1-2 on page 1-3 for connector location and “Connecting to HDSL, HDSL2, and HDSL4 Circuits” on
page 1-8, for connector descriptions).
DANGER
LTPH-UM-1261-01 2-7
Before making both DSX-1 and HDSLx connections to the HMS-318 List 3 shelf, ensure that the
Main CO power breaker is off. Otherwise, severe injury to the installer or damag e to the unit may
result.
Page 36

Chapter 2: Installation December 20, 2004
DSX and HDSL Connector Procedure
Step Action
1 Complete one of the following steps to make the DSX-1 and HDSLx connections to the shelf using one of
the following methods: Plug the DSX-1 interface cables into P1 and P2 and the HDSLx interface cables
into P3 and P4. Wire-wrap the DSX-1 and HDSLx inputs to the appropriate individual card slots. Pin
assignments are listed in Appendix A: “Signal and Pin Assignments” on page A-1.
Note: See Figure 1-2 on page 1-3 for the location of the HDSLx Sp an connectors. HDSLx S pan
pin assignments are listed in Appendix A: “Signal and Pin Assignments” on page A-1. Standard
PIC cable color codes are listed in Appendix B: “Standard PIC Color Code” on page B-1.
2 Continue to “Bonding (Safety) Ground, Power and Frame Ground, Alarm, and Optional Fan Inputs” on
page 2-9.
SPAN POWERED XDSL CONNECTIONS
Perform the following procedure to connect the Span Powered xDSL interface cables to connectors P1, P2, P3 and
P4 (see Figure 1-2 on page 1-3 for connector location and “Connecting Span Powered xDSL Circuits to the HMS-
318 List 3 Shelf” on page 1-10 for connector descriptions).
DANGER
Span Powered xDSL Connector Procedure
Before making any Span Powered xDSL connections to the HMS-318 List 3 shelf, ensure that the
Main CO power breaker is off. Otherwise, severe injury to the installer or damag e to the unit may
result.
Step Action
1 Complete one of the following steps to make the Span Powered xDSL connections to the shelf using one
of the following methods:
• Plug the Span Powered xDSL interface cables into P1, P2, P3 and P4.
• Wire-wrap the Span Powered xDSL inputs to the appropriate individual car d slots. Pin assignments
are listed in Appendix A: “Signal and Pin Assignments” on page A-1.
Note: See Figure 1-2 on page 1-3 for th e location of the HDSL S pan connectors. HDSL S pan
pin assignments are listed in Appendix A: “Signal and Pin Assignments” on page A-1.
Standa rd PIC cable color codes are listed in Appendix B: “Standard PIC Color Code” on
page B-1.
2 Continue to “Bonding (Safety) Ground, Power and Frame Ground, Alarm, and Optional Fan Inputs” on
page 2-9.
2-8 LTPH-UM-1261-01
Page 37

December 20, 2004 Chapter 2: Installation
BONDING (SAFETY) GROUND, POWER AND FRAME GROUND, ALARM, AND OPTIONAL
AN INPUTS
F
IMPORTANT
!
Bonding (safety) ground, power and frame ground, and alarm connections and cabling are marked for ease of
installation [see ground lug location (lab eled BONDING WIRE M IN #10 AWG)], TB1, and TB2 on the rear panel of
the HMS-318 List 3 Shelf, and the following procedures for proper safety ground, power, alarm, and optional fan
(alarms) connections (see Figure 1-2 on page 1-3).
Bonding (Safety) Ground Procedure
To connect the Bonding (Safety) ground to the HMS-318 List 3 Shelf, complete the following steps:
Before making connections to the HMS-318 List 3 shelf, ensure that the Main CO power breaker
is off. Otherwise, severe injury to the installer or damage to the unit may result.
Note: The ground wire exiting the HMS-318 List 3 Shelf is terminated with a ground lug. The lug can be
either a one-hole or two-hole lug. The surface of the lug that connects to the HMS-318 List 3 Sh elf sh ould
be cleaned with an antioxidant. The same should also be applied to the surface of the telco-style rack where
the connection is to be made. The #12 Hexhead screw (supplied) is used to connect the grounding lug to
the HMS-318 List 3 Shelf.
LTPH-UM-1261-01 2-9
Page 38

Chapter 2: Installation December 20, 2004
Step Action
1 Looking at the HMS-318 List 3 rear panel, find the ground lug location (labeled BONDING WIRE MIN #10
AWG) on the upper right corner extension of the right panel (see Figure 2-1).
2 Measure between the telco-style rack and the HMS-318 List 3 Shelf the correct length of a #10 AWG
(minimum) ground wire so that it reaches the ground lug location on the HMS-318 List 3 Shelf, and cut.
Leave enough excess to allow for tying to the rack.
3 Using wire strippers, strip about 5/8 inches of insulation from the ground wire that you will fasten to the
ground lug.
4 Next, using a crimping tool, insert the stripped end of the ground wire into the ground lug, and crimp.
5 Attach the ground lug to the HMS-318 List 3 Shelf by placing the ground lug against the ground lug
location, aligning the hole. Insert the ground-lug screw (#12 Hexhead) through the locking washer and
then through the hole in the ground lug and the ground lug location on the HMS-318 List 3 Shelf. Ensure
that the ground lug and attached ground wire does not interfere with the HMS-31 8 List Shelf or the telco-
style rack.
6 Tighten the screws to secure the locking washer and the ground lug to the ground lug location on the
HMS-318 List 3 Shelf.
7 Using wire strippers, strip about 5/8 inches of insulation from the other end of the ground wire. Using
locally approved practices and fasten the stripped end of the ground wire to the telco-style rack.
8 Use the tie-wraps (supplied) and secure the ground wire to the rack to prevent rotation.
P2 CONNECTOR
25
BONDING WIRE
MIN #10 AWG
P2
SHIELD
GND
4
A
1
B
2
C
3
D
4
E
5
F
6
H
7
J
8
K
9
L
10
P4
3
A
1
A
B
2
C
3
D
4
E
5
F
6
H
7
J
8
K
9
L
10
25
SHIELD
GND
1
B
2
C
3
D
4
E
5
F
6
H
7
J
8
K
9
L
10
P4
12
A
1
B
2
C
3
D
4
E
5
F
6
H
7
J
8
K
9
L
10
WIREWRAP
PINS
GROUND LUG
HEXHEAD SCREW
17-1261R1
P4 CONNECTOR
Figure 2-1. Grounding Lug
2-10 LTPH-UM-1261-01
Page 39

December 20, 2004 Chapter 2: Installation
1234
5
/
Power and Frame Ground Procedure
IMPORTANT
!
To avoid voltage differences from building up between the shelf ground (GND) bus and the
ground pins of the management terminal that connects to the RS-232 ports, connect the shelf
ground pins and the terminal ground bus to the TB1 FGND (frame ground) pin.
Step Action
1 Use locally approved practices to connect #12 AWG (minimum) power wiring from -48Vdc Office Battery
to -48VA and -48VB terminals on TB1-1 and TB1-2 (see <Cross-Ref>Figure 2).
2 Connect #12 AWG (minimum) power wiring from the Battery Returns to BAT RTN terminals on TB1-3
and TB1-4 (see <Cross-Ref>Figure 2).
Note: Slots 1 through 11 on the HMS-318 List 3 shelf are powered by the -48VA bus. Slots 12 through 22
are powered by the -48VB bus.
In the HMU/HLU configuration, the HMU-319 is diode-OR’ed to both power busses to guard against power
failure in the event that one power supply is lost. This feature requires the two ground (GND) terminals to
be connected on the HMU card.
16-1261R1
3
-48VA
FUSE
15A MAX 15A MAX
-48VB
FUSE
TB1
BAT RTN
FGND
Figure 2-2. Input Power Terminal Block (TB1)
Alarms Procedure
Note: As described in “Power and Alarm Connections” on page 7, the HMS-318 List 3 shelf provides alarm
outputs in the form of an Alarms wire-wrap field. This field consist s of a three-pin wire-wrap header for alarm
management. Before connecting the alarm inputs, you must first determine whether the external alarm
equipment requires either an NO or an NC circuit to pass an alarm.
Step Action
1 Use locally approved practices to connect the alarm inputs to the Alarms wire-wrap field (see Figure 2-3
on page 2-12).
Note: The HMU-319 is required for NO and NC alarm operation.
LTPH-UM-1261-01 2-11
Page 40

Chapter 2: Installation December 20, 2004
Optional Fan Alarm Procedure
Note: The FAN terminals wire-wrap field provide s access to the Normally Open (NO), Form A fan relay
contact located on the HMU-319 management u nit. A temperature monitor activates this fan relay when the
shelf temperature exceeds 45°C (±1°C) and deactivates the relay when the temperature drops below 35°C
(±1°C). If the temperature exceeds 77°C (±1°C) a critical alarm is also generated. The critical alarm reset s
when the temperature drops below 40°C (±1°C).
Step Action
1 Connect the optional fan inputs to the Alarms wire-wrap field pins 25 and 26 (see Figure 2-3).
ALARMS
NC C NO
123
CRIT AUD
5
4
7
89
10 11 12
13 14 15
16 17 18
19 20 21
22
23 24
25 26
6
CRIT VIS
MAJ AUD
MAJ VIS
MIN AUD
MIN VIS
SYS ID
ACO
GND
1
R
1
6
2
NO COM
1
-
FAN
6
0
TEMP
EXT
Figure 2-3. Alarms Wire-wrap Field (TB2)
2-12 LTPH-UM-1261-01
Page 41

December 20, 2004 Chapter 2: Installation
INSTALLI NG THE HMU-319 WITH HLU-319, H2TU-C-319, H4TU-C-319
Install the line units (HLUs) into slots 1 through 22 and the HMU-319 management unit into slot 23 of the HMS-318
List 3 shelf (see “HMS-318 List 3 Shelf - Front View” on page 1-2 for slot location).
Install HMU and HLU Procedure
Use anti-static wrist-straps connected to the ESD Jack (located on the right adapter bracket, see
ATTENTION
Step Action
1 Hold the HLU and HMU vertically with the front of the circuit card toward you. Align the top and bottom
2 Slide the HLU and HMU into their respective slots.
3 Press the HLU and HMU firmly into the connector until it is seated into the edge-connector on the shelf
Figure 1 on page 3) when inserting a circuit card. Avoid touching components on the circuit card.
edges of the HLU and HMU with the HMS-318 List 3 shelf slot guides.
backplane.
Note: The HLU and HMU will power up with various status LEDs and displays indicating power up status
(refer to the HLU-319, H2TU-C-319, or H4TU-C-319 Technical Practice and HMU-319L7V32 and L9V32
User Manual, catalog number LTPH-UM-1142 in the “Related Publications” on page ix for the proper
power-up descriptions).
INSTALLI NG LPS-300C POWER MODULE
Install the LoopStar (LPS-300C) Power Modules into slots 1 through 22 [odd numbered slots (1, 3, 5, 7, ... 21) ] of
the HMS-318 List 3 shelf (see Figure 1-2 on page 1-3 for slot location, “Connecting Span Powered xDSL Circuits to
the HMS-318 List 3 Shelf” on page 1-10 for Span Powered xDSL Circuit connection, and Appendix A: “Signal and
Pin Assignments” on page A-1 for pin assignments).
For visual and audible alarm contact operation, inst all an HMU-319. Refer to HMU-319 L7AV32 a nd L9V32
User Manual (LTPH-UM-1142).
LTPH-UM-1261-01 2-13
Page 42

Chapter 2: Installation December 20, 2004
Install LPS-300C Procedure
Use anti-static wrist-straps connected to the ESD Jack (located on the right adapter bracket, see
Figure 1-1 on page 1-2) when inserting a circuit card. Avoid touching components on the
ATTENTION
circuit card.
Step Action
1 Hold the LPS-300C Power Module vertically with the front of the ci rcuit card toward you. Align the top and
bottom edges of the LPS-300C with the HMS-318 List 3 shelf slot guides.
2 Slide the LPS-300C Power Module into its respective slot.
3 Press the LPS-300C Power Module firmly into the connector until it is seated into the edge-connector on
the shelf backplane.
Note: The LPS-300C will power up with various status LEDs indicating power up status (refer to the
LoopStar LPS-300C L1 Power Module Technical Practice, catalog number SCP-LPS300-010 in the
“Related Publications” on page iii for the proper power up descriptions).
2-14 LTPH-UM-1261-01
Page 43

Appendix
A
SIGNAL AND PIN ASSIGNMENTS
The Tip and Ring signal and pin assignment s to the HMS-318 List 3 shelf are:
• P1-DSX-1 Receive or xDSL B IN, Tip and Ring (see Table A-1)
• P2-DSX-1 Transmit or xDSL A IN, Tip and Ring (see Table A-2 on page A-2)
• P3-HDSL Span 1 or xDSL A OUT, Tip and Ring (see Table A-3 on page A-4)
• P4-HDSL Span 2 or xDSL B OUT, Tip and Ring (see Table A-4 on page A-5)
Connector P1 - DSX-1 Receive or Span Powered xDSL (xDSL B IN)
Table A-1 provides signal and pin assignment information for making DSX-1 receive or Span Powered (xDSL B IN)
circuit connections to the HMS-318 List 3 shelf.
T a ble A- 1. P1-DSX- 1 Receive or S pan Powered xDSL B IN, Tip and Ring
Cable Pin Number Slot Card Slot Pin Number
26 1 Tip
1 Ring
27 2 Tip
2 Ring
28 3 Tip
3 Ring
29 4 Tip
4 Ring
30 5 Tip
5 Ring
31 6 Tip
6 Ring
32 7 Tip
7 Ring
33 8 Tip
8 Ring
34 9 Tip
9 Ring
35 10 Tip
10 Ring
36 11 Tip
11 Ring
37 12 Tip
12 Ring
38 13 Tip
13 Ring
39 14 Tip
LTPH-UM-1261-01 A-1
Page 44

Appendix A: Signal and Pin Assignments December 20, 2004
Cable Pin Number Slot Card Slot Pin Number
14 Ring
40 15 Tip
15 Ring
41 16 Tip
16 Ring
42 17 Tip
17 Ring
43 18 Tip
18 Ring
44 19 Tip
19 Ring
45 20 Tip
20 Ring
46 21 Tip
21 Ring
47 22 Tip
22 Ring
Connector P2 - DSX-1 Transmit or S pan Powered xDSL (xDSL A IN)
Table A-2 provides signal and pin assignment information for making DSX-1 transmit or Span Powered xDSL (xDSL
A IN) circuit connections to the HMS-318 List 3 shelf.
T able A- 2. P2-DSX- 1 Transmit or Span Powered xDSL A IN, Tip and Ring
Cable Pin Number Slot Card Slot Pin Number
26 1 Tip
1 Ring
27 2 Tip
2 Ring
28 3 Tip
3 Ring
29 4 Tip
4 Ring
30 5 Tip
5 Ring
31 6 Tip
6 Ring
32 7 Tip
7 Ring
33 8 Tip
A-2 LTPH-UM-1261-01
Page 45

December 20, 2004 Appendix A: Signal and Pin Assignments
Cable Pin Number Slot Card Slot Pin Number
8 Ring
34 9 Tip
9 Ring
35 10 Tip
10 Ring
36 11 Tip
11 Ring
37 12 Tip
12 Ring
38 13 Tip
13 Ring
39 14 Tip
14 Ring
40 15 Tip
15 Ring
41 16 Tip
16 Ring
42 17 Tip
17 Ring
43 18 Tip
18 Ring
44 19 Tip
19 Ring
45 20 Tip
20 Ring
46 21 Tip
21 Ring
47 22 Tip
22 Ring
LTPH-UM-1261-01 A-3
Page 46

Appendix A: Signal and Pin Assignments December 20, 2004
Connector P3 - HDSL Span 1 (HDSL, HDSL2, or HDSL4) or Span Powered xDSL (xDSL A OUT)
Table A-3 provides connector P3 signal and pin assignment information for making HDSL Span 1 (HDSL, HDSL2,
or HDSL4) or Span Powered xDSL (xDSL A OUT) connections to the HMS-318 List 3 shelf.
Table A-3. P3-HDSL Span 1 or Span Powered xDSL A OUT, Tip and Ring
Cable Pin Number Slot Card Slot Pin Number
26 1 Tip
1 Ring
27 2 Tip
2 Ring
28 3 Tip
3 Ring
29 4 Tip
4 Ring
30 5 Tip
5 Ring
31 6 Tip
6 Ring
32 7 Tip
7 Ring
33 8 Tip
8 Ring
34 9 Tip
9 Ring
35 10 Tip
10 Ring
36 11 Tip
11 Ring
37 12 Tip
12 Ring
38 13 Tip
13 Ring
39 14 Tip
14 Ring
40 15 Tip
15 Ring
41 16 Tip
16 Ring
42 17 Tip
17 Ring
43 18 Tip
A-4 LTPH-UM-1261-01
Page 47

December 20, 2004 Appendix A: Signal and Pin Assignments
Cable Pin Number Slot Card Slot Pin Number
18 Ring
44 19 Tip
19 Ring
45 20 Tip
20 Ring
46 21 Tip
21 Ring
47 22 Tip
22 Ring
Connector P4 - HDSL Sp an 2 (HDSL, HDSL2, or HDSL4) or Span Powered xDSL B OUT
Table A-4 provides signal and pin assignment information for making HDSL Span 2 (HDSL, HDSL2, or HDSL4) or
Span Powered xDSL (xDSL B OUT) connections to th e HMS-318 List 3 shelf.
Table A-4. P3-HDSL Span 1 or Span Powered xDSL A OUT, Tip and Ring
Cable Pin Number Slot Card Slot Pin Number
26 1 Tip
1 Ring
27 2 Tip
2 Ring
28 3 Tip
3 Ring
29 4 Tip
4 Ring
30 5 Tip
5 Ring
31 6 Tip
6 Ring
32 7 Tip
7 Ring
33 8 Tip
8 Ring
34 9 Tip
9 Ring
35 10 Tip
10 Ring
36 11 Tip
11 Ring
37 12 Tip
LTPH-UM-1261-01 A-5
Page 48

Appendix A: Signal and Pin Assignments December 20, 2004
Cable Pin Number Slot Card Slot Pin Number
12 Ring
38 13 Tip
13 Ring
39 14 Tip
14 Ring
40 15 Tip
15 Ring
41 16 Tip
16 Ring
42 17 Tip
17 Ring
43 18 Tip
18 Ring
44 19 Tip
19 Ring
45 20 Tip
20 Ring
46 21 Tip
21 Ring
47 22 Tip
22 Ring
A-6 LTPH-UM-1261-01
Page 49

Appendix
B
STANDARD PIC C OLOR CODE
This appendix lists the standar d PIC color codes in tabular format with the Pair Number cross-referenced with the
colors of the Tip and Ring wires used by the installer.
Table B-1. Standard PIC Color Code
Pair Number Tip Ring
1 White Blue
2 White Orange
3 White Green
4 White Brown
5 White Slate
6 Red Blue
7 Red Orange
8 Red Green
9 Red Brown
10 Red Slate
11 Black Blue
12 Black Orange
13 Black Green
14 Black Brown
15 Black Slate
16 Yellow Blue
17 Yellow Orange
18 Yellow Green
19 Yellow Brown
20 Yellow Slate
21 Violet Blue
22 Violet Orange
23 Violet Green
24 Violet Brown
25 Violet Slate
26 White Blue
27 White Orange
28 White Green
LTPH-UM-1261-01 B-1
Page 50

Appendix B: Standard PIC Color Code December 20, 2004
B-2 LTPH-UM-1261-01
Page 51

Appendix
C
CIRCUIT CARD PREVENTIVE MEASURES
This appendix describes the preventive measures that should be observed for the following:
• Handling and storing of circuit cards.
• Installing/replacing circuit cards sensitive to static electricity.
HANDLING CIRCUIT CARDS
Damage to circuit cards, particularly those that are sensitive to st atic electricity, may occur at any time. Follow these
safeguards when handling circuit cards.
• Avoid dropping a circuit card.
• Hold circuit card by ejector tabs or card edges; avoid handling components or the connector pins.
• Avoid unnecessary removal and insertion of circuit cards. Contact life is reduced by repeated removals and
insertions.
• Avoid touching circuit card contacts. Handling leaves dirt and grease, causing unit failure and reduced contact
life.
• Wear a properly grounded antistatic discharge strap when handling circuit cards that are sensitive to static
electricity. This strap consists of an expandable wrist strap and grounding cord; its function is to rapidly dissipate charges to ground.
• Periodically check the resistance value of the antistatic discharge wrist strap. The resistance measurement
should be between 1 and 10 Mohms.
Note: Alternate grounding methods can be used; for example, conductive carpet, conductive shoes, or heel
grounders.
STORING CIRCUIT CARDS
Spare circuit cards must be left in the original shipping container until required. To prevent damage to circuit cards
while they are in storage, the following necessary precautions must be observed:
• Store circuit card in a dust-free environment. Dust particles will scratch the circuit card contacts when inserted
in a connector.
• Sto re circuit card in a dry en vironment at room temperature. Excessive heat will cause the circuit card to warp.
• Place circuit card in shipping container (if available) after removal. Otherwise, carefully place circuit card in a
static-shielding protective bag.
INSTALLATI ON/REPLACEMENT
To prevent electrostatic damage, the following conditions apply during the installation/replacement of circuit cards
that are sensitive to static electricity:
• All circuit cards must be enclosed in static-shielding protective bags for transport ation to and from the location.
• Upon installation/replacement, installers must wear a properly grounded antistatic discharge wrist strap.
Note: Whenever possible use the original static- shielding bag, padding, and box in which the circuit card
was received. If the original material was lost, use suit able packing.
LTPH-UM-1261-01 C-1
Page 52

Appendix C: Circuit Card Preventive Measures December 20, 2004
Circuit Card Ejector T a b or Built-in Thumb Hold
Most circuit cards have an ejector tab that is used to assist the installer in inserting and removing each circuit card.
These ejector tabs are typically located at either the top or bottom of the circuit card. Other types of cir cuit cards
have a built-in thumb hold for gripping the card. Follow the procedure given to remove and insert a circuit card.
Removing Circuit Card
DANGER
Contacting circuit card components or traces can result in an electrical shock even after removal
from the shelf.
Wear properly grounded anti-static wrist-straps when removing a circuit card. At all other times
ATTENTION
(shipping, storage, and so on) keep the circuit cards in their protective bags.
Step Action
1 Remove any front-panel cables from the circuit card.
Note: Note the positions of all cables and slots each circuit car d resides in for later replacement.
2 Grasp the circuit card at the top or bottom ejector tab or the built-in thumb hold and pull forward to release
it from its connection. A slight amount of force may be required to unseat the circuit card.
Inserting Circuit Card
Wear properly grounded anti-static wrist-straps when inserting a circuit card. At all other times
ATTENTION
(shipping, storage, and so on) keep the circuit cards in their protective bags.
Step Action
1 Holding the circuit card by its ejector tab or built-in thumb hold, insert into the shelf housing. Ensure that
the circuit card connection is firmly seated.
2 Attach any front-panel cables to the circuit card.
Note: To prevent confusion, it is sometimes important for the installer to note in which slot each circuit card
resides and in which connector each cable resides.
C-2 LTPH-UM-1261-01
Page 53

Appendix
SPECIFICATIONS
Power Requirements
CO Battery Voltage -48 Vdc nominal (-42.5 Vdc to -56.5 Vdc)
Fuse
Compliance
NEBS GR-63-CORE, Issue 2
Safety UL/cUL 60950-1
EMC EN 300 386-2 V1.1.3:December 1997
Physical
Dimensions (HxWxD) 5.22 in. x 19 in. x 12 in. (13.3 cm x 48.3 cm x 30.5 cm), without
Weight 17 lb. (7.7 kg)
Capacity 1 HMU Management Module and 22 HLU Modules
Maximum 15 A
GR-1089-CORE, Issue 3
SR-3580, Level 3
UL/cUL 60950-21
EN 60950-1:2001
EN 60950-21:2003
mounting brackets
a
D
or
22 ELU Modules
or
11 LPS-300C Power Modules
Mounting 3190-type mechanics
Operational Environment
Temperature -40°F to +149°F (-40°C to +65°C)
Humidity 5% to 95% (non-condensing)
Altitude 200 ft below sea level to 13,000 ft above sea level
(-60 m below seal level to 4,000 m above see level)
Storage Environment
Temperature -40°F to +185°F (-40°C to +85°C)
Humidity 5% to 95% (non-condensing)
LTPH-UM-1261-01 D-1
Page 54

Appendix D: Specifications December 20, 2004
Accessories Supplied
Brackets (attached at factory) for mounting in either
19-inch (48.3 cm) or 23-inch (58.4 cm) bays
Brackets for mounting in ETSI rack
Accessories Available
Extender Bracket Kit: available in three colors: EB-52, gray;
EB-52B, black; EB-52P, putty).
a.If fuse size and wire gauge requirements are not specific, follow local practices for determining your fuse and wire gauge size.
D-2 LTPH-UM-1261-01
Page 55

Appendix
E
PRODUCT SUPPORT
ADC Customer Service Group provides expert pre-sales support and training for all of its products. Technical
support is available 24 hours a day, 7 days a week by contacting the ADC Technical Assistance Center.
Sales Assistance: 800.366.3891 Quotation Proposals, Ordering and Delivery General,
and Product Information
Systems Integration: 800.366.3891 Complete Solutions (from concept to installation),
Network Design and Integration Testing, System TurnUp and Testing, Network Monitoring (upstream or
downstream), Power Monitoring and Remo te
Surveillance, Service/Maintenance Agreements, and
Systems Operation
ADC Technical Assistance Center:
800.366.3891
Email: wsd.support@adc.com
Online Technical Support: www.adc.com/Knowledge_Base/index.jsp
Online Technical Publications: www.adc.com/documentationlibrary/
Product Return Department: 800.366.3891
Email: repair.return@adc.com
Technical Information, System/Network Configuration,
Product Specification and Application, Training
(product-specific), Installation and Operation
Assistance, and Troubleshooting and Repair/Field
Assistance
technicalpublications/
ADC Return Material Authorization (RMA) number and
instructions must be obtained before returning products.
LTPH-UM-1261-01 E-1
Page 56

Appendix E: Product Support December 20, 2004
E-2 LTPH-UM-1261-01
Page 57

GLOSSARY
A
ACO – Alarm Cutoff
AUD – Audible (alarm)
AUX – Auxiliary port
AWG – American Wire Gauge
C
CLEI – Common Language Equipment Interface
CO – Central Office
COM – Common
CRIT – Critical (alarm)
D
DSL – Digital Subscriber Loop
DSX-1 – DS-1 Cross-connect frame
E
E1 – 2.048 Mbps data rate (Eur opean T-1)
EIA – Electronic Industries Alliance
ELU – E1 HiGain Line Unit
ESD – Electrostatic Discharge
ETSI – European Telecommunications Standard Institute
F
FCC – Federal Communications Commission
FGND – Frame Ground
G
G.SHDSL – Single-pair High-speed Digital Subscriber Line
G.703 – ITU-T Recommendation for physical/electrical characteristics of hierarchical digital interfaces.
H
HCDS – High Capacity Digital Service
HCP – HiGain Connector Panel
HDSL – High-bit-rate Digital Subscriber Line
HLU – HiGain Line Unit
HMS – HiGain Management Shelf
HMU – HiGain Management Unit
M
MAJ – Major (alarm)
MIN – Minor (alarm)
MOP – Method of Procedure
N
NC – Normally Closed
NEBS – Network Equipment Building System
NO – Normally Open
LTPH-UM-1261-01 GL-1
Page 58

Glossary December 20, 2004
O
OS port – Operator Services port
P
PIC – Plastic Insulated Conductor
R
RCV – Receive
RMA – Return Material Authorization
RX – Receive
S
SYS ID – System Identifier (alarm)
T
T1 – 1.544 Mbps data rate (North American)
V
VIS – Visible (alarm)
W
WECO – Western Electric Company (now AT&T Telecommunications)
X
XMT – Transmit
GL-2 LTPH-UM-1261-01
Page 59

Certification and Warranty
FCC Class A Compliance
This equipment has been tested and found to comply with the limit s for a Class A digit al device, pursuant to Part 15
of the FCC Rules. These limits are designed to provide reasonable protection against harmful interference when
the equipment is operated in a commercial environment. This equipment generates, uses, and can radiate radio
frequency energy and, if not installed and used in accordance with the instruction manual, ma y cause harmful inte rference to radio communications. Operation of this equipment in a residential area is likely to cause harmful interference in which case the user will be required to correct the interference at his own expense.
Limited Warranty
Product warranty is determined by your service agreement. Refer to the ADC Warranty/Software Handbook for
additional information, or contact your sales representative or Customer Service for details.
Modifications
The FCC requires the user to be notified that any changes or modifications made to this device that are not
expressly approved by ADC voids the user’s warranty.
All wiring external to the products should follo w the provisio ns of the curren t editio n of the National Electrica l Code.
Safety Standards Compliance
This equipment has been tested and verified to comply with the applicable sections of the following safety standards:
• GR 63-CORE - Network Equipment-Building System (NEBS) Requirements
• GR 1089-CORE - Electromagnetic Compatibility and Electrical Safety
• Binational Standard, UL-60950 3rd Edition/CSA1459 C22.2 No. 60950-00: Safety of Information Technology
Equipment
For technical assistance, refer to “Appendix E: Product Support” on page E-1.
Page 60

World Headquarters
ADC Telec ommunications, Inc.
PO Box 1101
Minneapolis, MN 55440-1101 USA
For Technical Assistance
Tel: 800.366.3891
HiGain® Managed Shelf
19-inch, 3190 Mechanic, 22-Slot Managed CO
Shelf (HMS-318 List 3)
User Manual
T1MF2S04RA
CLEI:
Product Catalog:
Document Number:
´,w$¶0^¨
1287040
HMS-318 List 3
LTPH-UM-1261-01
 Loading...