

Page 1
USER MANUAL
Soneplex
DS3 Loop Extender (D3LX) CO Module
Product: D3LXC-FCA100, D3L XC-SCA100
CLEI Code: SOCPG2GB, SOCPG2KB
Soneplex
DS3 Loop Extender (D3LX) RMT Module
Product: D3LXR-FCA100, D3LXR-SCA100
CLEI Code: SOCPG2HB, SOCPG2JB
Page 2

LTPS-UM-8013-03
Revision History of This Manual
To order copies of this document, use document catalog number LTPS-UM-8013-03.
Issue Release Date Revisions Made
1 January 11, 2002 Initial release
2 March 21, 2002 Updated BNC cable/cabling instructions
3 August 30, 2002 Updated BNC Tip and Ring illustration
Related Documentation
Soneplex Remote Terminal Enclosure Installation Manual ADCP-61-704
Soneplex Two-Position D3LX Remote Chassis Installation Instructions LTPS-AD-8029-xx
Soneplex Four-Position Remote Terminal Cabinet Installation Addendum for D3LX Systems LTPS-AD-8030-xx
Soneplex QLX/WQLXR and Four-Position Remote Terminal Cabinet Description Manual ADCP-61-151
Soneplex System Installation Manual LTPS-UM-8010-xx
Soneplex Loop Extender System Operation and Maintenance Manual ADCP-61-494
Soneplex TL1 Interface Specification for D3LX-Based Systems LTPS-UM-8027-xx
Soneplex D3LX Remote Craft Access Module (D3RCAM) User Manual LTPS-UM-8017-xx
Copyright
August 30, 2002
© 2002 ADC DSL Systems, Inc. All rights reserved.
Trademark Information
ADC and Soneplex are registered trademarks of ADC Telecommunications, Inc. No right, license, or interest to such trademarks is
granted hereunder, and you agree that no such righ t, license, or interest shall be asserted by you with re spect to such trademark.
Other product names mentioned in this manual are used for identification purposes only and may be trademarks or registered
trademarks of their respective companies.
Disclaimer of Liability
Information contained in this do cume nt is compan y private to ADC DSL Systems, Inc., and shall not be modified, used, copied,
reproduced or discl osed in whole or in part without the written consent of AD C.
Contents herein are curr ent as of th e date of publi catio n. ADC re serv es the right to ch ange the cont ents wi tho ut prio r no tice. In no
event shall ADC be liable for any d amages resulti ng from l oss of da ta, loss of us e, or los s of prof its, and ADC furthe r discl aims any
and all liability for indirect, incidental, special, consequential or other similar damages. This disclaimer of liability applies to all
products, publications and services during and after the warranty period.
ii August 30, 2002 D3LX CO and RMT Modules
Page 3
LTPS-UM-8013-03 Using This Manual
USING THIS MANUAL
The following conventions are used in this manual:
• Monospace type indicates screen text.
• Keys you press are indicated by small icons such as or . Key combinations to be pressed
simultaneously are indicated with a plus sign as follows: + .
Y ENTER
CTRL ESC
• Items you select are in bold.
• Three types of messages, identified by icons, appear in text.
Notes contain information about special circumstances.
Cautions indicate the possibility of personal injury or equipment damage.
The Electrostatic Discharge (ESD) symbol indicate s that a device or as sembly is susc eptible to
damage from electrostatic discharge.
INSPECTING SHIPMENT
Upon receipt of the equipment:
• Unpack each container and inspect the contents for signs of damage. If the equipment has been damaged in
transit, immediately report the extent of damage to the transportation company and to ADC DSL Systems,
Inc. Order replacement equipment, if necessary.
• Check the packing list to ensure complete and accurate s hipmen t of each listed item. If the shipment is short
or irregular, contact ADC DSL Systems, Inc. as described in “Appendix C - Pr odu ct Su pport ” on page41. If
you must store the equipment for a prolonged period, store the equipment in its original container.
D3LX CO and RMT Modules August 30, 2002 iii
Page 4

Inspecting Shipment LTPS-UM-8013-0 3
iv August 30, 2002 D3LX CO and RMT Modules
Page 5

LTPS-UM-8013-03 Table of Contents
TABLE OF CONTENTS
Overview ____________________________________________________________________________ 1
Front-Panel Description________________________________________________________________ 3
Protection Switching..........................................................................................................................4
Automatic Switching...........................................................................................................5
Manual Switching................................................................................................................5
Applications.......................................................................................................................................5
Preparing to Install D3LX Modules______________________________________________________ 6
Installing the BNC Panel _______________________________________________________________ 7
Overview............................................................................................................................................7
Installation of the Panel......................................................................................................................7
Installing a D3LX CO Module in an LEC _________________________________________________ 9
Power Verification................... ..... ...... ...... .................................. ..... ...... ..........................................12
Verification of Electrical DS3 Power Level......................................................................12
Verification of D3LX CO Optical Power..........................................................................13
Installing a D3LX RMT Module in a Remote Cabinet______________________________________ 14
Four-Position Remote Terminal Cabinet Installation......................................................................14
Two-Position QLX Remote BNC Chassis Installation....................................................................16
Power Verification................... ..... ...... ...... .................................. ..... ...... ..........................................16
Verification of Electrical DS3 Power Level......................................................................16
Verification of Optical Power............................................................................................17
Provisioning_________________________________________________________________________ 18
Manual .............................................................................................................................................18
Automatic.........................................................................................................................................18
Other Provisioning Considerations..................................................................................................19
Alarm Setting During Provisioning...................................................................................19
D3 Remote Craft Access Module (D3RCAM) Option .....................................................19
Setting Up System Options ____________________________________________________________ 19
Connecting a Maintenance Terminal to the SCU Craft Port ...........................................................19
Connecting a Maintenance Terminal to the D3RCAM Craft Port...................................................20
Navigating Through Craft Interface Menus...................................................... ...... ..... ....................22
Local Configuration__________________________________________________________________ 23
Configuring the D3LX System Through the SCU...........................................................................23
Configuring D3LX Alarms..............................................................................................................25
Setting Alarm Levels.........................................................................................................25
Displaying D3LX Status..................................................................................................................27
Viewing Loopback Status and Performing Loopback Commands..................................................28
D3LX CO and RMT Modules August 30, 2002 v
Page 6

Table of Contents LTPS-UM-8013-0 3
Performance Monitoring ................................................................................................................. 29
Performing System Maintenance .................................................................................................... 30
Logging Off..................................................................................................................................... 31
Removing D3LX Modules.............................................................................................................. 32
Remote Configuration _________________ ___ _________________ __ ___ _________________ ___ __33
D3RCAM Menu..............................................................................................................................34
Unit Configuration...........................................................................................................................34
Troubleshooting _____________________________________________________________________36
Appendix A - Specifications____________________________________________________________ 37
D3LX Card-Edge Connector............................. .................................. ...... ..... .................................38
Appendix B - Cleaning and Mating Fiber-Optic Systems____________________________________39
Cleaning...........................................................................................................................................39
Mating.............................................................................................................................................. 40
Appendix C - Product Support _________________________________________________________41
Appendix D - Abbreviations ___________________________________________________________ 42
Certification and Warranty _____________________________________________ Inside Back Cover
vi August 30, 2002 D3LX CO and RMT Modules
Page 7

LTPS-UM-8013-03 List of Figures
LIST OF FIGURES
1. D3LX CO and D3LX RMT Modules.............................................................................................................1
2. System Overview............................................................................................................................................2
3. D3LX CO Front Panel....................................................................................................................................3
4. Mounting the BNC Panel and Connecting ADC Adapter Cables (LEC Shown)...........................................8
5. Routing the Fiber Patch Cord....................................................................................................................... 10
6. D3LX Module Locations in Loop Extender Chassis....................................................................................11
7. Installing the D3LX CO ...............................................................................................................................12
8. Routing the Fiber Through a Four-Position Remote Terminal Cabinet.......................................................14
9. D3LX RMT Module Locations in a Four-Position Remote Terminal Cabinet............................................15
10. D3LX RMT Module Locations in a Two-Position QLX Remote BNC Chassis......................................... 16
11. Connecting a Maintenance Terminal to the SCU.........................................................................................20
12. Connecting a Maintenance Terminal to the D3RCAM................................................................................21
13. D3LX Configuration Screen.........................................................................................................................23
14. D3LX Alarm Setting Menu..........................................................................................................................26
15. Display D3LX Status....................................................................................................................................27
16. Loopback Status and Commands .................................................................................................................28
17. Performance Monitoring Menu–DS3/E3 PM Configuration Shown...........................................................29
18. System Maintenance–Trouble Isolation Screen Shown...............................................................................31
19. Removing a D3LX Module–D3LX CO Shown...........................................................................................32
20. D3RCAM Craft Interface Main Menu ................................................................................ ..... ...... . .............33
21. D3RCAM Menu Tree...................................... ...... ..... .................................................................................. 34
22. Unit Configuration Screen...................................................... ......................................................................34
23. D3LX Card-Edge Connector........................................................................................................................38
24. Cleaning Materials........................................................................................................................................39
D3LX CO and RMT Modules August 30, 2002 vii
Page 8

List of Tables LTPS-UM-8013-03
LIST OF TABLES
1. D3LX Front-Panel Description and Status LEDs..........................................................................................4
2. Tip and Ring Assignments for Protection Switching Applications ...............................................................8
3. Chassis Port Description .............................................................................................................................. 19
4. Navigational Keys for the Craft Interface Screens During Telnet Sessions................................................22
5. D3LX CO Configuration Fields–SCU V3.7 or later.................................................................................... 24
6. D3LX Alarm Level Defaults........................................................................................................................ 26
7. Un it Configu ration Fields–D3RCAM Version 1.0 or later..........................................................................35
8. Troubleshooting ...........................................................................................................................................36
9. D3LX Module Specifications....................................................................................................................... 37
viii August 30, 2002 D3LX CO and RMT Modules
Page 9
LTPS-UM-8013-03 Overview
OVERVIEW
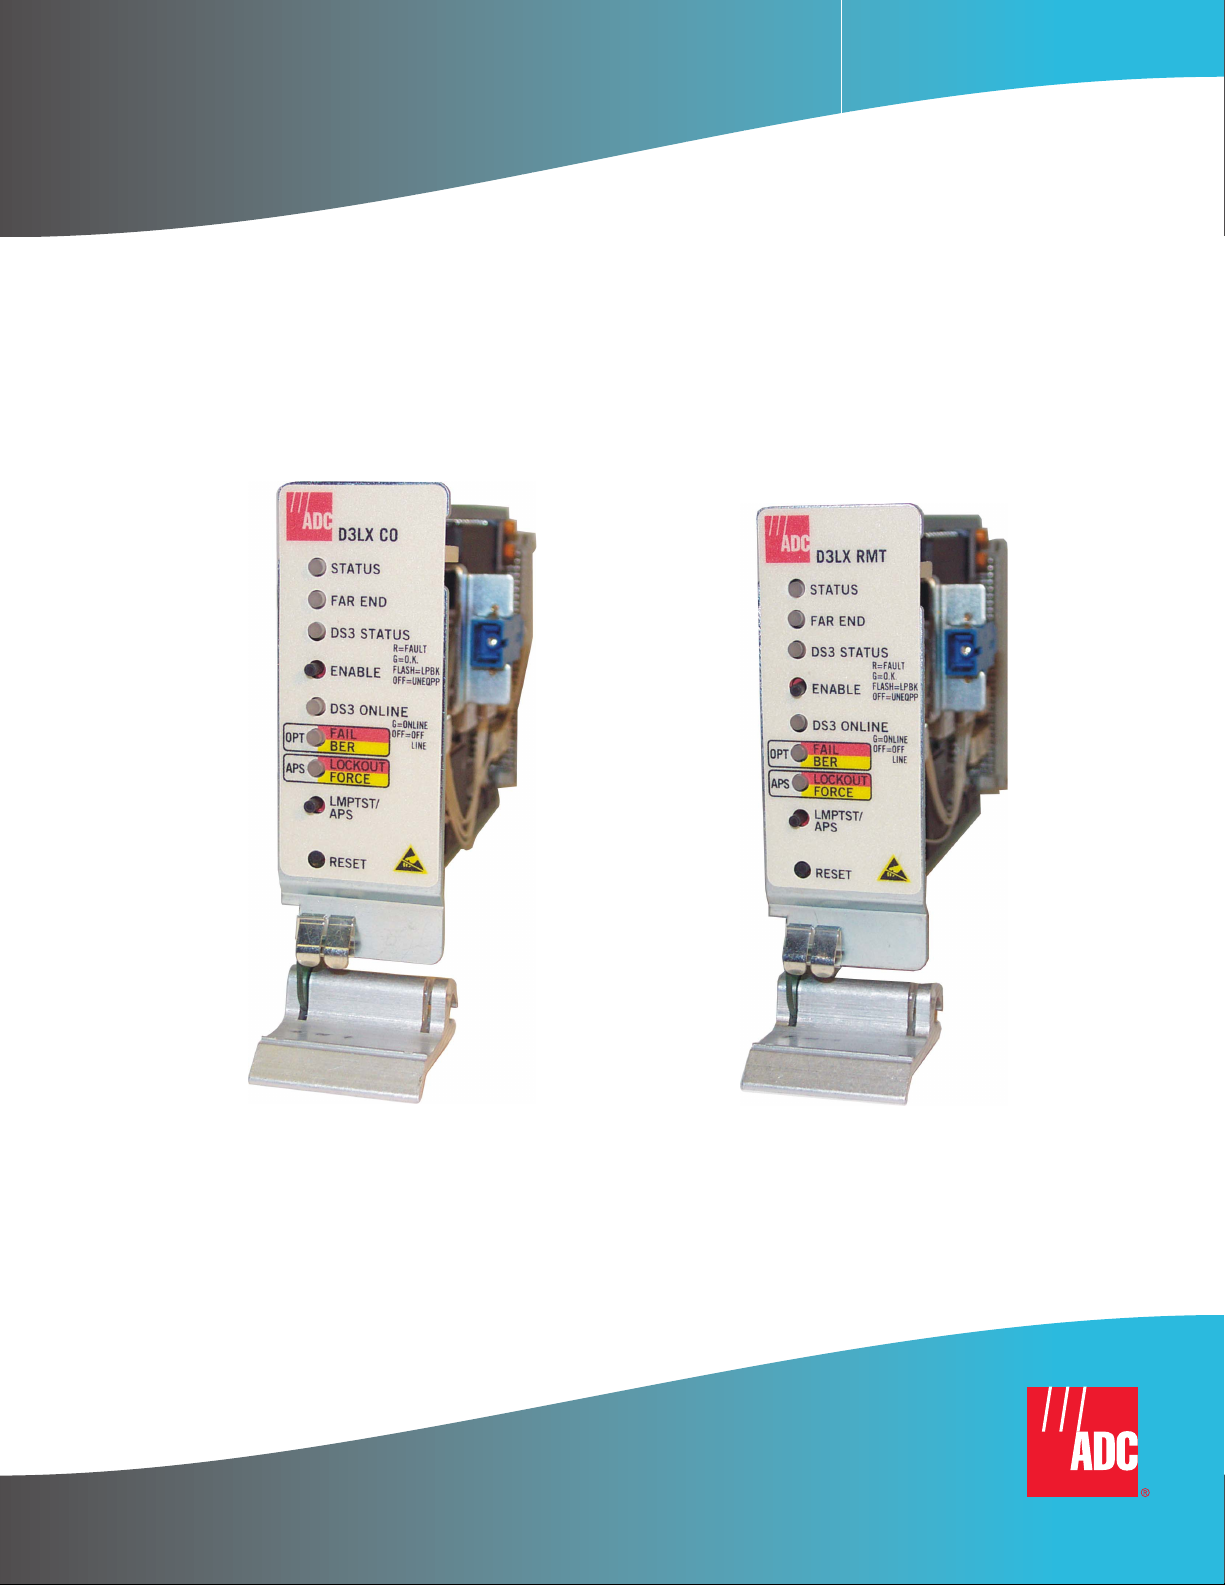
The Soneplex® DS3 Loop Extender
(D3LX) modules sho wn in Figure 1 are a pair of fiber-optic units that provide
DS3 service. The D3LX CO resides at the Central Office (CO) site, and the D3 LX RMT reside s at th e Custom er
Premises Equipment (CPE) or remote site.
D3LX
STATUS
FAR END
DS3 STATUS
ENABLE
DS3 ONLINE
C
O
D3LX
STATUS
FAR END
DS3 STATUS
ENABLE
DS3 ONLINE
R
M
T
Figure 1. D3LX CO and D3LX RMT Modules
The D3LX CO module occupies two card slots in a local, Soneplex Loop Extender Chassis (LEC). The D3LX
RMT module occupies two card slots in a Four-Position Remote Terminal Cabinet, or Two-Position QLX Remote
BNC Chassis. A D3LX Remote Craft Access Module (D3RCAM) may also installed to provide maintenance
terminal access at the remote site. For more information on the D3RCAM, refer to LTPS-UM-8017-xx, the
Four-Position Remote Terminal Cabinet, refer to ADCP-61-151, or the Two-Position QLX Remote BNC Chassis,
refer to LTPS-UM-8029-xx.
The D3LX modules are part of a system that converts a metallic DS3 circuit at the CO site into a DS3 optical signal
that uses Wavelength Division Multiplexing (WDM) to transmit a signal across one single-mode fiber to a D3LX
RMT via a D3LX LTU at the CPE site. The D3LX RMT mo dule converts the optical sign al back into an electrical
DS3 and transmits the signal back to the D3LX CO residing in the LEC as shown in Figure 2 on page 2.
The D3LX modules perform the following functions:
• Exchange status, alarm, and protection switching information.
• Perform bit error rate monitoring of the optical link.
• Monitor the optical input for Loss-Of-Signal (LOS) and Loss-Of-Frame (LOF).
• Monitor the laser bias for degradation.
• Retrieve remote module status.
• Provide 1+1 Protect mode (line protection).
D3LX CO and RMT Modules August 30, 2002 1
Page 10
Overview LTPS-UM-8013-03
CO - Local
DS3 out
(transmit)
2 3 4 5 6 7 56 4 3 2 1
1
DS3 out
DS3 in
(receive)
DS3 in and out
D3LX CO
STATUS
FAR END
DS3 STATUS
R=FAULT
G=O.K.
FLASH=LBK
ENABLE
OFF=UNEQPP
DS3 ONLINE
G=ONLINE
OFF=OFFLINE
FAIL
OPT
BER
LOCKOUT
APS
FORCE
LMPTST/
APS
RESET
D3LX CO
15
BNC panel - front
Loop Extender - front
21
T
R
T1
R1
19 18 17 16 1520 21 2016 17 18 19
BNC panel - rear
PORT 2 DTE RS-232
2-4
2-3
T
T
L1
L1
L1
R
R
T1
T1
L2
L2
L2
R1
R1
T
T
R
R
T1
T1
R1
R1
PORT 3 DTE RS-232
2-2
2-1
1-4
T
T
L1
R
R
T1
T1
L2
R1
R1
T
T
R
R
T1
T1
R1
R1
1-3
T
T
L1
L1
L1
R
R
T1
T1
L2
T1
L2
L2
R1
R1
R1
T
T
R
R
T1
T1
T1
R1
R1
R1
Loop Extender - rear
DS3 in
1-2
T
L1
R
L2
T
R
ADC
adapter
cables
SHIELD GND
FRAME GND
1-1
T
R
T1
R1
T
R
T1
R1
–48V
RTN
A
B
A
B
DS3 in and out
POWER
CPE - Remote
DS3 out
(transmit)
1-1
AC/DC
AC/DC
POWER
D3LX RMT
STATUS
FAR END
DS3 STATUS
R=FAULT
G=O.K.
FLASH=LBK
ENABLE
OFF=UNEQPP
DS3 ONLINE
G=ONLINE
OFF=OFFLINE
FAIL
OPT
BER
LOCKOUT
APS
FORCE
LMPTST/
APS
RESET
D3LX RMT
D3RCAM
STATUS
C
R
A
F
T
RESET
D3RCAM
TX RX
1-3
TX RX
2-1
TX RX
2-3
TX RX
D3LX LTU
jack block
DS3 in
(receive)
Four-Position Remote Cabinet - front
Figure 2. System Overview
2 August 30 , 20 02 D3LX CO and RMT Modules
Page 11
LTPS-UM-8013-03 Front-Panel Description
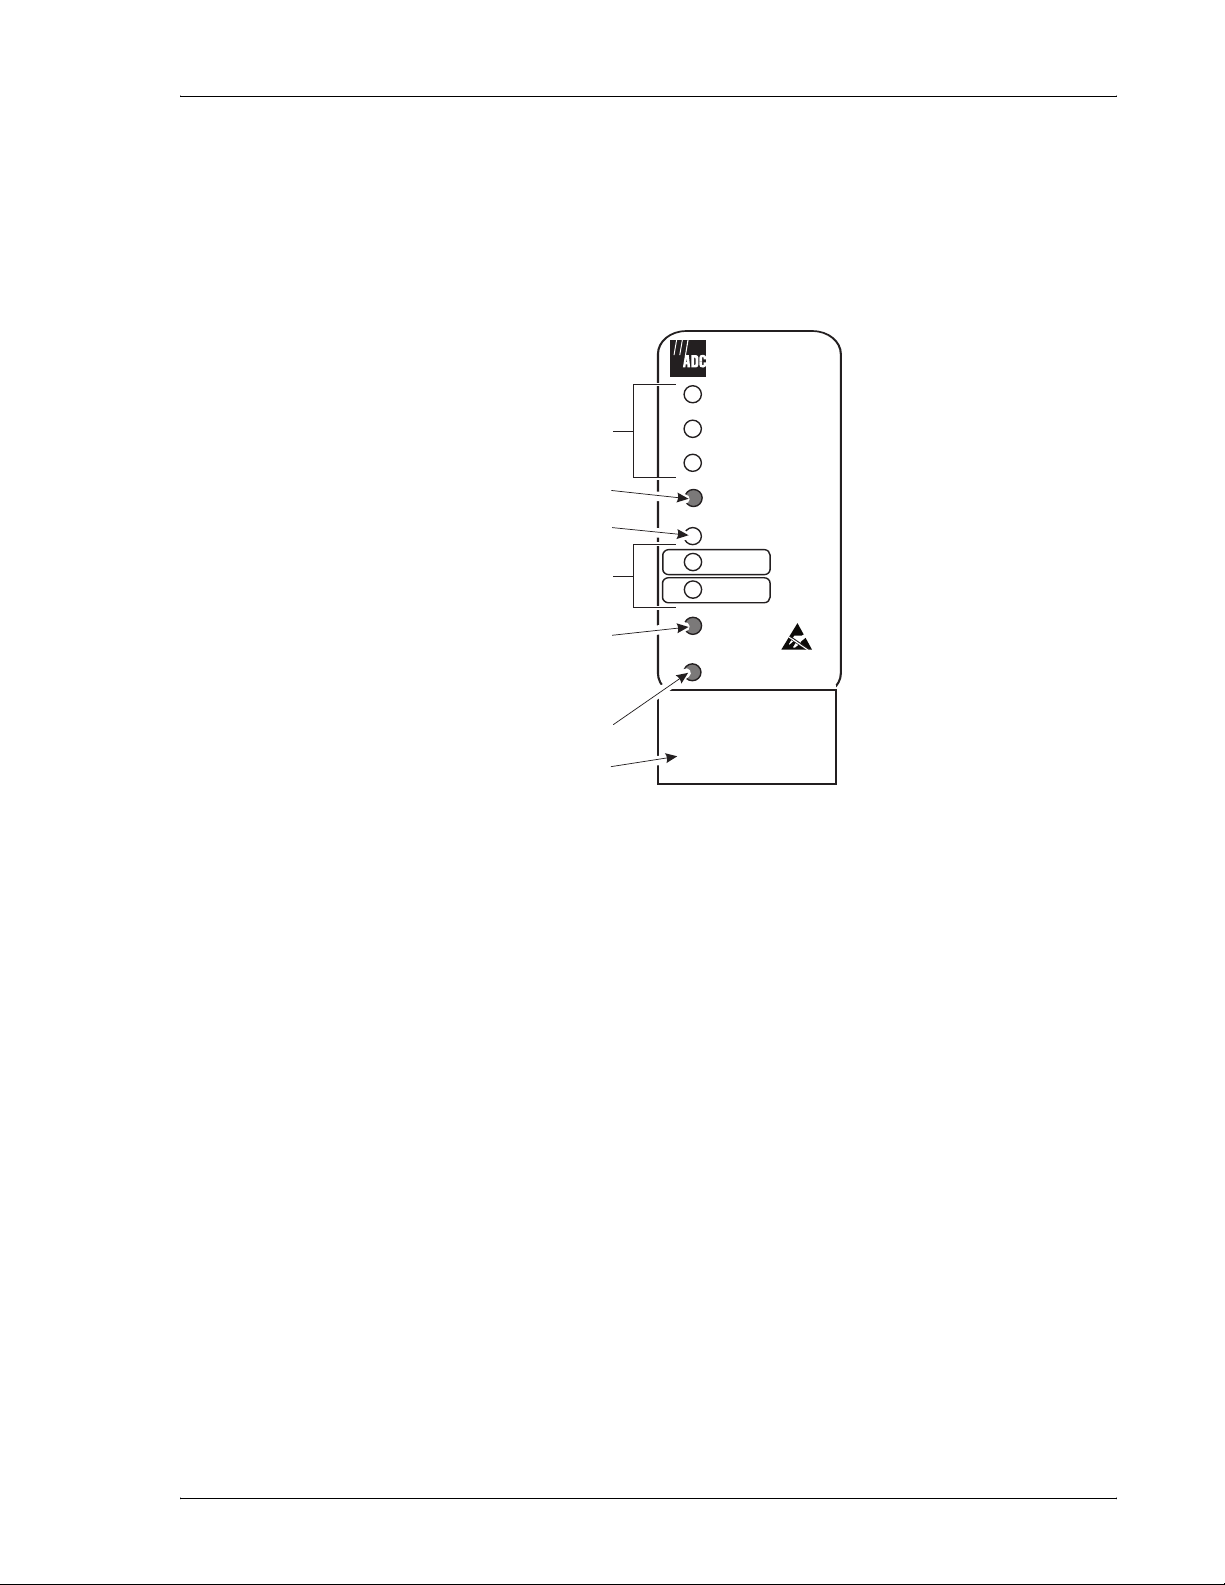
FRONT-PANEL DESCRIPTION
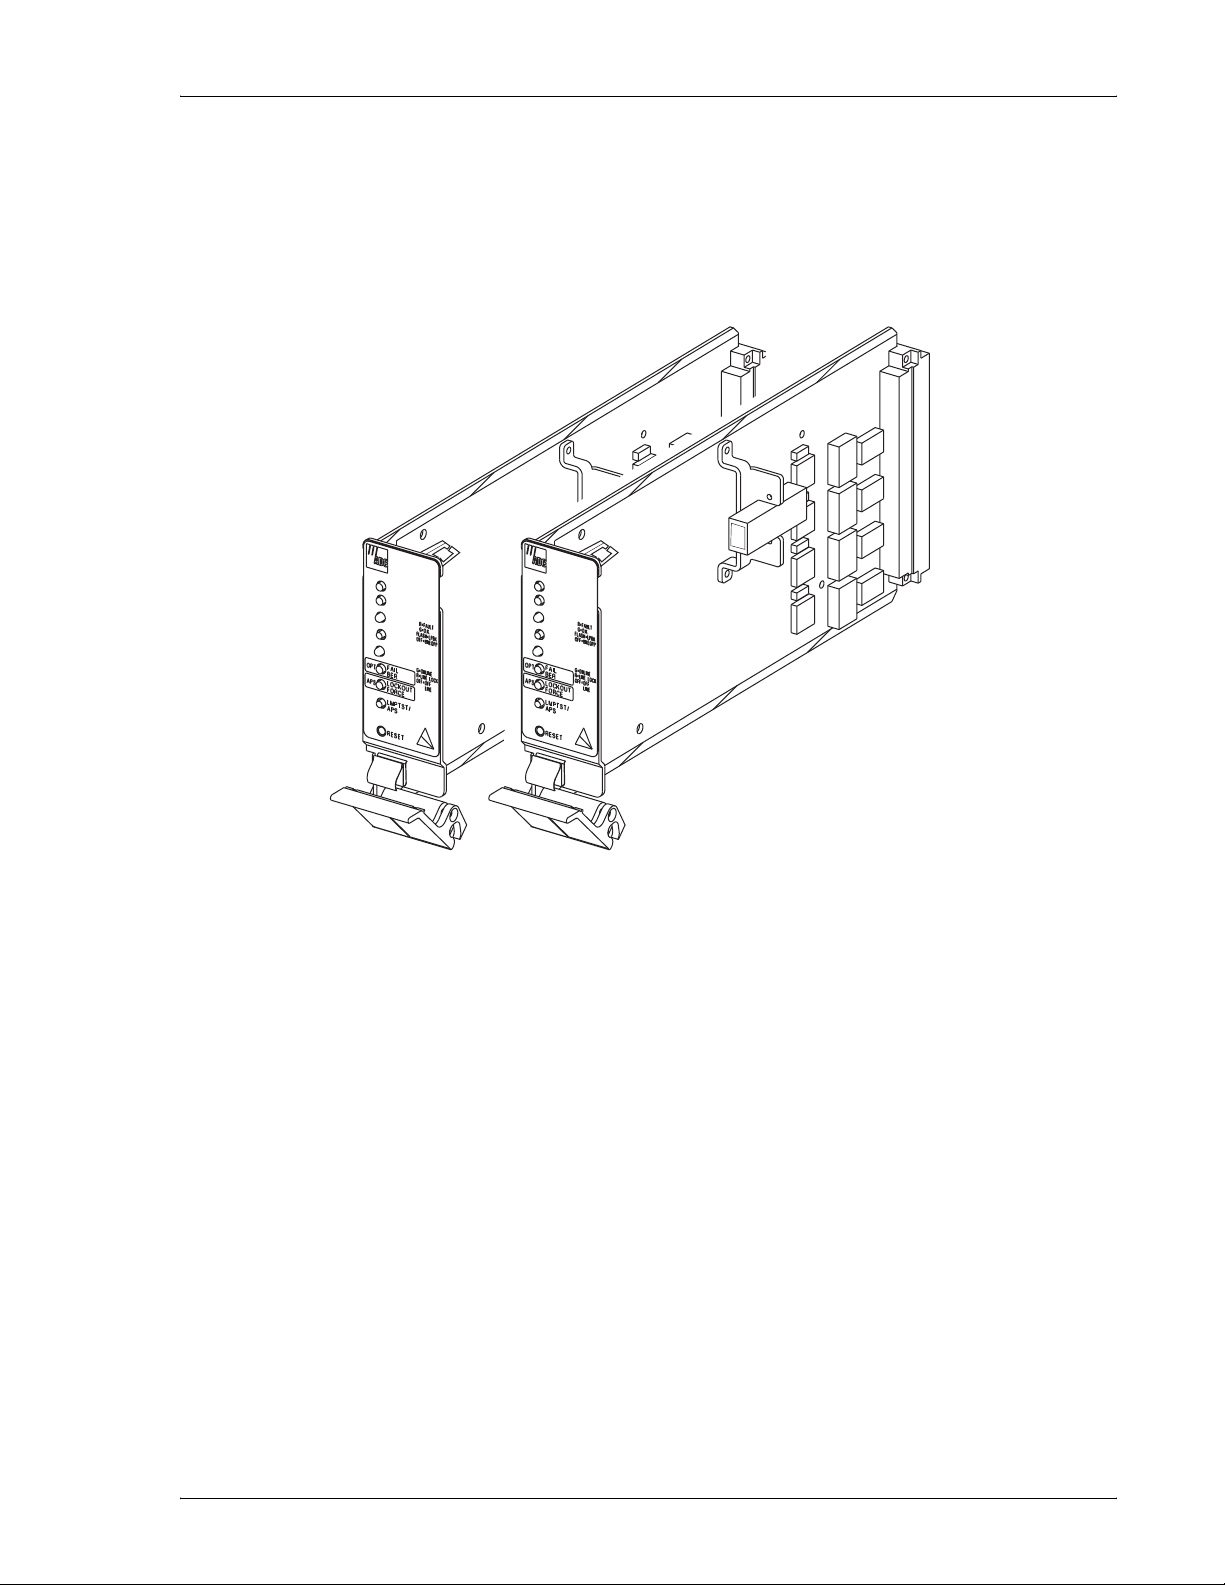
Figure 3 shows the D3LX CO front panel. Table 1 on page 4 describes the LEDs and other front-panel
components. For pinout diagrams of the D3LX card-edge connector, refer to “D3LX Card-Edge Connector” on
page 38.
D3LX CO
STATUS
Status LEDs
Enable pushbutton
Online status LED
Fiber-optic
status LEDs
OPT
APS
Lamp test force/
Automatic protection
switching pushbutton
Reset pushbutton
Retaining latch
Figure 3. D3LX CO Front Panel
FAR END
DS3 STATUS
ENABLE
DS3 ONLINE
FAIL
BER
LOCKOUT
FORCE
LMPTST/
APS
RESET
R=FAULT
G=O.K.
FLASH=LBK
OFF=UNEQPP
G=ONLINE
OFF=OFFLINE
D3LX CO and RMT Modules August 30, 2002 3
Page 12

Front-Panel Description LTPS-UM-8013-0 3
Table 1. D3LX Front-Panel Description and Status LEDs
Name Function
LEDs The LEDs can report the following conditions:
Activity Color Status
STATUS Off Not lit Blown fuse
On (solid) Green Normal operation.
On (solid) Yellow Module initializing or performing self test diagnostics or LED test.
On (solid) Red Module fault detected.
FAR END Off Not lit Remote alarms inactive (no alarm).
On (solid) Yellow Remote alarm on D3LX CO.
DS3 STATUS Off Not lit Unequipped.
On (solid) Green DS3 active.
On (flashing) Green DS3 in loopback, output AIS.
On (solid) Red DS3 fault (LOS).
On (flashing) Red DS3 in loopback, output AIS.
DS3 ONLINE Off Not lit DS3 offline.
On (solid) Green DS3 active.
OPT Off Not lit Optical link active (normal operation).
On (solid) Yellow BER fault.
On (solid) Red Optical link failure (OOF)
APS Off Not lit No protection switching (normal operation).
On (solid) Yellow Force manual protection enabled.
On (solid) Red Protection switching limit.
ENABLE
pushbutton
LMPTST/APS
pushbutton
RESET
pushbutton
Retaining latch Secures the D3LX when it is firmly seated in the backplane of the chassis and the latch is in the upright position
Pressed with APS In a protected system, the active DS3 are force switched to that module.
Note: The ENABLE pushbutton is pressed first and released last.
Pressed with RESET Cold start reset (service affecting).
Note: The ENABLE pushbutton is pressed first and released last.
Pressed Lights front-panel LEDs yellow, except for STATUS and DS3 STATUS which light red.
Pressed with ENABLE In a protected system, the active DS3 are force switched to that module.
Note: The ENABLE pushbutton is pressed first and released last.
Pressed Warm start reset (non-service affecting).
Pressed with ENABLE Cold start reset (service affecting).
Note: The ENABLE pushbutton is pressed first and released last.
PROTECTION SWITCHING
The D3LX system may be configured for either protected or non-protected mode. For protected mode, two
modules are installed: working and protect. The working module carries the signal, while the protect module is in
standby. Each working module uses 1 group, physically occupying 2 slots. Each protected module occupies an
additional 2 slots; there are four slots required for each D3LX system.
In protected mode, the offline module is switched into service whenever the D3LX determines that a service fault
has occurred in the online module.
4 August 30 , 20 02 D3LX CO and RMT Modules
Page 13

LTPS-UM-8013-03 Front-Panel Description
Automatic Switching
The 1:1 (Line) Protect mode transmits identical traffic across two parallel systems. The working and protect D3LX
modules provide Automatic Protection Switching (APS) compatible with the rem ote D3LX module. APS is
non-revertive and bidirectional and may be forced or disabled through the front-panel pushbuttons or the SCU
software.
Service is automatically switched from the online D3LX module to the offline module when one or more of the
following events occur:
• Offline module detects a failure in the online module.
• Online module detects an optical failure. (LOS, LOF, or BER threshold is exceeded.)
APS is completed within 50 msec of the initiation of a switch. After the occurrence of three automatic switches
within a 24-hour period, APS is locked out. APS may be enabled again through the front panel interface or the
craft interface.
APS to the offline module can be disabled. To do this, simultaneously press the LMPTST/APS and ENABLE
pushbuttons on the online module’s front panel. APS can be restored by pressing both pushbuttons a second time.
BER Monitoring
The optical link is continuously monitored for bit errors. If the bit errors exceed a predetermined threshold, and
the D3LX is configured for protection, protection switching occurs and an alarm is indicated. The optical alarm
is indicated when the threshold exceeds 10
between 10
-4
and 10
-10
(default is 10-6).
-6
to 10
-10
(default is 10-8). The optical switch threshold may be set
Manual Switching
Service can be manually switched from the online D3LX module to the offline module by simultaneously pressing
the LMPTST/APS and ENABLE pushbuttons located on the offline module’s front panel. This disables the APS
causing the APS LED to turn yellow. The ONLINE LED of the new online module (formerly the protect module)
turns green, indicating a successful transfer of service. The ONLINE LED of the new offline module (formerly
the working module) is not lit, indicating it is in standby mode and not carrying the DS3 service.
APPLICATIONS
D3LX modules can be used in a number of solutions:
• Switched Multimegabit Data Service (SMDS) Applications—D3LX modules support th e tr ans mi ssion of
SMDS service through the network.
• Private Line Interconnect Applications—D3LX modules provide private point-to-point LAN interconnect
services through the use of the D3LX.
• DS3 Video Distance Learning Applications—D3LX modules provide high quality video signal transmission
that is the most cost-effective solution for DS3 video transport.
• DS3 Asynchronous Transport Mode (ATM) Applications—D3L X modules provide high spe ed ATM
services using D3LX at a fraction of the cost of an OC-3 multiplexer.
D3LX CO and RMT Modules August 30, 2002 5
Page 14

Preparing to Install D3LX Modules LTPS-UM-8013-03
PREPARING TO INSTALL D3LX MODULES
Prior to installing D3LX modules in chassis confirm that:
• chassis are installed for each module (an LEC for the D3LX CO and a Four-Position Remote Terminal
Cabinet or Two-Position QLX Remote BNC Chassis for the D3LX RMT).
• a BNC Patch Panel with ADC adapter cables is installed in the CO rack and at the remote site. For more
information about this operation, refer to “Installing the BNC Panel” on page 7.
• protection switching is enabled (if you plan to employ it). For more information about protection switching,
refer to “Setting Up System Options” on page 19.
• a meter and variable line attenuator are available.
• fiber-optic patch cords are of appropriate length and that the connectors are of appropriate type (SC or FC)
for your application.
• the optical components receive the proper cleaning p rocedures. For more inf ormation about cleaning, refer to
“Appendix B - Cleaning and M ating Fiber-Optic Systems” on page 39.
• a Soneplex Controller Unit (SCU) version 3.7 or greater is installed in the LEC.
• any other optional equipment that needs to be installed prior to the D3LX modules, such as an Alarm
Processing Unit (APU) or D3LX Remote Access Module (D3RCAM), is installed. Refer to the optional
equipment documentation for installation information.
6 August 30 , 20 02 D3LX CO and RMT Modules
Page 15

LTPS-UM-8013-03 Installing the BNC Panel
INSTALLING THE BNC PANEL
OVERVIEW
The ADC BNC Panel consists of 14 pairs of 75Ω BNC connectors that are part of a system that converts an
electrical DS3 circuit at the CO site into an optical signal that uses WDM to transmit a signal across one
single-mode fiber to a CPE site. The BNC Panel can support 7 working D3LX lines and 7 protection D3LX lines.
(Table 2 on page 8 lists each working slot location as labelled on the front panel of the chassis and its
corresponding protection slot.)
The D3LX CO (CO module) converts the optical signal at the CO site and the D3LX RMT (remote module)
converts the optical signal back into an electrical DS3 and transmits the signal back to the D3LX CO residing in
the Loop Extender Chassis (LEC).
A BNC Panel and ADC adapter cables are required when D3LX modules are installed. Prior to ordering ADC
adapter cables, measure the distance between the BNC Panel and the chassis. For more information about
installing D3LX modules, refer to “Installing a D3LX CO Module in an LEC” on page 9.
INSTALLATION OF THE PANEL
Prior to installing the ADC adapter cables (BNC-3-CBL-WW), remove any existing wires from the
LINE wire-wrap row on the back of the LEC.
1 Mount the panel in the rack.
2 Secure the panel to the rack by using the provided screws.
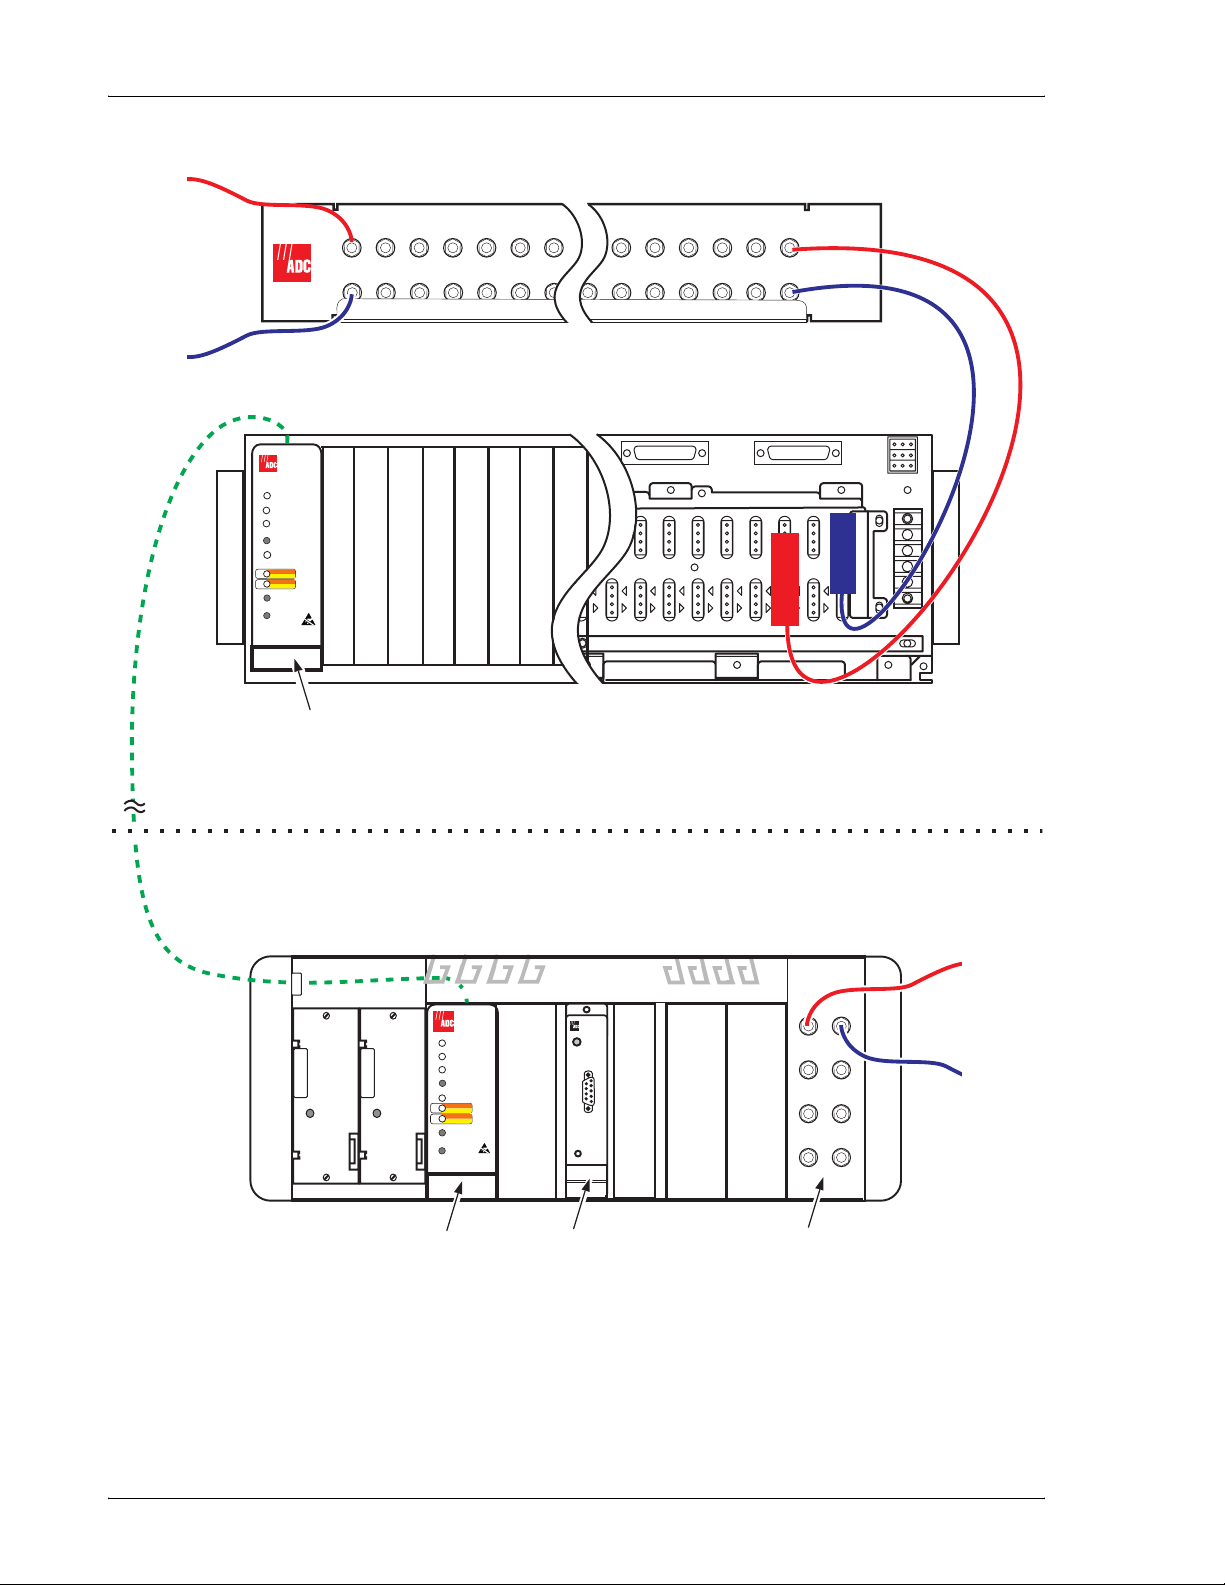
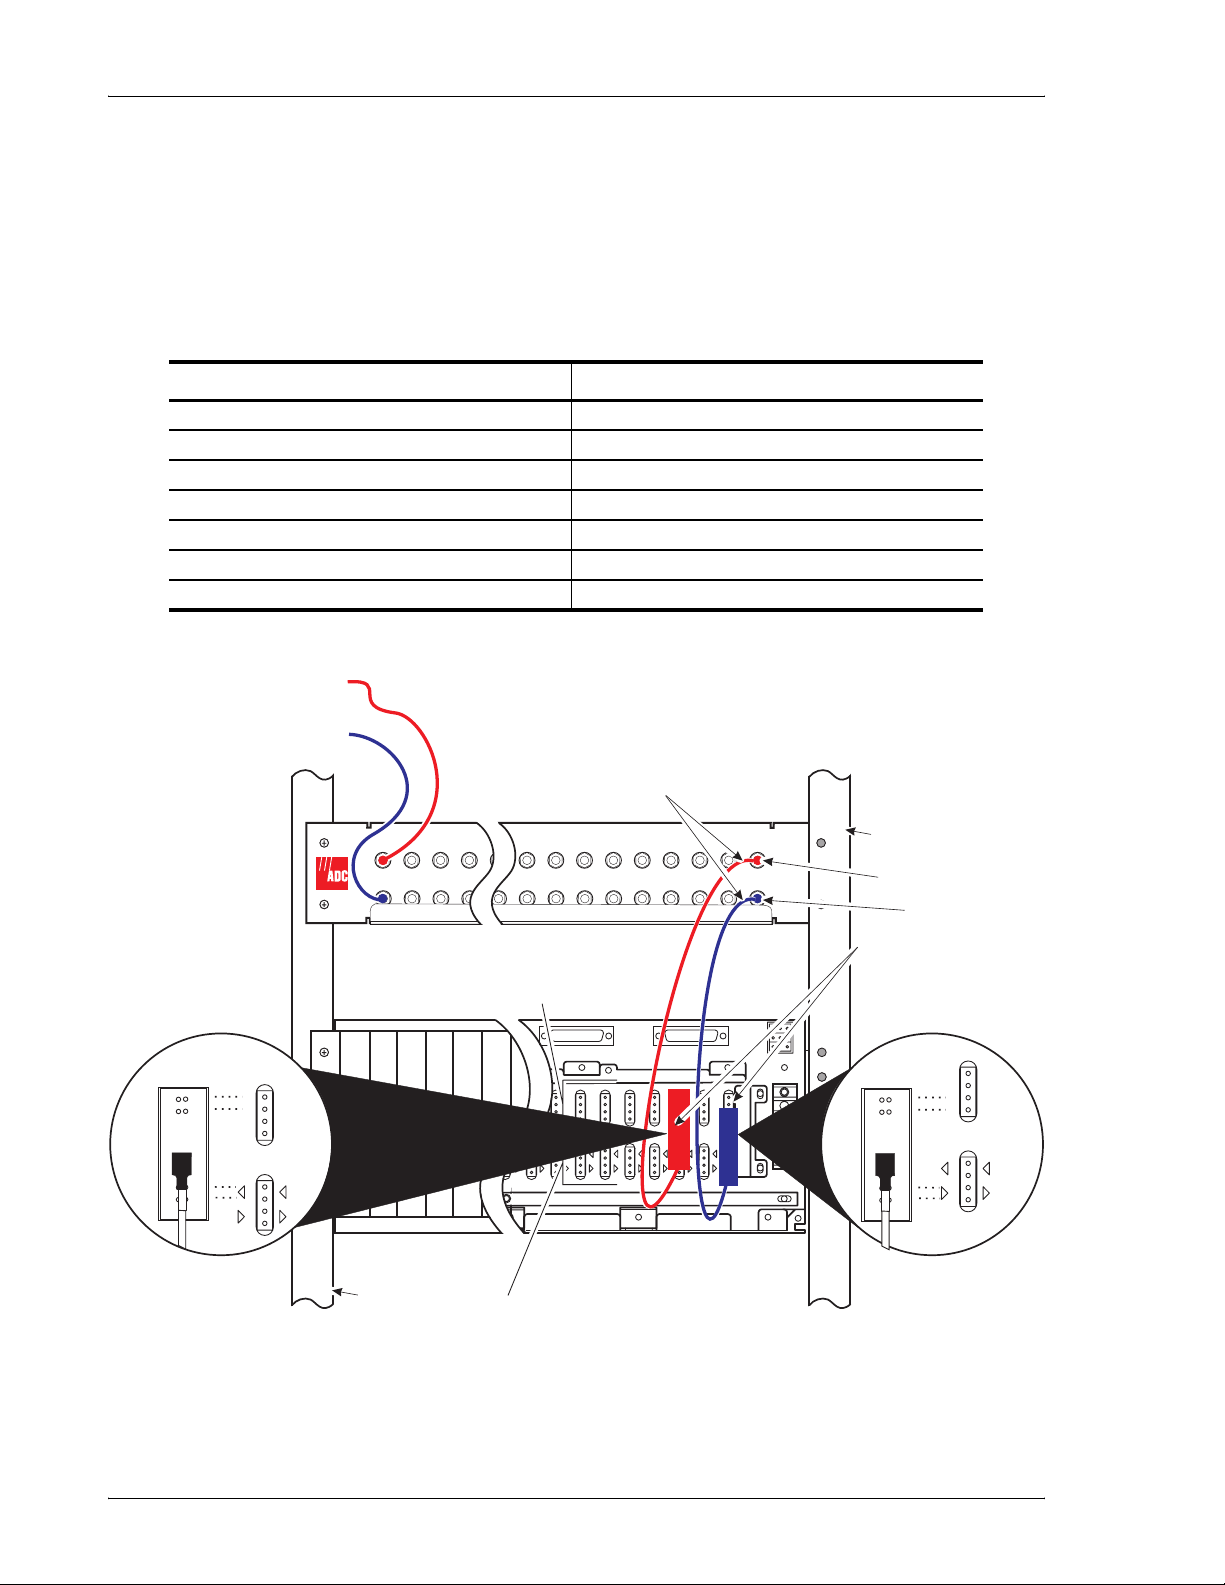
3 On the front of the panel, connect the DS3 IN (transmit) and DS3 OUT (receive) coax cables as shown in
Figure 4 on page 8. Note the connector numbers on the BNC panel.
In every group of 4 slots, such as 1-1 through 1- 4, the right mo st two slots have cables plugged into the bottom
2 wire-wrap pins (T1 and R1), and the two left most slots have cables plugged into the top 2 wire-wrap pins
(T and R). If it is a protected system or a single D3LX module, then sl ot s 1-2 and 1-4 do not have cables.
For exampl e, a D3LX CO module plugged into slo t 1-1 of the chassis or in a 2 D3LX protected system:
• The DS3 receive cable plugs into the botto m 2 pins T1 and R1 of slot 1-1. This is the DS3 that the D3LX
receives.
• The DS3 transmit cable is plugged into the top 2 pins T and R of slot 1-3. This is the DS3 that the D3LX
transmits.
In another example, for a D3LX CO module plugged into slot 1-3 of the chassis in an unprotected system:
• The DS3 receive cable plugs into the botto m 2 pins T1 and R1 of slot 1-2. This is the DS3 that the D3LX
receives.
• The DS3 transmit cable plugs into the top 2 pins T and R of slot 1-4. This is the DS3 that the D3LX
transmits.
4 From the rear of the panel, con nect the coax end of an ADC adapter cable to the DS3 IN (receive) conn ector.
The connector number must match the connector number on the front of the panel.
5 Connect the wire-wrap conversion block e nd of the same ADC adapter cable to the T and R EQUIP wire-wrap
posts on the back of the LEC as shown in Figure 4 on page 8. The top of the conversion block mates with the
T and R LINE wire-wrap posts to prevent improper connection.
D3LX CO and RMT Modules August 30, 2002 7
Page 16
Installing the BNC Panel LTPS-UM-8013-0 3
6 From the rear of the panel, connect the coax end of an ADC adapter cable to the DS3 OUT (transmit).
connector. The connector number must match the connector number on the front of the panel.
7 Connect the wire-wrap conversion block en d of the same ADC adapter cable to the T and R EQUIP wire-wrap
posts on the back of the LEC as shown in Figure 4 on page 8. The top of the conversion block mates with the
T1 and R1 LINE wire-wrap posts to prevent improper connection.
8 Repeat this entire procedure for each D3LX module installed.
Table 2. Tip and Ring Assignments for Protection Switching Applications
Working Card Slot TX/RX BNC Connector Pair Protect Card Slot TX/RX BNC Connector Pair
1-1 1/15 1-3 2/16
2-1 3/17 2-3 4/18
3-1 5/19 3-3 6/20
4-1 7/21 4-3 8/22
5-1 9/23 5-3 10/24
6-1 11/25 6-3 12/26
7-1 13/27 7-3 14/28
DS3 out
(transmit)
DS3 in
(receive)
ADC adapter
cables (coax end)
2 3 4 9 8 56 4 3 2 1
1
15
7
19 18 17 16 1523 22 2016 17 18 19
21
CO rack - rear
DS3 out
DS3 in
BNC panel - front
BNC panel - rear
LINE wire-wrap row
PORT 2 DTE RS-232
1-3
T
L1
R
T1
L2
R1
T
R
T1
R1
Loop Extender - front
2-4
T
L1
L1
R
T1
T1
L2
L2
R1
R1
T
T
R
R
T1
T1
T1
R1
R1
R1
2-3
T
L1
R
T1
L2
R1
T
R
T1
R1
Loop Extender - rear
PORT 3 DTE RS-232
2-2
2-1
1-4
1-3
T
T
L1
L1
R
R
T1
L2
L2
R1
T
T
R
R
T1
R1
1-2
T
T
T
L1
L1
R
R
R
T1
T1
T1
L2
L2
R1
R1
R1
T
T
T
R
R
R
T1
T1
T1
R1
R1
R1
SHIELD GND
FRAME GND
1-1
T
L1
R
T1
L2
R1
T
R
T1
R1
A
–48V
B
A
RTN
B
ADC adapter
cables
(conversion block end)
1-1
T
L1
R
T1
L2
R1
T
R
T1
R1
CO rack - front
EQUIP wire-wrap row
Figure 4. Mounting the BNC Panel and Connecting ADC Adapter Cables (LEC Shown)
8 August 30 , 20 02 D3LX CO and RMT Modules
Page 17

LTPS-UM-8013-03 Installing a D3LX CO Module in an LEC
INSTALLING A D3LX CO MODULE IN AN LEC
Avoid exposure to invisible laser radiation.
• Do not look into the end s of any o ptical fib er or directly into the m odule fib er connec tors as
exposure to invisible laser radiation may result.
• Use a meter to verify active fibers.
• Do not insert module edge connectors into the chassis connectors before connecting the
optical fiber to the module. Verify that LED indicators are not lit, and the module is not
engaged with the chassis connectors before proceeding.
When using D3LX CO modules in a group, never install other Soneplex modules in any of the
unused slots in the same group.
Remove any existing wire wraps from the LEC backplane prior to installing any ADC adapter
cables (BNC-3-CBL-WW) for the groups that are being used for D3LX modules.
Use the following procedure to install D3LX CO modules in LECs:
1 Select the fiber-optic patch cord with the appropriate length (the measured distance from the Fiber
Distribution Frame or equivalent d i stribution device) and the appropriate type optical connector (SC or FC
type).
2 Route the fiber patch cord through the top of the chassis, along the heat baff le/fiber management panel. Lower
the cord through the FiberGuide vertical duct to the location reserved for the D3LX CO module as shown in
Figure 5 on page 10. The protective cover must remain on the fiber connector to prevent dust and damage to
the connection. The fiber should be tagged to identify the circuit.
3 Open the front panel of the LEC into which the D3LX CO will be installed.
D3LX CO and RMT Modules August 30, 2002 9
Page 18

Installing a D3LX CO Module in an LEC LTPS-UM-8013-0 3
Fiber patch cord
FiberGuide vertical duct
Heat baffle/fiber management panel
Figure 5. Routing the Fiber Patch Cord
4 Locate the mounting slots designated for the D3LX CO modules in the chassis.
5 Refer to Figure 6 on page 11 for D3LX CO module locations chassis and slot corresponding to the DS3
signal.
– If no protection switching is required, proceed to the next step.
– If protection switching is required, a working module may be installed in the first slot of any quad group,
such as 1-1, 2-1, 3-1, 4-1, 5-1, 6-1, or 7-1. The protection module is installed in the slot to its immediate
right in the order of 1-3, 2-3, 3-3, 4-3, 5-3, 6-3, or 7-3. For more informati on on protection switching,
refer to “Protection Switching” on page 4.
Install the working module first, then the protect module.
10 August 30, 2002 D3LX CO and RMT Modules
Page 19

LTPS-UM-8013-03 Installing a D3LX CO Module in an LEC
Use #1 mounting slots for working D3LX units
Use #3 mounting slots for protect D3 unitsLX
1-3
2-3
3-3
4-3
5-3
6-3
7-3
D3LX
Working unit
D3LX
Protect unit
1-1
OPT
APS
1
1
STATUS
FAR END
DS3 STATUS
DS3 ONLINE
FAIL
BER
LOCKOUT
FORCE
D3LX CO
R=FAULT
G=O.K.
FLASH=LBK
ENABLE
OFF=UNEQPP
G=ONLINE
R=LINELOCK
OFF=OFFLINE
LMPTST/
APS
RESET
2-1
2
2
D3LX CO
STATUS
FAR END
DS3 STATUS
R=FAULT
G=O.K.
FLASH=LBK
ENABLE
OFF=UNEQPP
DS3 ONLINE
G=ONLINE
R=LINELOCK
OFF=OFFLINE
FAIL
OPT
BER
LOCKOUT
APS
FORCE
LMPTST/
APS
RESET
3-1
4-1
35467
5-1
6-1
7-1
SCU APU
Figure 6. D3LX Module Lo cations in Loop E xtender Chassis
6 Remove a new module from its protective ESD packaging. If the module is installed, remove it and inspect
for physical damage.
7 Align the module with the slot and slide the module into the chassis until about 3 inches protrude fr om the
front of the chassis as shown in Figure 7 on page 12. Do not seat module in connector at this tim e.
8 Remove the protective dust cap from the connector on the D3LX CO module.
S
C
U
STATUS
CR
O
ETH
MJ
S
X.25
S
MN
C
R
A
ACO
F
T
PWR
RESET
HSKP
RMT
ALM
DISP RMT
LMPTST
D3LX CO and RMT Modules August 30, 2002 11
Page 20

Installing a D3LX CO Module in an LEC LTPS-UM-8013-0 3
Fiber patch cord
Fiber clip
D3LX CO
Figure 7. Installing the D3LX CO
9 After removing the protective cover from a fiber patch cord, clean the fiber-optic connector and adapter as
directed in “Appendix B - Cleaning and Mating Fiber-Optic Systems” on page 39.
POWER VERIFICATION
Verification of Electrical DS3 Power Level
1 Apply power to the D3LX CO.
2 Attach the fiber patch cord from the D3LX CO to a meter.
3 Confirm that the readings are within the specification (-5 dBm to -23 dBm).
If the reading is not within the specification, check all fiber-optic connections to the D3LX CO.
If the reading is still not within the specification, replace the module.
4 Once the readings are within specification, disconnect the patch cord from the meter.
Now that the DS3 power level meets optical specifications, verify the D3LX CO module.
12 August 30, 2002 D3LX CO and RMT Modules
Page 21

LTPS-UM-8013-03 Installing a D3LX CO Module in an LEC
Verification of D3LX CO Optical Power
1 Connect an attenuator in series:
• Connect a patch cord from the meter to the attenuator.
• Connect a meter patch cord from the attenuator to the module.
2 Using the retaining latch, press the module into the chassi s until it is properly seated.
3 Is the STATUS indicator lit green?
• If Yes, continue to next step.
• If No, repeat steps 1 through 3 with a new D3LX CO module.
4 On the APU, as shown in Figure 6 on page 11, press the LMPTST/APS pushbutton. Did all D3LX CO
indicators light?
• If Yes, continue to next step.
• If No, repeat steps 1 through 3 with a new D3LX CO module.
The module laser is transmitting when power is applied to the module.
5 Confirm that the transmit power is -7 dBm ± 2 dBm.
If the reading is not within this specification, replace the module.
6 Reduce the voltage on the attenuator and confirm that the receive dynamic range is -5 dBm to 123 dBm.
If the reading is not within this specification, replace the module.
Verify that unit is completely disconnected from the chassis connectors before removing the
optical fiber from the plug-in unit. Verify that the far end transmitter is off before proceeding.
Exposure to invisible laser radiation from the optical fiber is possible if the far end transmitter
is transmitting. Verify that all LEDs are off (not illuminated).
7 Release the retaining latch on the D3LX CO module and slide the module out about 3 inches.
8 Disconnect the meter patch cord from the D3LX CO module.
9 Route the fiber out the top of the chassis and adjust as required to remove any excess slack.
10 Guide the fiber with one hand while sliding the module slowly back into the chassis.
Always allow sufficient fiber length to permit routing without severe bends. Fibers may be
permanently damaged if bent/curved to a radius of less than 1.5 inches (3.81 cm).
11 Using the retaining latch, press the module into the chassis until it is properly seated.
12 Did the STATUS indicator light green? (If ther e is no DS3 signal p resent, th e OPT FAIL indicator is lit red.)
• If Yes, continue to next step.
• If No, repeat steps 1 through 10 with a new D3LX CO module.
13 If this is to be a DS3 protected system, repeat the preceding steps to install the protect module in the slot
adjacent to the working module.
14 Repeat entire procedure for each D3LX CO module to be installed.
15 Store excess fiber at the fiber storage device specified in the work instruction.
D3LX CO and RMT Modules August 30, 2002 13
Page 22

Installing a D3LX RMT Module in a Remot e Ca bin et LTPS-UM-8013-0 3
INSTALLING A D3LX RMT MODULE IN A
REMOTE CABINET
Avoid exposure to invisible laser radiation.
• Do not look into the end s of any o ptical fib er or directly into the modul e fiber con nectors a s
exposure to invisible laser radiation may result.
• Use a meter to verify active fibers.
• Do not insert module edge connectors into the chassis connectors before connecting the
optical fiber to the module. Verify that LED indicators are not lit, and the module is not
engaged with the chassis connectors before proceeding.
Use the following procedure to install D3LX RMT modules in a Four-Position Remote Terminal Cabinet or
Two-Position QLX Remote BNC Chassis. After installing the D3LX RMT modules in either chassis, proceed to
“Power Verification” on page 16.
FOUR-POSITION REMOTE TERMINAL CABINET INSTALLATION
To install first the working module, and then the protect module (if installing D3LX RMT modules in protection
switching applications):
1 Open the front panel of the remote terminal into which the D3LX RMT will be inst alled.
2 Route the fiber patch cord through the to p of the chassis and around the rad ius limiters as shown in Figure 8.
The protective cover must remain on the fiber connector to prevent dust and damage to the connection. The
fiber should be tagged to identify the circuit.
Fiber-optic patch cord
Fiber-optic loop
Radius limiters
Figure 8. Routing the Fiber Through a Four-Position Remote Terminal Cabinet
14 August 30, 2002 D3LX CO and RMT Modules
Page 23

LTPS-UM-8013-03 Instal ling a D 3LX R MT Module in a Remote Cabinet
3 Locate the mounting slots designated for the D3LX RMT modules in the chassis. If protection switching is
required, a working module installs in the first slot of a quad group, such as 1-1 or 2-1. The protection module
installs in the slot to the right of the working module, slot 1-2 or 2-2.
4 Refer to Figure9 for D3LX RMT module locations chassis and slot corresponding to the DS3 signal.
– If no protection switching is required, proceed to the next step.
– If protection switching is required, a working module may be installed in the first slot of any quad group,
such as 1-1 or 2-1. The protection module is installed in the slot to its immediate right in the order of 1-3
or 2-3. For more information on protection swit ching, refe r to “Protection Switching” on page 4.
Install the working module first, then the protect module.
5 Remove a new module from its protective ESD packaging. If the module is installed, remove it and inspect
for physical damage.
6 Align the module with the slot and slide the module into the chassis until about three inches pr otru de fr om
the front of the chassis. Do not seat module in connector at this time.
7 Remove the protective dust cap from the connector on the D3LX RMT module.
Fiber clip
Fiber
management
enclosure
AC/DC
POWER
Fiber patch cord
AC/DC
POWER
OPT
APS
D3LX RMT
STATUS
FAR END
DS3 STATUS
ENABLE
DS3 ONLINE
FAIL
BER
LOCKOUT
FORCE
LMPTST/
APS
RESET
R=FAULT
G=O.K.
FLASH=LBK
OFF=UNEQPP
G=ONLINE
OFF=OFFLINE
OPT
APS
Fiber guides
D3LX RMT
STATUS
FAR END
DS3 STATUS
R=FAULT
G=O.K.
FLASH=LBK
ENABLE
OFF=UNEQPP
DS3 ONLINE
G=ONLINE
OFF=OFFLINE
FAIL
BER
LOCKOUT
FORCE
LMPTST/
APS
RESET
1-1
D3RCAM
D3LX RMT modules
C
R
A
F
T
APS/LMPTST
DS3 CAM
D3RCAM
STATUS
STATUS
ENABLE
APS
FAIL
ERROR
FAIL
ERROR
CRAFT
RESET
A
P
U
D3LX RMT
CR
STATUS
MJ
NET
EOP
DISP RMT
LMPTST
FAR END
MN
DS3 STATUS
R=FAULT
G=O.K.
FLASH=LBK
ENABLE
OPT
APS
DS3 ONLINE
FAIL
BER
LOCKOUT
FORCE
LMPTST/
APS
RESET
OFF=UNEQPP
G=ONLINE
R=LINELOCK
OFF=OFFLINE
ACO
PWR
HSKP
RMT
ALM
OPT
APS
STATUS
FAR END
DS3 STATUS
ENABLE
DS3 ONLINE
FAIL
BER
LOCKOUT
FORCE
LMPTST/
APS
RESET
2-1 2-31-3
APU
D3LX RMT
R=FAULT
G=O.K.
FLASH=LBK
OFF=UNEQPP
G=ONLINE
R=LINELOCK
OFF=OFFLINE
Fiber clip
1-1
TX RX
1-3
TX RX
2-1
TX RX
2-3
TX RX
D3LX LTU
jack block
Figure 9. D3LX RMT Module Locations in a Four-Position Remote Terminal Cabinet
8 After removing the protect ive co ver fro m a fiber patch cord, confirm that the fiber-optic connector is free of
debris as directed in “Appendix B - Cleaning and Mating Fiber-Optic Systems ” on page 39.
9 Proceed to “Power Verification” on page 16 .
D3LX CO and RMT Modules August 30, 2002 15
Page 24

Installing a D3LX RMT Module in a Remot e Ca bin et LTPS-UM-8013-0 3
TWO-POSITION QLX REMOTE BNC CHASSIS INSTALLATION
To install first the working module, and then the protect module (if installing D3LX RMT modules in protection
switching applications):
1 Open the front panel of the remote terminal into which the D3LX RMT will be inst alled.
2 Route the fiber patch cord through the left side of the fiber management enclosure located on the remote
terminal as shown in Figure 10. The protective cover must remain on the fiber connector to prevent dust and
damage to the connection. The fiber should be tagged to identify the circuit.
CR
MJ
P
U
D3RCAM
MN
PWR
HSKP
ACO
RMT
ALM
DISP RMT
STATUSSTATUS
C
R
RESET
A
F
T
D3LX RMT
STATUS
FAR END
G=ONLINE
OFF=OFFLINE
R=FAULT
G=O.K.
FLASH=LBK
OFF=UNEQPP
FAIL
BER
LOCKOUT
ENABLE
DS3 ONLINE
OPT
APS
FORCE
LMPTST/
APS
RESET
DS3 STATUS
D3LX RMT
STATUS
FAR END
G=ONLINE
OFF=OFFLINE
R=FAULT
G=O.K.
FLASH=LBK
OFF=UNEQPP
FAIL
BER
LOCKOUT
ENABLE
DS3 ONLINE
OPT
APS
FORCE
LMPTST/
APS
RESET
DS3 STATUS
A
Fiber
management
enclosure
D3RCAM
APU
D3LX RMT modules
Figure 10. D3LX RMT Module Locations in a Two-Position QLX Remote BNC Chassis
3 Locate the mounting slots designated for the D3LX RMT modules in the chassis.
4 Refer to Figure 10 for D3LX RMT module locations chassis and slot corresponding to the DS3 signal.
5 Remove a new module from its protective ESD packaging. If the module is installed, remove it and inspect
for physical damage.
6 Align the module with the slot and slide the module into the chassis until about three inches pr otru de fr om
the front of the chassis. Do not seat module in connector at this time.
7 Remove the protective dust cap from the connector on the D3LX RMT module.
8 After removing the protect ive co ver fro m a fiber patch cord, confirm that the fiber-optic connector is free o f
debris as directed in “Appendix B - Cleaning and Mating Fiber-Optic Systems” on page 39.
9 Proceed to “Power Verification” on page 16.
POWER VERIFICATION
Verification of Electrical DS3 Power Level
1 Apply power to the D3LX RMT.
2 Attach the fiber patch cord from the D3LX RMT to a meter.
3 Confirm that the readings are within the specification (-5 dBm to -23 dBm).
If the reading is not within the specification, check all fiber-optic connections to the D3LX RMT.
If the reading is still not within the specification, replace the module.
4 Once the readings are within specification, disconnect the patch cord from the meter.
Now that the DS3 power level meets optical specifications, verify the D3LX RMT module.
16 August 30, 2002 D3LX CO and RMT Modules
Page 25

LTPS-UM-8013-03 Instal ling a D 3LX R MT Module in a Remote Cabinet
Verification of Optical Power
1 Connect an attenuator in series:
• Connect a patch cord from the meter to the attenuator.
• Connect a meter patch cord from the attenuator to the module.
2 Using the retaining latch, press the module into the chassis until it is properly seated.
3 Is the STATUS indicator lit green?
• If Yes, continue to next step.
• If No, repeat step s 1 through 3 w ith a new D3LX RMT modul e.
4 On the APU, as shown in Figure 9 on p age 15, press the LMPTST/APS pushbutton. Did all D3LX RMT
indicators light?
• If Yes, continue to next step.
• If No, repeat steps 1 through 3 with a new D3LX RMT module.
The module laser is transmitting when power is applied to the module.
5 Confirm that the transmit power is -7 dBm ± 2 dBm.
If the reading is not within this specification, replace the module.
6 Reduce the voltage on the attenuator and confirm that the receive dynamic range is -5 to -23 dBm.
If the reading is not within this specification, replace the module.
Verify that unit is completely disconnected from the chassis connectors before removing the
optical fiber from the plug-in unit. Verify that the far end transmitter is off before proceeding.
Exposure to invisible laser radiation from the optical fiber is possible if the far end transmitter
is transmitting. Verify that all LEDs are off (not illuminated).
7 Release the retaining latch on the D3LX RMT module and slide the module out about 3 inches.
8 Disconnect the meter patch cord from the D3LX RMT module.
The D3LX RMT module optical power level specification is now verified.
9 Route the fiber out the top of the chassis and adjust as required to remove any excess slack.
10 Guide the fiber with one hand while sliding the module slowly back into the chassis.
Always allow sufficient fiber length to permit routing without severe bends. Fibers may be
permanently damaged if bent/curved to a radius of less than 1.5 inches (3.81 cm).
11 Using the retaining latch, press the module into the chassis until it is properly seated. If there is excessiv e
resistance, withdraw the module and check for alignment or obstructions.
12 Did the STATUS indicator light green? (If ther e is no DS3 signal p resent, th e OPT FAIL indicator is lit red.)
• If Yes, continue to next step.
• If No, repeat steps 1 through 10 with a new D3LX RMT module.
13 If this is to be a DS3 protected system, repeat the preceding steps to install the protect module in the slot
adjacent to the working module.
14 Repeat entire procedure for each D3LX RMT module to be installed.
D3LX CO and RMT Modules August 30, 2002 17
Page 26

Provisioning LTPS-UM-8013-03
15 Store the remaining slack fiber on the left side of the fiber management enclosure within the remote cabinet,
leaving 5 to 6 inches of slack fiber above the upper card guide to provide a service loop.
PROVISIONING
In D3LX systems, provisioning occurs automatically if a remote module is inst alled. In the event that a remote
module is not installed or properly functioning, refer to the manual provisioning process below.
MANUAL
Manual provisioning of the D3LX system may be performed locally through the SCU (version 3.7 or later) or
remotely through the D3RCAM. Craft interface software provides a user-fr iendly menu driven program to option
the modules in the system and maintain a provisioning database at the central office. In the chassis with the SCU,
provisioning instructions pass to resident modules through communication channels embedded in the backplane
of the chassis.
Perform manual provisioning through the craft interface of the D3LX module after installation or when changes
occur in the network system configuration. For complete information about manual p rov isioning, refer to the
Soneplex Loop Extender System Operation and Maintenance Manual (Version S1.0), document ADCP-61-494
and Soneplex Shelf Controller User Manual (V3.7).
AUTOMATIC
Automatic provisioning occurs in a previously provisioned system when replacing the D3LX module or when
power to the module is lost and then restored. In systems with D3LXs at the CO, the SCU provides provisioning
data to the module (slot) that powers up, based on the database established when the system was previously
provisioned.
When an SCU is replaced at the CO, the new SCU module requests provisioning data from the
D3LX CO modules in the local chassis and from the remote modules optically connected to
them. Additionally, the SCU retains its p rovisionin g databas e up to 24 hours after power is los t.
The following items are configured during provisioning:
• Protect or Non-Protect operation
-6
-10
• BER Minor Alarm Threshold (range, 10
• BER Switch Threshold (range, 10
• Equipped/Unequipped state
• Line State
– In-Service (IS)
– Out of Service (OOS)
-4
to 10
to 10
-10
)
)
• Alarm reporting options. For more information, see “Alarm Setting During Provisioning” on page 19.
• Line Buildout (range: two segments between 0 - 450 ft)
18 August 30, 2002 D3LX CO and RMT Modules
Page 27

LTPS-UM-8013-03 Setting Up System Options
OTHER PROVISIONING CONSIDERATIONS
Alarm Setting During Provisioning
The D3LX generates alarms on conditions occurring in the D3LX CO modules DS3 facility. The severity of the
alarm conditions as Critical, Major, Minor, or Event is selected while provisioning. The alarms are handed off to
an Alarm Processing Unit (APU) which acts as an interface between the D3LX modules and the customer alarm
monitoring equipment. For more information on alarms, see “Configuring D3LX Alarms” on page 25.
D3 Remote Craft Access Module (D3RCAM) Option
The D3RCAM is a plug-in module for the D3LX system which provides a craft interface at the remote site.
Additionally, the D3RCAM works in conjunction with the APU and the D3LX modules to display alarm
information for the remote chassis or terminal.
SETTING UP SYSTEM OPTIONS
To configure D3LX system options , you must connect a maintenance terminal to an available craft port. You may
select either the SCU or Ports 2 or 3 (local) or the D3RCAM (remote) craft port.
• If you are using the SCU, refer to “Connecting a Maintenance Terminal to the SCU Craft Port” on page 19.
• If you are using the D3RCAM, refer to “Connecting a Maintenance Ter minal to the D3RCAM Craft Port” on
page 20.
CONNECTING A MAINTENANCE TERMINAL TO THE SCU CRAFT PORT
Connect the VT100 compatible terminal or host computer to the interface port as follows:
1 For initial setup, connect the local maintenance terminal to the SCU craft port (on front panel). After
configuration, the SCU may be con nected to ports 2 o r 3 on the back plane of the LEC. For more informat ion
on Ports 2 and 3 located on the LEC, refer to Soneplex Loop Extender System Operation and Maintenance
Manual, ADCP-61-494. See Table 3 for chassis port description s.
Table 3. Chassis Po rt De scription
SCU Front-Panel Craft Port Ports 2 and 3
Function—DCE connection on the installed SCU module (see Figure 11 on
page 20)
Cable Type—Straight-through cable (26 AWG or larger, stranded pairs,
overall shielding, common for all leads).
Connector—Type DB-9 receptacle. Type DB-25 receptacle.
DTE connections on the chassis backplane. Ports
provide an RS (EIA-232) interface.
A null-modem cable or adapter.
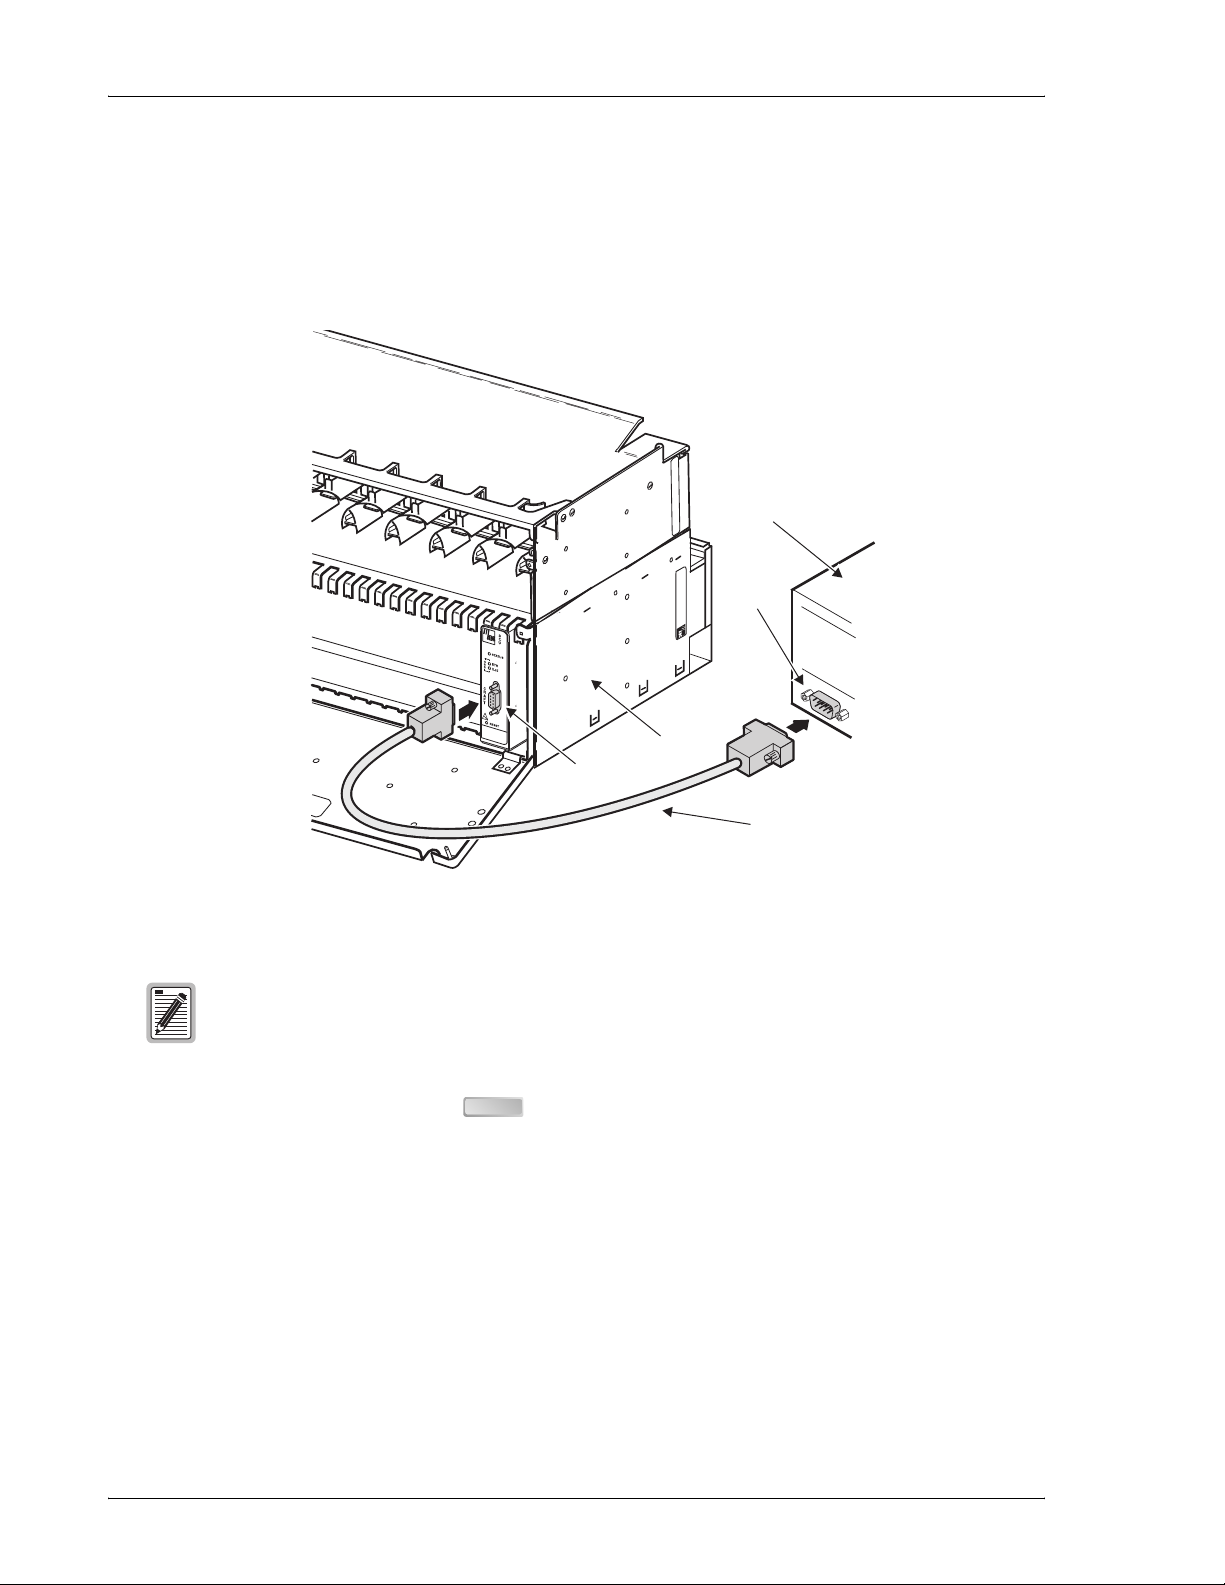
2 Connect one end of the interface cable to the main tenance terminal a nd the o ther end to th e craft po rt located
on the front of the SCU as shown in Figure 11.
3 Start a terminal emulation program such as Procomm that emulates a VT100 terminal.
4 Configure the maintenance terminal to the following communication settings:
D3LX CO and RMT Modules August 30, 2002 19
Page 28
Setting Up System Options LTPS-UM-8013-0 3
• 9600 baud
• No parity
• 8 data bits
• 1 stop bit
• Hardware flow control to OFF
Maintenance
terminal
Serial
COM port
LEC
Craft port
Interface cable
Figure 11. Connecting a Maintenance Terminal to the SCU
The default port configuration for the SCU craft port is CRAFT. Ports 2 and 3 must be configured
for CRAFT before the craft interface may be accessed via these ports.
5 At the maintenance terminal, press . The Enter User Name field appears.
ENTER
CONNECTING A MAINTENANCE TERMINAL TO THE D3RCAM CRAFT
ORT
P
1 Locate the D3RCAM in the remote cabinet. The D3RCAM craft port is located o n the front of the D3RCAM.
2 Select the cable for use between the craft port and the maintenance terminal with a DB-9 (male) connector at
one end and a maintenance terminal connector at the other end.
3 Connect one end of the interface cable to the maintenance terminal and the other end to the D3RCAM craft
port as shown i n Figure 12.
4 Start a terminal emulation program such as Procomm that emulates a VT100 terminal.
20 August 30, 2002 D3LX CO and RMT Modules
Page 29

LTPS-UM-8013-03 Setting Up System Options
5 At the maintenance terminal, press . The Enter User Name field appears.
ENTER
Maintenance
Serial
S
T
AT
U
S
C
R
A
F
T
R
E
S
E
T
COM port
Four-position remote
terminal chassis
Craft port
Interface cable
Figure 12. Connecting a Maintenance Terminal to the D3RCAM
terminal
D3LX CO and RMT Modules August 30, 2002 21
Page 30

Setting Up System Options LTPS-UM-8013-0 3
NAVIGATING THROUGH CRAFT INTERFACE MENUS
Many of the operations that follow require the use of the craft interface.
To select a menu from the craft interface, do one of the following:
• Press the number of the menu.
• Use the arrow keys to select the menu and press .
← →
ENTER
Table 4 summarizes the navigational keys, which are also listed in the on-screen Help menu.
Table 4. Navigational Keys for the Craft Interface Screens During Telnet Sessions
(a)
Key
SPACEBAR
ENTER
Returns to the previous menu.
ESC
↑
↓
→
Selects the next page or item to the right of the current one.
←
Menu number Selects the menu or item.
+ Returns to Main menu.
CTRL T
+ Returns to previous menu.
CTRL P
+ Terminates the session (logout).
CTRL D
+ Displays the Help menu.
CTRL A
+ Jumps to Active Alarm menu.
CTRL E
+ Jumps to Shelf Status screen.
CTRL G
+ Refreshes the screen.
CTRL R
(a) Legacy managemen t units require the use of control keys instead of arrow keys.
Function
Cycles through selections.
Activates the current setting or choice, or display a menu.
Selects the line or item above the current one.
Selects the line or item below the current one.
Selects the previous page or item to the left of the current one or returns to the previous menu.
Most VT100 emulation programs support a print screen option. For Windows-based prog rams ,
such as Procomm or HyperTerminal, see the Help menu for instructions.
22 August 30, 2002 D3LX CO and RMT Modules
Page 31

LTPS-UM-8013-03 Local Configuration
LOCAL CONFIGURATION
A D3LX system can be configured locally by an SCU (version 3.7 or later) with a D3LX CO module in an LEC.
It can also be configured remotely by a D3RCAM with a D3LX RMT module installed in a remote chassis. See
“Remote Configuration” on page 33 for the procedure configuring remotely using the D3RCAM.
The following details the local configuration procedure.
CONFIGURING THE D3LX SYSTEM THROUGH
3. Unit Configuration
THE SCU
Use the craft interface system menu to view or edit the configuration for
each D3LX module in the chassis. This menu can also be used to equip,
provision, assign thresholds, and assign service state.
1 Connect a maintenance terminal to the craft port on the SCU front panel and log on to the craft interface
system as described in “Connecting a Maintenance Terminal to the SCU Craft Port” on page 19.
See “Nav igating Throug h Craft Interfac e Menus” o n page 22 for detailed information on making
selections.
2 From the Main menu, select 3. Unit Configuration.
3 From the Unit Configuration menu, select 4. D3LX Configuration.
The D3LX Configuration appears as shown in Figure 13.
4. D3LX Configuration
Figure 13. D3LX Configuration Screen
D3LX CO and RMT Modules August 30, 2002 23
Page 32

Local Configuration LTPS-UM-8013-03
Press + for assistance when making selections.
4 Configure the fields as detailed in the Table 5 and assign the selections by pressing .
CTRL A
ENTER
5 Repeat Steps 2 through 5 for each D3LX system installed in the chassis.
Table 5. D3LX CO Configuration Fields–SCU V3.7 or later
Field Name Type Options Description Default
Unit Equip State Toggle EQUIPPED Establishes communication with SCU. Module
must be set to EQUIPPED before remaining
selections are allowed.
UNEQUIPPED No communication with SCU.
Unit Service State Toggle IN SERVICE Places the unit in service and allows equipment
alarm reporting by the SCU. Must be set to IS
for reporting of equipment alarms.
OUT OF SERVICE Removes unit from service and stops
equipment alarm reporting by the SCU.
Unit Protect State Toggle PROTECTED Line protection Unprotected
UNPROTECTED No protection
Optical Service State Toggle IN SERVICE Places facility in service and enables T2 alarm
reporting by the D3LX CO.
OUT OF SERVICE Removes facility from service and stops T2
alarm reporting by the D3LX CO.
Optical BER Alarm
Threshold
Toggle Set to OFF or set
between 10
-6
and 10
The average Bit Error Ratios of both the
-10
incoming optical signals are monitored by the
D3LX CO. By monitoring BERs, the D3LX CO is
capable of triggering a minor alarm when any of
the monitored signals degrades below the BER
threshold level.
Optical BER Switch
Threshold
DS3 Provisioned
(set for each T1)
Toggle Range from 10-4 to
10
-10
Sets the threshold at which the APS will be
executed.
Toggle YES Brings up T1 default settings and allows
configuration changes.
NO No configuration changes allowed.
DS3 Service State Toggle IN SERVICE Select IS after completing the remaining con-
figurations.
OUT OF SERVICE Leave this field at OUT OF SERVICE (versus IN
SERVICE) at this time to avoid undesirable
reporting of alarms.
DS3 Transmit LBO
Local
Toggle 0–225 ft., 226–450 ft. The DS1 signal output provides standard DSX
signal levels which can be compensated for at
various distances, such as cable length.
DS3 Transmit LBO
Remote
Toggle 0–225 ft., 226–450 ft. The DS1 signal output provides standard DSX
signal levels which can be compensated for at
various distances, such as cable length.
UNEQUIPPED
OOS
OOS
-8
10
-6
10
NO
OOS
0–225 ft.
0–225 ft.
Continued
24 August 30, 2002 D3LX CO and RMT Modules
Page 33

LTPS-UM-8013-03 Local Configuration
Table 5. D3LX CO Configuration Fields–SCU V3.7 or later (Continued)
Field Name Type Options Description Default
Housekeeping Lab els
1 and 2
* This field shows as N/A if D3RCAM is not installed at the Four-Position Remote Terminal Cabinet or Two-Position QLX Remote BNC
Chassis.
CONFIGURING D3LX ALARMS
Input Enter up to 8
alphanumeric
characters.
Enter the remote housekeeping alarm label you
want for each field; the fields can be edited to
create customized labels. When a
housekeeping alarm occurs, for example, door
ajar, water on the floor, or fire alarm, the name
assigned is displayed in the condition column
of the Alarm History and Active Alarms screens.
1. Alarms
SCU V3.7 = Blank
Use this procedure to set alarm indicators for equipment, optical
facilities, and DS3 facilities groups for each D3LX CO module. You
6. Set Alarm Levels
can select CRITICAL (CR), MAJOR (MJ), MINOR (MN), EVENT
(EV), or NOT RPTD (not reported) for each field.
7. Set D3LX Alarm Levels
Setting Alarm Levels
1 From the Main menu, select 1. Alarms.
2 From the Alarms menu, select 6. Set Alarms Levels.
3 From the Set Alarm Levels menu, select 7. Set D3LX Alarm Levels.
The D3LX CO Alarm Levels screen appears as shown in Figure 14 on page 26.
4 In the Group toggle field, use to select the group number (1-7).
SPACEBAR
5 From the Equipment Alarms, Optical Facility Alarms, and DS3 Facility Alarms fields, select CRITICAL
(CR), MAJOR (MJ), MINOR (MN), EVENT (EV), or NOT RPTD (not reported) for each field. Default
alarm levels are shown in Table 6 on page 26. Assign the selections by pressing
Abbreviations of the alarm field options (except NOT RPTD) appear in the Active Alarms and
Alarm History screens. The option you selec t for a particular type of alarm determines whether
you will be notified when that type alarm occurs: critical, major, and minor alarms are audible
and visual notifications, events are system actions without audible and visual notifi cations, and
not reported alarms do not require notification.
ENTER
D3LX CO and RMT Modules August 30, 2002 25
Page 34

Local Configuration LTPS-UM-8013-03
Figure 14. D3LX Alarm Setting Menu
Table 6. D3LX Alarm Level Defaults
Condition Alarm Level Default
Equipment Alarms
BOARD FAIL Major
COMM FAIL Major
CONFIG MISMATCH Minor
HSKP1, HSKP2 Minor
PROTECT COMM FAIL Minor
OPTICAL COMM FAIL Minor
VERSION MISMATCH Minor
Optical Facility Alarms
APS LIMIT Minor
FORCE TO WORK Minor
FORCE TO PROT Minor
LASER DEGRADE Minor
OPTICAL LOF Major
OPTICAL LOS Major
T-BER Minor
DS3 Facility Alarm
LOOPED BACK Minor
RECEIVE LOS Major
TRANSMIT LOS Minor
RECEIVE AIS Major
26 August 30, 2002 D3LX CO and RMT Modules
Page 35

LTPS-UM-8013-03 Local Configuration
DISPLAYING D3LX STATUS
Use this procedure to display the status of both working and protect
2. Display Status
5. Display D3LX Status
modules in local and remote sites.
1 From the Main menu, select 2. Display Status.
2 From the Alarms menu, select 5. Display D3LX Status (as shown in Figure 16).
3 Use , , , ,
SPACEBAR
← →
and to select the group and slot to display.
↓ ↑
Figure 15. Display D3LX Status
D3LX CO and RMT Modules August 30, 2002 27
Page 36

Local Configuration LTPS-UM-8013-03
VIEWING LOOPBACK STATUS AND
ERFORMING LOOPBACK COMMANDS
P
Use this procedure to view loopbacks and send loopback
6. System Maintenance
4. Loopback Status Commands
commands for a specific D3LX system.
1 From the Main menu, select 6. System Maintenance.
1. High/Low Speed
S
2 From the System Maintenance menu, select
4. Loopback Status Commands.
3 From the Loopback Status/Commands menu, select 1. High/Low Speed Loopback
Status/Commands (as shown in Figure 16) to view the status of current loopbacks and to enable new
loopback tests for low-speed modules and their associated components.
4 Use , , , ,
SPACEBAR
← →
to your requirements, then assign the selections by pressing .
and to select the group and slot to display, populate each data field according
↓ ↑
ENTER
tatus Commands
Loopback
Figure 16. Loopback Status and Commands
28 August 30, 2002 D3LX CO and RMT Modules
Page 37

LTPS-UM-8013-03 Local Configuration
PERFORMANCE MONITORING
Use this procedure to monitor the performance of modules on both
the near and far end of D3LX systems.
1 From the Main menu, select 7. Performance
Monitoring.
2 From the Performance Monitoring menu, select
DS3/E3 PM Configuration (as shown in Figure 17).
3 In PM Reports, select DS3/E3 Far End PM Configuration.
To change the type of report, select the Group and Circuit, then select Local or Remote, 15 Minute, Daily, or
Summary.
4 Use , , , ,
SPACEBAR
to your requirements, then assign the selections by pressing .
← →
and to select the group and slot to display, populate each data field according
↓ ↑
7. Performance Maintenance
1. PM Configuration
2. PM Reports
ENTER
Figure 17. Performanc e Monitoring Menu–DS3/E 3 PM Configuration Shown
D3LX CO and RMT Modules August 30, 2002 29
Page 38

Local Configuration LTPS-UM-8013-03
PERFORMING SYSTEM MAINTENANCE
Use this procedure to perform the system maintenance commands
listed.
1 From the Main menu, select 6. System Maintenance.
2 From the System Maintenance menu, select
• 1. Force/APS Commands, and then select
1. Commands for Optical Facilities to view
and force line protection for the available circuits,
• 2. Reset/LED Test Commands to reset the selected
D3LX module or verify that its LEDs are working properly,
• 4. Loopback Status Commands, and then select 1,
High/Low Speed Loopback Status/Commands
to view the loopback status or perform loopbacks on the
selected D3LX, or
• 8. Trouble Isolation (as shown in Figure 18 on
page 31), and then select the Group and Slot.
3 Use , , , ,
SPACEBAR
← →
display, populate each data field according to your require ments,
then assign the selections by pressing .
and to select t he grou p and slot to
↓ ↑
ENTER
6. System Maintenance
1. Force/APS Commands
2. Reset/LED Test Commands
3. Execute ACO (Alarm Cut-Off)
4. Loopback Status/Commands
5. Display Inventory
6. Display Circuit IDs
7. SCU-860 Data Transfer
8.Trouble Isolation
9. Metallic Loop Qualification
(MLQ Capable Chassis Required)
30 August 30, 2002 D3LX CO and RMT Modules
Page 39

LTPS-UM-8013-03 Local Configuration
Figure 18. System Maintenance–Trouble Isolation Screen Shown
LOGGING OFF
To log off from anywhere on the system during a Telne t session, press + .
CTRL D
D3LX CO and RMT Modules August 30, 2002 31
Page 40

Local Configuration LTPS-UM-8013-03
REMOVING D3LX MODULES
D3LX CO
STATUS
FAR END
DS3 STATUS
ENABLE
DS3 ONLINE
LEC
Optical receptical
Optical connector
Fiber patch cord
D3LX module
Figure 19. Removing a D3LX Module–D3LX CO Shown
Do not look into the ends of any optical fiber or into any plug-in module conn ector. Exposure to
invisible laser radiation may cause permanent eye damage. A meter should be used to verify
active fibers.
1 For SC-type connectors: pull down on the retaining latch and withdraw the unit halfway ou t of th e chass is
while preventing the fiber-optic cord from binding. Release the fiber-optic patch cord from the optical
receptacle by gently pulling back on the locking mechanism and remove the cord as shown in Figure 19.
2 For FC-type connectors: unscrew the threaded cap counterclockwise and withdraw the unit halfway out of
the chassis while preventing the fiber-optic cord from binding.
3 Replace the protective cap on the optical connector located on the circuit board.
32 August 30, 2002 D3LX CO and RMT Modules
Page 41

LTPS-UM-8013-03 Remote Configuration
REMOTE CONFIGURATION
Use the D3RCAM craft interface system menu to view or edit the configuration for each D3LX RMT module in
the chassis. This menu can also be used to equip, provision, assign thresholds, and assign service state. The
D3RCAM Configuration menu is shown in Figure 22 on page 34.
1 Connect a maintenance terminal to the craft port on the D3RCAM front panel. Logon to the craft interface
system as described in “Connecting a Maintenance Terminal to the D3RCAM Craft Port” on page 20.
The Main Menu appears, as shown in Figure 20. If the Main Menu does not appear, check the terminal
communication parameters (or computer software interface) and retry this procedure.
Figure 20. D3RCAM Craft Interface Main Menu
D3LX CO and RMT Modules August 30, 2002 33
Page 42

Remote Configuration LTPS-UM-8013-03
D3RCAM MENU
The D3RCAM Main Menu (as shown in Figure 21) displays following configuration options:
System
Date/Time
System
Maintenance
Protection Switch Status/Commands
D3LX Group 1
D3LX Group 2
Reset/LED Test Command
Execute ACO (Alarm Cut-Off)
Loopback Status/Commands
Display Inventory
Alarms
Display Active Alarms
Display Alarm Summary
Display Alarm History
Clear Alarm History
Display
Status
Display Shelf Status
Display D3LX Status
Unit Configuration
Figure 21. D3RCAM Menu Tree
UNIT CONFIGURATION
Use this procedure to configure each D3LX RMT module installed in the remote ch assis. Refer to your work order
for configuration settings.
Please note that it is not nece ssary to configure each card in a w orking and protect system. Both
working and protect cards are provisioned at the same time. Provisioning can be done from
either the CO or remote end.
Additionally, configuration must be done prior to testing an D3LX circuit from the remote end.
Help
Figure 22. Unit Configuration Screen
34 August 30, 2002 D3LX CO and RMT Modules
Page 43

LTPS-UM-8013-03 Remote Configuration
1 From the Main menu, select 3. Unit Confi guration.
2 Within the Unit Configuration screen (see Figure 22 on page 34), select the Group number that corresponds to
the D3LX circuit you want to configure, based on the module’s position in the remote unit.
3 Select each field parameter and move from field to field as shown in Table 7. Assign the selections by
pressing .
ENTER
Leave Unit Service State fie ld set to OOS (Out of Service) u ntil the Unit Equip State has been set.
This prevents false alarms. Set the Unit Service State to IS (In Service).
4 Repeat Steps 1 and 2 for each D3LX RMT system installed in the chassis.
Table 7. Unit Configuration Fields–D3RCAM Version 1.0 or later
Field Name Type Options Description Default
Unit Equip State Toggle EQUIPPED Establishes communication with D3RCAM.
UNEQUIPPED
Module must be set to EQUIPPED before
remaining selections are allowed.
UNEQUIPPED No communication with D3RCAM.
Unit Service State Toggle IN SERVICE Places the unit in service and allows equipment
OOS
alarm reporting by the D3RCAM. Must be set to
IS for reporting of equipment alarms.
OUT OF SERVICE Removes unit from service and stops
equipment alarm reporting by the D3RCAM.
Unit Protect State Toggle PROTECTED Line protection Unprotected
UNPROTECTED No protection
DS3 Provisioned Toggle YES Brings up DS3 default settings and allows
NO
configuration changes.
NO No configuration changes allowed.
DS3 Service State Toggle IN SERVICE Select IS after completing the remaining con-
OOS
figurations.
OUT OF SERVICE Leave this field at OUT OF SERVICE (versus IN
SERVICE) at this time to avoid undesirable
reporting of alarms.
Optical Service State Toggle IN SERVICE Places facility in service and enables T3 alarm
OOS
reporting by the D3LX RMT.
OUT OF SERVICE Removes facility from service and stops T3
alarm reporting by the D3LX RMT.
Optical BER Alarm
Threshold
Toggle Set to OFF or set
between 10
-6
and 10
The average Bit Error Ratios of both the
-10
incoming optical signals are monitored by the
10
-8
D3LX RMT. By monitoring BERs, the D3LX CO
is capable of triggering a minor alarm when any
of the monitored signals degrades below the
BER threshold level.
Optical BER Switch
Threshold
Toggle Range from 10-4 to
10
-10
Sets the threshold at which the APS will be
executed.
DS3 Remote LBO Toggle 0–225 ft., 226–450 ft. The DS3 signal output provides standard DSX
-6
10
0–225 ft.
signal levels which can be compensated for at
various distances, such as cable length.
DS3 Local LBO Toggle 0–225 ft., 226–450 ft. The DS3 signal output provides standard DSX
0–225 ft.
signal levels which can be compensated for at
various distances, such as cable length.
D3LX CO and RMT Modules August 30, 2002 35
Page 44

Troubleshooting LTPS-UM-8013-03
TROUBLESHOOTING
Before the system tests are started, the fiber-optic network and DS3 lines at both ends must be connected. The
STATUS and DS3 ONLINE LEDs should be illuminated green.
Table 8 is intended as an aid in localizing trouble. If trouble is encountered with the operation of the D3LX, verify
that all installer connections are correct and that the options are configured properly. If technical assistance is
required, refer to “Appendix C - Product Support” on page 41. ADC strongly recommends that no internal
(component level) repairs be attempted on the module. The only field service should be a fuse or module
replacement. Any unauthorized adjustments or repairs may void the unit’s warranty.
D3LX
Status
LED red?
No
Yes
Press Reset
on D3LX.
Status LED
still red?
No
STOP!
Yes
Reseat
D3LX.
Status LED
green?
Yes
STOP!
No
D3LX Opt
Fail/BER
LED red or
yellow?
No
D3LX APS
Lockout/
Force
LED red?
No
D3LX APS
Lockout/
Force LED
yellow?
No
D3LX
Remote
LED
yellow?
No
Yes
Yes
Is optical
receive level
within specs?
Correct optical receive
level (i.e., clean
connectors, remove
attenuators, etc.).
Determine reason for
lockout (i.e., online card
removed, borderline
fiber levels, etc.).Correct
condition.
Yes
Service has been manually switched
for maintenance purposes.May be
cleared through the Craft Interface or
Reset button on front panel.D3LX
Yes
Press DISP RMT
on APU.
Yes
No
Check and correct
fiber problems, (i.e.,
back reflections, etc.).
Reinsert .D3LX
STOP!
Press Reset
on . IsD3LX
condition still
present?
STOP!
Other LEDs may light to
indicate the cause of remote
alarm. Go to the Craft
Interface Active Alarms
display to determine cause.
No
STOP!
Opt Fail/
BER LED
still on?
No
STOP!
Yes
Yes
STOP!
Replace
D3LX.
Problem
resolved?
No
Call ADC.
Yes
STOP!
STOP!
Table 8. Troubleshooting
36 August 30, 2002 D3LX CO and RMT Modules
Page 45

LTPS-UM-8013-03 Appendix A - Specificatio ns
APPENDIX A - SPECIFICATIONS
Table 9. D3LX Module Specifications
Parameter Specifications Remarks
DS3
Input Frequency
Input Level
Interface Standard
Output Signal
Line Buildout - Software selectable
Input/ Output Impedance
Power
Consumption/Dissipation
Supply Voltage
Supply Current
Optical
Fiber Cable
Transmit Wavelength
D3LX CO
D3LX RMT
Optical Connector
Transmit Device
Receive Device
Transmit Power
Receive Dynamic Range
Minimum Optical Budget
BER Threshold for Protection Switching
BER Threshold for Minor Alarm
Dimensions
Size (H x W x D)
Weight
Environmental
Operating Temperature
Storage Temperature
Operating Humidity
Storage Humidity
44.736 Mbps
+5.7 dBm to -7.3 dBm
DSX-3 Bipolar
Within DSX-3 template
0 to 225, 226 to 450 ft.
75Ω ± 5%
6W
-42.0 to -56.0 Vdc
110 mA typical @ -48V
125 mA max. @ -48V
9/125 µm single-mode
1550 nm ± 40 nm
1310 nm ± 40 nm
SC or FC
Laser
PIN Photodiode
-7 dBm ± 2 dBm
-5 dBm to -23 dBm
13 dB
-4
8.5 x 10
1 x 10⁻⁴ to 1 x 10
4.4 x 1.4 x 9.2 in.
(11.2 x 3.6 x 23.4 cm)
1.0 lb (.45 kg)
-40°C to +65°C (-40°F to + 149°F)
-40°C to +80°C (-40°F to + 176°F)
5% to 95%
5% to 95%
to 1 x 10
-10
-10
Nominal
Per catalog number
Average Power
Software selectable threshold
Software selectable threshold
Each module
No condensation
No condensation
D3LX CO and RMT Modules August 30, 2002 37
Page 46

Appendix A - Specifications LTPS-UM-8013-03
D3LX CARD-EDGE CONNECTOR
Figure 23 shows the pin assignments of the card-edge connector on the D3LX card. Active pins are highlighted
in black.
CHASSIS GND
-48VDC B
DS3RXRING2
DS3RXTIP2
DS3RXRING1
DS3RXTIP1
TXMATECOMDAT
TXMATECOMCLK
GND
PS2 ALM
MPUDATOUT MPUDATIN MATEBRDFAIL
MPUDATOUT
MPUFAIL
SLOTADD3
SLOTADD0
-48VDC RTNA
CHASSIS GND
AMAJ
VMAL
GND
DS3RXRING2
DS3RXTIP2
DS3RXRING1
DS3RXTIP1
TXMATECOMDAT
TXMATECOMCLK
GND
GNDGND GND
MPUDATIN MYBRDFAIL
SLOTADD4 TESTLED
SLOTADD1 SLOTADD2
GND
-48VDC RTNB
ACOSWITCH
ACOSWITCH
AMIN
VMIN
REMALM
HSKPB
DISPLAYREM
GND
MPUCLKIN
MPUCLKIN
-48VDC A
32
31
30
29
28
27
26
25
24
23
22
21
20
19
18
17
16
15
14
13
12
11
10
9
8
7
6
5
4
3
2
1
BCA
Figure 23. D3LX Card-Edge Connector
38 August 30, 2002 D3LX CO and RMT Modules
Page 47

LTPS-UM-8013-03 Appendix B - Cleani ng and Mating Fiber-Optic Systems
APPENDIX B - CLEANING AND MATING
FIBER-OPTIC SYSTEMS
The performance of a fiber-optic system is mainly dependent on the fiber-optic connector cleaning procedures
performed before installation. Clean all connectors and adapters before making any connections.
CLEANING
1 Assemble the required cleaning materials shown in Figure 24:
• Lint-free laborato ry wipes
• Cotton tipped swabs
• Isopropyl alcohol in a pressurized dispenser
• Lint-free pipe cleaners
• Clean, dry, oil-free compressed air
M
A
H
L
M
A
H
S
F
F
A
M
A
H
S
F
F
B
F
L
F
F
L
F
L
H
B
A
K
U
M
Q-Tips
SINGLE TIPPED
L
APPLICATIONORS
U
K
L
B
L
U
W
K
O
B
L
B
H
W
F
O
L
O
B
S
O
F
B
L
W
S
B
K
H
B
F
A
O
U
L
H
B
M
H
W
S
B
H
K
A
B
U
M
H
H
100
KDLF;L
100
SIX INCH
DR
U
K
PIPE
CLEANERS
I
L
S
O
Y
O
PP
R
SDLJF;LETHIEDF
A
L
OOLHC
OOLHC
A
ISO O LLPPRY
OL
P
CISOOL
A
PPY
LOL
P
C
A
ISOOLPPRY
ASKLHF; SDA
OPR
KDL
PIPE
CLEANERS
Figure 24. Cleaning Materials
2 Clean connectors as follows:
a Moisten a lint-free wipe with alcohol and then wipe completely around the connector ferrule twice; wipe
several times across the tip.
b Use a lint-free dry wipe to wipe completely around the conn ector ferrule twice; wipe several times across
the tip.
c Blow across the end of the ferrule with clean, dry, compressed air.
d Visually inspect the connector tip for cleanliness. If the tip does not appear to be thoroughly cleaned,
repeat Step a through Step c.
3 Clean adapters as follows:
a SC and FC adapters are cleaned by using a pipe cleaner moistened with alcohol. Insert the pipe cleaner
into either end of the adapter and rotate so the inside surface of the adapter is wiped by the pipe cleaner.
Repeat this procedure for the opposite end.
b Blow the adapter dry with clean compressed air.
4 Clean attenuators with clean, dry compressed air only. Do not use a moistened wipe or pipe cleaner.
D3LX CO and RMT Modules August 30, 2002 39
Page 48

Appendix B - Cleaning and Ma ti ng F ib er-O ptic Systems LTPS-UM-8013-03
MATING
Mate the SC and FC connectors by inserting the connector into the adapter and aligning the connector key with
the adapter key slot as follows:
• FC connectors—Align the housing key with the slot in the adapter. Push the connector into the adapter and
screw the threaded cap clockwise onto the adapter to complete the connection.
• SC connector—Align the housing key with the slot in the adapter. Push the connector into the adapter until
a click is heard/felt, indicating that the latching system is engaged. When connector is fully engaged, the white
stripes on the sides of the connector housing should be hidden inside the adapter.
40 August 30, 2002 D3LX CO and RMT Modules
Page 49

LTPS-UM-8013-03 Appendix C - Product Support
APPENDIX C - PRODUCT SUPPORT
ADC Customer Service Group provides expert pre-sales and post-sales support and training for all its products.
Technical support is available 24 hours a day, 7 days a week by contacting the ADC Techni cal Assistance Center.
Sales Assistance
800.366.3891 extension 73000
(USA and Canada)
952.917.3000
Fax: 952.917.3237
Systems Integration
800.366.3891, extension 73000 (USA and Canada)
952.917.3000
ADC Technical Assistance Center
800.638.0031
714.730.3222
Fax: 714.730.2400
Email: wsd_support@adc.com
Online Technical Support
• Quotation Proposals
• Ordering and Delivery
• General Product Information
• Complete Solutions (from concept to installation)
• Network Design and Integration Testing
• System Turn-Up and Testing
• Network Monitoring (upstream or downstream)
• Power Monitoring and Remote Surveillance
• Service/Maintenance Agreements
• Systems Operation
• Technical Information
• System/Network Configuration
• Product Specification and Application
• Training (product-specific)
• Installation and Operation Assistance
• Troubleshooting and Repair/Field Assistance
• www.adc.com/Knowledge_Base/index.jsp
Online Technical Publications
Product Return Department
800.366.3891 ext. 73748 or
952.917.3748
Fax: 952.917.3237
Email: repair&return@adc.com
All telephone numbers with an 800 prefix are toll-free in the USA and Canada.
D3LX CO and RMT Modules August 30, 2002 41
• www.adc.com/library1/
• ADC Return Material Authorization (RMA) number and
instructions must be obtained before returning products.
Page 50

Appendix D - Abbreviat ion s LTPS-UM-8013-03
APPENDIX D - ABBREVIATIONS
A
APS: Automatic Protection Switching
APU: Alarm Processing Unit
ATM: Asynchronous Transport Mode
B
BER: Bit Error Rate
BNC: Bayonet-Locking Connector
C
CO: Central Office
CPE: Customer Premises Equipment
D
DCE: Data Communication Equipment
DTE: Data Terminal Equipment
E
ESD: Electrostatic Discharge
I
IS: In Service
L
LBO: Line Build Out
LEC: Loop Extender Chassis
LMPTST: Lamp Test
LOF: Loss-Of-Frame
O
OOS: Out-Of-Service
S
SCU: Soneplex Controller Unit
SMDS: Switched Multimegabit Data Service
W
WDM: Wavelength Division Multiplexing
42 August 30, 2002 D3LX CO and RMT Modules
Page 51

CERTIFICATION AND WARRANTY
FCC CLASS A COMPLIANCE
This equipment has been tested and found to comply with the limits for a Class A digital device, pursuant to Part 15 of the FCC Rules. These
limits are designed to provi de reasonable protection a g ai nst harmful interference w hen the equipment is opera ted in a commercial
environment. This equi pm ent generates, uses, and can radi at e radio frequency energy and, if not installed and used in acc ordance with the
instruction manual, may cause harmful interferen ce to ra dio communications. Operation of this equipment in a resi dential area is likely to
cause harmful interference in which case the user will be required to correct the interfer ence at his own expense.
LIMITED WARRANTY
ADC DSL Systems, Incorporated (“ADC”) warrants tha t, for a period of sixty (60) months from the date of shipment, the hardware portion
of its products will be free of material defects and faulty workmanship under normal use. ADC's obligation, under this warranty, is limited to
replacing or repairing, at ADC's option, any such hardware product which is returned during the 60-month warranty period per ADC's
instructions and which produc t is confirmed by ADC not to comply wi th the fore goi ng w arranty.
ADC warrants that, for a period of 90 days from the date of purchase, the software furnished with its products w il l operate substantially in
accordance wit h th e A DC published speci fications and docu mentation for such software. ADC’s entire liabili t y fo r software that does not
comply with the foregoing warranty and is reported to AD C during the 90-day warran ty pe riod is, at ADC’s option, eith er (a) return of the
price paid or (b) repair or replace of the software. ADC also warrants that, for a period of thirty (30) days from the date of purchase, the media
on which software is stored will be free from material defects under normal use. ADC will replace defective media at no charge if it is returned
to ADC during the 30-day warranty period along with proof of the date of shipment.
The transportation charges for shipment of returned produc ts t o A D C wil l be pre paid by the Buyer. ADC will pay transp ort at io n charges for
shipment of replacement products to Buyer, unless no troubl e i s fo und (NTF), in which case the Buye r w il l pay transportation charges.
ADC may use reconditioned parts for such repair or replacement. This warranty does not apply to any product which has been repaired, worked
upon, or altered by persons not authorized by ADC or in ADC's sole judgment has been subjected to misuse, accident, fire or other casualty,
or operation beyond its design rang e.
Repaired products have a 90-day warranty, or until th e end of the original warranty peri od—whichever period is greater.
ADC DISCLAIMS ALL OTHER WARRANTIES, EITHER EXPRESS OR IMPLIED, INCLUDING BUT NOT LIMITED TO IMPLIED
WARRANTIES OF MERCHANTABILITY AND FITNESS FOR A PARTICULAR PURPOSE, WITH RESPECT TO ITS PRODUCTS
AND ANY ACCOMPANYING WRITTEN MATERIALS. FURTHER, ADC DOES NOT WARRANT THAT SOFTWARE WILL BE
FREE FROM BUGS OR THAT ITS USE WILL BE UNINTERRUPTED OR REGARDING THE USE, OR THE RESULTS OF THE USE,
OF THE SOFTWARE IN TERMS OF CORRECTNESS, ACCURACY, RELIABILITY OR OTHERWISE.
MODIFICATIONS
Any changes or modifications made to this device that are not expressly approved by ADC DSL Systems, Inc. voids the user's warranty.
All wiring external to the pr oducts should follow the provisio ns of the current edition of the Nati onal Electrical Code.
STANDARDS COMPLIANCE
This equipment has been tested and verified to comply with the a ppl ic able sections of the following stand ards:
• GR 63-CORE - Network Equipment-Building Syste m (N EB S) Requirements (D3LX CO only)
• GR 1089-CORE - Electromagnetic Compatibility and Electrica l Safety (D3LX CO only )
• UL-1459 and CSA-C22.2, 225-M90: Telecom m unications Equipment El ectronic and Electrical Sa fet y
For technical assistance, refer to “Appendix C - Product Support” on page 41.
Page 52

ADC DSL Systems, Inc.
14402 Franklin Avenue
Tustin, CA 92780-7013
Tel: 714.832.9922
Fax: 714.832.9924
Technical Assistance
Tel: 800.366.3891 x73223
Fax: 952.917.3244
ISO9001/TL9000
DNV Certificat ion, Inc.
REGISTERED FIRM
DOCUMENT: LTPS-UM-8013-03
´,HS¶8N¨
1240518
 Loading...