

Page 1

XTREME PERFORMANCE GEAR
QUICK
START
GUIDE
XPG STARKER COMPACT MID-TOWER CHASSIS
22
YEAR
LIMITED
LIMITED
WARRANTY
WARRANTY
ADATA Technology Co., Ltd.
2F, No. 258, Liancheng Rd., Zhonghe Dist., New Taipei City 235, Taiwan
Product Name: XPG STARKER
產品類別:PC 機殼/PC
委製商: 威剛科技股份有限公司/
地址: 235 新北市中和區連城路258號2樓/
Tel :
+886-2-8228-0886
MADE IN CHINA
產地: 中國/
中国
機殼
威剛科技股份有限公司
Fax:
新北市中和區連城路258號2樓
+886-2-8228-0887
Page 2

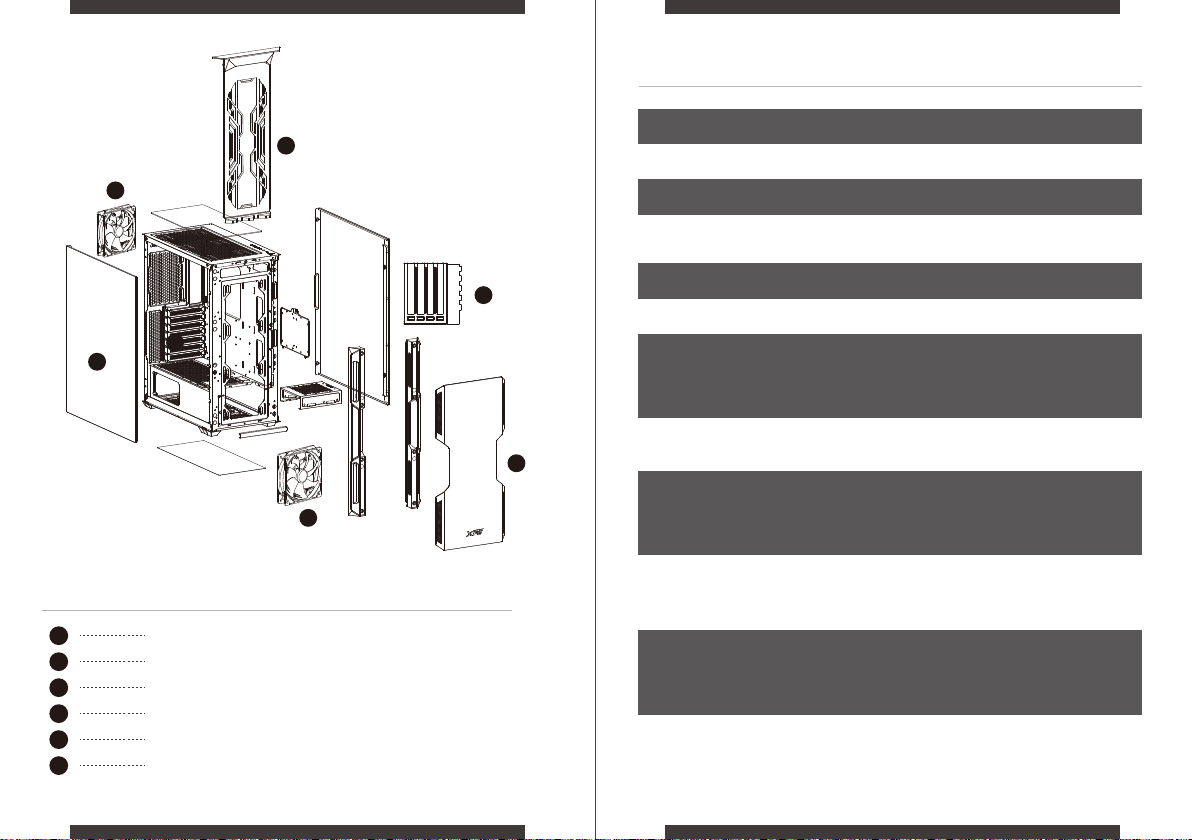
PACKAGE CONTENT
1.
XPG STARKER Chassis
2.
XPG STARKER Quick Installation Guide
3.
Warranty Guide
4.
VGA Bracket x1 for Vertical Installation
5.
Accessory Box
ACCESSORY BOX CONTENTS
Package Content
Specifications
Chassis I/O Port
Lead Installation Guide
Installation
Warranty Guide
02
04
05
06
07
15
x6
x3
x1
PSU Screws
Motherboard Standoffs
Nut Setter
x17
x8
x8
02
Motherboard Screws
HDD/SSD Screws
Cable Ties
Page 3
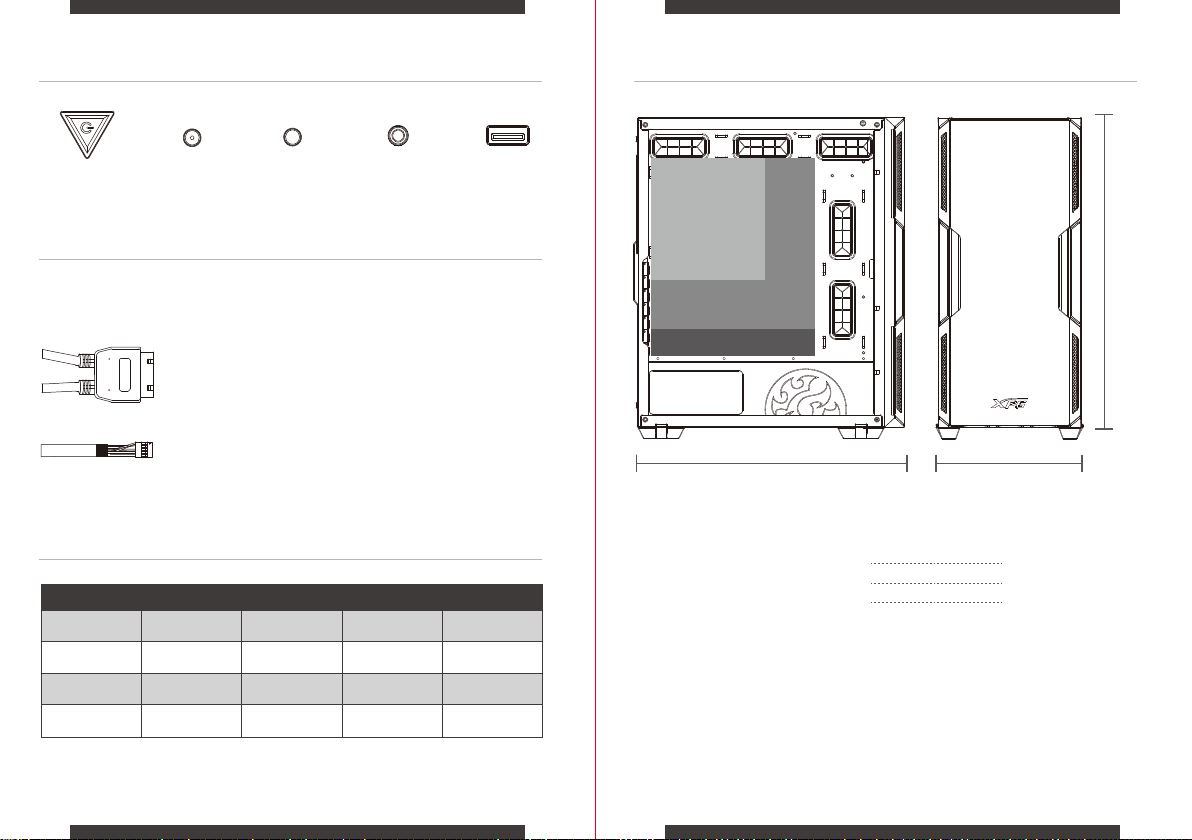
SPECIFICATIONS
B
E
C
D
F
XPG STARKER
COMPACT MID-TOWER CHASSIS
A
B
C
D
E
F
Magnetic Front Panel
“Removable-on-Rail” Dust Filter
Glass Panel
Replaceable VGA Brackets
1x XPG VENTO ARGB 120mm Fan Included
1x XPG VENTO 120mm Fan Included
Color
Form Factor
Dimensions
(H x W x D) 465 x 215 x 400mm
PCI-E Slots
D
3.5" Drive Bay 2+1 (Combo 3.5” / 2.5”)
2.5” Drive Bay
Fan Mounts
A
Fan Pre-Installed
Radiator Support
Black / White
Mini-ITX, Micro-ATX, ATX
7 Horizontal / 4 Vertical
(Transformable for Vertical GPU Support)
(Combo 3.5” / 2.5”)
2+1
FRONT
TOP
REAR
FRONT
REAR
FRONT
TOP
REAR
120mm x 3 / 140mm x 2
120mm x 2 / 140mm x 2
120mm x 1
XPG VENTO 120 x 1
XPG VENTO 120 ARGB x 1
360 / 280 / 240mm x 1
280 / 240 / 120mm x 1
120mm x 1
2 x USB 3.0 / 1 x Hybrid Audio Port
I/O Ports
1 x LED Button /*1 x Power Button
1 x Reset Button
VGA:350mm
Compatibility
CPU Cooler:165mm
PSU:160mm
0403
Page 4
FRONT I/O BUTTONS and PORTS DIMENSIONS and COMPATIBILITY
Power Button
Reset Button
LED Button
Hybrid Audio Port
USB 3.0 x 2
FRONT I/O CABLES
Please consult your user manual of motherboard manufacturer,
then connect these leads to the panel header on the motherboard.
USB3.0
USB 3.0 Connection : Please refer to the motherboard manual
for more information on the USB 3.0 connection.
Audio Connection:Please refer to the motherboard installation to
HD AUDIO
avoid the device error and cause the motherboard sound device to
be damaged.
PRE-SET LIGHTING EFFECTS
MODE DESCRIPTIONS
Mode 1 Mode 2 Mode 3 Mode 4 Mode 5
Red Green Blue Purple Yellow
Mode 6 Mode 7 Mode 8 Mode 9-12 Mode 13
White Orange Neon Green
Lighting effect
No. 1-4
Off
Mini-ITX
Micro-ATX
ATX
400mm 215mm
VGA Length Limitation
CPU Cooler Height Limitation
PSU Length Limitation
465mm
350mm
165mm
160mm
0605
Page 5
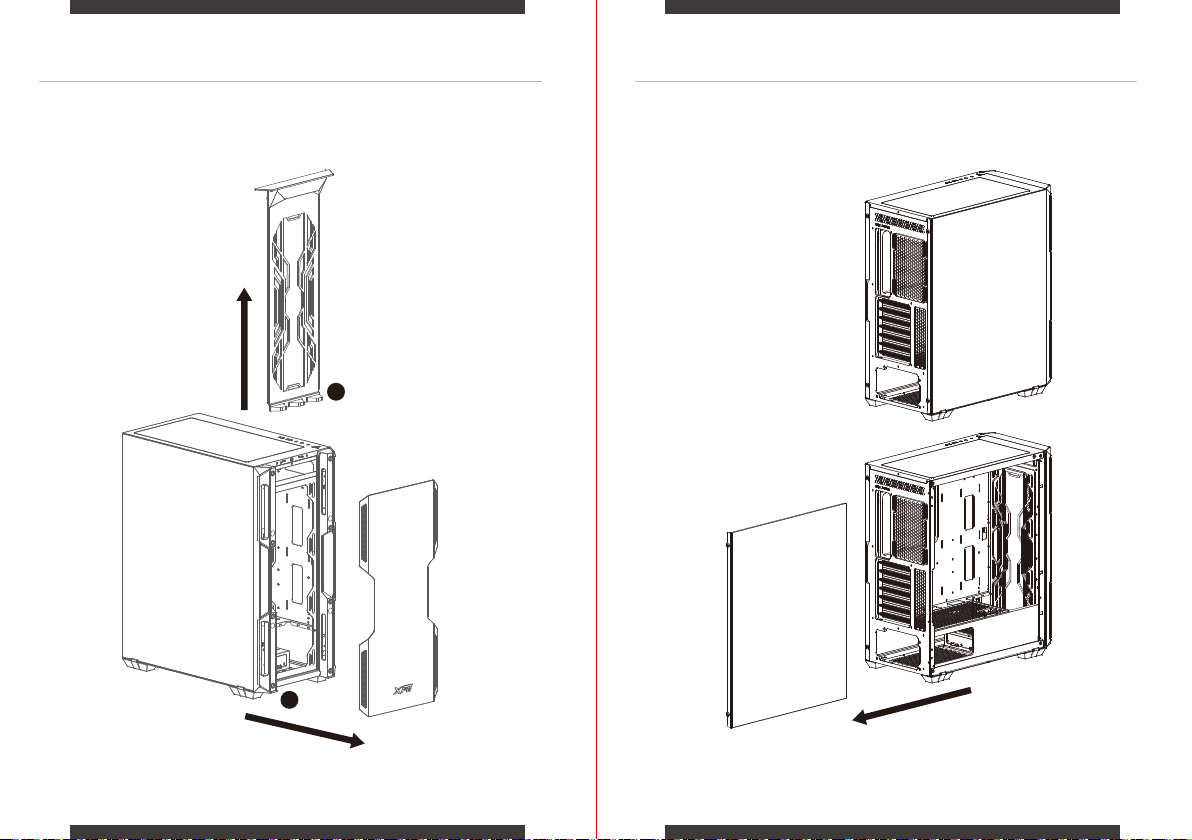
REMOVING THE FRONT PANEL and THE DUST FILTER REMOVING THE GLASS SIDE PANEL
1. Detach the Magnetic Front Panel
2. Pull Up the Removable-on-Rail Dust Filter
Manually unscrew the glass side panel, and pull backward with care.
2
1
0807
Page 6

POWER SUPPLY INSTALLATION FAN LOCATIONS and RADIATOR COMPATIBILITY
Compatibility Chart:Fan
Top
Rear
Quantity
140mm
x2x2x3
-
120mm
Location
Front
x2 Pre-Installed Fans:
XPG VENTO 120 at Front
XPG VENTO 120 ARGB at Rear
x2
x1
Compatibility Chart:Radiator
Radiator Size (mm)
360
280
240
140
120
Front
V
V
V
V
V
Location
Top Rear
V
V
V
V V
--
-
-
-
STORAGE LOCATIONS:3.5” HDD and 2.5” HDD/SSD
2.5” x2
2.5” x2 Or 3.5” x1
Combo 2.5”(x1) + 3.5” (x1)
Or 3.5” (x2)
1009
Page 7

DRIVES INSTALLATION INSTALLING COMBO STORAGE
Included Drive plate can install x1 3.5” HDD on top of PSU compartment,
or x2 2.5” HDD/SSD at the back of the chassis.
Place x2 3.5” HDD on the tray and beneath it,
and secure both with screws.
STORAGE
3.5” HDD
2.5” HDD/SSD
Support up to x2 2.5” HDD/SSD
Secure the drives to the plate with screws
2+1(Combo 3.5”/2.5”)
2+1(Combo 3.5”/2.5”)
Or
A Combo Installation with x1 2.5” HDD/SSD on
top of the tray, and x1 3.5” HDD beneath it.
1211
Page 8

INSTALLING PCI-E CARD
INSTALLING PCI-E CARD:Vertical
Horizontal Installation Vertical Installation
INSTALLING PCI-E CARD:Horizontal
Remove the pre-installed Horizontal VGA bracket,
and replace it with the included Vertical bracket.
1413
Page 9

EN
DE
CLEANING INSTRUCTIONS
Please use a clean damp cloth to clean the product properly.
Do not apply any soap or solvent agent on the surface to preserve its integrity.
SAFETY INSTRUCTIONS
For a proper use of the product, and to ensure your safety,please follow the following
instructions:
1.
Keep the device away from liquids, excess humidity or moisture to avoid any shock
hazards. Should the device come into contact with liquids, please make sure to unplug the
device immediately, store it in a dry place, and contact support for assistance.
Operate the device only within the specific temperature range of 0°C (32°F) to 40°C
2.
(104°F). Should the temperature exceed this range, unplug and/or switch off the device in
order to let the temperature stabilize to an optimal level.
3.
Should you have any other trouble operating the device properly and normal
troubleshooting does not work, please unplug the device and contact our service for
support.
Do not attempt to service or fix the device by yourself at any time.
4.
DURATION OF WARRANTY
ADATA Technology Co., Ltd. provides a two-year warranty period for this product unless
regional laws and regulations state otherwise.
LIMITATION OF WARRANTY
This limited warranty covers only repairs or replacements of products manufactured by
ADATA Technology Co. Ltd. and its authorized partners.
Please note that ADATA is responsible for providing free repairs except for the following
reasons:
1.
The warranty label is altered, damaged or missing.
Product serial number does not conform to our original system.
2.
Products purchased from an unauthorized agent.
3.
Damage caused by natural calamity
4.
Any abuse outside the intended product operation.
5.
ONLINE CUSTOMER SERVICE
For frequently asked questions, additional information and service instruction
please visit the product page at www.xpg.com
REINIGUNGSANWEISUNGEN
Bitte reinigen Sie das Produkt angemessen mit einem sauberen, feuchten Tuch.
Wenden Sie zur Wahrung ihrer Integrität weder Seife noch Lösungsmittel auf die Oberfläche an.
SICHERHEITSHINWEISE
Befolgen Sie für eine sachgemäße Produktverwendung und zur Gewährleistung Ihrer
Sicherheit die folgenden Hinweise:
Halten Sie das Gerät von Flüssigkeiten, übermäßiger Feuchtigkeit oder Nässe fern. Andernfalls
1.
droht Stromschlaggefahr. Falls das Gerät mit Flüssigkeiten in Kontakt kommt, müssen Sie
umgehend den Netzstecker ziehen, das Gerät an einem trockenen Ort aufbewahren und den
Kundendienst kontaktieren.
Nehmen Sie das Gerät nur innerhalb des angegebenen Temperaturbereichs von
2.
0 bis 40 °C in Betrieb. Bei Temperaturen außerhalb dieses Bereichs sollten Sie den Netzstecker
ziehen und/oder das Gerät abschalten, bis sich die Temperatur auf einen optimalen Wert
stabilisiert hat.
3.
Falls andere Probleme beim Betrieb Ihres Gerätes auftreten oder die normale Fehlerbehebung
nicht hilft, ziehen Sie bitte den Netzstecker und wenden Sie sich für Support an unseren
Kundendienst.
Versuchen Sie niemals, das Gerät eigenhändig zu reparieren oder zu warten.
4.
GARANTIEDAUER
ADATA Technology Co., Ltd. bietet eine zweijährige Garantiedauer für dieses Produkt,
sofern nicht von regionalen Gesetzen und Vorschriften anders verlangt.
GARANTIEBESCHRÄNKUNG
Diese eingeschränkte Garantie deckt nur Reparaturen oder Auswechslungen von durch
ADATA Technology Co., Ltd. und seine autorisierten Partner ab.
Bitte beachten Sie, dass ADATA für die Bereitstellung kostenloser Reparaturen
verantwortlich ist, mit folgenden Ausnahmen:
1.
Das Garantieetikett wurde verändert, beschädigt oder fehlt.
Produktseriennummer stimmt nicht mit unserem ursprünglichen System überein.
2.
Produkte wurden bei einem unautorisierten Händler erworben.
3.
Schäden aufgrund von Naturkatastrophen.
4.
Missbrauch bzw. Verwendung unter Nichtbeachtung der Bedienungsanweisungen.
5.
ONLINE-KUNDENDIENST
Bei häufig gestellten Fragen finden Sie zusätzliche Informationen und Serviceanweisungen
auf der Produktseite unter www.xpg.com
1615
Page 10

FR
ES
INSTRUCTIONS DE NETTOYAGE
Veuillez utiliser un chiffon propre et humide pour nettoyer correctement le produit.
Ne pas utiliser de savon ou de solvant sur la surface pour préserver son intégrité.
INSTRUCTIONS DE SÉCURITÉ
Pour une utilisation correcte du produit et pour votre propre sécurité, veuillez suivre les
instructions suivantes :
1.
Tenez l'appareil à l'écart des liquides, de la vapeur excessive ou de l'humidité pour éviter
tout risque de choc électrique. Si l'appareil entre en contact avec des liquides,
débranchez-le immédiatement, mettez-le dans un endroit sec et contactez notre service
après-vente pour assistance.
2.
N'utilisez l'appareil que dans la plage de température spécifiée de 0°C (32°F) à 40°C
(104°F). Si la température sort de cette plage, débranchez et / ou éteignez l'appareil pour
stabiliser la température à un niveau optimal.
Si vous avez d'autres problèmes de fonctionnement avec l'appareil et que le dépannage
3.
normal ne fonctionne pas, veuillez débrancher l'appareil et contacter notre service
après-vente pour assistance.
4.
N'essayez jamais d'installer ou de réparer l'appareil vous-même.
DURÉE DE GARANTIE
ADATA Technology Co., Ltd. offre une garantie limitée de deux ans pour ce produit, à moins
que les lois et règlements régionaux ne stipulent le contraire.
LIMITATION DE GARANTIE
Cette garantie limitée couvre uniquement les réparations ou les remplacements des produits
fabriqués par ADATA Technology Co., Ltd. et ses partenaires autorisés.
Veuillez noter qu'ADATA est responsable de fournir des réparations gratuites, sauf pour dans
les cas suivants :
1.
L'étiquette de garantie a été altérée, endommagée ou enlevée.
Le numéro de série du produit n'est pas conforme à notre système original.
2.
Les produits achetés d'un agent non autorisé.
3.
Les dommages causés par une catastrophe naturelle
4.
Tout abus en dehors de l'utilisation prévue du produit.
5.
SERVICE APRÈS-VENTE EN LIGNE
Pour les questions fréquemment posées, des informations supplémentaires et des
instructions de service, veuillez consulter la page du produit sur www.xpg.com
INSTRUCCIONES DE LIMPIEZA
Utilice un paño limpio y húmedo para limpiar el producto adecuadamente.
Para conservar la integridad del producto, no aplique jabón o agente disolvente sobre la superficie.
INSTRUCCIONES DE SEGURIDAD
Para usar el producto adecuadamente y garantizar su seguridad, siga las siguientes
instrucciones:
Mantenga el dispositivo alejado de líquidos, humedad excesiva o humedad para evitar riesgos de
1.
descarga. Si el dispositivo entra en contacto con líquidos, asegúrese de desenchufarlo
inmediatamente, guárdelo en un lugar seco y póngase en contacto con el servicio de soporte
técnico para obtener ayuda.
Utilice el dispositivo dentro del intervalo de temperatura especificado de 0 °C (32 °F) a 40 °C
2.
(104 °F). Si la temperatura supera este intervalo, desenchufe y/o apague el dispositivo para
permitir que la temperatura se estabilice en un nivel óptimo.
3.
Si tiene algún otro problema al utilizar el dispositivo correctamente y la solución normal no
funciona, desenchúfelo y póngase en contacto con nuestro servicio de soporte técnico.
No intente reparar o arreglar el dispositivo usted mismo en ningún momento.
4.
DURACIÓN DE LA GARANTÍA
ADATA Technology Co., Ltd. proporciona un período de garantía de dos años para este
producto a menos que las leyes y regulaciones
LIMITACIÓN DE LA GARANTÍA
Esta garantía limitada cubre solo las reparaciones o sustituciones de productos fabricados
por ADATA Technology Co., Ltd. y sus socios autorizados.
Tenga en cuenta que ADATA es responsable de proporcionar reparaciones gratuitas, excepto
por las siguientes razones:
1.
La etiqueta de garantía está modificada, dañada o perdida.
El número de serie del producto no se ajusta a nuestro sistema original.
2.
Productos adquiridos a agentes no autorizados.
3.
Daños causados por desastres naturales
4.
Cualquier abuso fuera de la operación prevista del producto.
5.
SERVICIO EN LÍNEA DE ATENCIÓN AL CLIENTE
Para preguntas frecuentes, información adicional e instrucciones de servicio, visite la página
del producto en www.xpg.com.
1817
Page 11

PT
RU
INSTRUÇÕES DE LIMPEZA
Use um pano úmido limpo para limpar o produto corretamente.
Não aplique qualquer tipo de sabão ou agente solvente na superfície para que se preserve sua
integridade.
INSTRUÇÕES DE SEGURANÇA
Para um uso adequado do produto e para garantir sua segurança, siga as seguintes
instruções:
1.
Mantenha o dispositivo afastado de líquidos, excesso de umidade ou umidade para evitar
riscos de choque. Se o dispositivo entrar em contato com líquidos, certifique-se de
desconectá-lo imediatamente, armazená-lo em local seco e entrar em contato com o
2.
suporte para obter assistência.
Utilize o dispositivo apenas dentro da faixa de temperatura específica de 0 °C (32°F) a
40°C (104°F). Se a temperatura exceder esse limite, desconecte e/ou desligue o
dispositivo para permitir que a temperatura se estabilize em um nível ideal.
3.
Se você tiver qualquer outro problema ao operar o dispositivo corretamente e a solução de
problemas normal não funcionar, desconecte o dispositivo e entre em contato com nosso
serviço para obter suporte.
Não tente, por si mesmo, consertar o dispositivo em momento algum.
4.
DURAÇÃO DA GARANTIA
ADATA Technology Co., Ltd. oferece um período de garantia de dois anos para este produto,
a menos que as leis e regulamentos regionais determinem o contrário.
LIMITAÇÃO DE GARANTIA
Esta garantia limitada cobre apenas reparos ou substituições de produtos fabricados pela
ADATA Technology Co., Ltd. e seus parceiros autorizados.
Note que a ADATA é responsável por fornecer reparos gratuitos, exceto pelos seguintes
motivos:
1.
A etiqueta de garantia está alterada, danificada ou faltando.
O número de série do produto não está conforme o nosso sistema original.
2.
Produtos comprados de um agente não autorizado.
3.
Danos causados por catástrofes naturais
4.
Qualquer desvio fora da operação pretendida do produto.
5.
SERVIÇO AO CLIENTE ONLINE
Para perguntas frequentes, informações adicionais e instruções sobre serviços, visite a página
do produto em www.xpg.com
ИНСТРУКЦИИ ПО ВЫПОЛНЕНИЮ ОЧИСТКИ
Для правильной очистки устройства возьмите чистую влажную салфетку.
Чтобы не повредить поверхность, не наносите на нее мыло и растворители.
ИНСТРУКЦИИ ПО ТЕХНИКЕ БЕЗОПАСНОСТИ
Для правильной и безопасной эксплуатации устройства соблюдайте приведенные
ниже инструкции.
Держите устройство вдали от различных жидкостей, сильной влажности или влаги во
1.
избежание поражения электрическим током. В случае попадания на устройство жидкости
сразу отключите его от электросети, поместите на хранение в сухое место и обратитесь за
помощью в службу поддержки.
2.
Эксплуатация устройства разрешена при температуре от 0°C(32°F) до 40 °C (104°F). В том
случае, если температура воздуха не соответствует указанному диапазону, выключите
питание устройства и (или) отключите его от электросети и дождитесь стабилизации
температуры до оптимального уровня.
3.
В том случае, если в работе устройства возникли нарушения, которые не удалось устранить
с помощью стандартных инструкций по поиску и устранению неисправностей, отключите
устройство от электросети и обратитесь в службу поддержки нашей компании.
Ни в коем случае не пытайтесь выполнять обслуживание или ремонт устройства
4.
самостоятельно.
СРОК ДЕЙСТВИЯ ГАРАНТИИ
Компания ADATA Technology Co., Ltd. предоставляет гарантию на данное устройство
сроком на два года при отсутствии иных требований региональных законов и норм.
ОГРАНИЧЕНИЕ ГАРАНТИИ
Данная ограниченная гарантия включает только ремонт или замену устройств,
изготовленных компанией ADATA Technology Co., Ltd. и ее уполномоченными партнерами.
Обратите внимание на то, что ADATA не обязуется предоставлять ремонт бесплатно в
следующих случаях:
Гарантийная наклейка изменена, повреждена или отсутствует.
1.
Серийный номер устройства не соответствует номеру в нашей исходной системе.
2.
Устройство было приобретено у неуполномоченного агента.
3.
Повреждение возникло в результате стихийного бедствия.
4.
Повреждения связаны использованием устройства не по назначению.
5.
ИНТЕРАКТИВНАЯ СЛУЖБА ПОДДЕРЖКИ ПОКУПАТЕЛЕЙ
Для просмотра вопросов и ответов, дополнительных сведений и инструкций по
выполнению обслуживания посетите страницу устройства на веб-сайте www.xpg.com
2019
Page 12

KR
JP
청소 지침
깨끗하고 축축한 천을 사용하여 제품을 올바르게 닦으십시오.
무결성을 보존하기 위해 표면에 비누나 용액을 발라서는 안 됩니다.
안전 지침
제품을 올바르게 사용하고 안전을 보장하려면 다음 지침을 따라야 합니다.
1.
감전을 방지하기 위해 장치를 액체, 과도한 습기 또는 수분이 들어가지 않도록 멀리 두십시오.
장치가 액체와 접촉한 경우 장치 전원을 즉시 차단하고, 건조한 곳에 둔 후 지원 부서에
도움을 요청하십시오.
0°C (32°F) à 40°C (104°F)의 특정 온도 범위 내에서만 장치를 작동하십시오. 온도가 해당
2.
범위를 초과할 경우, 장치의 전원을 차단하거나 스위치를 꺼서 온도를 최적의 수준으로
안정화 시키십시오.
장치를 제대로 작동하는 데 문제가 있고 일반적인 문제 해결 방법으로 해결할 수 없을 경우,
3.
장치의 전원을 차단하고 서비스 부서에 지원을 요청하십시오.
어느 때이건 직접 장치를 정비 또는 수리하려 해서는 안 됩니다.
4.
보증 기간
ADATA Technology Co., Ltd. 는 지역 법률 및 규정에 다르게 명시되지 않는 이상, 이 제품에
대해 2년 보증을 제공합니다.
보증 제한
이 제한된 보증은 ADATA Technology Co., Ltd. 및 그 공인 파트너가 제조한 제품 수리 또는
교체에만 적용됩니다. ADATA 는 다음의 경우 이외에는 무료 수리 서비스를 제공할 책임이
있습니다.
1.
보증 라벨이 변형, 손상 또는 누락된 경우.
제품 일련번호가 원래 시스템과 일치되지 않는 경우.
2.
공인되지 않은 에이전트에서 구매한 제품의 경우.
3.
자연 재해로 인해 손상이 발생한 경우.
4.
원래 제품 용도를 벗어나 오용하여 작동한 경우.
5.
온라인 고객 서비스
자주 묻는 질문, 추가 정보 및 서비스 지침은 www.xpg.com 의 제품 페이지를 방문하십시오.
お手入れ方法
清潔な布を湿らせて、適切な方法で製品を拭いてください。
表面の完全性が損なわれてしまうのを防ぐため、石鹸や溶剤を表面に塗らないでください。
安全に関する説明
製品を正しく使用して安全を確保するため、次の手順に従ってください。
1.
感電の危険性があるため、液体や過度の湿度、湿気に本装置を近づけないでください。本装置が
液体に接触した場合は、直ちに装置のプラグを抜き、乾燥した場所に保管の上、サポートまでお
問い合わせください。
装置は、0°C(32°F)〜40°C(104°F)の指定された温度範囲内でのみ動作させてください。温度が
2.
この範囲を超えた場合は、装置のプラグを抜くか電源を切り、温度が最適なレベルで安定するよ
うにしてください 。
3.
本装置を正常に動作させる上で他の問題が発生した場合や、通常のトラブルシューティングで解
決できない問題が発生した場合は、デバイスのプラグを抜き、当社のサービス担当にお問い合
わせください。
いかなる場合でも、自身で装置の点検や修理を試みないでください
4.
保証期間
その地域の法規制に別段の定めがない限り、ADATA Technology Co., Ltd. は本製品に対して2
年間の保証を提供します。
保証の制限
本限定保証は、ADATA Technology Co., Ltd. およびその認定パートナーが製造した製品の修理
または交換のみを対象としています。A DATA は、次の理由による場合を除き、ケースの無料修理
サービスを提供しています:
1.
保証ラベルが変更、破損、または紛失している場合。
製品のシリアル番号が、当社のオリジナルシステムのものと一致しない場合。
2.
認定されていない代理店から購入された製品の場合。
3.
自然災害による被害。
4.
製品に意図する動作を超えた悪用。
5.
オンラインカスタマーサービス
よくある質問や追加情報、および修理に関する説明については、www.xpg.com
にある製品ページをご覧ください。
2221
Page 13

AR
TC
ﻒﻴﻈﻨﺘﻟا تﻴﻠﻌﺗ
ً
ظﺎﻔﺤﻠﻟ ﺢﻄﺴﻟا ﲆﻋ ﺐﻳﺬﻣ لﻮﻠﺤﻣ يأ وأ نﻮﺑﺎﺼﻟا مﺪﺨﺘﺴﺗ ﻻﻪﺘﻣﻼﺳ ﲆﻋ
اﺪﻴﺟ ﺞﺘﻨﳌا ﻒﻴﻈﻨﺘﻟ شﻘﻟا ﻦﻣ ﻪﺒﻃر ﻪﻌﻄﻗ مﺪﺨﺘﺴﺗ
ﺔﻣﻼﺴﻟا تﻴﻠﻌﺗ
ﺔﻴﻟﺎﺘﻟا تﻴﻠﻌﺘﻟا عﺎﺒﺗا ﻰﺟﺮﻳ ، ﻚﺘﻣﻼﺳ نﻀﻟو ﺞﺘﻨﻤﻠﻟ ﺢﻴﺤﺼﻟا ماﺪﺨﺘﺳﻻا ﻞﺟأ ﻦﻣ
ﻦﻣ ﺪﻛﺄﺗ ﻞﺋاﻮﺴﻠﻟ زﺎﻬﺠﻟا ﺔﺴﻣﻼﻣ ﺔﻟﺎﺣ ﰲ .ﺔﻴﺋﺎﺑﺮﻬﻛ تﺎﻣﺪﺻ يأ ﺐﻨﺠﺘﻟ ﺔﺑﻮﻃﺮﻟا وأ ةﺪﺋاﺰﻟا ﺔﺑﻮﻃﺮﻟا ،ﻞﺋاﻮﺴﻟا ﻦﻋ اﺪﻴﻌﺑ زﺎﻬﺠﻟا ﻖﺑأ
ﺔﺟرد 104) ﺔﻳﻮﺌﻣ ﺔﺟرد 40 ﱃإ (ﺖﻳﺎﻬﻧﺮﻬﻓ ﺔﺟرد 32) ﺔﻳﻮﺌﻣ ﺔﺟرد 0 ﻦﻣ ةدﺪﺤﳌا ةراﺮﺤﻟا ﺔﺟرد قﺎﻄﻧ ﰲ ﻂﻘﻓ زﺎﻬﺠﻟا ﻞﻴﻐﺸﺘﺑ ﻢﻗ
ﱃإ ةراﺮﺤﻟا ﺔﺟرد راﺮﻘﺘﺳا ﻞﺟأ ﻦﻣ زﺎﻬﺠﻟا ءﺎﻔﻃإ ﻢﺘﻳ وأ ﺎﺑﺮﻬﻜﻟا ﺲﺑﺎﻘﻟا ﻞﺼﻔﻳ ،قﺎﻄﻨﻟا اﺬﻫ ةراﺮﺤﻟا ﺔﺟرد تزوﺎﺠﺗ اذإ .(ﺖﻳﺎﻬﻧﺮﻬﻓ
و زﺎﻬﺠﻟا ﻞﺼﻓ ﻰﺟﻓ ، ﻲﻌﻴﺒﻃ ﻞﻜﺸﺑ ءﺎﻄﺧﻷا ﻒﺸﻜﺘﺴﻣ ﻞﻤﻌﻳ و ﺢﻴﺤﺻ ﻞﻜﺸﺑ زﺎﻬﺠﻟا ﻞﻴﻐﺸﺗ ﰲ ىﺮﺧأ ﺔﻠﻜﺸﻣ يأ ﻚﺘﻬﺟاو اذإ
ةﺪﻋﺎﺴﻤﻠﻟ ﻢﻋﺪﻟا ﻊﻣ ﻞﺻاﻮﺘﻟاو فﺎﺟ نﺎﻜﻣ ﰲ زﺎﻬﺠﻟا ﻊﺿوو رﻮﻔﻟا ﲆﻋ ﺎﺑﺮﻬﻜﻟا ﺲﺑﺎﻘﻟا ﻞﺼﻓ
ﻞﺜﻣﻷا ىﻮﺘﺴﳌا
ةﺪﻋﺎﺴﻤﻠﻟ ﻢﻋﺪﻟا ﻊﻣ ﻞﺻاﻮﺗ
فﺮﻇ يأ ﺖﺤﺗ ﻚﺴﻔﻨﺑ ﻪﺣﻼﺻإ وأ زﺎﻬﺠﻟا ﺔﻧﺎﻴﺻ لوﺎﺤﺗ ﻻ
نﻀﻟا ةﺪﻣ
ﻚﻟذ فﻼﺧ ﲆﻋ ﺔﻴﻤﻴﻠﻗﻹا ﺢﺋاﻮﻠﻟاو ﻧاﻮﻘﻟا ﺺﻨﺗ ﺎﻣ ﺞﺘﻨﳌا اﺬﻬﻟ ﻣﺎﻋ ةﺪﳌ نﺿ ةﱰﻓ ﺔﻛﴍ ﺮﻓﻮﺗ
ADATA Technology Co.، Ltd.
نﻀﻟا طوﴍ
ﺔﻛﴍ ﻞﺒﻗ ﻦﻣ ﺔﻌﻨﺼﳌا تﺎﺠﺘﻨﳌا لاﺪﺒﺘﺳا وأ تﺎﺣﻼﺻإ ﻂﻘﻓ دوﺪﺤﳌا نﻀﻟا اﺬﻫ ﻲﻄﻐﻳ
ﺔﻟوﺆﺴﻣ نأ ﺔﻈﺣﻼﻣ ﻰﺟﺮﻳ .ﻦﻳﺪﻤﺘﻌﳌا ﺎﻬﺋﺎﻛﴍو ﺔﻴﻟﺎﺘﻟا بﺎﺒﺳﻷا ءﺎﻨﺜﺘﺳﺎﺑ ﺔﻴﻧﺎﺠﻣ تﺎﺣﻼﺻإ ﻓﻮﺗ ﻦﻋ
ﲇﺻﻷا ﺎﻨﻣﺎﻈﻧ ﻊﻣ ﺞﺘﻨﻤﻠﻟ ﲇﺴﻠﺴﺘﻟا ﻢﻗﺮﻟا ﻖﻓاﻮﺘﻳ ﻻ
ةرﻮﻛﺬﳌا ﺞﺘﻨﳌا ﻞﻴﻐﺸﺗ ﺔﻘﻳﺮﻃ جرﺎﺧ ماﺪﺨﺘﺳا ءﻮﺳ يأ
ADATA Technology Co.، Ltd. ADATA
هﺪﻘﻓ وأ ﻪﻔﻠﺗ وأ نﻀﻟا ﻖﺼﻠﻣ ﻴﻐﺗ
ﺪﻤﺘﻌﻣ ﻏ ﻞﻴﻛو ﻦﻣ ةاﱰﺸﳌا تﺎﺠﺘﻨﳌا
ﺔﻴﻌﻴﺒﻄﻟا ثراﻮﻜﻟا ﻦﻋ ﺔﻤﺟﺎﻨﻟا راﴐﻷا
ﺖﻧﱰﻧﻹا ﱪﻋ ءﻼﻤﻌﻟا ﺔﻣﺪﺧ
ﲆﻋ ﺞﺘﻨﳌا ﺔﺤﻔﺻ ةرﺎﻳز ﻰﺟﺮﻳ ،ﺔﻣﺪﺨﻟا تﻴﻠﻌﺗو ﺔﻴﻓﺎﺿﻹا تﺎﻣﻮﻠﻌﳌاو ﺔﻟواﺪﺘﳌا ﺔﻠﺌﺳﻸﻟ
www.xpg.com
清潔指南
使用沾濕乾淨抹布擦拭本產品以清潔表面,為保持產品的完整性,請勿使用肥皂或其他清潔用品。
安全須知
為確保使用安全,使用本產品時請遵循以下說明:
1.
.1
.2
.3
.4
將產品遠離液體、過重濕氣或潮濕處以避免意外觸電,若意外碰觸到液體,請務必立即拔除電
線,置放於乾燥處並連絡客服人員尋求進一步的協助。
產品建議使用溫度範圍為0°C (32°F) to 40°C (104°F),若溫度超過建議範圍請立即拔除電線
2.
並關上電源以讓產品維持穩定。
若在操作過程中遇到問題且無法排除故障,請拔除插頭並連絡客服人員尋求進一步的協助。
3.
4.
請勿嘗試自行維修本產品。
保固期限
除非地方法律與條款另有規定,針對本產品威剛科技提供兩年保固。
產品保固聲明
此保固聲明僅針對威剛科技與合作夥伴生產、製造的產品進行維修或換貨本保固聲明不適用於以
下項目:
保固標籤或防拆標籤被更改、破損或遺失時。
1.
產品序號不符或破損不清楚時
.1
.2
.3
.4
.5
2.
透過非威剛授權之經銷管道購買的產品
3.
天災造成的損壞
4.
因人為不當操作造成損壞
5.
線上客服
常見問題、更多資訊與服務指導請參考官方網站 www.xpg.com
2423
Page 14

限用物质及其化学符 (Restricted substance and its chemical symbots)
部件名称
电路板
机壳
附件
本表格依据
:
铅
Pb
SJ/T 11364
在该零部件的所有均质材料中的有害物质的含量不超过
汞
Hg
的规定编制。
镉
Cd
定的限量要求。
:
在该零部件中至少均质材料中的有害物质的含量超过
的限量要求。
( 判定 : 包括 EU RoHS的豁免项目)
六价铬
Cr (Vl)
多溴联苯
PBB
GB/T 26572
GB/T 26572
多溴
二苯醚
PBDE
标准规
标准规定
2625
 Loading...