


FREEHAND
Instruction Manual
The World at a Touch
ADAPTIVATION
INCORPORATED
1-800-723-2783 Sioux Falls, SD 57105 PRINTED IN U.S.A.
2225 W. 50th St., Suite 100
1

Table of Contents
NOTE: This equipment has been tested and found to comply with the limits for a Class B
digital device, pursuant to part 15 of the FCC rules. These limits are designed to provide
reasonable protection against harmful interference in a residential installation. This
equipment generates, uses and can radiate radio frequency energy and, if not installed and
used in accordance with the instructions, may cause harmful interference to radio
communications. However, there is no guarantee that interference will not occur in a
particular installation. If this equipment does cause harmful interference to radio or television
reception, which can be determined by turning the equipment off and on, the user is
encouraged to try to correct the interference by one or more of the following:
-- Reorient or relocate the receiving antenna.
-- Increase the separation between the equipment and receiver.
-- Connect the equipment into an outlet on a circuit different from that to which
the receiver is connected.
-- Consult the dealer or an experienced radio/TV technician for help.
Changes or modifications not expressly approved by Adaptivation could void the user's
authority to operate this equipment.
INTRODUCTION ................................................... 3
THEORY OF OPERATION .................................... 3
TERMINOLOGY .................................................... 4
MODES OF CONTROL ......................................... 5
FREEHAND DIAGRAM ........................................ 6
BATTERY INSTALLATION .................................. 7
OPERATION FOR AC APPLIANCES ................... 8
OPERATION FOR BATTERY OPERATED .......... 9
MOUNTING OPTIONS ....................................... 10
DELAYED ACTIVATION ..................................... 11
TROUBLESHOOTING ........................................ 12
WARRANTY ........................................................ 16
2

INTRODUCTION
Your Adaptivation, Inc. FreeHand has been designed to
provide access for individuals with physical or mental disabilities to basic environmental control. The FreeHand
will allow one electrical appliance or battery operated device to be activated by touching the device itself or by
plugging in an external switch such as Adaptivation's Taction Pads or Pal Pads. The FreeHand uses a RF signal to
remotely operate either a X-10 powerhouse module or a
Wireless Receiver. Each unit is sold separately. Because
the FreeHand is wireless, you are not tied down by cords or
limited to a particular area. Wireless activation will allow
greater flexibility and convenience for the user. Adaptivation strives to offer our clients the highest quality products
and support. Feel free to contact us at any time for assistance using your FreeHand.
Operating your FreeHand
Theory of Operation
The FreeHand activates by sending a radio frequency (RF)
signal to an Powerhouse X-10 module (also known as Lamp
and Appliance Modules at Radio Shack) or a Wireless Receiver. Diagram 1 helps illustrate a typical scenario.
3
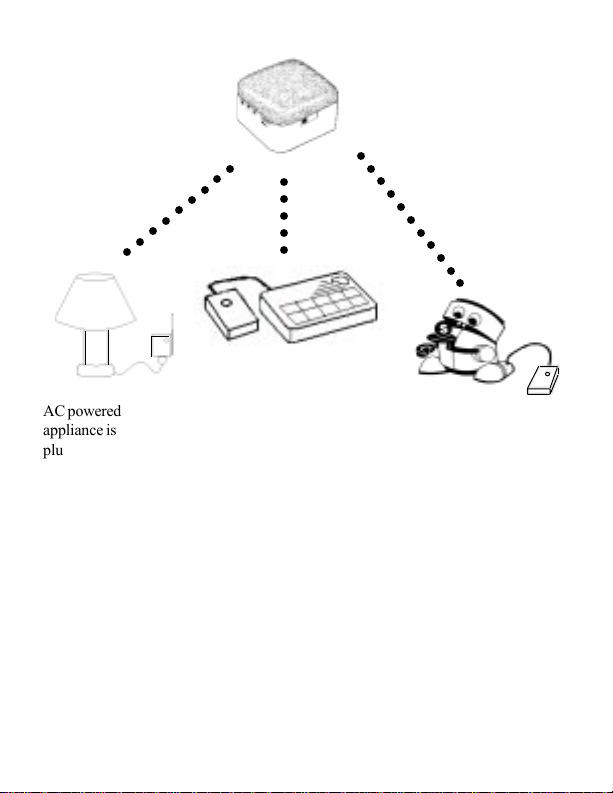
Diagram 1.
FreeHand sends
RF to receiver.
○○○○○○○○○○○
○○○○○
○○○○○○○○○
Wireless Receiver
is plugged into
AC powered
appliance is
plugged into X-10
module
VoicePal
communication
aid.
Wireless Receiver
is plugged into a
battery operated
toy.
Terminology
RF
RF stands for radio frequency. RF devices can transmit
through walls unlike infared which requires line of sight.
Wireless Receiver
A Wireless Receiver will allow the FreeHand to control most
battery operated devices and also communication aids or other
assistive devices.
4

Transceiver Module
The Transceiver Module accepts the RF siganl from the
FreeHand and will allow activation of most electrical or AC
appliances.
House Code
The house code is the frequency the FreeHand uses to transmit
to either a Wireless Receiver or a Transceiver Module. The
house code must be set to the same letter on both devices. Using different house codes can allow different individuals to
operate their own devices without interfering with each other.
Unit Code
This code allows one Transceiver Module to operate up to 16
other appliance modules. The unit code on the FreeHand
must be set to the same number as the number on the appliance module.
Modes of Control
Direct selection: The appliance activates for as long as the
switch is pressed.
Latched selection: Press once and the appliance turns on.
Press again and it turns off. The latch mode is effective when
a device needs to be turned on for an extended amount of time.
5

Diagram 2.
HOUSE UNIT SWITCH
CODE CODE IN
Unit Code Dial
House Code Dial
OFF
DIRECT TIMING MIN
LATCH TIMING SEC.
FREEHAND
Mode Selection Switch
OFF/Timing Knob
External Switch Jack
6

Timed Seconds: Press once and the appliance turns on, then
automatically turns off at the preset time anywhere from 1 to
60 seconds later.
Timed Minutes: Press once and the device turns on, then automatically turns off at the preset time anywhere from 1 to 60
minutes later.
Note: The timing is adjusted using the Timing Adjustment
Knob. See Diagram 2. If you wish to stop the device before
the timed amount is over, turn the Timing Knob to the "OFF"
position, then back to the "On" position. This will reset the
FreeHand.
Battery Installation
1. With the FreeHand lying face down, open the battery com-
partment cover by removing the single Phillips head screw.
2. Properly insert one 9 volt battery. Adaptivation recommends using only Alkaline 9 volt batteries to ensure long battery life.
3. Replace the battery compartment cover and secure with
screw. Take care not to overtighten.
Note: To conserve the batteries, turn off the FreeHand when
not in use.
7

Operation for AC Appliances
1. Set the FreeHand and the Transceiver Module to the same
house code. Also make sure the unit code is set to the number
1 position, unless you are plugging the applicance to be activated into another Appliance Module set to a different unit
code.
2. Plug the appliance you wish to operate into the bottom of
the Transceiver and plug it into the wall outlet. Make sure the
appliance is in the "on" position.
3. Check to make sure the wattage of the appliance does not
exceed the recommended maximum amount on the back of the
Transceiver Module.
4. Set the FreeHand to the desired mode of control and make
sure it is turned on by moving the OFF/TIMING DIAL to the
"on" position. . Press the top of the FreeHand or an external
switch to activate the appliance.
Note: If using other Appliance Modules other than the Transceiver Module, you must still have the Transceiver Module
plugged in since the FreeHand sends the RF signal to this
module first. Also make sure both the FreeHand and the Appliance Module are set to the same unit code number.
8

Operation for Battery-Operated Devices
1. Set the FreeHand and the Wireless Receiver to the same
house code. Also make sure both have the unit code set to the
same number.
2. Make sure you have inserted batteries into the Wireless Receiver and it is turned on.
3. Insert the plug on the Wireless Receiver into the battery
operated device you wish to activate.
4. Set the FreeHand to the desired mode of control and make
sure it is turned on by moving the OFF/TIMING KNOB to the
on position.
5. Press the top of the FreeHand or an external swtch to activate.
Options: If you are activating a communication aid such as
Adaptivation's VoicePal, insert the plug on the Wireless Receiver into the switch jack on the communication aid. Set the
FreeHand to the Direct mode. Activate the FreeHand to access your message on the communication aid.
If you are activating a battery-operated device or toy, insert the
plug on the Wireless Receiver into the switch jack on the
adapted device. If your device is not adapted use a battery interrupter which is inserted into the battery compartment of the
device.
9

External Switch Jack
For those individuals who are unable to access the top of the
FreeHand, any external switch may be plugged into the jack
marked SWITCH IN.
Mounting Options
The FreeHand has 3 threaded inserts on the bottom side.
These inserts can be used to easily mount the FreeHand to a
small triangular plate often found on common mounting aids
such as the Magic Arm or E-Mount available from
Adaptivation. The FreeHand also comes with rubber feet to
help keep it from sliding. When mounting on a table or other
flat surface, Velcro or Dual-Lock can be used as an alternate
mounting method. If necessary, remove the rubber feet to help
secure the Velcro.
Since the FreeHand is square in shape, this makes it very easy
to mount multiple FreeHands next to each other. You may
also try combining the FreeHand with other devices such as
the Chipper or Sequencer to make affordable communication
boards with environmental control.
10

Delayed Activation
Typically when the FreeHand is pressed, the corresponding
device activates almost immediately. A 1 second delay can be
added. This means the FreeHand or external switch must be
held down for 1 second before the device will operate. This
can be very helpful for a person who may accidentally drag
their hands. Delayed activation will help with these accidental
activations.
To set the 1 second delay, take the battery cover off the back of
the FreeHand. A two position slide switch is located on the
same side as the wires connected to the battery. Use a small
screwdriver to slide the switch. Now your FreeHand is set for
a 1 second delay.
11

Trouble Shooting
Your AC appliance is not working.
-Make sure the device works independently of the
FreeHand.
-Make sure the FreeHand is turned to the "on"
positon.
-Make sure the device is turned "on" at all times.
-Make sure the house code is set the same on both
transceiver and Freehand.
-Make sure you are within range (25 to 45 feet or
more) and there are no obstructions covering the an
tenna on the Transceiver Module.
-Check mode of control.
Your Battery-Operated device is not working.
-Make sure the device works indepedently of the
FreeHand.
-Make sure the FreeHand is turned to the "on"
position.
-Make sure the Wireless Receiver is turned on,
batteries are fresh, and it is plugged into the device.
-Make sure you are within range.
-Make sure you the house code and unit code are set
the same on both receiver and FreeHand.
12

The device activates intermittenly.
-Move the FreeHand closer to the receiver.
-Make sure batteries are fresh.
-Be sure to wait approximately 2 seconds before
reactivating. The FreeHand needs time to send the
RF signals. If activated rapidly, signals will become
backed up and receiver may not respond.
The device activates without using the FreeHand.
-Something in the environment is causing
interference. Set the FreeHand and receiver units to
a different house code.
-Check to make sure other X-10 compatible
environmental controls are not set to the same house
code and, or unit code.
13

Notes
14

Notes
15

FreeHand
1 Year Limited Warranty
Your Adaptivation FreeHand was carefully tested and inspected before it was
shipped from the factory. We warrant this product to be free from defects in materials
and workmanship under normal use and service for one (1) year from the date of
purchase. In the event of a defect in materials or workmanship, we will either repair
or replace without charge, at our option, any part which in our judgment shows evidence of such defect within one (1) year of purchase. Taction Pads are warranted for
six months from the original date of purchase.
This warranty does not apply if the FreeHand or Taction Pads have been misused,
abused, altered, or tampered with. At the end of the warranty period, Adaptivation
shall be under no further obligation expressed or implied.
This warranty gives you specific rights, and you may also have other rights which vary
from state to state.
For repair service, contact Adaptivation's technical dept. to receive a required RMA# (return material authorization number) prior to the return of
the device.
Adaptivation, Inc.
2225 W. 50th St. Suite 100
Sioux Falls, SD 57105
1(800)-723-2783, (605) 335-4445, Fax: (605) 335-4446, e-mail:
info@adaptivation.com, Web Page: www.adaptivation.com
Please insure your FreeHand is clean before returning it to Adaptivation for service.
This is not a medical device. It should not be used where incorrect or
faulty operation could reasonably be expected to result in injury or
worse!
16
5/99
 Loading...