

Page 1
R
USER’S GUIDE
AUA-3020
UOCONNECT ADAPTER
D
Page 2

Copyright
© 2001-2002 Adaptec, Inc. All rights reserved. No part of this publication may be
reproduced, stored in a retrieval system, or transmitted in any form or by any
means, electronic, mechanical, photocopying, recording or otherwise, without the
prior written consent of Adaptec, Inc., 691 South Milpitas Blvd., Milpitas, CA 95035.
Trademarks
Adaptec and the Adaptec logo are trademarks of Adaptec, Inc., which may be
registered in some jurisdictions. Windows 98, Windows 2000, Windows Me, and
Windows XP are trademarks of Microsoft Corporation in the U.S. and other
countries, used under license.
Macintosh and Power Macintosh are registered trademarks of Apple Computer,
used under license.
All other trademarks are the property of their respective owners.
Changes
The material in this document is for information only and is subject to change
without notice. While reasonable efforts have been made in the preparation of this
document to assure its accuracy, Adaptec, Inc. assumes no liability resulting from
errors or omissions in this document, or from the use of the information contained
herein.
Adaptec reserves the right to make changes in the product design without reservation and
without notification to its users.
Disclaimer
IF THIS PRODUCT DIRECTS YOU TO COPY MATERIALS, YOU MUST HAVE
PERMISSION FROM THE COPYRIGHT OWNER OF THE MATERIALS TO AVOID
VIOLATING THE LAW WHICH COULD RESULT IN DAMAGES OR OTHER
REMEDIES.
i
Page 3

Adaptec Customer Support
If you have questions about installing or using your Adaptec product, check this document
first—you will find answers to most of your questions here. If you need further assistance, use
the support options listed below.
Technical Support Identification (TSID) Number
■ Before contacting Technical Support, you need your unique 12-digit TSID number. The TSID
number identifies your product and support status.
■ The TSID number is included on two white, bar-coded labels, like the example below.
Support Options
■ Search the Adaptec Support Knowledgebase (ASK) at ask.adaptec.com for articles,
troubleshooting tips, and frequently asked questions for your product.
■ For support via Email, submit your question to Adaptec's Technical Support Specialists at
ask.adaptec.com.
■ To order Adaptec products, including accessories and cables, call +1 408-957-7274. Or, you
can order cables online at
Europe
■ Visit our Web site at www.adaptec-europe.com.
■ German and English: Search the Adaptec Support Knowledgebase (ASK) at
ask-de.adaptec.com for articles, troubleshooting tips, and frequently asked questions for
your product.
For support via e-mail, submit your question to Adaptec's Technical Support Specialists at
ask-de.adaptec.com.
■ French: Search the Adaptec Support Knowledgebase (ASK) at ask-fr.adaptec.com for articles,
troubleshooting tips, and frequently asked questions for your product.
For support via e-mail, submit your question to Adaptec's Technical Support Specialists at
ask-fr.adaptec.com.
■ To order Adaptec products, including accessories and cables,
go to
www.adaptec.com/buy-cables.
Australia and New Zealand
■ Visit our Web site at www.adaptec.com.au.
■ For support via e-mail, submit your question to Adaptec's Technical Support Specialists at
ask.adaptec.com.
Hong Kong and China
■ Visit our Web site at www.adaptec.com.
■ Fax Technical Support at +852 2869 7100.
Singapore
■ Visit our Web site at www.adaptec.com.
Japan
■ Search the Adaptec Support Knowledgebase (ASK) at ask.adaptec.co.jp
■ Visit our Web site at www.adaptec.co.jp.
www.adaptec.com/buy-cables.
ii
Page 4

Limited 5-Year Hardware Warranty
1. Adaptec, Inc. (“Adaptec”) warrants to the purchaser of this product that it will be free from
defects in material and workmanship for a period of five (5) years from the date of purchase.
If the product should become defective within the warranty period, Adaptec, at its option,
will repair or replace the product, or refund the purchaser’s purchase price for the product,
provided it is delivered at the purchaser’s expense to an authorized Adaptec service facility
or to Adaptec.
2. Repair or replacement parts or products will be furnished on an exchange basis and will
either be new or reconditioned. All replaced parts or products shall become the property of
Adaptec. This warranty shall not apply if the product has been damaged by accident,
misuse, abuse or as a result of unauthorized service or parts.
3. Warranty service is available to the purchaser by delivering the product during the warranty
period to an authorized Adaptec service facility or to Adaptec and providing proof of
purchase price and date. The purchaser shall bear all shipping, packing and insurance costs
and all other costs, excluding labor and parts, necessary to effectuate repair, replacement or
refund under this warranty.
4. For more information on how to obtain warranty service, write or telephone Adaptec at 691
South Milpitas Boulevard, Milpitas, CA 95035, (800) 959-7274.
5. THIS LIMITED WARRANTY DOES NOT EXTEND TO ANY PRODUCT WHICH HAS
BEEN DAMAGED AS A RESULT OF ACCIDENT, MISUSE, ABUSE, OR AS A RESULT OF
UNAUTHORIZED SERVICE OR PARTS.
6. THIS WARRANTY IS IN LIEU OF ALL OTHER EXPRESS WARRANTIES WHICH NOW
OR HEREAFTER MIGHT OTHERWISE ARISE RESPECT TO THIS PRODUCT. IMPLIED
WARRANTIES, INCLUDING THOSE OF MERCHANTABILITY, FITNESS FOR A
PARTICULAR PURPOSE AND NON-INFRINGEMENT SHALL (A) HAVE NO GREATER
DURATION THAN 5 YEARS FROM THE DATE OF PURCHASE, (B) TERMINATE
AUTOMATICALLY AT THE EXPIRATION OF SUCH PERIOD AND (C) TO THE EXTENT
PERMITTED BY LAW BE EXCLUDED. IN THE EVENT THIS PRODUCT BECOMES
DEFECTIVE DURING THE WARRANTY PERIOD, THE PURCHASER’S EXCLUSIVE
REMEDY SHALL BE REPAIR, REPLACEMENT OR REFUND AS PROVIDED ABOVE.
INCIDENTAL OR CONSEQUENTIAL DAMAGES, INCLUDING WITHOUT LIMITATION
LOSS OF DATA, ARISING FROM BREACH OF ANY EXPRESS OR IMPLIED WARRANTY
ARE NOT THE RESPONSIBILITY OF ADAPTEC AND, TO THE EXTENT PERMITTED BY
LAW, ARE HEREBY EXCLUDED BOTH FOR PROPERTY DAMAGE, AND TO THE
EXTENT NOT UNCONSCIONABLE, FOR PERSONAL INJURY DAMAGE.
7. SOME STATES DO NOT ALLOW THE EXCLUSION OR LIMITATION OF INCIDENTAL
OR CONSEQUENTIAL DAMAGES FOR CONSUMER PRODUCTS, AND SOME STATES
DO NOT ALLOW LIMITATIONS ON HOW LONG AN IMPLIED WARRANTY LASTS, SO
THE ABOVE LIMITATION OR EXCLUSIONS MAY NOT APPLY TO YOU.
8. This warranty gives you specific legal rights, and you may also have other rights which vary
from state to state.
iii
Page 5

Adaptec Software License Agreement
PLEASE READ CAREFULLY: THE USE OF THIS SOFTWARE IS SUBJECT TO THE SOFTWARE
LICENSE TERMS OF ADAPTEC, INC. AND OTHER LICENSORS WHOSE SOFTWARE MAY
BE BUNDLED WITH THIS PRODUCT.
BY YOUR USE OF THE SOFTWARE INCLUDED WITH THIS PRODUCT YOU AGREE TO THE
LICENSE TERMS REQUIRED BY THE LICENSOR OF THAT SOFTWARE, AS SET FORTH
DURING THE INSTALLATION PROCESS. IF YOU DO NOT AGREE TO THE LICENSE
TERMS APPLICABLE TO THE SOFTWARE, YOU MAY RETURN THE ENTIRE UNUSED
PRODUCT FOR A FULL REFUND.
In return for acquiring a license to use the Adaptec software (“Software”) and the related
documentation, you agree to the following terms and conditions:
1. License. This Agreement grants you, the Licensee, a license to:
a. Use the Software on a single computer system or on multiple workstations, systems and
servers which incorporate an Adaptec RAID controller and may be accessed by multiple
users from multiple locations. You may make as many installations of the Software as
needed, but must restrict such installation only to systems, workstations or servers
using an Adaptec RAID controller.
b. Make one copy of the Software in machine readable form solely for back-up purposes
provided you reproduce Adaptec’s copyright notice and any proprietary legends.
2. Restrictions. You may not distribute copies of the Software to others. You may not post or
otherwise make available the Software, or any portion thereof, in any form, on the Internet.
You may not use the Software in a computer service business, including in time sharing
applications. The Software contains trade secrets and, in order to protect them, you may not
decompile, reverse engineer, disassemble, or otherwise reduce the Software to a humanperceivable form. YOU MAY NOT MODIFY, ADAPT, TRANSLATE, RENT, LEASE, LOAN,
RESELL FOR PROFIT, DISTRIBUTE, NETWORK OR CREATE DERIVATIVE WORKS
BASED UPON THE SOFTWARE OR ANY PART THEREOF.
3. Ownership of Software. As Licensee, you own the media upon which the software is
recorded or fixed, but Adaptec and its licensors retain title and ownership of the Software
recorded on the original media and all subsequent copies of the Software, regardless of the
form or media in which or on which the original and other copies may exist. This license is
not a sale of the Software or any copy.
4. Confidentiality. You agree to maintain the Software in confidence and that you will not
disclose the Software to any third party without the express written consent of Adaptec. You
further agree to take all reasonable precautions to preclude access of unauthorized persons
to the Software.
5. Term. This license is effective until January 1, 2045, unless terminated earlier. You may
terminate the license at any time by destroying the Software (including the related
documentation) together with all copies or modifications in any form. Adaptec will have the
right to terminate our license immediately if you fail to comply with any term or condition
of this Agreement. Upon any termination, including termination by you, you must destroy
the Software (including the related documentation), together with all copies or
modifications in any form.
6. Special Terms Applicable to Databases. Where a database is included with the Software, you
acknowledge that it is licensed only in connection with the use of the Software to perform
disc creation, and that the database and all data derived therefrom must be maintained in
confidence in accordance with the provisions of Section 4. This license does not grant you
any rights to distribute or disclose such database or data.
iv
Page 6

7. Limited Warranty. Adaptec and its Licensor warrant only that the media upon which the
Software is furnished will be free from defects in material or workmanship under normal
use and service for a period of thirty (30) days from the date of delivery to you. ADAPTEC
AND ITS LICENSORS DO NOT AND CANNOT WARRANT THE PERFORMANCE OR
RESULTS YOU MAY OBTAIN BY USING THE SOFTWARE OR DOCUMENTATION. THE
FOREGOING STATES THE SOLE AND EXCLUSIVE REMEDIES ADAPTEC AND ITS
LICENSORS WILL PROVIDE FOR BREACH OF WARRANTY. EXCEPT FOR THE
FOREGOING LIMITED WARRANTY, ADAPTEC AND ITS LICENSORS MAKE NO
WARRANTIES, EXPRESSED OR IMPLIED, INCLUDING, BUT NOT LIMITED, AS TO
NON-INFRINGEMENT OF THIRD PARTY RIGHTS, MERCHANTABILITY OR FITNESS
FOR A PARTICULAR PURPOSE. Some states do not allow the exclusion of implied
warranties or limitations on how long an implied warranty may last, so the above
limitations may not apply to you. This warranty gives you specific legal rights and you may
also have other rights which vary from state to state.
8. The entire liability of Adaptec and its licensors, and your exclusive remedy for a breach of
this warranty, shall be:
a. The replacement of any media not meeting the above limited warranty which is
returned to Adaptec; or:
b. If Adaptec or its distributor is unable to deliver replacement media which is free from
defects in materials or workmanship, you may terminate this Agreement by returning
the Software and your money will be refunded.
9. Limitation of Liability. IN NO EVENT WILL ADAPTEC OR ITS LICENSORS BE LIABLE TO
YOU FOR ANY INCIDENTAL, CONSEQUENTIAL OR INDIRECT DAMAGES,
INCLUDING ANY LOST PROFITS, LOST SAVINGS, OR LOSS OF DATA, EVEN IF
ADAPTEC OR A LICENSOR HAS BEEN ADVISED OF THE POSSIBILITY OF SUCH
DAMAGES, OR FOR ANY CLAIM BY ANY OTHER PARTY. Some states do not allow the
exclusion or limitation of special, incidental, or consequential damages, so the above
limitation or exclusion may not apply to you.
10. Export. You acknowledge that the laws and regulations of the United States and other
countries may restrict the export and re-export of the Software. You agree that you will not
export or re-export the Software or documentation in any form in violation of applicable
United States and foreign law.
11. Government Restricted Rights. The Software is subject to restricted rights as follows. If the
Software is acquired under the terms of a GSA contract: use, reproduction or disclosure is
subject to the restrictions set forth in the applicable ADP Schedule contract. If the Software is
acquired under the terms of a DoD or civilian agency contract, use, duplication or disclosure
by the Government is subject to the restrictions of this Agreement in accordance with 48
C.F.R. 12.212
49 C.F.R. 227.7202-1
12. General. You acknowledge that you have read this Agreement, understand it, and that by
using the Software you agree to be bound by its terms and conditions. You further agree that
it is the complete and exclusive statement of the agreement between Adaptec and you, and
supersedes any proposal or prior agreement, oral or written, and any other communication
between Adaptec and you relating to the subject matter of this Agreement. No additional or
any different terms will be enforceable against Adaptec unless Adaptec gives its express
consent, including an express waiver of the terms of this Agreement, in writing signed by an
officer of Adaptec. You assume full responsibility for the use of the Software and agree to
use the Software legally and responsibly. This Agreement shall be governed by California
law, except as to copyright matters, which are covered by Federal law. This Agreement is
deemed entered into at Milpitas, California by both parties. Should any provision of this
Agreement be declared unenforceable in any jurisdiction, then such provision shall be
deemed severable from this Agreement and shall not affect the remainder hereof. All rights
in the Software not specifically granted in this Agreement are reserved by Adaptec.
Should you have any questions concerning this Agreement, you may contact Adaptec by
writing to:
Adaptec, Inc.
Legal Department
691 South Milpitas Boulevard
Milpitas, California 95035.
of the Federal Acquisition Regulations and its successors and
of the DoD FAR Supplement and its successors.
v
Page 7
Regulatory Compliance Statements
Federal Communications Commission Radio Frequency Interference Statement
WARNING: Changes or modifications to this unit not expressly approved by the party
responsible for compliance could void the user’s authority to operate the equipment.
This equipment has been tested and found to comply with the limits for a Class B digital device,
pursuant to Part 15 of the FCC rules. These limits are designed to provide reasonable protection
against harmful interference in a residential installation. This equipment generates, uses, and
can radiate radio frequency energy, and if not installed and used in accordance with the
instruction manual, may cause harmful interference to radio communications. However, there is
no guarantee that interference will not occur in a particular installation. However, if this
equipment does cause interference to radio or television equipment reception, which can be
determined by turning the equipment off and on, the user is encouraged to try to correct the
interference by one or more of the following measures:
• Reorient or relocate the receiving antenna.
• Increase the separation between equipment and receiver.
• Connect the equipment to an outlet on a circuit different from that to which the receiver is
connected.
• Consult the dealer or an experienced radio/television technician for help.
• Use a shielded and properly grounded I/O cable and power cable to ensure compliance of this
unit to the specified limits of the rules.
This device complies with part 15 of the FCC rules. Operation is subject to the following two
conditions: (1) this device may not cause harmful interference and (2) this device must accept
any interference received, including interference that may cause undesired operation.
Adaptec, Inc. AUA-3020 DuoConnect
Tes ted to Comply
With FCC Standards
FOR HOME OR OFFICE USE
European Union Compliance Statement
This Information Technology Equipment has been tested and found to comply with
the following European directives:
EMC Directive 89/336/EEC, as amended by 92/31/EEC and 93/68/EEC
EN 50081-1 (1992)
EN55022 (1994) Class B
EN 50082-1 (1992)
EN61000-4-2 (1998)
EN61000-4-3 (1998)
EN61000-4-4 (1995)
EN61000-4-5 (1995) Surges
EN61000-4-6 (1996) Conducted immunity
EN61000-4-11 (1994) Supply dips of variation
Australian/New Zealand Compliance Statement
This device has been tested and found to comply with the limits for a Class B digital
device, pursuant to the Australian/New Zealand standard AS/NZS 3548 set out by
the Spectrum Management Agency.
vi
Page 8

Canadian Compliance Statement
This Class B digital apparatus meets all requirements of the Canadian InterferenceCausing Equipment Regulations.
Cet appareil numérique de la classe B respecte toutes les exigences du Règlement sur
le matériel brouilleur du Canada.
Japanese Compliance (Voluntary Control Council Initiative)
This equipment complies to class B Information Technology equipment based on
VCCI (Voluntary Control Council for Interface). This equipment is designed for home
use but it may causes radio frequency interference problem if used too near to a
television or radio. Please handle it correctly per this documentation.
vii
Page 9

In this Guide
Getting Started 2
Installing the DuoConnect Adapter 3
Installing the Device Drivers 5
Connecting USB Devices 31
Troubleshooting 34
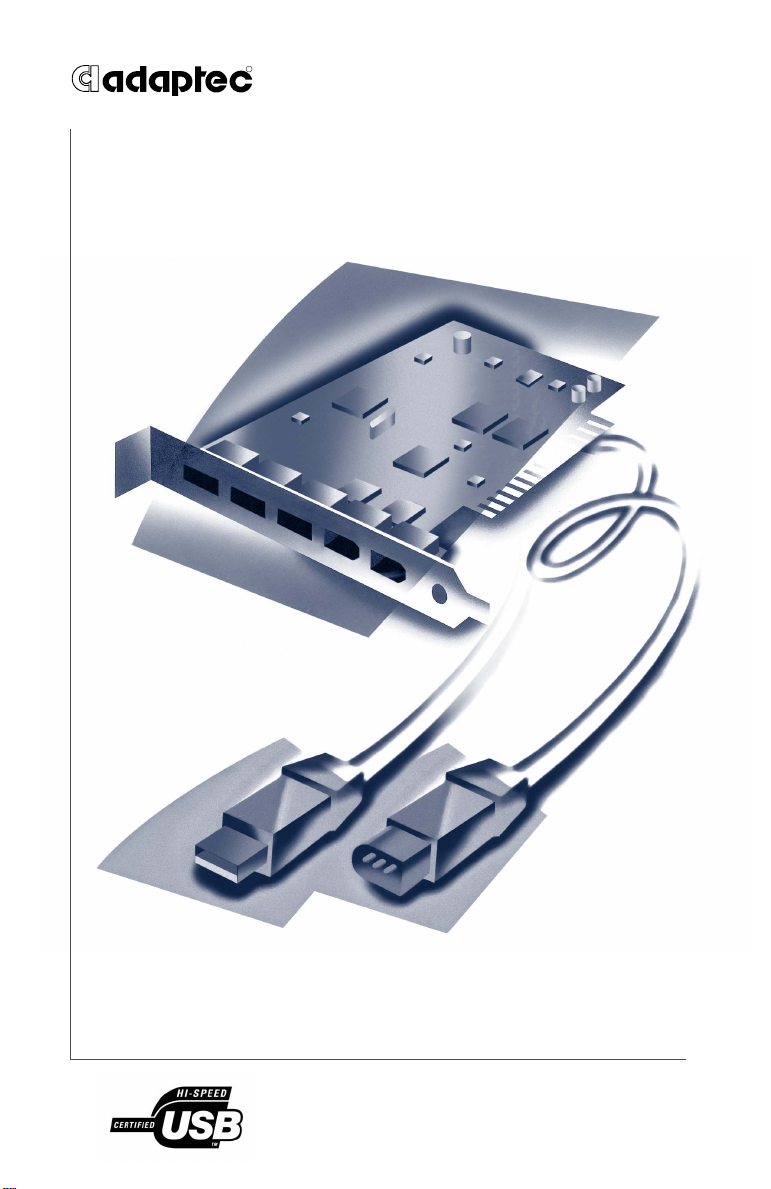
The DuoConnect adapter is a 32-bit, 33-MHz PCI adapter and
works in any 2.1 or later PCI slot. It enables you to connect USB 1.1
(OHCI), USB 2.0 (EHCI), and FireWire (IEEE 1394) devices to your
PC-compatible or Macintosh computer.
USB 2.0 is the fastest USB standard, capable of transferring data at
up to 480 megabits per second. USB 2.0 devices are compatible
with USB 1.1 devices.
FireWire is a serial bus protocol similar to USB 2.0. It transfers data
at speeds of up to 400 megabits per second and is used with
computer peripherals as well as with consumer electronics, such as
digital video cameras and game consoles.
This User’s Guide explains how to install your AUA-3020
DuoConnect Adapter in a PCI slot and how to install its associated
drivers. It also describes how to connect your AUA-3020 to a USB
device and a digital video camera.
1
Page 10

Getting Started
Getting Started
Kit Contents
■ DuoConnect adapter
■ FireWire cable (6-foot/1.8 meter, 6-to-4-pin FireWire cable used
to connect digital video cameras)
■ Printed Adaptec DuoConnect Installation Guide
■ DuoConnect CD containing device drivers, software, and
documentation
System Requirements
In order to use the DuoConnect adapter, you need
■ One of the following types of computers:
■ Windows XP, Windows 2000, Windows Me, or
Windows 98SE computer with a 200-MHz (or faster)
processor
■ Power Macintosh Beige G3, Rev. B or newer, with Macintosh
OS 9.0.4 and later
■ An available PCI slot (32-bit or 64-bit, 3.3-volt or 5-volt, 33-MHz
and 66-MHz)
■ A CD-ROM drive
2
Page 11
Installing the DuoConnect Adapter
Installing the DuoConnect
Adapter
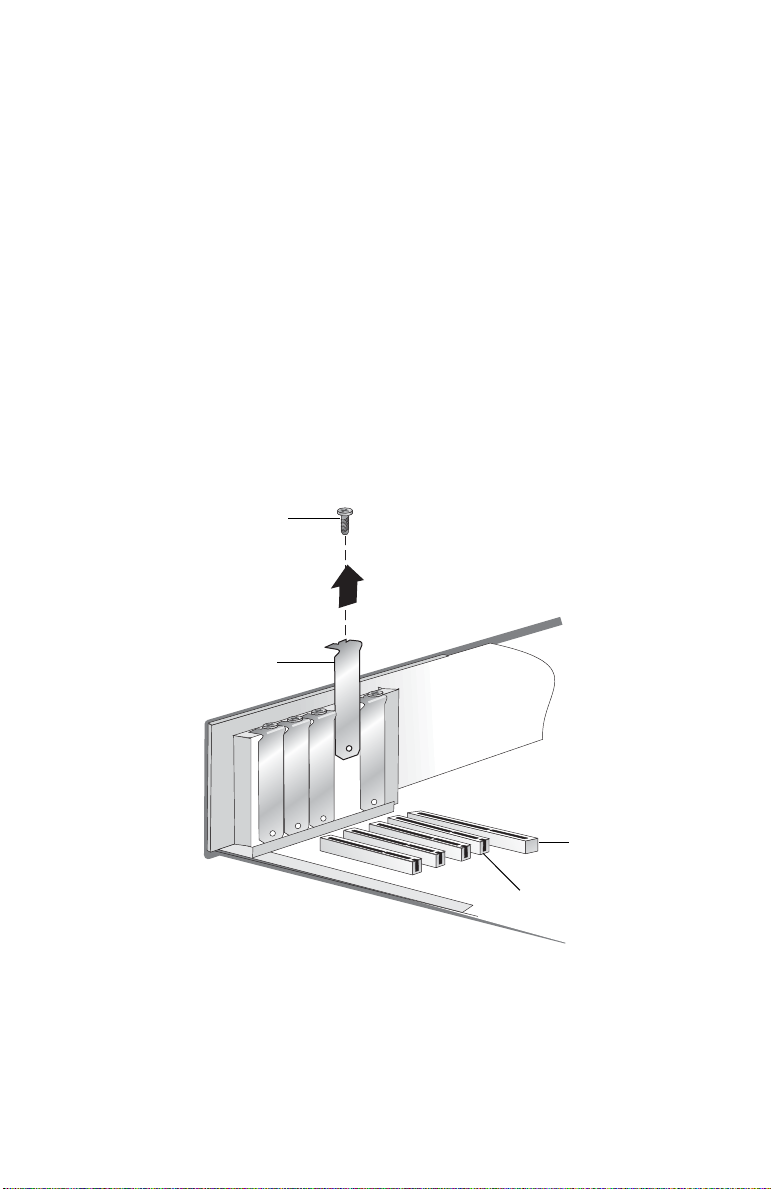
1 Discharge any static electricity from your body by touching a
grounded metal object (such as the exposed metal parts on the
back of your computer).
2 Turn off power to the computer and disconnect the power cord.
3 Open the computer cabinet. See your computer documentation
for specific instructions, if needed.
4 Locate an unused 32-bit or 64-bit PCI expansion slot and
remove the expansion slot cover. Save the cover screw for use in
Step 5 on page 4.
Slot cover screw
Expansion slot cover
64-bit PCI slot
32-bit PCI slot
3
Page 12

Installing the DuoConnect Adapter
5 Insert the DuoConnect adapter in a PCI expansion slot and
press down firmly until the adapter clicks into place. Then,
replace the slot cover screw. When installed properly, the
adapter should be level with the expansion slot.
6 Close the computer cabinet and reattach the power cord. Then,
power on your computer.
4
Page 13

Installing the Device Drivers
Installing the Device
Drivers
The DuoConnect adapter contains the four controllers:
Controller
Type
USB 1.1 2 NEC USB OHCI-compliant
USB 2.0 1 Adaptec AUA-3020 PCI to USB
FireWire 1 Texas Instruments OHCI-compliant IEEE 1394
When successfully installed, these controllers are displayed
separately in the Windows Device Manager.
To install the device drivers for these controllers, follow the
instructions provided for your operating system:
■ For Windows, see page 6.
■ For Macintosh, see page 28.
Number of
Controllers Description
EHCI-compliant
5
Page 14

Installing the Device Drivers
Installing on Windows Computers
After you install the DuoConnect adapter and power on your
computer, Windows recognizes the new hardware and
automatically opens the Found New Hardware Wizard.
Note: It may take longer than usual for your system to start
because the operating system is locating the new drivers.
To complete the driver installation, follow the instructions for your
Windows operating system:
■ For Windows XP, see page 7.
■ For Windows 2000, see page 11.
■ For Windows Me, see page 15.
■ For Windows 98SE, see page 18.
6
Page 15

Installing the Device Drivers
Windows XP
Note: You must be logged on as Administrator or have
administrator privileges to install the DuoConnect adapter on
Windows XP.
To complete the driver installation:
1 When the Found New Hardware Wizard opens, select Install
from a list or specific location..., then select Next.
7
Page 16

Installing the Device Drivers
2 Select Don’t search, I will choose the driver to install, then
click Next.
3 Click Next again.
4 Click Have Disk.
5 Insert the Adaptec DuoConnect CD into the CD-ROM drive.
Type the drive letter for your CD-ROM drive in the Copy
manufacturer’s files from box, as shown below, and click OK.
Note: Your CD-ROM drive may have a different drive letter
than the one shown in the example above.
8
Page 17

Installing the Device Drivers
6 On the next screen, click Continue Anyway.
Note: Adaptec drivers have been fully tested and certified
to work with the AUA-3020 DuoConnect adapter.
7 When the installation is complete, click Finish.
8 If you are prompted to restart the computer, click Yes.
9
Page 18

Installing the Device Drivers
9 To verify that the driver is installed, right-click the My
Computer desktop icon, select Properties, click the Hardware
tab, then click the Device Manager button. Expand Universal
Serial Bus controllers and verify that the information shown
below appears.
FireWire controller
USB 2.0 controller
(see note)
USB 1.1 controllers
Note: USB 2.0 controller – Your controller is identified by its
model number, which may differ from the model number
shown in this User’s Guide.
10
Page 19

Installing the Device Drivers
Windows 2000
Note: You must be logged on as Administrator or have
administrator privileges to install the DuoConnect adapter on
Windows 2000.
To complete the driver installation:
1 When the Found New Hardware Wizard opens, insert the
DuoConnect CD in your CD-ROM drive, then click Next.
11
Page 20

Installing the Device Drivers
2 In the Install Hardware Device Drivers window, select Search
for a suitable driver for my device..., and click Next.
3 In the Locate Driver Files window, uncheck all options except
CD-ROM drives, and click Next.
12
Page 21

Installing the Device Drivers
4
In the Driver Files Search Results window, ensure that the
one of the other drivers
check box is
not
checked, and click
Note: The driver name may differ from the one shown in
the example above, but it will be a.inf file.
Install
Next
.
5 When Windows is finished copying drivers, click Finish.
6 Restart your computer.
13
Page 22

Installing the Device Drivers
7 To verify that the driver is installed, right-click the My
Computer desktop icon, select Properties, click the Hardware
tab, and click the Device Manager button. Then, expand
IEEE 1394 Bus host controllers and Universal Serial Bus
Controllers. Verify that the information shown below appears.
FireWire controller
USB 2.0
controller
USB 1.1
controllers
14
Page 23

Windows Me
To complete the driver installation:
1
When the Add New Hardware Wizard appears,
DuoConnect CD in your CD-ROM drive. S
search for a better driver..., then click Next.
2 After the driver is copied, click Finish.
3
Select
Automatic
search for a better driver..., then click Next.
Installing the Device Drivers
insert the
elect
Automatic
Windows copies the FireWire drivers.
4 Click Finish.
15
Page 24

Installing the Device Drivers
5 If you see a message that the PCI Universal Serial Bus driver
was not located, select Automatic search for a better driver...,
then click Next.
Windows copies the USB 2.0 drivers.
6 Click Finish.
7 Restart your computer.
Note: It may take longer than usual for your system to
restart because the operating system is locating and
installing the new drivers.
16
Page 25

Installing the Device Drivers
8
To verify that the drivers are installed, right-click the
Computer
desktop icon, select Properties, and click the Device
My
Manager tab. Expand 1394 Bus Controller and Universal Serial
Bus Controllers. Verify that the information shown below
appears.
FireWire controller
USB 2.0 controller
USB 1.1 controllers
17
Page 26

Installing the Device Drivers
Windows 98 SE
The DuoConnect drivers are installed one at a time on
Windows 98SE systems. Carefully follow the instructions provided
to ensure all drivers are installed correctly.
Note: You may need your Windows 98SE CD to complete this
installation.
USB 1.1 (OHCI) Driver Installation
There are two USB 1.1 drivers to install. To complete the
installation:
1
When the Add New Hardware Wizard appears,
DuoConnect CD in your CD-ROM drive, then click Next.
2 Select Search for the best driver for your device..., then click
Next.
insert the
18
Page 27

3 Uncheck all options, then click Next.
4 Click Next.
Installing the Device Drivers
Note: The driver name may differ from the one shown in
the example above, but it will be a.inf file.
5 Click Next again. If Windows prompts you to restart your
computer, click No.
19
Page 28

Installing the Device Drivers
6 When the Add New Hardware Wizard opens, click Next.
7
Select
Search for the best driver for your device...
, and click
8 Uncheck all options, then click Next.
Next.
20
Page 29

Installing the Device Drivers
9 Select The updated driver..., then click Next.
10 You may see a message that Windows is searching for the
driver. Click Next.
11
When this prompt appears, insert your Windows 98SE
CD, then
click OK.
21
Page 30

Installing the Device Drivers
12 Type the drive letter for your CD-ROM drive in the Copy files
from box, then click OK.
Note: Your CD-ROM drive letter may be different from the
one shown in the example below.
Note: If you have copied the driver files onto your hard
drive and know where they are located, you can browse to
that folder instead of inserting the Windows 98SE CD.
13 Click Finish.
The first driver is installed.
14 To install the second USB 1.1 driver, repeat Steps 6 through 13.
22
Page 31

Installing the Device Drivers
USB 2.0 Driver Installation
When both USB 1.1 (OHCI) drivers are installed, the Found New
Hardware Wizard starts again. To complete the installation:
1 Click Next.
2
Select
Search for the best driver for your device...
, then click
Next.
3 Select CD-ROM drive, insert the DuoConnect CD, then click
Next.
23
Page 32

Installing the Device Drivers
4 If the following screen appears, select The updated driver...,
then click Next. If this screen does not appear, skip to Step 6.
5 Click Next.
6 Click Finish.
FireWire Driver Installation
When the USB 2.0 (EHCI) driver is installed, the Found New
Hardware Wizard starts again. To complete the installation:
1 Click Next.
2
Select
Search for the best driver for your device...
, then click
Next.
24
Page 33

Installing the Device Drivers
3 Uncheck all options, then click Next.
4 Select The updated driver..., then click Next.
5 You may see a message that Windows is searching for the
driver. Click Next.
25
Page 34

Installing the Device Drivers
6
When this prompt appears, insert your Windows 98SE
your CD-ROM drive, then click OK.
7
Type the drive letter for your CD-ROM drive
in the Copy files from
box, then click OK.
Note: Your CD-ROM drive letter may be different from the
one shown in the example below.
CD in
Note: If you have copied your driver files onto your hard
drive and know where they are located, you can browse to
that folder instead of inserting the Windows 98SE CD.
8 Click Finish.
26
Page 35

Installing the Device Drivers
Verifying Driver Installation
To verify that the drivers are installed:
1 Right-click the My Computer desktop icon, select Properties,
and click the Device Manager tab.
2 Expand IEEE 1394 Bus Controller and Universal Serial Bus
Controllers. Verify that the information shown below appears.
FireWire controller
USB 2.0 controller
USB 1.1 controllers
27
Page 36

Installing the Device Drivers
Installing on Macintosh Computers
Follow the installation instructions for your Macintosh operating
system.
Macintosh OS X
The drivers for your DuoConnect card are imbedded in Macintosh
OS X. See DuoConnect and Deep Sleep on page 30 to continue.
Macintosh OS 9.x
In this procedure, you install the DisableSleep driver, which
prepares your Macintosh computer to use the DuoConnect card.
Note: Blue and white G3s are not supported.
1 Turn on or restart the computer and insert the DuoConnect CD.
2 Double-click the Start Installation Here file on the CD.
3 Follow the instructions to install the latest Macintosh USB
drivers, if necessary.
4 Double-click the DuoConnect Installer file and follow the
instructions.
5 After the installation is complete, click Restart, if necessary, to
make the new settings take effect.
6 Verify that the card is seen by your computer by clicking Apple
System Profiler in the Apple Menu. Then, click the Devices
and Volumes tab.
Note: The Apple System Profiler (version 2.5.8 or earlier)
identifies the DuoConnect adapter incorrectly. If you have
one of these earlier versions, download a new version
from Apple's software update page.
28
Page 37

Installing the Device Drivers
7 Scroll to the PCI area and click the arrow next to each PCI slot to
reveal the PCI card information. If the DuoConnect adapter is
installed properly, you will see one of the following information
listings under one of the slots:
If you do not see the DuoConnect adapter listed, verify that the
Apple USB extensions are loaded and enabled. Also, verify that
the adapter is seated properly.
If you are still unable to resolve a problem, see the Adaptec Web
site at
http://www.adaptec.com
Knowledgebase at
http://ask.adaptec.com
or the Adaptec Support
for additional
troubleshooting information.
29
Page 38

Installing the Device Drivers
DuoConnect and Deep Sleep
The DuoConnect adapter does not support Deep Sleep on Power
Macintosh G4 computers.
Note: If you have Macintosh OS X version 10.1.3 or later, the
Deep Sleep feature is supported. If you have an earlier version
of the Macintosh OS, continue reading this section.
When you use the DuoConnect installer
as described on page 28, the
DisableSleep driver (shown at right) is
installed and the Deep Sleep feature is
disabled. After you install the DuoConnect driver, if you try to put
a Power Macintosh G4 into Deep Sleep, you will see the message
shown below.
If you want to remove USB connectivity from your Macintosh
computer and continue using Deep Sleep, simply remove the
DuoConnect adapter from your computer and the DisableSleep
extension is not used.
30
Page 39

Connecting USB Devices
Connecting USB Devices
You can connect standard USB 1.1 or high-speed USB 2.0 devices to
the connectors of the DuoConnect adapter, as shown below.
Hotplugging
The DuoConnect adapter supports hot-plugging, allowing USB
devices to be attached and recognized while the computer is on.
Device manufacturers support hot-plugging in different ways.
Refer to the instructions for each device for attaching and
mounting recommendations.
Note: Moving a device from one adapter connector to another
can cause the operating system to initiate a new hardware
installation process. Refer to the Readme file for details.
31
Page 40

Connecting USB Devices
Hubs
The following figure shows the recommended configuration for
connecting USB 1.1 and USB 2.0 devices. Note that you could
connect USB 2.0 devices to a USB 1.1 hub, but the USB 2.0 devices
would run at USB 1.1 speeds.
DuoConne c t ad a pt e r
USB 2.0 hub
USB 2.0 or
1.1 devices
USB 1.1 hub
USB 1.1
devices
Connecting a Digital Video Camera
Two types of FireWire connectors are commonly used: a 4-pin and
a 6-pin. The DuoConnect adapter contains two external 6-pin
connectors suitable for use with a camera. Digital video cameras
use a 4-pin connector and may not include a cable. (Other
peripherals typically use a 6-pin connector.)
To attach a digital video camera
1 Using a standard 6-to-4 pin FireWire cable (included in the kit)
plug the larger, 6-pin connector of the cable into an external
FireWire port on the DuoConnect adapter.
4-pin device connector 6-pin adapter connector
32
Page 41

Connecting USB Devices
2 Plug the smaller, 4-pin connector of the FireWire cable into the
FireWire port on your digital video camera.
Caution: When inserting the FireWire 4-pin connector into the
!
digital video camera, make sure the connector and the port
are properly aligned. Otherwise, you might bend and damage
the pins in the connector of the camera.
33
Page 42

Troubleshooting
Troubleshooting
If you encounter difficulties while installing the DuoConnect
adapter, check the following:
■ Is your device powered on?
■ Is the cable properly connected to the DuoConnect adapter and
the device?
■ Is the adapter seated evenly in the PCI slot?
■ Are your drivers current? Check http://www.adaptec.com for the
latest driver availability.
■ If you encounter any problems with the software, check the
Readme file on the CD.
■ Ensure that you have the proper drivers for your USB and
Firewire devices installed. Refer to each device manufacturer’s
Web site for the latest available drivers.
■ Windows only: Is bus mastering support provided and enabled
for the PCI slot containing the DuoConnect adapter? Refer to
the motherboard documentation for details.
■ Windows only: Is the driver loaded properly? First, try moving
the adapter to a different PCI slot. Windows 2000 only: Check the
Windows 2000 Event Log. Refer to the Windows documentation
for details.
■ Power Macintosh only: Is the adapter seen by the Apple System
Profiler. See Step 6 on page 28 for details.
■ Power Macintosh only: Check http://www.apple.com to ensure that
you have the latest Firewire and USB drivers installed.
For more troubleshooting information, visit
and
http://ask.adaptec.com.
http://www.adaptec.com
34
Page 43

R
Adaptec, Inc.
691 South Milpitas Boulevard
Milpitas, CA 95035 USA
© 2001-2002 Adaptec, Inc.
All rights reserved. Adaptec and the Adaptec logo
are trademarks of Adaptec, Inc. which may be
registered in some jurisdictions.
Part Number: 512925-06, Ver. AF LB 10/02
 Loading...