

Page 1

Operating manual
Ground drill
Model: GroundDrill - 5/7
Manufacturer
Address: WWW. ADAINSTRUMENTS.COM
Page 2

GroundDrill - 5/7
Table of contents
1. Introduction ........................................................................................................................................................................................3
2. Features..............................................................................................................................................................................................3
3. Specications.....................................................................................................................................................................................4
4. Precautions.........................................................................................................................................................................................4
5. The selection of appropriate auger....................................................................................................................................................6
6. Assembling .........................................................................................................................................................................................6
7. Air lter.............................................................................................................................................................................................8
8. Spark plug .........................................................................................................................................................................................8
9. Gear ...................................................................................................................................................................................................9
10. Fuel lter..........................................................................................................................................................................................9
11. Mufer cleaning..............................................................................................................................................................................9
12. Long term storage............................................................................................................................................................................10
13. Maintenance.....................................................................................................................................................................................10
14. Warranty ..........................................................................................................................................................................................11
15. Exceptions from responsibility .......................................................................................................................................................11
Appendix 1. “Warranty card”.
Appendix 2. “Certicate of acceptance and sale”.
Page 3

GroundDrill - 5/7
1. Introduction
Thanks for the purchase of ADA Instruments product. Beforer starting operation read carefully the operating manual. Keep it always
at hand. ADA Instruments product has ergonomic desing. It provides usability, high power and productivity.
Content of the operating manual may not fully correspond to the purchased instrument.
Manufacturer has a right to make changes in the conguration of some parts without previous notice.
2. Features
1. Handle
2. Spark plug cap
3. Ignition starter switch
4. Mufer
5. Input drive
6. Choking starting arrangement
7. Return starter
8. Reduction gear
9. Fuel tank cap
10. Fuel tank
11. Lubrication hole
12. Air lter
3
MEASUREMENT FOUNDATION
Page 4
GroundDrill - 5/7
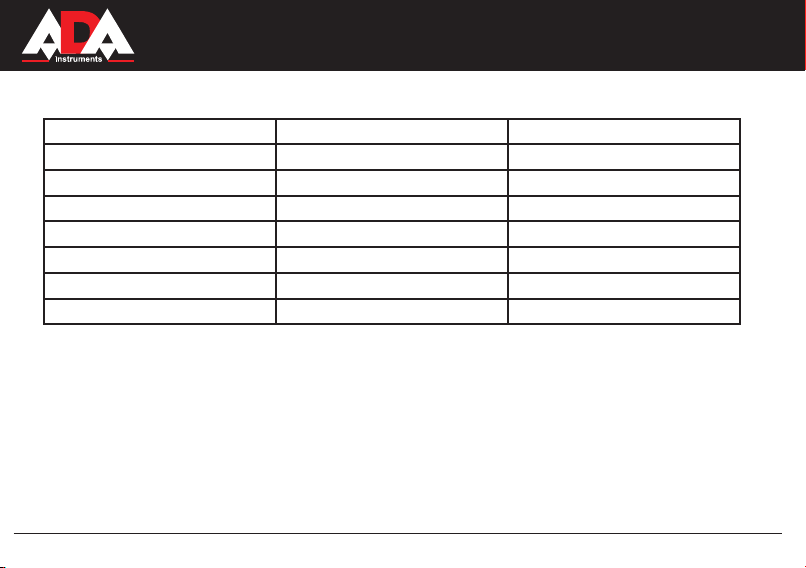
Specications
Name GroundDrill 5 GroundDrill 7
Engine 2-stroke engine, air-cooled 2-stroke engine, air-cooled
Engine capacity 52 сm
Power 1800 Wt / 8000 rev./ min / 2,45 h.p. 2400 Wt / 8000 rev./ min / 3,26 h.p.
Fuel tank capacity 1,2 l 1,2 l
Air-fuel mixture (fuel/oil) 25:1 25 :1
Auger length/diameter 800/200 mm 800/250 mm
Weight (with auger/without auger) 9,5 / 11 kg 9,5 / 11 kg
Precautions
1. Only adults can use ground drill.
2. Users can’t operate ground drill if they didn’t read the operating manual.
3. Don´t use ground drill if you are tired or under the influence of alcohol or drugs.
4. Ensure that anyone who uses the instrument is familiar wi th all controls and safety precautions.
5. Wear non-slip protective shoes, protective gloves, glasses, earmuffs and helmet .
6. When you use the instrument don´t wear scarfs and jewellery.
3
71 сm3
4
MEASUREMENT FOUNDATION
Page 5

GroundDrill - 5/7
7. Don´t start operation, until you are sure that the working area is clean. Keep flames and sparks from engine and fuel to
prevent fire.
8. Never run engine in a poorly ventilated area where the exaust fumes may be trapped and not easily taken away.
9. Move ground drill without power, detach the auger.
10. Replace auger if there are cracks and damages on it.
11. Use the mixture of fuel with octane level 92 and oil for 2 -stroke engines, in the ratio 25:1.
12. Never fill your fuel tank with the engine running. Stop engine and allow to cool before filling. Keep the engine from flames
and sparks. Never smoke while you fill your fuel tank.
13. Never remove the fuel cap with the engine running. Always keep (min 3m) the instrument (before starting) from the area
with spilled fuel.
14. Always keep the handles of the instrument dry and clean.
15. Before starting ensure that auger is not locked.
16. Never touch auger and don´t do servicing with engine running.
17. After you start the engine or before you stop working let the engine work at no load 2-3 min. Never stop suddenly the engine
at great speed.
18. Keep the instrument with both hands. Keep all parts of your body away from the auger and muffler.
19. Move the instrument durin g oper ation at no load.
20. Never touch the coating of spark plug or wire if the engine is running. Or electric shock may occur.
21. Store the instrument in an upright position with empty fuel tank.
22. Regularly check, adjust, repair and clean the instrument.
23. Don´t disassemble return starter. You can be seriously hurt.
24. Contact service center for maintenance that is not mentioned in this manual.
25. If your instrument is not suitable for use any more, dispose of it. Make sure that you don´t do damage to the environment.
5
MEASUREMENT FOUNDATION
Page 6

GroundDrill - 5/7
The selection of appropriate auger
Choose the twist drill according to the material you are going to work with. In case of drilling ice, choose ice auger. In case of
drilling ground, use ground auger. See Pic.1. Set output shaft (2) into the auger hole (3) and fix it with appropriate pin (1).
Pic.1 Pic.2
Assembling (Pic.1)
Fuel
Ground drill is equipped with 2-stroke engine. Always mix fuel with oil. Fuel must be mixed in a clean container outside in a well
ventilated area. Always use nonleaded gasoline with octane number ≤92 with 2 cycle oil, 25:1 ratio.
Fill fuel container 1/2 full of recommended. Then add recommended amount of oil. Shake fuel mixture. Then add the rest amount of
fuel.Shake carefully fuel mixture before to add mixture to the fuel tank. (Pic.2)
6
MEASUREMENT FOUNDATION
Page 7

Always shut-off engine before ll the fuel tank. Open fuel tank slowly. After lling the fuel
tank tight the tank cap.
Always keep the instrument 3 m away from the place where you are going to ll the fuel tank.
Clean the area around tank cap.
Starting engine
1. Move ignition starter switch to the ON position.(Pic.3)
2. Push several times on the primer bulb (4) (If you have it). When using the primer bulb, allow
the bulb to return completely to its original position between pushes. (Pic.4)
3. Pull return starter with a rapid full arm stroke.
4. After engine starts running, return throttle lever to the RUN position. Then pull again the
return starter (Pic.5).
NOTE! If the engine fails to start, repeat these steps 2-3 times.
Drilling
1. Hold handle tight with both hands (Pic.6)
2. Place the auger on the place where you are going to drill and start the engine.
3. If you feel unnatural vibrations or hear unwanted sounds, stop engine and check the
instrument.
4. Stop. Slow down the engine and move ignition starter switch to the STOP position. (Pic.7).
GroundDrill - 5/7
Pic.3
Pic.4
7
MEASUREMENT FOUNDATION
Page 8

Pic.5
Pic.6
GroundDrill - 5/7
Air lter (Pic .8, 9)
Clean air lter from dust and dirt to avoid:
1. Carburetor trouble
2. Start troubles
3. Reduction of engine power
4. Excessive wearing of the enging pa rts
5. Unwanted fuel ow. Clean lter daily in extremely dusty conditions.
Air lter cleaning
Demount cap of the air lter and lter. Wash in warm water with mild soap until dirt and
debris are removed. Dry lter with a clean cloth. Replace regularly lter by new one.
Replace lter if it´s defective.
Spark plug (Pic.10)
Following factors inuence on the s park plug:
1. Incorrect carburettor adjustment
2. Wrong fuel mixture (too much oil in the fuel)
3. Dirty air lter
4. Unfavourable working condition s
These factors cause difculties on the electrodes of
spark plug.
Pic.7
8
MEASUREMENT FOUNDATION
Page 9

Pic. 8 Pic. 9
Pic. 10
Pic. 11
GroundDrill - 5/7
If engine power drops, there are difculties to start it or it
runs bad at no load - rst check the spark plug. Clean the
spark plug if it´s dirty. Check electrode gap. If necessary,
make readjustment. Electrode gap should be 0.6mm.
Gear (pic. 11)
Every 50 h of operation check lubricant level in the gear
or gear system by way of disposal of priming plug for
lubricant on the side of gear. If you don´t see lubricant on
the gear wheels, ll the gear 3/4 with universal lithium
grease. Don´t ll the gear fully.
Fuel lter (pic.12)
Remove fuel from the fuel tank into an approved fuel container and take out a lign of fuel lter from the fuel
tank. Take out lter element and wash it with warm warter
with detergent. Dry the element on the air.
Replace the fuel lter If it´s hard and very dirty.
Mufer cleaning (pic.13)
Demount mufer and spark gap switch (if you have it)
and remove exhaust carbon from exhaust port or entrance
of the mufer every 100h of operation.
9
MEASUREMENT FOUNDATION
Page 10

Pic. 12
Pic. 13
GroundDrill - 5/7
Long term storage
Remove all fuel from the fuel tank. Start the engine and let it run until it stops.
Repair all damages that appeared during operation.
Clean the instrument with clean cloth. Add some drops of 2 cycle oil into the cylinder through the hole in the spark plug and run the engine.
Store ground drill in dry place.
Maintenance
Maintenance, replacement and repair can be done in the authorized service center.
DAILY MAINTENANCE
Check your ground drill for the presence of cracks.
Check the centering.
Auger with bad centering has strong vibration and it can damage the instrument.
Check nuts and screws.
WEEKLY MAINTENANCE
Check starter and pullback spring.
Clean spark plug, outer surface and air lter.
MONTHLY MAINTENANCE
Wash fuel tank with petrol.
Clean outer surface of carburettor and area around it.
Clean ventilator and area around it.
10
MEASUREMENT FOUNDATION
Page 11

GroundDrill - 5/7
Warranty
This product is warranted by the manufacturer to the original purchaser to be free from defects in material and workmanship under
normal use for a period of two (2) years from the date of purchase.
During the warranty period, and upon proof of purchase, the product will be repaired or replaced (with the same or similar model at
manufactures option), without charge for either parts of labour.
In case of a defect please contact the dealer where you originally purchased this product. The warranty will not apply to this product
if it has been misused, abused or altered. Withiut limiting the foregoing, leakage of the battery, bending or dropping the unit are
presumed to be defects resulting from misuse or abuse.
Exceptions from responsibility
The user of this product is expected to follow the instructions given in operators’ manual.
Although all instruments left our warehouse in perfect condition and adjustment the user is expected to carry out periodic checks of
the product’s accuracy and general performance.
The manufacturer, or its representatives, assumes no responsibility of results of a faulty or intentional usage or misuse including any
direct, indirect, consequential damage, and loss of prots.
The manufacturer, or its representatives, assumes no responsibility for consequential damage, and loss of prots by any disaster
(earthquake, storm, ood ...), re, accident, or an act of a third party and/or a usage in other than usual conditions.
The manufacturer, or its representatives, assumes no responsibility for any damage, and loss of prots due to a change of data, loss
of data and interruption of business etc., caused by using the product or an unusable product.
The manufacturer, or its representatives, assumes no responsibility for any damage, and loss of prots caused by usage other thsn
explained in the users’ manual.
The manufacturer, or its representatives, assumes no responsibility for damage caused by wrong movement or action due to connecting with other products.
11
MEASUREMENT FOUNDATION
Page 12

WARRANTY DOESN’T EXTEND TO FOLLOWING CASES:
1. If the standard or serial product number will be changed, erased, removed or wil be unreadable.
2. Periodic maintenance, repair or changing parts as a result of their normal runout.
3. All adaptations and modications with the purpose of improvement and expansion of normal sphere of product application, mentioned in the service instruction, without tentative written agreement of the expert provider.
4. Service by anyone other than an authorized service center.
5. Damage to products or parts caused by misuse, including, without limitation, misapplication or nrgligence of the terms of service
instruction.
6. Power supply units, chargers, accessories, wearing parts.
7. Products, damaged from mishandling, faulty adjustment, maintenance with low-quality and non-standard materials, presence of
any liquids and foreign objects inside the product.
8. Acts of God and/or actions of third persons.
9. In case of unwarranted repair till the end of warranty period because of damages during the operation of the product, it’s transportation and storing, warranty doesn’t resume.
For more information you can visit our website WWW.ADAINSTRUMENTS.COM
or write the letter with your questions on info@adainstruments.com
Page 13

WARRANTY CARD
Name and model of the product ________________________________________________
Serial number ________________date of sale_______________________
Name of commercial organization _____________________stamp of commercial organization
Warranty period for the instrument explotation is 24 months after the date of original retail purchase. It extends to the equipment, imported
on the RF territory by ofcial importer.
During this warranty period the owner of the product has the right for free repair of his instrument in case of manufacturing defects.
Warranty is valid only with original warranty card, fully and clear lled (stamp or mark of thr seller is obligatory).
Technical examination of instruments for fault identication which is under the warranty, is made only in the authorized service center.
In no event shall manufacturer be liable before the client for direct or consewuential damages, loss of prot or any other damage which
occur in the result of the instrument outage.
The product is received in the state of operability, without any visible damages, in full completeness. It is tested in my presence. I have no
complaints to the product quality. I am familiar with the conditions of qarranty service and i agree.
purchaser signature _______________________________
Before operating you should read service instruction!
If you have any questions about the warranty service and technical support contact seller of this product
Page 14

Certicate of acceptance and sale
__________________________________________________________________________
__________________________________________________________________________
___________________________________________________________№_____________
name and model of the instrument
Corresponds to ______________________________________________________________
designation of standard and technical requirements
Data of issue _______________________________________________________________
Stamp of quality control department
Price
Sold ___________________________________ Date of sale ______________________
name of commercial establishment
Page 15

Руководство по эксплуатации
Мотобур
Модель: Ground Drill - 5/7
Производитель: ADAINSTRUMENTS Адрес: WWW.ADAINSTRUMENTS.COM
Page 16

GroundDrill - 5/7
Содержание
1. Введение ............................................................................................................................................................................................17
2. Техническое описание ......................................................................................................................................................................17
3. Технические характеристики ..........................................................................................................................................................18
4. Меры предосторожности .................................................................................................................................................................18
5. Выбор подходящего шнека ..............................................................................................................................................................20
6. Операции ...........................................................................................................................................................................................21
7. Воздушный фильтр ...........................................................................................................................................................................22
8. Свеча зажигания ...............................................................................................................................................................................23
9. Передача ............................................................................................................................................................................................23
10. Топливный фильтр ..........................................................................................................................................................................23
11. Чистка глушителя .........................................................................................................................................................................24
12. Подготовка к консервации ...........................................................................................................................................................24
13. Техобслуживание ..........................................................................................................................................................................25
14. Гарантия ........................................................................................................................................................................................26
15. Освобождение от ответственности .............................................................................................................................................26
Приложение 1. “Гарантийный талон”.
Приложение 2. “Свидетельство о приемке и продаже”.
Page 17

GroundDrill - 5/7
Введение
Уважаемые пользователи!
Благодарим за покупку продукции ADA Instruments. В данном руководстве приведены правила эксплуатации инструмента.
Перед началом работ внимательно прочтите руководство. Эксплуатируйте инструмент в соответствии с правилами и с учетом
требований безопасности. Сохраните инструкцию, при необходимости Вы всегда можете обратиться к ней.
Продукция ADA Instruments отличается эргономичным дизайном, обеспечивающей удобство ее использования, продуманной
конструкцией, высокой мощностью и производительностью.
В связи с изменениями в технических характеристиках содержание руководства может неполностью соответствовать
приобретенному инструменту. Производитель оставляет за собой право вносить изменения в конструкцию отдельных деталей
без предварительного уведомления.
Техническое описание
1. Рукоятка
2. Колпачок свечи зажигания
3. Выключатель зажигания
4. Глушитель
5. Приводной вал
6. Дроссельное пусковое устройство
7. Возвратный стартер
8. Редуктор
9. Крышка топливного бака
10. Топливный бак
11. Смазочное отверстие
12. Воздушный фильтр
17
MEASUREMENT FOUNDATION
Page 18
GroundDrill - 5/7
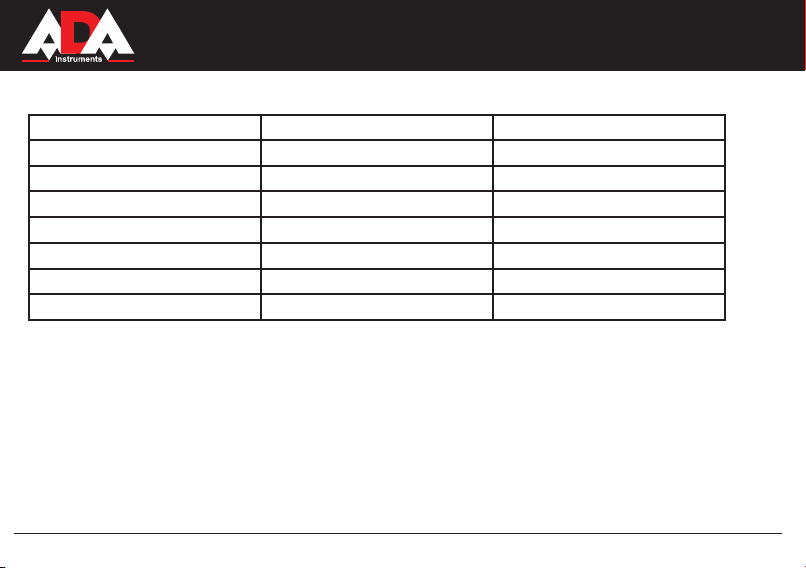
Технические характеристики
Наименование GroundDrill 5 GroundDrill 7
Тип двигателя 2-х тактный, возд. охлаждения 2-х тактный, возд. охлаждения
Объем двигателя 52 см
Мощность 1800 Вт / 8000 об./мин / 2, 45 л.с. 2400 Вт / 8000 об./мин / 3,26 л.с.
Объем топливного бака 1,2 л 1,2 л
Топливная смесь (бензин / масло) 25:1 25 :1
Длина/диаметр шнека 800/200 мм 800/250 мм
Вес (с шнеком/без шнека) 9,5 / 11 кг 9,5 / 11 кг
Меры предосторожности
1. Мотобур должен использоваться только людьми в хорошей физической форме, ознакомленными с руководством по
эксплуатации.
2. Пользователи, не ознакомленные с руководством по эксплуатации мотобура, к его использованию не допускаются.
3. Запрещается работа мотобуром, если Вы устали, либо находитесь под воздействием алкоголя или медикаментов.
4. Не используйте мотобур, пока полностью не поймете специфических методов работы.
5. Надевайте нескользящую защитную обувь, защитные перчатки, очки, наушники и шлем.
6. Для исключения попадания во вращающиеся части инструмента и бур запрещается при работе надевать шарфы,
украшения и что-либо подобное.
7. Перед началом работ обязательно проверьте рабочую зону на отсутствие электрических кабелей, трубопроводов и
подземных коммуникаций.
3
18
71 см3
MEASUREMENT FOUNDATION
Page 19

GroundDrill - 5/7
8. Запрещается использовать мотобур в плохо проветриваемых местах, а так же в закрытых помещениях и если
имеются взрывчатые или воспламеняющие ся пары.
9. Перемещайте мотобур с выключенным двигателем и с отсоединенным шнеком.
10. Запрещается использовать шнек, при наличии на нем каких-либо трещин или повреждений.
11. Для заправки мотобура используйте смесь бензина с октановым числом 92 и масла для двухтактных двигателей,
в соотношении 25:1
12. Заправляйте инструмент вдали от источников огня и с выключенным двигателем. Никогда не курите во время
заправки и использовании мотобура.
13. Никогда не снимайте крышку топливного бака когда работает двигатель. Если топливо разольется, перед запуском
удалите мотобур на безопасное расстояние от этого места (минимум на 3 метра).
14. Всегда содержите рукоятки мотобура сухими и чистыми. Запрещается присоединять к мотобуру инструменты и
приспособления, не указанные производителем
15. Перед запуском убедитесь, что шнек ничем не заблокирован, а мотобур находится в устойчивом и безопасном
положении.
16. Никогда не трогайте шнек и не выполняйте обслуживание при работающем двигателе. Убедитесь, что шнек не
вращается на холостом ходу двигателя.
17. После того, как двигатель заведется или перед его остановкой, дайте ему поработать 2-3 минуты на холостом ходу
без нагрузки. Избегайте работы на высоких оборотах без нагрузки. Никогда резко не останавливайте двигатель на
высоких скоростях.
18. При работе держите мотобур обеими руками при этом старайтесь держаться вдали от шнека и глушителя во
избежании получения травм и ожогов.
19. Перемещайте мотобур во время работы на холостом ходу двигателя.
20. Никогда не трогайте свечи зажигания или провод, если двигатель работает. Это может приве сти к удару
электрическим током.
21. Храните мотобур в вертикальном положении в сухом месте с пустым топливным баком.
19
MEASUREMENT FOUNDATION
Page 20

GroundDrill - 5/7
22. Для поддержания исправного состояния мотобура проводите указанное в руководстве техническое обслуживание.
Регулярно проверяйте, настраивайте, чините и очищайте инструмент.
23. Всегда следуйте инструкциям производителя во время технического обслуживания. Не разбирать возвратный
стартер, Вы можете получить травму от возвратной пружины.
24. При неисправностях мотобура обратитесь в специализированный сервис для их устранения. Сервис, не указанный
в данном руководстве, должен осуществляться квалифицированным персоналом.
25. Если Ваш мотобур более не пригоден к использованию, утилизируйте его должным образом, без нанесения вреда
окружающей среде.
Рис.1 Рис.2
Выбор подходящего шнека
Выбрать винтовое сверло в соответствии с материалом, в котором выполняется бурение.
В случае бурения льда, выбрать ледовый шнек. При бурении земли воспользуйтесь земляным шнеком.
См.рис.1. Установите выходной вал (2) в отверстие шнека (З) и закрепите его используя, подходящую шпильку (1).
20
MEASUREMENT FOUNDATION
Page 21

GroundDrill - 5/7
Операции
Топливо
Мотобур оснащен двухтактным двигателем. Всегда заправляйте двигатель топливом, смешанным с маслом. При заливке
топлива или обращении с ним следует обеспечить хорошую вентиляцию.
Используйте только неэтилированный бензин с октановым числом не ниже 92 в соотношении с 2х-тактным маслом 25:1.
Смешивайте топливо и масло в отдельном чистом контейнере. Для приготовления топливной смеси наполните чистый
контейнер половиной количества топлива планируемой к использованию. Затем добавьте все количество масла. Смешайте
(встряхните) топливную смесь. Добавьте оставшуюся половину топлива. Тщательно смешайте (встряхните) топливную
смесь перед заполнением топливного бака. (Рис.2)
Перед заправкой топливом всегда отключайте двигатель. Тщательно очистить участок вокруг крышки бака, чтобы в бак
не попала грязь. Хорошо смешайте топливо путем встряхивания контейнера. Открывайте топливный бак медленно, чтобы
сбросить возможное избыточное давление. После заправки осторожно затяните крышку топливного бака. Всегда удаляйте
аппарат минимум на З м от зоны топливной заправки, прежде чем запускать его.
Пуск
1. Установить выключатель зажигания (1) в положение ON (Рис.3).
2. Несколько раз нажать на заливочный баллон (4), чтобы топливо потекло через
баллон или обратную трубку. (При наличии подобного оснащения) (Рис.4)
3. Быстро потянуть возвратный стартер, крепко удерживая рычаг в руке и не позволяя
ему защелкиваться назад.
4. Если Вы услышите, что двигатель начинает заводиться, верните рычаг заслонки
в положение RUN (РАБОТА) (открыто). Затем снова быстро потяните возвратный
стартер (Рис.5)
ВНИМАНИЕ! Если двигатель не заводится, повторить операцию 2-3 раза.
Рис.3
21
MEASUREMENT FOUNDATION
Page 22

GroundDrill - 5/7
Бурение
1. Крепко держите рукоятку двумя руками, чтобы аппарат не нарушил Ваше равновесие.
(Рис.6)
2. Поместить шнек на место, где будет производиться бурение и привести его в движение.
Благодаря встроенному центробежному сцеплению эта работа не требует много усилий.
3. При возникновении неестественной вибрации или шумов следует отключить двигатель
и проверить аппарат.
4. Остановка. Снизить скорость двигателя и переместить выключатель зажигания в
положение остановки STOP . (Рис.7)
Воздушный фильтр (Рис. 8,9)
Воздушный фильтр должен быть очищен от пыли и грязи, чтобы избежать:
1. Неполадок карбюратора
2. Проблем при пуске.
3. Снижения мощности двигателя.
4. Излишнего износа деталей двигателя.
5. Ненормального расхода топлива. Ежедневно очищайте воздушный фильтр, либо
чаще, если работа выполняется в пыльной области.
Чистка воздушного фильтра
Демонтируйте крышку воздушного фильтра и фильтр. Промойте его в теплом
мыльном растворе. Перед повторной сборкой проверьте, чтобы фильтр был сухим и
не имел повреждений. Если фильтр имеет повреждения, то его необходимо заменить.
Воздушный фильтр, при промывке и сушке, может не очиститься полностью. Поэтому
его следует регулярно заменять на новый.
Рис.4
Рис.5
22
MEASUREMENT FOUNDATION
Page 23

Рис.6
Рис.7
GroundDrill - 5/7
Свеча зажигания (Рис.10)
На состояние свечи зажигания влияет:
1. Неверная регулировка карбюратора.
2. Неверно составленная топливная смесь (слишком много масла в бензине)
3. Грязный воздушный фильтр.
4. Неблагоприятные условия работы.
Эти факторы вызывают отложения на электродах свечи зажигания, что приводит к
неполадкам и затруднениям при пуске. Если мощность двигателя снижается, он трудно
запускается или плохо работает на холостом ходу, нужно всегда сначала проверить свечу
зажигания.
Если свеча зажигания грязная, необходимо ее очистить и проверить межэлектродный
зазор. При необходимости выполнить повторную регулировку. Правильный зазор
составляет 0.6 мм.
Передача (Рис. 11)
Каждые 50 часов эксплуатации проверять уровень смазки в передаче или зубчатом
зацеплении путем удаления заправочной пробки для смазки на боковой стороне передачи.
Если на торцах зубчатых колес не видно смазки, заполнить передачу на 3/4 качественной,
универсальной литиевой смазкой. Не заполнять передачу полностью.
Топливный фильтр (Рис.12)
Полностью слить топливо из топливного бака и извлечь из бака линию топливного
фильтра. Вытащить фильтрующий элемент из держателя и промыть его теплой водой
23
MEASUREMENT FOUNDATION
Page 24

Рис. 8 Рис. 9
Рис. 10
GroundDrill - 5/7
с моющим средством. Тщательно смыть средство и
высушить элемент на воздухе.
ВНИМАНИЕ! Если топливный фильтр твердый,
сильно загрязнен, полностью заменить его.
Чистка глушителя (Рис.13)
Через каждые 100 часов эксплуатации демонтировать
глушитель и искровой разрядник (если имеется) и
вычищать выхлопной нагар из выхлопного отверстия
или входа глушителя.
Подготовка к консервации
Слить все топливо из топливного бака. Завести двигатель
и дать ему поработать для полной остановки. Очистить
аппарат чистой тканью или воспользоваться воздушным
шлангом высокого давления. Накапать несколько капель
двухтактного двигательного масла в цилиндр, через
отверстие в свече зажигания и прокрутить двигатель
чтобы распределить масло. Хранить мотобур в
вертикальном положении в сухом месте.
Рис. 11
24
MEASUREMENT FOUNDATION
Page 25

Рис. 12
Рис. 13
GroundDrill - 5/7
Техобслуживание
Техобслуживание, замена или ремонт устройств и систем может
осуществляться в ремонтных мастерских.
ЕЖЕДНЕВНОЕ ТЕХОБСЛУЖИВАНИЕ
1. Проверка мотобура на надлежащее центрирование, остроту и наличие
трещин. Шнек с нарушенным центрированием имеет сильную вибрацию и
может повредить устройство.
2. Проверка прочности затягивания мотобура.
3. Проверка прочности посадки гаек и винтов.
ЕЖЕНЕДЕЛЬНОЕ ТЕХОБСЛУЖИВАНИЕ
1. Проверка стартера особенно, шнура и возвратной пружины.
2. Чистка наружной поверхности свечи зажигания.
3. Проверять наполнение коробки передач смазкой.
4. Чистка воздушного фильтра.
ЕЖЕМЕСЯЧНОЕ ТЕХОБСЛУЖИВАНИЕ
1. Промывка топливного бака бензином.
2. Чистка наружной поверхности карбюратора и пространства вокруг
него.
3. Чистка наружных поверхностей.
25
MEASUREMENT FOUNDATION
Page 26

GroundDrill - 5/7
Гарантия
Производитель предоставляет гарантию на продукцию покупателю в случае дефектов материала или качества его изготовления
во время использования оборудования с соблюдением инструкции пользователя на срок до 1 года со дня покупки. Во
время гарантийного срока, при предъявлении доказательства покупки, прибор будет починен или заменен на такую же или
аналогичную модель бесплатно. Гарантийные обязательства также распространяются и на запасные части.
В случае дефекта, пожалуйста, свяжитесь с дилером, у которого вы приобрели прибор. Гарантия не распространяется
на продукт, если повреждения возникли в результате деформации, неправильного использования или ненадлежащего
обращения.
Все вышеизложенные безо всяких ограничений причины, а также утечка батареи, деформация прибора являются дефектами,
которые возникли в результате неправильного использования или плохого обращения.
Освобождение от ответственности
Пользователю данного продукта необходимо следовать инструкциям, которые приведены в руководстве по эксплуатации.
Даже, несмотря на то, что все прборы проверены производителем, пользователь должен проверять точность прибора и его
работу.
Производитель или его представители не несут ответственности за прямые или косвенные убытки, упущенную выгоду или
иной ущерб, возникший в результате неправильного обращения с прибором.
Производитель или его представители не несут ответственности за косвенные убытки, упущенную выгоду, возникшие в
результате катастроф (землетрясение, шторм, наводнение и т.д.), пожара, несчастных случаев, действия третьих лиц и/или
использование прибора в необычных условиях.
Производитель или его представители не несут ответственности за косвенные убытки, упущенную выгоду, возникшие в
результате изменения данных, потери данных и временной приостановки бизнеса и т.д., вызванных применением прибора.
Производитель или его представители не несут ответственности за косвенные убытки, упущенную выгоду, возникшие в
результате использования прибора не по инструкции.
26
MEASUREMENT FOUNDATION
Page 27

ГАРАНТИЙНЫЕ ОБЯЗАТЕЛЬСТВА НЕ РАСПРОСТРАНЯЮТСЯ НА СЛЕДУЮЩИЕ СЛУЧАИ:
1.Если будет изменен, стерт, удален или будет неразборчив типовой или серийный номер на изделии;
2.Периодическое обслуживание и ремонт или замену запчастей в связи с их нормальным износом;
3.Любые адаптации и изменения с целью усовершенствования и расширения обычной сферы применения изделия, указанной
в инструкции по эксплуатации, без предварительного письменного соглашения специалиста поставщика;
4.Ремонт, произведенный не уполномоченным на то сервисным центром;
5.Ущерб в результате неправильной эксплуатации, включая, но не ограничиваясь этим, следующее: использовнаие изделия не
по назначению или не в соответствии с инструкцией по эксплуатации на прибор;
6.На элементы питания, зарядные устройства, комплектующие, быстроизнашивающиеся и запасные части;
7. Изделия, поврежденные в результате небрежного отношения, неправильной регулировки, ненадлежащего технического
обслуживания с применением некачественных и нестандартных расходных материалов, попадания жидкостей и посторонних
предметов внутрь.
8.Воздействие факторов непреодолимой силы и/или действие третьих лиц;
9.В случае негарантийного ремонта прибора до окончания гарантийного срока, произошедшего по причине полученных
повреждений в ходе эксплуатации, транспортировки или хранения, и не возобновляется.
Для получения дополнительной информации Вы можете посетить наш Интернет сайт WWW.ADAINSTRUMENTS.COM
или написать письмо с интерисующими Вас вопросами на электронный адрес info@adainstruments.com
Page 28

ГАРАНТИЙНЫЙ ТАЛОН
Наименование изделия и модель _______________________________________________
Серийный номер ___________________Дата продажи_________________
Наименование торговой организации ___________________Штамп торговой организации мп.
Гарантийный срок эксплуатации приборов составляет 24 месяца со дня продажи и распространяется на оборудование,
ввезенное на территорию РФ официальным импортером.
В течении гарантийного срока владелец имеет право на бесплатный ремонт изделия по неисправностям, являющимся
следствием производственных дефектов.
Гарантийные обязательства действительны только по предъявлении оригинального талона, заполненного полностью и четко
(наличие печати и штампа с наименованием и формой собственности продавца обязательно).
Техническое освидетельствование приборов (дефектация) на предмет установления гарантийного случая производится
только в авторизованной мастерской.
Производитель не несет ответственности перед клиентом за прямые или косвенные убытки, упущенную выгоду или иной
ущерб, возникшие в результате выхода из строя приобретенного оборудования.
Правовой основой настоящих гарантийных обязательств является действующее законодательство, в частности, Федеральный
закон РФ “О защите прав потребителя” и Гражданский кодекс РФ ч.II ст. 454-491.
Товар получен в исправном состоянии, без видимых повреждений, в полной комплектности, проверен в моем присутствии,
претензий по качеству товара не имею. С условиями гарантийного обслуживания ознакомлен и согласен.
Подпись получателя_________________________________
Перед началом эксплуатации внимательно ознакомьтесь с инструкцией по эксплуатации!
По вопросам гарантийного обслуживания и технической поддержки обращаться к продавцу данного товара
Page 29

СВИДЕТЕЛЬСТВО О ПРИЕМКЕ И ПРОДАЖЕ
______________________________________________________________________________________________
______________________________________________________________________________________________
_____________________________________________________________________________№_______________
НАИМЕНОВАНИЕ И ТИП ПРИБОРА
Соответствует __________________________________________________________________________________
обозначение стандарта и технических условий
Дата выпуска ___________________________________________________________________________________
Штамп ОТК (клеймо приемщика)
Цена
Продан(а) ___________________________________________________Дата продажи ______________________
Page 30

MEASUREMENT FOUNDATION
WWW.ADAINSTRUMENTS.COM
ADA
 Loading...