


Adafruit BH1750 Ambient Light Sensor
Created by Bryan Siepert
Last updated on 2021-06-03 12:38:40 PM EDT

2
3
6
6
6
8
8
8
9
9
11
12
12
13
13
14
14
14
16
17
17
17
17
Guide Contents
Guide Contents
Overview
Pinouts
Power Pins
I2C Logic Pins
Arduino
I2C Wiring
Library Installation
Load Example
Example Code
Arduino Docs
Python & CircuitPython
CircuitPython Microcontroller Wiring
Python Computer Wiring
CircuitPython Installation of BH1750 Library
Python Installation of BH1750 Library
CircuitPython & Python Usage
Example Code
Python Docs
Downloads
Files
Schematic
Fab Print
© Adafruit Industries https://learn.adafruit.com/adafruit-bh1750-ambient-light-sensor Page 2 of 19

Overview
This is the BH1750 16-bit Ambient Light sensor from Rohm. Because of how important it is to humans and
most other living things, sensing the amount of light in an environment is a common place to get started
when learning to work with microcontrollers and sensors. Should we turn up the brightness of our display
or dim it to save power? Which direction should your robot move to stay in an area with the most light? Is
it day or night? All of these questions can be answered with the help of the BH1750 (https://adafru.it/MfC).
It's a small, capable and inexpensive light sensor that you can include into your next project to add the
detection and measurement of light.
© Adafruit Industries https://learn.adafruit.com/adafruit-bh1750-ambient-light-sensor Page 3 of 19

The BH1750 provides 16-bit light measurements in lux, the SI unit for measuring light making it easy to
compare against other values like references and measurements from other sensors. Able to measure
from 0 to 65K+ lux, the BH1750. With some calibration and advanced adjustment of the measurement
time, it can even be convinced to measure as much as 100,000 lux!
Sensors tend to come in small packages and the BH1750 is no different. Not much bigger than a grain of
rice, this handy light sensing friend needs some help to be used by folks experimenting and without the
desire or tools to work with surface mount parts. We're here to help! Packaged on a PCB in our Stemma
QT form factor, the BH1750 comes integrated with a voltage regulator and level shifting circuitry to allow it
to be used with 3.3V devices like a Feather M4 or Raspberry Pi, or 5V devices such as an Arduino. Rather
than working with the itty bitty little contacts on the sensor, the PCB it's packaged on breaks out all the
pins to a standard 0.1 inch /2.54mm pitch header.
To make things easier and a bit more flexible, we've also included SparkFun Qwiic (https://adafru.it/Fpw)
© Adafruit Industries https://learn.adafruit.com/adafruit-bh1750-ambient-light-sensor Page 4 of 19

compatible STEMMA QT (https://adafru.it/Ft4) connectors for the I2C bus so you don't even need to
solder! Just plug in a compatible cable and attach it to your MCU of choice and you’re ready to load up
some software and measure some light. To help with the software part we’ve written a library that you can
use with CircuitPython compatible devices as well as computers like the Raspberry Pi by installing it using
PyPi. You can even use it on a full sized computer by using a MCP2221 breakout. (https://adafru.it/HMA)
Arduino users can use the well-crafted hp_BH1750 (https://adafru.it/MfD) library by Stefan
Armborst (https://adafru.it/MfE) and our installation instructions and wiring diagrams.
© Adafruit Industries https://learn.adafruit.com/adafruit-bh1750-ambient-light-sensor Page 5 of 19

Pinouts
Power Pins
VIN - this is the power pin. Since the sensor chip uses 3 VDC, we have included a voltage regulator
on board that will take 3-5VDC and safely convert it down. To power the board, give it the same
power as the logic level of your microcontroller - e.g. for a 5V microcontroller like Arduino, use 5V
3Vo - this is the 3.3V output from the voltage regulator, you can grab up to 100mA from this if you
like
GND - common ground for power and logic
I2C Logic Pins
SCL - I2C clock pin, connect to your microcontroller I2C clock line. This pin is level shifted so you can
use 3-5V logic, and there's a 10K pullup on this pin.
SDA - I2C data pin, connect to your microcontroller I2C data line. This pin is level shifted so you can
use 3-5V logic, and there's a 10K pullup on this pin.
STEMMA QT (https://adafru.it/Ft4) - These connectors allow you to connectors to dev boards
with STEMMA QT connectors or to other things with various associated
accessories (https://adafru.it/Ft6)
ADDR/AD0 Jumper - I2C Address pin. Pulling this pin high or bridging the solder jumper on the back
will change the I2C address from 0x23 to 0x5C
© Adafruit Industries https://learn.adafruit.com/adafruit-bh1750-ambient-light-sensor Page 6 of 19

© Adafruit Industries https://learn.adafruit.com/adafruit-bh1750-ambient-light-sensor Page 7 of 19

Arduino
Using the BH1750 with Arduino is a simple matter of wiring up the sensor to your Arduino-compatible
microcontroller, installing the hp_BH1750 (https://adafru.it/MfD) library written by Stefan
Armborst (https://adafru.it/MfE), and running one of many very well written examples. Usually we write our
own library but we were so impressed by Stefan's that we didn't think we could possibly improve on it, so
use it!
I2C Wiring
Use this wiring if you want to connect via I2C interface. The I2C address address for the BH1750 is 0x23
and can be switched to 0x5C by pulling the address pin high to VCC
Here is how to wire up the sensor using one of the STEMMA QT (https://adafru.it/Ft4) connectors. The
examples show a Metro but wiring will work the same for an Arduino or other compatible board.
Connect board VIN (red wire) to Arduino 5V if you
are running a 5V board Arduino (Uno, etc.). If your
board is 3V, connect to that instead.
Connect board GND (black wire) to Arduino GND
Connect board SCL (yellow wire) to Arduino SCL
Connect board SDA (blue wire) to Arduino SDA
Here is how to wire the sensor to a board using a solderless breadboard:
Connect board VIN (red wire) to Arduino 5V if you
are running a 5V board Arduino (Uno, etc.). If your
board is 3V, connect to that instead.
Connect board GND (black wire) to Arduino GND
Connect board SCL (yellow wire) to Arduino SCL
Connect board SDA (blue wire) to Arduino SDA
Library Installation
© Adafruit Industries https://learn.adafruit.com/adafruit-bh1750-ambient-light-sensor Page 8 of 19

You can install the hp_BH1750 (https://adafru.it/MfD) library for Arduino using the Library Manager in the
Arduino IDE.
Click the Manage Libraries ... menu item, search for hp BH1750, and select the hp_BH1750 library:
Load Example
To show the fundamental feature of the sensor, measuring the ambient light in lux, you can use the
modestly titled "BareMinimum" example:
Open File -> Examples -> hp_BH1750 -> BareMinimum
After opening the demo file, upload to your Arduino wired up to the sensor. Once you upload the code,
you will see the Lux values being printed when you open the Serial Monitor ( Tools->Serial Monitor) at
9600 baud, similar these measurements I got from waving a flashlight at the sensor
Example Code
© Adafruit Industries https://learn.adafruit.com/adafruit-bh1750-ambient-light-sensor Page 9 of 19

A full listing (https://adafru.it/MfF) of the above example can be found in the hp_BH1750 repo's example
directory (https://adafru.it/MfG) along with several other examples that show the many features of the
library.
© Adafruit Industries https://learn.adafruit.com/adafruit-bh1750-ambient-light-sensor Page 10 of 19

Arduino Docs
Arduino Docs (https://adafru.it/M0A)
© Adafruit Industries https://learn.adafruit.com/adafruit-bh1750-ambient-light-sensor Page 11 of 19
Python & CircuitPython
It's easy to use the BH1750 with Python or CircuitPython, and the Adafruit CircuitPython
BH1750 (https://adafru.it/MfH) module. This module allows you to easily write Python code that reads lux
measurements from the BH1750.
You can use this sensor with any CircuitPython microcontroller board or with a computer that has GPIO
and Python thanks to Adafruit_Blinka, our CircuitPython-for-Python compatibility
library (https://adafru.it/BSN).
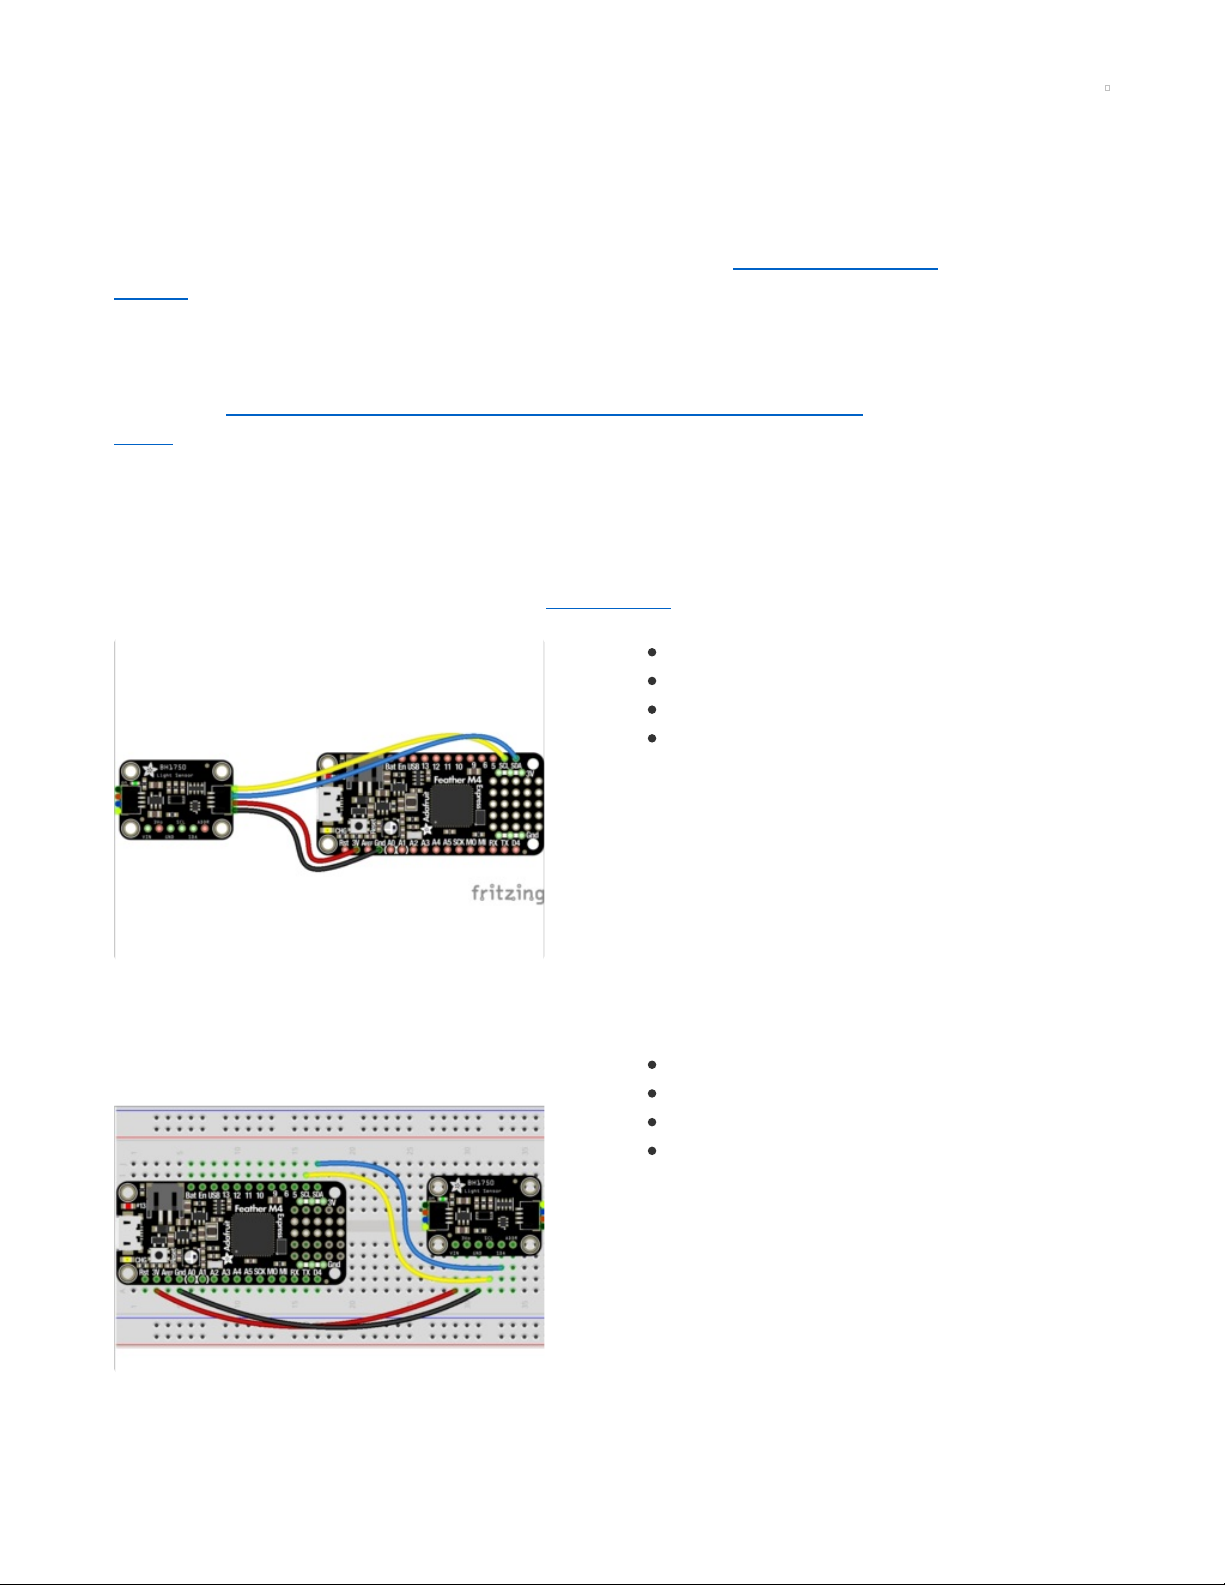
CircuitPython Microcontroller Wiring
First wire up a BH1750 to your board exactly as shown below. Here's an example of wiring a Feather M4
to the sensor with I2C using one of the handy STEMMA QT (https://adafru.it/Ft4) connectors:
Board 3V to sensor VIN (red wire)
Board GND to sensor GND (black wire)
Board SCL to sensor SCL (yellow wire)
Board SDA to sensor SDA (blue wire)
You can also use the standard 0.100" pitch headers to wire it up on a breadboard:
Board 3V to sensor VIN (red wire)
Board GND to sensor GND (black wire)
Board SCL to sensor SCL (yellow wire)
Board SDA to sensor SDA (blue wire)
© Adafruit Industries https://learn.adafruit.com/adafruit-bh1750-ambient-light-sensor Page 12 of 19
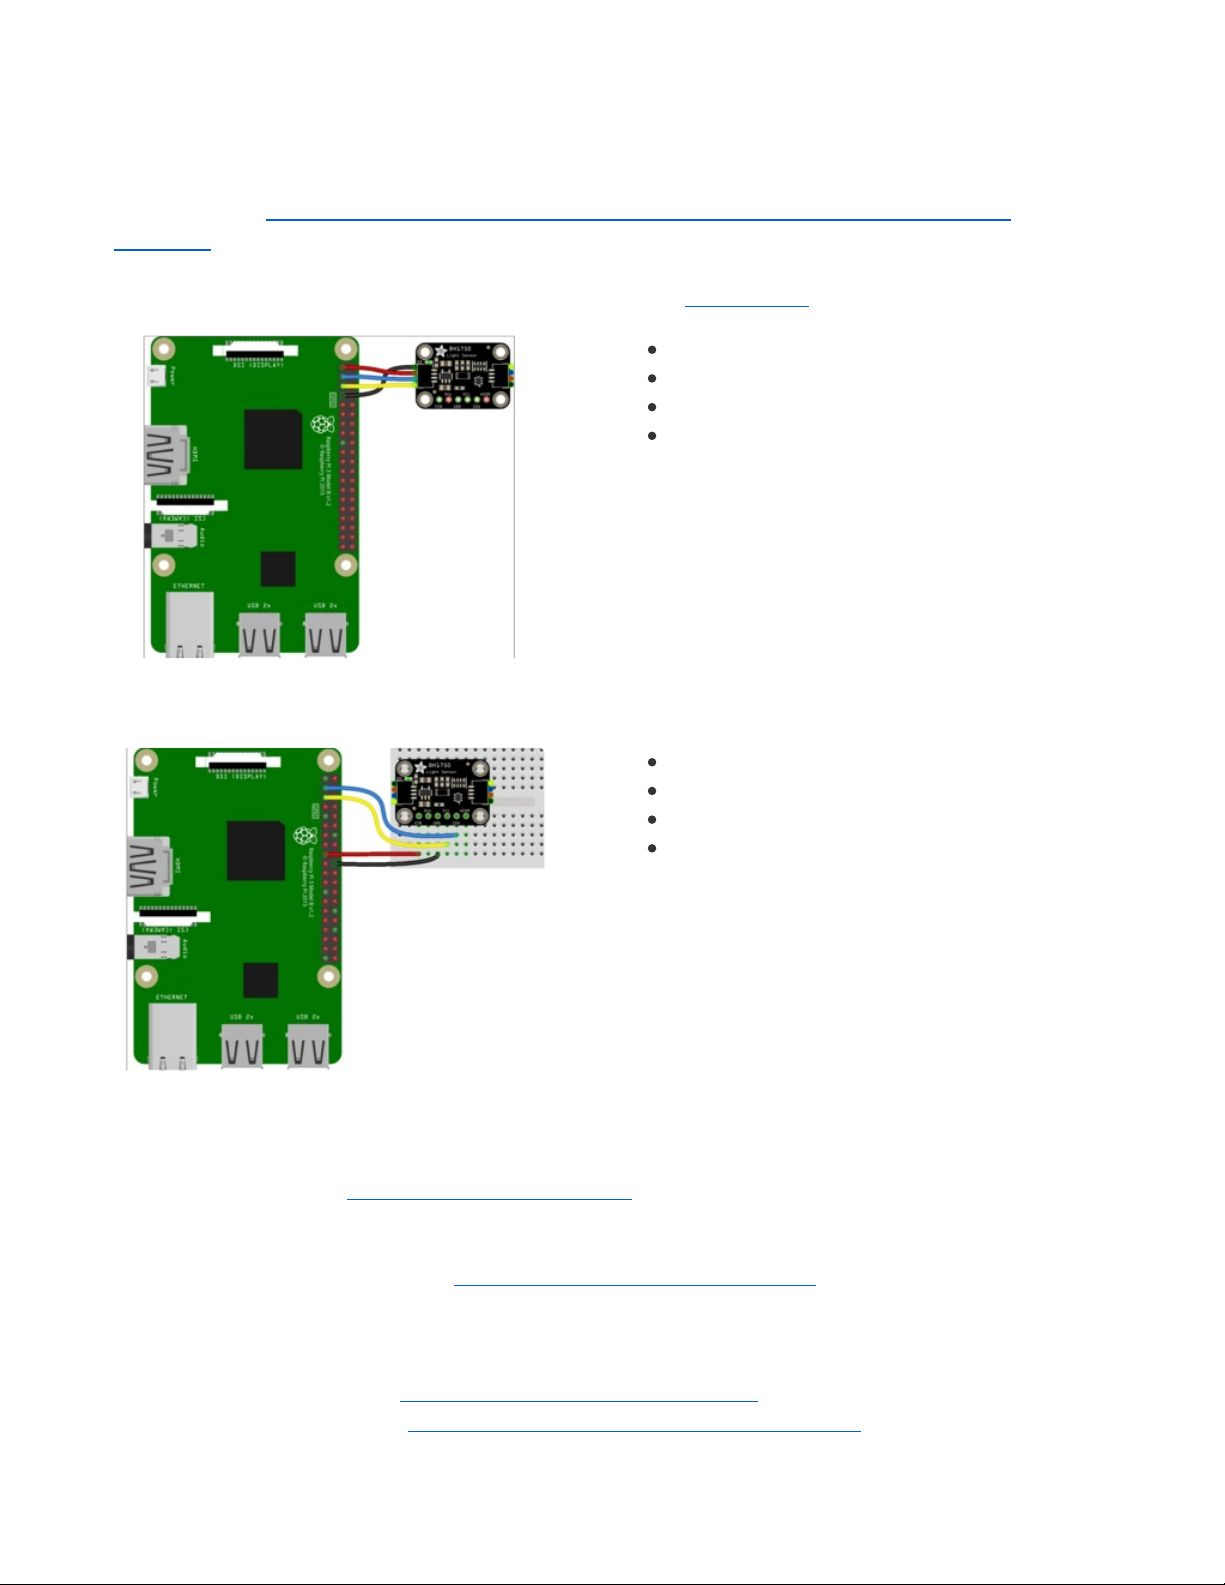
Python Computer Wiring
Since there's
dozens
of Linux computers/boards you can use, we will show wiring for Raspberry Pi. For
other platforms, please visit the guide for CircuitPython on Linux to see whether your platform is
supported (https://adafru.it/BSN).
Here's the Raspberry Pi wired to the sensor using I2C and a STEMMA QT (https://adafru.it/Ft4) connector:
Pi 3V to sensor VCC (red wire)
Pi GND to sensor GND (black wire)
Pi SCL to sensor SCL (yellow wire)
Pi SDA to sensor SDA (blue wire)
Finally here is an example of how to wire up a Raspberry Pi to the sensor using a solderless breadboard
Pi 3V to sensor VCC (red wire)
Pi GND to sensor GND (black wire)
Pi SCL to sensor SCL (yellow wire)
Pi SDA to sensor SDA (blue wire)
CircuitPython Installation of BH1750 Library
You'll need to install the Adafruit CircuitPython BH1750 (https://adafru.it/MfH) library on your CircuitPython
board.
First make sure you are running the latest version of Adafruit CircuitPython (https://adafru.it/Amd) for your
board.
Next you'll need to install the necessary libraries to use the hardware--carefully follow the steps to find
and install these libraries from Adafruit's CircuitPython library bundle (https://adafru.it/ENC). Our
CircuitPython starter guide has a great page on how to install the library bundle (https://adafru.it/ABU).
© Adafruit Industries https://learn.adafruit.com/adafruit-bh1750-ambient-light-sensor Page 13 of 19

Before continuing make sure your board's lib folder or root filesystem has the adafruit_bh1750.mpy file
and adafruit_bus_device folder copied over.
Next connect to the board's serial REPL (https://adafru.it/Awz)so you are at the CircuitPython >>> prompt.
Python Installation of BH1750 Library
You'll need to install the Adafruit_Blinka library that provides the CircuitPython support in Python. This
may also require enabling I2C on your platform and verifying you are running Python 3. Since each
platform is a little different, and Linux changes often, please visit the CircuitPython on Linux guide to get
your computer ready (https://adafru.it/BSN)!
Once that's done, from your command line run the following command:
sudo pip3 install adafruit-circuitpython-bh1750
If your default Python is version 3 you may need to run 'pip' instead. Just make sure you aren't trying to
use CircuitPython on Python 2.x, it isn't supported!
CircuitPython & Python Usage
To demonstrate the usage of the sensor we'll initialize it and read the temperature and humidity
measurements from the board's Python REPL.
Run the following code to import the necessary modules and initialize the I2C connection with the sensor:
Now you're ready to read values from the sensor using the lux property to return the ambient light level in
lux, the SI derived unit (https://adafru.it/MfI) for measuring illuminance (https://adafru.it/MfJ)
Example Code
© Adafruit Industries https://learn.adafruit.com/adafruit-bh1750-ambient-light-sensor Page 14 of 19

# SPDX-FileCopyrightText: 2020 Bryan Siepert, written for Adafruit Industries
# SPDX-License-Identifier: Unlicense
import time
import board
import adafruit_bh1750
i2c = board.I2C()
sensor = adafruit_bh1750.BH1750(i2c)
while True:
print("%.2f Lux" % sensor.lux)
time.sleep(1)
© Adafruit Industries https://learn.adafruit.com/adafruit-bh1750-ambient-light-sensor Page 15 of 19

Python Docs
Python Docs (https://adafru.it/M0B)
© Adafruit Industries https://learn.adafruit.com/adafruit-bh1750-ambient-light-sensor Page 16 of 19

Downloads
Files
BH1750 Datasheet (https://adafru.it/MfK)
EagleCAD files on GitHub (https://adafru.it/MfL)
Fritzing object in the Adafruit Fritzing Library (https://adafru.it/T9E)
Schematic
Fab Print
© Adafruit Industries https://learn.adafruit.com/adafruit-bh1750-ambient-light-sensor Page 17 of 19

© Adafruit Industries https://learn.adafruit.com/adafruit-bh1750-ambient-light-sensor Page 18 of 19

© Adafruit Industries Last Updated: 2021-06-03 12:38:40 PM EDT Page 19 of 19
 Loading...