

Page 1
Simple Raspberry Pi Robot
Created by Tony DiCola
Last updated on 2020-10-07 12:33:08 PM EDT
Page 2
Overview
This is a fun project to build a simple robot using the Raspberry Pi and Adafruit's awesome robot chassis
kit (http://adafru.it/2939). This robot is one of the simplest robots you can build and uses two DC motors to control a
pair of wheels. A swivel caster in the front holds the robot up, and the Raspberry Pi with motor
HAT (http://adafru.it/2348) controls the motors.
There are no sensors or other inputs to the robot, it will just follow a set of instructions in Python code that tell the
robot how to move. Use this project as a starting point for your own amazing Raspberry Pi robot projects! You could
add sensors to detect objects around the Pi, add a camera to get a robot's eye view of the world, or even connect the
robot to web services that control its actions--there's almost no limit to what you can do with this amazing robot!
To build this project it will help to familiarize yourself with using the Raspberry Pi. Follow these great learn Raspberry
Pi guides (https://adafru.it/dpe) to learn the basics. You will also want to review the motor HAT
guide (https://adafru.it/kCC), and skim the Bluefruit LE feather robot guide (https://adafru.it/kCD) to learn more about
the robot chassis.
© Adafruit Industries https://learn.adafruit.com/simple-raspberry-pi-robot Page 3 of 12
Page 3

Hardware
Parts
You'll need the following parts to build this robot:
Mini Rover Robot Chassis Kit (http://adafru.it/2939)
This kit includes almost everything needed to build the robot: a beautiful anodized aluminum
chassis (http://adafru.it/2943), two mini DC motors in a stepper case (http://adafru.it/2941), two motor
wheels (http://adafru.it/2744), a front caster wheel (http://adafru.it/2942), and a top plate with
standoffs (http://adafru.it/2944).
Raspberry Pi Model 2 (https://adafru.it/eCB), B+ (http://adafru.it/1914), or A+ (http://adafru.it/2266)
Stick with a more recent Raspberry Pi Model 2, B+, A+ as these boards have convenient mounting holes for
attaching to the robot chassis. I recommend the Model 2 because it's the most capable. You could
potentially use the Pi Zero but it is a bit small for mounting the motor HAT securely.
Motor HAT (http://adafru.it/2348)
This has everything needed to drive DC & stepper motors from the Pi, perfect for small robot projects.
Brass M2.5 Standoffs for Raspberry Pi HATs (http://adafru.it/2336)
These help hold the Motor HAT securely to the Pi. Although not shown in the photos these are highly
recommended!
4x AA Battery Holder With Switch (http://adafru.it/830)
The motors need a separate power supply from the Pi since they can draw a lot of current (much more
current than the Pi can source!). A small 4x AA battery pack with switch like this is perfect.
Small USB Battery Pack (http://adafru.it/1959)
This will power the Raspberry Pi. Use a pack that's small and light enough to mount on the robot. A ~2200
mAH pack like this one will run a Pi with WiFi dongle for about 5 hours on a full charge.
© Adafruit Industries https://learn.adafruit.com/simple-raspberry-pi-robot Page 4 of 12
Page 4

Miniature WiFi Module (http://adafru.it/814)
Although not technically required, a small Pi-compatible WiFi adapter will make it much easier to log into
and control the Pi robot.
2x #4-40 3/8" or longer machine screws and nuts
You'll need a couple machine screws to hold the Pi to the robot chassis.
Small Piece of Cardboard
You'll want a small piece of cardboard that's as large as the Raspberry Pi to help protect the bottom of the
Pi from touching the metal robot chassis and shorting out. Cut out a square from the box your parts ship to
you inside.
Jumper Wires (http://adafru.it/153)
Precision Screwdrivers & Small Adjustable Wrench or Pliers
Soldering Tools (https://adafru.it/fE3)
You'll need to solder a header and a few connectors onto the motor HAT. This is a relatively easy
soldering job, be sure to follow the guide to excellent soldering (https://adafru.it/dxy) if you're new to it!
Raspberry Pi Setup
You'll want to make sure your Raspberry Pi is running the latest version of the Raspbian Jessie operating
system (https://adafru.it/fQi). In addition the Pi will need access to the internet through a wired or wirless network
connection so it can download necessary software.
If you're new to the Raspberry Pi be sure to follow a few getting started guides (https://adafru.it/dpe) to learn how to
load an operating system on the Pi (https://adafru.it/jd0), setup a wired or wireless network
connection (https://adafru.it/dDN), and connect to its command line terminal (https://adafru.it/jvB).
Motor HAT
Start the project by following the motor HAT guide (https://adafru.it/kCC) to assemble and test the HAT. Make sure you
can install the motor HAT software and test each DC motor to verify it spins. It's much easier to troubleshoot issues
with the HAT and motors when it's outside the robot chassis!
Once you've assembled and checked the motor HAT works, continue on to learn how to put together the robot.
© Adafruit Industries https://learn.adafruit.com/simple-raspberry-pi-robot Page 5 of 12
Page 5

Assembly
Follow the steps below to build the robot. It will help to also skim the Bluefruit LE feather robot
guide (https://adafru.it/kBl) to see more pictures of assembling the robot chassis. There are a few small differences in
the assembly of the Pi robot that will be noted below.
Start by screwing the DC motors to the back of the
chassis (i.e. the end farther away from the angled front).
Make sure the motors have the same orientation, with
the side that the wire exits facing forward.
Next screw in the caster to the center mounting holes.
Assemble the wheels by stretching the tires onto the
hubs, then push the wheel into place on the motor head
and screw it in.
You can feed the DC motor wires up through the angled
mounting slots in the chassis.
Flip the robot over so it stands on its wheels.
Cut out a small square of cardboard that's about the
same size as the Raspberry Pi. This cardboard will
protect the bottom of the Pi from touching the metal
robot chassis and shorting out. It's very important to
prevent the bottom of the Pi from touching the metal
chassis or you could damage the Pi!
Screw the top plate standoffs into the mounting holes
near the center of the chassis (flanking where the
angled mounting slots meet).
© Adafruit Industries https://learn.adafruit.com/simple-raspberry-pi-robot Page 6 of 12
Page 6

Place the Pi on the cardboard and position it so the Pi's
rear mounting holes (near the USB ports) are directly
above the long mounting slot at the back of the chassis.
Use the #4-40 machine screws and nuts to screw
through the Pi and cardboard to securely hold the Pi in
place.
If you aren't using Pi HAT standoffs to hold the motor
HAT place a piece of electrical tape across the HDMI
connector side of the Pi. This will help prevent the
motor HAT from getting pushed down into the
connectors and shorting out. If you are using the
standoffs you can place them over the front mounting
holes of the Pi (not shown).
https://adafru.it/rad
https://adafru.it/rad
Push the motor HAT into place on the Pi's GPIO
connector. Screw down the standoffs if being used to
hold the HAT.
© Adafruit Industries https://learn.adafruit.com/simple-raspberry-pi-robot Page 7 of 12
Page 7

Connect the DC motors to the motor HAT as shown to
the left.
The left (or 'driver side' for US/right side of the road
drivers) DC motor should be connected to port M1 on
the motor HAT. The right (or 'passenger side') DC motor
should be connected to port M2 on the motor HAT.
The black motor wire connects to the left screw terminal
of the port, and the red motor wire connects to the right
screw terminal of the port. The middle GND screw
terminal is unused.
Connect the 4x AA battery pack red wire to the
+/positive power screw terminal on the HAT, and the
black wire to the -/negative power screw terminal.
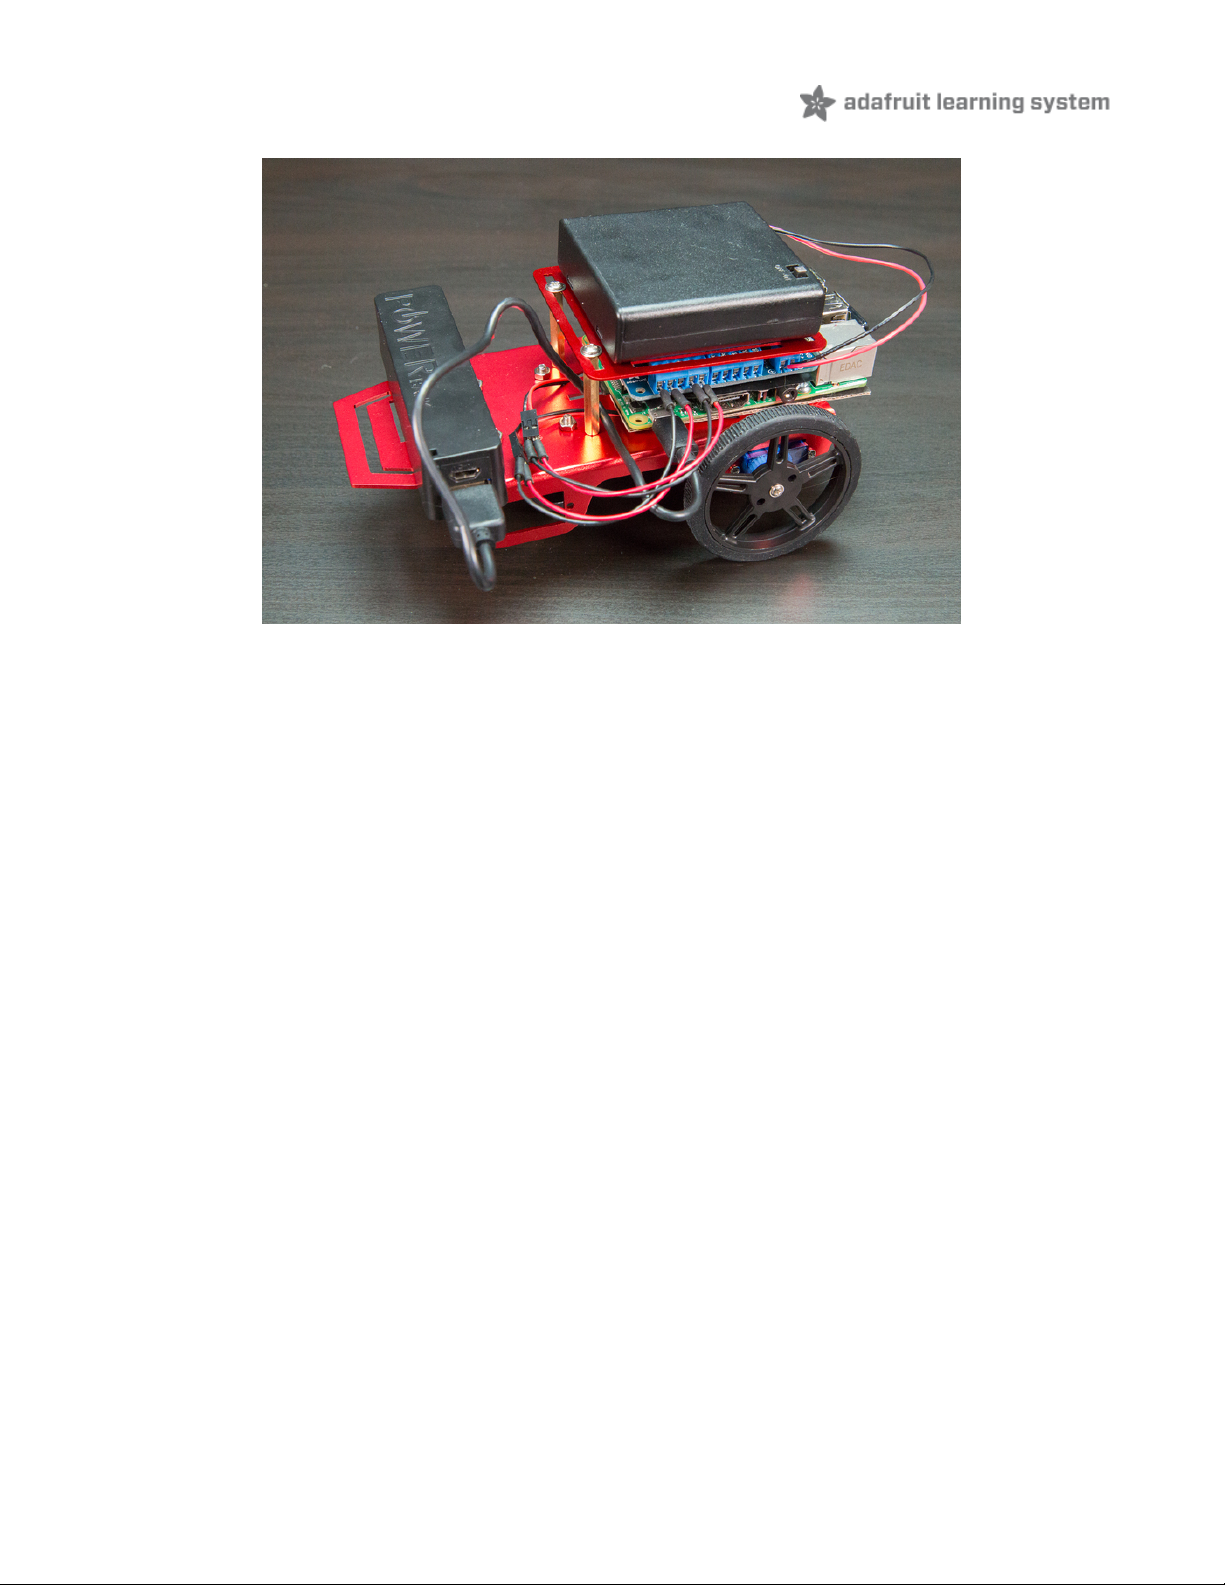
Finish the robot by screwing the top plate firmly to the
standoffs in the center. Use double sided foam tape or
electrical tape to hold the 4xAA battery pack to the top
plate, and the USB battery pack to the front of the robot.
© Adafruit Industries https://learn.adafruit.com/simple-raspberry-pi-robot Page 8 of 12
Page 8

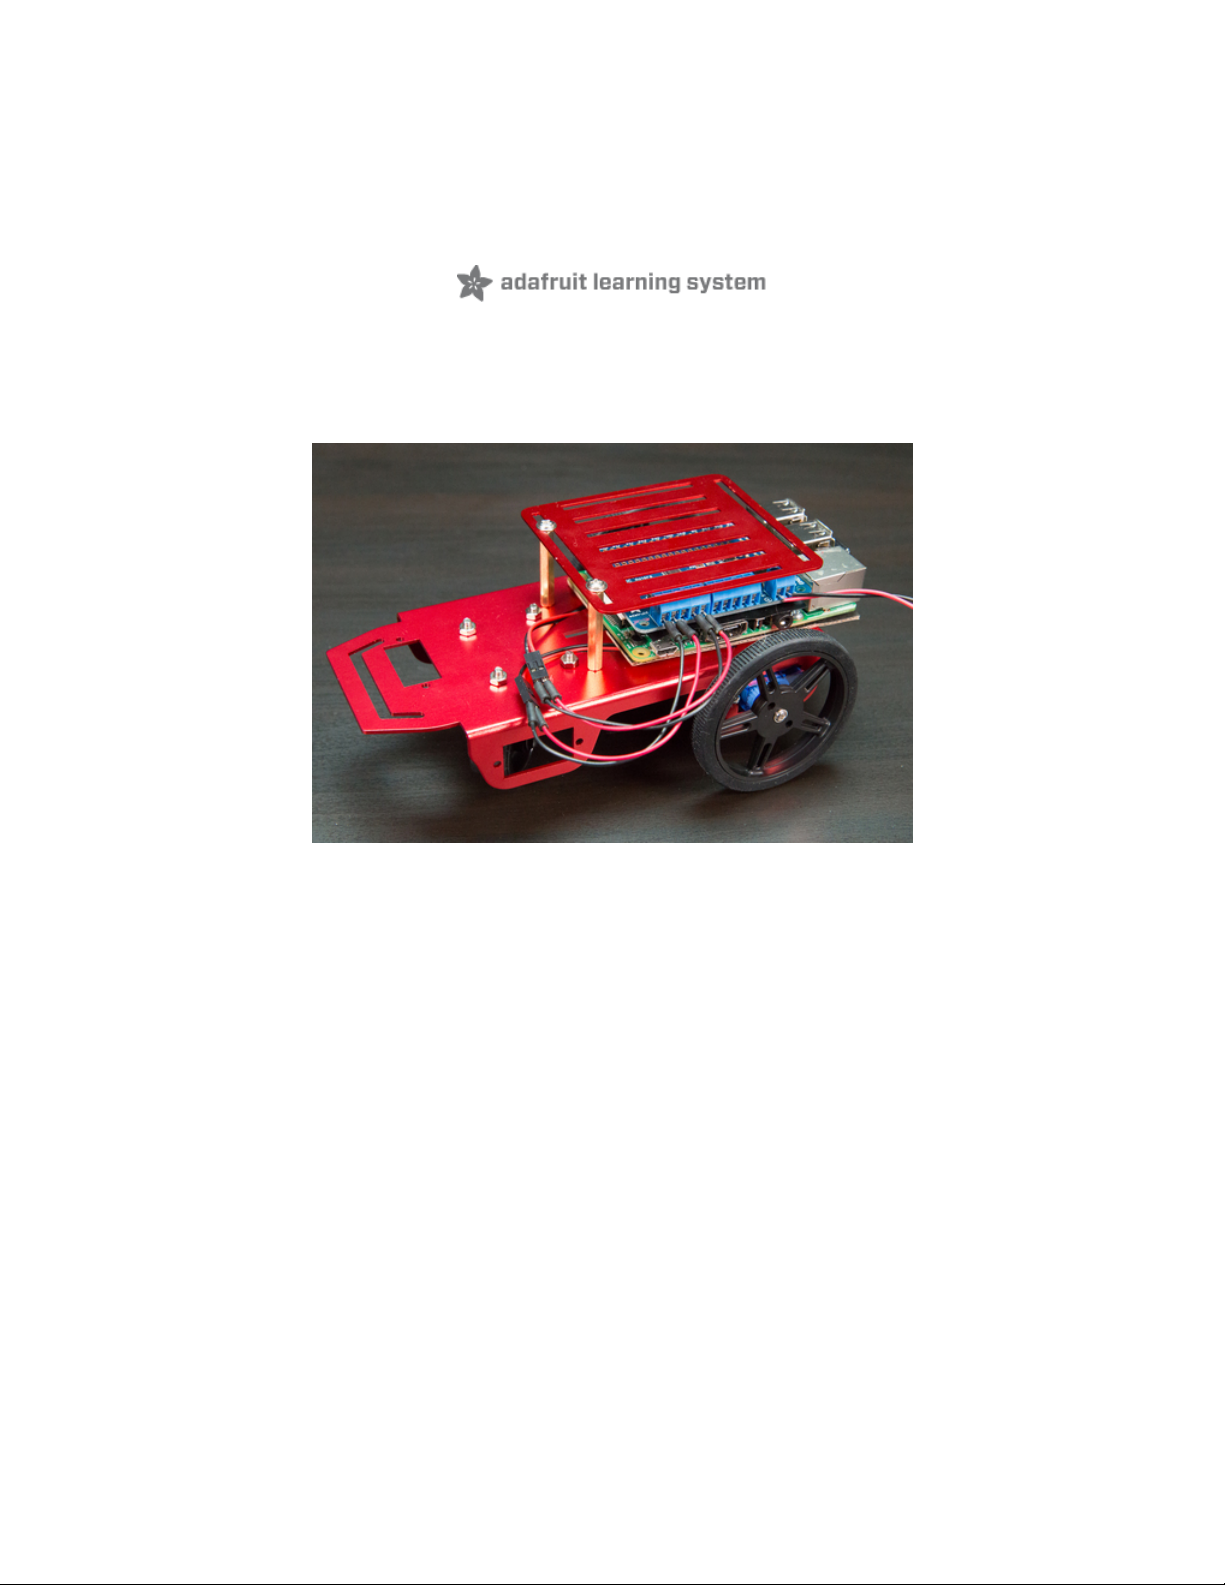
Woo hoo, that's all there is to building the bot! Your
robot should look something like the pictures to the left.
Continue on to learn about simple Python software to
make the robot move.
© Adafruit Industries https://learn.adafruit.com/simple-raspberry-pi-robot Page 9 of 12
Page 9

Software
The software for this project is actually included in the Adafruit CircuitPython MotorKit (https://adafru.it/DdU) library
examples. There's a motorkit_robot_test.py (https://adafru.it/NIf) script that tells the robot to move forward, backward,
and turn in different directions. This script uses a little helper class in motorkit_robot.py (https://adafru.it/NIA) that talks
to the motor HAT and exposes simple functions to move the robot.
Make sure you've followed the motor HAT guide software installation (https://adafru.it/kCG).
Download Example Files
The installation of the library does not include the examples. So you will want to grab those manually. You can use the
links below to download them. Be sure to save both of these into the same directory.
https://adafru.it/NIB
https://adafru.it/NIB
https://adafru.it/NIC
https://adafru.it/NIC
Run Example
To run the robot code first make sure the 4x AA battery pack connected to the motor HAT is powered on. Then place
the robot on the floor where there are no obstructions around it for a few feet. Remember this is a simple robot that
has no sensors to know if it's hitting something or about to fall off a table! Be very careful to ensure the path of the
robot is free and safe to travel!
When the motorkit_robot_test.py script runs it will instruct the robot to move. So make sure the coast is clear. When
you've ensured the path of the robot is clear run the following command to run the robot code:
python3 motorkit_robot_test.py
Be ready to pick up the bot or flip off its motor power supply in case it comes close to hitting something or falling!
Woo hoo, you should see the robot start to move around! If you see an error message check that you've followed all
of the steps above and in the motor HAT guide to install the software. Try testing each motor individually with the
motor HAT guide DC motor test software (https://adafru.it/kCH) to make sure they can spin.
Note that if the robot spins instead of moving forward you likely have the motors connected incorrectly. Try swapping
the order of the connections and testing again. You can flip the robot over and watch the wheels move to check that
they both move in the same direction when moving forward, and they move in opposite directions when turning.
Customizing
The example is very simple. The real fun comes from writing code to make the robot do what YOU want. Start by
making a copy of the motorkit_robot_test.py script and open it in an editor, like nano.
Open your script in a text editor and look for these lines:
© Adafruit Industries https://learn.adafruit.com/simple-raspberry-pi-robot Page 10 of 12
Page 10

robot.left(0.5, 1)
robot.right(0.5, 1)
robot.steer(0.5, 0.2)
time.sleep(3)
robot.stop() # Stop the robot from moving.
Those are the basic move commands. You can change those up as you want. Add more, etc.
As described in the code comment above them, each takes two parameters. The first one is the speed of the
movement. Speed should be a value between 0 and 255. The higher the value the faster the movement. Note that
you'll need to start with a value around 75-100 or so to move the motors with enough torque to get the robot started.
The second parameter is the amount of time (in seconds) to perform the action. For example a call to
robot.forward(150, 1.0) will move the robot forward at a speed of 150 for 1.0 second.
Another way to use the functions is to just pass the first parameter, the speed, to them. This will start the robot moving
and then return to your script so you can do other things. For example:
# Spin in place slowly for a few seconds.
robot.right(100) # No time is specified so the robot will start spinning forever.
time.sleep(2.0) # Pause for a few seconds while the robot spins (you could do
# other processing here though!).
robot.stop() # Stop the robot from moving.
In the snippet above the robot will start spinning to the right at a speed of 100, then the code will sleep for 2 seconds,
and finally stop the robot. Instead of sleeping you could perform other actions though, like reading sensors, talking to
web services, etc--the sky is the limit as far as what you can do with the robot & Python code!
© Adafruit Industries https://learn.adafruit.com/simple-raspberry-pi-robot Page 11 of 12
Page 11

© Adafruit Industries Last Updated: 2020-10-07 12:33:08 PM EDT Page 12 of 12
 Loading...