

Page 1
RGB Matrix Automatic YouTube ON AIR Sign
Created by John Park
Last updated on 2021-03-17 01:12:55 PM EDT
Page 2

2
3
3
6
8
8
8
10
10
10
11
11
12
13
14
14
14
15
15
17
17
17
19
19
21
23
24
24
25
25
27
27
27
27
27
31
31
31
33
34
Guide Contents
Guide Contents
Overview
Parts
Using M4 Airlift
Install CircuitPython
Set up CircuitPython Quick Start!
Further Information
Build the On Air Sign
Assembly
Shields Up
Power Connections
Data Cable
Wall Adapter
Using MatrixPortal
Prep the MatrixPortal
Power Prep
Power Terminals
Panel Power
Board Connection
Install CircuitPython
Set up CircuitPython Quick Start!
Further Information
Prepare YouTube API Token
YouTube Token
JSON
Keys
Font and Graphics
Glyph Bitmap Distribution Format
Glyph Tweaks
Shape Graphics
Code the On Air Sign
Libraries
Connect to the Internet
Text Editor
Code
LED Matrix Diffuser
LED Diffusion Acrylic
Measure and Cut the Plastic
Uglu Dashes
Stand
© Adafruit Industries https://learn.adafruit.com/rgb-matrix-automatic-youtube-on-air-sign Page 2 of 36
Page 3
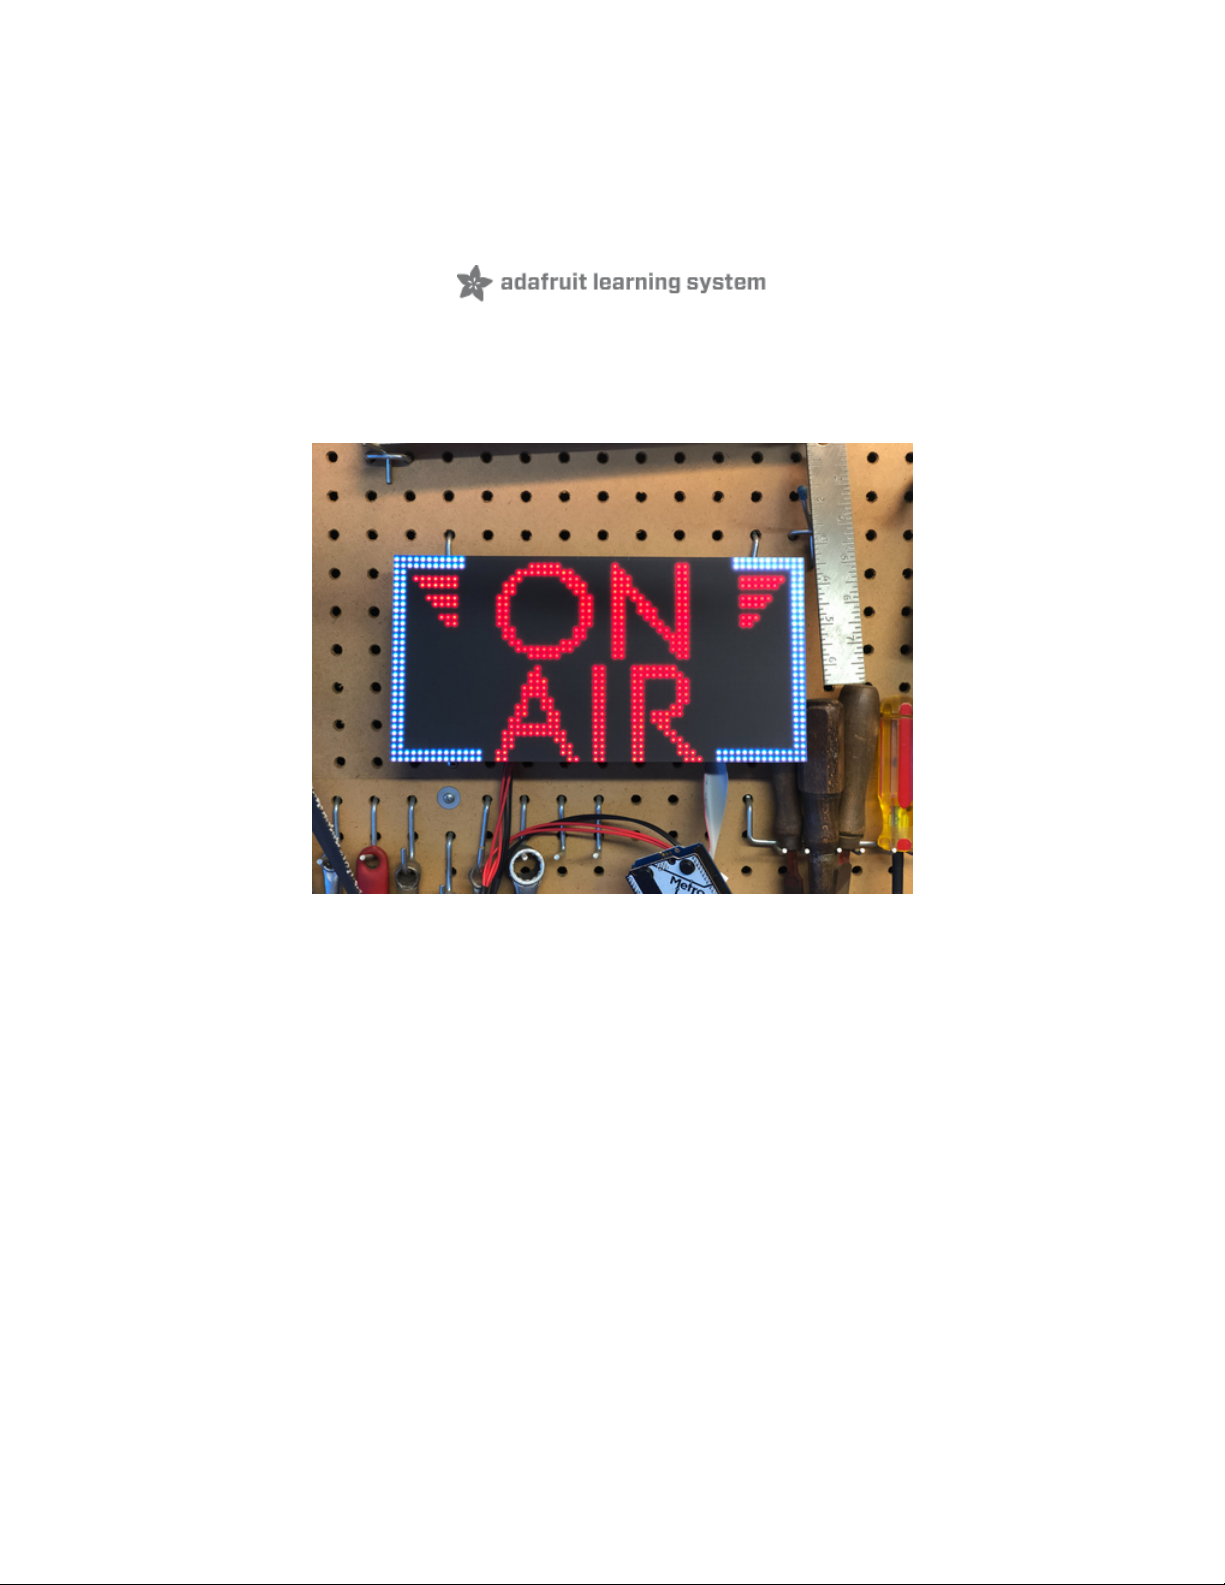
Overview
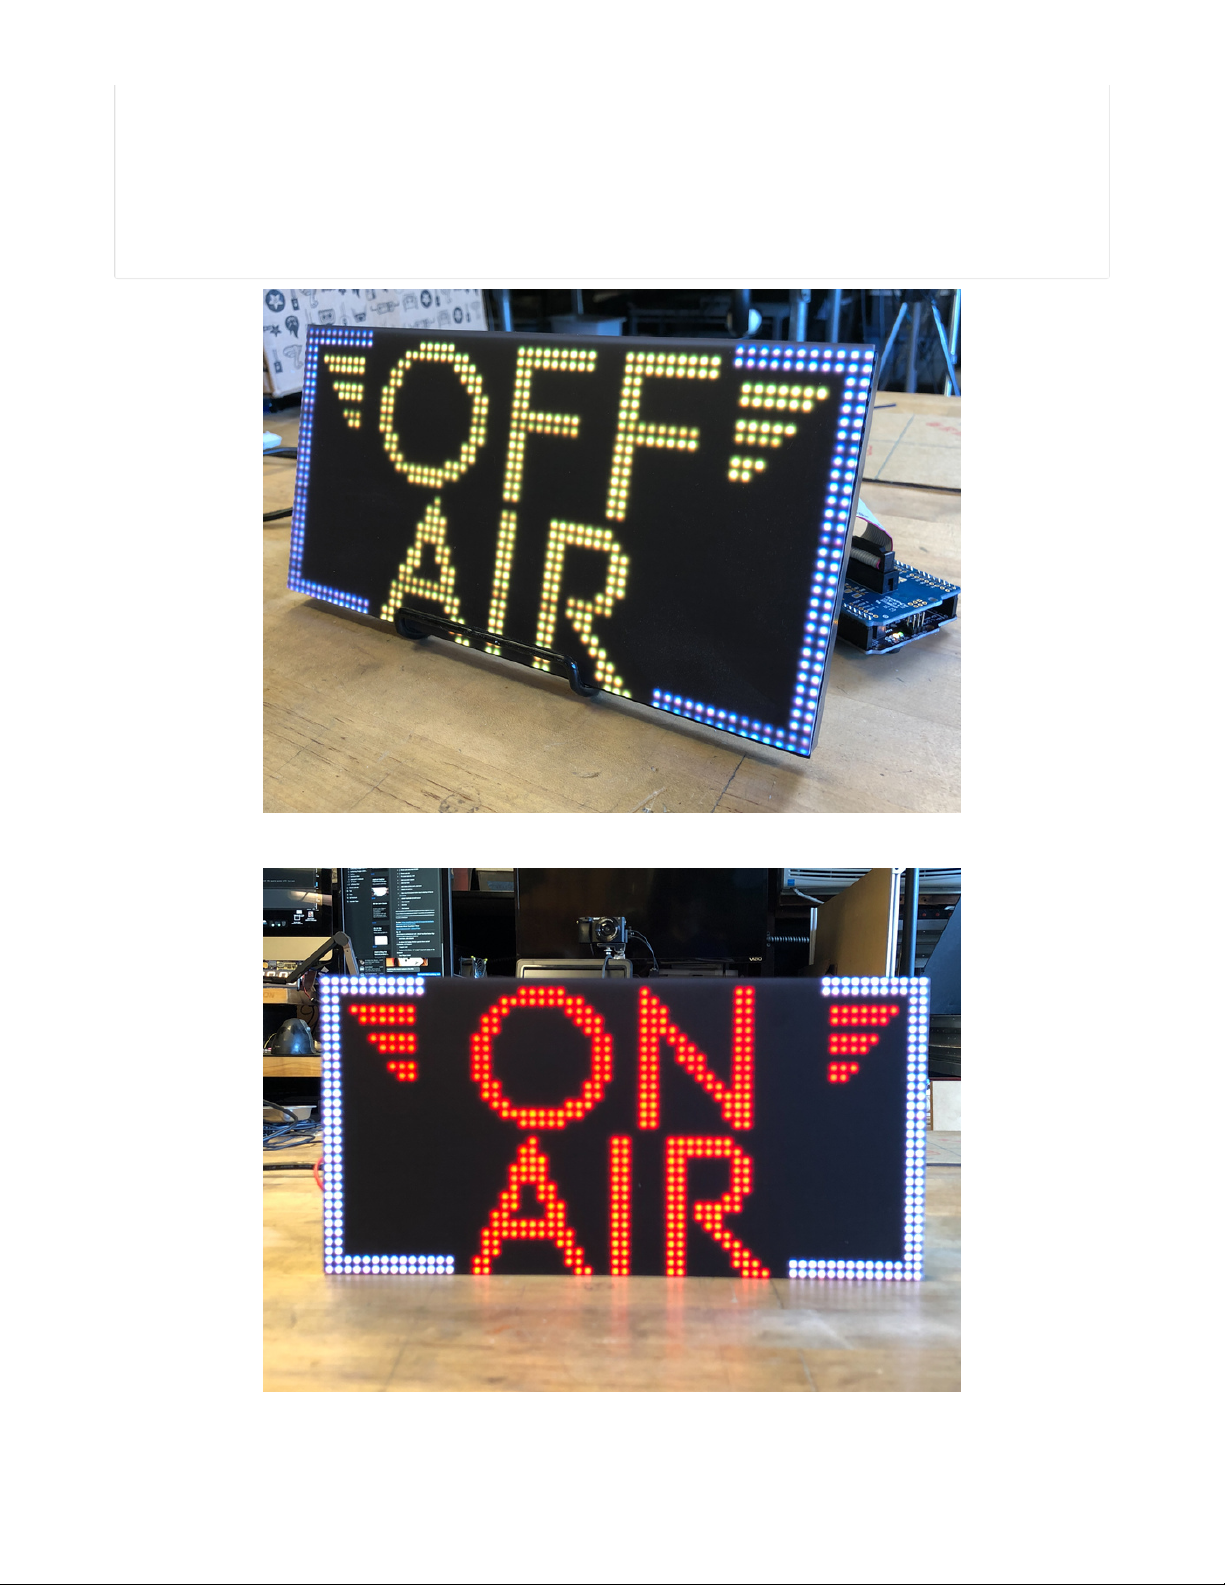
When your favorite YouTube channel is streaming this sign will let you know, in gorgeous Art Deco inspired style!
You'll code it with CircuitPython, and the board's built-in WiFi will allow it to check the YouTube Data API to find out when a channel is
livestreaming! Then, it'll light up the RGB LED matrix display with "OFF AIR" or "ON AIR" depending on the current status.
You'll use a beautiful bitmap font and custom line drawing graphics routines to make if fancy.
Parts
Your browser does not support the video tag.
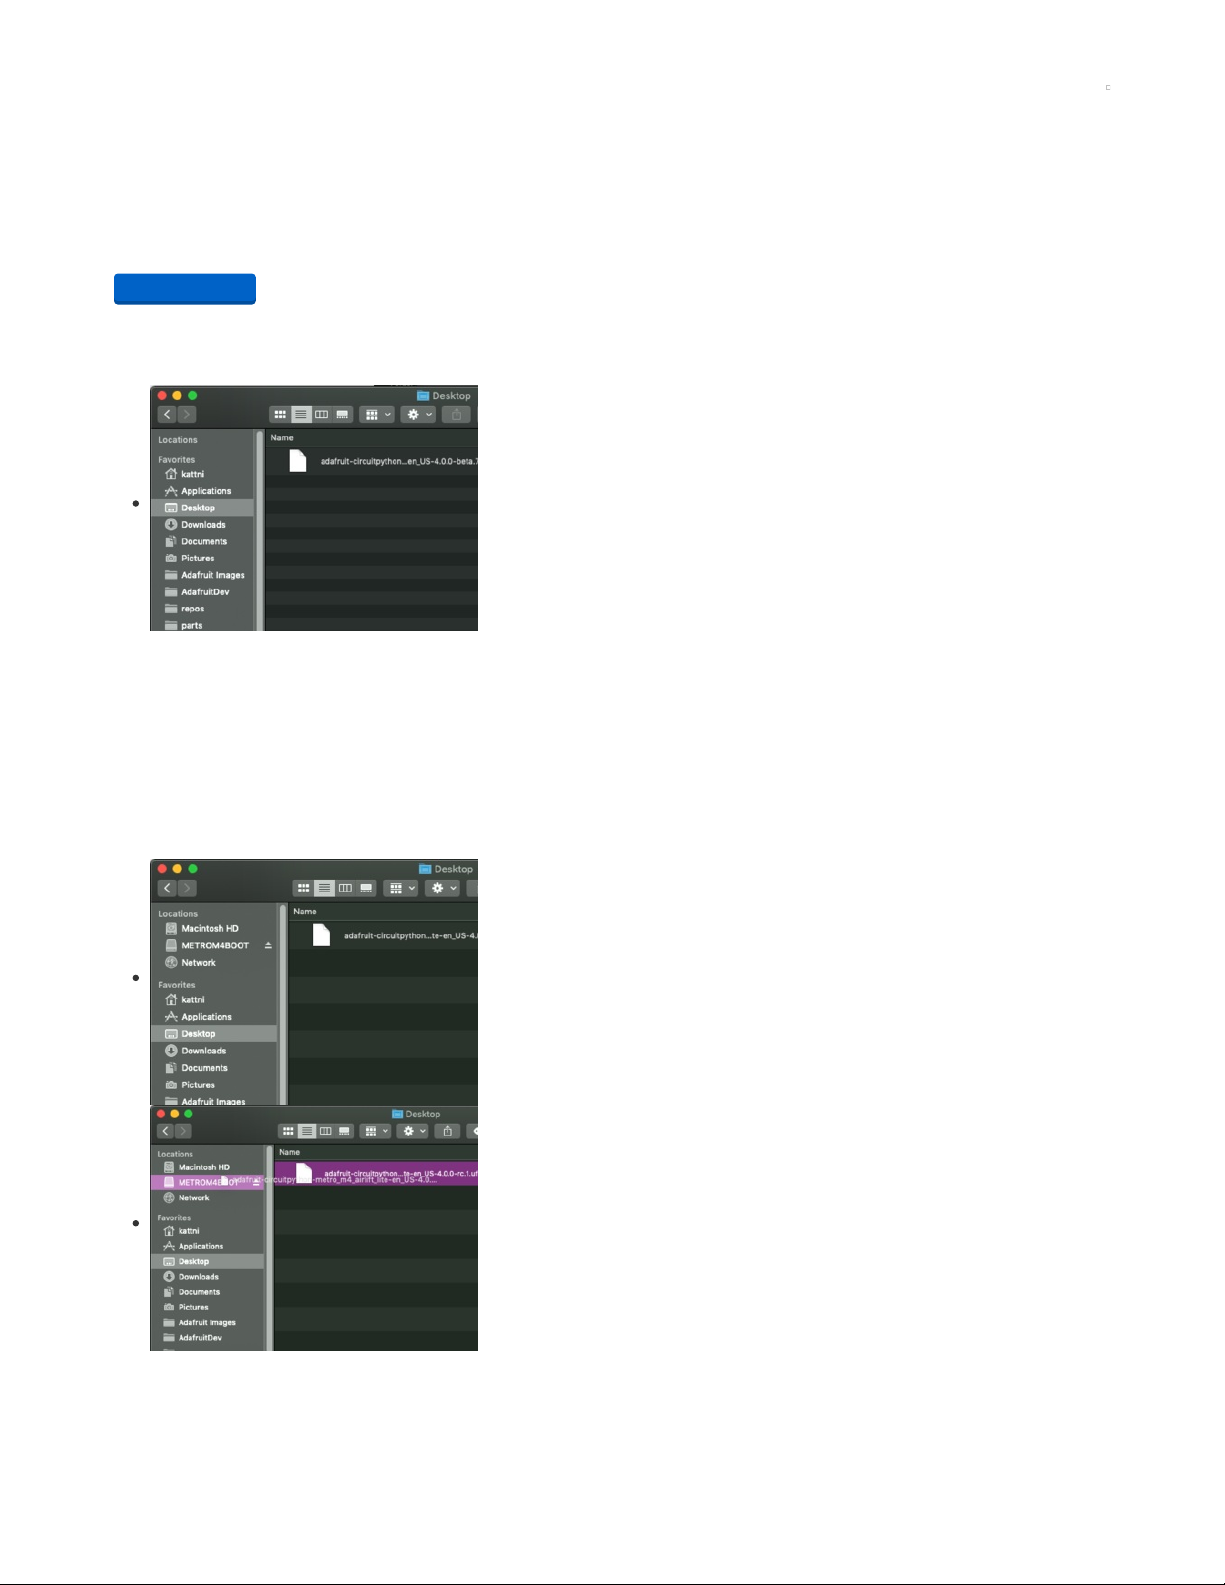
64x32 RGB LED Matrix - 4mm pitch
Bring a little bit of Times Square into your home with this sweet 64 x 32 square RGB LED matrix panel. These panels are normally used to
make video walls, here in New York we see them...
Out of Stock
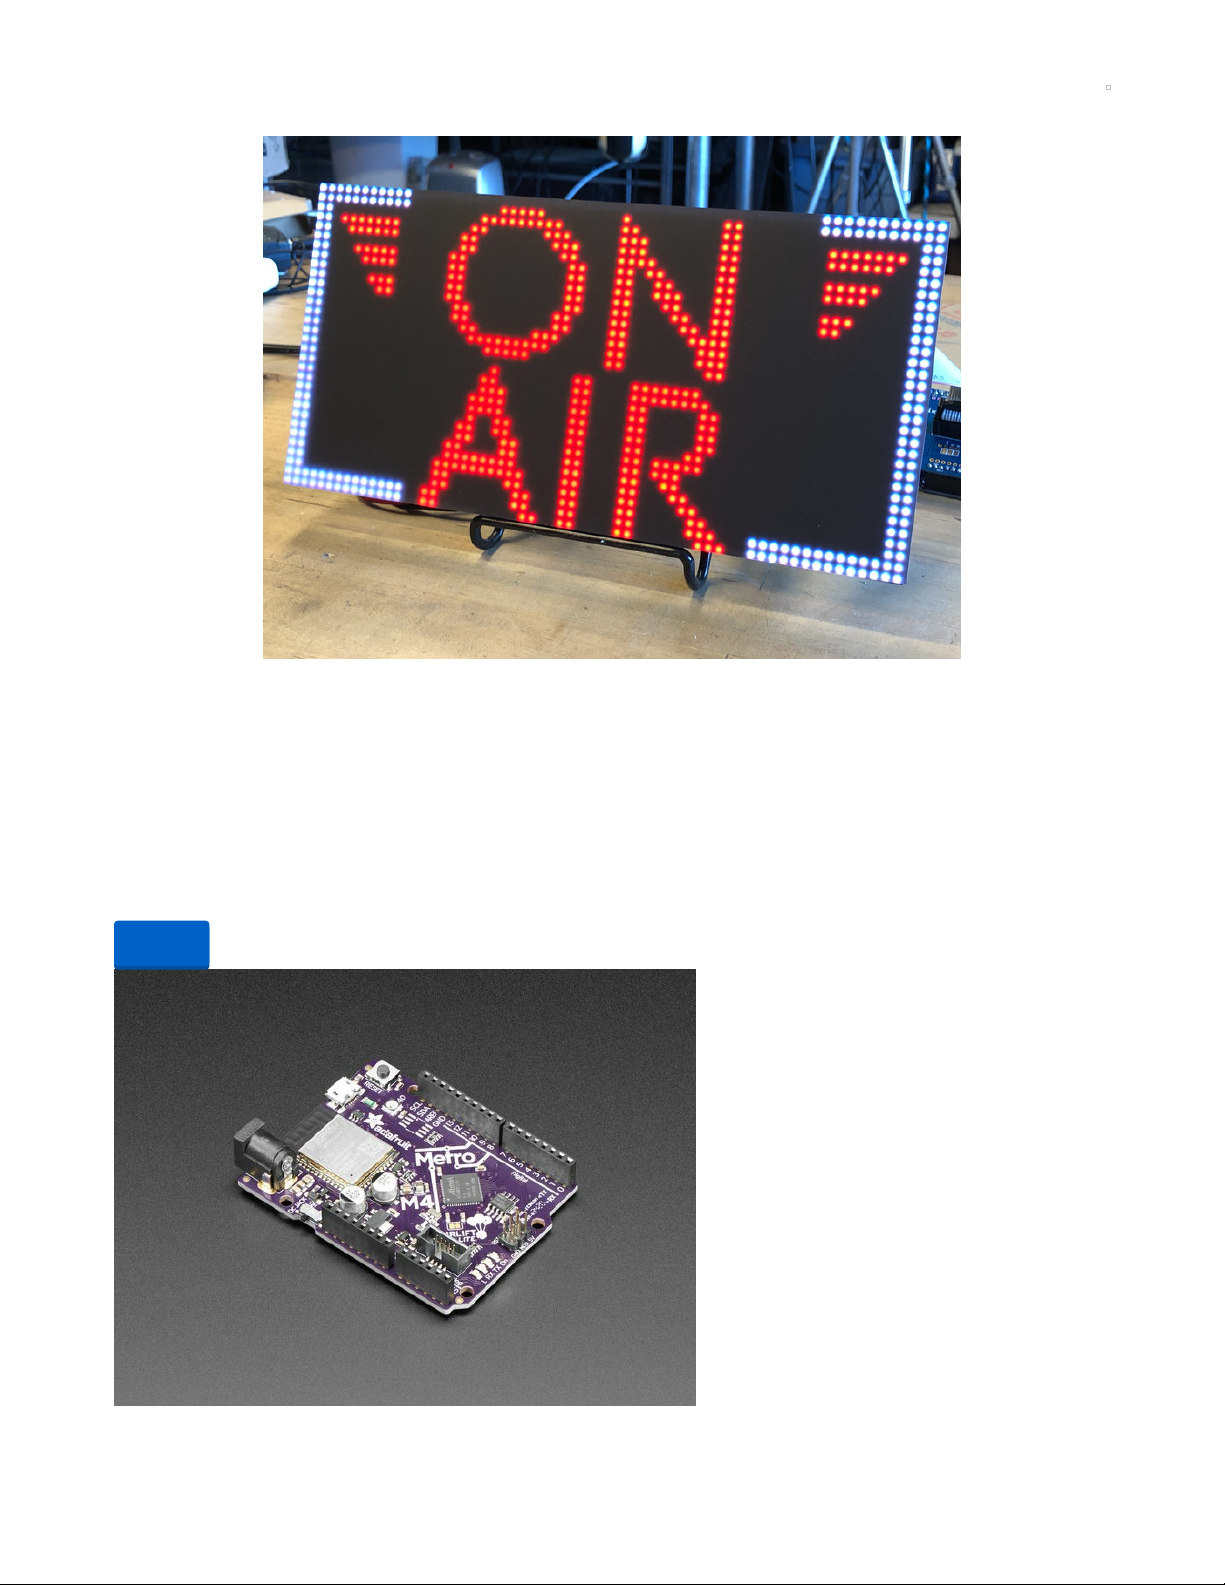
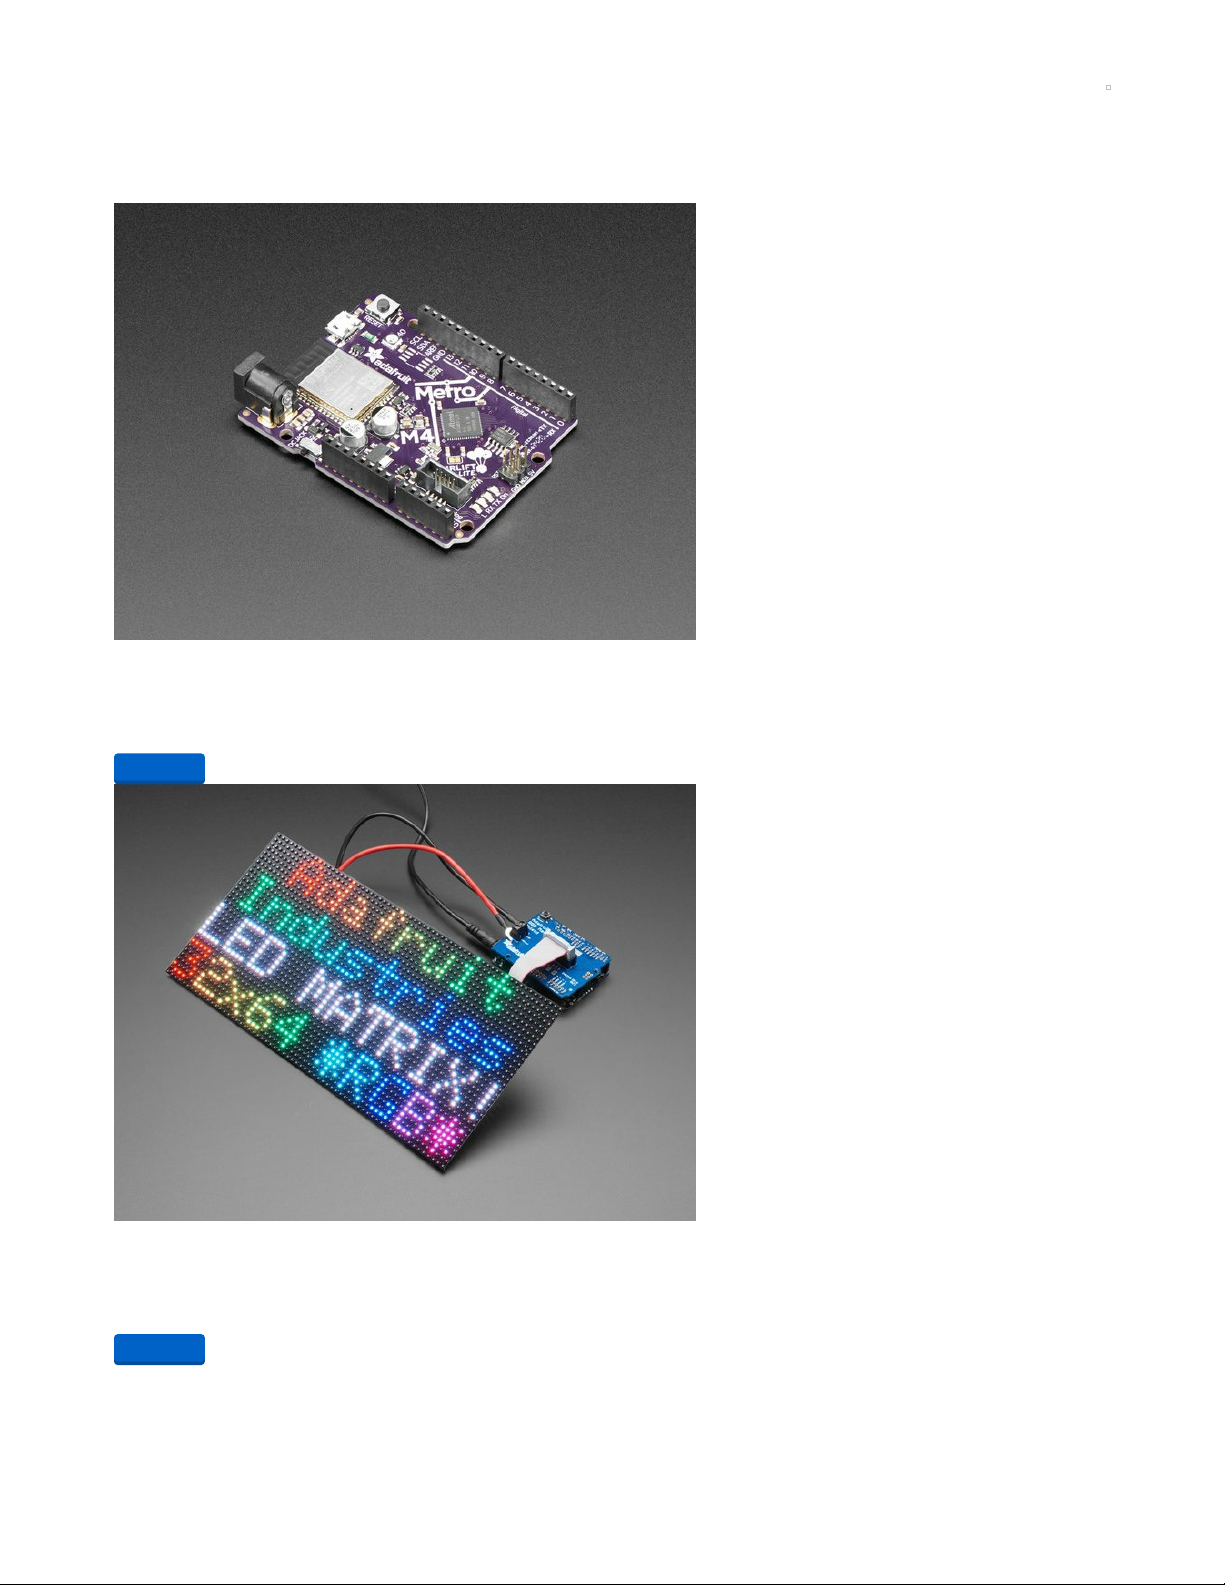
Adafruit Metro M4 Express AirLift (WiFi) - Lite
Out of
Stock
© Adafruit Industries https://learn.adafruit.com/rgb-matrix-automatic-youtube-on-air-sign Page 3 of 36
Page 4
Give your next project a lift with AirLift - our witty name for the ESP32 co-processor that graces this Metro M4. You already know about
the Adafruit Metro...
$34.95
In Stock
Adafruit RGB Matrix Shield for Arduino
Our RGB matricies are dazzling, with their hundreds or even thousands of individual RGB LEDs. Compared to NeoPixels, they've got great
density, power usage and the...
$5.95
In Stock
Your browser does not support the video tag.
Black LED Diffusion Acrylic Panel 12" x 12" - 0.1" / 2.6mm thick
A nice whoppin' slab of some lovely black acrylic to add some extra diffusion to your LED Matrix project. This material is 2.6mm (0.1") thick
and is made of special cast...
$9.95
In Stock
5V 4A (4000mA) switching power supply - UL Listed
Need a lot of 5V power? This switching supply gives a clean regulated 5V output at up to 4 Amps (4000mA). 110 or 240 input, so it works in
Add to Cart
Add to Cart
Add to Cart
© Adafruit Industries https://learn.adafruit.com/rgb-matrix-automatic-youtube-on-air-sign Page 4 of 36
Page 5
any country. The plugs are "US...
$14.95
In Stock
Adjustable Bent-Wire Stand - up to 7" Tablets and Small Screens
This handy bent-wire display stand was originally designed to hold up 7" tablets but the rubberized design is great for general purpose
electronics & TFT holding. We use it to...
$4.95
In Stock
USB cable - USB A to Micro-B
This here is your standard A to micro-B USB cable, for USB 1.1 or 2.0. Perfect for connecting a PC to your Metro, Feather, Raspberry Pi or
other dev-board or...
$2.95
In Stock
Add to Cart
Add to Cart
Add to Cart
© Adafruit Industries https://learn.adafruit.com/rgb-matrix-automatic-youtube-on-air-sign Page 5 of 36
Page 6
Using M4 Airlift
If you have a Metro M4 AirLift, you can build this project easily - you just need an RGB Matrix shield to help connect!
You will need a Metro M4 Airlift, matrix shield and matrix
Adafruit Metro M4 Express AirLift (WiFi) - Lite
Give your next project a lift with AirLift - our witty name for the ESP32 co-processor that graces this Metro M4. You already know about
the Adafruit Metro...
$34.95
In Stock
Adafruit RGB Matrix Shield for Arduino
Our RGB matricies are dazzling, with their hundreds or even thousands of individual RGB LEDs. Compared to NeoPixels, they've got great
density, power usage and the...
$5.95
In Stock
Your browser does not support the video tag.
64x32 RGB LED Matrix - 4mm pitch
Bring a little bit of Times Square into your home with this sweet 64 x 32 square RGB LED matrix panel. These panels are normally used to
Add to Cart
Add to Cart
© Adafruit Industries https://learn.adafruit.com/rgb-matrix-automatic-youtube-on-air-sign Page 6 of 36
Page 7

make video walls, here in New York we see them...
Out of Stock
Out of
Stock
© Adafruit Industries https://learn.adafruit.com/rgb-matrix-automatic-youtube-on-air-sign Page 7 of 36
Page 8
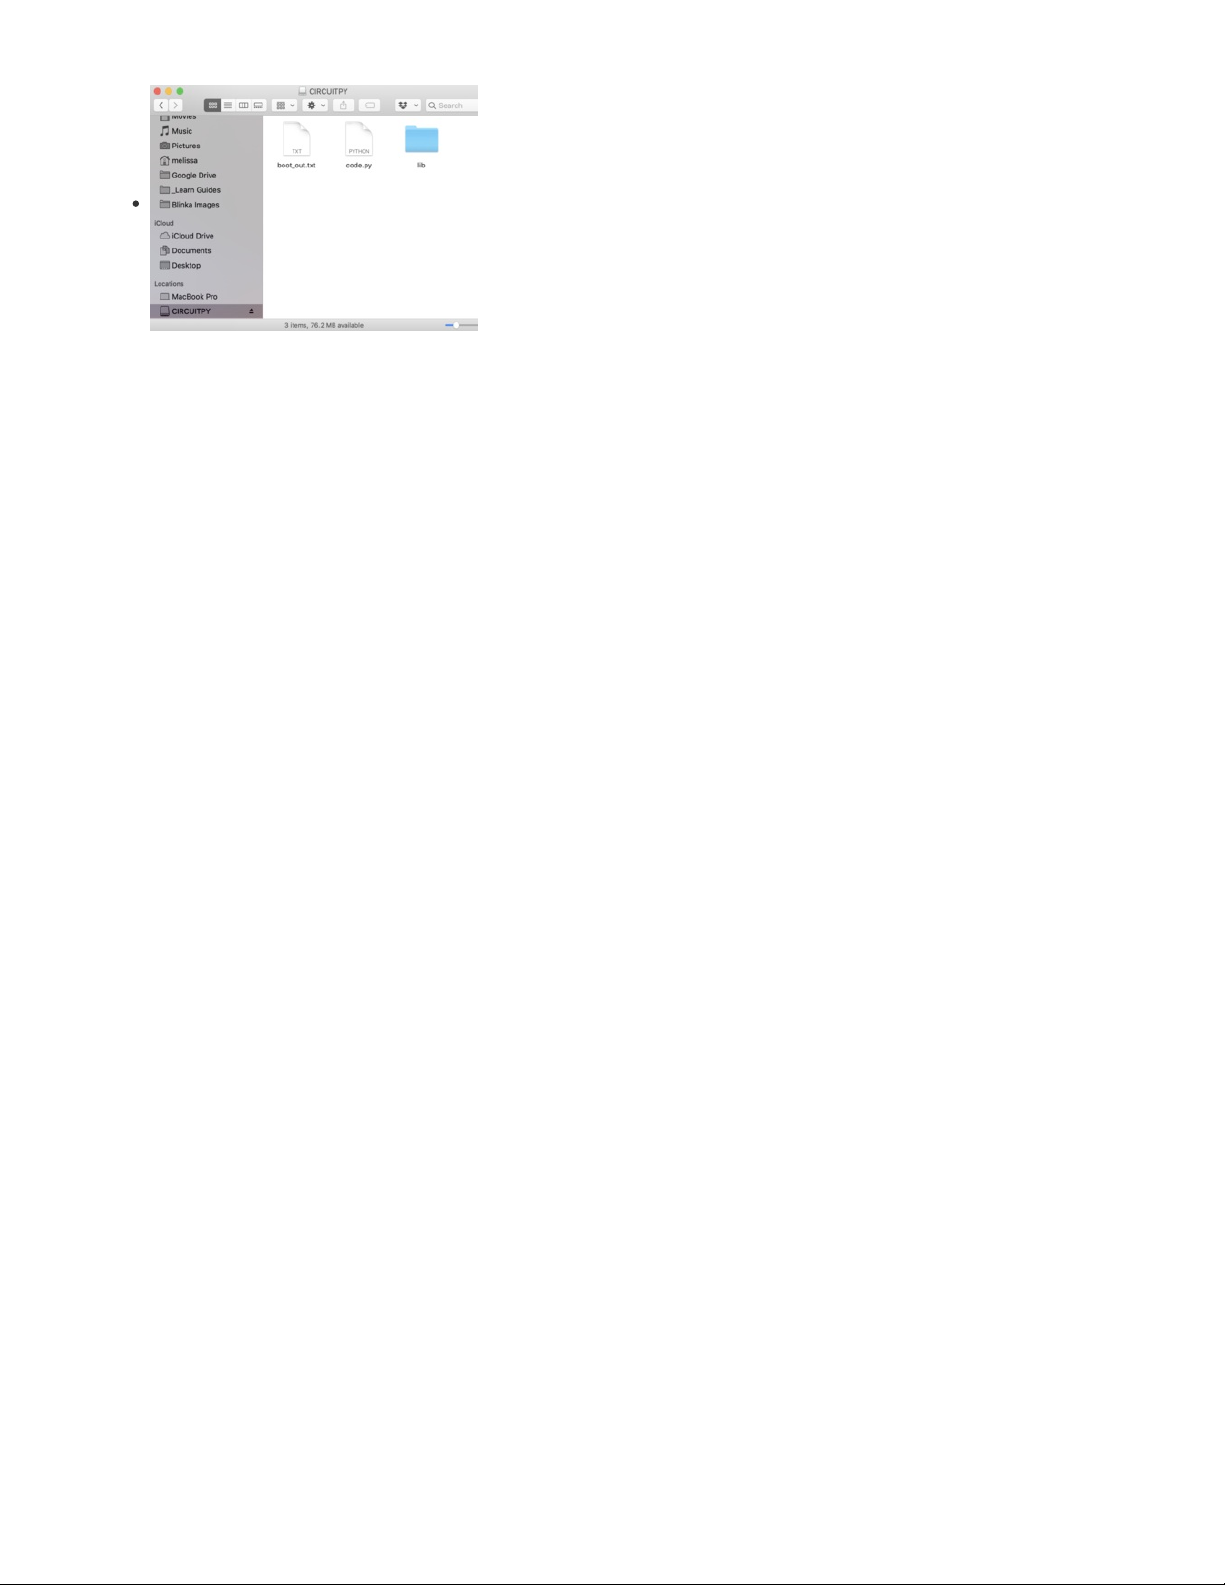
Install CircuitPython
CircuitPython (https://adafru.it/tB7) is a derivative of MicroPython (https://adafru.it/BeZ) designed to simplify experimentation and education
on low-cost microcontrollers. It makes it easier than ever to get prototyping by requiring no upfront desktop software downloads. Simply
copy and edit files on the CIRCUITPY drive to iterate.
Set up CircuitPython Quick Start!
Follow this quick step-by-step for super-fast Python power :)
https://adafru.it/EDA
Further Information
For more detailed info on installing CircuitPython, check out Installing CircuitPython (https://adafru.it/Amd).
Click the link above and download the latest UF2 file.
Download and save it to your desktop (or wherever is handy).
Plug your Metro M4 into your computer using a known-good USB cable.
A lot of people end up using charge-only USB cables and it is very frustrating! So make sure you
have a USB cable you know is good for data sync.
Double-click the Reset button next to the USB connector on your board, and you will see the
NeoPixel RGB LED (indicated by the arrow) turn green. If it turns red, check the USB cable, try
another USB port, etc.
If double-clicking doesn't work the first time, try again. Sometimes it can take a few tries to get the
rhythm right!
You will see a new disk drive appear called METROM4BOOT.
Drag the adafruit_circuitpython_etc.uf2 file to METROM4BOOT.
https://adafru.it/EDA
© Adafruit Industries https://learn.adafruit.com/rgb-matrix-automatic-youtube-on-air-sign Page 8 of 36
Page 9
The LED will flash. Then, the METROM4BOOT drive will disappear and a new disk drive called
CIRCUITPY will appear.
That's it, you're done! :)
© Adafruit Industries https://learn.adafruit.com/rgb-matrix-automatic-youtube-on-air-sign Page 9 of 36
Page 10
Build the On Air Sign
Assembly
Talking to an LED matrix display can be tricky! The 64 x 32 LED used here has a whopping 2,048 pixels, and each can display RGB colors,
which makes for a whole lot of data to sling around. Thankfully, our RGB Matrix shield paired with the Metro M4 Airlift does most of the
heavy lifting.
Let's assemble the boards and the display so we can get things running!
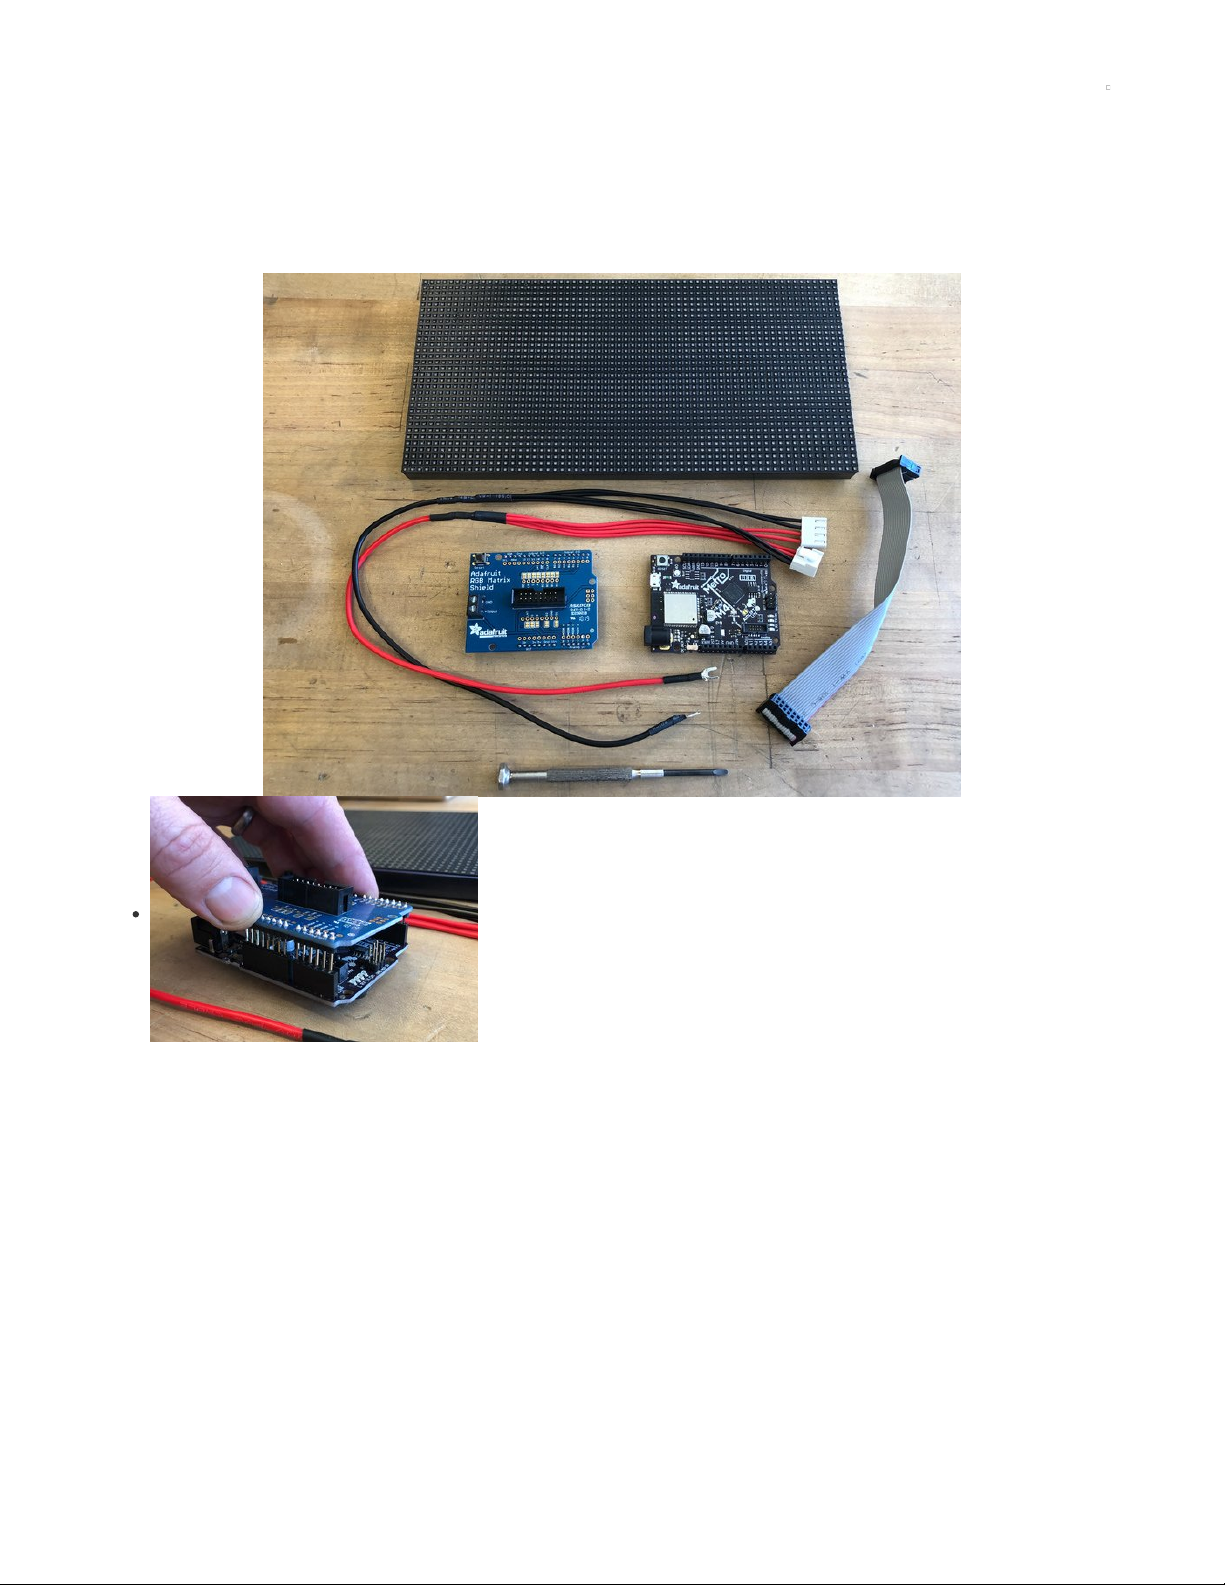
Shields Up
First, add the male headers, screw terminal block, and the 8x2-pin socket to the Matrix shield, by
following this guide (https://adafru.it/FBU). Be careful to match the socket polarity to the silkscreen
image on the board.
Be sure to also perform the clock pin mod as shown here (https://adafru.it/FBU).
Then plug the shield into the Metro M4 Airlift.
© Adafruit Industries https://learn.adafruit.com/rgb-matrix-automatic-youtube-on-air-sign Page 10 of 36
Page 11
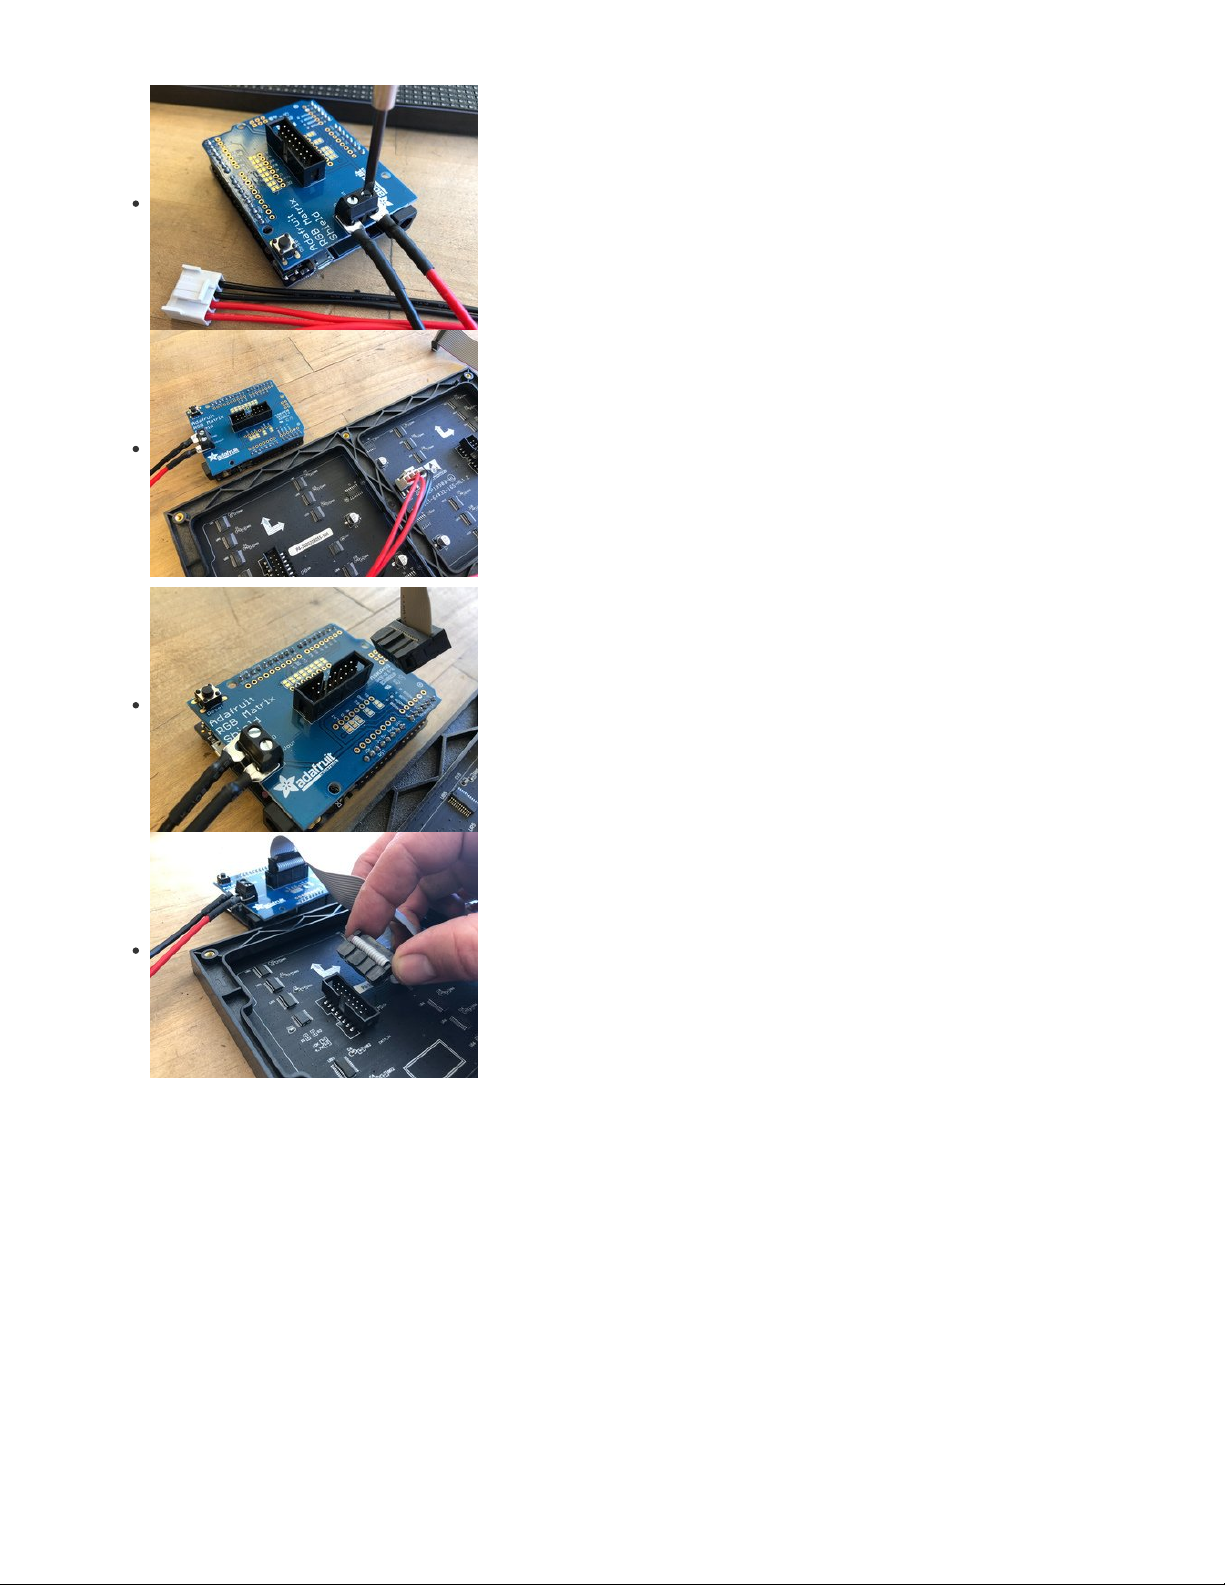
Power Connections
To provide power we'll screw the wiring harness connectors to the screw terminal blocks of the
shield. Be sure to match the black wire to GND and the red wire to +5Vout.
Now, simply plug the other end into the panel's power header. It can only go in one way.
Data Cable
Plug in the two ends of the ribbon cable, note that the connectors are keyed to only fit in the
correct orientation.
© Adafruit Industries https://learn.adafruit.com/rgb-matrix-automatic-youtube-on-air-sign Page 11 of 36
Page 12

Wall Adapter
We'll power the Metro M4 from the 5V 4A DC wall adapter plugged into the barrel jack. Even
though USB can provide power to the board, the current isn't adequate for lighting up hundreds
and thousands of LEDs!
© Adafruit Industries https://learn.adafruit.com/rgb-matrix-automatic-youtube-on-air-sign Page 12 of 36
Page 13

Using MatrixPortal
You can build this project with an all-in-one Matrix Portal board, its definitely the easiest and least-expensive way to go about it.
You will need a matrix portal, matrix, and USB C power/data cable
Your browser does not support the video tag.
Adafruit Matrix Portal - CircuitPython Powered Internet Display
Folks love our wide selection of RGB matrices and accessories, for making custom colorful LED displays... and our RGB Matrix Shields...
Out of Stock
Your browser does not support the video tag.
64x32 RGB LED Matrix - 4mm pitch
Bring a little bit of Times Square into your home with this sweet 64 x 32 square RGB LED matrix panel. These panels are normally used to
make video walls, here in New York we see them...
Out of Stock
USB Type A to Type C Cable - approx 1 meter / 3 ft long
As technology changes and adapts, so does Adafruit. This USB Type A to Type C cable will help you with the transition to USB C, even if
you're still...
Out of Stock
Out of
Stock
Out of
Stock
Out of
Stock
© Adafruit Industries https://learn.adafruit.com/rgb-matrix-automatic-youtube-on-air-sign Page 13 of 36
Page 14

Prep the MatrixPortal
Power Prep
The MatrixPortal supplies power to the matrix display panel via two standoffs. These come with
protective tape applied (part of our manufacturing process) which MUST BE REMOVED!
Use some tweezers or a fingernail to remove the two amber circles.
Power Terminals
Next, screw in the spade connectors to the corresponding standoff.
red wire goes to +5V
black wire goes to GND
© Adafruit Industries https://learn.adafruit.com/rgb-matrix-automatic-youtube-on-air-sign Page 14 of 36
Page 15
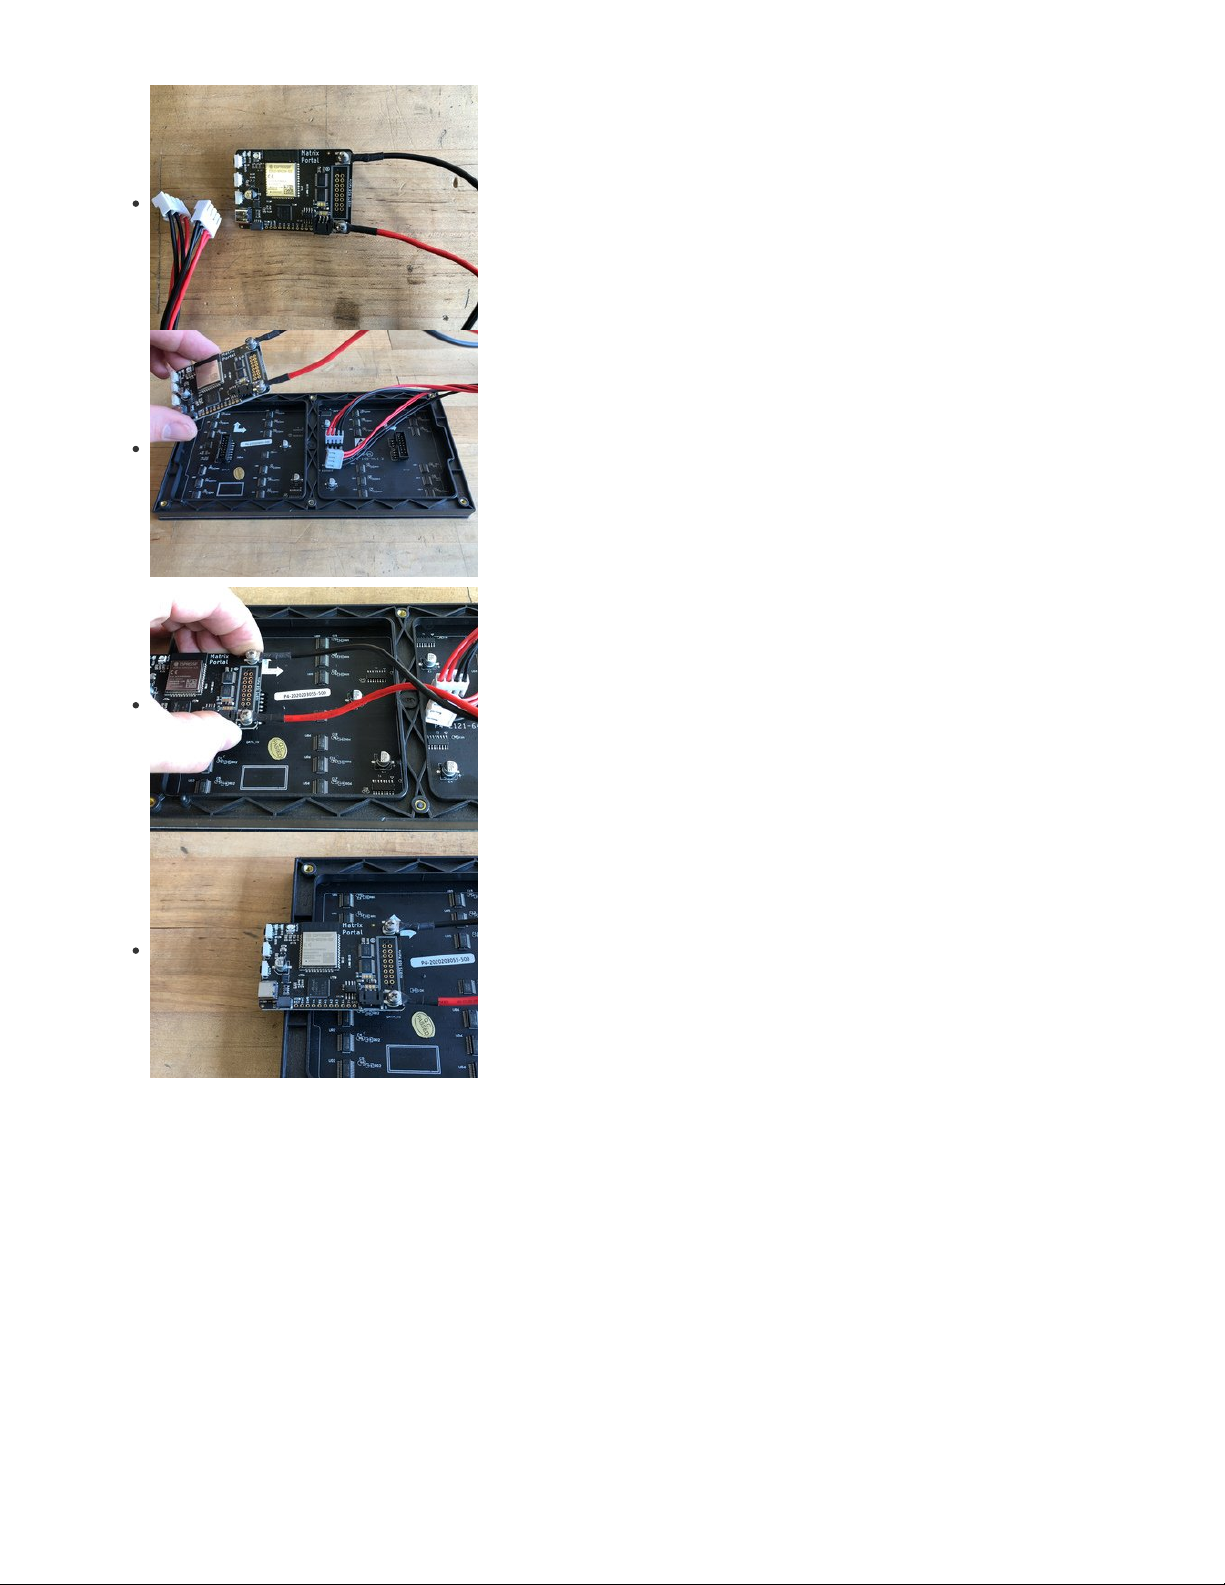
Panel Power
Plug either one of the four-conductor power plugs into the power connector pins on the panel. The
plug can only go in one way, and that way is marked on the board's silkscreen.
Board Connection
Now, plug the board into the left side shrouded 8x2 connector as shown. The orientation matters,
so take a moment to confirm that the white indicator arrow on the matrix panel is oriented pointing
up and right as seen here and the MatrixPortal overhangs the edge of the panel when connected.
This allows you to use the edge buttons from the front side.
Check nothing is impeding the board from plugging in firmly. If there's a plastic nub on the matrix
that's keeping the Portal from sitting flat, cut it off with diagonal cutters
© Adafruit Industries https://learn.adafruit.com/rgb-matrix-automatic-youtube-on-air-sign Page 15 of 36
Page 16

For info on adding LED diffusion acrylic, see the page LED Matrix Diffuser.
© Adafruit Industries https://learn.adafruit.com/rgb-matrix-automatic-youtube-on-air-sign Page 16 of 36
Page 17

Install CircuitPython
CircuitPython (https://adafru.it/tB7) is a derivative of MicroPython (https://adafru.it/BeZ) designed to simplify experimentation and education
on low-cost microcontrollers. It makes it easier than ever to get prototyping by requiring no upfront desktop software downloads. Simply
copy and edit files on the CIRCUITPY drive to iterate.
Set up CircuitPython Quick Start!
Follow this quick step-by-step for super-fast Python power :)
https://adafru.it/Nte
Further Information
For more detailed info on installing CircuitPython, check out Installing CircuitPython (https://adafru.it/Amd).
Click the link above and download the latest UF2 file.
Download and save it to your desktop (or wherever is handy).
Plug your MatrixPortal M4 into your computer using a known-good USB cable.
A lot of people end up using charge-only USB cables and it is very frustrating! So make sure you
have a USB cable you know is good for data sync.
Double-click the Reset button (indicated by the green arrow) on your board, and you will see the
NeoPixel RGB LED (indicated by the magenta arrow) turn green. If it turns red, check the USB cable,
try another USB port, etc.
If double-clicking doesn't work the first time, try again. Sometimes it can take a few tries to get the
rhythm right!
You will see a new disk drive appear called MATRIXBOOT.
Drag the adafruit_circuitpython_etc.uf2 file to MATRIXBOOT.
https://adafru.it/Nte
© Adafruit Industries https://learn.adafruit.com/rgb-matrix-automatic-youtube-on-air-sign Page 17 of 36
Page 18
The LED will flash. Then, the MATRIXBOOT drive will disappear and a new disk drive called
CIRCUITPY will appear.
That's it, you're done! :)
© Adafruit Industries https://learn.adafruit.com/rgb-matrix-automatic-youtube-on-air-sign Page 18 of 36
Page 19

Prepare YouTube API Token
These are the broad steps to using the On Air sign:
Create a Google API project to get a YouTube Data API token to enter into your secrets.py file
Get the Channel ID of the YouTube channel you want to monitor, this will go into the code.py
Set the operating hours you want to check for livestreams. The YouTube Data API allows about 100 queries per day of the streaming
status, so we need to limit the hours checked to concentrate that query power. This way, we can still check every few minutes.
YouTube Token
To prevent unwanted bot traffic, Google requires each query of the YouTube stats to be accompanied by a YouTube token.
First, you'll need to get set up with your YouTube Data API key. Follow these instructions to get this set up (https://adafru.it/Eia).
Click the dropdown menu for Select a project.
Then, click the New Project link at the upper right corner.
On the next page, give your project a name, such as Matrix-YouTube-Streaming and then click
CREATE. (Ignore the project name in the graphic)
Next, click the + ENABLE APIS AND SERVICES link at the top of the page.
Now, you'll be able to click the Library link on the left hand side so you can select the YouTube
Data API v3 from the available libraries.
© Adafruit Industries https://learn.adafruit.com/rgb-matrix-automatic-youtube-on-air-sign Page 19 of 36
Page 20

Click on the YouTube Data API v3 graphic button.
On the next page, click ENABLE.
Now we'll click on the CREATE CREDENTIALS button.
Choose the YouTube Data API v3 item from the first dropdown menu.
In the second menu, choose Other non-UI (e.g. cron job, daemon)
Then, click the Public data radio button.
Finally, click the What credentials do I need? button to get your API key.
© Adafruit Industries https://learn.adafruit.com/rgb-matrix-automatic-youtube-on-air-sign Page 20 of 36
Page 21

One last setting to enable - click on the API restrictions tab for your API key and set the dropdown
to YouTube Data API v3. Then click Save.
Your credentials will be generated and you should now copy the Key value and paste it into your
secrets.py file.
Here's how to enter the token into your secrets.py file.
secrets = {
'ssid' : '_your_wifi_ssid_',
'password' : '_your_wifi_password_',
'aio_username' : 'your_adafruitIO_username',
'aio_key' : 'your_ginormous_AIO_key',
'youtube_token' : 'HUGE_LONG_YOUTUBE_API_TOKEN'
}
JSON
To keep things current, the stats are grabbed from the Google APIs website itself.
Google automatically generates a JSON file for each YouTube channel, in this case at the address:
https://www.googleapis.com/youtube/v3/search?
part=snippet&channelId=UCpOlOeQjj7EsVnDh3zuCgsA&type=video&eventType=live&key=YOUR_HUGE_LONG_YOUTUBE_API_TOKEN
(Be sure to replace that last part with your actual token!)
This file contains all sorts of information, delivered in an easy-to-parse format. If you visit that URL in Firefox, you'll see the JSON data it
returns. You can look at the "beautified" version and the raw data to compare by clicking the buttons at top.
Here it is in a raw-er form, but still using indentation and carriage returns to make it readable:
{
"kind": "youtube#searchListResponse",
"etag": "-4wUWjFHBk38Khg9K18Hz94OcyU",
"regionCode": "US",
"pageInfo": {
"totalResults": 0,
"resultsPerPage": 5
},
"items": []
}
When the channel is not broadcasting a livestream, the items key will contain no data. Here's what this page will look like when there is a
livestream happening:
© Adafruit Industries https://learn.adafruit.com/rgb-matrix-automatic-youtube-on-air-sign Page 21 of 36
Page 22

{
"kind": "youtube#searchListResponse",
"etag": "gLr84DV9iftEnLHwS-d7TBzFqhA",
"regionCode": "US",
"pageInfo": {
"totalResults": 1,
"resultsPerPage": 5
},
"items": [
{
"kind": "youtube#searchResult",
"etag": "VKDTVQVYQDRDxvl-7WObsEXSCbc",
"id": {
"kind": "youtube#video",
"videoId": "20XZOCmf4ts"
},
"snippet": {
"publishedAt": "2020-08-05T02:19:17Z",
"channelId": "UC6p-tjZN8s9GBSbiN4K-bwg",
"title": "testing stream",
"description": "",
"thumbnails": {
"default": {
"url": "https://i.ytimg.com/vi/20XZOCmf4ts/default_live.jpg",
"width": 120,
"height": 90
},
"medium": {
"url": "https://i.ytimg.com/vi/20XZOCmf4ts/mqdefault_live.jpg",
"width": 320,
"height": 180
},
"high": {
"url": "https://i.ytimg.com/vi/20XZOCmf4ts/hqdefault_live.jpg",
"width": 480,
"height": 360
}
},
"channelTitle": "John Park",
"liveBroadcastContent": "live",
"publishTime": "2020-08-05T02:19:17Z"
}
}
]
}
Keys
If we look through the JSON file, we'll see a key called items with a sub-tree below it. When the broadcast is off air, this key will be empty,
but when it is on air, there is a lot of data there. In our code we can therefore tell when the broadcast is live based on the contents of the
items key.
Our CircuitPython code is able to check for data using this variable:
DATA_LOCATION1 = ["items"]
You can get your own Channel ID by logging in to YouTube and then going to your advanced account settings page (https://adafru.it/Eib).
© Adafruit Industries https://learn.adafruit.com/rgb-matrix-automatic-youtube-on-air-sign Page 22 of 36
Page 23

There, you'll see your YouTube Channel ID, which you can copy and paste into the code.py file's CHANNEL_ID variable to track that
channel's stats.
© Adafruit Industries https://learn.adafruit.com/rgb-matrix-automatic-youtube-on-air-sign Page 23 of 36
Page 24

Font and Graphics
Instead of the default Terminal typeface, we'll use a lovely typeface converted to a bitmap font for use on the matrix display.
In case you want to make your own font, this excellent guide (https://adafru.it/EFI) shows how to use FontForge to do just that!
I selected the Belotta Text typeface (https://adafru.it/MEg)found with the Google Fonts (https://adafru.it/MEh) search page. I then converted
it to a single bitmap font in a size that works for the 64x32 pixel matrix display. Here is the .bdf font:
https://adafru.it/MEi
To use it, download and uncompress the zip file and then drag it onto the board's CIRCUITPY drive. In CircuitPython we'll load the font so it
can be used for text display.
Glyph Bitmap Distribution Format
Side note about Glyph Bitmap Distribution Format (BDF) fonts -- they are stored as text files that are human and computer readable, and
you can even edit them by hand if you feel like getting super particular!
Here's what the letter 'A' glyph looks like in our converted font:
STARTCHAR A
ENCODING 65
SWIDTH 681 0
DWIDTH 14 0
BBX 13 15 1 0
BITMAP
0200
0600
0700
0F00
0F00
0980
1980
18C0
30C0
3FC0
7FE0
6060
6030
C030
C018
ENDCHAR
Each of those lines after the word BITMAP is a hexidecimal pixel mapping of a row of the glyph. Here's what that looks like converted to
binary, with each row padded to 16-bits:
0000001000000000
0000011000000000
0000011100000000
0000111100000000
0000111100000000
0000100110000000
0001100110000000
0001100011000000
0011000011000000
0011111111000000
0111111111100000
0110000001100000
0110000000110000
1100000000110000
1100000000011000
https://adafru.it/MEi
© Adafruit Industries https://learn.adafruit.com/rgb-matrix-automatic-youtube-on-air-sign Page 24 of 36
Page 25

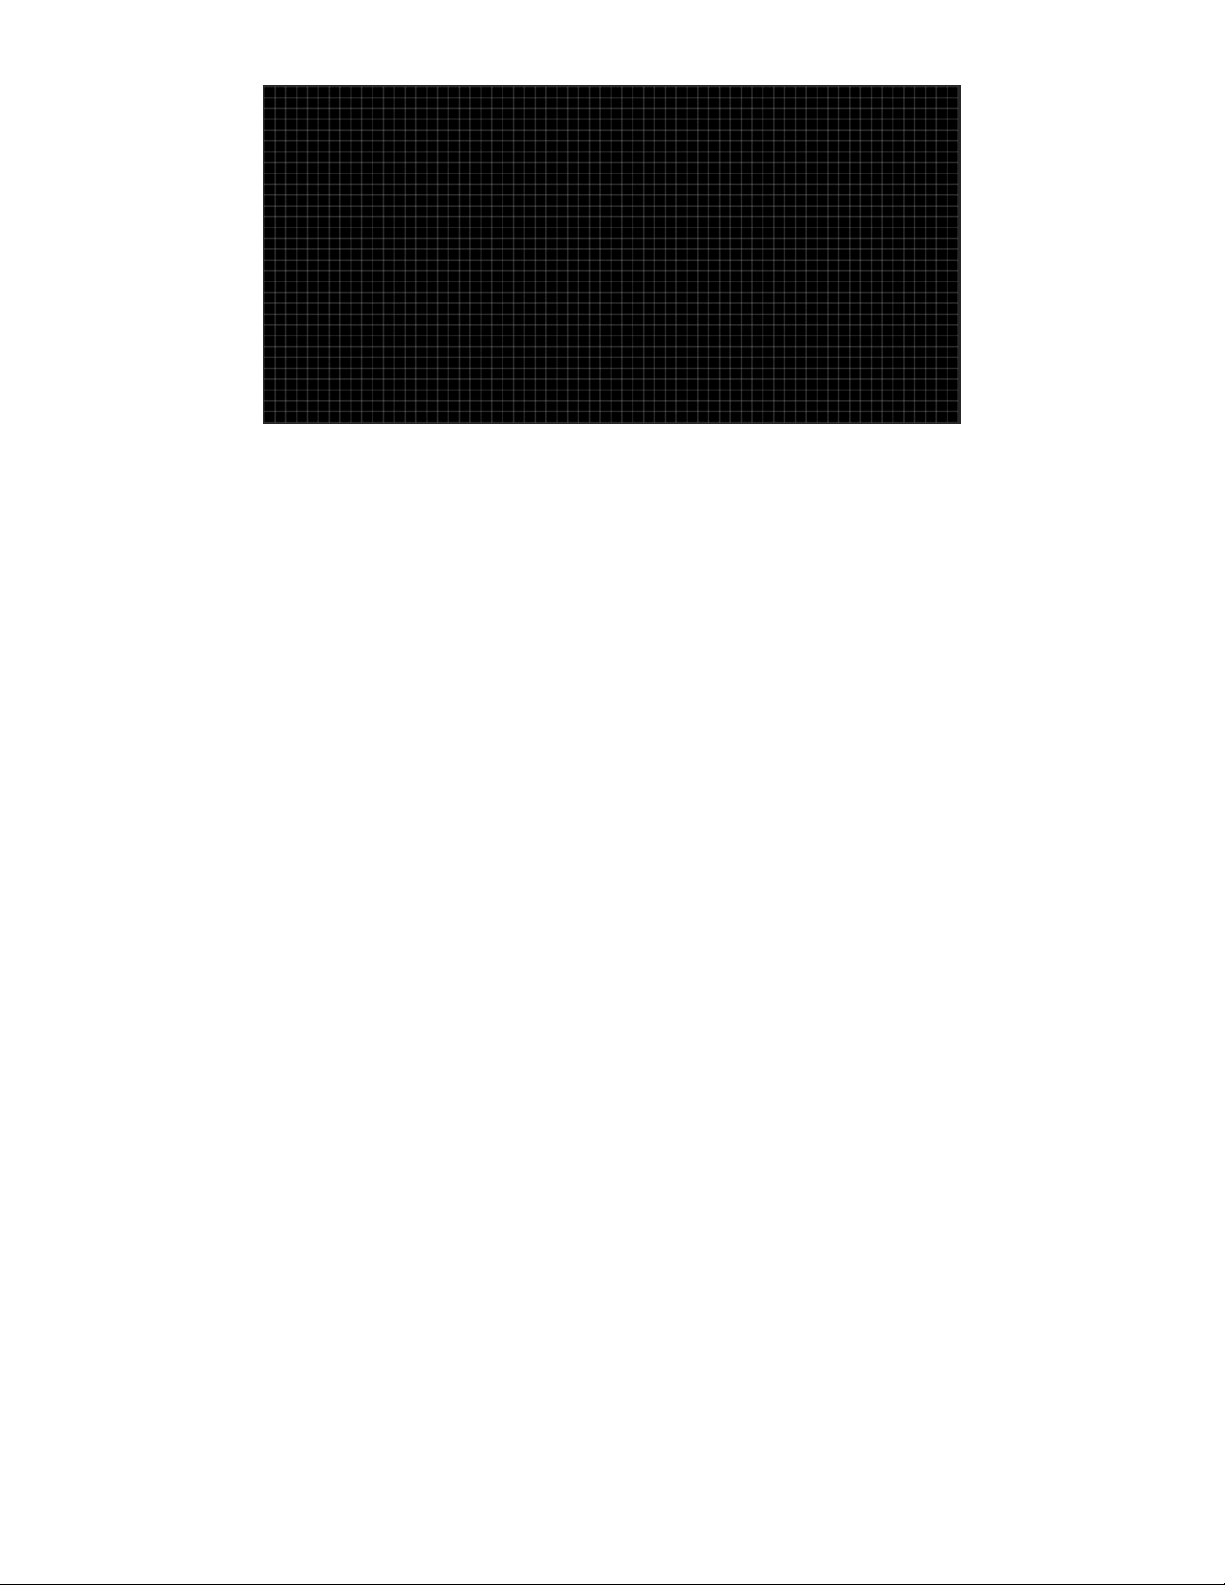
Here's what that 'A' looks like rendered on the 64x32 3mm pitch matrix
display.
Glyph Tweaks
In case you wanted to add a stylish hat on top of your 'A', you could change the first row to: 1fc0 which is 0001111111000000 in binary.
This would result it the image to the
left.
Now, that's a bit of a silly example, but the great thing about this is that you can fine-tune your glyphs beyond what may be easily
accomplished during the conversion process.
Shape Graphics
In order to draw some stylish graphic elements (a frame and some wings) we'll use the display_shapes library's Rectangle and Polygon
code.
With the Rectangle code, we'll draw six shapes to create the border frame (it has cutouts, otherwise we could make a single rectangle with
a black fill and a white outline).
rect1 = Rect(0, 0, 2, 32, fill=0x444444)
rect2 = Rect(62, 0, 2, 32, fill=0x444444)
rect3 = Rect(2, 0, 9, 2, fill=0x444444)
rect4 = Rect(53, 0, 9, 2, fill=0x444444)
rect5 = Rect(2, 30, 12, 2, fill=0x444444)
rect6 = Rect(50, 30, 12, 2, fill=0x444444)
These each set a starting coordinate point pair on x- and y-axes, and an ending point pair, as well as specify the color.
© Adafruit Industries https://learn.adafruit.com/rgb-matrix-automatic-youtube-on-air-sign Page 25 of 36
Page 26
© Adafruit Industries https://learn.adafruit.com/rgb-matrix-automatic-youtube-on-air-sign Page 26 of 36
Page 27
Code the On Air Sign
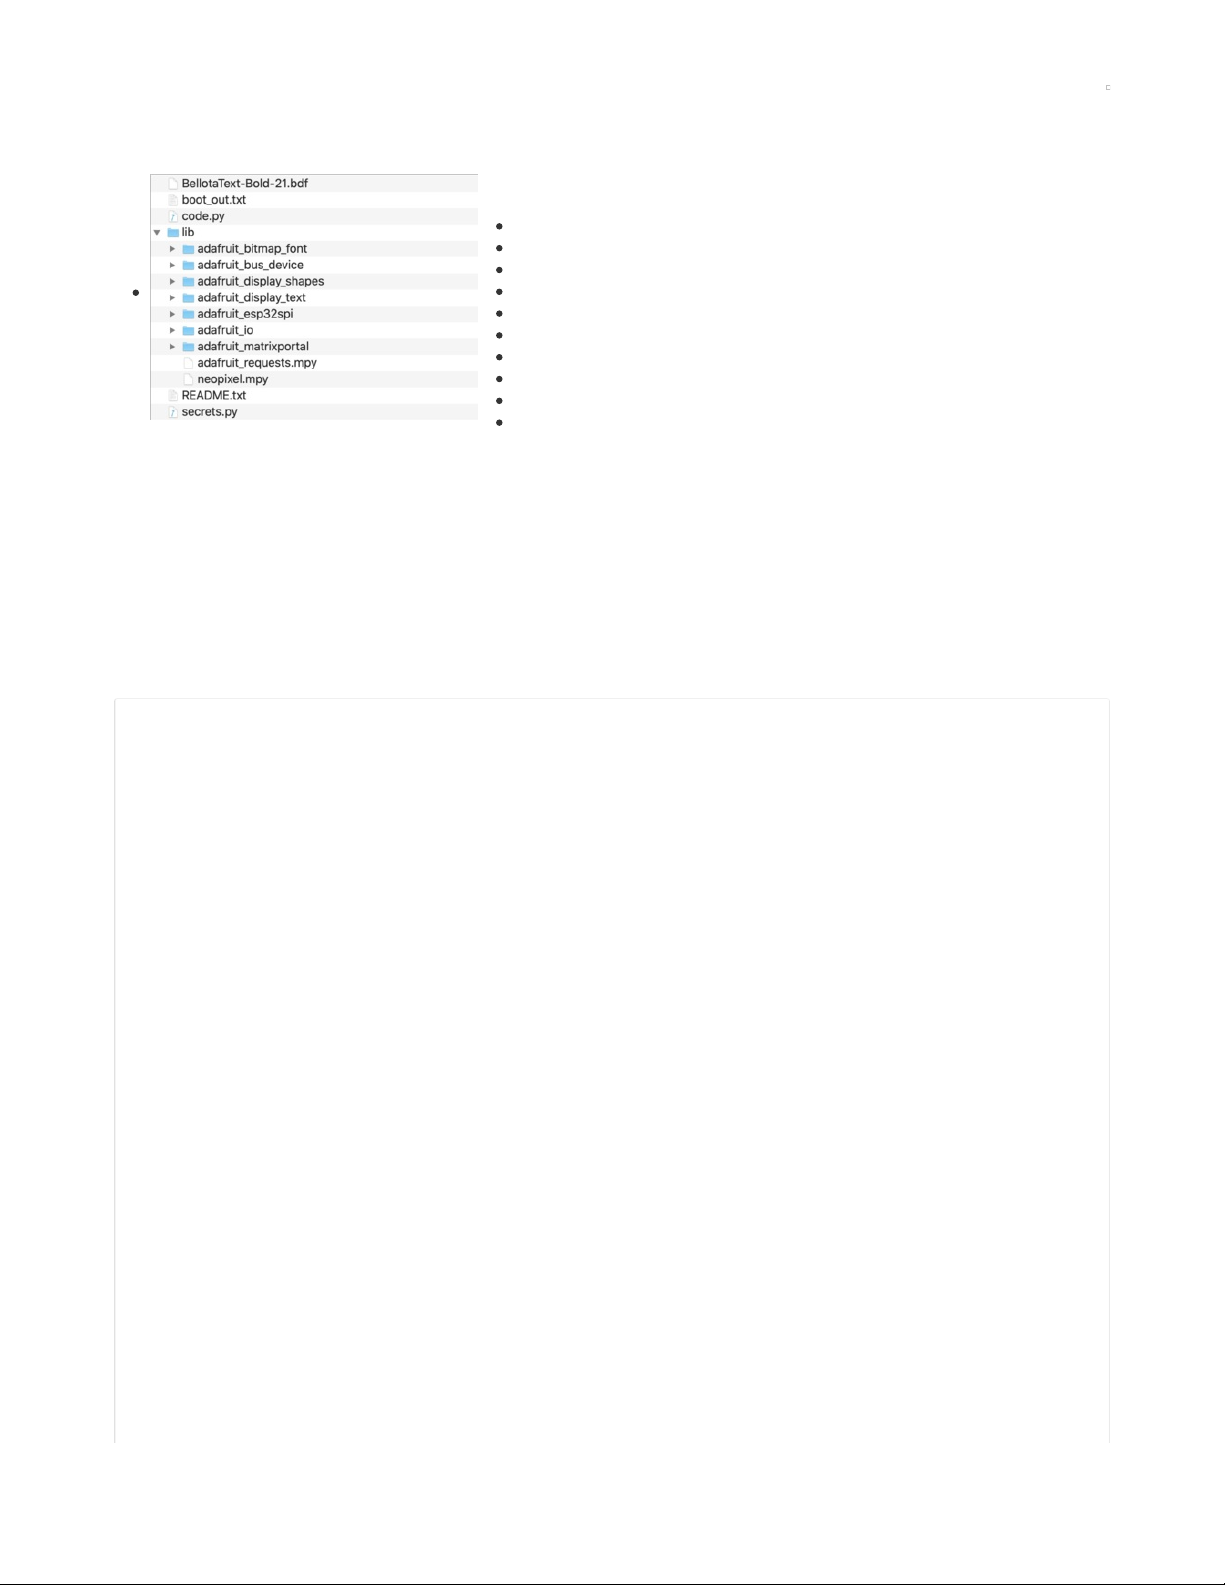
Libraries
We'll need to make sure we have these libraries installed. (Check out this link (https://adafru.it/ABU)
on installing libraries if needed.)
adafruit_bitmap_font
adafruit_bus_device
adafruit_display_shapes
adafruit_display_text
adafruit_matrixportal
adafruit_esp32spi
adafruit_io
adafruit_matrixportal
adafruit_requests.mpy
neopixel.mpy
Connect to the Internet
Once you have CircuitPython setup and libraries installed we can get your board connected to the Internet. The process for connecting can
be found here (https://adafru.it/NFK).
Text Editor
Adafruit recommends using the Mu editor for editing your CircuitPython code. You can get more info in this guide (https://adafru.it/ANO).
Alternatively, you can use any text editor that saves simple text files.
Code
Copy the code from the code-block below and paste it into the Mu editor and save it to your Metro M4 Airlift as code.py (or copy code.py
from the zip file and place on the CIRCUITPY drive).
# ON AIR sign for YouTube livestreaming
# Runs on Airlift Metro M4 with 64x32 RGB Matrix display & shield
import time
import board
import displayio
import adafruit_display_text.label
from adafruit_display_shapes.rect import Rect
from adafruit_display_shapes.polygon import Polygon
from adafruit_bitmap_font import bitmap_font
from adafruit_matrixportal.network import Network
from adafruit_matrixportal.matrix import Matrix
# Get wifi details and more from a secrets.py file
try:
from secrets import secrets
except ImportError:
print("WiFi secrets are kept in secrets.py, please add them there!")
raise
# Set up where we'll be fetching data from
# Adafruit YouTube channel:
CHANNEL_ID = (
"UCpOlOeQjj7EsVnDh3zuCgsA" # this isn't a secret but you have to look it up
)
DATA_SOURCE = (
"https://www.googleapis.com/youtube/v3/search?part=snippet&channelId="
+ CHANNEL_ID
+ "&type=video&eventType=live&key="
+ secrets["youtube_token"]
)
DATA_LOCATION1 = ["items"]
# Number of seconds between checking, if this is too quick the query quota will run out
UPDATE_DELAY = 300
# Times are in 24-hour format for simplification
OPERATING_TIME_START = "12:00" # what hour to start checking
OPERATING_TIME_END = "19:00" # what hour to stop checking
# --- Display setup --matrix = Matrix()
display = matrix.display
network = Network(status_neopixel=board.NEOPIXEL, debug=False)
© Adafruit Industries https://learn.adafruit.com/rgb-matrix-automatic-youtube-on-air-sign Page 27 of 36
Page 28

# --- Drawing setup --# Create a Group
group = displayio.Group(max_size=22)
# Create a bitmap object
bitmap = displayio.Bitmap(64, 32, 2) # width, height, bit depth
# Create a color palette
color = displayio.Palette(4)
color[0] = 0x000000 # black
color[1] = 0xFF0000 # red
color[2] = 0x444444 # dim white
color[3] = 0xDD8000 # gold
# Create a TileGrid using the Bitmap and Palette
tile_grid = displayio.TileGrid(bitmap, pixel_shader=color)
# Add the TileGrid to the Group
group.append(tile_grid)
# draw the frame for startup
rect1 = Rect(0, 0, 2, 32, fill=color[2])
rect2 = Rect(62, 0, 2, 32, fill=color[2])
rect3 = Rect(2, 0, 9, 2, fill=color[0])
rect4 = Rect(53, 0, 9, 2, fill=color[0])
rect5 = Rect(2, 30, 12, 2, fill=color[0])
rect6 = Rect(50, 30, 12, 2, fill=color[0])
group.append(rect1)
group.append(rect2)
group.append(rect3)
group.append(rect4)
group.append(rect5)
group.append(rect6)
def redraw_frame(): # to adjust spacing at bottom later
rect3.fill = color[2]
rect4.fill = color[2]
rect5.fill = color[2]
rect6.fill = color[2]
# draw the wings w polygon shapes
wing_polys = []
wing_polys.append(Polygon([(3, 3), (9, 3), (9, 4), (4, 4)], outline=color[1]))
wing_polys.append(Polygon([(5, 6), (9, 6), (9, 7), (6, 7)], outline=color[1]))
wing_polys.append(Polygon([(7, 9), (9, 9), (9, 10), (8, 10)], outline=color[1]))
wing_polys.append(Polygon([(54, 3), (60, 3), (59, 4), (54, 4)], outline=color[1]))
wing_polys.append(Polygon([(54, 6), (58, 6), (57, 7), (54, 7)], outline=color[1]))
wing_polys.append(Polygon([(54, 9), (56, 9), (55, 10), (54, 10)], outline=color[1]))
for wing_poly in wing_polys:
group.append(wing_poly)
def redraw_wings(index): # to change colors
for wing in wing_polys:
wing.outline = color[index]
# --- Content Setup --deco_font = bitmap_font.load_font("/BellotaText-Bold-21.bdf")
# Create two lines of text. Besides changing the text, you can also
# customize the color and font (using Adafruit_CircuitPython_Bitmap_Font).
# text positions
on_x = 15
on_y = 9
off_x = 12
off_y = 9
air_x = 15
air_y = 25
text_line1 = adafruit_display_text.label.Label(
deco_font, color=color[3], text="OFF", max_glyphs=6
)
text_line1.x = off_x
text_line1.y = off_y
text_line2 = adafruit_display_text.label.Label(
deco_font, color=color[1], text="AIR", max_glyphs=6
)
© Adafruit Industries https://learn.adafruit.com/rgb-matrix-automatic-youtube-on-air-sign Page 28 of 36
Page 29

)
text_line2.x = air_x
text_line2.y = air_y
# Put each line of text into the Group
group.append(text_line1)
group.append(text_line2)
def startup_text():
text_line1.text = "ADA"
text_line1.x = 10
text_line1.color = color[2]
text_line2.text = "FRUIT"
text_line2.x = 2
text_line2.color = color[2]
redraw_wings(0)
display.show(group)
startup_text() # display the startup text
def update_text(state):
if state: # if switch is on, text is "ON" at startup
text_line1.text = "ON"
text_line1.x = on_x
text_line1.color = color[1]
text_line2.text = "AIR"
text_line2.x = air_x
text_line2.color = color[1]
redraw_wings(1)
redraw_frame()
display.show(group)
else: # else, text if "OFF" at startup
text_line1.text = "OFF"
text_line1.x = off_x
text_line1.color = color[3]
text_line2.text = "AIR"
text_line2.x = air_x
text_line2.color = color[3]
redraw_wings(3)
redraw_frame()
display.show(group)
def get_status():
"""
Get the status whether we are on/off air within operating hours
If outside of hours, return False
"""
# Get the time values we need
now = time.localtime()
start_hour, start_minute = OPERATING_TIME_START.split(":")
end_hour, end_minute = OPERATING_TIME_END.split(":")
# Convert time into a float for easy calculations
start_time = int(start_hour) + (int(start_minute) / 60)
end_time = int(end_hour) + (int(end_minute) / 60)
current_time = now[3] + (now[4] / 60)
if start_time <= current_time < end_time:
try:
on_air = network.fetch_data(DATA_SOURCE, json_path=(DATA_LOCATION1,))
if len(on_air) > 0:
return True
except RuntimeError:
return False
return False
# Synchronize Board's clock to Internet
network.get_local_time()
mode_state = get_status()
update_text(mode_state)
last_check = None
while True:
if last_check is None or time.monotonic() > last_check + UPDATE_DELAY:
try:
status = get_status()
if status:
© Adafruit Industries https://learn.adafruit.com/rgb-matrix-automatic-youtube-on-air-sign Page 29 of 36
Page 30
if status:
if mode_state == 0: # state has changed, toggle it
update_text(1)
mode_state = 1
else:
if mode_state == 1:
update_text(0)
mode_state = 0
print("On Air:", status)
last_check = time.monotonic()
except RuntimeError as e:
print("Some error occured, retrying! -", e)
Now, your sign will connect to your WiFi, connect to Adafruit IO to get the time, and query YouTube for the on air status. If the status is
"false" the words "OFF AIR" are displayed. When the stream goes live, the sign will read "ON AIR"!
© Adafruit Industries https://learn.adafruit.com/rgb-matrix-automatic-youtube-on-air-sign Page 30 of 36
Page 31

LED Matrix Diffuser
LED Diffusion Acrylic
You can add an LED diffusion acrylic faceplate (https://adafru.it/MEF) to the your LED matrix display.
(Pictured here with the ON AIR project (https://adafru.it/MPE))
This can help protect the LEDs as well as enhance the look of the sign both indoors and out by
reducing glare and specular highlights of the plastic matrix grid.
Measure and Cut the Plastic
You can use the sign to measure and mark cut lines on the paper backing of the acrylic sheet.
Then, use a tablesaw or bandsaw with a fine toothed blade and a guide or sled to make the cuts.
Note: it is possible to score and snap acrylic, but it can be very tricky to get an even snap without
proper clamping.
© Adafruit Industries https://learn.adafruit.com/rgb-matrix-automatic-youtube-on-air-sign Page 31 of 36
Page 32

Peel away the paper backing from both sides and set the acrylic onto your matrix display.
© Adafruit Industries https://learn.adafruit.com/rgb-matrix-automatic-youtube-on-air-sign Page 32 of 36
Page 33

Uglu Dashes
The best method we've found for adhering acrylic to the matrix display is to use Uglu Dashes clear
adhesive rectangles from Pro Tapes (https://adafru.it/NcP). They are incredibly strong (although can
be removed if necessary), easy to apply, and are invisible once attached.
Use one at each corner and one each at the halfway point of the long edges, then press the acrylic
and matrix panel together for about 20 seconds.
Here you can see the impact of using the diffusion acrylic. (Pictured here with the ON AIR sign project)
© Adafruit Industries https://learn.adafruit.com/rgb-matrix-automatic-youtube-on-air-sign Page 33 of 36
Page 34

Stand
A very simple and attractive way to display your matrix is with the adjustable bent-wire
stand (https://adafru.it/MPF).
© Adafruit Industries https://learn.adafruit.com/rgb-matrix-automatic-youtube-on-air-sign Page 34 of 36
Page 35

Alternately, you can use a frame, 3D printed brackets (https://adafru.it/MZf), tape, glue, or even large binder clips to secure the acrylic to the
sign and then mount it on on a wall, shelf, or display cabinet.
These mini-magnet feet (https://adafru.it/MZA) can be used to stick the sign to a ferrous surface.
© Adafruit Industries https://learn.adafruit.com/rgb-matrix-automatic-youtube-on-air-sign Page 35 of 36
Page 36

© Adafruit Industries Last Updated: 2021-03-17 01:12:55 PM EDT Page 36 of 36
 Loading...