

Page 1

Retroreflective Greenscreen Light Ring QT Py Controller
Created by John Park
Last updated on 2021-03-17 08:36:16 PM EDT
Page 2

2
3
3
7
8
9
9
9
10
11
12
13
16
16
19
19
19
20
20
20
21
21
21
22
22
24
26
27
29
30
30
32
32
34
37
38
40
41
42
43
Guide Contents
Guide Contents
Overview
Parts
Elastic Band
Retroreflective Fabric
Chromakey Essentials
Chromakey Essentials
Traditional Greenscreen Example
Traditional Greenscreen Challenges
Retroreflector
Flashlight Demo
Retroreflective Chromakey
CircuitPython
Set up CircuitPython Quick Start!
CircuitPython Libraries
CircuitPython Library Bundle
Library Install Troubleshooting
Code the Chromakey Light Ring
Text Editor
Code
How It Works
Libraries
NeoPixel Setup
Pin Setup
Main Loop
Build the Chromakey Light Ring
Encoder QT Py
Wiring
Wiring Sleeve
NeoPixel Ring Wiring
Light Ring Mount
Add Encoder
Add Ring
Fasteners
Add Elastic Return Actuator (Rubber Band)
Attach to Lens
Prep for Use
Webcam Mount
Set Up the Retroreflective Background and Use the Keyer
Light Ring Mount
© Adafruit Industries https://learn.adafruit.com/retroreflective-green-screen-light-ring-controller Page 2 of 45
Page 3

Overview
From Zoom calls to SciFi effects films -- you can do it all with a DIY chromakey background made from
retroreflective fabric, lit with a lens-mounted NeoPixel light ring. A QT Py microcontroller running
CircuitPython allows you to control the light ring color and brightness with a push and twist of a rotary
encoder knob.
Create chromakey mattes to place your subject in front of any background image or video you like using
a retroreflective greenscreen/bluescreen -- you decide the color you need with the press of a knob.
Traditional greenscreen/bluescreen backgrounds are tricky to light evenly, and require a lot of space to
prevent your subject from casting shadows and receiving green/blue spill. This retroreflective screen
solves all of these problems -- and costs less, too!
This rig works equally well with realtime keyers (built into Zoom, OBS, and others) as well as offline
compositing software, such as DaVinci Resolve or iMovie.
This technique is used in existing commercial systems, such
as the Reflecmedia Chromatte/LiteRing (https://adafru.it/Rau)
and the LEDChromaKey (https://adafru.it/Rav) system.
A friend of mine told me about this technique and said he'd
built a DIY version that worked great. I figured NeoPixels
would work well for this and my buddy gave me some spare
retroreflective screen material to test it out. I did a quick test
and found out that it works better than I'd hoped!
Parts
© Adafruit Industries https://learn.adafruit.com/retroreflective-green-screen-light-ring-controller Page 3 of 45
Page 4

NeoPixel Ring - 24 x 5050 RGB LED with Integrated Drivers
Round and round and round they go! 24 ultra bright smart LED NeoPixels are arranged in a circle with
2.6" (66mm) outer diameter. The rings are 'chainable' - connect the...
$16.95
In Stock
Your browser does not support the video tag.
Adafruit QT Py - SAMD21 Dev Board with STEMMA QT
What a cutie pie! Or is it... a QT Py? This diminutive dev board comes with our favorite lil chip, the SAMD21
(as made famous in our GEMMA M0 and Trinket M0 boards).For...
$6.00
In Stock
Add to Cart
Add to Cart
© Adafruit Industries https://learn.adafruit.com/retroreflective-green-screen-light-ring-controller Page 4 of 45
Page 5

Rotary Encoder + Extras
This rotary encoder is the best of the best, its a high quality 24-pulse encoder, with detents and a nice
feel. It is panel mountable for placement in a box, or you can plug it into a...
$4.50
In Stock
Add to Cart
© Adafruit Industries https://learn.adafruit.com/retroreflective-green-screen-light-ring-controller Page 5 of 45
Page 6

Black Nylon Screw and Stand-off Set – M3 Thread
Totaling 420 pieces, this M3 Screw Set is a must-have for your workstation. You'll have enough screws,
nuts, and hex standoffs to fuel...
$16.95
In Stock
USB Type A to Type C Cable - approx 1 meter / 3 ft long
As technology changes and adapts, so does Adafruit. This USB Type A to Type C cable will help you with
the transition to USB C, even if you're still...
Out of Stock
Add to Cart
Out of
Stock
© Adafruit Industries https://learn.adafruit.com/retroreflective-green-screen-light-ring-controller Page 6 of 45
Page 7

Silicone Cover Stranded-Core Wire - 26AWG in Various Colors
Silicone-sheathing wire is super-flexible and soft, and it's also strong! Able to handle up to 200°C and up
to 600V, it will do when PVC covered wire wimps out. We like this...
Out of Stock
Elastic Band
You'll also need a single #33 size (approx. 3-1/2" x 1/8")
rubber or silicone band. I like the silicone hair bands like
these (https://adafru.it/Raw).
Add from Store
© Adafruit Industries https://learn.adafruit.com/retroreflective-green-screen-light-ring-controller Page 7 of 45
Page 8

Retroreflective Fabric
Get a yard or two of retroreflective fabric in either 39" or 49"
width. Available most readily on eBay, such as this
item (https://adafru.it/RaQ) or this one (https://adafru.it/RaR)
© Adafruit Industries https://learn.adafruit.com/retroreflective-green-screen-light-ring-controller Page 8 of 45
Page 9

Chromakey Essentials
Chromakey Essentials
The goal of a chromakey is to create an opacity matte (or alpha channel) that isolates a subject being
filmed from their background so that they may be composited in front of a different background.
This happens both in realtime applications and in offline composites for rendering.
Realtime chromakeys are used for weather people to appear in front of their maps on the local news.
They're used in Zoom conferences to make a participant appear in front of a Tahitian beach, or in OBS
streams to composite a gamer's head over their Mario speed run.
Offline chromakeying is done in compositing and video editing software such as Nuke, After Effects,
Premiere, DaVinci Resolve, and iMovie for compositing over film plates, video background, and stills in
everything from VFX feature films to indie music videos to home movies.
Traditional Greenscreen Example
By filming in front of a saturated bright green or blue
background, software can identify areas of the image that
contain the subject (the non-green or non-blue pixels) such
as actors, props, and puppets, and create a "hold out matte"
for them.
In the image seen here, the matte has is an opacity map in
which black pixels are transparent and white pixels are
opaque, with gray shades in between for partial opacity.
© Adafruit Industries https://learn.adafruit.com/retroreflective-green-screen-light-ring-controller Page 9 of 45
Page 10

This matte is then used to composite only the foreground
image over a different background layer.
Chromakeys work by isolating one particular color -- you can't wear a green shirt on a greenscreen
or a blue suit on a bluescreen!
Traditional Greenscreen Challenges
The entire premise of shooting on a greenscreen relies on having a very evenly lit greenscreen. The more
variation in the lighting from shadows cast on it by the subject, the more difficult it is to use.
Additionally, it's important to avoid having green spill light bounce from the greenscreen onto the actors.
These issues are typically solved by creating a lot of space between the actors and the greenscreen, by
lighting the greenscreen with dedicated lights, and by avoiding frontal lighting for the actors to prevent
shadow casting.
These techniques work well in a dedicated filming environment such as a soundstage, but can be a huge
challenge when shooting at home or in other constrained locations.
© Adafruit Industries https://learn.adafruit.com/retroreflective-green-screen-light-ring-controller Page 10 of 45
Page 11

In this image, our living room has been turned into a greenscreen stage. Note the pair of side lighting rigs
dedicated to the greenscreen.
Retroreflector
Since the requirement of a greenscreen is to have an evenly lit, saturated color backdrop, there must be a
way to achieve this that doesn't require a lot of space and dedicated lighting, right? There is! Enter the
retroreflector!
A retroreflector is a specialized material (or arrangement of mirrors) that reflects light directly back at its
source, regardless of incoming angle. This is why you see a runners shoes, or a safety vest, or a stop sign
at night so brightly reflect the light from your car's headlights the entire time they're in view -- there isn't
just one flash of light if you get lucky and the angles align for a brief moment. The retroreflective material
ensures that.
Here's a terrific video on retroreflectors (https://adafru.it/RaY) that my friend Josh shared with me.
Retroreflective fabric is covered in tiny spherical lenses which direct incoming most light back at its
source, regardless of entrance angle. They do this by refracting incoming light beams toward a mirrored
surface below the lens, which reflects the light, and then the glass beads refract the light a second time,
aiming them back toward the same direction from which they came.
This image adapted from one on the 3M Scotchlite website (https://adafru.it/Ran) may help explain:
© Adafruit Industries https://learn.adafruit.com/retroreflective-green-screen-light-ring-controller Page 11 of 45
Page 12

Flashlight Demo
Here's a demonstration of the retroreflector in action. With a
flashlight positioned directly inline with the camera lens, we
can see how the light returns back toward the lens no matter
what angle the light is relative to the retroreflective backdrop.
© Adafruit Industries https://learn.adafruit.com/retroreflective-green-screen-light-ring-controller Page 12 of 45
Page 13

Retroreflective Chromakey
If we shine an even, saturated green (or blue) light at the retroreflector from the point of view of a camera,
all of that lovely green light gets reflected right back at the camera lens. The light does not need to be
very bright at all, which means a ring of LEDs will do the trick of turning the backdrop into an even chroma
screen but will not cast any colored light onto the actors. It's science, but the results seem magical!
Also, note how the subject in the following examples is just inches from the screen without any problems
from shadows that we'd see with a traditional greenscreen.
© Adafruit Industries https://learn.adafruit.com/retroreflective-green-screen-light-ring-controller Page 13 of 45
Page 14

© Adafruit Industries https://learn.adafruit.com/retroreflective-green-screen-light-ring-controller Page 14 of 45
Page 15

© Adafruit Industries https://learn.adafruit.com/retroreflective-green-screen-light-ring-controller Page 15 of 45
Page 16

CircuitPython
CircuitPython (https://adafru.it/tB7) is a derivative of MicroPython (https://adafru.it/BeZ) designed to
simplify experimentation and education on low-cost microcontrollers. It makes it easier than ever to get
prototyping by requiring no upfront desktop software downloads. Simply copy and edit files on the
CIRCUITPY drive to iterate.
Set up CircuitPython Quick Start!
Follow this quick step-by-step for super-fast Python power :)
If you want to get started with your QT Py, and you have NOT soldered a chip to the back of it, download
CircuitPython from the following link:
https://adafru.it/NCB
If you have soldered a GD25Q16 SPI flash chip to the bottom of your board, you must use the
Haxpress version of CircuitPython for the Adafruit QT Py for the flash to work! If you have NOT
soldered a SPI flash chip to your QT Py, do NOT use this download! It will not give you 2MB of flash
space without a chip!
https://adafru.it/NCC
Click the link above and download the latest UF2 file.
Download and save it to your desktop (or wherever is handy).
https://adafru.it/NCB
https://adafru.it/NCC
© Adafruit Industries https://learn.adafruit.com/retroreflective-green-screen-light-ring-controller Page 16 of 45
Page 17

Plug your QT Py into your computer using a known-good
USB cable.
A lot of people end up using charge-only USB cables and it
is very frustrating! So make sure you have a USB cable you
know is good for data sync.
Double-click the small RST (reset) button, and you will see
the NeoPixel RGB LED turn green. If it turns red, check the
USB cable, try another USB port, etc.
If double-clicking doesn't work the first time, try again.
Sometimes it can take a few tries to get the rhythm right!
You will see a new disk drive appear called QTPY_BOOT.
Drag the adafruit_circuitpython_etc.uf2 file to QTPY_BOOT
The red LED will flash. Then, the QTPY_BOOT drive will
disappear and a new disk drive called CIRCUITPY will
appear.
That's it, you're done! :)
© Adafruit Industries https://learn.adafruit.com/retroreflective-green-screen-light-ring-controller Page 17 of 45
Page 18

© Adafruit Industries https://learn.adafruit.com/retroreflective-green-screen-light-ring-controller Page 18 of 45
Page 19

CircuitPython Libraries
The chromakey light ring code requires some CircuitPython libraries to work. Complete the following
steps to get your board ready.
CircuitPython Library Bundle
You'll need to install some libraries on your QT Py.
Carefully follow the steps to find and install these libraries from Adafruit's CircuitPython Library
Bundle (https://adafru.it/ENC). Our CircuitPython starter guide has a great page on how to install libraries
from the bundle (https://adafru.it/ABU).
You'll need to manually install the following libraries by
copying the files to the lib folder on your CIRCUITPY drive:
adafruit_pypixelbuf.mpy
neopixel.mpy
Library Install Troubleshooting
If you get an error indicating you have run out of space while copying files over, please refer to the
Prevent & Remove MacOS Hidden Files section of the Troubleshooting page (https://adafru.it/Den) for
information on resolving the issue.
© Adafruit Industries https://learn.adafruit.com/retroreflective-green-screen-light-ring-controller Page 19 of 45
Page 20

Code the Chromakey Light Ring
Text Editor
Adafruit recommends using the Mu editor for editing your CircuitPython code. You can get more info in
this guide (https://adafru.it/ANO).
Alternatively, you can use any text editor that saves simple text files.
Code
Copy the code shown below and paste it into Mu, then save it to your CIRCUITPY drive with the name
code.py
# SPDX-FileCopyrightText: 2021 Tod Kurt @todbot and John Park for Adafruit Industries
# SPDX-License-Identifier: MIT
# QT Py encoder based on https://github.com/todbot/qtpy-knob
# Retroreflective chromakey light ring
# Mount a rotary encoder directly to an Adafruit QT Py,
# add some neopixels to get a color/brightness controller
#
import time
import board
from digitalio import DigitalInOut, Direction, Pull
import neopixel
import rotaryio
dim_val = 0.2
NUM_PIX = 24
PIX_TYPE = "RGB" # RGB or RGBW
if PIX_TYPE == "RGB":
ORDER = (1, 0, 2)
GREEN = (0, 255, 0)
BLUE = (0, 0, 255)
WHITE = (255, 255, 255)
BLACK = (0, 0, 0)
else:
ORDER = (1, 0, 2, 3)
GREEN = (0, 255, 0, 0)
BLUE = (0, 0, 255, 0)
WHITE = (0, 0, 0, 255)
BLACK = (0, 0, 0, 0)
colors = [GREEN, BLUE, WHITE, BLACK]
current_color = 0
ring = neopixel.NeoPixel(
board.MISO, NUM_PIX, brightness=0.2, auto_write=False, pixel_order=ORDER
)
ring.fill(colors[current_color])
ring.show()
# button of rotary encoder
button = DigitalInOut(board.MOSI)
button.pull = Pull.UP
© Adafruit Industries https://learn.adafruit.com/retroreflective-green-screen-light-ring-controller Page 20 of 45
Page 21

# Use pin A2 as a fake ground for the rotary encoder
fakegnd = DigitalInOut(board.A2)
fakegnd.direction = Direction.OUTPUT
fakegnd.value = False
encoder = rotaryio.IncrementalEncoder(board.A3, board.A1)
print("---Chromakey Light Ring---")
last_encoder_val = encoder.position
ring_pos = 0
rainbow_pos = 0
last_time = time.monotonic()
ring_on = True
while True:
encoder_diff = last_encoder_val - encoder.position # encoder clicks since last read
last_encoder_val = encoder.position
if button.value is False: # button pressed
current_color = (current_color + 1) % len(colors)
ring.fill(colors[current_color])
ring.show()
time.sleep(0.5) # debounce
else:
if encoder_diff > 0:
if dim_val >= 0.01:
dim_val = (dim_val - 0.01) % 1.0
ring.brightness = dim_val
ring.show()
elif encoder_diff < 0:
if dim_val <= 0.99:
dim_val = (dim_val + 0.01) % 1.0
ring.brightness = dim_val
ring.show()
time.sleep(0.01)
How It Works
Libraries
First, the libraries are imported -- time for debouncing pauses, board for pin definitions, digitalio to set
pins to inputs or outputs and to use the encoder knob button, neopixel for RGB LEDs, and rotaryio for
reading the encoder.
NeoPixel Setup
Next, the dim_val variable is created and set for the starting brightness value of 20%.
Then NUM_PIX variable is set to the number of NeoPixels in the ring you're using, in this case 24.
Depending on the type of NeoPixel ring you use, you'll set it to either "RGB" or "RGBW".
© Adafruit Industries https://learn.adafruit.com/retroreflective-green-screen-light-ring-controller Page 21 of 45
Page 22

PIX_TYPE = "RGB" # RGB or RGBW
if PIX_TYPE == "RGB":
ORDER = (1, 0, 2)
GREEN = (0, 255, 0)
BLUE = (0, 0, 255)
WHITE = (255, 255, 255)
BLACK = (0, 0, 0)
else:
ORDER = (1, 0, 2, 3)
GREEN = (0, 255, 0, 0)
BLUE = (0, 0, 255, 0)
WHITE = (0, 0, 0, 255)
BLACK = (0, 0, 0, 0)
You can create any color you like for your chromakey -- for example, red or "magic pink" are used
when shooting props or puppets that have green and blue in them.
A list for colors is created so you can cycle between them using the push encoder button, then the ring is
set up and turned on to the first color in the list.
colors = [GREEN, BLUE, WHITE, BLACK]
current_color = 0
ring = neopixel.NeoPixel(
board.MISO, NUM_PIX, brightness=0.2, auto_write=False, pixel_order=ORDER
)
ring.fill(colors[current_color])
ring.show()
Pin Setup
You'll set up the encoder pins next. Based on the physical layout of the encoder legs, you'll need to set
pin A2 as a "fake" ground by setting it to be an output pin. Thanks again to Tod Kurt for this setup.
The encoder pins are on A3 and A2.
# button of rotary encoder
button = DigitalInOut(board.MOSI)
button.pull = Pull.UP
# Use pin A2 as a fake ground for the rotary encoder
fakegnd = DigitalInOut(board.A2)
fakegnd.direction = Direction.OUTPUT
fakegnd.value = False
encoder = rotaryio.IncrementalEncoder(board.A3, board.A1)
The state of the encoder position is stored in the last_encoder_val variable to compare it to the currently
read value, thus detecting if the knob is being turned and if so in which direction.
Main Loop
The main loop of the program does the following things:
© Adafruit Industries https://learn.adafruit.com/retroreflective-green-screen-light-ring-controller Page 22 of 45
Page 23

Compares the encoder value to the last encoder value.
If the encoder value is increasing (knob is turned clockwise), the brightness is increased. Conversely, if
the encoder value is decreasing, the brightness is decreased.
When the push encoder button is pressed, the color is switched to the next one in the colors list.
while True:
encoder_diff = last_encoder_val - encoder.position # encoder clicks since last read
last_encoder_val = encoder.position
if button.value is False: # button pressed
current_color = (current_color + 1) % len(colors)
ring.fill(colors[current_color])
ring.show()
time.sleep(0.5) # debounce
else:
if encoder_diff > 0:
if dim_val >= 0.01:
dim_val = (dim_val - 0.01) % 1.0
ring.brightness = dim_val
ring.show()
elif encoder_diff < 0:
if dim_val <= 0.99:
dim_val = (dim_val + 0.01) % 1.0
ring.brightness = dim_val
ring.show()
time.sleep(0.01)
© Adafruit Industries https://learn.adafruit.com/retroreflective-green-screen-light-ring-controller Page 23 of 45
Page 24

Build the Chromakey Light Ring
There are various ways to attach the light ring to the camera, dependent on the camera used. The lens of
the camera must be within the LED circle, and you want to avoid blocking any moving parts or sensors.
Below is a 3D printed solution for attaching to a number of different cameras including a lens barrel and a
webcam.
© Adafruit Industries https://learn.adafruit.com/retroreflective-green-screen-light-ring-controller Page 24 of 45
Page 25

First, we'll mount the rotary encoder to the QT Py. This is based on a method created by Tod "@todbot"
Kurt as documented here (https://adafru.it/Rao).
Encoder QT Py
Place a bit of insulation such as Kapton tape on the back of
the QT Py to prevent any shorts from metal on the underside
of the encoder.
You may also need to bend or clip the retention pegs on the
encoder.
Insert the encoder legs into the QT Py
from the underside
so
that these connections are made:
© Adafruit Industries https://learn.adafruit.com/retroreflective-green-screen-light-ring-controller Page 25 of 45
Page 26

Encoder two leg side are in QT Py GND and MO
Encoder three leg side are in QT Py A1, A2, A3
Don't solder them yet, first we'll insert the end of the black
wire into the same GND pin hole as the encoder leg.
Wiring
Insert the black wire's end into the same GND hole as the
encoder pin.
Solder this pin/wire combo in place, then solder the other
© Adafruit Industries https://learn.adafruit.com/retroreflective-green-screen-light-ring-controller Page 26 of 45
Page 27

encoder pins.
Solder the red wire to the QT Py's 3V pin hole.
Solder the gray wire into the QT Py's MI pin hole.
Wiring Sleeve
For extra style points you can use a length of wiring
sheathing or paracord sheath and heat shrink tubing to tidy
up the wires before soldering them to the NeoPixel ring.
© Adafruit Industries https://learn.adafruit.com/retroreflective-green-screen-light-ring-controller Page 27 of 45
Page 28
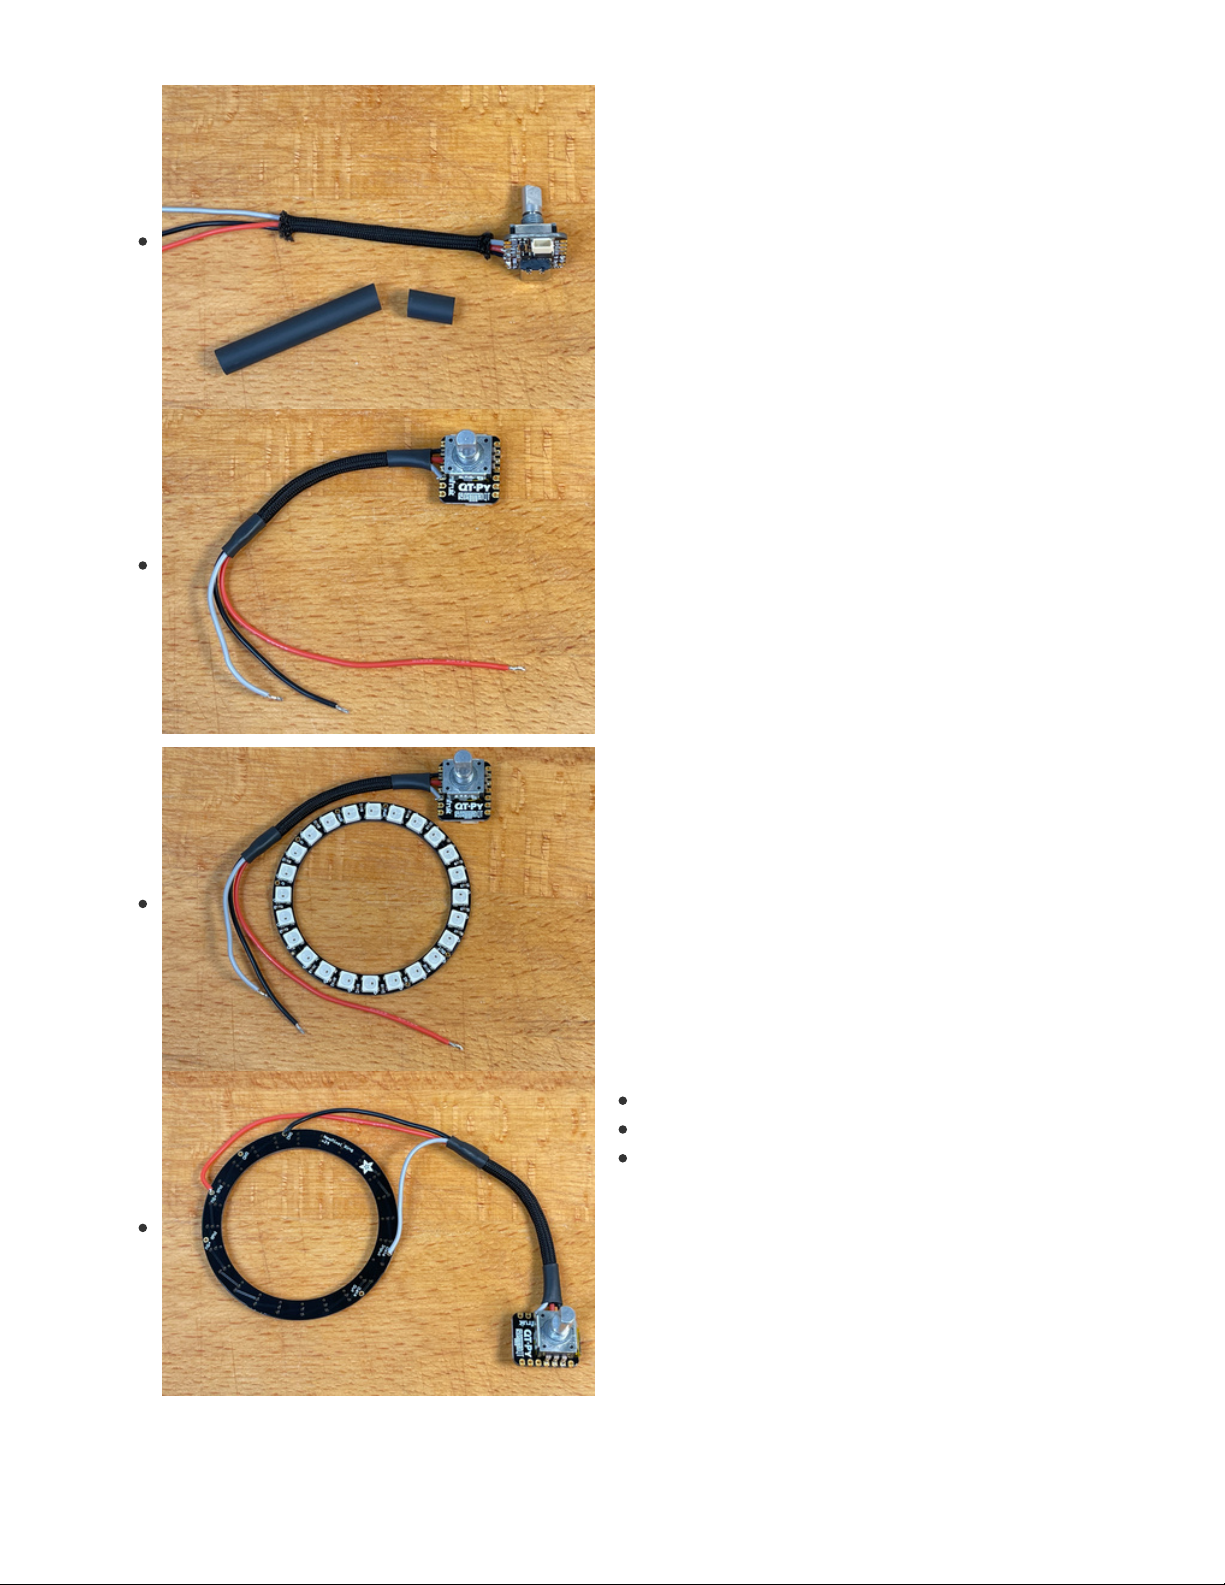
Remove the core strands from the paracord sheathing.
Insert the wires through the sheath, then cut to pieces of heat
shrink tubing length to head and hold the sheath in place.
NeoPixel Ring Wiring
Solder the wires to the NeoPixel ring as shown.
The connections are:
Red wire to PWR
Black wire to GND
Gray wire to Data Input
© Adafruit Industries https://learn.adafruit.com/retroreflective-green-screen-light-ring-controller Page 28 of 45
Page 29

Light Ring Mount
This light ring mount is designed to fit a variety of lenses on mirrorless cameras and DSLR cameras.
First, download the 3D model files linked below. Print the ring and four of the adjustment blocks. Settings
may vary from printer to printer. Below are my key settings, but these are pretty forgiving models, so you
should be able to print without too much noodling.
PLA filament
0.15mm layer height
30% infill
210º C extruder temperature
60º C heated glass build plate
© Adafruit Industries https://learn.adafruit.com/retroreflective-green-screen-light-ring-controller Page 29 of 45
Page 30

https://adafru.it/Rap
https://adafru.it/Raq
Add Encoder
Once the ring holder has printed, push the encoder through
a mounting hole as shown, then secure it with a nut.
https://adafru.it/Rap
https://adafru.it/Raq
© Adafruit Industries https://learn.adafruit.com/retroreflective-green-screen-light-ring-controller Page 30 of 45
Page 31
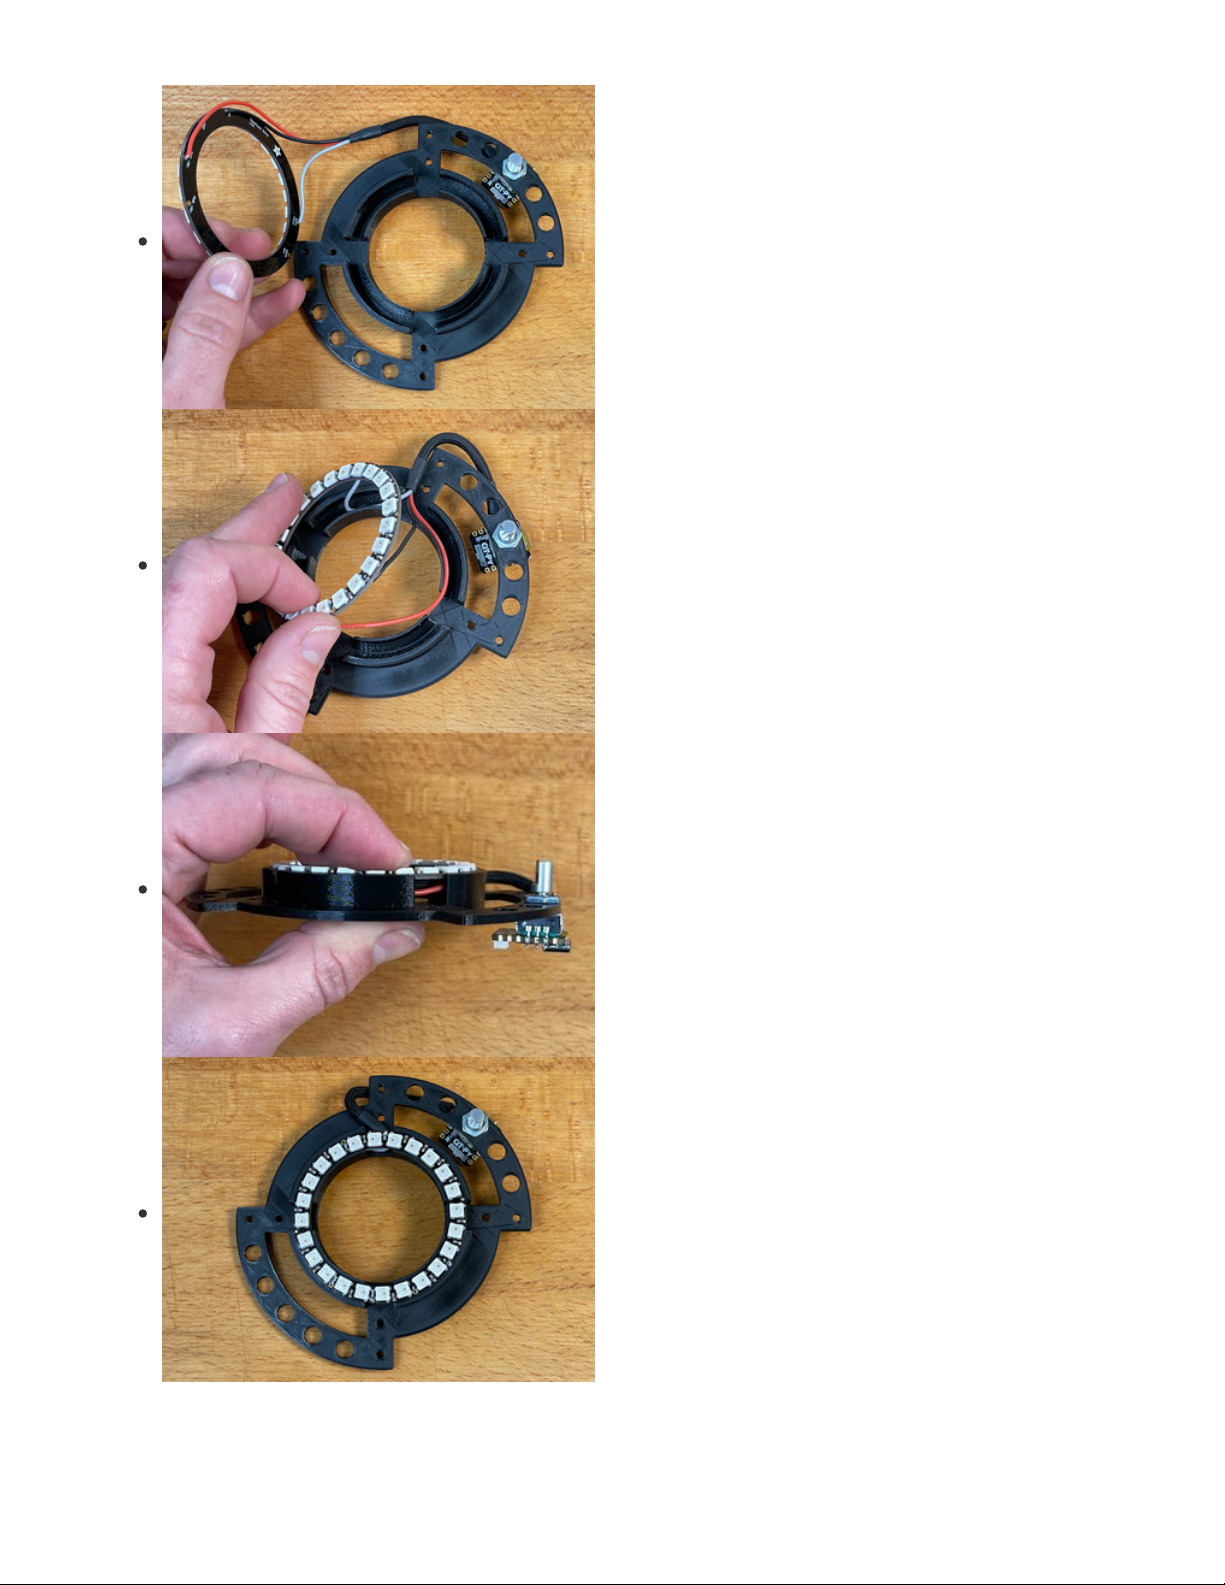
Add Ring
Minding the wiring, insert the ring into the ring holder. It will
be a tight press fit.
Only push the ring in until the LEDs are flush to the top of the
ring holder -- you can press it onto you workbench to get it
seated evenly.
© Adafruit Industries https://learn.adafruit.com/retroreflective-green-screen-light-ring-controller Page 31 of 45
Page 32

Fasteners
The blocks are held in place with nylon M3 fasteners which
will keep them secure but still allow them to slide and grip
the lens barrel.
Place the eight short screws through the mounting holes
from the front side of the ring.
Thread the eight standoffs onto the protruding short screws.
Use the eight long screws to screw the four 3D printed
© Adafruit Industries https://learn.adafruit.com/retroreflective-green-screen-light-ring-controller Page 32 of 45
Page 33

blocks into their standoffs.
The screw and standoff lengths are such at they should not
prevent the blocks from sliding even when the screws are
tight.
© Adafruit Industries https://learn.adafruit.com/retroreflective-green-screen-light-ring-controller Page 33 of 45
Page 34

The gripping blocks freely slide to whatever size lens you
need.
© Adafruit Industries https://learn.adafruit.com/retroreflective-green-screen-light-ring-controller Page 34 of 45
Page 35

Add Elastic Return Actuator (Rubber
Band)
Wrap the elastic band around the grooves of each of the
gripping blocks.
© Adafruit Industries https://learn.adafruit.com/retroreflective-green-screen-light-ring-controller Page 35 of 45
Page 36

Attach to Lens
To attach the chromakey light ring to your lens, simply pull the four gripping blocks away from center,
press the ring to the end of the lens barrel, and release the gripping blocks.
© Adafruit Industries https://learn.adafruit.com/retroreflective-green-screen-light-ring-controller Page 36 of 45
Page 37

© Adafruit Industries https://learn.adafruit.com/retroreflective-green-screen-light-ring-controller Page 37 of 45
Page 38

Prep for Use
Plug a USB-C power source into the QT Py and then select
your color mode (green/blue/white/off) by clicking the
encoder.
Turn the encoder wheel to increase or decrease the
brightness.
© Adafruit Industries https://learn.adafruit.com/retroreflective-green-screen-light-ring-controller Page 38 of 45
Page 39

Webcam Mount
With a couple of elastic bands you can affix the chromakey
light ring to a webcam, such as the popular Logitech C920.
Next we'll set up the retroreflective screen and light it up!
© Adafruit Industries https://learn.adafruit.com/retroreflective-green-screen-light-ring-controller Page 39 of 45
Page 40

Set Up the Retroreflective Background and Use the
Keyer
Hang the retroreflective fabric using spring clamps, magnets, or even gaffer's tape. You will want it to be
very close to the subject for best performance. This helps to avoid a halo effect.
Your retroreflective fabric may come with a protective film, make sure to remove that before use!
© Adafruit Industries https://learn.adafruit.com/retroreflective-green-screen-light-ring-controller Page 40 of 45
Page 41

Light Ring Mount
Mount the ring light on your camera, then power it via the
USB-C port on the QT Py.
In this shot I've got an LCD monitor showing me what the camera sees -- this is a great way to see how
the greenscreen looks, since you can't see the effect with your naked eye unless you're positioned right
behind the camera.
© Adafruit Industries https://learn.adafruit.com/retroreflective-green-screen-light-ring-controller Page 41 of 45
Page 42

Here's a behind the scenes video of the system in action:
© Adafruit Industries https://learn.adafruit.com/retroreflective-green-screen-light-ring-controller Page 42 of 45
Page 43

© Adafruit Industries https://learn.adafruit.com/retroreflective-green-screen-light-ring-controller Page 43 of 45
Page 44

© Adafruit Industries https://learn.adafruit.com/retroreflective-green-screen-light-ring-controller Page 44 of 45
Page 45

© Adafruit Industries Last Updated: 2021-03-17 08:36:16 PM EDT Page 45 of 45
 Loading...