

Page 1
PyPortal US Election Calendar
Created by Álvaro Figueroa
Last updated on 2021-03-17 01:18:28 PM EDT
Page 2

2
3
4
8
8
9
10
11
12
12
13
14
14
15
16
16
16
16
19
19
19
19
19
21
21
21
21
24
25
26
27
29
31
33
35
37
39
40
40
40
40
Guide Contents
Guide Contents
Overview
Parts
Install CircuitPython
Set up CircuitPython Quick Start!
PyPortal Default Files
CircuitPython Libraries
Installing the CircuitPython Library Bundle
Example Files
Copying Libraries to Your Board
Example: ImportError Due to Missing Library
Library Install on Non-Express Boards
Updating CircuitPython Libraries/Examples
PyPortal CircuitPython Setup
Code PyPortal with CircuitPython
Location
Adafruit IO Time Server
CircuitPython Code
How It Works
PyPortal Constructor
Background
Time
API Query and JSON
Fetch
JSON Traversal
Font
Graphics
Text Position
Text Color
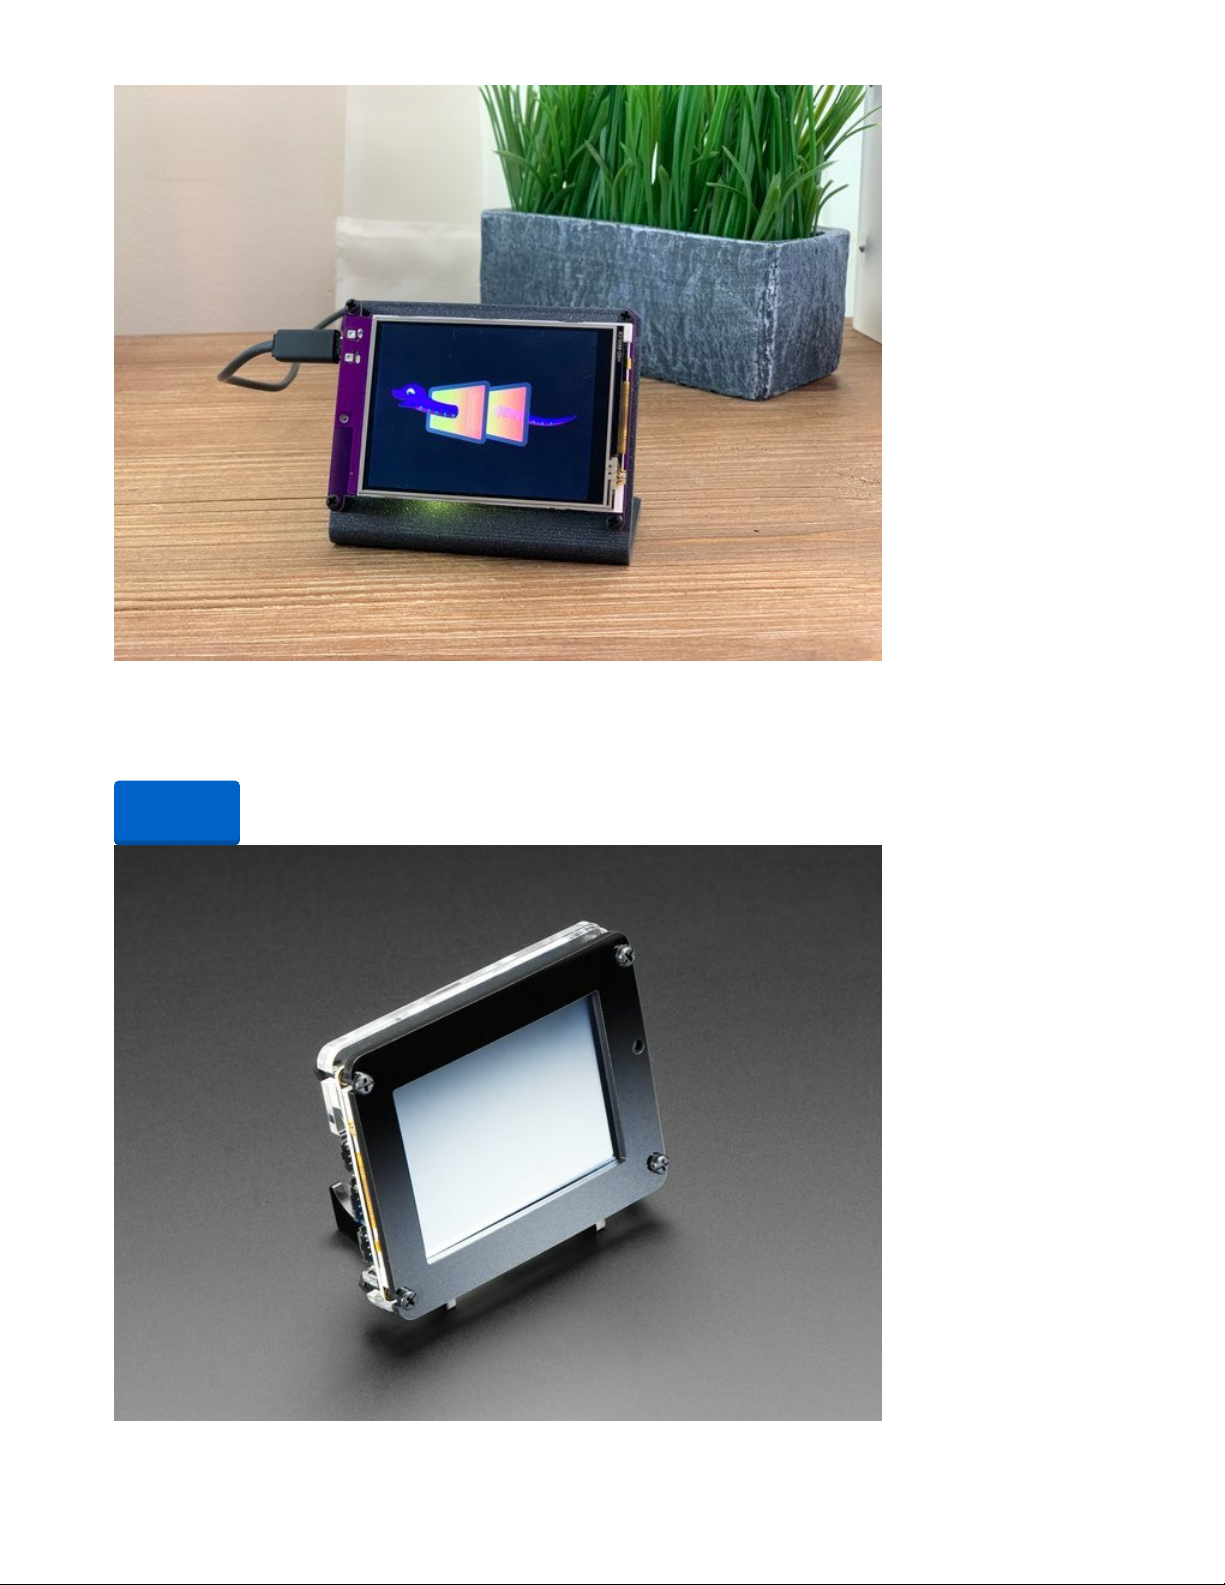
Build The PyPortal Stand
Prep
Sandwich
Legs
Add Long Screws
Screw It All Together
Bonus! Penny Roll Weight
Laser Cutter Files for PyPortal Stand
Troubleshooting
Problems with the WiFi
Problems setting up the county/state
PyPortal library on other devices
© Adafruit Industries https://learn.adafruit.com/pyportal-electioncal-us Page 2 of 41
Page 3
Overview
Voting is important to make the voice of the people as loud as possible.
But, it is also very complicated to remember all of the involved dates, so much so that you are almost
certain to miss a registration date.
To try to make it easier for us with forgetful minds, a community driven effort has been gathering all of the
hard to find information and dates, and compiling it on the Electioncal Website (https://adafru.it/M7F).
It's designed to share this information as an iCalendar url, which is super easy to add to your favorite
desktop software or to your mobile phone.
© Adafruit Industries https://learn.adafruit.com/pyportal-electioncal-us Page 3 of 41
Page 4
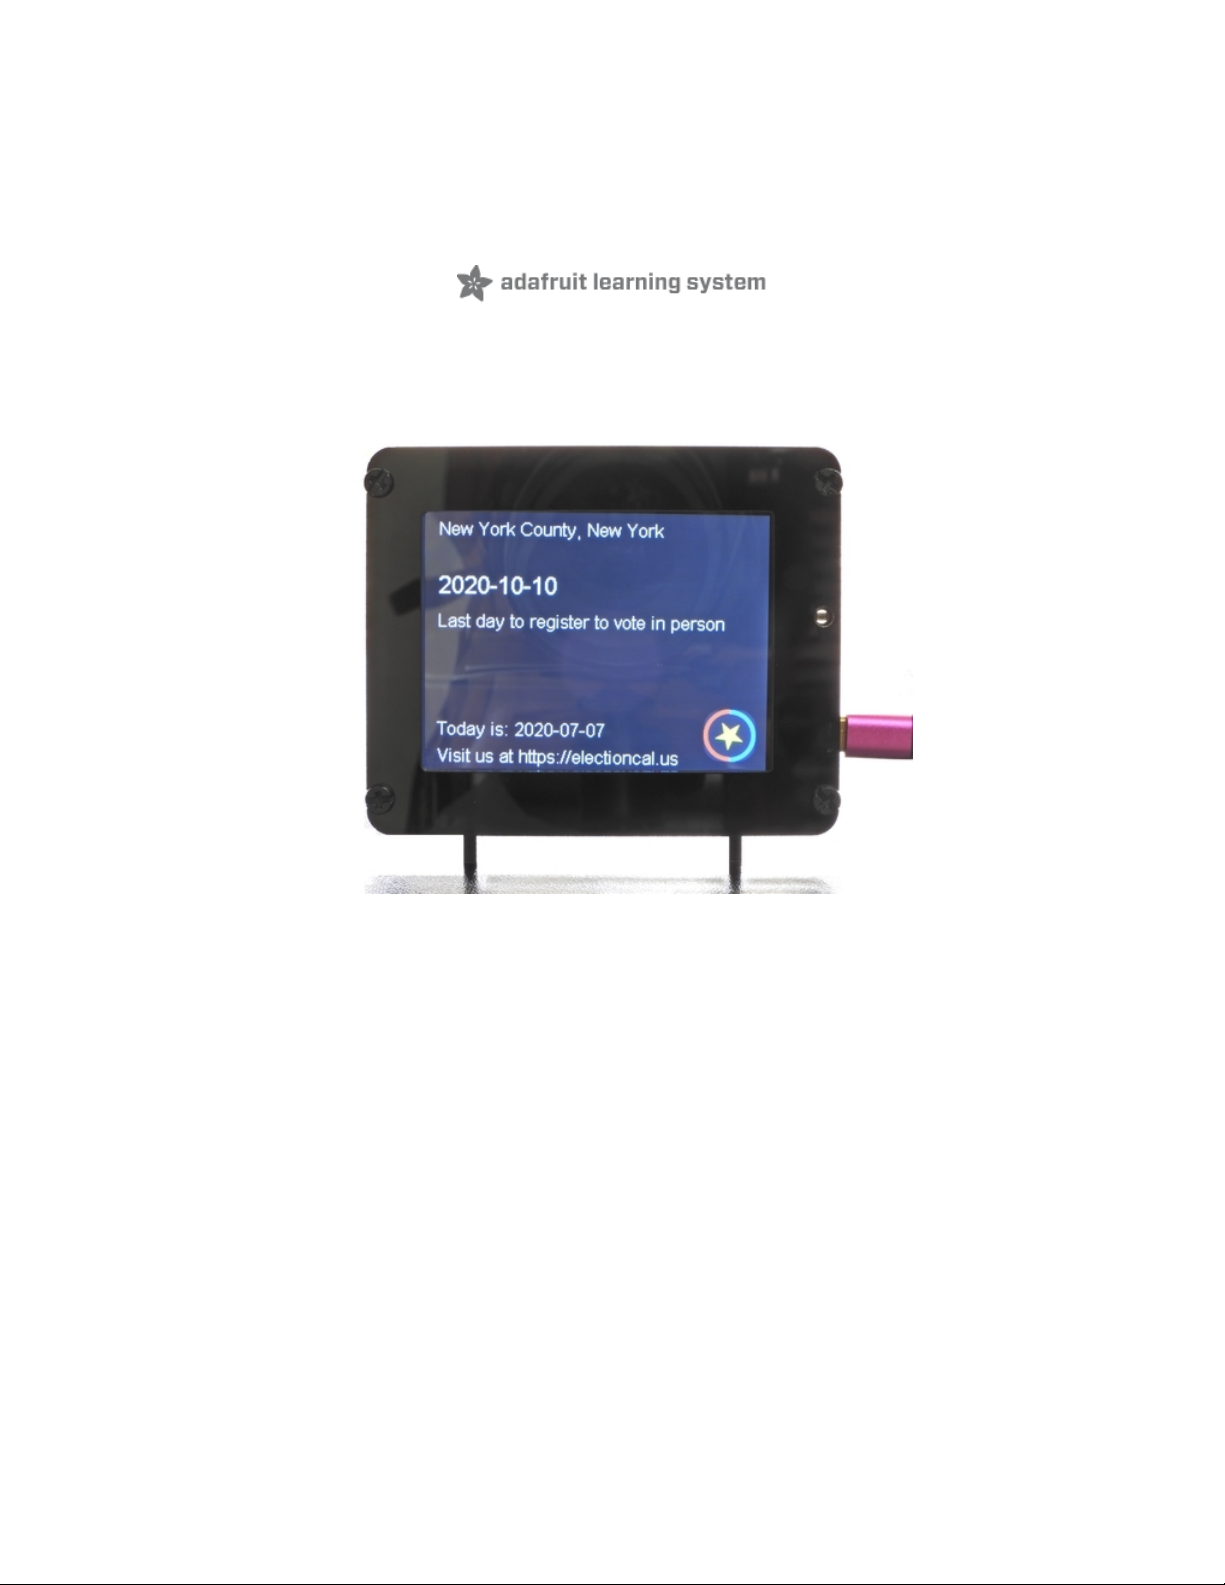
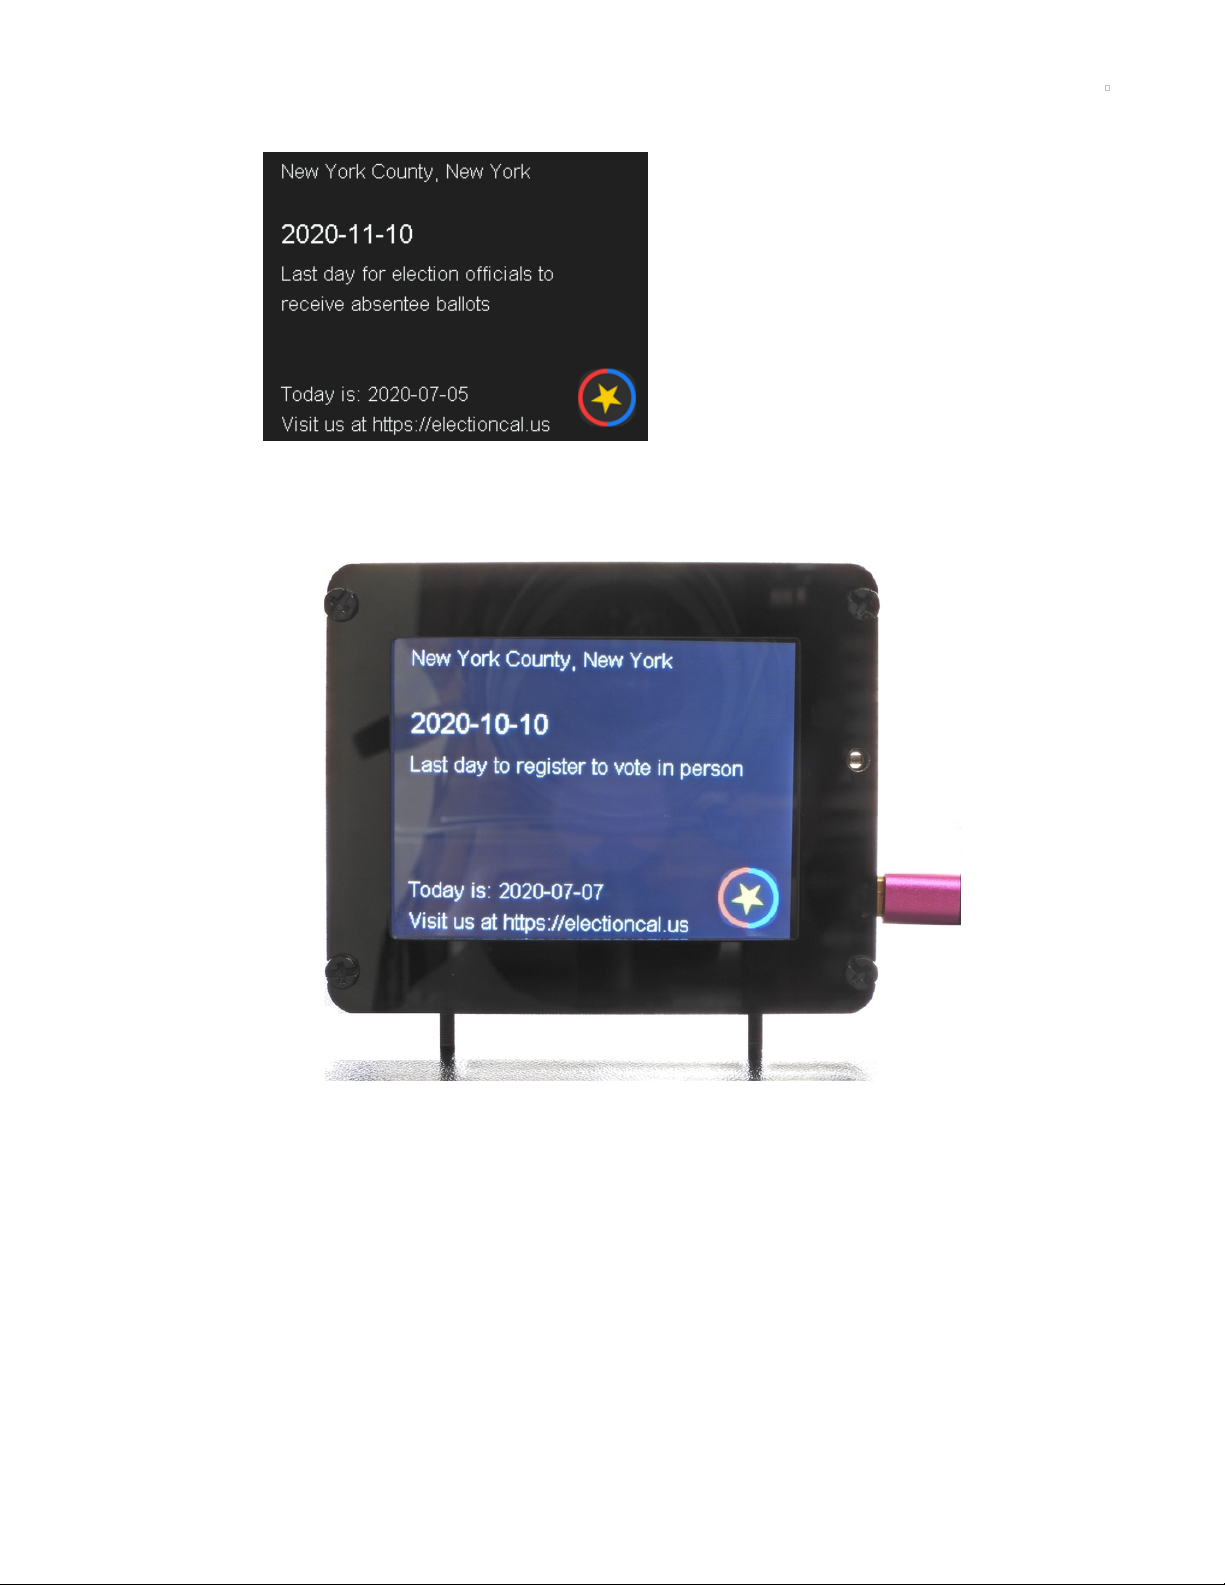
But sometimes we need a little visual reminder, and a beautiful way to do it, is with a PyPortal.
We are going to use CircuitPython to connect to the Internet, download and process the data, and then
display it in a nice and clean way, so we can always keep the pulse on our Election Calendar.
Parts
© Adafruit Industries https://learn.adafruit.com/pyportal-electioncal-us Page 4 of 41
Page 5
Adafruit PyPortal - CircuitPython Powered Internet Display
PyPortal, our easy-to-use IoT device that allows you to create all the things for the “Internet of Things” in
minutes. Make custom touch screen interface...
Out of Stock
Out of
Stock
© Adafruit Industries https://learn.adafruit.com/pyportal-electioncal-us Page 5 of 41
Page 6
Adafruit PyPortal Desktop Stand Enclosure Kit
PyPortal is our easy-to-use IoT device that allows you to create all the things for the “Internet of Things” in
minutes. Create little pocket...
$9.95
In Stock
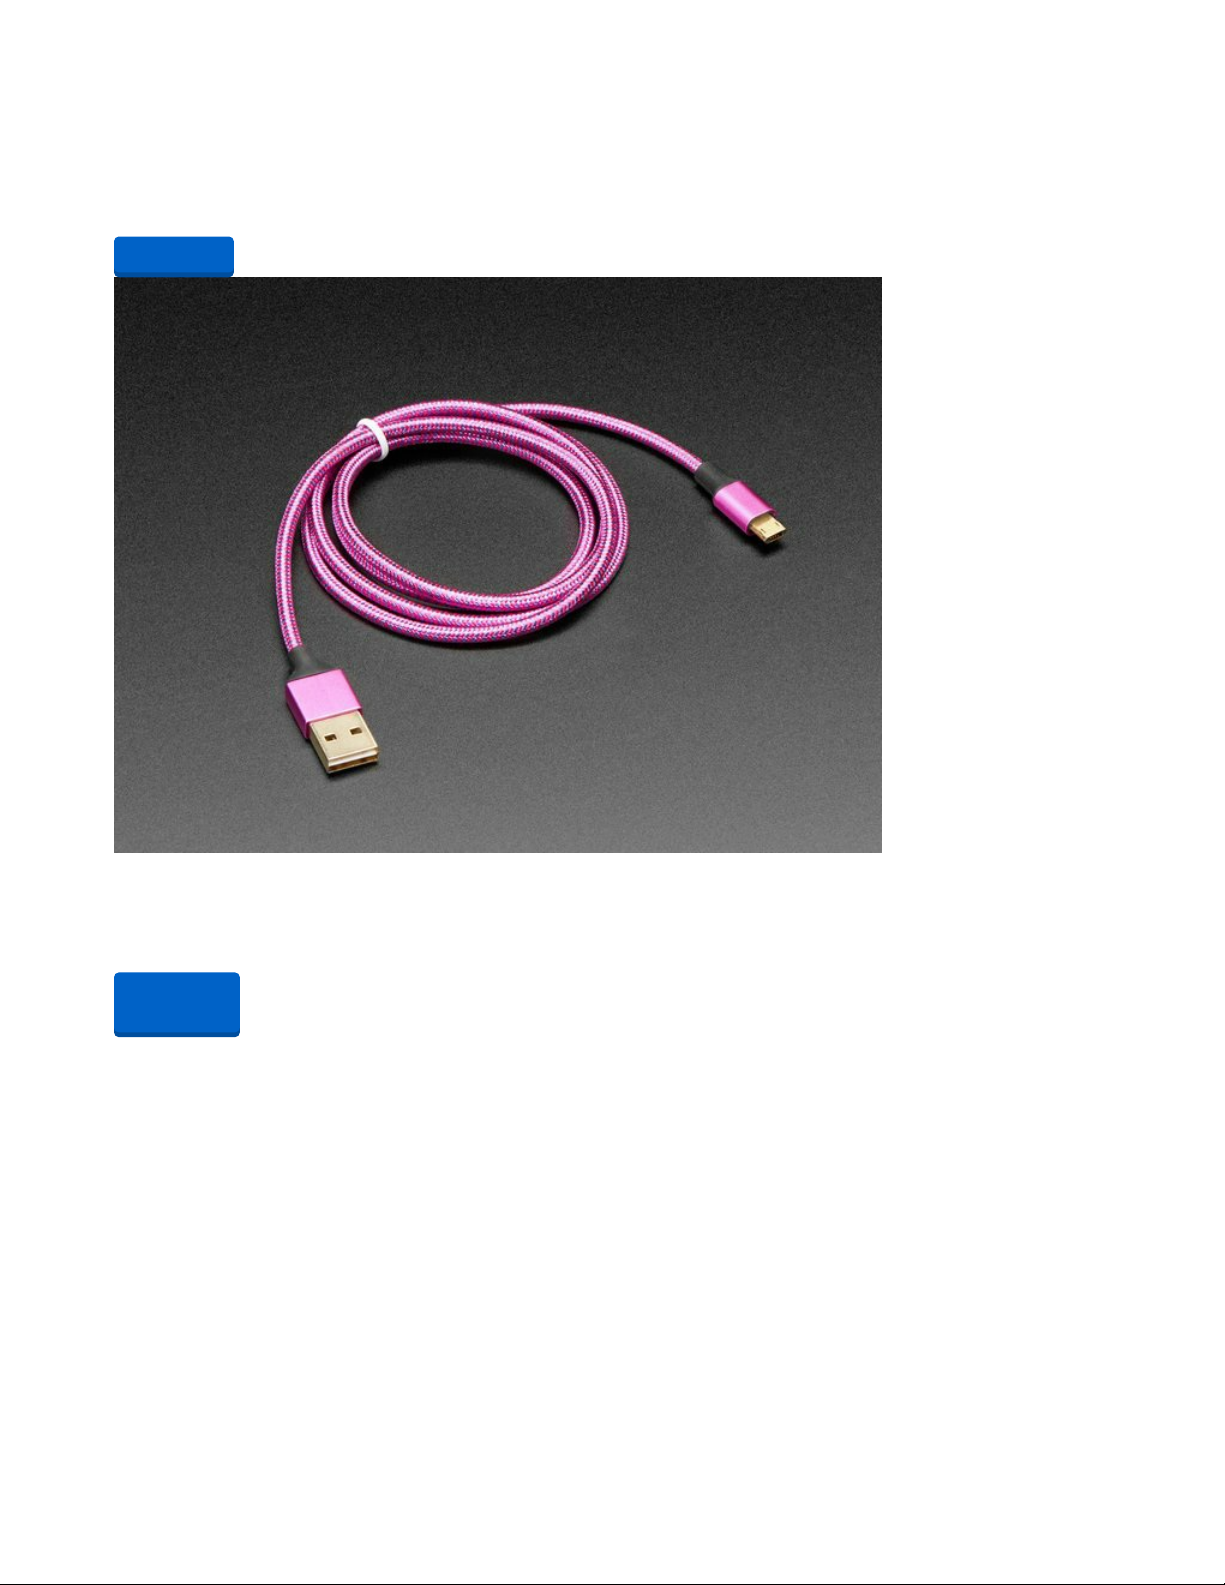
Fully Reversible Pink/Purple USB A to micro B Cable - 1m long
This cable is not only super-fashionable, with a woven pink and purple Blinka-like pattern, it's also fully
reversible! That's right, you will save seconds a day by...
Out of Stock
Add to Cart
Out of
Stock
© Adafruit Industries https://learn.adafruit.com/pyportal-electioncal-us Page 6 of 41
Page 7
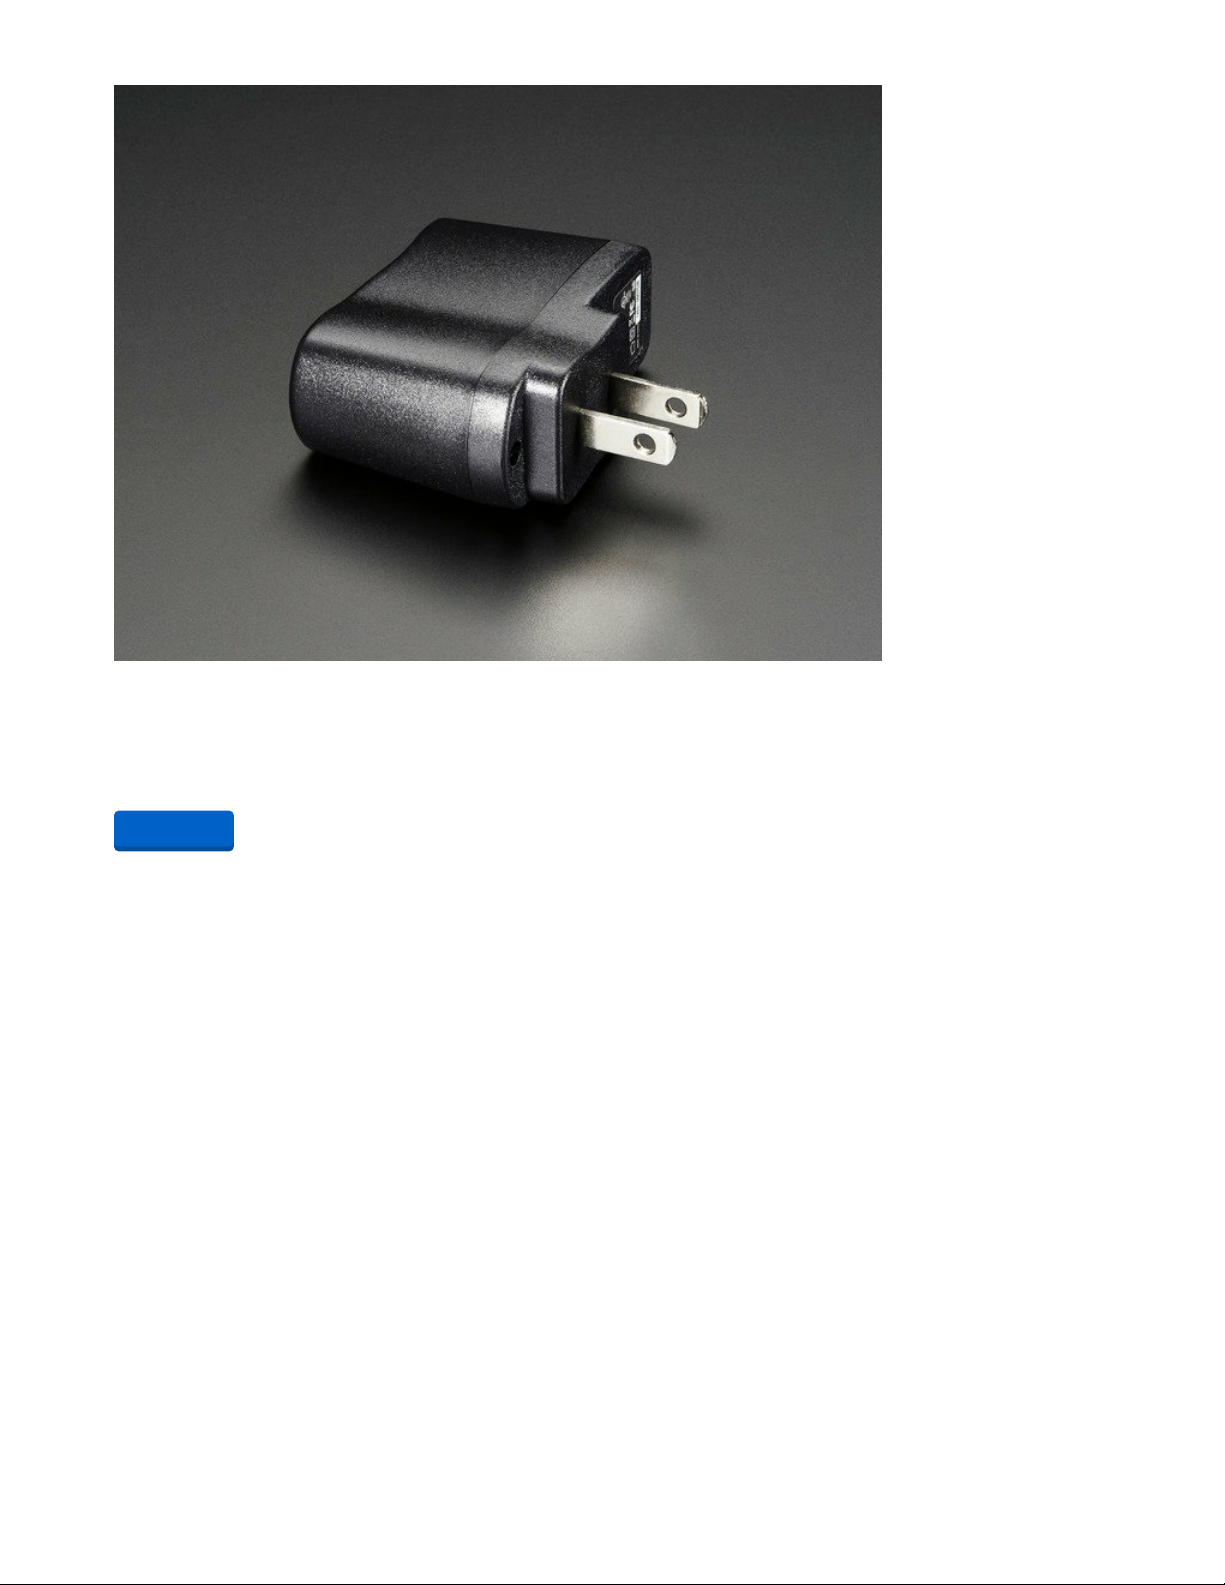
5V 1A (1000mA) USB port power supply - UL Listed
Need a USB jack for charging or powering a project, but don't want to lug around a computer? This
switching supply gives a clean regulated output at up to 1000mA! 110 or 240 input,...
$5.95
In Stock
Add to Cart
© Adafruit Industries https://learn.adafruit.com/pyportal-electioncal-us Page 7 of 41
Page 8
Install CircuitPython
CircuitPython (https://adafru.it/tB7) is a derivative of MicroPython (https://adafru.it/BeZ) designed to
simplify experimentation and education on low-cost microcontrollers. It makes it easier than ever to get
prototyping by requiring no upfront desktop software downloads. Simply copy and edit files on the
CIRCUITPY "flash" drive to iterate.
The following instructions will show you how to install CircuitPython. If you've already installed
CircuitPython but are looking to update it or reinstall it, the same steps work for that as well!
Set up CircuitPython Quick Start!
Follow this quick step-by-step for super-fast Python power :)
https://adafru.it/Egk
https://adafru.it/HFd
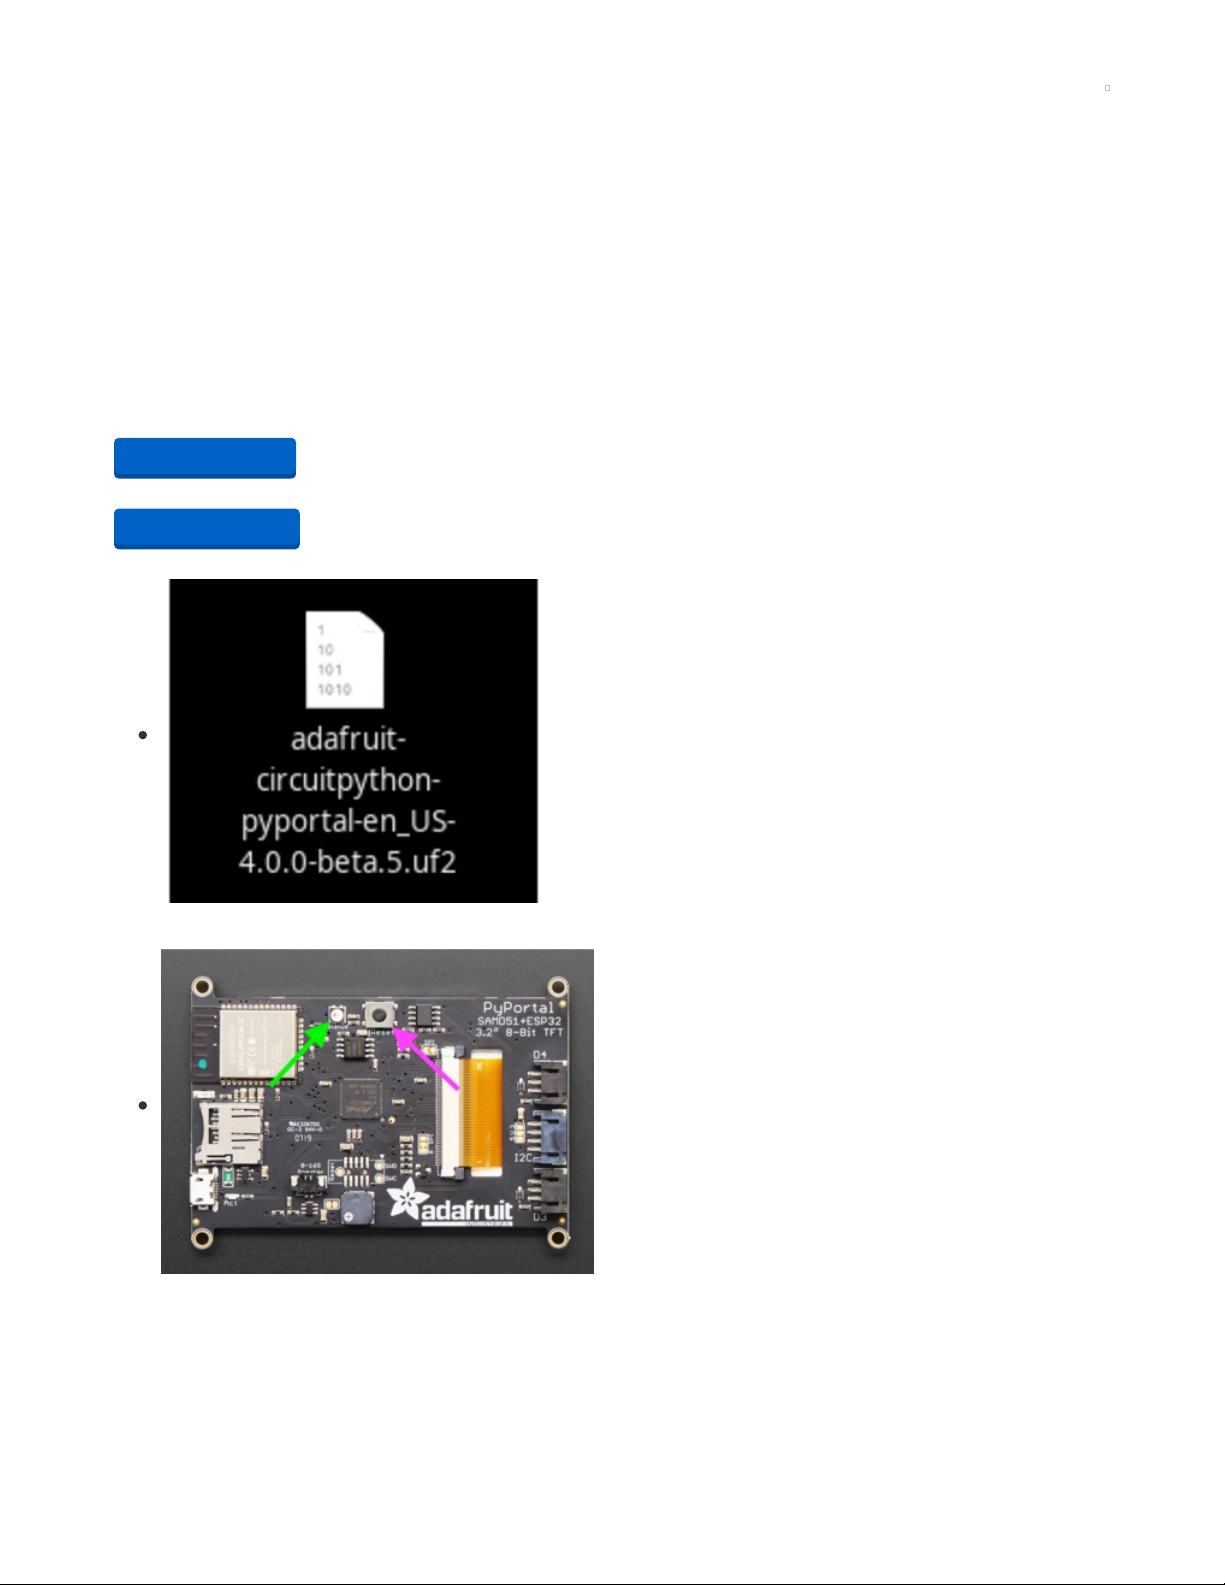
Click the link above to download the latest version of
CircuitPython for the PyPortal.
Download and save it to your desktop (or wherever is handy).
Plug your PyPortal into your computer using a known-good
USB cable.
A lot of people end up using charge-only USB cables and it
is very frustrating! So make sure you have a USB cable you
know is good for data sync.
Double-click the Reset button on the top in the middle
(magenta arrow) on your board, and you will see the NeoPixel
RGB LED (green arrow) turn green. If it turns red, check the
USB cable, try another USB port, etc. Note: The little red LED
next to the USB connector will pulse red. That's ok!
If double-clicking doesn't work the first time, try again.
Sometimes it can take a few tries to get the rhythm right!
https://adafru.it/Egk
https://adafru.it/HFd
© Adafruit Industries https://learn.adafruit.com/pyportal-electioncal-us Page 8 of 41
Page 9
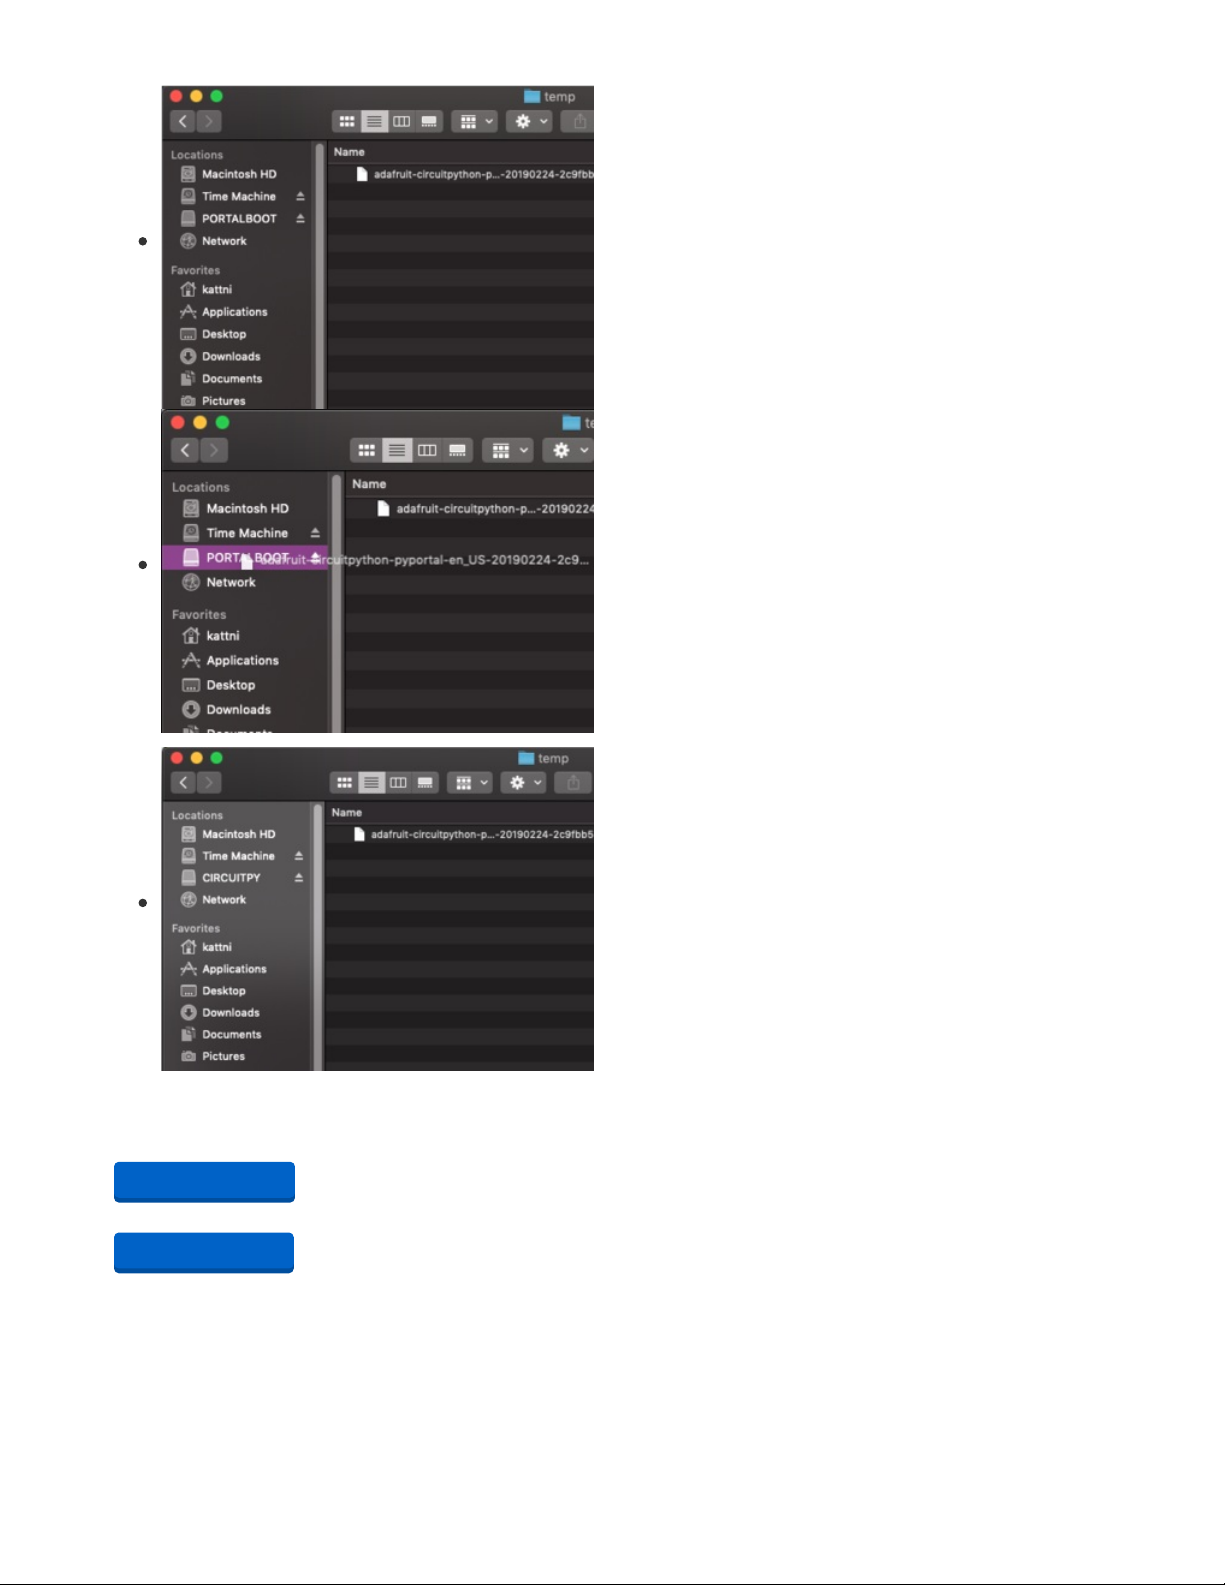
You will see a new disk drive appear called PORTALBOOT.
Drag the adafruit-circuitpython-pyportal-<whatever>.uf2 file
to PORTALBOOT.
The LED will flash. Then, the PORTALBOOT drive will
disappear and a new disk drive called CIRCUITPY will
appear.
If you haven't added any code to your board, the only file that
will be present is boot_out.txt. This is absolutely normal! It's
time for you to add your code.py and get started!
That's it, you're done! :)
PyPortal Default Files
Click below to download a zip of the files that shipped on the PyPortal or PyPortal Pynt.
https://adafru.it/Env
https://adafru.it/HFf
https://adafru.it/Env
https://adafru.it/HFf
© Adafruit Industries https://learn.adafruit.com/pyportal-electioncal-us Page 9 of 41
Page 10
CircuitPython Libraries
As we continue to develop CircuitPython and create new releases, we will stop supporting older
releases. Visit https://circuitpython.org/downloads to download the latest version of CircuitPython for
your board. You must download the CircuitPython Library Bundle that matches your version of
CircuitPython. Please update CircuitPython and then visit https://circuitpython.org/libraries to
download the latest Library Bundle.
Each CircuitPython program you run needs to have a lot of information to work. The reason CircuitPython
is so simple to use is that most of that information is stored in other files and works in the background.
These files are called
libraries
. Some of them are built into CircuitPython. Others are stored on your
CIRCUITPY drive in a folder called lib. Part of what makes CircuitPython so awesome is its ability to store
code separately from the firmware itself. Storing code separately from the firmware makes it easier to
update both the code you write and the libraries you depend.
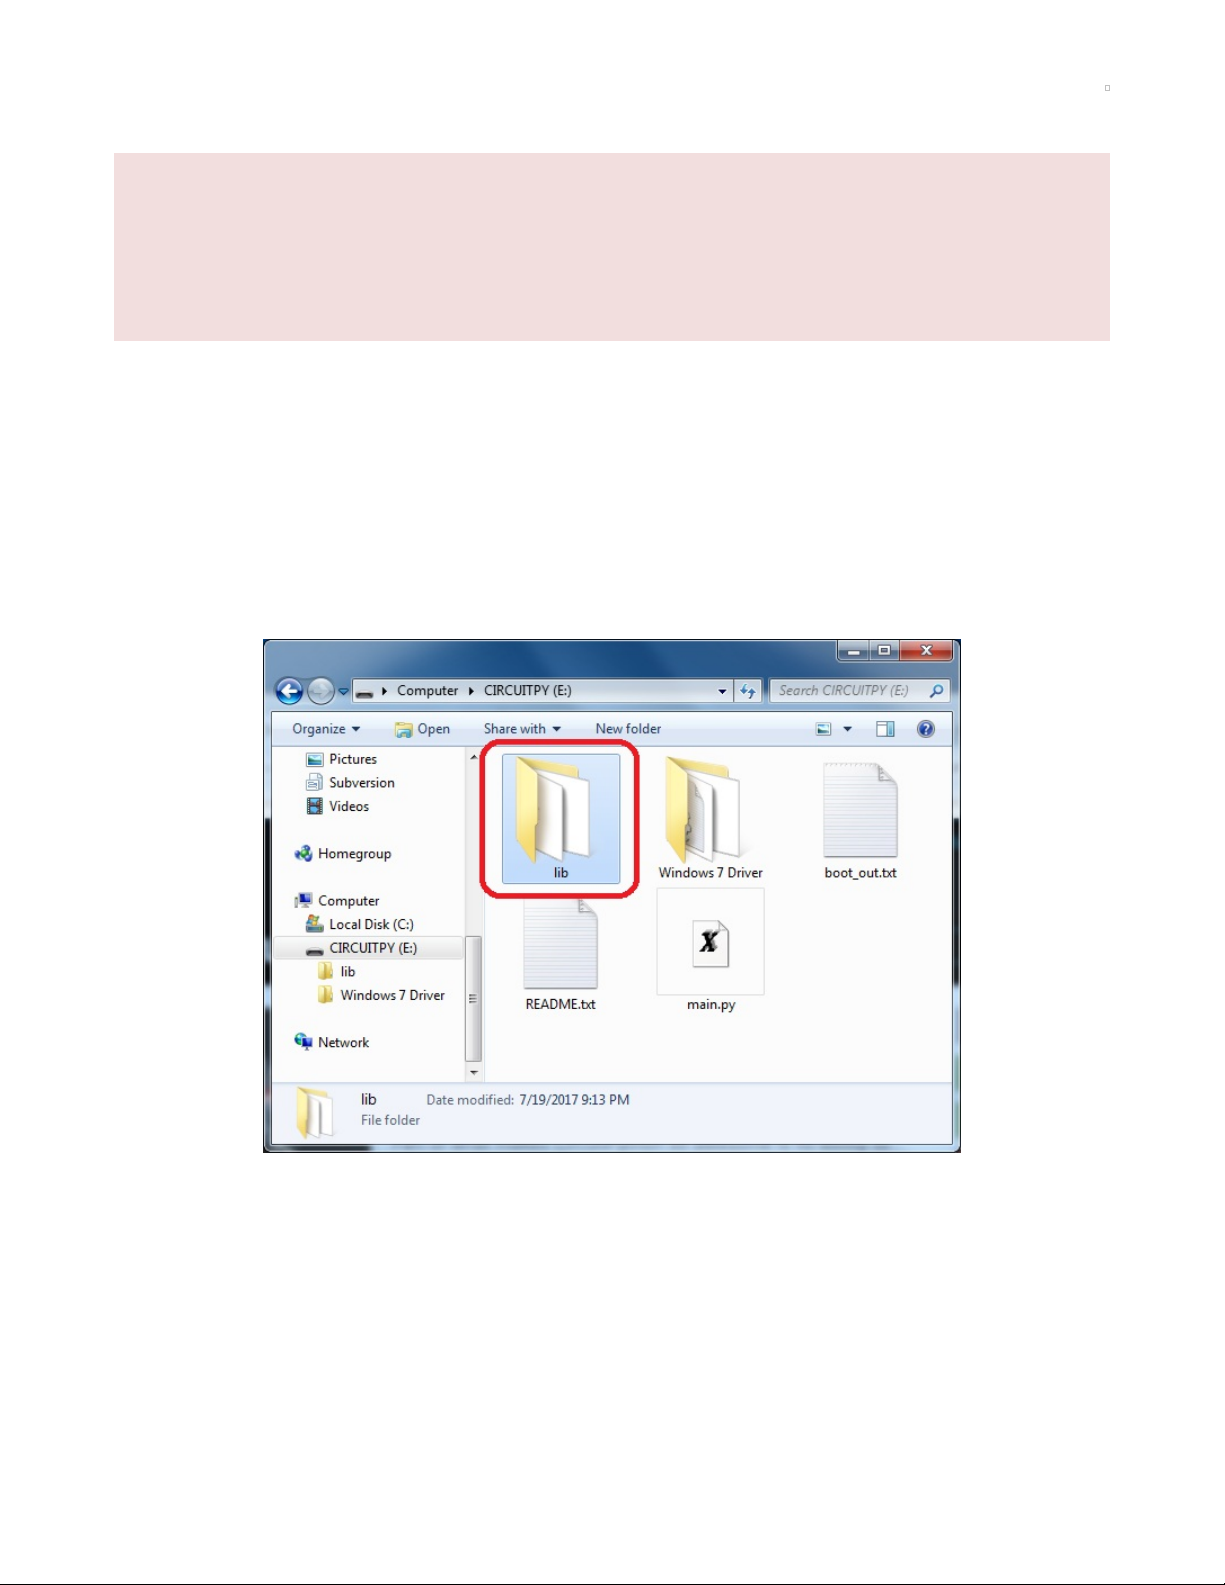
Your board may ship with a lib folder already, it's in the base directory of the drive. If not, simply create the
folder yourself. When you first install CircuitPython, an empty lib directory will be created for you.
CircuitPython libraries work in the same way as regular Python modules so the Python
docs (https://adafru.it/rar) are a great reference for how it all should work. In Python terms, we can place
our library files in the lib directory because its part of the Python path by default.
One downside of this approach of separate libraries is that they are not built in. To use them, one needs
to copy them to the CIRCUITPY drive before they can be used. Fortunately, we provide a bundle full of
our libraries.
Our bundle and releases also feature optimized versions of the libraries with the .mpy file extension.
These files take less space on the drive and have a smaller memory footprint as they are loaded.
© Adafruit Industries https://learn.adafruit.com/pyportal-electioncal-us Page 10 of 41
Page 11

Installing the CircuitPython Library Bundle
We're constantly updating and improving our libraries, so we don't (at this time) ship our CircuitPython
boards with the full library bundle. Instead, you can find example code in the guides for your board that
depends on external libraries. Some of these libraries may be available from us at Adafruit, some may be
written by community members!
Either way, as you start to explore CircuitPython, you'll want to know how to get libraries on board.
You can grab the latest Adafruit CircuitPython Bundle release by clicking the button below.
Note: Match up the bundle version with the version of CircuitPython you are running - 3.x library for
running any version of CircuitPython 3, 4.x for running any version of CircuitPython 4, etc. If you mix
libraries with major CircuitPython versions, you will most likely get errors due to changes in library
interfaces possible during major version changes.
https://adafru.it/ENC
If you need another version, you can also visit the bundle release page (https://adafru.it/Ayy) which will let
you select exactly what version you're looking for, as well as information about changes.
Either way, download the version that matches your CircuitPython firmware version. If you don't know
the version, look at the initial prompt in the CircuitPython REPL, which reports the version. For example, if
you're running v4.0.1, download the 4.x library bundle. There's also a py bundle which contains the
uncompressed python files, you probably
don't
want that unless you are doing advanced work on
libraries.
After downloading the zip, extract its contents. This is usually done by double clicking on the zip. On Mac
OSX, it places the file in the same directory as the zip.
Open the bundle folder. Inside you'll find two information files, and two folders. One folder is the lib
bundle, and the other folder is the examples bundle.
https://adafru.it/ENC
© Adafruit Industries https://learn.adafruit.com/pyportal-electioncal-us Page 11 of 41
Page 12
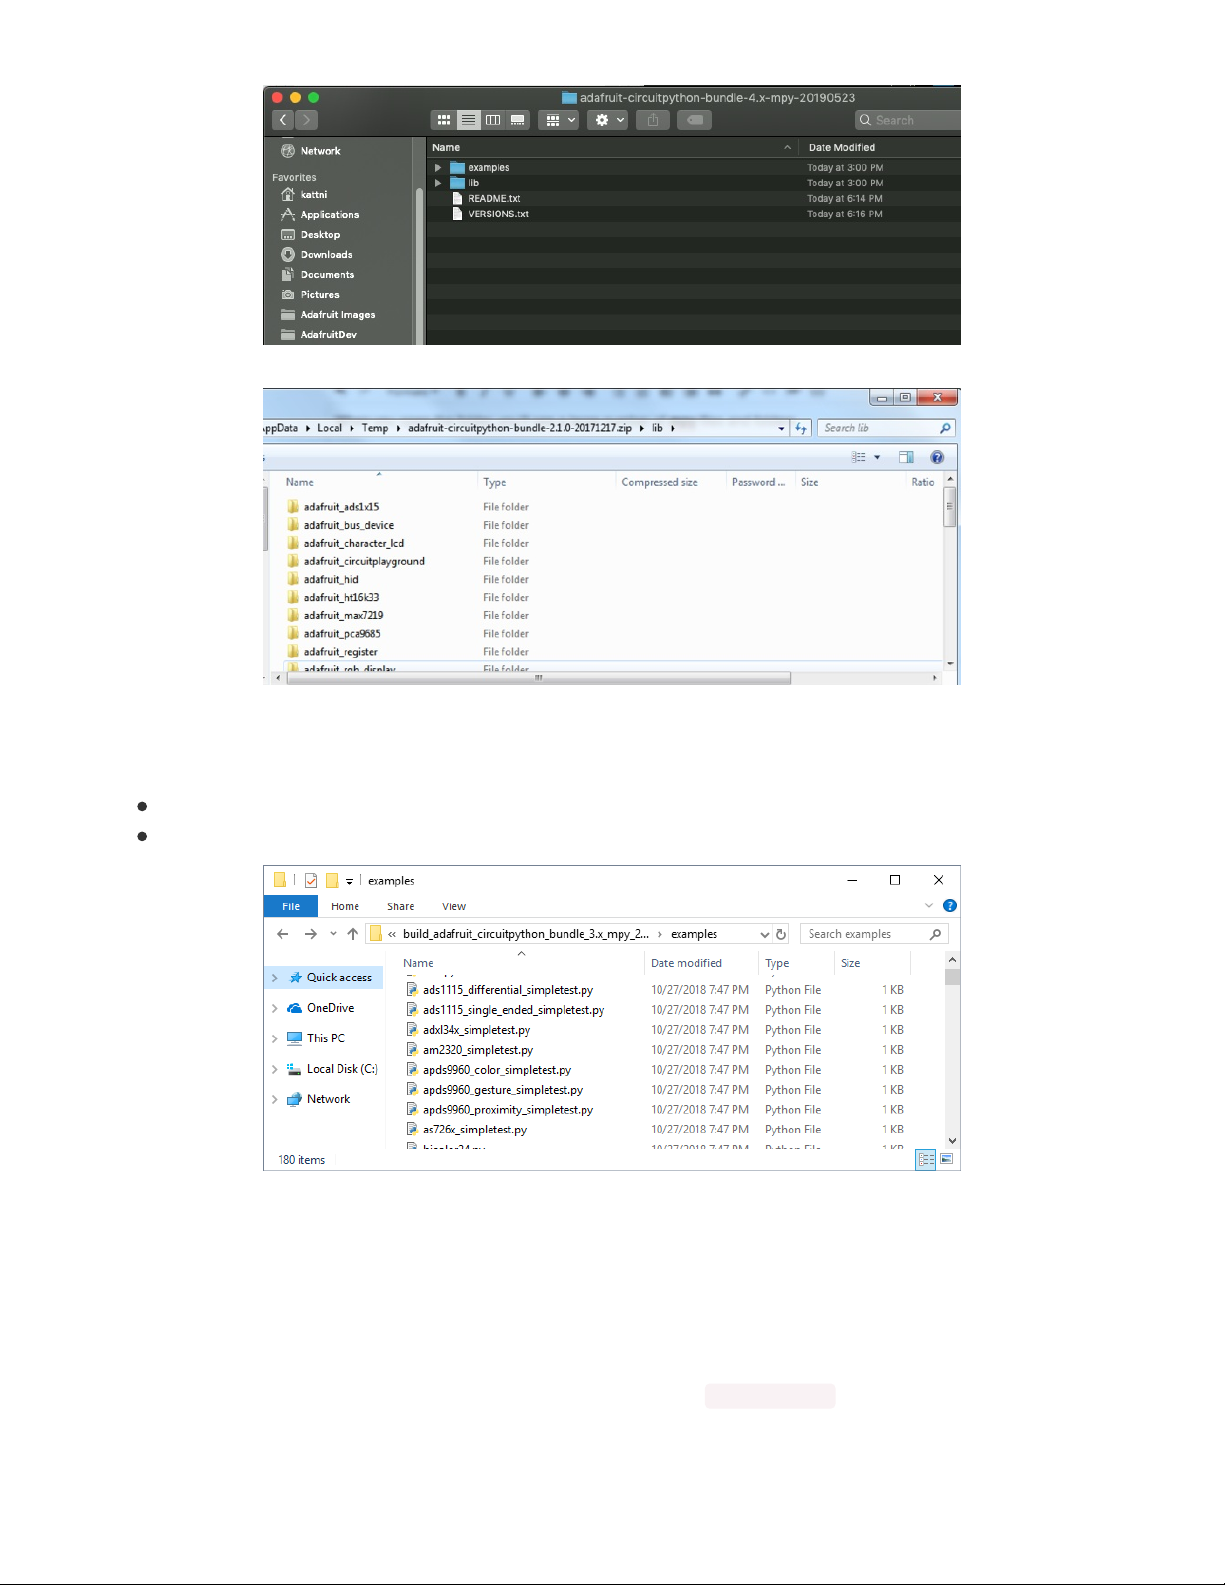
Now open the lib folder. When you open the folder, you'll see a large number of mpy files and folders
Example Files
All example files from each library are now included in the bundles, as well as an examples-only bundle.
These are included for two main reasons:
Allow for quick testing of devices.
Provide an example base of code, that is easily built upon for individualized purposes.
Copying Libraries to Your Board
First you'll want to create a lib folder on your CIRCUITPY drive. Open the drive, right click, choose the
option to create a new folder, and call it lib. Then, open the lib folder you extracted from the downloaded
zip. Inside you'll find a number of folders and .mpy files. Find the library you'd like to use, and copy it to
the lib folder on CIRCUITPY.
This also applies to example files. They are only supplied as raw .py files, so they may need to be
converted to .mpy using the mpy-cross utility if you encounter MemoryErrors . This is discussed in the
CircuitPython Essentials Guide (https://adafru.it/CTw). Usage is the same as described above in the
© Adafruit Industries https://learn.adafruit.com/pyportal-electioncal-us Page 12 of 41
Page 13

Express Boards section. Note: If you do not place examples in a separate folder, you would remove the
examples from the import statement.
If a library has multiple .mpy files contained in a folder, be sure to copy the entire folder to
CIRCUITPY/lib.
Example: ImportError Due to Missing Library
If you choose to load libraries as you need them, you may write up code that tries to use a library you
haven't yet loaded. We're going to demonstrate what happens when you try to utilise a library that you
don't have loaded on your board, and cover the steps required to resolve the issue.
This demonstration will only return an error if you do not have the required library loaded into the lib
folder on your CIRCUITPY drive.
Let's use a modified version of the blinky example.
import board
import time
import simpleio
led = simpleio.DigitalOut(board.D13)
while True:
led.value = True
time.sleep(0.5)
led.value = False
time.sleep(0.5)
Save this file. Nothing happens to your board. Let's check the serial console to see what's going on.
We have an ImportError . It says there is no module named 'simpleio' . That's the one we just included in our
code!
Click the link above to download the correct bundle. Extract the lib folder from the downloaded bundle
file. Scroll down to find simpleio.mpy. This is the library file we're looking for! Follow the steps above to
load an individual library file.
The LED starts blinking again! Let's check the serial console.
© Adafruit Industries https://learn.adafruit.com/pyportal-electioncal-us Page 13 of 41
Page 14

No errors! Excellent. You've successfully resolved an ImportError !
If you run into this error in the future, follow along with the steps above and choose the library that
matches the one you're missing.
Library Install on Non-Express Boards
If you have a Trinket M0 or Gemma M0, you'll want to follow the same steps in the example above to
install libraries as you need them. You don't always need to wait for an ImportError as you probably know
what library you added to your code. Simply open the lib folder you downloaded, find the library you
need, and drag it to the lib folder on your CIRCUITPY drive.
You may end up running out of space on your Trinket M0 or Gemma M0 even if you only load libraries as
you need them. There are a number of steps you can use to try to resolve this issue. You'll find them in
the Troubleshooting page in the Learn guides for your board.
Updating CircuitPython Libraries/Examples
Libraries and examples are updated from time to time, and it's important to update the files you have on
your CIRCUITPY drive.
To update a single library or example, follow the same steps above. When you drag the library file to your
lib folder, it will ask if you want to replace it. Say yes. That's it!
A new library bundle is released every time there's an update to a library. Updates include things like bug
fixes and new features. It's important to check in every so often to see if the libraries you're using have
been updated.
© Adafruit Industries https://learn.adafruit.com/pyportal-electioncal-us Page 14 of 41
Page 15
PyPortal CircuitPython Setup
To use all the amazing features of your PyPortal with CircuitPython, you must first install a number of
libraries. This page covers that process.
At a minimum, the following librarie are required. So grab them and install them into CIRCUITPY/lib
directory if you have not already done so:
adafruit_esp32spi - This is the library that gives you internet access via the ESP32 using (you
guessed it!) SPI transport. You need this for anything Internet
adafruit_requests - This library allows us to perform HTTP requests and get responses back from
servers. GET/POST/PUT/PATCH - they're all in here!
adafruit_pyportal - This is our friendly wrapper library that does a lot of our projects, displays
graphics and text, fetches data from the internet. Nearly all of our projects depend on it!
adafruit_touchscreen - a library for reading touches from the resistive touchscreen. Handles all the
analog noodling, rotation and calibration for you.
adafruit_io - this library helps connect the PyPortal to our free data logging and viewing service
adafruit_display_text - not surprisingly, it displays text on the screen
adafruit_bitmap_font - we have fancy font support, and it's easy to make new fonts. This library
reads and parses font files.
neopixel - for controlling the onboard NeoPixel
adafruit_sdcard - support for reading/writing data from the onboard SD card slot.
adafruit_bus_device - low level support for I2C/SPI
© Adafruit Industries https://learn.adafruit.com/pyportal-electioncal-us Page 15 of 41
Page 16
Code PyPortal with CircuitPython
Location
In the code.py file (which you will have renamed from electioncal.py), you can change the location for
which you want to display the election data in this lines:
# Change this to your state and county, replacing spaces for underscores and in lowercase
STATE="new_york"
COUNTY="new_york"
Adafruit IO Time Server
In order to get the precise time, our project will query the Adafruit IO Internet of Things service for the
time. Adafruit IO is absolutely free to use, but you'll need to log in with your Adafruit account to use it. If
you don't already have an Adafruit login, create one here (https://adafru.it/dAQ).
If you haven't used Adafruit IO before, check out this guide for more info (https://adafru.it/Ef8).
Once you have logged into your account, there are two pieces of information you'll need to place in your
secrets.py file: Adafruit IO username , and Adafruit IO key . Head to io.adafruit.com (https://adafru.it/fsU)
and simply click the View AIO Key link on the left hand side of the Adafruit IO page to get this
information.
Then, add them to the secrets.py file like this:
secrets = {
'ssid' : 'your_wifi_ssid',
'password' : 'your_wifi_password',
'aio_username' : '_your_aio_username_',
'aio_key' : '_your_big_huge_super_long_aio_key_'
}
CircuitPython Code
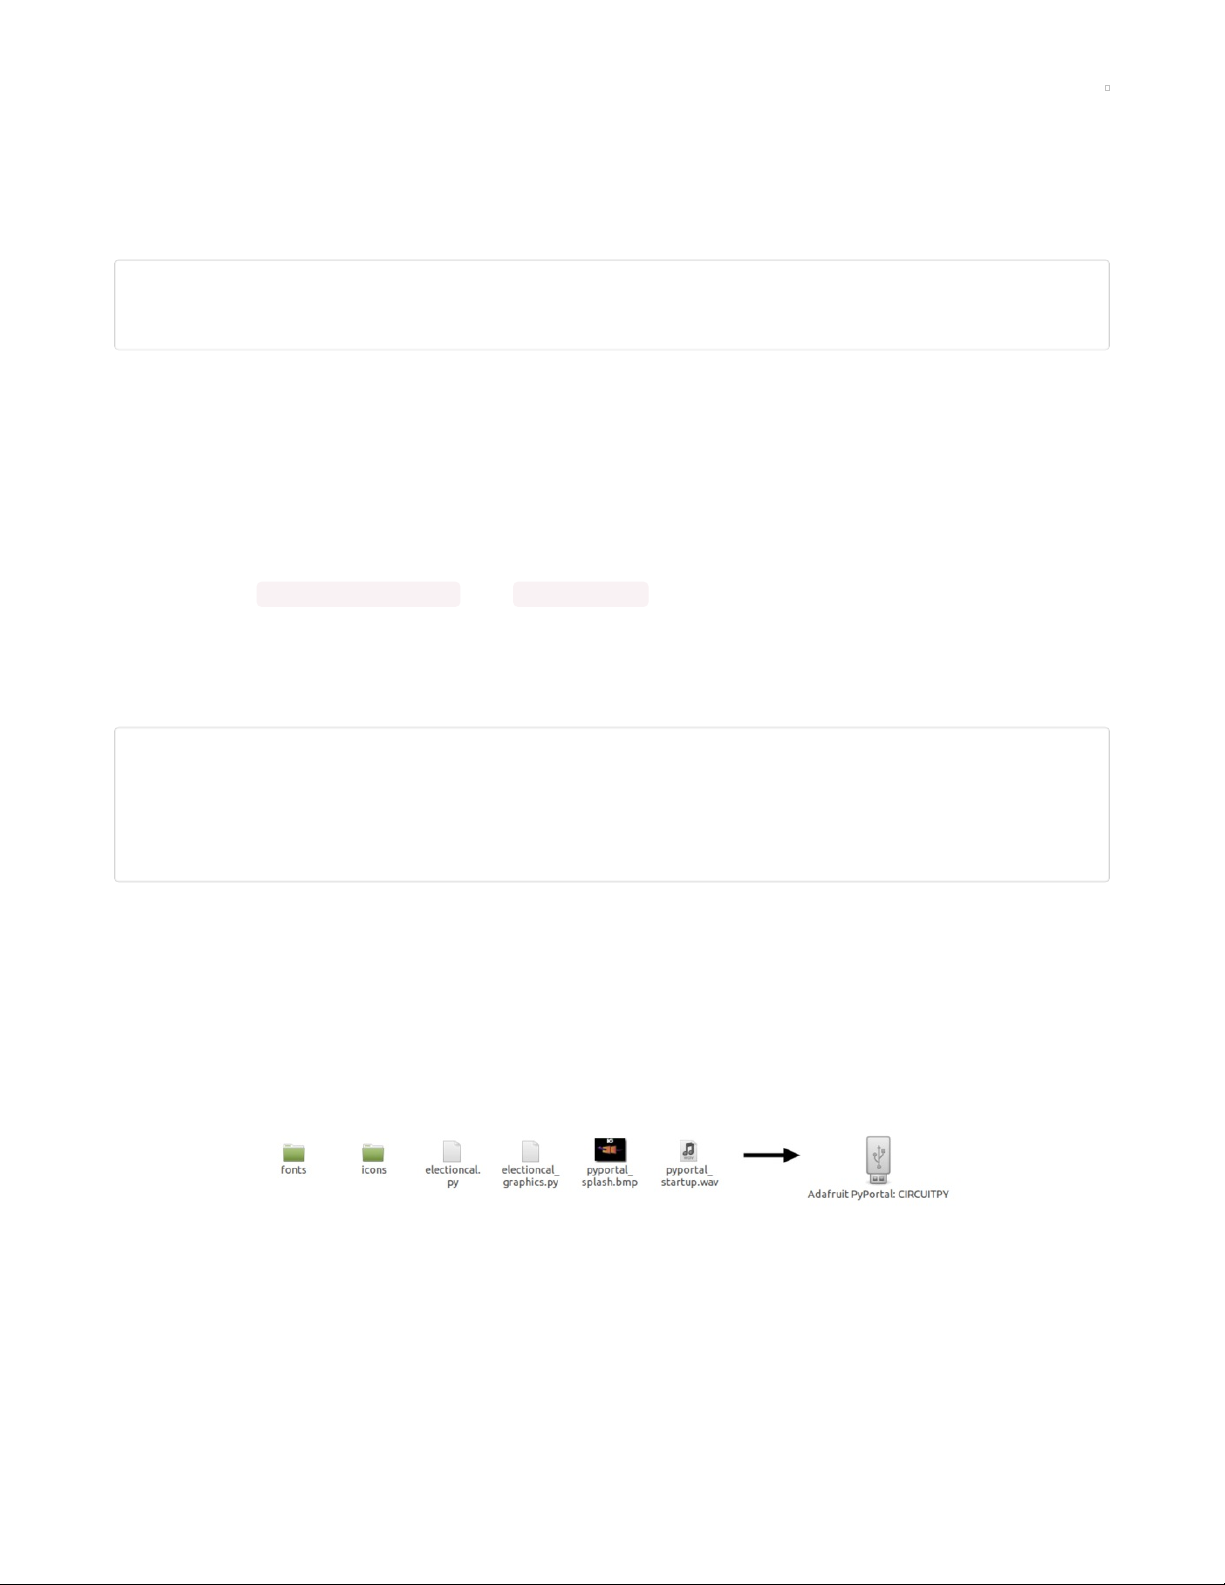
In the embedded code element below, click on the Download: Project Zip link, and save the .zip archive
file to your computer.
Then, decompress the .zip file, it will unpack to a folder named PyPortal_Electioncal_US.
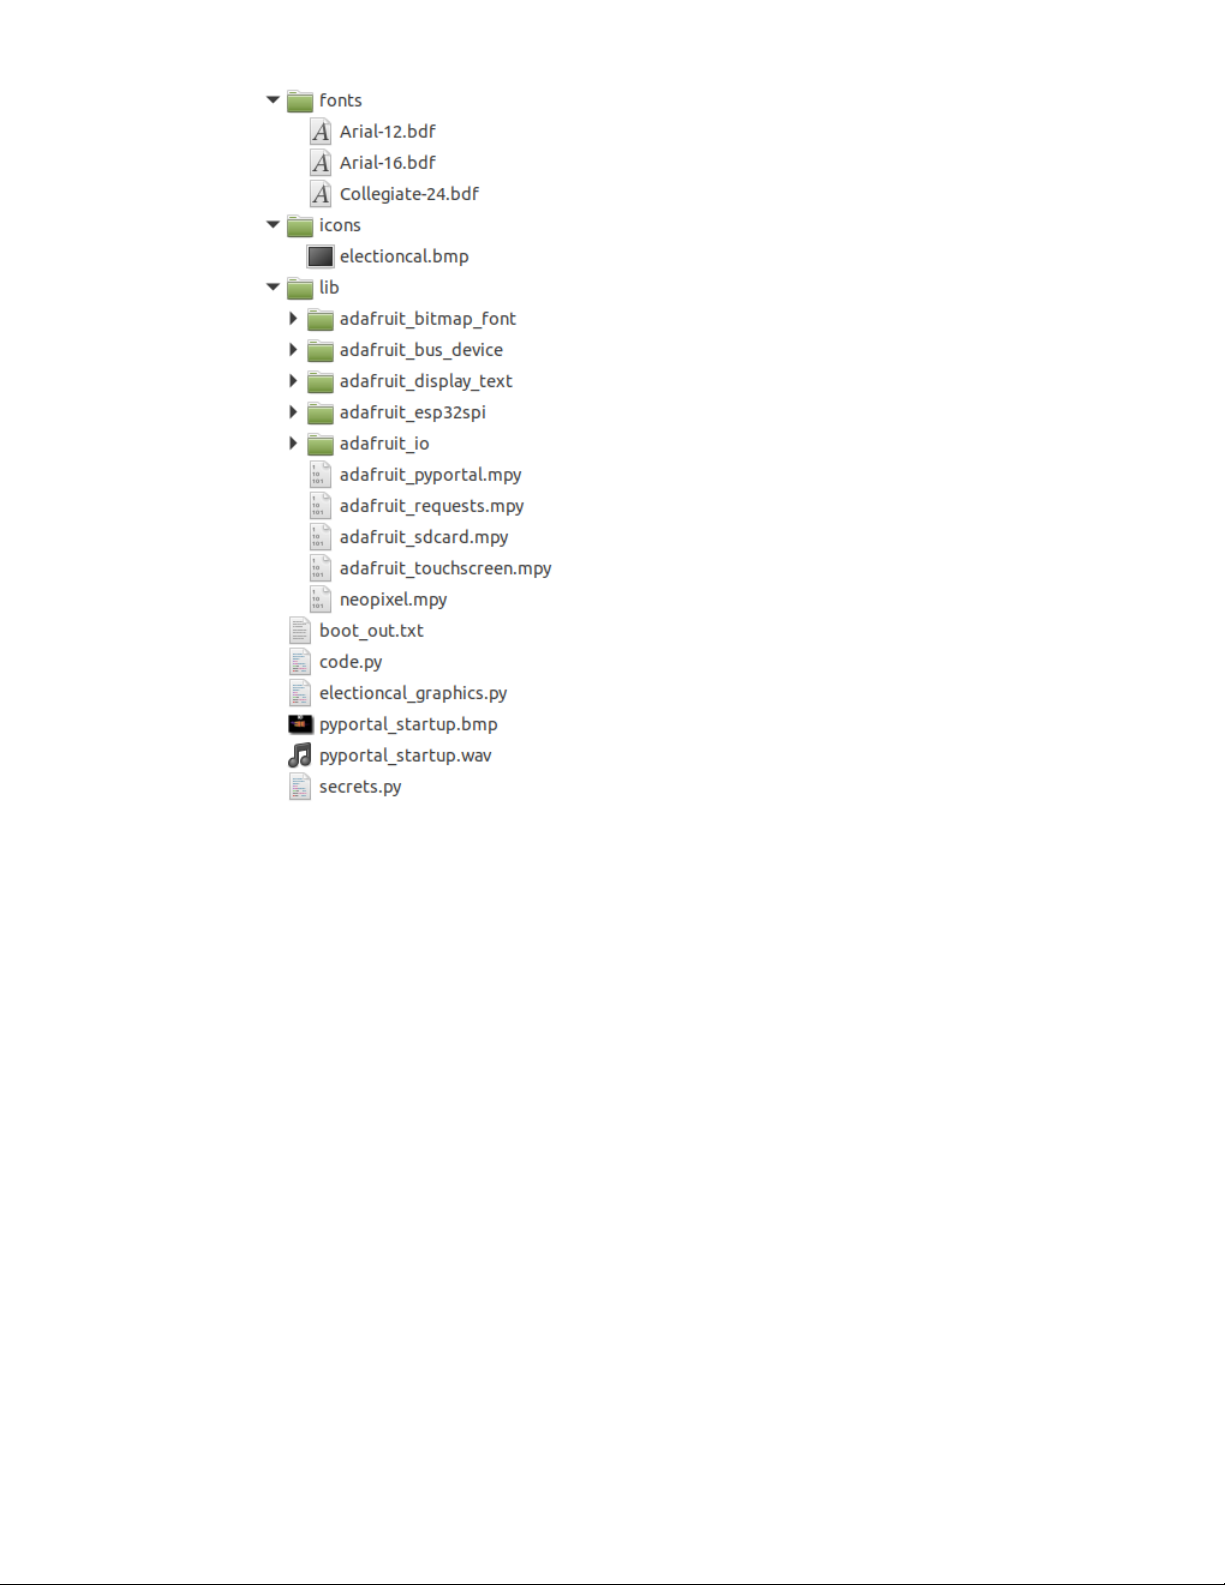
Copy the contents of the PyPortal_Electioncal_US directory to your PyPortal's CIRCUITPY drive, and then
be sure to rename the electioncal.py file to code.py so it will automatically run when the PyPortal restarts.
This is what the final contents of the CIRCUITPY drive will look like:
© Adafruit Industries https://learn.adafruit.com/pyportal-electioncal-us Page 16 of 41
Page 17
© Adafruit Industries https://learn.adafruit.com/pyportal-electioncal-us Page 17 of 41
Page 18

import sys
import time
import board
from adafruit_pyportal import PyPortal
cwd = ("/"+__file__).rsplit('/', 1)[0] # the current working directory (where this file is)
sys.path.append(cwd)
import electioncal_graphics # pylint: disable=wrong-import-position
# Get wifi details and more from a secrets.py file
try:
from secrets import secrets
except ImportError:
print("WiFi secrets are kept in secrets.py, please add them there!")
raise
# Change this to your state and county, replacing spaces for underscores and in lowercase
STATE="new_york"
COUNTY="new_york"
DATA_SOURCE = "https://electioncal.us/en/" + STATE +"/" + COUNTY + "/voter.json"
DATA_LOCATION = []
# Initialize the pyportal object and let us know what data to fetch and where
# to display it
pyportal = PyPortal(url=DATA_SOURCE,
json_path=DATA_LOCATION,
status_neopixel=board.NEOPIXEL,
default_bg=0x000000)
gfx = electioncal_graphics.Electioncal_Graphics(pyportal.splash, am_pm=True)
display_refresh = None
while True:
# only query the online time once per hour (and on first run)
if (not display_refresh) or (time.monotonic() - display_refresh) > 3600:
try:
print("Getting time from internet!")
pyportal.get_local_time()
display_refresh = time.monotonic()
except RuntimeError as e:
print("Some error occured, retrying! -", e)
continue
try:
value = pyportal.fetch()
#print("Response is", value)
gfx.load_data(value)
except RuntimeError as e:
print("Some error occured, retrying! -", e)
continue
try:
gfx.elections_cycle()
except RuntimeError as e:
print("Some error ocurred, retrying! -", e)
continue
If you run into any errors, such as "ImportError: no module named `adafruit_display_text.label`" be
sure to update your libraries to the latest release bundle!
© Adafruit Industries https://learn.adafruit.com/pyportal-electioncal-us Page 18 of 41
Page 19

How It Works
The PyPortal Electioncal US has a few steps it takes to provide you with the information desired. It has a
boot-up screen, a nice simple background, and multiple fonts for displaying the election dates.
PyPortal Constructor
When setting up the pyportal constructor, we are providing it with these things:
url to query
json_path to traverse and find the key:value pairs we need
default_bg default background color
Background
First, it displays a bitmap graphic as the screen's startup background while getting ready to download the
Election dates. This is a 320 x 240 pixel RGB 16-bit raster graphic in .bmp format.
Time
Next, the program connects through the WiFi to get the local time via the adafruit.io server, for which we
will display today's date at the bottom of the screen, to give you better context of the election dates.
API Query and JSON
At the top of this page, you configured:
DATA_SOURCE = "https://electioncal.us/en/" + STATE +"/" + COUNTY + "/voter.json"
This, with the STATE and COUNTY you defined, will turn into something like (New York County, New York
State in this example):
https://electioncal.us/en/new_york/new_york/voter.json
When this query is complete, it returns a JSON file that looks like this:
© Adafruit Industries https://learn.adafruit.com/pyportal-electioncal-us Page 19 of 41
Page 20
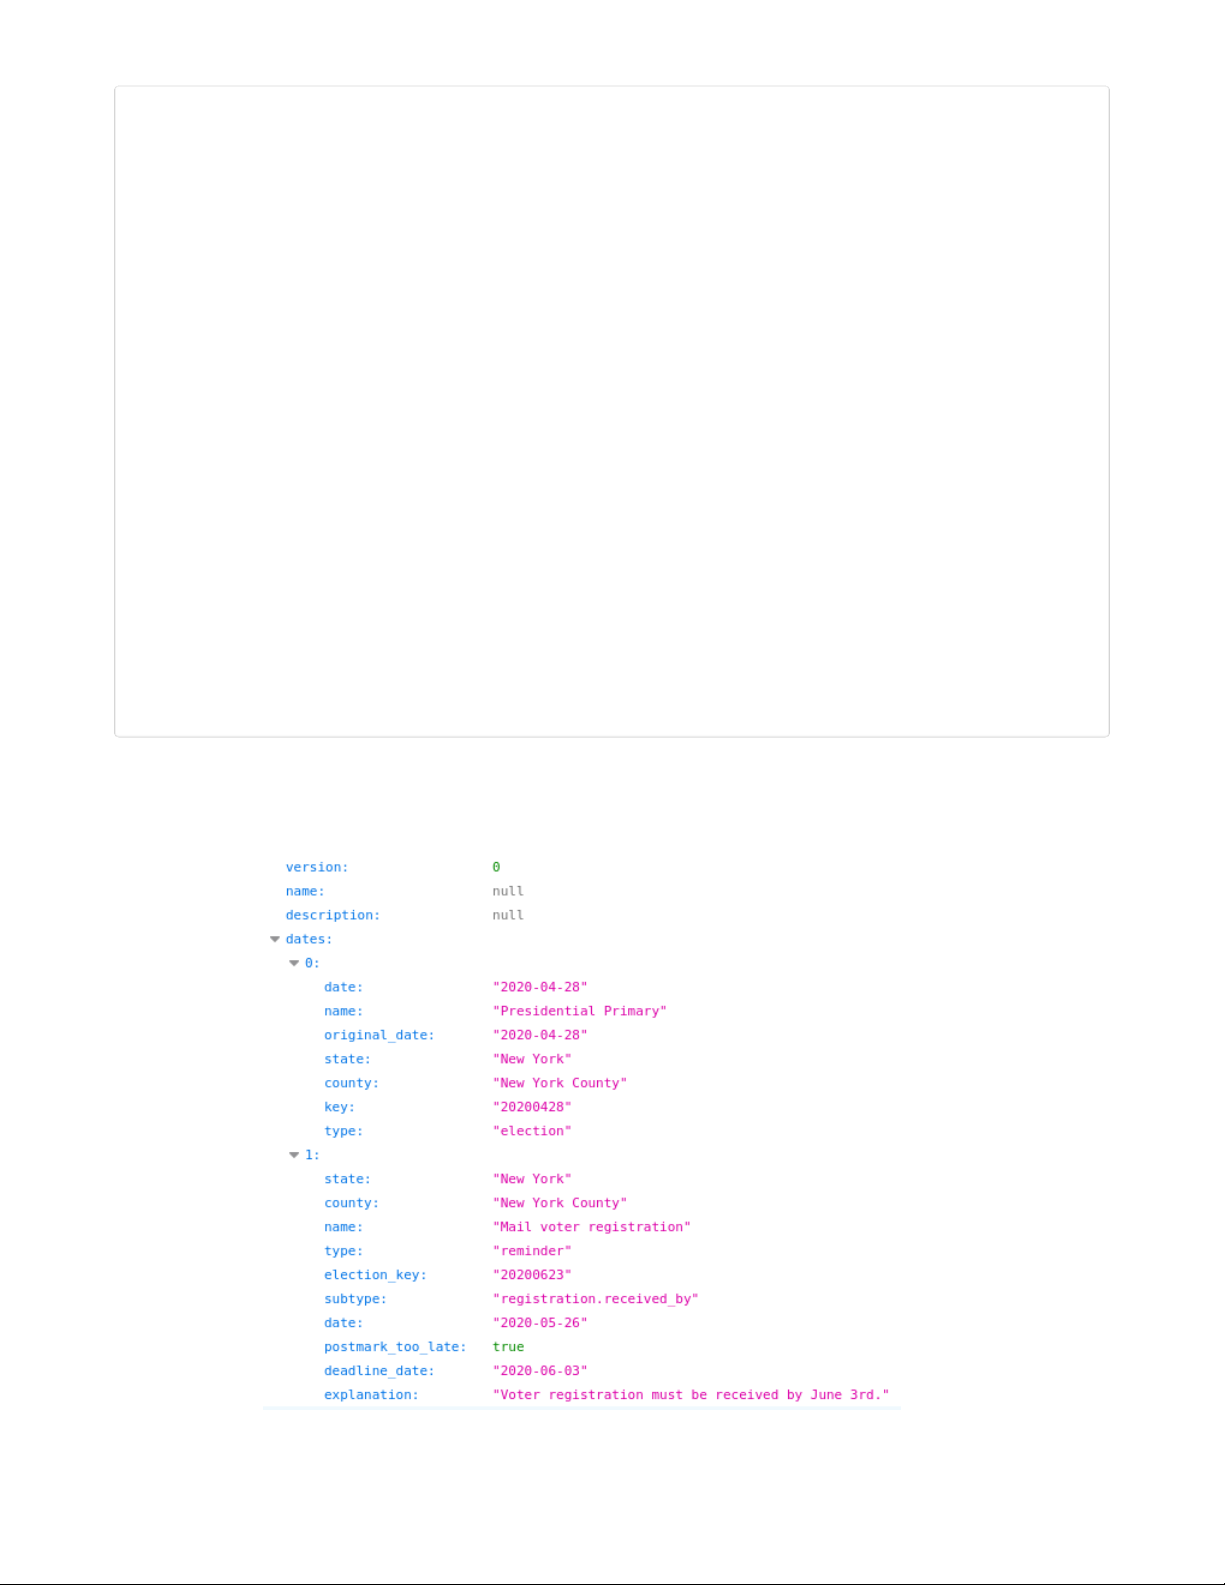
{
"version": 0,
"name": null,
"description": null,
"dates":
[
{
"date": "2020-04-28",
"name": "Presidential Primary",
"original_date": "2020-04-28",
"state": "New York",
"county": "New York County",
"key": "20200428",
"type": "election"
},
{
"state": "New York",
"county": "New York County",
"name": "Mail voter registration",
"type": "reminder",
"election_key": "20200623",
"subtype": "registration.received_by",
"date": "2020-05-26",
"postmark_too_late": true,
"deadline_date": "2020-06-03",
"explanation": "Voter registration must be received by June 3rd."
}
]
}
Here is the same file beautified with the Firefox browser's built in tools (You can also use online code
"beautifiers" such as https://codebeautify.org/jsonviewer (https://adafru.it/Eb5) or
http://jsonviewer.stack.hu (https://adafru.it/Eb6)) :
© Adafruit Industries https://learn.adafruit.com/pyportal-electioncal-us Page 20 of 41
Page 21

Fetch
With the PyPortal set up, we can then use pyportal.fetch() and then from the screen object we call
load_data() to load the JSON data to a way that is easy to pass through all the dates.
All of the heavy lifting of parsing that data and displaying it as text or bitmaps is done in the
electioncal_graphics.py code.
JSON Traversal
The JSON file is formatted in a way that makes it easy to traverse the hierarchy and parse the data. In it,
you'll see keys, such as state , county , name , type and date , and their respective values. So, here are
some key : value pairs we care about:
state: "New York"
county: "New York County"
name: "Presidential Primary"
date: "2020-04-28"
In order to fetch this data from the file, we need to be able to describe their locations in the file
hierarchically. This is helpful, for example, in differentiating between the 'name' value that you have in the
Presidential Primary and the 'name' of the Mail voter registration. To avoid name clashing, we rely on
JSON traversal.
In the electioncal_graphics.py file, you'll see how this is done. For example, the first date is found in this
hierarchy of the JSON file: ["dates"][0]["date"] .
In this case the number 0 is quite important, as it has the sub-tree that is relevant for the first, date, but if
you change it to a number such as 1 or 2 , you will print the second and third date. Please note that the
counter starts at zero.
Depending of the STATE and COUNTY you configured, you will have several election dates, so the
program then tries to replace this number by [i] , so that we can display not one date but many, and cycle
them through the screen.
Font
The data is displayed as text created with bitmapped fonts to overlay on top of the background. The fonts
used here are bitmap fonts made from the Arial typeface. You can learn more about converting type in
this guide (https://adafru.it/E7E).
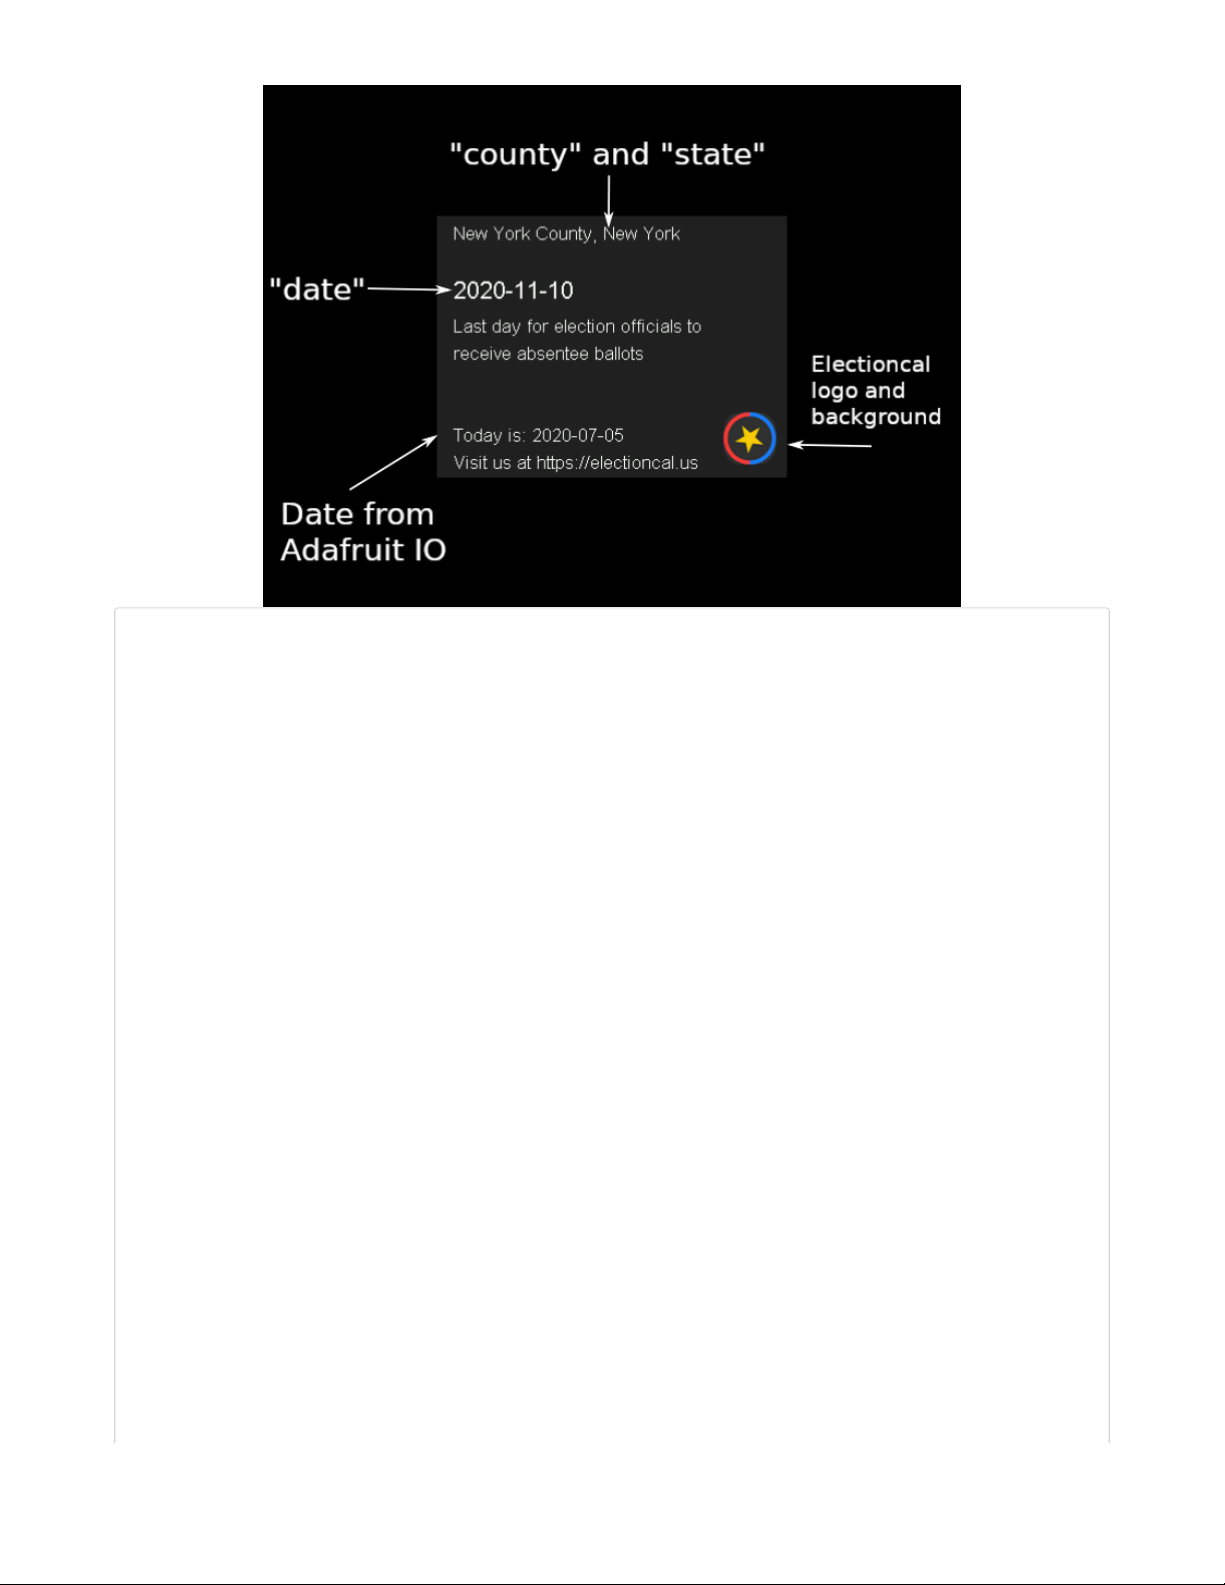
Graphics
Let's have a look at how the electioncal_graphics.py code places the elements on screen. Below, we can
see the icon and text that are displayed. The items in quotes are the key names from the JSON file, and
their values are what we see displayed using the CircuitPython label from the displayio library.
© Adafruit Industries https://learn.adafruit.com/pyportal-electioncal-us Page 21 of 41
Page 22
import time
import json
import displayio
from adafruit_display_text.label import Label
from adafruit_bitmap_font import bitmap_font
cwd = ("/"+__file__).rsplit('/', 1)[0] # the current working directory (where this file is)
small_font = cwd+"/fonts/Arial-12.bdf"
medium_font = cwd+"/fonts/Arial-16.bdf"
large_font = cwd+"/fonts/Arial-Bold-24.bdf"
class OpenWeather_Graphics(displayio.Group):
def __init__(self, root_group, *, am_pm=True, celsius=True):
super().__init__(max_size=2)
self.am_pm = am_pm
self.celsius = celsius
root_group.append(self)
self._icon_group = displayio.Group(max_size=1)
self.append(self._icon_group)
self._text_group = displayio.Group(max_size=5)
self.append(self._text_group)
self._icon_sprite = None
self._icon_file = None
self.set_icon(cwd+"/weather_background.bmp")
self.small_font = bitmap_font.load_font(small_font)
self.medium_font = bitmap_font.load_font(medium_font)
self.large_font = bitmap_font.load_font(large_font)
glyphs = b'0123456789abcdefghijklmnopqrstuvwxyzABCDEFGHIJKLMNOPQRSTUVWXYZ-,.: '
self.small_font.load_glyphs(glyphs)
self.medium_font.load_glyphs(glyphs)
self.large_font.load_glyphs(glyphs)
self.large_font.load_glyphs(('°',)) # a non-ascii character we need for sure
self.city_text = None
© Adafruit Industries https://learn.adafruit.com/pyportal-electioncal-us Page 22 of 41
Page 23

self.time_text = Label(self.medium_font, max_glyphs=8)
self.time_text.x = 200
self.time_text.y = 12
self.time_text.color = 0xFFFFFF
self._text_group.append(self.time_text)
self.temp_text = Label(self.large_font, max_glyphs=6)
self.temp_text.x = 200
self.temp_text.y = 195
self.temp_text.color = 0xFFFFFF
self._text_group.append(self.temp_text)
self.main_text = Label(self.large_font, max_glyphs=20)
self.main_text.x = 10
self.main_text.y = 195
self.main_text.color = 0xFFFFFF
self._text_group.append(self.main_text)
self.description_text = Label(self.small_font, max_glyphs=60)
self.description_text.x = 10
self.description_text.y = 225
self.description_text.color = 0xFFFFFF
self._text_group.append(self.description_text)
def display_weather(self, weather):
weather = json.loads(weather)
# set the icon/background
weather_icon = weather['weather'][0]['icon']
self.set_icon(cwd+"/icons/"+weather_icon+".bmp")
city_name = weather['name'] + ", " + weather['sys']['country']
print(city_name)
if not self.city_text:
self.city_text = Label(self.medium_font, text=city_name)
self.city_text.x = 10
self.city_text.y = 12
self.city_text.color = 0xFFFFFF
self._text_group.append(self.city_text)
self.update_time()
main_text = weather['weather'][0]['main']
print(main_text)
self.main_text.text = main_text
temperature = weather['main']['temp'] - 273.15 # its...in kelvin
print(temperature)
if self.celsius:
self.temp_text.text = "%d °C" % temperature
else:
self.temp_text.text = "%d °F" % ((temperature * 9 / 5) + 32)
description = weather['weather'][0]['description']
description = description[0].upper() + description[1:]
print(description)
self.description_text.text = description
# "thunderstorm with heavy drizzle"
def update_time(self):
"""Fetch the time.localtime(), parse it out and update the display text"""
now = time.localtime()
hour = now[3]
© Adafruit Industries https://learn.adafruit.com/pyportal-electioncal-us Page 23 of 41
Page 24

minute = now[4]
format_str = "%d:%02d"
if self.am_pm:
if hour >= 12:
hour -= 12
format_str = format_str+" PM"
else:
format_str = format_str+" AM"
if hour == 0:
hour = 12
time_str = format_str % (hour, minute)
print(time_str)
self.time_text.text = time_str
def set_icon(self, filename):
"""The background image to a bitmap file.
:param filename: The filename of the chosen icon
"""
print("Set icon to ", filename)
if self._icon_group:
self._icon_group.pop()
if not filename:
return # we're done, no icon desired
if self._icon_file:
self._icon_file.close()
self._icon_file = open(filename, "rb")
icon = displayio.OnDiskBitmap(self._icon_file)
try:
self._icon_sprite = displayio.TileGrid(icon,
pixel_shader=displayio.ColorConverter())
except TypeError:
self._icon_sprite = displayio.TileGrid(icon,
pixel_shader=displayio.ColorConverter(),
position=(0,0))
self._icon_group.append(self._icon_sprite)
Text Position
Depending on the design of your background bitmap and the length of the text you're displaying, you
may want to reposition the text and caption.
The PyPortal's display is 320 pixels wide and 240 pixels high. In order to refer to those positions on the
screen, we use an x/y coordinate system, where x is horizontal and y is vertical.
The origin of this coordinate system is the upper left corner. This means that a pixel placed at the upper
left corner would be (0,0) and the lower right corner would be (320, 240).
© Adafruit Industries https://learn.adafruit.com/pyportal-electioncal-us Page 24 of 41
Page 25
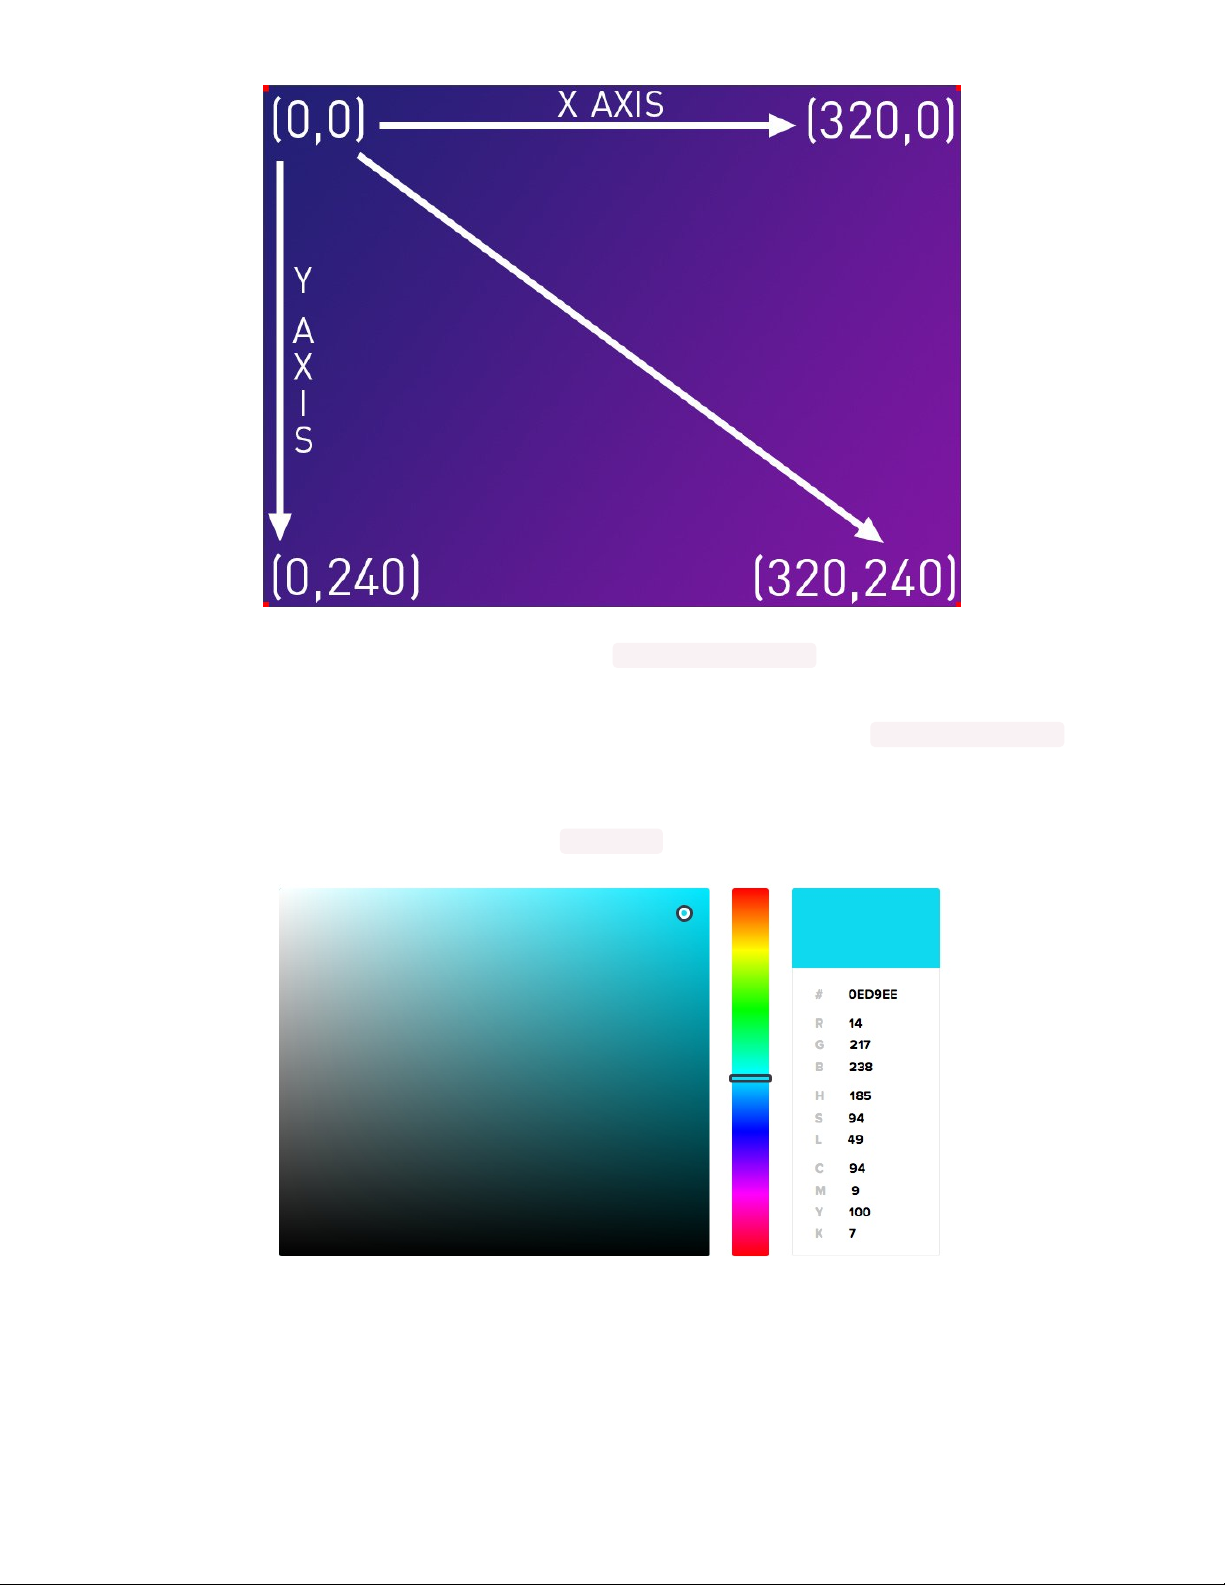
So, if you wanted to move the subscriber count text to the right and up closer to the top, your code may
look like this for that part of the pyportal constructor: text_position=(250, 10)
Text Color
Another way to customize your display is to adjust the color of the text. The line text_color=0xFFFFFF in
the constructor shows how. You will need to use the hexadecimal value for any color you want to display.
You can use something like https://htmlcolorcodes.com/ (https://adafru.it/Eb7) to pick your color and then
copy the hex value, in this example it would be 0x0ED9EE
Now, we get ready to assemble the case on the next page.
© Adafruit Industries https://learn.adafruit.com/pyportal-electioncal-us Page 25 of 41
Page 26

Build The PyPortal Stand
Here's how to assemble the laser cut acrylic stand for the PyPortal. The kit comes with six pieces of
acrylic and six nylon screws and nuts.
© Adafruit Industries https://learn.adafruit.com/pyportal-electioncal-us Page 26 of 41
Page 27
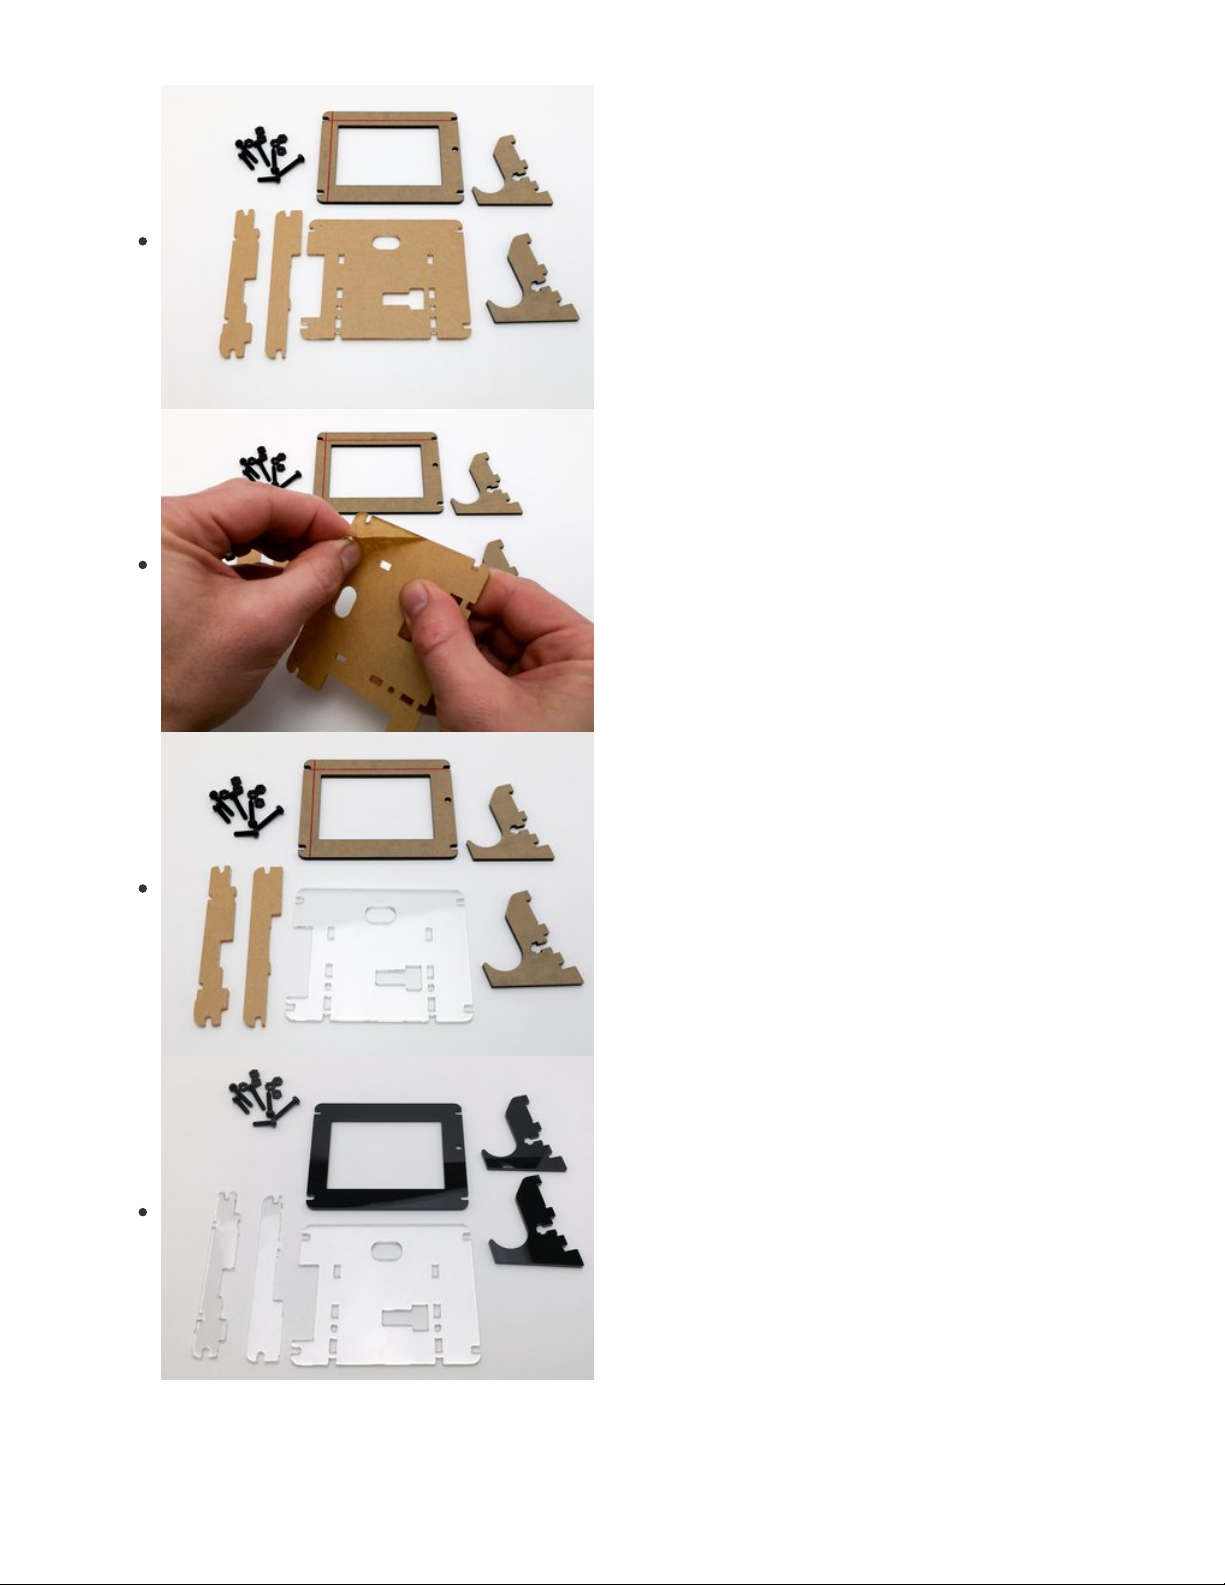
Prep
First, remove the protective paper from all of the acrylic
pieces.
© Adafruit Industries https://learn.adafruit.com/pyportal-electioncal-us Page 27 of 41
Page 28

© Adafruit Industries https://learn.adafruit.com/pyportal-electioncal-us Page 28 of 41
Page 29

Sandwich
Next, do a dry fit of the three clear piece of acrylic on the
back side of the PyPortal to get everything oriented properly.
The two small pieces are used as spacers to allow clearance
around some of the larger parts. Lay them onto the board
first, as shown.
Then, place the large clear piece on top, making sure to align
the hole for the reset and the cutout for the three JST ports.
Complete the sandwich by placing the stack on top of the
black front bezel with the hole for the light sensor oriented as
shown here.
© Adafruit Industries https://learn.adafruit.com/pyportal-electioncal-us Page 29 of 41
Page 30

© Adafruit Industries https://learn.adafruit.com/pyportal-electioncal-us Page 30 of 41
Page 31

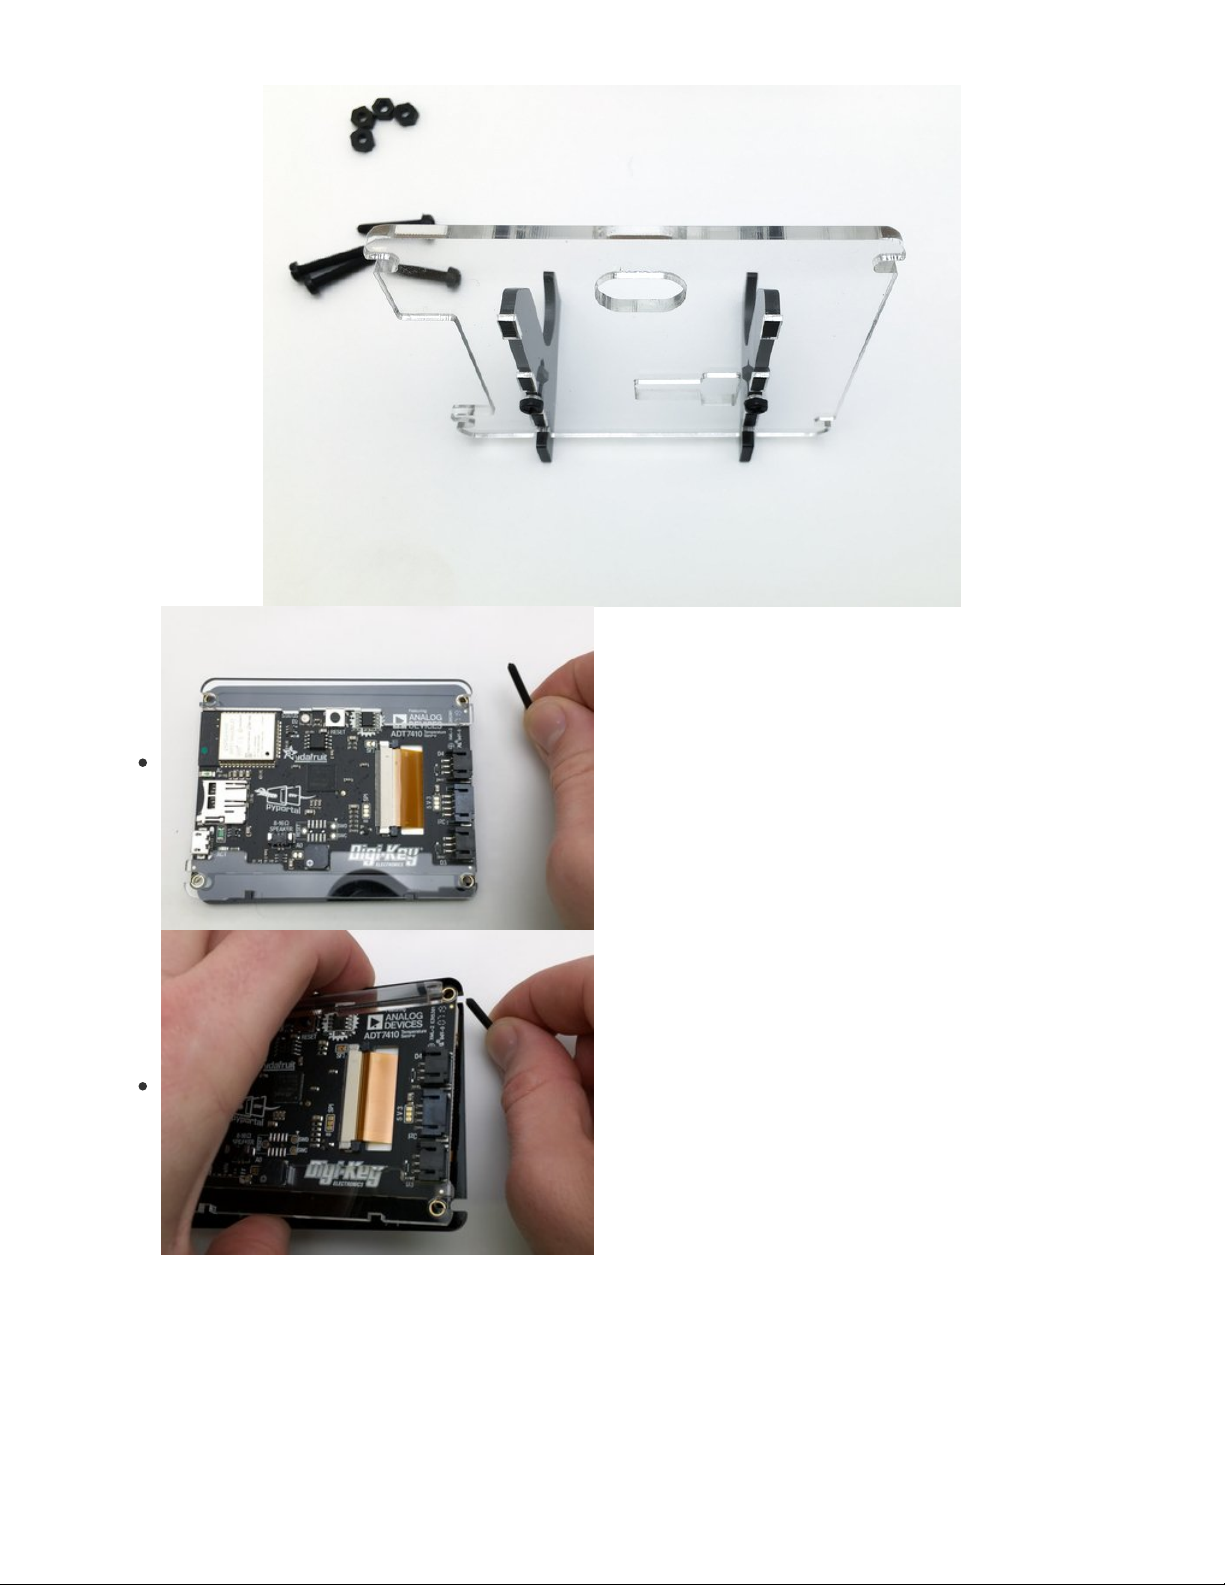
Legs
Now that the fit and orientation have been established, we'll
install the legs.
The two legs are identical. Pick one and slot it into the case
back as shown.
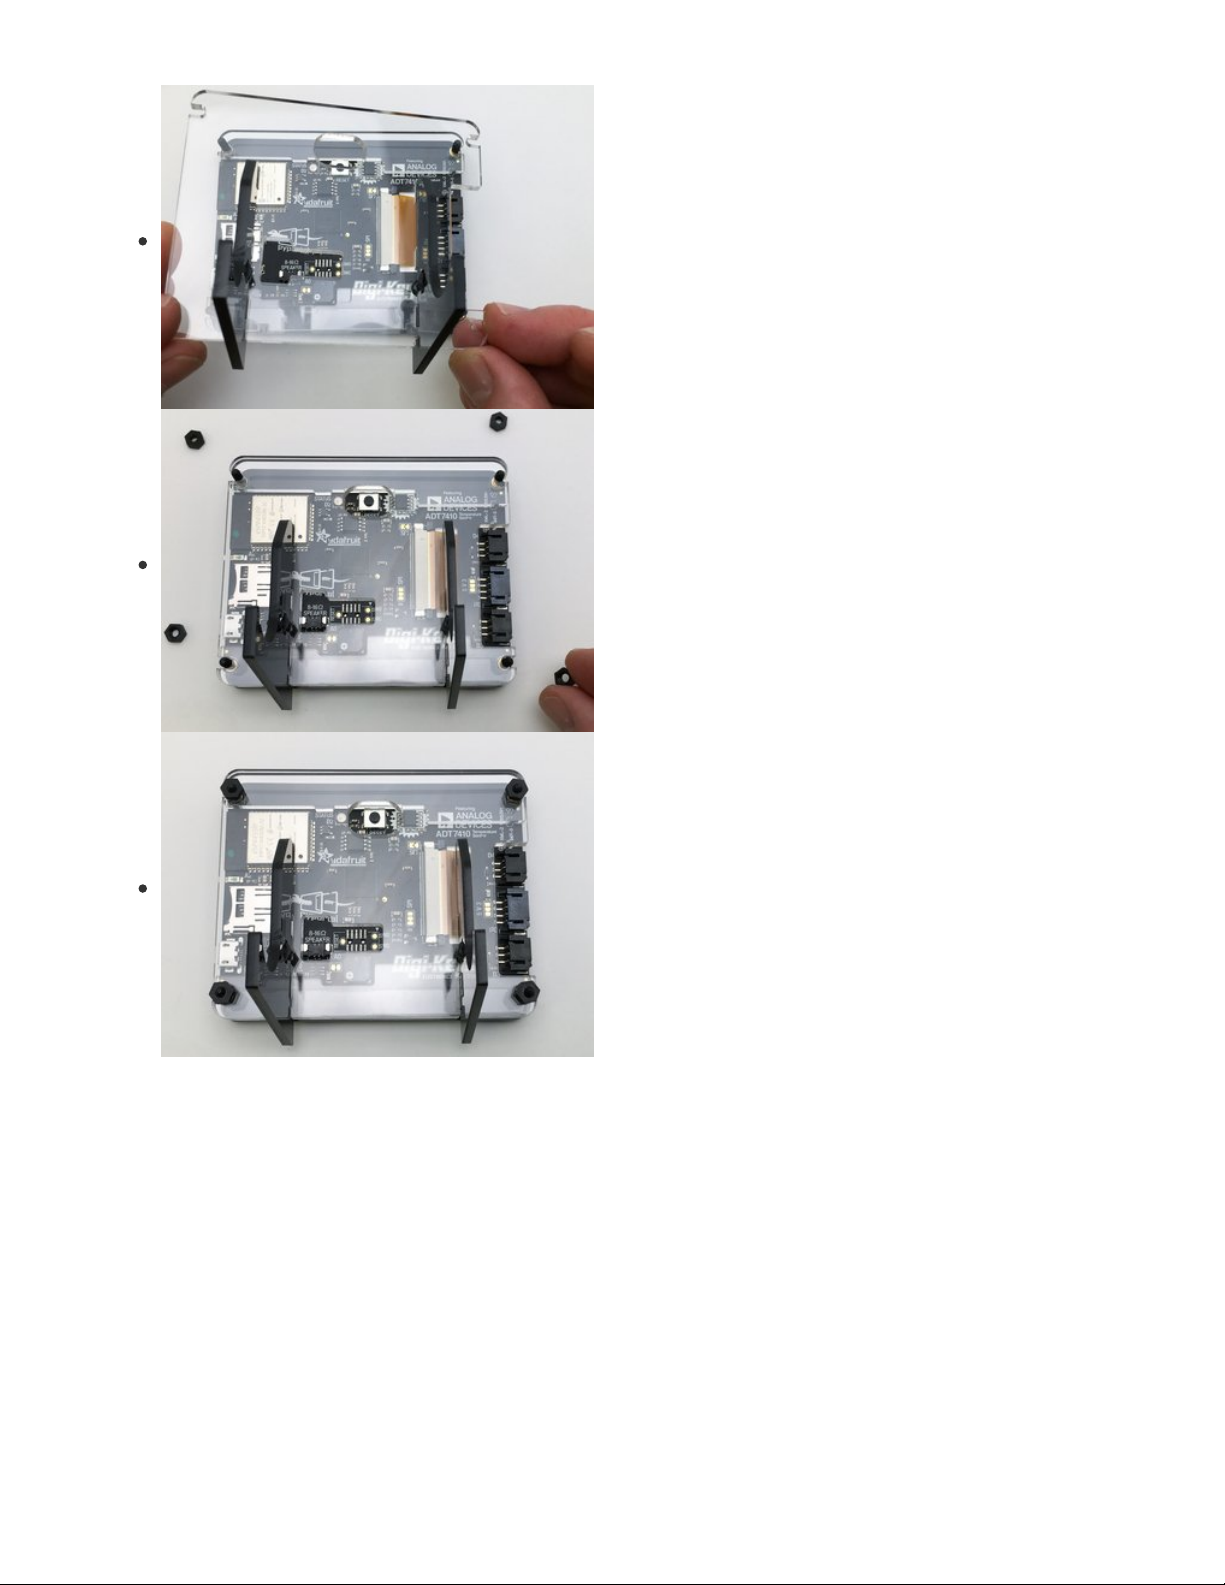
Place a nut into the captive slot of the leg and then feed a
short screw through from the front of the clear acrylic case
back. Fasten the screw (not too tight!) and then repeat for the
second leg.
© Adafruit Industries https://learn.adafruit.com/pyportal-electioncal-us Page 31 of 41
Page 32
© Adafruit Industries https://learn.adafruit.com/pyportal-electioncal-us Page 32 of 41
Page 33
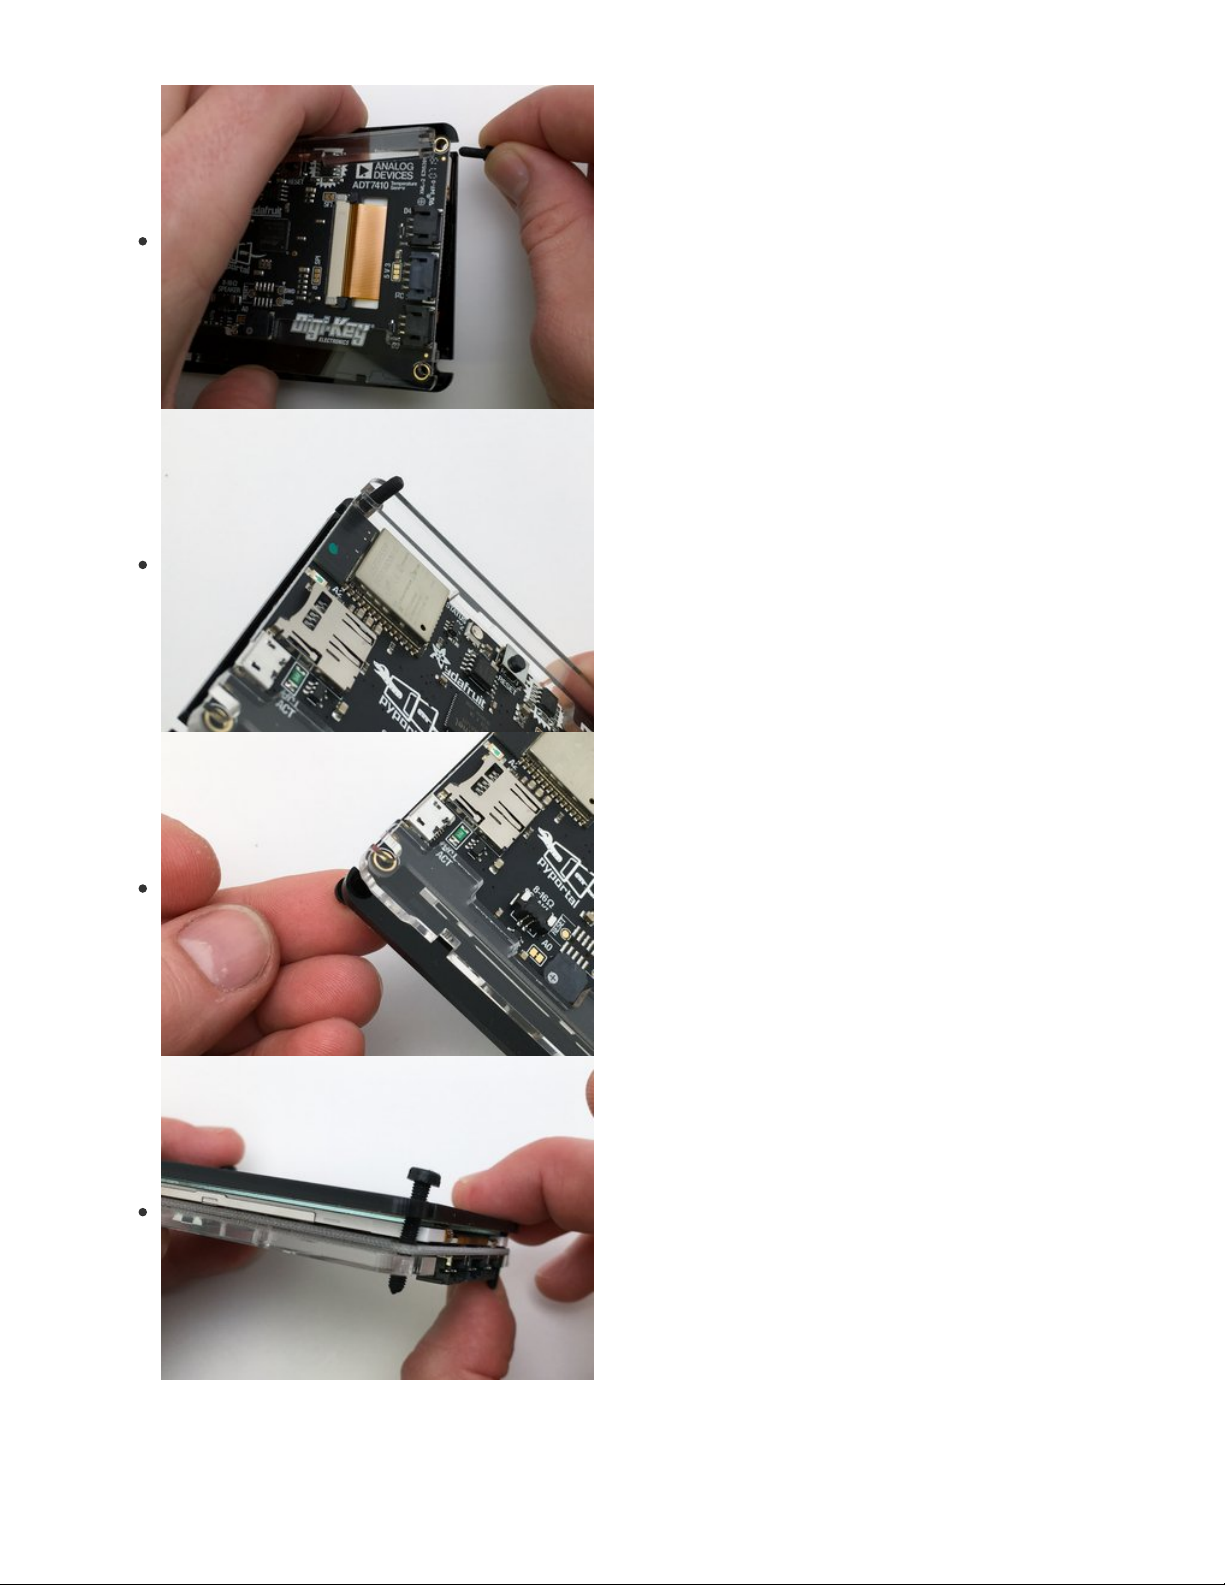
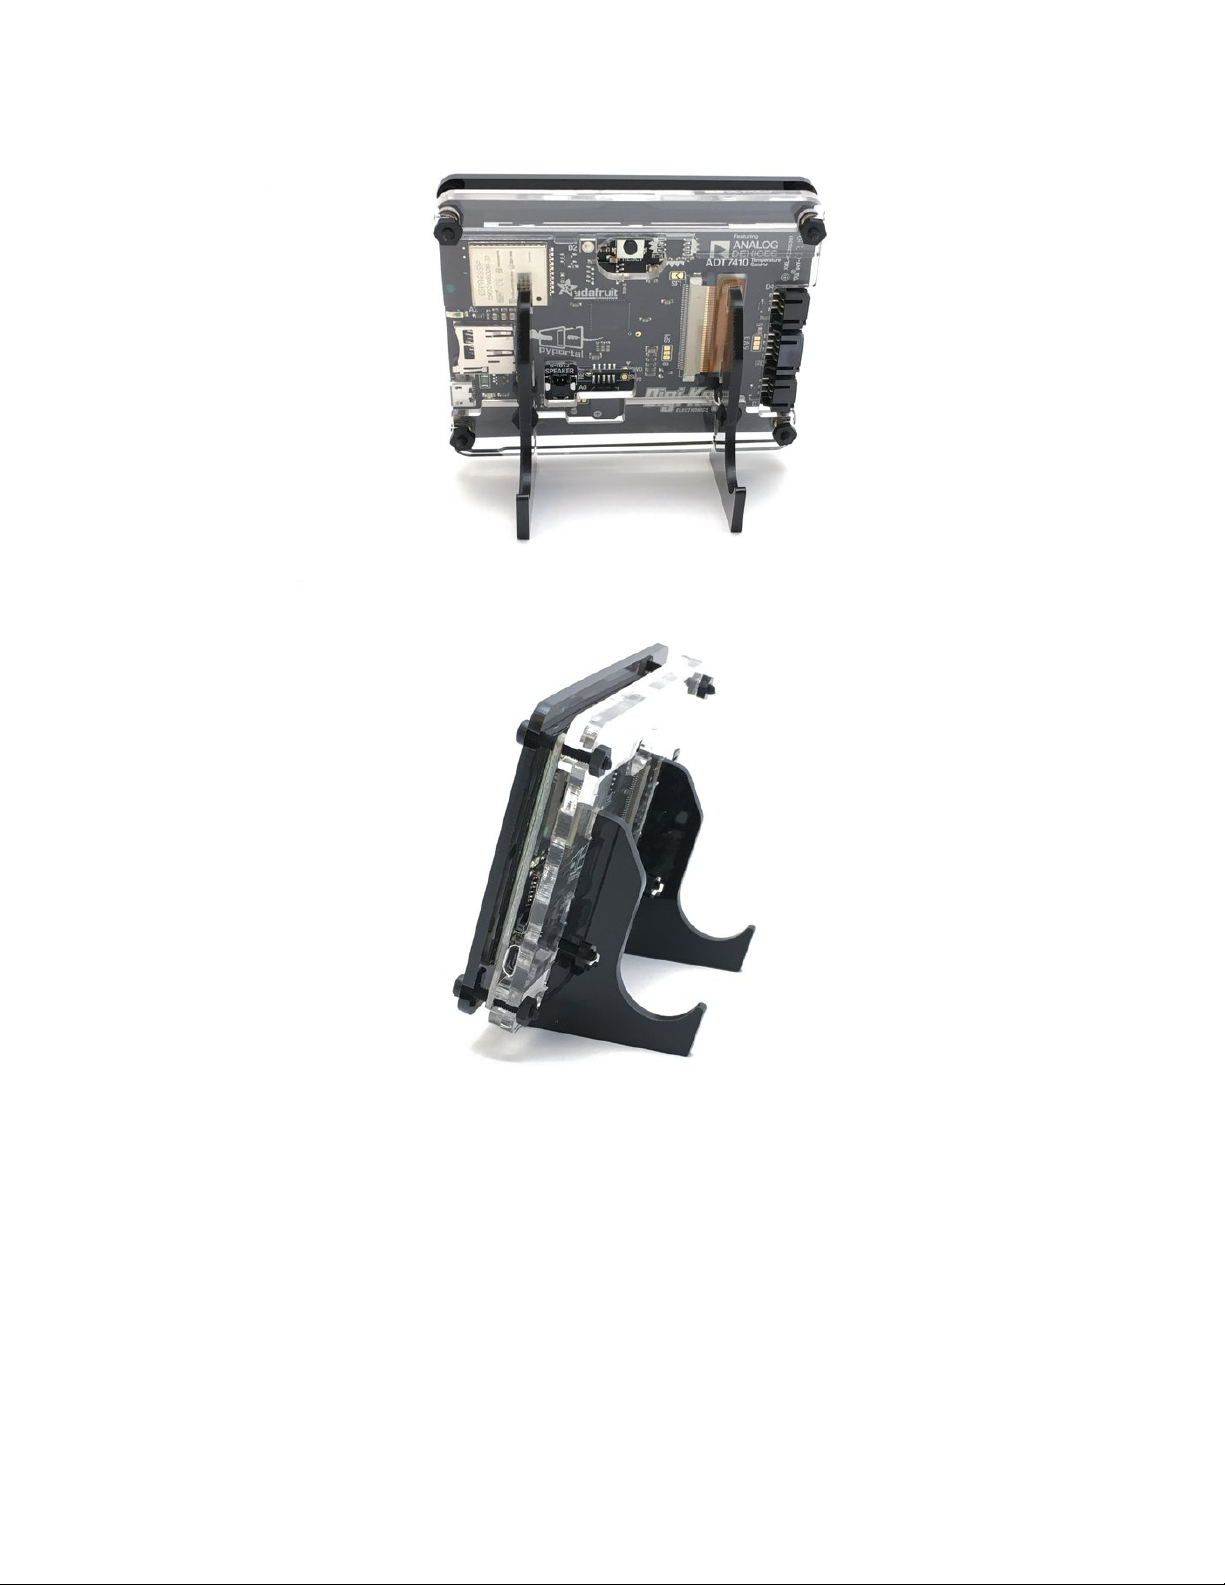
Add Long Screws
To put it all together, we'll use the four long screws to secure
the entire acrylic - PyPortal - acrylic - acrylic sandwich!
Run the four long screws from the front to the back, as
shown.
© Adafruit Industries https://learn.adafruit.com/pyportal-electioncal-us Page 33 of 41
Page 34
© Adafruit Industries https://learn.adafruit.com/pyportal-electioncal-us Page 34 of 41
Page 35
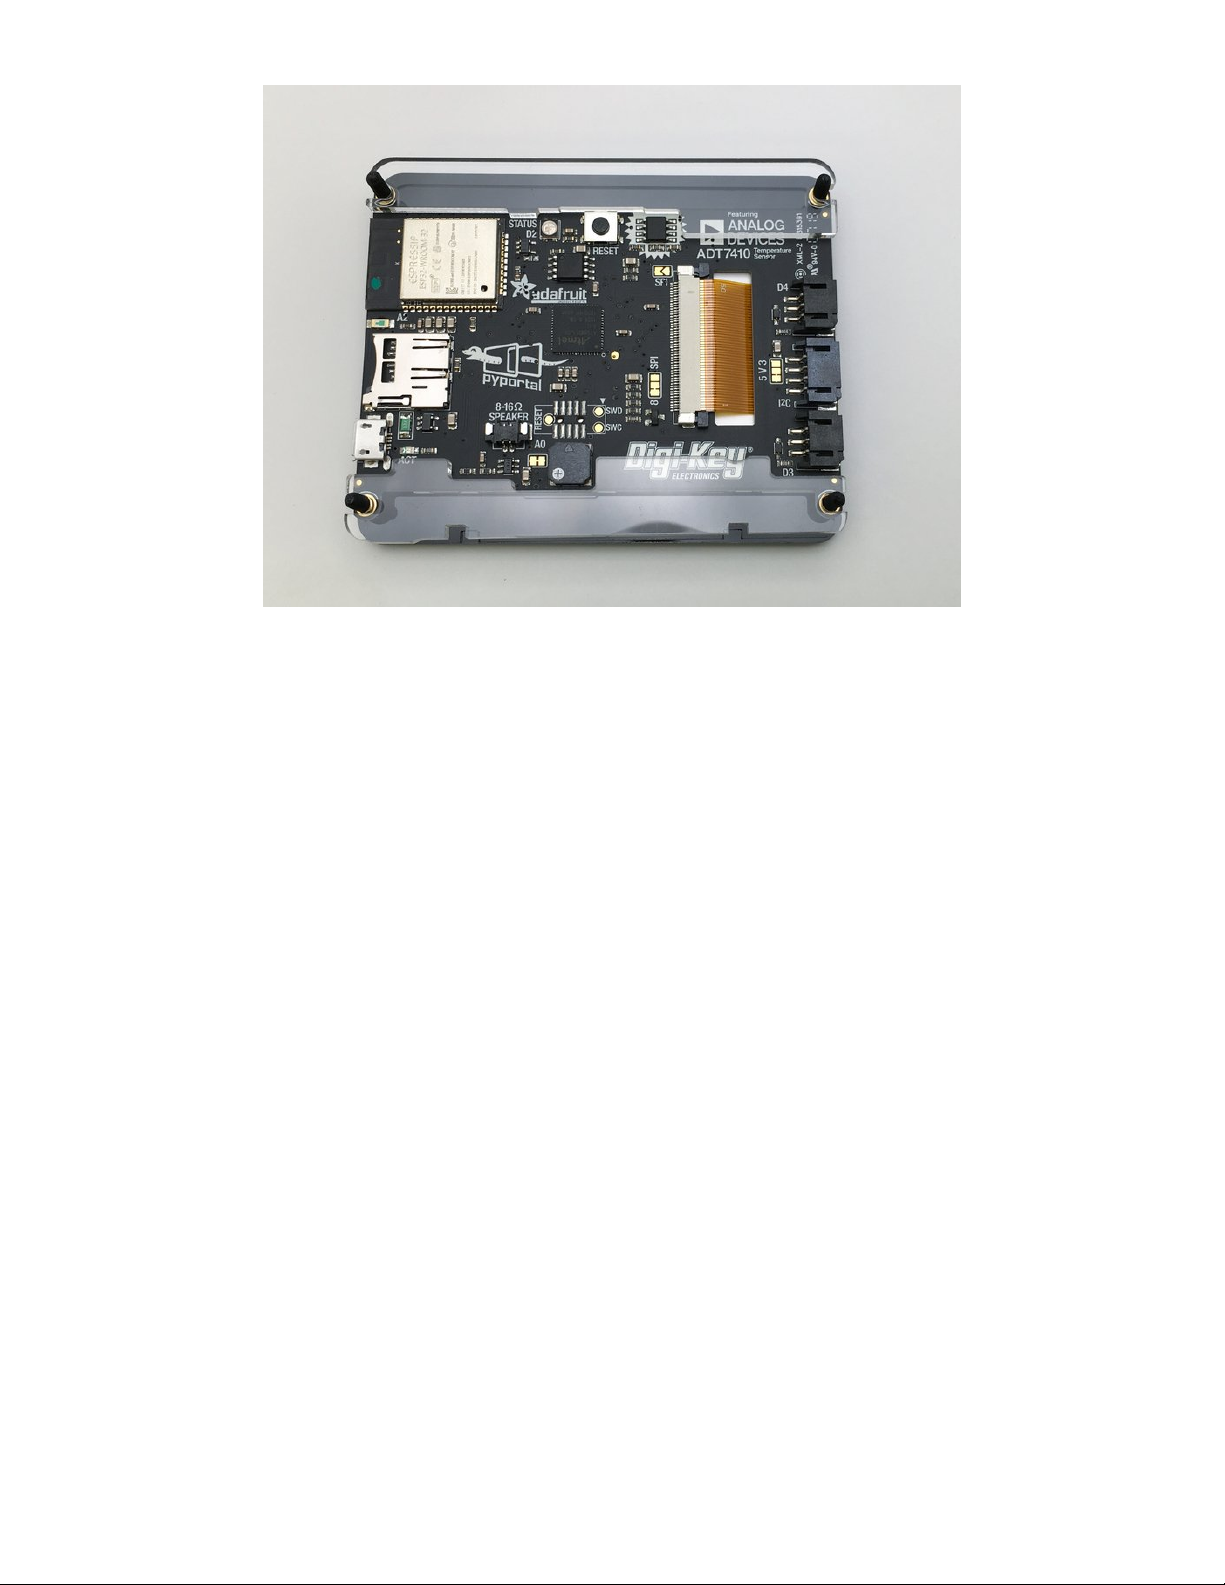
Screw It All Together
Finally, add the case back and legs assemblage and then
thread on the four nuts to secure it all in place.
Be careful not to over-tighten the screws. Doing so can
potentially crack the Pyportal display!
© Adafruit Industries https://learn.adafruit.com/pyportal-electioncal-us Page 35 of 41
Page 36

© Adafruit Industries https://learn.adafruit.com/pyportal-electioncal-us Page 36 of 41
Page 37
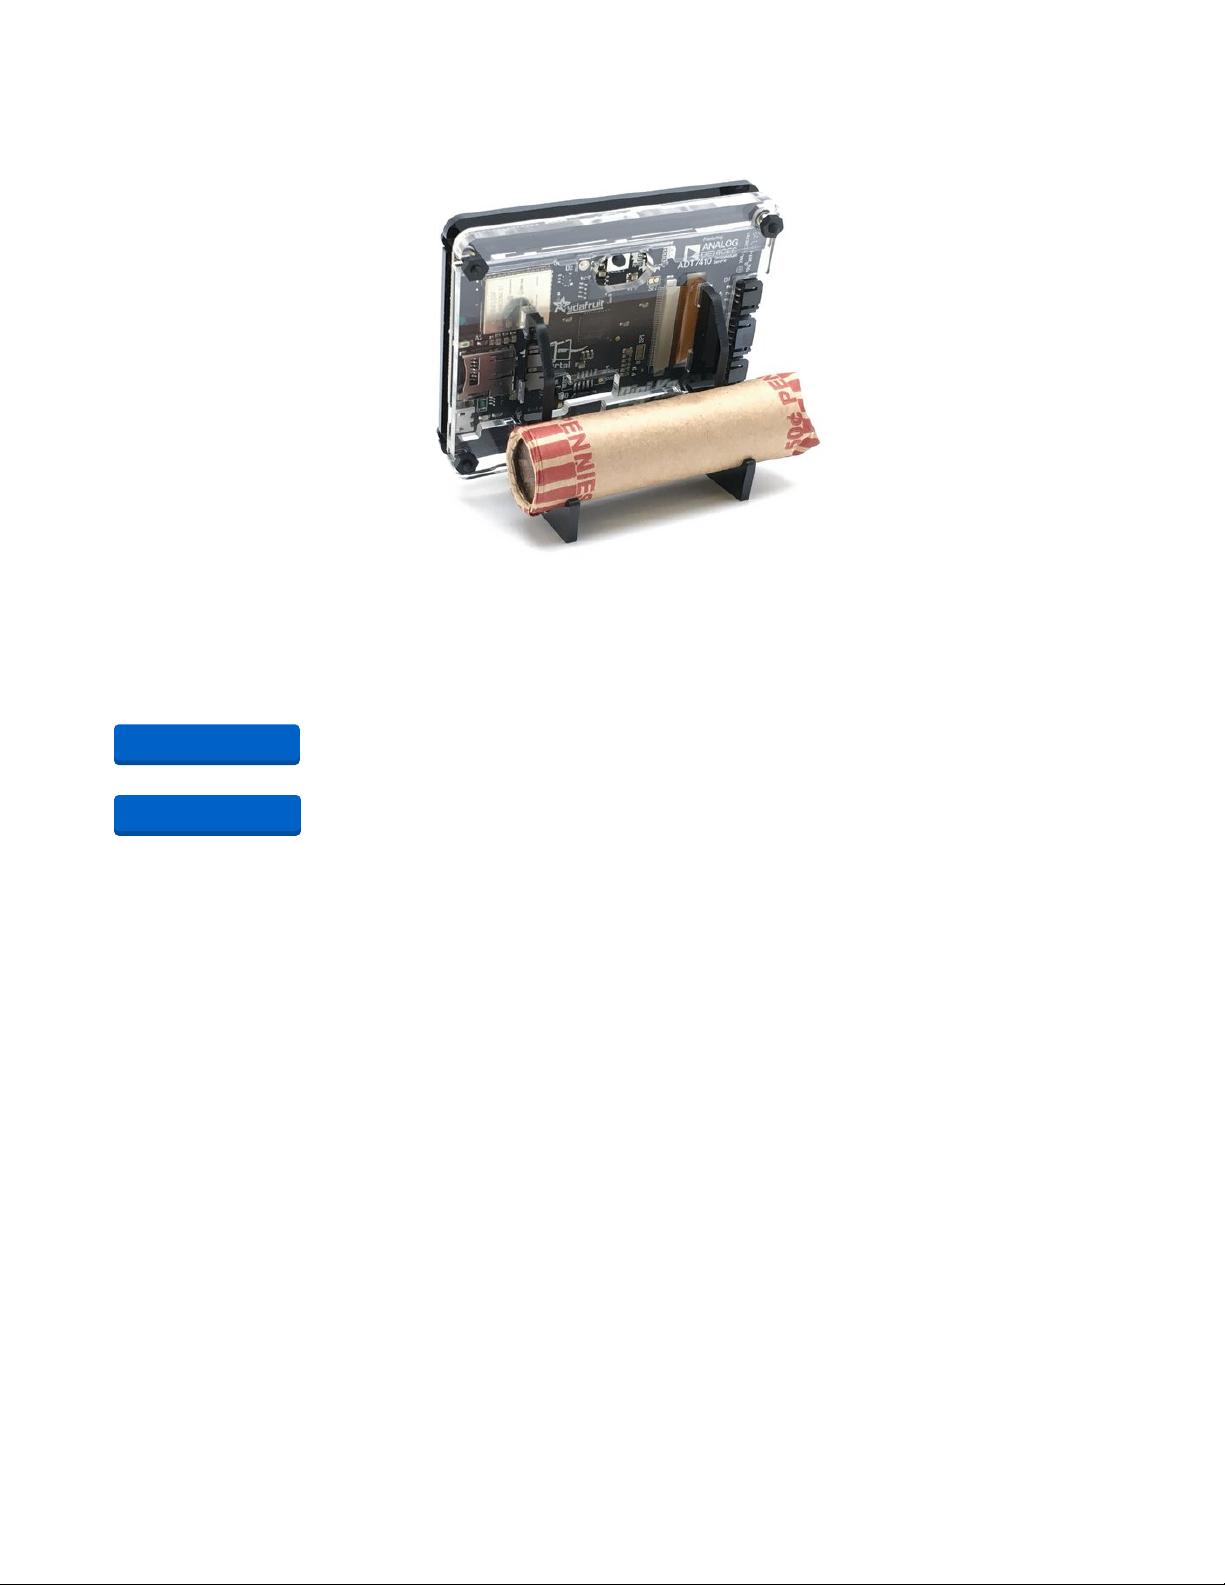
Bonus! Penny Roll Weight
If you'd like to give your PyPortal a bit of extra heft so it won't get pushed around on your desk, you can
make a great weight for $0.50. A roll of 50 pennies does the trick! The legs are designed to hold a roll of
coins perfectly!
© Adafruit Industries https://learn.adafruit.com/pyportal-electioncal-us Page 37 of 41
Page 38

© Adafruit Industries https://learn.adafruit.com/pyportal-electioncal-us Page 38 of 41
Page 39
Laser Cutter Files for PyPortal Stand
If you need to replace a piece or just want to make a spare for another PyPortal, here are the vector files
for 1/8" (3mm) acrylic, in Adobe Illustrator format:
https://adafru.it/EqN
https://adafru.it/EqO
https://adafru.it/EqN
https://adafru.it/EqO
© Adafruit Industries https://learn.adafruit.com/pyportal-electioncal-us Page 39 of 41
Page 40
Troubleshooting
While setting up our PyPortal with this project for Electioncal US, you might run into a bit of trouble.
Nothing to worry, all should be easy to solve.
Problems with the WiFi
If something is wrong with the WiFi connection, one way to recognize this problem is by connecting to the
REPL Serial Console, where you might find messages like:
Connecting to AP my-access-point
Could not connect to internet ('Failed to connect to ssid', b'my-access-point')
Retrying in 3 seconds...
Here are some things you might look at to solve this:
Checking the name of the access point and it's password on the secrets.py file
Getting closer to the access point if it is far away
Problems setting up the county/state
If the JSON data cannot be found, you will see an error such as:
Error loading JSON data: Please check the configuration of county and state, in code.py
Traceback (most recent call last):
File "code.py", line 60, in
File "code.py", line 57, in
File "electioncal_graphics.py", line 76, in load_data
File "electioncal_graphics.py", line 72, in load_data
ValueError: syntax error in JSON
If this happens:
Check the spelling of the state and county
If the name of your state or county has a space, replace it with an underscore _
Remember to lowercase both names
PyPortal library on other devices
The PyPortal is a wonderful device, but it is not the only device that has a screen, such as the larger and
smaller versions of the PyPortal such as the PyPortal Titano and the PyPortal Pynt.
Everything in the code should work well, but the laying of the text and background might be a bit off.
Nothing to worry here.
Make gradual changes to electioncal_graphics.py in the __init__ section, where x and y are defined for
all of the displayed objects.
© Adafruit Industries https://learn.adafruit.com/pyportal-electioncal-us Page 40 of 41
Page 41

© Adafruit Industries Last Updated: 2021-03-17 01:18:28 PM EDT Page 41 of 41
 Loading...