

Page 1
PyPortal Smart Thermometer with Analog Devices ADT7410, Adafruit
IO and CircuitPython
Created by Brent Rubell
Last updated on 2021-03-17 01:18:03 PM EDT
Page 2

2
3
6
6
6
8
8
9
10
10
10
12
13
14
14
14
18
20
21
21
22
26
26
26
26
29
30
30
30
30
30
31
Guide Contents
Guide Contents
Overview
CircuitPython Code
Prerequisite Guides
Parts
Install CircuitPython
Set up CircuitPython Quick Start!
PyPortal Default Files
Adafruit IO Setup
Feed Setup
Adafruit IO Trigger Setup
Build an Adafruit IO Dashboard
Obtain Adafruit IO Key
Internet Connect!
What's a secrets file?
Connect to WiFi
Requests
HTTP GET with Requests
HTTP POST with Requests
Advanced Requests Usage
WiFi Manager
Code PyPortal with CircuitPython
Secrets File Setup
Add Libraries
Add CircuitPython Code and Project Assets
Code Usage
Why is the backlight off by default?
Adafruit IO Usage
PyPortal Customization
Displaying temperature in Fahrenheit
Changing fonts
Custom Wall Mount
© Adafruit Industries
https://learn.adafruit.com/pyportal-smart-thermometer-with-analog-devices-adt7410-
adafruit-io-and-circuitpython
Page 2 of 32
Page 3
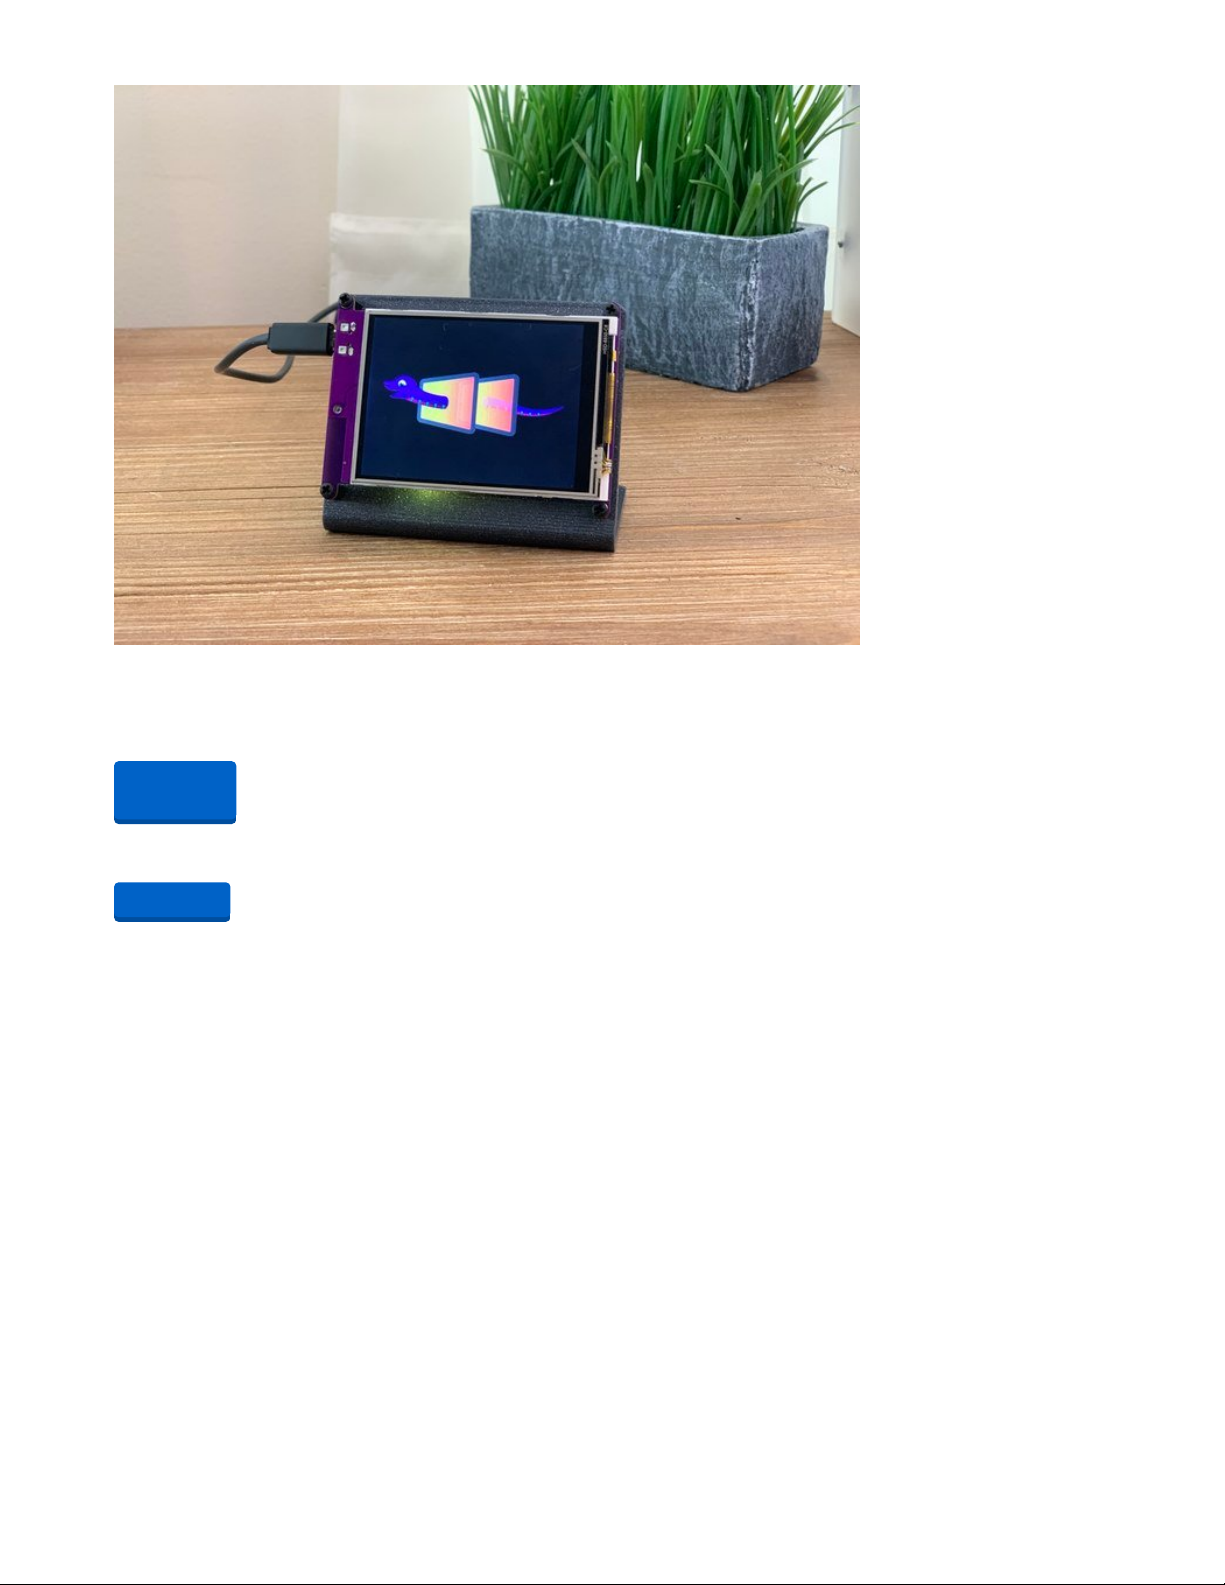
Overview
Connected your PyPortal to the internet and want to do more with data?
You'll be using the Analog Devices ADT7410 (https://adafru.it/EgN) built-into your PyPortal as a thermometer
to measure the ambient temperature over I2C.
But what makes this thermometer particularly
smart?
You'll be sending temperature data to the internet - using
the best data service in the world
- Adafruit
IO (https://adafru.it/fH9) - for real-time data visualization and long-term data logging.
Want to give your PyPortal Thermometer
more intelligence
? set up a Trigger on Adafruit IO to email you if
the PyPortal Thermometer dips below (or goes above!) a certain temperature threshold value.
© Adafruit Industries
https://learn.adafruit.com/pyportal-smart-thermometer-with-analog-devices-adt7410-
adafruit-io-and-circuitpython
Page 3 of 32
Page 4
We'll be using the Analog
Devices
ADT7410 (https://adafru.it/EaC)
built into the PyPortal to
measure the ambient
temperature over I2C
You'll also be using the
ambient light sensor, which
points through the front of the
PyPortal, to turn on the
PyPortal's display.
Wave at the PyPortal
to display the temperature
along with the current date
and time.
The date and time are
obtained from Adafruit IO and
are based on your PyPortal's IP
address - you don't need to
add
an RTC (https://adafru.it/sd6) or
fiddle with time zones!
© Adafruit Industries
https://learn.adafruit.com/pyportal-smart-thermometer-with-analog-devices-adt7410-
adafruit-io-and-circuitpython
Page 4 of 32
Page 5
CircuitPython Code
CircuitPython is great for
building Internet-of-Things
projects. Using the Adafruit IO
CircuitPython
module (https://adafru.it/Ean),
you can easily send data to
Adafruit IO, receive data from
Adafruit IO, and easily
manipulate data with the
powerful Adafruit IO API.
You can rapidly update your
code without having to
compile and store WiFi and
API secret keys on the device.
This means that there's no
editing code and re-uploading
whenever you move the
PyPortal to another network -
just update a file and you're
set.
Prerequisite Guides
If you're new to Adafruit IO or CircuitPython, take a moment to walk through the following guides to get you
started and up-to-speed:
Welcome to Adafruit IO (https://adafru.it/DZd)
Welcome to CircuitPython (https://adafru.it/cpy-welcome)
Parts
You only need a PyPortal for this guide - you'll be using the temperature and light sensors included with the
PyPortal. No other sensors or external circuitry required!
© Adafruit Industries
https://learn.adafruit.com/pyportal-smart-thermometer-with-analog-devices-adt7410-
adafruit-io-and-circuitpython
Page 5 of 32
Page 6
Adafruit PyPortal - CircuitPython Powered Internet Display
PyPortal, our easy-to-use IoT device that allows you to create all the things for the “Internet of Things” in
minutes. Make custom touch screen interface...
Out of Stock
1 x USB Cable
USB cable - USB A to Micro-B - 3 ft
Out of
Stock
Add to Cart
© Adafruit Industries
https://learn.adafruit.com/pyportal-smart-thermometer-with-analog-devices-adt7410-
adafruit-io-and-circuitpython
Page 6 of 32
Page 7
Install CircuitPython
CircuitPython (https://adafru.it/tB7) is a derivative of MicroPython (https://adafru.it/BeZ) designed to simplify
experimentation and education on low-cost microcontrollers. It makes it easier than ever to get prototyping
by requiring no upfront desktop software downloads. Simply copy and edit files on the CIRCUITPY "flash"
drive to iterate.
The following instructions will show you how to install CircuitPython. If you've already installed CircuitPython
but are looking to update it or reinstall it, the same steps work for that as well!
Set up CircuitPython Quick Start!
Follow this quick step-by-step for super-fast Python power :)
https://adafru.it/Egk
https://adafru.it/HFd
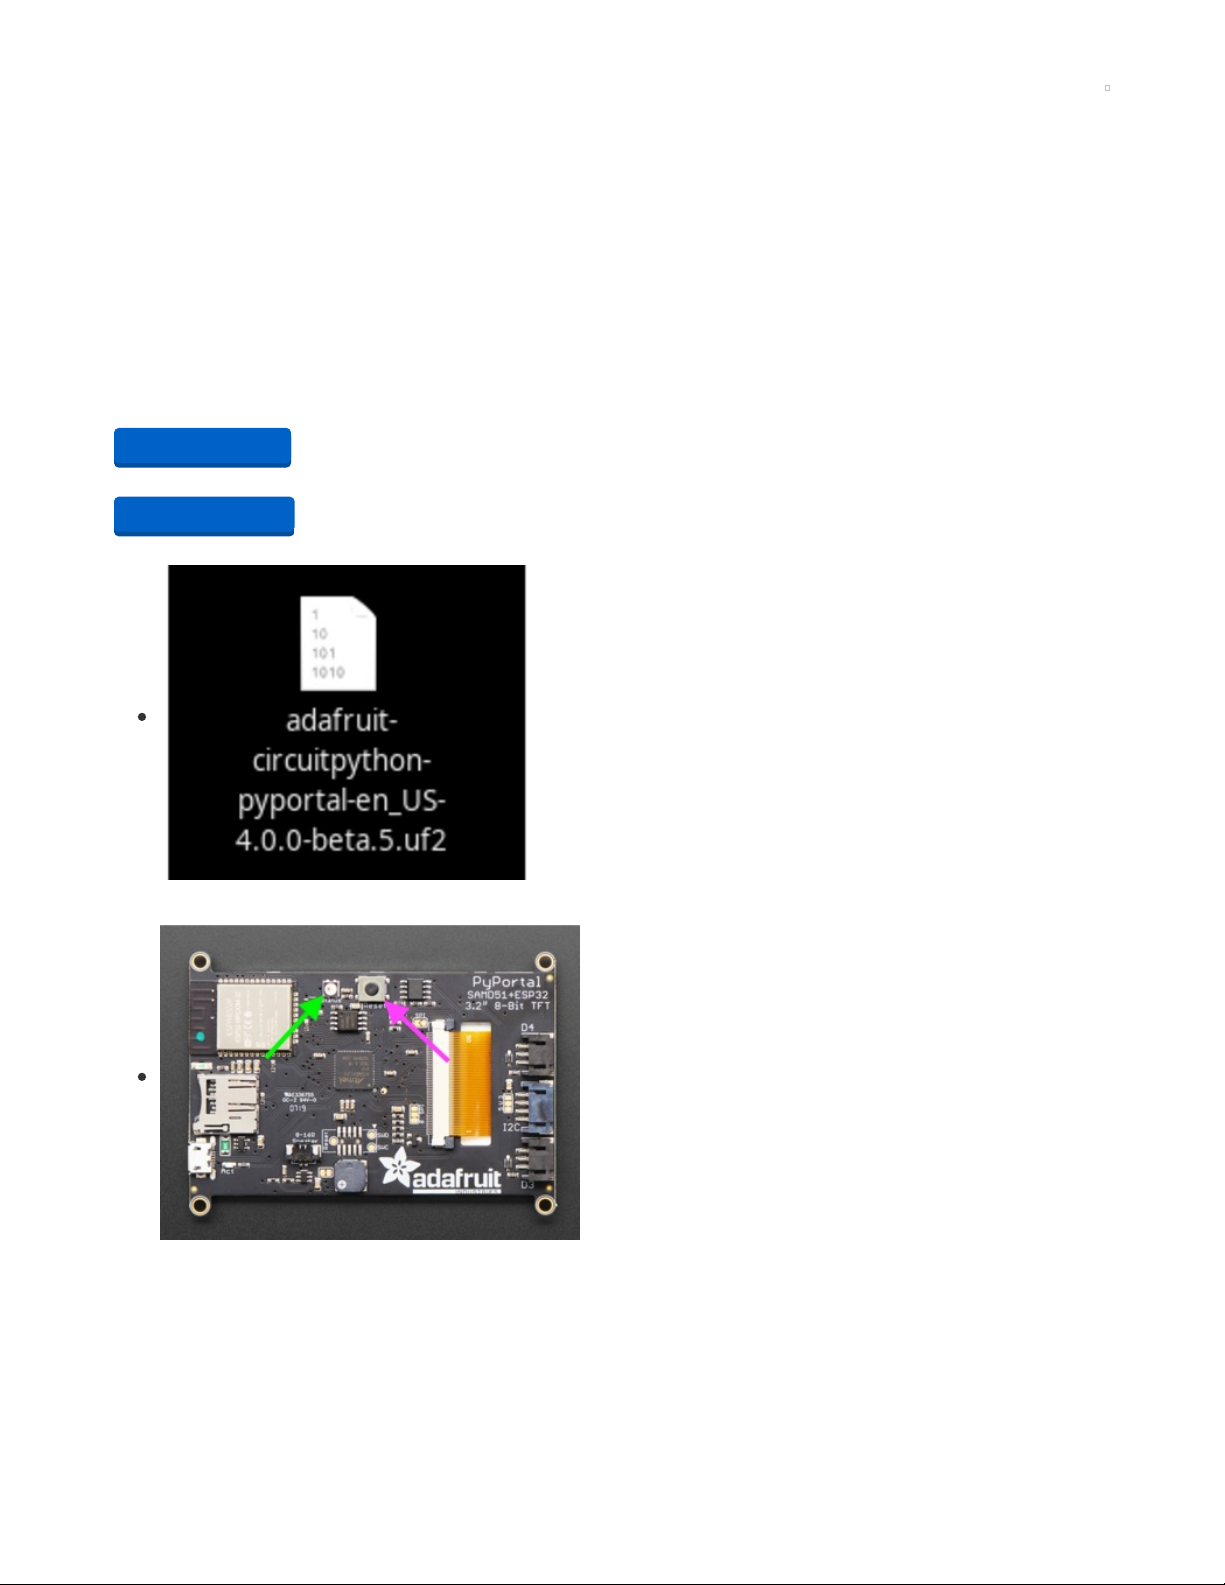
Click the link above to download the latest version of
CircuitPython for the PyPortal.
Download and save it to your desktop (or wherever is handy).
Plug your PyPortal into your computer using a known-good USB
cable.
A lot of people end up using charge-only USB cables and it is
very frustrating! So make sure you have a USB cable you know
is good for data sync.
Double-click the Reset button on the top in the middle (magenta
arrow) on your board, and you will see the NeoPixel RGB LED
(green arrow) turn green. If it turns red, check the USB cable, try
another USB port, etc. Note: The little red LED next to the USB
connector will pulse red. That's ok!
If double-clicking doesn't work the first time, try again.
Sometimes it can take a few tries to get the rhythm right!
https://adafru.it/Egk
https://adafru.it/HFd
© Adafruit Industries
https://learn.adafruit.com/pyportal-smart-thermometer-with-analog-devices-adt7410-
adafruit-io-and-circuitpython
Page 7 of 32
Page 8
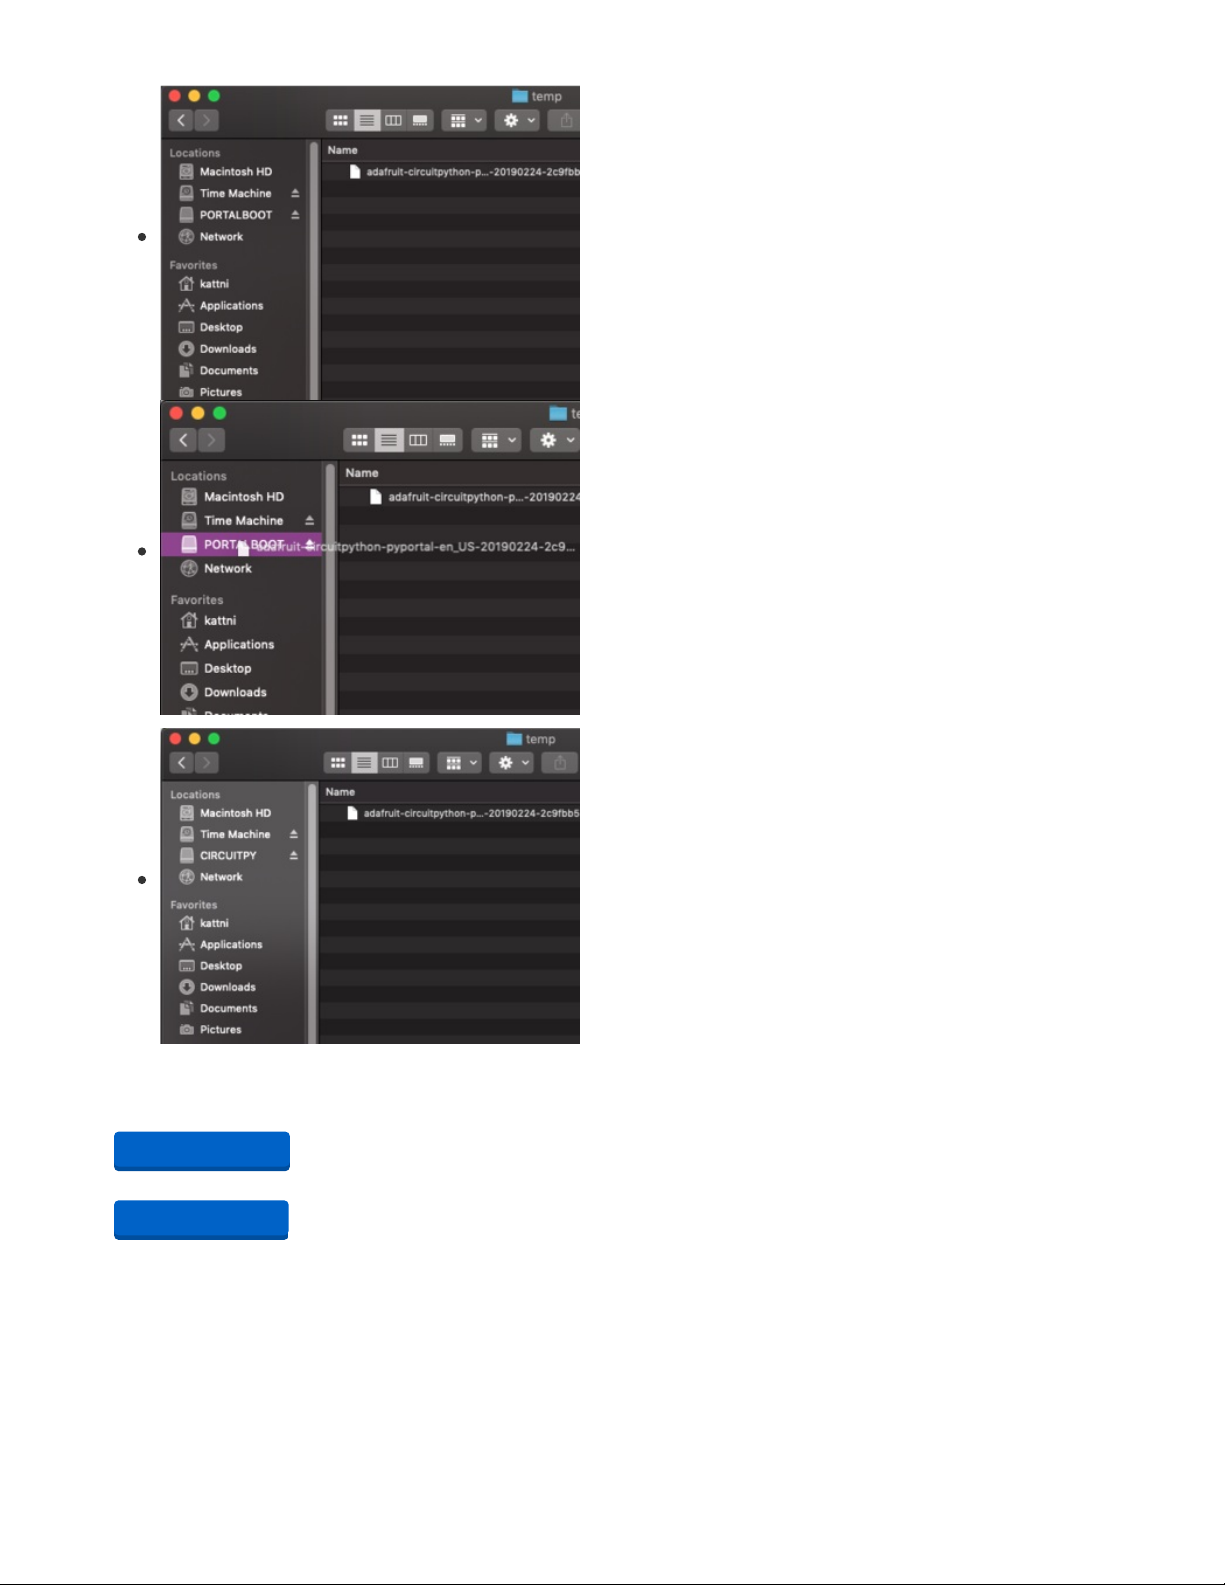
You will see a new disk drive appear called PORTALBOOT.
Drag the adafruit-circuitpython-pyportal-<whatever>.uf2 file to
PORTALBOOT.
The LED will flash. Then, the PORTALBOOT drive will disappear
and a new disk drive called CIRCUITPY will appear.
If you haven't added any code to your board, the only file that
will be present is boot_out.txt. This is absolutely normal! It's time
for you to add your code.py and get started!
That's it, you're done! :)
PyPortal Default Files
Click below to download a zip of the files that shipped on the PyPortal or PyPortal Pynt.
https://adafru.it/Env
https://adafru.it/HFf
https://adafru.it/Env
https://adafru.it/HFf
© Adafruit Industries
https://learn.adafruit.com/pyportal-smart-thermometer-with-analog-devices-adt7410-
adafruit-io-and-circuitpython
Page 8 of 32
Page 9

Adafruit IO Setup
Feed Setup
If you do not already have an Adafruit IO account set up, head over to io.adafruit.com (https://adafru.it/fH9) to
link your Adafruit.com account to Adafruit IO.
The first step is to create a new Adafruit IO feed to hold the data from the PyPortal's temperature sensor.
Navigate to the feeds page (https://adafru.it/mxC) on Adafruit IO. Then click Actions -> Create New Feed ,
and name this feed temperature.
If you do not already know how to create a feed, head over to Adafruit IO Basics:
Feeds (https://adafru.it/ioA).
Adafruit IO Trigger Setup
This optional step requires an active Adafruit IO Plus (IO+) account.
While you can remotely monitor your PyPortal thermometer using an Adafruit IO Dashboard, if you want to
be alerted of a specific high temperature reading when you're away from your keyboard. You can set up
Adafruit IO Triggers to monitor a feed for predefined conditions.
© Adafruit Industries
https://learn.adafruit.com/pyportal-smart-thermometer-with-analog-devices-adt7410-
adafruit-io-and-circuitpython
Page 9 of 32
Page 10
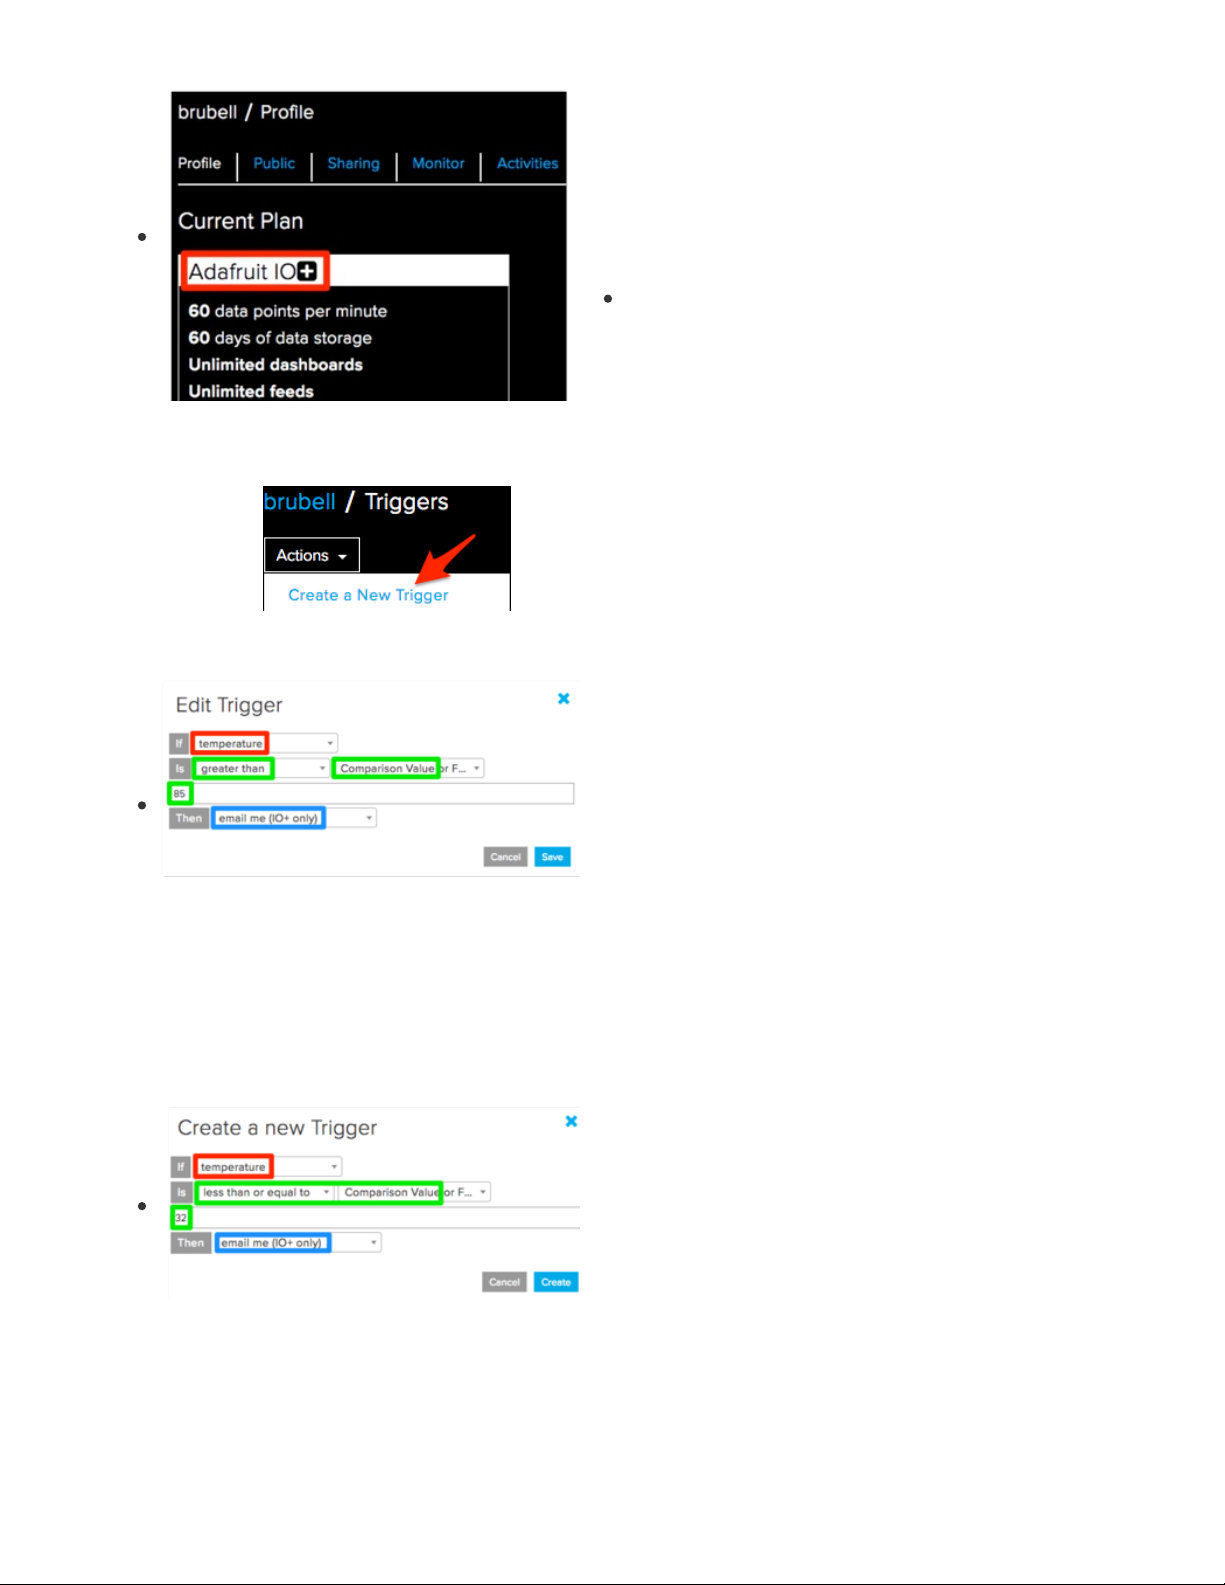
Adafruit IO Email Triggers are a feature of Adafruit IO Plus, and
require an active Adafruit IO Plus subscription.
To check if you have an Adafruit IO Plus subscription: Navigate
to your Adafruit IO Profile page (https://adafru.it/BmD) and check
your
Current Plan
.
Interested in upgrading to IO Plus? Learn more about
the upgraded, all systems go version of the Adafruit IO
service here... (https://adafru.it/Eg3)
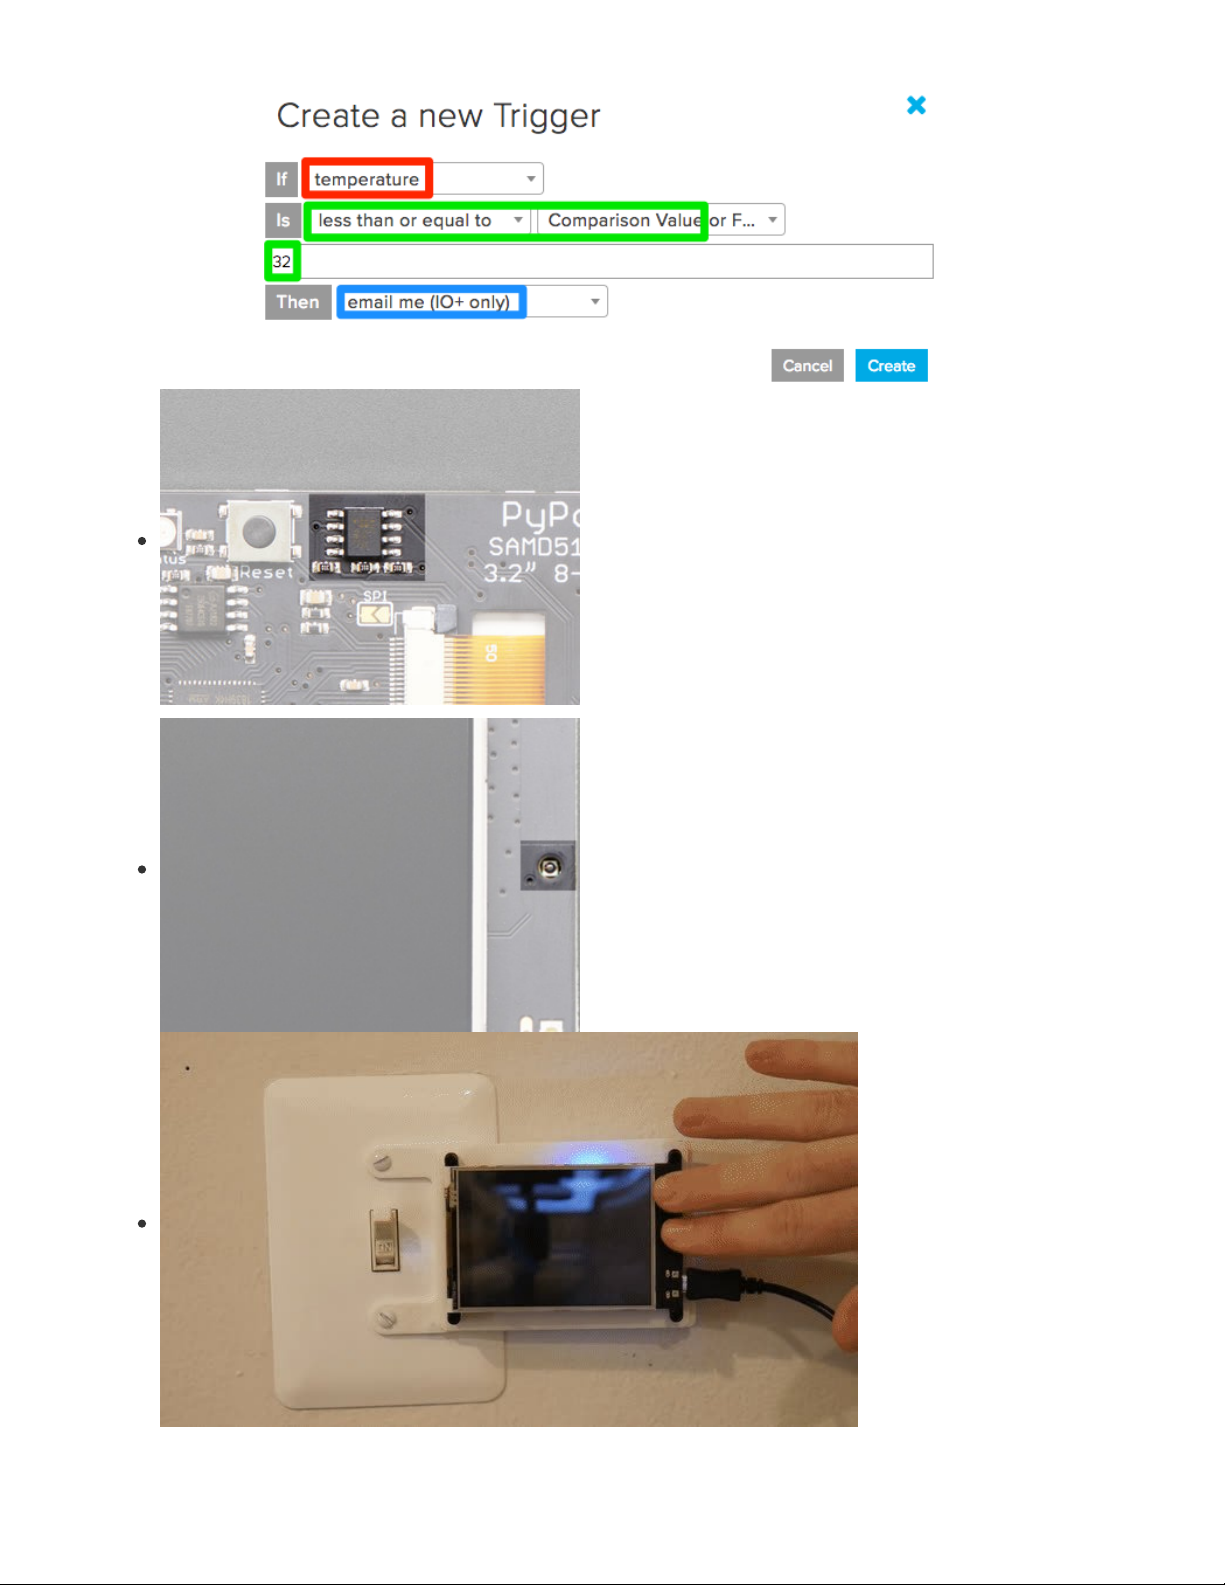
Navigate to the Adafruit IO trigger page (https://adafru.it/Em3). From the Actions dropdown, click Create a
New Trigger.
To set up the trigger, you'll need to define a condition and an action to perform when the condition occurs.
Set the feed to
temperature
Define the trigger to fire only when the feed value is
greater
than 85
.
Set the trigger action to
email me
Next, you'll set up a
second
trigger to email you if the temperature feed dips below freezing (in degrees
Fahrenheit).
Set the feed to
temperature
Define the trigger to fire only when the feed value is
less than or
equal to 32
.
Set the trigger action to
email me
Note that 85 is a
value
on the feed and does not include the unit - it can be 85 degrees Celsius, Fahrenheit
or even Kelvin. The code in this project supports converting the raw value before sending it to Adafruit IO.
© Adafruit Industries
https://learn.adafruit.com/pyportal-smart-thermometer-with-analog-devices-adt7410-
adafruit-io-and-circuitpython
Page 10 of 32
Page 11

Build an Adafruit IO Dashboard
Next, you'll create a dashboard to display the values from the feed you created.
If you do not know how to create or use Dashboards in Adafruit IO, head over to the Adafruit IO Basics:
Dashboards (https://adafru.it/f5m) guide.
From your dashboard, select the Gauge block.
Select the
temperature
feed
In the Block Settings step, set the Block Title toTemperature, set
the Gauge Min/Max Values to the upper and lower temperature
thresholds you want to measure.
You can label the gauge by setting the Gauge Label - this
example assumes temperature is to be measured in Degrees C.
Uncomfortably hot or cold?
You can optionally set the gauge
change color to warn you if the temperature goes above (or
below) a certain value.
While displaying the current values of the temperature is useful, Adafruit IO stores data so you can monitor
how it changes a long period of time.
To do this, we'll use the Line Chart block and set it up to display the light value over a period of time.
© Adafruit Industries
https://learn.adafruit.com/pyportal-smart-thermometer-with-analog-devices-adt7410-
adafruit-io-and-circuitpython
Page 11 of 32
Page 12

Create a new block, and link the temperature feed to the line
chart block. You can configure it to show the thermostat's history
from one hour to thirty days.
Your final dashboard should look like the following:
Obtain Adafruit IO Key
You are also going to need your Adafruit IO username and secret API key.
Navigate to your profile and click the View AIO Key button to retrieve them. Write them down in a safe
place, you'll need them for the next step.
© Adafruit Industries
https://learn.adafruit.com/pyportal-smart-thermometer-with-analog-devices-adt7410-
adafruit-io-and-circuitpython
Page 12 of 32
Page 13

Internet Connect!
Once you have CircuitPython setup and libraries installed we can get your board connected to the Internet.
Note that access to enterprise level secured WiFi networks is not currently supported, only WiFi networks
that require SSID and password.
To get connected, you will need to start by creating a
secrets file
.
What's a secrets file?
We expect people to share tons of projects as they build CircuitPython WiFi widgets. What we want to avoid
is people accidentally sharing their passwords or secret tokens and API keys. So, we designed all our
examples to use a secrets.py file, that is in your CIRCUITPY drive, to hold secret/private/custom data. That
way you can share your main project without worrying about accidentally sharing private stuff.
Your secrets.py file should look like this:
# This file is where you keep secret settings, passwords, and tokens!
# If you put them in the code you risk committing that info or sharing it
secrets = {
'ssid' : 'home ssid',
'password' : 'my password',
'timezone' : "America/New_York", # http://worldtimeapi.org/timezones
'github_token' : 'fawfj23rakjnfawiefa',
'hackaday_token' : 'h4xx0rs3kret',
}
Inside is a python dictionary named secrets with a line for each entry. Each entry has an entry name (say
'ssid' ) and then a colon to separate it from the entry key 'home ssid' and finally a comma ,
At a minimum you'll need the ssid and password for your local WiFi setup. As you make projects you may
need more tokens and keys, just add them one line at a time. See for example other tokens such as one for
accessing github or the hackaday API. Other non-secret data like your timezone can also go here, just cause
it's called secrets doesn't mean you can't have general customization data in there!
For the correct time zone string, look at http://worldtimeapi.org/timezones (https://adafru.it/EcP) and
remember that if your city is not listed, look for a city in the same time zone, for example Boston, New York,
Philadelphia, Washington DC, and Miami are all on the same time as New York.
Of course, don't share your secrets.py - keep that out of GitHub, Discord or other project-sharing sites.
Connect to WiFi
OK now you have your secrets setup - you can connect to the Internet. Lets use the ESP32SPI and the
Requests libraries - you'll need to visit the CircuitPython bundle and install (https://adafru.it/ENC):
adafruit_bus_device
adafruit_esp32spi
adafruit_requests
neopixel
Into your lib folder. Once that's done, load up the following example using Mu or your favorite editor:
# SPDX-FileCopyrightText: 2019 ladyada for Adafruit Industries
© Adafruit Industries
https://learn.adafruit.com/pyportal-smart-thermometer-with-analog-devices-adt7410-
adafruit-io-and-circuitpython
Page 13 of 32
Page 14

# SPDX-License-Identifier: MIT
import board
import busio
from digitalio import DigitalInOut
import adafruit_requests as requests
import adafruit_esp32spi.adafruit_esp32spi_socket as socket
from adafruit_esp32spi import adafruit_esp32spi
# Get wifi details and more from a secrets.py file
try:
from secrets import secrets
except ImportError:
print("WiFi secrets are kept in secrets.py, please add them there!")
raise
print("ESP32 SPI webclient test")
TEXT_URL = "http://wifitest.adafruit.com/testwifi/index.html"
JSON_URL = "http://api.coindesk.com/v1/bpi/currentprice/USD.json"
# If you are using a board with pre-defined ESP32 Pins:
esp32_cs = DigitalInOut(board.ESP_CS)
esp32_ready = DigitalInOut(board.ESP_BUSY)
esp32_reset = DigitalInOut(board.ESP_RESET)
# If you have an AirLift Shield:
# esp32_cs = DigitalInOut(board.D10)
# esp32_ready = DigitalInOut(board.D7)
# esp32_reset = DigitalInOut(board.D5)
# If you have an AirLift Featherwing or ItsyBitsy Airlift:
# esp32_cs = DigitalInOut(board.D13)
# esp32_ready = DigitalInOut(board.D11)
# esp32_reset = DigitalInOut(board.D12)
# If you have an externally connected ESP32:
# NOTE: You may need to change the pins to reflect your wiring
# esp32_cs = DigitalInOut(board.D9)
# esp32_ready = DigitalInOut(board.D10)
# esp32_reset = DigitalInOut(board.D5)
spi = busio.SPI(board.SCK, board.MOSI, board.MISO)
esp = adafruit_esp32spi.ESP_SPIcontrol(spi, esp32_cs, esp32_ready, esp32_reset)
requests.set_socket(socket, esp)
if esp.status == adafruit_esp32spi.WL_IDLE_STATUS:
print("ESP32 found and in idle mode")
print("Firmware vers.", esp.firmware_version)
print("MAC addr:", [hex(i) for i in esp.MAC_address])
for ap in esp.scan_networks():
print("\t%s\t\tRSSI: %d" % (str(ap["ssid"], "utf-8"), ap["rssi"]))
print("Connecting to AP...")
while not esp.is_connected:
try:
esp.connect_AP(secrets["ssid"], secrets["password"])
except RuntimeError as e:
print("could not connect to AP, retrying: ", e)
continue
print("Connected to", str(esp.ssid, "utf-8"), "\tRSSI:", esp.rssi)
print("My IP address is", esp.pretty_ip(esp.ip_address))
© Adafruit Industries
https://learn.adafruit.com/pyportal-smart-thermometer-with-analog-devices-adt7410-
adafruit-io-and-circuitpython
Page 14 of 32
Page 15

print(
"IP lookup adafruit.com: %s" % esp.pretty_ip(esp.get_host_by_name("adafruit.com"))
)
print("Ping google.com: %d ms" % esp.ping("google.com"))
# esp._debug = True
print("Fetching text from", TEXT_URL)
r = requests.get(TEXT_URL)
print("-" * 40)
print(r.text)
print("-" * 40)
r.close()
print()
print("Fetching json from", JSON_URL)
r = requests.get(JSON_URL)
print("-" * 40)
print(r.json())
print("-" * 40)
r.close()
print("Done!")
And save it to your board, with the name code.py .
Don't forget you'll also need to create the secrets.py file as seen above, with your WiFi ssid and password.
In a serial console, you should see something like the following. For more information about connecting with
a serial console, view the guide Connecting to the Serial Console (https://adafru.it/Bec).
In order, the example code...
© Adafruit Industries
https://learn.adafruit.com/pyportal-smart-thermometer-with-analog-devices-adt7410-
adafruit-io-and-circuitpython
Page 15 of 32
Page 16

Initializes the ESP32 over SPI using the SPI port and 3 control pins:
esp32_cs = DigitalInOut(board.ESP_CS)
esp32_ready = DigitalInOut(board.ESP_BUSY)
esp32_reset = DigitalInOut(board.ESP_RESET)
spi = busio.SPI(board.SCK, board.MOSI, board.MISO)
esp = adafruit_esp32spi.ESP_SPIcontrol(spi, esp32_cs, esp32_ready, esp32_reset)
Tells our requests library the type of socket we're using (socket type varies by connectivity type - we'll be
using the adafruit_esp32spi_socket for this example). We'll also set the interface to an esp object. This is a
little bit of a hack, but it lets us use requests like CPython does.
requests.set_socket(socket, esp)
Verifies an ESP32 is found, checks the firmware and MAC address
if esp.status == adafruit_esp32spi.WL_IDLE_STATUS:
print("ESP32 found and in idle mode")
print("Firmware vers.", esp.firmware_version)
print("MAC addr:", [hex(i) for i in esp.MAC_address])
Performs a scan of all access points it can see and prints out the name and signal strength:
for ap in esp.scan_networks():
print("\t%s\t\tRSSI: %d" % (str(ap['ssid'], 'utf-8'), ap['rssi']))
Connects to the AP we've defined here, then prints out the local IP address, attempts to do a domain name
lookup and ping google.com to check network connectivity (note sometimes the ping fails or takes a while,
this isn't a big deal)
print("Connecting to AP...")
while not esp.is_connected:
try:
esp.connect_AP(secrets["ssid"], secrets["password"])
except RuntimeError as e:
print("could not connect to AP, retrying: ", e)
continue
print("Connected to", str(esp.ssid, "utf-8"), "\tRSSI:", esp.rssi)
print("My IP address is", esp.pretty_ip(esp.ip_address))
print(
"IP lookup adafruit.com: %s" % esp.pretty_ip(esp.get_host_by_name("adafruit.com"))
OK now we're getting to the really interesting part. With a SAMD51 or other large-RAM (well, over 32 KB)
device, we can do a lot of neat tricks. Like for example we can implement an interface a lot like
requests (https://adafru.it/E9o) - which makes getting data
really really easy
To read in all the text from a web URL call requests.get - you can pass in https URLs for SSL connectivity
© Adafruit Industries
https://learn.adafruit.com/pyportal-smart-thermometer-with-analog-devices-adt7410-
adafruit-io-and-circuitpython
Page 16 of 32
Page 17

TEXT_URL = "http://wifitest.adafruit.com/testwifi/index.html"
print("Fetching text from", TEXT_URL)
r = requests.get(TEXT_URL)
print('-'*40)
print(r.text)
print('-'*40)
r.close()
Or, if the data is in structured JSON, you can get the json pre-parsed into a Python dictionary that can be
easily queried or traversed. (Again, only for nRF52840, M4 and other high-RAM boards)
JSON_URL = "http://api.coindesk.com/v1/bpi/currentprice/USD.json"
print("Fetching json from", JSON_URL)
r = requests.get(JSON_URL)
print('-'*40)
print(r.json())
print('-'*40)
r.close()
Requests
We've written a requests-like (https://adafru.it/Kpa) library for web interfacing
named Adafruit_CircuitPython_Requests (https://adafru.it/FpW). This library allows you to send HTTP/1.1
requests without "crafting" them and provides helpful methods for parsing the response from the server.
# SPDX-FileCopyrightText: 2021 ladyada for Adafruit Industries
# SPDX-License-Identifier: MIT
# adafruit_requests usage with an esp32spi_socket
import board
import busio
from digitalio import DigitalInOut
import adafruit_esp32spi.adafruit_esp32spi_socket as socket
from adafruit_esp32spi import adafruit_esp32spi
import adafruit_requests as requests
# Add a secrets.py to your filesystem that has a dictionary called secrets with "ssid" and
# "password" keys with your WiFi credentials. DO NOT share that file or commit it into Git or other
# source control.
# pylint: disable=no-name-in-module,wrong-import-order
try:
from secrets import secrets
except ImportError:
print("WiFi secrets are kept in secrets.py, please add them there!")
raise
# If you are using a board with pre-defined ESP32 Pins:
esp32_cs = DigitalInOut(board.ESP_CS)
esp32_ready = DigitalInOut(board.ESP_BUSY)
esp32_reset = DigitalInOut(board.ESP_RESET)
# If you have an externally connected ESP32:
# esp32_cs = DigitalInOut(board.D9)
# esp32_ready = DigitalInOut(board.D10)
# esp32_reset = DigitalInOut(board.D5)
spi = busio.SPI(board.SCK, board.MOSI, board.MISO)
esp = adafruit_esp32spi.ESP_SPIcontrol(spi, esp32_cs, esp32_ready, esp32_reset)
print("Connecting to AP...")
while not esp.is_connected:
© Adafruit Industries
https://learn.adafruit.com/pyportal-smart-thermometer-with-analog-devices-adt7410-
adafruit-io-and-circuitpython
Page 17 of 32
Page 18

try:
esp.connect_AP(secrets["ssid"], secrets["password"])
except RuntimeError as e:
print("could not connect to AP, retrying: ", e)
continue
print("Connected to", str(esp.ssid, "utf-8"), "\tRSSI:", esp.rssi)
# Initialize a requests object with a socket and esp32spi interface
socket.set_interface(esp)
requests.set_socket(socket, esp)
TEXT_URL = "http://wifitest.adafruit.com/testwifi/index.html"
JSON_GET_URL = "http://httpbin.org/get"
JSON_POST_URL = "http://httpbin.org/post"
print("Fetching text from %s" % TEXT_URL)
response = requests.get(TEXT_URL)
print("-" * 40)
print("Text Response: ", response.text)
print("-" * 40)
response.close()
print("Fetching JSON data from %s" % JSON_GET_URL)
response = requests.get(JSON_GET_URL)
print("-" * 40)
print("JSON Response: ", response.json())
print("-" * 40)
response.close()
data = "31F"
print("POSTing data to {0}: {1}".format(JSON_POST_URL, data))
response = requests.post(JSON_POST_URL, data=data)
print("-" * 40)
json_resp = response.json()
# Parse out the 'data' key from json_resp dict.
print("Data received from server:", json_resp["data"])
print("-" * 40)
response.close()
json_data = {"Date": "July 25, 2019"}
print("POSTing data to {0}: {1}".format(JSON_POST_URL, json_data))
response = requests.post(JSON_POST_URL, json=json_data)
print("-" * 40)
json_resp = response.json()
# Parse out the 'json' key from json_resp dict.
print("JSON Data received from server:", json_resp["json"])
print("-" * 40)
response.close()
The code first sets up the ESP32SPI interface. Then, it initializes a request object using an ESP32 socket and
the esp object.
© Adafruit Industries
https://learn.adafruit.com/pyportal-smart-thermometer-with-analog-devices-adt7410-
adafruit-io-and-circuitpython
Page 18 of 32
Page 19

import board
import busio
from digitalio import DigitalInOut
import adafruit_esp32spi.adafruit_esp32spi_socket as socket
from adafruit_esp32spi import adafruit_esp32spi
import adafruit_requests as requests
# If you are using a board with pre-defined ESP32 Pins:
esp32_cs = DigitalInOut(board.ESP_CS)
esp32_ready = DigitalInOut(board.ESP_BUSY)
esp32_reset = DigitalInOut(board.ESP_RESET)
# If you have an externally connected ESP32:
# esp32_cs = DigitalInOut(board.D9)
# esp32_ready = DigitalInOut(board.D10)
# esp32_reset = DigitalInOut(board.D5)
spi = busio.SPI(board.SCK, board.MOSI, board.MISO)
esp = adafruit_esp32spi.ESP_SPIcontrol(spi, esp32_cs, esp32_ready, esp32_reset)
print("Connecting to AP...")
while not esp.is_connected:
try:
esp.connect_AP(b'MY_SSID_NAME', b'MY_SSID_PASSWORD')
except RuntimeError as e:
print("could not connect to AP, retrying: ",e)
continue
print("Connected to", str(esp.ssid, 'utf-8'), "\tRSSI:", esp.rssi)
# Initialize a requests object with a socket and esp32spi interface
requests.set_socket(socket, esp)
HTTP GET with Requests
The code makes a HTTP GET request to Adafruit's WiFi testing website
- http://wifitest.adafruit.com/testwifi/index.html (https://adafru.it/FpZ).
To do this, we'll pass the URL into requests.get() . We're also going to save the response
from
the server into
a variable named response .
While we requested data from the server, we'd what the server responded with. Since we already saved the
server's response , we can read it back. Luckily for us, requests automatically decodes the server's response
into human-readable text, you can read it back by calling response.text .
Lastly, we'll perform a bit of cleanup by calling response.close() . This closes, deletes, and collect's the
response's data.
print("Fetching text from %s"%TEXT_URL)
response = requests.get(TEXT_URL)
print('-'*40)
print("Text Response: ", response.text)
print('-'*40)
response.close()
While some servers respond with text, some respond with json-formatted data consisting of attribute–value
pairs.
CircuitPython_Requests can convert a JSON-formatted response from a server into a CPython dict.
© Adafruit Industries
https://learn.adafruit.com/pyportal-smart-thermometer-with-analog-devices-adt7410-
adafruit-io-and-circuitpython
Page 19 of 32
Page 20

object.
We can also fetch and parse json data. We'll send a HTTP get to a url we know returns a json-formatted
response (instead of text data).
Then, the code calls response.json() to convert the response to a CPython dict .
print("Fetching JSON data from %s"%JSON_GET_URL)
response = requests.get(JSON_GET_URL)
print('-'*40)
print("JSON Response: ", response.json())
print('-'*40)
response.close()
HTTP POST with Requests
Requests can also POST data to a server by calling the requests.post method, passing it a data value.
data = '31F'
print("POSTing data to {0}: {1}".format(JSON_POST_URL, data))
response = requests.post(JSON_POST_URL, data=data)
print('-'*40)
json_resp = response.json()
# Parse out the 'data' key from json_resp dict.
print("Data received from server:", json_resp['data'])
print('-'*40)
response.close()
You can also post json-formatted data to a server by passing json_data into the requests.post method.
json_data = {"Date" : "July 25, 2019"}
print("POSTing data to {0}: {1}".format(JSON_POST_URL, json_data))
response = requests.post(JSON_POST_URL, json=json_data)
print('-'*40)
json_resp = response.json()
# Parse out the 'json' key from json_resp dict.
print("JSON Data received from server:", json_resp['json'])
print('-'*40)
response.close()
Advanced Requests Usage
Want to send custom HTTP headers, parse the response as raw bytes, or handle a response's http status
code in your CircuitPython code?
We've written an example to show advanced usage of the requests module below.
# SPDX-FileCopyrightText: 2021 ladyada for Adafruit Industries
# SPDX-License-Identifier: MIT
import board
import busio
from digitalio import DigitalInOut
import adafruit_esp32spi.adafruit_esp32spi_socket as socket
from adafruit_esp32spi import adafruit_esp32spi
import adafruit_requests as requests
© Adafruit Industries
https://learn.adafruit.com/pyportal-smart-thermometer-with-analog-devices-adt7410-
adafruit-io-and-circuitpython
Page 20 of 32
Page 21

# Add a secrets.py to your filesystem that has a dictionary called secrets with "ssid" and
# "password" keys with your WiFi credentials. DO NOT share that file or commit it into Git or other
# source control.
# pylint: disable=no-name-in-module,wrong-import-order
try:
from secrets import secrets
except ImportError:
print("WiFi secrets are kept in secrets.py, please add them there!")
raise
# If you are using a board with pre-defined ESP32 Pins:
esp32_cs = DigitalInOut(board.ESP_CS)
esp32_ready = DigitalInOut(board.ESP_BUSY)
esp32_reset = DigitalInOut(board.ESP_RESET)
# If you have an externally connected ESP32:
# esp32_cs = DigitalInOut(board.D9)
# esp32_ready = DigitalInOut(board.D10)
# esp32_reset = DigitalInOut(board.D5)
spi = busio.SPI(board.SCK, board.MOSI, board.MISO)
esp = adafruit_esp32spi.ESP_SPIcontrol(spi, esp32_cs, esp32_ready, esp32_reset)
print("Connecting to AP...")
while not esp.is_connected:
try:
esp.connect_AP(secrets["ssid"], secrets["password"])
except RuntimeError as e:
print("could not connect to AP, retrying: ", e)
continue
print("Connected to", str(esp.ssid, "utf-8"), "\tRSSI:", esp.rssi)
# Initialize a requests object with a socket and esp32spi interface
socket.set_interface(esp)
requests.set_socket(socket, esp)
JSON_GET_URL = "http://httpbin.org/get"
# Define a custom header as a dict.
headers = {"user-agent": "blinka/1.0.0"}
print("Fetching JSON data from %s..." % JSON_GET_URL)
response = requests.get(JSON_GET_URL, headers=headers)
print("-" * 60)
json_data = response.json()
headers = json_data["headers"]
print("Response's Custom User-Agent Header: {0}".format(headers["User-Agent"]))
print("-" * 60)
# Read Response's HTTP status code
print("Response HTTP Status Code: ", response.status_code)
print("-" * 60)
# Close, delete and collect the response data
response.close()
WiFi Manager
That simpletest example works but it's a little finicky - you need to constantly check WiFi status and have
many loops to manage connections and disconnections. For more advanced uses, we recommend using the
WiFiManager object. It will wrap the connection/status/requests loop for you - reconnecting if WiFi drops,
© Adafruit Industries
https://learn.adafruit.com/pyportal-smart-thermometer-with-analog-devices-adt7410-
adafruit-io-and-circuitpython
Page 21 of 32
Page 22

resetting the ESP32 if it gets into a bad state, etc.
Here's a more advanced example that shows the WiFi manager and also how to POST data with some extra
headers:
# SPDX-FileCopyrightText: 2019 ladyada for Adafruit Industries
# SPDX-License-Identifier: MIT
import time
import board
import busio
from digitalio import DigitalInOut
import neopixel
from adafruit_esp32spi import adafruit_esp32spi
from adafruit_esp32spi import adafruit_esp32spi_wifimanager
print("ESP32 SPI webclient test")
# Get wifi details and more from a secrets.py file
try:
from secrets import secrets
except ImportError:
print("WiFi secrets are kept in secrets.py, please add them there!")
raise
# If you are using a board with pre-defined ESP32 Pins:
esp32_cs = DigitalInOut(board.ESP_CS)
esp32_ready = DigitalInOut(board.ESP_BUSY)
esp32_reset = DigitalInOut(board.ESP_RESET)
# If you have an externally connected ESP32:
# esp32_cs = DigitalInOut(board.D9)
# esp32_ready = DigitalInOut(board.D10)
# esp32_reset = DigitalInOut(board.D5)
spi = busio.SPI(board.SCK, board.MOSI, board.MISO)
esp = adafruit_esp32spi.ESP_SPIcontrol(spi, esp32_cs, esp32_ready, esp32_reset)
"""Use below for Most Boards"""
status_light = neopixel.NeoPixel(
board.NEOPIXEL, 1, brightness=0.2
) # Uncomment for Most Boards
"""Uncomment below for ItsyBitsy M4"""
# status_light = dotstar.DotStar(board.APA102_SCK, board.APA102_MOSI, 1, brightness=0.2)
# Uncomment below for an externally defined RGB LED
# import adafruit_rgbled
# from adafruit_esp32spi import PWMOut
# RED_LED = PWMOut.PWMOut(esp, 26)
# GREEN_LED = PWMOut.PWMOut(esp, 27)
# BLUE_LED = PWMOut.PWMOut(esp, 25)
# status_light = adafruit_rgbled.RGBLED(RED_LED, BLUE_LED, GREEN_LED)
wifi = adafruit_esp32spi_wifimanager.ESPSPI_WiFiManager(esp, secrets, status_light)
counter = 0
while True:
try:
print("Posting data...", end="")
data = counter
feed = "test"
payload = {"value": data}
response = wifi.post(
"https://io.adafruit.com/api/v2/"
+ secrets["aio_username"]
© Adafruit Industries
https://learn.adafruit.com/pyportal-smart-thermometer-with-analog-devices-adt7410-
adafruit-io-and-circuitpython
Page 22 of 32
Page 23

+ "/feeds/"
+ feed
+ "/data",
json=payload,
headers={"X-AIO-KEY": secrets["aio_key"]},
)
print(response.json())
response.close()
counter = counter + 1
print("OK")
except (ValueError, RuntimeError) as e:
print("Failed to get data, retrying\n", e)
wifi.reset()
continue
response = None
time.sleep(15)
You'll note here we use a secrets.py file to manage our SSID info. The wifimanager is given the ESP32
object, secrets and a neopixel for status indication.
Note, you'll need to add a some additional information to your secrets file so that the code can query the
Adafruit IO API:
aio_username
aio_key
You can go to your adafruit.io View AIO Key link to get those two values and add them to the secrets file,
which will now look something like this:
# This file is where you keep secret settings, passwords, and tokens!
# If you put them in the code you risk committing that info or sharing it
secrets = {
'ssid' : '_your_ssid_',
'password' : '_your_wifi_password_',
'timezone' : "America/Los_Angeles", # http://worldtimeapi.org/timezones
'aio_username' : '_your_aio_username_',
'aio_key' : '_your_aio_key_',
}
Next, set up an Adafruit IO feed named test
If you do not know how to set up a feed, follow this page and come back when you've set up a feed
named test . (https://adafru.it/f5k)
We can then have a simple loop for posting data to Adafruit IO without having to deal with connecting or
initializing the hardware!
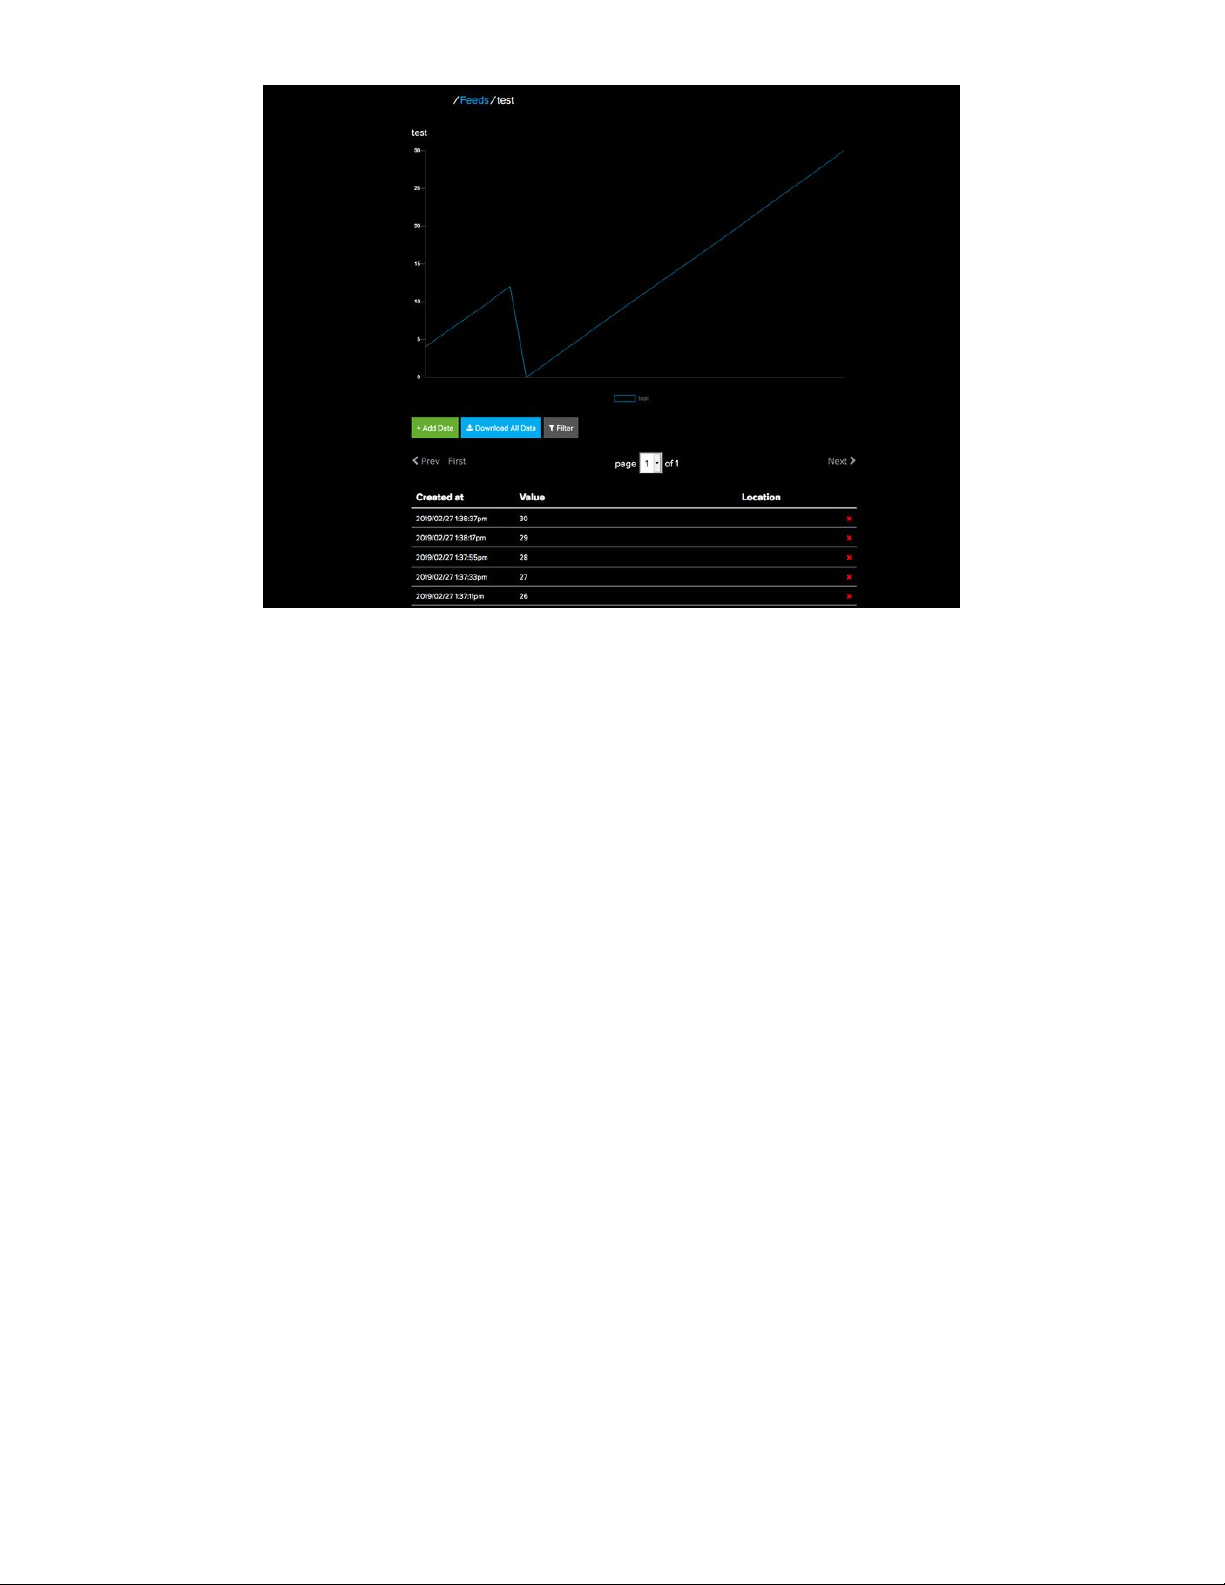
Take a look at your test feed on Adafruit.io and you'll see the value increase each time the CircuitPython
board posts data to it!
© Adafruit Industries
https://learn.adafruit.com/pyportal-smart-thermometer-with-analog-devices-adt7410-
adafruit-io-and-circuitpython
Page 23 of 32
Page 24
© Adafruit Industries
https://learn.adafruit.com/pyportal-smart-thermometer-with-analog-devices-adt7410-
adafruit-io-and-circuitpython
Page 24 of 32
Page 25

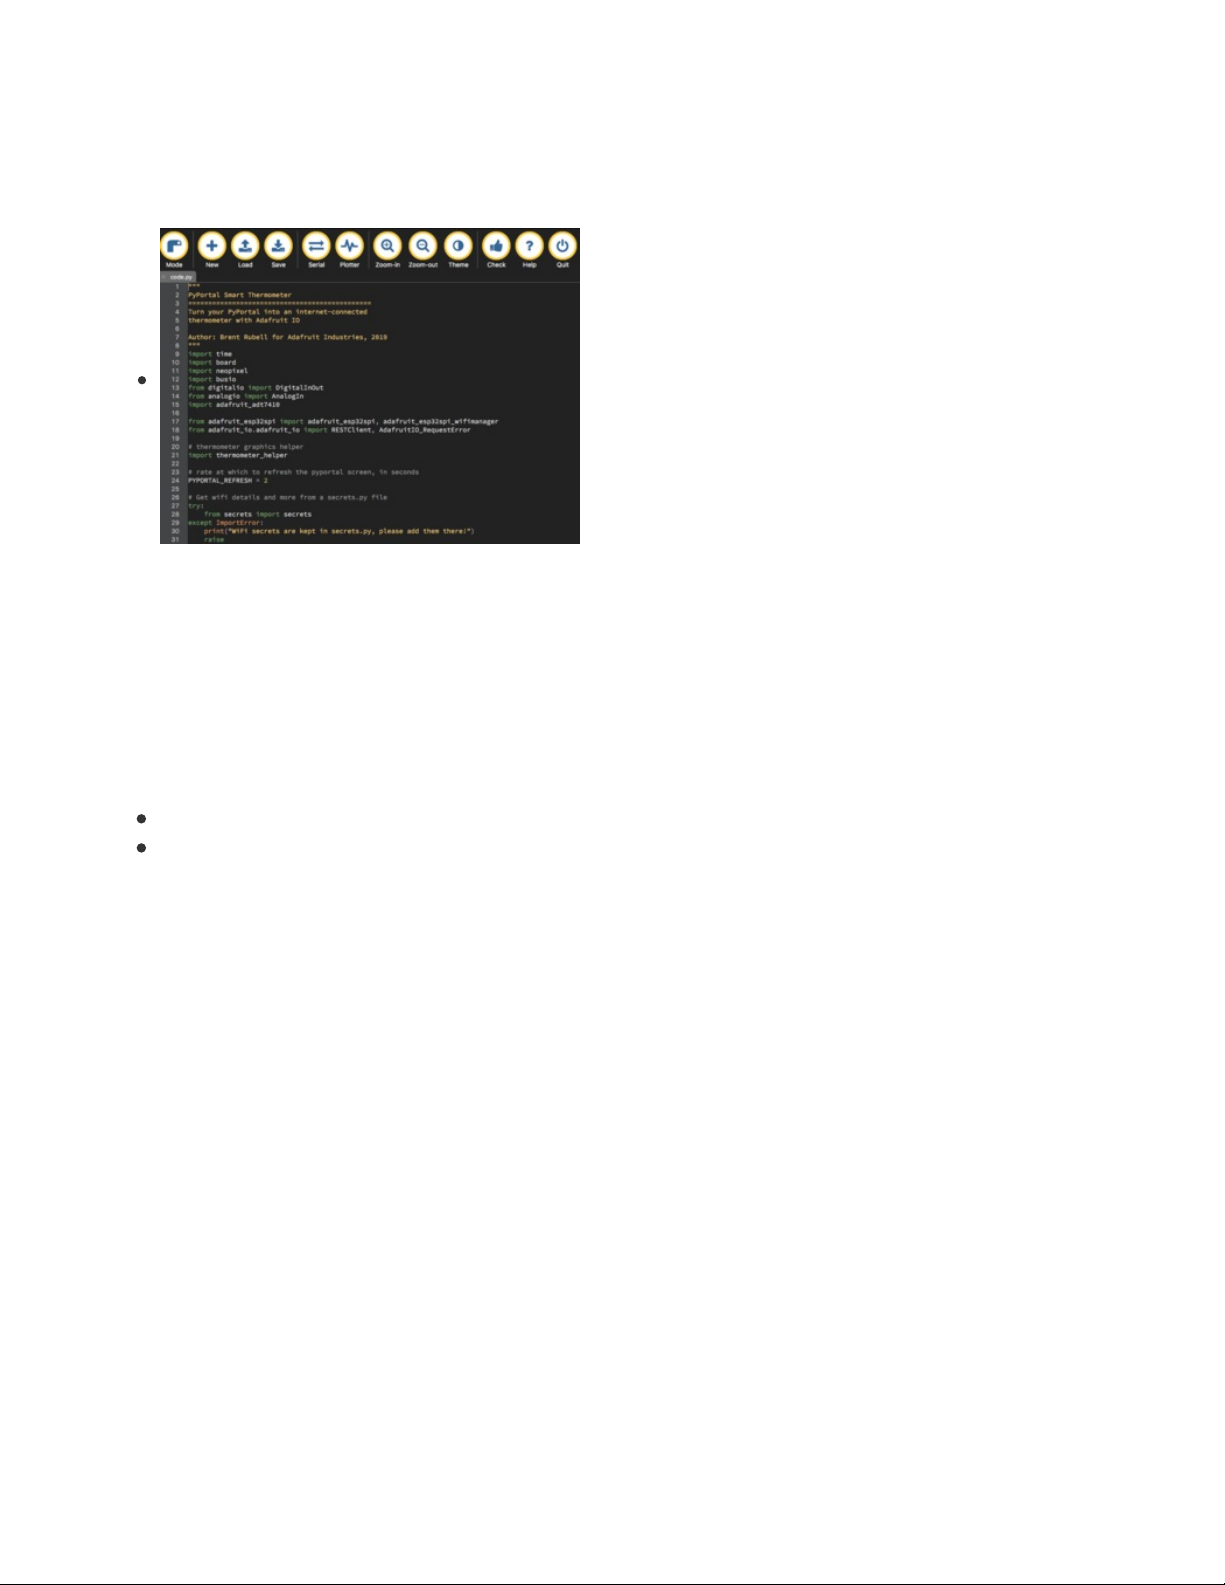
Code PyPortal with CircuitPython
Secrets File Setup
If you have not yet set up a secrets.py file in your CIRCUITPY drive and connected to the internet using it,
follow this guide and come back when you've successfully connected to the internet (https://adafru.it/Eao).
Adafruit IO username, and Adafruit IO key. Head to io.adafruit.com (https://adafru.it/fsU) and simply click
the View AIO Key link on the left hand side of the Adafruit IO page to get this information.
Then, add them to the secrets.py file:
secrets = {
'ssid' : '_your_wifi_ssid',
'password : '_your_wifi_password',
'aio_username' : '_your_adafruit_io_username',
'aio_key' : '_your_big_huge_super_long_aio_key_'
}
Add Libraries
Download the Adafruit CircuitPython Library Bundle. You can find the latest release here:
https://adafru.it/ENC
At a minimum we recommend the following libraries, in fact we more than recommend. They're basically
required. So grab them and install them into CIRCUITPY/lib now!
adafruit_esp32spi - This is the library that gives you internet access via the ESP32 using (you guessed
it!) SPI transport. You need this for anything Internet
adafruit_requests - This library allows us to perform HTTP requests and get responses back from
servers. GET/POST/PUT/PATCH - they're all in here!
adafruit_pyportal - This is our friendly wrapper library that does a lot of our projects, displays graphics
and text, fetches data from the internet. Nearly all of our projects depend on it!
adafruit_touchscreen - a library for reading touches from the resistive touchscreen. Handles all the
analog noodling, rotation and calibration for you.
adafruit_io - this library helps connect the PyPortal to our free datalogging and viewing service
adafruit_imageload - an image display helper, required for any graphics!
adafruit_display_text - not surprisingly, it displays text on the screen
adafruit_bitmap_font - we have fancy font support, and its easy to make new fonts. This library reads
and parses font files.
adafruit_slideshow - for making image slideshows - handy for quick display of graphics and sound
neopixel - for controlling the onboard neopixel
adafruit_adt7410 - library to read the temperature from the on-board Analog Devices ADT7410
precision temperature sensor
adafruit_sdcard - support for reading/writing data from the onboard SD card slot.
adafruit_bus_device - low level support for I2C/SPI
Add CircuitPython Code and Project Assets
In the embedded code element below, click on the Download: Project Zip link, and save the .zip archive file
to your computer.
https://adafru.it/ENC
© Adafruit Industries
https://learn.adafruit.com/pyportal-smart-thermometer-with-analog-devices-adt7410-
adafruit-io-and-circuitpython
Page 25 of 32
Page 26

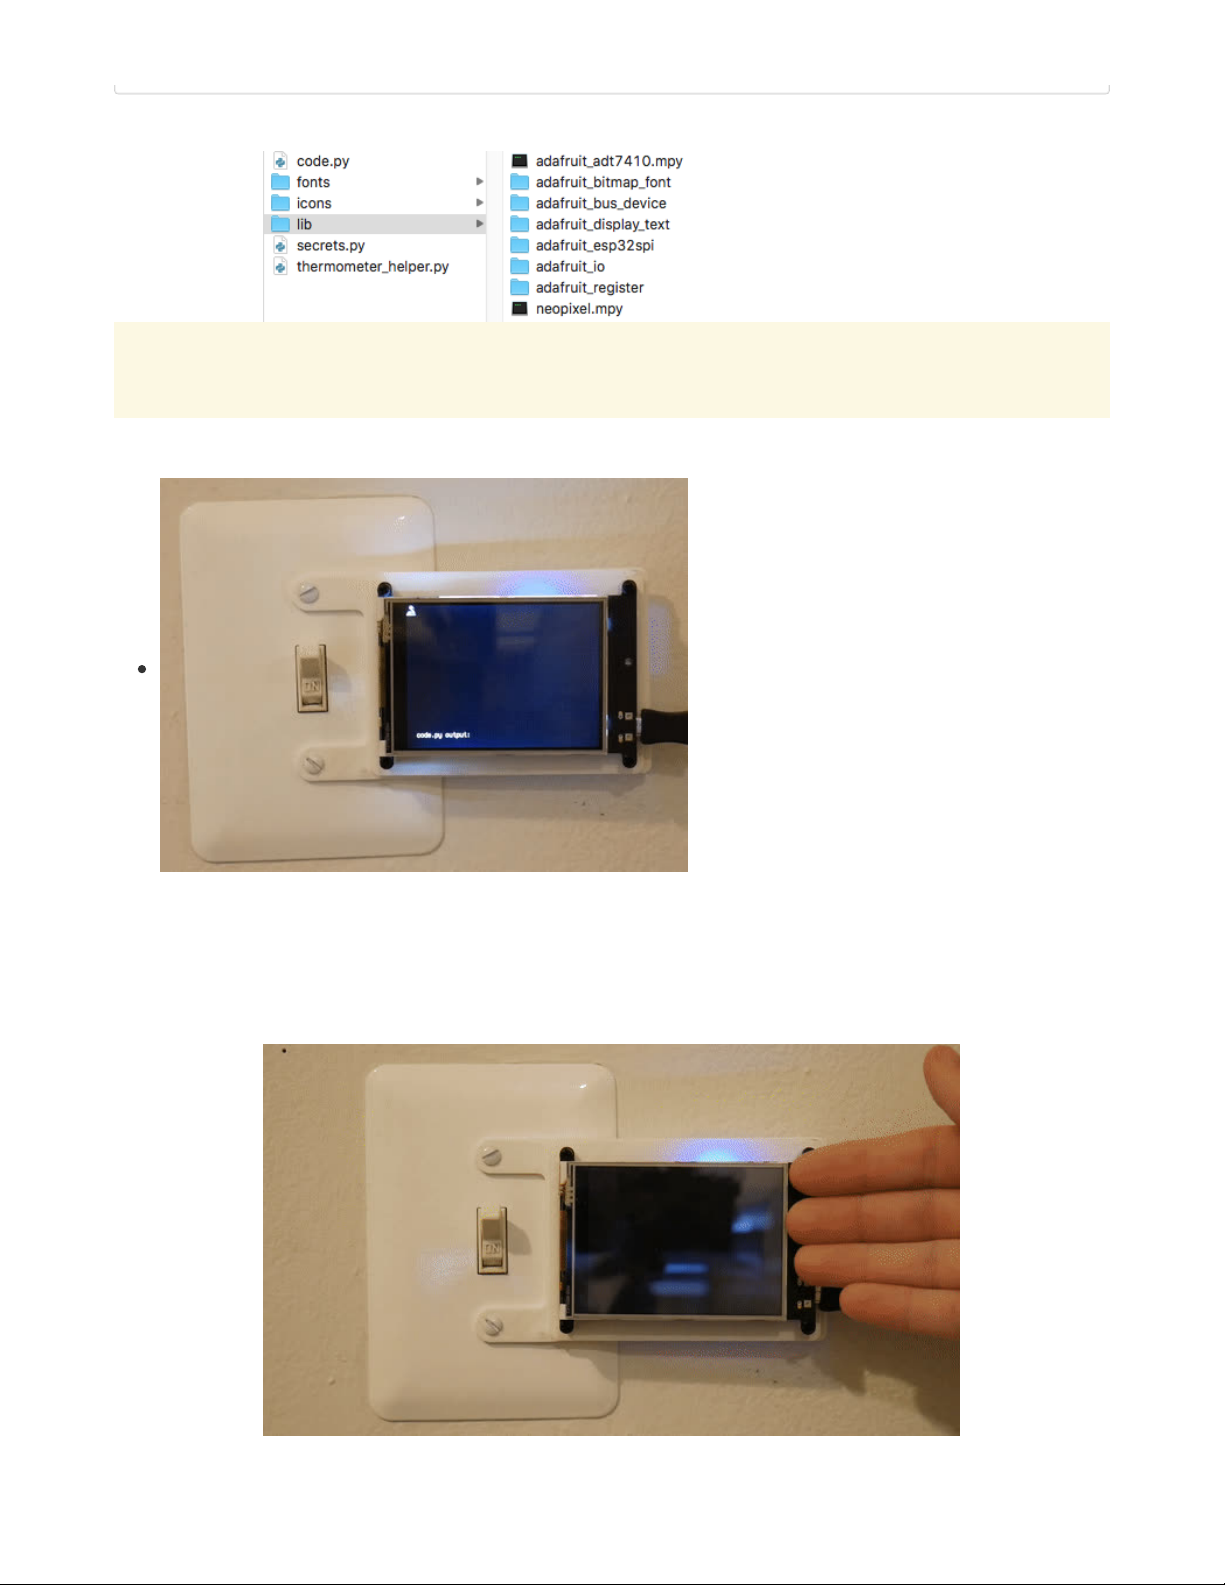
Then, uncompress the .zip file, it will unpack to a folder named PyPortal_Smart_Thermometer.
Copy the contents of the PyPortal_Smart_Thermometer directory to your PyPortal's CIRCUITPY drive.
Make sure to save the fonts (Ninito-Black-17.bdf and Ninito-Light-75.bdf) into the
fonts
folder on the
CIRCUITPY volume and save pyportal_splash.bmp into the
icons
folder.
Rename the thermometer.py file to code.py so it will automatically run when the PyPortal restarts.
"""
PyPortal Smart Thermometer
==============================================
Turn your PyPortal into an internet-connected
thermometer with Adafruit IO
Author: Brent Rubell for Adafruit Industries, 2019
"""
import time
import board
import neopixel
import busio
from digitalio import DigitalInOut
from analogio import AnalogIn
import adafruit_adt7410
from adafruit_esp32spi import adafruit_esp32spi, adafruit_esp32spi_wifimanager
from adafruit_io.adafruit_io import IO_HTTP, AdafruitIO_RequestError
# thermometer graphics helper
import thermometer_helper
# rate at which to refresh the pyportal screen, in seconds
PYPORTAL_REFRESH = 2
# Get wifi details and more from a secrets.py file
try:
from secrets import secrets
except ImportError:
print("WiFi secrets are kept in secrets.py, please add them there!")
raise
# PyPortal ESP32 Setup
esp32_cs = DigitalInOut(board.ESP_CS)
esp32_ready = DigitalInOut(board.ESP_BUSY)
esp32_reset = DigitalInOut(board.ESP_RESET)
spi = busio.SPI(board.SCK, board.MOSI, board.MISO)
esp = adafruit_esp32spi.ESP_SPIcontrol(spi, esp32_cs, esp32_ready, esp32_reset)
status_light = neopixel.NeoPixel(board.NEOPIXEL, 1, brightness=0.2)
wifi = adafruit_esp32spi_wifimanager.ESPSPI_WiFiManager(esp, secrets, status_light)
# Set your Adafruit IO Username and Key in secrets.py
# (visit io.adafruit.com if you need to create an account,
© Adafruit Industries
https://learn.adafruit.com/pyportal-smart-thermometer-with-analog-devices-adt7410-
adafruit-io-and-circuitpython
Page 26 of 32
Page 27

# or if you need your Adafruit IO key.)
try:
ADAFRUIT_IO_USER = secrets['aio_username']
ADAFRUIT_IO_KEY = secrets['aio_key']
except KeyError:
raise KeyError('To use this code, you need to include your Adafruit IO username \
and password in a secrets.py file on the CIRCUITPY drive.')
# Create an instance of the IO_HTTP client
io = IO_HTTP(ADAFRUIT_IO_USER, ADAFRUIT_IO_KEY, wifi)
# Get the temperature feed from Adafruit IO
temperature_feed = io.get_feed('temperature')
# init. graphics helper
gfx = thermometer_helper.Thermometer_GFX(celsius=False)
# init. adt7410
i2c_bus = busio.I2C(board.SCL, board.SDA)
adt = adafruit_adt7410.ADT7410(i2c_bus, address=0x48)
adt.high_resolution = True
# init. the light sensor
light_sensor = AnalogIn(board.LIGHT)
def set_backlight(val):
"""Adjust the TFT backlight.
:param val: The backlight brightness. Use a value between ``0`` and ``1``, where ``0`` is
off, and ``1`` is 100% brightness.
"""
val = max(0, min(1.0, val))
board.DISPLAY.auto_brightness = False
board.DISPLAY.brightness = val
while True:
# read the light sensor
light_value = light_sensor.value
print('Light Value: ', light_value)
# read the temperature sensor
temperature = adt.temperature
try: # WiFi Connection
if light_value < 1000: # turn on the backlight
set_backlight(1)
print('displaying temperature...')
gfx.display_temp(temperature)
# Get and display date and time form Adafruit IO
print('Getting time from Adafruit IO...')
datetime = io.receive_time()
print('displaying time...')
gfx.display_date_time(datetime)
else: # turn off the backlight
set_backlight(0)
try: # send temperature data to IO
gfx.display_io_status('Sending data...')
print('Sending data to Adafruit IO...')
io.send_data(temperature_feed['key'], temperature)
print('Data sent!')
gfx.display_io_status('Data sent!')
except AdafruitIO_RequestError as e:
raise AdafruitIO_RequestError('IO Error: ', e)
except (ValueError, RuntimeError) as e: # WiFi Connection Failure
print("Failed to get data, retrying\n", e)
wifi.reset()
continue
time.sleep(PYPORTAL_REFRESH)
© Adafruit Industries
https://learn.adafruit.com/pyportal-smart-thermometer-with-analog-devices-adt7410-
adafruit-io-and-circuitpython
Page 27 of 32
Page 28
This is what the final contents of the CIRCUITPY drive will look like:
If you run into any errors, such as "ImportError: no module named `adafruit_display_text.label`" be sure
to update your libraries to the latest release bundle!
Code Usage
Your PyPortal will boot up to a splash screen
displaying the PyPortal logo along with the Analog
Devices and Adafruit IO logos.
While the PyPortal
seems
like it's just displaying a
splash screen - it is doing a lot of work behind the
scenes! The PyPortal is loads in the two fonts this
project requires and sets up labels for displaying
text.
Wave your hand in front of the PyPortal's light sensor to turn on the display's backlight!
Your PyPortal Thermometer will display the current temperature reading, pull in the date and time from
Adafruit IO (based off of your IP address), and send the data to Adafruit IO.
When it finishes sending data, it'll turn the display back off but continue to send data to Adafruit IO.
© Adafruit Industries
https://learn.adafruit.com/pyportal-smart-thermometer-with-analog-devices-adt7410-
adafruit-io-and-circuitpython
Page 28 of 32
Page 29
Why is the backlight off by default?
When the backlight is turned on, it produces heat. This interferes with the ADT7410's ambient temperature
readings.
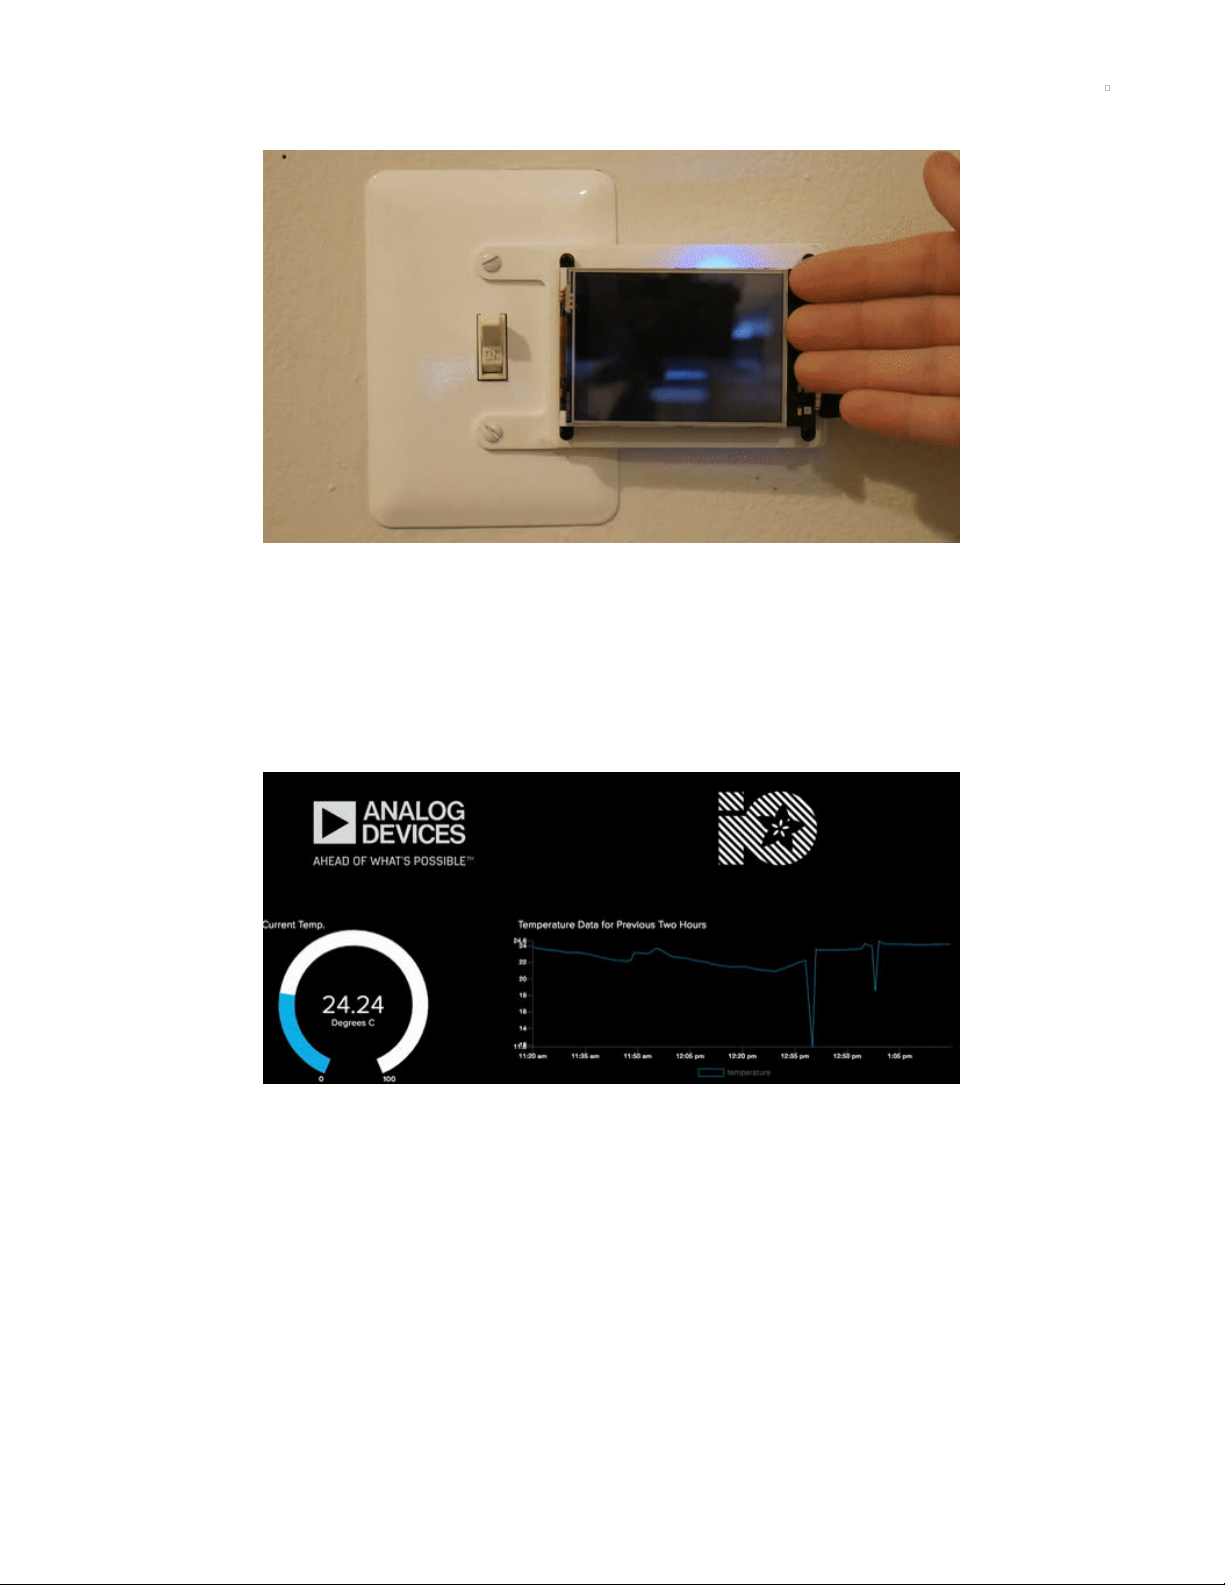
Adafruit IO Usage
While the PyPortal thermostat can display its temperature along with the current date/time on its screen what if you're physically away from the thermostat?
How do we know that the temperature data is being sent from the thermostat to Adafruit IO?
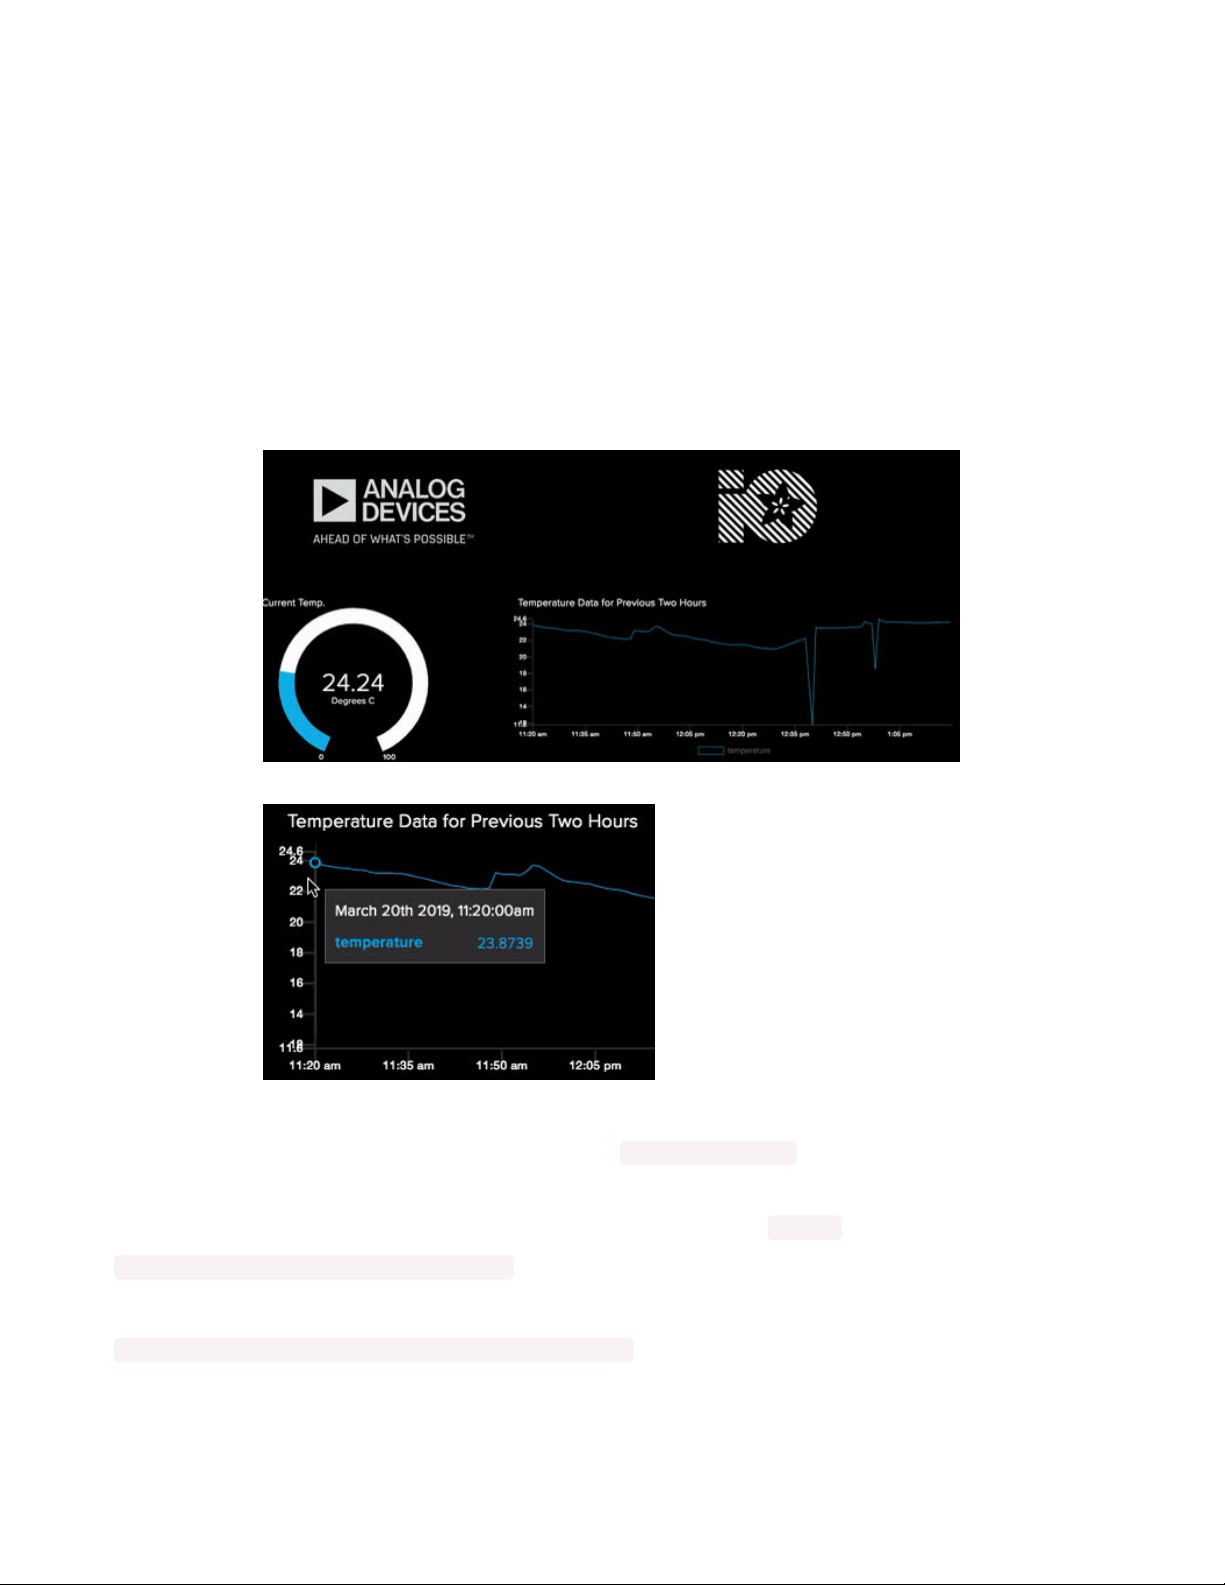
Open the Adafruit IO Dashboard you created earlier. Notice that the fill and values of the gauge changes as
values are sent from your PyPortal to Adafruit IO.
Then, leave the PyPortal running for a while and come back later to see new data appear on the line graph.
PyPortal Customization
Displaying temperature in Fahrenheit
Live in a region where Fahrenheit is the standard? The thermometer_helper can handle displaying the
temperature as either Fahrenheit or Celsius.
To display the temperature in Fahrenheit , modify the following line in code.py from:
gfx = thermometer_helper.Thermometer_GFX()
to
gfx = thermometer_helper.Thermometer_GFX(celsius=False)
Changing fonts
Want to use a different font? The fonts for this project are referenced at the top of
© Adafruit Industries
https://learn.adafruit.com/pyportal-smart-thermometer-with-analog-devices-adt7410-
adafruit-io-and-circuitpython
Page 29 of 32
Page 30
the thermometer_helper.py file as info_font and temperature_font .
The PyPortal reads .BDF (bitmap distribution format) fonts, so you'll need to convert a font into this format,
and then modify the code to use the new font.
For more information about converting fonts, read the learning guide here... (https://adafru.it/Em4)
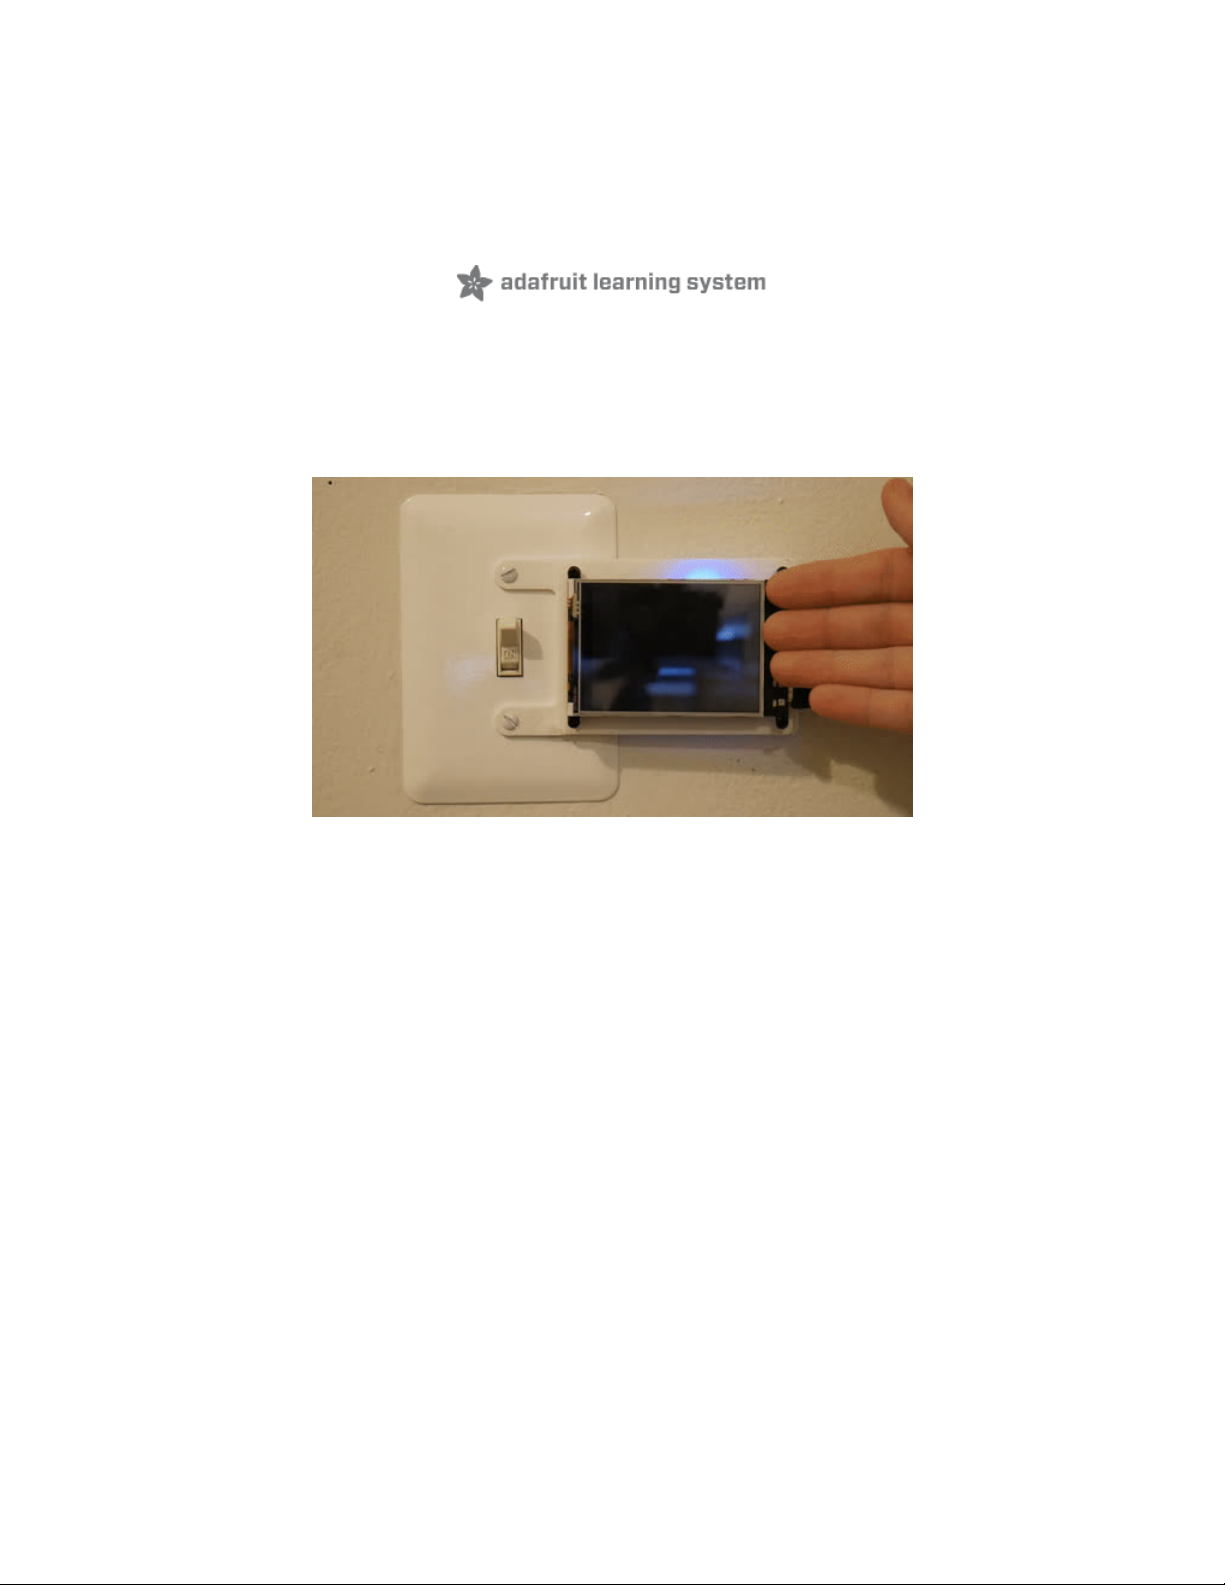
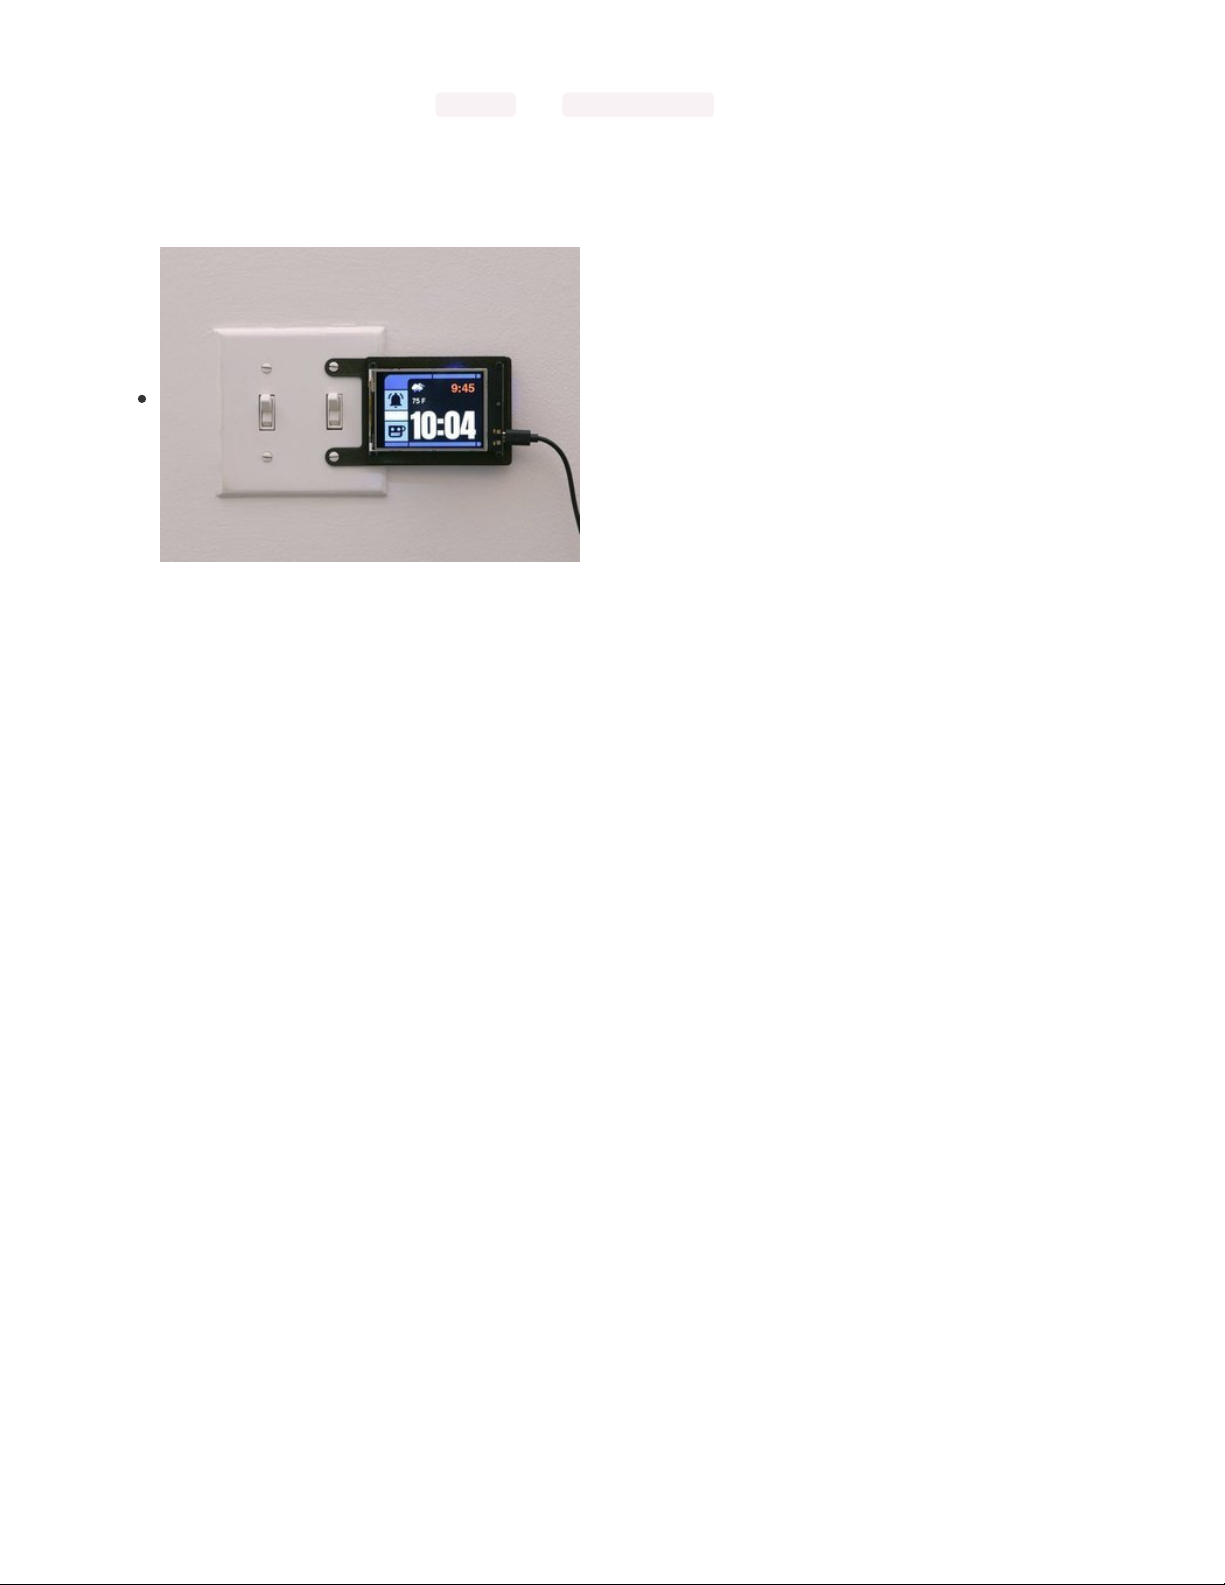
Custom Wall Mount
The wall mount used in this project PyPortal was created by the
Ruiz Brothers. For detailed instructions about how to print your
own, check out the learning system guide
here (https://adafru.it/Ek0).
© Adafruit Industries
https://learn.adafruit.com/pyportal-smart-thermometer-with-analog-devices-adt7410-
adafruit-io-and-circuitpython
Page 30 of 32
Page 31

© Adafruit Industries
https://learn.adafruit.com/pyportal-smart-thermometer-with-analog-devices-adt7410-
adafruit-io-and-circuitpython
Page 31 of 32
Page 32

© Adafruit Industries Last Updated: 2021-03-17 01:18:03 PM EDT Page 32 of 32
 Loading...