

Page 1

Adafruit NeoPixel Überguide
Created by Phillip Burgess
Last updated on 2018-07-30 11:48:15 PM UTC
Page 2

2
5
5
6
6
6
7
8
8
10
10
11
12
13
13
15
17
17
17
17
19
19
20
20
20
21
21
22
23
23
23
23
24
24
25
26
26
26
26
27
28
29
29
Guide Contents
Guide Contents
The Magic of NeoPixels
Important Things to Know About NeoPixels in General
Can I use NeoPixels for POV (persistence of vision) displays?
How about for light painting?
Is there a limit to the number of NeoPixels in a chain?
Form Factors
NeoPixel Strips
RGB NeoPixel Strips
Mini Skinny RGB NeoPixel Strips
RGBW NeoPixel Strips
Ultraviolet NeoPixel Strips
Finer Details About NeoPixel Strips
NeoPixel Rings
NeoPixel Ring Product Selector (http://adafru.it/3042)
Finer Details About NeoPixel Rings
NeoPixel Matrices
Rigid 8x8 NeoPixel Matrices
NeoPixel Matrix Product Selector (http://adafru.it/3052)
Flexible NeoPixel Matrices
Finer Details About NeoPixel Matrices
We also have a few special-purpose matrices on the NeoPixel Shields page!
NeoPixel Shields
NeoPixel Shield for Arduino
NeoPixel Shield Product Selector (https://adafru.it/lCw)
NeoPixel FeatherWing
Pimoroni Unicorn Hat
Particle/Spark NeoPixel Ring Kit
Other NeoPixel Shapes
NeoPixel Stick
NeoPixel Stick Product Selector (http://adafru.it/3039)
NeoPixel Jewels
NeoPixel Jewel Product Selector (http://adafru.it/3047)
1/4 60 NeoPixel Ring
NeoPixel Ring Product Selector (http://adafru.it/3042)
Individual NeoPixels
Integrated NeoPixel Products
Flora RGB Smart NeoPixels
Breadboard-Friendly RGB Smart NeoPixels
NeoPixel Mini PCB
Discrete NeoPixel Products
Through-Hole NeoPixels
SMT NeoPixels
© Adafruit Industries https://learn.adafruit.com/adafruit-neopixel-uberguide Page 2 of 68
Page 3

31
32
33
34
34
35
37
37
37
38
38
38
39
40
41
41
41
42
42
42
42
43
45
45
46
46
46
46
47
47
50
50
51
51
51
53
53
56
56
56
56
56
56
57
57
WS2811 Driver IC
Basic Connections
Can NeoPixels be powered directly from the Arduino’s 5V pin?
Best Practices
Improper use can damage your NeoPixels. Before diving in, be aware of the following:
Powering NeoPixels
Estimating Power Requirements
I estimate I need a 3.6 Amp power supply. I have a 10 Amp supply on-hand. Will this cause my NeoPixels to
explode?
What about batteries and “Amp hours”?
I need to power LOTS of NeoPixels and don’t have a power supply that large. Can I use several smaller ones?
Giant Power Supplies
Distributing Power
Driving 5V NeoPixels from 3.3V Microcontrollers
Software
Arduino Library Installation
Install Adafruit_NeoPixel via Library Manager
Manually Install Adafruit_NeoPixel Library
A Simple Code Example: strandtest
Nothing happens!
Something happens but the LEDs are blinking in a weird way!
I don't have RGBW LEDs and the LEDs are still blinking weird!
Arduino Library Use
I’m calling setPixel() but nothing’s happening!
Can I have multiple NeoPixel objects on different pins?
Can I connect multiple NeoPixel strips to the same Arduino pin?
I'm getting the wrong colors. Red and blue are swapped!
The colors fall apart when I use setBrightness() repeatedly!
Pixels Gobble RAM
NeoMatrix Library
Layouts
Why not just use the rotation feature in Adafruit_GFX?
Tiled Matrices
Other Layouts
RAM Again
Gamma Correction
CircuitPython
Setting Up
Advanced Coding
FastLED Library
FAQ and Further Programming Insights
Help! My Arduino servo code stops working when combined with NeoPixels!
When driving NeoPixels I cannot receive infrared codes on my IR receiver!
How fast can I refresh a string of (N) pixels?
That won’t do. Now what?
Can I control NeoPixels using (Board X)?
© Adafruit Industries https://learn.adafruit.com/adafruit-neopixel-uberguide Page 3 of 68
Page 4

57
57
58
58
58
59
60
60
60
61
62
63
64
65
66
67
Why not Raspberry Pi?
DMA NeoPixels for ARM Cortex-M0 Boards
Third-Party Libraries
WS2811? WS2812? Why do I see two different names mentioned?
Writing Your Own Library
My Microcontroller Isn’t Fast Enough to Do That
Downloads
NeoPixel 12-LED Ring
NeoPixel 16-LED Ring
NeoPixel 24-LED Ring
NeoPixel 1/4 60-LED Ring
NeoPixel Jewel
Breadboard Friendly NeoPixel Breakout
NeoPixel NeoMatrix 8x8
NeoPixel Arduino Shield
NeoPixel 8 Stick
© Adafruit Industries https://learn.adafruit.com/adafruit-neopixel-uberguide Page 4 of 68
Page 5
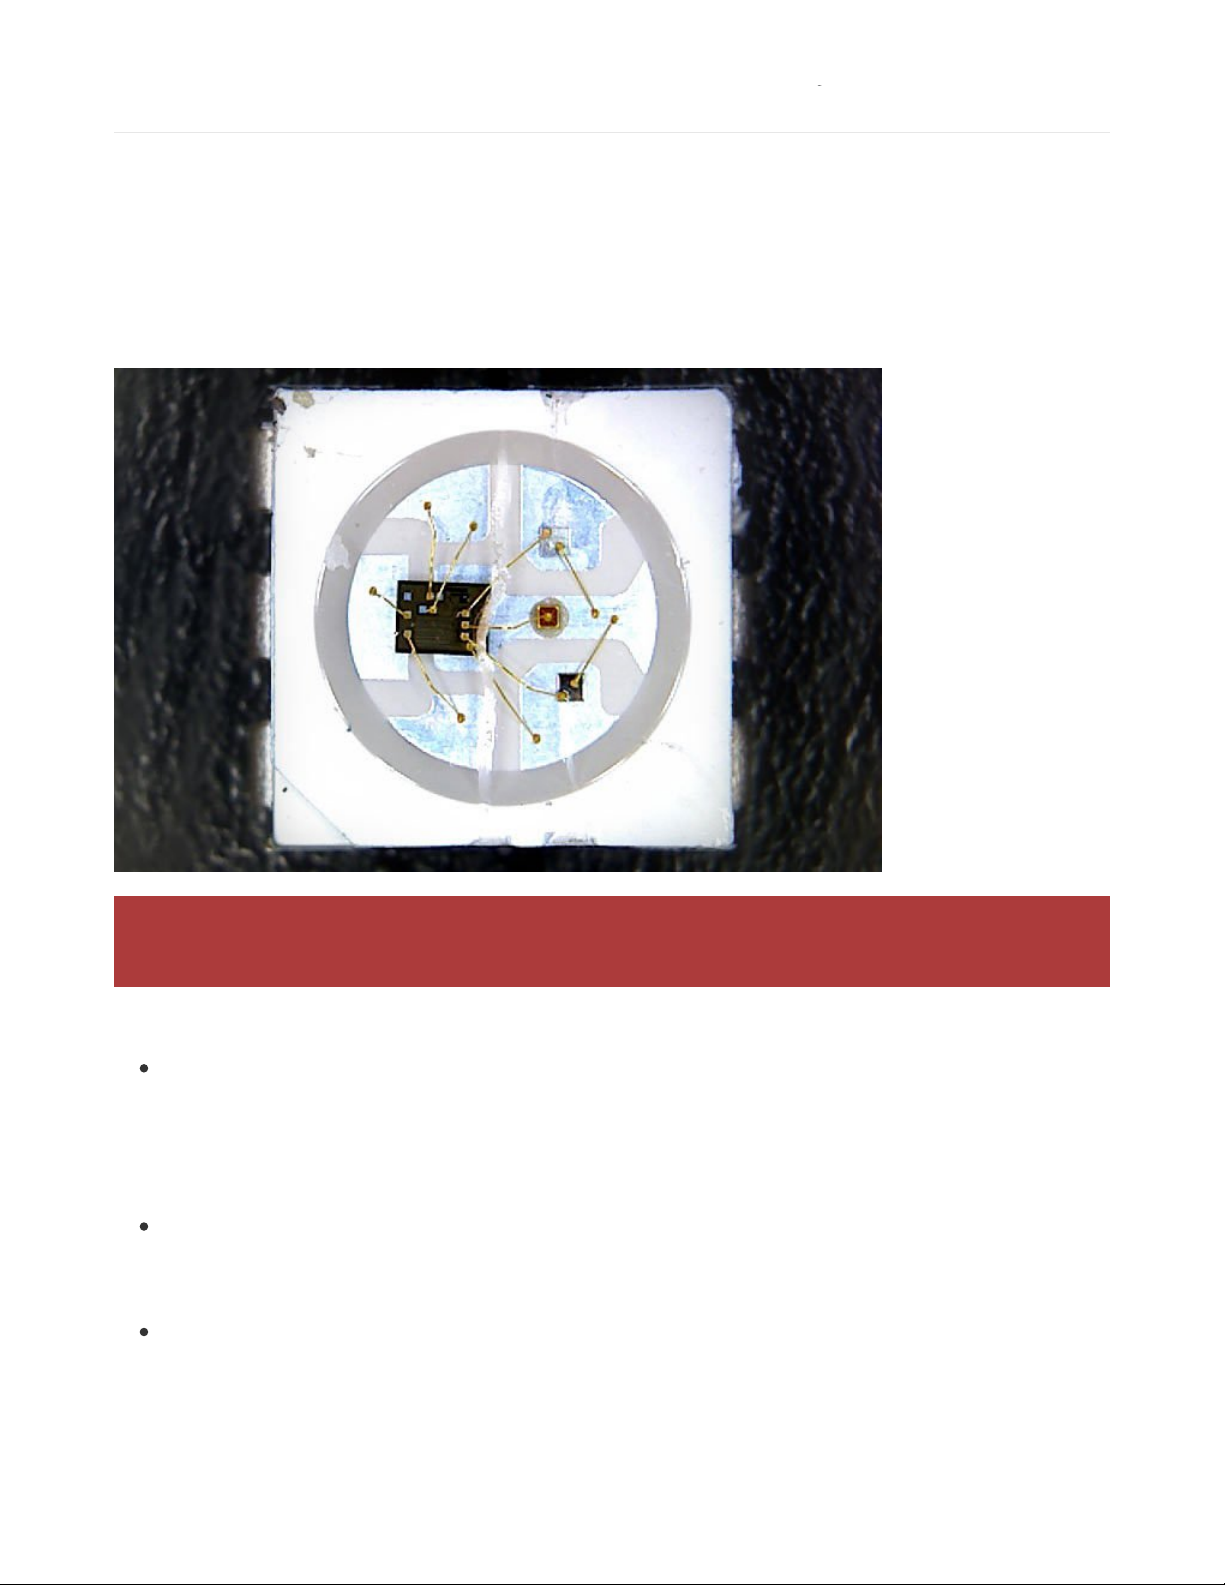
The Magic of NeoPixels
Incorporating scads of LEDs into an electronic project used to be a hairy prospect, a veritable rat’s nest of wires and
code. The arrival of dedicated LED driver chips brought welcome relief, offloading grunt work from the microcontroller
and allowing one to focus on the application. Much simpler, but still not “Christmas light” simple.
The WS2812 Integrated Light Source — or
NeoPixel
in Adafruit parlance — is the latest advance in the quest for a
simple, scalable and affordable full-color LED. Red, green and blue LEDs are integrated alongside a driver chip into a
tiny surface-mount package controlled through a single wire. They can be used individually, chained into longer strings
or assembled into still more interesting form-factors.
Important Things to Know About NeoPixels in General
Not all addressable LEDs are NeoPixels. “NeoPixel” is Adafruit’s brand for individually-addressable RGB color
pixels and strips based on the WS2812, WS2811 and SK6812 LED/drivers, using a single-wire control protocol.
Other LED products we carry — DotStars, WS2801 pixels, LPD8806 and “analog” strips — use different
methodologies (and have their own tutorials).
When seeking technical support in the forums, a solution can be
found more quickly if the correct LED type is mentioned, i.e. avoid calling DotStars “NeoPixels”…similar, but
different!
NeoPixels don’t just light up on their own; they require a microcontroller (such as Arduino) and some
programming. We provide some sample code to get you started. To create your own effects and animation, you’ll
need some programming practice. If this is a new experience, work through some of the beginning Arduino
tutorials to get a feel for the language.
NeoPixels aren’t the answer for every project. The control signal has very strict timing requirements, and some
development boards (such as Netduino or Raspberry Pi) can’t reliably achieve this. This is why we continue to
offer other LED types; some are more adaptable to certain situations.
We know you’re eager to get started…but If this is your first time using NeoPixels, please at least read the
“Best Practices” page before connecting anything!
© Adafruit Industries https://learn.adafruit.com/adafruit-neopixel-uberguide Page 5 of 68
Page 6

Can I use NeoPixels for POV (persistence of vision) displays?
Not recommended. The refresh rate is relatively low (about 400 Hz), and color displays in fast motion may appear
“speckled.” They look fine in stationary displays though (signs, decorations, jewelry, etc.). For POV use, DotStar
strips will look much better (they have about a 20 KHz refresh rate).
How about for light painting?
Definitely! The slower movement used for photographic light painting doesn’t call attention to the limited refresh
rate; the results look great, especially with a light diffuser.
Is there a limit to the number of NeoPixels in a chain?
There’s no
inherent
limit in the maximum length of a NeoPixel chain, but eventually you’ll encounter any of various
practical
limits:
1. RAM: NeoPixels require some RAM from the host microcontroller; more pixels = more RAM. It’s only a few
bytes each, but as most microcontrollers are pretty resource-constrained, this becomes a very real
consideration for large projects.
2. Power: each NeoPixel draws a little bit of current; more pixels = more power. Power supplies likewise have
some upper limit.
3. Time: NeoPixels process data from the host microcontroller at a fixed data rate; more pixels = more time and
lower animation frame rates.
© Adafruit Industries https://learn.adafruit.com/adafruit-neopixel-uberguide Page 6 of 68
Page 7

Form Factors
NeoPixel products are available in a
zillion
form factors…from individual tiny pixels to huge matrices…plus strips, rings
and everything in-between.
Pick a category from the left column for product links and tips & tricks specific to each type of NeoPixel.
© Adafruit Industries https://learn.adafruit.com/adafruit-neopixel-uberguide Page 7 of 68
Page 8

NeoPixel Strips
The most popular type of NeoPixels are these flexible LED strips…they can be cut to length and fit into all manner of
things. We’ve got a
dozen
varieties! Two vital things to be aware of:
Though strips are described as “flexible,” they do not tolerate continuous and repeated bending. “Formable”
might be a better word. A typical application is architecture, where they can be curved around columns and then
stay put. Repeated flexing (as on costumes) will soon crack the solder connections. For wearable use, either affix
shorter segments to a semi-rigid base (e.g. a hat, BMX armor, etc.), or use the individual
sewable
NeoPixels
shown later.
Watch your power draw. Though each pixel only needs a little current, it adds up fast…NeoPixel strips are so
simple to use, one can quickly get carried away! We’ll explain more on the “Powering NeoPixels” page.
RGB NeoPixel Strips
NeoPixel Digital RGB LED Weatherproof Strip is
available in three different “densities”: 30, 60 and 144
LEDs per meter, on a white or black backing strip.
30 LEDs per meter, white
strip (http://adafru.it/1376)
30 LEDs per meter, black
strip (http://adafru.it/1460)
60 LEDs per meter, white
strip (http://adafru.it/1138)
60 LEDs per meter, black
strip (http://adafru.it/1461)
144 LEDs per meter, white
strip (http://adafru.it/1507)
144 LEDs per meter, black
strip (http://adafru.it/1506)
The
approximate
peak power use (all LEDs on at
maximum brightness) per meter is:
30 LEDs: 9 Watts (about 1.8 Amps at 5 Volts).
60 LEDs: 18 Watts (about 3.6 Amps at 5 Volts).
144 LEDs : 43 watts (8.6 Amps at 5 Volts).
Mixed colors and lower brightness settings will use
proportionally less power.
© Adafruit Industries https://learn.adafruit.com/adafruit-neopixel-uberguide Page 8 of 68
Page 9

© Adafruit Industries https://learn.adafruit.com/adafruit-neopixel-uberguide Page 9 of 68
Page 10

Mini Skinny RGB NeoPixel Strips
Mini Skinny
NeoPixel strips are about half the width of
classic NeoPixel strips. They’re available in two densities
and backing colors:
30 LEDs per meter, white
strip (http://adafru.it/2949)
30 LEDs per meter, black
strip (http://adafru.it/2954)
60 LEDs per meter, white
strip (https://adafru.it/lFs)
60 LEDs per meter, black
strip (http://adafru.it/2964)
144 LEDs per meter, white
strip (https://adafru.it/lXa)
144 LEDs per meter, black
strip (https://adafru.it/lXb)
30 and 60 LED/meter strips are 7.5 mm wide, or 5 mm if
you remove the strip from the casing (vs 12.5 mm / 10
mm for classic strips). The high-density 144/m strips are
about 10 mm wide, or 7.5mm with the casing removed.
Power requirements are similar to standard-width
NeoPixel strips as described above.
RGBW NeoPixel Strips
© Adafruit Industries https://learn.adafruit.com/adafruit-neopixel-uberguide Page 10 of 68
Page 11

A recent addition is RGBW NeoPixel strips. These add a
fourth LED element — pure white — which is more “true”
and pleasing to the eye than white mixed from
red+green+blue. Like the RGB strips, they’re available in
different pixel densities and backing strip colors.
30 RGBW LEDs per meter,
white strip (http://adafru.it/2832)
30 RGBW LEDs per meter, black
strip (http://adafru.it/2824)
60 RGBW LEDs per meter, white
strip (http://adafru.it/2842)
60 RGBW LEDs per meter, black
strip (http://adafru.it/2837)
144 RGBW LEDs per meter, white
strip (http://adafru.it/2847)
144 RGBW LEDs per meter, black
strip (http://adafru.it/2848)
With a fourth LED per pixel, these strips may potentially
draw up to 33% more current than their RGB
equivalents. The maximum brightest cases are
(approximately):
30 RGBW LEDs: 12 Watts (2.4 Amps at 5 Volts)
60 RGBW LEDs: 24 Watts (4.8 Amps at 5 Volts)
144 RGBW LEDs: 57 Watts (11.5 Amps at 5 Volts)
Width is the same as “classic” NeoPixel strip…these are
not
the “skinny” size.
Ultraviolet NeoPixel Strips
A single-color
ultraviolet
variant of NeoPixel strip is
available for special applications, currently one pixel
density and backing color:
32 UV LEDs per meter, white
strip (https://adafru.it/BZ5)
This can provide unusual effects when combined with
UV-reactive paints, fluorescent laser-cut acrylic, etc.
The usual NeoPixel R, G and B channels translate to
three individual UV diodes. So we recommend you
pretty much just set all three channels to the same
value, ranging from (0, 0, 0) to (255, 255, 255).
Same width as “classic” NeoPixel strip, and power draw
at full brightness should be just a bit more than RGB
30/m: about 9.6W/meter (1.9A @ 5V).
© Adafruit Industries https://learn.adafruit.com/adafruit-neopixel-uberguide Page 11 of 68
Page 12

Finer Details About NeoPixel Strips
144 pixel/m NeoPixel strips and 32/m UV strips are sold in one meter lengths. Each meter is a separate strip with
end connectors. Longer contiguous lengths are
not
offered in 144 pixels/m RGB, RGBW or 32/m UV.
30 and 60 pixel/m NeoPixel strips are sold in one meter
multiples.
Orders for multiple meters will be a single
contiguous strip, up to a limit: 4 meters for 60 pixels/m strip, 5 meters for 30 pixels/m.
For 30 and 60 pixels/meter strips, if purchasing less than a full reel (4 or 5 meters, respectively), the strip may or
may not have 3-pin JST plugs soldered at one or both ends. These plugs are for factory testing and might be at
either end — the plug does not always indicate the input end! Arrows printed on the strip show the actual data
direction. You may need to solder your own wires or plug.
The flex strips are enclosed in a weatherproof silicone sleeve, making them immune to rain and splashes, but are
not recommended for continuous submersion. Early 144 pixel/meter strips were not weatherproof, but the current
inventory now offers this feature.
The silicone sleeve can be cut and removed for a slimmer profile, but this compromises the strip's
weather resistance.
Very few glues will adhere to the weatherproof silicone sleeve. Using zip ties for a “mechanical” bond is usually
faster and easier. The only reliable glues we’ve found are Permatex 66B Clear RTV Silicone (not all silicone glues
will work!) and Loctite Plastics Bonding System, a 2-part cyanoacrylate glue. Customers have reported
excellent
results with Permatex Ultra Grey Silicone Gasket Maker as well.
However,
do not
use Permatex 66B silicone to seal the open end of a cut strip! Like many RTV silicones, 66B
releases acetic acid when curing, which can destroy electronics. It’s fine on the
outside
of the strip, but not
the
inside.
Use GE Silicone II for sealing strip ends, or good ol’ hot melt glue.
2-sided carpet tape provides a light grip on the silicone sleeve; something like a Post-It Note. Or you can try
clear duct tape over the top.
All LED strips are manufactured in 1/2 meter segments that are then joined into a longer strip. The pixel spacing
across these joins is usually 2-3 millimeters different than the rest. This is not a manufacturing mistake, just
physical reality.
Some batches of 144 pixel strip don’t have pads
between the LEDs. If you cut these into shorter sections,
the only way to connect to them (except at the half-
meter segments) is to carefully solder directly to the
LED. The corner with the notch is the GND pin.
NeoPixel strips are just the start…we’ve got
shapes
too! Rings, grids, shields and more…
© Adafruit Industries https://learn.adafruit.com/adafruit-neopixel-uberguide Page 12 of 68
Page 13

NeoPixel Rings
NeoPixel rings are circular rigid printed circuit boards festooned with NeoPixel LEDs. Originally designed for our
NeoPixel Goggles kit (http://adafru.it/2221), they proved so popular with other projects…timepieces, GPS wayfinders,
jewelry, etc…that we now offer several sizes and varieties…
Rather than list a zillion different links, we have a single landing page for selecting among all the different NeoPixel
ring products:
NeoPixel Ring Product Selector (http://adafru.it/3042)
NeoPixel rings are offered in 12, 16, 24 and 60 pixel
varieties.
60-pixel rings are actually sold as 15-pixel
quarters.
For
a full circle, you’ll need to purchase 4 and solder them
together. Or you might find creative ideas for
individual arcs!
© Adafruit Industries https://learn.adafruit.com/adafruit-neopixel-uberguide Page 13 of 68
Page 14

All rings are about 3.6 millimeters / 0.15" thick (1.6 mm for PCB, 2 mm for NeoPixels).
RGB NeoPixels are the most affordable and can
produce
millions
of color combinations.
RGBW NeoPixels offer an eye-pleasing “true” white
in
addition
to RGB. These are available in three different
color temperaures:
Cool white: approximately 6000 Kelvin (K).
Neutral: approx 4500K.
Warm white: approx. 3000K.
RGBW pixels incorporate a translucent diffuser layer to
help mix and soften the light output. This makes them
appear less intense than RGB pixels (which are “water
clear”), but it’s really the same LEDs inside.
Number of Pixels Outer Diameter Inner Diameter
12 37 mm / 1.5" 23 mm / 1"
16 44.5 mm / 1.75" 31.75 mm / 1.25"
24 66 mm / 2.6" 52.5 mm / 2.05"
60 (4x 15-pixel arcs) 158 mm / 6.2" 145 mm / 5.7"
© Adafruit Industries https://learn.adafruit.com/adafruit-neopixel-uberguide Page 14 of 68
Page 15

Finer Details About NeoPixel Rings
When soldering wires to these rings, you need to be extra vigilant about solder blobs and short circuits. The
spacing between components is
very
tight! It’s often easiest to insert the wire from the front and solder on the
back.
If using alligator clips, we recommend first soldering short jumper wires to the ring inputs and connecting the
clips to those, for similar reasons.
(Some of our tutorials and product photos do show alligator clips directly
connected to the rings, but we’ve had a lot of experience using them.)
© Adafruit Industries https://learn.adafruit.com/adafruit-neopixel-uberguide Page 15 of 68
Page 16
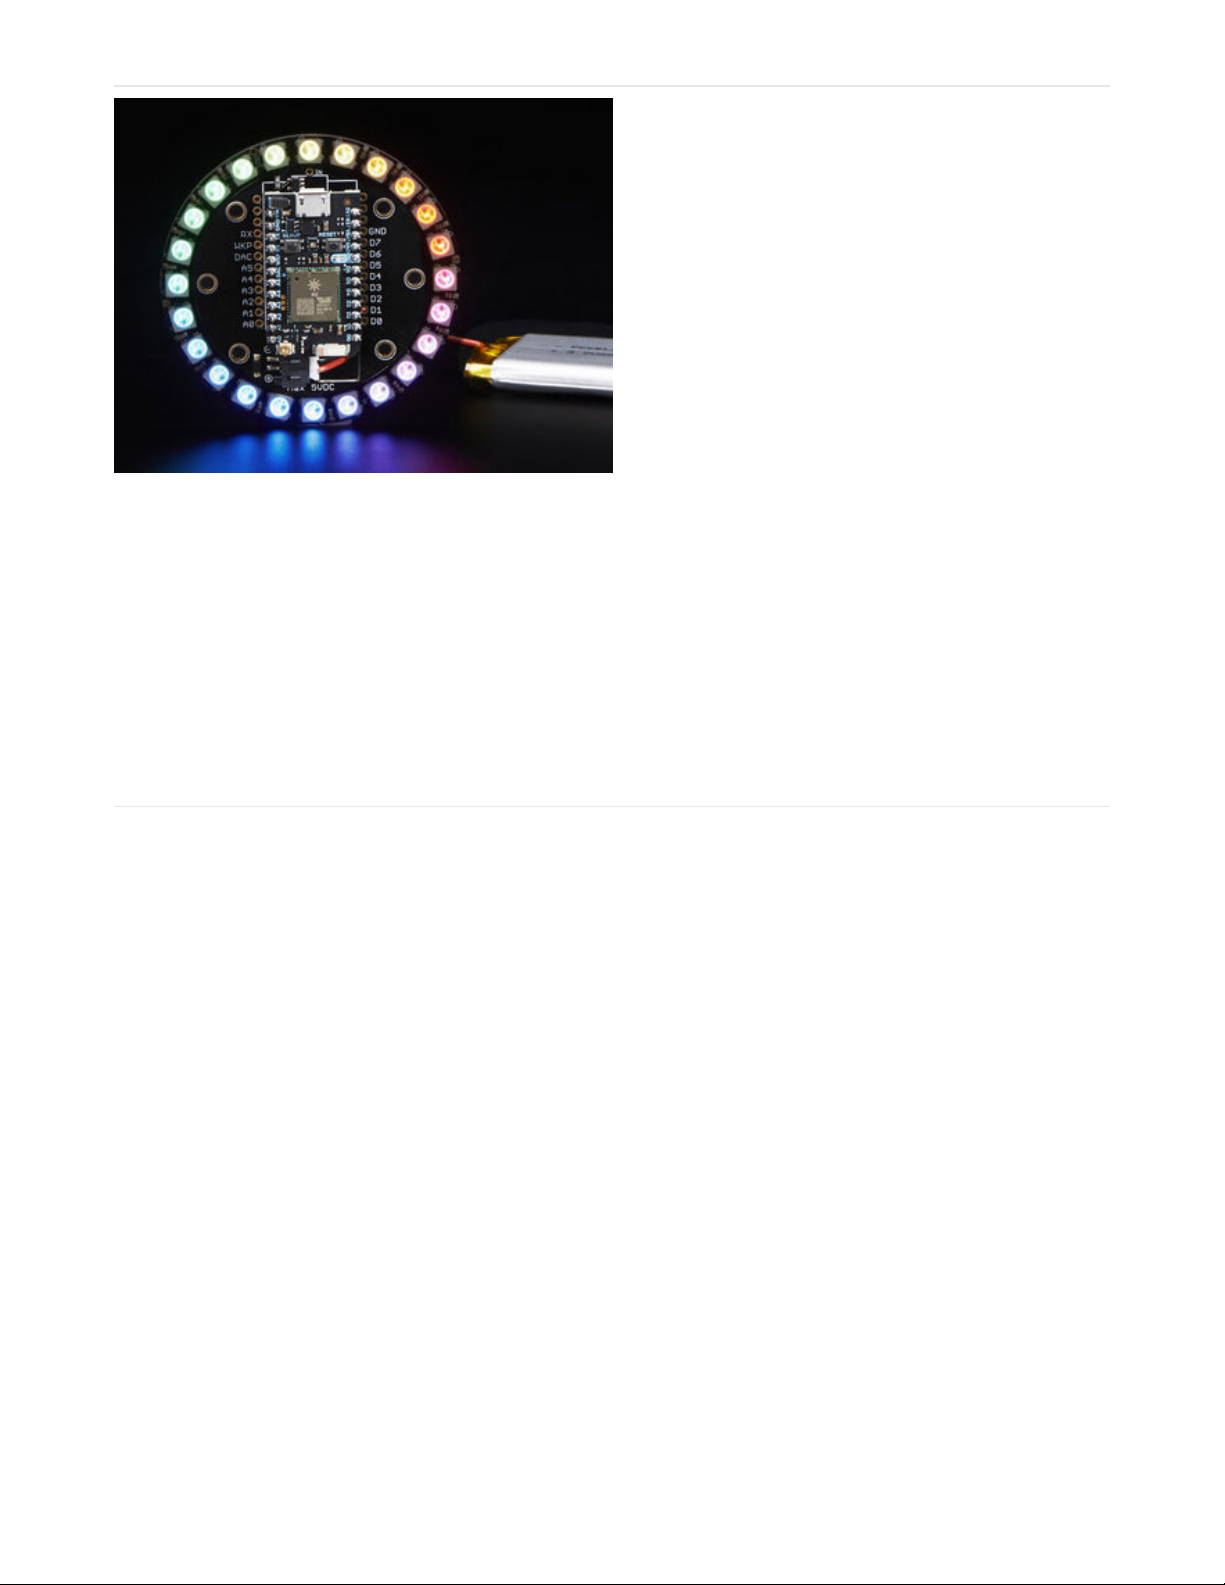
There’s also a 24-pixel RGB ring (http://adafru.it/2268)
specifically designed
for the Particle (formerly Spark)
Photon development board.
This one’s not “see-through” like the others — the space
at the center provides a socket for the Photon
board (http://adafru.it/2721).
© Adafruit Industries https://learn.adafruit.com/adafruit-neopixel-uberguide Page 16 of 68
Page 17

NeoPixel Matrices
NeoPixel matrices are two-dimensional
grids
of NeoPixels, all controlled from a single microcontroller pin.
Rigid 8x8 NeoPixel Matrices
Like NeoPixel rings, these 64-pixel matrices are assembled on a rigid printed circuit board and are available in both
RGB and RGBW varieties.
NeoPixel Matrix Product Selector (http://adafru.it/3052)
All measure 71 millimeters (2.8 inches) square and about 3.6 mm thick. There are several mounting holes, and the
DOUT pin allows multiple matrices to be linked in series.
RGB NeoPixels are the most affordable and can produce
millions
of color combinations.
RGBW NeoPixels offer an eye-pleasing “true” white
in addition
to RGB. These are available in three different color
temperaures:
Cool white: approximately 6000 Kelvin (K).
Neutral: approx 4500K.
Warm white: approx. 3000K.
RGBW pixels incorporate a translucent diffuser layer to help mix and soften the light output. This makes them appear
less intense than RGB pixels (which are “water clear”), but it’s really the same LEDs inside.
Flexible NeoPixel Matrices
© Adafruit Industries https://learn.adafruit.com/adafruit-neopixel-uberguide Page 17 of 68
Page 18

Flexible NeoPixel matrices are available in three
different sizes:
8x8 RGB pixels (http://adafru.it/2612)
16x16 RGB pixels (http://adafru.it/2547)
8x32 RGB pixels (http://adafru.it/2294)
© Adafruit Industries https://learn.adafruit.com/adafruit-neopixel-uberguide Page 18 of 68
Page 19

Flex matrices are about 2 millimeters (0.08 inches) thick.
Though called “flexible,” these matrices do not tolerate continuous and repeated bending. “Formable” might be a
better word — they can be bent around a rigid or semi-rigid shape, like a hat. Repeated flexing (as on costumes) will
soon crack the solder connections. (The videos on the product pages are to highlight just how flexible these
matrices are, but this really is a “don’t try this at home” thing.)
Flex matrices are available with RGB pixels only; RGBW is not offered.
Finer Details About NeoPixel Matrices
As mentioned on the NeoPixel Strips page, keep power consumption in mind when working with NeoPixel matrices.
With so many pixels at your disposal, it’s easy to get carried away.
If you need a size or shape of NeoPixel matrix that’s not offered here, it’s possible to create your own using sections of
NeoPixel strip!
NeoPixel matrices don’t enforce any particular “topology” — some may have rows of pixels arranged left-to-right,
others may alternate left-to-right and right-to-left rows, or they could be installed in vertical columns instead. This will
require some planning in your code. Our
NeoMatrix
library supports most matrix topologies.
We also have a few special-purpose matrices on the NeoPixel Shields page!
Size Dimensions Total # of LEDs Max Power Draw (approx)
8x8 80 mm / 3.15" square 64 19 Watts (3.8 Amps at 5 Volts)
16x16 160 mm / 6.3" square 256 77 Watts (15 Amps at 5 Volts)
8x32 320 mm x 80 mm / 12.6" x 3" 256 77 Watts (15 Amps at 5 Volts)
© Adafruit Industries https://learn.adafruit.com/adafruit-neopixel-uberguide Page 19 of 68
Page 20

NeoPixel Shields
Though not all “Shields” in the strictly-speaking Arduino sense, a few NeoPixel products are designed to fit directly
atop (or below) certain microcontroller boards…
NeoPixel Shield for Arduino
This 5x8 NeoPixel Shield for
Arduino (http://adafru.it/1430) fits neatly atop
an Arduino Uno or compatible boards (5V logic
recommended). Like many of our NeoPixel products,
they’re available in RGB and various RGBW pixel types:
NeoPixel Shield Product
Selector (https://adafru.it/lCw)
By default, the LEDs are powered from the Arduino’s 5V
pin. As long as you
aren't
lighting up all the pixels at full
brightness that should be fine. Or power the shield with
an external power supply by soldering the included
terminal block.
The NeoPixels are controlled on digital pin 6, but with
some deft wiring you could change this to any pin.
© Adafruit Industries https://learn.adafruit.com/adafruit-neopixel-uberguide Page 20 of 68
Page 21
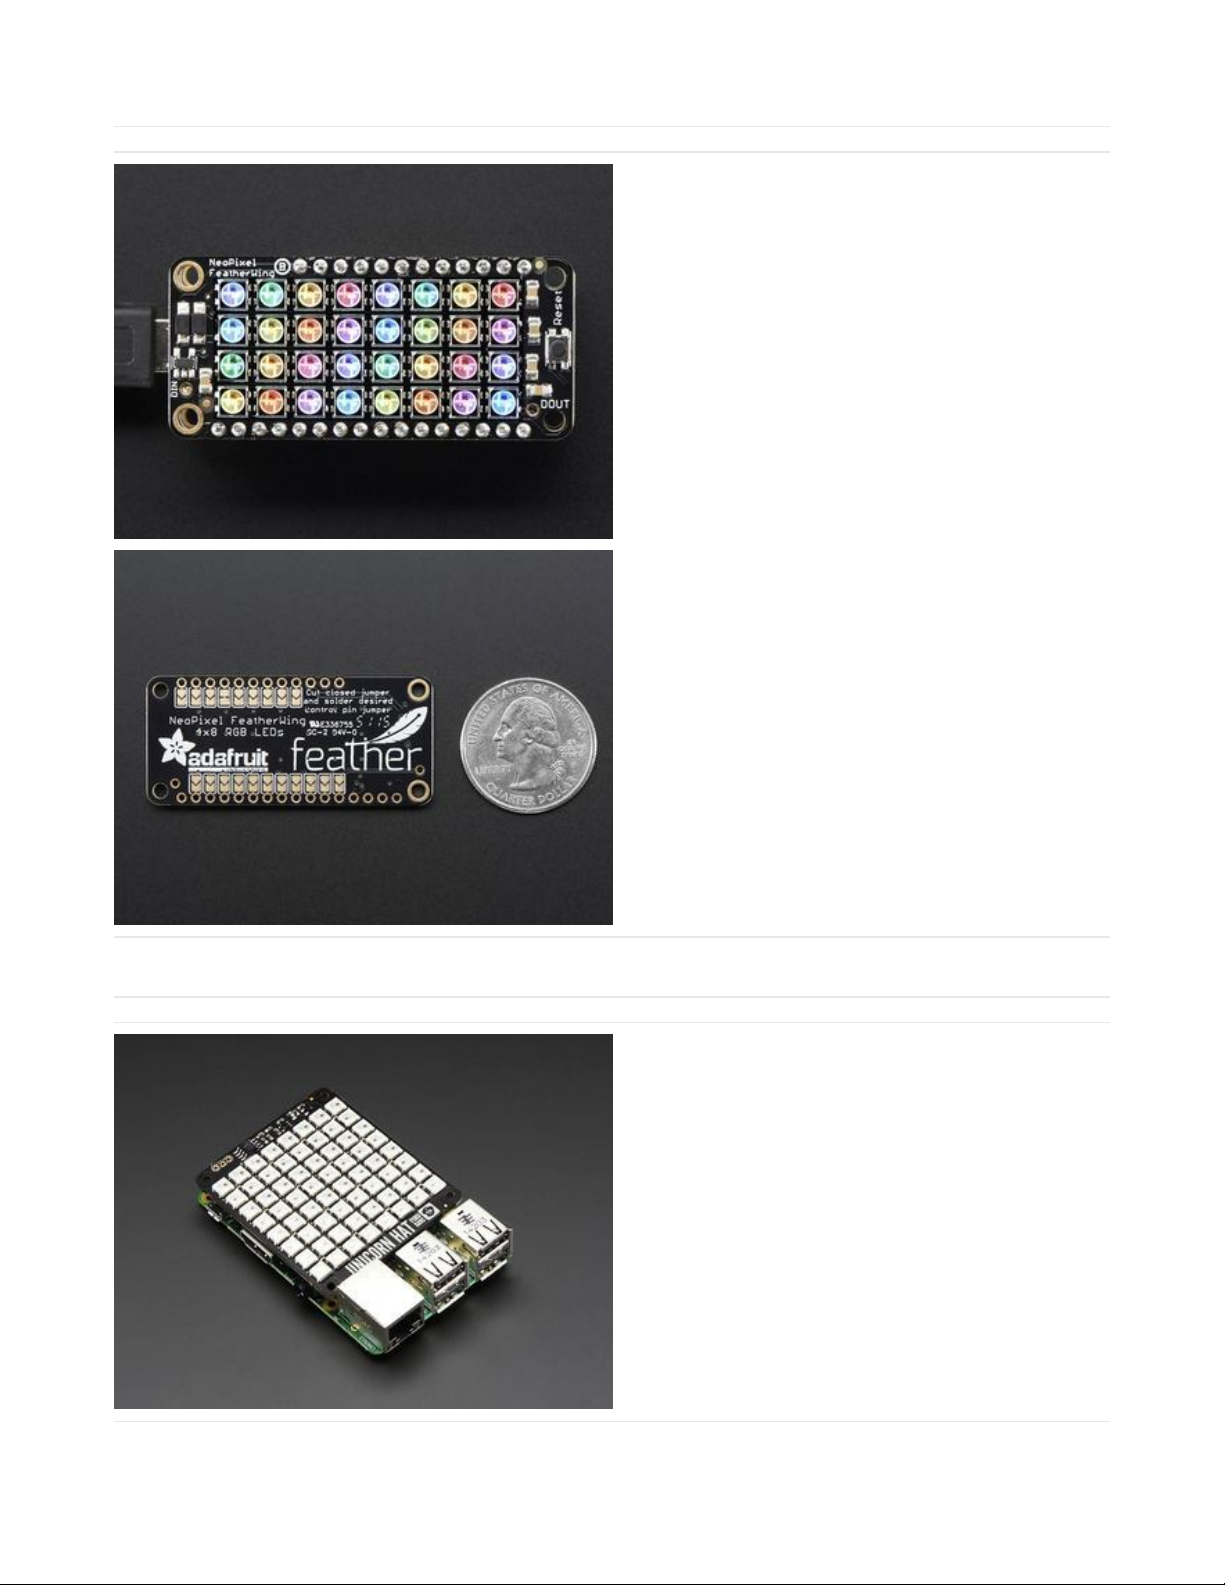
NeoPixel FeatherWing
Quite possibly
The Cutest Thing in the History of Cute
Little Things,
the NeoPixel
FeatherWing (http://adafru.it/2945) is is 4x8 pixel matrix
that fits
perfectly
atop any of our Feather microcontroller
boards (https://adafru.it/l7B).
The NeoPixels are normally controlled from digital pin 6,
but pads on the bottom make this reassignable. In
particular, the default pin for Feather Huzzah ESP8266
must be moved, try pin #15!
The NeoPixel Featherwing is RGB only; there’s no
RGBW version.
Pimoroni Unicorn Hat
The Pimoroni Unicorn Hat (http://adafru.it/2288) is aptly
named after a mythical animal — normally we’ll say that
NeoPixels don’t work with the Raspberry Pi, but
Pimoroni has worked up some magical
software (https://adafru.it/lCx) that makes this
combination possible! It’s an 8x8 RGB matrix that fits
neatly atop the Raspberry Pi Model A+, B+ or Pi 2.
Due to the way Unicorn HAT works, you can't use your
Pi's analog audio alongside it. If you see odd random
colour patterns and flickering make sure analog audio is
disabled.
© Adafruit Industries https://learn.adafruit.com/adafruit-neopixel-uberguide Page 21 of 68
Page 22
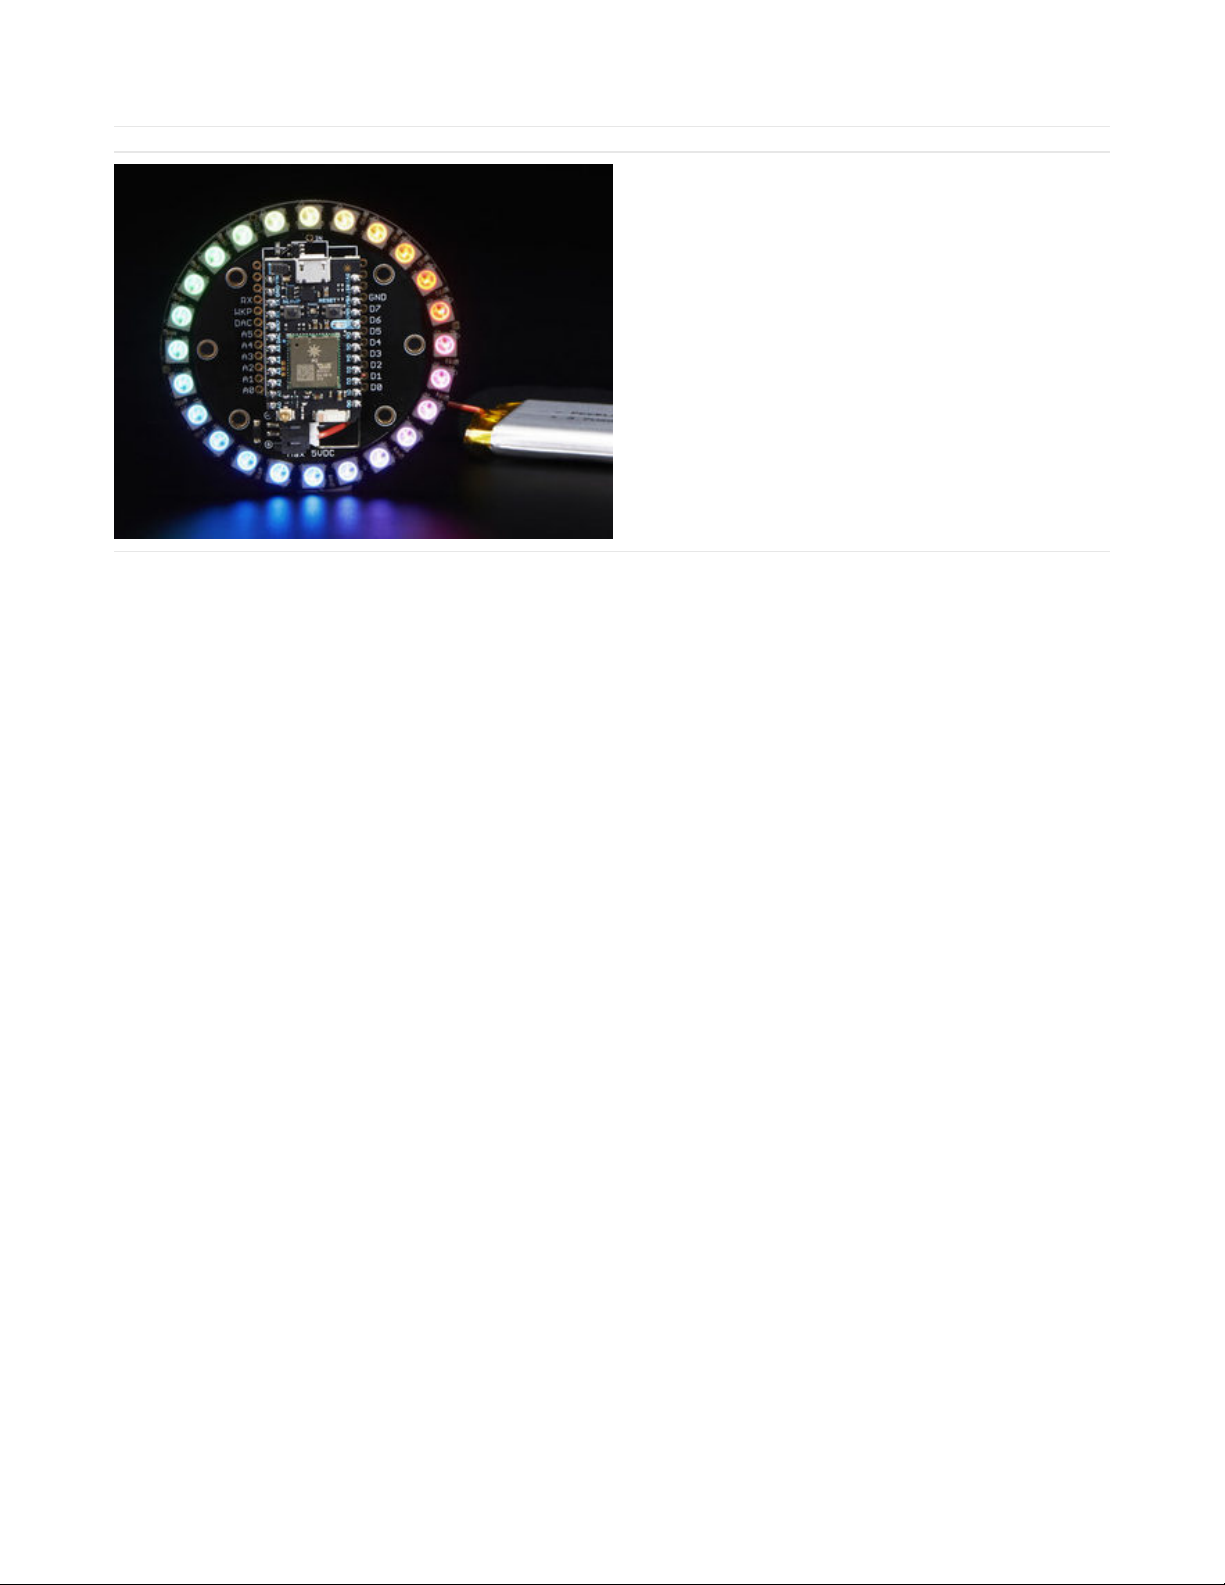
Particle/Spark NeoPixel Ring Kit
Previously mentioned on the “Rings” page, but for
posterity: this 24-pixel RGB ring (http://adafru.it/2268) is
specifically designed for the Particle (formerly
Spark) Photon development board.
© Adafruit Industries https://learn.adafruit.com/adafruit-neopixel-uberguide Page 22 of 68
Page 23

Other NeoPixel Shapes
NeoPixel Stick
The simplest thing…a row of 8 NeoPixels along a rigid
circuit board. These make great bargraph indicators!
Like our rings and matrices, NeoPixel sticks are available
in RGB and RGBW varieties.
NeoPixel Stick Product
Selector (http://adafru.it/3039)
All measure 51.1 x 10.2 millimeters (2.0 x 0.4 inches).
NeoPixel Jewels
© Adafruit Industries https://learn.adafruit.com/adafruit-neopixel-uberguide Page 23 of 68
Page 24

When you need more “punch” than a single NeoPixel
can provide, these 7-pixel jewels provide a lot of light in
a compact shape. Again, RGB and RGBW varieties are
available.
NeoPixel Jewel Product
Selector (http://adafru.it/3047)
All measure 23 millimeters (0.9 inches) in diameter.
1/4 60 NeoPixel Ring
© Adafruit Industries https://learn.adafruit.com/adafruit-neopixel-uberguide Page 24 of 68
Page 25

Though originally designed to be used in groups of four
to complete a 60 NeoPixel Ring, the individual 15-
pixel
quarter rings
can also be used to solve interesting
design problems! RGB and RGBW are available.
NeoPixel Ring Product
Selector (http://adafru.it/3042)
© Adafruit Industries https://learn.adafruit.com/adafruit-neopixel-uberguide Page 25 of 68
Page 26

Individual NeoPixels
If you need just a small number of pixels…or if ready-made shapes and strips don’t quite provide what you’re
after…individual NeoPixels provide the most control over placement and quantity.
Integrated NeoPixel Products
Some individual NeoPixel products come ready to use, with a small PCB holding the LED, a decoupling capacitor for
power, and points for connecting wires.
Flora RGB Smart NeoPixels
The original Adafruit NeoPixel form factor! Flora RGB
Smart NeoPixels were designed for wearable projects
using conductive thread, but can also be soldered
normally with wires. These are available in two formats:
Pack of 4 (http://adafru.it/1260), ready to use as-is.
Sheet of 20 (http://adafru.it/1559), cut them off the
sheet as you need them and save a little money.
Flora RGB Smart Pixels measure about 12.5 millimeters
(0.5 inches) in diameter. These are RGB only; there’s no
RGBW version.
Breadboard-Friendly RGB Smart NeoPixels
© Adafruit Industries https://learn.adafruit.com/adafruit-neopixel-uberguide Page 26 of 68
Page 27

These are similar to the sewable Flora NeoPixels, but
with a pin arrangement that (with the addition of
headers) fits neatly into a breadboard for prototyping.
Also available in two formats:
Pack of 4 (http://adafru.it/1312), ready to use as-is.
Sheet of 25 (http://adafru.it/1558), cut off as
needed.
For both types, headers (http://adafru.it/392) are
optional and not included.
Breadboard-Friendly NeoPixels measure 10.2 x 12.7
millimeters (0.4 x 0.5 inches) and are RGB only; there’s
no RGBW version.
NeoPixel Mini PCB
© Adafruit Industries https://learn.adafruit.com/adafruit-neopixel-uberguide Page 27 of 68
Page 28

NeoPixel Mini PCB (http://adafru.it/1612) — sold in
packs of 5 — are the smallest ready-to-use NeoPixel
format.
These have no mounting holes or soldering vias…wires
must be soldered directly to pads on the back of the
PCB.
Each is about 10 millimeters (0.3 inches) in diameter.
These are RGB only; there’s no RGBW version.
Discrete NeoPixel Products
For advanced users needing fully customized designs, discrete NeoPixel components are available. You’ll need to
provide your own PCB and (depending on the pixel type) surface-mount soldering skill.
It’s very strongly recommended that each NeoPixel have an accompanying 0.1 μF capacitor between +V and ground.
This prevents communication problems due to brownout of the on-pixel driver logic. It’s occasionally sufficient to have
one
capacitor
between pairs
of pixels; some of our NeoPixel rings work that way.
© Adafruit Industries https://learn.adafruit.com/adafruit-neopixel-uberguide Page 28 of 68
Page 29

Through-Hole NeoPixels
Discrete Through-hole NeoPixels are available in two
sizes:
8mm Diffused (http://adafru.it/1734) – pack of 5.
5mm Diffused (http://adafru.it/1938) – pack of 5.
5mm Clear (http://adafru.it/1837) have been
discontinued, but the product page is still
available if you require pinout information.
Through-hole NeoPixels are RGB only; there’s no RGBW
version. Use of a 0.1 μF capacitor (http://adafru.it/753)
between + and ground on each pixel is strongly
encouraged.
SMT NeoPixels
Surface-mount “5050” (5 millimeter square) NeoPixels
© Adafruit Industries https://learn.adafruit.com/adafruit-neopixel-uberguide Page 29 of 68
Page 30

are available in many varieties:
5050 RGB LED (http://adafru.it/1655) – pack of 10.
RGBW NeoPixel – Cool White – white
case (http://adafru.it/2759) – pack of 10.
RGBW NeoPixel – Neutral White –
white case (http://adafru.it/2758) – pack of 10.
RGBW NeoPixel – Warm White –
white case (http://adafru.it/2757) – pack of 10.
RGBW NeoPixel – Cool White –
black case (http://adafru.it/2762) – pack of 10.
RGBW NeoPixel – Neutral White –
black case (http://adafru.it/2761) – pack of 10.
RGBW NeoPixel – Warm White –
black case (http://adafru.it/2760) – pack of 10.
NeoPixel – Cool White (http://adafru.it/2375) (3X
white, no RGB) – pack of 10.
NeoPixel – Warm White (http://adafru.it/2376) (3X
white, no RGB) – pack of 10.
All measure 5 millimeters square. Adding a 0.1 μF
capacitor between + and ground is recommended for
each pixel.
The white- and black-cased pixels are functionally
identical; this is purely an
aesthetic
choice for your
design.
“Cool white” measures approximately 6000 Kelvin.
“Neutral white” is approx. 4500K. “Warm White” is
approx. 3000K.
© Adafruit Industries https://learn.adafruit.com/adafruit-neopixel-uberguide Page 30 of 68
Page 31

Tiny surface-mount “3535” (3.5 millimeters square)
NeoPixels are available in two RGB versions; no RGBW
is available.
NeoPixel Mini 3535 RGB – white
case (http://adafru.it/2659) – pack of 10.
NeoPixel Mini 3535 RGB – black
case (http://adafru.it/2686) – pack of 10.
Decoupling capacitor recommended. As with the
“5050” NeoPixels, white- and black-cased versions are
functionally identical, this is an aesthetic design option.
WS2811 Driver IC
The NeoPixel driver logic is available
separately (http://adafru.it/1378) from the LEDs,
allowing power-users to create extremely customized
designs…perhaps using other LED colors, or combined
with power MOSFETs (http://adafru.it/355) to control
high-current LEDs or “analog” RGB LED
strips (https://adafru.it/lCy) using the NeoPixel protocol.
These require circuit design skills, custom PCBs and fine
surface-mount soldering. A 0.1 uF decoupling capacitor
is recommended for each chip.
© Adafruit Industries https://learn.adafruit.com/adafruit-neopixel-uberguide Page 31 of 68
Page 32

Basic Connections
To get started, let’s assume you have some model of Arduino microcontroller connected to the computer’s USB port.
We’ll elaborate on the finer points of powering NeoPixels later, but in general you’ll usually be using a 5V DC power
supply (e.g. “wall wart”) or — for wearable projects — a 3.7 Volt lithium-polymer battery.
Identify the “input” end of your NeoPixel strip, pixel(s) or other device. On some, there will be a solder pad labeled
“DIN” or “DI” (data input). Others will have an arrow showing the direction that data moves. The data input can
originate from any digital pin on the Arduino, but all the example code is set up for digital pin 6 by default. The
NeoPixel shield comes wired this way.
If using a Flora, Feather or other microcontroller board with an attached lithium-polymer battery: connect the +5V
input on the strip to the pad labeled VBAT or BAT on the board, GND from the strip to any GND pad on the
microcontroller board, and DIN to Flora pin D6. If the board doesn’t have a pin #6, you’ll need to modify the example
code to change the pin number.
For other Arduino boards with a separate +5V DC power supply for the NeoPixels: connect the +5V input on the strip
to the + (positive) terminal on the power supply (don’t connect to the Arduino), DIN to digital pin 6 on the Arduino, and
– (minus or GND) on the strip must connect to both the minus (–) terminal on the DC supply and a GND pin on the
Arduino (there are usually several — any will do).
The 144 pixel strips are so tightly packed, there’s no room for labels other than –, + and the data direction arrows. Data
is the un-labeled pad.
The order of the three pins can vary between different strip densities and batches. ALWAYS use the labels
printed ON THE STRIP. Look closely, NEVER blindly follow a NeoPixel strip wiring diagram; it might be based
on a different strip type!
When connecting NeoPixels to any LIVE power source or microcontroller, ALWAYS CONNECT GROUND (–)
BEFORE ANYTHING ELSE. Conversely, disconnect ground last when separating.
© Adafruit Industries https://learn.adafruit.com/adafruit-neopixel-uberguide Page 32 of 68
Page 33

Can NeoPixels be powered directly from the Arduino’s 5V pin?
Sometimes. The Arduino can continuously supply only about 500 milliamps to the 5V pin. Each NeoPixel can draw
up to 60 milliamps at full brightness. So yes, you can skip the separate DC supply and power directly off the
Arduino
as long as just a few pixels are used,
more if the colors and overall brightness are low. When in doubt, give
the pixels a separate power supply.
When using a DC power supply, or an especially large battery, we recommend adding a large capacitor
(1000 µF, 6.3V or higher) across the + and – terminals. This prevents the initial onrush of current from
damaging the pixels. See the photo on the next page for an example.
With through-hole NeoPixels (5mm or 8mm), add a 0.1 µF capacitor between the + and – pins of EACH PIXEL.
Individual pixels may misbehave without this “decoupling cap.”
Adding a ~470 ohm resistor between your microcontroller's data pin and the data input on the NeoPixels can
help prevent spikes on the data line that can damage your first pixel. Please add one between your micro
and NeoPixels! Our NeoPixel rings already have this resistor on there
© Adafruit Industries https://learn.adafruit.com/adafruit-neopixel-uberguide Page 33 of 68
Page 34

Best Practices
Improper use can damage your NeoPixels. Before diving in, be aware of the following:
Before connecting NeoPixels to any large power source (DC “wall wart” or even a large battery), add a capacitor
(1000 µF, 6.3V or higher) across the + and – terminals as shown above. The capacitor buffers sudden changes in
the current drawn by the strip.
Place a 300 to 500 Ohm resistor between the Arduino data output pin and the input to the first NeoPixel. The
resistor should be at the end of the wire closest to the NeoPixel(s), not the microcontroller.
Some products
already incorporate this resistor…if you’re not sure, add one…there’s no harm in doubling up!
Try to minimize the distance between the Arduino and first pixel, so the signal is clear. A meter or two is usually
no problem. Much longer and things can become unreliable.
Avoid connecting NeoPixels to a live circuit. If you simply
must,
always connect ground first, then +5V, then data.
Disconnect in the reverse order.
If powering the pixels with a separate supply, apply power to the pixels before applying power to the
microcontroller.
Observe the same precautions as you would for any static-sensitive part; ground yourself before handling, etc.
NeoPixels powered by 5v require a 5V data signal. If using a 3.3V microcontroller you must use a logic level
shifter such as a 74AHCT125 (https://adafru.it/e5g) or 74HCT245 (http://adafru.it/1779). (If you are powering your
NeoPixels with 3.7v like from a LiPoly, a 3.3v data signal is OK)
Make sure that your connections are secure. Alligator clips do not make reliable connections to the tiny solder
pads on NeoPixel rings. Better to solder a small pigtail wire to the ring and attach the alligator clips to that.
If your microcontroller and NeoPixels are powered from two different sources (e.g. separate batteries for each),
there
must
be a ground connection between the two.
Some of our projects don’t make the above precautions…these are typically small battery-powered devices and power
spikes aren’t a big concern. Any project with a lot pixels or a large power source should definitely include the power
capacitor and data line resistor.
© Adafruit Industries https://learn.adafruit.com/adafruit-neopixel-uberguide Page 34 of 68
Page 35

Powering NeoPixels
NeoPixels are usually described as “5 Volt devices,” but the reality is a little more nuanced than that.
Some (not all) NeoPixel products can work with slightly higher voltages. This depends on the additional support
components around the chip, based on available space, cost and the most likely application. Refer to the specific
product description page for guidance on acceptable voltage limits for each type. When in doubt, aim for 5 Volts.
Lower voltages are always acceptable, with the caveat that the LEDs will be slightly dimmer. There’s a limit below
which the LED will fail to light, or will start to show the wrong color.
Before connecting a NeoPixel strip to ANY source of
power, we very strongly recommend adding a large
capacitor (1000 µF, 6.3V or higher) across the + and –
terminals. This prevents the initial onrush of current
from damaging the pixels.
For many wearable projects we recommend a lithium-
polymer battery (http://adafru.it/328). These deliver 3.7
Volts — perfect for directly feeding low-power
microcontrollers such as the Adafruit Flora, yet enough
voltage to run a short length of NeoPixels.
When connecting NeoPixels to any live power source or microcontroller, ALWAYS CONNECT GROUND (–)
BEFORE ANYTHING ELSE. Conversely, disconnect ground last when separating.
Adding a 300 to 500 Ohm resistor between your microcontroller's data pin and the data input on the first
NeoPixel can help prevent voltage spikes that might otherwise damage your first pixel. Please add one
between your micro and NeoPixels!
© Adafruit Industries https://learn.adafruit.com/adafruit-neopixel-uberguide Page 35 of 68
Page 36
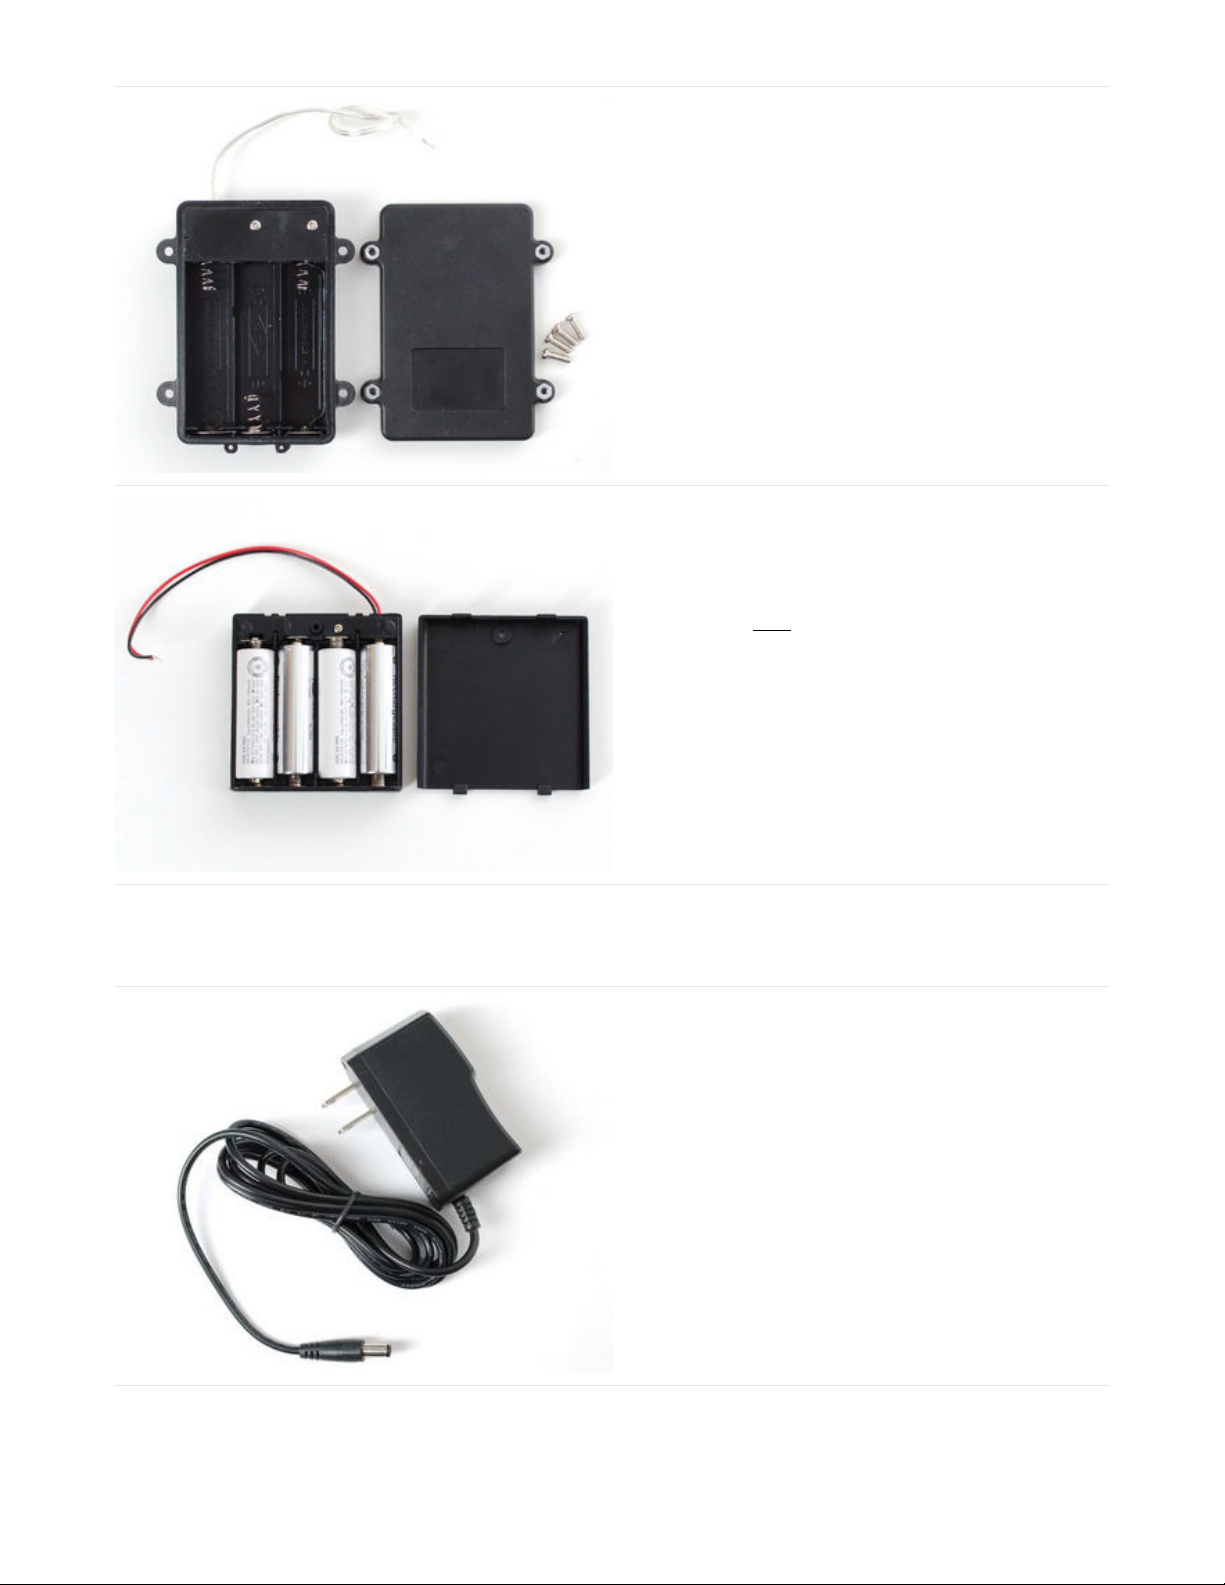
Three alkaline cells (such as AA batteries) can be
installed in a battery holder (http://adafru.it/771) to
provide 4.5 Volts. Though larger and heaver than the
fancy lithium-polymer pack, they’re inexpensive and
readily available.
Four nickel-metal hydride (NiMH) rechargeable cells can
similarly be used in a 4-cell battery
holder (http://adafru.it/830) to provide 4.8 Volts.
Make sure you only use NiMH cells in this
configuration. Four alkaline cells (the disposable type)
will output 6V total — that’s too high for some
NeoPixels, and definitely too much for the
microcontroller!
Battery-operated LED project planning is discussed in greater detail in Battery Power for LED Pixels and
Strips (https://adafru.it/cDU).
For most non-portable “desktop” projects, a 5V DC
switching power supply (http://adafru.it/276) is ideal. This
small 2 Amp supply is good for a a meter or so of
NeoPixel strip. We’ll explain larger projects in a moment.
© Adafruit Industries https://learn.adafruit.com/adafruit-neopixel-uberguide Page 36 of 68
Page 37

Be extremely cautious with bench power supplies.
Some — even reputable, well-regarded brands — can
produce a large voltage spike when initially switched
on, instantly destroying your NeoPixels!
If you use a bench supply, do not connect NeoPixels
directly. Turn on the power supply first, let the voltage
stabilize,
then
connect the pixels (GND first).
Estimating Power Requirements
Each individual NeoPixel draws up to 60 milliamps at maximum brightness white (red + green + blue). In actual use
though, it’s rare for all pixels to be turned on that way. When mixing colors and displaying animations, the current draw
will be much less. It’s impossible to estimate a single number for all circumstances, but we’ve been using 1/3 this (20
mA per pixel) as a gross rule of thumb with no ill effects. But if you know for a fact that you need every pixel on at
maximum brightness, use the full 60 mA figure.
To estimate power supply needs, multiply the number of pixels by 20, then divide the result by 1,000 for the “rule of
thumb” power supply rating in Amps. Or use 60 (instead of 20) if you want to guarantee an absolute margin of safety
for all situations. For example:
60 NeoPixels × 20 mA ÷ 1,000 = 1.2 Amps minimum
60 NeoPixels × 60 mA ÷ 1,000 = 3.6 Amps minimum
The choice of “overhead” in your power supply is up to you. Maximum safety and reliability are achieved with a more
generously-sized power supply, and this is what we recommend. Most power supplies can briefly push a little extra
current for short periods. Many contain a thermal fuse and will simply shut down if overworked. So they may
technically
work,
but this is the electronics equivalent of abusing a rental car.
Keep in mind, 60 mA is a
worst case
estimate! We’ve written a whole separate tutorial on getting things under
control: Sipping Power with NeoPixels (https://adafru.it/wbm).
I estimate I need a 3.6 Amp power supply. I have a 10 Amp supply on-hand. Will this cause my NeoPixels to
explode?
As long as the output is 5 Volts DC, you’re golden. The LEDs will only draw as much current (Amperes) as they
need. So extra Amps are OK — in fact, it can be a
good
thing. The larger power supply will run cooler because it’s
not being pushed to its limit.
Excessive
voltage,
however, will definitely kill your LEDs.
Extra Amps = good. Extra Volts = bad.
What about batteries and “Amp hours”?
Amp-hours are current over time. A 2,600 mAh (milliamp-hour) battery can be thought of as delivering 2.6 Amps
© Adafruit Industries https://learn.adafruit.com/adafruit-neopixel-uberguide Page 37 of 68
Page 38
continuously for one hour, or 1.3 Amps for 2 hours, and so forth. In reality, it’s not quite linear like that; most batteries
have disproportionally shorter run times with a heavy load. Also, most batteries won’t take kindly to being
discharged in an hour — this can even be dangerous! Select a battery sufficiently large that it will take at least a
couple hours to run down. It’s both safer for you and better for the longevity of the battery.
I need to power LOTS of NeoPixels and don’t have a power supply that large. Can I use several smaller ones?
Maybe. There are benefits to using a single supply, and large power supplies are discussed below. “Non-optimal”
doesn’t necessarily mean “pessimal” though, and we wouldn’t discourage anyone from using what resources they
have.
If you go this route, the key is to have all of the ground pins among the strips connected in common, but the +5V
from each power supply should be connected only to one length of NeoPixels — those should
not
all be joined.
Every power supply is a little different — not
precisely
5 Volts — and this keeps some from back-feeding into others.
Giant Power Supplies
Adafruit offers 5V DC power supplies up to 10 Amps (http://adafru.it/658). This is usually sufficient for a couple hundred
NeoPixels or more. For
really
large installations, you’ll need to look elsewhere.
One possibility is to repurpose an ATX computer power supply. The nice beefy server types often provide up to 30
Amps. Some minor modifications are needed…Google around for “ATX power supply hack.” Note that the ATX 5V rail
can be very unstable if there's no load on the 12V rail!
Even larger (and scarier, and much more expensive) are laboratory power supplies with ratings into the
hundreds
of
Amps. Sometimes this is what’s needed for architectural scale projects and large stage productions. And occasionally
we get requests for help…
Please note that projects of this scale are potentially very dangerous, and the problems of power distribution are
fundamentally different than hobby-scale projects. As much as we enjoy helping our customers in the forums, they are
for
product technical support
and not full-on
engineering services.
If you’re developing a project of this scope, hire a
professional electrician with experience in high-power, low-voltage systems such as photovoltaics or large RVs and
boats. This is no charade.
Distributing Power
The longer a wire is, the more resistance it has. The more resistance, the more voltage drops along its length. If voltage
drops too far, the color of NeoPixels can be affected.
Consider a full 4 meter reel of NeoPixels. With 5V applied at one end of the strip, for those pixels closest to this end,
power traverses only a few inches of copper. But at the far end of the strip, power traverses
8 meters
of copper — 4
meters out on the +5V line, 4 meters back on the ground line. Those furthest pixels will be tinted brown due to the
voltage drop (blue and green LEDs require higher voltage than red).
Pro Tip: NeoPixels don’t care what end they receive power from. Though data moves in only one direction, electricity
can go
either way.
You can connect power at the head, the tail, in the middle, or ideally distribute it to several points.
For best color consistency, aim for 1 meter or less distance from any pixel to a power connection. With larger NeoPixel
setups, think of power distribution as branches of a tree rather than one continuous line.
© Adafruit Industries https://learn.adafruit.com/adafruit-neopixel-uberguide Page 38 of 68
Page 39
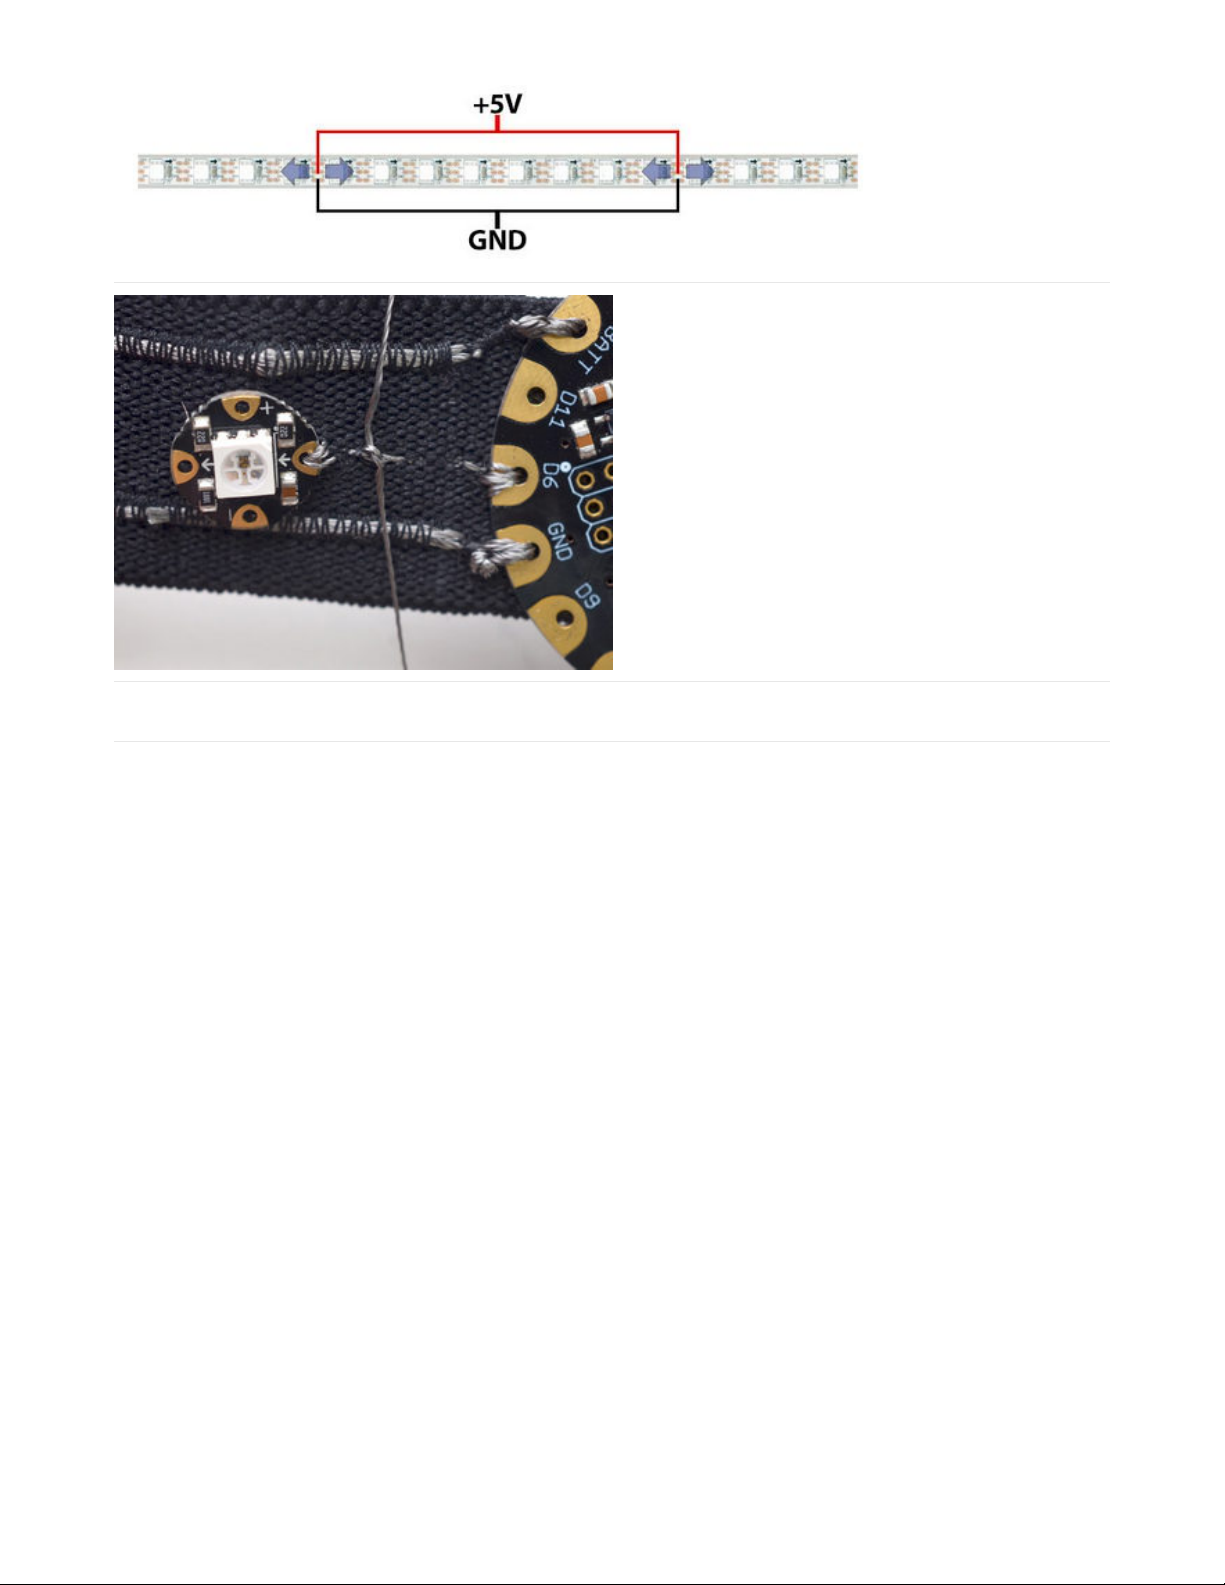
Resistance is just as much a concern on tiny projects
too!
For wearable electronics we like conductive thread…it’s
flexible and withstands hand washing. Downside is that
it doesn’t carry much current. Here several strands of
conductive thread have been grouped to provide better
capacity for the + and – conductors down a pair of
suspenders.
(From the Pac Man Pixel
Suspenders (https://adafru.it/ciD) guide.)
Driving 5V NeoPixels from 3.3V Microcontrollers
Increasingly, microcontrollers are running at 3.3 Volts instead of 5 Volts. That’s great news for efficiency, but can
present a communication problem with 5V NeoPixels. The 3.3V signal from the microcontroller may not be “loud”
enough to register with the higher-voltage device. The manufacturer recommends a minimum signal voltage of 70% of
the NeoPixel voltage.
There are two ways this can be addressed:
1. Lower the voltage to the NeoPixels so it’s closer (or equal) to that of the microcontroller. This is why we
recommend LiPo batteries for FLORA projects: 3.7V is enough to run a short length of pixels, and the
microcontroller is comfortable at that voltage as well.
2. Use a logic level shifter (https://adafru.it/e5g) to step up the signal from the microcontroller to the first pixel.
© Adafruit Industries https://learn.adafruit.com/adafruit-neopixel-uberguide Page 39 of 68
Page 40

Software
NeoPixels got their start on Arduino, but have since branched out to other boards and languages.
Pick a category from the left column for information specific to each coding environment.
© Adafruit Industries https://learn.adafruit.com/adafruit-neopixel-uberguide Page 40 of 68
Page 41

Arduino Library Installation
Controlling NeoPixels “from scratch” is quite a challenge, so we provide a library letting you focus on the fun and
interesting bits. The library works with most mainstream Arduino boards and derivatives: Uno, Mega, Leonardo, Micro,
Adafruit Flora, etc. — most anything with an Atmel AVR 8-bit processor from 8 to 16 MHz — and also works with the
Arduino Due and all varieties of the PJRC Teensy boards.
Because processor-specific assembly language is used, this library does not work on Netduino, ChipKIT or other
advanced “Arduino-like” boards. Others may have written code and libraries for such boards, but we’re not able to
provide technical support for any bugs or trouble you might encounter there; it’s some real frontier engineering. Some
of these alternative libraries are covered in the “Advanced Coding” section.
Install Adafruit_NeoPixel via Library Manager
Recent versions of the Arduino IDE (1.6.2 and later) make library installation super easy via the Library Manager
interface. From the Sketch menu, > Include Library > Manage Libraries... In the text input box type in "NeoPixel". Look
for "Adafruit NeoPixel by Adafruit" and select the latest version by clicking on the dropbox menu next to the Install
button. Then click on the Install button. After it's installed, you can click the "close" button.
Manually Install Adafruit_NeoPixel Library
If you’re using an older version of the IDE, or just want to set things up manually, “classic” installation of the library is as
follows: you can visit the Adafruit_NeoPixel library page (https://adafru.it/aZU) at Github and download from there, or
just click this button:
https://adafru.it/cDj
https://adafru.it/cDj
1. Uncompress the ZIP file after it’s finished downloading.
2. The resulting folder should contain the files Adafruit_NeoPixel.cpp, Adafruit_NeoPixel.h and an “examples” sub-
folder. Sometimes in Windows you’ll get an intermediate-level folder and need to move things around.
3. Rename the folder (containing the .cpp and .h files) to Adafruit_NeoPixel (with the underscore and everything),
and place it alongside your other Arduino libraries, typically in your (home folder)/Documents/Arduino/Libraries
© Adafruit Industries https://learn.adafruit.com/adafruit-neopixel-uberguide Page 41 of 68
Page 42

folder. Libraries should
never
be installed in the “Libraries” folder alongside the Arduino application itself…put
them in the subdirectory of your home folder.
4. Re-start the Arduino IDE if it’s currently running.
Here’s a tutorial (https://adafru.it/aYM) that walks through the process of correctly installing Arduino libraries manually.
A Simple Code Example: strandtest
Launch the Arduino IDE. From the File menu, select Sketchbook→Libraries→Adafruit_NeoPixel→strandtest
(If the Adafruit_NeoPixel rollover menu is not present, the library has not been correctly installed, or the IDE needs to
be restarted after installation. Check the installation steps above to confirm it’s properly named and located.)
Select your board type and serial port from the Tools menu, and try uploading to the board. If the NeoPixels are
connected and powered as previously described, you should see a little light show.
Nothing happens!
Check your connections. The most common mistake is connecting to the output end of a strip rather than the input.
Something happens but the LEDs are blinking in a weird way!
If you are using an RGBW NeoPixel product (look at the LEDs, are they divided 'in half' with a yellow semicircle? you
have RGBW Neopixels!)
Change this line:
Adafruit_NeoPixel strip = Adafruit_NeoPixel(60, PIN, NEO_GRB + NEO_KHZ800);
to
Adafruit_NeoPixel strip = Adafruit_NeoPixel(60, PIN, NEO_RGBW + NEO_KHZ800);
and reupload the strandtest example.
I don't have RGBW LEDs and the LEDs are still blinking weird!
99% of the time this is due to not having a shared ground wire connected to the Arduino. Make sure the Ground
wire from the Neopixels connects to BOTH your power supply ground AND the Arduino ground.
© Adafruit Industries https://learn.adafruit.com/adafruit-neopixel-uberguide Page 42 of 68
Page 43

Arduino Library Use
It’s assumed at this point that you have the Adafruit_NeoPixel library for Arduino installed and have run the
strandtest example sketch successfully. If not, return to the prior page for directions to set that up.
To learn about writing your own NeoPixel sketches, let’s begin by dissecting the strandtest sketch…
All NeoPixel sketches begin by including the header file:
The block of code that follows is mostly descriptive comments. Only the last line is really doing any work:
The first line assigns a number to the symbol “PIN” for later reference. It doesn’t
need
to be done this way, but makes it
easier to change the pin where the NeoPixels are connected without digging deeper into the code.
The last line declares a NeoPixel
object.
We’ll refer to this by name later to control the strip of pixels. There are three
parameters or
arguments
in parenthesis:
1. The number of sequential NeoPixels in the strip. In the example this is set to 60, equal to 1 meter of medium-
density strip. Change this to match the actual number you’re using.
2. The pin number to which the NeoPixel strip (or other device) is connected. Normally this would be a number, but
we previously declared the symbol PIN to refer to it by name here.
3. A value indicating the type of NeoPixels that are connected. In most cases you can leave this off and pass just
two arguments; the example code is just being extra descriptive. If you have a supply of classic “V1” Flora pixels,
those require NEO_KHZ400 + NEO_RGB to be passed here.
Then, in the setup() function, call begin() to prepare the data pin for NeoPixel output:
The second line, strip.show(), isn’t absolutely necessary, it’s just there to be thorough. That function pushes data out to
the pixels…since no colors have been set yet, this initializes all the NeoPixels to an initial “off” state in case some were
#include <Adafruit_NeoPixel.h>
#define PIN 6
// Parameter 1 = number of pixels in strip
// Parameter 2 = pin number (most are valid)
// Parameter 3 = pixel type flags, add together as needed:
// NEO_KHZ800 800 KHz bitstream (most NeoPixel products w/WS2812 LEDs)
// NEO_KHZ400 400 KHz (classic 'v1' (not v2) FLORA pixels, WS2811 drivers)
// NEO_GRB Pixels are wired for GRB bitstream (most NeoPixel products)
// NEO_RGB Pixels are wired for RGB bitstream (v1 FLORA pixels, not v2)
Adafruit_NeoPixel strip = Adafruit_NeoPixel(60, PIN, NEO_GRB + NEO_KHZ800);
For through-hole 8mm NeoPixels, use NEO_RGB instead of NEO_GRB in the strip declaration. For RGBW
LEDs use NEO_RGBW (some RGBW strips use NEO_GRBW, so try that if you're getting unexpected results!)
void setup() {
strip.begin();
strip.show(); // Initialize all pixels to 'off'
}
© Adafruit Industries https://learn.adafruit.com/adafruit-neopixel-uberguide Page 43 of 68
Page 44

left lit by a prior program.
In the strandtest example, loop() doesn’t set any pixel colors on its own — it calls other functions that create animated
effects. So let’s ignore it for now and look ahead, inside the individual functions, to see how the strip is controlled.
There are two ways to set the color of a pixel. The first is:
or, if you're using RGBW strips:
The first argument — n in this example — is the pixel number along the strip, starting from 0 closest to the Arduino. If
you have a strip of 30 pixels, they’re numbered 0 through 29. It’s a computer thing. You’ll see various places in the
code using a for loop, passing the loop counter variable as the pixel number to this function, to set the values of
multiple pixels.
The next three arguments are the pixel color, expressed as red, green and blue brightness levels, where 0 is dimmest
(off) and 255 is maximum brightness. The last
optional
argument is for white, which will only be used if the strip was
defined during creation as an RGBW type and the strip actually is RGBW type.
To set the 12th pixel (#11, counting from 0) to magenta (red + blue), you could write:
to set the 8th pixel (#7 counting from 0) to half-brightness white, with no light from red/green/blue, use:
An alternate syntax has just two arguments:
Here, color is a 32-bit type that merges the red, green and blue values into a single number. This is sometimes easier
or faster for some (but not all) programs to work with; you’ll see the strandtest code uses both syntaxes in different
places.
You can also convert separate red, green and blue values into a single 32-bit type for later use:
Then later you can just pass “magenta” as an argument to setPixelColor rather than the separate red, green and blue
numbers every time.
strip.setPixelColor(n, red, green, blue);
strip.setPixelColor(n, red, green, blue, white);
strip.setPixelColor(11, 255, 0, 255);
strip.setPixelColor(7, 0, 0, 0, 127);
strip.setPixelColor(n, color);
uint32_t magenta = strip.Color(255, 0, 255);
© Adafruit Industries https://learn.adafruit.com/adafruit-neopixel-uberguide Page 44 of 68
Page 45

You can also (optionally) add a white component to the color at the end, like this:
setPixelColor() does not have an immediate effect on the LEDs. To “push” the color data to the strip, call show():
This updates the whole strip at once, and despite the extra step is actually a good thing. If every call to setPixelColor()
had an immediate effect, animation would appear jumpy rather than buttery smooth.
You can query the color of a previously-set pixel using getPixelColor():
This returns a 32-bit merged color value.
The number of pixels in a previously-declared strip can be queried using numPixels():
The overall brightness of all the LEDs can be adjusted using setBrightness(). This takes a single argument, a number in
the range 0 (off) to 255 (max brightness). For example, to set a strip to 1/4 brightness:
Just like setPixel(), this does not have an immediate effect. You need to follow this with a call to show().
setBrightness() was intended to be called
once,
in setup(), to limit the current/brightness of the LEDs throughout the
life of the sketch. It is
not
intended as an animation effect itself! The operation of this function is “lossy” — it modifies
the current pixel data in RAM, not in the show() call — in order to meet NeoPixels’ strict timing requirements. Certain
animation effects are better served by leaving the brightness setting alone, modulating pixel brightness in your own
sketch logic and redrawing the full strip with setPixel().
I’m calling setPixel() but nothing’s happening!
There are two main culprits for this:
1. forgetting to call strip.begin() in setup().
2. forgetting to call strip.show() after setting pixel colors.
Another (less common) possibility is running out of RAM — see the last section below. If the program
sort of
works
but has unpredictable results, consider that.
Can I have multiple NeoPixel objects on different pins?
Certainly! Each requires its own declaration with a unique name:
uint32_t greenishwhite = strip.Color(0, 64, 0, 64);
strip.show();
uint32_t color = strip.getPixelColor(11);
uint16_t n = strip.numPixels();
strip.setBrightness(64);
Adafruit_NeoPixel strip_a = Adafruit_NeoPixel(16, 5);
Adafruit_NeoPixel strip_b = Adafruit_NeoPixel(16, 6);
© Adafruit Industries https://learn.adafruit.com/adafruit-neopixel-uberguide Page 45 of 68
Page 46

The above declares two distinct NeoPixel objects, one each on pins 5 and 6, each containing 16 pixels and using the
implied default type (NEO_KHZ800 + NEO_GRB).
Can I connect multiple NeoPixel strips to the same Arduino pin?
In many cases, yes. All the strips will then show exactly the same thing. This only works up to a point though…four
strips on a single pin is a good and reliable number. If you need more than that, individual NeoPixels can be used as
buffers to “fan out” to more strips: connect one Arduino pin to the inputs of four separate NeoPixels, then connect
each pixels’ output to the inputs of four strips (or fewer, if you don’t need quite that many). If the strips are 10 pixels
long, declare the NeoPixel object as having 11 pixels. The extra “buffer” pixels will be at position #0 — just leave
them turned off — and the strips then run from positions 1 through 10.
I'm getting the wrong colors. Red and blue are swapped!
When using through-hole 8mm NeoPixels (or V1 Flora pixels), use NEO_RGB for the third parameter in the
Adafruit_NeoPixel declaration. For all other types of NeoPixels, use NEO_GRB.
The colors fall apart when I use setBrightness() repeatedly!
See note above; setBrightness() is designed as a one-time setup function, not an animation effect.
Also see the “Advanced Coding” page — there’s an alternative library that includes “nondestructive” brightness
adjustment, among other features!
Pixels Gobble RAM
Each NeoPixel requires about 3 bytes of RAM. This doesn’t sound like very much, but when you start using dozens or
even hundreds of pixels, and consider that the mainstream Arduino Uno only has 2 kilobytes of RAM (often much less
after other libraries stake their claim), this can be a real problem!
For using really large numbers of LEDs, you might need to step up to a more potent board like the Arduino Mega or
Due. But if you’re close and need just a little extra space, you can sometimes tweak your code to be more RAM-
efficient. This tutorial has some pointers on memory usage. (https://adafru.it/coj)
© Adafruit Industries https://learn.adafruit.com/adafruit-neopixel-uberguide Page 46 of 68
Page 47
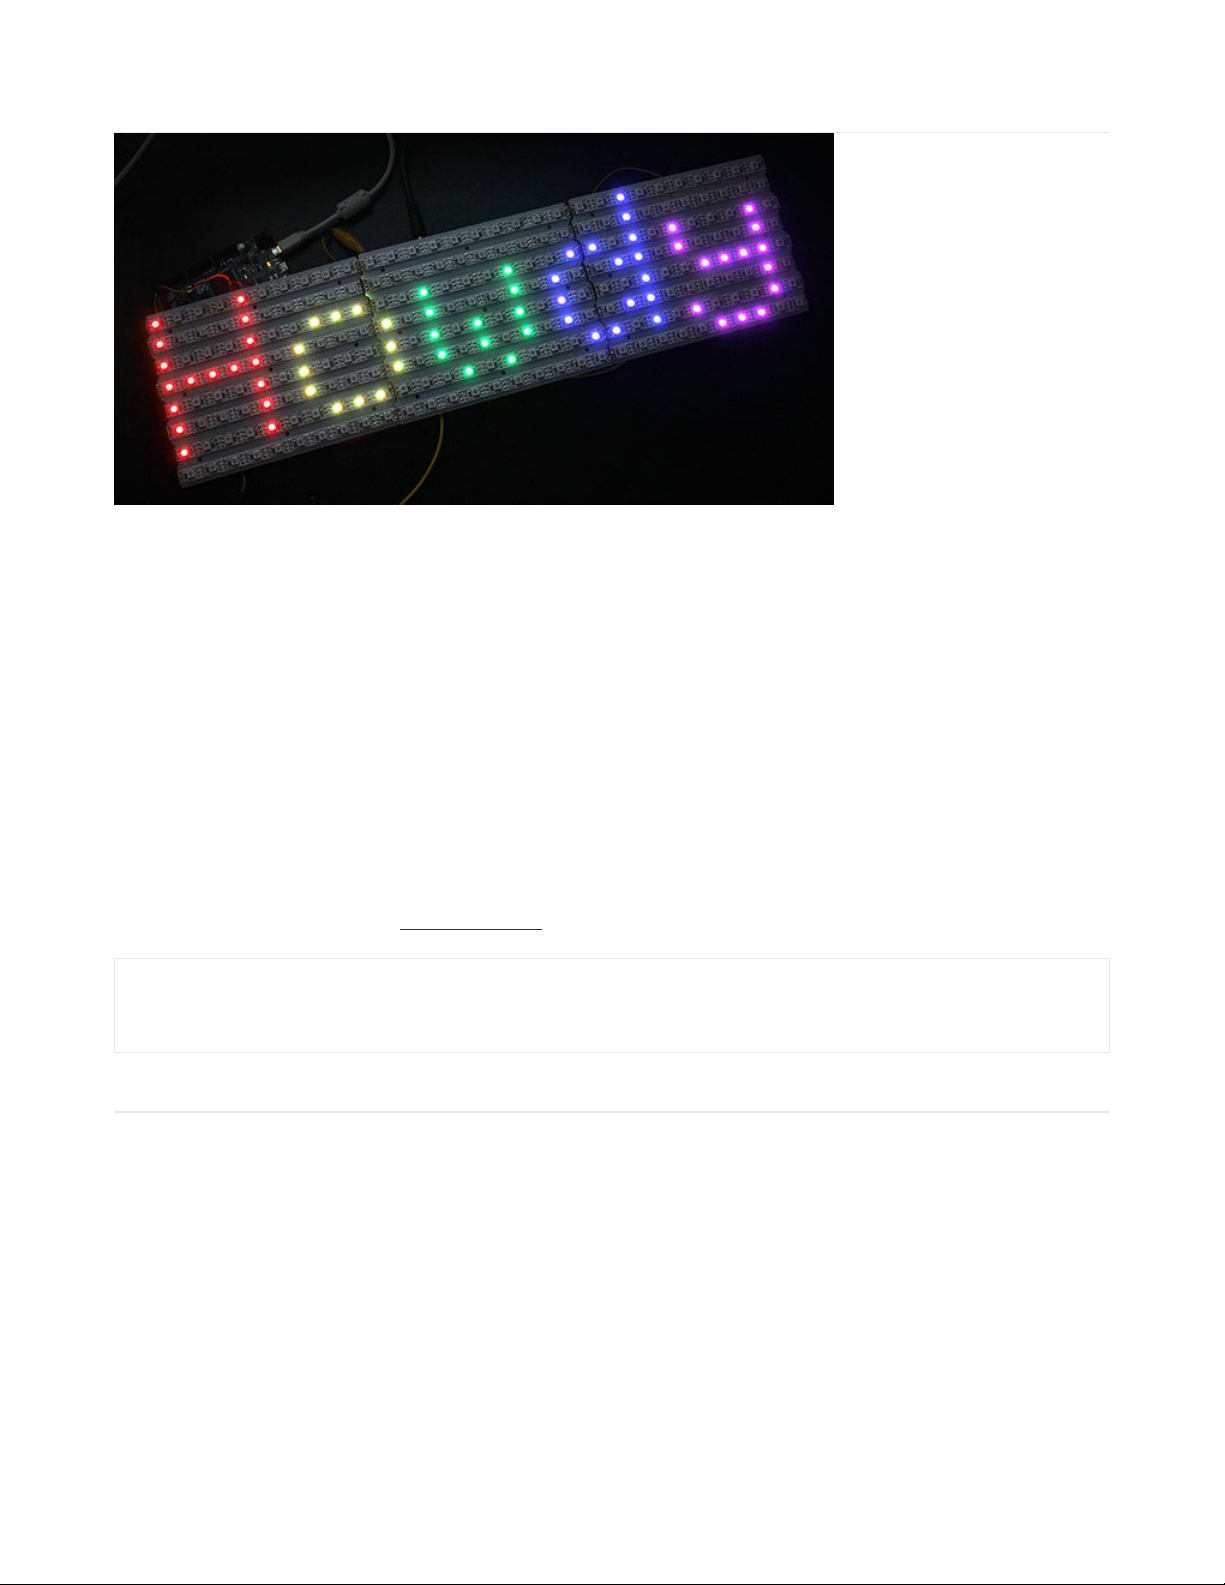
NeoMatrix Library
The Adafruit_NeoMatrix library builds upon Adafruit_NeoPixel to create two-dimensional graphic displays using
NeoPixels. You can then easily draw shapes, text and animation without having to calculate every X/Y pixel position.
Small NeoPixel matrices are available in the shop. Larger displays can be formed using sections of NeoPixel strip, as
shown in the photo above.
In addition to the Adafruit_NeoPixel library (which was already downloaded and installed in a prior step), NeoMatrix
requires two additional libraries:
1. Adafruit_NeoMatrix (https://adafru.it/cDt)
2. Adafruit_GFX (https://adafru.it/cBB)
If you’ve previously used any Adafruit LCD or OLED displays, you might already have the latter library installed.
Installation for both is similar to Adafruit_NeoPixel before: unzip, make sure the folder name matches the .cpp and .h
files within, then move to your Arduino libraries folder and restart the IDE.
Arduino sketches need to include all three headers just to use this library:
Layouts
Adafruit_NeoMatrix uses exactly the same coordinate system, color functions and graphics commands as the
Adafruit_GFX library. If you’re new to the latter, a separate tutorial explains its use (https://adafru.it/aPe). There are also
example sketches included with the Adafruit_NeoMatrix library.
We’ll just focus on the
constructor
here — how to declare a two-dimensional display made from NeoPixels. Powering
the beast is another matter, covered on the prior page.
The library handles both
single
matrices — all NeoPixels in a single uniform grid — and
tiled
matrices — multiple grids
combined into a larger display:
#include <Adafruit_GFX.h>
#include <Adafruit_NeoMatrix.h>
#include <Adafruit_NeoPixel.h>
© Adafruit Industries https://learn.adafruit.com/adafruit-neopixel-uberguide Page 47 of 68
Page 48
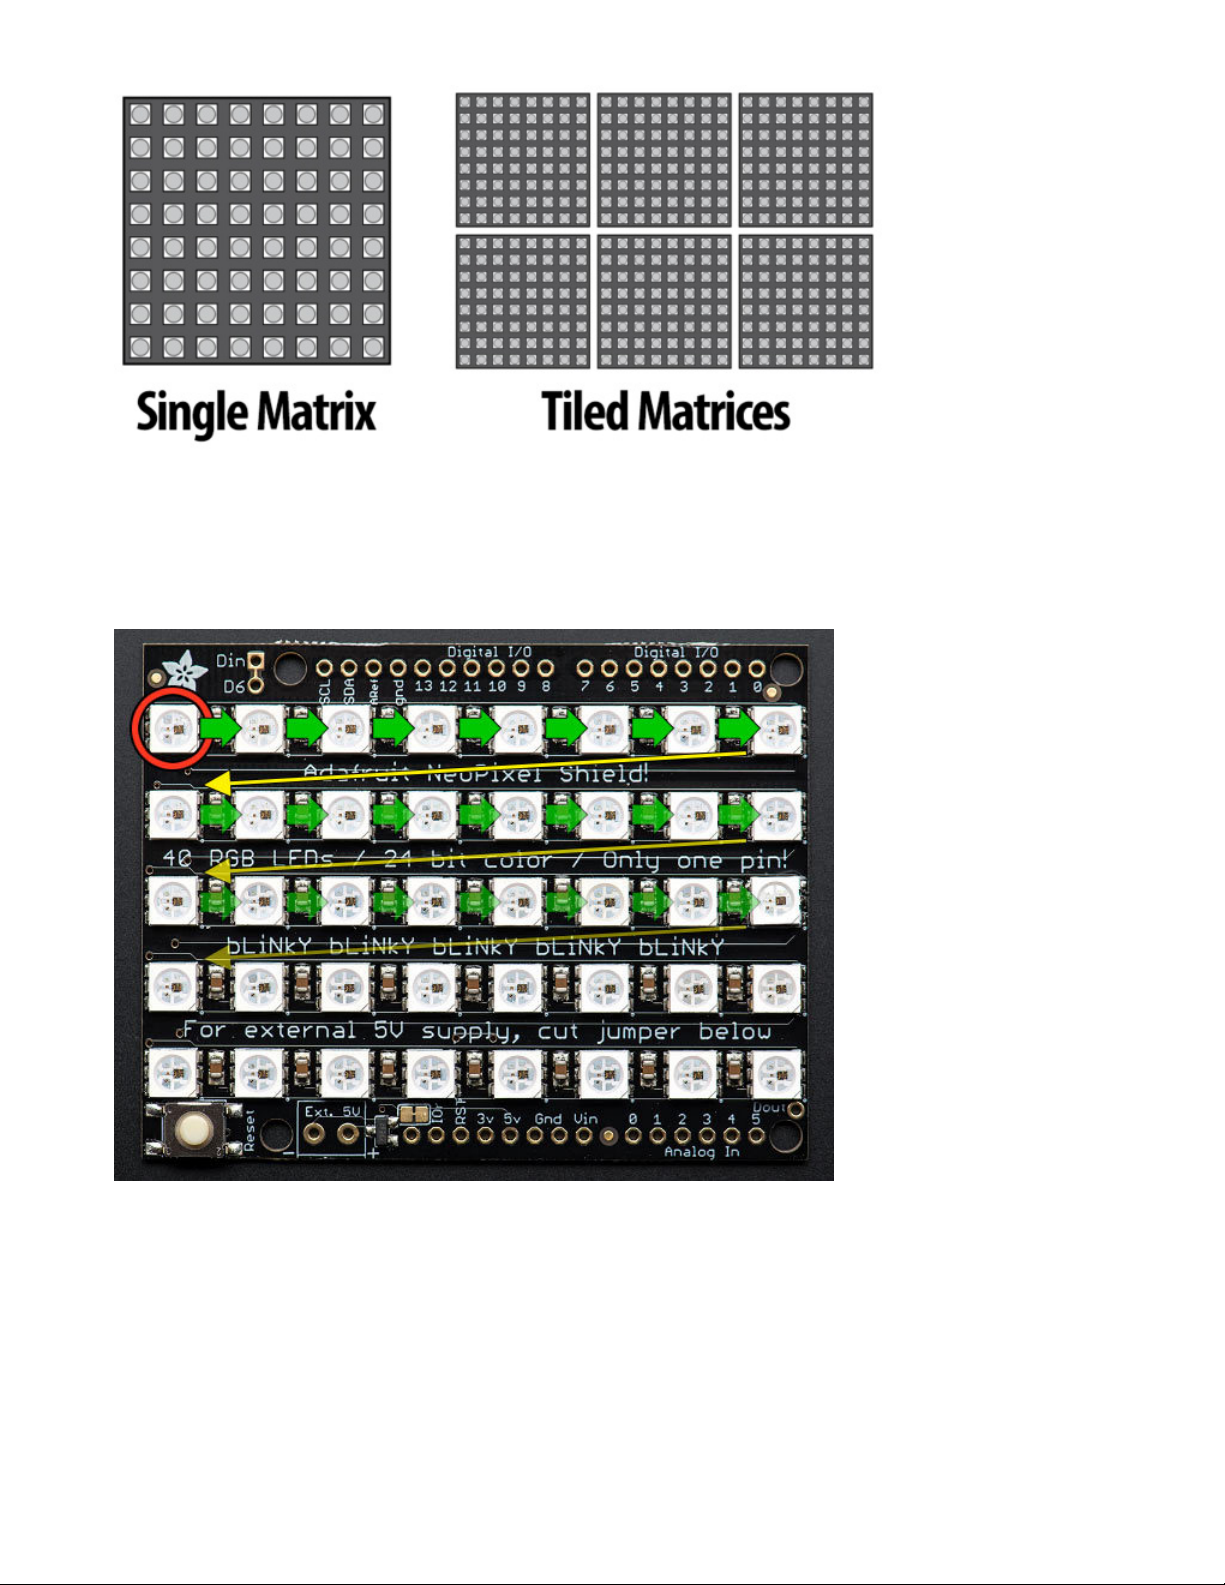
Let’s begin with the declaration for a single matrix, because it’s simpler to explain. We’ll be demonstrating the NeoPixel
Shield for Arduino in this case — an 8x5 matrix of NeoPixels. When looking at this shield with the text in a readable
orientation, the first pixel, #0, is at the top left. Each successive pixel is right one position — pixel 1 is directly to the
right of pixel 0, and so forth. At the end of each row, the next pixel is at the left side of the next row. This isn’t
something we decide in code…it’s how the NeoPixels are hard-wired in the circuit board comprising the shield.
We refer to this layout as
row major
and
progressive. Row major
means the pixels are arranged in horizontal lines (the
opposite, in vertical lines, is
column major
).
Progressive
means each row proceeds in the same direction. Some
matrices will reverse direction on each row, as it can be easier to wire that way. We call that a
zigzag
layout.
However…for this example, we want to use the shield in the “tall” direction, so the Arduino is standing up on the desk
with the USB cable at the top. When we turn the board this way, the matrix layout changes…
© Adafruit Industries https://learn.adafruit.com/adafruit-neopixel-uberguide Page 48 of 68
Page 49
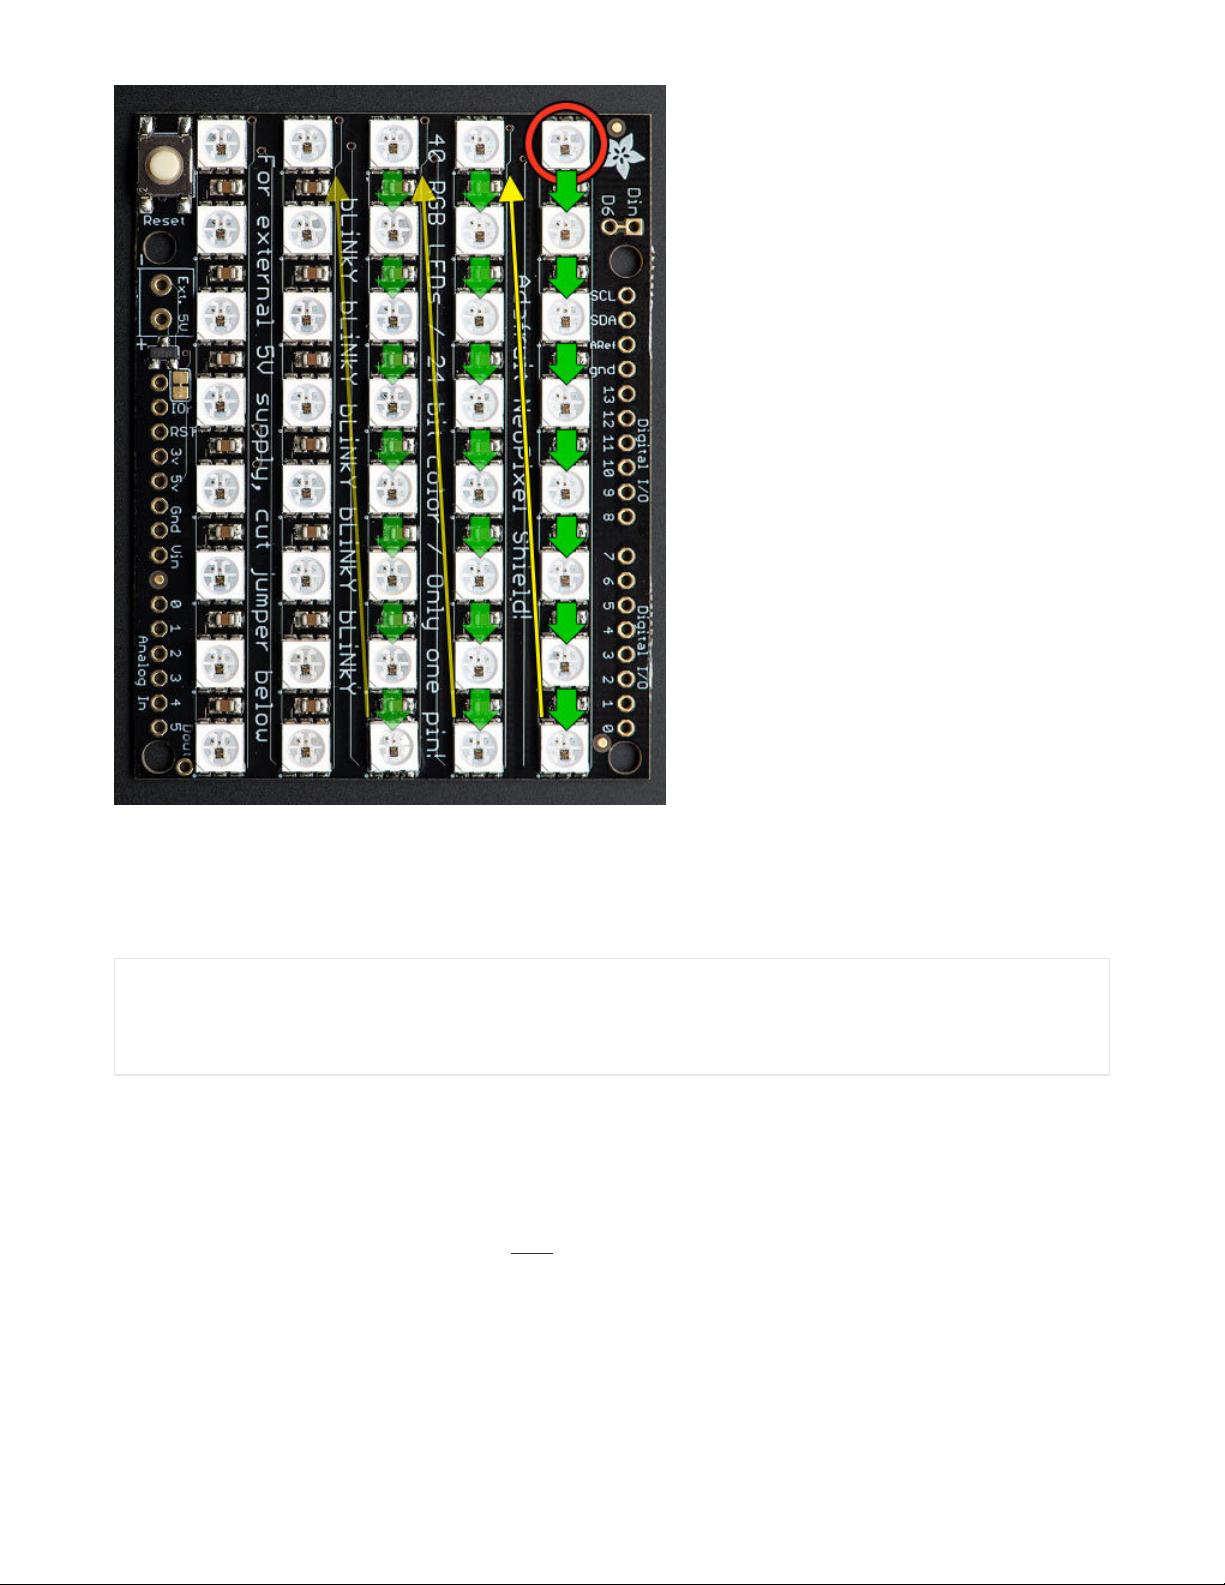
Now the first pixel is at the top right. Pixels increment top-to-bottom — it’s now column major. The order of the
columns is still progressive though.
We declare the matrix thusly:
The first two arguments — 5 and 8 — are the width and height of the matrix, in pixels. The third argument — 6 — is the
pin number to which the NeoPixels are connected. On the shield this is hard-wired to digital pin 6, but standalone
matrices are free to use other pins.
The next argument is the interesting one. This indicates where the first pixel in the matrix is positioned and the
arrangement of rows or columns. The first pixel must be at one of the four corners;
which
corner is indicated by adding
either NEO_MATRIX_TOP or NEO_MATRIX_BOTTOM to either NEO_MATRIX_LEFT or NEO_MATRIX_RIGHT. The
row/column arrangement is indicated by further adding either NEO_MATRIX_COLUMNS or NEO_MATRIX_ROWS to
either NEO_MATRIX_PROGRESSIVE or NEO_MATRIX_ZIGZAG. These values are all added to form a single value as in
the above code.
NEO_MATRIX_TOP + NEO_MATRIX_RIGHT + NEO_MATRIX_COLUMNS + NEO_MATRIX_PROGRESSIVE
Adafruit_NeoMatrix matrix = Adafruit_NeoMatrix(5, 8, 6,
NEO_MATRIX_TOP + NEO_MATRIX_RIGHT +
NEO_MATRIX_COLUMNS + NEO_MATRIX_PROGRESSIVE,
NEO_GRB + NEO_KHZ800);
© Adafruit Industries https://learn.adafruit.com/adafruit-neopixel-uberguide Page 49 of 68
Page 50

The last argument is exactly the same as with the NeoPixel library, indicating the type of LED pixels being used. In the
majority of cases with the latest NeoPixel products, you can simply leave this argument off…the example code is just
being extra descriptive.
The point of this setup is that the rest of the sketch never needs to think about the layout of the matrix. Coordinate
(0,0) for drawing graphics will always be at the top-left, regardless of the actual position of the first NeoPixel.
Why not just use the rotation feature in Adafruit_GFX?
Adafruit_GFX only handles rotation. Though it would handle our example above, it doesn’t cover every permutation
of rotation
and mirroring
that may occur with certain matrix layouts, not to mention the zig-zag capability, or this next
bit…
Tiled Matrices
A
tiled
matrix is comprised of multiple smaller NeoPixel matrices. This is sometimes easier for assembly or for
distributing power. All of the sub-matrices need to be the same size, and must be ordered in a predictable manner. The
Adafruit_NeoMatrix() constructor then receives some additional arguments:
The first two arguments are the width and height, in pixels, of each tiled sub-matrix, not the entire display.
The next two arguments are the number of tiles, in the horizontal and vertical direction. The dimensions of the overall
display then will always be a multiple of the sub-matrix dimensions.
The fifth argument is the pin number, same as before and as with the NeoPixel library. The last argument also follows
prior behaviors, and in most cases can be left off.
The second-to-last argument though…this gets complicated…
With a single matrix, there was a starting corner, a major axis (rows or columns) and a line sequence (progressive or
zigzag). This is now doubled — similar information is needed both for the pixel order within the individual tiles, and the
overall arrangement of tiles in the display. As before, we add up a list of symbols to produce a single argument
describing the display format.
The NEO_MATRIX_* symbols work the same as in the prior single-matrix case, and now refer to the individual sub-
matrices within the overall display. All tiles must follow the same format. An additional set of symbols work similarly to
then describe the tile order.
The first tile must be located at one of the four corners. Add either NEO_TILE_TOP or NEO_TILE_BOTTOM and
NEO_TILE_LEFT or NEO_TILE_RIGHT to indicate the position of the first tile. This is independent of the position of the
first pixel within the tiles; they can be different corners.
Tiles can be arranged in horizontal rows or vertical columns. Again this is independent of the pixel order within the
tiles. Add either NEO_TILE_ROWS or NEO_TILE_COLUMNS.
Finally, rows or columns of tiles may be arranged in progressive or zigzag order; that is, every row or column proceeds
in the same order, or alternating rows/columns switch direction. Add either NEO_TILE_PROGRESSIVE or
NEO_TILE_ZIGZAG to indicate the order. BUT…if NEO_TILE_ZIGZAG order is selected, alternate lines of tiles must be
Adafruit_NeoMatrix matrix = Adafruit_NeoMatrix(
matrixWidth, matrixHeight, tilesX, tilesY, pin, matrixType, ledType);
© Adafruit Industries https://learn.adafruit.com/adafruit-neopixel-uberguide Page 50 of 68
Page 51
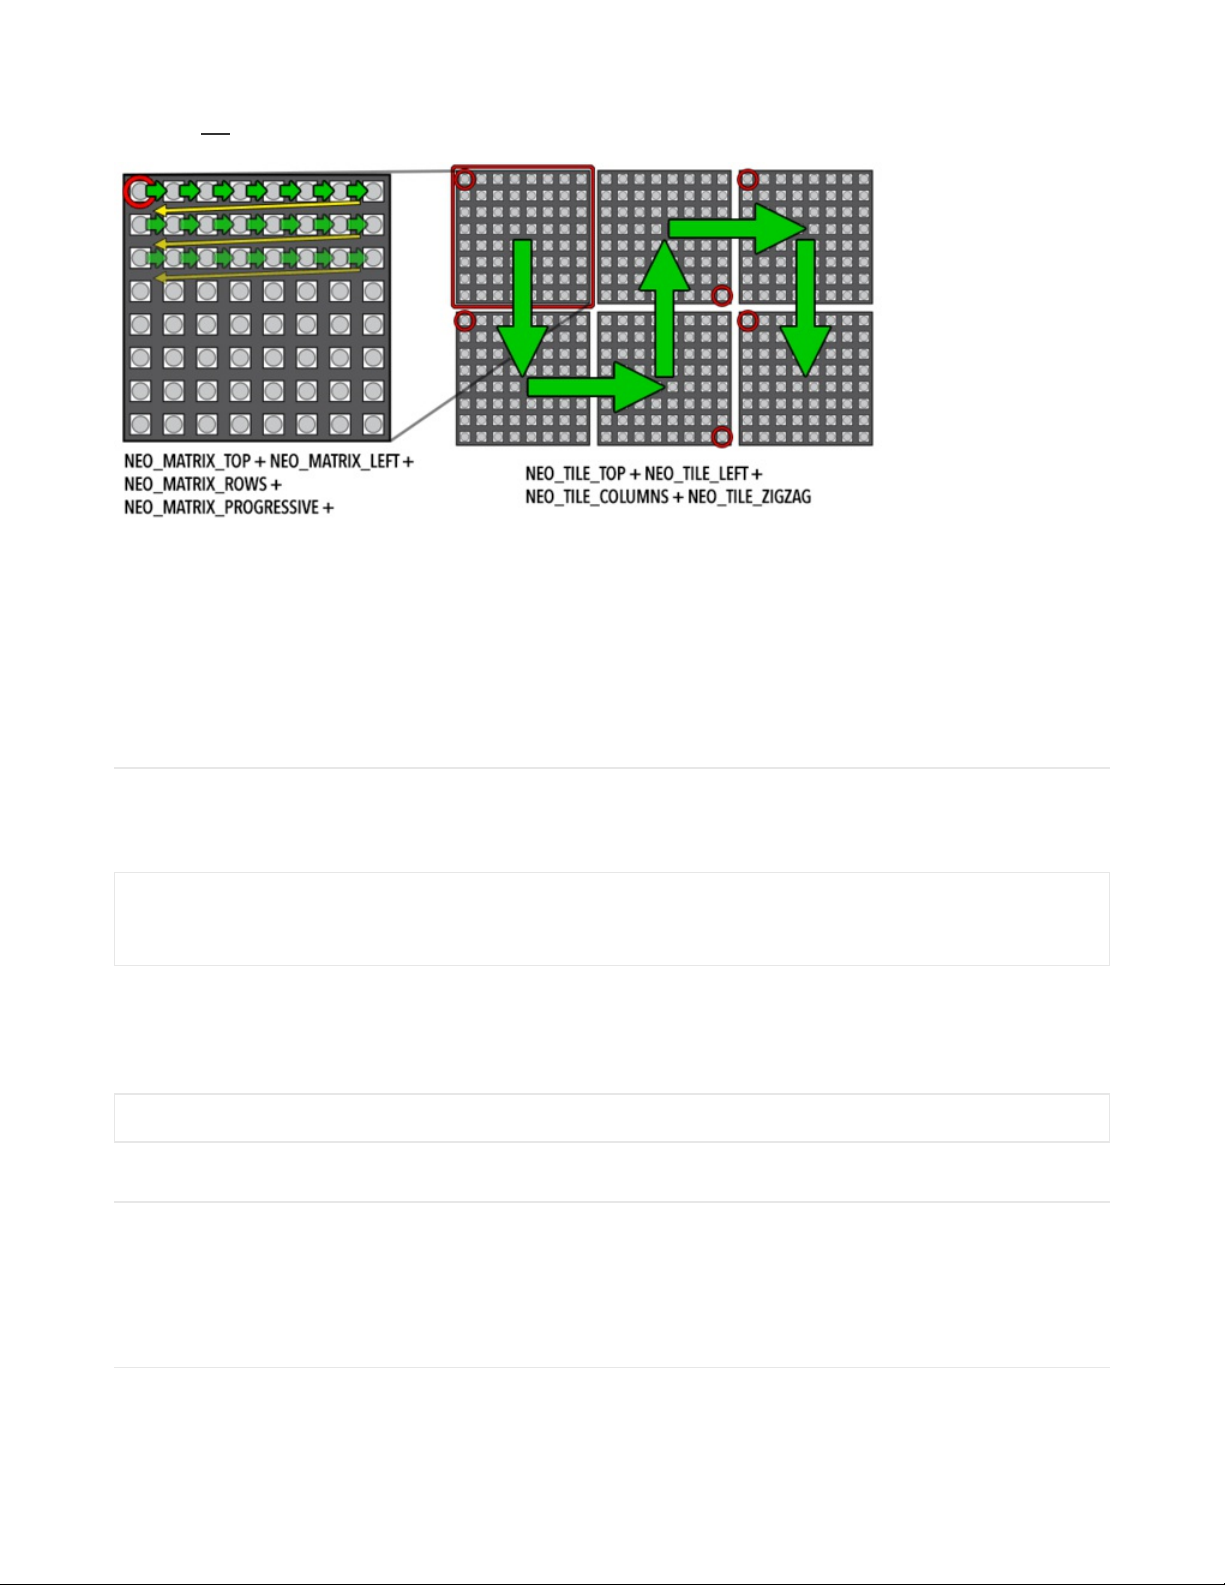
rotated 180 degrees. This is intentional and by design; it keeps the tile-to-tile wiring more consistent and simple. This
rotation is not required for NEO_TILE_PROGRESSIVE.
Tiles don’t need to be square! The above is just one possible layout. The display shown at the top of this page is three
10x8 tiles assembled from NeoPixel strip.
Once the matrix is defined, the remainder of the project is similar to Adafruit_NeoPixel. Remember to use
matrix.begin() in the setup() function and matrix.show() to update the display after drawing. The setBrightness() function
is also available. The library includes a couple of example sketches for reference.
Other Layouts
For any other cases that are not uniformly tiled, you can provide your own function to remap X/Y coordinates to
NeoPixel strip indices. This function should accept two unsigned 16-bit arguments (pixel X, Y coordinates) and return an
unsigned 16-bit value (corresponding strip index). The simplest row-major progressive function might resemble this:
That’s a crude example. Yours might be designed for pixels arranged in a spiral (easy wiring), or a Hilbert curve.
The function is then enabled using setRemapFunction():
RAM Again
On a per-pixel basis, Adafruit_NeoMatrix is no more memory-hungry than Adafruit_NeoPixel, requiring 3 bytes of RAM
per pixel. But the number of pixels in a two-dimensional display takes off exponentially…a 16x16 display requires
four
times
the memory of an 8x8 display, or about 768 bytes of RAM (nearly half the available space on an Arduino Uno). It
can be anywhere from
tricky
to
impossible
to combine large displays with memory-hungry libraries such as SD or ffft.
Gamma Correction
Because the Adafruit_GFX library was originally designed for LCDs (having limited color fidelity), it handles colors as
16-bit values (rather than the full 24 bits that NeoPixels are capable of). This is not the big loss it might seem. A quirk of
uint16_t myRemapFn(uint16_t x, uint16_t y) {
return WIDTH * y + x;
}
matrix.setRemapFunction(myRemapFn);
© Adafruit Industries https://learn.adafruit.com/adafruit-neopixel-uberguide Page 51 of 68
Page 52

human vision makes bright colors less discernible than dim ones. The Adafruit_NeoMatrix library uses
gamma
correction
to select brightness levels that are visually (though not numerically) equidistant. There are 32 levels for red
and blue, 64 levels for green.
The Color() function performs the necessary conversion; you don’t need to do any math. It accepts 8-bit red, green and
blue values, and returns a gamma-corrected 16-bit color that can then be passed to other drawing functions.
© Adafruit Industries https://learn.adafruit.com/adafruit-neopixel-uberguide Page 52 of 68
Page 53
CircuitPython
CircuitPython (https://adafru.it/tB7) is Adafruit's branch of MicroPython (https://adafru.it/f9W) designed to simplify
experimentation and education on modern low-cost microcontrollers. It makes it easier than ever to get prototyping by
requiring no upfront desktop software downloads.
With CircuitPython you can write clean and simple Python code to control hardware instead of having to use complex
low-level languages like C or C++ (what Arduino uses for programming). It's great for beginners!
The simplicity of the Python programming language makes CircuitPython an excellent choice for beginners who are
new to programming and hardware. CircuitPython is also quite full-featured and supports all of Python's syntax (Python
version 3.4) and implements a small subset of the Python standard library so even seasoned Python veterans will find
CircuitPython familiar and fun to use.
Setting Up
Some of our latest boards ship from the factory with CircuitPython preinstalled. For those that don’t, or if you’ve
overwritten CircuitPython with an Arduino sketch and want to get it back, you’ll find setup directions in the Adafruit
Learning System guide specific to each board:
Metro M0 Express or Feather M0 Express (https://adafru.it/BeT)
Circuit Playground Express (https://adafru.it/BZ6)
Gemma M0 (https://adafru.it/zAl)
Trinket M0 (https://adafru.it/ABS)
For other boards (Feather HUZZAH, Feather M0 Basic and Arduino Zero), check the CircuitPython Github
repository (https://adafru.it/tB7) for the latest setup notes.
Here's an example with a lot of different visual effects you can check out. You'll need the neopixel.mpy library file if you
don't have it yet! (https://adafru.it/y8E)
© Adafruit Industries https://learn.adafruit.com/adafruit-neopixel-uberguide Page 53 of 68
Page 54

When declaring a NeoPixel object in CircuitPython, the object's argument list requires the output pin you'll use and the
number of pixels. There's two optional arguments, brightness (range from 0 (off) to 1.0 (full brightness)) and auto_write .
When auto_write is set to True , every pixel change is immediately written to the strip…this is easier to use but
way
slower. If you set auto_write=False then you will have to call strip.show() when you want to actually write color data out.
# CircuitPython demo - NeoPixel
import time
import board
import neopixel
pixpin = board.D1
numpix = 10
strip = neopixel.NeoPixel(pixpin, numpix, brightness=0.3, auto_write=False)
def wheel(pos):
# Input a value 0 to 255 to get a color value.
# The colours are a transition r - g - b - back to r.
if (pos < 0) or (pos > 255):
return (0, 0, 0)
if pos < 85:
return (int(pos * 3), int(255 - (pos * 3)), 0)
elif pos < 170:
pos -= 85
return (int(255 - pos * 3), 0, int(pos * 3))
else:
pos -= 170
return (0, int(pos * 3), int(255 - pos * 3))
def rainbow_cycle(wait):
for j in range(255):
for i in range(len(strip)):
idx = int((i * 256 / len(strip)) + j)
strip[i] = wheel(idx & 255)
strip.write()
time.sleep(wait)
while True:
strip.fill((255, 0, 0))
strip.write()
time.sleep(1)
strip.fill((0, 255, 0))
strip.write()
time.sleep(1)
strip.fill((0, 0, 255))
strip.write()
time.sleep(1)
rainbow_cycle(0.001) # rainbowcycle with 1ms delay per step
© Adafruit Industries https://learn.adafruit.com/adafruit-neopixel-uberguide Page 54 of 68
Page 55

You can easily set colors by indexing into the location strip[n] = (red, green, blue) . For example, strip[0] = (100, 0, 0) will
set the first pixel to a medium-brightness red, and strip[2] = (0, 255, 0) will set the third pixel to bright green. Then, if you
have auto_write=False don't forget to call strip.show() .
© Adafruit Industries https://learn.adafruit.com/adafruit-neopixel-uberguide Page 55 of 68
Page 56

Advanced Coding
FastLED Library
If looking to boost your NeoPixel prowess, you may find everything you need in the FastLED
library (https://adafru.it/eip). It’s an alternative to the Adafruit_NeoPixel library, providing more advanced features like
HSV color support, nondestructive brightness setting and high-speed mathematical operations. (It works with other
LED types too, such as DotStars!)
FastLED works altogether differently; it’s not a drop-in replacement for Adafruit_NeoPixel, and existing sketches will
require some rewriting.
Note: FastLED currently works only with RGB NeoPixels; RGBW pixels are not yet supported. At all. You will get
incorrect and unpredictable colors.
We don’t write or maintain FastLED, and can’t provide software troubleshooting advice.
If requesting help with a
FastLED NeoPixel project in the forums, we’ll usually ask that you try one of the known-working Adafruit_NeoPixel
example sketches to narrow down whether it’s a hardware or software issue.
Visit the FastLED web site to get started. (https://adafru.it/eip)
FAQ and Further Programming Insights
Help! My Arduino servo code stops working when combined with NeoPixels!
Unfortunately the NeoPixel and Servo libraries don’t play nice together; one is dependent on periodically disabling
interrupts, the other absolutely requires interrupts. There are a couple of options here:
Use a dedicated servo control shield or breakout board, offloading that task from the processor so interrupts
are a non-issue.
Use a hardware-PWM-based servo library rather than the stock Arduino Servo library. This can provide rock-
steady servo timing without interrupts, but can only control a very limited number of servos (2-3), and only on
very specific pins.
When driving NeoPixels I cannot receive infrared codes on my IR receiver!
Just like servos, the infrared library uses software interrupts to poll the IR LED, while the standard NeoPixel library
blocks interrupts while NeoPixel are being updated.
If you don't constantly update the NeoPixel, IR will work in between updates, but if you update them all the time, you
will need to use another library and a microcontroller more capable than an Uno or Mega. Ideally one with DMA so
that NeoPixels don't take up any CPU cycles.
Marc MERLIN explains how to this depending on what chip you have (Teensy, ESP8266 or ESP32):
http://marc.merlins.org/perso/arduino/post_2017-04-03_Arduino-328P-Uno-Teensy3_1-ESP8266-ESP32-IR-and-
Neopixels.html
How fast can I refresh a string of (N) pixels?
NeoPixels receive data from a fixed-frequency 800 KHz datastream (except for “V1” Flora pixels, which use 400
KHz). Each bit of data therefore requires 1/800,000 sec — 1.25 microseconds. One pixel requires 24 bits (8 bits each
for red, green blue) — 30 microseconds. After the last pixel’s worth of data is issued, the stream must stop for at
least 50 microseconds for the new colors to “latch.”
© Adafruit Industries https://learn.adafruit.com/adafruit-neopixel-uberguide Page 56 of 68
Page 57

For a strip of 100 pixels, that’s (100 * 30) + 50, or 3,050 microseconds. 1,000,000 / 3,050 = 328 updates per second,
approximately.
However…
That’s
only
the time needed to
push the bits
down the wire. The
actual
refresh rate will be something less than this,
and can’t be estimated as a single number for all cases. It takes time to process each “frame” of animation. How
much time depends on the complexity of the math and the efficiency of the code (for example, floating-point
calculations can be relatively slow). The formula above gives a maximum
theoretical
rate, but that’s just a starting
point. Reality in some cases could fall an order of magnitude (or more) below this.
For exploratory benchmarking, you can always write code
as if
a large number of pixels were present, and time the
result. The extra output bits will simply be ignored by the strip (or you can even test with no NeoPixels connected at
all).
That won’t do. Now what?
Because NeoPixels use a fixed-frequency clock, options are limited. You can’t switch out for a faster microcontroller
and expect substantially different results.
One option is to use a different LED type, such as our DotStar or LPD8806 strips, or WS2801 pixels. These can be
driven at higher data rates, though they do have some other tradeoffs with respect to NeoPixels (cost, color
resolution and/or pixel density).
Another is to develop your own code on a more capable microcontroller or an FPGA that drives
multiple
NeoPixel
strips
in parallel
. One such project — OctoWS2811 for the Teensy 3 microcontroller — is shown later. This sort of
thing is a complex undertaking and not recommended for beginners. And even among more experienced
programmers, there’s often an unreasonable over-emphasis on data rates when the
real
bottlenecks lie elsewhere…
don’t dwell on this too much unless you can confirm it’s the root of the problem.
Can I control NeoPixels using (Board X)?
We currently only offer an Arduino library. See the links later for other devices. For anything beyond this, if
considering writing your own library, understand that some processors are better suited to the task than others.
Read through the timing requirements shown below and determine if the chip in question can synthesize a signal
meeting those specifications. An 8 MHz AVR can just barely keep up…anything slower may have trouble, though
some hardware-specific hacks (like clever use of SPI) might make it possible. In many cases, assembly language is
required.
Why not Raspberry Pi?
The Raspberry Pi running Linux is a multitasking system, and control may switch among multiple running programs
at any time. As such, it’s impossible to guarantee the strict 800 KHz signal required by NeoPixels. You may be able
to fudge it for short intervals, but it’s not something that can be counted upon. This is why we use DotStar LEDs for
the Raspberry Pi light painting project.
DMA NeoPixels for ARM Cortex-M0 Boards
If you’re using a recent “M0” development board such as the Adafruit Feather M0, Circuit Playground Express or
Arduino Zero, an alternate NeoPixel library (https://adafru.it/xBb) exploits these devices’
direct memory access
(DMA)
feature to operate more smoothly. Advanced Arduino sketches can then use interrupts with impunity, and code that
depends on the millis() or micros() functions will not lose time.
© Adafruit Industries https://learn.adafruit.com/adafruit-neopixel-uberguide Page 57 of 68
Page 58

There’s a corresponding DMA version of the NeoMatrix library (https://adafru.it/xAQ) as well.
Plus an 8-way concurrent NeoPixel DMA library (https://adafru.it/Blw).
Third-Party Libraries
In addition to the previously-mentioned FastLED library, NeoPixel-compatible libraries have been developed for
devices beyond Arduino. Please keep in mind that Adafruit did not develop any of this code and can’t fix bugs or offer
technical help. This is Wild West stuff.
OctoWS2811 (https://adafru.it/cDM): specifically for the PJRC Teensy 3.0 microcontroller board. Uses DMA to
drive up to 8 NeoPixel strips concurrently with minimal processor load. Multiple boards can be cascaded for still
larger displays.
FadeCandy (https://adafru.it/cDN): also for Teensy 3.0. Doesn’t support as many pixels as OctoWS2811, but adds
dithering and smooth interpolation for color purists.
LEDscape (https://adafru.it/cDO): specifically for BeagleBone Black. Although the BeagleBone is a multitasking
Linux system like the not-NeoPixel-compatible Raspberry Pi, this code exploits hardware features specific to the
BeagleBone Black to drive
hundreds
of meters of NeoPixel strip with virtually no processor load.
WS2812 LED Driver (https://adafru.it/cDP) for Parallax Propeller.
xCORE NeoPixel test code (https://adafru.it/dcO) for the XMOS xCORE startKIT.
WS2811? WS2812? Why do I see two different names mentioned?
The WS2811 is an earlier driver chip separate from the RGB LED. The data signal is similar, but runs at half the speed.
By the time the WS2812 (with integrated LED) was released, a lot of code and projects had already built up around
the WS2811 name. Sometimes code “for the WS2811” might actually be for the newer chip, or for either type. The
Adafruit_NeoPixel library supports both.
Writing Your Own Library
The WS2812 datasheet (https://adafru.it/cDB) explains the data transmission protocol. This is a
self-clocking
signal —
there’s only one wire, not separate data and clock lines. “1” and “0” bits are indicated by varying the duty cycle of a
fixed-frequency square wave.
There’s a math goof in the datasheet’s timing values. Use these figures instead:
Some of these are 3.3V devices. See the “Powering NeoPixel” page for notes on controlling 5V NeoPixels
from 3.3V microcontrollers.
© Adafruit Industries https://learn.adafruit.com/adafruit-neopixel-uberguide Page 58 of 68
Page 59
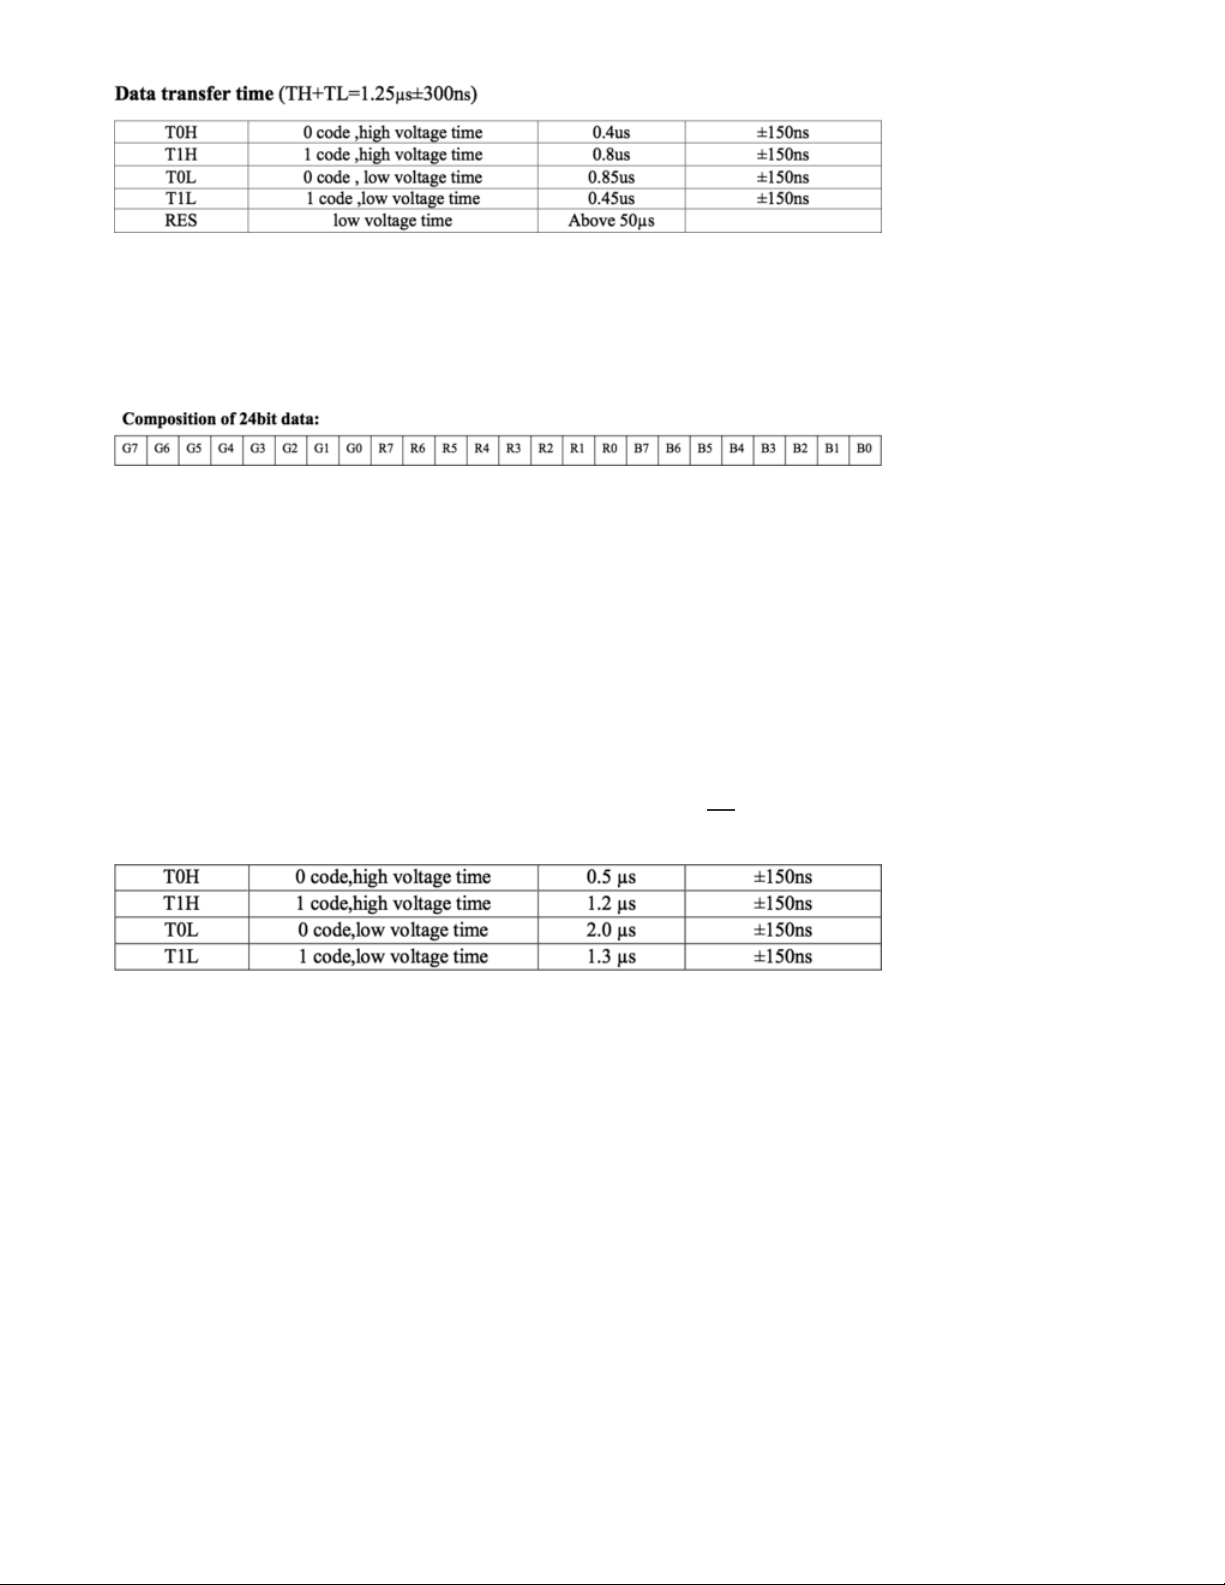
Note that there’s nearly 25% “wiggle room” in the timing. So if your code can’t match the recommended times exactly,
it’s usually okay, as long as it’s close.
There are three bytes of data for each pixel. These should be issued in green, red, blue order, with the most-significant
bit first.
The data for pixel #0 (nearest the microcontroller) is issued first, then pixel #1, and so forth to the furthest pixel. This
does not operate like a traditional shift register!
After all the color data is sent, the data line must be held low for a minimum of 50 microseconds for the new colors to
“latch.”
You may want to dig through our Arduino library (https://adafru.it/aZU) for insights. The timing-critial parts are written in
AVR assembly language, but it’s extensively commented with C-like pseudocode.
My Microcontroller Isn’t Fast Enough to Do That
The WS2812 appears to be backwardly-compatible with the 400 KHz WS2811 signal. If you can precisely match the
latter chip’s timing, either type will respond. The WS2811 protocol is not simply a half-speed WS2812. The duty
cycle for the “0” and “1” bits is slightly different. From the WS2811 datasheet:
© Adafruit Industries https://learn.adafruit.com/adafruit-neopixel-uberguide Page 59 of 68
Page 60

Downloads
WS2812 Datasheet (used in some older items) (https://adafru.it/qta)
WS2812B Datasheet (https://adafru.it/uaR) (used in some older items)
SK6812 Datasheet (https://adafru.it/uaS) (used in all our strips as of 2016)
NeoPixel 12-LED Ring
EagleCAD PCB files on GitHub (https://adafru.it/qic)
Fritzing object in Adafruit Fritzing library (https://adafru.it/aP3)
NeoPixel 16-LED Ring
EagleCAD PCB files on GitHub (https://adafru.it/qic)
Fritzing object in Adafruit Fritzing library (https://adafru.it/aP3)
© Adafruit Industries https://learn.adafruit.com/adafruit-neopixel-uberguide Page 60 of 68
Page 61

NeoPixel 24-LED Ring
EagleCAD PCB files on GitHub (https://adafru.it/qic)
Fritzing object in Adafruit Fritzing library (https://adafru.it/aP3)
© Adafruit Industries https://learn.adafruit.com/adafruit-neopixel-uberguide Page 61 of 68
Page 62

NeoPixel 1/4 60-LED Ring
EagleCAD PCB files on GitHub (https://adafru.it/qic)
Fritzing object in Adafruit Fritzing library (https://adafru.it/aP3)
© Adafruit Industries https://learn.adafruit.com/adafruit-neopixel-uberguide Page 62 of 68
Page 63
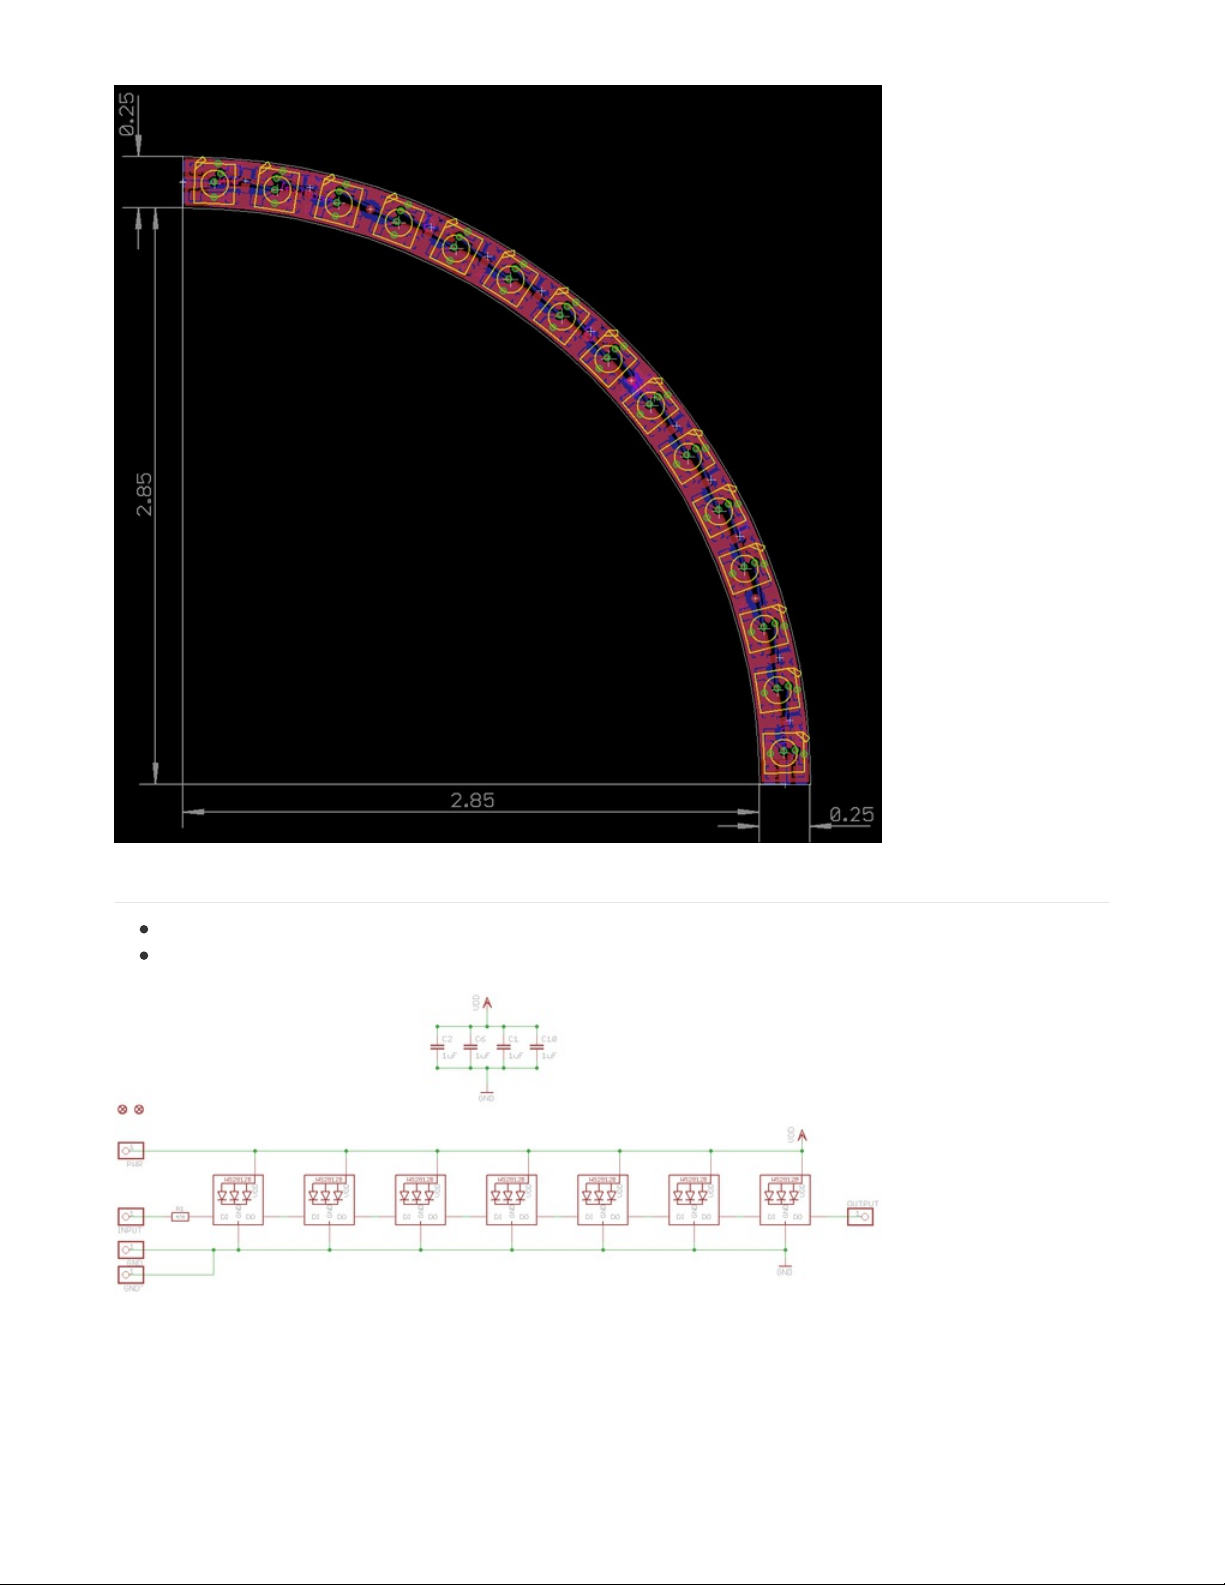
NeoPixel Jewel
EagleCAD PCB files on GitHub (https://adafru.it/ped)
Fritzing object in Adafruit Fritzing library (https://adafru.it/aP3)
© Adafruit Industries https://learn.adafruit.com/adafruit-neopixel-uberguide Page 63 of 68
Page 64

Breadboard Friendly NeoPixel Breakout
EagleCAD PCB files on GitHub (https://adafru.it/rAt)
Fritzing object in Adafruit Fritzing library (https://adafru.it/aP3)
© Adafruit Industries https://learn.adafruit.com/adafruit-neopixel-uberguide Page 64 of 68
Page 65

NeoPixel NeoMatrix 8x8
EagleCAD PCB files on GitHub (https://adafru.it/rB8)
Fritzing object in Adafruit Fritzing library (https://adafru.it/aP3)
© Adafruit Industries https://learn.adafruit.com/adafruit-neopixel-uberguide Page 65 of 68
Page 66

NeoPixel Arduino Shield
EagleCAD PCB files on GitHub (https://adafru.it/rCg)
Fritzing object in Adafruit Fritzing library (https://adafru.it/aP3)
© Adafruit Industries https://learn.adafruit.com/adafruit-neopixel-uberguide Page 66 of 68
Page 67

NeoPixel 8 Stick
EagleCAD PCB files on GitHub (https://adafru.it/rCQ)
Fritzing object in Adafruit Fritzing library (https://adafru.it/aP3)
© Adafruit Industries https://learn.adafruit.com/adafruit-neopixel-uberguide Page 67 of 68
Page 68

© Adafruit Industries Last Updated: 2018-07-30 11:48:14 PM UTC Page 68 of 68
 Loading...