

My Mini Race Car
Created by John Park
Last updated on 2021-04-07 06:12:01 PM EDT

2
3
5
5
6
7
7
8
8
9
10
10
11
13
18
19
23
23
30
30
30
31
33
36
36
36
37
40
41
41
43
43
44
45
46
48
49
50
53
54
59
59
59
Guide Contents
Guide Contents
Introduction
Unboxing Your Mini Race Car Kit
Kit Contents
Feather, USB Cable, & Batteries
Car Chassis & Assembly Tools
Prototyping Parts and Components
Assembling and Wiring Your Mini Race Car
Motors and Wheels and Tires
Lower Chassis
Turn over the plate
Turn over the plate again
Prepare the Battery Box
Middle Chassis Layer
Prepare the Electronics
LiPoly Battery
3D Printed Car Parts
Bonus Body Parts
How Your Race Car Works: The Basics
Board Support Package and Drivers
Libraries
DC Motor Test
Let's Get Moving
Code for Your Race Car
Libraries
The Code
Driving Your Race Car
Temperature and Humidity Data
Power Pins:
I2C Logic pins:
Download Adafruit_HTU21DF
Load Demo
Bluetooth Data Streaming
Plotting
Sensor Placement
Make Your Race Car Autonomous
Mounting the Sensors
The Code
Control Your Race Car's Speed
Using the Controller to Control Speed
Connecting Your Race Car to Adafruit IO
Sign up for Adafruit IO and create your first dashboard.
Send data to Adafruit IO
© Adafruit Industries https://learn.adafruit.com/my-mini-race-car Page 2 of 65
Introduction
Get ready to race down the track with your Feather microcontroller-based Mini Race Car! You'll build this
high performance racer, using the Bluetooth LE capable Feather 32u4 Bluefruit LE board, Motor Driver
FeatherWing, and TE HTU21D-F temperature & humidity sensor to give you racetrack telemetry data.
© Adafruit Industries https://learn.adafruit.com/my-mini-race-car Page 3 of 65
All of this is controlled from your mobile device using the free Bluefruit Connect app for iOS and Android.
Let's get started!!
© Adafruit Industries https://learn.adafruit.com/my-mini-race-car Page 4 of 65
Unboxing Your Mini Race Car Kit
My Mini Race Car is designed to introduce you to the joys of making with electronics. We decided to come
up with a fun pack of parts that:
Could introduce a beginner to making
Teach electronics and programming skills
Does not assume any prior experience
Does not require any soldering or special tools
Kit Contents
After a lot of thinking, here's what we came up with:
© Adafruit Industries https://learn.adafruit.com/my-mini-race-car Page 5 of 65
Feather, USB Cable, & Batteries
Feather 32u4 Bluefruit LE is the brains of your race car! It is Arduino-compatible and has Bluetooth
wireless control
Motor FeatherWing is the muscle of this car, providing power to the motors -- Lets you drive up to 4
DC or 2 stepper motors- certainly enough motors to power the car kit!
TE HTU21D-F is the heart of your race car. Temperature & Humidity sensor breakout board for
realtime car/track sensing!
1x USB Cable - Standard A-B - 3 ft/1m (http://adafru.it/62) - use this to install new code onto your
Feather (from any computer)
3.7V LiPoly battery - this battery will power your Feather (but not the motors)
© Adafruit Industries https://learn.adafruit.com/my-mini-race-car Page 6 of 65

4x AA Batteries (http://adafru.it/3349) - Use these to power your the motors of your super
awesome little race car
Car Chassis & Assembly Tools
Three layer Robot Chassis Kit in Black (http://adafru.it/3244) - This kit gives you everything you need
to build the shell of a 2-wheel-drive Mobile Platform Robot to help you channel your inner Mario
Andretti
Pocket Screwdriver with Philips and slotted ends
Prototyping Parts and Components
Half Size Breadboard Perfect fit for your car kit. Your Feather will connect to the breadboard,
allowing you to easily plug in other sensor, LEDs, buzzers, potentiometers, switches, and more
1x 4xAA Battery Holder w/ On/Off Switch (https://adafru.it/sfq) - A nice portable battery holder for your
car's motor batteries.
1x Shield stacking headers for Arduino (http://adafru.it/85) - Allow optional plugging in of many
different boards, sensors, and wiring
1x Rubber Bumper Feet (https://adafru.it/dLG) - Helps keep the battery packs safe and secure
Jumper wires for making additional connections
© Adafruit Industries https://learn.adafruit.com/my-mini-race-car Page 7 of 65

Assembling and Wiring Your Mini Race Car
The wiring and assembly is pretty easy, and there is no soldering required! You'll just need the
small screwdriver that came in the kit, and it wouldn't hurt to grab some pliers. (It'll make it faster and
easier to put together)
First, you'll assemble the robot chassis. All the parts needed for this are inside the brown box with the
'Custom Black 2WD Robot + extra layer' sticker on it.
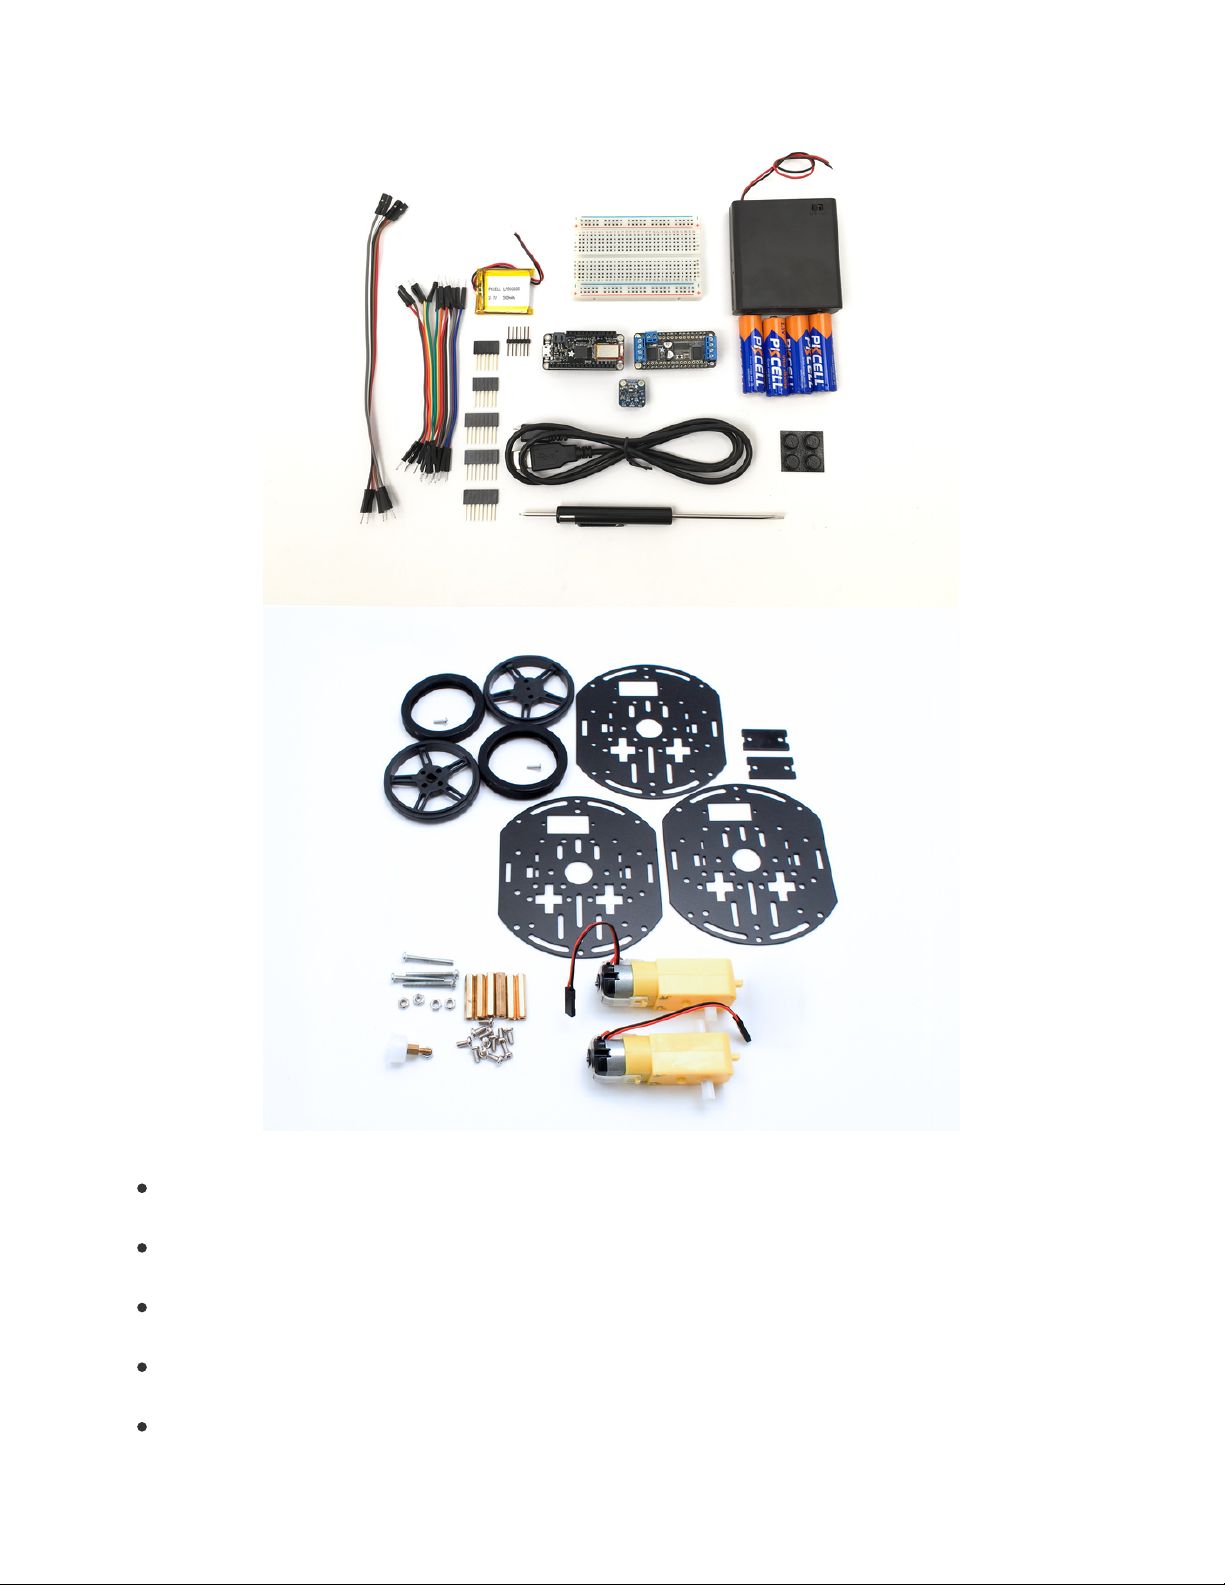
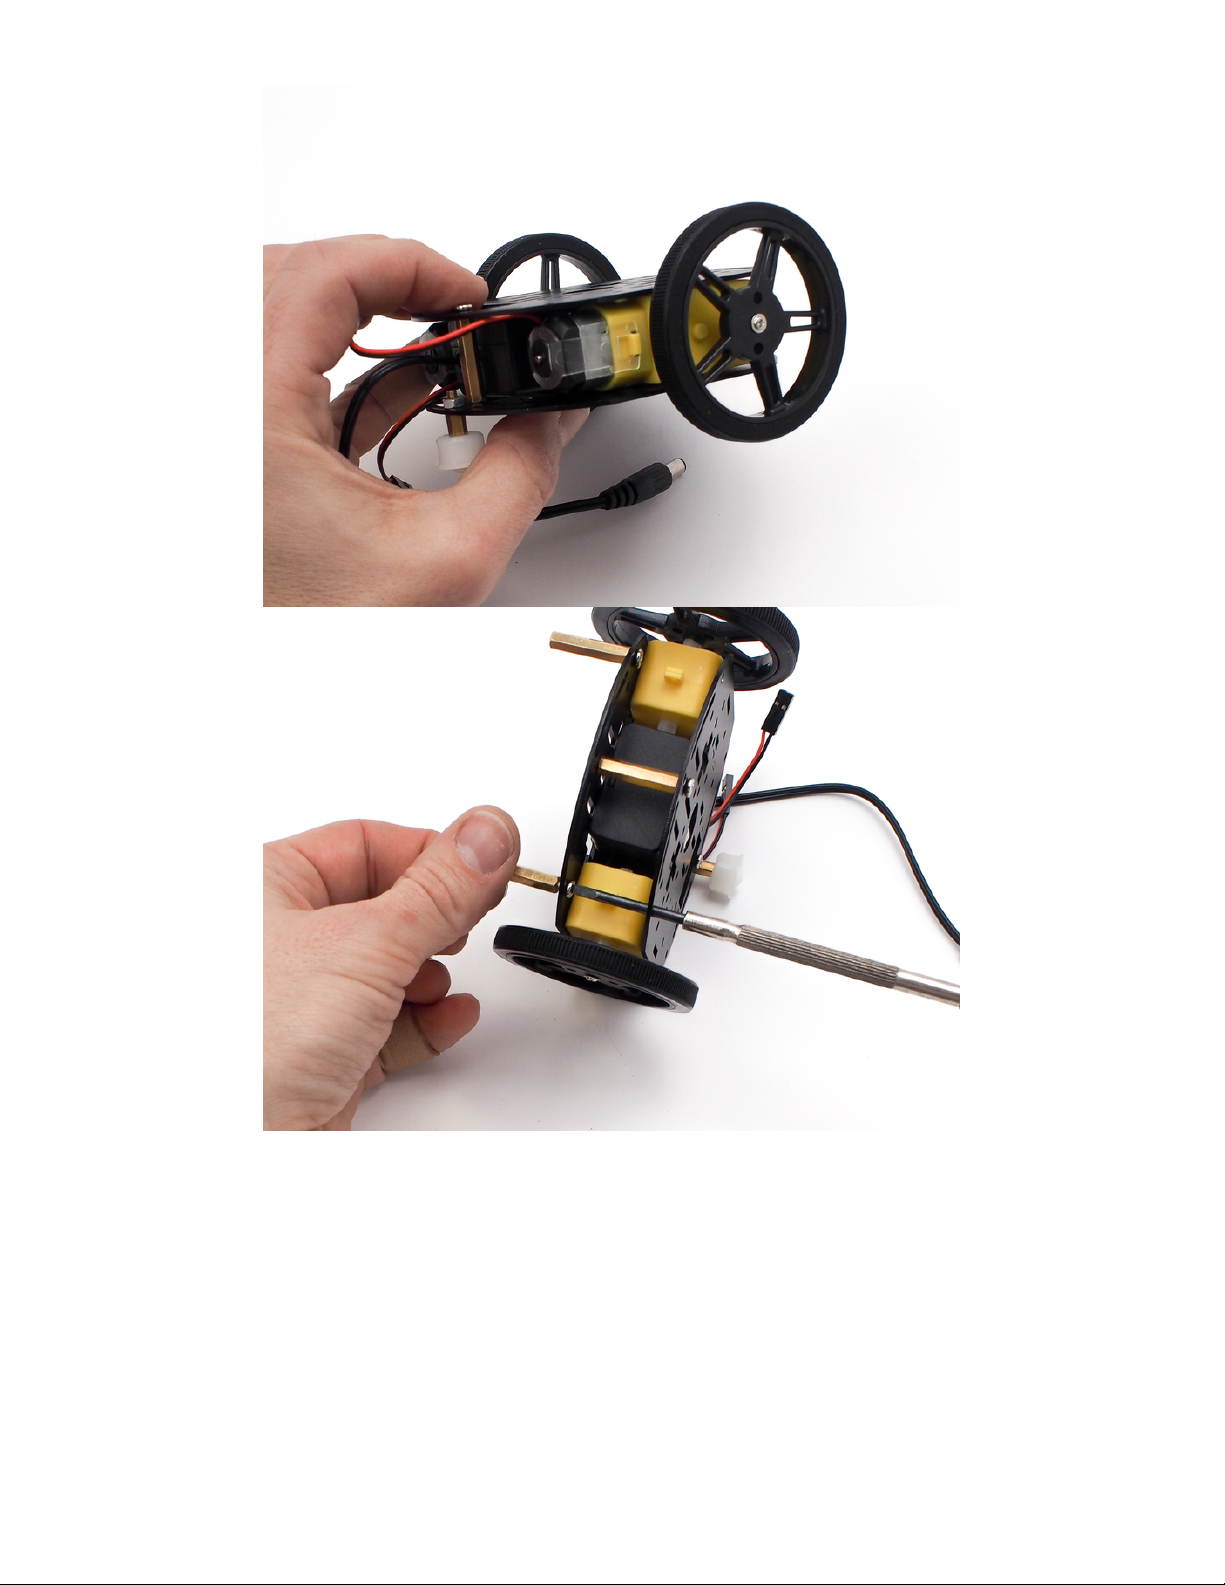
Motors and Wheels and Tires
To start, take the two motors, four long screws, four nuts, and
two black panels.
Screw the two black panels onto the motors.
The metal panels go on the side with the red and black wires
coming out.
Have the hex nuts on the metal panel side so they don't
interfere with the wheel!
The metal panels go on the side with the red and black wires coming out.
Have the hex nuts on the metal panel side so they don't interfere with the wheel!
© Adafruit Industries https://learn.adafruit.com/my-mini-race-car Page 8 of 65
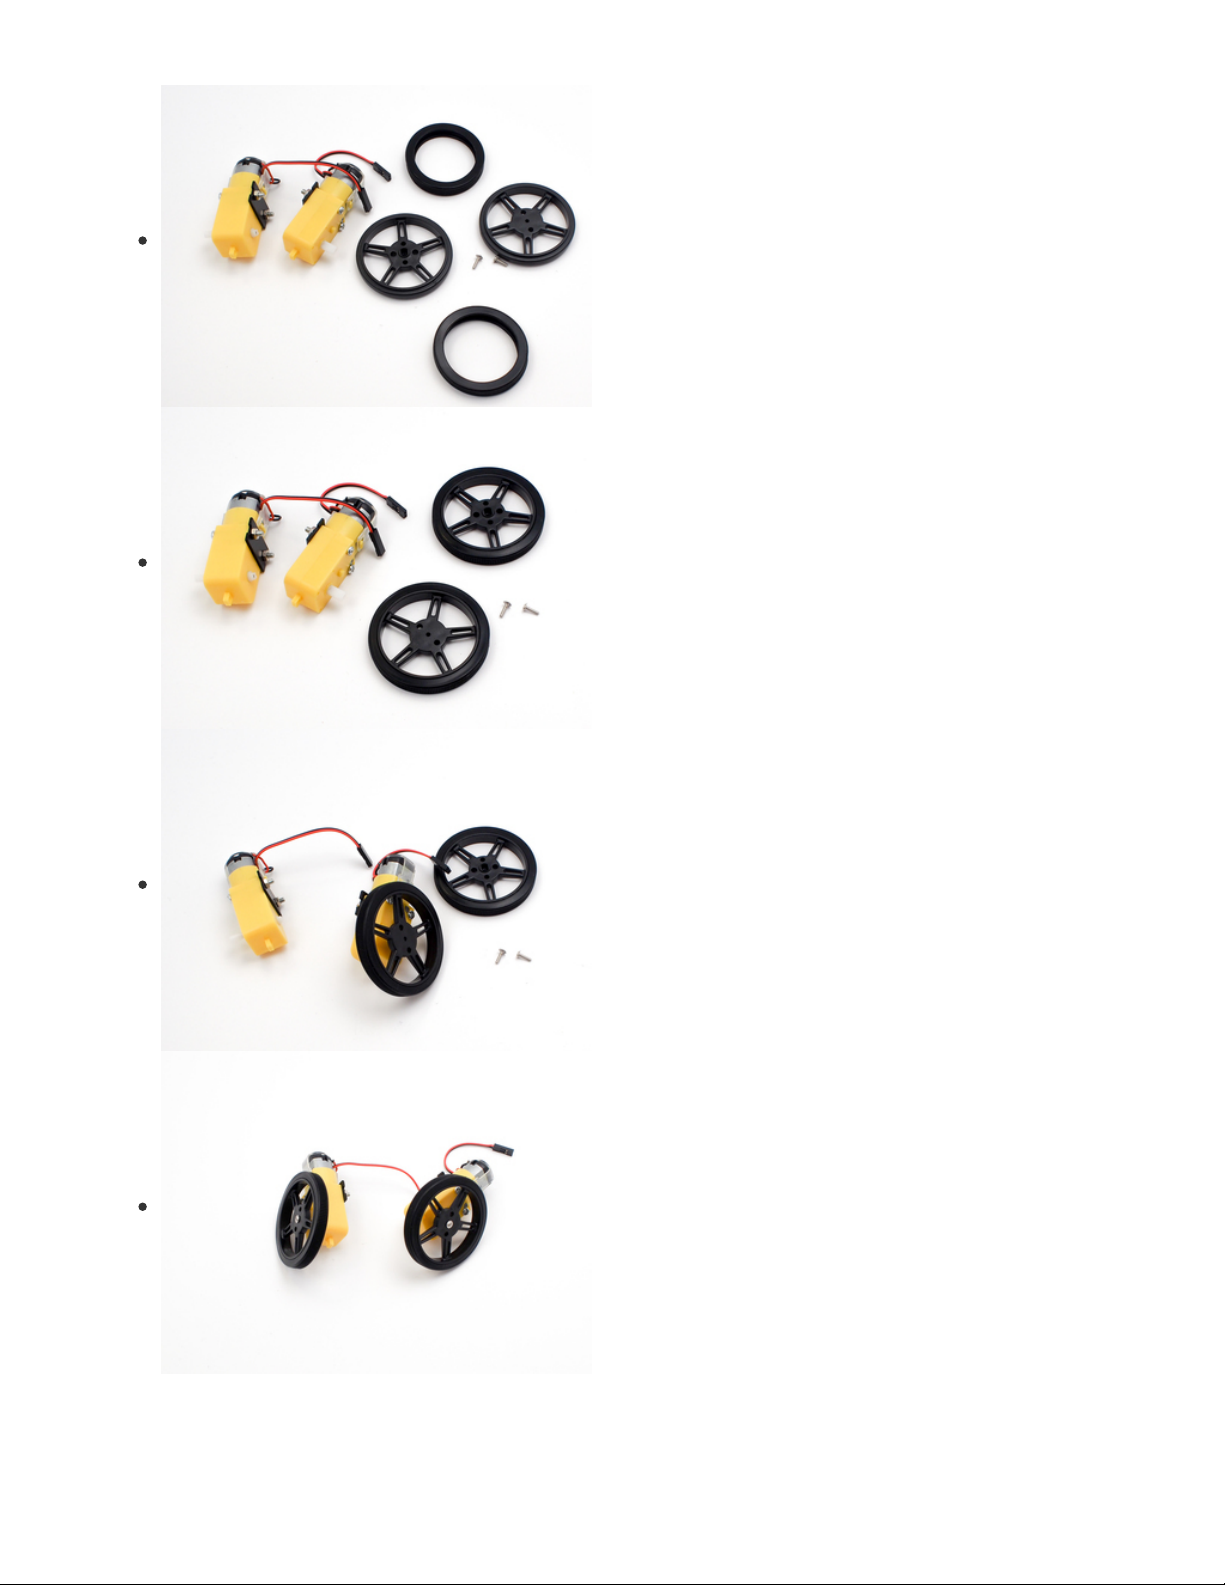
Take the two wheels, rubber treads, and 2x small screws
found in the same bag as the wheels.
Put the rubber treads on the wheels. This is a lot of fun!
Fit the wheels onto the white knob on the motors, they will
snap nicely onto the oval center.
Lower Chassis
© Adafruit Industries https://learn.adafruit.com/my-mini-race-car Page 9 of 65

Take one of the black chassis layers. All three layers are
identical.
Align it on your table as shown on the left. Note that the panel
is not symmetrical - look on the left to see that rectangle cut
out? Make sure it's aligned as you see here!
Attach two of the brass standoffs onto the black chassis layer.
The standoffs should be screwed into the second set of
holes from the outer edge - meaning the two interior holes.
Turn over the plate
Attach the white free-wheel into the exterior hole closest to the rectangular opening.
The white free-wheel should be on the opposite side of the chassis of the standoff.
Turn over the plate again
© Adafruit Industries https://learn.adafruit.com/my-mini-race-car Page 10 of 65
Take your assembled wheels and fit them into the chassis layer.
There are 2 slots on the black panels that you attached to your motor that should fit perfectly into the
chassis layer.
The metal front of the motor will be pointing toward the side of the chassis where you placed your white
freewheel
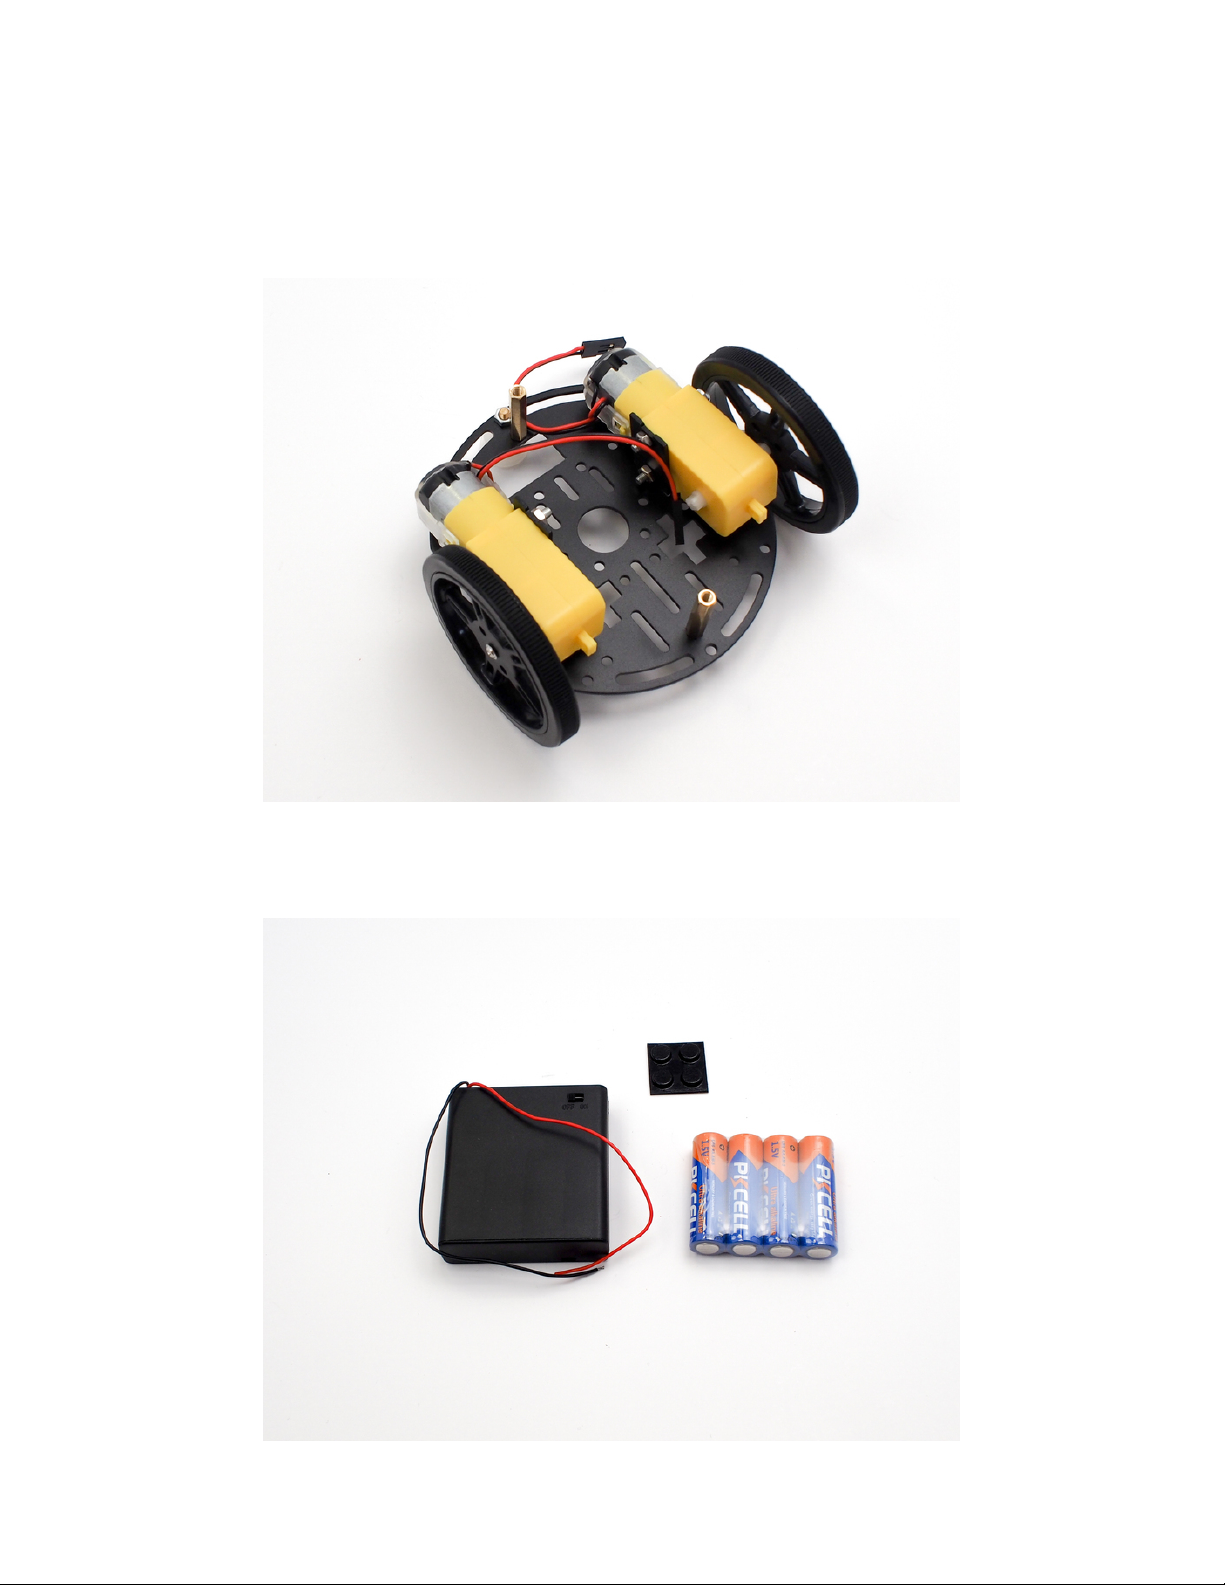
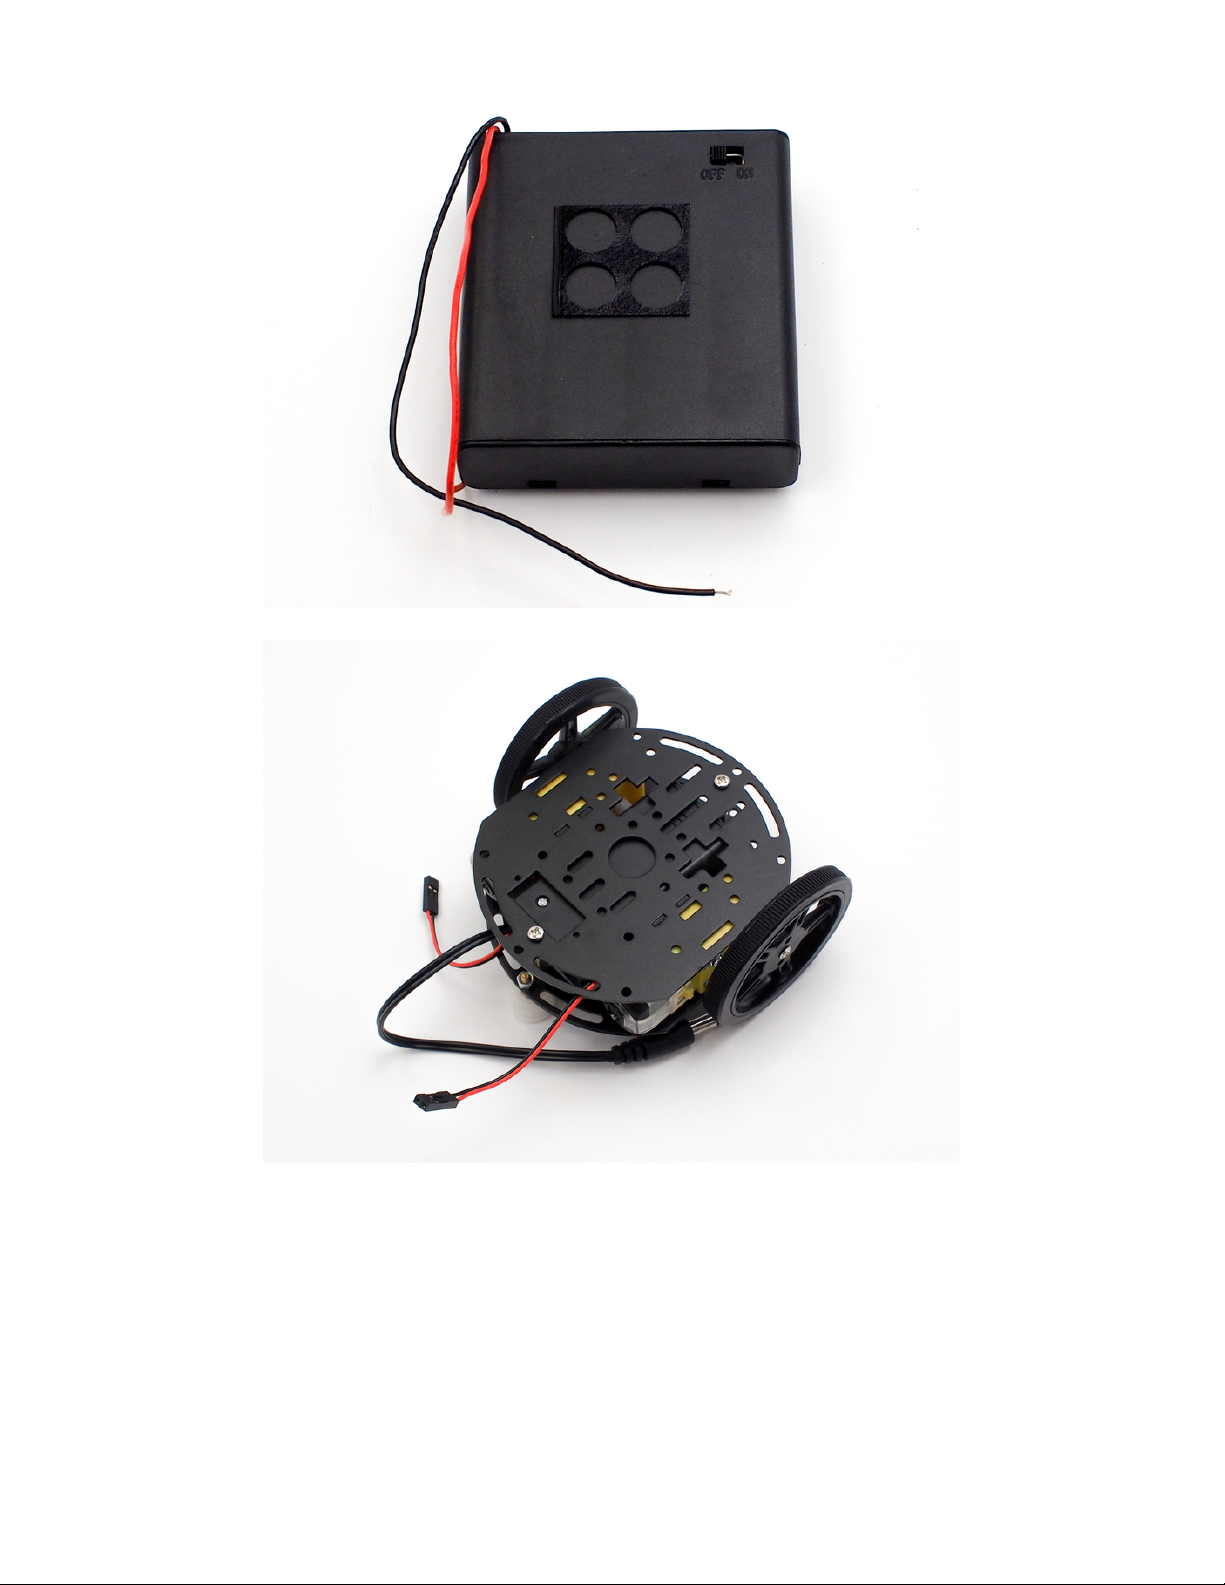
Prepare the Battery Box
For this step, you will need the AA battery box, 4 x AA batteries, the screwdriver, and a sheet of 4 rubber
bumpers.
© Adafruit Industries https://learn.adafruit.com/my-mini-race-car Page 11 of 65
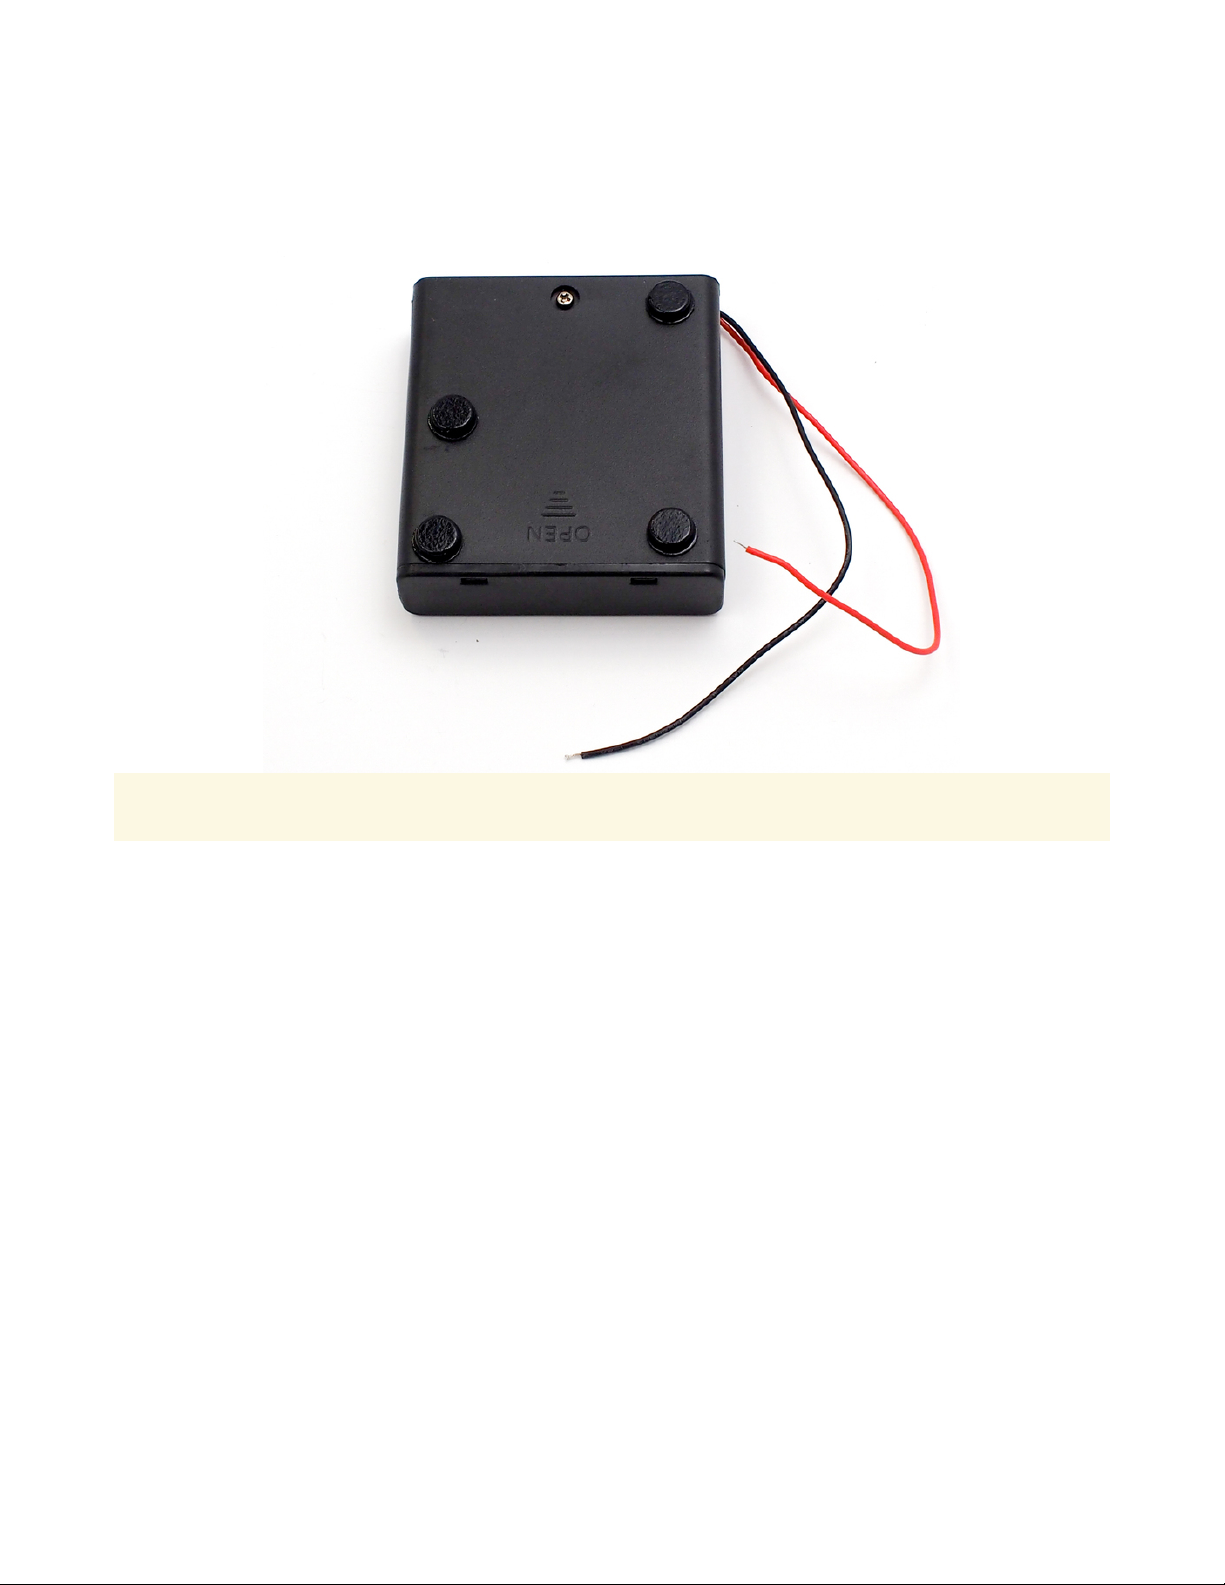
First, open each battery box, grab out the screw, insert your batteries, and then screw the boxes shut. Oh,
and make sure you have the boxes switched to the off position. Now, take the 4 rubber bumpers and
place them as shown in the picture below. Notice how the one bumper on the left side is not in the upper
left corner. Important: don't throw away the leftover piece of bumper material, we are going to use that on
the next step.
Do not discard the leftover piece of bumper material.
Flip the battery box over and place the scrap piece of the bumper material in the middle. This will help
hold the battery box nice and tight between the top and middle plate of your robot.
© Adafruit Industries https://learn.adafruit.com/my-mini-race-car Page 12 of 65
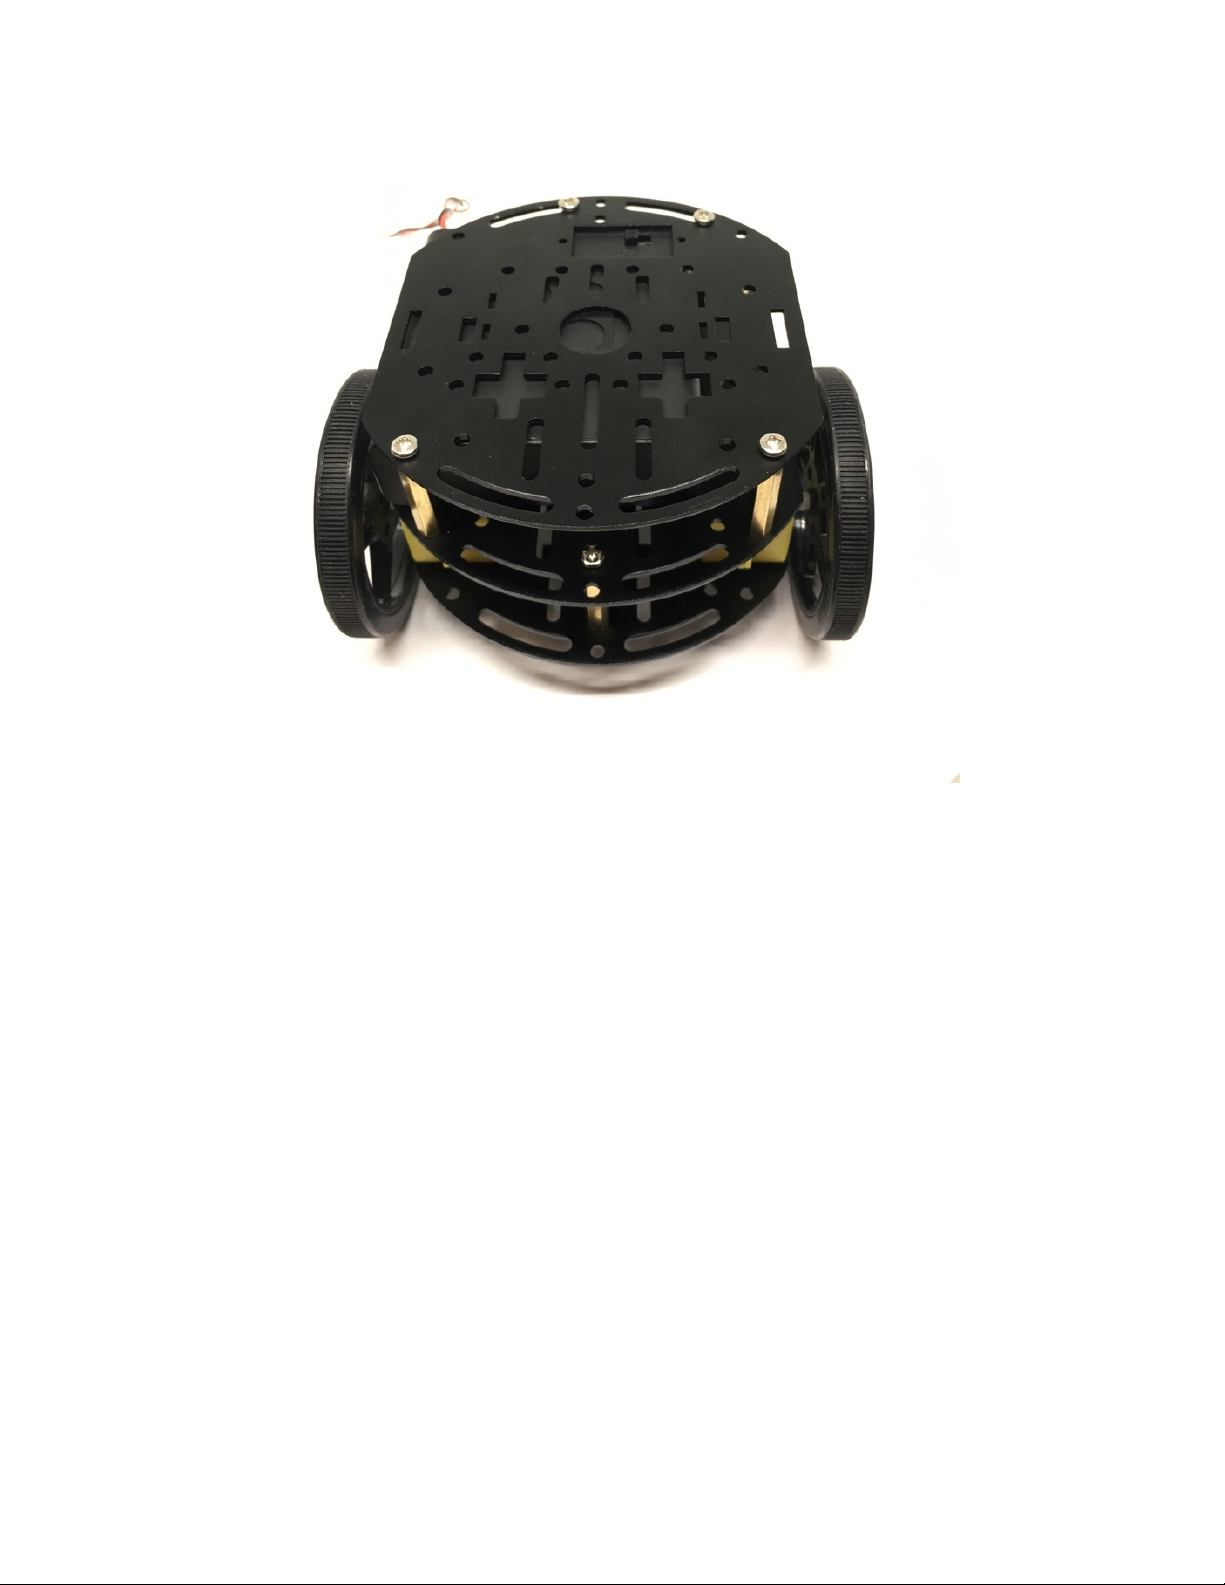
Middle Chassis Layer
Place the middle chassis layer onto robot, making sure to fit the motor tabs into the slots of the layer, then
screw in the two brass standoffs.
© Adafruit Industries https://learn.adafruit.com/my-mini-race-car Page 13 of 65
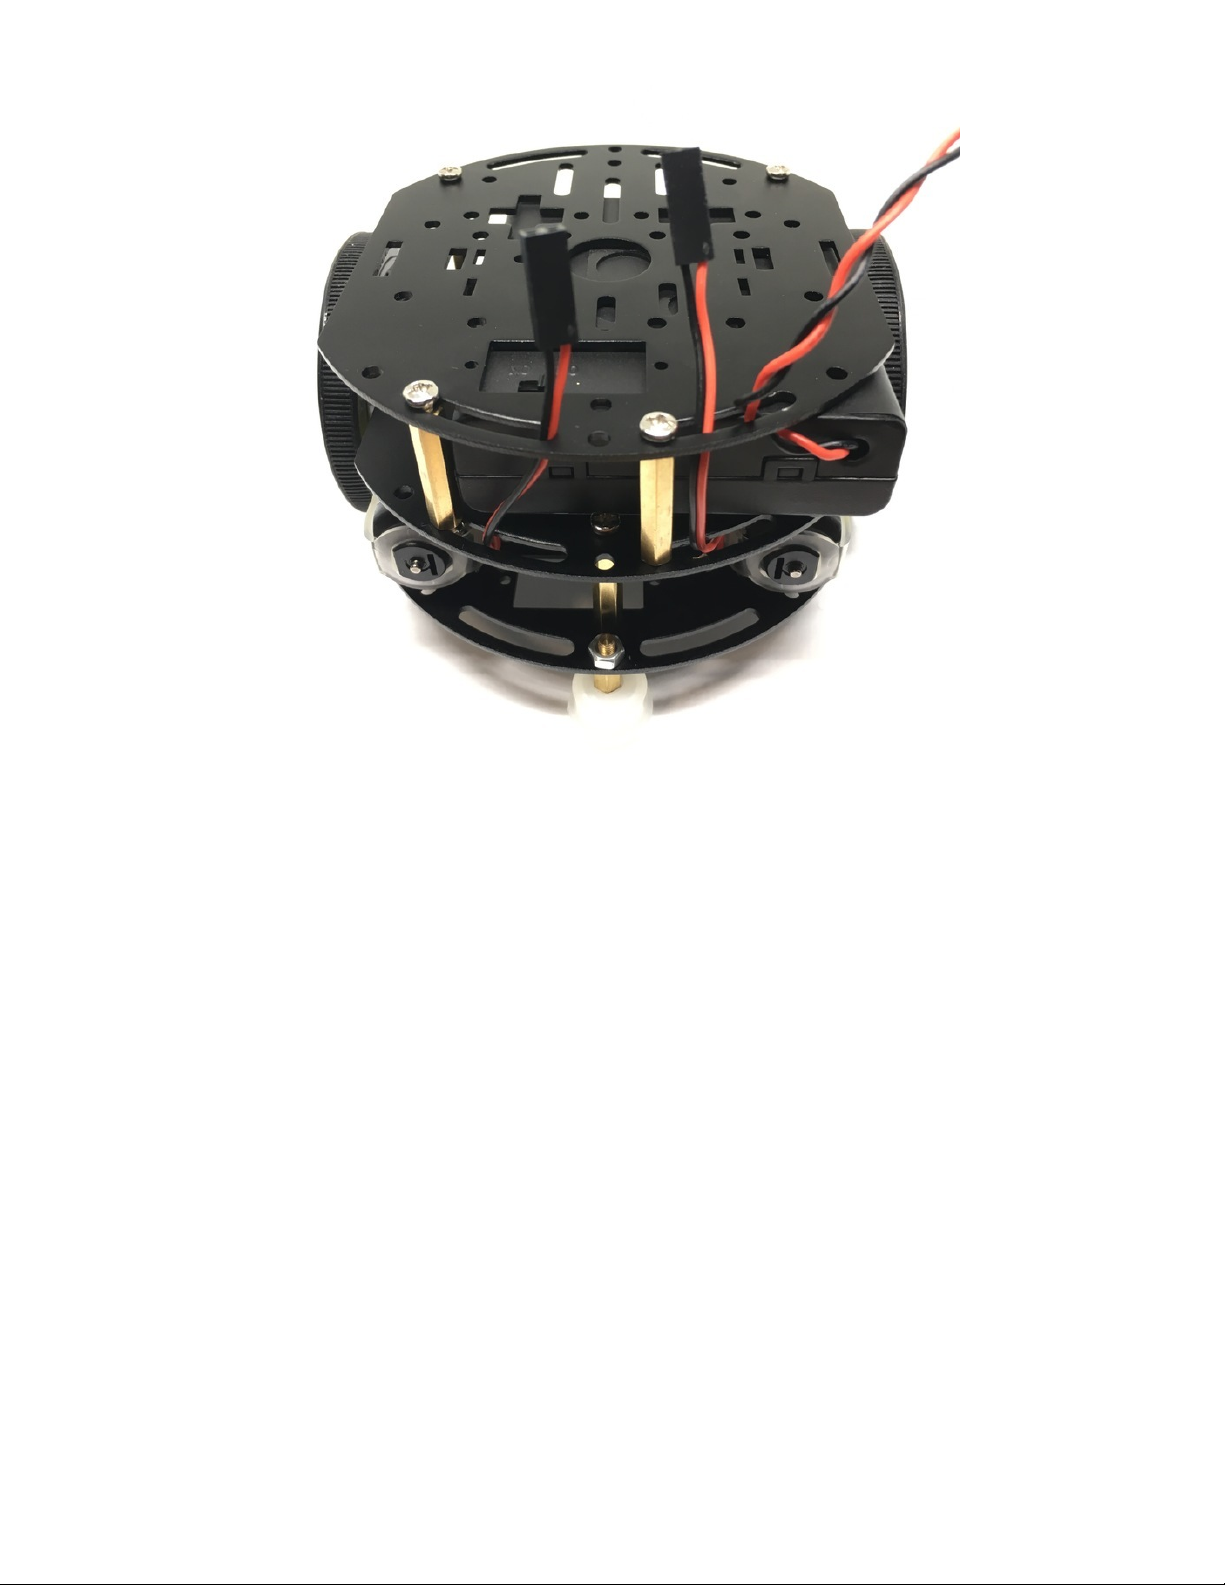
Take a look at the image below and install the brass stand-offs in the same positions. You can insert the
stand-off screws through the middle plate and hand tighten the stand-offs while putting a bit of pressure
on the screw with your finger. Or, as a tip, you can screw in the stand-off screws with the flat end of the
screwdriver, which can reach through the holes in the bottom plate.
© Adafruit Industries https://learn.adafruit.com/my-mini-race-car Page 14 of 65
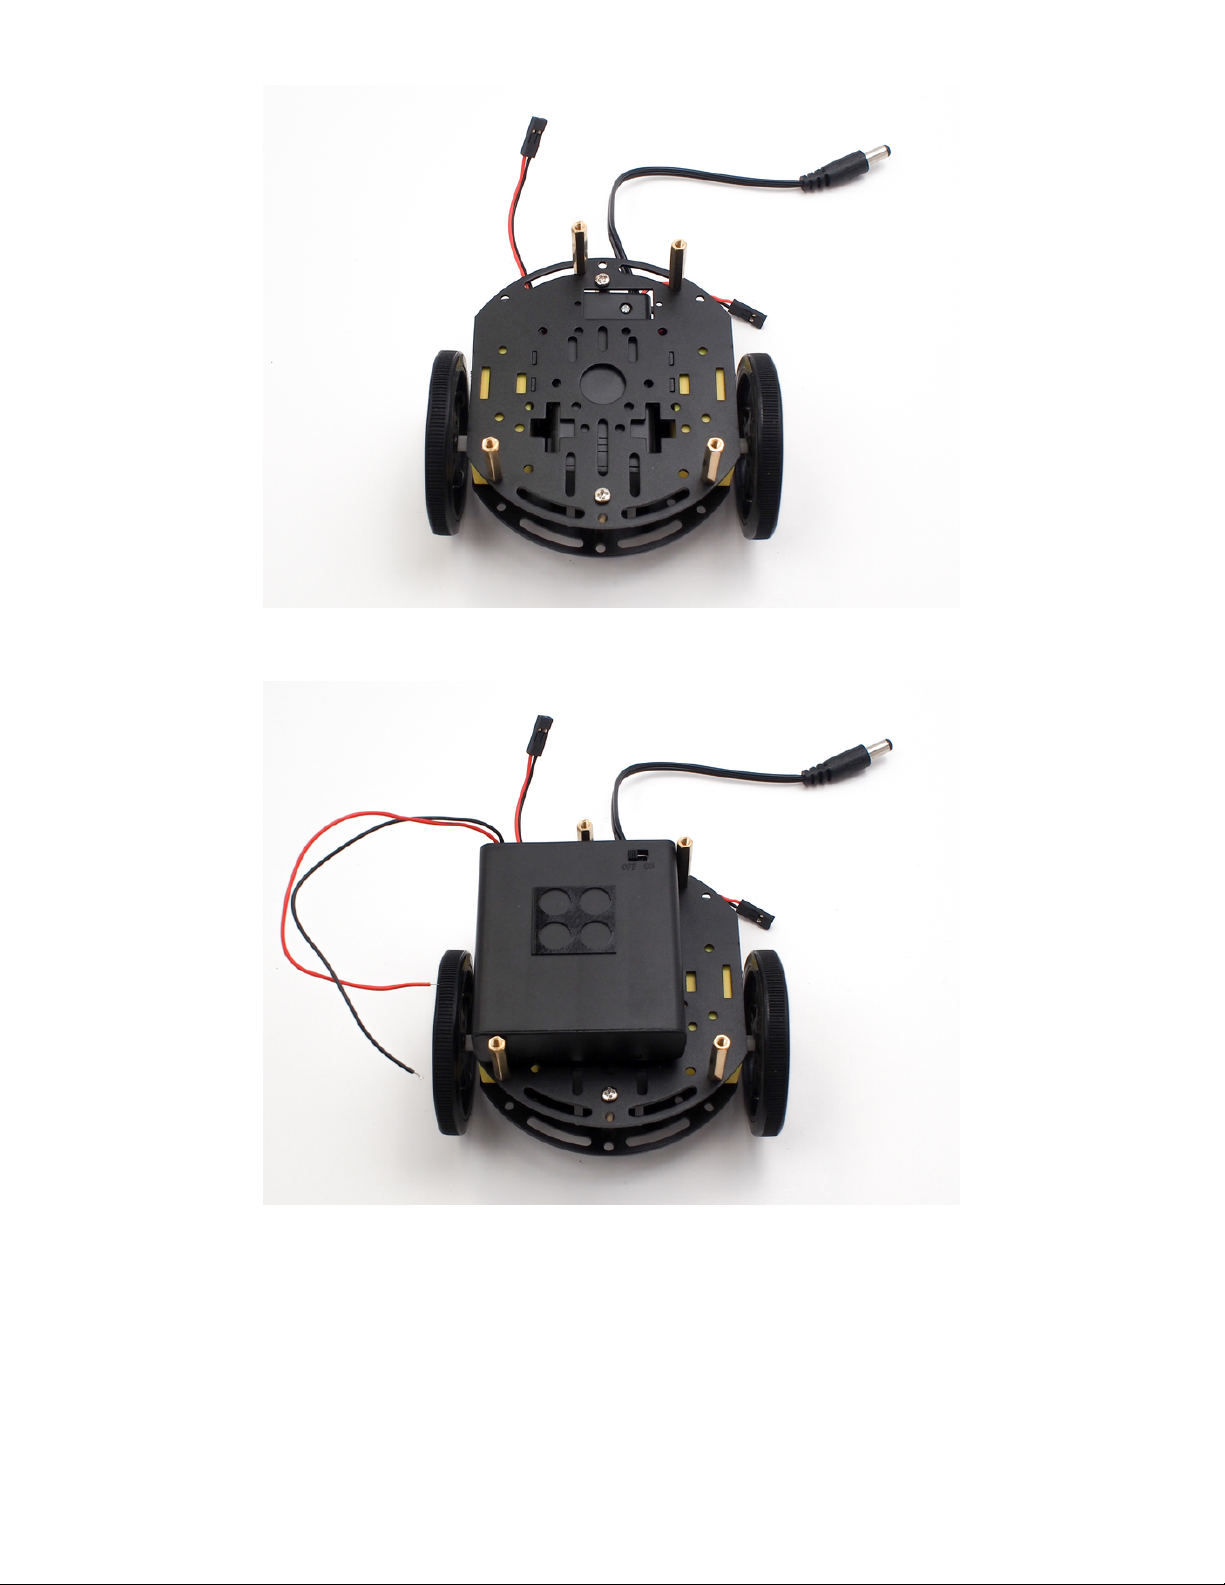
Once you have the stand-offs in place as shown in the image above, let's place the battery box in the
correct spot as shown in the image below.
Notice the battery box is lined up on the left side of the middle chassis plate. It should be just in-between
the upper left stand-off and the lower left stand-off (not touching either). This will make sure the on-off
switch lines up just right in the hole of the top plate. Go ahead and install the top plate now as shown
here.
© Adafruit Industries https://learn.adafruit.com/my-mini-race-car Page 15 of 65
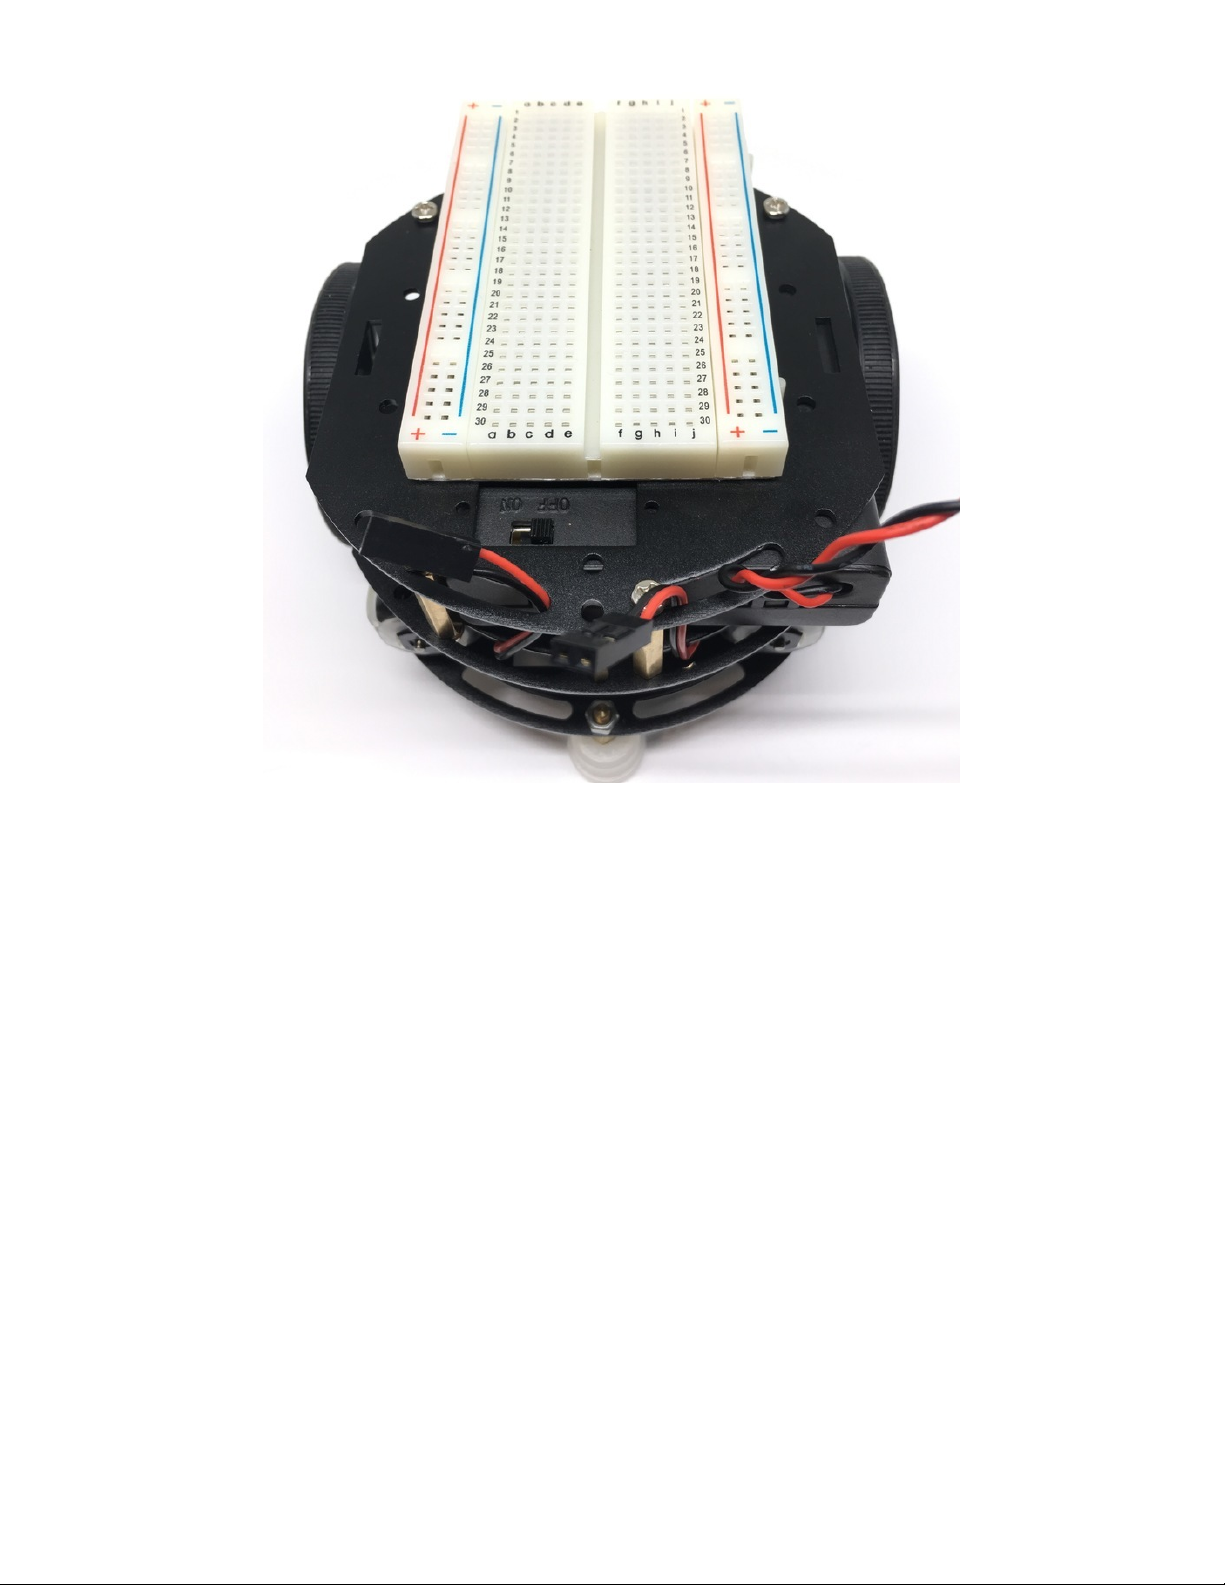
See how the on-off switch is now accessible through the top plate? Now let's take just a minute to route
the wires from the motors and the battery box through the chassis like shown in the image below.
© Adafruit Industries https://learn.adafruit.com/my-mini-race-car Page 16 of 65
We are getting close! Now let's install the breadboard on top of the robot. Peel off the backing from the
foam sticker on the bottom of the breadboard. Take a look at the image below and stick it exactly as
shown. Be sure to install the breadboard just as shown in the image below and not sideways or the motor
wires won't reach the motor driver Feather Wing.
© Adafruit Industries https://learn.adafruit.com/my-mini-race-car Page 17 of 65
Prepare the Electronics
© Adafruit Industries https://learn.adafruit.com/my-mini-race-car Page 18 of 65
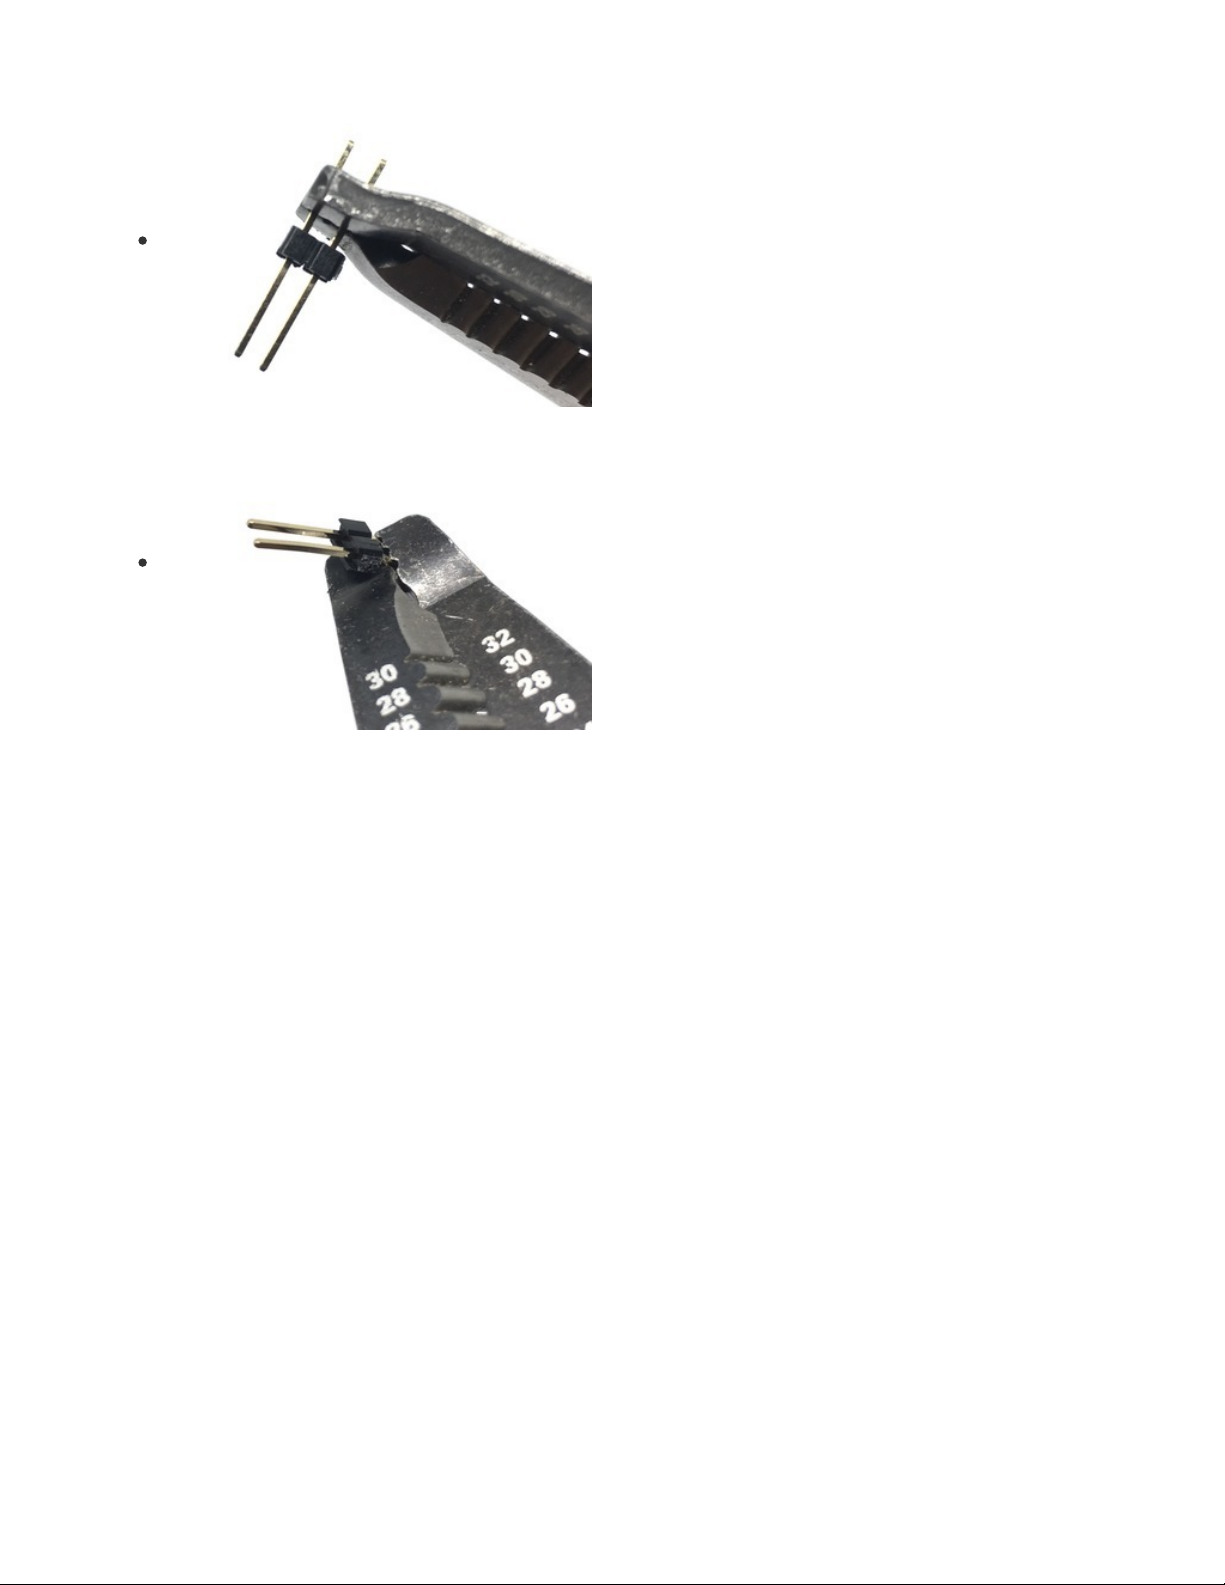
For this next step, a pair of pliers is handy. First, grab the 6
header pins all attached together and break them into 3 sets
of 2 header pins. Then, grab them in the pliers like shown
here, and then slightly bend them so they look like the next
picture.
If you don't have pliers you can do it with your fingers
(carefully!)
With the breadboard in place, go ahead and grab your stacked Bluefruit Feather, and Motor Driver
FeatherWing and install it in the breadboard with the USB port facing away from the wires like shown in
the image below. Then use your screwdriver and install the bent header pins like shown in the image.
Finally, attach the motor wires and power wires as shown in the image. It is important that you have the
red and black wires in the correct position. Please reference the image below and triple check that they
are installed correctly.
LiPoly Battery
© Adafruit Industries https://learn.adafruit.com/my-mini-race-car Page 19 of 65
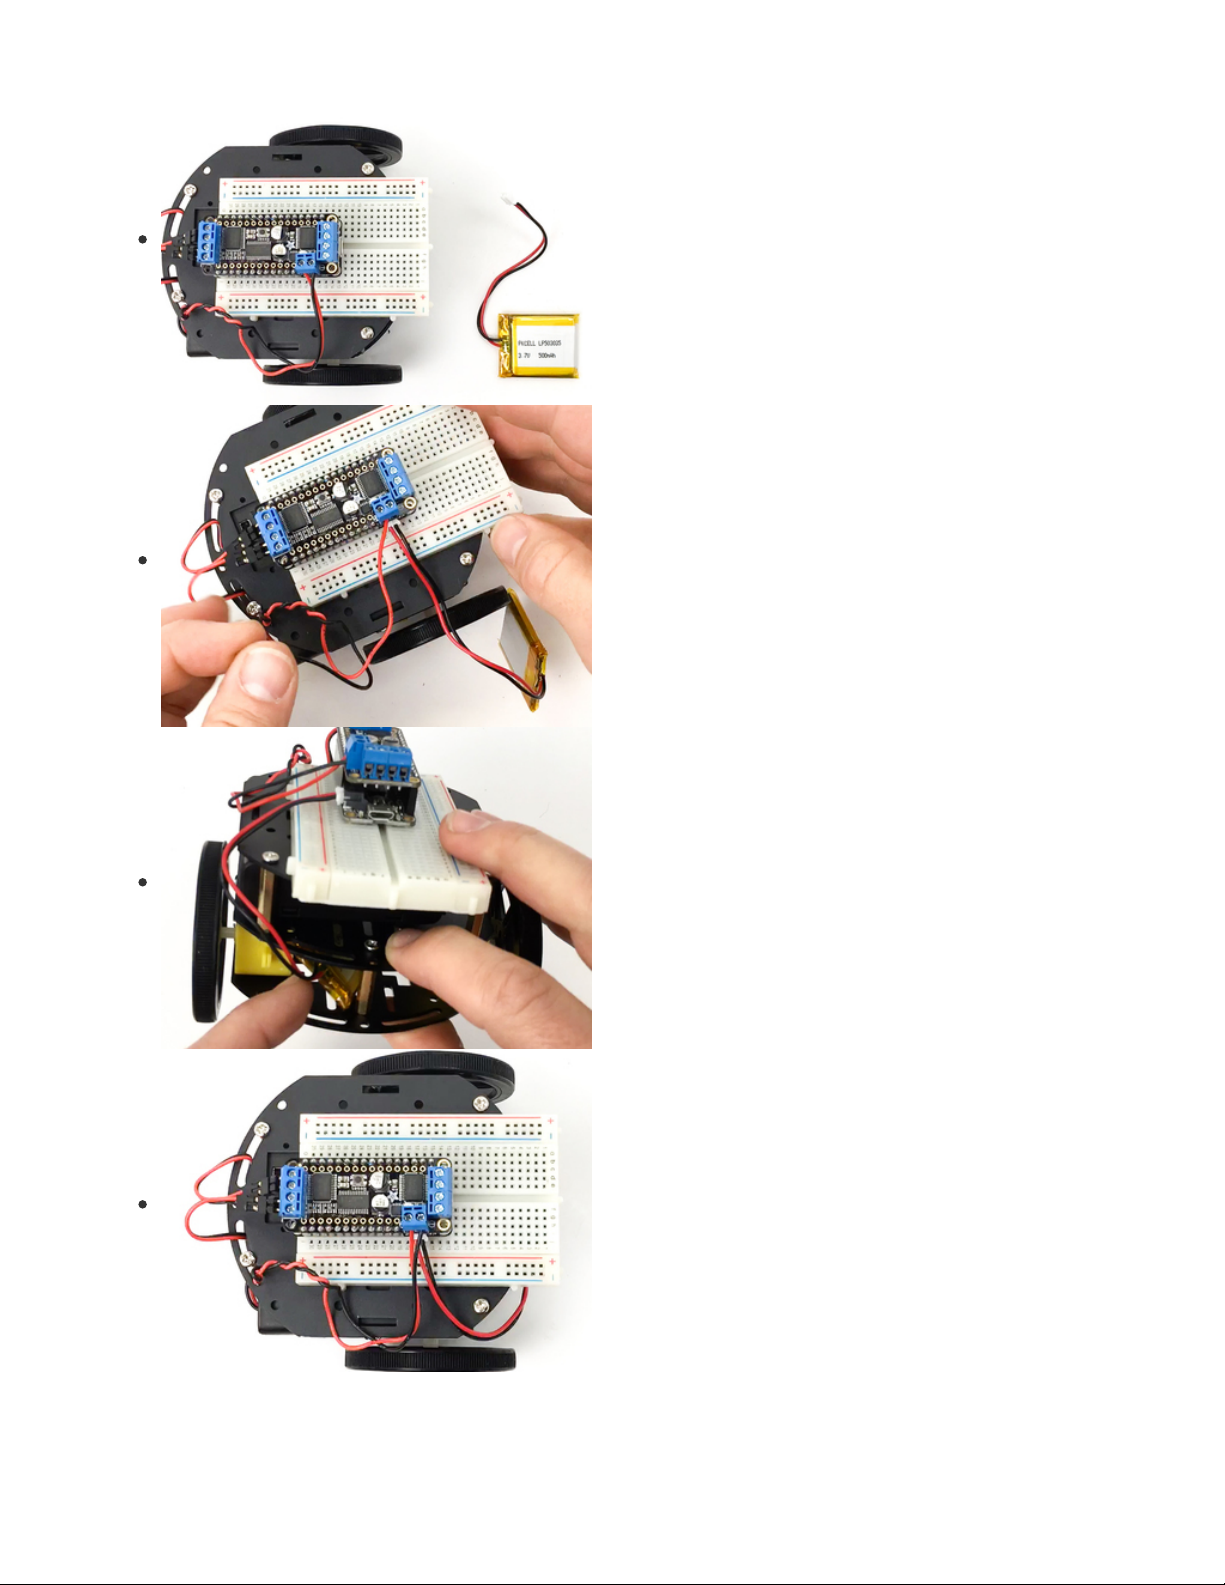
The AA batteries will supply power to the motors through the
Motor Driver FeatherWing, but what about power for the
Feather itself? For that, you'll use a LiPoly battery. It's small,
powerful, and very convenient -- you can charge it simply by
plugging the Feather into a USB charger!
Plug the LiPoly battery into the JST battery port on the
Feather, and then tuck the battery into the space in the lower
level of the robot. If you like, you can secure it with double
stick foam tape.
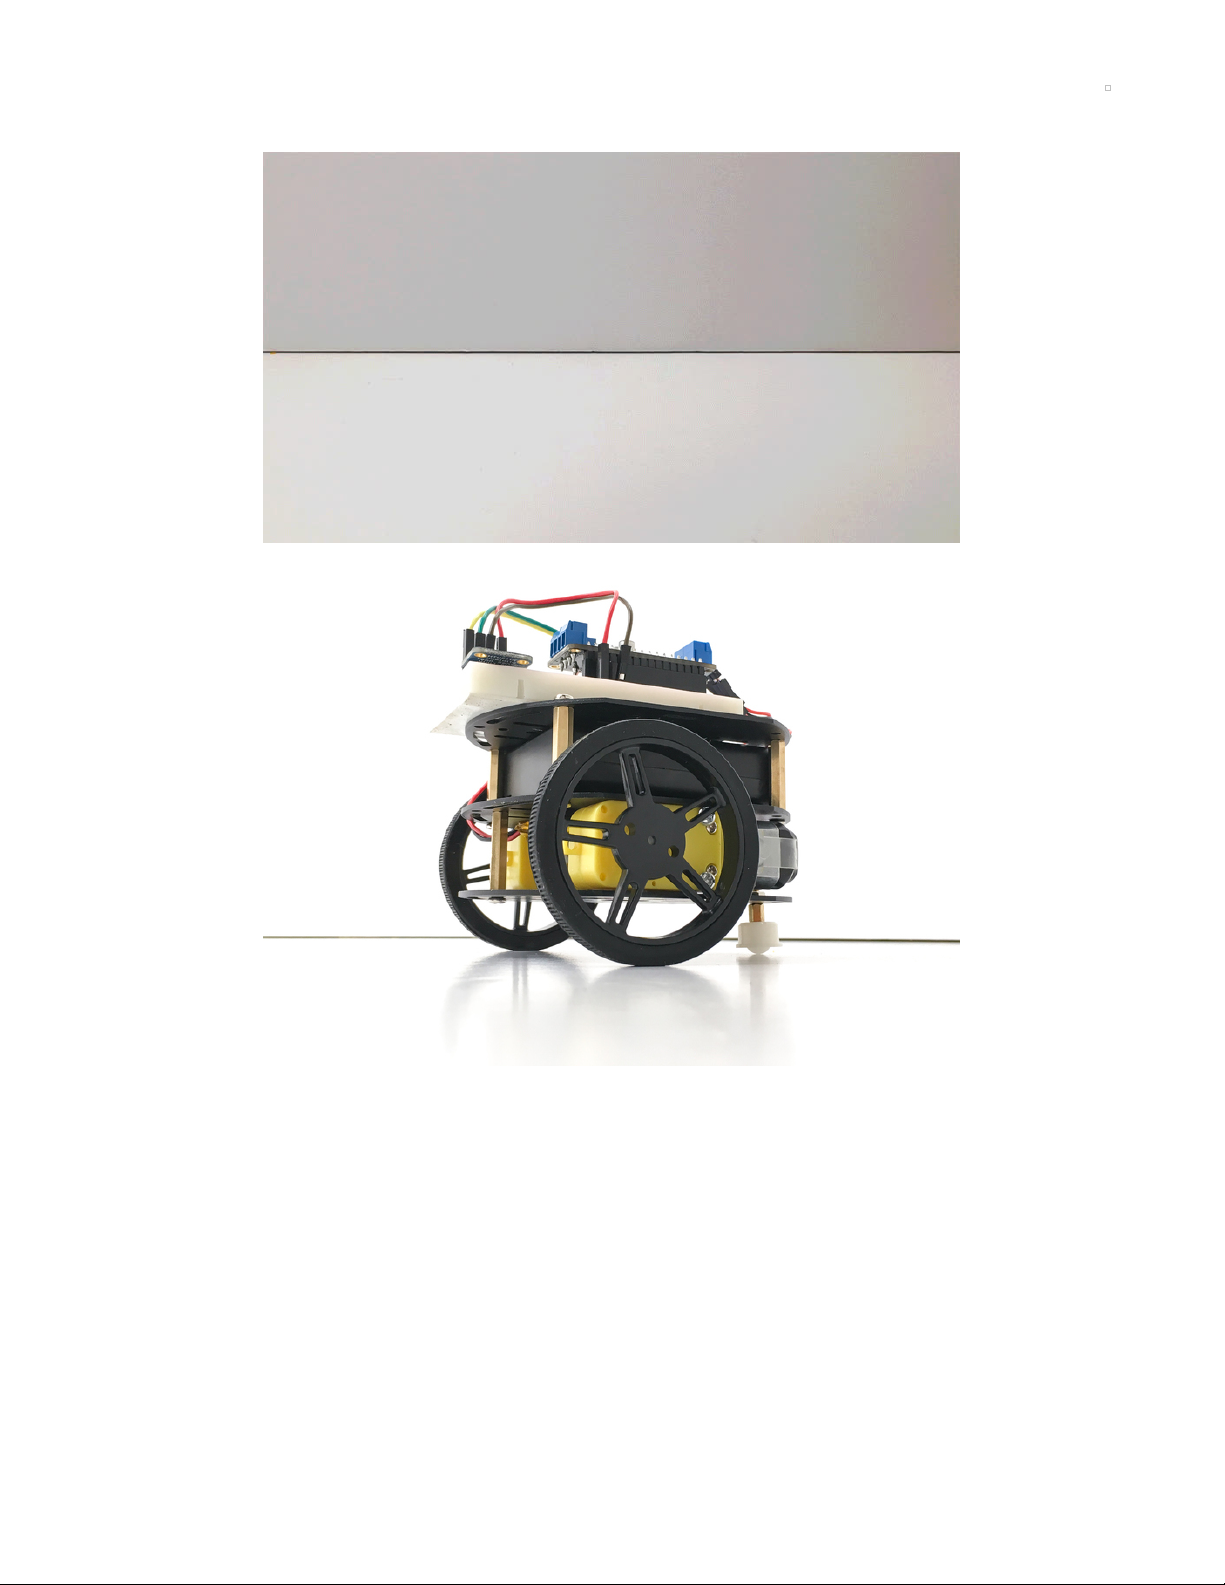
Congratulations, you've built your robot!
© Adafruit Industries https://learn.adafruit.com/my-mini-race-car Page 20 of 65

That's it for the first part of getting your robot assembled and wired. Now, let's get this robot moving! On to
the code!
© Adafruit Industries https://learn.adafruit.com/my-mini-race-car Page 21 of 65

© Adafruit Industries https://learn.adafruit.com/my-mini-race-car Page 22 of 65

3D Printed Car Parts
Bonus Body Parts
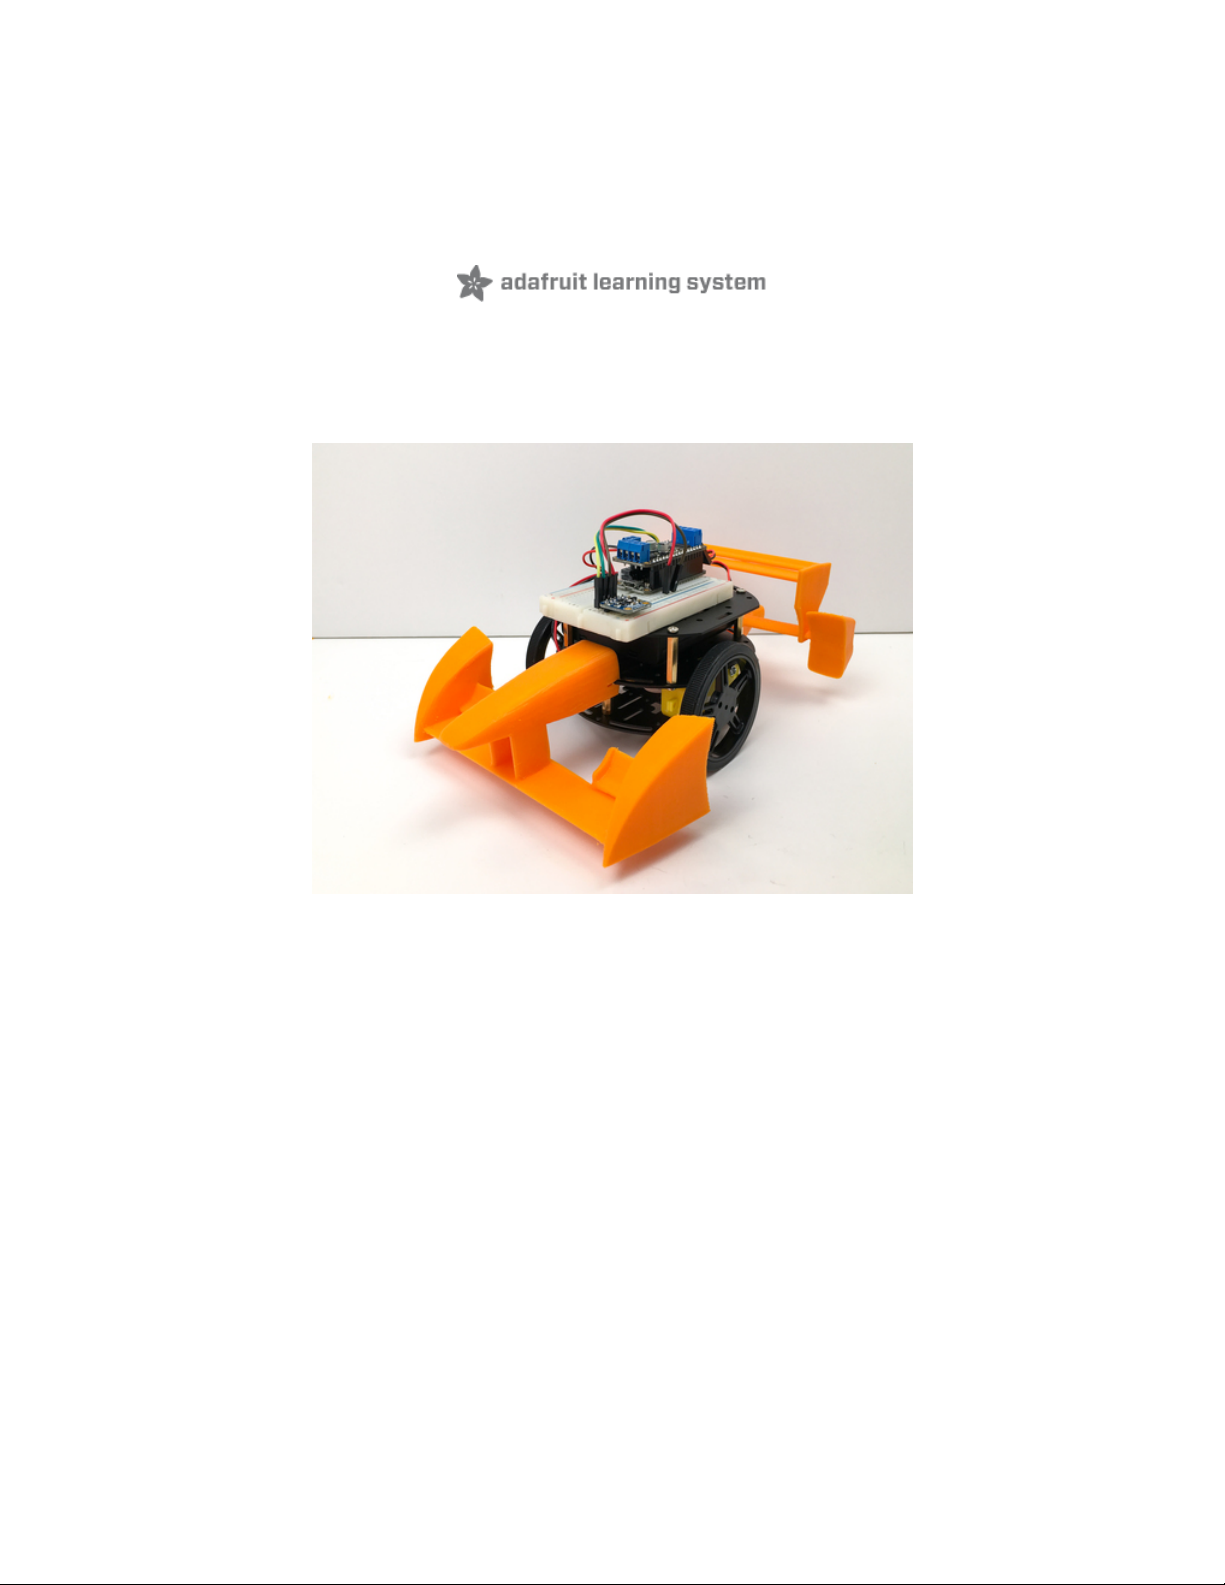
Want to dress your race car up to look like its Formula E bigger siblings? Add a 3D printed nose and tail to
your mini race car! You can imagine how these wings provide all the downforce needed to keep a real
Formula E car stable and provide the downforce to prevent lift off!
These models are based on the excellent Formula E Race Car model by
petropixel (https://adafru.it/wES) published on Thingiverse under Creative Commons license.
© Adafruit Industries https://learn.adafruit.com/my-mini-race-car Page 23 of 65

I designed the new parts to be printed vertically (nose up for the front piece, tail down for the back piece)
and they each have a groove that can be used to press fit them onto the race car's middle plate.
You can download the model files here, and then either print them on your own 3D printer, or send them
to a service, such as 3D Hubs, to have them printed for you.
https://adafru.it/wEZ
https://adafru.it/wEZ
© Adafruit Industries https://learn.adafruit.com/my-mini-race-car Page 24 of 65

Once they're done printing, clean off any support material, and then fit them onto the racer's middle plate.
© Adafruit Industries https://learn.adafruit.com/my-mini-race-car Page 25 of 65

© Adafruit Industries https://learn.adafruit.com/my-mini-race-car Page 26 of 65

© Adafruit Industries https://learn.adafruit.com/my-mini-race-car Page 27 of 65

© Adafruit Industries https://learn.adafruit.com/my-mini-race-car Page 28 of 65

© Adafruit Industries https://learn.adafruit.com/my-mini-race-car Page 29 of 65

How Your Race Car Works: The Basics
Before we dig into the more complicated code, let's take a minute to break down the simple motor
controller code, and how it works to control your robot's motors.
Before going any further, make sure you have a basic understanding of how to program and use an
Arduino-compatible Feather microcontroller. Thankfully, we have a lot of great tutorials on how this whole
thing works. Click here to get started with Arduino (https://adafru.it/pcg), and then come back to this guide
to continue.
Before going any further, make sure you have a basic understanding of how to program and use an
Arduino
Board Support Package and Drivers
For the Feather 32u4, check out the guide for how to install Arduino IDE & add Adafruit
Board (https://adafru.it/lHa) support, then install Feather Board support (https://adafru.it/lHb)
Libraries
For your robot to work correctly, you will need to install a couple libraries. To install the libraries, we will
use Arduino's handy library manager. Navigate to the library manager like shown in the screenshot below.
© Adafruit Industries https://learn.adafruit.com/my-mini-race-car Page 30 of 65

Then, all you need to do is search for the library you want to install. For this mini race car, start by
searching for 'Adafruit Motor Shield', you should see two options like this:
Under the Adafruit Motor Shield V2 Library, select the latest version from the dropdown, then click the
install button.
While we won't need it quite yet, you might as well go ahead and search for 'Adafruit BluefruitLE nRF51',
and install the latest version of that. We will use this library later on.
DC Motor Test
Now that you have the libraries installed, let's open up the example sketch to try out the DC motors on
your car. You can find the example sketch in the Arduino Examples menu:
© Adafruit Industries https://learn.adafruit.com/my-mini-race-car Page 31 of 65

Take a look through this example sketch. Before you upload the code and run it on your robot, you need
to make a change or two. First off, you will need to change what port the motors are connected to. Let's
start by just trying one of the motors. If you remember when we assembled the robot, we connected the
motors to the back of the motor shield, in ports M3, and M4. So, in the top part of the code, go ahead and
change out the port from 1, to 3 like this:
// Select which 'port' M1, M2, M3 or M4. In this case, M1
Adafruit_DCMotor *myMotor = AFMS.getMotor(3);
// You can also make another motor on port M2
//Adafruit_DCMotor *myOtherMotor = AFMS.getMotor(2);
When you see two forward slashes // in front of text, that is called commenting. Anything written after
the // will be ignored by the Arduino. It is a way to communicate with whomever is reading your code.
Place your car on top of a cup or mug so the wheels are not touching the ground. Select Adafruit Feather
32u4 as the board under the Arduino Tools menu, and upload this code to your Feather through the USB
connector.
Notice how just the one wheel is going forward, then backward. If you update the code to this:
// Select which 'port' M1, M2, M3 or M4. In this case, M1
Adafruit_DCMotor *myMotor = AFMS.getMotor(4);
// You can also make another motor on port M2
//Adafruit_DCMotor *myOtherMotor = AFMS.getMotor(2);
With the motor port changed to 4, the other motor should now run. That is really the basics of how we will
go about controlling the race car.
© Adafruit Industries https://learn.adafruit.com/my-mini-race-car Page 32 of 65

Let's Get Moving
Now that you know how to make either motor go forward and backward with the example sketch, let's
learn the rest of the motor controller basics and write a sketch to get this robot moving. At the top of your
sketch, you just need to call out both motors. To do this, you just need to uncomment the
myOtherMotor line of code by removing the two forward slashes before the code. Then, set the second
motor to 3 like so:
// Select which 'port' M1, M2, M3 or M4. In this case, M1
Adafruit_DCMotor *myMotor = AFMS.getMotor(4);
// You can also make another motor on port M3
Adafruit_DCMotor *myOtherMotor = AFMS.getMotor(3);
In this case, we have myMotor set to M4, which is our right side motor, and myOtherMotor is set to M3, our
left side motor.
Using the names myMotor, and myOtherMotor makes things really hard for us to remember which motor is
which. So, we can simply change the variable name to whatever we want. Let's simply call them leftMotor,
and rightMotor like this:
// Set up the left motor on port M4
Adafruit_DCMotor *leftMotor = AFMS.getMotor(4);
// Set up the right motor on port M3
Adafruit_DCMotor *rightMotor = AFMS.getMotor(3);
Of course, now that we have changed the variable name, we need to replace any instance of myMotor
with leftMotor , and myOtherMotor with rightMotor .
Before we start driving forward, backward, or turning; we need to tell the motor controller how fast we
want the motors to go. This is done using the setSpeed function. If we want to make both motors go full
speed ahead, we would set them both to 255 like this:
// Set the speed to start, from 0 (off) to 255 (max speed)
leftMotor->setSpeed(255);
rightMotor->setSpeed(255);
To make your robot go forward, all we need to do is tell each motor to go forward like this:
leftMotor->run(FORWARD); //LEFT MOTOR FULL STEAM AHEAD!
rightMotor->run(FORWARD); //RIGHT MOTOR FULL STEAM AHEAD!
All right, let's put this into a full sketch and give it a shot. For this sketch, Go ahead and upload this sketch
to your robot. I have slowed down the speed for safety, but you can update to whatever you want. Even
though it is slowed down, don't forget to set your race car on a mug or a cup to keep the wheels off the
ground.
© Adafruit Industries https://learn.adafruit.com/my-mini-race-car Page 33 of 65

/*
This is a test sketch for the Adafruit assembled Motor Shield for Arduino v2
It won't work with v1.x motor shields! Only for the v2's with built in PWM
control
For use with the Adafruit Motor Shield v2
----> http://www.adafruit.com/products/1438
*/
#include <Wire.h>
#include <Adafruit_MotorShield.h>
#include "utility/Adafruit_MS_PWMServoDriver.h"
// Create the motor shield object with the default I2C address
Adafruit_MotorShield AFMS = Adafruit_MotorShield();
// Or, create it with a different I2C address (say for stacking)
// Adafruit_MotorShield AFMS = Adafruit_MotorShield(0x61);
// Set up the left motor on port M4
Adafruit_DCMotor *leftMotor = AFMS.getMotor(4);
// Set up the right motor on port M3
Adafruit_DCMotor *rightMotor = AFMS.getMotor(3);
void setup() {
Serial.begin(9600); // set up Serial library at 9600 bps
Serial.println("Adafruit Motorshield v2 - Robot Test!");
AFMS.begin(); // create with the default frequency 1.6KHz
//AFMS.begin(1000); // OR with a different frequency, say 1KHz
}
void loop() {
// Set the speed to start, from 0 (off) to 255 (max speed)
leftMotor->setSpeed(100);
rightMotor->setSpeed(100);
leftMotor->run(FORWARD); //LEFT MOTOR FULL STEAM AHEAD!
rightMotor->run(FORWARD); //RIGHT MOTOR FULL STEAM AHEAD!
}
Is your race car still not going forward? Be sure to flip the switch on your battery box to 'on'
Ok, so we have the robot going forward. To put the robot in reverse, you just need to change FORWARD
to BACKWARD . Turning is just as easy. To turn right, you just need to turn off the right motor, and go
FORWARD with the left motor. This brings us to the next bit of motor controller code you need to know,
RELEASE . Instead of FORWARD , or BACKWARD , you can also use RELEASE . RELEASE is like pulling
the plug on the motor. It will ignore speeds, and direction, and just stop what it is doing. The code for
RELEASE looks like this:
leftMotor->run(RELEASE);
rightMotor->run(RELEASE);
If we take that to our sketch, we can now make the robot turn in circles by releasing the right motor, and
going forward with the left motor:
© Adafruit Industries https://learn.adafruit.com/my-mini-race-car Page 34 of 65

/*
This is a test sketch for the Adafruit assembled Motor Shield for Arduino v2
It won't work with v1.x motor shields! Only for the v2's with built in PWM
control
For use with the Adafruit Motor Shield v2
----> http://www.adafruit.com/products/1438
*/
#include <Wire.h>
#include <Adafruit_MotorShield.h>
#include "utility/Adafruit_MS_PWMServoDriver.h"
// Create the motor shield object with the default I2C address
Adafruit_MotorShield AFMS = Adafruit_MotorShield();
// Or, create it with a different I2C address (say for stacking)
// Adafruit_MotorShield AFMS = Adafruit_MotorShield(0x61);
// Set up the left motor on port M4
Adafruit_DCMotor *leftMotor = AFMS.getMotor(4);
// Set up the right motor on port M3
Adafruit_DCMotor *rightMotor = AFMS.getMotor(3);
void setup() {
Serial.begin(9600); // set up Serial library at 9600 bps
Serial.println("Adafruit Motorshield v2 - Robot Test!");
AFMS.begin(); // create with the default frequency 1.6KHz
//AFMS.begin(1000); // OR with a different frequency, say 1KHz
}
void loop() {
// Set the speed to start, from 0 (off) to 255 (max speed)
leftMotor->setSpeed(100);
rightMotor->setSpeed(100);
leftMotor->run(FORWARD); //LEFT MOTOR FULL STEAM AHEAD!
rightMotor->run(RELEASE); //RIGHT MOTOR FULL STOP!
}
That just about covers the basics, now let's take this to the next level...
© Adafruit Industries https://learn.adafruit.com/my-mini-race-car Page 35 of 65

Code for Your Race Car
To take this robot to the next level, we are going to modify James De Vito's awesome code for the similar
Red Robot Rover (https://adafru.it/kBm). In his code, he has multiple control methods where you can either
use the Bluefruit App controller or use your phone's accelerometer to drive your robot. For this example, I
am going to simplify things and we will just use the control pad. This will free up the four auxiliary buttons
for some customization which we will cover in a couple steps.
Libraries
For this code to work, we will need a couple libraries. See the previous step on a really easy way to install
these libraries using the Arduino Library manager.
First up is the Adafruit BLE library. Learn more about this library and download it here. (https://adafru.it/lDS)
Next, we will need the Adafruit MotorShield library. Learn more about this library and download it
here. (https://adafru.it/t8A)
The Code
Once you have the libraries installed, you will need to download the updated code. Click the button below
to download. Then, double-click the archive to unzip it, and then move the MiniRaceCar folder to your
Arduino sketches directory.
https://adafru.it/wEV
If you take a good look through this code, you will see it isn't so much more complicated than what we
learned in the previous step. There is some complicated code that deals with the Bluetooth connection to
your mobile device (which we will use in the next step). This version of the sketch also includes code for
reading and streaming the temperature and humidity sensor data, which we'll look at a bit more later.
One neat feature we added is a way to slowly speed up the motors to full speed so it doesn't pop a
wheelie when you take off going forward with this bit of code:
// speed up the motors
for (int speed=0; speed < maxspeed; speed+=5) {
L_MOTOR->setSpeed(speed);
R_MOTOR->setSpeed(speed);
delay(5); // 250ms total to speed up
}
We just use a simple for loop to slowly ramp up the speed until it hits max speed. Learn more about for
loops here (https://adafru.it/tb9).
https://adafru.it/wEV
© Adafruit Industries https://learn.adafruit.com/my-mini-race-car Page 36 of 65

Driving Your Race Car
Now it is time to take control of your robot. We will be using the Adafruit Bluefruit LE Connect app. Go
ahead and download it on your preferred device.
https://adafru.it/ddu
https://adafru.it/f4G
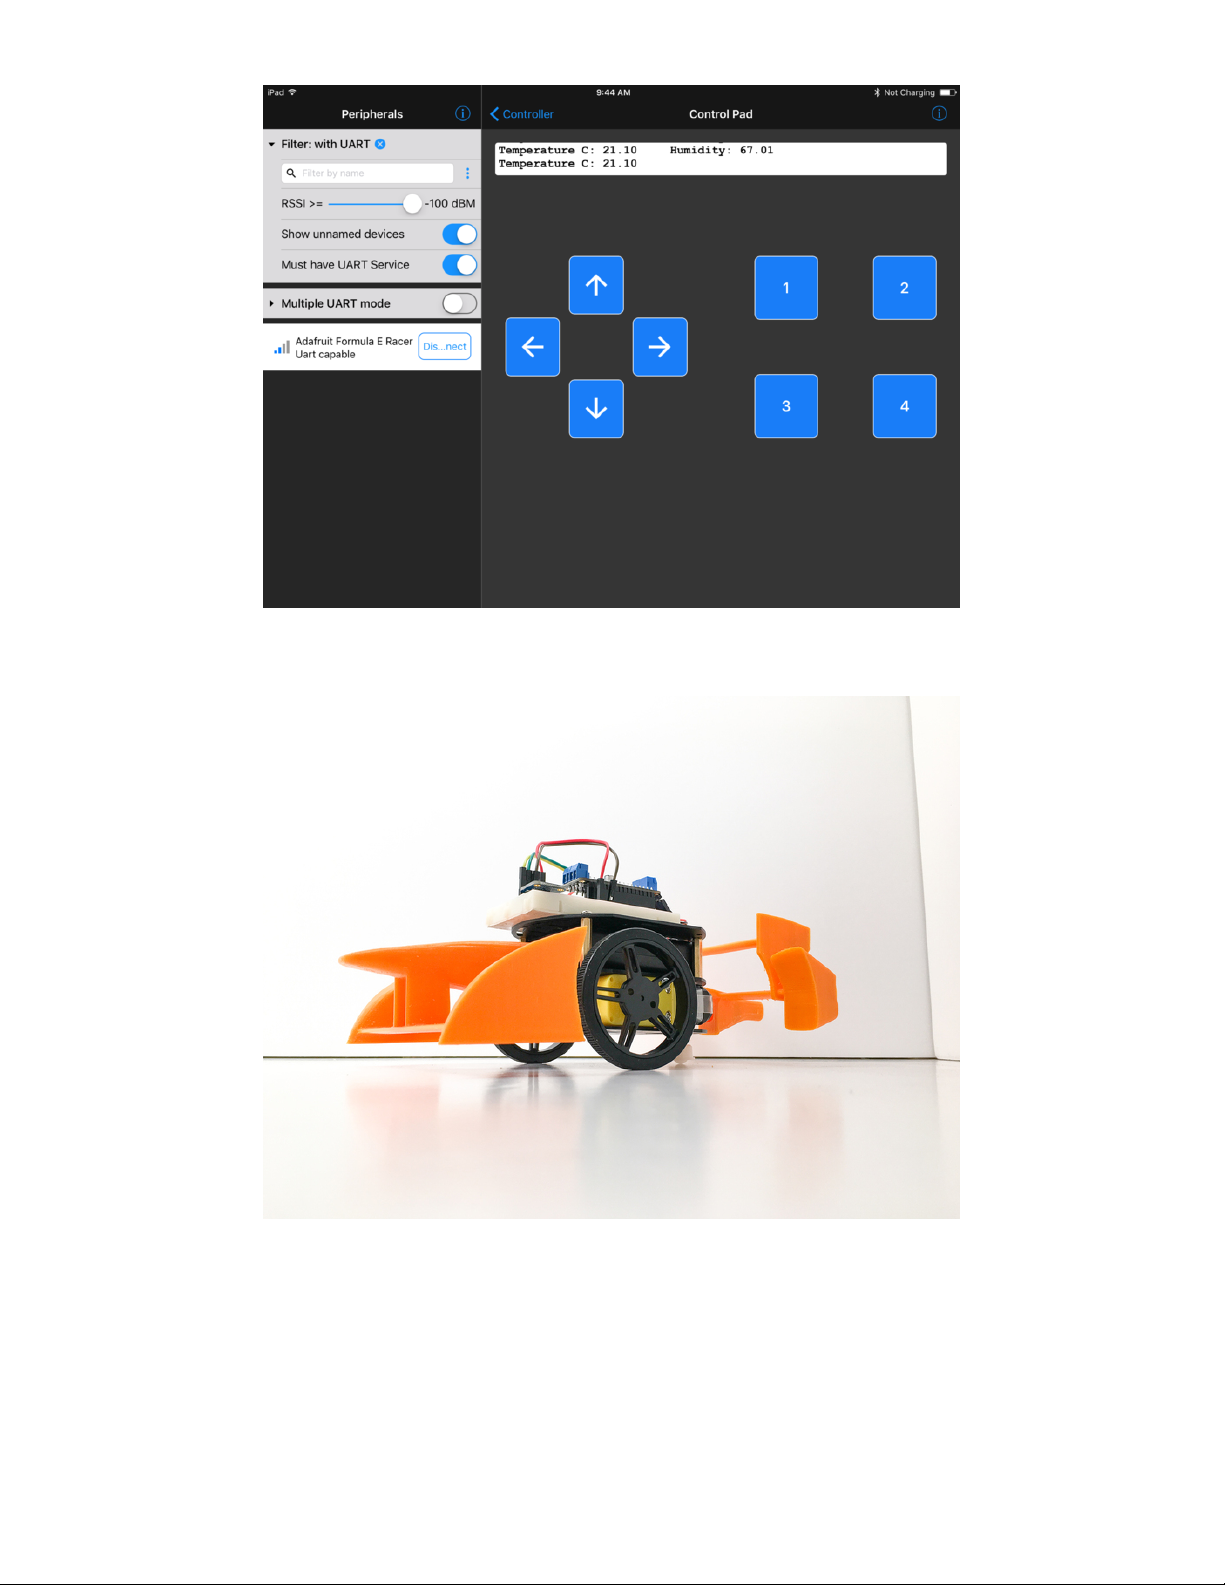
Load up the Bluefruit LE Connect app, and the first thing you will see is a list of available Bluetooth devices
to connect to. Find the one that says Adafruit Formula E Racer, and tap the Connect button.
Here's what it looks like on the iPad version:
Once you connect, you will see a whole bunch of device information. At the bottom of the app, tap the
Controller button.
https://adafru.it/ddu
https://adafru.it/f4G
© Adafruit Industries https://learn.adafruit.com/my-mini-race-car Page 37 of 65

On the next screen, you will see some advanced features of the app. For now, click the Control Pad link.
The Control Pad should load up, presenting four arrow keys, four assignable buttons, and a small readout
for streaming data.
© Adafruit Industries https://learn.adafruit.com/my-mini-race-car Page 38 of 65

Make sure your race car is unplugged from USB (the LiPoly battery will provide power), and that the AA
battery pack is turned on.
Then, go ahead and use the arrows to drive your rover. Be careful, this little guy is fast! Be sure to place it
on the floor first!
© Adafruit Industries https://learn.adafruit.com/my-mini-race-car Page 39 of 65

Temperature and Humidity Data
In real-life race cars, monitoring the gearbox temperature is important for squeezing out the most
performance from the car as is possible. As temperatures rise, oil viscosity becomes thinner, which is
great for a time trial, but can be a problem in a longer race.
Included in your race car kit is the accurate and excellent HTU21D-F Temperature & Humidity Breakout
Board, based on the TE Connectivity sensor. With it, you can measure the temperature and humidity of
your race car, wirelessly! You can stream this data from the Bluefruit application on your mobile device,
even while driving the car!!
© Adafruit Industries https://learn.adafruit.com/my-mini-race-car Page 40 of 65

First, you'll connect the sensor to your Feather, and read the data over the serial port.
The HTU21D-F is an I2C sensor. That means it uses the two I2C data/clock wires available on most
microcontrollers, and can share those pins with other sensors as long as they don't have an address
collision.
Power Pins:
Vin - this is the power pin. To power the board, plug it into the 3V pin on your Feather
GND - common ground for power and logic, plug this into the GND pin on your Feather
I2C Logic pins:
SCL - I2C clock pin, connect to your Feather's I2C clock line, labeled SCL
SDA - I2C data pin, connect to your Feather's I2C data line, labeled SDA
© Adafruit Industries https://learn.adafruit.com/my-mini-race-car Page 41 of 65

© Adafruit Industries https://learn.adafruit.com/my-mini-race-car Page 42 of 65

The HTU21D-F has a default I2C address of 0x40 and cannot be changed!
Download Adafruit_HTU21DF
To begin reading sensor data, you will need to download Adafruit_HTU21DF_Library from our github
repository (https://adafru.it/dw5). You can do that by visiting the github repo and manually downloading or,
easier, download it from within the Arduino IDE. To do so, click on Sketch > Include library > Manage
libraries... and then within the pop-up window, search for "adafruit htu21df" then, select the library and
click Install.
Load Demo
Open up File->Examples->Adafruit_HTU21DF->HTU21DFtest and upload to your Feather wired up to the
sensor.
© Adafruit Industries https://learn.adafruit.com/my-mini-race-car Page 43 of 65

Thats it! Now open up the serial monitor window to begin the test.
You can try breathing on the sensor to increase the humidity. The sensor reacts very fast!
For more details on the sensor, check out the Learning Guide (https://adafru.it/wEW)!
Bluetooth Data Streaming
The Bluefruit library makes it fairly simple to stream data as if it's going to the Serial monitor, but is instead
traveling through the air to your phone or tablet!
By using the Adafruit BluefruitLE SPI command ble.print(htu.readTemperature()) instead of
Serial.print(htu.readTemperature()) we can watch the device running the Bluefruit app instead of the
computer's serial monitor to see the same data stream. Magic!
© Adafruit Industries https://learn.adafruit.com/my-mini-race-car Page 44 of 65

Re-upload the MiniRaceCar.ino sketch to your Feather, then, connect it to the Bluefruit app and click on
the Uart button at the bottom.
Here's what it looks like when running:
Plotting
Another great way to asses the changes in temperature and humidity of your race car over time is by
visualizing it on a graph.
The Bluefruit app has a built in data plotter, here's what the data looks like when you breathe directly on
the sensor:
© Adafruit Industries https://learn.adafruit.com/my-mini-race-car Page 45 of 65

Sensor Placement
If you like, you can use the included Male/Female 6" jumper
wires to extend the sensor and place it elsewhere on the car.
Perhaps you want a better idea of the track temperature:
place the sensor on the underside of the vehicle!
© Adafruit Industries https://learn.adafruit.com/my-mini-race-car Page 46 of 65

© Adafruit Industries https://learn.adafruit.com/my-mini-race-car Page 47 of 65

Make Your Race Car Autonomous
While it is definitely neat to use your phone to control your racer, it is time to set your little car free. The
first step in making your racer autonomous is to add proximity sensors so it can avoid obstacles.
The simplest way to do this is to add a couple robot whiskers to sense when it physically runs into a wall
or object. You simply write some code to listen for when the switch has been triggered, stop, turn around,
and go forward again. These Micro Switches with a wire are perfect for this.
Micro Switch w/Wire - Three Terminals
Micro-switches are often found in arcade buttons and joysticks but they're also really handy in any kind of
mechatronics project or when you need a basic sensor. They are always...
$2.95
In Stock
While this is a great way to navigate around obsticles, I prefer to use a something a bit more intelligent so
my little robot doesn't actually have to run into things to navigate. There are plenty of distance sensor
options out there (there is a whole category of them (https://adafru.it/t8F) on the Adafruit shop), but the
sensor I am going to use is the neat little IR sensor from from Sharp.
Add to Cart
© Adafruit Industries https://learn.adafruit.com/my-mini-race-car Page 48 of 65

Sharp GP2Y0D810Z0F Digital Distance Sensor with Pololu Carrier
If you're like me, you've always wanted a smaller and faster way to sense an object between 2 and 10
centimeters away. If you're really like me, you've wanted the...
$8.95
In Stock
The obvious benefit here is the size, but also the price. This little sensor will sense an object about 10
centimeters away, and acts like a normal switch. There is a pin on the board that is normally high and
switches to low when it senses an object. Because of the small size, we can put two of these on our little
robot.
Mounting the Sensors
There are a ton of ways you can mount this sensor to your robot. The easiest way would be to just a bit of
double sided foam tape to stick it in place, but I decided to make a super simple 3D printed mount.
Note, this will not work with the Formula E race car nose part mounted
https://adafru.it/t9b
Add to Cart
https://adafru.it/t9b
© Adafruit Industries https://learn.adafruit.com/my-mini-race-car Page 49 of 65

I used a couple M2.5 screws to secure the mounts to the robot (required a drill bit to clean up the holes in
the 3D print). I wired up the left sensor to pin A4, and the right sensor to pin A5.
The Code
The code to make your robot take advantage of its new eyes is very straight forward. For now, we are
going to focus on the Adafruit MotorShield library.
https://adafru.it/t9c
https://adafru.it/t9c
© Adafruit Industries https://learn.adafruit.com/my-mini-race-car Page 50 of 65

#include <Wire.h>
#include <Adafruit_MotorShield.h>
#include "utility/Adafruit_MS_PWMServoDriver.h"
// Create the motor shield object with the default I2C address
Adafruit_MotorShield AFMS = Adafruit_MotorShield();
// And connect 2 DC motors to port M3 & M4 !
Adafruit_DCMotor *L_MOTOR = AFMS.getMotor(3);
Adafruit_DCMotor *R_MOTOR = AFMS.getMotor(4);
// And connect the Sharp distance sensors
int leftSensor = A4;
int rightSensor = A5;
void setup() {
Serial.begin(9600); // set up Serial library at 9600 bps
Serial.println("Adafruit Motorshield v2 - DC Motor test!");
pinMode(leftSensor, INPUT); // set up distance sensor pins
pinMode(rightSensor, INPUT);
AFMS.begin(); // create with the default frequency 1.6KHz
}
void loop() {
L_MOTOR->setSpeed(200);
R_MOTOR->setSpeed(200);
L_MOTOR->run(FORWARD);
R_MOTOR->run(FORWARD);
while (digitalRead(rightSensor) == LOW){
L_MOTOR->setSpeed(100);
R_MOTOR->setSpeed(100);
L_MOTOR->run(BACKWARD);
R_MOTOR->run(RELEASE);
}
while (digitalRead(leftSensor) == LOW){
L_MOTOR->setSpeed(100);
R_MOTOR->setSpeed(100);
L_MOTOR->run(RELEASE);
R_MOTOR->run(BACKWARD);
}
}
As you can see from the above code, there isn't a whole lot going on here. All we are doing is reading one
of the distance sensors, and if it senses an object we reverse the opposite side motor until the object is no
longer detected. We also slow things down quite a bit, as this little robot is so quick it loves to pop
wheelies when it starts and stops quickly.
© Adafruit Industries https://learn.adafruit.com/my-mini-race-car Page 51 of 65

This is just the beginning of what you can do with distance sensing. The next steps are up to you. You can
integrate this code into the bluetooth controller code to turn on and off auto mode with a button press.
What other ideas can you think of?
© Adafruit Industries https://learn.adafruit.com/my-mini-race-car Page 52 of 65

Control Your Race Car's Speed
Instead of hard coding a specific speed for your race car, here we will use a couple different ways to
adjust your speed without having to constantly upload new code.
The first way we are going to adjust the speed is with a simple breadboard trim potentiometer. Pick one up
on the Adafruit Shop:
Breadboard trim potentiometer
These are our favorite trim pots, perfect for breadboarding and prototyping. They have a long grippy
adjustment knob and with 0.1" spacing, they plug into breadboards or...
$1.25
In Stock
Potentiometers, or Pots for short, are variable resistors that allow us to send different voltages to the
Feather analog pin. Wiring it up is super simple. Just connect one of the outside pins to a 3.3V pin, and the
other outside pin to ground. Then, connect the middle pin to the A0 pin on the Feather. For a reminder on
which pin is which on the Bluefruit Feather, click here (https://adafru.it/tbb).
The code to get this all working is incredibly simple. Just copy and paste in the code below to the top of
your main loop.
//Set your motor speed
int reading = analogRead(A0);
L_MOTOR->setSpeed(map(reading, 0, 1023, 0, 255));
R_MOTOR->setSpeed(map(reading, 0, 1023, 0, 255));
So, it should look something like this now:
Add to Cart
© Adafruit Industries https://learn.adafruit.com/my-mini-race-car Page 53 of 65

void loop(void)
{
//Set your motor speed
int reading = analogRead(A0);
L_MOTOR->setSpeed(map(reading, 0, 1023, 0, 255));
R_MOTOR->setSpeed(map(reading, 0, 1023, 0, 255));
// read new packet data
uint8_t len = readPacket(&ble, BLE_READPACKET_TIMEOUT);
readController();
}
What we are doing here is reading that analog pin, and the Feather is going to pull a number from 0 to
1023, depending on which direction the arrow is facing on your pot. Because the motor controller needs a
value from 0 to 255, we are using the map() function (https://adafru.it/tbc).
Go ahead and upload this code to your race car, and turn the pot, then press forward on the controller to
see how it works. Keep changing to direction of the arrow on the pot to adjust the speed.
Using the Controller to Control Speed
If you would rather just control your car's speed using the extra 4 buttons on the controller, it is also pretty
easy to set up. First off, we need to set up a global speed variable. Anywhere above the sketch setup, add
in something like this:
int robotSpeed = 100;
In the main loop, we can then use that variable to set the motor speed using:
L_MOTOR->setSpeed(robotSpeed);
R_MOTOR->setSpeed(robotSpeed);
Then, all we need to do is increment the speed up every time we press the 1 button, and down every time
we press the 3 button.
if(buttnum == 1){
if(robotSpeed <= 245){
robotSpeed = robotSpeed + 10;
}
}
if(buttnum == 2){
}
if(buttnum == 3){
if(robotSpeed >=10){
robotSpeed = robotSpeed - 10;
}
}
if(buttnum == 4){
}
© Adafruit Industries https://learn.adafruit.com/my-mini-race-car Page 54 of 65

Here is the whole block of code for you to copy and paste in:
/*********************************************************************
This is an example for our nRF51822 based Bluefruit LE modules
Modified to drive a 3-wheeled BLE Robot Rover! by http://james.devi.to
Pick one up today in the Adafruit shop!
Adafruit invests time and resources providing this open source code,
please support Adafruit and open-source hardware by purchasing
products from Adafruit!
MIT license, check LICENSE for more information
All text above, and the splash screen below must be included in
any redistribution
*********************************************************************/
#include <string.h>
#include <Arduino.h>
#include <SPI.h>
#if not defined (_VARIANT_ARDUINO_DUE_X_)
#include <SoftwareSerial.h>
#endif
#include "Adafruit_BLE.h"
#include "Adafruit_BluefruitLE_SPI.h"
#include "Adafruit_BluefruitLE_UART.h"
#include "BluefruitConfig.h"
#include <Wire.h>
#include <Adafruit_MotorShield.h>
// Create the motor shield object with the default I2C address
Adafruit_MotorShield AFMS = Adafruit_MotorShield();
// And connect 2 DC motors to port M3 & M4 !
Adafruit_DCMotor *L_MOTOR = AFMS.getMotor(3);
Adafruit_DCMotor *R_MOTOR = AFMS.getMotor(4);
//Name your RC here
String BROADCAST_NAME = "Adafruit Black Robot Rover";
String BROADCAST_CMD = String("AT+GAPDEVNAME=" + BROADCAST_NAME);
Adafruit_BluefruitLE_SPI ble(BLUEFRUIT_SPI_CS, BLUEFRUIT_SPI_IRQ, BLUEFRUIT_SPI_RST);
// A small helper
void error(const __FlashStringHelper*err) {
Serial.println(err);
while (1);
}
// function prototypes over in packetparser.cpp
uint8_t readPacket(Adafruit_BLE *ble, uint16_t timeout);
float parsefloat(uint8_t *buffer);
void printHex(const uint8_t * data, const uint32_t numBytes);
// the packet buffer
extern uint8_t packetbuffer[];
© Adafruit Industries https://learn.adafruit.com/my-mini-race-car Page 55 of 65

char buf[60];
int robotSpeed = 100;
/**************************************************************************/
/*!
@brief Sets up the HW an the BLE module (this function is called
automatically on startup)
*/
/**************************************************************************/
void setup(void)
{
Serial.begin(9600);
AFMS.begin(); // create with the default frequency 1.6KHz
// turn on motors
L_MOTOR->setSpeed(0);
L_MOTOR->run(RELEASE);
R_MOTOR->setSpeed(0);
R_MOTOR->run(RELEASE);
Serial.begin(115200);
Serial.println(F("Adafruit Bluefruit Robot Controller Example"));
Serial.println(F("-----------------------------------------"));
/* Initialize the module */
BLEsetup();
//Set your motor speed (255 Max)
L_MOTOR->setSpeed(robotSpeed);
R_MOTOR->setSpeed(robotSpeed);
}
void loop(void)
{
L_MOTOR->setSpeed(robotSpeed);
R_MOTOR->setSpeed(robotSpeed);
// read new packet data
uint8_t len = readPacket(&ble, BLE_READPACKET_TIMEOUT);
readController();
}
bool readController(){
// Buttons
if (packetbuffer[1] == 'B') {
uint8_t buttnum = packetbuffer[2] - '0';
boolean pressed = packetbuffer[3] - '0';
if (pressed) {
if(buttnum == 1){
if(robotSpeed <= 245){
robotSpeed = robotSpeed + 10;
}
}
© Adafruit Industries https://learn.adafruit.com/my-mini-race-car Page 56 of 65

if(buttnum == 2){
}
if(buttnum == 3){
if(robotSpeed >=10){
robotSpeed = robotSpeed - 10;
}
}
if(buttnum == 4){
}
if(buttnum == 5){
L_MOTOR->run(FORWARD);
R_MOTOR->run(FORWARD);
}
if(buttnum == 6){
L_MOTOR->run(BACKWARD);
R_MOTOR->run(BACKWARD);
}
if(buttnum == 7){
L_MOTOR->run(RELEASE);
R_MOTOR->run(FORWARD);
}
if(buttnum == 8){
L_MOTOR->run(FORWARD);
R_MOTOR->run(RELEASE);
}
}
else {
L_MOTOR->run(RELEASE);
R_MOTOR->run(RELEASE);
}
}
}
void BLEsetup(){
Serial.print(F("Initialising the Bluefruit LE module: "));
if ( !ble.begin(VERBOSE_MODE) )
{
error(F("Couldn't find Bluefruit, make sure it's in CoMmanD mode & check wiring?"));
}
Serial.println( F("OK!") );
/* Perform a factory reset to make sure everything is in a known state */
Serial.println(F("Performing a factory reset: "));
if (! ble.factoryReset() ){
error(F("Couldn't factory reset"));
}
//Convert the name change command to a char array
BROADCAST_CMD.toCharArray(buf, 60);
//Change the broadcast device name here!
if(ble.sendCommandCheckOK(buf)){
Serial.println("name changed");
}
© Adafruit Industries https://learn.adafruit.com/my-mini-race-car Page 57 of 65

delay(250);
//reset to take effect
if(ble.sendCommandCheckOK("ATZ")){
Serial.println("resetting");
}
delay(250);
//Confirm name change
ble.sendCommandCheckOK("AT+GAPDEVNAME");
/* Disable command echo from Bluefruit */
ble.echo(false);
Serial.println("Requesting Bluefruit info:");
/* Print Bluefruit information */
ble.info();
Serial.println(F("Please use Adafruit Bluefruit LE app to connect in Controller mode"));
Serial.println(F("Then activate/use the sensors, color picker, game controller, etc!"));
Serial.println();
ble.verbose(false); // debug info is a little annoying after this point!
/* Wait for connection */
while (! ble.isConnected()) {
delay(500);
}
Serial.println(F("*****************"));
// Set Bluefruit to DATA mode
Serial.println( F("Switching to DATA mode!") );
ble.setMode(BLUEFRUIT_MODE_DATA);
Serial.println(F("*****************"));
}
© Adafruit Industries https://learn.adafruit.com/my-mini-race-car Page 58 of 65

Connecting Your Race Car to Adafruit IO
One of the great things about using the Adafruit Feather system is that you can easily swap out Feathers
and FeatherWings to make your projects do different things. In this case we are going to use all of the
upgrades from the previous steps, but we are going to swap out the 32u4 Bluefruit LE Feather for a
HUZZAH ESP8266 Feather. This will allow us to connect our race car to Adafruit IO and log
the temperature and humidity, as well as control the race car's speed from afar.
Sign up for Adafruit IO and create your first dashboard.
The first thing to do is head on over to io.adafruit.com (https://adafru.it/fsU) and sign up. Then click on
dashboards in the left sidebar and under the actions dropdown, click create new dashboard. Name the
dashboard whatever you want (like My Race Car), add a description if you want, and click the create
button.
Send data to Adafruit IO
Before we start controlling the race car from Adafruit IO, lets just make sure everything is working by
streaming some temperature and humidity data and monitoring it on a graph.
If you haven't already, you will need to swap out the Bluefruit Feather for a HUZZAH Feather. Don't have a
HUZZAH Feather? Get one here:
Assembled Feather HUZZAH w/ ESP8266 WiFi With Stacking Headers
Feather is the new development board from Adafruit, and like its namesake it is thin, light, and lets you fly!
We designed Feather to be a new standard for portable microcontroller...
Out of Stock
Out of
Stock
© Adafruit Industries https://learn.adafruit.com/my-mini-race-car Page 59 of 65

Just gently lift off the motor FeatherWing with the wires still attached, and then gently remove the Bluefruit
Feather from the breadboard (be sure to remember where the pins were located. Install the Feather
HUZZAH in the exact same spot and attach the Motor FeatherWing.
Next, download the following file and open it in the Arduino IDE.
https://adafru.it/xCH
If this is your first time using Adafruit IO, on that config page, you will need to enter your secret key and
username into the config tab. On your newly created dashboard, click on the yellow key icon in the upper
right:
On the next page you will find your username and unique key. Copy and paste those into the
corresponding spots on the Config tab. Then, enter your wifi SSID and password.
Go ahead and upload this to your HUZZAH. Open the Arduino serial terminal and make sure you
connected to AIO, and that data is streaming.
Now, lets add in a graph and view the data in real time. Click the blue '+' icon and then select the line
graph option. On the next page, choose the temperature and humidity feeds that we just created:
On the next page, name your graph and click save. Feel free to click the green 'Edit this dashboard'
button and drag around your graph, resize, and maybe change the graph from live to 1 hour. Click 'DONE
EDITING' to save your changes. You should now see data slowly streaming on your graph. Now it's time to
control your race car.
There are some minor pin changes between the HUZZAH and Bluefruit Feathers. Because of this, we
need to move the pins for our autonomous sensors. Move the left sensor to HUZZAH pin 12, and the right
sensor to pin 14:
https://adafru.it/xCH
© Adafruit Industries https://learn.adafruit.com/my-mini-race-car Page 60 of 65

Next, add a slider to your dashboard in the same way that you created the graph. This time instead of
choosing a feed, we are going to create one. In the upper right, name your feed 'racecarspeed'
Click create, and then name your slider 'Race Car Speed', leave the minimum value at 0, and set the max
to 255. Save and add the slider to your dashboard.
We also need to create a button. We are going to use the button to manually ask for the temperature and
humidity instead of constantly streaming. Create a monetary button and name it 'racecartakereading'
Next, we will upload some modified code and give this all a test. Copy and paste in the below code over
the Temperature and Humidity test code:
// Adafruit IO Temperature & Humidity Example
// Tutorial Link: https://learn.adafruit.com/adafruit-io-basics-temperature-and-humidity
//
// Adafruit invests time and resources providing this open source code.
// Please support Adafruit and open source hardware by purchasing
// products from Adafruit!
//
// Written by Todd Treece for Adafruit Industries
// Copyright (c) 2016-2017 Adafruit Industries
// Licensed under the MIT license.
//
// All text above must be included in any redistribution.
/************************** Configuration ***********************************/
// edit the config.h tab and enter your Adafruit IO credentials
// and any additional configuration needed for WiFi, cellular,
// or ethernet clients.
#include "config.h"
/************************ Example Starts Here *******************************/
#include <Wire.h>
#include "Adafruit_HTU21DF.h"
#include <Adafruit_MotorShield.h>
// Create the motor shield object with the default I2C address
Adafruit_MotorShield AFMS = Adafruit_MotorShield();
© Adafruit Industries https://learn.adafruit.com/my-mini-race-car Page 61 of 65

// And connect 2 DC motors to port M3 & M4 !
Adafruit_DCMotor *L_MOTOR = AFMS.getMotor(3);
Adafruit_DCMotor *R_MOTOR = AFMS.getMotor(4);
// set up the 'temperature' and 'humidity' feeds
AdafruitIO_Feed *temperature = io.feed("temperature");
AdafruitIO_Feed *humidity = io.feed("humidity");
AdafruitIO_Feed *racecarspeed = io.feed("racecarspeed");
AdafruitIO_Feed *racecartakereading = io.feed("racecartakereading");
Adafruit_HTU21DF htu = Adafruit_HTU21DF();
int RaceCar_Speed = 10;
// And connect the Sharp distance sensors
int leftSensor = 12;
int rightSensor = 14;
void setup() {
// start the serial connection
Serial.begin(115200);
AFMS.begin(); // create with the default frequency 1.6KHz
// turn on motors
L_MOTOR->setSpeed(0);
L_MOTOR->run(RELEASE);
R_MOTOR->setSpeed(0);
R_MOTOR->run(RELEASE);
pinMode(leftSensor, INPUT); // set up distance sensor pins
pinMode(rightSensor, INPUT);
// wait for serial monitor to open
while(! Serial);
Serial.println("HTU21D-F test");
if (!htu.begin()) {
Serial.println("Couldn't find sensor!");
while (1);
}
// connect to io.adafruit.com
Serial.print("Connecting to Adafruit IO");
io.connect();
// wait for a connection
while(io.status() < AIO_CONNECTED) {
Serial.print(".");
delay(500);
}
// we are connected
Serial.println();
Serial.println(io.statusText());
racecarspeed->onMessage(handleSpeed);
racecartakereading->onMessage(handleReading);
//Set your motor speed (255 Max)
L_MOTOR->setSpeed(RaceCar_Speed);
© Adafruit Industries https://learn.adafruit.com/my-mini-race-car Page 62 of 65

L_MOTOR->setSpeed(RaceCar_Speed);
R_MOTOR->setSpeed(RaceCar_Speed);
}
void loop() {
// io.run(); is required for all sketches.
// it should always be present at the top of your loop
// function. it keeps the client connected to
// io.adafruit.com, and processes any incoming data.
io.run();
L_MOTOR->setSpeed(RaceCar_Speed);
R_MOTOR->setSpeed(RaceCar_Speed);
L_MOTOR->run(FORWARD);
R_MOTOR->run(FORWARD);
if (digitalRead(rightSensor) == LOW){
Serial.print("Right Sensor Triggered");
}
while (digitalRead(rightSensor) == LOW){
L_MOTOR->setSpeed(RaceCar_Speed/2);
R_MOTOR->setSpeed(RaceCar_Speed/2);
L_MOTOR->run(BACKWARD);
R_MOTOR->run(RELEASE);
}
while (digitalRead(leftSensor) == LOW){
L_MOTOR->setSpeed(RaceCar_Speed/2);
R_MOTOR->setSpeed(RaceCar_Speed/2);
L_MOTOR->run(RELEASE);
R_MOTOR->run(BACKWARD);
}
}
void handleSpeed(AdafruitIO_Data *data) {
// convert the data to integer
RaceCar_Speed = data->toInt();
Serial.print("speed: ");
Serial.println(RaceCar_Speed);
}
void handleReading(AdafruitIO_Data *data) {
float celsius = htu.readTemperature();
float fahrenheit = (celsius * 1.8) + 32;
Serial.print("celsius: ");
Serial.print(celsius);
Serial.println("C");
Serial.print("fahrenheit: ");
Serial.print(fahrenheit);
Serial.println("F");
// save fahrenheit (or celsius) to Adafruit IO
temperature->save(fahrenheit);
Serial.print("humidity: ");
© Adafruit Industries https://learn.adafruit.com/my-mini-race-car Page 63 of 65

Serial.print(htu.readHumidity());
Serial.println("%");
// save humidity to Adafruit IO
humidity->save(htu.readHumidity());
}
Upload the above code (make sure you have your config file the same as before). Prop your race car up
off the ground and try sliding the speed slider. The wheel speed should go from off to full speed.
You should also be able to press the Take Reading button and see data show up on your graph. Feel free
to add some other dashboard blocks like the gauge to show the current temperature and humidity.
Organize your dashboard the way you want. Here is how I organized mine:
What else can you control with AIO on your race car? How about adding in a piezo buzzer and creating a
horn? Maybe a button to put your race car in reverse? Tell us what you did to your race car in the Adafruit
Forums (https://adafru.it/jIf).
© Adafruit Industries https://learn.adafruit.com/my-mini-race-car Page 64 of 65

© Adafruit Industries Last Updated: 2021-04-07 06:12:01 PM EDT Page 65 of 65
 Loading...