

Page 1
How to add a New Board to the circuitpython.org website
Created by Melissa LeBlanc-Williams
Last updated on 2021-01-21 03:04:15 PM EST
Page 2

2
4
4
5
5
7
7
8
8
9
11
11
11
12
12
12
12
13
13
13
13
13
13
13
13
13
13
14
15
15
15
16
16
17
17
17
17
17
17
17
17
17
17
17
18
18
18
18
18
19
20
21
21
21
21
21
21
Guide Contents
Guide Contents
Overview
The Process
Preparing the Images
Finding Images on Flickr
Resizing Photos
PhotoShop
GIMP
ezgif.com
Optimizing Images
Adding to Downloads
Image Location
Markdown File
Header
layout
board_id
title
name
manufacturer
board_url
board_image
downloads_display
features
Body
Purchase Section
Learn More Section
Contribute Section
Submit a Pull Request
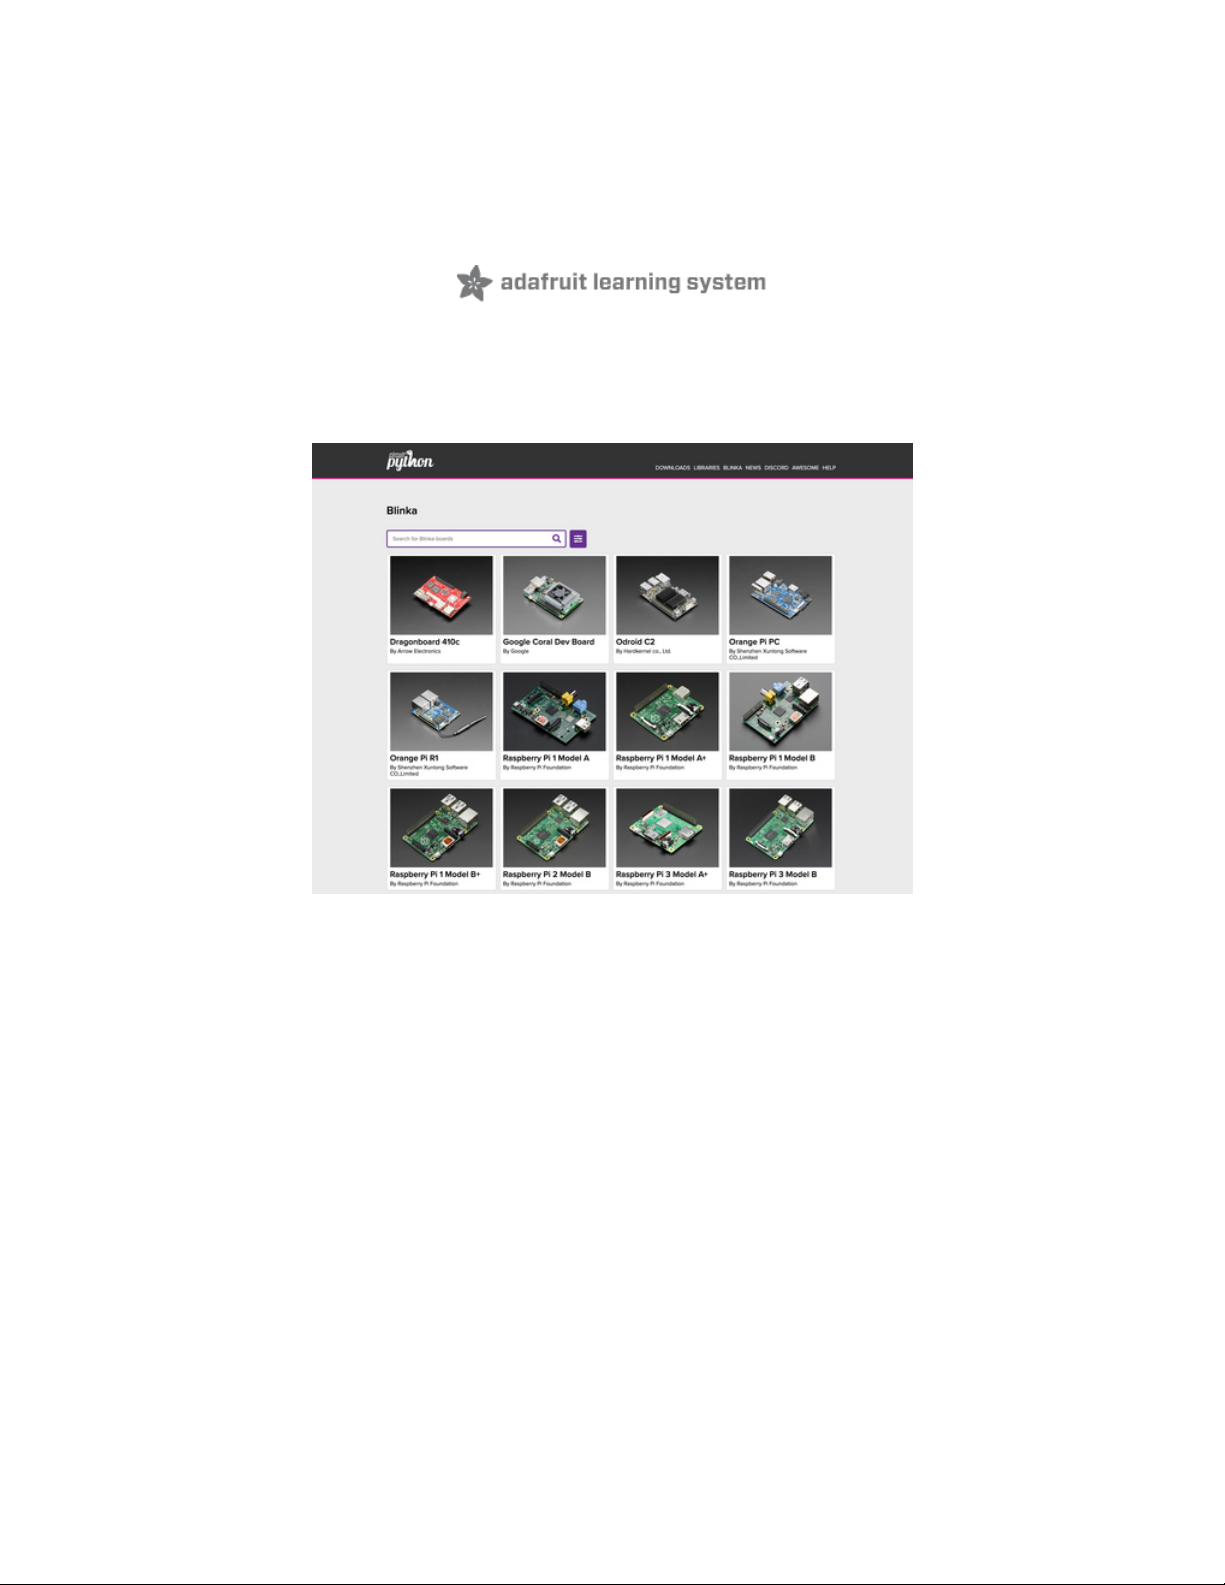
Adding to Blinka
Image Location
Markdown File
Header
layout
board_id
title
name
manufacturer
board_url
board_image
download_instructions
downloads_display
blinka
date_added
features
Body
Purchase Section
Learn More Section
Contribute Section
Final File
Submit a Pull Request
Testing Changes Locally
Troubleshooting
My PR has been approved and merged, but my changes aren't showing up
I've waited more than a few minutes and they still aren't showing up
My changes were merged, but the image is wrong or missing
Some of the images are right, but not all of them
There are some Unknown boards showing up in addition to the board I added
© Adafruit Industries https://learn.adafruit.com/how-to-add-a-new-board-to-the-circuitpython-org-website Page 2 of 22
Page 3

21There is an Unknown board and the board I added isn't showing up
© Adafruit Industries https://learn.adafruit.com/how-to-add-a-new-board-to-the-circuitpython-org-website Page 3 of 22
Page 4

Overview
So you've designed a microcontroller board that runs CircuitPython and you would like to show it off to
the world by adding it to the circuitpython.org (https://adafru.it/EFq) website? We can show you how.
Or perhaps you now have Blinka running on your Linux-based Single Board Computer (SBC) and want to
share that to everyone? We can show you how to do that too.
There are two sections where you can add boards. The first is the downloads page for microcontrollers
running CircuitPython and that will not only show off the details of your board, but provide links to
download the latest stable and development releases of CircuitPython.
The other section is the Blinka page which house all of the boards that support Blinka, which is our
CircuitPython library compatibility layer for SBCs and Python 3. This page allows your to display all of the
stats for your board as well as point to a guide for setting up Blinka on your board.
The Process
Either way, the process is about the same. Adding a board to the circuitpython.org website is easy and
only requires three images and one Markdown or MD file per board.
Getting setup is very easy. The first thing you'll need to do is head over to Github and create a fork. If you
would like more information, be sure to check out our Contribute to CircuitPython with Git and
GitHub (https://adafru.it/Dkh) guide.
The repository to create a fork of is https://github.com/adafruit/circuitpython-org (https://adafru.it/Fno).
Once you create a fork, you will need to clone it with git and you will have access to all of the source files
for the website.
Let's continue with preparing our images!
© Adafruit Industries https://learn.adafruit.com/how-to-add-a-new-board-to-the-circuitpython-org-website Page 4 of 22
Page 5
Preparing the Images
To add a board to CircuitPython.org, you will need three sizes of the same image for each board.
1. Small Size Minimum Width of 292 pixels. (Most photos are 293x225)
2. Large Size Minimum Width of 590 pixels. (Most photos are 780x600)
3. Original Size Photo in a Large Size
A good aspect ratio that looks nice for the Original Photo size is 13:10. This is the ratio used for most of
Adafruit's product photos. We will start with finding an image, if you don't already have it, resizing it to the
appropriate size, and optimizing it for the website.
Finding Images on Flickr
Adafruit has many products available on Flickr in high resolution. Most of the photos are in the 13:10
aspect ratio.
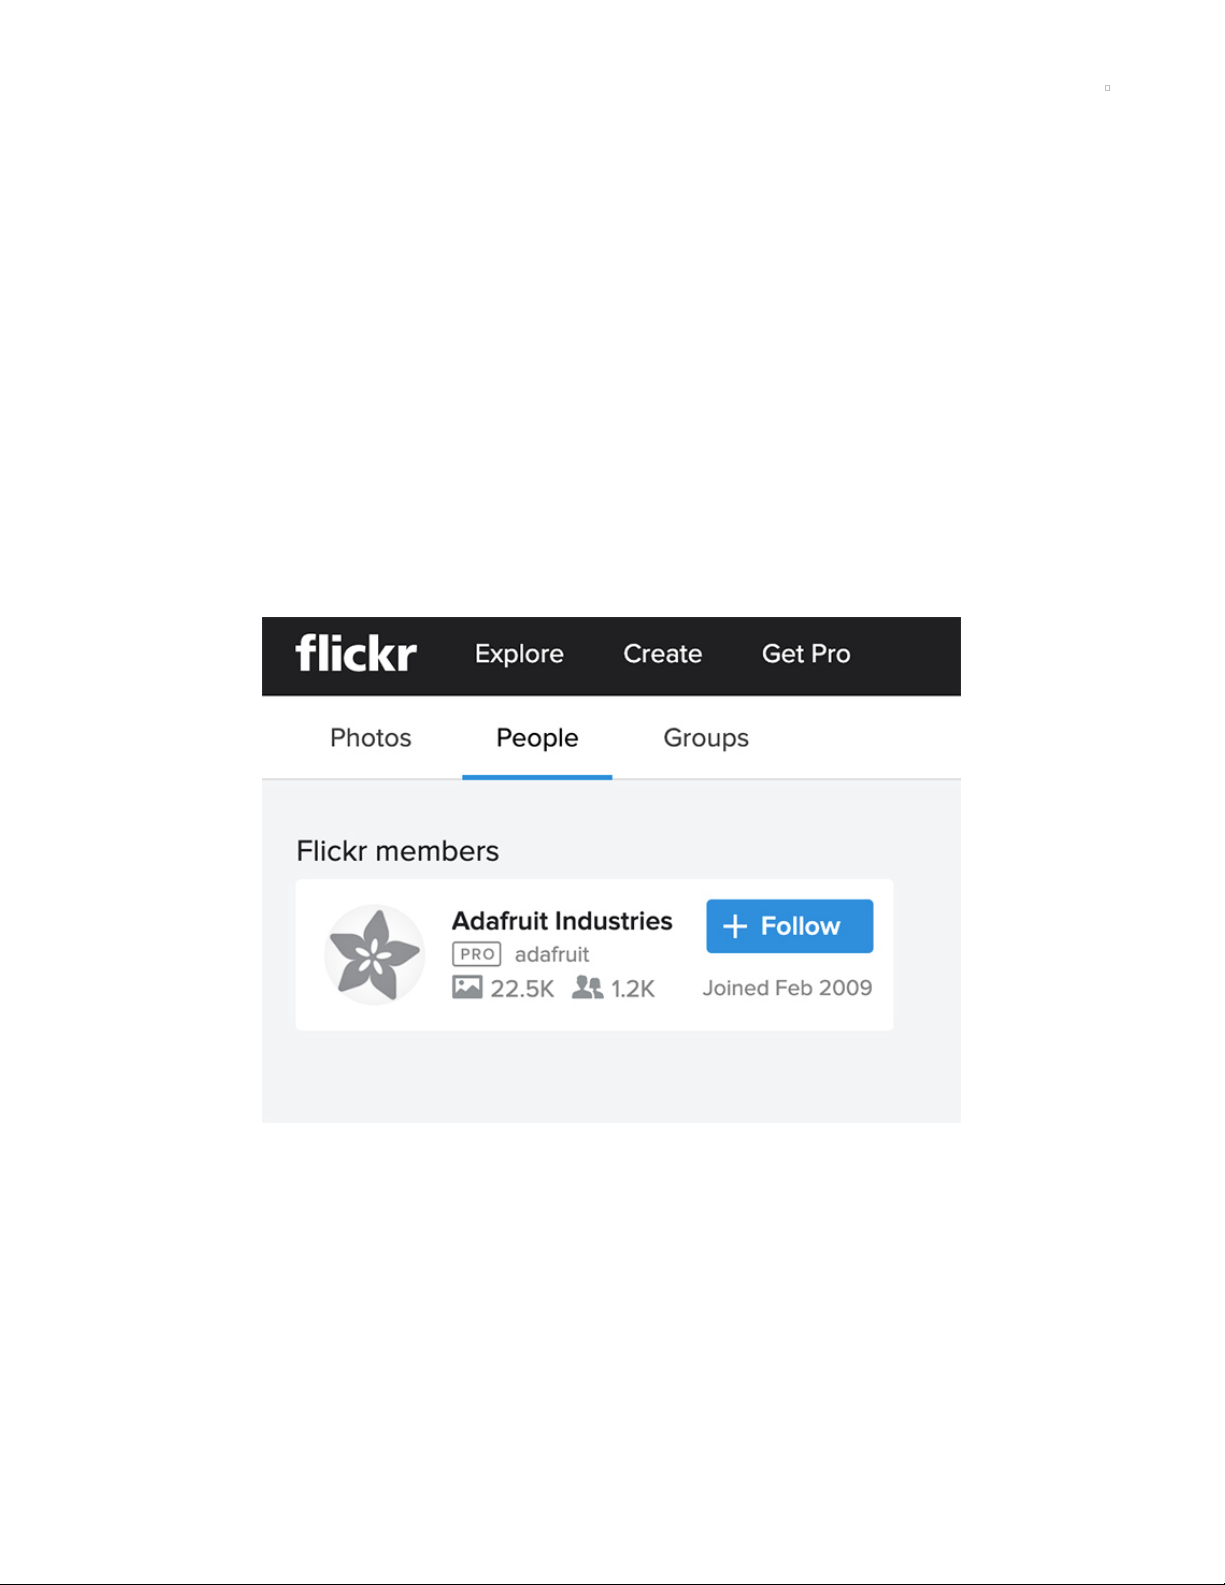
1. Go to https://www.flickr.com (https://adafru.it/Fnj)
2. Type "Adafruit Industries" into the search box and click "Search people"
3. Click on Adafruit Industries
Click the Magnifying Glass icon on the right
© Adafruit Industries https://learn.adafruit.com/how-to-add-a-new-board-to-the-circuitpython-org-website Page 5 of 22
Page 6
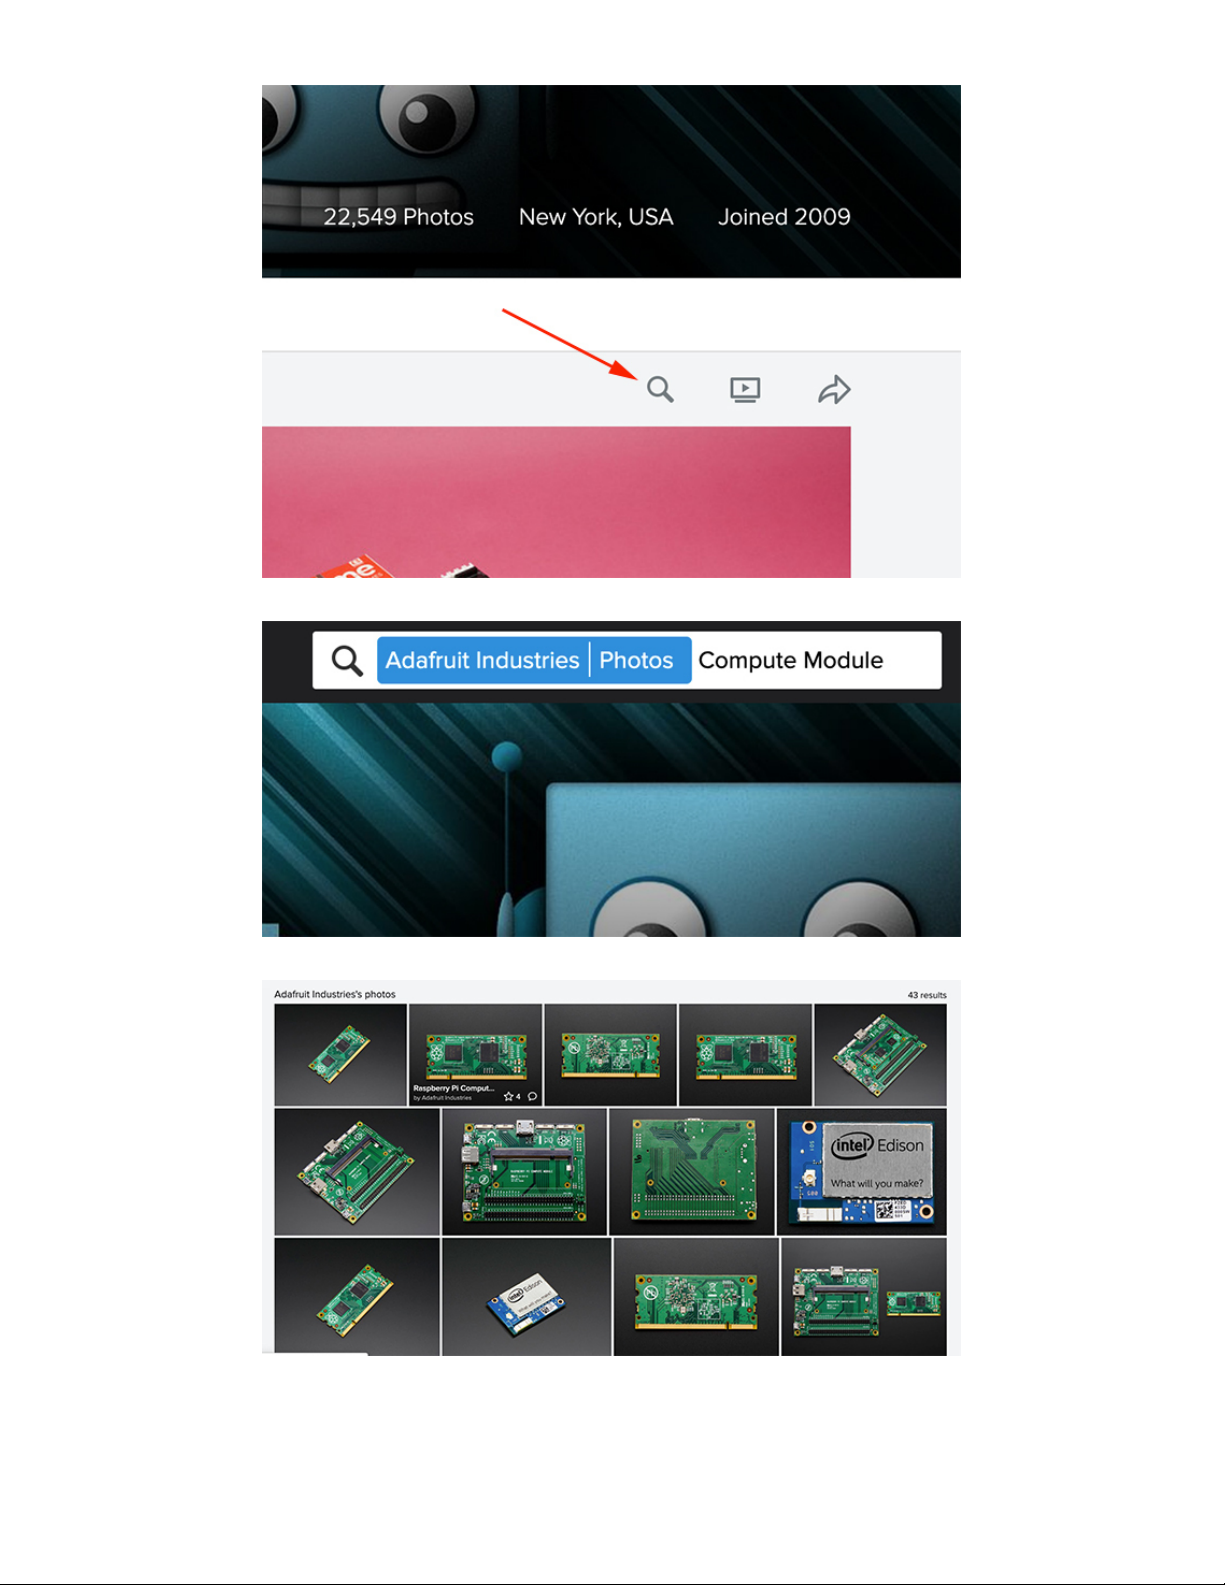
At the top, type in your Search Term and press enter
Click on a Photo in the Search Results
Verify the Description matches the item that you're looking for
© Adafruit Industries https://learn.adafruit.com/how-to-add-a-new-board-to-the-circuitpython-org-website Page 6 of 22
Page 7
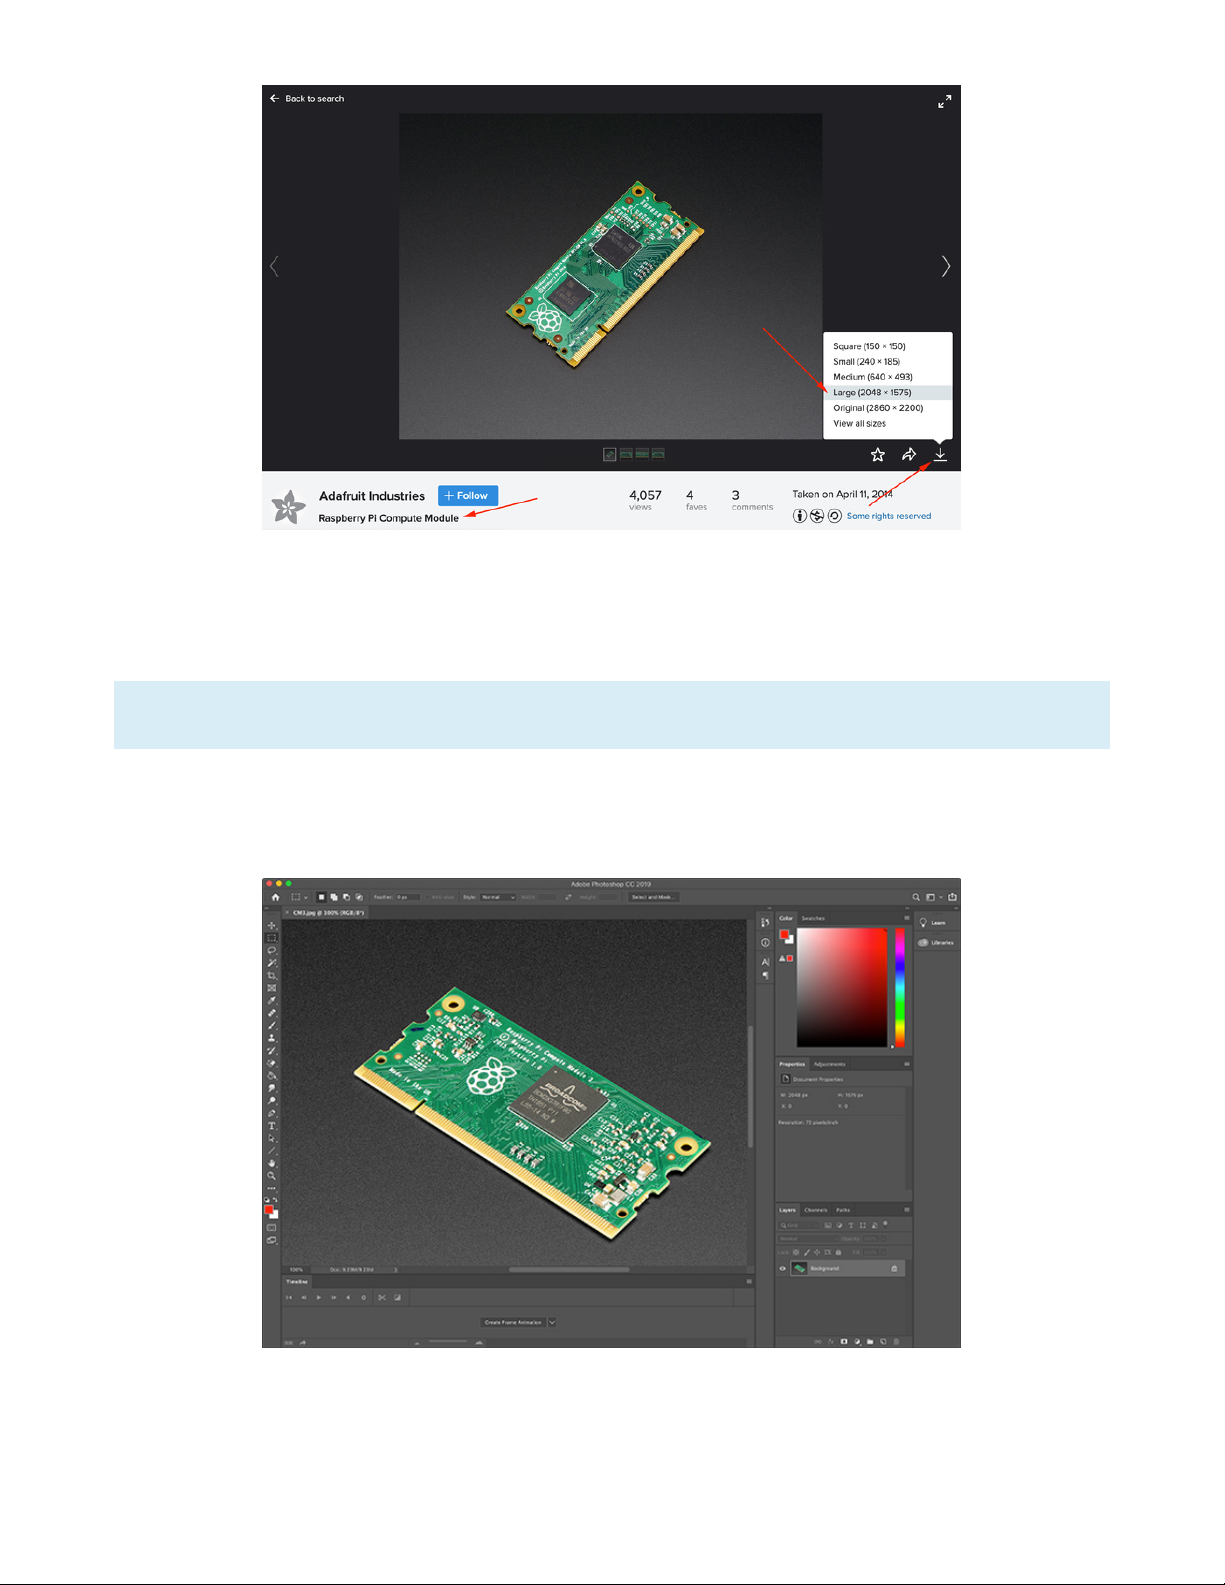
Click the Arrow on the right side and select a size that will be your Original Sized photo
Resizing Photos
Photos can be resized in your favorite photo editor such as PhotoShop or GIMP or via websites such as
ezgif.com
All three images should have the exact same filename.
PhotoShop
PhotoShop is one of the most popular pieces of Photo Editing software by Adobe, however it is not free.
Here are the steps to resize the image in PhotoShop.
1. Open the Original Sized Photo
2. Go to Image→Image Size...
3. Type a width like 780. The height should automatically adjust.
© Adafruit Industries https://learn.adafruit.com/how-to-add-a-new-board-to-the-circuitpython-org-website Page 7 of 22
Page 8

4. Press OK
5. Go to File→Export→Export As...
6. Select JPG for your Format and you can leave the quality as 100%
7. Click Export All... and save the file into a folder where you'll remember it. Choose a filename
appropriate to your board.
8. Click Edit→Undo until you undo the resizing of the image
9. Repeat at step 2 for the small sized image, except choose something like 293 for the width
GIMP
GIMP, which stands for Gnu Image Manipulation Program is another very popular, but free piece of
software. Here are the steps to resize an image in GIMP.
1. Open the Original Sized Photo
2. If it asks about Converting to RGB Working Space, click Convert
3. Go to Image→Scale Image...
4. Type a width like 780. The height should automatically adjust
5. Press Scale
6. Go to File→Export As...
7. Select JPG for your Format and you can leave the quality as 100%.
8. Click Export to save the file into a folder where you'll remember it. Choose a filename appropriate to
your board.
9. Click Edit→Undo until you undo the resizing of the image
10. Repeat at step 2 for the small sized image, except choose something like 293 for the width
ezgif.com
ezgif.com is a website that provides all kinds of free image manipulation tools. This is a great option if you
don't want to install any software on your computer. Here are the steps to resize the image in ezgif.com.
© Adafruit Industries https://learn.adafruit.com/how-to-add-a-new-board-to-the-circuitpython-org-website Page 8 of 22
Page 9

1. Navigate to https://ezgif.com/resize (https://adafru.it/Fnk) in your browser
2. Click Choose File and select your image
3. Click Upload!
4. Type a width like 780 into the width box. Leave the height empty so it should automatically adjust
5. Under If the aspect ratio does not match leave it as Center and crop to fit.
6. Click Resize image!
7. Scroll down and under the resized image, click save
8. It will download as ezgif.com-resize.jpg into your downloads folder
9. Find it in your downloads and rename it to something more appropriate
10. Repeat for the small sized image, except choose something like 293 for the width
Image compression now automatically occurs in the Pull Request, so optimizing the images is not
necessary anymore.
Optimizing Images
Use your favorite image optimization website such as compressjpeg.com which we will cover.
© Adafruit Industries https://learn.adafruit.com/how-to-add-a-new-board-to-the-circuitpython-org-website Page 9 of 22
Page 10

1. Navigate to https://compressjpeg.com/ (https://adafru.it/Fnl) in your browser
2. Drag and drop all of your images into the area labeled Drop Your Files Here
3. Once they are done automatically compressing, click the Download All button
4. Unzip the file that downloads
5. If you had several similar filenames for the same board, you can look at the file size to determine the
appropriate file.
6. Rename the files to the final name you would like to use.
Your images should now be ready for adding a board.
© Adafruit Industries https://learn.adafruit.com/how-to-add-a-new-board-to-the-circuitpython-org-website Page 10 of 22
Page 11

Adding to Downloads
The Downloads section is for microcontroller boards which incorporate CircuitPython compatibility. If you
have a Single Board Linux computer, see the Adding to Blinka page.
Image Location
Once you have your images prepared, you will want to place them into the three folders inside
assets/images/boards as follows:
1. The Original Sized image should be placed into the original folder.
2. The Larger of the two resized images should be placed into the large folder.
3. The Smaller of the two resized images should be placed into the small folder.
All three images should have the same filename.
Markdown File
The markdown file contains all of the information used for the board. To create a Markdown file for your
board, go into the _boards folder and make a duplicate of the unknown.md file.
You will want to rename the duplicate to something like board_name.md to match your image files. For
instance, if your images were named feather_m4_express.jpg, you would want to use
feather_m4_express.md.
Open up the new markdown file in your favorite text editor. This should be a text editor like Windows
notepad and not a word processor such as Microsoft Word because word processors add extra data that
will not work well with the Markdown file format.
We'll start with the header section and go line by line to make sure you have the correct information
added. The header section always starts with three hyphen characters and ends with three hyphen
characters. You can always look at the other Markdown files for examples too. We're going to take a look
at the Feather M4 Express file.
© Adafruit Industries https://learn.adafruit.com/how-to-add-a-new-board-to-the-circuitpython-org-website Page 11 of 22
Page 12

--layout: download
board_id: "feather_m4_express"
title: "Feather M4 Express Download"
name: "Feather M4 Express"
manufacturer: "Adafruit"
board_url: "https://www.adafruit.com"
board_image: "feather_m4_express.jpg"
features:
- Feather-Compatible
- Battery Charging
---
This feather is powered by the ATSAMD51J19 - with its 120MHz Cortex M4 with floating point support and 512KB Flas
h and 192KB RAM. Your code will zig and zag and zoom, and with a bunch of extra peripherals for support, this will
for sure be your favorite new chipset.
And best of all, it's a Feather - so you know it will work with all our FeatherWings! What a great way to quickly
get up and running.
The most exciting part of the Feather M4 is that while you can use it with the Arduino IDE - and it's bonkers fast
when you do, we are shipping it with CircuitPython on board. When you plug it in, it will show up as a very small
disk drive with main.py on it. Edit main.py with your favorite text editor to build your project using Python, th
e most popular programming language. No installs, IDE or compiler needed, so you can use it on any computer, even
ChromeBooks or computers you can't install software on. When you're done, unplug the Feather and your code will go
with you.
The Feather M4 Express uses the extra space left over to add a Mini NeoPixel, 2 MB SPI Flash storage and a little
prototyping space. You can use the SPI Flash storage like a very tiny hard drive. When used in CircuitPython, the
2 MB flash acts as storage for all your scripts, libraries and files. When used in Arduino, you can read/write fil
es to it, like a little datalogger or SD card, and then with our helper program, access the files over USB.
Easy reprogramming: the Feather M4 comes pre-loaded with the UF2 bootloader, which looks like a USB storage key. S
imply drag firmware on to program, no special tools or drivers needed! It can be used to load up CircuitPython or
Arduino IDE (it is bossa-compatible)
Comes fully assembled and tested, with the UF2 USB bootloader. We also toss in some headers so you can solder it i
n and plug into a solderless breadboard.
## Purchase
* [Adafruit](https://www.adafruit.com/product/3857)
* [Digi-Key](https://www.digikey.com/short/p87f17)
## Contribute
Have some info to add for this board? Edit the source for this page [here](https://github.com/adafruit/circuitpyth
on-org/edit/master/_board/{{ page.board_id }}.md).
Header
layout
Leave this set to download since we're on the downloads page
board_id
This should be the name of the board for example "feather_m4_express".
title
This is the page title and should be more descriptive and end with the word Download. For example
"Feather M4 Express Download".
© Adafruit Industries https://learn.adafruit.com/how-to-add-a-new-board-to-the-circuitpython-org-website Page 12 of 22
Page 13

name
This is the name of the board and should be the same as Title but without the word Download. For
example "Feather M4 Express".
manufacturer
The name of the board manufacturer. For example "Adafruit".
board_url
This is a full URL that the use to view the product information for the board. For example
"https://www.adafruit.com/product/3857".
board_image
This is the filename only for the image you created. The path for the appropriate sized will automatically
be generated. For instance "feather_m4_express.jpg".
downloads_display
This can optionally be included in order to hide your board by setting it to false. Omitting this value or
setting it to true will display your board. The value should be true or false.
features
This is a list with features that the board has such as Battery Charging, Bluetooth, WiFi, etc. Items in this
list are preceded by two spaces, a hyphen character, and another space. Features should be limited to
the items in this list and spelled exactly the same:
Speaker
Solder-Free Alligator Clip
Feather-Compatible
Battery Charging
Display
Wi-Fi
Bluetooth/BTLE
Robotics
LoRa/Radio
GPS
STEMMA QT/QWIIC
Body
The body is more free form and should include at least one paragraph for a description of the board. This
is often copied from a product page.
Purchase Section
If a board is available for purchase, it should include a Purchase section with one or more links.
Learn More Section
This section is more commonly found on pages where the board is not yet available for purchase. This
should include informational links about the board.
Contribute Section
This should is a standard section that should be left intact as it is. It allows an easy way for people to
make modifications to board information.
© Adafruit Industries https://learn.adafruit.com/how-to-add-a-new-board-to-the-circuitpython-org-website Page 13 of 22
Page 14

Submit a Pull Request
Now that you have your changes made, go ahead and commit your code to Github and submit a Pull
Request. It will be reviewed and if it looks good, it will be merged in.
© Adafruit Industries https://learn.adafruit.com/how-to-add-a-new-board-to-the-circuitpython-org-website Page 14 of 22
Page 15

Adding to Blinka
For Linux-based Single Board Computers, you will want to add the new board to the Blinka section of the
website.
Image Location
Once you have your images prepared, you will want to place them into the three folders inside
assets/images/boards as follows:
1. The Original Sized image should be placed into the original folder.
2. The Larger of the two resized images should be placed into the large folder.
3. The Smaller of the two resized images should be placed into the small folder.
All three images should have the same filename.
Markdown File
The markdown file contains all of the information used for the board. To create a Markdown file for the
board, go into the _blinka folder and make a duplicate of one of the other files.
You will want to rename the duplicate to something like board_name.md to match your image files. For
instance, if we're going to add the Raspberry Compute Module 3, we'll make a copy
of raspberry_pi_3b.md because the board is the most similar to the board we're adding. We'll name it
raspberry_pi_cm3.md and we'll makes sure all of the images are named raspberry_pi_cm3.jpg.
Open up the new markdown file in your favorite text editor. This should be a text editor like notepad and
not a word processor such as Microsoft Word because word processors add extra data that will not work
well with the Markdown file format.
We'll start with the header section and go line by line to make sure you have the correct information
added. The header section always starts with three hyphen characters and ends with three hyphen
characters. You can always look at the other Markdown files for examples too.
Here's the file that we're starting with.
© Adafruit Industries https://learn.adafruit.com/how-to-add-a-new-board-to-the-circuitpython-org-website Page 15 of 22
Page 16

--layout: download
board_id: "raspberry_pi_3bplus"
title: "Raspberry Pi 3 Model B+ Download"
name: "Raspberry Pi 3 Model B+"
manufacturer: "Raspberry Pi Foundation"
board_url: "https://www.raspberrypi.org/products/raspberry-pi-3-model-b-plus/"
board_image: "raspberry_pi_3bplus.jpg"
download_instructions: "https://learn.adafruit.com/circuitpython-on-raspberrypi-linux/installing-circuitpython-onraspberry-pi"
downloads_display: true
blinka: true
date_added: 2019-6-17
features:
- Wi-Fi
- Bluetooth/BLE
- Ethernet
- HDMI
- 40-pin GPIO
---
The Raspberry Pi 3 Model B+ is the most popular Raspberry Pi computer made, and the Pi Foundation knows you can al
ways make a good thing better! And what could make the Pi 3 better? How about a faster processor, 5 GHz WiFi, and
updated Ethernet chip with PoE capability? Good guess - that's exactly what they did!
The Raspberry Pi 3 Model B+ is the latest product in the Raspberry Pi 3 range, boasting an updated 64-bit quad cor
e processor running at 1.4GHz with built-in metal heatsink, dual-band 2.4GHz and 5GHz wireless LAN, faster (300 mb
ps) Ethernet, and PoE capability via a separate PoE HAT.
- Broadcom BCM2837B0, Cortex-A53 (ARMv8) 64-bit SoC @ 1.4GHz
- 1GB LPDDR2 SDRAM
- 2.4GHz and 5GHz IEEE 802.11.b/g/n/ac wireless LAN, Bluetooth 4.2, BLE
- Gigabit Ethernet over USB 2.0 (maximum throughput 300 Mbps)
- Extended 40-pin GPIO header
- Full-size HDMI
- 4 USB 2.0 ports
- CSI camera port for connecting a Raspberry Pi camera
- DSI display port for connecting a Raspberry Pi touchscreen display
- 4-pole stereo output and composite video port
- Micro SD port for loading your operating system and storing data
- 5V/2.5A DC power input
- Power-over-Ethernet (PoE) support (requires separate PoE HAT)
## Purchase
* [Adafruit](https://www.adafruit.com/product/3775)
## Contribute
Have some info to add for this board? Edit the source for this page [here](https://github.com/adafruit/circuitpyth
on-org/edit/master/_blinka/{{ page.board_id }}.md).
Header
Let's take a look at the Header Options. You may notice that there's a few more here than the downloads
page has.
layout
Leave this set to download. Even though this is the Blinka page, the layout should be the same as the
download page.
© Adafruit Industries https://learn.adafruit.com/how-to-add-a-new-board-to-the-circuitpython-org-website Page 16 of 22
Page 17

board_id
This should be the name of the board for example "raspberry_pi_cm3".
title
This is the page title and should be more descriptive and end with the word Download. For example
"Raspberry Pi Compute Module 3 Download".
name
This is the name of the board and should be the same as Title but without the word Download. For
example "Raspberry Pi Compute Module 3".
manufacturer
The name of the board manufacturer. For example "Raspberry Pi Foundation".
board_url
This is a full URL that the use to view the product information for the board. For example
"https://www.raspberrypi.org/products/compute-module-3/".
board_image
This is the filename only for the image you created. The path for the appropriate sized will automatically
be generated. For instance "raspberry_pi_cm3.jpg".
download_instructions
This should be the full URL that points to the appropriate setup guide. For example
"https://learn.adafruit.com/circuitpython-on-raspberrypi-linux/installing-circuitpython-on-raspberry-pi".
Leave it blank if there are no board setup instructions.
downloads_display
This can optionally be included in order to hide your board by setting it to false. Omitting this value or
setting it to true will display your board.
blinka
This value should always be set to true. This tells the downloads layout to look for the additional Blinka
page header options.
date_added
This should be the date that the new board was merged in and released in Blinka. It should be in the
format of YYYY-M-D .
features
This is a list with features that the board has such as Battery Charging, Bluetooth, WiFi, etc. Items in this
list are preceded by two spaces, a hyphen character, and another space. Features should be limited to
the items in this list and spelled exactly the same:
Ethernet
HDMI
Wi-Fi
40-pin GPIO
GPS
Feather-Compatible
Bluetooth/BLE
USB 3.0
© Adafruit Industries https://learn.adafruit.com/how-to-add-a-new-board-to-the-circuitpython-org-website Page 17 of 22
Page 18

Infrared Receiver
Body
The body is more free form and should include at least one paragraph for a description of the board. This
is often copied from a product page. If this is available on the vendor website, this would be the preferred
text. If not, we usually make it concise, but informational.
Purchase Section
If a board is available for purchase, it should include a Purchase section with one or more links.
Learn More Section
This section is more commonly found on pages where the board is not yet available for purchase. This
should include informational links about the board.
Contribute Section
This should is a standard section that should be left intact as it is. It allows an easy way for people to
make modifications to board information.
Final File
After editing the duplicated file, this is what it looks like. In this case, it was not available on adafruit.com,
but was available through the Raspberry Pi Foundation website.
© Adafruit Industries https://learn.adafruit.com/how-to-add-a-new-board-to-the-circuitpython-org-website Page 18 of 22
Page 19

--layout: download
board_id: "raspberry_pi_cm3"
title: "Raspberry Pi Compute Module 3 Download"
name: "Raspberry Pi Compute Module 3"
manufacturer: "Raspberry Pi Foundation"
board_url: "https://www.raspberrypi.org/products/compute-module-3/"
board_image: "raspberry_pi_cm3.jpg"
download_instructions: "https://learn.adafruit.com/circuitpython-on-raspberrypi-linux/installing-circuitpython-onraspberry-pi"
downloads_display: true
blinka: true
date_added: 2019-6-24
features:
- HDMI
---
The Compute Module 3 contains the guts of a Raspberry Pi 3 (the BCM2837 processor and 1GB RAM) as well as an optio
nal 4GB eMMC Flash device (which is the equivalent of the SD card in the Pi). The Pi 3 has a processor speed of 1.
2GHz and runs at roughly 10 times the speed of the Pi 1 due to its quad-core CPU. This is all integrated on to a s
mall 67.6mm x 31mm board which fits into a standard DDR2 SODIMM connector (the same type of connector as used for
laptop memory). The Flash memory is connected directly to the processor on the board, but the remaining processor
interfaces are available to the user via the connector pins. You get the full flexibility of the BCM2837 SoC (whic
h means that many more GPIOs and interfaces are available as compared to the Raspberry Pi), and designing the Modu
le into a custom system should be relatively straightforward as we’ve put all the tricky bits onto the Module itse
lf.
The Compute Module is available for purchase in single units, or in batches of hundreds or thousands. To get start
ed designing a PCB to use the Module, we provide an open-source breakout board with a single Module in an affordab
le development kit.
## Purchase
* [Raspberry Pi Foundation](https://www.raspberrypi.org/products/compute-module-io-board-v3/)
## Contribute
Have some info to add for this board? Edit the source for this page [here](https://github.com/adafruit/circuitpyth
on-org/edit/master/_blinka/{{ page.board_id }}.md).
Submit a Pull Request
Now that you have your changes made, go ahead and commit your code to Github and submit a Pull
Request. It will be reviewed and if it looks good, it will be merged in.
© Adafruit Industries https://learn.adafruit.com/how-to-add-a-new-board-to-the-circuitpython-org-website Page 19 of 22
Page 20

Testing Changes Locally
To test the changes locally, you before creating a Pull Request, you can run a copy of the the
circuitpython.org website locally to see what everything looks like.
1. Open up a terminal or command prompt window.
2. You need "ruby" and "ruby-bundler" installed locally.
3. As needed, git submodule update --init --recursive to fetch the submodules.
4. One time, run bundle config set path 'vendor/bundle' && bundle install.
5. Run bundle exec jekyll serve 2>&1 to generate the site locally. The 2>&1 is optional and just suppresses
a bunch of warning messages.
6. Visit the displayed server address in a browser.
After most local edits, the content will be updated. You will need to reload (ctrl-r/command-r or F5) your
browser
© Adafruit Industries https://learn.adafruit.com/how-to-add-a-new-board-to-the-circuitpython-org-website Page 20 of 22
Page 21

Troubleshooting
My PR has been approved and merged, but my changes aren't
showing up
It usually takes a few minutes for the pages to update.
I've waited more than a few minutes and they still aren't showing up
Very rarely, but on occasion, Github Pages runs into a problem and doesn't upload the changes. You can
check this by going to https://github.com/adafruit/circuitpython-org (https://adafru.it/Fno), going to the
Settings tab, if you have access, and scrolling down to the Github Pages section to check for an error.
Submitting a new PR will cause it to repair itself. If you want to submit an empty Pull Request (no
changes), you can first create an empty commit with the following command:
git commit --allow-empty -m "Trigger GHPages Rebuild"
You can change the message to be whatever is appropriate. After that, submit a new Pull Request.
My changes were merged, but the image is wrong or missing
You will want to check that the image specified in your markdown file matches the image name and does
not include a path.
Some of the images are right, but not all of them
First try refreshing the page in case the data is cached in your browser. If that doesn't work, make sure all
of the image filenames match.
There are some Unknown boards showing up in addition to the board
I added
If the new board you added is showing up and there is also an existing ID for your board, make sure to
use that first. To find the ID, Right-click on the Unknown board and choose Inspect. Look for the data-id
tag to get the board ID.
There is an Unknown board and the board I added isn't showing up
Check the formatting of the Markdown file you just added. Extra or too few of spaces can cause it to not
be parsed correctly.
© Adafruit Industries https://learn.adafruit.com/how-to-add-a-new-board-to-the-circuitpython-org-website Page 21 of 22
Page 22

© Adafruit Industries Last Updated: 2021-01-21 03:04:15 PM EST Page 22 of 22
 Loading...