

Page 1
Build an ML Package Detector with Lobe
Created by Adi Azulay
Last updated on 2021-04-26 06:22:36 PM EDT
Page 2

2
3
3
4
5
5
5
6
7
7
7
9
9
11
13
15
16
16
16
17
17
20
22
24
27
Guide Contents
Guide Contents
Overview
Background Knowledge
Required Parts
Set up your Pi
Hardware Setup
Installing Lobe SDK
Download the Code
Set up an FTP Connection
Windows Instructions
Mac Instructions
Collect Images
Install your Pi with the Camera pointing towards a package drop-off spot.
Collect training images
Train your Model
Export your Model
Get Predictions on the Pi
Uploading the model to the Pi
Run the Package Detector Code
Set up E-mail Alerts
Set up an IFTTT Applet
Setup Webhook Key
Start the program again
Continuous Learning
Going Further
© Adafruit Industries https://learn.adafruit.com/build-an-ml-package-detector Page 2 of 28
Page 3

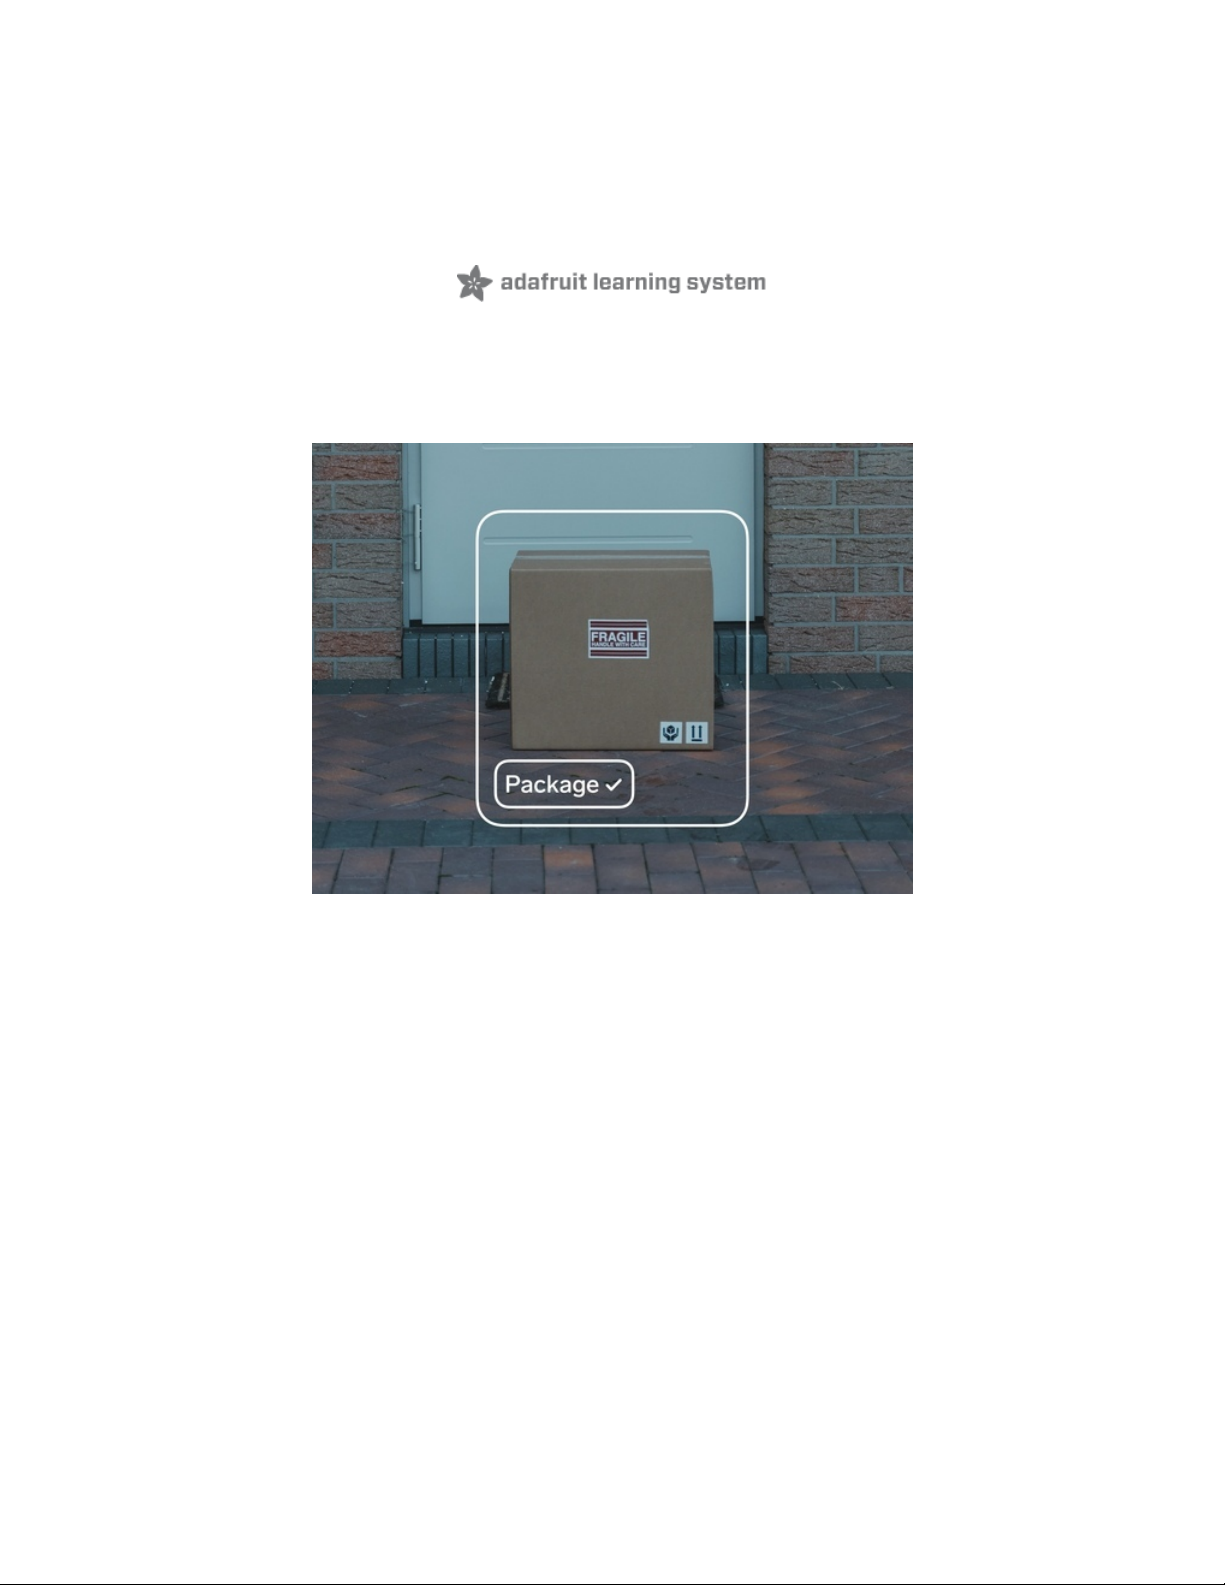
Overview
Build a machine learning (ML) package detector that sends you a notification when a package is left at
your door!
You can also use this tutorial to train a model to notify you for any kind of event. For example, lets you
know when your dog is at the door, your favorite parking spot is open, or if there are birds at your bird
feeder.
We'll use Lobe to train our model and then deploy it to a Raspberry Pi 4. We'll use the BrainCraft HAT to
interface with the Pi to collect images and preview what the camera is seeing. Next, we'll setup an applet
on If This Then That to send us an e-mail alert whenever a package is detected. Finally, we'll improve our
model by collecting more training data in situations where the model gets confused.
This tutorial is part of a series which includes:
Tutorial 1: Machine Learning 101 with Lobe and Raspberry Pi (https://adafru.it/Rie)
Tutorial 2: Build an ML Rock Paper Scissors Game with Lobe (https://adafru.it/RiB)
Background Knowledge
New to Lobe? At a minimum, we recommend following the introductory Tutorial 1 above.
To be successful with this project, you'll need some experience with the following:
1. Setting up and using the Raspberry Pi
2. Some familiarity with using the terminal window
3. Installing the Pi Camera
© Adafruit Industries https://learn.adafruit.com/build-an-ml-package-detector Page 3 of 28
Page 4
Required Parts
Microsoft Machine Learning Kit for Lobe with Raspberry Pi 4 4GB
Machine learning is a transformative tool that’s redefining how we build software—but up until now, it was
only accessible to a small group of experts. At Adafruit, we...
Out of Stock
Out of
Stock
© Adafruit Industries https://learn.adafruit.com/build-an-ml-package-detector Page 4 of 28
Page 5

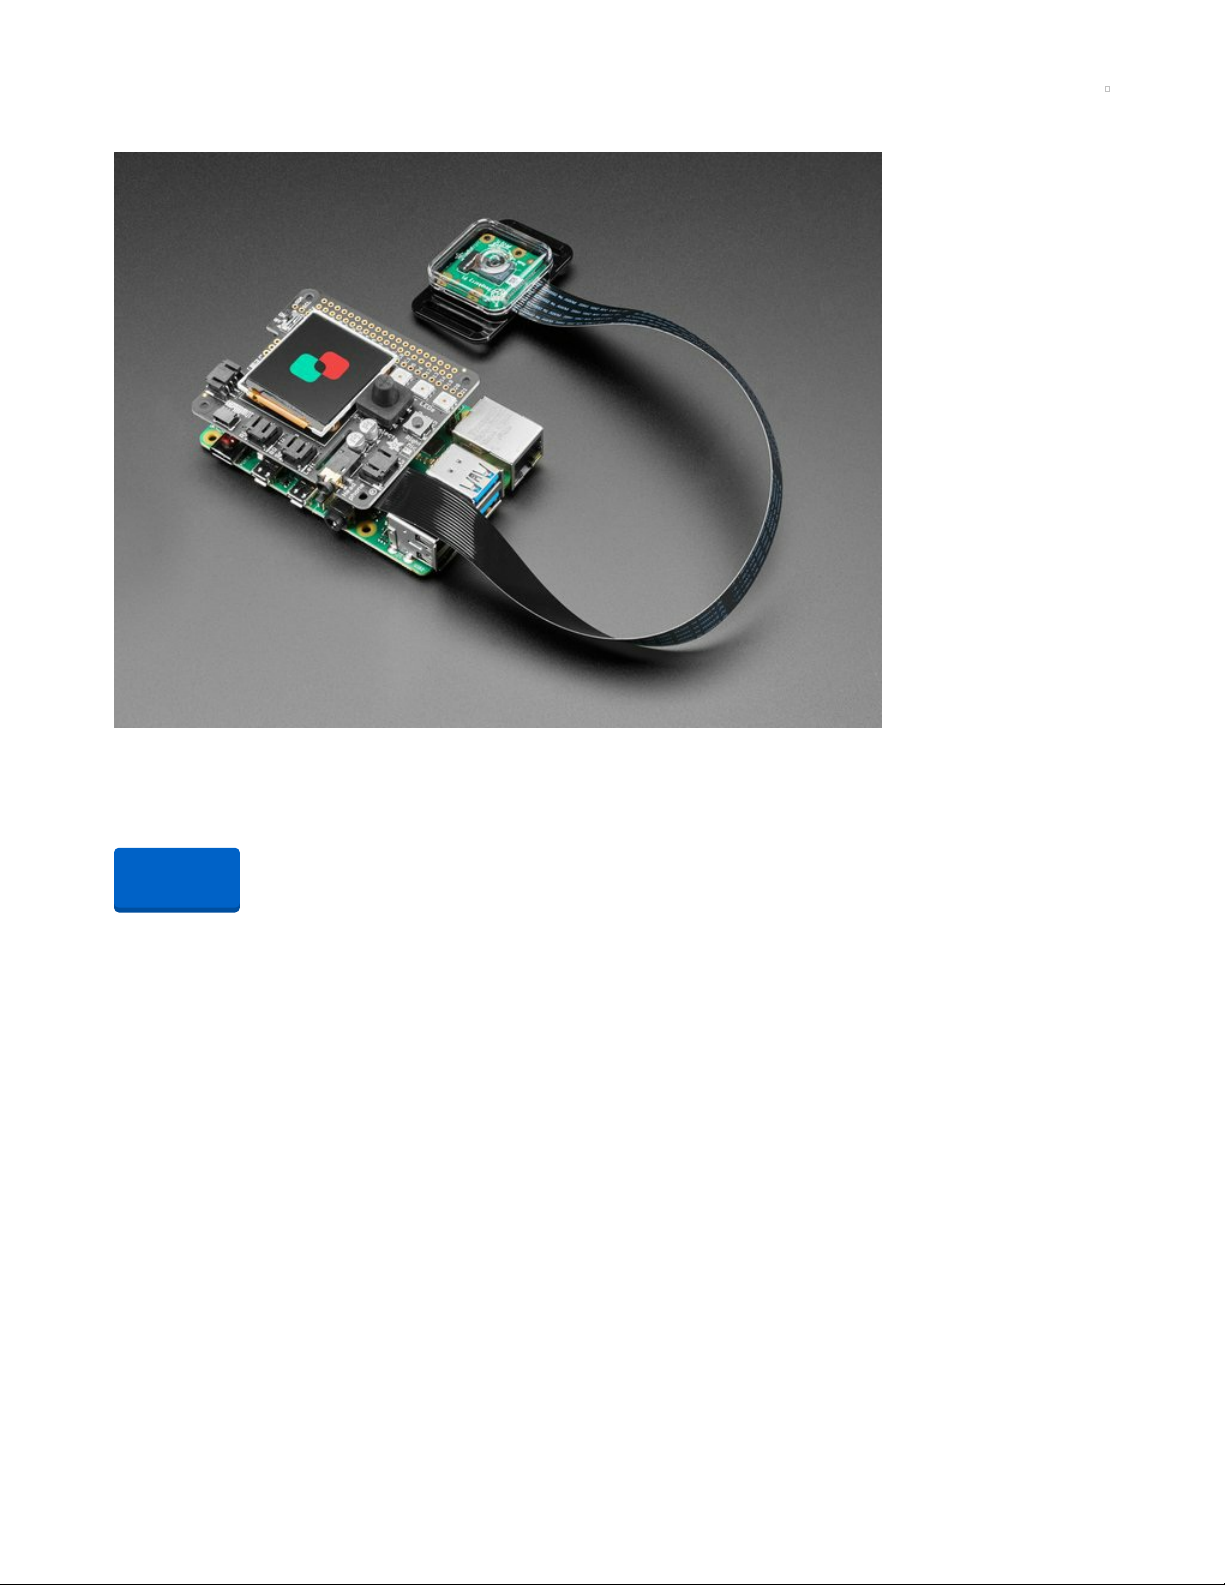
Set up your Pi
Hardware Setup
Before starting, set up your Pi and BrainCraft HAT. Follow this primary guide for the
BrainCraft (https://adafru.it/Rta) to configure these services:
Blinka
Fan Service
Display Module
Installing Lobe SDK
Connect to your Pi using SSH and run the following script to install the Lobe SDK:
cd ~
wget https://raw.githubusercontent.com/lobe/lobe-python/master/scripts/lobe-rpi-install.sh
sudo bash lobe-rpi-install.sh
Note: To setup SSH, follow this guide (https://adafru.it/jvB).
© Adafruit Industries https://learn.adafruit.com/build-an-ml-package-detector Page 5 of 28
Page 6

Download the Code
Download the GitHub repo into the Pi's home folder with the following commands:
cd ~
git clone https://github.com/lobe/lobe-adafruit-kit.git
The GitHub repo can also be found here (https://adafru.it/Rvb).
© Adafruit Industries https://learn.adafruit.com/build-an-ml-package-detector Page 6 of 28
Page 7

Set up an FTP Connection
Since we're using the Pi in a headless configuration, we'll use an FTP connection to transfer files between
our computer and the Pi.
Windows Instructions
Download and install WinSCP (https://adafru.it/OcF)
Open WinSCP and start a New Session
Select an SFTP connection, fill in the IP address of your Pi, set the username to Pi, and put in your
password.
Your Pi's IP address is on the screen of the BrainCraft. You can also use the hostname address, e.g.
"raspberrypi.local" (pi@raspberrypi.local).
Mac Instructions
Download and install FileZilla (https://adafru.it/RuC). When it's done installing, open the program.
© Adafruit Industries https://learn.adafruit.com/build-an-ml-package-detector Page 7 of 28
Page 8
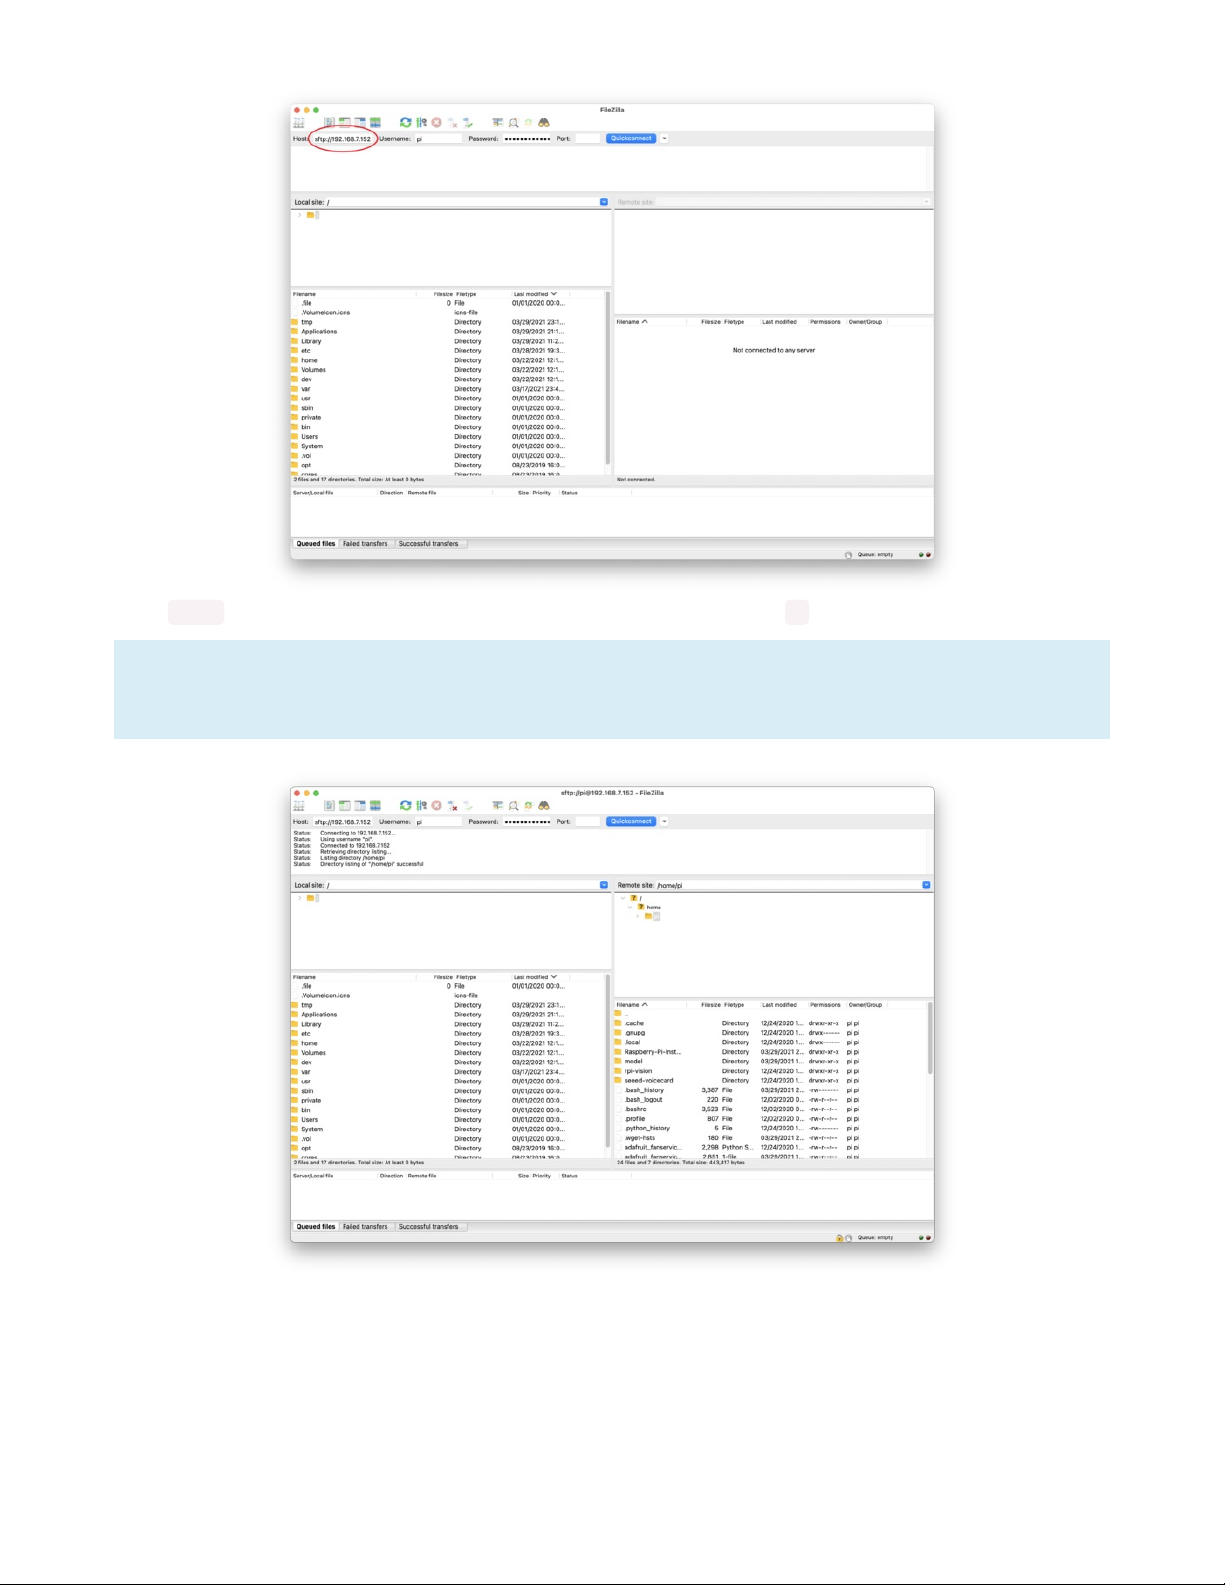
Type sftp:// followed by the IP address of your Pi. Set the username to pi and put in your password.
Your Pi's IP address is on the screen of the BrainCraft. You can also use the hostname address, e.g.
"raspberrypi.local" (pi@raspberrypi.local).
© Adafruit Industries https://learn.adafruit.com/build-an-ml-package-detector Page 8 of 28
Page 9
Collect Images
Before we can train an ML model, we need to collect some images. For this model, we'll need two
categories: images that have a package in them and images that don't.
To make our model more accurate under various weather conditions and other situations, it's useful to
have lots of pictures in both categories at different times of day and in different lighting conditions.
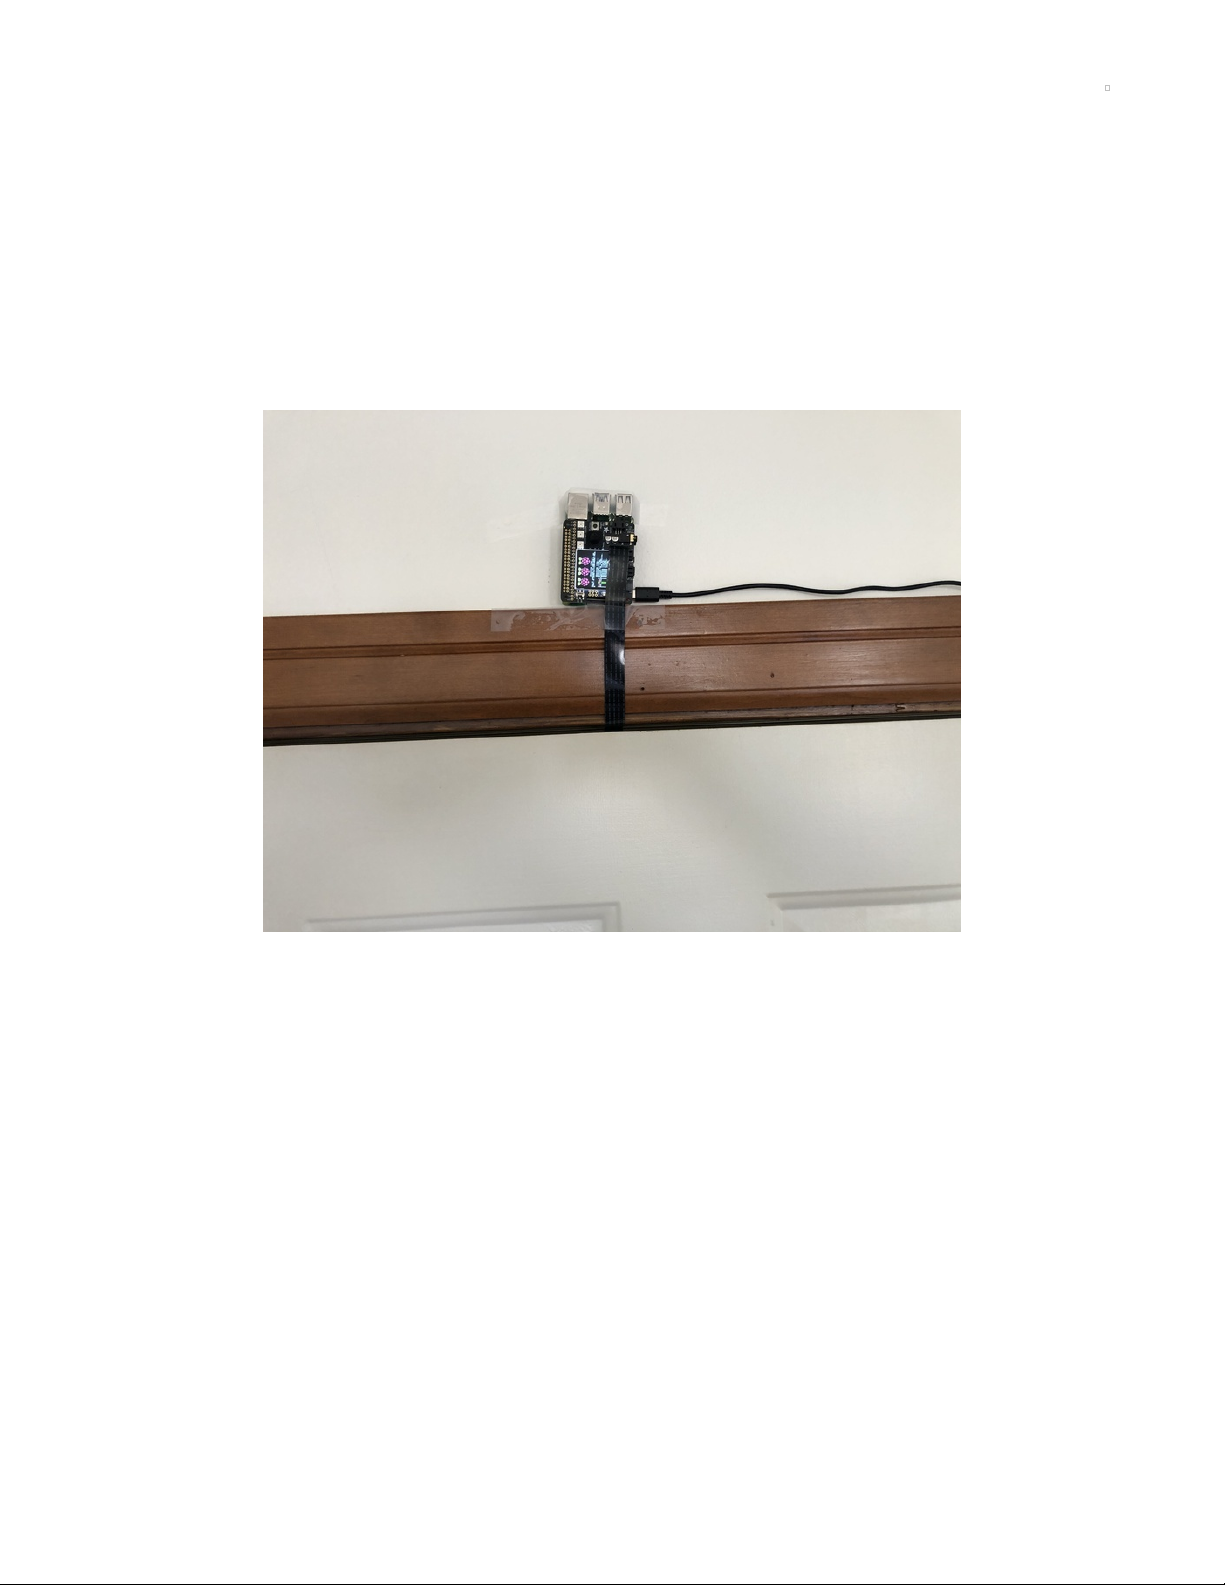
Install your Pi with the Camera pointing towards a package drop-off
spot.
I installed my Pi just inside the door frame, with the camera outside and pointing down.
© Adafruit Industries https://learn.adafruit.com/build-an-ml-package-detector Page 9 of 28
Page 10

Open a terminal window and connect to your Pi via SSH.
© Adafruit Industries https://learn.adafruit.com/build-an-ml-package-detector Page 10 of 28
Page 11

Tip: Your IP address is displayed on the screen of the BrainCraft
In terminal, run the lobe-capture.py program with the following commands:
cd ~
cd lobe-adafruit-kit
python3 lobe-capture.py
Collect training images
Using the button on the BrainCraft, take 20-30 pictures with
no packages. These pictures will be our baseline.
Holding the button down will take a burst of pictures.
Next take 20-30 with packages.
Use as many different boxes as you have, and try moving the packages around, stacking them, and
using a different number.
© Adafruit Industries https://learn.adafruit.com/build-an-ml-package-detector Page 11 of 28
Page 12

Upload all the pictures to your computer using FTP, and put them in a folder called Package Detector .
Inside of that folder create two more folders called no package and package . Sort your images into those
two folders.
Make sure your folder names are the same (including punctuation) for the sample code to work!
© Adafruit Industries https://learn.adafruit.com/build-an-ml-package-detector Page 12 of 28
Page 13

Train your Model
Open Lobe and create a new project.
Select Import in the top left, then select Dataset from the drop-down menu.
Choose the Package Detector folder you created in the previous step. Lobe will automatically start training
your model!
© Adafruit Industries https://learn.adafruit.com/build-an-ml-package-detector Page 13 of 28
Page 14

You may need to optimize your model before exporting it. This allows Lobe to train for longer and
continue to find improvements for your model. To optimize, click the menu icon and select "Optimize
Model".
You can do a basic test of your model on your computer, but it is best to test your model in the location it
will be used, like your front door.
To fully test the model, we'll have to deploy it to the Pi. Onward!
© Adafruit Industries https://learn.adafruit.com/build-an-ml-package-detector Page 14 of 28
Page 15

Export your Model
Next, export your Lobe model to use on the Raspberry Pi. We'll use TensorFlow Lite which is a format that
is optimized for mobile and edge devices, like the Pi.
In Lobe, navigate to the Use tab and click Export.
Select TensorFlow Lite and select a location to save the model. We'll transfer the model to our Raspberry
Pi later in the tutorial.
© Adafruit Industries https://learn.adafruit.com/build-an-ml-package-detector Page 15 of 28
Page 16

Get Predictions on the Pi
Uploading the model to the Pi
In terminal, connect to your Pi using SSH and create a directory named model via the following
commands:
cd ~
mkdir model
The IP address is on the screen of your BrainCraft Hat
Open an FTP connection and transfer the model.tflite and signature.json files exported from Lobe into the
model directory on the Pi.
Run the Package Detector Code
Run the package detector code with the following commands:
cd ~
cd lobe-adafruit-kit
python3 lobe-package-detector.py
Next, go look at your Pi! The BrainCraft screen should now show you what the camera is seeing along
with a prediction label.
Try putting a package (or an empty box) in the camera field-of-view and see if the Pi detects the package.
If the model does not recognize the package, add more training images to your model.
© Adafruit Industries https://learn.adafruit.com/build-an-ml-package-detector Page 16 of 28
Page 17

Set up E-mail Alerts
Now that your Pi is making prediction on package deliveries, let's set up some alerts!
Set up an IFTTT Applet
Go to IFTTT (https://adafru.it/ReI) and log in (or create an account).
Once you are logged in, click
Create
in the top right corner to create a new Applet.
Click the
Add
button on the
If This
block.
Search for and select
Webhooks.
© Adafruit Industries https://learn.adafruit.com/build-an-ml-package-detector Page 17 of 28
Page 18

Set the Event Name trigger to
package
, and click on
Create trigger
.
This will trigger an action when the ML model label is "package".
If you are using a different ML model label than "package", be sure to change the Event Name
trigger!
Next, click the
Add
button on the
Then That
block.
© Adafruit Industries https://learn.adafruit.com/build-an-ml-package-detector Page 18 of 28
Page 19

Search for and select
Email.
If this is the first time you're setting up an e-mail applet in IFTTT, you'll need to verify your e-mail.
© Adafruit Industries https://learn.adafruit.com/build-an-ml-package-detector Page 19 of 28
Page 20

Edit the subject line and body text of the email notification. This is the email you'll see for each package
notification. The items highlighted in gray are dynamic elements that are generated when the event runs.
Finally give your applet a name and click
Finish
.
Your email notification applet is now ready to go!
Setup Webhook Key
We're using a webhook to trigger the email notification. The webhook has a unique key, so only you can
trigger the event. We're going to get the key from IFTTT and set it as an environment variable on the Pi.
© Adafruit Industries https://learn.adafruit.com/build-an-ml-package-detector Page 20 of 28
Page 21

From your profile menu in the top right, select
My services.
Next, select
Webhooks.
From the Webhooks screen, select
Documentation
in the top right.
© Adafruit Industries https://learn.adafruit.com/build-an-ml-package-detector Page 21 of 28
Page 22

Copy the key from the top of the page.
Remember to treat the key like a password
Open an SSH connection to the Pi. Create a new environment variable called IFTTTKEY .
Use the following command in terminal, replacing PASTE-KEY-HERE with your IFTTT key:
export IFTTTKEY=PASTE-KEY-HERE
Start the program again
Finally, restart the lobe-package-detector.py program and you're all set to go!
© Adafruit Industries https://learn.adafruit.com/build-an-ml-package-detector Page 22 of 28
Page 23

© Adafruit Industries https://learn.adafruit.com/build-an-ml-package-detector Page 23 of 28
Page 24

Continuous Learning
You may notice that your package detector is sending you notifications when things that aren't packages
are in its view (e.g. people, birds, etc.).
To improve our model, we'll use continuous learning by taking pictures of things that confuse our model,
and then retrain the model using these new images.
Collect some other objects that aren't packages that might be by your front door. Wait for the model to
make a prediction, then push and hold the joy stick up (towards the LEDs) on the BrainCraft if the label
you see is correct, the LEDs will blink green when the picture is saved. If the label is wrong, push and hold
the joy stick down (away from the LEDs) the LEDs will blink red when the picture is saved.
This will save the images into a structed dataset folder named retraining_data .
Take 10-20 pictures of each object using the joystick on the Pi.
© Adafruit Industries https://learn.adafruit.com/build-an-ml-package-detector Page 24 of 28
Page 25

Open an FTP Connection to the Pi and copy the retraining_data folder to your computer.
Open the Package Detector project in Lobe.
© Adafruit Industries https://learn.adafruit.com/build-an-ml-package-detector Page 25 of 28
Page 26

Import the structured dataset you created on your Pi.
Any images saved in the top level directory, retraining_data in this case, will need to be labeled in Lobe.
You can put these photos in the "no package" category or, if you want a more detailed package detector,
you can create new categories!
When you're done labeling, export your updated model and deploy it to the Pi. Follow instructions in
"Export your Model (https://adafru.it/Rtb)".
© Adafruit Industries https://learn.adafruit.com/build-an-ml-package-detector Page 26 of 28
Page 27

Going Further
Now that your model is trained and improved, and you're getting email notifications from just a package,
there are lots of other ways you can extend this project!
You might want to use this notify you when your pet is at the door or if there is food being delivered. All
you have to do is add a new label in Lobe, add another trigger in IFTTT, and you'll have a different alert!
© Adafruit Industries https://learn.adafruit.com/build-an-ml-package-detector Page 27 of 28
Page 28

© Adafruit Industries Last Updated: 2021-04-26 06:22:36 PM EDT Page 28 of 28
 Loading...