

Page 1

Introducing the Adafruit Bluefruit LE UART Friend
Created by Kevin Townsend
Last updated on 2017-04-24 08:30:30 PM UTC
Page 2

2
9
9
10
10
10
10
12
12
12
12
13
14
14
14
15
16
16
16
16
18
18
18
19
19
21
21
22
22
22
22
23
Guide Contents
Guide Contents
Introduction
So it's a Fancy Pants Wireless UART Adapter?
Download our free Android/iOS app and you're ready to rock!
You can do a lot more too!
Why Use Adafruit's Module?
Technical Specifications
Pinouts
Power Pins
UART Pins
Other Pins
Reverse Side Breakouts
Assembly
Prepare the header strip:
Add the breakout board:
And Solder!
Wiring
Wiring for Arduino Uno
Wiring for an Arduino Micro or Leonardo
Wiring for an FTDI Cable
Factory Reset
Factory Reset via DFU Pin
FactoryReset Sample Sketch
AT+FACTORYRESET
Factory Reset via FCTR Test Pad
DFU Updates
Adafruit Bluefruit LE Connect
Current Measurements
Test Conditions
Fast Advertising Mode
Slow Advertising Mode
Connected Mode (UART)
© Adafruit Industries
https://learn.adafruit.com/introducing-the-adafruit-bluefruit-le-uart-
friend
Page 2 of 115
Page 3

24
25
25
25
25
26
26
26
27
27
27
27
27
27
27
27
28
29
29
29
30
32
32
32
33
37
37
37
38
38
39
40
41
43
Software
Configuration!
Which board do you have?
Bluefruit Micro or Feather 32u4 Bluefruit
Feather M0 Bluefruit LE
Bluefruit LE SPI Friend
Bluefruit LE UART Friend or Flora BLE
Configure the Pins Used
Common settings:
Software UART
Hardware UART
Mode Pin
SPI Pins
Software SPI Pins
Select the Serial Bus
UART Based Boards (Bluefruit LE UART Friend & Flora BLE)
SPI Based Boards (Bluefruit LE SPI Friend)
ATCommand
Opening the Sketch
Configuration
Running the Sketch
BLEUart
Opening the Sketch
Configuration
Running the Sketch
HIDKeyboard
Opening the Sketch
Configuration
Running the Sketch
Bonding the HID Keyboard
Android
iOS
OS X
Controller
© Adafruit Industries
https://learn.adafruit.com/introducing-the-adafruit-bluefruit-le-uart-
friend
Page 3 of 115
Page 4

43
43
44
44
45
46
47
49
49
49
50
50
51
52
54
54
54
55
56
57
58
60
60
60
60
61
61
61
62
62
62
62
Opening the Sketch
Configuration
Running the Sketch
Using Bluefruit LE Connect in Controller Mode
Streaming Sensor Data
Control Pad Module
Color Picker Module
HeartRateMonitor
Opening the Sketch
Configuration
If Using Hardware or Software UART
Running the Sketch
nRF Toolbox HRM Example
CoreBluetooth HRM Example
UriBeacon
Opening the Sketch
Configuration
Running the Sketch
HALP!
Data Mode
Switching Command/Data Mode via +++
Command Mode
Hayes/AT Commands
Test Command Mode '=?'
Write Command Mode '=xxx'
Execute Mode
Read Command Mode '?'
Dynamically Switching Modes via +++
Standard AT
AT
ATI
ATZ
© Adafruit Industries
https://learn.adafruit.com/introducing-the-adafruit-bluefruit-le-uart-
friend
Page 4 of 115
Page 5

62
63
64
64
64
64
64
65
65
66
66
66
66
67
67
68
68
68
68
69
70
70
71
72
72
72
73
73
74
74
74
74
ATE
+++
General Purpose
AT+FACTORYRESET
AT+DFU
AT+HELP
AT+NVMWRITE
AT+NVMREAD
AT+MODESWITCHEN
Hardware
AT+BAUDRATE
AT+HWADC
AT+HWGETDIETEMP
AT+HWGPIO
AT+HWGPIOMODE
AT+HWI2CSCAN
AT+HWVBAT
AT+HWRANDOM
AT+HWMODELED
AT+UARTFLOW
Beacon
AT+BLEBEACON
AT+BLEURIBEACON
Deprecated: AT+EDDYSTONEENABLE
AT+EDDYSTONEURL
AT+EDDYSTONECONFIGEN
AT+EDDYSTONESERVICEEN
AT+EDDYSTONEBROADCAST
BLE Generic
AT+BLEPOWERLEVEL
AT+BLEGETADDRTYPE
AT+BLEGETADDR
© Adafruit Industries
https://learn.adafruit.com/introducing-the-adafruit-bluefruit-le-uart-
friend
Page 5 of 115
Page 6

75
75
76
76
76
77
77
78
78
78
79
79
79
80
80
81
81
82
82
82
83
83
83
84
84
84
84
84
85
85
86
86
86
AT+BLEGETPEERADDR
AT+BLEGETRSSI
BLE Services
AT+BLEUARTTX
TX FIFO Buffer Handling
AT+BLEUARTTXF
AT+BLEUARTRX
AT+BLEUARTFIFO
AT+BLEKEYBOARDEN
AT+BLEKEYBOARD
AT+BLEKEYBOARDCODE
Modifier Values
AT+BLEHIDEN
AT+BLEHIDMOUSEMOVE
AT+BLEHIDMOUSEBUTTON
AT+BLEHIDCONTROLKEY
AT+BLEHIDGAMEPADEN
AT+BLEHIDGAMEPAD
AT+BLEMIDIEN
AT+BLEMIDIRX
AT+BLEMIDITX
AT+BLEBATTEN
AT+BLEBATTVAL
BLE GAP
AT+GAPCONNECTABLE
AT+GAPGETCONN
AT+GAPDISCONNECT
AT+GAPDEVNAME
AT+GAPDELBONDS
AT+GAPINTERVALS
AT+GAPSTARTADV
AT+GAPSTOPADV
AT+GAPSETADVDATA
© Adafruit Industries
https://learn.adafruit.com/introducing-the-adafruit-bluefruit-le-uart-
friend
Page 6 of 115
Page 7

88
88
88
88
89
90
91
92
93
93
93
93
93
96
96
96
97
97
98
98
98
99
99
100
100
101
101
101
101
102
102
102
102
BLE GATT
GATT Limitations
AT+GATTCLEAR
AT+GATTADDSERVICE
AT+GATTADDCHAR
AT+GATTCHAR
AT+GATTLIST
AT+GATTCHARRAW
Debug
AT+DBGMEMRD
AT+DBGNVMRD
AT+DBGSTACKSIZE
AT+DBGSTACKDUMP
History
Version 0.7.7
Version 0.7.0
Version 0.6.7
Version 0.6.6
Version 0.6.5
Version 0.6.2
Version 0.5.0
Version 0.4.7
Version 0.3.0
GATT Service Details
UART Service
UART Service
Characteristics
TX (0x0002)
RX (0x0003)
Software Resources
Bluefruit LE Client Apps and Libraries
Bluefruit LE Connect (http://adafru.it/f4G) (Android/Java)
Bluefruit LE Connect (http://adafru.it/f4H) (iOS/Swift)
© Adafruit Industries
https://learn.adafruit.com/introducing-the-adafruit-bluefruit-le-uart-
friend
Page 7 of 115
Page 8

102
103
103
104
104
105
105
105
106
107
107
107
112
112
112
112
112
112
112
112
113
114
114
114
114
Bluefruit LE Connect for OS X (http://adafru.it/o9F) (Swift)
Bluefruit LE Command Line Updater for OS X (http://adafru.it/pLF)
(Swift)
Deprecated: Bluefruit Buddy (http://adafru.it/mCn) (OS X)
ABLE (http://adafru.it/ijB) (Cross Platform/Node+Electron)
Bluefruit LE Python Wrapper (http://adafru.it/fQF)
Debug Tools
AdaLink (http://adafru.it/fPq) (Python)
Adafruit nRF51822 Flasher (http://adafru.it/fVL) (Python)
BLE FAQ
Bluefruit LE Connect (Android)
Nordic nRF Toolbox
Adafruit_nRF51822_Flasher
Device Recovery
How to Recover a Bluefruit Board
1. Force DFU Mode at Startup
2. Update the Bluefruit Firmware
BLEFRIEND32 Firmware (UART, 32KB SRAM)
BLESPIFRIEND Firmware (SPI)
3. Flash a Test Sketch
4. Perform a Factory Reset
Still Having Problems?
Downloads
Files
Schematic
Board Layout
© Adafruit Industries
https://learn.adafruit.com/introducing-the-adafruit-bluefruit-le-uart-
friend
Page 8 of 115
Page 9

Introduction
Would you like to add powerful and easy-to-use Bluetooth Low Energy to your robot, art or other electronics project? Heck yeah! With BLE now
included in modern smart phones and tablets, its fun to add wireless connectivity. So what you really need is the new Adafruit Bluefruit LE UART
Friend!
The Bluefruit LE UART Friend makes it easy to add Bluetooth Low Energy connectivity to anything with a hardware or software serial port. We
even have nice hardware flow control so you won't have to think about losing data. Connect to your Arduino or other microcontroller or even just a
standard FTDI cable for debugging and testing.
This multi-function module can do quite a lot! For most people, they'll be very happy to use the standard Nordic UART RX/TX connection profile. In
this profile, the Bluefruit acts as a data pipe, that can 'transparently' transmit back and forth from your iOS or Android device. You can use our iOS
App (http://adafru.it/iCi) or Android App (http://adafru.it/f4G), or write your own to communicate with the UART service (http://adafru.it/iCF).
So it's a Fancy Pants Wireless UART Adapter?
© Adafruit Industries
https://learn.adafruit.com/introducing-the-adafruit-bluefruit-le-uart-
friend
Page 9 of 115
Page 10

The board is capable of much more than just sending strings over the air! Thanks to an easy to learn AT command set (http://adafru.it/iCG), you
have full control over how the device behaves, including the ability to define and manipulate your own GATT Services and
Characteristics (http://adafru.it/iCH), or change the way that the device advertises itself for other Bluetooth Low Energy devices to see. You can
also use the AT commands to query the die temperature, check the battery voltage, and more, check the connection RSSI or MAC address, and
tons more. Really, way too long to list here!
Download our free Android/iOS app and you're ready to rock!
Using our Bluefruit iOS App (http://adafru.it/iCi) or Android App (http://adafru.it/f4G), you can quickly get your project prototyped by using your iOS
or Android phone/tablet as a controller. We have a color picker (http://adafru.it/iCI), quaternion/accelerometer/gyro/magnetometer or location
(GPS) (http://adafru.it/iCI), and an 8-button control game pad (http://adafru.it/iCI).
You can do a lot more too!
The Bluefruit can also act like an HID Keyboard (http://adafru.it/iCJ) (for devices that support BLE HID)
Can become a BLE Heart Rate Monitor (http://adafru.it/iCK) (a standard profile for BLE) - you just need to add the pulse-detection circuitry
Turn it into a UriBeacon (http://adafru.it/iCL), the Google standard for Bluetooth LE beacons. Just power it and the 'Friend will bleep out a
URL to any nearby devices with the UriBeacon app installed.
Built in over-the-air bootloading capability so we can keep you updated with the hottest new firmware. (http://adafru.it/iCM) Use any Android
or iOS device to get updates and install them!
Why Use Adafruit's Module?
There are plenty of BLE modules out there, with varying quality on the HW design as well as the firmware.
One of the biggest advantages of the Adafruit Bluefruit LE family is that we wrote all of the firmware running on the devices ourselves from
scratch.
We control every line of code that runs on our modules ... and so we aren't at the mercy of any third party vendors who may or may not be
interested in keeping their code up to date or catering to our customer's needs.
Because we control everything about the product, we add features that are important to our customers, can solve any issues that do come up
without begging any 3rd parties, and we can even change Bluetooth SoCs entirely if the need ever arises!
Technical Specifications
ARM Cortex M0 core running at 16MHz
256KB flash memory
32KB SRAM
Peak current draw
Transport: UART @ 9600 baud with HW flow control (CTS+RTS required!)
5V-safe inputs (Arduino Uno friendly, etc.)
On-board 3.3V voltage regulation
Bootloader with support for safe OTA firmware updates
Easy AT command set to get up and running quickly
© Adafruit Industries
https://learn.adafruit.com/introducing-the-adafruit-bluefruit-le-uart-
friend
Page 10 of 115
Page 11

© Adafruit Industries
https://learn.adafruit.com/introducing-the-adafruit-bluefruit-le-uart-
friend
Page 11 of 115
Page 12

Pinouts
HW flow control (CTS+RTS) should always be used with the nRF51822. The UART peripheral block is designed in a way that more or less
requires HW flow control for reliable UART communication, with a very small internal buffer and tight timing limitations due to the SoftDevice
architecture (Nordic's proprietary Bluetooth Low Energy stack).
Power Pins
VIN: This is the power supply for the module, supply with 3.3-16V power supply input. This will be regulated down to 3.3V to run the chip
GND: The common/GND pin for power and logic
UART Pins
TXO - This is the UART Transmit pin out of the breakout (Bluefruit LE --> MCU), it's at 3.3V logic level.
RXI - This is the UART Receive pin into the breakout (MCU --> Bluefruit LE). This has a logic level shifter on it, you can use 3-5V logic.
CTS - Clear to Send hardware flow control pin into the the breakou (MCU --> Bluefruit LE). Use this pin to tell the Bluefruit that it can send
data back to the microcontroller over the TXO pin. This pin is pulled high by default and must be set to ground in order to enable data
transfer out! If you do not need hardware flow control, tie this pin to ground it is a level shifted pin, you can use 3-5V logic
RTS - Read to Send flow control pin out of the module (Bluefruit LE --> MCU). This pin will be low when its fine to send data to the Bluefruit.
In general, at 9600 baud we haven't seen a need for this pin, but you can watch it for full flow control! This pin is 3.3V out
Other Pins
MOD: Mode Selection. The Bluefruit has two modes, Command and Data. You can keep this pin disconnected, and use the slide switch to
select the mode. Or, you can control the mode by setting this pin voltage, it will override the switch setting! High = Command Mode, Low =
UART/DATA mode. This pin is level shifted, you can use 3-5V logic
DFU: Setting this pin low when you power the device up will force the Bluefruit LE module to enter a special firmware update mode to update
the firmware over the air. Once the device is powered up, this pin can also be used to perform a factory reset. Wire the pin to GND for >5s
until the two LEDs start to blink, then release the pin (set it to 5V or logic high) and a factory reset will be performed.
© Adafruit Industries
https://learn.adafruit.com/introducing-the-adafruit-bluefruit-le-uart-
friend
Page 12 of 115
Page 13

Reverse Side Breakouts
On the back we also have a few breakouts!
Opt VBat: If you fancy, you can solder on a JST 2-PH connector (http://adafru.it/1769), this will let you easily plug in a Lithium Ion or other battery
pack. This connector pad is diode protected so you can use both Vin and VBat and the regulator will automatically switch to the higher voltage
Opt. 32 KHz: If you're doing some funky low power work, we wanted to give you the option of solderin in a 32khz oscillator.
(http://adafru.it/f4U)Our firmware doesn't support it yet but its there!
SWC: This is the SWD clock pin, 3v logic - for advanced hackers!
SWD: This is the SWD data pin, 3v logic - for advanced hackers!
3Vo: This is the output from the 3V regulator, for testing and also if you really need regulated 3V, up to 250mA available
FCR: This is the factory reset pin. When all else fails and you did something to really weird out your module, tie this pad to ground while powering
up the module and it will factory reset. You should try the DFU reset method first tho (see that tutorial page)
© Adafruit Industries
https://learn.adafruit.com/introducing-the-adafruit-bluefruit-le-uart-
friend
Page 13 of 115
Page 14

Assembly
Prepare the header strip:
Cut the strip to length if necessary. It will be easier to solder if you insert it into a
breadboard - long pins down
Add the breakout board:
Place the breakout board over the pins so that the short pins poke through the breakout
pads
© Adafruit Industries
https://learn.adafruit.com/introducing-the-adafruit-bluefruit-le-uart-
friend
Page 14 of 115
Page 15

And Solder!
Be sure to solder all pins for reliable electrical contact.
Solder the longer power/data strip first
(For tips on soldering, be sure to check out our Guide to Excellent
Soldering (http://adafru.it/aTk)).
You're done! Check your solder joints visually and continue onto the next steps
© Adafruit Industries
https://learn.adafruit.com/introducing-the-adafruit-bluefruit-le-uart-
friend
Page 15 of 115
Page 16

Wiring
You can use the Bluefruit LE UART friend with any microcontroller with 3 or 5V logic, but we'll be demoing it with an Arduino UNO. Depending on
whether your microcontroller has a hardware or software UART, adjust pins as necessary!
Wiring for Arduino Uno
To connect the Bluefruit LE UART Friend to your Arduino Uno using the default pinout in our sample sketches, connect the pins up as follows:
MOD to Pin 12
CTS to Pin 11
TXO to Pin 10
RXI to Pin 9
VIN to 5V
RTS to Pin 8
GND to GND
The wiring diagram below shows how this might look on your system:
All of these pins are 'flexible' and you can change them around as necesary after you get your setup running nicely, but we recommend starting
out with our default wiring.
Wiring for an Arduino Micro or Leonardo
To connect the Bluefruit LE UART Friend to an Arduino Micro or Leonardo, use the following pinout and make sure you've selected HW UART as
the constructor in your sample sketches (they default to SW Serial):
1/TX to RXI
0/RX to TXO
+5V on the Micro/Leonardo to VIN
GND to GND
Connect CTS on the Bluefruit LE Module to GND
The HW Serial constructor can be seen below, and should be uncommented in the sample sketches:
/* ...or hardware serial, which does not need the RTS/CTS pins. Uncomment this line */
Adafruit_BluefruitLE_UART ble(BLUEFRUIT_HWSERIAL_NAME, BLUEFRUIT_UART_MODE_PIN);
Wiring for an FTDI Cable
© Adafruit Industries
https://learn.adafruit.com/introducing-the-adafruit-bluefruit-le-uart-
friend
Page 16 of 115
Page 17

Since the UART Friend is, well, a serial port, you can use an FTDI Friend or cable to quickly connect using any serial console. You won't get
MODE or DFU connections, so don't forget to flick the mode switch as necessary if you want to be in a particular mode.
Simply insert an FTDI cable directly into the Bluefruit LE UART Friend header by using the six pins in the middle, being careful to align the power
pins up correctly (the red wire to VIN and the black wire to GND):
© Adafruit Industries
https://learn.adafruit.com/introducing-the-adafruit-bluefruit-le-uart-
friend
Page 17 of 115
Page 18

Factory Reset
There are several methods that you can use to perform a factory reset on your Bluefruit LE module if something gets misconfigured, or to delete
persistent changes like UriBeacon or advertising payload changes, etc.
These methods are the same for both UART and SPI versions of Bluefruit LE
Factory Reset via DFU Pin
If you hold the DFU pin low (set the pin to GND) for >5 seconds, the red and blue LEDs next to the module will start blinking and the device will
perform a factory reset as soon as you release the DFU pin (disconnecting it from GND).
If you have a DFU button instead of a pin, just hold the button down.
FactoryReset Sample Sketch
There is a FactoryReset sample sketch in the Adafruit Bluefruit LE library, which can be access in the File > Examples >
Adafruit_BluefruitLE_nRF51 folder (See the Software section of this tutorial (http://adafru.it/iCj) for instructions on installing the library):
© Adafruit Industries
https://learn.adafruit.com/introducing-the-adafruit-bluefruit-le-uart-
friend
Page 18 of 115
Page 19

Upload this sketch and open the Serial Monitor and it should perform a factory reset for you:
AT+FACTORYRESET
You can also perform a factory reset by sending the AT+FACTORYRESET command to your Bluefruit LE module in your favorite terminal
emulator or using the ATCommand (http://adafru.it/iCk) example sketch.
AT+FACTORYRESET
OK
This command will also cause the device to reset.
Factory Reset via FCTR Test Pad
On the bottom of the Bluefruit LE Friend board or shields there is a test pad or pin that exposes the Factory Reset pin on the modules (marked
FCR or F.RST). Setting this pad low when the device is powered up will cause a factory reset at startup.
© Adafruit Industries
https://learn.adafruit.com/introducing-the-adafruit-bluefruit-le-uart-
friend
Page 19 of 115
Page 20

© Adafruit Industries
https://learn.adafruit.com/introducing-the-adafruit-bluefruit-le-uart-
friend
Page 20 of 115
Page 21

DFU Updates
We're constantly working on the Bluefruit LE firmware to add new features, and keep up to date with what customers need and want.
To make sure you stay up to date with those changes, we've included an easy to use over the air updater on all of our nRF51 based Bluefruit LE
modules.
Adafruit Bluefruit LE Connect
Updating your Bluefruit LE device to the latest firmware is as easy as installing Adafruit's Bluefruit LE Connect
application (http://adafru.it/f4G) (Android) from the Google Play Store or Bluefruit LE Connect for iOS (http://adafru.it/f4H) from the Apple App
Store.
Any time a firmware update is available, the application will propose to download the latest binaries and take care of all the details of transferring
them to your Bluefruit device, ans shown in the video below:
© Adafruit Industries
https://learn.adafruit.com/introducing-the-adafruit-bluefruit-le-uart-
friend
Page 21 of 115
Page 22

Current Measurements
The following tables give you an idea of the average current draw in three different operating modes with the Bluefruit LE UART Friend:
Fast Advertising Mode (the first 30 seconds after power up)
Slow Advertising Mode (>30s since power up)
Connected Mode (using the UART profile in this case)
Test Conditions
The board was powered from a fully charged 1200mAh 4.2V LIPO (http://adafru.it/dyW) cell running at 4.2V. Power efficiency will generally
increase as the LIPO battery voltage drops, so 4.2V should be considered a worst case scenario.
Power Supply: 1200mAh 4.2V LIPO Cell (at 4.2V)
Firmware: 0.6.2
Fast Advertising Mode
The first 30 seconds that the Bluefruit LE UART Friend is powered up it will enter 'Fast Advertising Mode', which sends an advertising packet once
every 100ms.
Average Current: 1.44mA
Peak Current: 13.5mA
Expected Battery Life: 832 hours (~34.6 days)
The MODE LEDs can be seen blinking in regular intervals as the three rectangular bumps at the bottom of the chart.
Slow Advertising Mode
After 30 seconds the Bluefruit LE UART Friend will enter 'Slow Advertising Mode', which sends an advertising packet once every 546.25ms.
Average Current: 1.25mA
Peak Current: 13.5mA
Expected Battery Life: 956 hours (~40 days)
© Adafruit Industries
https://learn.adafruit.com/introducing-the-adafruit-bluefruit-le-uart-
friend
Page 22 of 115
Page 23

Connected Mode (UART)
The following measurements illustrate the average current draw in connected mode (with the connected LED enabled). UART mode was used as
a test case.
Average Current: 1.86mA
Peak Current: 15.2mA
Expected Battery Life: 645 hours (~26.8 days)
© Adafruit Industries
https://learn.adafruit.com/introducing-the-adafruit-bluefruit-le-uart-
friend
Page 23 of 115
Page 24

Software
In order to try out our demos, you'll need to download the Adafruit BLE library for the nRF51 based modules such as this one (a.k.a.
Adafruit_BluefruitLE_nRF51)
You can check out the code here at github, (http://adafru.it/f4V) but its likely easier to just download by clicking:
Download Adafruit_BluefruitLE_nRF51
http://adafru.it/f4W
Rename the uncompressed folder Adafruit_BluefruitLE_nRF51 and check that the Adafruit_BluefruitLE_nRF51 folder contains
Adafruit_BLE.cpp and Adafruit_BLE.h (as well as a bunch of other files)
Place the Adafruit_BluefruitLE_nRF51 library folder your arduinosketchfolder/libraries/ folder.
You may need to create the libraries subfolder if its your first library. Restart the IDE.
We also have a great tutorial on Arduino library installation at:
http://learn.adafruit.com/adafruit-all-about-arduino-libraries-install-use (http://adafru.it/aYM)
After restarting, check that you see the library folder with examples:
© Adafruit Industries
https://learn.adafruit.com/introducing-the-adafruit-bluefruit-le-uart-
friend
Page 24 of 115
Page 25

Configuration!
Before you start uploading any of the example sketches, you'll need to CONFIGURE the Bluefruit interface - there's a lot of options so pay close
attention!
Which board do you have?
There's a few products under the Bluefruit name:
If you are using the Bluefruit LE Shield then you have an SPI-connected NRF51822
module. You can use this with Atmega328 (Arduino UNO or compatible), ATmega32u4
(Arduino Leonardo, compatible) or ATSAMD21 (Arduino Zero, compatible) and possibly
others.
Your pinouts are Hardware SPI, CS = 8, IRQ = 7, RST = 4
Bluefruit Micro or Feather 32u4 Bluefruit
If you have a Bluefruit Micro or Feather 32u4 Bluefruit LE then you have an
ATmega32u4 chip with Hardware SPI, CS = 8, IRQ = 7, RST = 4
Feather M0 Bluefruit LE
If you have a Feather M0 Bluefruit LE then you have an ATSAMD21 chip with Hardware
SPI, CS = 8, IRQ = 7, RST = 4
© Adafruit Industries
https://learn.adafruit.com/introducing-the-adafruit-bluefruit-le-uart-
friend
Page 25 of 115
Page 26

Bluefruit LE SPI Friend
If you have a stand-alone module, you have a bit of flexibility with wiring however we
strongly recommend Hardware SPI, CS = 8, IRQ = 7, RST = 4
You can use this with just about any microcontroller with 5 or 6 pins
Bluefruit LE UART Friend or Flora BLE
If you have a stand-alone UART module you have some flexibility with wiring. However
we suggest hardware UART if possible. You will likely need to use the flow control CTS
pin if you are not using hardware UART. There's also a MODE pin
You can use this with just about any microcontroller with at least 3 pins, but best used
with a Hardware Serial/UART capable chip!
Configure the Pins Used
You'll want to check the Bluefruit Config to set up the pins you'll be using for UART or SPI
Each example sketch has a secondary tab with configuration details. You'll want to edit and save the sketch to your own documents folder once
set up.
© Adafruit Industries
https://learn.adafruit.com/introducing-the-adafruit-bluefruit-le-uart-
friend
Page 26 of 115
Page 27

Common settings:
You can set up how much RAM to set aside for a communication buffer and whether you want to have full debug output. Debug output is 'noisy' on
the serial console but is handy since you can see all communication between the micro and the BLE
// ---------------------------------------------------------------------------------------------// These settings are used in both SW UART, HW UART and SPI mode
// ---------------------------------------------------------------------------------------------#define BUFSIZE 128 // Size of the read buffer for incoming data
#define VERBOSE_MODE true // If set to 'true' enables debug output
Software UART
If you are using Software UART, you can set up which pins are going to be used for RX, TX, and CTS flow control. Some microcontrollers are
limited on which pins can be used! Check the SoftwareSerial library documentation for more details
// SOFTWARE UART SETTINGS
#define BLUEFRUIT_SWUART_RXD_PIN 9 // Required for software serial!
#define BLUEFRUIT_SWUART_TXD_PIN 10 // Required for software serial!
#define BLUEFRUIT_UART_CTS_PIN 11 // Required for software serial!
#define BLUEFRUIT_UART_RTS_PIN -1 // Optional, set to -1 if unused
Hardware UART
If you have Hardware Serial, there's a 'name' for it, usually Serial1 - you can set that up here:
// HARDWARE UART SETTINGS
#ifdef Serial1 // this makes it not complain on compilation if there's no Serial1
#define BLUEFRUIT_HWSERIAL_NAME Serial1
#endif
Mode Pin
For both hardware and software serial, you will likely want to define the MODE pin. There's a few sketches that dont use it, instead depending on
commands to set/unset the mode. Its best to use the MODE pin if you have a GPIO to spare!
#define BLUEFRUIT_UART_MODE_PIN 12 // Set to -1 if unused
SPI Pins
For both Hardware and Software SPI, you'll want to set the CS (chip select) line, IRQ (interrupt request) line and if you have a pin to spare, RST
(Reset)
// SHARED SPI SETTINGS
#define BLUEFRUIT_SPI_CS 8
#define BLUEFRUIT_SPI_IRQ 7
#define BLUEFRUIT_SPI_RST 4 // Optional but recommended, set to -1 if unused
Software SPI Pins
If you don't have a hardware SPI port available, you can use any three pins...its a tad slower but very flexible
// SOFTWARE SPI SETTINGS
#define BLUEFRUIT_SPI_SCK 13
#define BLUEFRUIT_SPI_MISO 12
#define BLUEFRUIT_SPI_MOSI 11
Refer to the table above to determine whether you have SPI or UART controlled Bluefruits!
Select the Serial Bus
Once you've configured your pin setup in the BluefruitConfig.h file, you can now check and adapt the example sketch.
The Adafruit_BluefruitLE_nRF51 library supports four different serial bus options, depending on the HW you are using: SPI both hardware and
software type, and UART both hardware and software type.
UART Based Boards (Bluefruit LE UART Friend & Flora BLE)
This is for Bluefruit LE UART Friend & Flora BLE boards. You can use either software serial or hardware serial. Hardware serial is higher quality,
and less risky with respect to losing data. However, you may not have hardware serial available! Software serial does work just fine with flow-
© Adafruit Industries
https://learn.adafruit.com/introducing-the-adafruit-bluefruit-le-uart-
friend
Page 27 of 115
Page 28

control and we do have that available at the cost of a single GPIO pin.
For software serial (Arduino Uno, Adafruit Metro) you should uncomment the software serial contructor below, and make sure the other three
options (hardware serial & SPI) are commented out.
// Create the bluefruit object, either software serial...uncomment these lines
SoftwareSerial bluefruitSS = SoftwareSerial(BLUEFRUIT_SWUART_TXD_PIN, BLUEFRUIT_SWUART_RXD_PIN);
Adafruit_BluefruitLE_UART ble(bluefruitSS, BLUEFRUIT_UART_MODE_PIN,
BLUEFRUIT_UART_CTS_PIN, BLUEFRUIT_UART_RTS_PIN);
For boards that require hardware serial (Adafruit Flora, etc.), uncomment the hardware serial constructor, and make sure the other three options
are commented out
/* ...or hardware serial, which does not need the RTS/CTS pins. Uncomment this line */
Adafruit_BluefruitLE_UART ble(BLUEFRUIT_HWSERIAL_NAME, BLUEFRUIT_UART_MODE_PIN);
SPI Based Boards (Bluefruit LE SPI Friend)
For SPI based boards, you should uncomment the hardware SPI constructor below, making sure the other constructors are commented out:
/* ...hardware SPI, using SCK/MOSI/MISO hardware SPI pins and then user selected CS/IRQ/RST */
Adafruit_BluefruitLE_SPI ble(BLUEFRUIT_SPI_CS, BLUEFRUIT_SPI_IRQ, BLUEFRUIT_SPI_RST);
If for some reason you can't use HW SPI, you can switch to software mode to bit-bang the SPI transfers via the following constructor:
/* ...software SPI, using SCK/MOSI/MISO user-defined SPI pins and then user selected CS/IRQ/RST */
Adafruit_BluefruitLE_SPI ble(BLUEFRUIT_SPI_SCK, BLUEFRUIT_SPI_MISO,
BLUEFRUIT_SPI_MOSI, BLUEFRUIT_SPI_CS,
BLUEFRUIT_SPI_IRQ, BLUEFRUIT_SPI_RST);
© Adafruit Industries
https://learn.adafruit.com/introducing-the-adafruit-bluefruit-le-uart-
friend
Page 28 of 115
Page 29

ATCommand
The ATCommand example allows you to execute AT commands from your sketch, and see the results in the Serial Monitor. This can be useful
for debugging, or just testing different commands out to see how they work in the real world. It's a good one to start with!
Opening the Sketch
To open the ATCommand sketch, click on the File > Examples > Adafruit_BluefruitLE_nRF51 folder in the Arduino IDE and select atcommand:
This will open up a new instance of the example in the IDE, as shown below:
Configuration
Check the Configuration! page earlier to set up the sketch for Software/Hardware UART or Software/Hardware SPI. The default is hardware SPI
If using software or hardware Serial UART:
This tutorial does not need to use the MODE pin, make sure you have the mode switch in CMD mode if you do not configure & connect a
© Adafruit Industries
https://learn.adafruit.com/introducing-the-adafruit-bluefruit-le-uart-
friend
Page 29 of 115
Page 30

MODE pin
Don't forget to also connect the CTS pin on the Bluefruit to ground if you are not using it! (The Flora has this already done)
Running the Sketch
Once you upload the sketch to your board (via the arrow-shaped upload icon), and the upload process has finished, open up the Serial Monitor
via Tools > Serial Monitor, and make sure that the baud rate in the lower right-hand corner is set to 115200:
To send an AT command to the Bluefruit LE module, enter the command in the textbox at the top of the Serial Monitor and click the Send button:
The response to the AT command will be displayed in the main part of the Serial Monitor. The response from 'ATI' is shown below:
© Adafruit Industries
https://learn.adafruit.com/introducing-the-adafruit-bluefruit-le-uart-
friend
Page 30 of 115
Page 31
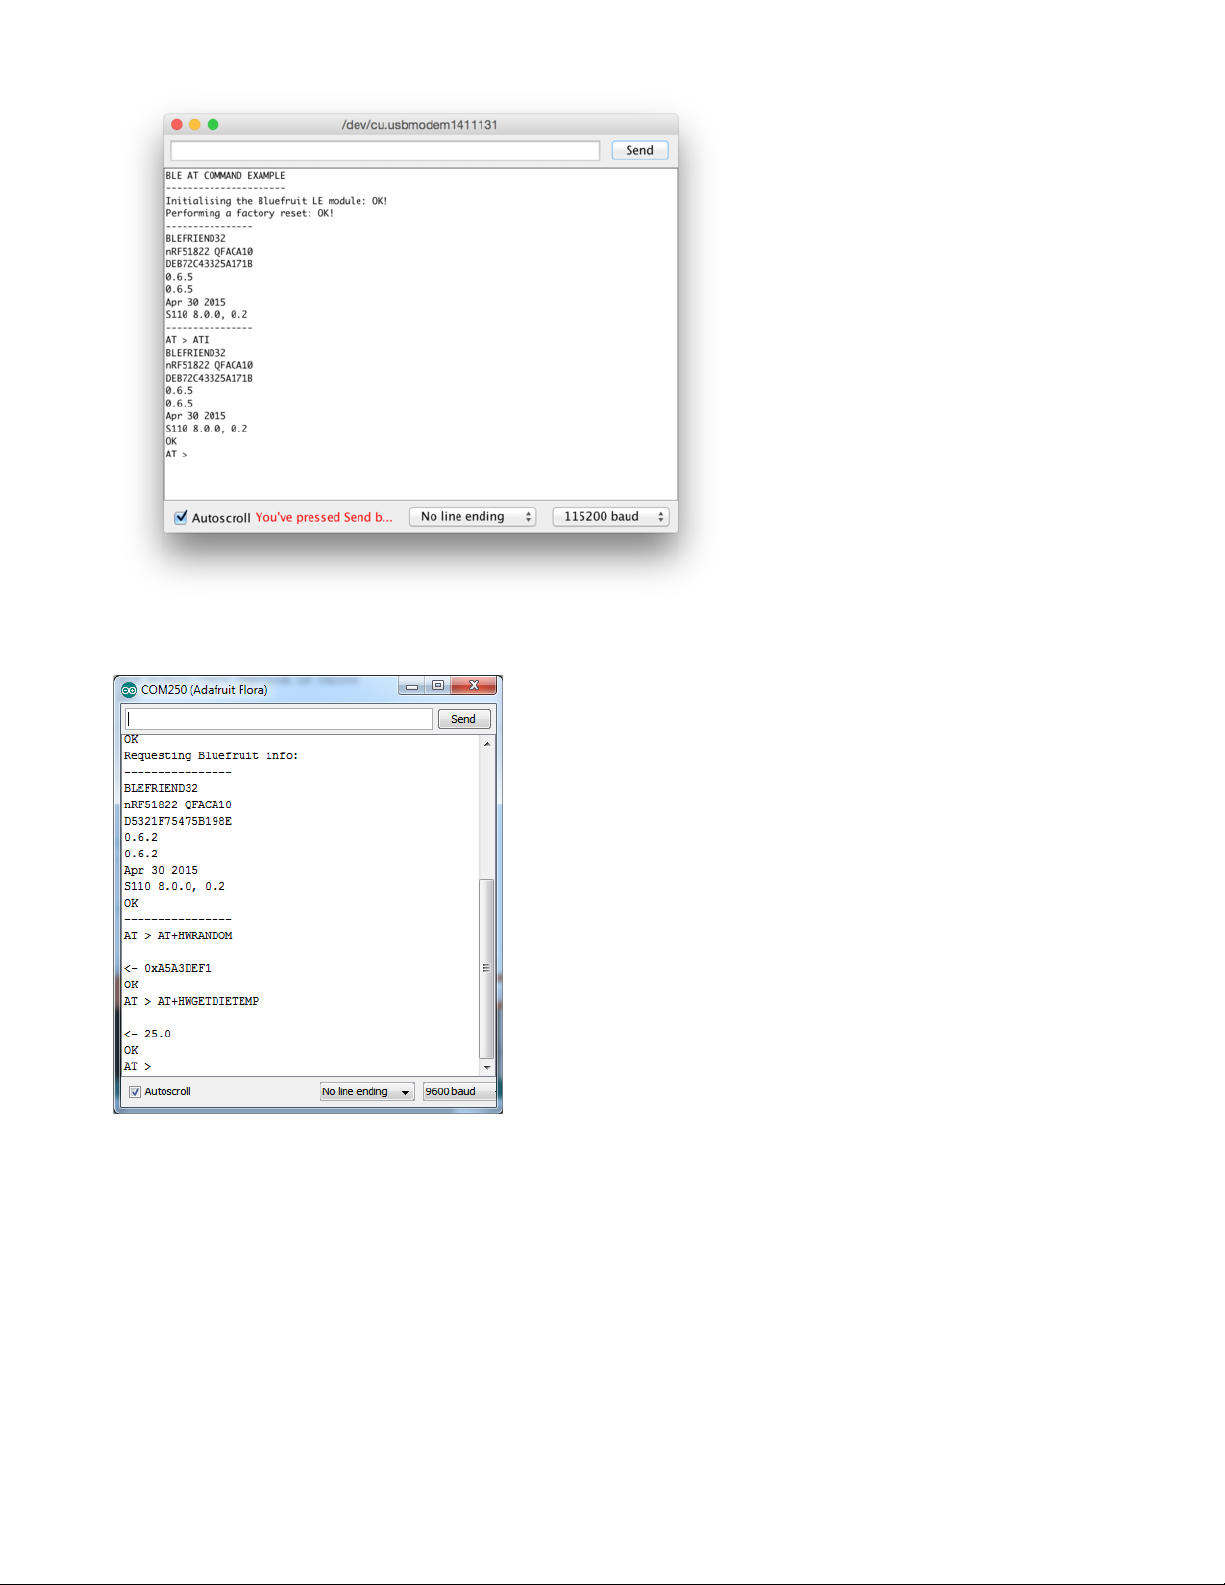
You can do pretty much anything at this prompt, with the AT command set. Try AT+HELP to get a list of all commands, and try out ones like
AT+HWGETDIETEMP (get temperature at the nRF51822 die) and AT+HWRANDOM (generate a random number)
© Adafruit Industries
https://learn.adafruit.com/introducing-the-adafruit-bluefruit-le-uart-
friend
Page 31 of 115
Page 32

BLEUart
The BLEUart example sketch allows you to send and receive text data between the Arduino and a connected Bluetooth Low Energy Central
device on the other end (such as you mobile phone using the Adafruit Bluefruit LE Connect application for Android (http://adafru.it/f4G) or
iOS (http://adafru.it/f4H) in UART mode).
Opening the Sketch
To open the ATCommand sketch, click on the File > Examples > Adafruit_BluefruitLE_nRF51 folder in the Arduino IDE and select
bleuart_cmdmode:
This will open up a new instance of the example in the IDE, as shown below:
Configuration
Check the Configuration! page earlier to set up the sketch for Software/Hardware UART or Software/Hardware SPI. The default is hardware SPI
© Adafruit Industries
https://learn.adafruit.com/introducing-the-adafruit-bluefruit-le-uart-
friend
Page 32 of 115
Page 33

If using software or hardware Serial UART:
This tutorial does not need to use the MODE pin, make sure you have the mode switch in CMD mode if you do not configure & connect a
MODE pin
Don't forget to also connect the CTS pin on the Bluefruit to ground if you are not using it! (The Flora has this already done)
Running the Sketch
Once you upload the sketch to your board (via the arrow-shaped upload icon), and the upload process has finished, open up the Serial Monitor
via Tools > Serial Monitor, and make sure that the baud rate in the lower right-hand corner is set to 115200:
Once you see the request, use the App to connect to the Bluefruit LE module in UART mode so you get the text box on your phone
Any text that you type in the box at the top of the Serial Monitor will be sent to the connected phone, and any data sent from the phone will be
displayed in the serial monitor:
© Adafruit Industries
https://learn.adafruit.com/introducing-the-adafruit-bluefruit-le-uart-
friend
Page 33 of 115
Page 34

You can see the incoming string here in the Adafruit Bluefruit LE Connect app below (iOS in this case):
© Adafruit Industries
https://learn.adafruit.com/introducing-the-adafruit-bluefruit-le-uart-
friend
Page 34 of 115
Page 35

The response text ('Why hello, Arduino!') can be seen below:
© Adafruit Industries
https://learn.adafruit.com/introducing-the-adafruit-bluefruit-le-uart-
friend
Page 35 of 115
Page 36

© Adafruit Industries
https://learn.adafruit.com/introducing-the-adafruit-bluefruit-le-uart-
friend
Page 36 of 115
Page 37

HIDKeyboard
The HIDKeyboard example shows you how you can use the built-in HID keyboard AT commands to send keyboard data to any BLE-enabled
Android or iOS phone, or other device that supports BLE HID peripherals.
Opening the Sketch
To open the ATCommand sketch, click on the File > Examples > Adafruit_BluefruitLE_nRF51 folder in the Arduino IDE and select
hidkeyboard:
This will open up a new instance of the example in the IDE, as shown below:
Configuration
Check the Configuration! page earlier to set up the sketch for Software/Hardware UART or Software/Hardware SPI. The default is hardware SPI
If using software or hardware Serial UART:
© Adafruit Industries
https://learn.adafruit.com/introducing-the-adafruit-bluefruit-le-uart-
friend
Page 37 of 115
Page 38

This tutorial does not need to use the MODE pin, make sure you have the mode switch in CMD mode!
Don't forget to also connect the CTS pin on the Bluefruit to ground if you are not using it! (The Flora has this already done)
Running the Sketch
Once you upload the sketch to your board (via the arrow-shaped upload icon), and the upload process has finished, open up the Serial Monitor
via Tools > Serial Monitor, and make sure that the baud rate in the lower right-hand corner is set to 115200:
To send keyboard data, type anything into the textbox at the top of the Serial Monitor and click the Send button.
Bonding the HID Keyboard
Before you can use the HID keyboard, you will need to 'bond' it to your phone or PC. The bonding process establishes a permanent connection
between the two devices, meaning that as soon as your phone or PC sees the Bluefruit LE module again it will automatically connect.
The exact procedures for bonding the keyboard will varying from one platform to another.
When you no longer need a bond, or wish to bond the Bluefruit LE module to another device, be sure to delete the bonding information on the
phone or PC, otherwise you may not be able to connect on a new device!
© Adafruit Industries
https://learn.adafruit.com/introducing-the-adafruit-bluefruit-le-uart-
friend
Page 38 of 115
Page 39

Android
To bond the keyboard on a Bluetooth Low Energy enabled Android device, go to the Settings application and click the Bluetooth icon.
These screenshots are based on Android 5.0 running on a Nexus 7 2013. The exact appearance may vary depending on your device and OS
version.
Inside the Bluetooth setting panel you should see the Bluefruit LE module advertising itself as Bluefruit Keyboard under the 'Available devices'
list:
Tapping the device will start the bonding process, which should end with the Bluefruit Keyboard device being moved to a new 'Paired devices' list
with 'Connected' written underneath the device name:
To delete the bonding information, click the gear icon to the right of the device name and the click the Forget button:
© Adafruit Industries
https://learn.adafruit.com/introducing-the-adafruit-bluefruit-le-uart-
friend
Page 39 of 115
Page 40

iOS
To bond the keyboard on an iOS device, go to the Settings application on your phone, and click the Bluetooth menu item.
The keyboard should appear under the OTHER DEVICES list:
© Adafruit Industries
https://learn.adafruit.com/introducing-the-adafruit-bluefruit-le-uart-
friend
Page 40 of 115
Page 41

Once the bonding process is complete the device will be moved to the MY DEVICES category, and you can start to use the Bluefruit LE module as
a keyboard:
To unbond the device, click the 'info' icon and then select the Forget this Device option in the menu:
OS X
To bond the keyboard on an OS X device, go to the Bluetooth Preferences window and click the Pair button beside the Bluefruit Keyboard
device generated by this example sketch:
© Adafruit Industries
https://learn.adafruit.com/introducing-the-adafruit-bluefruit-le-uart-
friend
Page 41 of 115
Page 42

To unbond the device once it has been paired, click the small 'x' icon beside Bluefruit Keyboard:
... and then click the Remove button when the confirmation dialogue box pops up:
© Adafruit Industries
https://learn.adafruit.com/introducing-the-adafruit-bluefruit-le-uart-
friend
Page 42 of 115
Page 43

Controller
The Controller sketch allows you to turn your BLE-enabled iOS or Android device in a hand-held controller or an external data source, taking
advantage of the wealth of sensors on your phone or tablet.
You can take accelerometer or quaternion data from your phone, and push it out to your Arduino via BLE, or get the latest GPS co-ordinates for
your device without having to purchase (or power!) any external HW.
Opening the Sketch
To open the Controller sketch, click on the File > Examples > Adafruit_BluefruitLE_nRF51 folder in the Arduino IDE and select controller:
This will open up a new instance of the example in the IDE, as shown below:
Configuration
Check the Configuration! page earlier to set up the sketch for Software/Hardware UART or Software/Hardware SPI. The default is hardware SPI
© Adafruit Industries
https://learn.adafruit.com/introducing-the-adafruit-bluefruit-le-uart-
friend
Page 43 of 115
Page 44
If using software or hardware Serial UART:
This tutorial will also be easier to use if you wire up the MODE pin, you can use any pin but our tutorial has pin 12 by default. You can change
this to any pin. If you do not set the MODE pin then make sure you have the mode switch in CMD mode
If you are using a Flora or otherwise don't want to wire up the Mode pin, set the BLUEFRUIT_UART_MODE_PIN to -1 in the configuration
tab so that the sketch will use the +++ method to switch between Command and Data mode!
Don't forget to also connect the CTS pin on the Bluefruit to ground if you are not using it! (The Flora has this already done)
Running the Sketch
Once you upload the sketch to your board (via the arrow-shaped upload icon), and the upload process has finished, open up the Serial Monitor
via Tools > Serial Monitor, and make sure that the baud rate in the lower right-hand corner is set to 115200:
Using Bluefruit LE Connect in Controller Mode
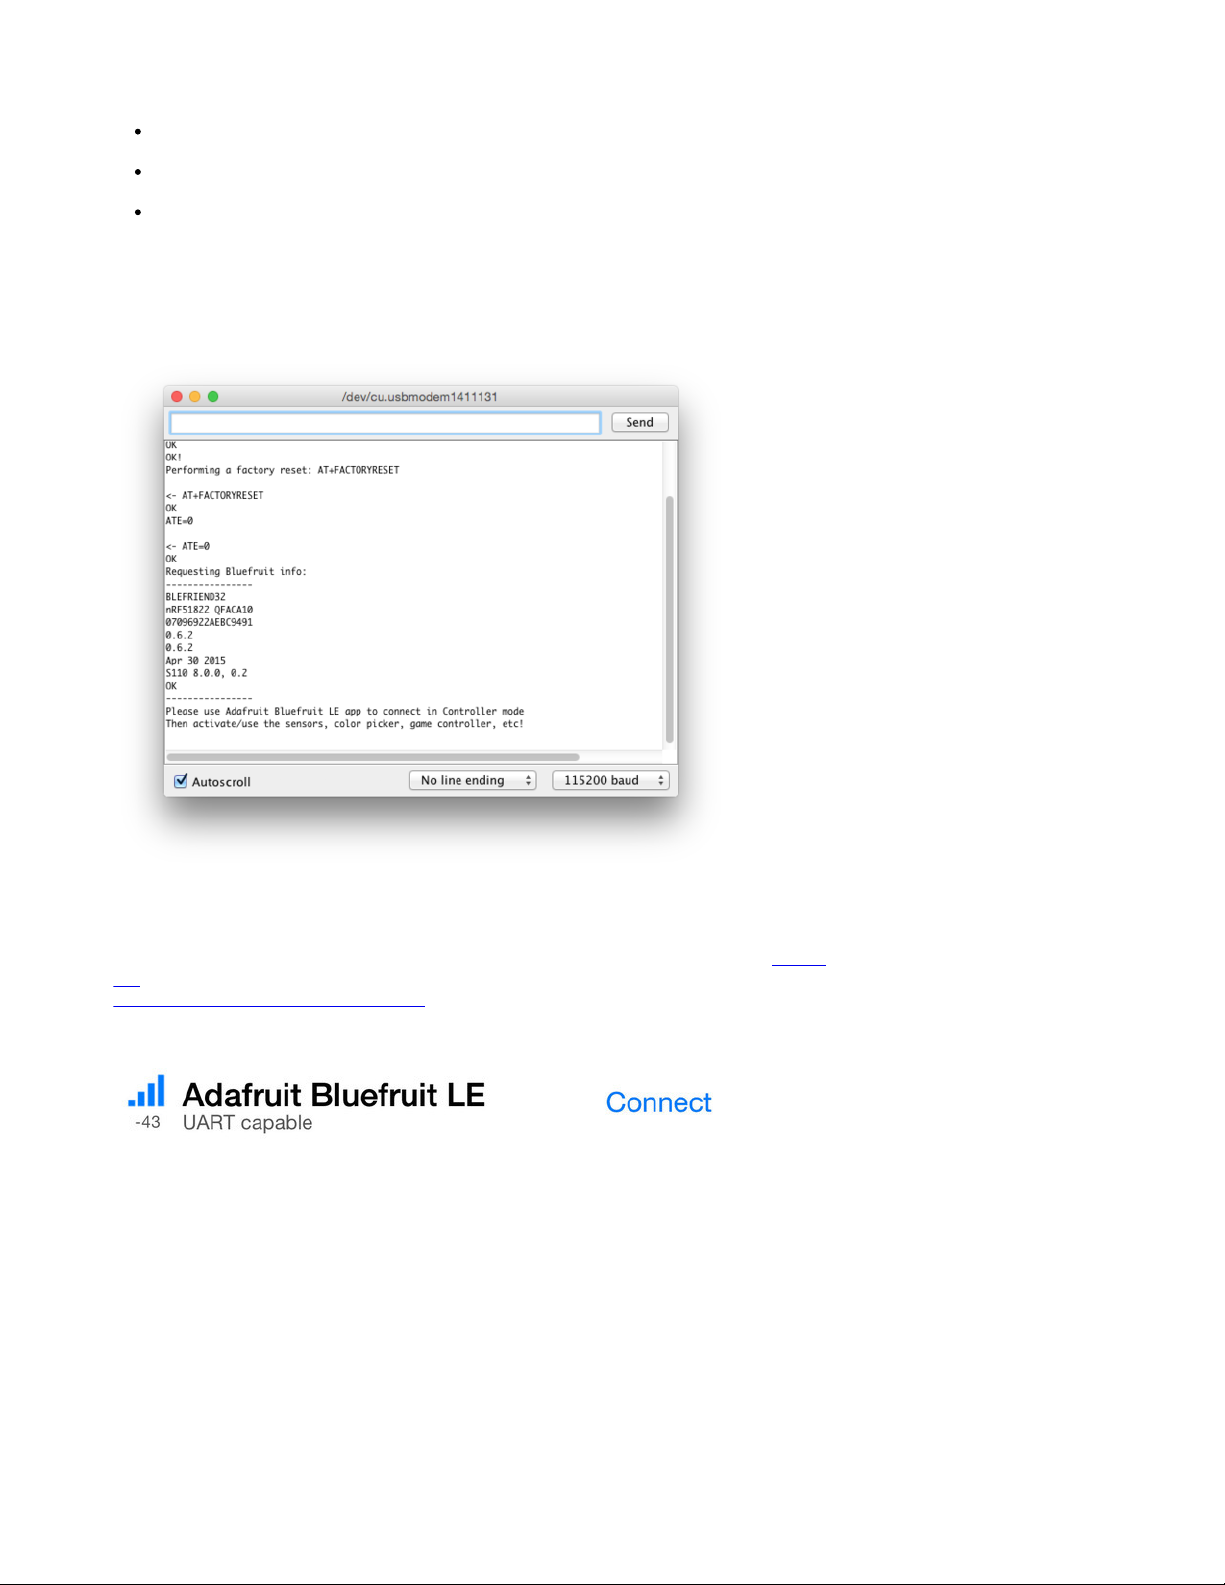
Once the sketch is running you can open Adafruit's Bluefruit LE Connect application (available for Android (http://adafru.it/f4G) or
iOS (http://adafru.it/f4H)) and use the Controller application to interact with the sketch. (If you're new to Bluefruit LE Connect, have a look at our
dedicated Bluefruit LE Connect learning guide (http://adafru.it/iCm).)
On the welcome screen, select the Adafruit Bluefruit LE device from the list of BLE devices in range:
Then from the activity list select Controller:
© Adafruit Industries
https://learn.adafruit.com/introducing-the-adafruit-bluefruit-le-uart-
friend
Page 44 of 115
Page 45

This will bring up a list of data points you can send from your phone or tablet to your Bluefruit LE module, by enabling or disabling the appropriate
sensor(s).
Streaming Sensor Data
You can take Quaternion (absolute orientation), Accelerometer, Gyroscope, Magnetometer or GPS Location data from your phone and send it
directly to your Arduino from the Controller activity.
By enabling the Accelerometer field, for example, you should see accelerometer data update in the app:
The data is parsed in the example sketch and output to the Serial Monitor as follows:
Accel 0.20 -0.51 -0.76
Accel 0.22 -0.50 -0.83
© Adafruit Industries
https://learn.adafruit.com/introducing-the-adafruit-bluefruit-le-uart-
friend
Page 45 of 115
Page 46

Accel 0.25 -0.51 -0.83
Accel 0.21 -0.47 -0.76
Accel 0.27 -0.48 -0.82
Note that even though we only print 2 decimal points, the values are received from the App as a full 4-byte floating point.
Control Pad Module
You can also use the Control Pad Module to capture button presses and releases by selecting the appropriate menu item:
This will bring up the Control Pad panel, shown below:
Button presses and releases will all be logged to the Serial Monitor with the ID of the button used:
Button 8 pressed
Button 8 released
Button 3 pressed
Button 3 released
© Adafruit Industries
https://learn.adafruit.com/introducing-the-adafruit-bluefruit-le-uart-
friend
Page 46 of 115
Page 47

Color Picker Module
You can also send RGB color data via the Color Picker module, which presents the following color selection dialogue:
This will give you Hexadecimal color data in the following format:
RGB #A42FFF
You can combine the color picker and controller sample sketches to make color-configurable animations triggered by buttons in the mobile app-very handy for wearables! Download this combined sample code (configured for Feather but easy to adapt to FLORA, BLE Micro, etc.) to get
started:
© Adafruit Industries
https://learn.adafruit.com/introducing-the-adafruit-bluefruit-le-uart-
friend
Page 47 of 115
Page 48

feather_bluefruit_neopixel_animation_controller.zip
http://adafru.it/kzF
© Adafruit Industries
https://learn.adafruit.com/introducing-the-adafruit-bluefruit-le-uart-
friend
Page 48 of 115
Page 49

HeartRateMonitor
The HeartRateMonitor example allows you to define a new GATT Service and associated GATT Characteristics, and update the characteristic
values using standard AT commands.
Opening the Sketch
To open the ATCommand sketch, click on the File > Examples > Adafruit_BluefruitLE_nRF51 folder in the Arduino IDE and select
heartratemonitor:
This will open up a new instance of the example in the IDE, as shown below:
Configuration
© Adafruit Industries
https://learn.adafruit.com/introducing-the-adafruit-bluefruit-le-uart-
friend
Page 49 of 115
Page 50

Check the Configuration! page earlier to set up the sketch for Software/Hardware UART or Software/Hardware SPI. The default is hardware SPI
If Using Hardware or Software UART
This tutorial does not need to use the MODE pin, make sure you have the mode switch in CMD mode if you do not configure & connect a
MODE pin
This demo uses some long data transfer strings, so we recommend defining and connecting both CTS and RTS to pins, even if you are using
hardware serial.
If you are using a Flora or just dont want to connect CTS or RTS, set the pin #define's to -1 and Don't forget to also connect the CTS pin on the
Bluefruit to ground! (The Flora has this already done)
If you are using RTS and CTS, you can remove this line below, which will slow down the data transmission
// this line is particularly required for Flora, but is a good idea
// anyways for the super long lines ahead!
ble.setInterCharWriteDelay(5); // 5 ms
Running the Sketch
Once you upload the sketch to your board (via the arrow-shaped upload icon), and the upload process has finished, open up the Serial Monitor
via Tools > Serial Monitor, and make sure that the baud rate in the lower right-hand corner is set to 115200:
© Adafruit Industries
https://learn.adafruit.com/introducing-the-adafruit-bluefruit-le-uart-
friend
Page 50 of 115
Page 51

If you open up an application on your mobile device or laptop that support the standard Heart Rate Monitor Service (http://adafru.it/f4I), you should
be able to see the heart rate being updated in sync with the changes seen in the Serial Monitor:
nRF Toolbox HRM Example
The image below is a screenshot from the free nRF Toolbox (http://adafru.it/e9M) application from Nordic on Android (also available on
iOS (http://adafru.it/f4J)), showing the incoming Heart Rate Monitor data:
© Adafruit Industries
https://learn.adafruit.com/introducing-the-adafruit-bluefruit-le-uart-
friend
Page 51 of 115
Page 52

CoreBluetooth HRM Example
The image below is from a freely available CoreBluetooth sample application (http://adafru.it/f4K) from Apple showing how to work with Bluetooth
Low Energy services and characteristics:
© Adafruit Industries
https://learn.adafruit.com/introducing-the-adafruit-bluefruit-le-uart-
friend
Page 52 of 115
Page 53

© Adafruit Industries
https://learn.adafruit.com/introducing-the-adafruit-bluefruit-le-uart-
friend
Page 53 of 115
Page 54
UriBeacon
The UriBeacon example shows you how to use the built-in UriBeacon AT commands to configure the Bluefruit LE module as a UriBeacon
advertiser, following Google's Physical Web UriBeacon (http://adafru.it/edk) specification.
Opening the Sketch
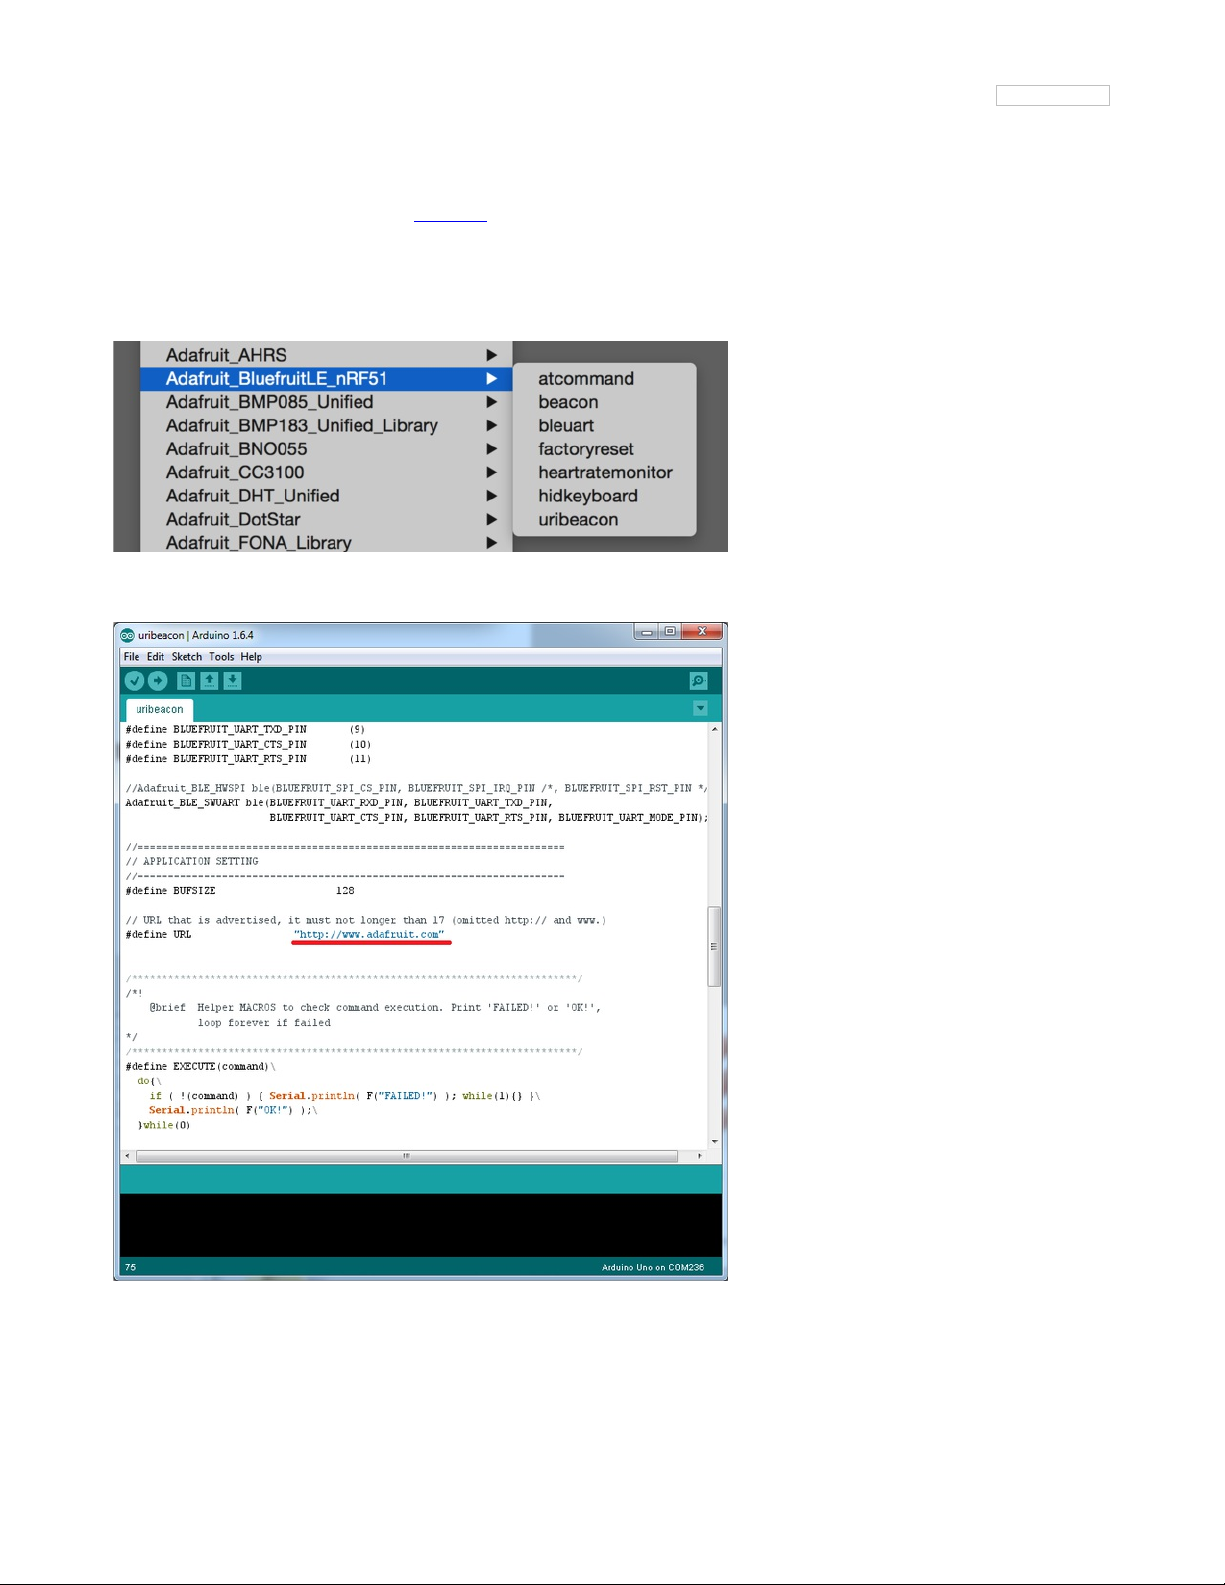
To open the ATCommand sketch, click on the File > Examples > Adafruit_BluefruitLE_nRF51 folder in the Arduino IDE and select uribeacon:
This will open up a new instance of the example in the IDE, as shown below. You can edit the URL that the beacon will point to, from the default
http://www.adafruit.com or just upload as is to test
Configuration
Check the Configuration! page earlier to set up the sketch for Software/Hardware UART or Software/Hardware SPI. The default is hardware SPI
If using software or hardware Serial UART:
© Adafruit Industries
https://learn.adafruit.com/introducing-the-adafruit-bluefruit-le-uart-
friend
Page 54 of 115
Page 55

This tutorial does not need to use the MODE pin, make sure you have the mode switch in CMD mode if you do not configure & connect a
MODE pin
Don't forget to also connect the CTS pin on the Bluefruit to ground if you are not using it! (The Flora has this already done)
Running the Sketch
Once you upload the sketch to your board (via the arrow-shaped upload icon), and the upload process has finished, open up the Serial Monitor
via Tools > Serial Monitor, and make sure that the baud rate in the lower right-hand corner is set to 115200:
At this point you can open the Physical Web Application for Android (http://adafru.it/edi) or for iOS (http://adafru.it/edj), and you should see a link
advertising Adafruit's website:
© Adafruit Industries
https://learn.adafruit.com/introducing-the-adafruit-bluefruit-le-uart-
friend
Page 55 of 115
Page 56

HALP!
When using the Bluefruit Micro or a Bluefruit LE with Flora/Due/Leonardo/Micro the examples dont run?
We add a special line to setup() to make it so the Arduino will halt until it sees you've connected over the Serial console. This makes debugging
great but makes it so you cannot run the program disconnected from a computer.
Solution? Once you are done debugging, remove these two lines from setup()
while (!Serial);
delay(500);
I can't seem to "Find" the Bluefruit LE!
Getting something like this?
For UART/Serial Bluefruits:
Check you have the MODE switch in CMD and the MODE pin not wired to anything if it isnt used!
If you are trying to control the MODE from your micro, make sure you set the MODE pin in the sketch
Make sure you have RXI and TXO wired right! They are often swapped by accident
Make sure CTS is tied to GND if you are using hardware serial and not using CTS
Check the MODE red LED, is it blinking? If its blinking continuously, you might be in DFU mode, power cycle the module!
If you are using Hardware Serial/Software Serial make sure you know which one and have that set up
If using SPI Bluefruit:
Make sure you have all 5 (or 6) wires connected properly.
If using hardware SPI, you need to make sure you're connected to the hardware SPI port, which differs depending on the main chipset.
If using Bluefruit Micro:
Make sure you change the RESET pin to #4 in any Config file. Also be sure you are using hardware SPI to connect!
© Adafruit Industries
https://learn.adafruit.com/introducing-the-adafruit-bluefruit-le-uart-
friend
Page 56 of 115
Page 57

Data Mode
By placing the BLEFriend module in 'UART Data' mode (set the mode selection switch to UART or setting the MODE pin to gound) you can use
the module as a 'tranparent UART connection' to the Bluefruit app. This makes data transfer super simple. Data is sent to the app when any 9600
baud data is received on the RXI pin and any data from the app is automatically transmitted via the TXO pin
In order to keep from overloading your microcontroller, you can use the flow control pins. Keep the CTS pin high until you're ready for more data,
then ground it to let the Bluefruit module know you're ready for more data!
This mode uses hardware flow control! You must set the CTS pin to ground in order to enable the TXO pin, so if you're wondering why its not
sending data, check that CTS is being used right!
You can determine if you are in Data Mode by looking at the mode LED. It should blink two times followed by a three second pause, as shown
below:
You can then connect the the app in UART mode and send/receive data transparently
© Adafruit Industries
https://learn.adafruit.com/introducing-the-adafruit-bluefruit-le-uart-
friend
Page 57 of 115
Page 58

Switching Command/Data Mode via +++
On either side of the connection (via the Arduino Uno or in your mobile app), you can dynamically switch between command and data mode by
sending the "+++\n" string, as detailed in the +++ command summary (http://adafru.it/iCN).
If you start in data mode, you can send text for example, with "+++\nATI\n+++\n", which will cause the Bluefruit LE module to switch to command
mode, execute the ATI command, and then switch back to data mode.
The +++ command can be sent from either side, making it possible to execute commands from the mobile application as well as on the Bluefruit LE
side.
# Start in Data Mode
© Adafruit Industries
https://learn.adafruit.com/introducing-the-adafruit-bluefruit-le-uart-
friend
Page 58 of 115
Page 59

> Hello, World! Data mode!
# Send command to switch modes
> +++
# Bluefruit LE module switches to CMD mode
# Send ATI command and wait for the response
> ATI
< BLEFRIEND
< nRF51822 QFAAG00
< B122AAC33F3D2296
< 0.6.2
< 0.6.2
< May 01 2015
< OK
# Switch back to DATA mode
> +++
< OK
# We're back in data mode now
Welcome back!
© Adafruit Industries
https://learn.adafruit.com/introducing-the-adafruit-bluefruit-le-uart-
friend
Page 59 of 115
Page 60

Command Mode
By placing the BLEFriend module in 'Command' mode (set the mode selection switch to CMD or setting the MODE pin to a high voltage) you can
enter a variety of Hayes AT style commands to configure the device or retrieve basic information about the module of BLE connection.
In order to keep from overloading your microcontroller, you can use the flow control pins. Keep the CTS pin high until you're ready for more data,
then ground it to let the Bluefruit module know you're ready for more data!
This mode uses hardware flow control! You must set the CTS pin to ground in order to enable the TXO pin, so if you're wondering why its not
responding to commands, check that CTS is being used right!
You can determine if you are in Command Mode by looking at the mode LED. It should blink three times followed by a three second pause, as
shown below:
Hayes/AT Commands
When operating in command mode, the Bluefruit LE Pro modules use a Hayes AT-style command set (http://adafru.it/ebJ)to configure the device.
The advantage of an AT style command set is that it's easy to use in machine to machine communication, while still being somewhat user friendly
for humans.
Test Command Mode '=?'
'Test' mode is used to check whether or not the specified command exists on the system or not.
Certain firmware versions or configurations may or may not include a specific command, and you can determine if the command is present by
taking the command name and appending '=?' to it, as shown below
AT+BLESTARTADV=?
If the command is present, the device will reply with 'OK'. If the command is not present, the device will reply with 'ERROR'.
AT+BLESTARTADV=?
OK\r\n
AT+MISSINGCMD=?
ERROR\r\n
Write Command Mode '=xxx'
'Write' mode is used to assign specific value(s) to the command, such as changing the radio's transmit power level using the command we used
above.
To write a value to the command, simple append an '=' sign to the command followed by any paramater(s) you wish to write (other than a lone '?'
character which will be interpretted as tet mode):
AT+BLEPOWERLEVEL=-8
If the write was successful, you will generally get an 'OK' response on a new line, as shown below:
AT+BLEPOWERLEVEL=-8
OK\r\n
If there was a problem with the command (such as an invalid parameter) you will get an 'ERROR' response on a new line, as shown below:
AT+BLEPOWERLEVEL=3
ERROR\r\n
Note: This particular error was generated because '3' is not a valid value for the AT+BLEPOWERLEVEL command. Entering '-4', '0' or '4' would
© Adafruit Industries
https://learn.adafruit.com/introducing-the-adafruit-bluefruit-le-uart-
friend
Page 60 of 115
Page 61

succeed since these are all valid values for this command.
Execute Mode
'Execute' mode will cause the specific command to 'run', if possible, and will be used when the command name is entered with no additional
parameters.
AT+FACTORYRESET
You might use execute mode to perform a factory reset, for example, by executing the AT+FACTORYRESET command as follows:
AT+FACTORYRESET
OK\r\n
NOTE: Many commands that are means to be read will perform the same action whether they are sent to the command parser in 'execute' or
'read' mode. For example, the following commands will produce identical results:
AT+BLEGETPOWERLEVEL
-4\r\n
OK\r\n
AT+BLEGETPOWERLEVEL?
-4\r\n
OK\r\n
If the command doesn't support execute mode, the response will normally be 'ERROR' on a new line.
Read Command Mode '?'
'Read' mode is used to read the current value of a command.
Not every command supports read mode, but you generally use this to retrieve information like the current transmit power level for the radio by
appending a '?' to the command, as shown below:
AT+BLEPOWERLEVEL?
If the command doesn't support read mode or if there was a problem with the request, you will normally get an 'ERROR' response.
If the command read was successful, you will normally get the read results followed by 'OK' on a new line, as shown below:
AT+BLEPOWERLEVEL?
-4\r\n
OK\r\n
Note: For simple commands, 'Read' mode and 'Execute' mode behave identically.
Dynamically Switching Modes via +++
When operating in Command Mode you can dynamically switch to Data Mode (and back again) in software via the +++
command (http://adafru.it/iCN). See the full command description for details.
© Adafruit Industries
https://learn.adafruit.com/introducing-the-adafruit-bluefruit-le-uart-
friend
Page 61 of 115
Page 62

Standard AT
The following standard Hayes/AT commands are available on Bluefruit LE modules:
AT
Acts as a ping to check if we are in command mode. If we are in command mode, we should receive the 'OK' response.
Codebase Revision: 0.3.0
Parameters: None
Output: None
AT
OK
ATI
Displays basic information about the Bluefruit module.
Codebase Revision: 0.3.0
Parameters: None
Output: Displays the following values:
Board Name
Microcontroller/Radio SoC Name
Unique Serial Number
Core Bluefruit Codebase Revision
Project Firmware Revision
Firmware Build Date
Softdevice, Softdevice Version, Bootloader Version (0.5.0+)
ATI
BLEFRIEND
nRF51822 QFAAG00
FB462DF92A2C8656
0.5.0
0.5.0
Feb 24 2015
S110 7.1.0, 0.0
OK
Updates:
Version 0.4.7+ of the firmware adds the chip revision after the chip name if it can be detected (ex. 'nRF51822 QFAAG00').
Version 0.5.0+ of the firmware adds a new 7th record containing the softdevice, softdevice version and bootloader version (ex. 'S110 7.1.0,
0.0').
ATZ
Performs a system reset.
Codebase Revision: 0.3.0
Parameters: None
Output: None
ATZ
OK
ATE
© Adafruit Industries
https://learn.adafruit.com/introducing-the-adafruit-bluefruit-le-uart-
friend
Page 62 of 115
Page 63

Enables or disables echo of input characters with the AT parser
Codebase Revision: 0.3.0
Parameters: '1' = enable echo, '0' = disable echo
Output: None
# Disable echo support
ATE=0
OK
#Enable echo support
ATE=1
OK
+++
Dynamically switches between DATA and COMMAND mode without changing the physical CMD/UART select switch.
When you are in COMMAND mode, entering '+++\n' or '+++\r\n' will cause the module to switch to DATA mode, and anything typed into the
console will go direct to the BLUE UART service.
To switch from DATA mode back to COMMAND mode, simply enter '+++\n' or '+++\r\n' again (be sure to include the new line character!), and a
new 'OK' response will be displayed letting you know that you are back in COMMAND mode (see the two 'OK' entries in the sample code below).
Codebase Revision: 0.4.7
Parameters: None
Output: None
Note that +++ can also be used on the mobile device to send and receive AT command on iOS or Android, though this should always be used with
care.
See the AT+MODESWITCHEN command to control the availability of the +++ command
ATI
BLEFRIEND
nRF51822 QFAAG00
B122AAC33F3D2296
0.4.6
0.4.6
Dec 22 2014
OK
+++
OK
OK
© Adafruit Industries
https://learn.adafruit.com/introducing-the-adafruit-bluefruit-le-uart-
friend
Page 63 of 115
Page 64

General Purpose
The following general purpose commands are available on all Bluefruit LE modules:
AT+FACTORYRESET
Clears any user config data from non-volatile memory and performs a factory reset before resetting the Bluefruit module.
Codebase Revision: 0.3.0
Parameters: None
Output: None
AT+FACTORYRESET
OK
As of version 0.5.0+ of the firmware, you can perform a factory reset by holding the DFU button down for 10s until the blue CONNECTED LED
lights up, and then releasing the button.
AT+DFU
Forces the module into DFU mode, allowing over the air firmware updates using a dedicated DFU app on iOS or Android.
Codebase Revision: 0.3.0
Parameters: None
Output: None
The AT parser will no longer responsd after the AT+DFU command is entered, since normal program execution effectively halts and a full system
reset is performed to start the bootloader code
AT+DFU
OK
AT+HELP
Displays a comma-separated list of all AT parser commands available on the system.
Codebase Version: 0.3.0
Parameters: None
Output: A comma-separated list of all AT parser commands available on the system.
The sample code below may not match future firmware releases and is provided for illustration purposes only
AT+HELP
AT+FACTORYRESET,AT+DFU,ATZ,ATI,ATE,AT+DBGMEMRD,AT+DBGNVMRD,AT+HWLEDPOLARITY,AT+HWLED,AT+HWGETDIETEMP,AT+HWMODEPINPOLARITY,AT+HWMODEPIN,AT+HWGPIOMODE,AT+HWGPIO,AT+HWI2CSCAN,AT+HWADC,AT+HWVBAT,AT+HWPWM,AT+HWPWRDN,AT+BLEPOWERLEVEL,AT+BLEGETADDRTYPE,AT+BLEGETADDR,AT+BLEBEACON,AT+BLEGETRSSI,AT+GAPGETCONN,AT+GAPDISCONNECT,AT+GAPDEVNAME,AT+GAPDELBONDS,AT+GAPINTERVALS,AT+GAPSTARTADV,AT+GAPSTOPADV,AT+GAPAUTOADV,AT+GAPSETADVDATA,AT+BLEUARTTX,AT+BLEUARTRX,AT+GATTADDSERVICE,AT+GATTADDCHAR,AT+GATTCHAR,AT+GATTLIST,AT+GATTCLEAR,AT+HELP
OK
AT+NVMWRITE
Writes data to the 256 byte user non-volatile memory (NVM) region.
Codebase Version: 0.7.0
Parameters:
offset: The numeric offset for the first byte from the starting position in the user NVM
datatype: Which can be one of STRING (1), BYTEARRAY (2) or INTEGER (3)
data: The data to write to NVM memory (the exact payload format will change based on the specified datatype).
Output: Nothing
# Write 32768 as an integer starting at byte 16 in user NVM
© Adafruit Industries
https://learn.adafruit.com/introducing-the-adafruit-bluefruit-le-uart-
friend
Page 64 of 115
Page 65

AT+NVMWRITE=16,INTEGER,32768
OK
AT+NVMREAD
Reads data from the 256 byte user non-volatile memory (NVM) region.
Codebase Version: 0.7.0
Parameters:
offset: The numeric offset for the first byte from the starting position in the user NVM
size: The number of bytes to read
datatype: The type used for the data being read, which is required to properly parse the data and display it as a response. The value can be
one of STRING (1), BYTEARRAY (2) or INTEGER (3)
Output: The data read back, formatted based on the datatype argument.
# Read an integer back from position 16 in user NVM
AT+NVMREAD=16, 4, INTEGER
32768
OK
AT+MODESWITCHEN
Enables or disables mode switches via the '+++' command on the BLE peripheral of BLE UART side of the connection.
Codebase Version: 0.7.1
Parameters:
location: This can be a string, either 'local' or 'ble' indicating which side should have the '+++' command enabled or disabled, 'local' being
the Bluefruit peripheral and 'ble' being the phone or tablet.
state: '0' to disable '+++' mode switches, '1' to enable them.
Output: None
By default, '+++' is enabled locally, and disabled in BLE
# Disable reomte '+++' mode switches
AT+MODESWITCHEN=ble,0
OK
© Adafruit Industries
https://learn.adafruit.com/introducing-the-adafruit-bluefruit-le-uart-
friend
Page 65 of 115
Page 66

Hardware
The following commands allow you to interact with the low level HW on the Bluefruit LE module, such as reading or toggling the GPIO pins,
performing an ADC conversion ,etc.:
AT+BAUDRATE
Changes the baud rate used by the HW UART peripheral on the nRF51822.
Codebase Revision: 0.7.0
Parameters: Baud rate, which must be one of the following values:
1200
2400
4800
9600
14400
19200
28800
38400
57600
76800
115200
230400
250000
460800
921600
1000000
Output: The current baud rate
# Set the baud rate to 115200
AT+BAUDRATE=115200
OK
# Check the current baud rate
AT+BAUDRATE
115200
OK
AT+HWADC
Performs an ADC conversion on the specified ADC pin
Codebase Revision: 0.3.0
Parameters: The ADC channel (0..7)
Output: The results of the ADC conversion
AT+HWADC=0
178
OK
AT+HWGETDIETEMP
Gets the temperature in degree celcius of the BLE module's die. This can be used for debug purposes (higher die temperature generally means
higher current consumption), but does not corresponds to ambient temperature and can nto be used as a replacement for a normal temperature
sensor.
Codebase Revision: 0.3.0
Parameters: None
Output: The die temperature in degrees celcius
© Adafruit Industries
https://learn.adafruit.com/introducing-the-adafruit-bluefruit-le-uart-
friend
Page 66 of 115
Page 67

AT+HWGETDIETEMP
32.25
OK
AT+HWGPIO
Gets or sets the value of the specified GPIO pin (depending on the pin's mode).
Codebase Revision: 0.3.0
Parameters: The parameters for this command change depending on the pin mode.
OUTPUT MODE: The following comma-separated parameters can be used when updating a pin that is set as an output:
Pin numbers
Pin state, where:
0 = clear the pin (logic low/GND)
1 = set the pin (logic high/VCC)
INPUT MODE: To read the current state of an input pin or a pin that has been configured as an output, enter the pin number as a single
parameter.
Output: The pin state if you are reading an input or checking the state of an input pin (meaning only 1 parameter is supplied, the pin number),
where:
0 means the pin is logic low/GND
1 means the pin is logic high/VCC
Trying to set the value of a pin that has not been configured as an output will produce an 'ERROR' response.
Some pins are reserved for specific functions on Bluefruit modules and can not be used as GPIO. If you try to make use of a reserved pin number
an 'ERROR' response will be generated.
# Set pin 14 HIGH
AT+HWGPIO=14,1
OK
# Set pin 14 LOW
AT+HWGPIO=14,0
OK
# Read the current state of pin 14
AT+HWGPIO=14
0
OK
# Try to update a pin that is not set as an output
AT+HWGPIOMODE=14,0
OK
AT+HWGPIO=14,1
ERROR
AT+HWGPIOMODE
This will set the mode for the specified GPIO pin (input, output, etc.).
Codebase Revision: 0.3.0
Parameters: This command one or two values (comma-separated in the case of two parameters being used):
The pin number
The new GPIO mode, where:
0 = Input
1 = Output
2 = Input with pullup enabled
3 = Input with pulldown enabled
Output: If a single parameters is passed (the GPIO pin number) the current pin mode will be returned.
Some pins are reserved for specific functions on Bluefruit modules and can not be used as GPIO. If you try to make use of a reserved pin number
an 'ERROR' response will be generated.
# Configure pin 14 as an output
AT+HWGPIOMODE=14,0
© Adafruit Industries
https://learn.adafruit.com/introducing-the-adafruit-bluefruit-le-uart-
friend
Page 67 of 115
Page 68

OK
# Get the current mode for pin 14
AT+HWPGIOMODE=14
0
OK
AT+HWI2CSCAN
Scans the I2C bus to try to detect any connected I2C devices, and returns the address of devices that were found during the scan process.
Codebase Revision: 0.3.0
Parameters: None
Output: A comma-separated list of any I2C address that were found while scanning the valid address range on the I2C bus, or nothing is no
devices were found.
# I2C scan with two devices detected
AT+HWI2CSCAN
0x23,0x35
OK
# I2C scan with no devices detected
AT+HWI2CSCAN
OK
AT+HWVBAT
Returns the main power supply voltage level in millivolts
Codebase Revision: 0.3.0
Parameters: None
Output: The VBAT level in millivolts
AT+HWVBAT
3248
OK
AT+HWRANDOM
Generates a random 32-bit number using the HW random number generator on the nRF51822 (based on white noise).
Codebase Revision: 0.4.7
Parameters: None
Output: A random 32-bit hexadecimal value (ex. '0x12345678')
AT+HWRANDOM
0x769ED823
OK
AT+HWMODELED
Allows you to override the default behaviour of the MODE led (which indicates the operating mode by default).
Codebase Revision: 0.6.6
Parameters: LED operating mode, which can be one of the following values:
disable or DISABLE or 0 - Disable the MODE LED entirely to save power
mode or MODE or 1 - Default behaviour, indicates the current operating mode
hwuart or HWUART or 2 - Toggles the LED on any activity on the HW UART bus (TX or RX)
bleuart or BLEUART or 3 - Toggles the LED on any activity on the BLE UART Service (TX or RX characteristic)
spi or SPI or 4 - Toggles the LED on any SPI activity
manual or MANUAL or 5 - Manually sets the state of the MODE LED via a second comma-separated parameter, which can be on, off,
or toggle.
© Adafruit Industries
https://learn.adafruit.com/introducing-the-adafruit-bluefruit-le-uart-
friend
Page 68 of 115
Page 69

Output: If run with no parameters, returns an upper-case string representing the current MODE LED operating mode from the fields above
# Get the curent MODE LED setting
AT+HWMODELED
MODE
OK
# Change the MODE LED to indicate BLE UART activity
AT+HWMODELED=BLEUART
OK
# Manually toggle the MODE LED
AT+HWMODELED=MANUAL,TOGGLE
OK
AT+UARTFLOW
Enables or disable hardware flow control (CTS + RTS) on the UART peripheral block of the nRF51822.
Codebase Revision: 0.7.0
Parameters: HW flow control state, which can be one of:
on
off
0
1
Output: If run with no parameters, returns a number representing whether flow control is enabled (1) or disabled (0).
# Check the current flow control state
AT+UARTFLOW
1
OK
# Disable HW flow control
AT+UARTFLOW=off
OK
© Adafruit Industries
https://learn.adafruit.com/introducing-the-adafruit-bluefruit-le-uart-
friend
Page 69 of 115
Page 70

Beacon
Adafruit's Bluefruit LE modules currently support the following 'Beacon' technologies:
Beacon (Apple) via AT+BLEBEACON
UriBeacon (Google) via AT+BLEURIBEACON (deprecated)
Eddystone (Google) via AT+EDDYSTONE*
Modules can be configured to act as 'Beacons' using the following commands:
AT+BLEBEACON
Codebase Revision: 0.3.0
Parameters: The following comma-separated parameters are required to enable beacon mode:
Bluetooth Manufacturer ID (uint16_t)
128-bit UUID
Major Value (uint16_t)
Minor Value (uint16_t)
RSSI @ 1m (int8_t)
Output: None
# Enable Apple iBeacon emulation
# Manufacturer ID = 0x004C
AT+BLEBEACON=0x004C,01-12-23-34-45-56-67-78-89-9A-AB-BC-CD-DE-EF-F0,0x0000,0x0000,-59
OK
# Reset to change the advertising data
ATZ
OK
# Enable Nordic Beacon emulation
# Manufacturer ID = 0x0059
AT+BLEBEACON=0x0059,01-12-23-34-45-56-67-78-89-9A-AB-BC-CD-DE-EF-F0,0x0000,0x0000,-59
OK
# Reset to change the advertising data
ATZ
OK
AT+BLEBEACON will cause the beacon data to be stored in non-volatile config memory on the Bluefruit LE module, and these values will be
persisted across system resets and power cycles. To remove or clear the beacon data you need to enter the 'AT+FACTORYRESET' command in
command mode.
Entering Nordic Beacon emulation using the sample code above, you can see the simulated beacon in Nordic's 'Beacon Config' tool below:
© Adafruit Industries
https://learn.adafruit.com/introducing-the-adafruit-bluefruit-le-uart-
friend
Page 70 of 115
Page 71

AT+BLEURIBEACON
Converts the specified URI into a UriBeacon (http://adafru.it/edk) advertising packet, and configures the module to advertise as a UriBeacon (part
of Google's Physical Web (http://adafru.it/ehZ) project).
To view the UriBeacon URIs you can use one of the following mobile applications:
Android 4.3+: Physical Web (http://adafru.it/edi) on the Google Play Store
iOS: Physical Web (http://adafru.it/edj) in Apple's App Store
Codebase Revision: 0.4.7
Parameters: The URI to encode (ex. http://www.adafruit.com/blog (http://adafru.it/ei0))
Output: None of a valid URI was entered (length is acceptable, etc.).
© Adafruit Industries
https://learn.adafruit.com/introducing-the-adafruit-bluefruit-le-uart-
friend
Page 71 of 115
Page 72

AT+BLEURIBEACON=http://www.adafruit.com/blog
OK
# Reset to change the advertising data
ATZ
OK
If the supplied URI is too long you will get the following output:
AT+BLEURIBEACON=http://www.adafruit.com/this/uri/is/too/long
URL is too long
ERROR
If the URI that you are trying to encode is too long, try using a shortening service like bit.ly, and encode the shortened URI.
UriBeacon should be considered deprecated as a standard, and EddyStone should be used for any future development. No further development
will happen in the Bluefruit LE firmware around UriBeacon.
Deprecated: AT+EDDYSTONEENABLE
This command will enable Eddystone (http://adafru.it/fSA) support on the Bluefruit LE module. Eddystone support must be enabled before the
other related commands can be used.
Codebase Revision: 0.6.6
Parameters: 1 or 0 (1 = enable, 0 = disable)
Output: The current state of Eddystone support if no parameters are provided (1 = enabled, 0 = disabled)
This command was removed in firmware 0.7.0 to avoid confusion. Use AT+EDDYSTONESERVICEEN in 0.7.0 and higher.
# Enable Eddystone support
AT+EDDYSTONEENABLE=1
OK
# Check the current Eddystone status on the module
AT+EDDYSTONEENABLE
1
OK
AT+EDDYSTONEURL
This command will set the URL for the Eddystone-URL (http://adafru.it/fSB) protocol.
Codebase Revision: 0.6.6
Parameters:
The URL to encode (mandatory)
An optional second parameter indicates whether to continue advertising the Eddystone URL even when the peripheral is connected to a
central device
Firmware 0.6.7 added an optional third parameter for the RSSI at 0 meters value. This should be measured by the end user by checking the
RSSI value on the receiving device at 1m and then adding 41 to that value (to compensate for the signal strength loss over 1m), so an RSSI
of -62 at 1m would mean that you should enter -21 as the RSSI at 0m. Default value is -18dBm.
Output: Firmware <= 0.6.6: none. With firmware >= 0.6.7 running this command with no parameters will return the current URL.
# Set the Eddystone URL to adafruit
AT+EDDYSTONEURL=http://www.adafruit.com
OK
# Set the Eddystone URL to adafruit and advertise it even when connected
AT+EDDYSTONEURL=http://www.adafruit.com,1
OK
AT+EDDYSTONECONFIGEN
This command causes the Bluefruit LE module to enable the Eddystone URL config service for the specified number of seconds.
This command should be used in combination with the Physical Web application from Google, available for Android (http://adafru.it/edi) or
iOS (http://adafru.it/edj). Run this command then select the 'Edit URL' option from the app to change the destination URL over the air.
Codebase Revision: 0.6.6
© Adafruit Industries
https://learn.adafruit.com/introducing-the-adafruit-bluefruit-le-uart-
friend
Page 72 of 115
Page 73

Parameters: The number of seconds to advertised the config service UUID
Output: None
# Start advertising the Eddystone config service for 5 minutes (300s)
AT+EDDYSTONECONFIGEN=300
OK
AT+EDDYSTONESERVICEEN
Adds or removes the Eddystone service from the GATT table (requires a reset to take effect).
Codebase Revision: 0.7.0
Parameters: Whether or not the Eddystone service should be enabled or not, using on of the following values:
on
off
1
0
Output: If the command is executed with no parameters it will disable a numeric value indicating whether the service is enabled (1) or disabled (0).
You must perform a system reset for this command to take effect.
# Enable Eddystone service
AT+EddyStonServiceEn=on
OK
AT+EddyStonServiceEn=1
OK
# Disable Eddystone service
AT+EddyStonServiceEn=off
OK
AT+EddyStonServiceEn=0
OK
AT+EDDYSTONEBROADCAST
This command can be used to start of stop advertising the Eddystone payload using the URL stored in non-volatile memory (NVM).
Codebase Revision: 0.7.0
Parameters: Whether or not the payload should be broadcast, using one of the following values:
on
off
1
0
Output: If executed with no parameters, the current broadcast state will be displayed as a numeric value.
# Enable broadcasting current setting of EddyStone (stored previously on nvm)
AT+EddyStoneBroadcast=on
OK
AT+EddyStoneBroadcast=1
OK
# Disable broadcasting current setting of EddyStone (still stored on nvm)
AT+EddyStoneBroadcast=off
OK
AT+EddyStoneBroadcast=0
OK
© Adafruit Industries
https://learn.adafruit.com/introducing-the-adafruit-bluefruit-le-uart-
friend
Page 73 of 115
Page 74

BLE Generic
The following general purpose BLE commands are available on Bluefruit LE modules:
AT+BLEPOWERLEVEL
Gets or sets the current transmit power level for the module's radio (higher transmit power equals better range, lower transmit power equals better
battery life).
Codebase Revision: 0.3.0
Parameters: The TX power level (in dBm), which can be one of the following values (from lowest to higher transmit power):
-40
-20
-16
-12
-8
-4
0
4
Output: The current transmit power level (in dBm)
The updated power level will take affect as soon as the command is entered. If the device isn't connected to another device, advertising will stop
momentarily and then restart once the new power level has taken affect.
# Get the current TX power level (in dBm)
AT+BLEPOWERLEVEL
0
OK
# Set the TX power level to 4dBm (maximum value)
AT+BLEPOWERLEVEL=4
OK
# Set the TX power level to -12dBm (better battery life)
AT+BLEPOWERLEVEL=-12
OK
# Set the TX power level to an invalid value
AT+BLEPOWERLEVEL=-3
ERROR
AT+BLEGETADDRTYPE
Gets the address type (for the 48-bit BLE device address).
Normally this will be '1' (random), which means that the module uses a 48-bit address that was randomly generated during the manufacturing
process and written to the die by the manufacturer.
Random does not mean that the device address is randomly generated every time, only that a one-time random number is used.
Codebase Revision: 0.3.0
Parameters: None
Output: The address type, which can be one of the following values:
0 = public
1 = random
AT+BLEGETADDRTYPE
1
OK
AT+BLEGETADDR
© Adafruit Industries
https://learn.adafruit.com/introducing-the-adafruit-bluefruit-le-uart-
friend
Page 74 of 115
Page 75

Gets the 48-bit BLE device address.
Codebase Revision: 0.3.0
Parameters: None
Output: The 48-bit BLE device address in the following format: 'AA:BB:CC:DD:EE:FF'
AT+BLEGETADDR
E4:C6:C7:31:95:11
OK
AT+BLEGETPEERADDR
Gets the 48-bit address of the peer (central) device we are connected to.
Codebase Revision: 0.6.5
Parameters: None
Output: The 48-bit address of the connected central device in hex format. The command will return ERROR if we are not connected to a central
device.
Please note that the address returned by the central device is almost always a random value that will change over time, and this value should
generally not be trusted. This command is provided for certain edge cases, but is not useful in most day to day scenarios.
AT+BLEGETPEERADDR
48:B2:26:E6:C1:1D
OK
AT+BLEGETRSSI
Gets the RSSI value (Received Signal Strength Indicator), which can be used to estimate the reliability of data transmission between two devices
(the lower the number the better).
Codebase Revision: 0.3.0
Parameters: None
Output: The RSSI level (in dBm) if we are connected to a device, otherwise '0'
# Connected to an external device
AT+BLEGETRSSI
-46
OK
# Not connected to an external device
AT+BLEGETRSSI
0
OK
© Adafruit Industries
https://learn.adafruit.com/introducing-the-adafruit-bluefruit-le-uart-
friend
Page 75 of 115
Page 76

BLE Services
The following commands allow you to interact with various GATT services present on Bluefruit LE modules when running in Command Mode.
AT+BLEUARTTX
This command will transmit the specified text message out via the UART Service (http://adafru.it/iCn) while you are running in Command Mode.
Codebase Revision: 0.3.0
Parameters: The message payload to transmit. The payload can be up to 240 characters (since AT command strings are limited to a maximum of
256 bytes total).
Output: This command will produce an ERROR message if you are not connected to a central device, or if the internal TX FIFO on the Bluefruit
LE module is full.
As of firmware release 0.6.2 and higher, AT+BLEUARTTX can accept a limited set of escape code sequences:
\r = carriage return
\n = new line
\t = tab
\b = backspace
\\ = backward slash
As of firmware release 0.6.7 and higher, AT+BLEUARTTX can accept the following escape code sequence since AT+BLEUARTTX=? has a
specific meaning to the AT parser:
\? = transmits a single question mark
As of firmware release 0.7.6 and higher, AT+BLEUARTTX can accept the following escape code sequence:
\+ = transmit a single '+' character without having to worry about `+++` mode switch combinations
You must be connected to another device for this command to execute
# Send a string when connected to another device
AT+BLEUARTTX=THIS IS A TEST
OK
# Send a string when not connected
AT+BLEUARTTX=THIS IS A TEST
ERROR
TX FIFO Buffer Handling
Starting with firmware version 0.6.7, when the TX FIFO buffer is full a 200ms blocking delay will be used to see if any free space becomes
available in the FIFO before returning ERROR. The exact process is detailed in the flow chart below:
© Adafruit Industries
https://learn.adafruit.com/introducing-the-adafruit-bluefruit-le-uart-
friend
Page 76 of 115
Page 77

Note: The TX FIFO full check will happen for each GATT transaction (of up to 20 bytes of data each), so large data transfers may have multiple
200ms wait states.
You can use the AT+BLEUARTFIFO=TX (http://adafru.it/id3) command to check the size of the TX FIFO before sending data to ensure that you
have enough free space available in the buffer.
The TX FIFO has the following size, depending on the firmware version used:
Firmware <=0.6.6: 160 characters wide
Firmware >=0.6.7: 1024 characters wide
It IS possible with large data transfers that part of the payload can be transmitted, and the command can still produce an ERROR if the FIFO
doesn't empty in time in the middle of the payload transfer (since data is transmitted in maximum 20 byte chunks). If you need to ensure reliable
data transfer, you should always check the TX FIFO size before sending data, which you can do using the AT+BLEUARTFIFO command. If not
enough space is available for the entire payload, add a SW delay until enough space is available. Any single AT+BLEUARTTX command can fit
into the FIFO, but multiple large instances of this command may cause the FIFO to fill up mid transfer.
AT+BLEUARTTXF
This is a convenience function the serves the same purpose as AT+BLEUARTTX, but data is immediately sent in a single BLE packet ('F' for force
packet). This command will accept a maximum of 20 characters, which is the limit of what can be send in a single packet.
Codebase Revision: 0.7.6
Parameters: See AT+BLEUARTTX
Output: See AT+BLEUARTTX
AT+BLEUARTRX
This command will dump the UART service (http://adafru.it/iCn)'s RX buffer to the display if any data has been received from from the UART
service while running in Command Mode. The data will be removed from the buffer once it is displayed using this command.
Any characters left in the buffer when switching back to Data Mode will cause the buffered characters to be displayed as soon as the mode switch
is complete (within the limits of available buffer space, which is 1024 bytes on current black 32KB SRAM devices, or 160 bytes for the blue first
generation BLEFriend board based on 16KB SRAM parts).
Codebase Revision: 0.3.0
Parameters: None
Output: The RX buffer's content if any data is available, otherwise nothing.
You can also use the AT+BLEUARTFIFO=RX command to check if any incoming data is available or not.
© Adafruit Industries
https://learn.adafruit.com/introducing-the-adafruit-bluefruit-le-uart-
friend
Page 77 of 115
Page 78

# Command results when data is available
AT+BLEUARTRX
Sent from Android
OK
# Command results when no data is available
AT+BLEUARTRX
OK
AT+BLEUARTFIFO
This command will return the free space available in the BLE UART TX and RX FIFOs. If you are transmitting large chunks of data, you may want
to check if you have enough free space in the TX FIFO before sending, keeping in mind that individual GATT packets can contain up to 20 user
bytes each.
Codebase Revision: 0.6.7
Parameters: Running this command with no parameters will return two comma-separated values indicating the free space in the TX buffer,
following by the RX buffer. To request a specific buffer, you can execute the command with either a "TX" or "RX" value (For example:
"AT+BLEUARTFIFO=TX").
Output: The free space remaining in the TX and RX FIFO buffer if no parameter is present, otherwise the free space remaining in the specified
FIFO buffer.
AT+BLEUARTFIFO
1024,1024
OK
AT+BLEUARTFIFO=TX
1024
OK
AT+BLEUARTFIFO=RX
1024
OK
AT+BLEKEYBOARDEN
This command will enable GATT over HID (GoH) keyboard support, which allows you to emulate a keyboard on supported iOS and Android
devices. By default HID keyboard support is disabled, so you need to set BLEKEYBOARDEN to 1 and then perform a system reset before the
keyboard will be enumerated and appear in the Bluetooth preferences on your phone, where if can be bonded as a BLE keyboard.
Codebase Revision: 0.5.0
Parameters: 1 or 0 (1 = enable, 0 = disable)
Output: None
As of firmware version 0.6.6 this command is now an alias for AT+BLEHIDEN
You must perform a system reset (ATZ) before the changes take effect!
Before you can use your HID over GATT keyboard, you will need to bond your mobile device with the Bluefruit LE module in the Bluetooth
preferences panel.
# Enable BLE keyboard support then reset
AT+BLEKEYBOARDEN=1
OK
ATZ
OK
# Disable BLE keyboard support then reset
AT+BLEKEYBOARDEN=0
OK
ATZ
OK
AT+BLEKEYBOARD
Sends text data over the BLE keyboard interface (if it has previously been enabled via AT+BLEKEYBOARDEN).
Any valid alpha-numeric character can be sent, and the following escape sequences are also supported:
\r - Carriage Return
© Adafruit Industries
https://learn.adafruit.com/introducing-the-adafruit-bluefruit-le-uart-
friend
Page 78 of 115
Page 79

\n - Line Feed
\b - Backspace
\t - Tab
\\ - Backslash
As of version 0.6.7 you can also use the following escape code when sending a single character ('AT+BLEKEYBOARD=?' has another meaning
for the AT parser):
\? - Question mark
Codebase Revision: 0.5.0
Parameters: The text string (optionally including escape characters) to transmit
Output: None
# Send a URI with a new line ending to execute in Chrome, etc.
AT+BLEKEYBOARD=http://www.adafruit.com\r\n
OK
# Send a single question mark (special use case, 0.6.7+)
AT+BLEKEYBOARD=\?
OK
AT+BLEKEYBOARDCODE
Sends a raw hex sequence of USB HID keycodes to the BLE keyboard interface including key modifiers and up to six alpha-numeric characters.
This command accepts the following ascii-encoded HEX payload, matching the way HID over GATT sends keyboard data:
Byte 0: Modifier
Byte 1: Reserved (should always be 00)
Bytes 2..7: Hexadecimal values for ASCII-encoded characters (if no character is used you can enter '00' or leave trailing characters empty)
After a keycode sequence is sent with the AT+BLEKEYBOARDCODE command, you must send a second AT+BLEKEYBOARDCODE
command with at least two 00 characters to indicate the keys were released!
Modifier Values
The modifier byte can have one or more of the following bits set:
Bit 0 (0x01): Left Control
Bit 1 (0x02): Left Shift
Bit 2 (0x04): Left Alt
Bit 3 (0x08): Left Window
Bit 4 (0x10): Right Control
Bit 5 (0x20): Right Shift
Bit 6 (0x40): Right Alt
Bit 7 (0x80): Right Window
Codebase Revision: 0.5.0
Parameters: A set of hexadecimal values separated by a hyphen ('-'). Note that these are HID scan code values, not standard ASCII values!
Output: None
HID key code values don't correspond to ASCII key codes! For example, 'a' has an HID keycode value of '04', and there is no keycode for an upper
case 'A' since you use the modifier to set upper case values. For details, google 'usb hid keyboard scan codes', and see the example below.
A list of HID keyboard codes can be found here (http://adafru.it/cQV) (see section 7).
# send 'abc' with shift key --> 'ABC'
AT+BLEKEYBOARDCODE=02-00-04-05-06-00-00
OK
# Indicate that the keys were released (mandatory!)
AT+BLEKEYBOARDCODE=00-00
OK
AT+BLEHIDEN
This command will enable GATT over HID (GoH) support, which allows you to emulate a keyboard, mouse or media controll on supported iOS,
© Adafruit Industries
https://learn.adafruit.com/introducing-the-adafruit-bluefruit-le-uart-
friend
Page 79 of 115
Page 80

Android, OSX and Windows 10 devices. By default HID support is disabled, so you need to set BLEHIDEN to 1 and then perform a system reset
before the HID devices will be enumerated and appear in on your central device.
Codebase Revision: 0.6.6
Parameters: 1 or 0 (1 = enable, 0 = disable)
Output: None
You normally need to 'bond' the Bluefruit LE peripheral to use the HID commands, and the exact bonding process will change from one operating
system to another.
If you have previously bonded to a device and need to clear the bond, you can run the AT+FACTORYRESET command which will erase all stored
bond data on the Bluefruit LE module.
# Enable GATT over HID support on the Bluefruit LE module
AT+BLEHIDEN=1
OK
# Reset so that the changes take effect
ATZ
OK
AT+BLEHIDMOUSEMOVE
Moves the HID mouse or scroll wheen position the specified number of ticks.
All parameters are signed 8-bit values (-128 to +127). Positive values move to the right or down, and origin is the top left corner.
Codebase Revision: 0.6.6
Parameters: X Ticks (+/-), Y Ticks (+/-), Scroll Wheel (+/-), Pan Wheel (+/-)
Output: None
# Move the mouse 100 ticks right and 100 ticks down
AT+BLEHIDMOUSEMOVE=100,100
OK
# Scroll down 20 pixels or lines (depending on context)
AT+BLEHIDMOUSEMOVE=,,20,
OK
# Pan (horizontal scroll) to the right (exact behaviour depends on OS)
AT+BLEHIDMOUSEMOVE=0,0,0,100
AT+BLEHIDMOUSEBUTTON
Manipulates the HID mouse buttons via the specific string(s).
Codebase Revision: 0.6.6
Parameters: Button Mask String [L][R][M][B][F], Action [PRESS][CLICK][DOUBLECLICK][HOLD]
L = Left Button
R = Right Button
M = Middle Button
B = Back Button
F = Forward Button
If the second parameter (Action) is "HOLD", an optional third parameter can be passed specifying how long the button should be held in
milliseconds.
Output: None
# Double click the left mouse button
AT+BLEHIDMOUSEBUTTON=L,doubleclick
OK
# Press the left mouse button down, move the mouse, then release L
# This is required to perform 'drag' then stop type operations
AT+BLEHIDMOUSEBUTTON=L
OK
AT+BLEHIDMOUSEMOVE=-100,50
OK
AT+BLEHIDMOUSEBUTTON=0
© Adafruit Industries
https://learn.adafruit.com/introducing-the-adafruit-bluefruit-le-uart-
friend
Page 80 of 115
Page 81

OK
# Hold the backward mouse button for 200 milliseconds (OS dependent)
AT+BLEHIDMOUSEBUTTON=B,hold,200
OK
AT+BLEHIDCONTROLKEY
Sends HID media control commands for the bonded device (adjust volume, screen brightness, song selection, etc.).
Codebase Revision: 0.6.6
Parameters: The HID control key to send, followed by an optional delay in ms to hold the button
The control key string can be one of the following values:
System Controls (works on most systems)
BRIGHTNESS+
BRIGHTNESS-
Media Controls (works on most systems)
PLAYPAUSE
MEDIANEXT
MEDIAPREVIOUS
MEDIASTOP
Sound Controls (works on most systems)
VOLUME
MUTE
BASS
TREBLE
BASS_BOOST
VOLUME+
VOLUMEBASS+
BASSTREBLE+
TREBLE-
Application Launchers (Windows 10 only so far)
EMAILREADER
CALCULATOR
FILEBROWSER
Browser/File Explorer Controls (Firefox on Windows/Android only)
SEARCH
HOME
BACK
FORWARD
STOP
REFRESH
BOOKMARKS
You can also send a raw 16-bit hexadecimal value in the '0xABCD' format. A full list of 16-bit 'HID Consumer Control Key Codes' can be found
here (http://adafru.it/cQV)(see section 12).
Output: Normally none.
If you are not bonded and connected to a central device, this command will return ERROR. Make sure you are connected and HID support is
enabled before running these commands.
# Toggle the sound on the bonded central device
AT+BLEHIDCONTROLKEY=MUTE
OK
# Hold the VOLUME+ key for 500ms
AT+BLEHIDCONTROLKEY=VOLUME+,500
OK
# Send a raw 16-bit Consumer Key Code (0x006F = Brightness+)
AT+BLEHIDCONTROLKEY=0x006F
OK
AT+BLEHIDGAMEPADEN
© Adafruit Industries
https://learn.adafruit.com/introducing-the-adafruit-bluefruit-le-uart-
friend
Page 81 of 115
Page 82

Enables HID gamepad support in the HID service. By default the gamepad is disabled as of version 0.7.6 of the firmware since it causes problems
on iOS and OS X and should only be used on Android and Windows based devices.
Codebase Revision: 0.7.6
Parameters: Whether the gamepad service should be enabled via one of the following values:
on
off
1
0
Output: If executed with no parameters, a numeric value will be returned indicating whether the battery service is enabled (1) or disabled (0).
This command requires a system reset to take effect.
AT+BLEHIDGAMEPAD
Sends a specific HID gamepad payload out over BLE
Codebase Revision: 0.7.0
Parameters: The following comma-separated parameters are available:
x: LEFT, RIGHT: If X=-1 then 'LEFT' is pressed, if X=1 then 'RIGHT' is pressed, if X=0 then neither left nor right are pressed
y: UP, DOWN: If Y=-1 then 'UP' is pressed, if Y=1 then 'DOWN' is pressed, if Y=0 then neither up nor down are pressed
buttons: 0x00-0xFF, which is a bit mask for 8 button 0-7
Output: Nothing
HID gamepad is disabled by default as of version 0.7.6, and must first be enabled via AT+BLEHIDGAMEPADEN=1 before it can be used.
Note: You need to send both 'press' and 'release' events for each button, otherwise the system will think that the button is still pressed until a
release state is received.
# Press 'RIGHT' and 'Button0' at the same time
AT+BLEHIDGAMEPAD=1,0,0x01
# Press 'UP' and 'Button1' + 'Button0' at the same time
AT+BLEHIDGAMEPAD=0,-1,0x03
AT+BLEMIDIEN
Enables or disables the BLE MIDI service.
Codebase Revision: 0.7.0
Parameters: State, which can be one of:
on
off
0
1
Output: If executed with no parameters, it will return the current state of the MIDI service as an integer indicating if it is enabled (1) or disabled (0).
Note: This command will require a reset to take effect.
# Check the current state of the MIDI service
AT+BLEMIDIEN
1
OK
# Enable the MIDI Service
AT+BLEMIDIEN=1
OK
AT+BLEMIDIRX
Reads an incoming MIDI character array from the buffer.
Codebase Revision: 0.7.0
© Adafruit Industries
https://learn.adafruit.com/introducing-the-adafruit-bluefruit-le-uart-
friend
Page 82 of 115
Page 83

Parameters: None
Output: The midi event in byte array format
AT+BLEMIDIRX
90-3C-7F
OK
AT+BLEMIDITX
Sends a MIDI event to host.
Codebase Revision: 0.7.0
Parameters: The MIDI event in hex array format, which can be either:
A series of full MIDI events (up to 4 events)
Exactly 1 full MIDI event + several running events without status (up to 7)
Output: None
# Send 1 event (middle C with max velocity)
AT+BLEMIDITX=90-3C-7F
OK
# Send 2 events
AT+BLEMIDITX=90-3C-7F-A0-3C-7F
OK
# Send 1 full event + running event
AT+BLEMIDITX=90-3C-7F-3C-7F
OK
AT+BLEBATTEN
Enables the Battery Service following the definition from the Bluetooth SIG.
Codebase Revision: 0.7.0
Parameters: Whether the battery service should be enabled, via on of the following values:
on
off
1
0
Output: If executed with no parameters, a numeric value will be returned indicating whether the battery service is enabled (1) or disabled (0).
This command requires a system reset to take effect.
# Enable the Battery Service
AT+BLEBATTEN=1
OK
AT+BLEBATTVAL
Sets the current battery level in percentage (0..100) for the Battery Service (if enabled).
Codebase Revision: 0.7.0
Parameters: The percentage for the battery in the range of 0..100.
Output: If executed with no parameters, the current battery level stored in the characteristic.
# Set the battery level to 72%
AT+BLEBATTVAL=72
OK
© Adafruit Industries
https://learn.adafruit.com/introducing-the-adafruit-bluefruit-le-uart-
friend
Page 83 of 115
Page 84

BLE GAP
GAP (http://adafru.it/iCo), which stands for the Generic Access Profile, governs advertising and connections with Bluetooth Low Energy devices.
The following commands can be used to configure the GAP settings on the BLE module.
You can use these commands to modify the advertising data (for ex. the device name that appears during the advertising process), to retrieve
information about the connection that has been established between two devices, or the disconnect if you no longer wish to maintain a connection.
AT+GAPCONNECTABLE
This command can be used to prevent the device from being 'connectable'.
Codebase Revision: 0.7.0
Parameters: Whether or not the device should advertise itself as connectable, using one of the following values:
yes
no
1
0
Output: The 'connectable' state of the device if no parameter is provided
# Make the device non-connectable (advertising only)
AT+GAPCONNECTABLE=0
OK
# Check the current connectability status
AT+GAPCONNECTABLE
1
OK
AT+GAPGETCONN
Diplays the current connection status (if we are connected to another BLE device or not).
Codebase Revision: 0.3.0
Parameters: None
Output: 1 if we are connected, otherwise 0
# Connected
AT+GAPGETCONN
1
OK
# Not connected
AT+GAPGETCONN
0
OK
AT+GAPDISCONNECT
Disconnects to the external device if we are currently connected.
Codebase Revision: 0.3.0
Parameters: None
Output: None
AT+GAPDISCONNECT
OK
AT+GAPDEVNAME
© Adafruit Industries
https://learn.adafruit.com/introducing-the-adafruit-bluefruit-le-uart-
friend
Page 84 of 115
Page 85

Gets or sets the device name, which is included in the advertising payload for the Bluefruit LE module
Codebase Revision: 0.3.0
Parameters:
None to read the current device name
The new device name if you want to change the value
Output: The device name if the command is executed in read mode
Updating the device name will persist the new value to non-volatile memory, and the updated name will be used when the device is reset. To reset
the device to factory settings and clean the config data from memory run the AT+FACTORYRESET command.
# Read the current device name
AT+GAPDEVNAME
UART
OK
# Update the device name to 'BLEFriend'
AT+GAPDEVNAME=BLEFriend
OK
# Reset to take effect
ATZ
OK
AT+GAPDELBONDS
Deletes and bonding information stored on the Bluefruit LE module.
Codebase Revision: 0.3.0
Parameters: None
Output: None
AT+GAPDELBONDS
OK
AT+GAPINTERVALS
Gets or sets the various advertising and connection intervals for the Bluefruit LE module.
Be extremely careful with this command since it can be easy to cause problems changing the intervals, and depending on the values selected
some mobile devices may no longer recognize the module or refuse to connect to it.
Codebase Revision: 0.3.0
Parameters: If updating the GAP intervals, the following comma-separated values can be entered:
Minimum connection interval (in milliseconds)
Maximum connection interval (in milliseconds)
Fast Advertising interval (in milliseconds)
Fast Advertising timeout (in seconds)
>= 0.7.0: Low power advertising interval (in milliseconds), default = 417.5 ms
To save power, the Bluefruit modules automatically drop to a lower advertising rate after 'fast advertising timeout' seconds. The default value is 30
seconds ('Fast Advertising Timeout'). The low power advertising interval is hard-coded to approximately 0.6s in firmware < 0.7.0. Support to
control the low power interval was added in the 0.7.0 firmware release via an optional fifth parameter.
Please note the following min and max limitations for the GAP parameters:
Absolute minimum connection interval: 10ms
Absolute maximum connection interval: 4000ms
Absolute minimum fast advertising interval: 20ms
Absolute maximum fast advertisting interval: 10240ms
Absolute minimum low power advertising interval: 20ms
Absolute maximum low power advertising interval: 10240ms
If you only wish to update one interval value, leave the other comma-separated values empty (ex. ',,110,' will only update the third value,
advertising interval).
© Adafruit Industries
https://learn.adafruit.com/introducing-the-adafruit-bluefruit-le-uart-
friend
Page 85 of 115
Page 86

Output: If reading the current GAP interval settings, the following comma-separated information will be displayed:
Minimum connection interval (in milliseconds)
Maximum connection interval (in milliseconds)
Advertising interval (in milliseconds)
Advertising timeout (in milliseconds)
Updating the GAP intervals will persist the new values to non-volatile memory, and the updated values will be used when the device is reset. To
reset the device to factory settings and clean the config data from memory run the AT+FACTORYRESET command.
# Read the current GAP intervals
AT+GAPINTERVALS
20,100,100,30
# Update all values
AT+GAPINTERVALS=20,200,200,30
OK
# Update only the advertising interval
AT+GAPINTERVALS=,,150,
OK
AT+GAPSTARTADV
Causes the Bluefruit LE module to start transmitting advertising packets if this isn't already the case (assuming we aren't already connected to an
external device).
Codebase Revision: 0.3.0
Parameters: None
Output: None
# Command results when advertising data is not being sent
AT+GAPSTARTADV
OK
# Command results when we are already advertising
AT+GAPSTARTADV
ERROR
# Command results when we are connected to another device
AT+GAPSTARTADV
ERROR
AT+GAPSTOPADV
Stops advertising packets from being transmitted by the Bluefruit LE module.
Codebase Revision: 0.3.0
Parameters: None
Output: None
AT+GAPSTOPADV
OK
AT+GAPSETADVDATA
Sets the raw advertising data payload to the specified byte array (overriding the normal advertising data), following the guidelines in the Bluetooth
4.0 or 4.1 Core Specification (http://adafru.it/ddd).
In particular, Core Specification Supplement (CSS) v4 contains the details on common advertising data fields like 'Flags' (Part A, Section 1.3)
and the various Service UUID lists (Part A, Section 1.1). A list of all possible GAP Data Types is available on the Bluetooth SIG's Generic Access
Profile (http://adafru.it/cYs) page.
The Advertising Data payload consists of Generic Access Profile (http://adafru.it/cYs) data that is inserted into the advertising packet in the
following format: [U8:LEN] [U8:Data Type Value] [n:Value]
WARNING: This command requires a degree of knowledge about the low level details of the Bluetooth 4.0 or 4.1 Core Specification, and should
only be used by expert users. Misuse of this command can easily cause your device to be undetectable by central devices in radio range.
© Adafruit Industries
https://learn.adafruit.com/introducing-the-adafruit-bluefruit-le-uart-
friend
Page 86 of 115
Page 87

WARNING: This command will override the normal advertising payload and may prevent some services from acting as expected.
To restore the advertising data to the normal default values use the AT+FACTORYRESET command.
For example, to insert the 'Flags' Data Type (Data Type Value 0x01), and set the value to 0x06/0b00000110 (BR/EDR Not Supported and LE
General Discoverable Mode) we would use the following byte array:
02-01-06
0x02 indicates the number of bytes in the entry
0x01 is the 'Data Type Value (http://adafru.it/cYs)' and indicates that this is a 'Flag'
0x06 (0b00000110) is the Flag value, and asserts the following fields (see Core Specification 4.0, Volume 3, Part C, 18.1):
LE General Discoverable Mode (i.e. anyone can discover this device)
BR/EDR Not Supported (i.e. this is a Bluetooth Low Energy only device)
If we also want to include two 16-bit service UUIDs in the advertising data (so that listening devices know that we support these services) we could
append the following data to the byte array:
05-02-0D-18-0A-18
0x05 indicates that the number of bytes in the entry (5)
0x02 is the 'Data Type Value (http://adafru.it/cYs)' and indicates that this is an 'Incomplete List of 16-bit Service Class UUIDs'
0x0D 0x18 is the first 16-bit UUID (which translates to 0x180D, corresponding to the Heart Rate Service (http://adafru.it/ddB)).
0x0A 0x18 is another 16-bit UUID (which translates to 0x180A, corresponding to the Device Information Service (http://adafru.it/ecj)).
Including the service UUIDs is important since some mobile applications will only work with devices that advertise a specific service UUID in the
advertising packet. This is true for most apps from Nordic Semiconductors, for example.
Codebase Revision: 0.3.0
Parameters: The raw byte array that should be inserted into the advertising data section of the advertising packet, being careful to stay within the
space limits defined by the Bluetooth Core Specification.
Response: None
# Advertise as Discoverable and BLE only with 16-bit UUIDs 0x180D and 0x180A
AT+GAPSETADVDATA=02-01-06-05-02-0d-18-0a-18
OK
The results of this command can be seen in the screenshot below, taken from a sniffer analyzing the advertising packets in Wireshark. The
advertising data payload is higlighted in blue in the raw byte array at the bottom of the image, and the packet analysis is in the upper section:
© Adafruit Industries
https://learn.adafruit.com/introducing-the-adafruit-bluefruit-le-uart-
friend
Page 87 of 115
Page 88

BLE GATT
GATT (http://adafru.it/iCp), which standards for the Generic ATTribute Profile, governs data organization and data exchanges between connected
devices. One device (the peripheral) acts as a GATT Server, which stores data in Attribute records, and the second device in the connection (the
central) acts as a GATT Client, requesting data from the server whenever necessary.
The following commands can be used to create custom GATT services and characteristics on the BLEFriend, which are used to store and
exchange data.
Please note that any characteristics that you define here will automatically be saved to non-volatile FLASH config memory on the device and reinitialised the next time the device starts.
You need to perform a system reset via 'ATZ' before most of the commands below will take effect!
GATT Limitations
The commands below have the following limitations due to SRAM and resource availability, which should be kept in mind when creating or
working with customer GATT services and characteristics.
These values apply to firmware 0.7.0 and higher:
Maximum number of services: 10
Maximum number of characteristics: 30
Maximum buffer size for each characteristic: 32 bytes
Maximum number of CCCDs: 16
If you want to clear any previous config value, enter the 'AT+FACTORYRESET' command before working on a new peripheral configuration.
AT+GATTCLEAR
Clears any custom GATT services and characteristics that have been defined on the device.
Codebase Revision: 0.3.0
Parameters: None
Response: None
AT+GATTCLEAR
OK
AT+GATTADDSERVICE
Adds a new custom service definition to the device.
Codebase Revision: 0.3.0
Parameters: This command accepts a set of comma-separated key-value pairs that are used to define the service properties. The following key-
value pairs can be used:
UUID: The 16-bit UUID to use for this service. 16-bit values should be in hexadecimal format (0x1234).
UUID128: The 128-bit UUID to use for this service. 128-bit values should be in the following format: 00-11-22-33-44-55-66-77-88-99-AA-BB-
CC-DD-EE-FF
Response: The index value of the service in the custom GATT service lookup table. (It's important to keep track of these index values to work with
the service later.)
Note: Key values are not case-sensitive
Only one UUID type can be entered for the service (either UUID or UUID128)
# Clear any previous custom services/characteristics
AT+GATTCLEAR
OK
# Add a battery service (UUID = 0x180F) to the peripheral
AT+GATTADDSERVICE=UUID=0x180F
© Adafruit Industries
https://learn.adafruit.com/introducing-the-adafruit-bluefruit-le-uart-
friend
Page 88 of 115
Page 89

1
OK
# Add a battery measurement characteristic (UUID = 0x2A19), notify enabled
AT+GATTADDCHAR=UUID=0x2A19,PROPERTIES=0x10,MIN_LEN=1,VALUE=100
1
OK
# Clear any previous custom services/characteristics
AT+GATTCLEAR
OK
# Add a custom service to the peripheral
AT+GATTADDSERVICE=UUID128=00-11-00-11-44-55-66-77-88-99-AA-BB-CC-DD-EE-FF
1
OK
# Add a custom characteristic to the above service (making sure that there
# is no conflict between the 16-bit UUID and bytes 3+4 of the 128-bit service UUID)
AT+GATTADDCHAR=UUID=0x0002,PROPERTIES=0x02,MIN_LEN=1,VALUE=100
1
OK
AT+GATTADDCHAR
Adds a custom characteristic to the last service that was added to the peripheral (via AT+GATTADDSERVICE).
AT+GATTADDCHAR must be run AFTER AT+GATTADDSERVICE, and will add the new characteristic to the last service definition that was
added.
As of version 0.6.6 of the Bluefruit LE firmware you can now use custom 128-bit UUIDs with this command. See the example at the bottom of this
command description.
Codebase Revision: 0.3.0
Parameters: This command accepts a set of comma-separated key-value pairs that are used to define the characteristic properties. The following
key-value pais can be used:
UUID: The 16-bit UUID to use for the characteristic (which will be insert in the 3rd and 4th bytes of the parent services 128-bit UUID). This
value should be entered in hexadecimal format (ex. 'UUID=0x1234'). This value must be unique, and should not conflict with bytes 3+4 of the
parent service's 128-bit UUID.
PROPERTIES: The 8-bit characteristic properties field, as defined by the Bluetooth SIG. The following values can be used:
0x02 - Read
0x04 - Write Without Response
0x08 - Write
0x10 - Notify
0x20 - Indicate
MIN_LEN: The minimum size of the values for this characteristic (in bytes, min = 1, max = 20, default = 1)
MAX_LEN: The maximum size of the values for the characteristic (in bytes, min = 1, max = 20, default = 1)
VALUE: The initial value to assign to this characteristic (within the limits of 'MIN_LEN' and 'MAX_LEN'). Value can be an integer ("-100",
"27"), a hexadecimal value ("0xABCD"), a byte array ("aa-bb-cc-dd") or a string ("GATT!").
>=0.7.0 - DATATYPE: This argument indicates the data type stored in the characteristic, and is used to help parse data properly. It can be
one of the following values:
AUTO (0, default)
STRING (1)
BYTEARRAY (2)
INTEGER (3)
>=0.7.0 - DESCRIPTION: Adds the specified string as the characteristic description entry
>=0.7.0 - PRESENTATION: Adds the specified value as the characteristic presentation format entry
Response: The index value of the characteristic in the custom GATT characteristic lookup table. (It's important to keep track of these
characteristic index values to work with the characteristic later.)
Note: Key values are not case-sensitive
Make sure that the 16-bit UUID is unique and does not conflict with bytes 3+4 of the 128-bit service UUID
# Clear any previous custom services/characteristics
AT+GATTCLEAR
OK
# Add a battery service (UUID = 0x180F) to the peripheral
AT+GATTADDSERVICE=UUID=0x180F
1
OK
© Adafruit Industries
https://learn.adafruit.com/introducing-the-adafruit-bluefruit-le-uart-
friend
Page 89 of 115
Page 90

# Add a battery measurement characteristic (UUID = 0x2A19), notify enabled
AT+GATTADDCHAR=UUID=0x2A19,PROPERTIES=0x10,MIN_LEN=1,VALUE=100
1
OK
# Clear any previous custom services/characteristics
AT+GATTCLEAR
OK
# Add a custom service to the peripheral
AT+GATTADDSERVICE=UUID128=00-11-00-11-44-55-66-77-88-99-AA-BB-CC-DD-EE-FF
1
OK
# Add a custom characteristic to the above service (making sure that there
# is no conflict between the 16-bit UUID and bytes 3+4 of the 128-bit service UUID)
AT+GATTADDCHAR=UUID=0x0002,PROPERTIES=0x02,MIN_LEN=1,VALUE=100
1
OK
Version 0.6.6 of the Bluefruit LE firmware added the ability to use a new 'UUID128' flag to add custom 128-bit UUIDs that aren't related to the
parent service UUID (which is used when passing the 16-bit 'UUID' flag).
To specify a 128-bit UUID for your customer characteristic, enter a value resembling the following syntax:
# Add a custom characteristic to the above service using a
# custom 128-bit UUID
AT+GATTADDCHAR=UUID128=00-11-22-33-44-55-66-77-88-99-AA-BB-CC-DD-EE-FF,PROPERTIES=0x02,MIN_LEN=1,VALUE=100
1
OK
Version 0.7.0 of the Bluefruit LE firmware added the new DESCRIPTION and PRESENTATION keywoards, corresponding the the GATT
Characteristic User Description (http://adafru.it/oIA) and the GATT Characteristic Presentation Format (http://adafru.it/oIB) Descriptors.
The DESCRIPTION field is a string that contains a short text description of the characteristic. Some apps may not display this data, but it should
be visible using something like the Master Control Panel application from Nordic on iOS and Android.
The PRESENTATION field contains a 7-byte payload that encapsulates the characteristic presentation format data. It requires a specific set of
bytes and values to work properly. See the following link for details on how to format the
payload: https://developer.bluetooth.org/gatt/descriptors/Pages/DescriptorViewer.aspx?
u=org.bluetooth.descriptor.gatt.characteristic_presentation_format.xml (http://adafru.it/oIB)
The following example shows how you might use both of these new fields:
AT+GATTADDCHAR=UUID=0x2A37, PROPERTIES=0x10, MIN_LEN=2, MAX_LEN=3, VALUE=00-40,
DESCRIPTION=HRM Measurement, PRESENTATION=17-00-AC-27-01-00-00
For the Characteristic Presentation Format we have:
Format = IEEE-11073 32-bit FLOAT (Decimal 23, Hex 0x17)
Exponent = 0/None
Unit = Thermodynamic temperature: Degrees Fahrenheit (0x27AC) - Bluetooth LE Unit List (http://adafru.it/oID)
Namespace = Bluetooth SIG Assigned Number (0x01)
Description = None (0x0000)
The results from Nordic's Master Control Panel app can be seen below:
AT+GATTCHAR
© Adafruit Industries
https://learn.adafruit.com/introducing-the-adafruit-bluefruit-le-uart-
friend
Page 90 of 115
Page 91

Gets or sets the value of the specified custom GATT characteristic (based on the index ID returned when the characteristic was added to the
system via AT+GATTADDCHAR).
Codebase Revision: 0.3.0
Parameters: This function takes one or two comma-separated functions (one parameter = read, two parameters = write).
The first parameter is the characteristic index value, as returned from the AT+GATTADDCHAR function. This parameter is always required,
and if no second parameter is entered the current value of this characteristic will be returned.
The second (optional) parameter is the new value to assign to this characteristic (within the MIN_SIZE and MAX_SIZE limits defined when
creating it).
Response: If the command is used in read mode (only the characteristic index is provided as a value), the response will display the current value
of the characteristics. If the command is used in write mode (two comma-separated values are provided), the characteristics will be updated to
use the provided value.
# Clear any previous custom services/characteristics
AT+GATTCLEAR
OK
# Add a battery service (UUID = 0x180F) to the peripheral
AT+GATTADDSERVICE=UUID=0x180F
1
OK
# Add a battery measurement characteristic (UUID = 0x2A19), notify enabled
AT+GATTADDCHAR=UUID=0x2A19,PROPERTIES=0x10,MIN_LEN=1,VALUE=100
1
OK
# Read the battery measurement characteristic (index ID = 1)
AT+GATTCHAR=1
0x64
OK
# Update the battery measurement characteristic to 32 (hex 0x20)
AT+GATTCHAR=1,32
OK
# Verify the previous write attempt
AT+GATTCHAR=1
0x20
OK
AT+GATTLIST
Lists all custom GATT services and characteristics that have been defined on the device.
Codebase Revision: 0.3.0
Parameters: None
Response: A list of all custom services and characteristics defined on the device.
# Clear any previous custom services/characteristics
AT+GATTCLEAR
OK
# Add a battery service (UUID = 0x180F) to the peripheral
AT+GATTADDSERVICE=UUID=0x180F
1
OK
# Add a battery measurement characteristic (UUID = 0x2A19), notify enabled
AT+GATTADDCHAR=UUID=0x2A19,PROPERTIES=0x10,MIN_LEN=1,VALUE=100
1
OK
# Add a custom service to the peripheral
AT+GATTADDSERVICE=UUID128=00-11-00-11-44-55-66-77-88-99-AA-BB-CC-DD-EE-FF
2
OK
# Add a custom characteristic to the above service (making sure that there
# is no conflict between the 16-bit UUID and bytes 3+4 of the 128-bit service UUID)
AT+GATTADDCHAR=UUID=0x0002,PROPERTIES=0x02,MIN_LEN=1,VALUE=100
2
OK
© Adafruit Industries
https://learn.adafruit.com/introducing-the-adafruit-bluefruit-le-uart-
friend
Page 91 of 115
Page 92

# Get a list of all custom GATT services and characteristics on the device
AT+GATTLIST
ID=01,UUID=0x180F
ID=01,UUID=0x2A19,PROPERTIES=0x10,MIN_LEN=1,MAX_LEN=1,VALUE=0x64
ID=02,UUID=0x11, UUID128=00-11-00-11-44-55-66-77-88-99-AA-BB-CC-DD-EE-FF
ID=02,UUID=0x02,PROPERTIES=0x02,MIN_LEN=1,MAX_LEN=1,VALUE=0x64
OK
AT+GATTCHARRAW
This read only command reads binary (instead of ASCII) data from a characteristic. It is non-printable but has less overhead and is easier when
writing libraries in Arduino.
Codebase Revision: 0.7.0
Parameters: The numeric ID of the characteristic to display the data for
Output: Binary data corresponding to the specified characteristic.
Note: This is a specialized command and no NEWLINE is present at the end of the command!
© Adafruit Industries
https://learn.adafruit.com/introducing-the-adafruit-bluefruit-le-uart-
friend
Page 92 of 115
Page 93

Debug
The following debug commands are available on Bluefruit LE modules:
Use these commands with care since they can easily lead to a HardFault error on the ARM core, which will cause the device to stop responding.
AT+DBGMEMRD
Displays the raw memory contents at the specified address.
Codebase Revision: 0.3.0
Parameters: The following comma-separated parameters can be used with this command:
The starting address to read memory from (in hexadecimal form, with or without the leading '0x')
The word size (can be 1, 2, 4 or 8)
The number of words to read
Output: The raw memory contents in hexadecimal format using the specified length and word size (see examples below for details)
# Read 12 1-byte values starting at 0x10000009
AT+DBGMEMRD=0x10000009,1,12
FF FF FF FF FF FF FF 00 04 00 00 00
OK
# Try to read 2 4-byte values starting at 0x10000000
AT+DBGMEMRD=0x10000000,4,2
55AA55AA 55AA55AA
OK
# Try to read 2 4-byte values starting at 0x10000009
# This will fail because the Cortex M0 can't perform misaligned
# reads, and any non 8-bit values must start on an even address
AT+DBGMEMRD=0x10000009,4,2
MISALIGNED ACCESS
ERROR
AT+DBGNVMRD
Displays the raw contents of the config data section of non-volatile memory
Codebase Revision: 0.3.0
Properties: None
Output: The raw config data from non-volatile memory
AT+DBGNVMRD
FE CA 38 05 00 03 00 00 01 12 01 00 55 41 52 54 00 00 00 00 00 00 00 00 00 00 00 00 00 00 00 00 00 00 00 00 00 00 00 00 00 00 00 00 14 00 64 00 64 00 1E 00 00 00 00 00 00 00 00 00 00 00 00 00 00 00 00 00 00 00 00 00 00 00 00 00 00 00 00 00 00 00 00 00 00 00 00 00 00 00 00 00 00 00 00 00 00 00 00 00 00 00 00 00 00 00 00 00 01 00 00 00 00 00 00 00 00 00 00 00 00 00 00 00 00 00 00 00 00 00 00 00 00 00 00 00 00 00 00 00 00 00 00 00 00 00 00 00 00 00 00 00 00 00 00 00 00 00 00 00 00 00 00 00 00 00 00 00 00 00 00 00 00 00 00 00 00 00 00 00 00 00 00 00 00 00 00 00 00 00 00 00 00 00 00 00 00 00 00 00 00 00 00 00 00 00 00 00 00 00 00 00 00 00 00 00 00 00 00 00 00 00 00 00 00 00 00 00 00 00 00 00 00 00 00 00 00 00 00 00 00 00 00 00 00 00 00 00 00 00 00 00 00 00 00 00 00 00 00 00 00 00 00 00 00 00 00 00 00 00 00 00 00 00 00 00 00 00 00 00 00 00 00 00 00 00 00 00 00 00 00 00 00 00 00 00 00 00 00 00 00 00 00 00 00 00 00 00 00 00 00 00 00 00 00 00 00 00 00 00 00 00 00 00 00 00 00 00 00 00 00 00 00 00 00 00 00 00 00 00 00 00 00 00 00 00 00 00 00 00 00 00 00 00 00 00 00 00 00 00 00 00 00 00 00 00 00 00 00 00 00 00 00 00 00 00 00 00 00 00 00 00 00 00 00 00 00 00 00 00 00 00 00 00 00 00 00 00 00 00 00 00 00 00 00 00 00 00 00 00 00 00 00 00 00 00 00 00 00 00 00 00 00 00 00 00 00 00 00 00 00 00 00 00 00 00 00 00 00 00 00 00 00 00 00 00 00 00 00 00 00 00 00 00 00 00 00 00 00 00 00 00 00 00 00 00 00 00 00 00 00 00 00 00 00 00 00 00 00 00 00 00 00 00 00 00 00 00 00 00 00 00 00 00 00 00 00 00 00 00 00 00 00 00 00 00 00 00 00 00 00 00 00 00 00 00 00 00 00 00 00 00 00 00 00 00 00 00 00 00 00 00 00 00 00 00 00 00 00 00 00 00 00 00 00 00 00 00 00 00 00 00 00 00 00 00 00 00 00 00 00 00 00 00 00 00 00 00 00 00 00 00 00 00 00 00 00 00 00 00 00 00 00 00 00 00 00 00 00 00 00 00 00 00 00 00 00 00 00 00 00 00 00 00 00 00 00 00 00 00 00 00 00 00 00 00 00 00 00 00 00 00 00 00 00 00 00 00 00 00 00 00 00 00 00 00 00 00 00 00 00 00 00 00 00 00 00 00 00 00 00 00 00 00 00 00 00 00 00 00 00 00 00 00 00 00 00 00 00 00 00 00 00 00 00 00 00 00 00 00 00 00 00 00 00 00 00 00 00 00 00 00 00 00 00 00 00 00 00 00 00 00 00 00 00 00 00 00 00 00 00 00 00 00 00 00 00 00 00 00 00 00 00 00 00 00 00 00 00 00 00 00 00 00 00 00 00 00 00 00 00 00 00 00 00 00 00 00 00 00 00 00 00 00 00 00 00 00 00 00 00 00 00 00 00 00 00 00 00 00 00 00 00 00 00 00 00 00 00 00 00 00 00 00 00 00 00 00 00 00 00 00 00 00 00 00 00 00 00 00 00 00 00 00 00 00 00 00 00 00 00 00 00 00 00 00 00 00 00 00 00 00 00 00 00 00 00 00 00 00 00 00 00 00 00 00 00 00 00 00 00 00 00 00 00 00 00 00 00 00 00 00 00 00 00 00 00 00 00 00 00 00 00 00 00 00 00 00 00 00 00 00 00 00 00 00 00 00 00 00 00 00 00 00 00 00 00 00 00 00 00 00 00 00 00 00 00 00 00 00 00 00 00 00 00 00 00 00 00 00 00 00 00 00 00 00 00 00 00 00 00 00 00 00 00 00 00 00 00 00 00 00 00 00 00 00 00 00 00 00 00 00 00 00 00 00 00 00 00 00 00 00 00 00 00 00 00 00 00 00 00 00 00 00 00 00 00 00 00 00 00 00 00 00 00 00 00 00 00 00 00 00 00 00 00 00 00 00 00 00 00 00 00 00 00 00 00 00 00 00 00 00 00 00 00 00 00 00 00 00 00 00 00 00 00 00 00 00 00 00 00 00 00 00 00 00 00 00 00 00 00 00 00 00 00 00 00 00 00 00 00 00 00 00 00 00 00 00 00 00 00 00 00 00 00 00 00 00 00 00 00 00 00 00 00 00 00 00 00 00 00 00 00 00 00 00 00 00 00 00 00 00 00 00 00 00 00 00 00 00 00 00 00 00 00 00 00 00 00 00 00 00 00 00 00 00 00 00 00 00 00 00 00 00 00 00 00 00 00 00 00 00 00 00 00 00 00 00 00 00 00 00 00 00 00 00 00 00 00 00 00 00 00 00 00 00 00 00 00 00 00 00 00 00 00 00 00 00 00 00 00 00 00 00 00 00 00 00 00 00 00 00 00 00 00 00 00 00 00 00 00 00 00 00 00 00 00 00 00 00 00 00 00 00 00 00 00 00 00 00 00 00 00 00 00 00 00 00 00 00 00 00 00 00 00 00 00 00 00 00 00 00 00 00 00 00 00 00 00 00 00 00 00 00 00 00 00 00 00 00 00 00 00 00 00 00 00 00 00 00 00 00 00 00 00 00 00 00 00 00 00 00 00 00 00 00 00 00 00 00 00 00 00 00 00 00 00 00 00 00 00 00 00 00 00 00 00 00 00 00 00 00 00 00 00 00 00 00 00 00 00 00 00 00 00 00 00 00 00 00 00 00 00 00 00 00 00 00 00 00 00 00 00 00 00 00 00 00 00 00 00 00 BA FF 00 00
OK
AT+DBGSTACKSIZE
Returns the current stack size, to help detect stack overflow or detect stack memory usage when optimising memory usage on the system.
Codebase Revision: 0.4.7
Parameters: None
Output: The current size of stack memory in bytes
AT+DBGSTACKSIZE
1032
OK
AT+DBGSTACKDUMP
© Adafruit Industries
https://learn.adafruit.com/introducing-the-adafruit-bluefruit-le-uart-
friend
Page 93 of 115
Page 94

Dumps the current stack contents. Unused sections of stack memory are filled with '0xCAFEFOOD' to help determine where stack usage stops.
This command is purely for debug and development purposes.
Codebase Revision: 0.4.7
Parameters: None
Output: The memory contents of the entire stack region
AT+DBGSTACKDUMP
0x20003800: CAFEF00D CAFEF00D CAFEF00D CAFEF00D
0x20003810: CAFEF00D CAFEF00D CAFEF00D CAFEF00D
0x20003820: CAFEF00D CAFEF00D CAFEF00D CAFEF00D
0x20003830: CAFEF00D CAFEF00D CAFEF00D CAFEF00D
0x20003840: CAFEF00D CAFEF00D CAFEF00D CAFEF00D
0x20003850: CAFEF00D CAFEF00D CAFEF00D CAFEF00D
0x20003860: CAFEF00D CAFEF00D CAFEF00D CAFEF00D
0x20003870: CAFEF00D CAFEF00D CAFEF00D CAFEF00D
0x20003880: CAFEF00D CAFEF00D CAFEF00D CAFEF00D
0x20003890: CAFEF00D CAFEF00D CAFEF00D CAFEF00D
0x200038A0: CAFEF00D CAFEF00D CAFEF00D CAFEF00D
0x200038B0: CAFEF00D CAFEF00D CAFEF00D CAFEF00D
0x200038C0: CAFEF00D CAFEF00D CAFEF00D CAFEF00D
0x200038D0: CAFEF00D CAFEF00D CAFEF00D CAFEF00D
0x200038E0: CAFEF00D CAFEF00D CAFEF00D CAFEF00D
0x200038F0: CAFEF00D CAFEF00D CAFEF00D CAFEF00D
0x20003900: CAFEF00D CAFEF00D CAFEF00D CAFEF00D
0x20003910: CAFEF00D CAFEF00D CAFEF00D CAFEF00D
0x20003920: CAFEF00D CAFEF00D CAFEF00D CAFEF00D
0x20003930: CAFEF00D CAFEF00D CAFEF00D CAFEF00D
0x20003940: CAFEF00D CAFEF00D CAFEF00D CAFEF00D
0x20003950: CAFEF00D CAFEF00D CAFEF00D CAFEF00D
0x20003960: CAFEF00D CAFEF00D CAFEF00D CAFEF00D
0x20003970: CAFEF00D CAFEF00D CAFEF00D CAFEF00D
0x20003980: CAFEF00D CAFEF00D CAFEF00D CAFEF00D
0x20003990: CAFEF00D CAFEF00D CAFEF00D CAFEF00D
0x200039A0: CAFEF00D CAFEF00D CAFEF00D CAFEF00D
0x200039B0: CAFEF00D CAFEF00D CAFEF00D CAFEF00D
0x200039C0: CAFEF00D CAFEF00D CAFEF00D CAFEF00D
0x200039D0: CAFEF00D CAFEF00D CAFEF00D CAFEF00D
0x200039E0: CAFEF00D CAFEF00D CAFEF00D CAFEF00D
0x200039F0: CAFEF00D CAFEF00D CAFEF00D CAFEF00D
0x20003A00: CAFEF00D CAFEF00D CAFEF00D CAFEF00D
0x20003A10: CAFEF00D CAFEF00D CAFEF00D CAFEF00D
0x20003A20: CAFEF00D CAFEF00D CAFEF00D CAFEF00D
0x20003A30: CAFEF00D CAFEF00D CAFEF00D CAFEF00D
0x20003A40: CAFEF00D CAFEF00D CAFEF00D CAFEF00D
0x20003A50: CAFEF00D CAFEF00D CAFEF00D CAFEF00D
0x20003A60: CAFEF00D CAFEF00D CAFEF00D CAFEF00D
0x20003A70: CAFEF00D CAFEF00D CAFEF00D CAFEF00D
0x20003A80: CAFEF00D CAFEF00D CAFEF00D CAFEF00D
0x20003A90: CAFEF00D CAFEF00D CAFEF00D CAFEF00D
0x20003AA0: CAFEF00D CAFEF00D CAFEF00D CAFEF00D
0x20003AB0: CAFEF00D CAFEF00D CAFEF00D CAFEF00D
0x20003AC0: CAFEF00D CAFEF00D CAFEF00D CAFEF00D
0x20003AD0: CAFEF00D CAFEF00D CAFEF00D CAFEF00D
0x20003AE0: CAFEF00D CAFEF00D CAFEF00D CAFEF00D
0x20003AF0: CAFEF00D CAFEF00D CAFEF00D CAFEF00D
0x20003B00: CAFEF00D CAFEF00D CAFEF00D CAFEF00D
0x20003B10: CAFEF00D CAFEF00D CAFEF00D CAFEF00D
0x20003B20: CAFEF00D CAFEF00D CAFEF00D CAFEF00D
0x20003B30: CAFEF00D CAFEF00D CAFEF00D CAFEF00D
0x20003B40: CAFEF00D CAFEF00D CAFEF00D CAFEF00D
0x20003B50: CAFEF00D CAFEF00D CAFEF00D CAFEF00D
0x20003B60: CAFEF00D CAFEF00D CAFEF00D CAFEF00D
0x20003B70: CAFEF00D CAFEF00D CAFEF00D CAFEF00D
0x20003B80: CAFEF00D CAFEF00D CAFEF00D CAFEF00D
0x20003B90: CAFEF00D CAFEF00D CAFEF00D CAFEF00D
0x20003BA0: CAFEF00D CAFEF00D CAFEF00D CAFEF00D
0x20003BB0: CAFEF00D CAFEF00D CAFEF00D CAFEF00D
0x20003BC0: CAFEF00D CAFEF00D CAFEF00D CAFEF00D
0x20003BD0: CAFEF00D CAFEF00D CAFEF00D CAFEF00D
0x20003BE0: CAFEF00D CAFEF00D CAFEF00D CAFEF00D
0x20003BF0: CAFEF00D CAFEF00D 00000000 CAFEF00D
0x20003C00: 00000004 20001D04 CAFEF00D FFFFEF68
0x20003C10: CAFEF00D 00001098 CAFEF00D CAFEF00D
0x20003C20: CAFEF00D CAFEF00D 00001006 200018D8
0x20003C30: 00000001 200018D8 20001C50 00000004
0x20003C40: 20001BB0 000134A5 0000100D 20001D28
0x20003C50: 00000006 00000006 20001C38 20001D44
0x20003C60: 20001C6C 20001D44 00000006 00000005
© Adafruit Industries
https://learn.adafruit.com/introducing-the-adafruit-bluefruit-le-uart-
friend
Page 94 of 115
Page 95

0x20003C70: 20001D38 00000005 20001D38 00000000
0x20003C80: 00000001 00012083 200018C8 000013D3
0x20003C90: 00550000 00000001 80E80000 4FC40000
0x20003CA0: 000080E8 00000009 60900000 000080E8
0x20003CB0: 60140000 20002764 0009608F 000080E8
0x20003CC0: 80000000 000080E8 00000000 00129F5F
0x20003CD0: 00000000 0001E4D9 80E80000 200018C8
0x20003CE0: 200018D4 00000000 80E80000 000000FF
0x20003CF0: 0000011C 0001BCE1 0000203A 0001BC1D
0x20003D00: 00000000 0001BC1D 80E80000 0001BCE1
0x20003D10: 0000011C 0001BDA9 80E80000 0001BDA9
0x20003D20: 0000011C FFFFFFF9 008B8000 0001BC1D
0x20003D30: 00000048 00000010 0000A000 00000009
0x20003D40: 0001E326 00000001 80E80000 51538000
0x20003D50: 000080E8 0001E9CF 00000000 00000009
0x20003D60: 61C78000 000080E8 00000048 00000504
0x20003D70: 0000A1FC 0002125C 00000000 000080E8
0x20003D80: 00000000 0012A236 00000000 0001E4D9
0x20003D90: 000080E8 00000009 00004998 000080E8
0x20003DA0: 622C8000 0012A29B 00000042 0001E479
0x20003DB0: 40011000 000185EF 00006E10 00000000
0x20003DC0: 00000000 00000004 0000000C 00000000
0x20003DD0: 62780000 00018579 2000311B 0001ACDF
0x20003DE0: 00000000 20003054 20002050 00000001
0x20003DF0: 20003DF8 0002085D 00000001 200030D4
0x20003E00: 00000200 0001F663 00000001 200030D4
0x20003E10: 00000001 2000311B 0001F631 00020A6D
0x20003E20: 00000001 00000000 0000000C 200030D4
0x20003E30: 2000311B 00000042 200030D4 00020AD7
0x20003E40: 20002050 200030D4 20002050 00020833
0x20003E50: 20002050 20003F1B 20002050 0001FF89
0x20003E60: 20002050 0001FFA3 00000005 20003ED8
0x20003E70: 20002050 0001FF8B 00000010 00020491
0x20003E80: 00000001 0012A54E 00000020 00022409
0x20003E90: 00000000 20002050 200030D4 0001FF8B
0x20003EA0: 00021263 00000005 0000000C 20003F74
0x20003EB0: 20003ED8 20002050 200030D4 00020187
0x20003EC0: 20003ED4 20003054 00000000 20003F75
0x20003ED0: 00000008 20003F64 00000084 FFFFFFFF
0x20003EE0: FFFFFFFF 00000008 00000001 00000008
0x20003EF0: 20302058 2000311B 0001F631 00020A6D
0x20003F00: 20002050 00000000 0000000C 200030D4
0x20003F10: 32002050 32303032 00323330 000258D7
0x20003F20: 20002050 200030D4 20002050 00020833
0x20003F30: 00000000 20002050 00000020 000001CE
0x20003F40: 20003F40 200030D4 00000004 0001ED83
0x20003F50: 200030D4 20003F60 000001D6 000001D7
0x20003F60: 000001D8 00016559 0000000C 00000000
0x20003F70: 6C383025 00000058 200030D4 FFFFFFFF
0x20003F80: 1FFF4000 00000028 00000028 000217F8
0x20003F90: 200020C7 000166C5 000166AD 00017ED9
0x20003FA0: FFFFFFFF 200020B8 2000306C 200030D4
0x20003FB0: 200020B4 000180AD 1FFF4000 200020B0
0x20003FC0: 200020B0 200020B0 1FFF4000 0001A63D
0x20003FD0: CAFEF00D CAFEF00D 200020B4 00000002
0x20003FE0: FFFFFFFF FFFFFFFF 1FFF4000 00000000
0x20003FF0: 00000000 00000000 00000000 00016113
OK
© Adafruit Industries
https://learn.adafruit.com/introducing-the-adafruit-bluefruit-le-uart-
friend
Page 95 of 115
Page 96

History
This page tracks additions or changes to the AT command set based on the firmware version number (which you can obtain via the 'ATI'
command):
Version 0.7.7
The following AT commands and features were added in the 0.7.7 release:
Added AT+BLEUARTTXF (F for force) to immediately send the specified data out in an BLE UART packet (max 20 bytes), bypassing any
FIFO delays and avoiding packets potentially being transmitted in two transactions.
Adjusted BLE UART service to use min connection interval as the tx interval
Added AT+DFUIRQ to enable using the DFU Pin for IRQ purposes when there is a supported event on the nRF51822
Enabled the internal pullup resistor on the CS pin for Bluefruit SPI boards
Added AT+MODESWITCHEN to enable/disable +++ mode switching from the local (serial or SPI) or BLE UART side. By default local =
enabled, ble = disabled, meaning commands can only be executed via the local interface by default.
Implemented a '\+' escape code to immediately send '+' chars without trigger the +++ delay waiting for further similar input
Added AT+BLEHIDGAMEPADEN to separately enable HID Gamepad, since iOS/OSX has a conflict with gamepad devices causing HID
keyboard to not working properly.
The following bugs were fixed in release 0.7.7:
Fixed a factory reset issue when a long delay occurs in app_error_handler()
Fixed an issue where strings were being truncated at 64 chars in UART
Fixed HID keyboard support not working with iOS 9 & 10
Version 0.7.0
The following AT commands were added in the 0.7.0 release:
AT+BAUDRATE
Change the HW UART baudrate
AT+UARTFLOW
Enable or disable HW UART flow control
AT+BLEMIDIEN=on/off/0/1
Enable/disable MIDI service, requires a reset to take affect
AT+BLEMIDITX
Send a MIDI event
AT+BLEMIDIRX
Receive an available MIDI event
AT+GATTCHARRAW
Added this read only command to read binary (instead of ASCII) data from a characteristic. It is non-printable but less overhead and easier
for writing library in Arduino
AT+NVMWRITE=offset,datatype,data
Writes data to 256 byte user NVM. Datatype must be STRING (1), BYTEARRAY (2), or INTEGER (3)
AT+NVMREAD=offset,size,datatype
Reads data back from 256 bytes user NVM
AT+NVMREADRAW=offset,size binary data
Binary data (instead of ASCII) is returned, ending with "OK\r\n". It is non-printable but less overhead and easier to use in some situations.
AT+BLEHIDGAMEPAD=x,y,buttons
X is LEFT, RIGHT: X=-1 LEFT is pressed, X=1 RIGHT is pressed, X=0 no pressed
Y is UP, DOWN: Y=-1 i UP, Y=1 is DOWN, Y=0 no pressed
Button [0x00-0xFF] is a bit mask for 8 button 0-7
AT+GAPCONNECTABLE=on/off/1/0
Allow/disallow connection to the device
AT+EDDYSTONESERVICEEN
Add/remove EddyStone service to GATT table (requires reset)
AT+EDDYSTONEBROADCAST=on/off/0/1
Start/stop broadcasting url using settings from NVM
AT+BLEBATTEN=on/off/1/0
Enable battery service. Reset required due to the service change.
AT+BLEBATTVAL=percent
Updates the Battery level, percent is 0 to 100
© Adafruit Industries
https://learn.adafruit.com/introducing-the-adafruit-bluefruit-le-uart-
friend
Page 96 of 115
Page 97

The following commands were changed in the 0.7.0 release:
AT+GATTADDCHAR
Added a DATATYPE option to indicate the data type for the GATT characteristic's payload. Valid option are: AUTO (0, default),
STRING (1), BYTEARRAY (2), INTEGER (3)
Added characteristic user description option via the DESCRIPTION flag
Added characteristic presentation format support via the PRESENTATION flag
AT+GAPINTERVALS
Added a new 'adv_lowpower_interval' parameter, default value is 417.5 ms. Current arguments are now: min_conn, max_conn, adv_interval,
adv_timeout, adv_lowpower_interval
Key bug fixes and changes in this release:
Significant BTLE UART speed and reliability improvements
Added callback support (work in progress) for:
BLE UART RX
GATT Characteristic(s) RX
MIDI RX
Connect/Disconnect
Increased MAX_LEN for each characteristic from 20 to 32 bytes
Changed the default GAP parameters:
Advertising interval = 20ms
Min connection interval = 20 ms
Max connection interval = 40 ms
Increased the maximum number of CCCDs saved to flash from 8 to 16
Eddystone config service disabled by default
Removed AT+EDDYSTONEENABLE to avoid confusion
Changed advertising timeout for Eddystone to 'unlimited'
Fixed Write-No-Response characteristic property, which wasn't being handled properly
Fixed timing constraints to meet Apple design guidelines
Fixed systick to ms calculation
Fixed all tests with google eddystone validator except for writing tx_power = 1 dB (not valid on nrf51)
Fixed a bug where writing from the central does not update the value on the characteristic correctly
Fixed an issue with HID examples, where when paired with Central, a disconnect then reconnect could not send HID reports anymore
Version 0.6.7
The following AT commands were added in the 0.6.7 release:
AT+BLEUARTFIFO
Returns the number of free bytes available in the TX and RX FIFOs for the Bluetooth UART Service.
The following commands were changed in the 0.6.7 release:
AT+BLEUARTTX
If the TX FIFO is full, the command will wait up to 200ms to see if the FIFO size decreases before exiting and returning an ERROR response
due to the FIFO being full.
AT+BLEURIBEACON
This command will go back to using the old (deprecated) UriBeacon UUID (0xFED8), and only the AT+EDDYSTONEURL command will use
the newer Eddystone UUID (0xFEAA).
AT+BLEKEYBOARD and AT+BLEUARTTX
These commands now accept '\?' as an escape code since 'AT+BLEKEYBOARD=?' has another meaning for the AT parser. To send a
single question mark the following command should be used: 'AT+BLEKEYBOARD=\?' or 'AT+BLEUARTTX=\?'
AT+EDDYSTONEURL
This command now accepts an optional third parameter for RSSI at 0m value (default is -18dBm).
Running this command with no parameters ('AT+EDDYSTONEURL\r\n') will now return the current URL.
Key bug fixes in this release:
The FIFO handling for the Bluetooth UART Service was improved for speed and stability, and the TX and RF FIFOs were increased to 1024
bytes each.
An issue where a timer overflow was causing factory resets every 4 hours or so has been resolved.
Fixed a problem with the GATT server where 'value_len' was being incorrectly parsed for integer values in characteristics where 'max_len' >4
Version 0.6.6
The following AT commands were added in the 0.6.6 release:
© Adafruit Industries
https://learn.adafruit.com/introducing-the-adafruit-bluefruit-le-uart-
friend
Page 97 of 115
Page 98

AT+EDDYSTONEURL
Update the URL for the beacon and switch to beacon mode
AT+EDDYSTONEENABLE
Enable/disable beacon mode using the configured url
AT+EDDYSTONECONFIGEN
Enable advertising for the the Eddystone configuration service for the specified number of seconds
AT+HWMODELED
Allows the user to override the default MODE LED behaviour with one of the following options: DISABLE, MODE, HWUART, BLEUART, SPI,
MANUAL
AT+BLECONTROLKEY
Allows HID media control values to be sent to a bonded central device (volume, screen brightness, etc.)
AT+BLEHIDEN
Enables or disables BLE HID support in the Bluefruit LE firmware (mouse, keyboard and media control)
AT+BLEMOUSEMOVE
To move the HID mouse
AT+BLEMOUSEBUTTON
To set the state of the HID mouse buttons
The following commands were changed in the 0.6.6 release:
AT+BLEKEYBOARDEN - Now an alias for AT+BLEHIDEN
AT+GATTADDCHAR - Added a new UUID128 field to allow custom UUIDs
Key bug fixes in this release:
Fixed issues with long beacon URLs
Fixed big endian issue in at+blebeacon for major & minor number
Known issues with this release:
Windows 10 seems to support a limited number of characteristics for the DIS service. We had to disable the Serial Number characteristic to
enable HID support with windows 10.
Version 0.6.5
The following AT commands were added in the 0.6.5 release:
AT+BLEGETPEERADDR (http://adafru.it/iCq)
The following commands were changed in the 0.6.5 release:
Increased the UART buffer size (on the nRF51) from 128 to 256 bytes
+++ now responds with the current operating mode
Fixed a bug with AT+GATTCHAR values sometimes not being saved to NVM
Fixed a bug with AT+GATTCHAR max_len value not being taken into account after a reset (min_len was always used when repopulating the
value)
Version 0.6.2
This is the first release targetting 32KB SRAM parts (QFAC). 16KB SRAM parts can't be used with this firmware due to memory management
issues, and should use the earlier 0.5.0 firmware.
The following AT commands were changed in the 0.6.2 release:
AT+BLEUARTTX (http://adafru.it/iCr)
Basic escape codes were added for new lines, tabs and backspace
AT+BLEKEYBOARD (http://adafru.it/iCr)
Also works with OS X now, and may function with other operating systems that support BLE HID keyboards
Version 0.5.0
The following AT commands were added in the 0.5.0 release:
AT+BLEKEYBOARDEN (http://adafru.it/iCr)
AT+BLEKEYBOARD (http://adafru.it/iCr)
AT+BLEKEYBOARDCODE (http://adafru.it/iCr)
© Adafruit Industries
https://learn.adafruit.com/introducing-the-adafruit-bluefruit-le-uart-
friend
Page 98 of 115
Page 99

The following AT commands were changed in the 0.5.0 release:
ATI (http://adafru.it/iCs)
The SoftDevice, SoftDevice version and bootloader version were added as a new (7th) record. For Ex: "S110 7.1.0, 0.0" indicates version
7.1.0 of the S110 softdevice is used with the 0.0 bootloader (future boards will use a newer 0.1 bootloader).
Other notes concerning 0.5.0:
Starting with version 0.5.0, you can execute the AT+FACTORYRESET command at any point (and without a terminal emulator) by holding the
DFU button down for 10 seconds until the blue CONNECTED LED starts flashing, then releasing it.
Version 0.4.7
The following AT commands were added in the 0.4.7 release:
+++ (http://adafru.it/iCs)
AT+HWRANDOM (http://adafru.it/iCt)
AT+BLEURIBEACON (http://adafru.it/iCu)
AT+DBGSTACKSIZE (http://adafru.it/iCv)
AT+DBGSTACKDUMP (http://adafru.it/iCv)
The following commands were changed in the 0.4.7 release:
ATI
(http://adafru.it/iCs)The chip revision was added after the chip name. Whereas ATI would previously report 'nRF51822', it will now add the
specific HW revision if it can be detected (ex 'nRF51822 QFAAG00')
Version 0.3.0
First public release
© Adafruit Industries
https://learn.adafruit.com/introducing-the-adafruit-bluefruit-le-uart-
friend
Page 99 of 115
Page 100

GATT Service Details
Data in Bluetooth Low Energy is organized around units called 'GATT Services (http://adafru.it/iCp)' and 'GATT Characteristics'. To expose data to
another device, you must instantiate at least one service on your device.
Adafruit's Bluefruit LE Pro modules support some 'standard' services, described below (more may be added in the future).
UART Service
The UART Service is the standard means of sending and receiving data between connected devices, and simulates a familiar two-line UART
interface (one line to transmit data, another to receive it).
The service is described in detail on the dedicated UART Service (http://adafru.it/iCn) page.
© Adafruit Industries
https://learn.adafruit.com/introducing-the-adafruit-bluefruit-le-uart-
friend
Page 100 of 115
 Loading...