

Page 1

Adafruit 2.23" Monochrome OLED Bonnet
Created by Melissa LeBlanc-Williams
Last updated on 2020-08-17 12:05:23 PM EDT
Page 2
Overview
If you're looking for a bright, readable OLED display for a Raspberry Pi (https://adafru.it/wF8) (most likely a Pi
Zero (https://adafru.it/vIa)) project, this might be just the thing you need!
The Adafruit 2.23" Monochrome OLED Bonnet for Raspberry Pi is your chonky OLED pal, ready to snap onto any and
all Raspberry Pi computers, to give you a vivid display. The Bonnet comes with a 2.13" diagonal monochrome 128x32
OLED, with sharp white pixels. The OLED the I2C pins plus GPIO #4 for reset, so you have plenty of GPIO connections
available for buttons, LEDs, sensors, etc. It sits nice and flat, so many cases that have an open top can have this display
inserted.
© Adafruit Industries https://learn.adafruit.com/adafruit-2-23-monochrome-oled-bonnet Page 3 of 14
Page 3

Compared to our similar PiOLED display (https://adafru.it/wVd), this OLED has the same resolution but is much larger,
so it can be read from across the room. This screen is made of 128x32 individual white OLED pixels and because the
display makes its own light, no backlight is required. This reduces the power required to run the OLED and is why the
display has such high contrast; we really like OLED displays for their crispness!
Using the display is very easy, we have a Python library for the SSD1305 chipset. Our example code allows you to draw
images, text, whatever you like, using the Python imaging library. Our tests showed 30 FPS update rates so you can do
animations or simple video.
© Adafruit Industries https://learn.adafruit.com/adafruit-2-23-monochrome-oled-bonnet Page 4 of 14
Page 4

Comes completely pre-assembled and tested so you don't need to do anything but plug it in and install our Python
code! Works with any Raspberry Pi computer that has a 2x20 connector, such as the Pi B+, Pi 2, Pi 3, Pi 4, and Pi Zero
(and any others that have a 2x20 connector!)
On the bottom, we have a Qwiic/STEMMA QT connector for I2C sensors and devices so you can plug and play any of
our STEMMA QT devices (https://adafru.it/GfR).
© Adafruit Industries https://learn.adafruit.com/adafruit-2-23-monochrome-oled-bonnet Page 5 of 14
Page 5

Usage
Install CircuitPython
This guide assumes that you've gotten your Raspberry Pi up and running, and have CircuitPython installed. If not,
check out the guide:
https://adafru.it/Deo
https://adafru.it/Deo
To install the library for the Pi OLED (https://adafru.it/GIf), enter the following into the terminal:
sudo pip3 install adafruit-circuitpython-ssd1305
If that complains about pip3 not being installed, then run this first to install it:
sudo apt-get install python3-pip
We also need PIL to allow using text with custom fonts. There are several system libraries that PIL relies on, so
installing via a package manager is the easiest way to bring in everything:
sudo apt-get install python3-pil
Enable I2C
To enable i2c, you can follow our detailed guide on configuring the Pi with I2C support here. (https://adafru.it/Deo)
After you've enabled I2C you will need to shutdown with sudo shutdown -h now
Once the Pi has halted, plug in the PiOLED. Now you can power the Pi back up, and log back in. Run the following
command from a terminal prompt to scan/detect the I2C devices
sudo i2cdetect -y 1
You should see the following, indicating that address 0x3c (the OLED display) was found
This guide assumes you have your Raspberry Pi all set up with an operating system, network connectivity and
SSH!
© Adafruit Industries https://learn.adafruit.com/adafruit-2-23-monochrome-oled-bonnet Page 6 of 14
Page 6

Verify I2C Device
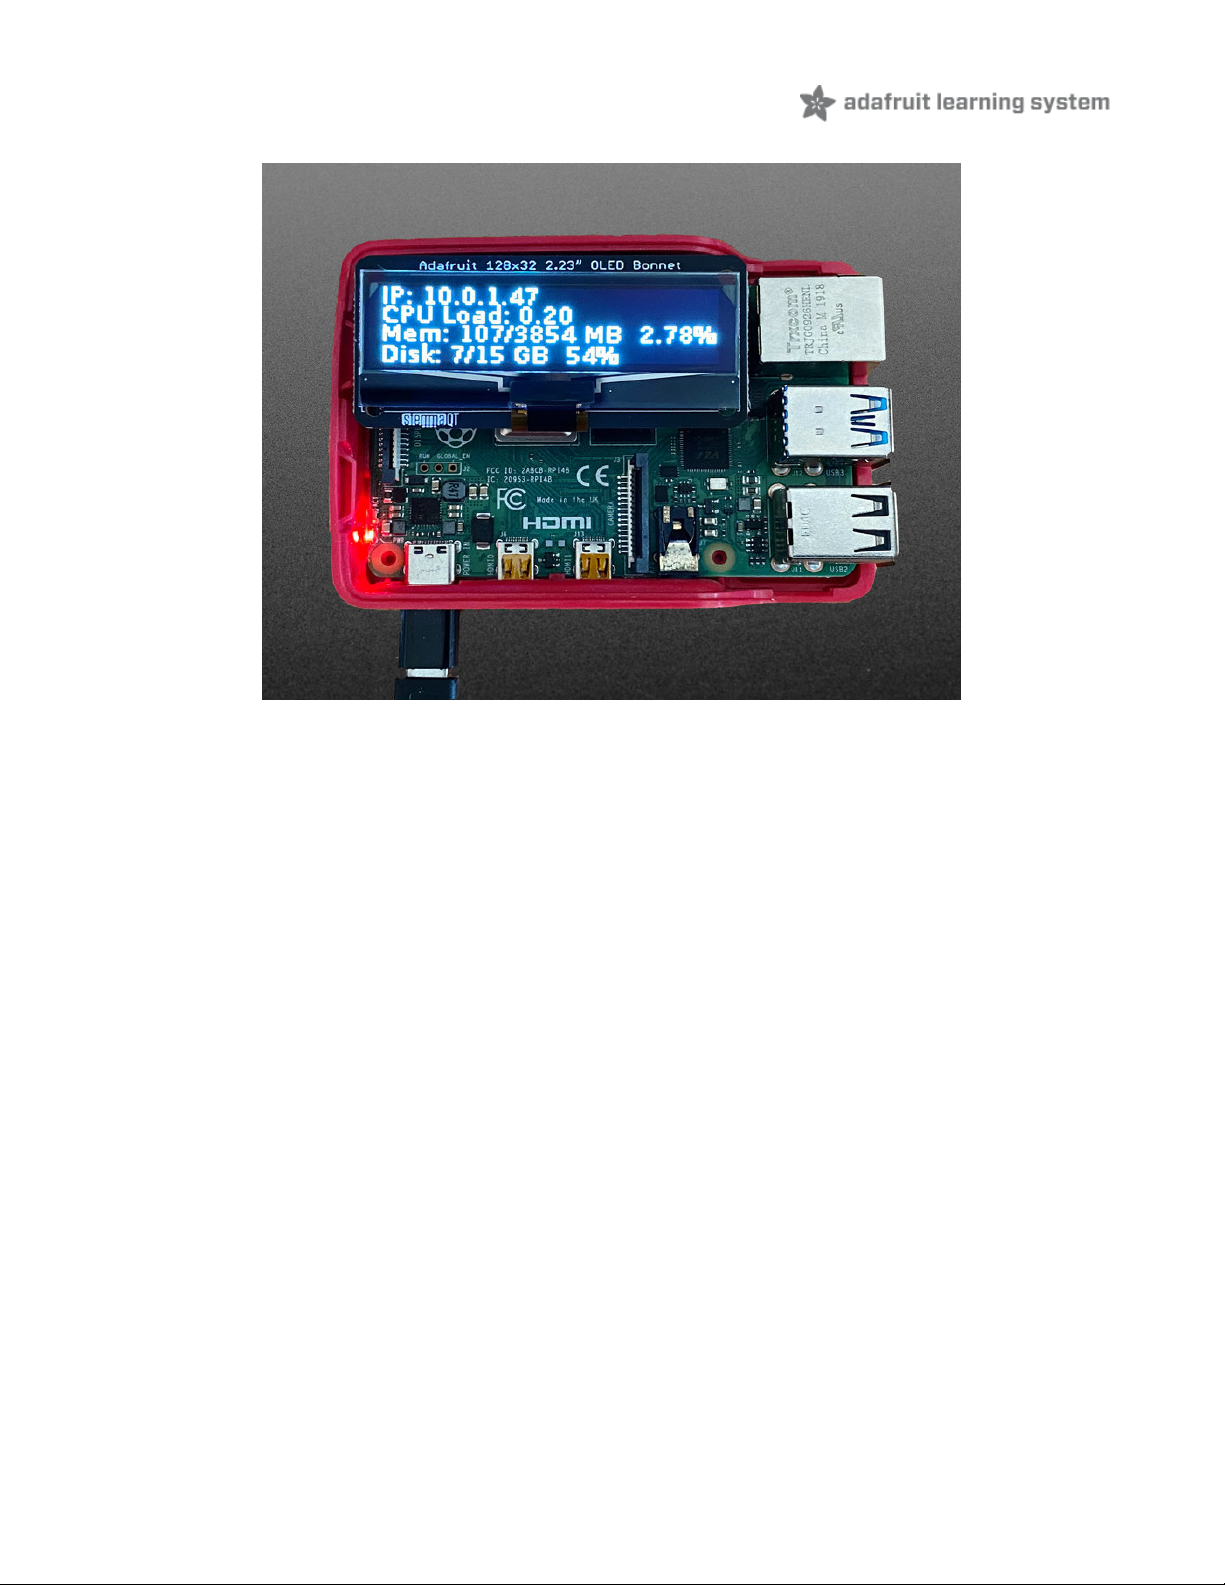
You can run our stats example, which will query the Pi for details on CPU load, disk space, etc. and print it on the
OLED.
Create a new file with nano ~pi/stats.py and paste this code below in! Then save it.
Temporarily unable to load content:
Run sudo python3 stats.py and you should see something like the following image:
Running Stats on Boot
You can pretty easily make it so this handy program runs every time you boot your Pi.
The fastest/easiest way is to put it in /etc/rc.local
Run sudo nano /etc/rc.local and add the line
sudo python3 /home/pi/stats.py &
© Adafruit Industries https://learn.adafruit.com/adafruit-2-23-monochrome-oled-bonnet Page 7 of 14
Page 7

on its own line right before exit 0
Then save and exit. Reboot to verify that the screen comes up on boot!
For more advanced usage, check out our linux system services guide (https://adafru.it/wFR)
Library Usage
In the examples subdirectory of the Adafruit_CircuitPython_SSD1305 repository (https://adafru.it/LDg), you'll find
examples which demonstrate the usage of the library.
To help you get started, I'll walk you through the stats.py code you ran earlier, that way you can use this file as a basis
of a future project.
import time
import subprocess
from board import SCL, SDA, D4
import busio
import digitalio
from PIL import Image, ImageDraw, ImageFont
import adafruit_ssd1305
First, a few Python modules are imported. This includes the adafruit_ssd1305 module which contains the OLED driver
classes.
To draw images, shapes, and text/fonts, the code imports some of the Python Imaging Library's modules like Image ,
ImageDraw , and ImageFont .
© Adafruit Industries https://learn.adafruit.com/adafruit-2-23-monochrome-oled-bonnet Page 8 of 14
Page 8

# Define the Reset Pin
oled_reset = digitalio.DigitalInOut(D4)
# Create the I2C interface.
i2c = busio.I2C(SCL, SDA)
# Create the SSD1305 OLED class.
# The first two parameters are the pixel width and pixel height. Change these
# to the right size for your display!
disp = adafruit_ssd1305.SSD1305_I2C(128, 32, i2c, reset=oled_reset)
Since the PiOLED is a 128x32 I2C only device, the screen size, reset pin, and the i2c interface are passed to the
adafruit_ssd.SSD1305_I2C class.
# Clear display.
disp.fill(0)
disp.show()
# Create blank image for drawing.
# Make sure to create image with mode '1' for 1-bit color.
width = disp.width
height = disp.height
image = Image.new('1', (width, height))
# Get drawing object to draw on image.
draw = ImageDraw.Draw(image)
# Draw a black filled box to clear the image.
draw.rectangle((0, 0, width, height), outline=0, fill=0)
The next chunk of code clears the display by inverting its fill with fill(0) and then writing to the display with show() .
Then it will configure a PIL drawing class to prepare for drawing graphics. Notice that the image buffer is created in 1-
bit mode with the '1' parameter, this is important because the display only supports black and white colors.
We then re-draw a large black rectangle to clear the screen. In theory we don't have to clear the screen again, but its a
good example of how to draw a shape!
# Draw some shapes.
# First define some constants to allow easy resizing of shapes.
padding = -2
top = padding
bottom = height-padding
# Move left to right keeping track of the current x position for drawing shapes.
x = 0
# Load default font.
font = ImageFont.load_default()
# Alternatively load a TTF font. Make sure the .ttf font file is in the
# same directory as the python script!
# Some other nice fonts to try: http://www.dafont.com/bitmap.php
#font = ImageFont.truetype('/usr/share/fonts/truetype/dejavu/DejaVuSans.ttf', 9)
© Adafruit Industries https://learn.adafruit.com/adafruit-2-23-monochrome-oled-bonnet Page 9 of 14
Page 9

Once the display is initialized and a drawing object is prepared, you can draw shapes, text and graphics using PIL's
drawing commands (https://adafru.it/dfH). We'll define some constraints based on the height and width of the display to
allow for easy resizing of shapes.
Then, the code loads the default font, which works fine, but there's other fonts you can load.
Next the code loads a built-in default font and draws a few lines of text. You can also load your own TrueType font and
use it to render fancy text in any style you like
while True:
# Draw a black filled box to clear the image.
draw.rectangle((0, 0, width, height), outline=0, fill=0)
# Shell scripts for system monitoring from here:
# https://unix.stackexchange.com/questions/119126/command-to-display-memory-usage-disk-usage-andcpu-load
cmd = "hostname -I | cut -d\' \' -f1"
IP = subprocess.check_output(cmd, shell=True).decode("utf-8")
cmd = "top -bn1 | grep load | awk '{printf \"CPU Load: %.2f\", $(NF-2)}'"
CPU = subprocess.check_output(cmd, shell=True).decode("utf-8")
cmd = "free -m | awk 'NR==2{printf \"Mem: %s/%s MB %.2f%%\", $3,$2,$3*100/$2 }'"
MemUsage = subprocess.check_output(cmd, shell=True).decode("utf-8")
cmd = "df -h | awk '$NF==\"/\"{printf \"Disk: %d/%d GB %s\", $3,$2,$5}'"
Disk = subprocess.check_output(cmd, shell=True).decode("utf-8")
# Write four lines of text.
draw.text((x, top+0), "IP: "+IP, font=font, fill=255)
draw.text((x, top+8), CPU, font=font, fill=255)
draw.text((x, top+16), MemUsage, font=font, fill=255)
draw.text((x, top+25), Disk, font=font, fill=255)
# Display image.
disp.image(image)
disp.show()
time.sleep(.1)
Using the subprocess class, python can utilize linux commands to access the Pi's system information. This
loop updates the screen at 10 times a second.
That's all there is to the stats.py code!
Speeding up the Display
For the best performance, especially if you are doing fast animations, you'll want to tweak the I2C core to run at 1MHz.
By default it may be 100KHz or 400KHz
To do this edit the config with sudo nano /boot/config.txt
and add to the end of the file
dtparam=i2c_baudrate=1000000
© Adafruit Industries https://learn.adafruit.com/adafruit-2-23-monochrome-oled-bonnet Page 10 of 14
Page 10

© Adafruit Industries https://learn.adafruit.com/adafruit-2-23-monochrome-oled-bonnet Page 11 of 14
Page 11

Downloads
Files
EagleCAD PCB files on GitHub (https://adafru.it/LDh)
UG-2832ALBCG01 (https://adafru.it/LDi) Datasheet
SSD1305 (https://adafru.it/LDj) Datasheet
Fritzing object in Adafruit Fritzing Library (https://adafru.it/c7M)
Schematic & Fabrication Print
© Adafruit Industries https://learn.adafruit.com/adafruit-2-23-monochrome-oled-bonnet Page 12 of 14
Page 12

© Adafruit Industries https://learn.adafruit.com/adafruit-2-23-monochrome-oled-bonnet Page 13 of 14
Page 13

© Adafruit Industries Last Updated: 2020-08-17 12:05:22 PM EDT Page 14 of 14
 Loading...