

Page 1

Precision Health Scale
UC-321PBT-C
Instruction Manual
1WMPD4001968B
Page 2

Contents
Before Use
Precautions -------------------------------------------------------------------------------------- 1
Scale Components ------------------------------------------------------------------------------ 2
Display Symbols --------------------------------------------------------------------------------- 3
Installing (or Replacing) Batteries ---------------------------------------------------------- 3
Pairing The PBT-C Series Device With a Continua-Compliant Manager ---------- 4
Operations
Basic Measurement ----------------------------------------------------------------------------- 5
Measuring Your Weight-------------------------------------------------------------------------------------- 5
Measuring an Infant or Small Animal--------------------------------------------------------------------- 6
Measuring Your Weight on a Carpet -------------------------------------------------------- 7
References
Specifications ------------------------------------------------------------------------------------- 8
Maintaining the Scale--------------------------------------------------------------------------- 8
Transmitting Data to a Continua Manager ----------------------------------------------- 9
Before Requesting Service-------------------------------------------------------------------- 9
Precautions
Please read this booklet before using your scale.
Place your scale on a solid level surface, such as tile, wood,
or laminate flooring.
Do not place your scale on a soft, wet or slippery floor.
If the scale must be used on a carpet, be sure to attach the
plastic add-on feet as shown on Page 6.
Your scale contains delicate, high-precision parts. Avoid
extremes in temperature, humidity, direct sunlight, shock,
moisture and dust.
Do not step on your scale with your feet wet. Be sure that your
No!
No!
Display
Shock
feet are dry to prevent slipping or serious injury.
Step on the center portion of your scale gently.
Do not step on the display window.
Holding the measurement switch for extended periods will
shorten battery life.
Indications for Use
This scale is designed for personal use.
1
Page 3
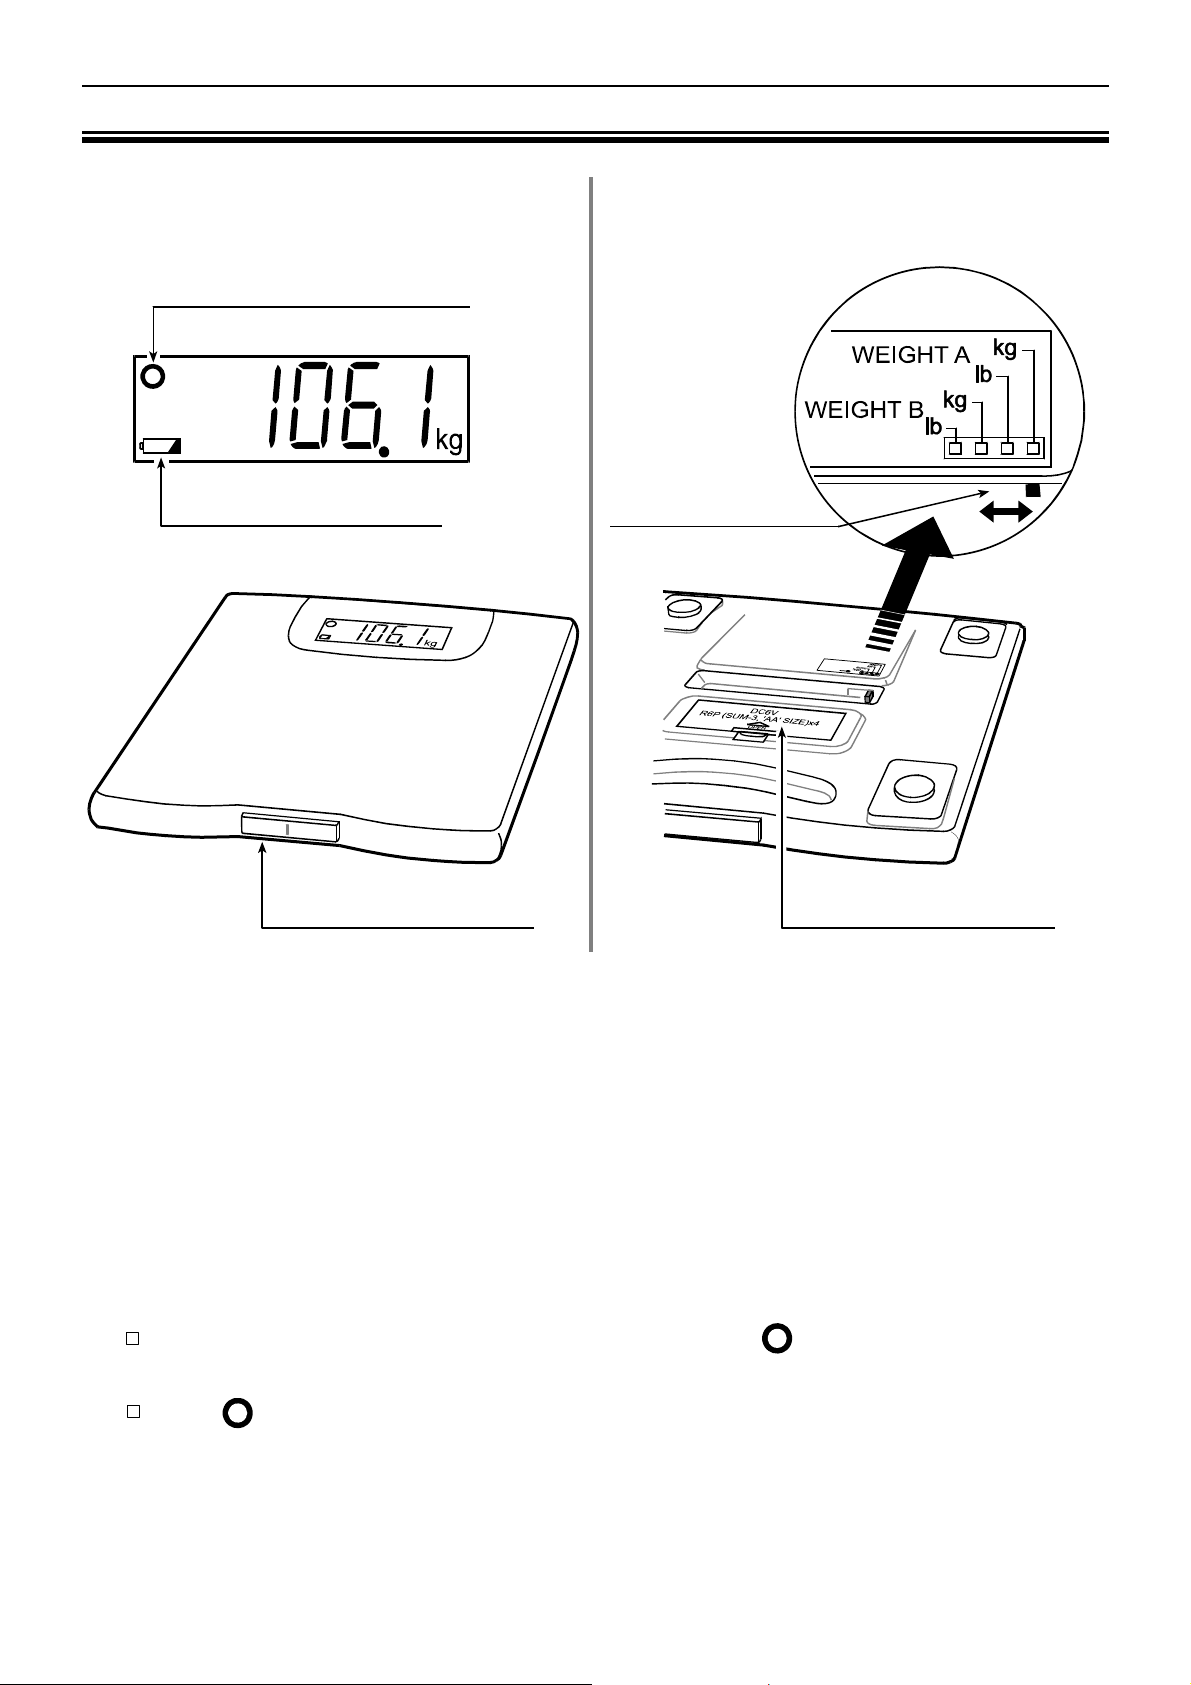
Scale Components
Display Back
Ready/Complete Symbol
Front
Low Battery Indicator
Slide Switch
Measurement Switch
Battery Compartment
The following measurements can be selected by the slide switch and are
classified into two categories - WEIGHT A and WEIGHT B. Within WEIGHT A
and WEIGHT B, you have a choice to select and have your weight displayed in
kg or lb. Use the WEIGHT B category to enable the radio to send measurement
results. The radio will not function if the scale is in a WEIGHT A selection.
The scale has an “Automatic- power-off” function.
If “0.0 kg /0.0 lb” and the Ready/Complete symbol are displayed about
forty-five seconds, the scale will automatically turn off.
If the symbol and the weight are displayed about fifteen seconds, the
scale will automatically turn off.
2
Page 4
Display Symbols
Ready/Complete symbol.
This symbol is displayed when the measurement display is stable.
Low battery indicator.
If this symbol is displayed, replace all four batteries with new ones.
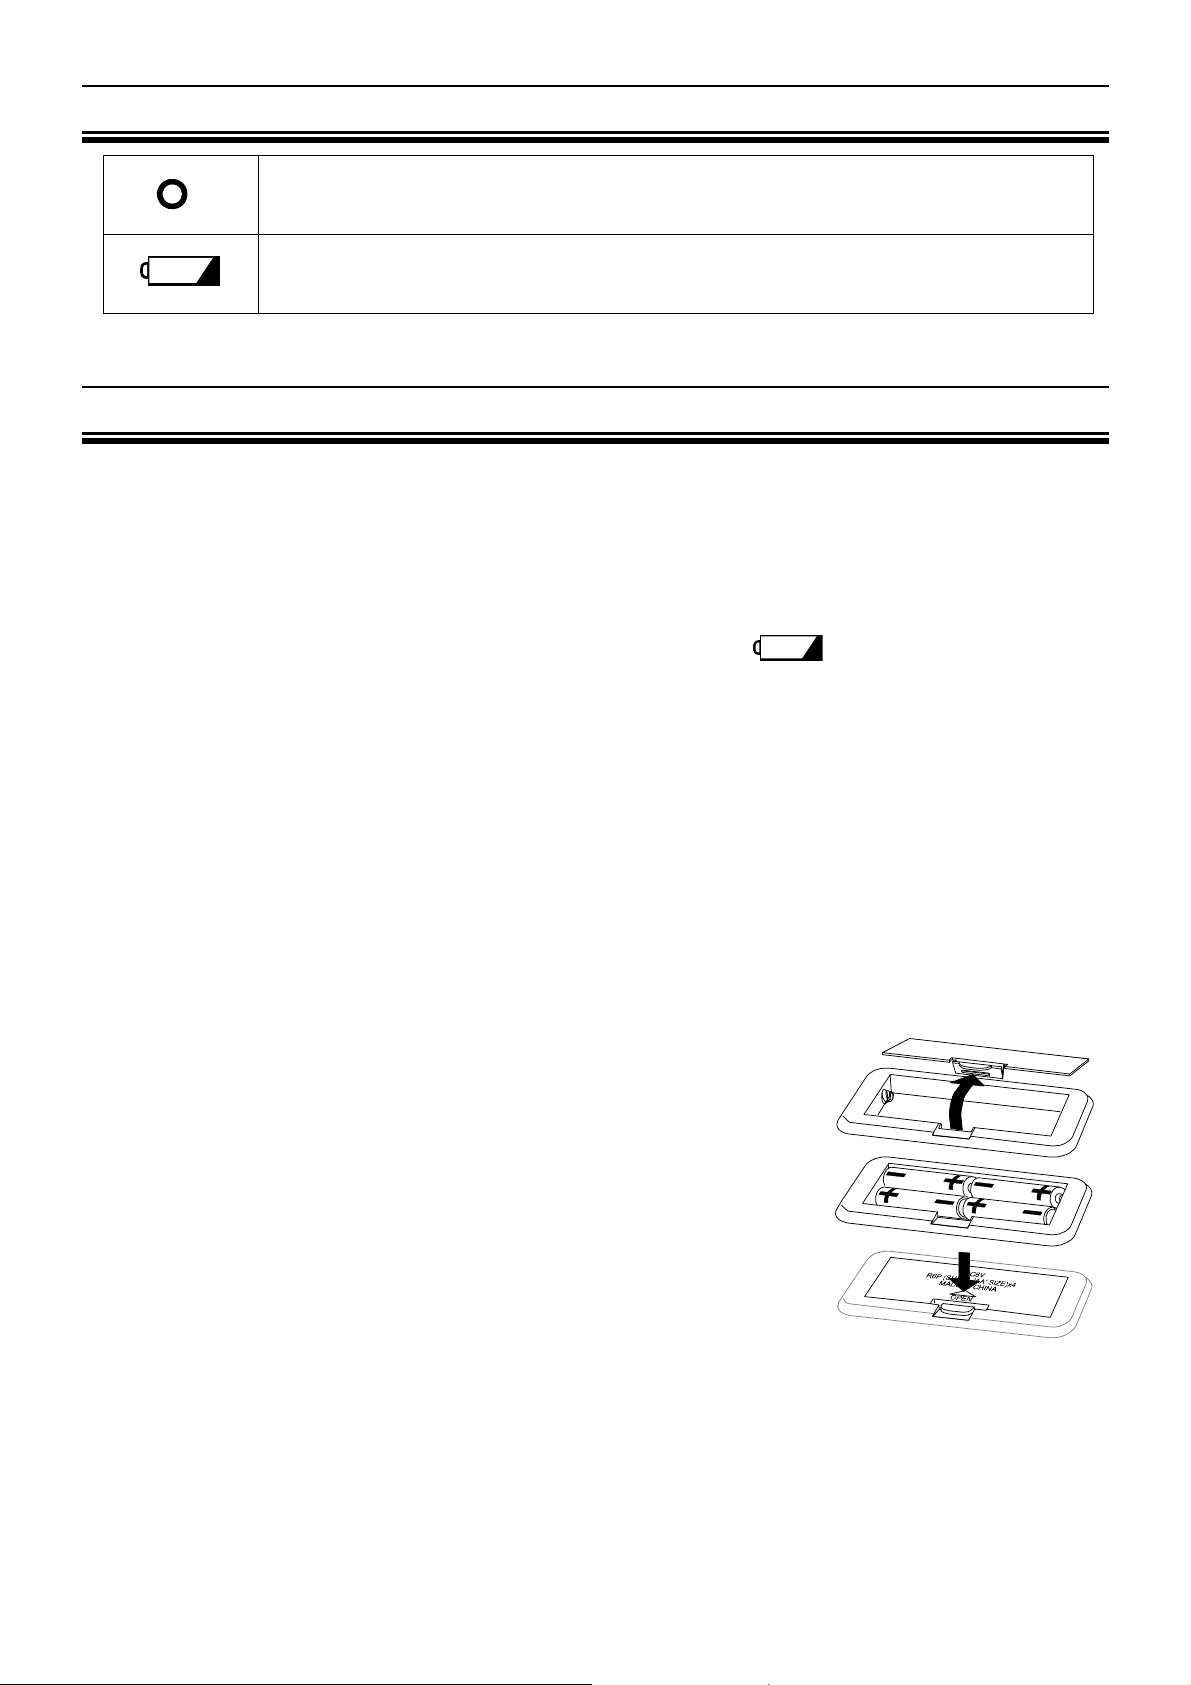
Installing (or Replacing) Batteries
Caution
Insert each battery with its positive (+) and negative (-) terminals properly
aligned with the corresponding symbols in the battery compartment.
Improper installation of the batteries may cause battery leakage.
Replace all four batteries with new ones, when the symbol is displayed.
Do not mix new and used batteries. It may cause damage to the scale or
shorten battery life.
The battery life is dependant upon the environmental temperature, battery type
and usage.
Remove the batteries from the battery compartment, when the scale is not to be
used for a long time. They may leak and damage the scale.
Steps for Installing (or Replacing) Batteries
1. Remove the battery compartment cover on the
underside of the scale by gently pushing the hook in
the direction indicated by the arrow and lifting the
cover backward.
2. Install four new batteries with the positive (+) and
negative (-) terminals properly aligned with the
corresponding symbols in the battery compartment.
3. Replace the cover by sliding it into the compartment
and gently pressing into place.
3
Page 5

Pairing The PBT-C Series Device With a Continua-Compliant Manager
Model UC-321PBT-C is a PBT-C series device. PBT-C series devices are
designed to be connected only with Continua Managers.
To pair the device with a Manager, please follow these steps:
1. Remove the four AA batteries from the device.
2. Discharge the device completely by trying to take a measurement. Press the
“Measurement” switch, tap the toe switch, or tap the surface of the device as
appropriate.
Note: the measurement will not proceed and the LCD will remain blank.
3. Insert the four AA batteries back into the device.
4. Refer to the Manager’s instruction manual to start a Bluetooth discovery and
inquiry process.
The device will stay discoverable for 60 seconds following battery insertion.
If the Manager fails to pair with the device, repeat steps 1 through 3.
5. Once the manager has discovered the device, enter the PIN “123456” as a
password to finish the pairing process.
When the Manager supports SSP (Secure Simple Pairing), no password is
required for the pairing process.
A device that has been certified by Continua displays this
logo.
A Bluetooth device has the logo mark of Bluetooth printed
on it.
The RoHS (Restriction of Hazardous Substances)
Directive
4
Page 6

Basic Measurement
Measuring Your Weight
1. Set the slide switch to the correct mode.
Example: Set the slide switch to [WEIGHT B].
Set the slide switch
to the correct mode
Press the measurement switch
2. Press the measurement switch gently.
All display segments are displayed for several
seconds.
Ready/Complete
symbol
3. Wait until the symbol is displayed.
Wait until “0.0 kg /0.0 lb” and the Ready/Complete
symbol are displayed.
Note: If “0.0 kg /0.0 lb” and the Ready/Complete
symbol are displayed about forty-five
seconds, the scale will automatically turn off.
4. Step on the scale gently and stand still
during the measurement.
Step on the scale
You will see the display changed to dashes.
Please remain still as much as you can.
5. Your weight is displayed after the symbol
is displayed.
After about fifteen seconds, the scale will
automatically turn off.
6. Step off the scale.
Slide Switch
Measurement Switch
Step off the scale
5
Page 7

Basic Measurement
g
g
Measuring an Infant or Small Animal
1. Set the slide switch to the correct mode.
Example: Set the slide switch to [WEIGHT B].
Set the slide switch
to the correct mode
2. Press the measurement switch gently and
step on the scale.
All display segments are displayed
for several seconds.
Step on the scale without any baby
Ready/Complete
or animal in your arms before “0.0
kg /0.0 lb” is displayed.
3. Have the infant or the animal placed in your
arms
Remain on the scale and have the infant or the
animal placed securely in your arms within ten
seconds after the scale displays “0.0 kg /0.0 lb”
Press the measurement switch
Step on the scale
symbol
k
Have the infant or the animal
placed in your arms
and the Ready/Complete symbol .
Remain still during the measurement until the
Ready/Complete symbol is displayed. You will
see the display changed to dashes. Please
remain still as much as you can.
Note: If “0.0 kg /0.0 lb” and the Ready/Complete
symbol are displayed about forty-five
seconds, the scale will automatically turn off.
4. The weight of the infant or the animal can be
read after the symbol is displayed.
After about fifteen seconds, the scale will
automatically turn off.
5. Step off the scale.
k
Step off the scale
6
Page 8

Measuring Your Weight on a Carpet
Place the scale on a solid level surface, such as tile, wood, or laminate flooring.
If the scale must be used on a carpet, be sure to attach the plastic add-on feet.
Steps for Attaching the Add-on Feet
1. Each add-on foot has two pins. Match those pins to the holes on the scale leg and
insert firmly.
2. Attach add-on feet on all four legs.
Notes
Please be careful not to fall when using the add-on feet.
We recommend using this scale on a solid and level surface.
7
Page 9

Specifications
Digital display Liquid crystal display, 25 mm character height
Maximum capacity 200 kg / 450 lb
Minimum display 0.1 kg / 0.2 lb
Wireless communication WML-40AH (Mitsumi Electronics Co. Ltd.)
Bluetooth Ver.2.1 Class 1 HDP
Continua certified
Power source Four type AA batteries
(R6P or LR6, 1.5 volt x 4)
Battery life Approximately 1000 measurements
Accessories Add-on feet (4), Instruction manual, batteries(4)
Specifications are subject to change without prior notice or any obligation on the
part of the manufacturer.
Compliance with European Directives
The scale complies with the statutory EMC (Electromagnetic Compatibility)
directive 2004/108/EC. The WML-40AH is approved in accordance to
R&TTE directive transmitter module marked by , manufactured by
MITSUMI incorporated to OEM product.
Notes: Indoor use only. The displayed value may be adversely affected
under extreme electromagnetic influences.
Compliance with FCC Rules
The scale complies with part 15 of the FCC rules and contains the FCC ID
POOWML- C40 .
Compliance with Industry Canada
IC: 4250A-WMLC40.
Maintaining the Scale
Clean the scale with a soft dry cloth or a cloth moistened with water and a mild
detergent. Never use alcohol, benzine, thinner or other harsh chemicals to clean
the scale.
Remove the batteries from the battery compartment, when the scale is not going
to be used for a long time.
8
Page 10

Transmitting Data to a Continua Manager
Measurement results will be automatically transmitted to the paired Manager at
each measurement. In the case of unsuccessful transmission, the device stores
the last 25 measurements in memory. The device will send all of the data at the
next successful connection and clear memory.
Before Requesting Service
Problems Corrective Action
Nothing is displayed by pressing the
measurement switch.
Check the battery installation.
Replace all four batteries with new ones.
“88888” remains displayed.
“e- 0” is displayed.
The difference between an estimated
weight and a measured weight is
excessive.
Remove and reinstall the batteries.
Place the scale on a solid level surface.
Remove any foreign objects that might
be touching the bottom of the scale.
When the scale is placed on a carpet, be
sure that the add-on feet are attached or
try moving the scale to a level surface
such as tile or wood.
is displayed. Replace all four batteries with new ones.
If you can not locate and fix the problem, contact your supplier, or the A&D service
group. The A&D service group will support authorized suppliers with technical
information, spare parts and units.
9
Page 11

MEMO
10
Page 12

A&D Company, Limited
1-243 Asahi, Kitamoto-shi, Saitama 364-8585 JAPAN
Telephone: [81] (48) 593-1111 Fax: [81] (48) 593-1119
A&D INSTRUMENTS LTD.
Unit 24/26 Blacklands Way, Abingdon Business Park, Abingdon, Oxfordshire OX14 1DY United Kingdom
Telephone: [44] (1235) 550420 Fax: [44] (1235) 550485
A&D Australasia Pty Ltd.
32 Dew Street, Thebarton, South Australia 5031 AUSTRALIA
Telephone: [61] (8) 8301-8100 Fax: [61] (8) 8352-7409
A&D ENGINEERING, INC.
1756 Automation Parkway, San Jose, California 95131 U.S.A.
Telephone: [1] (408) 263-5333 Fax: [1] (408)263-0119
A&D KOREA Limited 한국에이.엔.디(주)
대한민국 서울시 영등포구 여의도동 36-2 맨하탄 빌딩 8층
( 8th Floor, Manhattan Bldg. 36-2 Yoido-dong, Youngdeungpo-ku, Seoul, KOREA )
Telephone: [82] (2) 780-4101 Fax: [82] (2) 782-4280
 Loading...