

Page 1
1. Read these instructions.
7
H
2. Keep these instructions.
3. Heed all warnings.
4. Follow all instructions.
5. Do not use this apparatus near water.
6. Clean only with dry cloth.
7. Do not block any ventilation openings.
8. Do not install near any heat sources as radiator, heat registers, stoves
or other apparatus (including amplifiers)) that produce heat.
9. Only use attachments/accessories specified by the manufacturer.
10. Use only with the cart, stand, tripod, braket or table
specified by the manufacturer, or sold with the
apparatus. When a cart is used, use caution when
moving the cart/apparatus combination to avoid
injury from tip-over.
11. Refer all servicing to qualified personnel. Servicing
is required when the apparatus has been damaged in
any way, such as power-supply cordor plug is damaged, liquid has
been spilled or objects have fallen into the apparatus, the apparatus
has been exposed to rain or moisture, does not operate normally, or
has been dropped.
12. Do not cover the dissipation heat sink. Leave space around the
amplifier to ensure a good ventilation.
13. The apparatus shall not be exposed to dripping or spashing and no
objects filled with liquids, such as vases, shall be placed on the
apparatus.
14. No naked flame sources, such as lighted candles,should be placed
on theapparatus.
15. Remove the battery during transportation.
is a product entirely
designed and produced in Italy
by
LIGHT
LIVE
LASTING
Frequency Response: 40Hz - 20kHz
Max Power Out: 90W
System Format: 2 way Amp
Woofer Power: 60W
Tweeter Power: 30W
Construction: Brich Plywood Cabinet
Weight: 9,5 kg
Dimensions (WxHxD) 263x384x310 mm
N.B.
For more information you can download the complete
manual from the company web site.
Bluetooth name and logo are properties of their respective owners.
Makita name is the propertie of the respective owner.
All brand name and trademarks are properties of their respective owners.
MADE IN ITALY
Page 2
B
A
is not equipped with an inner power supply system.
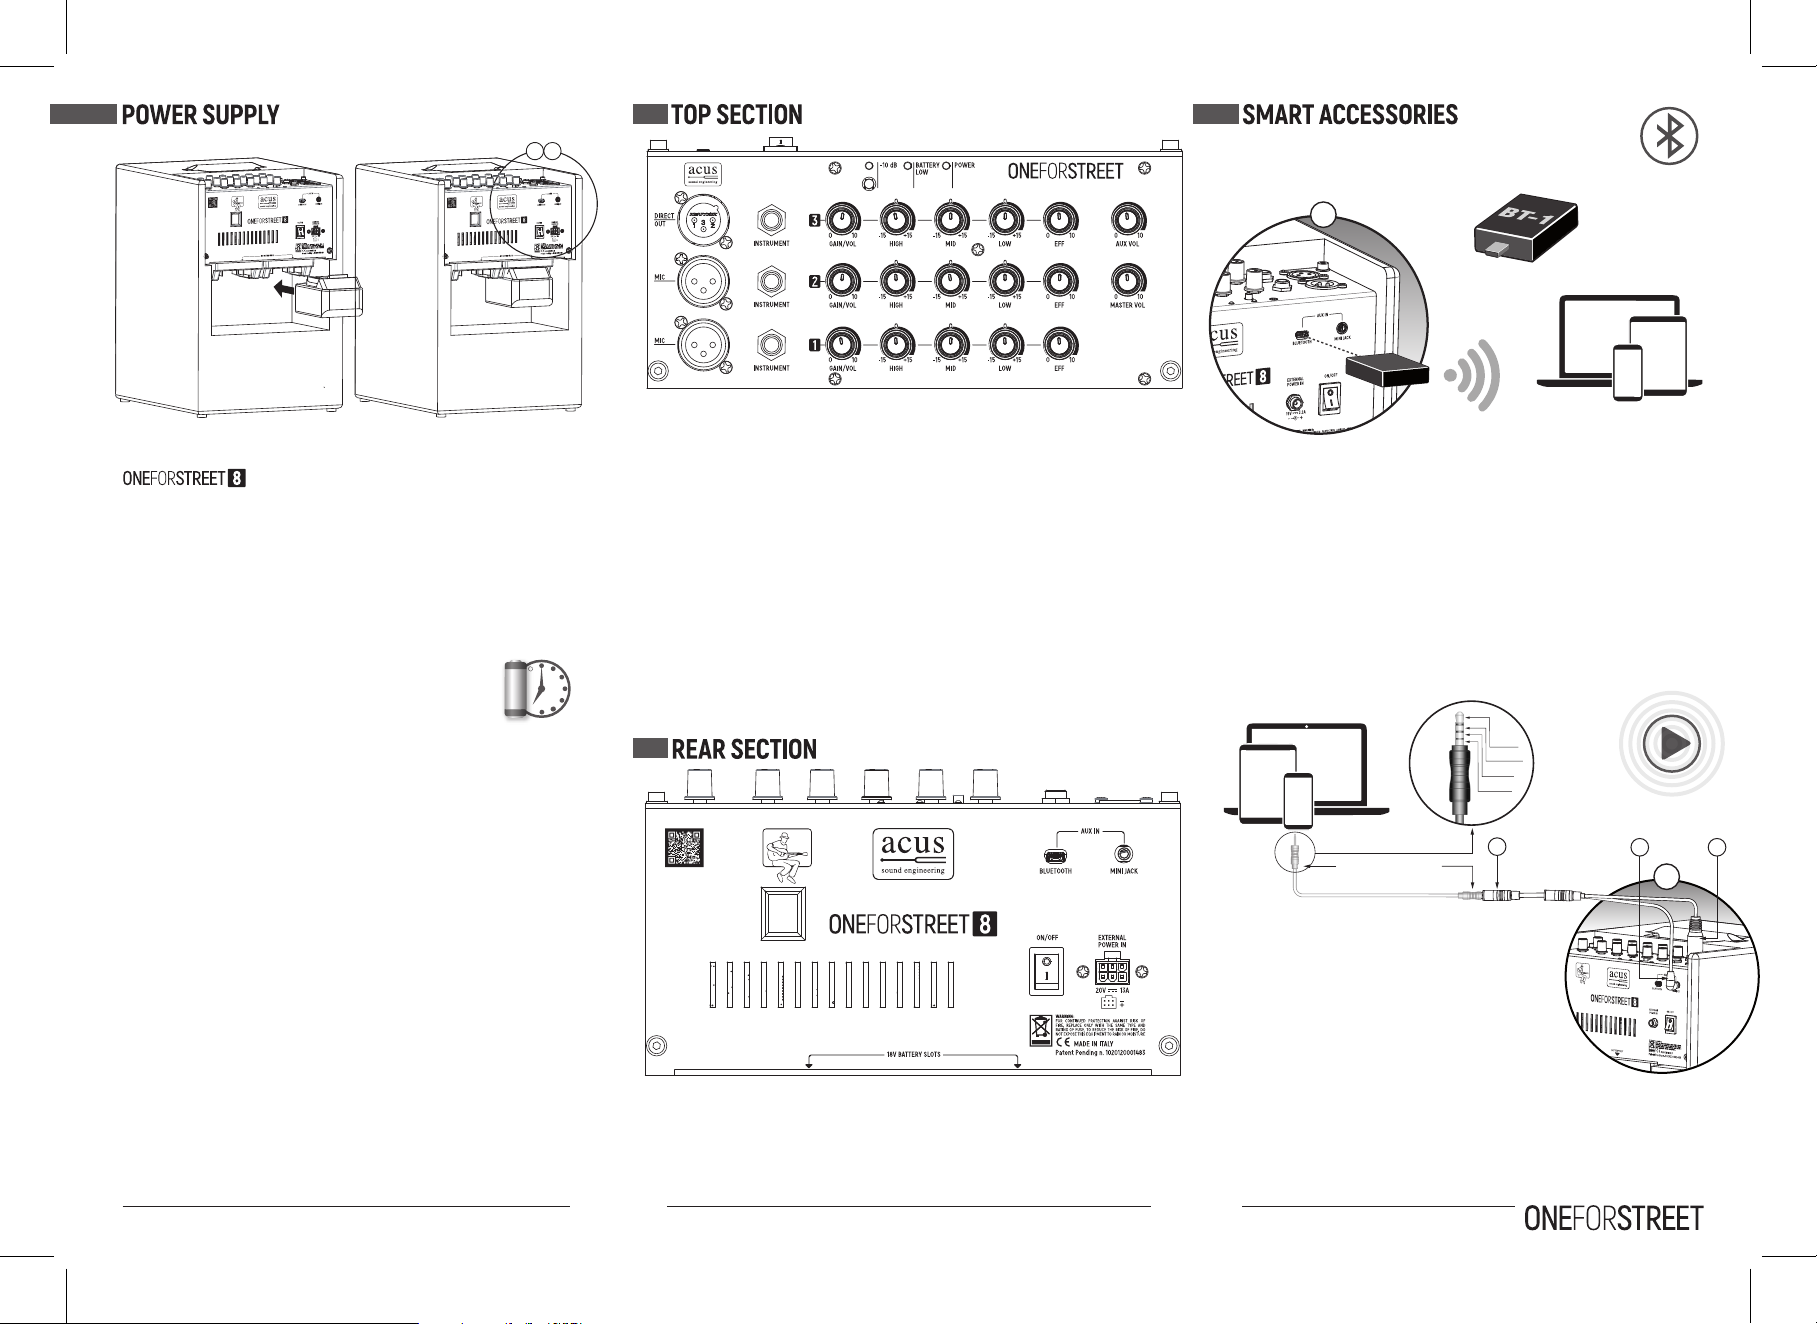
Is possible to power it with 2 types of source:
1. Battery (not included): insert the batter y in the dedicated sled
2. External Power Supply (included): connect the power supply to the
relative connector.
COMPATIBILITY:
ACUS Sound Engineering SRL suggest the use of MAKITA 18V- 3 or 5 Ah.
BATTERY POWERING:
The system has 4 operative status:
1. Battery Full: Batter y Status LED (9) is OFF
7
H
2. Slightly Discharged Battery Status: Battery Status LED ( 9)starts to
flash. In this status the LED ON Time is about 1/3 of LED Time OFF.
3. Very Low Battery Status: Battery Status LED (9) ON Time is the same
of Time ON.
4. Completely Discharged Battery Status: Battery Status LED (9 ) if
always ON and the system stops to work. In this status is necessary to
replace the battery with another one full.
WARNING:
1. Is important to recharge the battery as soon as possible.
2. Avoiding to let the ON /OFF Switch (14) when the system is not used
because the system continue to absorb energy.
3. Avoid to let a totally discharged battery inserted because the system
adsorbs a very little quantity of energy even with the ON /OFF Switch
in the OFF position, and this fact (for a long time ) will put the battery
in a very low discharged status, reducing the batter y life.
EXTERNAL POWER SUPPLY POWERING.
The system works always in "Battery Full" status, so Battery Status
LED ( 9) is always OFF.
WARNING:
Is no possible to recharge a battery with the amplifier power supply.
1.
MIC IN with 1kΩ of Impedance. You can connect any type of microphone on it, even
Condenser Microphone (this input is equipped with a Phantom power,always Active).
2. INSTRUMENT IN wit h 110kΩ of Impedance. You can connect any type of
Instrument on it. This input doesn't exclude the MIC IN (1).
3. GAIN / VOL: this knob permits to regulate the gain and the volume of the system
(its range is from -∞ to +20dB ). Moving this knob to the minimum
(0 position) puts the volume of the channel to 0. Moving it to the maximum
(10 position) put the signal level to +20dB.
4. HIGH - MID - LOW: 3 band EQ with a dynamic from -15dB to +15dB.
5. EFF:
channel Effect Level. The system is equipped with a fixed length Reverb. With
this knob is possible to regulate this Reverb Level for the channel
6. MASTER VOL: Master Volume of the system.
7. AUX VOL: AUX IN (12) Inputs Volume.
8. Power: LED for indicating if the system is ON (Led ON ) or OFF.
9. Battery status: LED for indicating the External Battery Status.
10.-10d B: pushing this switch will reduce the DIRECT OUT (11) signal level of 10dB.
This attenuation condition is indicated with a LED.
11. DIREC OUT:
12. AUX IN : section with 2 Inputs : a 3.5mm Jack and a mini-USB for Acus Ar tesia
BT-1 device. Both inputs are controlled with AUX VOL (7) knob.
13. EXTERNAL POWER IN: connector for the External Power Supply (Included).
14. ON/OFF: Power Switch for Turning-ON / OFF the system.
15. 18V BATTERY SLOTS : slot connection for powering the system with the
external battery (not included).
balanced output for connecting the system with an External System.
ACUS Artesia BT-1
A
1.
Make sure that the amplifier is powered off and connect the ACUS Artesia BT-1
Bluetooth Receiver to mini-USB AUX IN connector.
2. Turn the amplifier on. The ACUS Artesia BT-1 Bluetooth Receiver blue LED
indicator lamp should flash quickly. This lasts for about 5 seconds. Then it will
flash again every 7 seconds until it matches (or pair) successfully with another
Bluetooth device.
3. After it has matched successfully, find ACUS Artesia BT-1 as an option on your
Bluetooth Device's Settings and then select it to connect.
4. When the blue LED Indicator lamp on the ACU S Artesia BT-1 Bluetooth
Receiver is ON steady with no flashing, then the two devices have been
successfully connected.
ACUS Artesia LS-1 - TRRS ADAPTER for your live streaming
LEFT
RIGHT
GND
MIC
CABLE NOT INCLUDED
3
1. 3.5 mm Right-Angle Stereo Plug:
connect to AUX IN Input.
2. 3-Pole XLR Female Connector:
connect to DIRECT OUT output.
3. 3.5 mm TRRS Jack Connector: connect to
recording /reproduction device used for your Live
Streaming with a 3.5mm TRRS Plug to Plug cable
(not included).
Suggestions: for obtaining better configuration is very
important to have a moderate volume to the amplifier DIRECT OUT output.
If the amplifier is equipped with the attenuation switch (labeled with -10dB)
push this switch for a very easy and fast signal level matching.
If the amplifier is not equipped with this switch, for best configuration please
reduce all channel volume more than half and then regulate the amplifier
master volume for obtaining the right sound to the speaker.
1
B
2
 Loading...