

Acura ZDX NAVIGATION 2012 Owner Manual

201
2 ZDX
Navigation Manual
(Unlinked)
This document does not contain hyperlinks and may be formatted for printing instead of
web use. This is due to changes in content and specifications of the vehicle that happen
throughout the model year. This manual will be replaced with a hyperlinked version at the
end of the model year.
© 2011 Honda Motor Co., Ltd. P/N 00X31-SZN-8200
The information and specifications included in this publication were in effect at the time of approval for printing. Honda Motor Co., Ltd., reserves the right,
however, to discontinue or change specifications or design at any time without notice and without incurring any obligation.
Accessories Precautions
The GPS antenna is located in the dashboard. Metallic front or side window tinting can seriously degrade or obstruct GPS reception.
Signal noise from devices such as radar detectors, vehicle tracking devices, remote starters, and additional amplifiers can disrupt the navigation system. If you
install any such item, install it away from the navigation display and antenna.
Important Safety Information
WARNING
Using the navigation system while driving can take your
attention away from the road, causing a crash in which you
could be seriously injured or killed.
Only operate system controls when the conditions permit you
to safely do so.
Avoid focusing on the screen or manually operating the system controls while driving.
Enter information before you begin driving or when stopped. As you drive, listen to the audible instructions and use voice commands when possible. Pull to the
side of the road if you need more time to look at the screen or operate the controls.
Route guidance may conflict with street closures, road construction, detours, and out-of-date map data.
The system itself may also have limitations. Verify route information by carefully observing roads, signs, and signals. Always use your own judgment and obey
traffic laws.
System Limitations P. 222
2
NOTICE
Clean the screen with a soft, damp cloth. You may use a mild cleaner intended for use on navigation screens.

2 System Setup P. 19
Start-up 20 Voice Control System 22 Interface Settings 24 Personal Information 36
Music Search 44 Routing & Guidance 48 Clock Adjustment 58 Vehicle 60
AcuraLink® 63 Traffic and Weather Status 64 Data Reset 65
2 Navigation P. 67
Entering a Destination 68 Calculating the Route 90 Driving to Your Destination 93 Map Menu 98
Changing Your Route 121 Changing Your Destination 128 Resuming Your Trip 132
2 Audio P. 133
Audio System 134 Playing FM/AM Radio 136 Playing XM® Radio 140 Playing a Disc 145
Playing Hard Disc Drive (HDD)
Audio 149
Playing Bluetooth®
Audio 168
Playing an iPod® 159 Searching for Music Using
Adjusting the Sound 170 Audio Remote Controls 171
Song By Voice™ (SBV) 163
Playing a USB Flash
Drive 164
2 Bluetooth® HandsFreeLink® P. 173
Bluetooth®
HandsFreeLink® 174
Editing User Name and
PIN 183
Pairing a Phone 176 Importing Phonebook
Making a Call 184 Receiving a Call 187 HFL Menus 188
Data 180
Setting Up Speed
Dialing 181
2 AcuraLink® Messages P. 191
AcuraLink® Messages 192 Reading Messages 192 Message Categories 193 Message Options 194
Dealer Appointments 195
2 Other Features P. 197
Calendar 198 Calculator 200 Information Functions 202 Multi-view Rear Camera 206
2 Troubleshooting P. 207
Troubleshooting 208 Error Messages 215
2 Reference Information P. 219
System Initialization 220 System Limitations 222 Client Assistance 224 Legal Information 227
Contents
Quick Reference Guide
System Setup
Navigation
Bluetooth
® HandsFreeLink®
AcuraLink® Messages
Other Features
Troubleshooting
Reference Information
Voice Commands
Audio
P.2
P.19
P.67
P.133
P.173
P.191
P.197
P.207
P.219
P.233
2 Voice Commands P. 233
Voice Commands 234
Index
P.245

Overview—Functions at a Glance
(P41)
(P37)
(P68)
(P91)
(P93)
(P122)
(P123)
Subscription service
Quick Reference Guide
Navigation
You can select any place/landmark as a destination by using voice control or the Interface Dial. The navigation
system gives you turn-by-turn driving directions to your destination.
2
Store home addresses (
Register
2 home addresses.
Store contacts
Store up to
200 contacts in 2 address books.
Enter destination
Select your destination using
Select route
Set route preferences and select one of
Track route
Follow your route in real-time with voice guidance.
AcuraLink Real-Time Traffic™ (P119)
Bypass congestion and traffic incidents.
AcuraLink Real-Time Weather™ (P114)
Access weather information.
Avoid certain areas
Set streets and areas to detour around.
Add waypoints
Add up to
4 “pit stops” along your route.
12 methods.
3 routes.

(P206)
Audio
(P136)
(P140)
(P145)
(P149)
(P159)
(P164)
(P168)
(P192)
(P22)
(P174)
The advanced audio system provides clear, well-defined sound and makes the most of your music.
Enjoy listening to a variety of audio sources, such as:
Quick Reference Guide
AM/FM Radio
XM® Radio
Compact Disc
Hard Disk Drive (HDD)
iPod®
USB Flash Drive
Bluetooth® Audio
AcuraLink®
AcuraLink® provides you with important information and messages between your vehicle and Acura.
AcuraLink Messages
Display messages from Acura, tips, and other information.
Voice Control
Use voice commands for safer system control while driving. You can operate all key functions of
the navigation, audio, Bluetooth® HandsFreeLink®, and climate control systems.
Bluetooth® HandsFreeLink®
Pair a compatible cell phone to receive incoming and make outgoing calls. You can operate the
phone features without ever taking your hands off the wheel.
Other Features
Multi-view Rear Camera (
Helps you check for obstacles around the rear of your vehicle on the navigation screen when reversing.
3
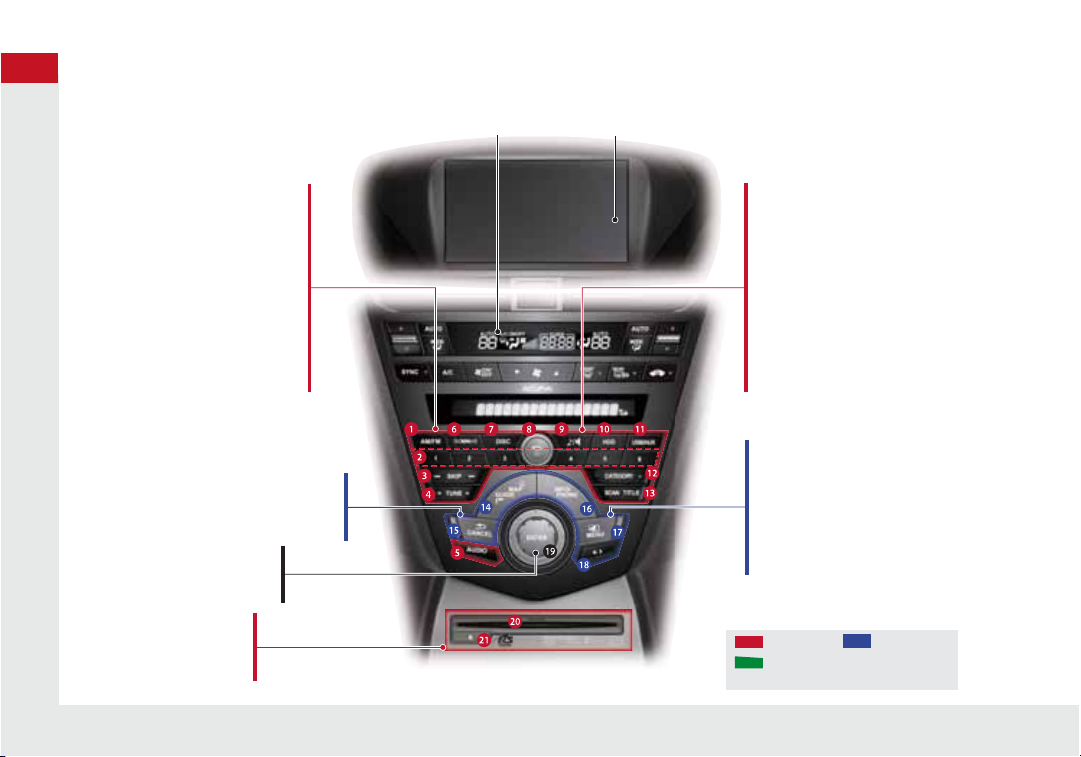
System Controls
8 VOL 9 (Volume/Power)
Knob
(P6)
Display
9 8 (Sound) Button
(P170)
la HDD Button (P145)
3 SKIP Bar (P6)
1 AM/FM Button (P136)
2 Preset Buttons (P6)
4 TUNE Bar (P6)
5 AUDIO Button (P7)
6 XM Button (P140)
7 DISC Button (P6)
le MAP/GUIDE Button (P103)
lf CANCEL Button
lj Interface Dial/ENTER
Button
(P8)
ma Disc Slot (P6)
mb E (Eject) Button
Navigation Screen
Audio
Navigation
Voice Control
Bluetooth® HandsFreeLink®
lb USB/AUX Button (P159)
lc CATEGORY Bar (P6)
ld SCAN/TITLE Bar (P6)
lg INFO/PHONE Button
(P174)
lh MENU Button (P68)
li a (Display Mode)
Button
(P29)
Quick Reference Guide
4
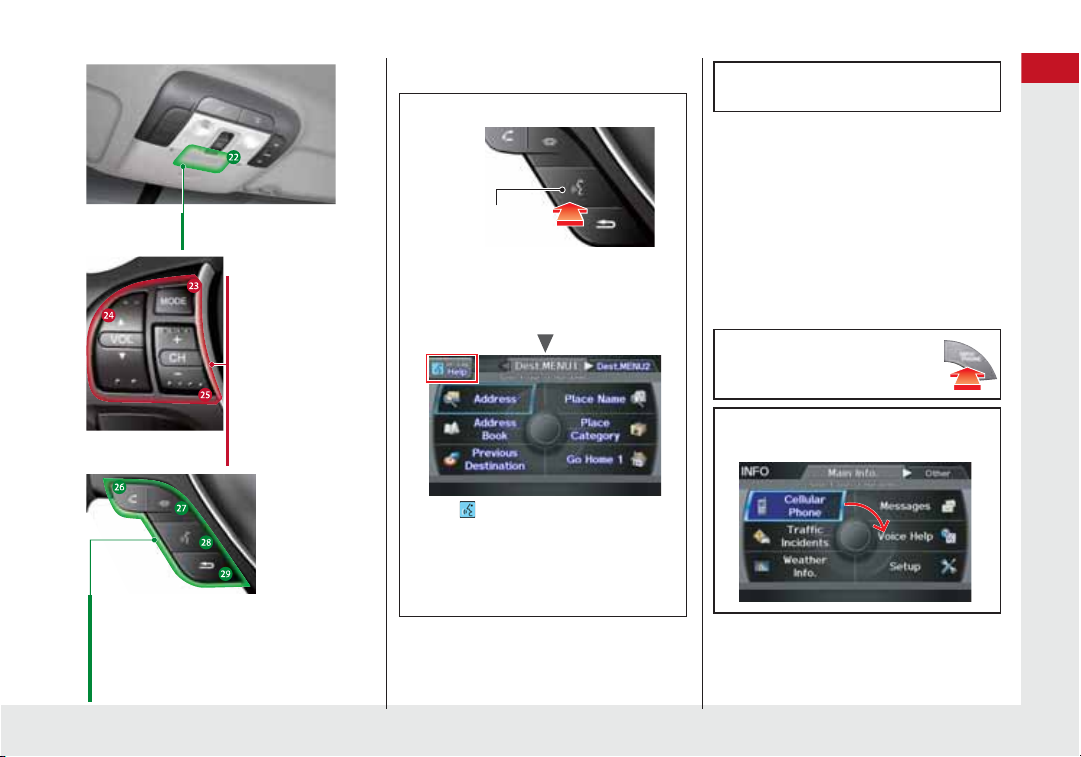
mc Microphone
(P22)
md MODE Button
(P171)
me VOL (Volume)
Button
(P171)
mf CH (Channel)
Button
(P172)
mj K (Back) Button
mi d (Talk) Button
(P5)
mh j (Hang-Up) Button (P187)
mg h (Pick-Up) Button (P187)
(P22)
Voice Control Operation
a Press and release the d (Talk) button.
d (Talk Button)
A helpful prompt asks what you
would like to do. Press and release the
d (Talk) button again to bypass this
prompt.
The icon is displayed and the
system beeps when ready for a
command. Press the K (Back) button
to cancel.
Available voice commands are
highlighted on the screen.
b Say a voice command.
Voice Comand Index (P233)
The audio system is muted during voice
control mode.
Carefully read the usage note for the voice
control. Voice Control System (
Voice Help
This navigation system comes with Voice
Help information, which tells you how to
use the voice command functions.
Go to Voice Help for tips when using the
voice command functions.
a Press the INFO/PHONE
button.
b Rotate i to select Voice Help.
Press u.
Quick Reference Guide
5
Audio System
TITLE
Displays track title, artist, and other text
information, if available.
8
Bass, treble, and balance settings.
1 to 6
Preset stations (FM/AM) and channels (XM).
SKIP
Finds stations with strong signal (FM/AM).
Skip to start/end of tracks, or press and hold
to fast reverse/forward (Disc).
SCAN
Plays 10-second sample of each station (FM/
AM), channel (XM), or track (Disc).
Press again to play the current selection.
TUNE
Tunes to next frequency
(FM/AM) or channel (XM).
Fast-reverse/forward.
CATEGORY
Selects next category (XM) or next folder
(WMA, MP3, AAC).
Quick Reference Guide
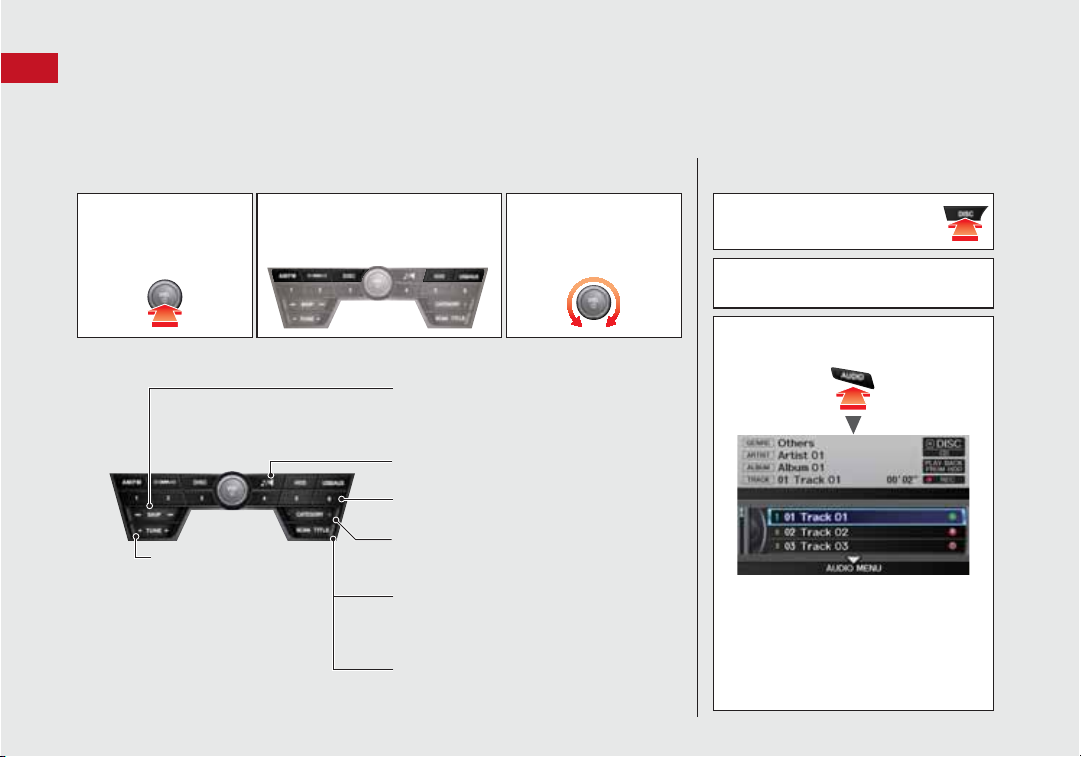
You can play music from a wide array of media sources. You can also control the audio system using voice commands.
Basic Operation
a Press the VOL 9
(Volume/Power)
knob to turn the
audio system on/off.
Audio Buttons
6
b Select the audio source. c Rotate the VOL 9
(Volume/Power)
knob to adjust the
volume.
Loading a Disc
a Press the DISC button.
b Insert a disc into the disc slot.
The disc automatically starts playing.
c Press the AUDIO button to display
the audio screen.
Select an audio source (e.g., FM/AM)
to stop the disc.
Press the E (Eject) button to remove
the disc. If you eject but do not
remove the disc, the disc
automatically reloads after a few
seconds.
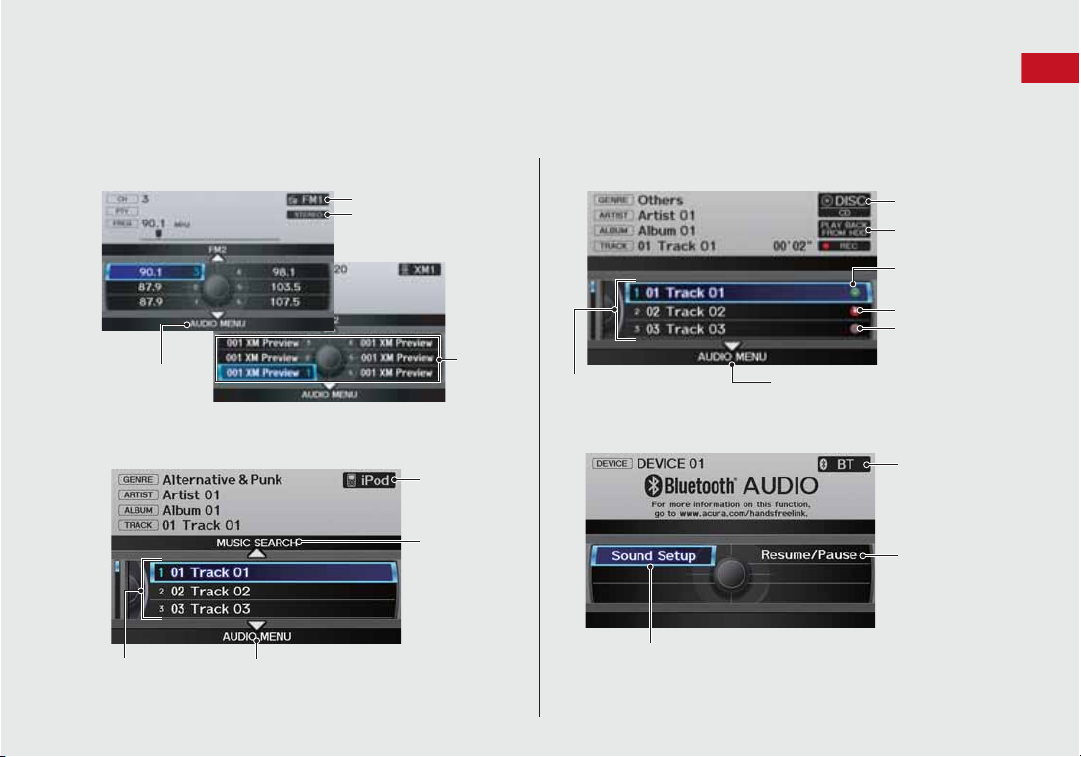
Audio Control Display
(P136)
(P140)
(P149)
(P159)
(P164)
Band
Stereo indicator
Presets
Tune, scan, and
other functions
(P145)
(P168)
Disc mode
Play mode
Recorded
icon
Recording icon
Recording
ready icon
Repeat, random, scan, and
other functions
Track list
Bluetooth®
Audio mode
Stop/Start
control
Sound preferences
Press the AUDIO button to display the audio system on the navigation screen.
Quick Reference Guide
FM/AM Radio
, XM® Radio
Hard Disk Drive (HDD)
,USB Flash Drive
Track list
Repeat, shuffle, and other functions
, iPod®
iPod® mode
(HDD mode,
USB mode)
Search
menu
Compact Disc (
Bluetooth® Audio
7

Interface Dial/ENTER Button Operation
You will see these icons in each chapter.
They represent how you can operate the Interface Dial.
Changes scale
Map screens
Highlights menu options
Menu screens
Rotate dial
Press ENTER
Move up Move left Move down Move right
Scrolls map
(8 directions)
Menu screens
Selects labeled
function
Menu screens
Selects function
Selects map icon
Map screens
Selecting Icon
Selects highlighted option
Menu screens
Rotate dial i Press ENTER u
Move
e up r down w left y right
Quick Reference Guide
8
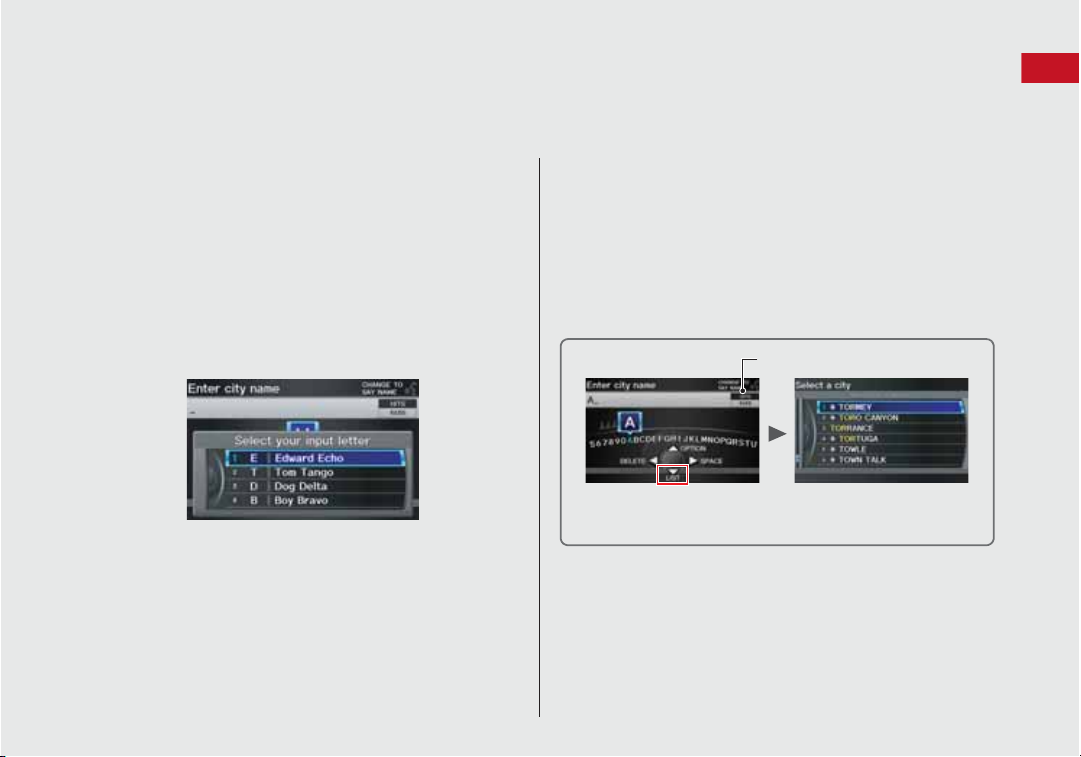
How to Enter Information
You can enter information (e.g., city names, street names, personal names, and business names comprising letters, numbers, and symbols)
when prompted on input screens by two different methods.
Quick Reference Guide
Using Voice Control
When you see d in this manual, voice commands are available for
that feature.
z Say the letter, number, or symbol (e.g., say d “A”).
z Use spelling assist (e.g., say d “Alpha” to enter the letter “A” or
d “Hyphen” to enter a hyphen).
z The system beeps if you say an unavailable (grayed out) letter or
number.
z If a voice command is not recognized, a list is displayed with
possible options.
On list screens:
z Say the number of the list item (e.g., say d “Five” to select item
5).
z Say d “Up” or d “Previous” to scroll up one page.
z Say d “Down” or d “Next” to scroll down one page.
Using the Interface Dial
Rotate i to highlight a character.
The # (pound symbol) or @ (at symbol) displays symbols.
z Move e to select OPTION to display accented and upper/lower
case characters.
Press to enter the highlighted character.
z Move y to select SPACE to enter a space character.
z Move w to select DELETE to remove the last entered character.
Number of Hits
On input search screens, the number of hits in the map database is
displayed. Move r to select LIST to display a list of possible entries.
9
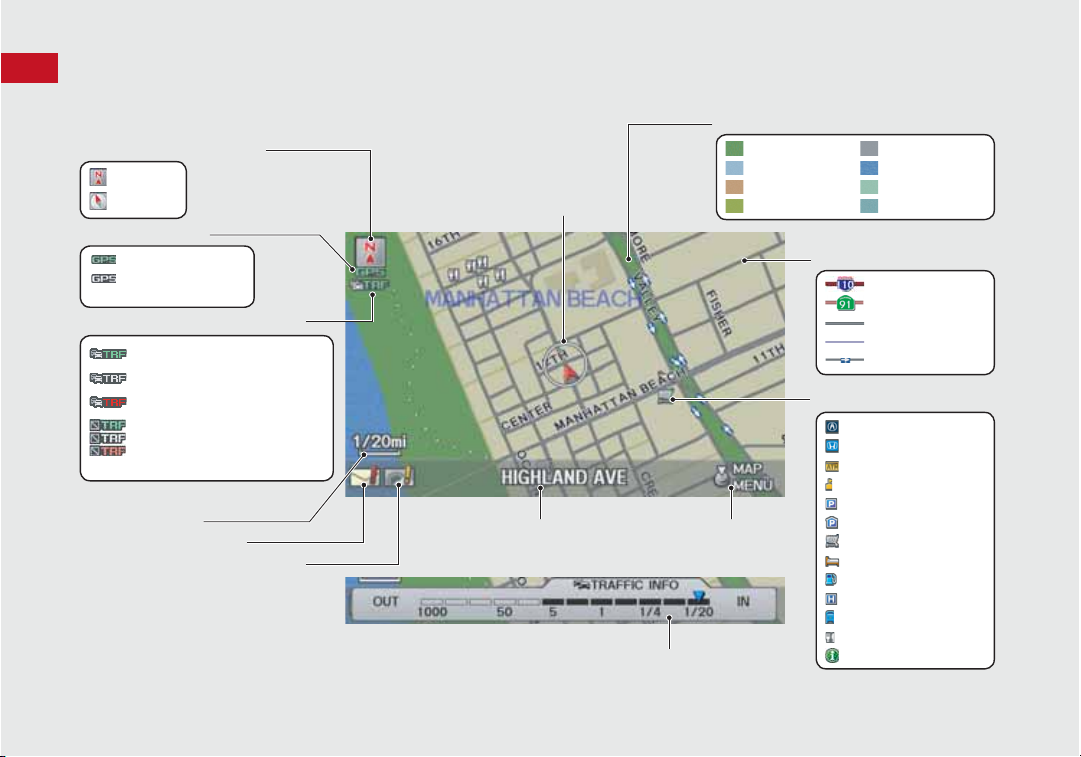
Map Screen Legend
Map orientation (P108)
GPS signal strength
North up
Heading up
Best reception
Good reception
No icon: Poor/No reception
Traffic status indicator (P119)
Traffic information available
Flow or incident data not available
Traffic information not available
Traffic information off or map
scale too large
No icon: Out of coverage area
Current map scale
Message icon (P192)
Weather warning icon (P116)
Current street name
Map menu (P98)
Map scale (P111)
Current vehicle position(P109)
Feature areas
Streets
Landmark icons (P106)
Park
Hospital
Shopping Mall
Golf Course
Airport/Business
Water Area
Cemetery
University
Freeways
State routes
Verified streets
Unverified streets
One-way streets
Acura dealer
Honda dealer
ATM
School
Parking lot
Parking garage
Grocery store
Hotel/Lodging
Gas station
Hospital
Post office
Restaurant
Freeway exit information
Quick Reference Guide
10
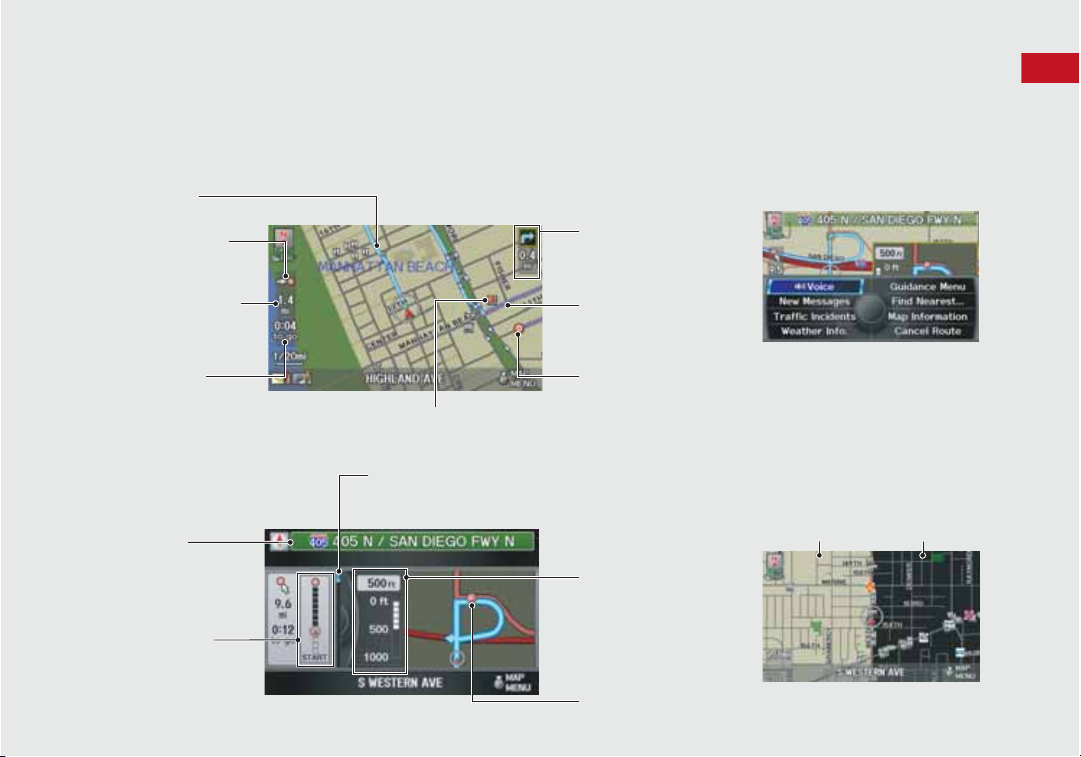
During Route Guidance
Calculated route
(P93)
Destination direction
indicator
Direction “as the crow
flies”
Next guidance
indicator
Distance to the next
guidance point.
Distance to destination
Distance of the actual
route.
Estimated time to
destination
Waypoint (P123)
Destination icon
(P92)
Calculated route
(unverified roads)
(P94)
Street name of
guidance point
Route guidance list scroll bar
Rotate i to scroll the list of
guidance points.
Route progress bar
Distance to
guidance point
No entry icon
During route guidance, route information is displayed on the map screen and guidance screen.
Press the MAP/GUIDE button to toggle between the map and guidance screen.
Map Screen
Quick Reference Guide
Map Menu
Contains map or routing options.
Guidance Screen
Day or Night Mode
Press the a (Display mode) button
to manually switch between day and
night mode.
Day mode Night mode
11
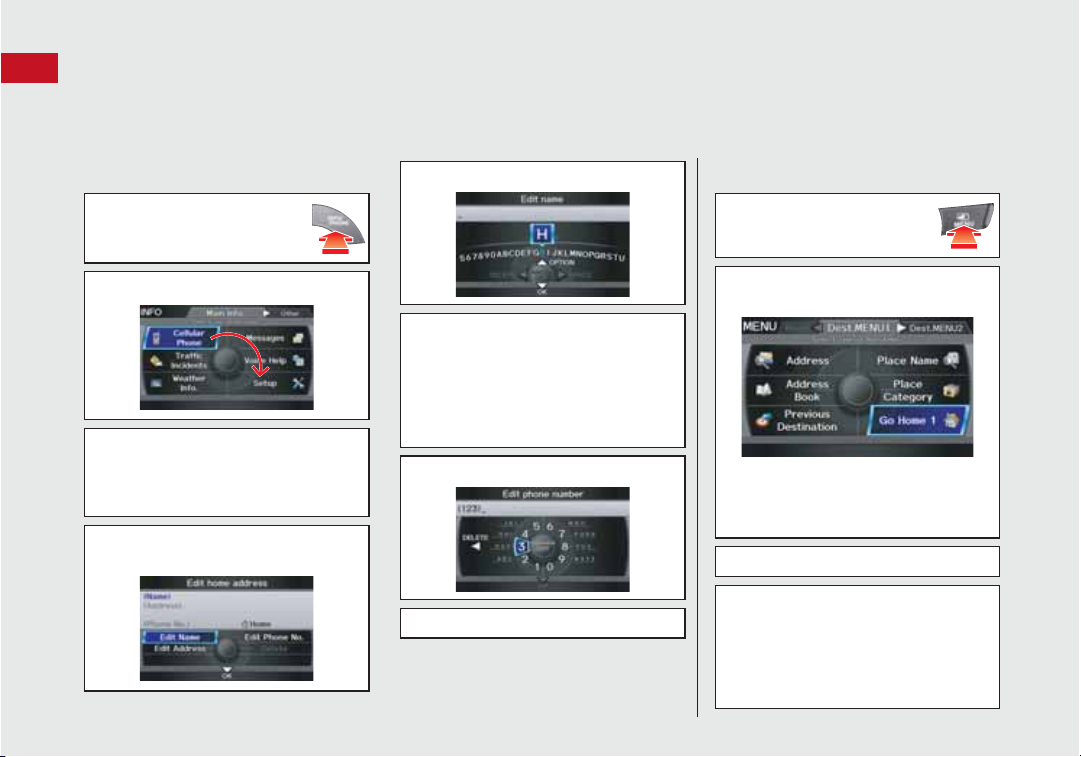
Navigation—Home Addresses and Going Home
Quick Reference Guide
The “Home” feature automatically routes you to your home address from any location simply by selecting Go Home 1 or 2, or saying d “Go
Home.” You can store two home addresses as Home Address 1 and Home Address 2. (P41)
Storing Your Home Address
a Press the INFO/PHONE
button.
b Rotate i to select Setup. Press u.
c Rotate i to select Personal
Information. Press u.
d Rotate i to select Home Address 1.
Press u.
e Rotate i to select Edit Name. Press
u.
12
f Enter a name.
g Rotate i to select Edit Address.
Press u.
h Rotate i to select Address. Press u.
i Enter an address.
j Rotate i to select Edit Phone No.
Press u.
k Enter a phone number.
l Move r to select OK.
Going Home
a Press the MENU button.
b Rotate i to select Go Home 1. Press
u.
Alternatively, you can say d “Go
Home” from any screen. Your home
address is displayed on the Calculate
Route screen.
c Move r to select OK.
z The following voice commands are
available: say d “Go Home,” d “Go
Home 1,” d “Go Home 2.”
z If you have two home addresses stored,
saying d “Go Home” will select Home
Address 1.
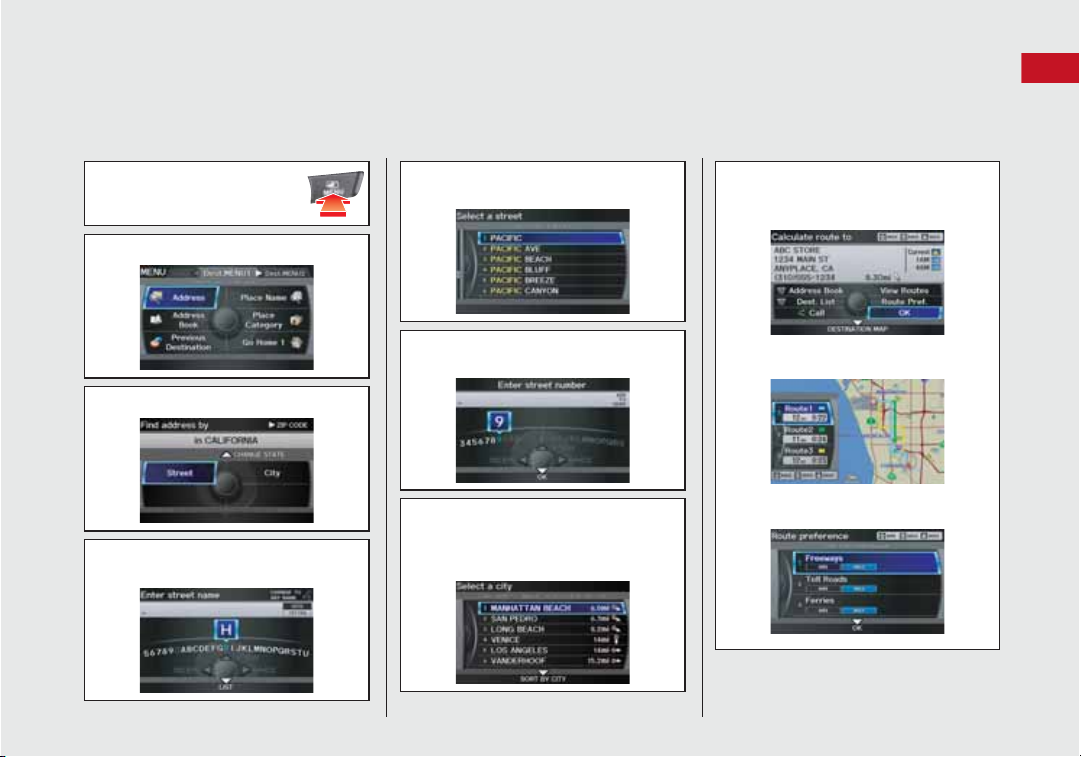
Navigation—Entering a Destination
Enter your destination using one of several methods, then follow route guidance on the map or guidance screen to your destination. You
can also perform these steps using d voice control.
Quick Reference Guide
a Press the MENU button.
b Rotate i to select Address. Press u.
c Rotate i to select Street. Press u.
d Enter the name of your destination
street.
e Rotate i to select your destination
street from the list. Press u.
f Enter the street number. Move r to
select OK when finished.
g If there is more than one city with the
specified street, a list of cities is
displayed. Rotate i to select the
desired city from the list. Press u.
h Rotate i to select OK. Press u.
Route guidance to the destination
begins.
z Select View Routes: Choose one of
three routes.
z Select Route Pref.: Choose MAX or MIN
for the three settings.
13
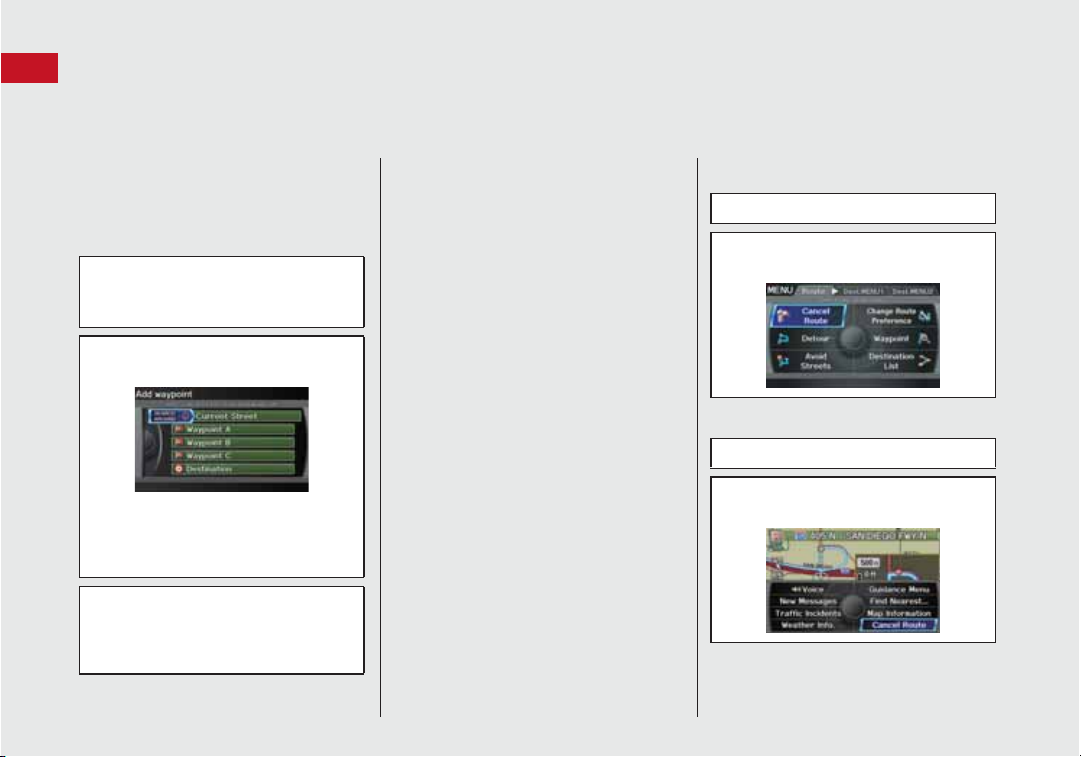
Navigation—Changing Route or Destination
Quick Reference Guide
You can alter your route by adding waypoints to visit, adding streets to avoid, or changing your destination during route guidance.
Adding a Waypoint
(“Pit Stop”)
You can add up to four waypoints along
your route. (P123)
a Press the MENU button.
b Rotate i to select Waypoint. Press
u.
c Rotate i to select location and
search method. Press u.
z SEARCH AROUND: Search around a
location.
z SEARCH ALONG: Search between two
locations.
d Select the icon category and location
to add to the Destination List when
prompted.
e Move r to select OK.
14
Changing Your
Destination
There are four methods you can use to
specify a new destination during route
guidance.
z Say d “Find Nearest…” (P128)
Searches for the nearest place/landmark
on the map screen (e.g., d “Find
nearest gas station”).
z Say d “Go Home” (P12)
Routes to your home address.
z Selecting an icon on the map (P129)
Scroll the map to position the cursor over
a place/landmark icon or a new area on
the map. Press u twice.
z Entering a new destination (P130)
Press the MENU button. Move y to
select Dest.MENU1/2 and enter a new
destination.
Canceling Your Route
a Press the MENU button.
b Rotate i to select Cancel Route.
Press u.
From the map screen:
a Press u to select Map Menu.
b Rotate i to select Cancel Route.
Press u.
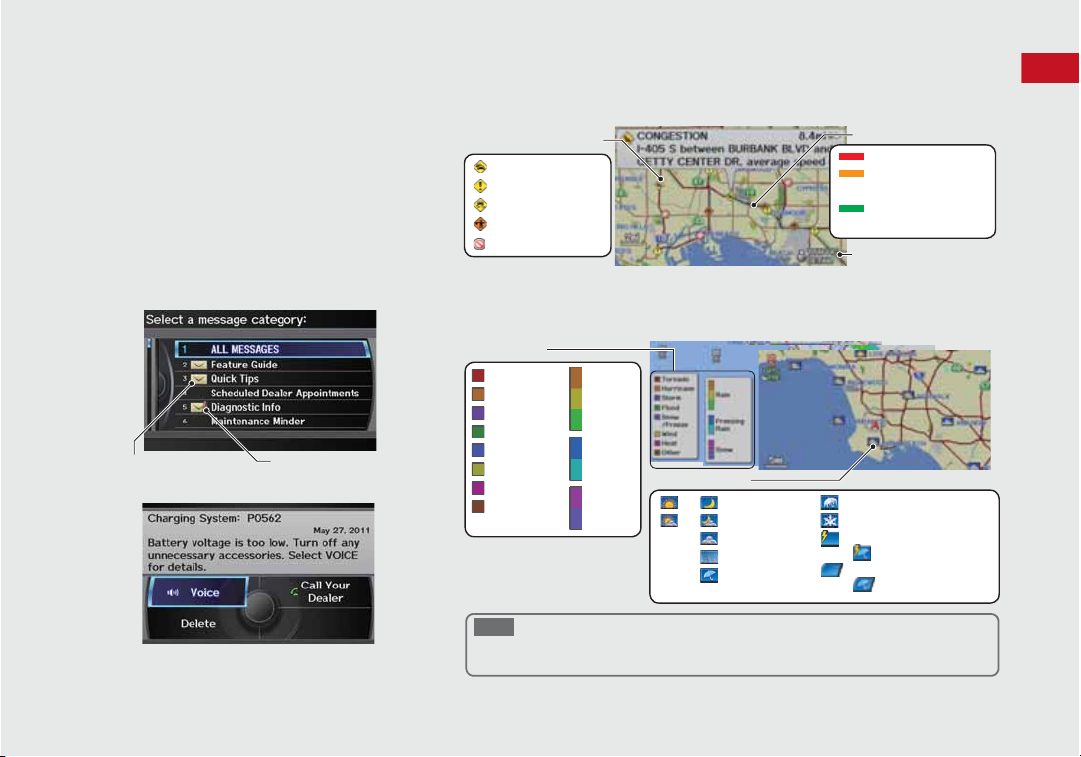
AcuraLink®
(P191)
Traffic incident icons
Congestion
Incident
Weather
Construction
Road Closed
Traffic flow indicator
Heavy (0 – 27 mph)
Moderate
(27 – 52 mph)
Free-flowing
(52+ mph)
Traffic incident details
Color index
Tornado
Hurricane
Storm
Flood
Snow/Freeze
Wind
Heat
Other
Rain
Freezing
rain
Snow
Weather icons
or Clear
Possibility of lightning
(e.g., rain and lightning)
AcuraLink Real-Time Traffic and Weather are fee-based subscription services,
with a complimentary 90-day trial upon first retail purchase.
NOTE
AcuraLink® Messages
AcuraLink Real-Time Traffic™
Displays continuously updated traffic information and recalculates your route in
response to traffic flow, incidents, or road closures. (P119)
AcuraLink® provides a direct communication link
between you and Acura. It sends and receives several
kinds of messages through XM® Radio, including:
z Vehicle feature guide
z Operating quick tips
z Safety and maintenance information
z Diagnostic information
z Dealer appointment and maintenance reminders
AcuraLink Real-Time Weather™
Displays continuously updated weather information and weather forecasts, and
provides weather warnings along your route. (P114)
Unread message Important message
Example of an AcuraLink® Message
If you have linked your cell phone to the Bluetooth®
HandsFreeLink®, you can contact your Acura dealer
from this screen.
or Partly cloudy
Cloudy
Fog
Rain
Freezing rain
Snow
Possibility of high winds
(e.g., rain and wind)
Quick Reference Guide
15

Troubleshooting For more Information
(P207)
Quick Reference Guide
16
Why does the vehicle position icon on the map “lag” a
short distance behind my actual position, especially at
intersections?
This is normal. The navigation system is unaware of the
width of intersections. Large differences in vehicle position
can indicate a temporary loss of the GPS signal.
Why does the “time to destination” display sometimes
increase even though I am getting closer to my
destination?
The “time to destination” is based on the posted road
speed signs and your actual road speed to give you a
better estimate of arrival time.
Why does my clock frequently change the time forward
and backward by one hour?
The clock setting is automatically updated based on your
GPS location. If you normally drive between two time
zones, the clock may keep adjusting the time. You can
turn this feature off.
2
Clock Adjustment P. 58
How do I specify a destination when an entered city or
street could not be found?
Try entering the street first. Some cities are lumped in with
a major metro area. In rural “unverified” areas or new
subdivisions, streets may be missing or only partially
numbered.
How do I turn on the navigation system voice guidance?
1. Press the INFO/PHONE button. Rotate i to select
Setup and press u. Check that Volume is not set to
OFF.
2. Move y to select Other, rotate i to select Basic
Settings, and press u. Set Voice Recognition
Feedback to ON if you want the system to provide
confirmations and system prompts.
My battery was disconnected or went dead, and the
navigation system is asking for a code. Where do I find it?
Your vehicle comes with a card in the glove box that
includes the 5-digit security code and serial number. You
should keep this card in a safe place outside your vehicle. If
you cannot find it, contact your dealer.

How to Use This Manual
C
C
(P1)
(P245)
This section explains different methods on how you can easily find information in this manual.
Searching the Table of Contents
Two types of Tables of Contents help
you find your desired information.
More Detailed
Contents
Table of Contents Chapter Contents
First, find the general chapter related to
what you are looking for (e.g., entering
a destination from the Address Book).
Then, go to that chapter to view a more
specific table of contents.
This more detailed table of contents
shows you exactly what information is
listed by section and title.
Searching the Index
Menu items displayed on the
navigation screen (e.g., Address Book)
can be found individually in the Index.
Navigation Screen Index
The Index consists of main
terms and sub-entries. The
sub-entries help you get to
the desired page depending
on what you are looking
for.
Go to the
Next Page
17
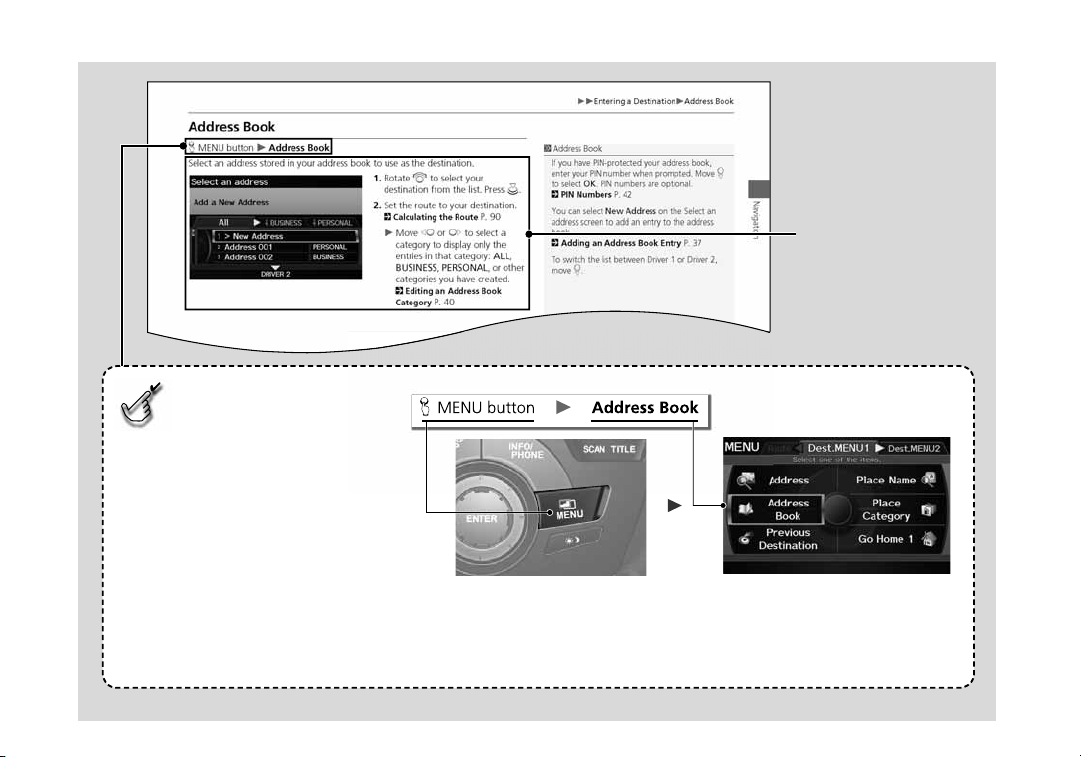
Menu Tree
The menu tree helps guide you
through the system’s menu options.
To get to your desired function, follow
the menu tree in order of the steps
shown.
NOTE:
All menu options can also be
activated with voice commands.
Press the hard button on the
system control panel.
Press the MENU button.
Select the menu option with the
Interface Dial.
Rotate i to select Address Book.
Press u.
After following the menu
tree, step-by-step
instructions explain how to
achieve the desired result.
* Sample pages and images in this section may differ from the actual ones.
18

System Setup
This section describes the start-up procedure, and the navigation and
audio system setup functions.
Start-up ................................................... 20
Voice Control System ............................. 22
Command Input .................................... 22
Voice Recognition .................................. 23
Interface Settings ................................... 24
Display and Volume Settings.................. 24
Interface Dial Feedback .......................... 25
Basic Settings......................................... 26
Color ..................................................... 27
Language............................................... 31
Wallpaper .............................................. 32
Personal Information .............................. 36
Address Book......................................... 37
Home Addresses .................................... 41
PIN Numbers...........................................42
Previous Destinations ..............................43
Music Search ............................................44
Song By Voice™ (SBV) ............................45
Phonetic Modification .............................46
Routing & Guidance ................................48
Rerouting................................................49
Unverified Area Routing..........................50
Traffic Rerouting .....................................52
Edit Avoid Area.......................................53
Edit Waypoint Search Area......................55
Street Name Guidance ............................56
Guidance Screen Interruption..................57
Clock Adjustment.................................... 58
Adjust Time............................................ 59
Resetting the Clock Settings................... 59
Vehicle ..................................................... 60
Off-road Tracking................................... 61
Correct Vehicle Position ......................... 62
AcuraLink®.............................................. 63
AcuraLink/Messages............................... 63
Traffic and Weather Status.................... 64
Data Reset ............................................... 65
Reset Factory Default Settings ................ 65
Clear Personal Data................................ 66
19
System Setup
Start-up
1 Start-up
If the navigation system loses power at any time,
you may be prompted for the 5-digit security
code.
2 System Initialization P. 220
At start-up, the driver’s fob key is automatically
detected and the address book settings, setup
preferences, wallpapers, and audio settings for
that driver (e.g., Driver 1) are loaded.
Message Icon
If you have any unread messages, the
(message) icon is displayed at the bottom left
side of the screen.
2 AcuraLink® Messages P. 192
You can change the system language at any
time.
2 Language P. 31
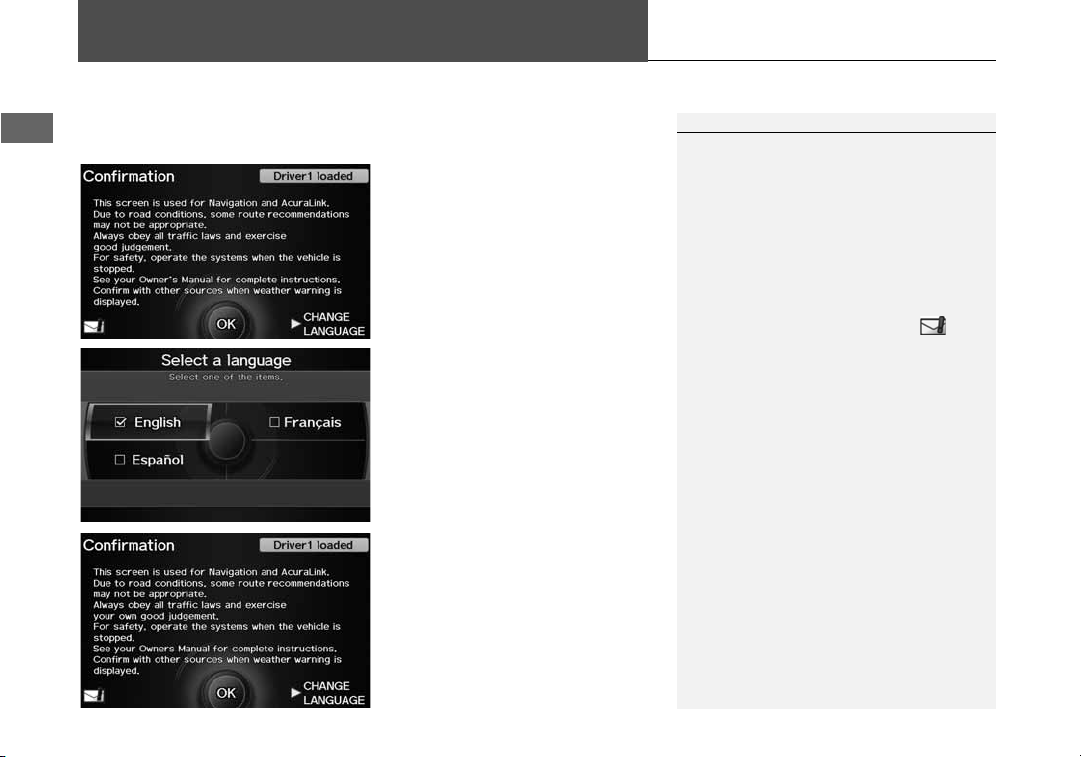
“OK” on the Confirmation screen cannot be
activated by voice. If you do not press u within
30 seconds, the screen goes blank (or displays
your wallpaper screen and you cannot use voice
commands). Press any navigation or voice control
button to continue.
2 Wallpaper P. 32
The navigation system starts automatically when you turn the ignition to
ACCESSORY (I) or ON (II). At start-up, the following Confirmation screen is displayed.
1. Move y to select CHANGE
LANGUAGE.
X
If you do not need to change
the system language, proceed to
step 3.
2. Rotate i to change the system
language. Press u.
3. Press u to select OK.
X
Your current position is
displayed on the map screen.
X
If you have set any calendar
event reminders, they are
displayed. Proceed to step 4.
20
System Setup
1 Start-up
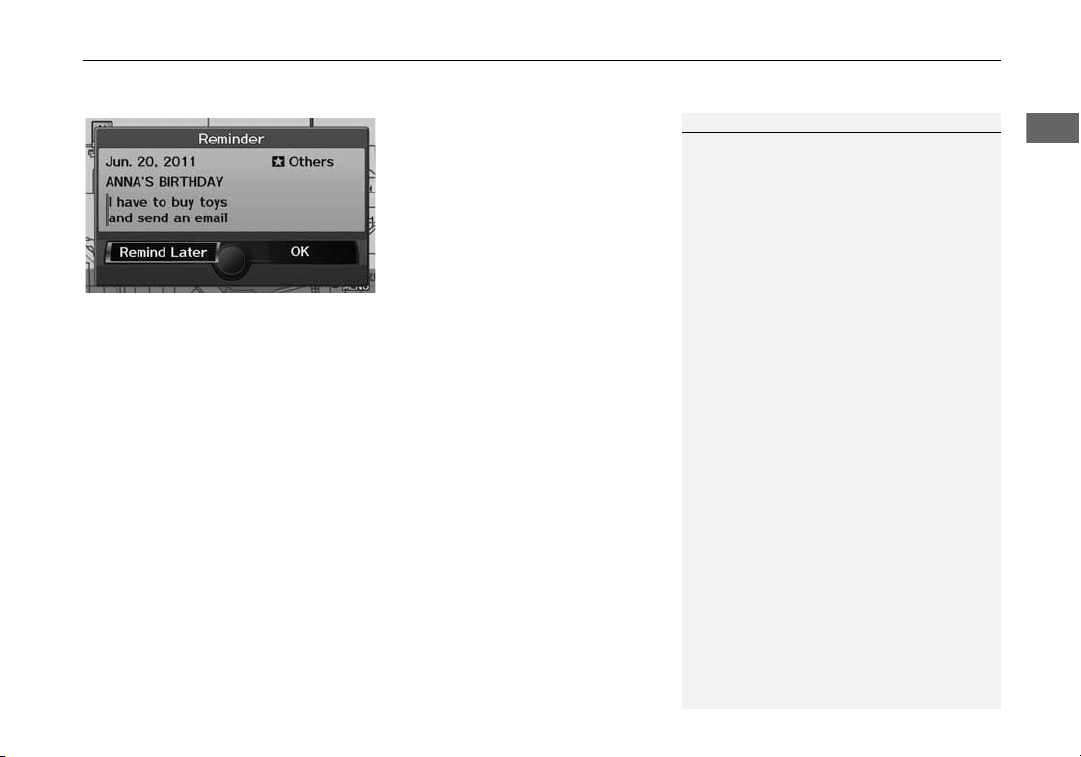
You can set a calendar event reminder.
2 Calendar P. 198
Remind Later
You can skip the reminder by pressing the
CANCEL button.
4. Rotate i to select an option.
Press u.
X
Your current position is
displayed on the map screen.
The following options are available:
• Remind Later: Displays the reminder again next time you start the vehicle.
• OK: Turns the reminder off.
XX
Start-up
X
21

System Setup
Voice Control System
1 d (Talk) Button
When you press the d (Talk) button, a helpful
prompt asks what you would like to do. Press
and release the d (Talk) button again to bypass
this prompt and give a command.
1 Command Input
The audio system is muted while using the voice
control system.
Your vehicle has a voice control system that allows hands-free operation of most of
the navigation system functions. You can also control the audio and climate control
system, and make and receive phone calls using Bluetooth® HandsFreeLink®.
The voice control system uses the d (Talk) and K (Back) buttons on the steering
wheel and a microphone near the map lights on the ceiling.
A “Voice Help” feature provides a tutorial that explains how to use the voice control
system.
2 Voice Help P. 5
Command Input
If the system does not understand a command or you wait too long to give a
command, it responds with “Pardon,” “Please repeat,” or “Would you say again.”
When you give a command, the system generally either repeats the command as a
confirmation or asks you for further information. If you do not wish to hear this
feedback, you can turn it off. However, listening to the feedback will help familiarize
you with the way the system expects commands to be phrased.
2 Basic Settings P. 26
If the system cannot perform a command or the command is not appropriate for the
screen you are on, the system beeps.
If the system responds with prompts such as “Please use the Interface Dial to…” or
“Please choose an area with the Interface Dial,” the system is asking for input that
cannot be performed using the voice control system.
On character input screens, a list of possible characters is displayed if the system
does not recognize your command.
You can find out which voice commands are available for a particular screen using
the d Help command. The system will display and read the list of available
commands to you.
22

System Setup
1 Voice Recognition
The voice control system can only be used from
the driver’s seat because the microphone unit
removes noises from the front passenger’s side.
Voice Recognition
To achieve optimum voice recognition when using either the navigation voice
control system or Bluetooth® HandsFreeLink®:
• Make sure the correct screen is displayed for the voice command that you are
using.
2 Voice Commands P. 234
• Close the windows and moonroof.
• Adjust the dashboard and side vents so air does not blow onto the microphone on
the ceiling.
• Speak clearly in a clear, natural speaking voice without pausing between words.
• Reduce any background noise if possible. The system may misinterpret your
command if more than one person is speaking at the same time.
• Refer to the Voice Help tutorial.
2 Voice Help P. 5
XX
Voice Control SystemXVoice Recognition
23
System Setup
Interface Settings
1 Display and Volume Settings
You can set separate daytime and nighttime
settings for Brightness, Contrast, and Black
Level. Adjust each setting when the display is in
either daytime or nighttime mode.
You can set the display and volume settings
using voice commands on the Setup screen.
2 Main Setup Screen Commands P. 240
Volume
If you set Volume to OFF, you will not hear
route guidance or voice command confirmations.
If you then select Voice in the Map Menu, you
will hear route guidance at the default volume.
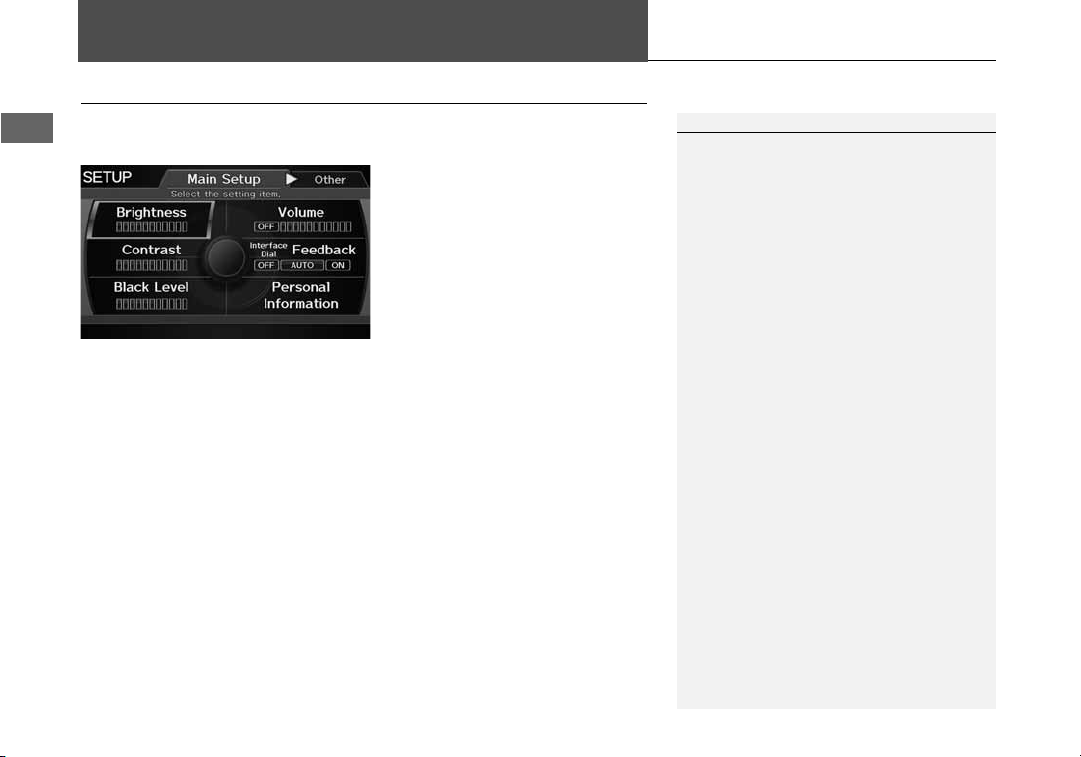
Display and Volume Settings
H INFO/PHONE button X Setup
Use the Main Setup screen to adjust the display and volume.
The following items are available:
• Brightness: Adjusts the screen’s brightness.
• Contrast: Adjusts the screen’s contrast.
• Black Level: Adjusts the screen’s black level.
• Volume: Adjusts the navigation system volume level.
24
1. Rotate i to select an item. Press
u.
2. Rotate i to make the
adjustment. Press u.

System Setup
Interface Dial Feedback
1 Interface Dial Feedback
You can use this feature to minimize the need to
look at the screen while operating the Interface
Dial.
You can set the interface dial feedback settings
using voice commands on the Setup screen.
2 Main Setup Screen Commands P. 240
H INFO/PHONE button X Setup X Interface Dial Feedback
Set if and when the system reads aloud a selection made using the Interface Dial.
The following options are available:
• ON: Always reads the selection.
• AUTO (factory default): Reads the selection only when the vehicle is moving.
• OFF: Disables the feature.
Rotate i to select an option. Press
u.
XX
Interface SettingsXInterface Dial Feedback
25
XX
System Setup
Interface SettingsXBasic Settings
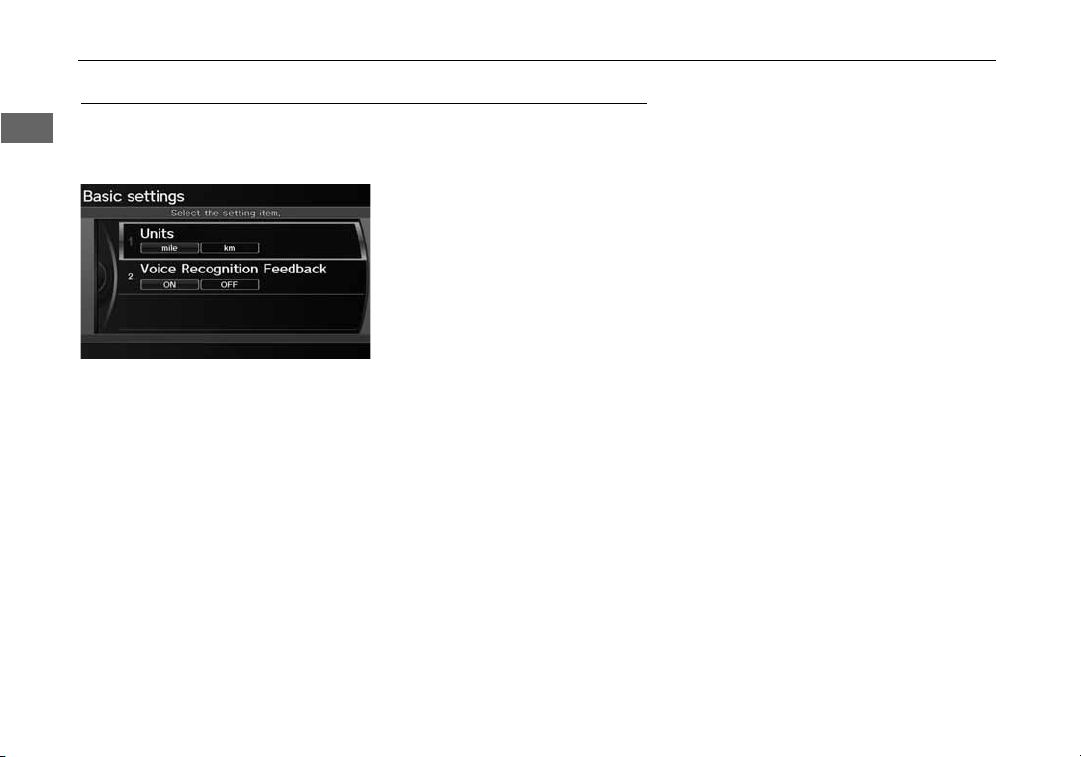
Basic Settings
H INFO/PHONE button X Setup X Other X Basic Settings
Set the map units to either miles or kilometers (km), and control the voice feedback
from the navigation system.
The following items are available:
• Units: Sets the map units to either miles (factory default) or kilometers (km).
• Voice Recognition Feedback: Turns the voice feedback feature on or off.
ON (factory default): Provides voice control system confirmation or prompts.
OFF: Disables the feature.
Rotate i to select an item. Press u.
26
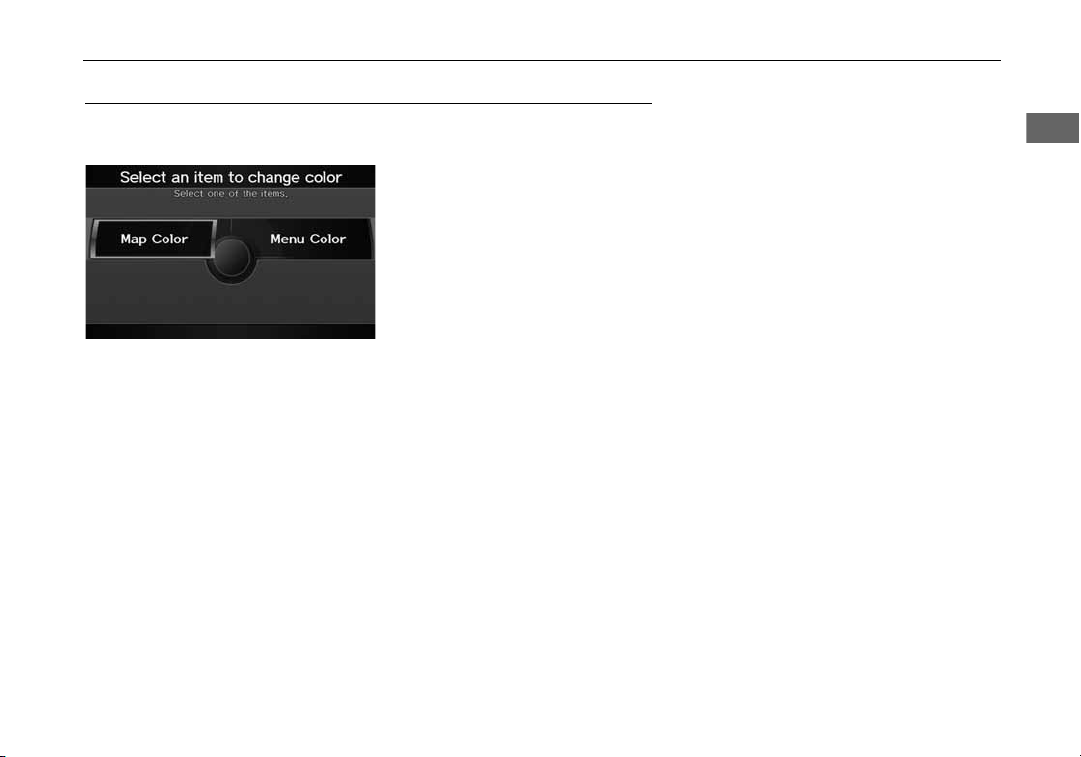
System Setup
Color
H INFO/PHONE button X Setup X Other X Color
Choose the color of the navigation map and system menus.
Rotate i to select an item. Press u.
The following items are available:
• Map Color: Sets the color of the map screen.
2 Map Color P. 28
• Menu Color: Sets the color of the menu screens.
2 Menu Color P. 28
XX
Interface SettingsXColor
27
XX
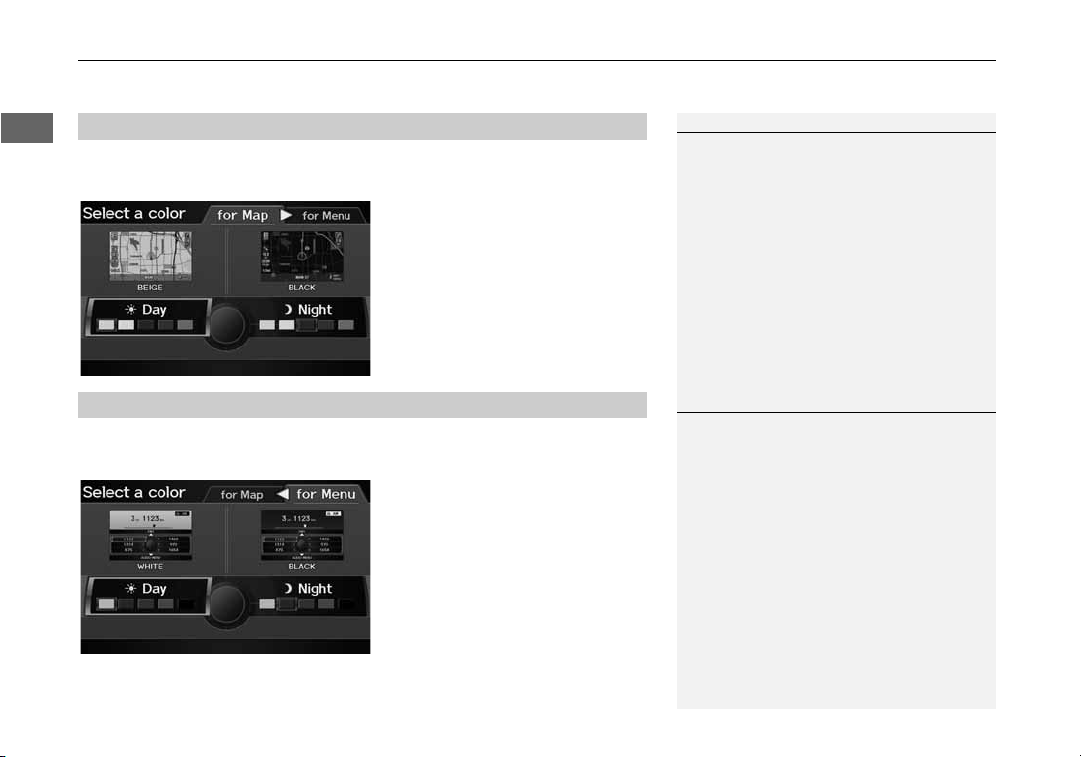
System Setup
1 Map Color
For Day mode
Set to WHITE (factory default is BEIGE) to obtain
the best daytime display contrast.
For Night mode
Set to BLACK (factory default) to obtain the best
nighttime display contrast.
1 Menu Color
For Day mode
Set to WHITE (factory default) to obtain the best
daytime display contrast.
For Night mode
Set to BLACK (factory default) to obtain the best
nighttime display contrast.
Interface SettingsXColor
■ Map Color
H INFO/PHONE button X Setup X Other X Color X Map Color
Set separate map colors for Day and Night modes.
■ Menu Color
H INFO/PHONE button
Set separate menu colors for Day and Night modes.
28
X
Setup X Other X Color X Menu Color
1. Rotate i to select Day or Night.
Press u.
2. Rotate i to select a color for the
map screen. Press u.
1. Rotate i to select Day or Night.
Press u.
2. Rotate i to select a color for the
menu screens. Press u.
 Loading...