

Page 1

2012 ZDX
Owner’s Manual
(Unlinked)
This document does not contain hyperlinks and may be formatted for printing instead of web use. This is due to changes
in content and specifications of the vehicle that happen throughout the model year. This manual will be replaced with a
hyperlinked version at the end of the model year.
© 2011 American Honda Motor Co., Inc. - All Rights Reserved
P/N 00X31-SZN-
6200
Page 2

This owner’s manual should be considered a permanent part of the
vehicle and should remain with the vehicle when it is sold.
2 Safe Driving P. 21
For Safe Driving P. 22 Seat Belts P. 27 Airbags P. 35
This owner’s manual covers all models of your vehicle. You may find
descriptions of equipment and features that are not on your
particular model.
Images throughout this owner’s manual (including the front cover)
represent features and equipment that are available on some, but
not all, models. Your particular model may not have some of these
features.
This owner’s manual is for vehicles sold in the United States and
Canada.
The information and specifications included in this publication were
in effect at the time of approval for printing. Honda Motor Co., Ltd.
reserves the right, however, to discontinue or change specifications
or design at any time without notice and without incurring any
obligation.
2 Instrument Panel P. 67
Indicators P. 68 Gauges and Multi-Information Display P. 87
2 Controls P. 101
Setting the Clock P. 102 Locking and Unlocking the Doors P. 103
Opening and Closing the Panoramic Glass Roof P. 126
Adjusting the Seats P. 143
2 Features P. 167
Audio System P. 168 Audio System Basic Operation P. 171
General Information on the Audio System P. 191
Bluetooth® HandsFreeLink® P. 197
2 Driving P. 209
Before Driving P. 210 Towing a Trailer P. 215
Rearview Camera P. 262 Refueling P. 263 Fuel Economy P. 266
2 Maintenance P. 269
Before Performing Maintenance P. 270 Maintenance MinderTM P. 273
Checking and Maintaining Wiper Blades P. 298
Climate Control System Maintenance P. 312
2 Handling the Unexpected P. 317
Tools P. 318 If a Tire Goes Flat P. 319
Overheating P. 332 Indicator, Coming On/Blinking P. 334
When You Cannot Unlock the Fuel Fill Door P. 346
2 Information P. 349
Specifications P. 350 Identification Numbers P. 351
Emissions Testing P. 354 Warranty Coverages P. 356
Page 3

Contents
Child Safety P. 50 Exhaust Gas Hazard P. 64 Safety Labels P. 65
Opening and Closing the Tailgate P. 114 Security System P. 120 Opening and Closing the Windows P. 123
Operating the Switches Around the Steering Wheel P. 127 Adjusting the Mirrors P. 141
Interior Lights/Interior Convenience Items P. 151 Climate Control System P. 163
Audio Error Messages P. 188 Audio Remote Controls P. 190
HomeLink® Universal Transceiver P. 195
When Driving P. 223 Braking P. 253 Parking Your Vehicle P. 261
Accessories and Modifications P. 267
Maintenance Under the Hood P. 277 Replacing Light Bulbs P. 291
Checking and Maintaining Tires P. 300 Battery P. 309 Remote Transmitter Care P. 310
Cleaning P. 313
Engine Does Not Start P. 326 Jump Starting P. 329 Shift Lever Does Not Move P. 331
Fuses P. 338 Emergency Towing P. 344
When You Cannot Open or Close the Tailgate P. 347
Devices that Emit Radio Waves P. 352 Reporting Safety Defects P. 353
Authorized Manuals P. 358 Client Service Information P. 359
Quick Reference Guide
Safe Driving
Instrument Panel
Controls
Features
Driving
Maintenance
Handling the Unexpected
Information
Index
P. 2
P. 21
P. 67
P. 101
P. 167
P. 209
P. 269
P. 317
P. 349
P. 361
Page 4
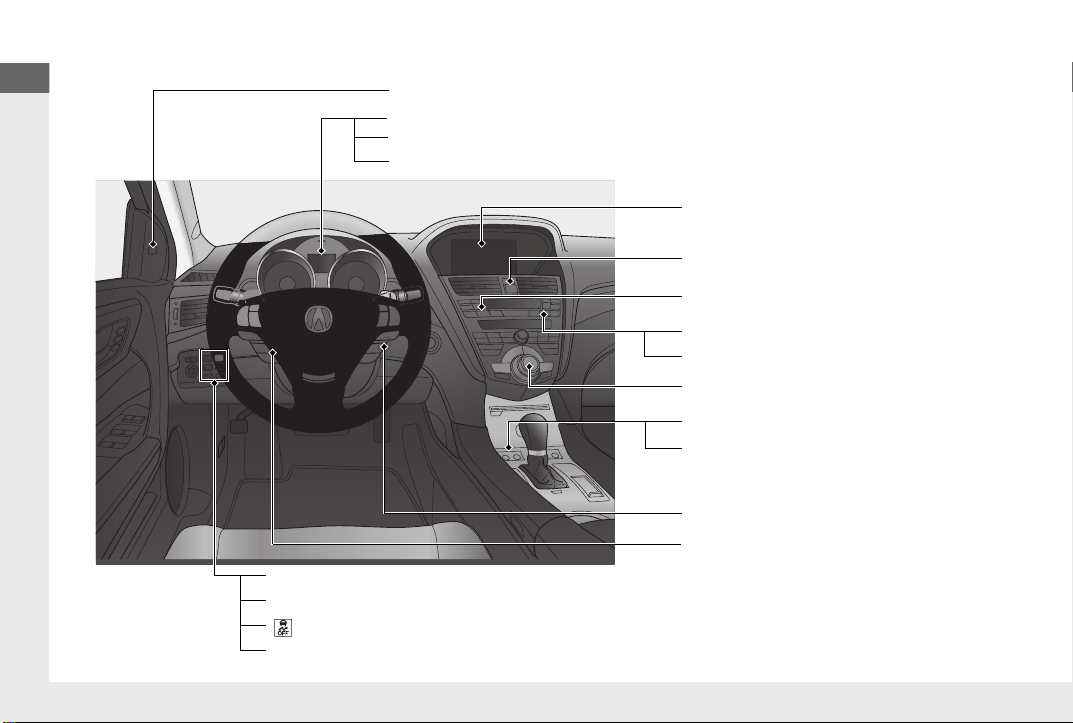
Quick Reference Guide
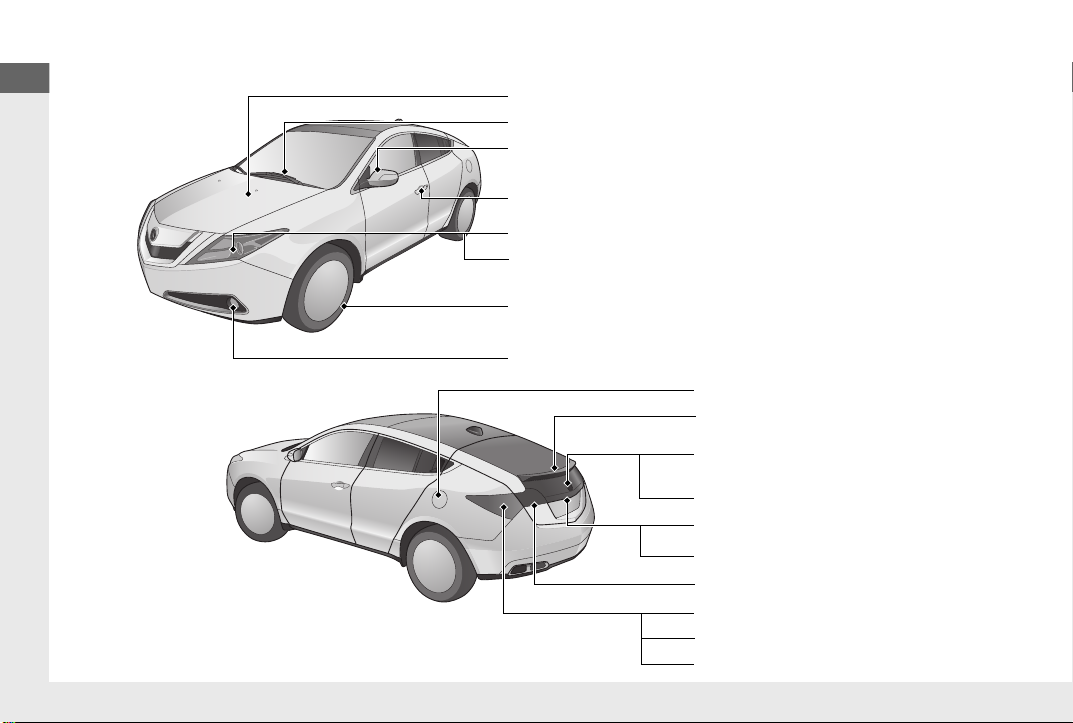
❙ Indicators (P 68)
❙ Gauges (P 87)
❙ Multi-Information Display (P 88)
❙ Blind Spot Information System (BSI) Alert Indicator
*
(P 246)
❙ Navigation System
*
() See Navigation System Manual
❙ Audio System (P 168)
❙ Hazard Warning Button
❙ Climate Control System (P 163)
❙ Rear Window Defogger (P 137)
❙ Front Seat Heater Switches
*
(P 160)
❙ Ignition Switch
*
(P 127)
❙ Steering Wheel Adjustments (P 140)
❙ Heated Mirror Button (P 137)
❙ Front Seat Heater and Seat
Ventilation Switches
*
(P 161)
❙ (Vehicle Stability Assist (VSA®) System OFF) Button (P 243)
❙ Collision Mitigation Braking System
TM
(CMBSTM) OFF Button* (P 259)
❙ Blind Spot Information System (BSI) OFF Button
*
(P 247)
❙ Headlight Washer Button
*
(P 135)
Visual Index
2
Page 5
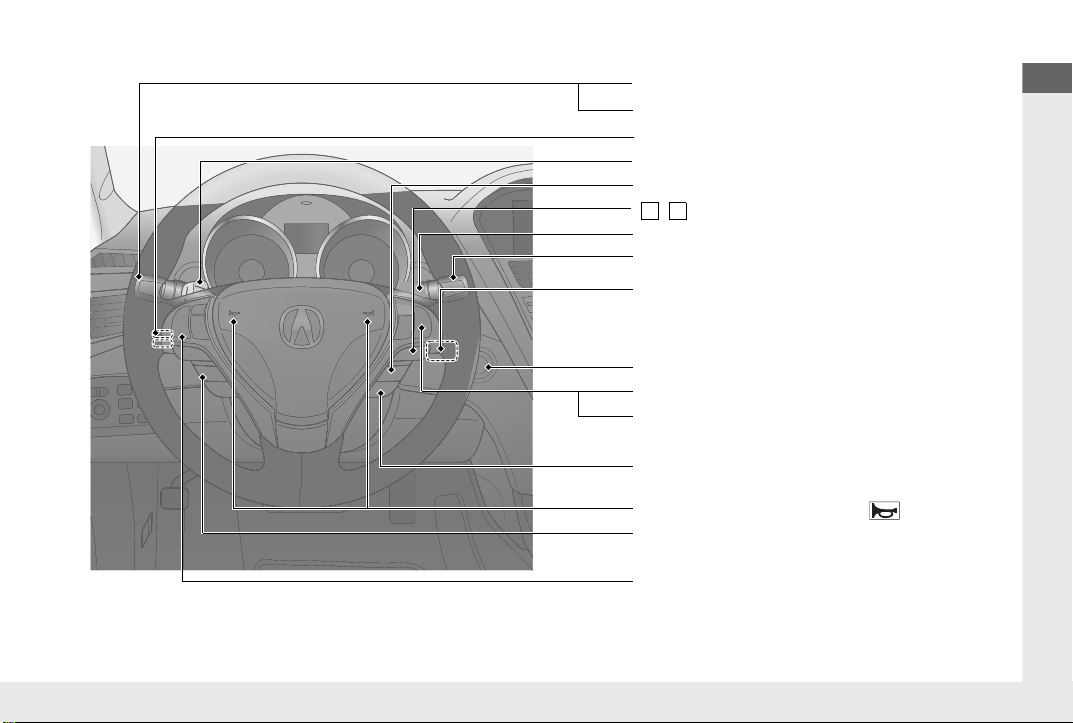
Quick Reference Guide
❙ Headlights/Turn Signals (P 131)
❙ Fog Lights (P 133)
❙ Wipers/Washers (P 134)
❙ Cruise Control Buttons
*
(P 232)
❙ Paddle Shifter (Shift down) (P 231)
❙ Paddle Shifter (Shift up) (P 231)
❙ Audio Remote Control Buttons (P 190)
❙ Bluetooth® HandsFreeLink® System
Voice Control Buttons
(P 197)
❙ SEL/RESET Button (P 88)
❙ / (Information) Button (P 88)
3
4
❙ Horn (Press an area around .)
❙ Brightness Control (P 136)
❙ Keyless Access Remote Slot
*
(P 130)
❙ Adaptive Cruise Control (ACC) Distance
Button
*
(P 240)
❙ Adaptive Cruise Control (ACC)
Buttons
*
(P 235)
❙ ENGINE START/STOP Button
*
(P 128)
* Not available on all models
3
Page 6
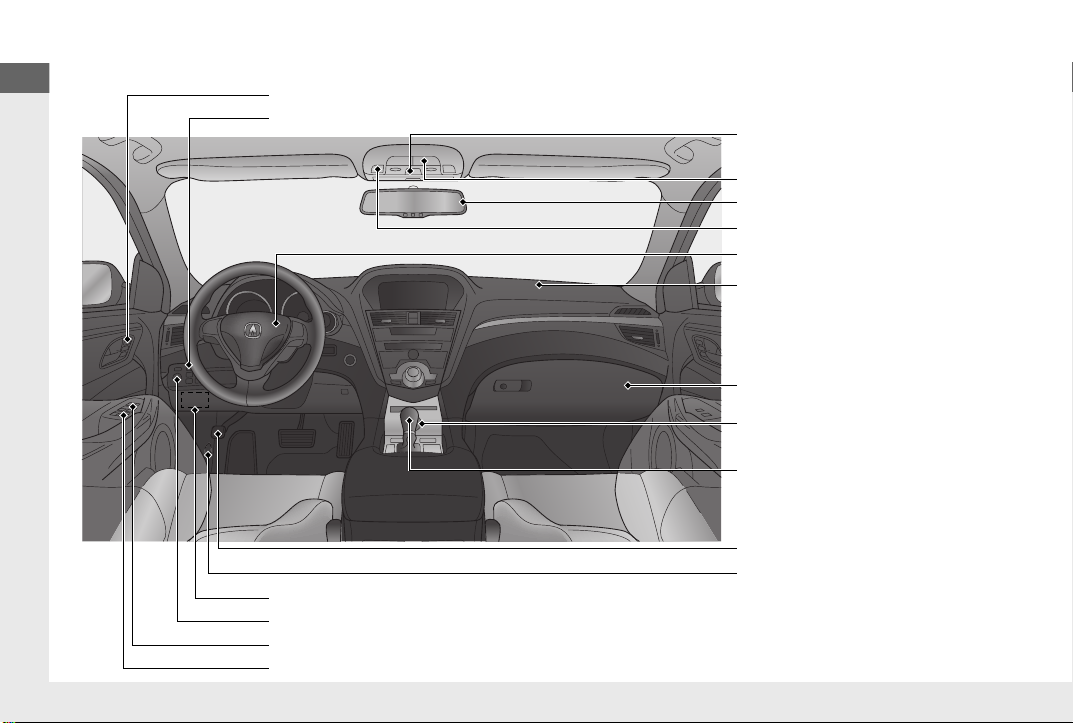
Visual Index
Quick Reference Guide
❙ Driving Position Memory System Buttons (P 139)
❙ Power Tailgate Button (P 117)
❙ Glove Box (P 153)
❙ Parking Brake (P 253)
❙ Hood Release Handle (P 278)
❙ Power Door Lock Master Switch (Unlocking Fuel Fill Door) (P 111)
❙ Interior Fuse Box (P 339)
❙ Door Mirror Controls (P 142)
❙ Power Window Switches (P 123)
❙ Integrated Dynamics System
(IDS) Switch
*
(P 252)
❙ Panoramic Glass Roof/
Sunshade Switch
(P 126)
❙ Map Lights (Front) (P 152)
❙ Rearview Mirror (P 141)
❙ HomeLink® Button (P 195)
❙ Driver’s Front Airbag (P 38)
❙ Passenger’s Front Airbag
(P 38)
❙ Shift Lever Automatic
Transmission
(P 227)
4
Page 7
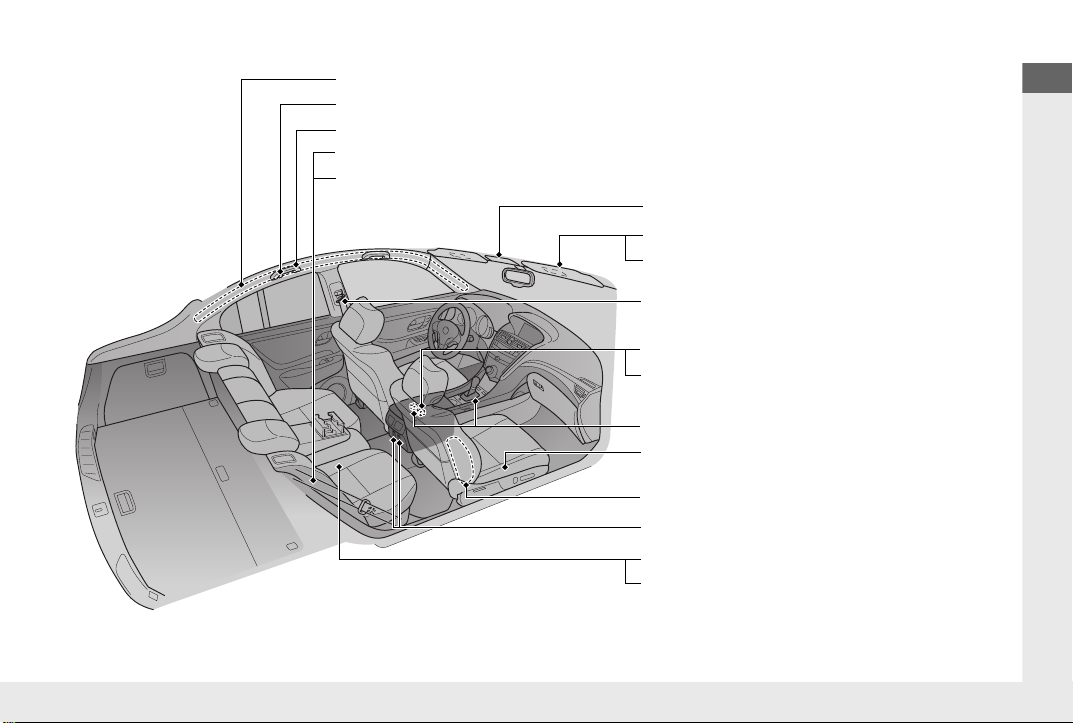
Quick Reference Guide
❙ Seat Belt to Secure a Child Seat (P 60)
❙ Seat Belt (Installing a Child Seat) (P 58)
❙ Grab Handle
❙ Coat Hook (P 158)
❙ Side Curtain Airbags (P 45)
❙ Front Seat (P 143)
❙ Seat Belts (P 27)
❙ Sunglasses Holder (P 159)
❙ Sun Visors
❙ Vanity Mirrors
❙ USB Adapter Cable (P 169)
❙ Auxiliary Input Jack (P 169)
❙ Rear Seat (P 149)
❙ LATCH to Secure a Child Seat (P 55)
❙ Side Airbags (P 42)
❙ Rear Seat Heater Switches
*
(P 162)
❙ Accessory Power Sockets (P 157)
* Not available on all models
5
Page 8
Visual Index
Quick Reference Guide
❙ Fog Lights (P 133, 292)
❙ How to Refuel (P 264)
❙ Maintenance Under the Hood (P 277)
❙ Windshield Wipers (P 134, 298)
❙ Power Door Mirrors (P 142)
❙ Tires (P 300, 319)
❙ Door Lock/Unlock Control (P 106)
❙ Headlights (P 131, 291)
❙ Front Turn Signal/Parking/Side Marker/Daytime Running
Lights
(P 131, 293)
❙ High-Mount Brake Light (P 297)
❙ Opening/Closing the Tailgate
(P 114)
❙ Tailgate Open Handle (P 115)
❙ Stop/Taillights (P 295)
❙ Rear Turn Signal Lights (P 295)
❙ Rear Side Marker Lights (P 295)
❙ Rearview Camera (P 262)
❙ Rear License Plate Lights (P 297)
❙ Back-Up Lights (P 296)
6
Page 9

Quick Reference Guide
Safe Driving (P 21)
Airbags (P 35)
● Your vehicle is fitted with airbags to help protect you and
your passengers during a moderate-to-severe collision.
Child Safety (P 50)
● All children 12 and younger should be seated in the rear seat.
● Smaller children should be properly restrained in a forward-facing child seat.
● Infants must be properly restrained in a rear-facing child seat.
Exhaust Gas Hazard (P 64)
● Your vehicle emits dangerous exhaust gases that contain carbon
monoxide. Do not run the engine in confined spaces where carbon
monoxide gas can accumulate.
Before Driving Checklist (P 26)
● Before driving, check that the front seats, head restraints,
steering wheel, and mirrors have been properly adjusted.
Seat Belts (P 27)
● Fasten your seat belt and sit upright well
back in the seat.
● Check that your passengers are wearing
their seat belts correctly.
Fasten your lap belt as
low as possible.
7
Page 10
Quick Reference Guide
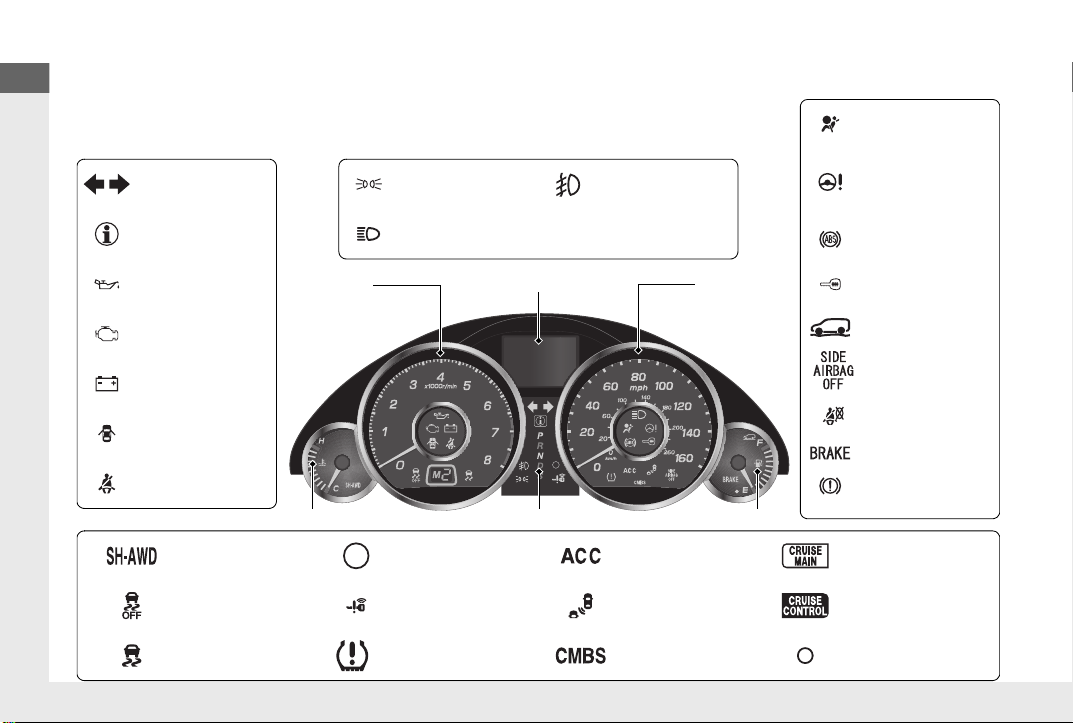
Instrument Panel (P 67)
System Indicators
Malfunction
Indicator Lamp
Low Oil Pressure
Indicator
Charging System
Indicator
Anti-lock Brake
System (ABS)
Indicator
Vehicle Stability
Assist (VSA®)
System Indicator
VSA® OFF Indicator
Low Tire Pressure/
TPMS Indicator
Electronically
Controlled Power
Steering System
(ECPS) Indicator
*
Lights Reminders
Lights On Indicator
High Beam Indicator
Fog Light Indicator
Immobilizer System
Indicator
Seat Belt Reminder
Indicator
System Indicators
Cruise Control
Indicator
*
System Message
Indicator
Parking Brake and
Brake System
Indicator
Supplemental
Restraint System
Indicator
Side Airbag Off
Indicator
Door and Tailgate
Open Indicator
Cruise Main
Indicator
*
Tachometer Speedometer
Fuel Gauge
Security System
Indicator
Shift Lever Position Indicator
Low Fuel Indicator
Gauges (P 87)/Multi-Information Display (P 88)/
System Indicators
(P 68)
Turn Signal and
Hazard Warning
Indicators
Temperature Gauge
SH-AWD Indicator
Keyless Access
System Indicator
*
Active Damper
System Indicator
*
Blind Spot
Information
Indicator
*
Collision Mitigation
Braking System
TM
(CMBS
TM
) Indicator
*
Adaptive Cruise
Control (ACC)
Indicator
*
System Indicators
Multi-Information Display
U.S.
Canada
Canada
U.S.
8
Page 11
Quick Reference Guide
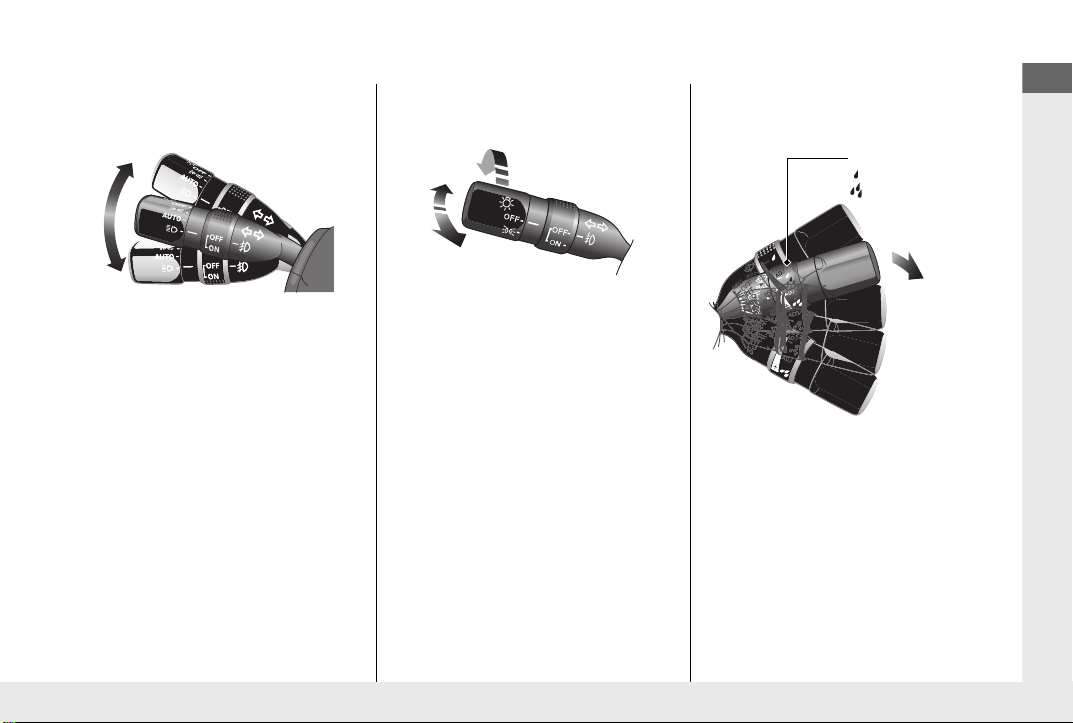
Controls (P 101)
Left
Right
Turn Signal Control Lever
Light Control Switches
High Beam
Low
Beam
Flashing
Wiper/Washer Control Lever
Adjustment Ring
: Long Delay
: Short Delay
MIST
OFF
INT: Low speed with intermittent
LO: Low speed wipe
HI: High speed wipe
Pull toward
you to spray
washer
fluid.
* Not available on all models
Turn Signals (P 131)
Lights (P 131)
Wipers and Washers
(P 134)
9
Page 12
Quick Reference Guide
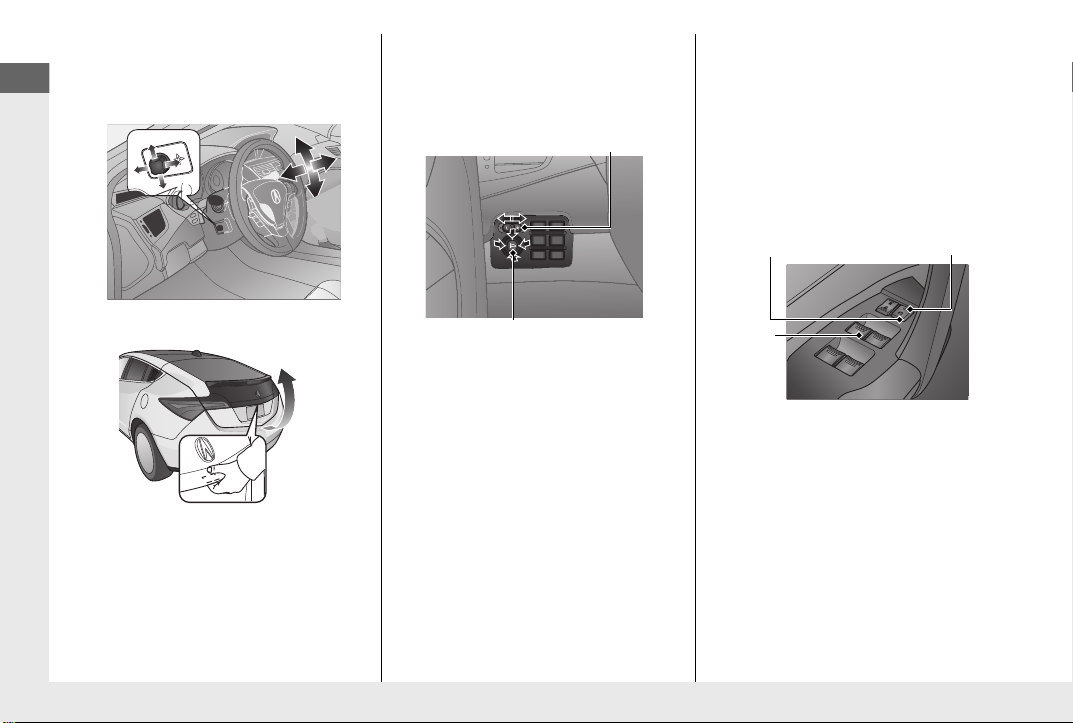
Steering Wheel (P 140)
Selector Switch
Adjustment Switch
Power Window Lock Button
Window
Switch
Indicator
● To adjust, push and hold the adjustment
switch to move the steering wheel to the
desired position.
Tailgate (P 114)
Power Door Mirrors
● With the ignition switch in ON
the selector switch to L or R.
● Push the appropriate edge of the
adjustment switch to adjust the mirror.
● Place the selector switch in the L or R
position to use the reverse tilt door mirror
feature.
(P 142)
*1
w
, move
Power Windows (P 123)
● With the ignition switch in ON
and close the power windows.
● If the power window lock button is in the
OFF position, each passenger’s window
can be opened and closed with its own
switch.
● If the power window lock button is in the
ON position (indicator is on), each
passenger’s window switch is disabled.
w
*1
, open
● With all the doors unlocked, press the
tailgate release button on the tailgate to
open it.
● Press the power tailgate button on the
instrument panel or the remote
transmitter to open and close the power
tailgate.
10
*1: Models with the keyless access system
have an ENGINE START/STOP button instead
of an ignition switch.
Page 13
Quick Reference Guide
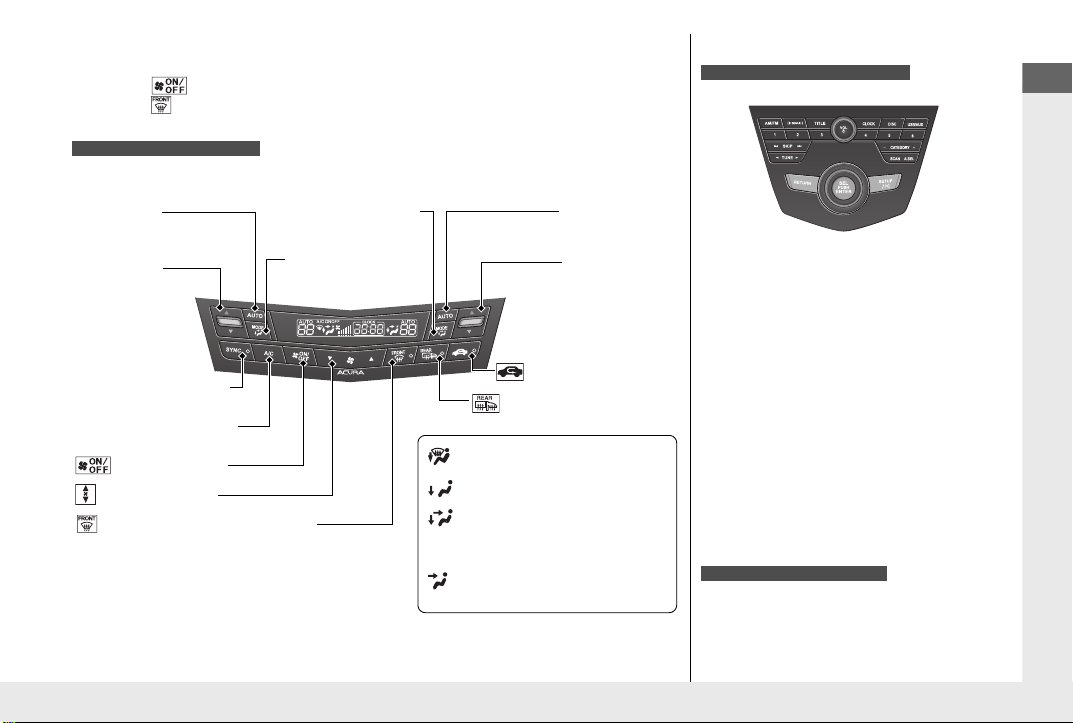
Climate Control System (P 163)
Models with navigation system
(Fan Control) Bar
(Rear Window Defogger/
Heated Mirror) Button
(Windshield Defroster) Button
A/C (Air Conditioning)
Button
Air flows from dashboard vents
and back of the center console.
Air flows from floor and
dashboard vents, and back of
the center console.
Air flows from floor vents.
Air flows from floor and
windshield defroster vents.
(ON/OFF) Button
(Recirculation) Button
Passenger’s Side MODE
Control Button
Passenger’s Side
Temperature
Control Switch
SYNC (Synchronized)
Button
Driver’s Side
AUTO Button
Driver’s Side
Temperature
Control Switch
Driver’s Side MODE
Control Button
Passenger’s Side
AUTO Button
Models without navigation system
Models with navigation system
● Press the driver's or passenger’s AUTO button to activate the climate control system.
● Press the button to turn the system on or off.
● Press the button to defrost the windshield.
The climate control system is voice operable. See the navigation system manual for complete
details.
Clock (P 102)
a Press the SETUP button.
b Turn the selector knob to select CLOCK
ADJUST, then press the knob.
c Turn the selector knob to select the
clock display setting, hours, or minutes,
then press the knob.
d Turn the selector knob to change the
clock display setting, hours, or minutes,
then press the knob.
e Select Set with the selector knob, then
press the knob to complete clock
adjustment.
The navigation system receives signals from
GPS satellites, updating the clock
automatically.
11
Page 14

Quick Reference Guide
Features (P 167)
Audio Display
SCAN/A.SEL (Auto
Select) Bar
AM/FM Button
RETURN Button
Selector Knob
TITLE Button
TUNE Bar
VOL (Volume/
Power) Knob
DISC Button
USB/AUX Button
CD Slot
(CD Eject)
Button
Preset Buttons
(1-6)
SETUP Button
SKIP Bar
CATEGORY Bar
LOAD Button
(XM®)
Button
VOL Button
MODE Button
CH Button
3
4
Audio system (P 168)
For navigation system operation () See Navigation System Manual
● Audio Remote Controls (P 190)
12
● VOL (Volume) Button
Press / to adjust the volume
up/down.
● MODE Button
Press and release to change the audio
mode: FM1/FM2/AM/XM1/XM2/CD/AUX.
● CH (Channel) Button
Radio:Press and release to change the
preset station.
Press and hold to select the next or
previous strong station.
CD/USB device:
Press and release to skip to the
beginning of the next song or
return to the beginning of the
current song.
Press and hold to change a folder.
Page 15
Quick Reference Guide
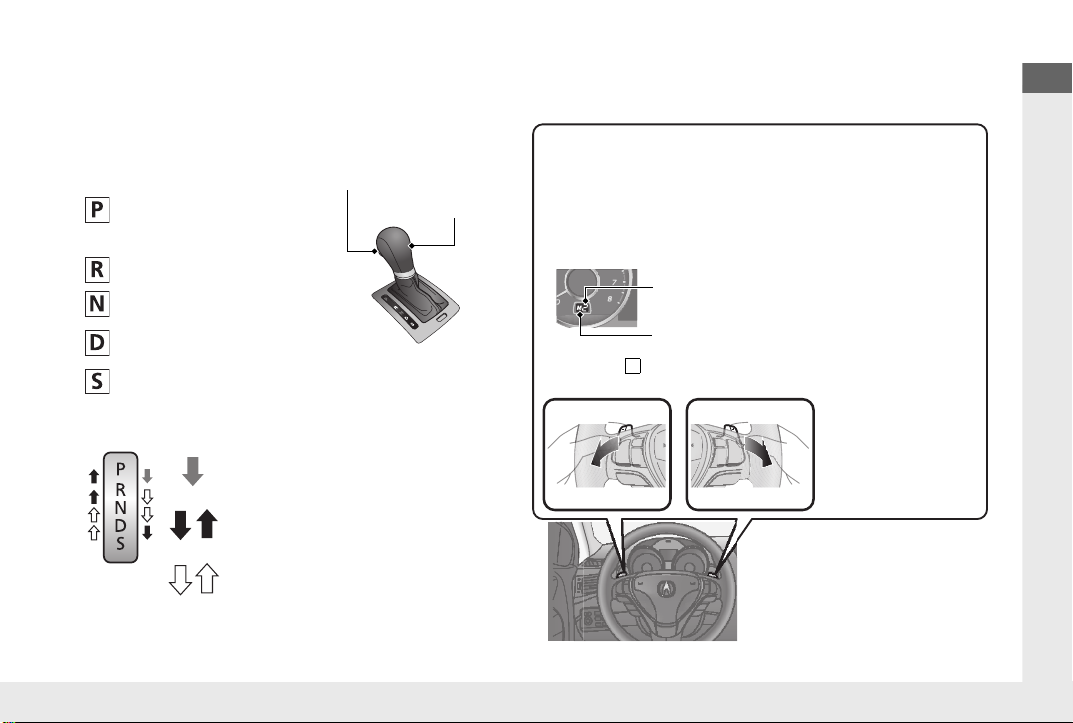
Driving (P 209)
Release Button
Shift Lever
Depress the brake pedal and press the
release button to move out of
P.
Move the shift lever without
pressing the release button.
Press the release button to
move the shift lever.
Automatic Transmission (P 227)
● Shift to
P and depress the brake pedal when starting the engine.
● Shifting
Park
Turn off or start the engine.
Transmission is locked.
Reverse
Neutral
Transmission is not locked.
Drive
Normal driving. D-paddle shift mode can be used.
S Position
Sequential shift mode can be used.
Paddle Shifters (P 230)
M Indicator
Shift Down
Paddle Shifter
-
Shift Up +
Paddle Shifter
● Paddle shifters allow you to shift gears much like a manual
transmission (1st through 6th). This is useful for engine braking.
● D-paddle shift mode: The transmission will shift back to
automatic mode once the system detects that the vehicle is
cruising.
● Sequential shift mode: Holds the selected gear, and the M
indicator comes on.
Selected Gear Number
13
Page 16
Quick Reference Guide
VSA® OFF Button (P 244)
● The vehicle stability assist (VSA®) system
helps stabilize the vehicle during
cornering, and helps maintain traction
while accelerating on loose or slippery
road surfaces.
● VSA® comes on automatically every time
you start the engine.
● To turn VSA® on or off, press and hold
the button until you hear a beep.
Cruise Control (P 232)
● Cruise control allows you to maintain a
set speed without keeping your foot on
the accelerator pedal.
● To use cruise control, press the CRUISE
button, then press the DECEL/SET button
once you have received the desired speed
(above 25 mph or 40 km/h).
Tire Pressure Monitoring
System (TPMS)
● TPMS monitors tire pressure.
● TPMS is turned on automatically every
time you start the engine.
(P 248)
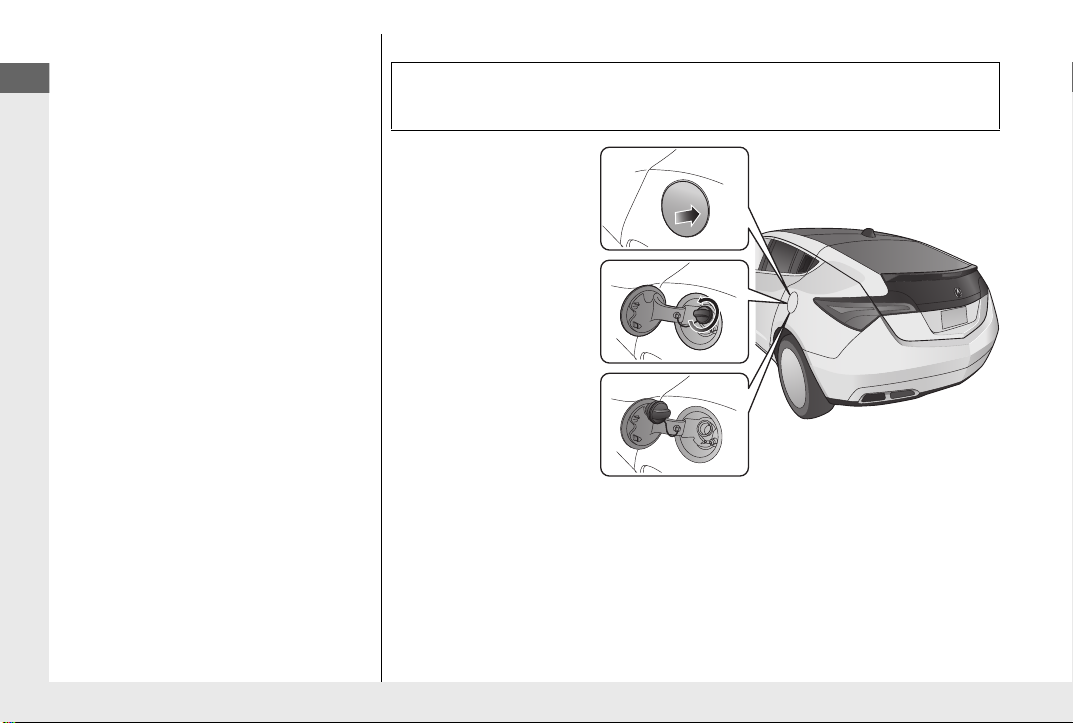
Refueling (P 263)
Fuel recommendation: Premium unleaded gasoline with a pump octane number
91 or higher required
Fuel tank capacity: 21.00 US gal (79.5 L)
a Unlock the driver’s door.
b Press on the edge of the
fuel fill door to make it
pop up slightly.
c Turn the fuel fill cap
slowly to remove the
cap.
d Place the cap in the
holder on the fuel fill
door.
e After refueling, screw
the cap back on until it
clicks at least once.
14
Page 17
Quick Reference Guide
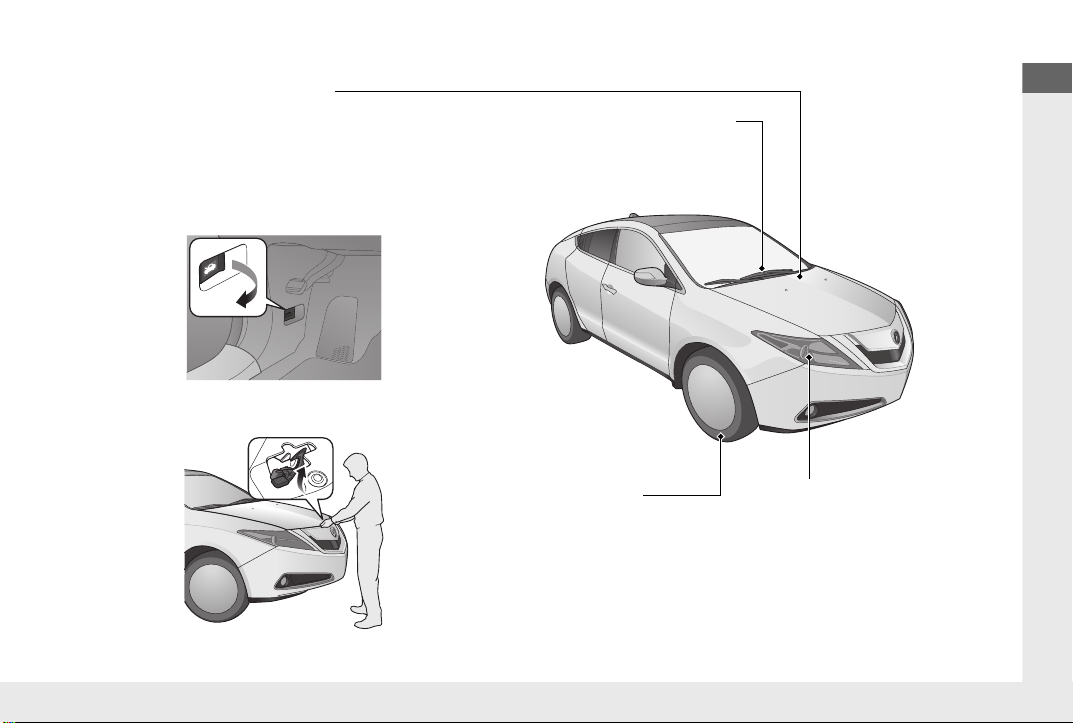
Maintenance (P 269)
Under the Hood (P 277)
● Check engine oil, engine coolant, and windshield washer
fluid. Add when necessary.
● Check brake fluid.
● Check the battery regularly.
a Pull the hood release handle under the corner of the
dashboard.
b Locate the hood latch lever, pull the lever up, and lift up
the hood.
c When finished, close the hood and make sure it is firmly
locked in place.
Lights (P 291)
● Inspect all lights regularly.
Wiper Blades (P 298)
● Replace blades if they leave streaks
across the windshield.
Tires (P 300)
● Inspect tires and wheels regularly.
● Check tire pressures regularly.
● Install snow tires for winter
driving.
15
Page 18
Quick Reference Guide
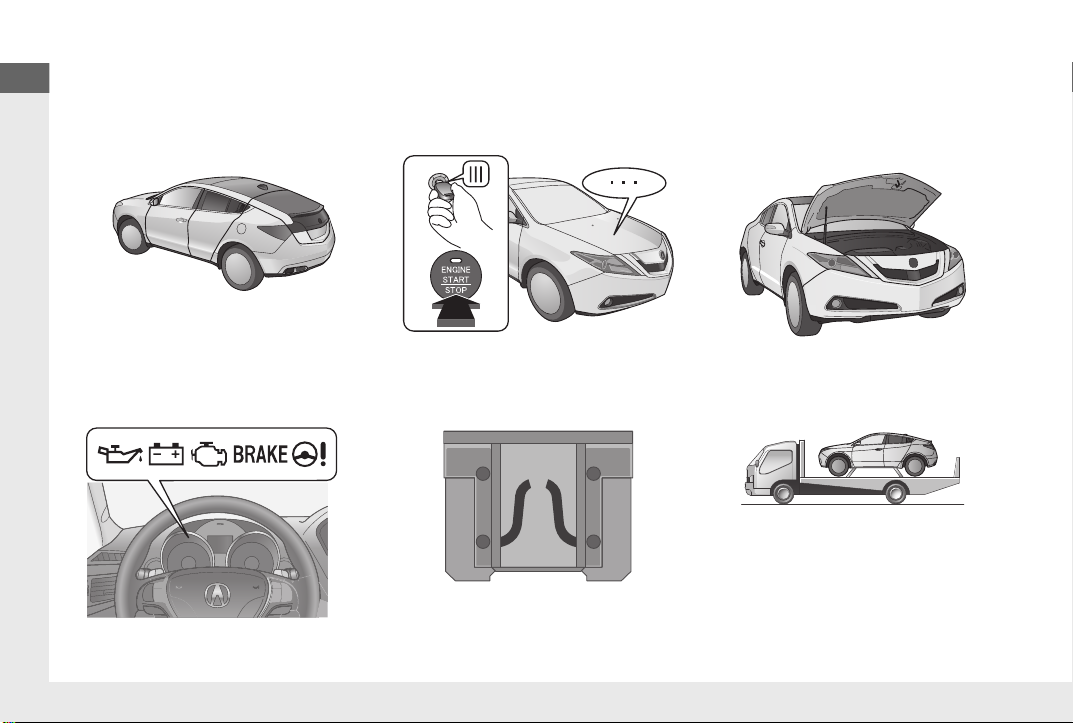
Handling the Unexpected (P 317)
Flat Tire (P 319)
● Park in a safe location and replace the
flat tire with the compact spare tire
located under the cargo area.
Indicators Come On
● Identify the indicator and consult the
owner’s manual.
(P 334)
Engine Won’t Start
● If the battery is dead, jump start using a
booster battery.
(P 326)
Blown Fuse (P 343)
● Check for a blown fuse if an electrical
device does not operate.
Overheating (P 332)
● Park in a safe location. If you do not see
steam under the hood, open the hood,
and let the engine cool down.
Emergency Towing
● Call a professional towing service if you
need to tow your vehicle.
(P 344)
16
Page 19
Quick Reference Guide
What to Do If
* Not available on all models
*1: Models with the keyless access system have an ENGINE START/STOP button instead of an ignition switch.
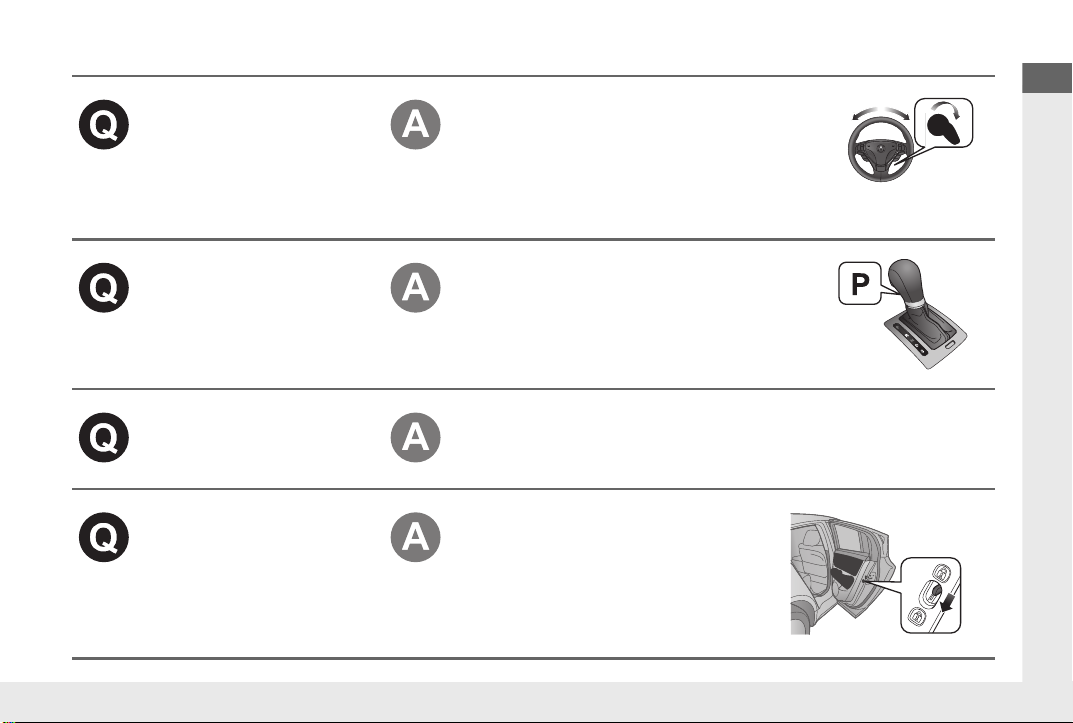
The ignition switch does
not turn from
0 to q
*1
.
Why?
The ignition switch does
not turn from
q to 0
*1
and I cannot remove the
key. Why?
Why does the brake pedal
pulsate slightly when
applying the brakes?
The rear door cannot be
opened from inside the
vehicle. Why?
●
The steering wheel may be locked.
●
Try to turn the steering wheel left and right
while turning the ignition key.
●
Move the steering wheel left and right while
pressing the ENGINE START/STOP button
*
at
the same time.
The shift lever should be moved to P .
This can occur when the ABS activates, and does not indicate a
problem. Apply firm, steady pressure on the brake pedal. Never
pump the brake pedal.
Check if the childproof lock is in the
LOCK position. If so, open the rear
door with the outside door handle.
To cancel this function, push the lever
to the UNLOCK position.
17
Page 20
Quick Reference Guide
Why do the doors lock
after I unlocked the doors
using a remote
transmitter?
If you do not open the doors within 30 seconds, the doors are
relocked automatically for security.
18
Why does the beeper
sound when I open the
driver’s door?
Why does the beeper
sound when I start driving?
Why do I hear a screeching
sound when I apply the
brake pedal?
Is it possible to use
unleaded gasoline with a
Pump Octane Number
(PON) of 87 or higher on
this vehicle?
The beeper sounds when:
●
The key is left in the ignition switch.
●
The exterior lights are left on.
●
The power mode is in ACCESSORY.
The beeper sounds when:
●
Driver and/or front passenger are not wearing their seat belts.
●
The parking brake lever is not fully released.
The brake pads may need to be replaced. Have your vehicle
inspected by a dealer.
If premium unleaded gasoline with a PON of 91 or higher is not
available, you can temporarily use the gasoline with a PON of
87 or higher.
This will result in decreased engine performance, and can cause
occasional metallic knocking noise in the engine.
Unleaded gasoline with a PON of 91 or higher is required. The
long-term use of a lower PON gasoline can lead to engine
damage.
Page 21

Quick Reference Guide
California Proposition 65 Warning
WARNING: This product contains or emits
chemicals known to the state of California to cause
cancer and birth defects or other reproductive
harm.
NOTICE
To read data recorded by an EDR, special equipment is required,
and access to the vehicle or the EDR is needed. In addition to the
vehicle manufacturer, other parties, such as law enforcement, that
have the special equipment, can read the information if they have
access to the vehicle or the EDR.
Event Data Recorders
This vehicle is equipped with an event data recorder (EDR).
The main purpose of an EDR is to record, in certain crash or near
crash-like situations, such as an air bag deployment or hitting a
road obstacle, data that will assist in understanding how a vehicle’s
systems performed. The EDR is designed to record data related
to vehicle dynamics and safety systems for a short period of
time, typically 30 seconds or less. The EDR in this vehicle is
designed to record such data as:
• How various systems in your vehicle were operating;
• Whether or not the driver and passenger safety belts were
buckled/fastened;
• How far (if at all) the driver was depressing the accelerator
and/or brake pedal; and,
• How fast the vehicle was traveling.
These data can help provide a better understanding of the
circumstances in which crashes and injuries occur. NOTE: EDR data
are recorded by your vehicle only if a non-trivial crash situation
occurs; no data are recorded by the EDR under normal driving
conditions and no personal data (e.g., name, gender, age, and
crash location) are recorded. However, other parties, such as law
enforcement, could combine the EDR data with the type of
personally identifying data routinely acquired during a crash
investigation.
The data belongs to the vehicle owner and may not be accessed by
anyone else except as legally required or with the permission of the
vehicle owner.
Service Diagnostic Recorders
This vehicle is equipped with service-related devices that record
information about powertrain performance. The data can be used
to verify emissions law requirements and/or help technicians
diagnose and solve service problems. It may also be combined with
data from other sources for research purposes, but it remains
confidential.
California Perchlorate Contamination Prevention Act
The airbags, seat belt tensioners, and CR type batteries in this
vehicle may contain perchlorate materials - special handling may
apply. See www.dtsc.ca.gov/hazardouswaste/perchlorate/
As you read this manual, you will find information that is preceded
by a symbol. This information is intended to help you avoid
damage to your vehicle, other property, or the environment.
19
Page 22

Quick Reference Guide
A Few Words About Safety
3DANGER
3WARNING
3CAUTION
Your safety, and the safety of others, is very important. And
operating this vehicle safely is an important responsibility.
To help you make informed decisions about safety, we have
provided operating procedures and other information on labels and
in this manual. This information alerts you to potential hazards that
could hurt you or others.
Of course, it is not practical or possible to warn you about all the
hazards associated with operating or maintaining your vehicle. You
must use your own good judgement.
You will find this important safety information in a variety of forms,
including:
● Safety Labels - on the vehicle.
● Safety Messages - preceded by a safety alert symbol
one of three signal words: DANGER, WARNING, or CAUTION.
These signal words mean:
You WILL be KILLED or SERIOUSLY HURT if
you don't follow instructions.
You CAN be KILLED or SERIOUSLY HURT if
you don't follow instructions.
You CAN be HURT if you don't follow
instructions.
● Safety Headings - such as Important Safety Precautions.
● Safety Section - such as Safe Driving.
● Instructions - how to use this vehicle correctly and safely.
This entire book is filled with important safety information - please
read it carefully.
3 and
20
Page 23

Safe Driving
You can find many safety recommendations throughout this chapter, and throughout this manual.
For Safe Driving
Important Safety Precautions .............22
Important Handling Information......... 24
Your Vehicle’s Safety Features............ 25
Seat Belts
About Your Seat Belts........................ 27
Fastening a Seat Belt.......................... 31
Seat Belt Inspection............................34
Airbags
Airbag System Components............... 35
Types of Airbags ................................ 38
Front Airbags (SRS) ............................ 38
Side Airbags ...................................... 42
Side Curtain Airbags.......................... 45
Airbag System Indicators.................... 46
Airbag Care....................................... 49
Child Safety
Protecting Child Passengers ............... 50
Safety of Infants and Small Children .......52
Safety of Larger Children ................... 62
Exhaust Gas Hazard
Carbon Monoxide Gas....................... 64
Safety Labels
Label Locations.................................. 65
21
Page 24

Safe Driving
For Safe Driving
1Important Safety Precautions
Some states, provinces and territories prohibit the use
of cell phones other than hands-free devices by the
driver while driving.
The following pages explain your vehicle’s safety features and how to use them
properly. The safety precautions below are ones that we consider to be among the
most important.
Important Safety Precautions
■ Always wear your seat belt
A seat belt is your best protection in all types of collisions. Airbags are designed to
supplement seat belts, not replace them. So even though your vehicle is equipped
with airbags, make sure you and your passengers always wear your seat belts, and
wear them properly.
■ Restrain all children
Children age 12 and under should ride properly restrained in a back seat, not the
front seat. Infants and small children should be restrained in a child seat. Larger
children should use a booster seat and a lap/shoulder seat belt until they can use the
belt properly without a booster seat.
■ Be aware of airbag hazards
While airbags can save lives, they can cause serious or fatal injuries to occupants
who sit too close to them, or are not properly restrained. Infants, young children,
and short adults are at the greatest risk. Be sure to follow all instructions and
warnings in this manual.
■ Don’t drink and drive
Alcohol and driving don’t mix. Even one drink can reduce your ability to respond to
changing conditions, and your reaction time gets worse with every additional drink.
So don't drink and drive, and don't let your friends drink and drive, either.
22
Page 25

uuFor Safe Driving uImportant Safety Precautions
Safe Driving
■ Pay appropriate attention to the task of driving safely
Engaging in cell phone conversation or other activities that keep you from paying
close attention to the road, other vehicles, and pedestrians could lead to a crash.
Remember, situations can change quickly, and only you can decide when it is safe to
divert some attention away from driving.
■ Control your speed
Excessive speed is a major factor in crash injuries and deaths. Generally, the higher
the speed, the greater the risk, but serious injuries can also occur at lower speeds.
Never drive faster than is safe for current conditions, regardless of the maximum
speed posted.
■ Keep your vehicle in safe condition
Having a tire blowout or a mechanical failure can be extremely hazardous.
To reduce the possibility of such problems, check your tire pressures and condition
frequently, and perform all regularly scheduled maintenance.
23
Page 26

uuFor Safe Driving uImportant Handling Information
Safe Driving
1Important Handling Information
Failure to operate your vehicle correctly might result
in a crash or a roll over.
2 Precautions While Driving P. 226
2 Off-Highway Driving Guidelines P. 220
Important Handling Information
Your vehicle has higher ground clearance than a passenger vehicle designed for use
only on pavement. Higher ground clearance has many advantages for off-highway
driving. It allows you to travel over bumps, obstacles, and rough terrain. It also
provides good visibility so you can anticipate problems earlier.
These advantages come at some cost. Because your vehicle is taller and rides higher
off the ground, it has a higher center gravity making it more susceptible to tripping
or roll over if you make abrupt turns. Utility vehicles have a significantly higher
rollover rate than other types of vehicles. In a rollover crash, an unbelted person is
significantly more likely to die than a person wearing a seat belt. As a reminder,
make sure you and your passengers always wear seat belts.
24
Page 27
Safe Driving
Your Vehicle’s Safety Features
1Your Vehicle’s Safety Features
Your vehicle is equipped with many features that
work together to help protect you and your
passengers during a crash.
Some features do not require any action on your part.
These include a strong steel framework that forms a
safety cage around the passenger compartment,
front and rear crush zones, a collapsible steering
column, and tensioners that tighten the front seat
belts in a sufficient crash.
However, you and your passengers cannot take full
advantage of these features unless you remain seated
in the correct position and always wear your seat
belts. In fact, some safety features can contribute to
injuries if they are not used properly.
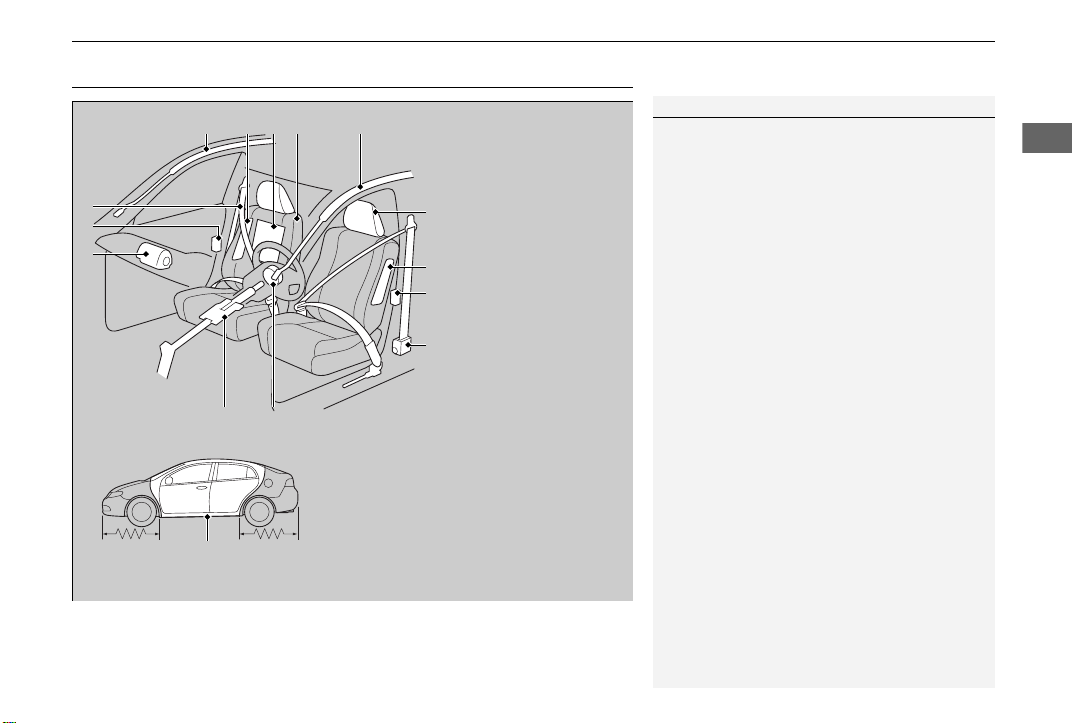
a Safety Cage
b Crush Zones
c Seats and Seat-Backs
d Head Restraints
e Collapsible Steering Column
f Seat Belts
g Front Airbags
h Side Airbags
i Side Curtain Airbags
jDoor Locks
k Seat Belt Tensioners/Seat Belt
e-pretensioners
*
l Occupant Position Detection
System (OPDS) Sensor
abb
e
f
il
j
k
g
hdc
g
j
h
i
* Not available on all models
uuFor Safe Driving uYour Vehicle’s Safety Features
The following checklist will help you take an active role in protecting yourself and
your passengers.
Continued
25
Page 28
uuFor Safe Driving uYour Vehicle’s Safety Features
Safe Driving
1Safety Checklist
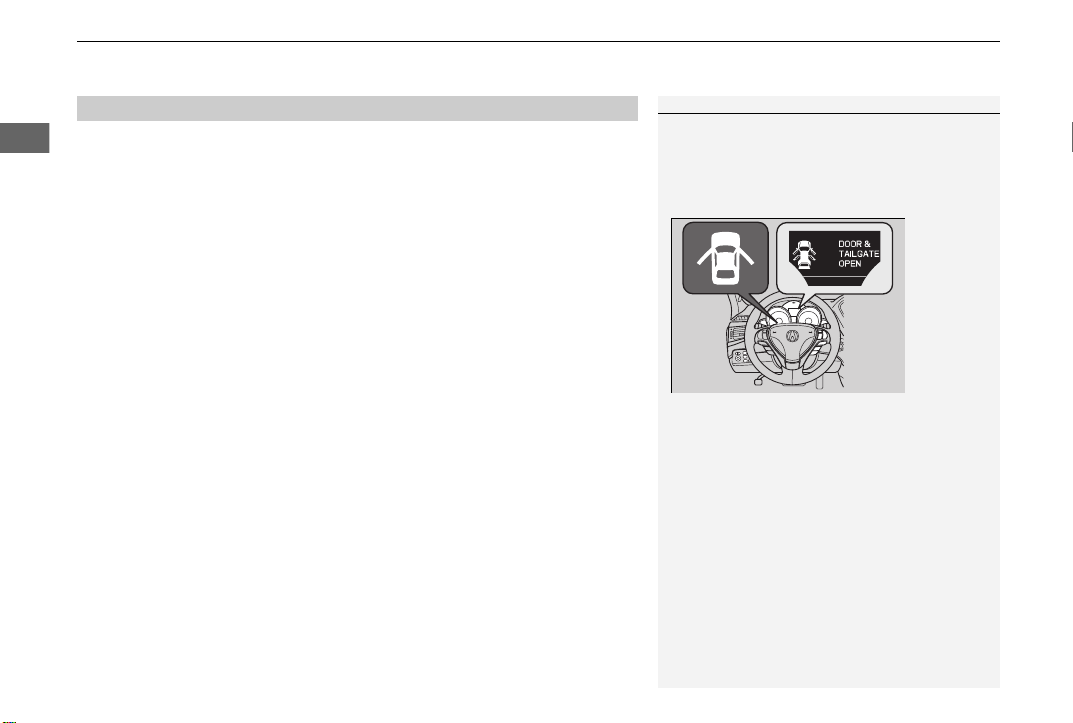
If the door and tailgate open indicator is on, a door
and/or the tailgate is not completely closed. Close all
doors and the tailgate tightly until the indicator goes
off.
2 Door and Tailgate Open Indicator P. 73
Safety Checklist
■
For the safety of you and your passengers, make a habit of checking these items
each time before you drive.
• After everyone has entered the vehicle, be sure all doors and the tailgate are
closed and locked. Locking the doors and the tailgate helps prevent an occupant
from being ejected and an outsider from unexpectedly opening a door or the
tailgate.
2 Locking/Unlocking the Doors from the Inside P. 111
• Adjust your seat to a position suitable for driving. Be sure the front seats are
adjusted as far to the rear as possible while allowing the driver to control the
vehicle. Sitting too close to a front airbag can result in serious or fatal injury in a
crash.
2 Adjusting the Seats P. 143
• Adjust head restraints to the proper position. Head restraints are most effective
when the center of the head restraint aligns with the center of your head. Taller
persons should adjust their head restraint to the highest position.
2 Adjusting the Head Restraints P. 145
• Always wear your seat belt, and make sure you wear it properly. Confirm that any
passengers are properly belted as well.
2 Fastening a Seat Belt P. 31
• Protect children by using seat belts or child seats according to a child’s age, height
and weight.
2 Child Safety P. 50
26
Page 29

Safe Driving
Seat Belts
1About Your Seat Belts
Seat belts cannot completely protect you in every
crash. But in most cases, seat belts can reduce your
risk of serious injury.
Most states and all Canadian provinces and territories
require you to wear seat belts.
3
WARNING
Not wearing a seat belt properly increases
the chance of serious injury or death in a
crash, even though your vehicle has
airbags.
Be sure you and your passengers always
wear seat belts and wear them properly.
About Your Seat Belts
Seat belts are the single most effective safety device because they keep you
connected to the vehicle so that you can take advantage of many built-in safety
features. They also help keep you from being thrown against the inside of the
vehicle, against other passengers, or out of the vehicle. When worn properly, seat
belts also keep your body properly positioned in a crash so that you can take full
advantage of the additional protection provided by the airbags.
In addition, seat belts help protect you in almost every type of crash, including:
- frontal impacts
- side impacts
- rear impacts
- rollovers
■ Lap/shoulder seat belts
All five seating positions are equipped with lap/shoulder seat belts with emergency
locking retractors. In normal driving the retractor lets you move freely while keeping
some tension on the belt. During a collision or sudden stop the retractor locks to
restrain your body. The rear seat belts also have a lockable retractor for use with
child seats.
2 Installing a Child Seat with a Lap/Shoulder Seat Belt P. 58
Continued
27
Page 30
uuSeat Belts u About Your Seat Belts
Safe Driving
1About Your Seat Belts
If a rear seat passenger moves around and extends
the seat belt, the lockable retractor may activate. If
this happens, release the retractor by unfastening the
seat belt and allow the belt to retract completely.
Then refasten the belt.
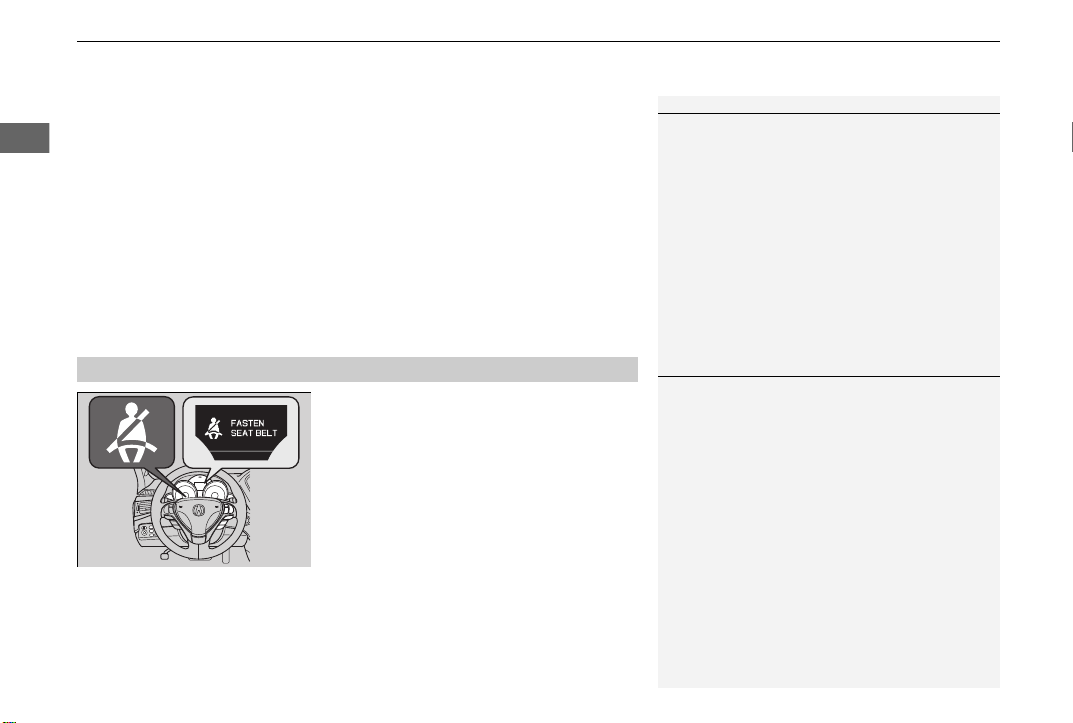
1Seat Belt Reminder
The indicator will also come on if a front passenger
does not fasten their seat belt within 6 seconds after
the ignition switch is turned to ON
(w
*1
.
When no one is sitting in the front passenger’s seat,
or a child or small adult is riding there, the indicator
will not come on.
This is because the weight sensors in the seat cannot
detect their presence.
■ Proper use of seat belts
Follow these guidelines for proper use:
• All occupants should sit upright, well back in the seat, and remain in that position
for the duration of the trip. Slouching and leaning reduces the effectiveness of
the belt and can increase the chance of serious injury in a crash.
• Never place the shoulder part of a lap/shoulder seat belt under your arm or
behind your back. This could cause very serious injuries in a crash.
• Two people should never use the same seat belt. If they do, they could be very
seriously injured in a crash.
• Do not put any accessories on the seat belts. Devices intended to improve comfort
or reposition the shoulder part of a seat belt can reduce the protective capability
and increase the chance of serious injury in a crash.
Seat Belt Reminder
■
*1: Models with the keyless access system have an ENGINE START/STOP button
instead of an ignition switch.
Your vehicle monitors front seat belt use. If
the ignition switch is turned to ON
w
*1
before the driver’s seat belt is fastened, a
beeper will sound and the indicator will blink.
If the driver does not fasten the belt before
the beeper stops, the indicator will remain on.
The beeper will also periodically sound and
the indicator will blink while driving until the
driver’s and front passenger’s seat belts are
fastened.
28
Page 31

Safe Driving
Automatic Seat Belt Tensioners
1Automatic Seat Belt Tensioners
The seat belt tensioners can only operate once.
If a tensioner is activated, the SRS indicator will come
on. Have a dealer replace the tensioner and
thoroughly inspect the seat belt system as it may not
offer protection in a subsequent crash.
During a moderate-to-severe side impact, the
tensioner on that side of the vehicle also activates.
■
The front seats are equipped with automatic seat belt tensioners to enhance safety.
The tensioners automatically tighten the front seat belts during a moderate-tosevere frontal collision, sometimes even if the collision is not severe enough to
inflate the front airbags.
uuSeat Belts uAbout Your Seat Belts
Continued
29
Page 32

uuSeat Belts u About Your Seat Belts
Safe Driving
1Seat Belt e-pretensioners
*
If the automatic seat belt tensioners are activated
during a collision, both of the front seat belt
assemblies and all related components must be
replaced.
2 Automatic Seat Belt Tensioners P. 29
The front passengers e-pretensioner does not
activate when the passengers front airbag is
automatically turned off.
* Not available on all models
Seat Belt e-pretensioners
■
*
Vehicles equipped with CMBSTM also have seat
belt e-pretensioners in the front seats that
automatically start to retract if your vehicle
gets too close to another vehicle in front of
you. They begin with a light tug to alert the
driver, then tighten if the system detects that
your vehicle may collide with the vehicle in
front of you. The e-pretensioners will release if
a collision is avoided.
2 CMBSTM (Collision Mitigation Braking
2 Brake Assist System P. 256
System
TM
)* P. 257
30
Page 33

Safe Driving
Fastening a Seat Belt
1Fastening a Seat Belt
No one should sit in a seat with an inoperative seat
belt or one that does not appear to be working
correctly. Using a seat belt that is not working
properly may not protect the occupant in a crash.
Have a dealer check the belt as soon as possible.
Never insert any foreign objects into the buckle or
retractor mechanism.
Pull out slowly.
Correct
Seated
Posture.
Latch
Plate
Buckle
After adjusting a front seat to the proper position, and while sitting upright and well
back in the seat:
2 Adjusting the Seats P. 143
1. Pull the seat belt out slowly.
2. Insert the latch plate into the buckle, then
tug on the belt to make sure the buckle is
secure.
u Make sure that the belt is not twisted or
caught on anything.
Continued
uuSeat Beltsu Fastening a Seat Belt
31
Page 34

uuSeat Belts u Fastening a Seat Belt
Safe Driving
1Fastening a Seat Belt
To release the belt, push the red PRESS button then
guide the belt by hand until it has retracted
completely.
When exiting the vehicle, be sure the belt is out of
the way and will not get caught by closing the door.
3
WARNING
Improperly positioning the seat belts can
cause serious injury or death in a crash.
Make sure all seat belts are properly
positioned before driving.
Lap belt
as low as
possible
1Adjusting the Shoulder Anchor
The shoulder anchor height can be adjusted to four
levels. If the belt contacts your neck, lower the height
one level at a time.
After an adjustment, make sure that the shoulder
anchor position is secure.
Push
Adjusting the Shoulder Anchor
■
The front seats have adjustable shoulder anchors to accommodate taller and shorter
occupants.
32
3. Position the lap part of the belt as low as
possible across your hips, then pull up on
the shoulder part of the belt so the lap part
fits snugly. This lets your strong pelvic
bones take the force of a crash and reduces
the chance of internal injuries.
4. If necessary, pull up on the belt again to
remove any slack, then check that the belt
rests across the center of your chest and
over your shoulder. This spreads the forces
of a crash over the strongest bones in your
upper body.
1. Move the anchor up and down while
holding the release button.
2. Position the anchor so that the belt rests
across the center of your chest and over
your shoulder.
Page 35

Safe Driving
Advice for Pregnant Women
1Advice for Pregnant Women
Each time you have a checkup, ask your doctor if it is
okay for you to drive.
To reduce the risk of injuries to both you and your
unborn child that can be caused by an inflating front
airbag:
• When driving, sit upright and adjust the seat as far
back as possible while allowing full control of the
vehicle.
• When sitting in the front passenger’s seat, adjust
the seat as far back as possible.
Wear the shoulder belt
across the chest avoiding
the abdomen.
Wear the lap part of the
belt as low as possible
across the hips.
■
If you are pregnant, the best way to protect yourself and your unborn child when
driving or riding in a vehicle is to always wear a seat belt and keep the lap part of the
belt as low as possible across the hips.
uuSeat Beltsu Fastening a Seat Belt
33
Page 36

uuSeat Belts u Seat Belt Inspection
Safe Driving
1Seat Belt Inspection
3
WARNING
Not checking or maintaining seat belts can
result in serious injury or death if the seat
belts do not work properly when needed.
Check your seat belts regularly and have
any problem corrected as soon as possible.
Seat Belt Inspection
Regularly check the condition of your seat belts as follows:
• Pull each belt out fully, and look for frays, cuts, burns, and wear.
• Check that the latches work smoothly and the belts retract easily.
u If a belt does not retract easily, cleaning the belt may correct the problem. Only
use a mild soap and warm water. Do not use bleach or cleaning solvents. Make
sure the belt is completely dry before allowing it to retract.
Any belt that is not in good condition or working properly will not provide proper
protection and should be replaced as soon as possible.
A belt that has been worn during a crash may not provide the same level of
protection in a subsequent crash. Have your seat belts inspected by a dealer after
any collision.
34
Page 37

Safe Driving
Airbags
a c
g
ijleba
h
b
d
e
f
h
h
m
h
kh
h
Airbag System Components
Continued
35
Page 38

uuAirbags u Airbag System Components
Safe Driving
Models with CMBS
TM
The front, front side, and side curtain
airbags are deployed according to the
direction and severity of impact. The airbag
system includes:
a Two SRS (Supplemental Restraint System)
front airbags. The driver’s airbag is stored
in the center of the steering wheel; the
front passenger’s airbag is stored in the
dashboard. Both are marked SRS
AIRBAG.
b Two side airbags, one for the driver and
one for a front passenger. The airbags are
stored in the outer edges of the seatbacks. Both are marked SIDE AIRBAG.
c Two side curtain airbags, one for each
side of the vehicle. The airbags are stored
in the ceiling, above the side windows.
The front and rear pillars are marked
SIDE CURTAIN AIRBAG.
36
d An electronic control unit that continually
monitors and records information about
the sensors, the airbag activators, the
seat belt tensioners, and driver and front
passenger seat belt use when the ignition
switch is in ON
w
*1
.
h Impact sensors that can detect a
moderate to severe front impact, side
impact, or if your vehicle is about to
rollover.
i An indicator on the dashboard that alerts
you that the front passenger’s front
e Automatic front seat belt tensioners. The
airbag has been turned off.
driver’s and front passenger’s seat belts
incorporate sensors that detect whether
or not they are fastened.
j Sensors that can detect if a child or small
statured adult is in the deployment path
of the front passenger’s side airbag.
The front seat belt tensioners also include
the e-pretensioners.
f A driver’s seat position sensor. If the seat
is too far forward, the airbag will inflate
with less force.
g Weight sensors in the front passenger’s
seat. The front passenger’s airbag will be
turned off if the weight on the seat is 65
k An indicator on the instrument panel that
alerts you to a possible problem with your
airbag system or seat belt tensioners.
l An indicator on the instrument panel that
alerts you that the front passenger’s side
airbag has been turned off.
m Safing Sensor
lbs (29 kg) or less (the weight of an infant
or small child).
*1: Models with the keyless access system
have an ENGINE START/STOP button
instead of an ignition switch.
Page 39

Safe Driving
Important facts about your airbags
1Important facts about your airbags
Do not attempt to deactivate your airbags. Together,
airbags and seat belts provide the best protection.
When driving, keep hands and arms out of the
deployment path of the front airbag by holding each
side of the steering wheel. Do not cross an arm over
the airbag cover.
■
Airbags can pose serious hazards. To do their job, airbags must inflate with
tremendous force. So, while airbags help save lives, they can cause minor injuries,
sometimes even fatal ones if occupants are not wearing their seat belts properly and
sitting correctly.
What you should do: Always wear your seat belt properly, and sit upright and as
far back from the steering wheel as possible while allowing full control of the
vehicle. A front passenger should move their seat as far back from the dashboard as
possible.
Remember, however, that no safety system can prevent all injuries or deaths that
can occur in a severe crash, even when seat belts are properly worn and the airbags
deploy.
Do not place hard or sharp objects between yourself and a front airbag.
Carrying hard or sharp objects on your lap, or driving with a pipe or other sharp
object in your mouth, can result in injuries if your front airbag inflates.
Do not attach or place objects on the front airbag covers. Objects on the
covers marked SRS AIRBAG could interfere with the proper operation of the airbags
or be propelled inside the vehicle and hurt someone if the airbags inflate.
uuAirbags uAirbag System Components
37
Page 40

uuAirbags u Types of Airbags
Safe Driving
1Types of Airbags
The airbags can inflate whenever the ignition switch
is in ON
(w
*1
.
*1: Models with the keyless access system have an
ENGINE START/STOP
button instead of an ignition
switch.
1Front Airbags (SRS)
Dual-Stage, Multiple-Threshold Front Airbags
(SRS)
Your vehicle is equipped with dual-stage, multiplethreshold front airbags (SRS).
During a frontal crash severe enough to cause one or
both front airbags to deploy, the airbags can inflate
at different rates, depending on the severity of the
crash, whether or not the seat belts are latched,
and/or other factors. Frontal airbags are designed to
supplement the seat belts to help reduce the
likelihood of head and chest injuries in frontal
crashes.
Types of Airbags
Your vehicle is equipped with three types of airbags:
• Front airbags: Airbags in front of the driver’s and front passenger’s seats.
• Side airbags: Airbags in the driver’s and front passenger’s seat-backs.
• Side curtain airbags: Airbags above the side windows.
Each is discussed in the following pages.
Front Airbags (SRS)
The front SRS airbags inflate in a moderate to severe frontal collision to help protect
the head and chest of the driver and/or front passenger.
SRS (Supplemental Restraint System) indicates that the airbags are designed to
supplement seat belts, not replace them. Seat belts are the occupant’s primary
restraint system.
Housing Locations
■
The front airbags are housed in the center of the steering wheel for the driver, and
in the dashboard for the front passenger. Both airbags are marked SRS AIRBAG.
38
Page 41

Safe Driving
Operation
1How the Front Airbags Work
After a front airbag inflates in a crash, you may see
what looks like smoke. This is actually powder from
the airbag’s surface. Although the powder is not
harmful, people with respiratory problems may
experience some temporary discomfort. If this occurs,
get out of the vehicle as soon as it is safe to do so.
Although the driver’s and front passenger’s airbags
normally inflate within a split second of each other, it
is possible for only one airbag to deploy. This can
happen if the severity of a collision is at the margin,
or threshold, that determines whether or not the
airbags will deploy. In such cases, the seat belt will
provide sufficient protection, and the supplemental
protection offered by the airbag would be minimal.
■
Front airbags are designed to inflate during moderate-to-severe frontal collisions.
When the vehicle decelerates suddenly, the sensors send information to the control
unit which signals one or both front airbags to inflate.
A frontal collision can be either head-on or angled between two vehicles, or when a
vehicle crashes into a stationary object, such as a concrete wall.
How the Front Airbags Work
■
The total time for inflation and deflation is so fast that most occupants are not
aware that the airbags deployed until they see them lying in front of them.
While your seat belt restrains your torso, the
front airbag provides supplemental protection
for your head and chest.
The front airbags deflate immediately so that
they won’t interfere with the driver’s visibility
or the ability to steer or operate other
controls.
Continued
uuAirbags uFront Airbags (SRS)
39
Page 42

uuAirbags u Front Airbags (SRS)
Safe Driving
■ When front airbags should not deploy
Minor frontal crashes: Front airbags were designed to supplement seat belts and
help save lives, not to prevent minor scrapes, or even broken bones that might occur
during a less than moderate-to-severe frontal crash.
Side impacts: Front airbags can provide protection when a sudden deceleration
causes a driver or front passenger to move towards the front of the vehicle. Side
airbags and side curtain airbags have been specifically designed to help reduce the
severity of injuries that can occur during a moderate-to-severe side impact which
can cause the driver or passenger to move towards the side of the vehicle.
Rear impacts: Head restraints and seat belts are your best protection during a rear
impact. Front airbags cannot provide any significant protection and are not designed
to deploy in such collisions.
Rollovers: Seat belts and, in vehicles equipped with a rollover sensor, side airbags
and side curtain airbags offer the best protection in a rollover. Because front airbags
could provide little if any protection, they are not designed to deploy during a
rollover.
■ When front airbags deploy with little or no visible damage
Because the airbag system senses sudden deceleration, a strong impact to the
vehicle framework or suspension might cause one or more of the airbags to deploy.
Examples include running into a curb, the edge of a hole, or other low fixed object
that causes a sudden deceleration in the vehicle chassis. Since the impact is
underneath the vehicle, damage may not be readily apparent.
■ When front airbags may not deploy, even though exterior damage
appears severe
Since crushable body parts absorb crash energy during an impact, the amount of
visible damage does not always indicate proper airbag operation. In fact, some
collisions can result in severe damage but no airbag deployment because the airbags
would not have been needed or would not have provided protection even if they
had deployed.
40
Page 43

Safe Driving
Advanced Airbags
1Advanced Airbags
If there is a problem with the driver’s seat position
sensor, the SRS indicator will come on and the airbag
will inflate with full (normal) force, regardless of the
driver’s seating position.
For both advanced front airbags to work properly:
• Do not spill any liquid on or under the seats.
• Do not put any object under the passenger’s seat.
• Make sure any objects are positioned properly on
the floor. Improperly positioned objects can
interfere with the advanced airbag sensors.
• All occupants should sit upright and wear their seat
belts properly.
• Do not place any cover over the passenger side
dashboard.
Make sure the floor mat behind the front passenger’s
seat is hooked to the floor mat anchor. An improperly
placed mat can interfere with the advanced airbag
sensors.
2 Floor Mats P. 314
Driver’s
Seat
Position
Sensor
Passenger’s
Seat
Weight
Sensors
■
Your front airbags have advanced features to help reduce the likelihood of airbag
related injuries to smaller occupants.
uuAirbags uFront Airbags (SRS)
The driver’s advanced front airbag system
includes a seat position sensor.
If the seat is too far forward, the airbag
inflates with less force, regardless of the
severity of the impact.
The passenger’s advanced front airbag system
has weight sensors.
Although Acura recommends against carrying
an infant or small child in front, if the sensors
detect the weight of a child (up to about 65
lbs or 29 kg), the system will automatically
turn off the passenger’s front airbag.
41
Page 44

uuAirbags u Side Airbags
Safe Driving
1Side Airbags
Do not attach accessories on or near the side airbags.
They can interfere with the proper operation of the
airbags, or hurt someone if an airbag inflates.
If the impact is on the passenger side, the airbag may
not deploy if there is no passenger in the passenger
seat.
Do not cover or replace the front seat-back covers
without consulting a dealer.
Improperly replacing or covering front seat-back
covers can prevent your side airbags from properly
deploying during a side impact.
Housing
Location
When
inflated
Side
Airbag
Side Airbags
The side airbags help protect the upper torso of the driver or a front passenger
during a moderate-to-severe side impact.
42
Housing Locations
■
Operation
■
The side airbags are housed in the outside
edge of the driver’s and passenger’s seatbacks.
Both are marked SIDE AIRBAG.
When the sensors detect a moderate-tosevere side impact, the control unit signals the
side airbag on the impact side to immediately
inflate.
Page 45

uuAirbags uSide Airbags
Safe Driving
■ When a side airbag deploys with little or no visible damage
Because the airbag system senses sudden acceleration, a strong impact to the side
of the vehicle’s framework can cause a side airbag to deploy. In such cases, there
may be little or no damage, but the side impact sensors detected a severe enough
impact to deploy the airbag.
■ When a side airbag may not deploy, even though visible damage appears
severe
It is possible for a side airbag to not deploy during an impact that results in
apparently severe damage. This can occur when the point of impact was towards
the far front or rear of the vehicle, or when the vehicle’s crushable body parts
absorbed most of the crash energy. In either case, the side airbag would not have
been needed nor provided protection even if it had deployed.
Continued
43
Page 46

uuAirbags u Side Airbags
Safe Driving
1Side Airbag Cutoff System
The sensors that monitor the front passenger’s height
and body position may not work if:
• The seat-back is wet
• The passenger is touching a metal or other
electrical conductive object
• A seat cushion is on the seat
• The passenger is wearing excessively thick clothing
Sensor that
monitor the
passenger’s height.
Sensor that monitor
the passenger’s
position.
Side Airbag Cutoff System
■
To reduce the likelihood that a front passenger may be injured by an inflating side
airbag, the passenger side airbag is automatically turned off when:
• The height sensors detect a child or short-statured adult is seated in the front
passenger seat.
• The position sensor detects that the front passenger is leaning into the
deployment path of the side airbag.
When the side airbag cutoff system is activated, the side airbag off indicator comes
on.
2 Side Airbag Off Indicator P. 48
Side Airbag Off Indicator
■
If the side airbag off indicator comes on, have the passenger sit upright. A few
seconds after the passenger is sitting properly, the side airbag will automatically be
turned on, and the indicator will go off.
If the front passenger is a child, stop when it is safe to do so, and have the child sit
properly restrained in a rear seat.
44
Page 47

Safe Driving
Side Curtain Airbags
1Side Curtain Airbags
The side curtain airbags are most effective when an
occupant is wearing their seat belt properly and
sitting upright, well back in their seat.
Do not attach any objects to the side windows or roof
pillars as they can interfere with the proper operation
of the side curtain airbags.
If the impact is on the passenger side, the side curtain
airbag deploys even if there is no passenger in the
passenger seat.
Side Curtain Airbag Storage
Deployed Side Curtain Airbag
The side curtain airbags help protect the heads of the driver and passengers in outer
seating positions during a moderate-to-severe side impact or rollover.
uuAirbags u Side Curtain Airbags
Housing Locations
■
Operation
■
■ When side curtain airbags deploy in a frontal collision
One or both side curtain airbags may inflate in a moderate-to-severe angled frontal
collision.
In this case, the side curtain airbags will deploy slightly after the front airbags.
The side curtain airbags are located in the
ceiling above the side windows on both sides
of the vehicle.
The side curtain airbag is designed to deploy
in a moderate-to-severe side impact or
rollover.
45
Page 48

uuAirbags u Airbag System Indicators
Safe Driving
1SRS (Supplemental Restraint System) Indicator
3
WARNING
Ignoring the SRS indicator can result in
serious injury or death if the airbag systems
or tensioners do not work properly.
Have your vehicle checked by a dealer as
soon as possible if the SRS indicator alerts
you to a possible problem.
Airbag System Indicators
If a problem occurs in the airbag system, the SRS indicator will come on and a
message appears on the multi-information display.
SRS (Supplemental Restraint System) Indicator
■
■ When the ignition switch is turned to
The indicator comes on for a few seconds,
then goes off. This tells you the system is
working properly.
If the indicator comes on at any other time, or does not come on at all, have the
system checked by a dealer as soon as possible. If you don’t, your airbags and seat
belt tensioners may not work properly when they are needed.
ON
w
*1
*1: Models with the keyless access system have an ENGINE START/STOP button
instead of an ignition switch.
46
Page 49

Safe Driving
Passenger Airbag Off Indicator
1Passenger Airbag Off Indicator
If the indicator comes on with no front passenger and
no objects on the passenger’s seat, or with an adult
riding there, something may be interfering with the
weight sensors. Such as:
• An object hanging on the seat or in the seat-back
pocket.
• A child seat or other object pressing against the
rear of the seat-back.
• A rear passenger pushing or pulling on the back of
the front passenger’s seat.
• The front seat or seat-back is forced back against
an object on the seat or floor behind it.
• An object placed under the front passenger’s seat.
If none of these conditions exist, have your vehicle
checked by a dealer as soon as possible.
The passenger airbag off indicator may come on and
goes off repeatedly if the total weight on the seat is
near the airbag cutoff threshold.
U.S. Canada
■
Infants and small children should always ride properly restrained in a back seat.
2 Child Safety P. 50
Objects placed on the seat can also cause the indicator to come on.
If the front passenger seat is empty, the passenger’s front airbag will not deploy and
the indicator will not come on.
uuAirbags uAirbag System Indicators
■ When the passenger airbag off
indicator comes on
The indicator comes on to alert you that the
passenger’s front airbag has been turned off.
This occurs when the front passenger’s weight
sensors detect 65 lbs (29 kg) or less, the
weight of an infant or small child, on the seat.
Continued
47
Page 50

uuAirbags u Airbag System Indicators
Safe Driving
1Side Airbag Off Indicator
When you turn the ignition switch to ON
(w
*1
, the
indicator should come on for a few seconds and then
go out. If it doesn’t come on, stays on, or comes on
while driving without a passenger in the front seat,
have the system checked by a dealer as soon as
possible.
*1: Models with the keyless access system have an
ENGINE START/STOP button instead of an ignition
switch.
Canada
U.S.
Side Airbag Off Indicator
■
■ When the side airbag off indicator comes on
This indicator comes on if the passenger’s side airbag has been turned off because
the passenger is too small to be sitting in the front seat, is slouching or not sitting
upright, or has leaned into the airbag’s deployment path.
Unless the passenger is a smaller statured adult or a child, the indicator should go
off when the passenger returns to a proper upright sitting position.
48
Page 51

uuAirbags uAirbag Care
Safe Driving
1Airbag Care
We recommend against the use of salvaged airbag
system components, including the airbag, tensioners,
sensors, and control unit.
Airbag Care
You do not need to, and should not, perform any maintenance on or replace any
airbag system components yourself. However, you should have your vehicle
inspected by a dealer in the following situations:
■ When the airbags have deployed
If an airbag has inflated, the control unit and other related parts must be replaced.
Similarly, once an automatic seat belt tensioner has been activated, it must be
replaced.
■ When the vehicle has been in a moderate-to-severe collision
Even if the airbags did not inflate, have your dealer inspect the following: the driver’s
seat position sensor, weight sensors in the passenger’s seat, front seat belt
tensioners, and each seat belt that was worn during the crash.
■ Do not remove or modify a front seat without consulting a dealer
This would likely disable the driver’s seat position sensor or the passenger’s weight
sensors. If it is necessary to remove or modify a front seat to accommodate a person
with disabilities, contact an Acura dealer. For U.S. vehicles you can also contact
Acura Client Service at 800-382-2238. For Canadian vehicles you can also contact
Canadian Acura Client Service at 888-9-ACURA-9.
49
Page 52

Safe Driving
Child Safety
1Protecting Child Passengers
The National Highway Traffic Safety
Administration and Transport Canada recommend
that all children age 12 and under be properly
restrained in a rear seat. Some states or
provinces/territories have laws restricting where
children may ride.
3
WARNING
Children who are unrestrained or
improperly restrained can be seriously
injured or killed in a crash.
Any child too small for a seat belt should be
properly restrained in a child seat. A larger
child should be properly restrained with a
seat belt, using a booster seat if necessary.
Protecting Child Passengers
Each year, many children are injured or killed in vehicle crashes because they are
either unrestrained or not properly restrained. In fact, vehicle accidents are the
number one cause of death of children age 12 and under.
To reduce the number of child deaths and injuries, every state, Canadian province
and territory requires that infants and children be properly restrained when they ride
in a vehicle.
Children should sit properly restrained in a rear seat. This is because:
• An inflating front or side airbag can injure
or kill a child sitting in the front seat.
50
• A child in the front seat is more likely to
interfere with the driver’s ability to safely
control the vehicle.
• Statistics show that children of all sizes and
ages are safer when they are properly
restrained in a rear seat.
Page 53

uuChild Safety uProtecting Child Passengers
Safe Driving
1Protecting Child Passengers
To deactivate a lockable retractor, release the buckle
and allow the seat belt to wind up all the way.
To remind you of the passenger’s front airbag
hazards and child safety, your vehicle has warning
labels on the dashboard (U.S. models) and on the
front visors. Please read and follow the instructions
on these labels.
2 Safety Labels P. 65
3
WARNING
Allowing a child to play with a seat belt or
wrap one around their neck can result in
serious injury or death.
Instruct children not to play with any seat
belt and make sure any unused seat belt a
child can reach is buckled, fully retracted,
and locked.
• Any child who is too small to wear a seat belt correctly must be restrained in an
approved child seat that is properly secured to the vehicle using either the lap belt
portion of the lap/shoulder belt or the lower anchors of the LATCH system.
• Never hold a child on your lap because it is impossible to protect them in the
event of a collision.
• Never put a seat belt over yourself and a child. During a crash, the belt would
likely press deep into the child and cause serious or fatal injuries.
seriously injured in a crash.
• Do not allow children to operate the doors, windows or seat adjustments.
• Never let two children use the same seat belt. Both children could be very
• Do not leave children in the vehicle unattended, especially in hot weather when
the inside of the vehicle can get hot enough to kill them. They could also activate
vehicle controls causing it to move unexpectedly.
51
Page 54

uuChild Safety uSafety of Infants and Small Children
Safe Driving
1Protecting Infants
Rear-facing child seats should never be installed in a
forward facing position.
Always refer to the child seat manufacturer’s
instructions before installation.
3
WARNING
Placing a rear-facing child seat in the front
seat can result in serious injury or death
during a crash.
Always place a rear-facing child seat in the
rear seat, not the front.
Safety of Infants and Small Children
■
An infant must be properly restrained in a rear-facing, reclining child seat until the
infant reaches the seat maker’s weight or height limit for the seat, and the infant is
at least one year old.
When properly installed, a rear-facing child seat may prevent the driver or a front
passenger from moving their seat all the way back, or from locking their seat-back
in the desired position.
Protecting Infants
■ Positioning a rear-facing child seat
Child seats must be placed and secured in a
rear seating position.
It can also interfere with proper operation of the passenger’s advanced front airbag
system.
2 Airbags P. 35
If this occurs, we recommend that you install the child seat directly behind the front
passenger’s seat, move the seat as far forward as needed, and leave it unoccupied.
Or, you may wish to get a smaller rear-facing child seat.
52
Page 55

Safe Driving
Protecting Smaller Children
1Protecting Smaller Children
Educate yourself about the laws and regulations
regarding child seat use where you are driving, and
follow the child seat manufacturer’s instructions.
Many experts recommend use of a rear-facing seat
up to age two, if the child’s height and weight are
appropriate for a rear-facing seat.
3
WARNING
Placing a forward-facing child seat in the
front seat can result in serious injury or
death if the front airbag inflates.
If you must place a forward-facing child
seat in front, move the vehicle seat as far
back as possible, and properly restrain the
child.
■
If a child is at least one year old and within the weight range indicated by the child
seat manufacturer, the child should be properly restrained in a firmly secured
forward-facing child seat.
Placing a forward-facing child seat in the front seat can be hazardous, even with
advanced front airbags that automatically turn the passenger’s front airbag off. A
rear seat is the safest place for a child.
uuChild Safety uSafety of Infants and Small Children
■ Forward-facing child seat placement
We strongly recommend placing a forwardfacing child seat in a rear seating position.
Continued
53
Page 56

uuChild Safety uSafety of Infants and Small Children
Safe Driving
1Selecting a Child Seat
Installation of a LATCH-compatible child seat is
simple.
LATCH-compatible child seats have been developed
to simplify the installation process and reduce the
likelihood of injuries caused by incorrect installation.
Selecting a Child Seat
■
Most child seats are LATCH-compatible (Lower Anchors and Tethers for CHildren).
Some have a rigid-type connector, while others have a flexible-type connector. Both
are equally easy to use. Some existing and previously owned child seats can only be
installed using the seat belt. Whichever type you choose, follow the child seat
manufacturer’s use and care instructions as well as the instructions in this manual.
Proper installation is key to maximizing your child’s safety.
In seating positions and vehicles not equipped with LATCH, a LATCH compatible
child seat can be installed using the seat belt and a top tether for added security.
This is because all child seats are required to be designed so that they can be secured
with a lap belt or the lap part of a lap/shoulder belt. In addition, the child seat
manufacturer may advise that a seat belt be used to attach a LATCH-compatible seat
once a child reaches a specified weight. Please read the child seat owner’s manual
for proper installation instructions.
■ Important consideration when selecting a child seat
Make sure the child seat meets the following three requirements:
• The child seat is the correct type and size for the child.
• The child seat is the correct type for the seating position.
• The child seat is compliant with Federal Motor Vehicle Safety Standard 213 or
Canadian Motor Vehicle Safety Standard 213.
54
Page 57

Safe Driving
Marks
Rear Head
Restraint Tilt
Button
Head Restraint
Installing a LATCH-Compatible Child Seat
■
A LATCH-compatible child seat can be installed in either of the two outer rear seats.
A child seat is attached to the lower anchors with either the rigid or flexible type of
connectors.
1. Locate the lower anchors under the marks.
2. Push the rear head restraint tilt buttons to
pivot the head restraints down.
uuChild Safety uSafety of Infants and Small Children
Continued
55
Page 58

uuChild Safety uSafety of Infants and Small Children
Safe Driving
Rigid Type
Lower Anchors
Flexible
Type
1Installing a LATCH-Compatible Child Seat
For your child’s safety, when using a child seat
installed using the LATCH system, make sure that the
seat is properly secured to the vehicle. A child seat
that is not properly secured will not adequately
protect a child in a crash and may cause injury to the
child or other vehicle occupants.
3. Place the child seat on the vehicle seat then
attach the child seat to the lower anchors
according to the instructions that came
with the child seat.
u When installing the child seat, make sure
that the lower anchors are not
obstructed by the seat belt or any other
object.
56
Page 59

uuChild Safety uSafety of Infants and Small Children
Safe Driving
Tether
Strap
Hook
Anchor
4. Raise the head restraint, then route the
tether strap between the head restraint
legs, and secure the tether strap hook onto
the anchor.
5. Tighten the tether strap as instructed by the
child seat maker.
6. Lower the head restraint until it locks in
place.
7. Make sure the child seat is firmly secured by
rocking it forward and back and side to
side; little movement should be felt.
8. Make sure any unused seat belt that a child
can reach is buckled, the lockable retractor
is activated, and the belt is fully retracted
and locked.
Continued
57
Page 60

uuChild Safety uSafety of Infants and Small Children
Safe Driving
1Installing a Child Seat with a Lap/Shoulder Seat Belt
A child seat that is not properly secured will not
adequately protect a child in a crash and may cause
injury to the child or other vehicle occupants.
Installing a Child Seat with a Lap/Shoulder Seat Belt
■
1. Place the child seat on the vehicle seat.
2. Route the seat belt through the child seat
according to the seat maker’s instructions,
and insert the latch plate into the buckle.
u Insert the latch plate fully until it clicks.
3. Slowly pull the shoulder part of the belt all
the way out until it stops. This activates the
lockable retractor.
4. Let the seat belt completely wind up into
the retractor, then try to pull it out to make
sure the retractor is locked.
u If you are able to pull the shoulder belt
out, the lockable retractor is not
activated. Pull the seat belt all the way
out, and repeat steps 2 – 4.
5. Grab the shoulder part of the seat belt near
the buckle, and pull up to remove any slack
from the lap part of the belt.
u When doing this, place your weight on
the child seat and push it into the vehicle
seat.
58
Page 61

Safe Driving
1Installing a Child Seat with a Lap/Shoulder Seat Belt
To deactivate a lockable retractor, release the buckle
and allow the seat belt to wind up all the way.
uuChild Safety uSafety of Infants and Small Children
6. Make sure the child restraint system is
firmly secured by rocking it forward and
back and side to side; little movement
should be felt.
7. Make sure any unused seat belt that a child
can reach is buckled, the lockable retractor
is activated, and the belt is fully retracted
and locked.
Continued
59
Page 62

uuChild Safety uSafety of Infants and Small Children
Safe Driving
1Adding Security with a Tether
Since a tether can provide additional security to the
lap/shoulder seat belt installation, we recommend
using a tether whenever one is available.
Anchor
Tether Anchorage Points
Outer Position
Tether Strap Hook
Adding Security with a Tether
■
A tether anchorage point is provided behind
each rear seating position. A child seat that is
installed with a seat belt and comes with a
tether can use the tether for additional
security.
■ Using an outer anchor
1. Raise the head restraint, then route the
tether strap through the head restraint legs.
Make sure the strap is not twisted.
2. Secure the tether strap hook onto the
anchor.
3. Lower the head restraint until it locks in
place.
4. Tighten the tether strap as instructed by the
child seat manufacturer.
60
Page 63

uuChild Safety uSafety of Infants and Small Children
Safe Driving
Anchor
Tether
Strap
Hook
Center Position
■ Using the center anchor
1. Lower the head restraint.
2. Route the tether strap over the head
restraint and seat-back.
Make sure the strap is not twisted.
3. Secure the tether strap hook onto the
anchor.
4. Tighten the tether strap as instructed by the
child seat manufacturer.
61
Page 64

uuChild Safety uSafety of Larger Children
Safe Driving
1Safety of Larger Children
3
WARNING
Allowing a child age 12 or under to sit in
front can result in injury or death if the
passenger’s front airbag inflates.
If a larger child must ride in front, move the
vehicle seat as far to the rear as possible,
have the child sit up properly and wear the
seat belt properly, using a booster seat if
needed.
Safety of Larger Children
Protecting Larger Children
■
The following pages give instructions on how to check proper seat belt fit, what kind
of booster seat to use if one is needed, and important precautions for a child who
must sit in front.
Checking Seat Belt Fit
■
When a child is too big for a child seat, secure the child in a rear seat using the
lap/shoulder seat belt. Have the child sit upright and all the way back, then answer
the following questions.
If you answer yes to all these questions, the child is ready to wear the lap/shoulder
seat belt correctly. If you answer no to any question, the child needs to ride on a
booster seat until the seat belt fits properly without a booster seat.
■ Checklist
• Do the child’s knees bend comfortably over
the edge of the seat?
• Does the shoulder belt cross between the
child’s neck and arm?
• Is the lap part of the seat belt as low as
possible, touching the child’s thighs?
• Will the child be able to stay seated like this
for the whole trip?
62
Page 65

Safe Driving
Booster Seats
1Booster Seats
When installing a booster seat, make sure to read the
instructions that came with it, and install the seat
accordingly.
There are high- and low-type booster seats. Choose a
booster seat that allows the child to wear the seat
belt correctly.
Some U.S. states and Canadian provinces and
territories require children to use a booster seat until
they reach a given age or weight (e.g. 6 years or 60
lbs). Be sure to check current laws in the state or
province, or territory where you intend to drive.
■
Protecting Larger Children-Final Checks
■
Your vehicle has a rear seat where children can be properly restrained. If you ever
have to carry a group of children, and a child must ride in front:
• Make sure you read and fully understand the instructions and safety information
in this manual.
• Move the front passenger seat as far back as possible.
• Have the child sit upright and well back in the seat.
• Check that the seat belt is properly positioned so that the child is secure in the
seat.
■ Monitoring child passengers
We strongly recommend that you keep an eye on child passengers. Even older, more
mature children sometimes need to be reminded to fasten their seat belts and sit up
properly.
uuChild Safetyu Safety of Larger Children
If a lap/shoulder seat belt cannot be used
properly, position the child in a booster seat in
a rear seating position. For the child’s safety,
check that the child meets the booster seat
manufacturer’s recommendations.
63
Page 66

Safe Driving
Exhaust Gas Hazard
1Carbon Monoxide Gas
An enclosed area such as a garage can quickly fill up
with carbon monoxide gas.
Do not run the engine with the garage door
closed.Even when the garage door is open, drive out
of the garage immediately after starting the engine.
3
WARNING
Carbon monoxide gas is toxic.
Breathing it can cause unconsciousness and
even kill you.
Avoid any enclosed areas or activities that
expose you to carbon monoxide.
Carbon Monoxide Gas
The engine exhaust from this vehicle contains carbon monoxide, a colorless,
odorless, and highly toxic gas. As long as you properly maintain your vehicle, carbon
monoxide gas will not get into the interior.
■ Have the exhaust system inspected for leaks whenever
• The exhaust system is making an unusual noise.
• The exhaust system may have been damaged.
• The vehicle is raised for an oil change.
When you operate a vehicle with the tailgate open, airflow can pull exhaust gas into
the interior and create a hazardous condition. If you must drive with the tailgate
open, open all the windows and set the climate control system as shown below.
1. Select the fresh air mode.
2. Select the mode.
3. Set the fan speed to high.
4. Set the temperature control to a comfortable setting.
Adjust the climate control system in the same manner if you sit in your parked
vehicle with the engine running.
64
Page 67

Safe Driving
Safety Labels
Sun Visor
U.S. models Canadian models
Radiator Cap
Doorjambs
U.S. models
U.S. models only
Dashboard
Canadian models
Doorjambs
Label Locations
These labels are in the locations shown. They warn you of potential hazards that can cause serious injury or death. Read these labels
carefully.
If a label comes off or becomes hard to read (except for the U.S. dashboard label which may be removed by the owner), contact a dealer
for a replacement.
65
Page 68

66
Page 69

Instrument Panel
This chapter describes the buttons, indicators, and gauges that are used while driving.
Indicators ............................................ 68
Multi-Information Display Warning and
Information Messages...................... 80
Gauges and Multi-Information Display
Gauges.............................................. 87
Multi-Information Display .................. 88
67
Page 70

Instrument Panel
Indicators
U.S.
Canada
Indicator Name On/Blinking Explanation Message
●
Comes on for a few seconds when
you turn the ignition switch to ON
*1
(w
, then goes off.
●
Parking Brake
and Brake
System Indicator
(Red)
Comes on when the parking brake
is applied, and goes off when it is
released.
●
Comes on when the brake fluid
level is low.
●
Comes on if there is a problem
with the brake system.
●
The beeper sounds and the
indicator comes on if you drive
with the parking brake not fully
released.
●
Low Oil Pressure
Indicator
Comes on when you turn the
ignition switch to ON
goes off when the engine starts.
●
Comes on when the engine oil
(w
*1
, and
pressure is low.
*1: Models with the keyless access system have an ENGINE START/STOP button instead of an ignition switch.
●
Comes on while driving - Make sure
the parking brake is released. Check the
brake fluid level.
2 What to do when the indicator
comes on while driving P. 336
●
Comes on along with the ABS
indicator - Have the vehicle checked by a
dealer.
2 If the Brake System Indicator (Red)
Comes On P. 336
●
Comes on while driving - Immediately
stop in a safe place.
2 If the Low Oil Pressure Indicator
Comes On P. 334
68
Page 71

uuIndicators u
Instrument Panel
Indicator Name On/Blinking Explanation Message
●
Comes on when you turn the
ignition switch to ON
(w
*1
, and
goes off either when the engine
Malfunction
Indicator Lamp
starts or after several seconds if the
engine is not started. If “readiness
codes” have not been set, it blinks
five times before it goes off.
●
Comes on if there is a problem
with the emissions control system.
●
Blinks when a misfire in the
engine’s cylinders is detected.
●
Charging System
Indicator
Comes on when you turn the
ignition switch to ON
goes off when the engine starts.
●
Comes on when the battery is not
(w
*1
, and
charging.
●
Readiness codes are part of the on board
diagnostics for the emissions control
systems.
2 Testing of Readiness Codes P. 354
●
Comes on while driving - Have the
vehicle checked by a dealer.
●
Blinks while driving - Stop in a safe
place where there are no flammable
objects. Stop the engine for 10 minutes
or more, and wait for it to cool down.
Then, take the vehicle to a dealer.
2 If the Malfunction Indicator Lamp
Comes On or Blinks P. 335
●
Stays on while driving - Turn off the
climate control system and rear defogger
in order to reduce electricity
consumption.
2 If the Charging System Indicator
Comes On P. 334
*1: Models with the keyless access system have an ENGINE START/STOP button instead of an ignition switch.
Continued
69
Page 72

uuIndicators u
Instrument Panel
* Not available on all models
Indicator Name On/Blinking Explanation Message
Shift Position
Indicator
Transmission
Indicator
M (sequential
shift mode)
Indicator/Gear
Position Indicator
*1: Models with the keyless access system have an ENGINE START/STOP button instead of an ignition switch.
70
●
Indicates in which position your shift
lever is.
●
Comes on for a few seconds when
you turn the ignition switch to ON
*1
(w
, then goes off.
●
Blinks if the transmission system has
a problem.
●
Comes on when the manual
sequential shift mode is applied.
●
Blinks if the transmission system has
*
a problem.
2 Shifting P. 228
●
Blinks while driving - Avoid sudden
starts and acceleration and have the
vehicle checked by a dealer
immediately.
2 Sequential Shift Mode P. 230
—
—
Page 73

uuIndicators u
Instrument Panel
Indicator Name On/Blinking Explanation Message
●
Comes on and the beeper sounds if
you are not wearing a seat belt when
you turn the ignition switch to ON
*1
(w
Seat Belt
Reminder
Indicator
. If the front passenger is not
wearing a seat belt, the indicator
comes on about a few seconds later.
●
Blinks while driving if either you or
the front passenger has not fastened
a seat belt. The beeper sounds and
●
The beeper stops and the indicator
goes off when you and the front
passenger fasten their seat belts.
●
Stays on after you or the front
passenger has fastened the seat
belt - A detection error may have
occurred in the sensor. Have the
vehicle checked by a dealer.
2 Seat Belt Reminder P. 28
the indicator blinks at regular
intervals.
Low Fuel Indicator
●
Comes on when the fuel reserve is
running low (approximately
2.9 U.S. gal./10.8 Liter left).
●
Blinks if there is a problem with the
●
Comes on - Refuel your vehicle as
soon as possible.
●
Blinks - Have the vehicle checked by a
dealer.
fuel gauge.
ABS (Anti-lock
Brake System)
Indicator
●
Comes on for a few seconds when
you turn the ignition switch to ON
*1
(w
, then goes off.
●
If it comes on at any other time, there
is a problem with the ABS.
●
Stays on constantly - Have the
vehicle checked by a dealer. With this
indicator on, your vehicle still has
normal braking ability but no anti-lock
function.
2 ABS (Anti-lock Brake System)
P. 255
*1: Models with the keyless access system have an ENGINE START/STOP button instead of an ignition switch.
Continued
71
Page 74

uuIndicators u
Instrument Panel
* Not available on all models
Indicator Name On/Blinking Explanation Message
●
Comes on for a few seconds when
you turn the ignition switch to ON
*1
(w
, then goes off.
●
Supplemental
Restraint System
Indicator
Comes on if a problem with any of
the following is detected:
- Supplemental restraint system
- Side airbag system
●
Stays on constantly or does not
come on at all - Have the vehicle
checked by a dealer.
- Side curtain airbag system
VSA® (Vehicle
Stability Assist)
System Indicator
- Seat belt tensioner
- Seat belt e-pretensioner
●
Comes on for a few seconds when
you turn the ignition switch to ON
*1
(w
, then goes off.
●
Blinks when VSA® is active.
●
Comes on if there is a problem with
*
●
Stays on constantly - Have the vehicle
checked by a dealer.
2 VSA® (Vehicle Stability Assist), aka
ESC (Electronic Stability Control),
System P. 243
the VSA® system or hill start assist
system.
●
VSA® (Vehicle
Stability Assist)
OFF Indicator
Comes on for a few seconds when
you turn the ignition switch to ON
*1
(w
, then goes off.
●
Comes on when you deactivate
2 VSA® On and Off P. 244
VSA®.
—
*1: Models with the keyless access system have an ENGINE START/STOP button instead of an ignition switch.
72
Page 75

uuIndicators u
Instrument Panel
* Not available on all models
Indicator Name On/Blinking Explanation Message
●
Comes on for a few seconds if you turn
the ignition switch to ON
Door and
Tailgate
Open
Indicator
off.
●
Comes on if any door or the tailgate is not
completely closed.
●
The beeper sounds and the indicator
*1
(w
, then goes
●
Goes off when all doors and the tailgate
are closed.
comes on if any door or the tailgate is
opened while driving.
Active
Damper
System
Indicator
*
ECPS
(Electronically
Controlled
Power
Steering)
System
*
Indicator
●
Comes on for a few seconds when you
change the power mode to ON, then goes
off.
●
Comes on if there is a problem with the
Active Damper System.
●
Comes on when you change the power
mode to ON, and goes off when the
engine starts.
●
Comes on if there is a problem with the
ECPS system.
●
Stays on constantly - Have the vehicle
checked by a dealer. With this indicator
on, your vehicle has normal damping
ability without the active damper
feature.
2 IDS (Integrated Dynamics
●
Stays on constantly - Stop in a safe
System)
*
P. 252
place, stop the engine and wait for a
while. Turn on the engine again and see
if the indicator goes off.
●
Comes back on - Have the vehicle
checked by a dealer.
*1: Models with the keyless access system have an ENGINE START/STOP button instead of an ignition switch.
Continued
73
Page 76

uuIndicators u
Instrument Panel
3
4
3
4
Indicator Name On/Blinking Explanation Message
●
Comes on for a few seconds when you
turn the ignition switch to ON
●
Low Tire
Pressure/
TPMS
Indicator
Comes on if the tire pressure of any of the
tires becomes significantly low.
●
Blinks for about one minute, and then
stays on if there is a problem with the
TPMS, or when a compact spare tire is
(w
*1
temporarily installed.
●
.
Comes on while driving - Stop in a
safe place, check tire pressures, and
inflate the tire(s) if necessary.
●
Blinks and remains on - Have the
vehicle checked by a dealer. If the
vehicle is fitted with a compact spare,
get your regular tire repaired or
replaced and put back on your vehicle
as soon as you can.
●
System
Message
Indicator
Comes on for a few seconds when you
turn the ignition switch to ON
(w
*1
goes off.
●
Comes on along with a beep when a
problem is detected. A system message on
the multi-information display appears at
the same time.
, then
●
While the indicator is on, press the /
(information) button to see the
message again.
●
Refer to the Indicators information in
this chapter when a system message
appears on the multi-information
display. Take the appropriate action for
the message.
●
The multi-information display does not return
to the normal screen unless the warning is
canceled, or the / button is pressed.
*1: Models with the keyless access system have an ENGINE START/STOP button instead of an ignition switch.
—
74
Page 77

uuIndicators u
Instrument Panel
U.S.
Canada
Indicator Name On/Blinking Explanation Message
●
The turn signal indicators blink when
Turn Signal
Indicators
High Beam
Indicator
Lights On
Indicator
you operate the turn signal lever.
●
If you press the hazard warning
button, both indicators and all turn
signals blink at the same time.
●
Comes on when the high beam
headlights are on.
●
Comes on whenever the light switch
is on, or in AUTO when the exterior
lights are on.
●
Does not blink or blinks rapidly - A
turn signal light bulb has blown.
Change the bulb immediately.
2 Replacing Light Bulbs P. , 291
— —
●
If you remove the key from the ignition
*1
switch
while the lights are on, a chime
sounds when the driver’s door is
—
—
opened.
●
Fog Light
Indicator
Comes on when the fog lights are
on.
— —
Side Airbag Off
Indicator
●
Comes on for a few seconds when
you turn the ignition switch to ON
*1
(w
, then goes off.
●
Comes on when the passenger side
airbag system is automatically shut
off.
●
It does not mean there is a problem
with your side airbags.
●
Comes on when nobody is sitting in
the passenger seat - Have the vehicle
checked by a dealer.
●
Comes on when someone is sitting
in the seat - Have the passenger sit
properly.
*1: Models with the keyless access system have an ENGINE START/STOP button instead of an ignition switch.
Continued
75
Page 78

uuIndicators u
Instrument Panel
Indicator Name On/Blinking Explanation Message
●
Comes on briefly when you turn the
ignition switch to ON
(w
*1
, then
goes off.
●
Immobilizer
System Indicator
Comes on if the immobilizer system
cannot recognize the key
information.
●
Blinks - You cannot start the engine.
Turn the ignition switch to LOCK
pull the key out, and then insert the key
and turn it to ON
●
Repeatedly blinks - The system may
(w
*1
again.
be malfunctioning. Have the vehicle
(0
*1
,
checked by a dealer.
●
Do not attempt to alter this system or
add other devices to it. Electrical
problems can occur.
●
Security System
Alarm Indicator
Blinks when the security system
alarm has been set.
2 Security System Alarm P. 120
*1: Models with the keyless access system have an ENGINE START/STOP button instead of an ignition switch.
—
—
76
Page 79

uuIndicators u
Instrument Panel
* Not available on all models
Indicator Name On/Blinking Explanation Message
●
CRUISE MAIN
Indicator
CRUISE CONTROL
Indicator
*
*
Comes on when you press the
CRUISE button.
●
Comes on if you have set a speed for
cruise control.
●
Comes on for a few seconds when
2 Cruise Control* P. 232
2 Cruise Control* P. 232
●
Have your vehicle checked by a dealer.
—
—
you change the power mode to ON.
●
Keyless Access
System Indicator
SH-AWD® (Super
Handling-All
Wheel Drive
TM
Indicator
Comes on as soon as a problem is
detected in the keyless access
*
system or keyless starting system.
●
Comes on for a few seconds when
you turn the ignition switch to ON
*1
(w
, then goes off.
●
Comes on if there is a problem with
)
the SH-AWD® system.
●
Blinks when the differential
temperature is too high.
●
Stays on constantly –the engine
drives the front wheels only in this state.
Have the vehicle checked by a dealer.
●
Blinks while driving – Stop in a safe
place, shift to P, and idle the engine
until the indicator goes off. If the
indicator does not stop blinking, take
your vehicle to a dealer.
2 SH-AWD® (Super Handling-All
Wheel Drive
TM
) P. 245
*1: Models with the keyless access system have an ENGINE START/STOP button instead of an ignition switch.
Continued
77
Page 80

uuIndicators u
Instrument Panel
* Not available on all models
Indicator Name On/Blinking Explanation Message
●
ACC (Adaptive
Cruise Control)
Indicator
*
(Amber)
Comes on for a few seconds when
you change the power mode to ON,
then goes off.
●
Comes on if there is a problem with
the CMBS
TM
.
●
Comes on while driving - Have the
vehicle checked by a dealer.
ACC (Adaptive
Cruise Control)
Indicator (Green)
78
●
Comes on when you push the MAIN
button.
*
2 ACC (Adaptive Cruise Control)*
P. 235
Page 81

uuIndicators u
Instrument Panel
* Not available on all models
Indicator Name On/Blinking Explanation Message
●
Comes on for a few seconds when
you change the power mode to ON,
then goes off.
●
Stays on while BSI is turned off.
●
Comes on when mud, snow, or ice
—
accumulates in the vicinity of sensor.
●
BSI (Blind Spot
Information)
Indicator
*
Comes on if there is a problem with
the system.
●
Comes on while driving - Remove
the obstacle in the vicinity of sensor.
●
Comes on while driving - Have the
vehicle checked by a dealer.
●
Comes on for a few seconds when
CMBSTM (Collision
Mitigation Brake
TM
System
Indicator
)
*
you change the power mode to ON,
then goes off.
●
Comes on when you deactivate the
TM
. A multi-information display
CMBS
message appears for five seconds.
●
Comes on if there is a problem with
the CMBS
TM
.
●
Stays on constantly without the
TM
off - Have the vehicle checked
CMBS
by a dealer.
2 CMBSTM (Collision Mitigation
Braking System
TM
)* P. 257
79
Page 82

uuIndicators uMulti-Information Display Warning and Information Messages
Instrument Panel
3
4
Multi-Information Display Warning and Information Messages
The following messages appear only on the multi-information display. Press the / (information) button to see the message again with
the system message indicator on.
Message Condition Explanation
●
Appears when the fuel fill cap is loose or is not
installed.
●
Appears if there is a problem with the DRL system.
2 Tighten Fuel Cap Message P. 335
●
Have your vehicle checked by a dealer.
2 Daytime Running Lights P. 133
●
Appears when washer fluid gets low.
●
Refill washer fluid.
2 Refilling Window Washer Fluid P. 290
80
Page 83

uuIndicatorsu Multi-Information Display Warning and Information Messages
Instrument Panel
Models without
keyless access remote
Message Condition Explanation
●
Appears when the scheduled maintenance is due soon.
●
Consequently, SERVICE DUE NOW and SERVICE
PAST DUE follow.
●
Appears when you open the driver’s door while the
ignition key is in LOCK
●
Appears when the engine coolant temperature gets
(0 .
abnormally high.
2 Maintenance Minder Messages on the Multi-
Information Display P. 274
●
Remove the key from the ignition switch.
2 Overheating P. 332
*1: Models with the keyless access system have an ENGINE START/STOP button instead of an ignition switch.
●
Appears when there is a problem with the power
tailgate system.
●
Appears when the starting system has a problem.
●
Manually open or close the power tailgate.
●
Have the vehicle checked by a dealer.
●
As a temporary measure, hold the ignition switch to
START
*1
(e
for up to 15 seconds and start the engine.
Have the vehicle checked by a dealer.
Continued
81
Page 84

uuIndicators uMulti-Information Display Warning and Information Messages
Instrument Panel
Models with adaptive cruise control
* Not available on all models
Message Condition Explanation
●
Appears for about three seconds when ACC has been
automatically canceled.
●
Appears if anything covers the radar sensor cover and
prevents the sensor from detecting a vehicle in front.
●
May appear when driving in bad weather (rain, snow,
fog, etc.)
●
Flashes when the system senses a likely collision with a
vehicle in front of you.
●
You can resume the set speed after the condition that
caused ACC to cancel improves. Press the RES/ACCEL
button.
2 ACC (Adaptive Cruise Control)* P. 235
●
When the radar sensor gets dirty, stop your vehicle in a
safe place, and wipe off dirt using a soft cloth.
●
Have your vehicle checked by a dear if the message
does not disappear even after you clean the sensor
cover.
●
Take the appropriate means to prevent a collision (apply
the brakes, change lanes, etc.)
82
Page 85

uuIndicatorsu Multi-Information Display Warning and Information Messages
Instrument Panel
* Not available on all models
Message Condition Explanation
●
Appears for five seconds when you change the IDS
(Integrated Dynamics System) mode.
●
Appears when there is a problem with the sensor on the
battery.
2 IDS (Integrated Dynamics System)* P. 252
●
Have your vehicle checked by a dealer.
2 Checking the Battery P. 309
Continued
83
Page 86

uuIndicators uMulti-Information Display Warning and Information Messages
Instrument Panel
Models with keyless access system
Message Condition Explanation
●
Appears after you unlock and open the driver’s door.
●
Appears three seconds after the TO START ENGINE
message appears.
2 Starting the Engine P. 223
2 Starting the Engine P. 223
84
●
Appears when the steering wheel is locked.
●
Move the steering wheel left and right while pressing
the ENGINE START/STOP button at the same time.
●
Appears if you push the ENGINE START/STOP button
to turn the engine off without the shift lever in
●
Appears when the power mode is in ACCESSORY. —
(P .
●
Push the ENGINE START/STOP button twice after
moving the shift lever to
(P.
Page 87

uuIndicatorsu Multi-Information Display Warning and Information Messages
Instrument Panel
Models with keyless access system
Message Condition Explanation
●
Appears after the driver’s door is opened when the
power mode is in ACCESSORY.
●
Press the ENGINE START/STOP button twice with your
foot off the brake pedal to change the power mode to
VEHICLE OFF (LOCK).
●
Appears when you take the keyless access remote out
of the vehicle and close the door while the power mode
is ON. The beeper sounds inside and outside the vehicle.
●
Appears when the keyless access remote battery
becomes weak.
●
Bring the keyless access remote back inside the vehicle,
and close the door.
●
The engine continues to run if you take the keyless
access remote out of the vehicle while the engine is
running. Once you change the power mode to OFF, the
engine does not start again unless you bring back the
remote inside the vehicle.
●
Replace the battery as soon as possible.
2 Replacing the Button Battery P. 310
Continued
85
Page 88

uuIndicators uMulti-Information Display Warning and Information Messages
Instrument Panel
Models with keyless access system
Message Condition Explanation
●
Appears when you shift into (P after having turned off
the keyless access system main switch.
●
Appears when you press the ENGINE START/STOP
button without inserting the keyless access remote
under any of the following conditions:
- The keyless access remote main switch is off.
- The keyless access remote’s battery is weak.
- The remote is not inside the vehicle.
●
Appears when you open the driver’s door while the
power mode is OFF.
●
Remove the keyless access remote with the power
mode OFF. You cannot remove the remote from the slot
while the power mode is other than OFF.
2 Keyless Access Remote Slot P. 130
●
Press the ENGINE START/STOP button after you insert
the keyless access remote into the slot.
2 Keyless Access Remote Slot P. 130
●
Remove the keyless access remote from the slot.
2 Keyless Access Remote Slot P. 130
86
Page 89

Instrument Panel
Gauges and Multi-Information Display
1Fuel Gauge
NOTICE
You should refuel when the needle approaches .
Running out of fuel can cause the engine to misfire,
damaging the catalytic converter.
The actual amount of remaining fuel may differ from
the fuel gauge reading.
E
1Temperature Gauge
NOTICE
Driving with the temperature gauge pointer in the
upper zone can cause serious engine damage. Pull
safely to the side of the road and allow engine
temperature to return to normal.
2 Overheating P. 332
Gauges
Gauges include the speedometer, tachometer, fuel gauge, and related indicators.
They are displayed when the ignition switch is in ON
Speedometer
■
Displays your driving speed in mph (U.S.) or km/h (Canada).
Tachometer
■
Shows the number of engine revolutions per minute.
Fuel Gauge
■
Displays the amount of fuel left in the fuel tank.
Temperature Gauge
■
Displays the temperature of the engine coolant.
w
*1
.
*1: Models with the keyless access system have an ENGINE START/STOP button
instead of an ignition switch.
87
Page 90

uuGauges and Multi-Information DisplayuMulti-Information Display
Instrument Panel
3
4
Multi-Information Display
The multi-information display shows the odometer, trip meter, outside temperature
indicator, and other gauges.
It also displays important messages such as warnings and other helpful information.
Switching the Display
■
Press the ( / information) button or the SEL/RESET button to change the
display.
88
Page 91

uuGauges and Multi-Information Display uMulti-Information Display
Instrument Panel
SEL/RESET Button
/ Button
3
4
HFL
Black Screen
Tire Pressure for
each tire
Trip Computer
Keyless Memory
Settings
TM
SH-AWD Torque
Distribution Monitor
Continued
89
Page 92

uuGauges and Multi-Information DisplayuMulti-Information Display
Instrument Panel
SEL/RESET Button.
Outside Temperature
Trip A Trip B Engine Oil LifeOdometer
Odometer
■
Shows the total number of miles (U.S.) or kilometers (Canada) that your vehicle has
accumulated.
90
Page 93

uuGauges and Multi-Information Display uMulti-Information Display
Instrument Panel
1Trip Meter
Switch between trip meter A and trip meter B by
pressing the SEL/RESET button.
1Outside Temperature
The temperature sensor is in the front bumper.
Road heat and exhaust from another vehicle can
affect the temperature reading when your vehicle
speed is less than 19 mph (30 km/h).
It may take several minutes for the display to be
updated after the temperature reading has stabilized.
Use the multi-information display’s customized
features to correct the temperature.
2 Customized Features P. 94
1Average Fuel Economy
You can choose to reset Trip A information when you
refuel.
2 Customized Features P. 94
Trip Meter
■
Shows the total number of miles (U.S.) or kilometers (Canada) driven since the last
reset. Meters A and B can be used to measure two separate trips.
To reset a trip meter, display it, then press and hold the SEL/RESET button. The trip
meter is reset to 0.0.
Outside Temperature
■
Shows the outside temperature in Fahrenheit (U.S.) or Celsius (Canada).
■ Adjusting the outside temperature display
Adjust the temperature reading up to ±5°F or ±3°C if the temperature reading
seems incorrect.
■ Resetting a trip meter
Engine Oil Life
■
Shows the remaining oil life and Maintenance Minder
2 Maintenance MinderTM P. 273
Average Fuel Economy
■
Shows the estimated average fuel economy of each trip meter in mpg (U.S.) or l/
100 km (Canada). The display is updated at set intervals. When a trip meter is reset,
the average fuel economy is also reset.
TM
.
Continued
91
Page 94

uuGauges and Multi-Information DisplayuMulti-Information Display
Instrument Panel
1Average Speed
You can choose to reset Trip A information when you
refuel.
2 Customized Features P. 94
1Elapsed Time
You can choose to reset Trip A information when you
refuel.
2 Customized Features P. 94
Average Speed
■
Shows the average speed in mph or km/h since the last time Trip A or Trip B was
reset.
Elapsed Time
■
Shows the time elapsed since the last time Trip A or Trip B was reset.
Instant Fuel Economy
■
Shows the instant fuel economy as a bar graph in mpg or l/100 km.
Range
■
Shows the estimated distance you can travel on the remaining fuel. This distance is
estimated from the fuel economy of your trips in the past.
92
Page 95

uuGauges and Multi-Information Display uMulti-Information Display
Instrument Panel
Each wheel’s torque
SH-AWD® Torque Distribution Monitor
■
The indicators on the display show the
amount of torque being transferred to the
right front, left front, right rear, and left rear
Tire Pressure Monitor
■
Shows each tire’s pressure.
2 TPMS (Tire Pressure Monitoring System) P. 248
Bluetooth® HandsFreeLink®
■
Shows your paired cell phone’s information.
2 Bluetooth® HandsFreeLink® P. 197
wheels.
2 SH-AWD® (Super Handling-All Wheel
TM
Drive
) P. 245
Continued
93
Page 96

uuGauges and Multi-Information DisplayuMulti-Information Display
Instrument Panel
1Customized Features
To customize other features, press the / button.
2 List of customizable options P. 96
2 Example of customization settings P. 99
Customization is possible when you see the driver’s
ID (DRIVER 1 or DRIVER 2) on the CHG setting
screen.
The driver’s ID indicates which remote transmitter
you have used to unlock the driver’s door.The
customized settings are recalled every time you
unlock the driver’s door with that remote.
When you customize settings: Shift to
(P
3
4
3
4
/ Button:
Changes the customize
menus and items.
3
4
Multi-Information Display:
Goes to customize settings.
SEL/RESET button:
Enters the selected
item
Customized Features
■
Use the multi-information display to customize certain features.
■ How to customize
Press the / button to select Keyless Memory Settings
switch is in ON
*1: Models with the keyless access system have an ENGINE START/STOP button
instead of an ignition switch.
94
w
*1
.
TM
while the ignition
Page 97

uuGauges and Multi-Information Display uMulti-Information Display
Instrument Panel
3
4
SEL/RESET
CHG SETTING
DEFAULT ALL
EXIT
ACC SETUP
*
EXIT
SECURITY RELOCK TIMER
TRIP COMPUTER TRIP A INFO RESET
ADJUST ALARM VOLUME
AUTO INTERIOR ILLUMINATION
KEYLESS START GUIDANCE SCREENS
*
LANGUAGE SELECTION
ADJUST OUTSIDE TEMP. DISPLAY
MEMORY POSITION LINK
AUTO TILT AND TELESCOPE STEERING WHEEL
DOOR UNLOCK MODE
KEYLESS ACCESS LIGHT FLASH
KEYLESS ACCESS BEEP
INTERIOR LIGHT DIMMING TIME
HEADLIGHT AUTO OFF TIMER
AUTO LIGHT SENSITIVITY
AUTO DOOR LOCK
AUTO DOOR UNLOCK
KEY AND REMOTE UNLOCK MODE
KEYLESS LOCK ACKNOWLEDGMENT
PRE-RUNNING CAR DETECT BEEP
ACC DISPLAY SPEED UNIT
3
4343434343434
34343
4
METER SETUP
POSITION SETUP
KEYLESS ACCESS SETUP
*
LIGHTING SETUP
DOOR/WINDOW SETUP
SEL/RESET
SEL/RESET
SEL/RESET
SEL/RESET
SEL/RESET
SEL/RESET
SEL/RESET
* Not available on all models
■ Customization flow
Press the / button to select Keyless Memory Settings
TM
and press the SEL/RESET button.
Continued
95
Page 98

uuGauges and Multi-Information DisplayuMulti-Information Display
Instrument Panel
■ List of customizable options
Setup Group Customizable Features Description Selectable settings
ACC Setup
*1
Meter Setup
*1: Not available on all models
*2: Default Setting
Pre-running Car Detect
Beep
ACC Display Speed Unit Changes the ACC display speed unit. km/h
Language Selection Changes the displayed language. English*2, French, Spanish
Adjust Outside Temp.
Display
Trip Computer Trip A Info
Reset
Adjust Alarm Volume
Auto Interior Illumination Changes the interior light sensitivity to your liking.
Keyless Start Guidance
*1
Screens
Causes the system to beep when a vehicle ahead of
you gets too close.
Adjusts the temperature reading by a few degrees.
Changes the setting of how to reset trip meter A,
average fuel economy A, average speed A, and
elapsed time A.
Changes the indicator alarm volume into three
levels.
Changes the display of the keyless start guidance
screens.
*2
, OFF
ON
*2
(Canada), mph*2 (U.S.)
-5°F ~ ±0°F*2 ~ +5°F (U.S.)
-3°C ~ ±0°C*2 ~ +3°C (Canada)
WITH REFUEL*2, MANUAL
ONLY, IGN OFF
HIGH, MID*2, LOW
MAX, HIGH, MID*2, LOW,
MIN, OFF
ON*2, OFF
96
Page 99

uuGauges and Multi-Information Display uMulti-Information Display
Instrument Panel
Setup Group Customizable Features Description Selectable settings
Position
Setup
Memory Position Link
Auto Tilt and Telescope
Steering Wheel
Door Unlock Mode
Keyless
Access
*1
Setup
Keyless Access Light
Flash
Keyless Access Beep
Interior Light Dimming
Time
Lighting
Setup
Headlight Auto Off
Timer
Changes the driver’s seat, the steering wheel, and
the outside mirror positions to a stored setting.
Moves the steering wheel fully up when you get in/
get out of the vehicle.
Changes which doors unlock when you grab the
driver’s door handle.
Causes some exterior lights to blink when you
unlock/lock the doors.
Causes the beeper to sound when you unlock/lock
the doors.
Changes the length of time the interior lights stay on
after you close the doors.
Changes the length of time the exterior lights stay
on after you close the driver’s door.
Auto Light Sensitivity Changes the timing for the headlights to come on. Max, High, Mid
*2
, OFF
ON
*2
, OFF
ON
Driver Door*2, All Doors
ON*2, OFF
ON*2, OFF
*2
60 sec, 30 sec
60 sec, 30 sec, 15 sec
, 15 sec
*2
*2
, Low, Min
, 0 sec
*1: Not available on all models
*2: Default Setting
Continued
97
Page 100

uuGauges and Multi-Information DisplayuMulti-Information Display
Instrument Panel
Setup Group Customizable Features Description Selectable settings
Door/
Window
Setup
Auto Door Lock
Auto Door Unlock
Key and Remote Unlock
Mode
Keyless Lock
Acknowledgment
Changes the setting for the automatic locking
feature.
Changes the setting for when the doors and the
tailgate unlock automatically.
Changes which doors unlock with the remote
transmitter on the first push.
LOCK/UNLOCK - The exterior lights flash
LOCK (2nd push) - The beeper sounds
Shift from
*1
SPD
, OFF
Shift to P*1, IGN Off, OFF
Driver Door*1, All Doors
Driver Door
*1
, OFF
ON
Changes the time it takes for the doors and the
Security Relock Timer
tailgate to relock and the security system to set after
you unlock the vehicle without opening any door
90 sec, 60 sec, 30 sec
and the tailgate.
Default All Sets/Cancels all the customized settings as default. Set, Cancel
*1:Default Setting
P , With VEH
*1
, All Doors
*1
98
 Loading...